:max_bytes(150000):strip_icc():format(webp)/GettyImages-758317893-3ab5c26f770448db8b4a58205fb549f1.jpg)
Updated Kdenlive Review – Is It The Best Video Editor for 2024

Kdenlive Review – Is It The Best Video Editor?
When you look for an open source video editor online, you will come across several popular video editors. One of them has to be Kdenlive video editor that is available free and compatible across all desktop operating systems. The video editor claims to be suitable for beginners as well as for professional video editors.
Starting from multi-track video editing and support for different file formats to loads to effects and flexible interface, Kdenlive video editor seems to be truly powerful. But is it comparable to premium video editors and is it suitable for standard and advanced video editing? Read our Kdenlive tutorial and review for everything you need to know.
Part 1. Key Features of Kdenlive
If you need to edit videos occasionally, a free video editor is what you will be looking for. Unfortunately, most free videos have very basic video editing tools and they are suitable for editing personal videos only. On the contrary, Kdenlive comes with all the standard as well as some advanced video editing features. Here are all the key features of Kdenlive video editor that you should be aware of.
Multi-track editing – Kdenlive comes with a versatile timeline where you can have multiple tracks consisting of video clips, audio files and different effects and objects. You can lock the tracks as well as mute them so that you can experiment as you edit your video.
Effects and Transitions – Even though limited, there are eye-catching effects and transitions available. You can also go for color correction as well as minor adjustments in your audio. Besides, the titler lets you create amazing 2D texts and titles.
Proxy Editing – Kdenlive uses proxy editing technique to lower the resolution of high-resolution videos while you edit them. This takes away the pressure on the CPU resources, but when it renders, the original resolution gets restored back. That is why Kdenlive has been effective in low-end computers as well.
Flexible User Interface – Kdenlive comes with a customizable user interface. This means you can arrange the layouts of your workflow as per your requirements. Besides, there are configurable keyboard shortcuts. There are also different themes available for the user interface.
Keyframing – One of the advanced features of Kdenlive is that you can keyframe any effect. This means you can change the parameters of the effects with time using curves. Besides, the software supports green screen effect.
Miscellaneous – The software supports almost all types of audio and video file formats. There is an option for automatic backup which is highly useful in any video editing software. The software also supports online resources and add-ons.
Part 2. Basic Editing with Kdenlive
Kdenlive is available for free and you should definitely try it out. Thereafter, you decide whether it is perfect for you or not. After Kdenlive download, here are all the steps for basic video editing with Kdenlive.
Import a clip:
Step 1: Launch Kdenlive on your computer and make sure you have the video clip ready on your hard drive.
Step 2: Go to Project menu option. Click on “Add Clip or Folder” option. You can include all the video clips on any folder.
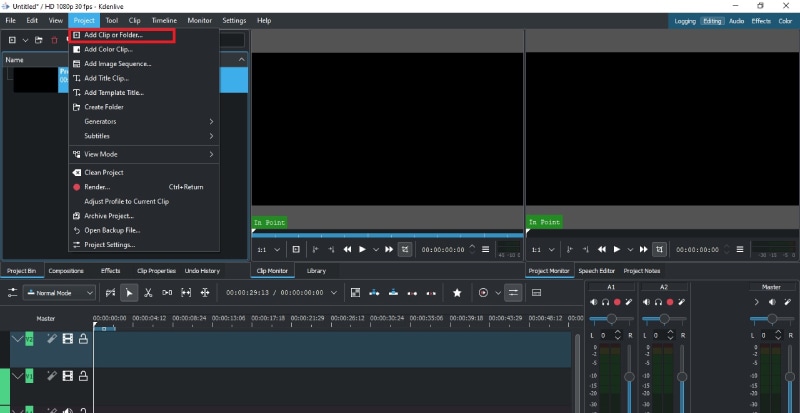
Step 3: The imported clips will then have to be dragged and dropped on the timeline from Project Bin.
Trim and Export:
Step 1: Import the video clip on Kdenlive and drag and drop the clip on the timeline.
Step 2: Put the timeline cursor over the point on the video clip from where you want to trim it.
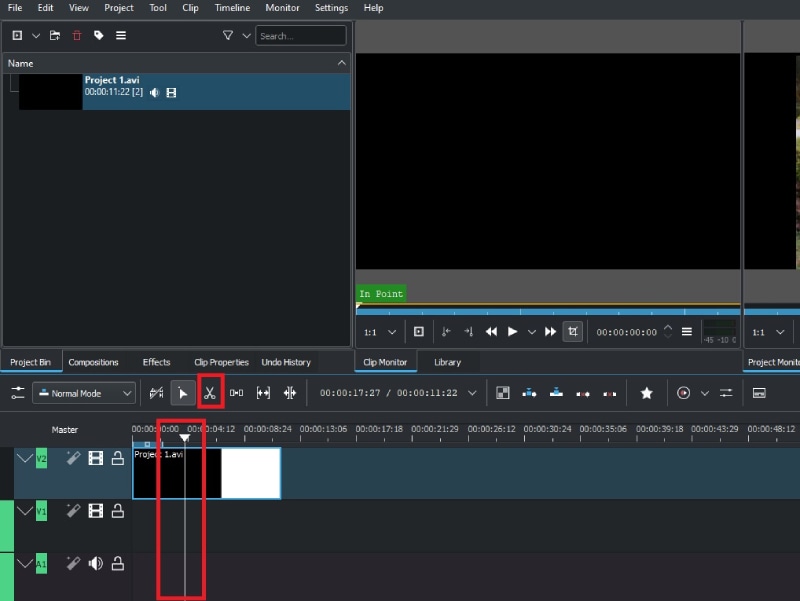
Step 3: Click on Scissor icon to start trimming. Thereafter, move the red timeline cursor to the point where you want the trimming to end.
![]()
Add multiple tracks:
There is enough number of tracks already available on Kdenlive timeline. However, when you are editing a large video project, you may need more tracks that already present.
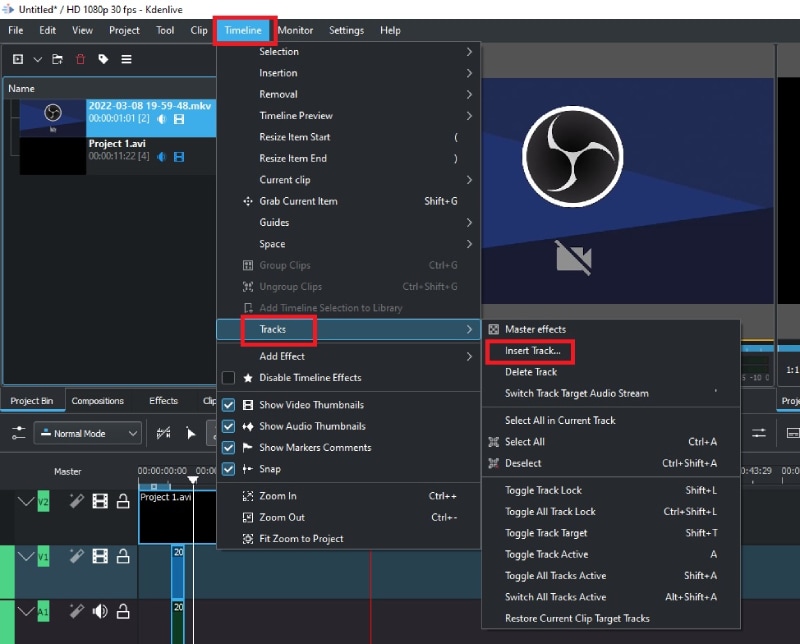
Step 1: Go to Timeline menu option.
Step 2: Go to Tracks> Inset Track option.
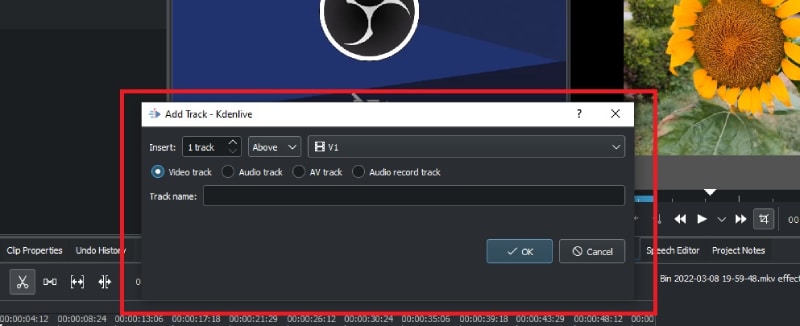
Step 3: Enter a name for the track and select the type of track and click on Ok button.
Adjust brightness and contrast:
Step 1: Go to Effects> Color and Image Correction.
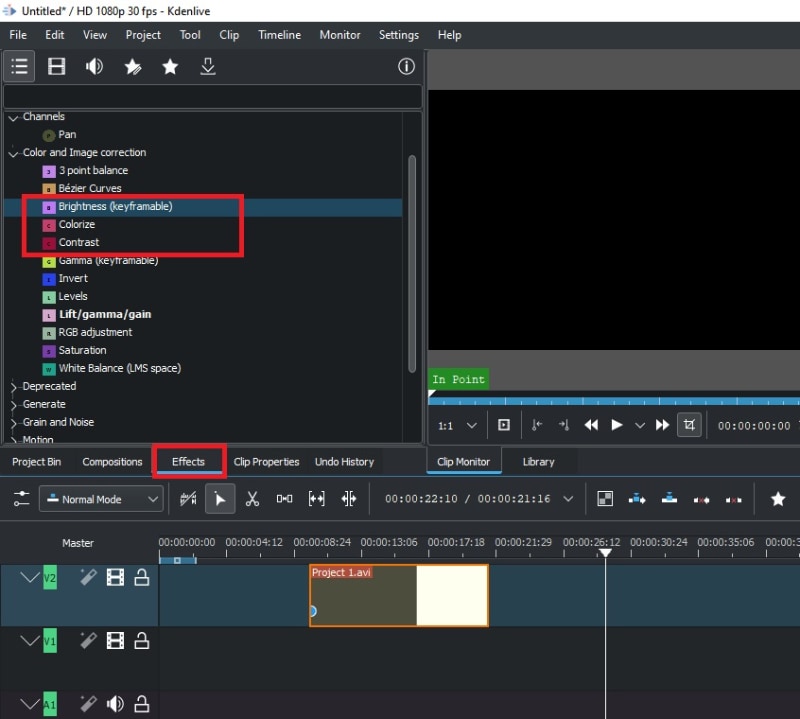
Step 2: Drag and drop Brightness or Contrast directly on the video clip.
Step 3: Click on Brightness that you just placed on the video clip and adjust the parameter from its slider.
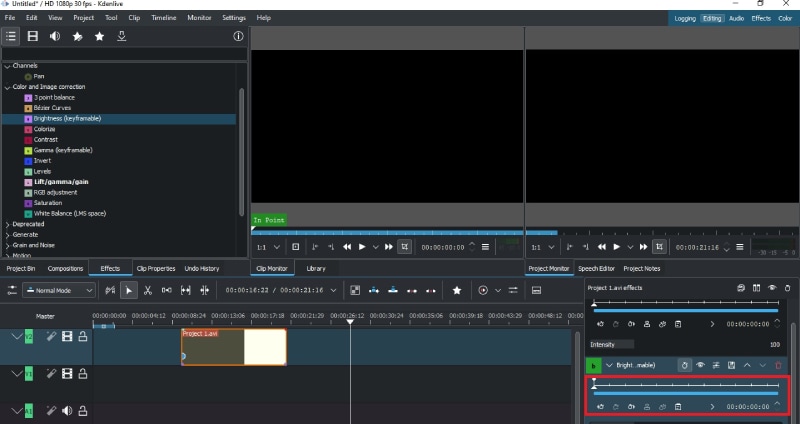
Speed up or slow down:
Step 1: Right-click on the video clip that is on the timeline and click on Change Speed option.
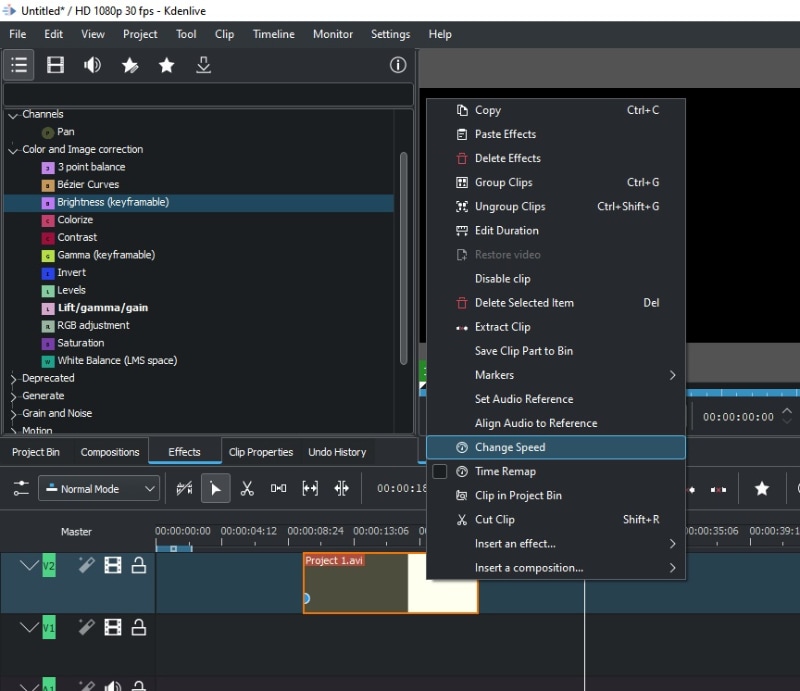
Step 2: Adjust the slider to increase or decrease video clip speed and click on Ok button.

Part 3. Advanced Editing with Kdenlive
Now that we have discussed the basic editing Kdenlive tutorial, let us focus on a couple of useful advanced editing features of Kdenlive.
Use green screen effects:
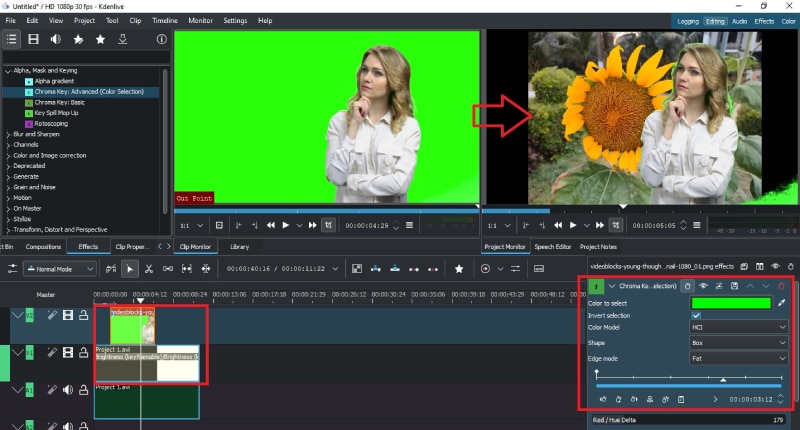
You must have the video clip with green screen background on the timeline. Below the green screen clip should be the background image with which you want to replace the green screen background.
Step 1: Go to Effect> Alpha, Mask and Keying option.
Step 2: Drag and drop “Chroma Key : Advanced” on the video clip where there is a green screen.
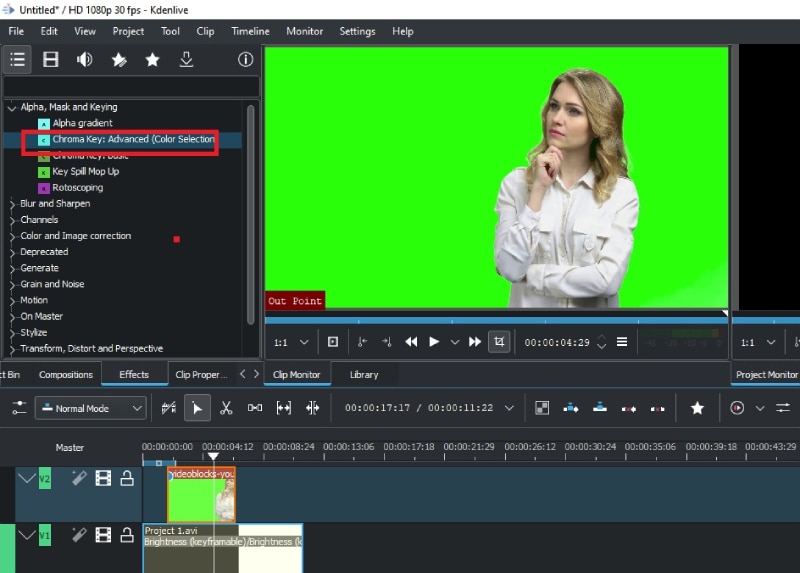
Step 3: Click on video clip and adjust the parameters to soften the edges and make it as natural as possible.
**Add audio:
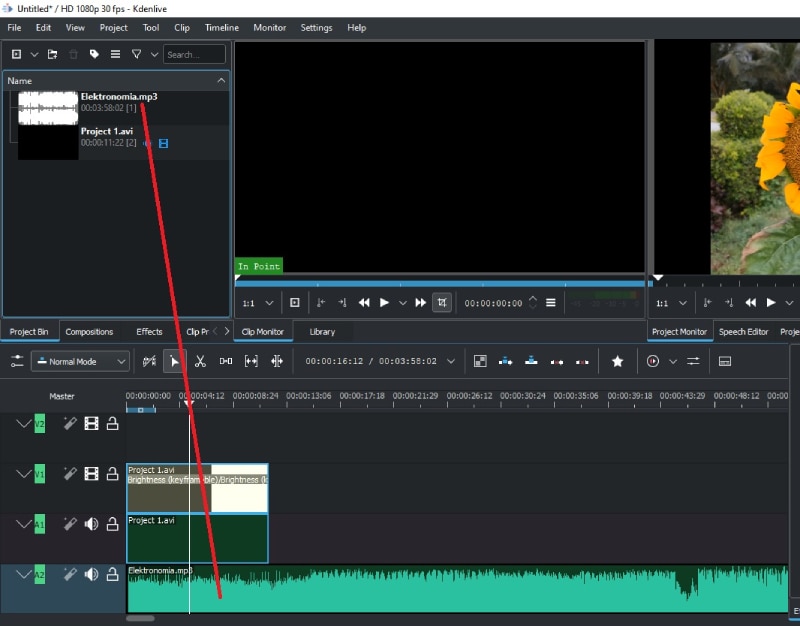
Adding audio files and music files to the video is as easy as adding video clips. You should have your audio file ready on your hard drive.
Step 1: Go to Project menu option. Click on “Add Clip or Folder” option. Select the audio file or folder from your hard drive.

Step 2: The imported audio files will have to be dragged and dropped on the timeline from Project Bin.
Part 4. Best Kdenlive Alternative to Edit Videos
Kdenlive has several drawbacks that prevent it from becoming the best video editor. Even though the features are sufficient for beginners, it is not suitable for professional editing. There is a lack of advanced options such as motion tracking or faster video production. Besides, the effects are very limited in number and so are the text and audio effects. That is why we recommend Wondershare Filmora as the best alternative to Kdenlive Mac and Windows.
Filmora is a premium video editor with video capturing feature. You can record your screen and webcam video. There is no dearth of effects, filters, elements and royalty-free media files. The user interface is cleaner and hence, it is suitable for both beginners and professionals. Here are the key features of Filmora.

For Win 7 or later (64-bit)
For macOS 10.12 or later
- 4K video editing and exporting without lag.
- Noise removal, color tuning, and video stabilization.
- Standard editing like trim, crop, split, join, rotate etc.
- Advanced text styles, audio mixing options, and audio equalizers.
- Wide range of stock media files. Supports different file formats.
- Capture screen and webcam video with internal and external audio.
Frequently Asked Questions
**Is Kdenlive a good editor?
Kdenlive is a good editor if you are getting started in video editing or you are editing your video for personal usage. However, for professional and even social media videos, a premium video editor will be better. We recommend Filmora over Kdenlive because Kdenlive lacks advanced video editing options.
**Does Kdenlive cost money?
Kdenlive Windows, Mac, and Linux are available free of cost as it belongs to the open-source software category. There is also no premium version available, and hence, all the features are unlocked in the free version.
**What can you do with Kdenlive?
You can trim your video, add music, add effects, adjust speed, correct colors, and add green screen effect. Besides, you can add multiple video clips and audio files to the timeline. There are options for keyframable effects as well.
Logo Intro Videos Are the Hottest Trend in Town and Are Gaining Popularity Quickly. Keep Reading This Article to Learn Their Importance and How to Design One
Almost every business has a logo, which they use to depict their character and unique values. However, static logos are soon becoming a thing of the past. Companies are now turning to animated logos to wow their audience. Perhaps a logo intro is the missing piece you need to create a buzz around your brand and grab the attention of any onlooker.
The article below will discuss the importance of logo reveals, how they can benefit your company and how to make one for yourself.

Importance of Logo Reveals in Your Intro Video
- First and foremost, logo reveal add some spice to your image. A slight motion could go a long way in giving the viewer a unique perspective on your logo.
- Secondly, logo reveal intro videos set you apart from your competitors. Any slight similarities between logos can be easily forgotten when you create an animated clip of your logo. Logo reveals also boost brand awareness because the animation is etched in your clients’ minds, making it easy to remember.
- Lastly, free logo intro templates evoke positive emotions, which cause your audience to associate your brand with good things.
Benefits of Using Logo Reveal Intro Video With Templates
- The first benefit of using a logo intro template is that it is pretty fast to make. In less than 5 minutes, you will have your video ready to use. You don’t need to go through a learning curve to make the video. The pre-made templates make your work easy, taking the tedium out of the entire process.
- As you continue trying to put your business out there, it would help to consider the cost. A free logo intro template is an affordable way to spread the word about your business and won’t leave a massive dent in your pockets.
- Lastly, logo reveal intro videos with templates are fun to design. It is interesting to see all the shapes and forms come together to form the final result.
How To Make a Logo Reveal Intro Video With Templates
Now that you know what a logo reveal is and how it can benefit your company, you are probably very eager to learn how to make one for yourself. Wondershare Filmora is an example of an efficient tool you can use to create a logo reveal intro video with templates.
Free Download For Win 7 or later(64-bit)
Free Download For macOS 10.14 or later
Since this platform has numerous features, we will only discuss the template feature. Wondershare Filmora has more than 1000 templates you can use to create a stunning logo reveal video. If you are unsatisfied with the stock videos within the template, you can replace them with unique videos from your internal storage.
A bonus point is that Filmora allows you to share your favorite templates with other creators who want to give creating a logo reveal video a trial.
How-to steps
Below is a simple step-by-step guide to making a logo reveal intro video with Filmora.
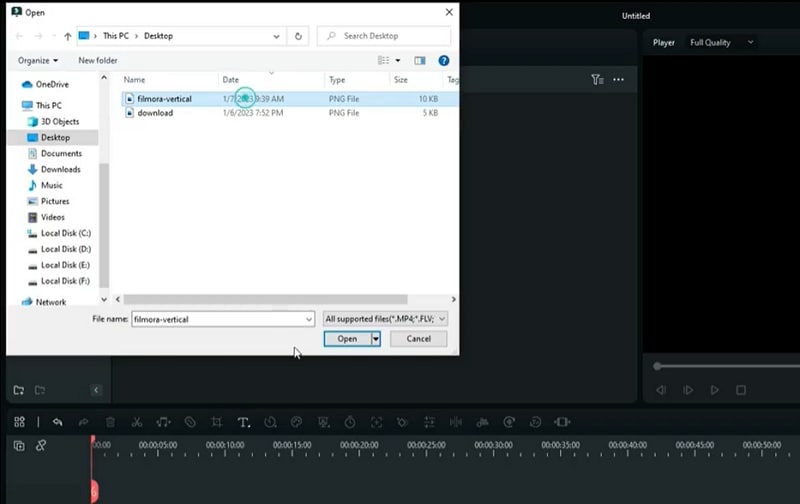
Step1 Upload videos from your internal storage.
Step2 Select the “Templates” tab and type “Intro logo” in the search bar to narrow down your search.
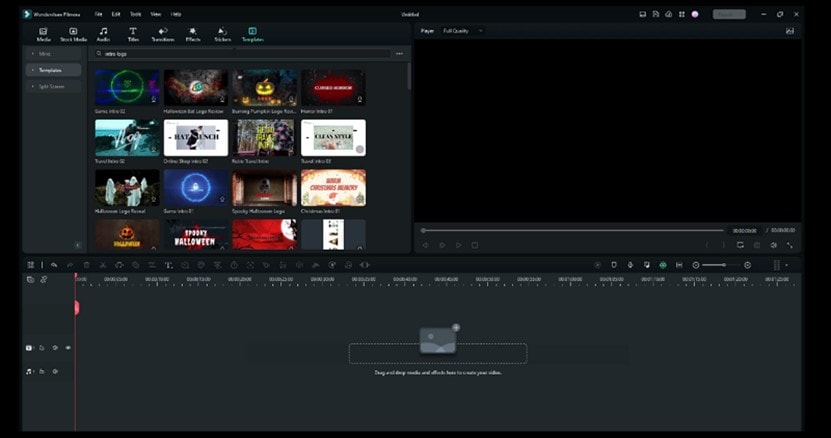
Step3 Choose a template that tickles your fancy and drag it to the track below.
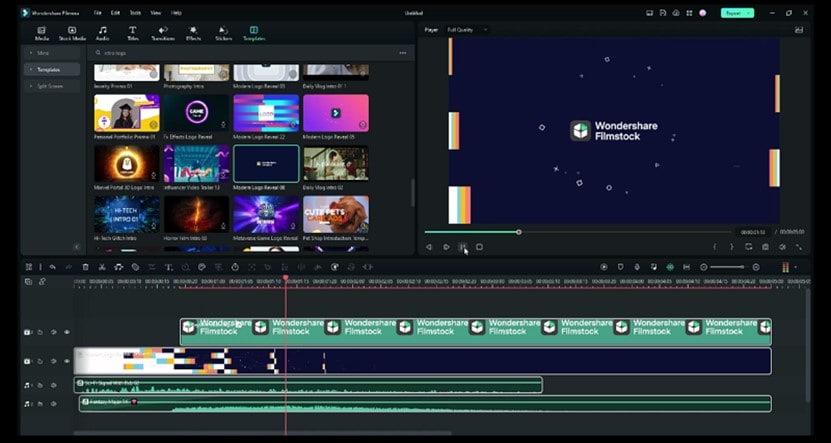
Step4 Drag your own logo to the track to replace the sample one.

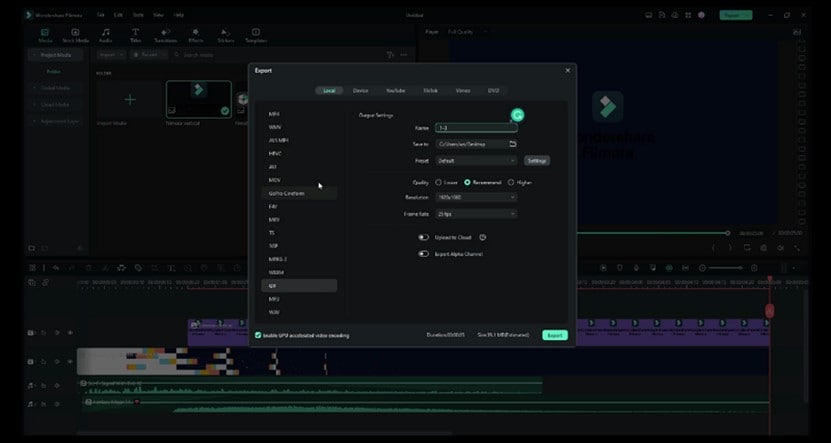
Step5 Export your video as an MP4 and save a copy to your internal storage.
Tips for a Fantastic Logo Intro
We hope the comprehensive guide above was easy to follow and inspired you to try your hand at creating your own logo reveal video. Without further ado, let’s discuss some tips for a fantastic logo intro.
- Start by conducting ample research to find as many intro videos as possible before attempting to make your own. Watching and learning will allow you to figure out what works and what you shouldn’t do. You might also discover many resources to make a fantastic intro video you missed.
- Understand what message your company intends to send and tailor your intro video to portray it as accurately as possible. For instance, you could create a fun video to relay that your brand is easygoing.
- It wouldn’t be a great idea to show your entire logo all at once. You could create anticipation by showing tiny bits of your logo in each frame till the final logo covers the screen.
- Design your video in a manner that keeps your audience glued to the screen. The dynamism will keep the viewer watching because they don’t want to miss what comes next.
- Though it is not mandatory, you could end the video on a dark background, such as pitch black, to ensure your logo is clearly visible to your audience.
- The most important tip is to keep the video short, so you don’t bore your audience. The average attention span for most viewers is shorter than 15 seconds, meaning any video longer than that will cause them to click away from your video.
People Also Ask
Before we bid you goodbye, let’s answer some commonly asked questions about template intro logo and logo reveals.
Q1. What Is a Logo Intro?
You have probably seen a logo intro before, even though you didn’t know what you were looking at. A logo intro is a short clip of a company’s logo that features before a movie.
Recently, companies have started warming up to logo intros to create a lasting impression on their visitors and prospective clients. You could use a logo intro to portray your unique character and encapsulate what you stand for. In addition, a logo intro is a sure way to gain a competitive advantage over your rivals.
Q2. What Is a Logo Reveal?
Contrary to the logo intro that features at the beginning of the clip, a logo reveal comes at the tail end. This short animation is a depiction of your logo, which helps cement your marketing strategy and display your brand in a more interactive manner.
A logo reveal is also known as a logo stinger or sting. Since the average attention span of Internet users is pretty short, it would be a great idea to keep the logo reveal to a maximum of 10 seconds. The shorter the video, the higher the chance your audience will grasp your message and remember your brand.
Q3. What Are the 5 Rules of a Good Logo?
You cannot create an unforgettable logo reveal without designing the logo first. Since your company logo appears on almost anything concerning your business, it would be wise to make a valiant effort to ensure it fits the bill. Below are some of the qualities of a good logo.
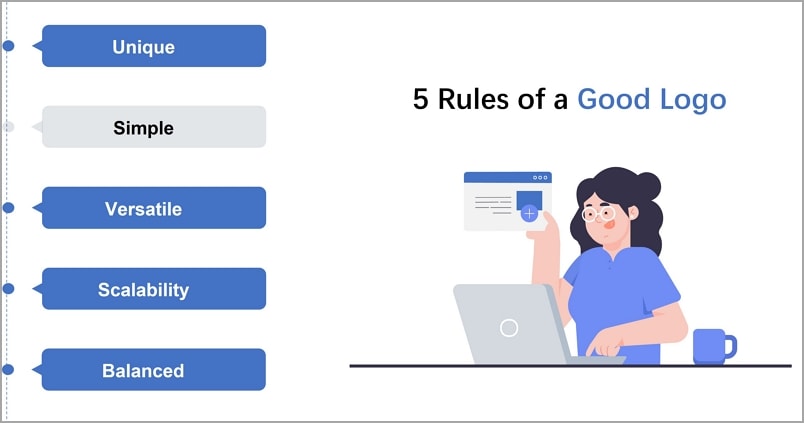
Unique
It would be a shame if your logo looked like someone else’s. Ensure your logo is your own creation and can easily be associated with your brand. Copying someone else’s logo could make your audience mistake you for someone else.
Simple
Complex logos are hard to recognize. They are also much harder to enlarge or reduce. It would help to incorporate strong lines and letters into your logo as opposed to thinner ones.
Versatile
Your logo should look good with or without colour. If you must add colour, ensure you don’t exceed four colours in the design. Remember that printing your logo when it contains too many colours becomes an expensive affair.
Scalability
It would help to ensure that your logo looks good in a big or small size. Remember that you will use your logo on letterheads and perhaps on large banners.
Balanced
Lastly, you should ensure that no element within your logo overpowers the rest. Ensure you keep all the elements in the centre because an asymmetrical logo with all the details in the corner doesn’t look aesthetically pleasing.
Q4. What Are the 7 Elements of a Good Logo?
The seven elements of a good logo include the following.

Simplicity
A simple design is far more superior to an overly complicated one. You could draw inspiration from brands like Nike.
Memorability
A good logo is one that your audience can remember off-head. Simple doesn’t always have to mean simplistic.
Timelessness
Trends come and go, but a timeless logo will remain appropriate in the years to come. It is not uncommon for some brands to retain their logos for more than a decade.
Relevance
It would be wise to ensure your logo relates to your industry in one way or the other.
High-quality typography
The wrong font on your logo can negatively impact your business. Your typography should also be easy to read from afar.
Well-balanced colors
Your choice of colors can subconsciously influence your target audience’s buying decisions and how they perceive you. For instance, blue communicates honesty and reliability, while yellow elicits feelings of happiness.
Versatility
Lastly, it would be wise to ensure that you can use your logo in numerous instances, like on a letterhead or on your social media platforms.
Conclusion
We cannot dispute a logo’s importance to your overall brand image. Your logo helps you communicate your unique message to your target audience and prospective clients. Instead of sticking with the bland, old-fashioned static logo, you have now learned a new way to animate your logo and add some spice. We hope the suggestions in this article will help you create an excellent logo reveal intro video that keeps your audience hooked and craving more.
Free Download For macOS 10.14 or later
Since this platform has numerous features, we will only discuss the template feature. Wondershare Filmora has more than 1000 templates you can use to create a stunning logo reveal video. If you are unsatisfied with the stock videos within the template, you can replace them with unique videos from your internal storage.
A bonus point is that Filmora allows you to share your favorite templates with other creators who want to give creating a logo reveal video a trial.
How-to steps
Below is a simple step-by-step guide to making a logo reveal intro video with Filmora.
Step1 Upload videos from your internal storage.

Step2 Select the “Templates” tab and type “Intro logo” in the search bar to narrow down your search.

Step3 Choose a template that tickles your fancy and drag it to the track below.

Step4 Drag your own logo to the track to replace the sample one.

Step5 Export your video as an MP4 and save a copy to your internal storage.

Tips for a Fantastic Logo Intro
We hope the comprehensive guide above was easy to follow and inspired you to try your hand at creating your own logo reveal video. Without further ado, let’s discuss some tips for a fantastic logo intro.
- Start by conducting ample research to find as many intro videos as possible before attempting to make your own. Watching and learning will allow you to figure out what works and what you shouldn’t do. You might also discover many resources to make a fantastic intro video you missed.
- Understand what message your company intends to send and tailor your intro video to portray it as accurately as possible. For instance, you could create a fun video to relay that your brand is easygoing.
- It wouldn’t be a great idea to show your entire logo all at once. You could create anticipation by showing tiny bits of your logo in each frame till the final logo covers the screen.
- Design your video in a manner that keeps your audience glued to the screen. The dynamism will keep the viewer watching because they don’t want to miss what comes next.
- Though it is not mandatory, you could end the video on a dark background, such as pitch black, to ensure your logo is clearly visible to your audience.
- The most important tip is to keep the video short, so you don’t bore your audience. The average attention span for most viewers is shorter than 15 seconds, meaning any video longer than that will cause them to click away from your video.
People Also Ask
Before we bid you goodbye, let’s answer some commonly asked questions about template intro logo and logo reveals.
Q1. What Is a Logo Intro?
You have probably seen a logo intro before, even though you didn’t know what you were looking at. A logo intro is a short clip of a company’s logo that features before a movie.
Recently, companies have started warming up to logo intros to create a lasting impression on their visitors and prospective clients. You could use a logo intro to portray your unique character and encapsulate what you stand for. In addition, a logo intro is a sure way to gain a competitive advantage over your rivals.
Q2. What Is a Logo Reveal?
Contrary to the logo intro that features at the beginning of the clip, a logo reveal comes at the tail end. This short animation is a depiction of your logo, which helps cement your marketing strategy and display your brand in a more interactive manner.
A logo reveal is also known as a logo stinger or sting. Since the average attention span of Internet users is pretty short, it would be a great idea to keep the logo reveal to a maximum of 10 seconds. The shorter the video, the higher the chance your audience will grasp your message and remember your brand.
Q3. What Are the 5 Rules of a Good Logo?
You cannot create an unforgettable logo reveal without designing the logo first. Since your company logo appears on almost anything concerning your business, it would be wise to make a valiant effort to ensure it fits the bill. Below are some of the qualities of a good logo.

Unique
It would be a shame if your logo looked like someone else’s. Ensure your logo is your own creation and can easily be associated with your brand. Copying someone else’s logo could make your audience mistake you for someone else.
Simple
Complex logos are hard to recognize. They are also much harder to enlarge or reduce. It would help to incorporate strong lines and letters into your logo as opposed to thinner ones.
Versatile
Your logo should look good with or without colour. If you must add colour, ensure you don’t exceed four colours in the design. Remember that printing your logo when it contains too many colours becomes an expensive affair.
Scalability
It would help to ensure that your logo looks good in a big or small size. Remember that you will use your logo on letterheads and perhaps on large banners.
Balanced
Lastly, you should ensure that no element within your logo overpowers the rest. Ensure you keep all the elements in the centre because an asymmetrical logo with all the details in the corner doesn’t look aesthetically pleasing.
Q4. What Are the 7 Elements of a Good Logo?
The seven elements of a good logo include the following.

Simplicity
A simple design is far more superior to an overly complicated one. You could draw inspiration from brands like Nike.
Memorability
A good logo is one that your audience can remember off-head. Simple doesn’t always have to mean simplistic.
Timelessness
Trends come and go, but a timeless logo will remain appropriate in the years to come. It is not uncommon for some brands to retain their logos for more than a decade.
Relevance
It would be wise to ensure your logo relates to your industry in one way or the other.
High-quality typography
The wrong font on your logo can negatively impact your business. Your typography should also be easy to read from afar.
Well-balanced colors
Your choice of colors can subconsciously influence your target audience’s buying decisions and how they perceive you. For instance, blue communicates honesty and reliability, while yellow elicits feelings of happiness.
Versatility
Lastly, it would be wise to ensure that you can use your logo in numerous instances, like on a letterhead or on your social media platforms.
Conclusion
We cannot dispute a logo’s importance to your overall brand image. Your logo helps you communicate your unique message to your target audience and prospective clients. Instead of sticking with the bland, old-fashioned static logo, you have now learned a new way to animate your logo and add some spice. We hope the suggestions in this article will help you create an excellent logo reveal intro video that keeps your audience hooked and craving more.
Everything That You Need to Know About Video Montages- Ideas, Techniqu
Video montages are one of the best types of video formats people enjoy, and they are useful for different occasions. Whether you want to create a montage of your memories as an anniversary gift or create a montage of product photos for promotions, uses are multiple here. This prompts the need for users to learn how to make a montage, and that is what we will cover in this post.
These videos, with a series of shots and information edited together cohesively in sequence, are useful for showcasing storyline progress. Here, you will learn about use cases of the process, like a birthday video montage, more ideas, and the process of making them. Read on if any of that interests you.

Part 1. Classic Montage Ideas in Art and Film
Video montages play a major role in films, art productions, and gaming, like the call of duty montage.
In terms of the first example, when you watch movies, you might notice this technique used in many movies, utilized more prominently since the 1920s when Sergei Eisenstein coined the term first. These scenes appear as stitched-together shots of the characters showing time passage, enjoying activities or memories.
Different techniques are common, like rhythmic, metric, intellectual, or tonal. For example, the 2000 movie “Requiem for a Dream” showcased an intellectual/metric style of video montage to show the disorientating effect of the character under drug influence. A relatively recent example would be Benedict Cumberbatch’s 2016 movie “Doctor Strange”, where the montage shows the titular character’s interaction with the villain (no spoilers).
3 Top Montages in Film for All Times
If the above two examples did not fully express what is a montage video, seeing more examples should help. For this, here are three of the top montage examples available in Film History, each version representing a separate video montage style.
1. Rocky (1976)
One of the most notable montages is available in the 1976 action movie, the Sylvester Stallone-starrer “Rocky”. The type of video montage that is visible in this movie is rhythmic in nature, showcasing the training the character undergoes. This is edited with a musical background score, summarising some shots’ full training progression process.
To add an emotive tone to the video, music is added to the video clip that engages audiences to feel the character’s passion. A rhythmic style of video montage technique is used to cut the shorts as per the content. The lengths of each clip are not similar and differ as per the action going on in the scene.
2. Mulan (1998)
Video montages are also visible in animated movies, as seen in the 1998 version of Disney’s “Mulan”. The scene in question is where the song “I’ll Make a Man Out of You” plays while Mulan undergoes strict training for the military from the male lead. A sequence of shots showing her progress is shown.
Here, the video montage is shown with the background music that perfectly aligns with what is occurring in the video. The visuals and the audio in the background cohesively show the main character’s struggle, which creates an emotional response in the audience. Therefore, the style of video montage here falls under tonal or overtonal categories.
Watch this video to get an idea of how music and visuals can partner for tonal video montages.
3. Creed (2015)
Like in the Rocky movie, its 2015 sequel, “Creed”, also has a video montage. Here, the clips in the sequence are also used to depict the intense training progress. However, where it differs from the rhythmic formula is that the sequence highlights the emotional journey or determination of Adonis Creed to succeed.
Plus, this video montage is a homage to the original version; the tonal effect is further noticeable in the scene of Rocky’s health deterioration against Creed’s training. Thus, it juxtaposes the two scenes, creating an emotional impact on viewers to root for the main character.
Watch this video to understand what is a montage video of the tonal type.
Part 2. Creative Montage Ideas for Social Media
Of course, movies and TV shows are the only types of media where video montage techniques are useful. Many non-professionals use options like a fortnite montage editor to create and edit montage videos for other projects they can share across platforms. Some even create video montages to create videos for social media.
These include vlog-like videos that people record and then edit together into a montage which different techniques. Plus, some users create montages of different things that interest them, like gameplay. Then, they share those videos across social media for views, like on TikTok or YouTube.
· Gaming Montages
Different creators focus on developing gaming montages to create projects for the games they operate. These can include videos showcasing the skills or gameplays of the creation, all explaining a specific theme in some cases.
There are different games that the users focus on for showcasing their gaming prowess in action. Common examples include Fortnite, Call of Duty, CSGO, or PUBG montage videos.
Watch this video to get an idea.
· Wedding Montages
Many users turn to edit video montages for specific occasions, adding clips of different moments instead of one long-running documentary. They incorporate stylish effects like slow motion and transitions, incorporate a moving background score, and more.
Many top influencers and celebrities have used this technique for their wedding videos on social media. Additionally, regular people also adopt the style.
Watch this video as an example.
· Birthday Montages
Like wedding videos, users can try out the video montage technique to create videos for birthdays. These can include scenes of the main creator throughout their preparation phase for the party. Alternately, some users create video montages of their experience leading up to the video celebration, through a longer period or the same day.
Watch this video to understand how these videos may look.
Part 3. How Can I Create Easily a Montage Video?
After understanding the types of video montage techniques and ideas, the next point of concern is learning how to make a montage.
One of the best editing software to use for this process is Wondershare Filmora . With this editor, you can create different video montages as per the theme, customized or instantly. Filmora includes premium-quality effects and transitions, including free stock media that you can also add. Plus, the software allows the ability to record voiceover and adjust background scores in the video.
You can also choose the aspect ratio for the video, depending on the platform you post it on. For example, if you are creating a full professional-level scene montage, use the widescreen (16:9) aspect ratio, like in YouTube videos. Or, use the portrait (9:16) for mobile-based videos for TikTok videos or a 1:1 aspect ratio for Instagram videos.
Watch this video to know how it works.
Free Download For Win 7 or later(64-bit)
Free Download For macOS 10.14 or later
Features of Filmora for Video Montage Making
There are multiple top-quality features available in the Filmora software that is useful for creating and editing video montages. Use them and create dynamic videos.
1. Screen Recorder
The Screen Recorder feature is accessible through the home page of the Filmora software after launching. Since the first stage of making a montage involves getting the video clips for it, you can use this to record the video. For example, if you have a movie saved on your desktop, use the screen recorder and tap the Play button to record the screen.

You can adjust further settings, like which headphone or speaker to use for the audio recording.
2. Preset Templates
Next comes the editing process. After completing the recording process for the montage video, you can use preset templates on Filmora via Instant Mode. This is useful for users who do not have enough time to fully edit a long montage video or have the technical skills for it.
You can click on the Instant Mode tab on the home page. Then, choose the specific theme of the video montage you will create, like Birthday, Wedding, Business, etc. After selecting the theme, you can insert multiple video clips into the editor. Adjust the clips in sequence and press the “Auto-Create” button.

3. Abundant Video Effects and Music Resources
If you want to customize the video montage video manually, you can use the various effects and advanced features in the main editor timeline. For example, click on the Effects tab to find your options.

After importing the file(s) into the editor and dragging it to the timeline, you can use the Crop icon to cut clips. Then, rearrange them and merge them. Plus, further editing features are available for premium-level edits, like the Chroma Key. Click on it and add a green screen in the background.

The AI Portrait feature is also available, automatically detecting the main character and accurately removing the background.
You can adjust the speed of transitions in the video with the Speed Ramping function. Many high-quality effects are available under the Effects tab, and you can add audio to the video through the Media tab.

Conclusion
Video montages are one of the tried-and-tested methods used in film-making, gaming videos, and social media videos. You can use Filmora to create such video montages based on the type of video montage technique that fits it. Then, share it directly to YouTube or save it for transferring across different platforms.
Free Download For Win 7 or later(64-bit)
Free Download For macOS 10.14 or later
Part 1. Classic Montage Ideas in Art and Film
Video montages play a major role in films, art productions, and gaming, like the call of duty montage.
In terms of the first example, when you watch movies, you might notice this technique used in many movies, utilized more prominently since the 1920s when Sergei Eisenstein coined the term first. These scenes appear as stitched-together shots of the characters showing time passage, enjoying activities or memories.
Different techniques are common, like rhythmic, metric, intellectual, or tonal. For example, the 2000 movie “Requiem for a Dream” showcased an intellectual/metric style of video montage to show the disorientating effect of the character under drug influence. A relatively recent example would be Benedict Cumberbatch’s 2016 movie “Doctor Strange”, where the montage shows the titular character’s interaction with the villain (no spoilers).
3 Top Montages in Film for All Times
If the above two examples did not fully express what is a montage video, seeing more examples should help. For this, here are three of the top montage examples available in Film History, each version representing a separate video montage style.
1. Rocky (1976)
One of the most notable montages is available in the 1976 action movie, the Sylvester Stallone-starrer “Rocky”. The type of video montage that is visible in this movie is rhythmic in nature, showcasing the training the character undergoes. This is edited with a musical background score, summarising some shots’ full training progression process.
To add an emotive tone to the video, music is added to the video clip that engages audiences to feel the character’s passion. A rhythmic style of video montage technique is used to cut the shorts as per the content. The lengths of each clip are not similar and differ as per the action going on in the scene.
2. Mulan (1998)
Video montages are also visible in animated movies, as seen in the 1998 version of Disney’s “Mulan”. The scene in question is where the song “I’ll Make a Man Out of You” plays while Mulan undergoes strict training for the military from the male lead. A sequence of shots showing her progress is shown.
Here, the video montage is shown with the background music that perfectly aligns with what is occurring in the video. The visuals and the audio in the background cohesively show the main character’s struggle, which creates an emotional response in the audience. Therefore, the style of video montage here falls under tonal or overtonal categories.
Watch this video to get an idea of how music and visuals can partner for tonal video montages.
3. Creed (2015)
Like in the Rocky movie, its 2015 sequel, “Creed”, also has a video montage. Here, the clips in the sequence are also used to depict the intense training progress. However, where it differs from the rhythmic formula is that the sequence highlights the emotional journey or determination of Adonis Creed to succeed.
Plus, this video montage is a homage to the original version; the tonal effect is further noticeable in the scene of Rocky’s health deterioration against Creed’s training. Thus, it juxtaposes the two scenes, creating an emotional impact on viewers to root for the main character.
Watch this video to understand what is a montage video of the tonal type.
Part 2. Creative Montage Ideas for Social Media
Of course, movies and TV shows are the only types of media where video montage techniques are useful. Many non-professionals use options like a fortnite montage editor to create and edit montage videos for other projects they can share across platforms. Some even create video montages to create videos for social media.
These include vlog-like videos that people record and then edit together into a montage which different techniques. Plus, some users create montages of different things that interest them, like gameplay. Then, they share those videos across social media for views, like on TikTok or YouTube.
· Gaming Montages
Different creators focus on developing gaming montages to create projects for the games they operate. These can include videos showcasing the skills or gameplays of the creation, all explaining a specific theme in some cases.
There are different games that the users focus on for showcasing their gaming prowess in action. Common examples include Fortnite, Call of Duty, CSGO, or PUBG montage videos.
Watch this video to get an idea.
· Wedding Montages
Many users turn to edit video montages for specific occasions, adding clips of different moments instead of one long-running documentary. They incorporate stylish effects like slow motion and transitions, incorporate a moving background score, and more.
Many top influencers and celebrities have used this technique for their wedding videos on social media. Additionally, regular people also adopt the style.
Watch this video as an example.
· Birthday Montages
Like wedding videos, users can try out the video montage technique to create videos for birthdays. These can include scenes of the main creator throughout their preparation phase for the party. Alternately, some users create video montages of their experience leading up to the video celebration, through a longer period or the same day.
Watch this video to understand how these videos may look.
Part 3. How Can I Create Easily a Montage Video?
After understanding the types of video montage techniques and ideas, the next point of concern is learning how to make a montage.
One of the best editing software to use for this process is Wondershare Filmora . With this editor, you can create different video montages as per the theme, customized or instantly. Filmora includes premium-quality effects and transitions, including free stock media that you can also add. Plus, the software allows the ability to record voiceover and adjust background scores in the video.
You can also choose the aspect ratio for the video, depending on the platform you post it on. For example, if you are creating a full professional-level scene montage, use the widescreen (16:9) aspect ratio, like in YouTube videos. Or, use the portrait (9:16) for mobile-based videos for TikTok videos or a 1:1 aspect ratio for Instagram videos.
Watch this video to know how it works.
Free Download For Win 7 or later(64-bit)
Free Download For macOS 10.14 or later
Features of Filmora for Video Montage Making
There are multiple top-quality features available in the Filmora software that is useful for creating and editing video montages. Use them and create dynamic videos.
1. Screen Recorder
The Screen Recorder feature is accessible through the home page of the Filmora software after launching. Since the first stage of making a montage involves getting the video clips for it, you can use this to record the video. For example, if you have a movie saved on your desktop, use the screen recorder and tap the Play button to record the screen.

You can adjust further settings, like which headphone or speaker to use for the audio recording.
2. Preset Templates
Next comes the editing process. After completing the recording process for the montage video, you can use preset templates on Filmora via Instant Mode. This is useful for users who do not have enough time to fully edit a long montage video or have the technical skills for it.
You can click on the Instant Mode tab on the home page. Then, choose the specific theme of the video montage you will create, like Birthday, Wedding, Business, etc. After selecting the theme, you can insert multiple video clips into the editor. Adjust the clips in sequence and press the “Auto-Create” button.

3. Abundant Video Effects and Music Resources
If you want to customize the video montage video manually, you can use the various effects and advanced features in the main editor timeline. For example, click on the Effects tab to find your options.

After importing the file(s) into the editor and dragging it to the timeline, you can use the Crop icon to cut clips. Then, rearrange them and merge them. Plus, further editing features are available for premium-level edits, like the Chroma Key. Click on it and add a green screen in the background.

The AI Portrait feature is also available, automatically detecting the main character and accurately removing the background.
You can adjust the speed of transitions in the video with the Speed Ramping function. Many high-quality effects are available under the Effects tab, and you can add audio to the video through the Media tab.

Conclusion
Video montages are one of the tried-and-tested methods used in film-making, gaming videos, and social media videos. You can use Filmora to create such video montages based on the type of video montage technique that fits it. Then, share it directly to YouTube or save it for transferring across different platforms.
Free Download For Win 7 or later(64-bit)
Free Download For macOS 10.14 or later
How Does Sony’s S&Q Feature Help Recording Slow-Motion Video
Creating slomos has become essential to videography, cinema, and content generation. However, regarding professional-grade slomos, you cannot trust just any camera. Sony S&Q is one of those professional-grade cameras that help shoot in slow motion.
This article will provide a brief review of S&Q mode and Sony Vegas slow motion. In addition, you’ll come across a professional-grade video editor performing this task. This alternative is software that provides diverse slow-motion creation options.
Slow Motion Video Maker Slow your video’s speed with better control of your keyframes to create unique cinematic effects!
Make A Slow Motion Video Make A Slow Motion Video More Features

Part 1: Capturing Slow Motion Videos with Sony S&Q Feature
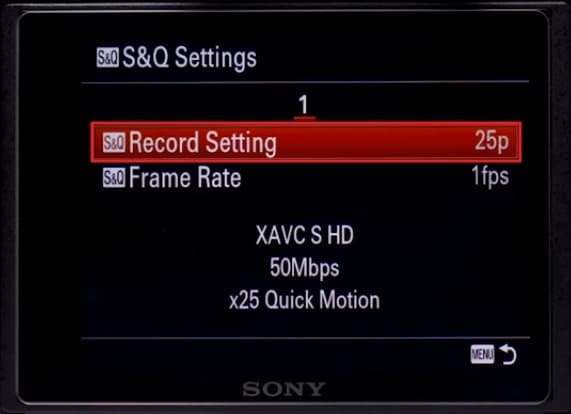
Who hasn’t heard about Sony and its services in the world of videography? Along with many features, the cameras offer a Sony S&Q mode for slo-mo creation. This model can manipulate video frame rates higher than standard cameras. It offers three frame rate options to select from 25p, 50p, and 60p. Here is a chance to learn to capture a slow-motion shot using S&Q mode Sony:
Step 1
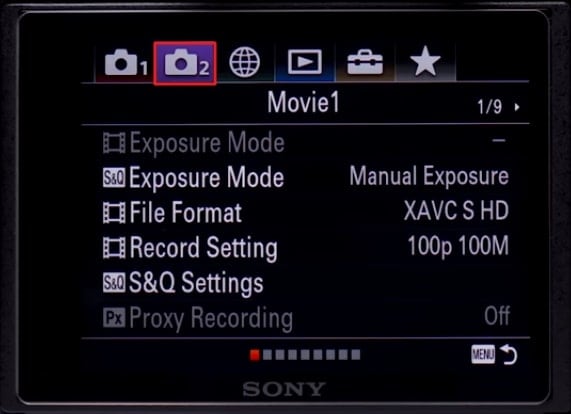
From your camera’s dial, select the “S&Q” option. Access the camera’s display screen and go to “Menu 2” from the top bar. Then, “S&Q Settings” in the featured section.
Step 2
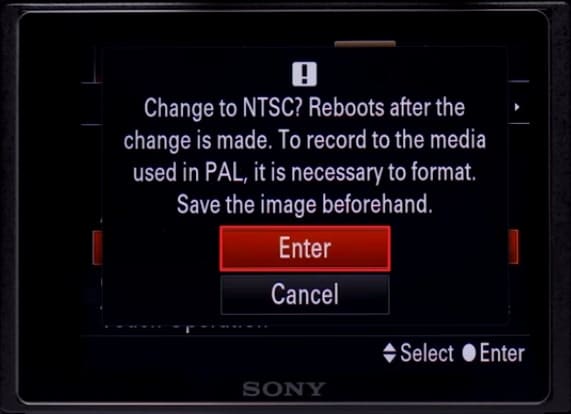
Once you reach the Sony S&Q mode settings, click “Record Settings.” This will decide the output frame rate of your video. In PAL, you have two record options: 25p and 50p. On the other hand, in the NTSC, you’ll have three options: 25p, 50p, and 60p.
Step 3
Click the “Enter” option to finalize the Record settings.
Step 4
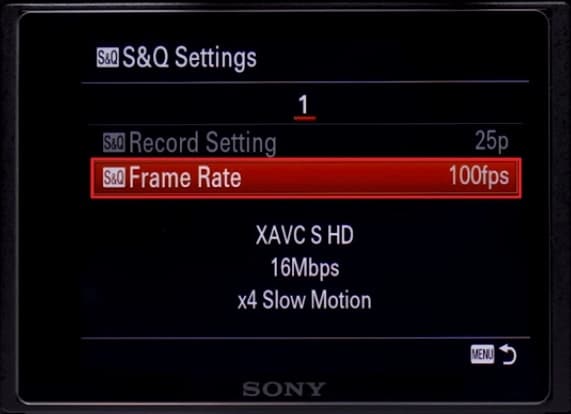
Upon accessing the “Frame Rate” settings, you’ll find many options there. The highest frame rate in PAL is 100 fps, while in NTSC, itit is 120 fps. You can also choose the Exposure settings for your camera according to footage. After setting these preferences, start capturing a video in slow motion.
Part 2: Different Sony Cameras Offering S&Q Feature
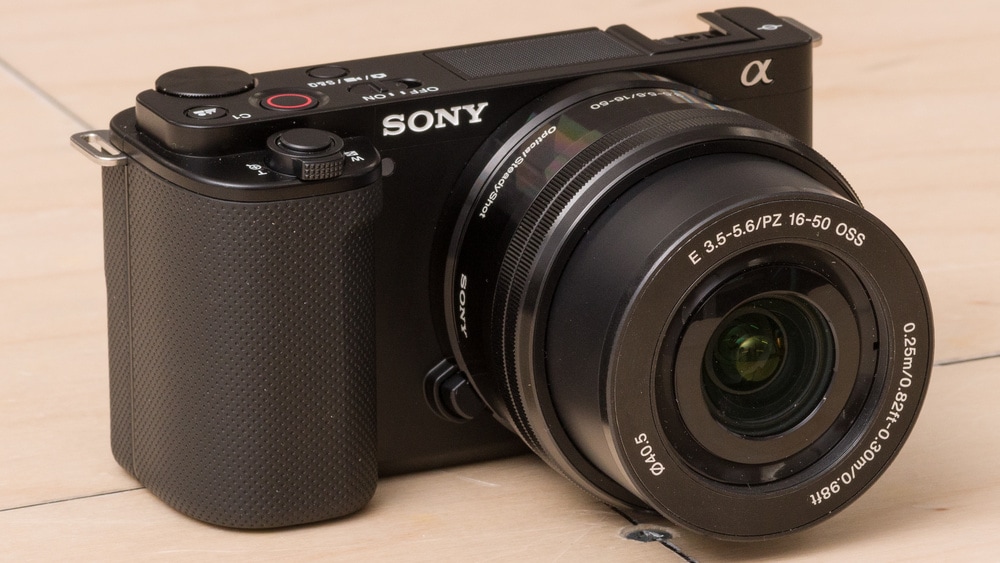
There is no lack of devices that help you capture any scene with perfection. Someone obsessed with videography can understand the worth of a high-quality camera. Sony launched two such products named A7iii and Sony ZV E10 slow motion. Both are high-output, professional-grade cameras to assist in slo-mo creation. Here is a brief review of these cameras for you to compare and select better:
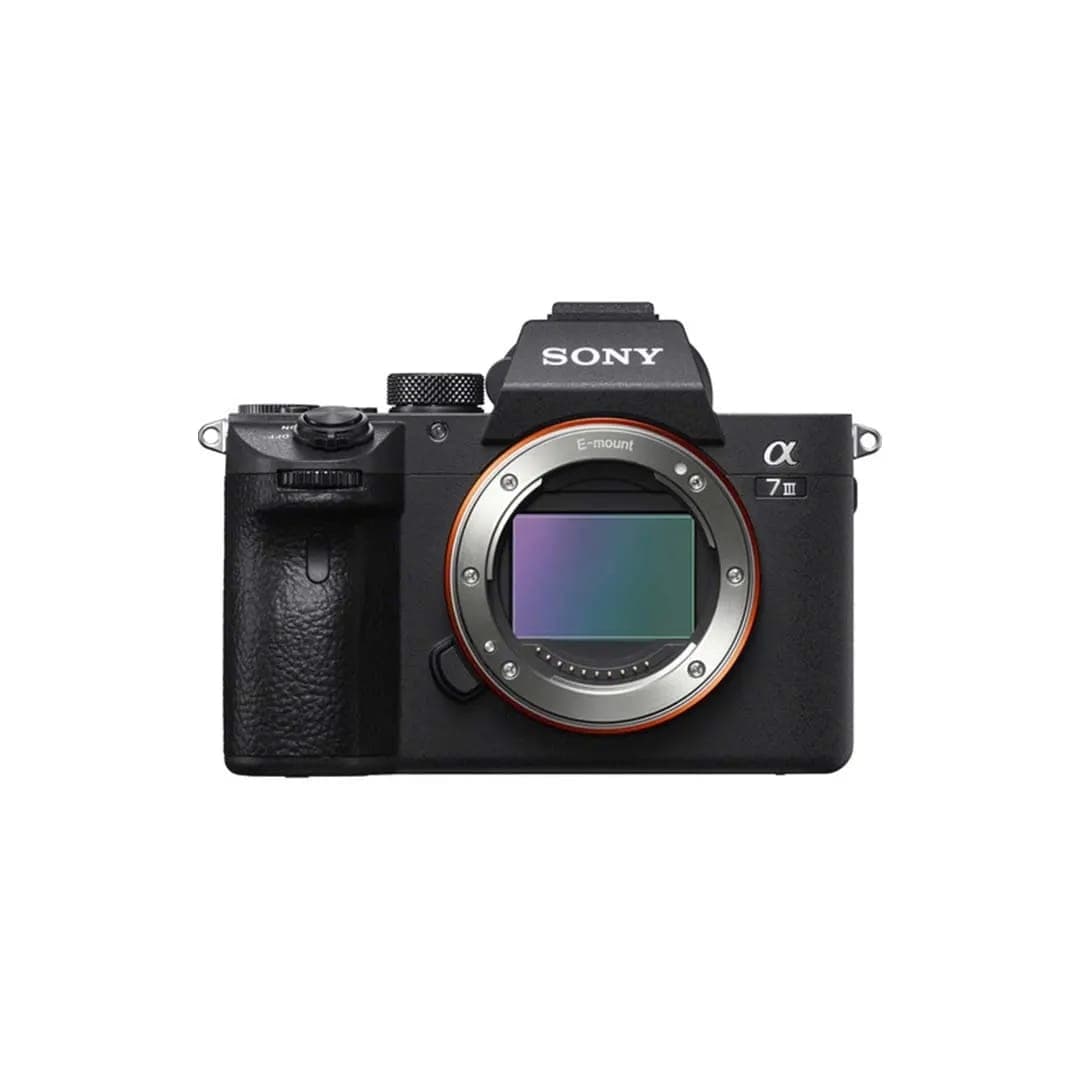
1. Sony A7 III
Sony A7iii slow motion camera launch occurred in 2018 with a bundle of features. This camera offers 120fps video capture for creating slomos or high-speed effects. It has an APS-C size, 24.2-megapixel, and an Exmor CMOS sensor for more precise results. In addition, it possesses a 4K Ultra-High Resolution of 3840 x 2160 for videos. The camera also has an LCD touch screen, which proves productive in settings.
2. Sony ZV-E10
This is an upgraded S&Q mode Sony camera that first emerged in 2021 with a fully articulated screen. It has an APS-C size, 24.2-megapixel, and an Exmor CMOS sensor for balanced shooting. This version also has the highest video frame rate of 120 fps for the professional slo-mo effect. It captures slomos in 4K (UHD) 3840 x 1920 video resolution for quality maintenance. It has a directional 3-capsule microphone for high-definition audio.
Part 3: How to Slow Down Video in Sony Vegas Pro?
Vegas Pro stands amongst the top video editors who excel at creating slow motions. With its powerful speed manipulation, it can curate cinematic slo-mo effects. In addition, the tool offers an Optical Flow option for ultra-high-quality slomos. It offers a non-linear timeline editing, which means selective durations to apply this effect. Given below is the step-by-step guide to Sony V egas slow motion:
Step 1
After launching the software, import the video and bring it to the timeline.
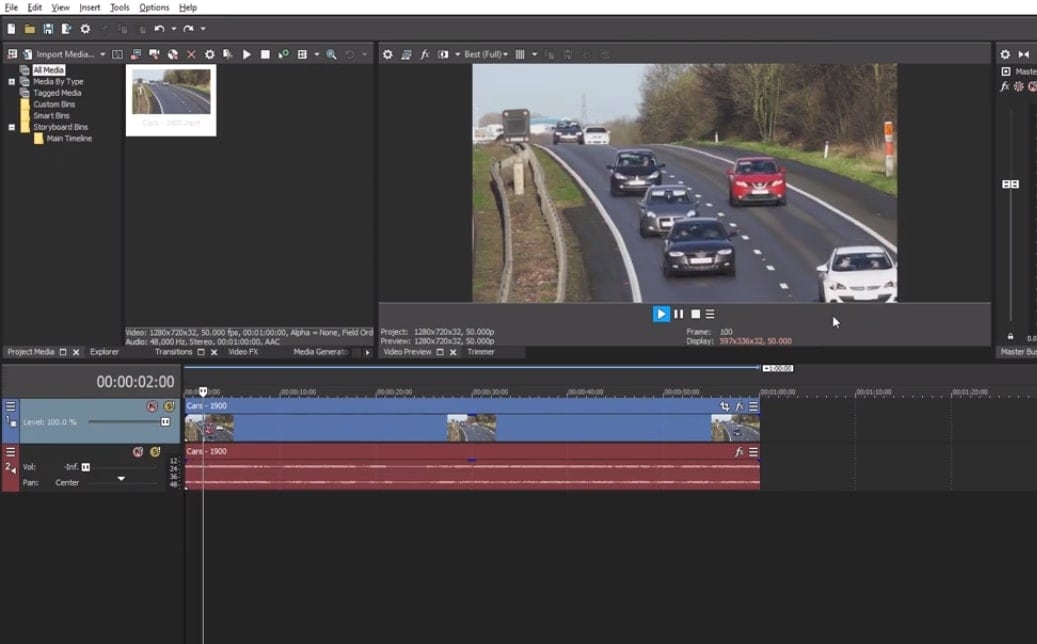
Step 2
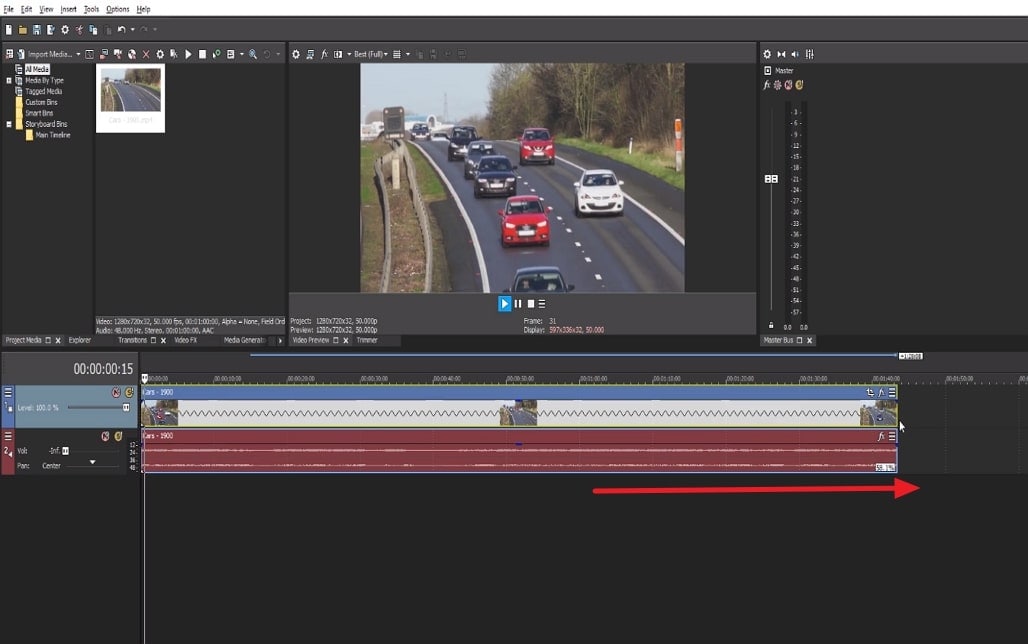
Navigate towards the editing panel where the clip and audio track are showing. Place your cursor at the finishing line of the clip and stretch it throughout the timeline. This will add a slow-motion effect to your video.
Part 4: Wondershare Filmora: Comprehending the Best Alternative for Slowing Down Videos
All the above slow-motion solutions are adequate but not reliable. This is because shooting in So ny S& Q mode declines video quality upon export. In addition, the Sony Vegas slow motion subscription plans start at more than $500. This seems expensive for someone who just started editing and is a beginner.
Wondershare Filmora is the perfect alternative to S ony ZY E10 slow motion and other devices. It offers an intuitive speed change interface at affordable prices. In addition, there is more than one method to alter its speed with optical flow. Moreover, the software offers extensive export settings to set video resolution.
Free Download For Win 7 or later(64-bit)
Free Download For macOS 10.14 or later
Step-by-Step Guide to Creating Slow Motion in Filmora
The fundamental technique for achieving slow motion in Filmora involves Uniform Speed. This method simply adjusts the playback speed of a video through a slider. The process of creating slow-motion content is mentioned below:
Step 1Import Media to Initiate Slow-Motion Creation
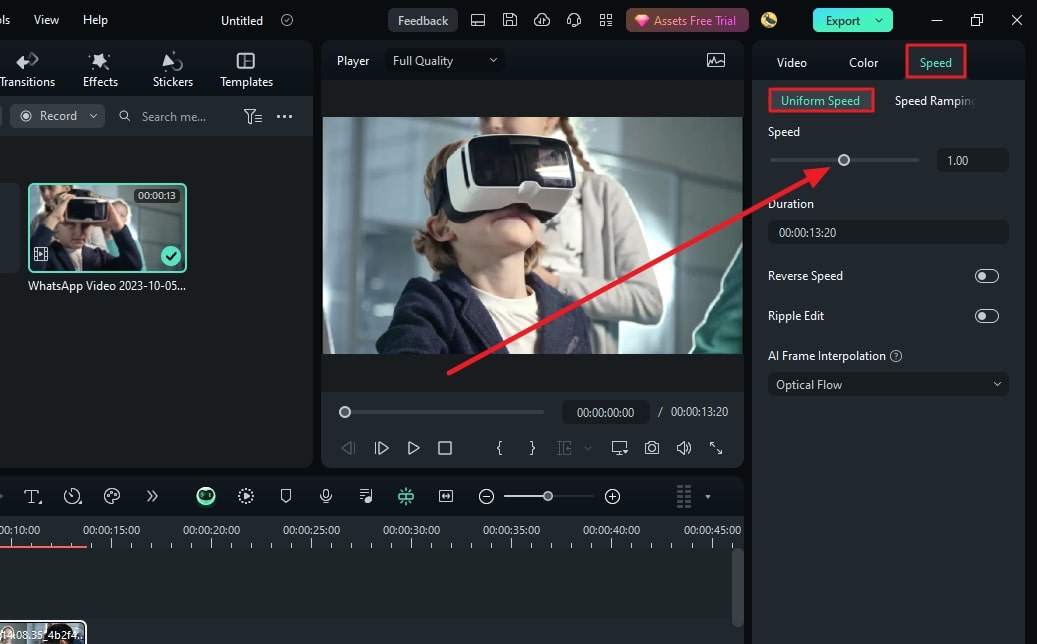
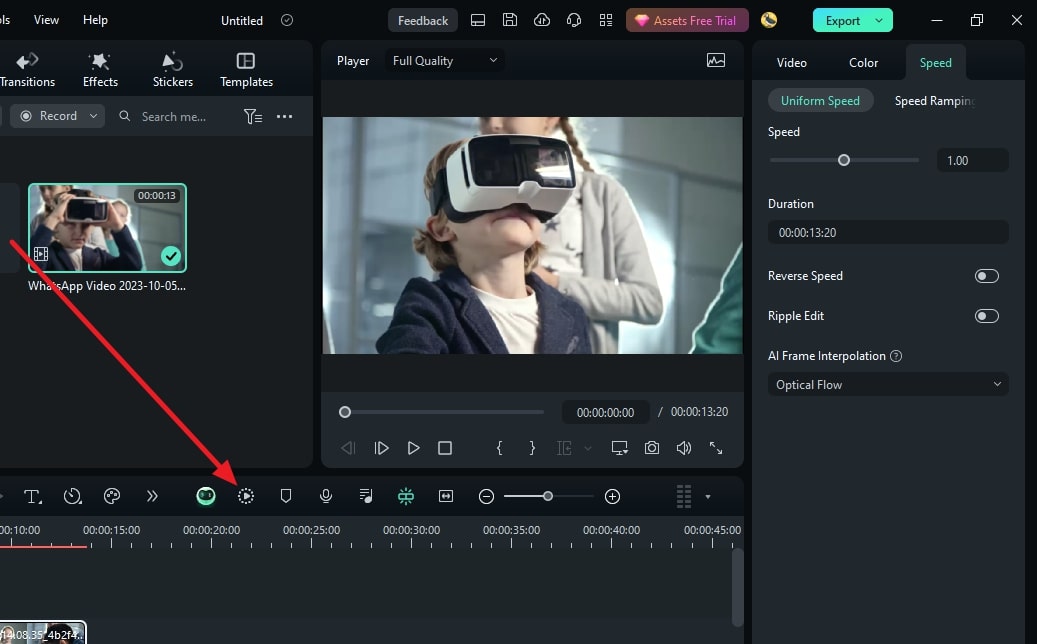
Initiate Filmora by clicking the “New Project” button and access the editing interface. Hit the “Ctrl + I” keys to import media and bring it to the timeline. After selecting the clip in the timeline, navigate to the settings panel. Proceed to the “Speed” > “Uniform Speed” to access the speed change slider. Drag the slider towards the left to adjust the slow-motion speed.
Step 2Access AI Frame Interpolation Settings
To achieve smooth slow motion, access AI Frame Interpolation at the bottom. Expand this section and opt for the “Optical Flow” to apply.

Step 3Enable Render Preview to Review Results
Once all adjustments are complete, select the video and return to the timeline panel. Use your cursor to access the “File” tab in the top toolbar and choose “Render Preview.” Utilize the preview options before exporting the video.
Key Features of Filmora
Filmora doesn’t just claim to be the best; there are multiple features to support this claim. If you want to explore the features of this S ony A7iii slow motio n, read this section:
AI Copilot Editing: We understand the confusion of being an amateur at editing. The unfamiliarity with a tool increases it. Hence, Filmora offers this feature. As the name suggests, it acts as your assistant to run errands in Filmora. Ask it about any feature, and it will give direction and editing suggestions.
AI Text-Based Editing: Filmora excels in cutting or trimming videos for editing. It has recently introduced text-based editing AI to convert video speech to text. Afterward, users can remove a specific text to eliminate the video section.
Remove Background: With Filmora, video editing is more accessible than ever. The AI Smart Cutout option removes the video backgrounds with precision. Afterward, you can replace it with Filmora’s pre-developed background. This includes solid colors, gradients, and other graphics.
AI Image: Can’t spare time to capture images for your new content idea? With Filmora’s text to generate AI, you can now curate images. The AI only requires you to add a prompt and craft results accordingly. Upon creation, users can also select a preferred image resolution.
Conclusion
This article has discussed the purpose of Sony S&Q and how to use it for slo-mo creation. In addition, users learned about two of Sony’s cameras, which are popular for slow-motion. Afterward, we discussed a desktop method to create slow motion. Considering all the drawbacks of these methods, we recommended Filmora. It is a desktop alternative to these tools with AI abilities to enhance task achievement.
Make A Slow Motion Video Make A Slow Motion Video More Features

Part 1: Capturing Slow Motion Videos with Sony S&Q Feature
Who hasn’t heard about Sony and its services in the world of videography? Along with many features, the cameras offer a Sony S&Q mode for slo-mo creation. This model can manipulate video frame rates higher than standard cameras. It offers three frame rate options to select from 25p, 50p, and 60p. Here is a chance to learn to capture a slow-motion shot using S&Q mode Sony:
Step 1
From your camera’s dial, select the “S&Q” option. Access the camera’s display screen and go to “Menu 2” from the top bar. Then, “S&Q Settings” in the featured section.

Step 2
Once you reach the Sony S&Q mode settings, click “Record Settings.” This will decide the output frame rate of your video. In PAL, you have two record options: 25p and 50p. On the other hand, in the NTSC, you’ll have three options: 25p, 50p, and 60p.

Step 3
Click the “Enter” option to finalize the Record settings.

Step 4
Upon accessing the “Frame Rate” settings, you’ll find many options there. The highest frame rate in PAL is 100 fps, while in NTSC, itit is 120 fps. You can also choose the Exposure settings for your camera according to footage. After setting these preferences, start capturing a video in slow motion.

Part 2: Different Sony Cameras Offering S&Q Feature
There is no lack of devices that help you capture any scene with perfection. Someone obsessed with videography can understand the worth of a high-quality camera. Sony launched two such products named A7iii and Sony ZV E10 slow motion. Both are high-output, professional-grade cameras to assist in slo-mo creation. Here is a brief review of these cameras for you to compare and select better:
1. Sony A7 III
Sony A7iii slow motion camera launch occurred in 2018 with a bundle of features. This camera offers 120fps video capture for creating slomos or high-speed effects. It has an APS-C size, 24.2-megapixel, and an Exmor CMOS sensor for more precise results. In addition, it possesses a 4K Ultra-High Resolution of 3840 x 2160 for videos. The camera also has an LCD touch screen, which proves productive in settings.

2. Sony ZV-E10
This is an upgraded S&Q mode Sony camera that first emerged in 2021 with a fully articulated screen. It has an APS-C size, 24.2-megapixel, and an Exmor CMOS sensor for balanced shooting. This version also has the highest video frame rate of 120 fps for the professional slo-mo effect. It captures slomos in 4K (UHD) 3840 x 1920 video resolution for quality maintenance. It has a directional 3-capsule microphone for high-definition audio.

Part 3: How to Slow Down Video in Sony Vegas Pro?
Vegas Pro stands amongst the top video editors who excel at creating slow motions. With its powerful speed manipulation, it can curate cinematic slo-mo effects. In addition, the tool offers an Optical Flow option for ultra-high-quality slomos. It offers a non-linear timeline editing, which means selective durations to apply this effect. Given below is the step-by-step guide to Sony V egas slow motion:
Step 1
After launching the software, import the video and bring it to the timeline.

Step 2
Navigate towards the editing panel where the clip and audio track are showing. Place your cursor at the finishing line of the clip and stretch it throughout the timeline. This will add a slow-motion effect to your video.

Part 4: Wondershare Filmora: Comprehending the Best Alternative for Slowing Down Videos
All the above slow-motion solutions are adequate but not reliable. This is because shooting in So ny S& Q mode declines video quality upon export. In addition, the Sony Vegas slow motion subscription plans start at more than $500. This seems expensive for someone who just started editing and is a beginner.
Wondershare Filmora is the perfect alternative to S ony ZY E10 slow motion and other devices. It offers an intuitive speed change interface at affordable prices. In addition, there is more than one method to alter its speed with optical flow. Moreover, the software offers extensive export settings to set video resolution.
Free Download For Win 7 or later(64-bit)
Free Download For macOS 10.14 or later
Step-by-Step Guide to Creating Slow Motion in Filmora
The fundamental technique for achieving slow motion in Filmora involves Uniform Speed. This method simply adjusts the playback speed of a video through a slider. The process of creating slow-motion content is mentioned below:
Step 1Import Media to Initiate Slow-Motion Creation
Initiate Filmora by clicking the “New Project” button and access the editing interface. Hit the “Ctrl + I” keys to import media and bring it to the timeline. After selecting the clip in the timeline, navigate to the settings panel. Proceed to the “Speed” > “Uniform Speed” to access the speed change slider. Drag the slider towards the left to adjust the slow-motion speed.

Step 2Access AI Frame Interpolation Settings
To achieve smooth slow motion, access AI Frame Interpolation at the bottom. Expand this section and opt for the “Optical Flow” to apply.

Step 3Enable Render Preview to Review Results
Once all adjustments are complete, select the video and return to the timeline panel. Use your cursor to access the “File” tab in the top toolbar and choose “Render Preview.” Utilize the preview options before exporting the video.

Key Features of Filmora
Filmora doesn’t just claim to be the best; there are multiple features to support this claim. If you want to explore the features of this S ony A7iii slow motio n, read this section:
AI Copilot Editing: We understand the confusion of being an amateur at editing. The unfamiliarity with a tool increases it. Hence, Filmora offers this feature. As the name suggests, it acts as your assistant to run errands in Filmora. Ask it about any feature, and it will give direction and editing suggestions.
AI Text-Based Editing: Filmora excels in cutting or trimming videos for editing. It has recently introduced text-based editing AI to convert video speech to text. Afterward, users can remove a specific text to eliminate the video section.
Remove Background: With Filmora, video editing is more accessible than ever. The AI Smart Cutout option removes the video backgrounds with precision. Afterward, you can replace it with Filmora’s pre-developed background. This includes solid colors, gradients, and other graphics.
AI Image: Can’t spare time to capture images for your new content idea? With Filmora’s text to generate AI, you can now curate images. The AI only requires you to add a prompt and craft results accordingly. Upon creation, users can also select a preferred image resolution.
Conclusion
This article has discussed the purpose of Sony S&Q and how to use it for slo-mo creation. In addition, users learned about two of Sony’s cameras, which are popular for slow-motion. Afterward, we discussed a desktop method to create slow motion. Considering all the drawbacks of these methods, we recommended Filmora. It is a desktop alternative to these tools with AI abilities to enhance task achievement.
Also read:
- New 2024 Approved Best 6 WebM to GIF Converters
- Best Ways to Add Photos to Tik Tok Video for 2024
- New How to Add Custom Subtitles to Netflix
- New Want to Add Subtitles to Netflix Videos in Your Preferred Language? Read This Article to Learn Two Different Methods for Uploading Custom Subtitles to Netflix
- Updated Best Filmic Pro LUTs For Video Editing
- How to Create The Best Video Collages ?
- New How to Add Transitions in Adobe Premiere Pro
- New Best 5 AI Music Video Examples and Makers to Make Them for 2024
- New Top 5 Online Video Converter for Instagram
- New 3 Effective Methods to Correct Color Distortion in Videos for 2024
- New 2024 Approved Effective 10 Ways to Convert YouTube to MOV at Ease PC & Online
- New Top 10 Transparent Image Online Tools That Help You A Lot
- How to Be a Good Podcast Host (2024 Updated)
- New In 2024, How To Combine Videos On TikTok
- Detailed Tutorial to Merge Videos in VLC Media Player for 2024
- How to Create a Light Sweep (Shine) Effect for 2024
- Updated If You Are a Marketer Who Want to Create Facebook Ads to Boost Your Business, You Are Coming to the Right Place. Well Share You some Useful Tips to Start Your First FB Ads Campaign
- Updated 2024 Approved Guaranteed 10 Storyboard Creators To Make Animation Easier For You
- How to Add Subtitles in Canva, In 2024
- How To Edit Youtube Videos In Simple Steps for 2024
- Updated 2024 Approved What Slideshow Templates Can Teach You About Aesthetic
- How To Add Motion Blur On CapCut? (IPhone & Android) for 2024
- Updated Best AR Video App - Top 10 Picks for 2024
- Learn to Splice Videos Together on iPhone for 2024
- 2024 Approved How to Add Video Transitions in Videos
- How to Edit a TikTok Video After Posting for 2024
- 2 Actionable Ways to Extract Subtitles From MKV Videos without Quality Loss
- In 2024, This Article Talks in Detail About How to Download Windows Movie Maker 2012 Version, the Key Features, How to Use It, Etc. It Further Discusses an Alternative Way to Create Videos on Windows PC. Check Out
- Best Online GIF to Image (PNG/JPG) Converter for 2024
- What Is the Top Filmora Slideshow Templates? Experts Choice for 2024
- New 2024 Approved Adobe Premiere Pro Rec 709 LUTs Finding The Best Options
- New Srt File Creator for 2024
- In 2024, Camtasia Vs Captivate Which Is Better
- Updated How To Change Text Color In Premiere Pro
- In This Article, We Will Cover the Stages of Film Production You Need to Keep in Mind.Without Further Ado, Lets Get Started for 2024
- New 2024 Approved Guide of 8 Photo Collage Apps for PC
- New 2024 Approved 5 Tools to Create a Time-Lapse Video Online
- Do You Know Anything About the Video Format Supported by WhatsApp? If Not, Then This Is the Right Time to Learn About WhatsApp-Supported Video Formats for 2024
- What Is Motion Tracking and How to Use It
- Updated 2024 Approved Slow Down or Speed Up Videos Easily on PC, Online, and Phone
- 2024 Approved How To Add Text In After Effects
- Updated Makeup Video Is One of the Video Types that Many Vloggers Are Creating. If You Are Also the One Who Wants to Share Makeup Experiences in Videos, Then You Can Follow the Guide Below to Make a Makeup Video with Simple Steps
- Mask Tracking with Adobe Premiere Pro A Detailed Guide
- Top-Search The Best Game Screen Recording Tools for PC
- Updated How to Add VHS Green Screen to Your Video
- New 3 Ways to Combine 2 or 3 Videos Into 1 for 2024
- In 2024, How to Detect and Stop mSpy from Spying on Your Apple iPhone 13 | Dr.fone
- In 2024, Will Pokémon Go Ban the Account if You Use PGSharp On Tecno Camon 20 | Dr.fone
- Sign .dotm file Documents Online for Free
- In 2024, 5 Techniques to Transfer Data from Vivo Y77t to iPhone 15/14/13/12 | Dr.fone
- Is GSM Flasher ADB Legit? Full Review To Bypass Your Xiaomi Redmi K70EFRP Lock
- How To Fake GPS On Xiaomi Redmi K70 For Mobile Legends? | Dr.fone
- Full Guide to Fix iToolab AnyGO Not Working On Tecno Pova 6 Pro 5G | Dr.fone
- In 2024, Unlocking Made Easy The Best 10 Apps for Unlocking Your Xiaomi 14 Ultra Device
- In 2024, How to Transfer Contacts from Realme Narzo N53 to iPhone XS/11 | Dr.fone
- How to unlock Vivo V29 Pro
- In 2024, Full Guide to Fix iToolab AnyGO Not Working On Xiaomi Civi 3 Disney 100th Anniversary Edition | Dr.fone
- How To Restore Missing Call Logs from Infinix Smart 8 HD
- How To Unlock Apple iPhone 15 Pro Max Without Passcode? 4 Easy Methods
- How to Infinix Hot 30i Get Deleted photos Back with Ease and Safety?
- Is GSM Flasher ADB Legit? Full Review To Bypass Your Sony Xperia 10 V Phone FRP Lock
- How to Fix Unfortunately, Contacts Has Stopped Error on Realme C67 5G | Dr.fone
- A Complete Guide To OEM Unlocking on Lava Yuva 2 Pro
- How to Factory Reset OnePlus Ace 2 Pro If I Forgot Security Code or Password? | Dr.fone
- In 2024, Top 7 Phone Number Locators To Track Nokia XR21 Location | Dr.fone
- Top 5 Car Locator Apps for Apple iPhone SE (2020) | Dr.fone
- Can I use iTools gpx file to catch the rare Pokemon On Vivo V29 Pro | Dr.fone
- 4 Ways to Fix Android Blue Screen of Death On Sony Xperia 1 V | Dr.fone
- Complete guide for recovering call logs on Oppo Reno 11 5G
- In 2024, Here Are Some Reliable Ways to Get Pokemon Go Friend Codes For Xiaomi Redmi A2+ | Dr.fone
- 8 Workable Fixes to the SIM not provisioned MM#2 Error on Itel A60 | Dr.fone
- In 2024, Here Are Some Reliable Ways to Get Pokemon Go Friend Codes For Tecno Spark Go (2024) | Dr.fone
- In 2024, A Comprehensive Guide to iCloud Unlock From Apple iPhone 6 Plus Online
- Ultimate Guide to Catch the Regional-Located Pokemon For Nokia C12 | Dr.fone
- How Can I Use a Fake GPS Without Mock Location On Poco X5 Pro? | Dr.fone
- Updated 2024 Approved How to Create Picsart Cartoon
- In 2024, Complete Fixes To Solve iPhone 11 Pro Randomly Asking for Apple ID Password | Dr.fone
- How To Do Lava Yuva 3 Screen Sharing | Dr.fone
- In 2024, How to Transfer Data After Switching From OnePlus 11 5G to Latest Samsung | Dr.fone
- 8 Solutions to Solve YouTube App Crashing on Lava Blaze 2 | Dr.fone
- The Best Android Unlock Software For Oppo Reno 10 Pro 5G Device Top 5 Picks to Remove Android Locks
- Local Trade Copier
- Top 4 Ways to Trace Huawei Nova Y71 Location | Dr.fone
- Apple iPhone 13 Pro Screen Mirroring You Must Know | Dr.fone
- How to Change Spotify Location After Moving to Another Country On Vivo V30 Pro | Dr.fone
- Home Button Not Working on Samsung Galaxy S23 Tactical Edition? Here Are Real Fixes | Dr.fone
- In 2024, 10 Easy-to-Use FRP Bypass Tools for Unlocking Google Accounts On Poco F5 Pro 5G
- In 2024, How to Bypass iPhone 15 Plus Passcode Easily Video Inside
- Title: Updated Kdenlive Review – Is It The Best Video Editor for 2024
- Author: Chloe
- Created at : 2024-04-24 07:08:37
- Updated at : 2024-04-25 07:08:37
- Link: https://ai-editing-video.techidaily.com/updated-kdenlive-review-is-it-the-best-video-editor-for-2024/
- License: This work is licensed under CC BY-NC-SA 4.0.

