

Updated Learn How to Feather Shapes in After Effects and Add a Professional Touch to Your Designs. This Comprehensive Guide Covers Everything From the Basics to Advanced Techniques. Perfect for Beginners and Experts Alike
Learn How to Feather Shapes in After Effects and Add a Professional Touch to Your Designs. This Comprehensive Guide Covers Everything From the Basics to Advanced Techniques. Perfect for Beginners and Experts Alike
Feathering shapes in After Effects can greatly enhance your designs’ overall look and feel. This technique involves creating a soft, blurred edge around the shapes, which adds a sense of depth and dimension. Whether you’re a beginner or an experienced After Effects user, understanding how to feather shapes is a valuable skill to have in your arsenal.
This guide will cover everything you need about feathering shapes in After Effects. From the basics to advanced techniques, you’ll learn how to add a professional touch to your designs and take your skills to the next level.
Whether you’re creating a logo, animation, or visual effect, the ability to feather shapes will help you achieve the desired look and feel for your project. So, let’s dive in and explore the world of feathering in After Effects!
What Is Mask Edge Feather in After Effects?
Mask Edge Feather in After Effects is a feature that enables you to create a soft or blurred transition between the masked and unmasked areas of your composition. The mask feather setting can be found in the properties and is measured in pixels. Increasing the feather value increases the softness or blurriness of the mask’s edges, creating a smoother transition between the masked and unmasked parts of the image.
One of the key benefits of feathering masks is that it allows you to blend the masked object with its background, making the effect look more natural and convincing. The mask feather tool can also create custom feather shapes anywhere along the edge of the mask. To access the mask feather tool, switch to the pen tool by pressing the “G“ key and selecting the feather pen.
The mask edge feather feature in After Effects is a powerful and versatile tool that can help you achieve a wide range of creative effects. Whether you’re creating an animation or visual effect, or want to add a professional touch to your designs, understanding how to use the mask feather tool is an essential skill in your After Effects toolkit.
How To Feather a Shape in After Effects?
Feathering a shape in After Effects is a simple process that can greatly enhance the look and feel of your designs. By following these steps, you’ll be able to easily feather shapes in After Effects and add a professional touch to your designs.
Keep in mind that the feather value can be adjusted to your preference and the needs of your project, so feel free to experiment and see what works best for you.
There are two options to feather the edge in After Effects:
A. Adding a Mask to Shape Layer
Step1 Add a mask to create a feathered edge.

Step2 Edit the feather parameter under the mask in the composition panel.

B. Applying Fast Box Blur Effect
Step1 Go to the “Effects and Preset“ tab and search for the “Fast Box Blur“ effect.

Step2 Increase the “Blur Radius“ to see the edges feather.

How To Use Variable Mask Feather in After Effects?
Variable mask feather in After Effects allows you to create masks with variable feathering. It means you can have different feather values for different parts of the same mask. This feature gives you greater control and flexibility over your masks, allowing you to easily create complex effects and transitions.
With variable mask feathers, you can create complex effects, such as a shape that feathers more in one direction than the other. Or you can create a mask with a soft transition in one area and a hard transition in another.
By experimenting with different feather values and mask shapes, you can achieve a wide range of creative effects in After Effects. To use variable mask feather in After Effects, you’ll need to follow these steps:
Step1 Use the pen tool to create corner points.

Step2 Create the Mask Feather points.

Step3 Adjust the Feather Parameter.

Step4 Go to “Pen Tool“ > “Mask Feather Tool“ and click anywhere on the mask path.

Step5 Drag the mask point feathering around the focus.

This tutorial came from Crish Design . For more tutorials about After Effects tips and techniques, you can refer to the Crish Design YouTube channel.
Need an Alternative? Try Wondershare Filmora
If you’re looking for a more accessible and user-friendly alternative to After Effects, consider using Wondershare Filmora . Filmora is a powerful video editing software that offers many of the same features as After Effects, including an edge feather feature that’s a great alternative to the mask edge feather in After Effects.
Free Download For Win 7 or later(64-bit)
Free Download For macOS 10.14 or later
The edge feather in Filmora is known as the “Blur Strength” and can be found in the “Masks” tab of the editor. Like the mask edge feather in After Effects, the Blur Strength in Filmora is measured in pixels and determines the softness or blurriness of the edges of the mask.

Filmora also offers a wide range of other features that make it a great choice for video editings, such as a user-friendly interface, an extensive library of special effects, and support for multiple file formats. Whether you’re a beginner or an experienced editor, Filmora has everything you need to create professional-quality videos.
So, if you’re looking for an alternative to After Effects that’s easier to use and more accessible, consider giving Wondershare Filmora a try. Its powerful edge-feature feature and user-friendly interface make it the perfect choice for creating professional-quality videos without the hassle of using complex and time-consuming software.
How To Use Shape Feather Tool in Wondershare Filmora?
The Shape Feather Tool in Wondershare Filmora is a great way to create a soft, gradual transition between different shapes in your video. This tool can be used to create a variety of effects, from gentle fades to complex animations.
Whether creating a simple animation or a complex visual effect, this tool gives you the control and flexibility you need to create professional-quality videos. To use the Shape Feather Tool in Filmora, follow these steps:
Step1 Open Wondershare Filmora and create a new project. Import the video and drag it to the timeline.

Step2 Double-click the video in the Player Window. In the editing window, click “Video“> “Mask“ and add a shape mask.

Step3 Scroll down to find the “Blur Strength“ option, and adjust the blur value.

How To Use Variable Mask Feather in Wondershare Filmora?
Wondershare Filmora also allows you to use variable mask feathers to create a smooth, gradual transition between different parts of your video.
But first, understand the process of using the pen tool. When using the pen tool to draw shapes in Filmora, you can customize the shape and feather to your specifications. To do this, select the pen tool and use it to draw the shape you want. You can adjust the feathering by moving the feathering control points and fine-tuning the Blur Strength in the “Mask“ tab.
To use Variable Mask Feather in Filmora, follow these steps:
Step1 Select the “Draw Mask“ option under the Mask tab, and use the pen tool to draw whatever shape you like in the video.

Step2 Adjust the “Blur Strength“ value.
Conclusion
Feathering shapes in After Effects and Wondershare Filmora are powerful tools for creating smooth, seamless transitions in your videos. With the mask feather setting in After Effects and the Shape Feather Tool in Filmora, you have the flexibility and control you need to create the exact look you want.
Whether you’re looking to feather shapes in After Effects or prefer the convenience of using Wondershare Filmora, there’s a solution for you. So why wait? Start feathering your shapes today and bring your video editing skills to the next level For macOS 10.14 or later
The edge feather in Filmora is known as the “Blur Strength” and can be found in the “Masks” tab of the editor. Like the mask edge feather in After Effects, the Blur Strength in Filmora is measured in pixels and determines the softness or blurriness of the edges of the mask.
Filmora also offers a wide range of other features that make it a great choice for video editings, such as a user-friendly interface, an extensive library of special effects, and support for multiple file formats. Whether you’re a beginner or an experienced editor, Filmora has everything you need to create professional-quality videos.
So, if you’re looking for an alternative to After Effects that’s easier to use and more accessible, consider giving Wondershare Filmora a try. Its powerful edge-feature feature and user-friendly interface make it the perfect choice for creating professional-quality videos without the hassle of using complex and time-consuming software.
How To Use Shape Feather Tool in Wondershare Filmora?
The Shape Feather Tool in Wondershare Filmora is a great way to create a soft, gradual transition between different shapes in your video. This tool can be used to create a variety of effects, from gentle fades to complex animations.
Whether creating a simple animation or a complex visual effect, this tool gives you the control and flexibility you need to create professional-quality videos. To use the Shape Feather Tool in Filmora, follow these steps:
Step1 Open Wondershare Filmora and create a new project. Import the video and drag it to the timeline.
Step2 Double-click the video in the Player Window. In the editing window, click “Video“> “Mask“ and add a shape mask.
Step3 Scroll down to find the “Blur Strength“ option, and adjust the blur value.
How To Use Variable Mask Feather in Wondershare Filmora?
Wondershare Filmora also allows you to use variable mask feathers to create a smooth, gradual transition between different parts of your video.
But first, understand the process of using the pen tool. When using the pen tool to draw shapes in Filmora, you can customize the shape and feather to your specifications. To do this, select the pen tool and use it to draw the shape you want. You can adjust the feathering by moving the feathering control points and fine-tuning the Blur Strength in the “Mask“ tab.
To use Variable Mask Feather in Filmora, follow these steps:
Step1 Select the “Draw Mask“ option under the Mask tab, and use the pen tool to draw whatever shape you like in the video.
Step2 Adjust the “Blur Strength“ value.
Conclusion
Feathering shapes in After Effects and Wondershare Filmora are powerful tools for creating smooth, seamless transitions in your videos. With the mask feather setting in After Effects and the Shape Feather Tool in Filmora, you have the flexibility and control you need to create the exact look you want.
Whether you’re looking to feather shapes in After Effects or prefer the convenience of using Wondershare Filmora, there’s a solution for you. So why wait? Start feathering your shapes today and bring your video editing skills to the next level!
Ways to Learn Discord Game Bots – Even if You’re Just Starting Out [20
Ways to Learn Discord Game Bots – Even if You’re Just Starting out
An easy yet powerful editor
Numerous effects to choose from
Detailed tutorials provided by the official channel
Discord is free social communication service used by tens of millions of individuals aged 13 and above to socialize with their communities and friends. People use discord regularly to discuss various topics, from art projects and family vacations to homework and mental health help. It serves as a home for communities of different sizes but has become quite popular as discord bot games due to the rise in the gaming community.
The great majority of servers are private, invite-only locations where friends and communities may communicate and spend time together. More significant, more open groups based on specific themes like popular video games like PUBG and Genshin Impact. Because all discussions are opt-in, users have complete choice over who they connect with and how they use discord.
In this article
01 [What Are Discord Game Bots?](#Part 1)
02 [How Do You Add Bot Games to Discord?](#Part 2)
03 [Top 10 Picks of Discord Gaming Bots](#Part 3)
04 [Discord Game Bots FAQs](#Part 4)
Part 1 What Are Discord Game Bots?
Discord game bots are artificial intelligence (AI)-powered applications that automate processes and add music, games, welcome messages, memes, and other fun stuff to your server. These bots make it simple to interact with your audience, grow your community, and manage your server.
There is a plethora of game bots for discord to pick from, each with its purpose. Some may automatically welcome new users, while others utilize webhooks to interface with other apps—and it may be tough for novice users to figure out which ones will provide the most remarkable results for their requirements.
Part 2 How Do You Add Bot Games to Discord?
Follow the steps below to add game bots for discord successfully:
Step 1: To add a bot to your Discord server, go to the bot’s source page. We’ll be using ProBot for this lesson.
Step 2: Depending on the bot you’re adding, click Add to Discord or Invite Now.
Step 3: To grant the bot access, a pop-up window will appear asking you to check in to your Discord account.
Step 4: After you log in, you’ll see a box asking for account authorization. Locate and choose the Add to Server drop-down menu.
Step 5: This will bring up a list of discord servers where you can add a bot game discord. Continue after selecting your server.
Step 6: Examine the server permissions that the bot asks for. Select and deselect according to your requirements. When you’re ready, click Authorize.
For those who like to share their discord game bots experience through screen recordings and whatnot, a potent and convenient video editing tool to make your sessions look even more incredible is Filmora.
Wondershare Filmora Video Editor is a famous video editing program for those who wish to focus on editing and producing high-quality videos. The program supports 4K video editing. It’s a reasonably priced tool featuring effects for both video and audio. When it comes to designing, adding effects, and modifying movies, it provides users with many possibilities. You can use the tool to add overlays, create animations and objects, add music, and input text. Imagine sharing your experience in 4k
For Win 7 or later (64-bit)
For macOS 10.12 or later
Part 3 Top 10 Picks of Discord Gaming Bots
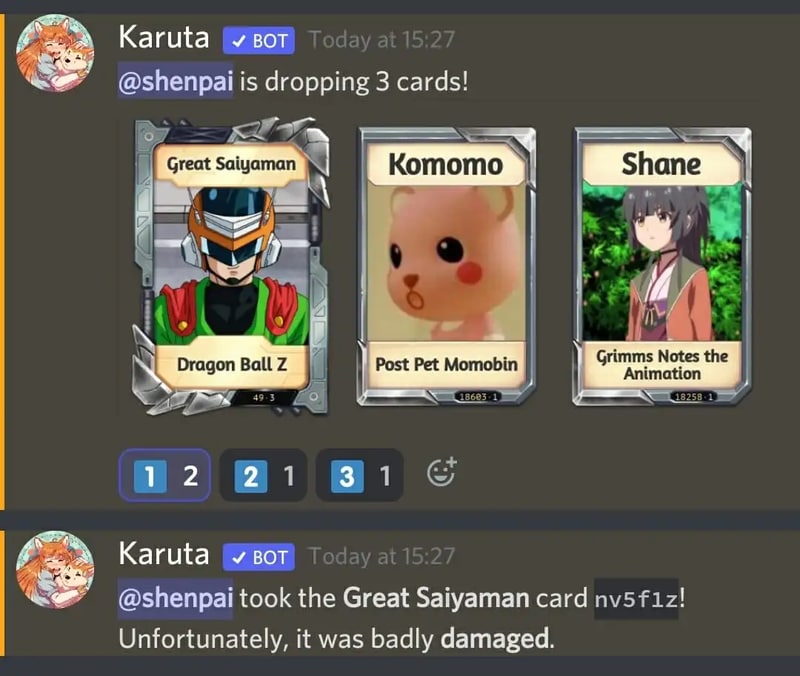
01Karuta
Karuta is a discord game bot where you gather anime characters. In Karuta, though, you collect characters using trading cards. Your cards and other objects may be customized, upgraded, and traded with other players. Better still, you maintain the same cards between servers, allowing you to play Karuta with the same deck on any server where the game discord bot is!
02Dragon Bot Z
Dragon Bot Z is the discord bot game that adds discord Ball Z, a multiplayer text-based RPG, to your server. Players in Discord Ball Z summon characters from the iconic Dragon Ball Z franchise, train them, fight foes, buy equipment, and trade with other players. This Discord game is ideal for Dragon Ball fans or anybody who likes text-based roleplaying games.

03Mudae
Mudae is a bot discord game with character-collecting. For example, you can claim popular anime and videogame characters as your “waifus” or “husbandos,” develop your harem, and compete for your favorite characters with other users. You can also trade the characters with other members.

04Rock Puppy
Rock Puppy is a basic yet entertaining game bots discord bot that incorporates several classic games. You can enjoy Discord games like ConnectFour, Truth or Dare, Trivia, Tic-Tac-Toe, Russian Roulette, and Would You Rather with Rock Puppy. You may also use magic 8-ball, dice, or tarot cards, play classic board and party games on your server with Rock Puppy.

05GarticBOT
GarticBot is a bot game in discord that allows you to play the drawing game Gartic. GarticBot begins the Discord game by painting an image on your server. Members then compete against one another to predict the image the quickest. Others can guess your drawings if you submit them. Type the command g.draw, and Gartic will provide you with a URL to submit your artwork. GarticBot creates a fun Pictionary-style game for everyone on your server to play.

06TriviaBot
TriviaBot is the most popular trivia game discord bot. It has over 90,000 questions, and you can even submit your own for inclusion in the bot. Members can form and join teams to compete in competitions. You may also create a public leaderboard to display who performs the best on the server.

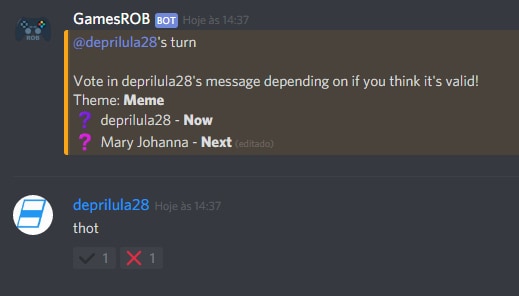
07GamesRob
The finest Uno discord game bot is GamesROB. ConnectFour, Trivia, Battleship, 2048, Tic-Tac-Toe, Minesweeper, and Hangman are the other traditional party games added to discord. You may also play “Detective,” a Discord game in which you try to figure out who is the “assassin” on your server, memory games, and Town, Country, River, a game in which you try to come up with as many phrases as possible within a theme.
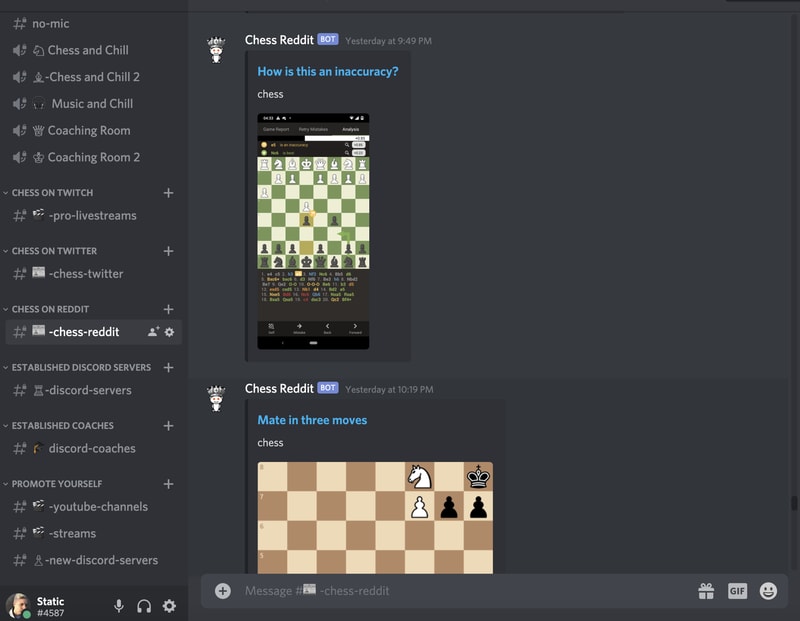
08Chess Reddit
Chess is a simple game that allows you to play chess on discord. You may play a chess game with other server members directly on the server. Instruct the bot on which pieces to move and where they should go. After each move, the Discord game bot creates a fresh graphic of the board so you can plot your next move. And, because the game hosts on your server, other users may watch and debate it!
09PokeMeow
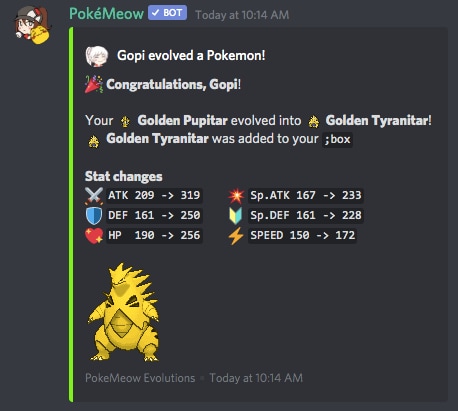
PokeMeow is by far the most popular Pokemon game discord bot. With this Pokemon bot, you may capture Pokemon on your server, trade, battle with other players, and accomplish tasks for in-game currency and stuff. As you keep building up your Pokedex, the Pokemon bot also allows to compete with other users on the worldwide leaderboard! PokeMeow is the ideal Pokemon Discord bot for fans of the Pokemon series.
10IdleRPG
IdleRPG is a discord game where you may play a text-based roleplaying game. You may make your character complete with ethnicity and social status. Then, you can go on quests and combat beasts, purchase, and exchange mythic objects, join guilds, engage with gods, and even marry other players. Play through your character’s adventure while engaging with and creating stories with other players. IdleRPG is likely to provide your server with hundreds of hours of roleplaying pleasure.

Part 4 Discord Game Bots FAQs
Now, let us go through some FAQs about discord game bots:
Q. Is it possible to play games with discord bots?
A. You could indeed play discord games in-server with bots, challenge other members, and win prizes! A game bot is a terrific method to keep players engaged on your server, especially if it’s a gaming Discord channel.
Q. Do game bots spy on you?
A. No, game discord bots do not have inbuilt spyware.
Q. How many bots should a server have?
A. It’s best not to have more than 20 bots game on discord on a server at any moment. More bots than this may cause users to become confused and the service to seem suspicious.
Q. Are discord bots free?
A. All these discord game bots are free to use. However, some have premium upgrades.
Q. Which bot is the most popular game bot in discord?
A. Worddle
Q. Which bot is the best bot for gaming on discord?
A. Gawesome is an excellent alternative for adding a multifunctional bot to your discord server.
● Ending Thoughts →
● Discord is accessible communication and socializing service for individuals aged 13 and above.
● The platform extends to various servers, each with its users, rules, themes, and channels, but one underutilized feature is the ability to develop and code custom AI-powered bots.
● Game bots for discord are artificial intelligence (AI)-powered applications that automate processes and add games to your discord server.
● These game discord bots make it simple to interact with your audience, grow your community, and manage your server.
● Lastly, to enhance the discord game bots experience and bring your gaming videos to life, use the Filmora software.
Discord is free social communication service used by tens of millions of individuals aged 13 and above to socialize with their communities and friends. People use discord regularly to discuss various topics, from art projects and family vacations to homework and mental health help. It serves as a home for communities of different sizes but has become quite popular as discord bot games due to the rise in the gaming community.
The great majority of servers are private, invite-only locations where friends and communities may communicate and spend time together. More significant, more open groups based on specific themes like popular video games like PUBG and Genshin Impact. Because all discussions are opt-in, users have complete choice over who they connect with and how they use discord.
In this article
01 [What Are Discord Game Bots?](#Part 1)
02 [How Do You Add Bot Games to Discord?](#Part 2)
03 [Top 10 Picks of Discord Gaming Bots](#Part 3)
04 [Discord Game Bots FAQs](#Part 4)
Part 1 What Are Discord Game Bots?
Discord game bots are artificial intelligence (AI)-powered applications that automate processes and add music, games, welcome messages, memes, and other fun stuff to your server. These bots make it simple to interact with your audience, grow your community, and manage your server.
There is a plethora of game bots for discord to pick from, each with its purpose. Some may automatically welcome new users, while others utilize webhooks to interface with other apps—and it may be tough for novice users to figure out which ones will provide the most remarkable results for their requirements.
Part 2 How Do You Add Bot Games to Discord?
Follow the steps below to add game bots for discord successfully:
Step 1: To add a bot to your Discord server, go to the bot’s source page. We’ll be using ProBot for this lesson.
Step 2: Depending on the bot you’re adding, click Add to Discord or Invite Now.
Step 3: To grant the bot access, a pop-up window will appear asking you to check in to your Discord account.
Step 4: After you log in, you’ll see a box asking for account authorization. Locate and choose the Add to Server drop-down menu.
Step 5: This will bring up a list of discord servers where you can add a bot game discord. Continue after selecting your server.
Step 6: Examine the server permissions that the bot asks for. Select and deselect according to your requirements. When you’re ready, click Authorize.
For those who like to share their discord game bots experience through screen recordings and whatnot, a potent and convenient video editing tool to make your sessions look even more incredible is Filmora.
Wondershare Filmora Video Editor is a famous video editing program for those who wish to focus on editing and producing high-quality videos. The program supports 4K video editing. It’s a reasonably priced tool featuring effects for both video and audio. When it comes to designing, adding effects, and modifying movies, it provides users with many possibilities. You can use the tool to add overlays, create animations and objects, add music, and input text. Imagine sharing your experience in 4k
For Win 7 or later (64-bit)
For macOS 10.12 or later
Part 3 Top 10 Picks of Discord Gaming Bots
01Karuta
Karuta is a discord game bot where you gather anime characters. In Karuta, though, you collect characters using trading cards. Your cards and other objects may be customized, upgraded, and traded with other players. Better still, you maintain the same cards between servers, allowing you to play Karuta with the same deck on any server where the game discord bot is!
02Dragon Bot Z
Dragon Bot Z is the discord bot game that adds discord Ball Z, a multiplayer text-based RPG, to your server. Players in Discord Ball Z summon characters from the iconic Dragon Ball Z franchise, train them, fight foes, buy equipment, and trade with other players. This Discord game is ideal for Dragon Ball fans or anybody who likes text-based roleplaying games.
03Mudae
Mudae is a bot discord game with character-collecting. For example, you can claim popular anime and videogame characters as your “waifus” or “husbandos,” develop your harem, and compete for your favorite characters with other users. You can also trade the characters with other members.
04Rock Puppy
Rock Puppy is a basic yet entertaining game bots discord bot that incorporates several classic games. You can enjoy Discord games like ConnectFour, Truth or Dare, Trivia, Tic-Tac-Toe, Russian Roulette, and Would You Rather with Rock Puppy. You may also use magic 8-ball, dice, or tarot cards, play classic board and party games on your server with Rock Puppy.
05GarticBOT
GarticBot is a bot game in discord that allows you to play the drawing game Gartic. GarticBot begins the Discord game by painting an image on your server. Members then compete against one another to predict the image the quickest. Others can guess your drawings if you submit them. Type the command g.draw, and Gartic will provide you with a URL to submit your artwork. GarticBot creates a fun Pictionary-style game for everyone on your server to play.
06TriviaBot
TriviaBot is the most popular trivia game discord bot. It has over 90,000 questions, and you can even submit your own for inclusion in the bot. Members can form and join teams to compete in competitions. You may also create a public leaderboard to display who performs the best on the server.
07GamesRob
The finest Uno discord game bot is GamesROB. ConnectFour, Trivia, Battleship, 2048, Tic-Tac-Toe, Minesweeper, and Hangman are the other traditional party games added to discord. You may also play “Detective,” a Discord game in which you try to figure out who is the “assassin” on your server, memory games, and Town, Country, River, a game in which you try to come up with as many phrases as possible within a theme.
08Chess Reddit
Chess is a simple game that allows you to play chess on discord. You may play a chess game with other server members directly on the server. Instruct the bot on which pieces to move and where they should go. After each move, the Discord game bot creates a fresh graphic of the board so you can plot your next move. And, because the game hosts on your server, other users may watch and debate it!
09PokeMeow
PokeMeow is by far the most popular Pokemon game discord bot. With this Pokemon bot, you may capture Pokemon on your server, trade, battle with other players, and accomplish tasks for in-game currency and stuff. As you keep building up your Pokedex, the Pokemon bot also allows to compete with other users on the worldwide leaderboard! PokeMeow is the ideal Pokemon Discord bot for fans of the Pokemon series.
10IdleRPG
IdleRPG is a discord game where you may play a text-based roleplaying game. You may make your character complete with ethnicity and social status. Then, you can go on quests and combat beasts, purchase, and exchange mythic objects, join guilds, engage with gods, and even marry other players. Play through your character’s adventure while engaging with and creating stories with other players. IdleRPG is likely to provide your server with hundreds of hours of roleplaying pleasure.
Part 4 Discord Game Bots FAQs
Now, let us go through some FAQs about discord game bots:
Q. Is it possible to play games with discord bots?
A. You could indeed play discord games in-server with bots, challenge other members, and win prizes! A game bot is a terrific method to keep players engaged on your server, especially if it’s a gaming Discord channel.
Q. Do game bots spy on you?
A. No, game discord bots do not have inbuilt spyware.
Q. How many bots should a server have?
A. It’s best not to have more than 20 bots game on discord on a server at any moment. More bots than this may cause users to become confused and the service to seem suspicious.
Q. Are discord bots free?
A. All these discord game bots are free to use. However, some have premium upgrades.
Q. Which bot is the most popular game bot in discord?
A. Worddle
Q. Which bot is the best bot for gaming on discord?
A. Gawesome is an excellent alternative for adding a multifunctional bot to your discord server.
● Ending Thoughts →
● Discord is accessible communication and socializing service for individuals aged 13 and above.
● The platform extends to various servers, each with its users, rules, themes, and channels, but one underutilized feature is the ability to develop and code custom AI-powered bots.
● Game bots for discord are artificial intelligence (AI)-powered applications that automate processes and add games to your discord server.
● These game discord bots make it simple to interact with your audience, grow your community, and manage your server.
● Lastly, to enhance the discord game bots experience and bring your gaming videos to life, use the Filmora software.
Top 5 Tools to Help You Know More Freeze-Frame Video Editing Skills
Best 5 Tools to Help You Know More Freeze Frame Video Editing Skills
An easy yet powerful editor
Numerous effects to choose from
Detailed tutorials provided by the official channel
The freeze-frame video editing effect is a technique used to stop the moving image of a video and hold it still onscreen. This effect aims to pause the world the video is living in and allow the audience to process the scene and gain more context fully. Note that the world around us keeps ongoing, and time never stops. But luckily for us, we can pause film and video with a simple but powerful video effect known as the freeze-frame.
In addition, a freeze-frame can be carried out in a video to showcase a specific frame in your clip by extending the length of Time that frame is displayed. For example, you can decide to freeze a frame to show the video frame where a goal is being scored in a sporting event or use it to showcase a captured reaction or a smile. When a freeze-frame applies to a video clip, the clip automatically splits at the freezing point, and the chosen frame is inserted as an image file (BMP) and displayed on screen for the duration you set. This article will teach how to use the freeze-frame editing service ideally.
In this article
01 [How to Add a Freeze-frame to Video Clips in all Tools](#Part 1)
02 [SUPER COOL Freeze-frame Effect with Filmora 11](#Part 2)
Part 1 How to Add a Freeze-frame to Video Clips in all Tools
Do you want to draw your audience’s attention to a point or for dramatic flair by stopping your video and holding on to a single frame? This section will give you the best tools for freeze-frame editing via a step-by-step guide on how to do it.
01After Effects
Here is a step-by-step guide on how to Freeze-frame in After Effects:
Step 1: Download After Effects
Download and install Adobe After Effects and open it on your desktop. This software works with both macOS and Windows.

Step 2: New Composition
Next is to open a new project or drag and drop your video and add it to the timeline. Another way is to click on “New Composition from Footage” and then browse the video you want to edit.

Step 3: Select the Frame
There is a Playhead or slider above the slide, which will help you to select the frame needed to be frozen. Press the “Space bar” to play and pause the video. Then, with the help of the slider, select the frame and pause the video at that instant.

Step 4: Create a New Layer
After you pause the video at the place you want to freeze, Press “Ctrl + Shift + D” to cut the video at that instant, then another layer of the video will add just after the moment.

Step 5: Freeze the Frame
Next is to right-click on the layer, and the settings will pop up. Go to Time> Freeze-frame, and your selected frame will get frozen.

Step 6: Save the Video
Finally, go to File > Export to save the video per your PC requirement.
02** Wondershare Filmora Video Editor
For Win 7 or later (64-bit)
For macOS 10.12 or later
Here is a step-by-step guide on how to Freeze-frame in Wondershare Filmora:
Step 1: Import your media files
After installing the software on your PC, drag and drop all files into the primary window or click on “Import” to browse your file folder. Also, this program supports a variety of media files, including MP4, MKV, WMV, MOV, DV, AVI, MTS, TS, 3GP, M4V, etc. After uploading the video, drag them to the Video Timeline.

Step 2: Freeze video with ease
Now play the video clip you want to add freeze-frame and pause it when it comes to the correct position. Then click the “Snapshot” icon under the Viewer panel. Immediately, a picture will add to the media library. Drag and drop the Picture to the PIP track over the main video track, and set the duration of the still image.

Step 3: Save your video
When satisfied with your result, click “Export” to export your video. In the pop-up window that appears, please select the file format options to save onto your computer, or you can directly upload it to Twitter, YouTube, or Facebook, to share with your family and friends.

03Premiere Pro
Here is a step-by-step guide on how to Freeze-frame in Premiere Pro using a video frame for the duration of a clip:
Step 1: Download Premiere Pro
Download and install Adobe Premiere Pro on your PC and open it to start editing your video. Import video to Premiere Pro and drag and drop to the timeline.
Step 2: Select a clip in a Timeline panel.
To freeze a frame using other methods than the In or Out point, open the video portion in the Source Monitor, and set the Marker 0 (zero) to the frame you wish to pause in the video.
Step 3: Choose Clip > Video Options > Frame Hold.
Next is to tap Hold On and select the frame you want to hold from the menu. However, you can choose the frame based on Source Timecode, In Point, Out Point, Sequence Timecode, or Playhead position.
Step 4: Finally, specify “Hold Filters” and click OK.
Effect settings use the values at the holding frame to prevent keyframed effect settings (if any are present) from animating during the clip’s duration.

04Kapwing
Step 1: Upload and edit your video with Kapwing.
Choose to “Get Started,” upload a file from your device, or paste a video link from a third-party site like YouTube, Vimeo, or TikTok. In any case, you’ll be whisked away to your very own video editing studio.

Step 2: Give your video a freeze-frame effect.
Select the “Timing” tab in the right navigation bar and click “Freeze Frame” after uploading your video to Kapwing.
In Kapwing, you may add a freeze-frame to a video.
As you can see, clicking “Freeze Frame” instantly creates an image layer for the frame your timeline slider was on. Click on the image layer and choose from the “Duration” dropdown option under the “Edit” tab in the right navigation bar to change the length of the freeze-frame. Alternatively, you may drag the image layer onto your timeline by clicking and dragging it.
That’s all there is to it!

05Animotica
Step 1: Creating a New Project
To begin, open your video editor and select Create a New Project. Choose Empty Project, give your project a name, and click the Create a New Project button.

Step 2: Selecting the Video to Freeze
Select Add Video/Photo Clips from the drop-down menu.
You can add video clips to Animotica by navigating to where you saved your video clip, selecting it, and opening it. You’ll now return to the project window, where your video will display. You can enable a wide range of enhancing options by tapping on the video clip with your mouse.

Step 3: The Freeze Effect
To activate your options, tap on the video clip. You must now decide which segment of the video you want to freeze. To make things easy for you, press the play and pause buttons when you reach the part you want to freeze.
Take a picture of the video by dragging your pointer down to the camera icon and pressing it to take a photo while keeping the clip paused, where you want it to be frozen. When you do that, a menu of three options will appear; select Take Snapshots and Insert in Current Position. This choice will split the movie in half and insert the scene you just recorded in the middle, resulting in a freeze.

Part 2 SUPER COOL Freeze-frame Effect with Filmora 11
With no prior experience in video editing, you may get started right away.
Filmora 11 is a scalable experience built for new and seasoned content creators who want freeze-frame editing. You may start cutting and editing your videos like an expert, even if you’re a beginner, and access anything you need from the toolbar once the software launches on your computer, including media, audio, titles, effects, split-screen formatting, elements, and transitions.
Hundreds of extra alternatives are available for each of these elements, which you can drag and drop over your chosen film. You can also use the scissors symbol to cut the movie by pausing on a specific frame within your shot and clicking it. Filmora 11 also comes with pre-set aspect ratios and resolutions for your chosen media to get started right away.
● Ending Thoughts →
● This article provided users with a guide to using Mac and Windows video editor freeze-frame for your video effects. Aside from the editor listed here, Movavi video editor freeze-frame and other editors are available on the Internet.
● However, the ones listed in this blog are our top picks for the best you can use. In addition, Filmora is the best freeze-frame effect editor with a lot of effects you can use in your video editing
The freeze-frame video editing effect is a technique used to stop the moving image of a video and hold it still onscreen. This effect aims to pause the world the video is living in and allow the audience to process the scene and gain more context fully. Note that the world around us keeps ongoing, and time never stops. But luckily for us, we can pause film and video with a simple but powerful video effect known as the freeze-frame.
In addition, a freeze-frame can be carried out in a video to showcase a specific frame in your clip by extending the length of Time that frame is displayed. For example, you can decide to freeze a frame to show the video frame where a goal is being scored in a sporting event or use it to showcase a captured reaction or a smile. When a freeze-frame applies to a video clip, the clip automatically splits at the freezing point, and the chosen frame is inserted as an image file (BMP) and displayed on screen for the duration you set. This article will teach how to use the freeze-frame editing service ideally.
In this article
01 [How to Add a Freeze-frame to Video Clips in all Tools](#Part 1)
02 [SUPER COOL Freeze-frame Effect with Filmora 11](#Part 2)
Part 1 How to Add a Freeze-frame to Video Clips in all Tools
Do you want to draw your audience’s attention to a point or for dramatic flair by stopping your video and holding on to a single frame? This section will give you the best tools for freeze-frame editing via a step-by-step guide on how to do it.
01After Effects
Here is a step-by-step guide on how to Freeze-frame in After Effects:
Step 1: Download After Effects
Download and install Adobe After Effects and open it on your desktop. This software works with both macOS and Windows.
Step 2: New Composition
Next is to open a new project or drag and drop your video and add it to the timeline. Another way is to click on “New Composition from Footage” and then browse the video you want to edit.
Step 3: Select the Frame
There is a Playhead or slider above the slide, which will help you to select the frame needed to be frozen. Press the “Space bar” to play and pause the video. Then, with the help of the slider, select the frame and pause the video at that instant.
Step 4: Create a New Layer
After you pause the video at the place you want to freeze, Press “Ctrl + Shift + D” to cut the video at that instant, then another layer of the video will add just after the moment.
Step 5: Freeze the Frame
Next is to right-click on the layer, and the settings will pop up. Go to Time> Freeze-frame, and your selected frame will get frozen.
Step 6: Save the Video
Finally, go to File > Export to save the video per your PC requirement.
02** Wondershare Filmora Video Editor
For Win 7 or later (64-bit)
For macOS 10.12 or later
Here is a step-by-step guide on how to Freeze-frame in Wondershare Filmora:
Step 1: Import your media files
After installing the software on your PC, drag and drop all files into the primary window or click on “Import” to browse your file folder. Also, this program supports a variety of media files, including MP4, MKV, WMV, MOV, DV, AVI, MTS, TS, 3GP, M4V, etc. After uploading the video, drag them to the Video Timeline.
Step 2: Freeze video with ease
Now play the video clip you want to add freeze-frame and pause it when it comes to the correct position. Then click the “Snapshot” icon under the Viewer panel. Immediately, a picture will add to the media library. Drag and drop the Picture to the PIP track over the main video track, and set the duration of the still image.
Step 3: Save your video
When satisfied with your result, click “Export” to export your video. In the pop-up window that appears, please select the file format options to save onto your computer, or you can directly upload it to Twitter, YouTube, or Facebook, to share with your family and friends.
03Premiere Pro
Here is a step-by-step guide on how to Freeze-frame in Premiere Pro using a video frame for the duration of a clip:
Step 1: Download Premiere Pro
Download and install Adobe Premiere Pro on your PC and open it to start editing your video. Import video to Premiere Pro and drag and drop to the timeline.
Step 2: Select a clip in a Timeline panel.
To freeze a frame using other methods than the In or Out point, open the video portion in the Source Monitor, and set the Marker 0 (zero) to the frame you wish to pause in the video.
Step 3: Choose Clip > Video Options > Frame Hold.
Next is to tap Hold On and select the frame you want to hold from the menu. However, you can choose the frame based on Source Timecode, In Point, Out Point, Sequence Timecode, or Playhead position.
Step 4: Finally, specify “Hold Filters” and click OK.
Effect settings use the values at the holding frame to prevent keyframed effect settings (if any are present) from animating during the clip’s duration.
04Kapwing
Step 1: Upload and edit your video with Kapwing.
Choose to “Get Started,” upload a file from your device, or paste a video link from a third-party site like YouTube, Vimeo, or TikTok. In any case, you’ll be whisked away to your very own video editing studio.
Step 2: Give your video a freeze-frame effect.
Select the “Timing” tab in the right navigation bar and click “Freeze Frame” after uploading your video to Kapwing.
In Kapwing, you may add a freeze-frame to a video.
As you can see, clicking “Freeze Frame” instantly creates an image layer for the frame your timeline slider was on. Click on the image layer and choose from the “Duration” dropdown option under the “Edit” tab in the right navigation bar to change the length of the freeze-frame. Alternatively, you may drag the image layer onto your timeline by clicking and dragging it.
That’s all there is to it!
05Animotica
Step 1: Creating a New Project
To begin, open your video editor and select Create a New Project. Choose Empty Project, give your project a name, and click the Create a New Project button.
Step 2: Selecting the Video to Freeze
Select Add Video/Photo Clips from the drop-down menu.
You can add video clips to Animotica by navigating to where you saved your video clip, selecting it, and opening it. You’ll now return to the project window, where your video will display. You can enable a wide range of enhancing options by tapping on the video clip with your mouse.
Step 3: The Freeze Effect
To activate your options, tap on the video clip. You must now decide which segment of the video you want to freeze. To make things easy for you, press the play and pause buttons when you reach the part you want to freeze.
Take a picture of the video by dragging your pointer down to the camera icon and pressing it to take a photo while keeping the clip paused, where you want it to be frozen. When you do that, a menu of three options will appear; select Take Snapshots and Insert in Current Position. This choice will split the movie in half and insert the scene you just recorded in the middle, resulting in a freeze.
Part 2 SUPER COOL Freeze-frame Effect with Filmora 11
With no prior experience in video editing, you may get started right away.
Filmora 11 is a scalable experience built for new and seasoned content creators who want freeze-frame editing. You may start cutting and editing your videos like an expert, even if you’re a beginner, and access anything you need from the toolbar once the software launches on your computer, including media, audio, titles, effects, split-screen formatting, elements, and transitions.
Hundreds of extra alternatives are available for each of these elements, which you can drag and drop over your chosen film. You can also use the scissors symbol to cut the movie by pausing on a specific frame within your shot and clicking it. Filmora 11 also comes with pre-set aspect ratios and resolutions for your chosen media to get started right away.
● Ending Thoughts →
● This article provided users with a guide to using Mac and Windows video editor freeze-frame for your video effects. Aside from the editor listed here, Movavi video editor freeze-frame and other editors are available on the Internet.
● However, the ones listed in this blog are our top picks for the best you can use. In addition, Filmora is the best freeze-frame effect editor with a lot of effects you can use in your video editing
How to Use LUTs in Premiere Pro
Create High-Quality Video - Wondershare Filmora
An easy and powerful YouTube video editor
Numerous video and audio effects to choose from
Detailed tutorials provided by the official channel
Do you wonder how some pictures or videos look so stunning? As you keep reading you will discover the secrets of achieving similar quality for your content. You need a video or photo-editing software such as Adobe Premiere Pro and LUTS. Premier Pro luts are file types that you use to make color corrections to your content. They are available in different formats, each with varying capabilities. Below is everything you need to improve your editing skills using Adobe’s software and premiere luts.

In this article
01 How does Premiere Pro Classify LUTS?
02 How to use Luts in Adobe Premiere Pro?
03 How to save and export your LUTS?
How does Premiere Pro Classify LUTS?
A premiere pro lut can fall into two categories depending on its core function. These are:
• Looks
These are premiere luts you use to make changes to your video or photo’s appearance and color scheme. They are available as presets under the Lumetri Color Panel and offer quick fixes to your content.
• Input Lut
You use these premiere pro luts to interpret log footage. Additionally, they are the first step of your color correcting process and work best on DSLR footage. However, keep reading to discover how to use luts in Adobe Premiere Pro.
How to use Luts in Adobe Premiere Pro?
Now that you are aware of how the program classifies the Luts, here is how you can correct your footage.
1. Get the latest version of the program
You can purchase and download the program from your region’s Adobe Website. The program is available for both macOS and Windows. However, it is quite heavy on the system. According to reports, the below requirements are sufficient.
- You need a processer with 8 cores and clock speeds upwards of 3.2GHz.
- 16 GB of Ram is ideal for macOS. However, you do require upwards of 32GB if you are running Windows.
- Graphics cards from Nvidia and AMD are best if you also want to improve the program’s performance. You request one that can handle the Adobe Premiere Pro from your supplier.
- Furthermore, invest in a high-capacity storage device to save your projects since some outputs can be very large after color correction. The program allows you to render 4K files which are the largest.
- Finally, the above requirements are sufficient to run the following versions OF Adobe Premiere Pro:
i. Adobe Premiere Pro 22.2
ii. Adobe Premiere Pro 22.1.2
iii. Adobe Premiere Pro 22.1.1
iv. Adobe Premiere Pro 22.0
2. Select the video you want and put it on the timeline

3. Premiere luts are accessible from two sections of the program
Input luts are available under the Basic Correction tab from the Lumetri Panel as above.
Alternatively, you can get them by accessing the Basic Correction tab from the Lumetri Section of the Effects Control Panel.
4. Then, open the Input LUT dropdown menu and choose the premiere lut you want
Adobe Premiere Pro has preset input LUTs. However, you can also add your own by clicking browse. Doing so opens your computer’s File Explorer and you can locate your custom premiere luts. The software applies the premiere lut, after which you can use the tools to make adjustments.
Additionally, Adobe Premiere Pro allows you to install custom LUT files to use. Below is the process for macOS users.
- Create these target directories in your Adobe Premiere Installation files. • For shared devices
/Library/Application Support/Adobe/Common/LUTs/Creative
/Library/Application Support/Adobe/Common/LUTs/Technical
• You need to create these files if you have administrator access.
/Users//Library/Application Support/Adobe/Common/LUTs/Creative
/Users//Library/Application Support/Adobe/Common/LUTs/Technical - Copy your custom LUT files to each of the folders.
- These will be available in your Lumetri Panel next time you launch Adobe Premiere Pro.
The process is the same for Windows Users. However, the target directories are different.
- For shared devices:
C:\ Program Files\ Adobe\Common\LUTs\Creative
C:\ Program Files\ Adobe\Common\LUTs\Creative - You need to create these files if you have administrator access.
C:\Users\yourusername\AppData\Roaming\Adobe\Common\LUTs\Creative
C:\Users\yourusername\AppData\Roaming\Adobe\Common\LUTs\Technical
Adobe Premiere Pro accepts .look and .cube file types, allowing you more creative freedom. Additionally, you can save and export any custom premiere luts to use in other projects. The next section offers a step-by-step guide on how to do that.
Finally, Looks allow you to make quick adjustments to your videos using the presets available on the Lumetri Panel. You can access these from the Effects Panel. Furthermore, it also allows you to preview the result. The intensity of the look can vary depending on where the slider is on the effects panel.
How to save and export your LUTS?
Most filmmakers prefer to save their premier luts for later use. Here is how to do it:
- Follow the above process through to step 5.
- Once you finish your editing, click on the Lumetri Pop Up menu and choose Save Preset.
- Fill the respective fields with your custom information and click OK. The program will then save the clip to the location you specify.
- You can save custom luts in the following ways:
Scale only applies the new lut to the video. As such, all other luts you use are deleted. Therefore, if your video is one hour, your custom settings will run through the clip’s entire length.
Anchor To In Point only saves the section of the clip where your custom settings are active. Additionally, the software will add all pre-existing luts to the section without scaling. - Additionally, you can repeat the process and export your LUTs in the following formats:
.look exports the LUT as an Adobe Premiere Pro file to a location on your device.
.cube saves the Lumetri preset you can use on other color grading software. For example, you can use your .cube custom lut with Filmora.

For Win 7 or later (64-bit)
For macOS 10.12 or later
Finally, the above procedures only apply to certain versions of Adobe Premiere Pro. They may differ across devices. This is because Adobe releases new updates regularly to fix bugs and offer new functionality. So, keep checking regularly for any changes.
Conclusion
●Adobe Premiere Pro offers you fun luts to enhance the quality of your video. Additionally, the option to render videos in 4K quality allows you to output creations of the highest quality. Additionally, the option to save and export your LUTS to use with other programs like Filmora, means there is no limit to what you can create. Here is a link to some LUTs you can try on your next edit.
Do you wonder how some pictures or videos look so stunning? As you keep reading you will discover the secrets of achieving similar quality for your content. You need a video or photo-editing software such as Adobe Premiere Pro and LUTS. Premier Pro luts are file types that you use to make color corrections to your content. They are available in different formats, each with varying capabilities. Below is everything you need to improve your editing skills using Adobe’s software and premiere luts.
In this article
01 How does Premiere Pro Classify LUTS?
02 How to use Luts in Adobe Premiere Pro?
03 How to save and export your LUTS?
How does Premiere Pro Classify LUTS?
A premiere pro lut can fall into two categories depending on its core function. These are:
• Looks
These are premiere luts you use to make changes to your video or photo’s appearance and color scheme. They are available as presets under the Lumetri Color Panel and offer quick fixes to your content.
• Input Lut
You use these premiere pro luts to interpret log footage. Additionally, they are the first step of your color correcting process and work best on DSLR footage. However, keep reading to discover how to use luts in Adobe Premiere Pro.
How to use Luts in Adobe Premiere Pro?
Now that you are aware of how the program classifies the Luts, here is how you can correct your footage.
1. Get the latest version of the program
You can purchase and download the program from your region’s Adobe Website. The program is available for both macOS and Windows. However, it is quite heavy on the system. According to reports, the below requirements are sufficient.
- You need a processer with 8 cores and clock speeds upwards of 3.2GHz.
- 16 GB of Ram is ideal for macOS. However, you do require upwards of 32GB if you are running Windows.
- Graphics cards from Nvidia and AMD are best if you also want to improve the program’s performance. You request one that can handle the Adobe Premiere Pro from your supplier.
- Furthermore, invest in a high-capacity storage device to save your projects since some outputs can be very large after color correction. The program allows you to render 4K files which are the largest.
- Finally, the above requirements are sufficient to run the following versions OF Adobe Premiere Pro:
i. Adobe Premiere Pro 22.2
ii. Adobe Premiere Pro 22.1.2
iii. Adobe Premiere Pro 22.1.1
iv. Adobe Premiere Pro 22.0
2. Select the video you want and put it on the timeline
3. Premiere luts are accessible from two sections of the program
Input luts are available under the Basic Correction tab from the Lumetri Panel as above.
Alternatively, you can get them by accessing the Basic Correction tab from the Lumetri Section of the Effects Control Panel.
4. Then, open the Input LUT dropdown menu and choose the premiere lut you want
Adobe Premiere Pro has preset input LUTs. However, you can also add your own by clicking browse. Doing so opens your computer’s File Explorer and you can locate your custom premiere luts. The software applies the premiere lut, after which you can use the tools to make adjustments.
Additionally, Adobe Premiere Pro allows you to install custom LUT files to use. Below is the process for macOS users.
- Create these target directories in your Adobe Premiere Installation files. • For shared devices
/Library/Application Support/Adobe/Common/LUTs/Creative
/Library/Application Support/Adobe/Common/LUTs/Technical
• You need to create these files if you have administrator access.
/Users//Library/Application Support/Adobe/Common/LUTs/Creative
/Users//Library/Application Support/Adobe/Common/LUTs/Technical - Copy your custom LUT files to each of the folders.
- These will be available in your Lumetri Panel next time you launch Adobe Premiere Pro.
The process is the same for Windows Users. However, the target directories are different.
- For shared devices:
C:\ Program Files\ Adobe\Common\LUTs\Creative
C:\ Program Files\ Adobe\Common\LUTs\Creative - You need to create these files if you have administrator access.
C:\Users\yourusername\AppData\Roaming\Adobe\Common\LUTs\Creative
C:\Users\yourusername\AppData\Roaming\Adobe\Common\LUTs\Technical
Adobe Premiere Pro accepts .look and .cube file types, allowing you more creative freedom. Additionally, you can save and export any custom premiere luts to use in other projects. The next section offers a step-by-step guide on how to do that.
Finally, Looks allow you to make quick adjustments to your videos using the presets available on the Lumetri Panel. You can access these from the Effects Panel. Furthermore, it also allows you to preview the result. The intensity of the look can vary depending on where the slider is on the effects panel.
How to save and export your LUTS?
Most filmmakers prefer to save their premier luts for later use. Here is how to do it:
- Follow the above process through to step 5.
- Once you finish your editing, click on the Lumetri Pop Up menu and choose Save Preset.
- Fill the respective fields with your custom information and click OK. The program will then save the clip to the location you specify.
- You can save custom luts in the following ways:
Scale only applies the new lut to the video. As such, all other luts you use are deleted. Therefore, if your video is one hour, your custom settings will run through the clip’s entire length.
Anchor To In Point only saves the section of the clip where your custom settings are active. Additionally, the software will add all pre-existing luts to the section without scaling. - Additionally, you can repeat the process and export your LUTs in the following formats:
.look exports the LUT as an Adobe Premiere Pro file to a location on your device.
.cube saves the Lumetri preset you can use on other color grading software. For example, you can use your .cube custom lut with Filmora.
For Win 7 or later (64-bit)
For macOS 10.12 or later
Finally, the above procedures only apply to certain versions of Adobe Premiere Pro. They may differ across devices. This is because Adobe releases new updates regularly to fix bugs and offer new functionality. So, keep checking regularly for any changes.
Conclusion
●Adobe Premiere Pro offers you fun luts to enhance the quality of your video. Additionally, the option to render videos in 4K quality allows you to output creations of the highest quality. Additionally, the option to save and export your LUTS to use with other programs like Filmora, means there is no limit to what you can create. Here is a link to some LUTs you can try on your next edit.
Also read:
- Updated How to Make Loop Video in PowerPoint
- Why Did Filmora AI Portrait Attract People for 2024
- Easiest Fix Included! Top 5 Ways to Convert HDR to SDR Videos for 2024
- 2024 Approved Extracting Audio From Videos Is a Key to Better Storytelling. Learn How Filmoras Audio Removal Feature Can Enhance Your Video Stories
- Add Selective Color Effect to Your Videos Using Filmora
- 2024 Approved How to Overlay Video in Premiere Pro
- New In 2024, How to Create a Slideshow GIF?
- New In 2024, How to Become a Youtuber
- In 2024, Best Tips for Camtasia Freeze-Frame
- In 2024, What Are The Stages Of Film Production
- Learn How to Slow Down Time-Lapse Videos on iPhone to Make Detailed and Captivating Slow-Motion Effects in Your Time-Lapse Captures
- In 2024, Looking for the Best Way to Create Stunning Video Animations? Here, We Look at some of the Best Animated Video Maker Solutions to Use
- Updated What Is Animated GIF
- If the Phenomenon of Augmented Reality Fascinates You, Consider Entering Into the Gaming World with the Best AR Games You Will Ever Come Across
- Top 10 Sound Extractors to Extract Sound From Video 2023 for 2024
- New Stunning Glitch Effect and Its Creation Steps for Premiere Pro
- How to Make Falling Text Effect in Filmora, In 2024
- New 2024 Approved Unraveling How the Slow Motion Guys Have Revolutionized The Slow Motion Game
- Fixes | What If YouTube Zoom to Fill Not Working?
- 2024 Approved Top 8 Sites to Download Glitch Transition for Premiere Pro
- How to Put a Filter on a Video in iMovie
- Updated Best 10 Options Slow Down Video Online with Perfection
- New A Complete Guideline About QuickTime Player for 2024
- In 2024, AI Features of Filmora - Silence Detection in Videos
- Updated How Can You Get VHS Filter and Glitch Filter to Your Images or Videos?
- 2024 Approved Do You Know There Are Websites to Download Free Glitch Transition Effects for Premiere Pro? You Can Easily Download Them and Make Awesome Videos
- New 2024 Approved Final Cut Pro for iPad- Is It Available?
- Updated The Way to Make Dynamic Video Collages for 2024
- New How to Turn Text Into a Podcast
- New In 2024, Best 10 Tools To Make Quiz Videos
- Spoofing Life360 How to Do it on Itel A70? | Dr.fone
- In 2024, Detailed guide of ispoofer for pogo installation On Motorola Moto G73 5G | Dr.fone
- In 2024, 10 Easy-to-Use FRP Bypass Tools for Unlocking Google Accounts On Samsung
- 2024 Approved Top 10 Free Football Streaming Websites for Live Matches
- In 2024, How I Transferred Messages from OnePlus Nord CE 3 Lite 5G to iPhone 12/XS (Max) in Seconds | Dr.fone
- The Ultimate Guide to Get the Rare Candy on Pokemon Go Fire Red On OnePlus Ace 2 | Dr.fone
- In 2024, How to Screen Mirroring Nubia Z50 Ultra? | Dr.fone
- Complete guide for recovering messages files on Tecno
- How to Fix Error 495 While Download/Updating Android Apps On Lava Agni 2 5G | Dr.fone
- How to Fake Snapchat Location without Jailbreak On Meizu 21 Pro | Dr.fone
- In 2024, How to Share/Fake Location on WhatsApp for OnePlus Nord CE 3 Lite 5G | Dr.fone
- How to Fake Snapchat Location on Samsung Galaxy M34 5G | Dr.fone
- In 2024, 9 Mind-Blowing Tricks to Hatch Eggs in Pokemon Go Without Walking On Samsung Galaxy S24+ | Dr.fone
- How to Screen Mirroring Vivo Y200 to PC? | Dr.fone
- 4 Easy Ways for Your Motorola Defy 2 Hard Reset | Dr.fone
- The Best iSpoofer Alternative to Try On Xiaomi Civi 3 | Dr.fone
- In 2024, Top 10 Telegram Spy Tools On Lava Blaze Curve 5G for Parents | Dr.fone
- Undelete lost music from Honor Magic Vs 2
- Title: Updated Learn How to Feather Shapes in After Effects and Add a Professional Touch to Your Designs. This Comprehensive Guide Covers Everything From the Basics to Advanced Techniques. Perfect for Beginners and Experts Alike
- Author: Chloe
- Created at : 2024-06-18 14:31:13
- Updated at : 2024-06-19 14:31:13
- Link: https://ai-editing-video.techidaily.com/updated-learn-how-to-feather-shapes-in-after-effects-and-add-a-professional-touch-to-your-designs-this-comprehensive-guide-covers-everything-from-the-basics/
- License: This work is licensed under CC BY-NC-SA 4.0.
