
:max_bytes(150000):strip_icc():format(webp)/GettyImages-591408071-5bc7767d4cedfd0026a2ce3f.jpg)
Updated Looking for the Steps to Add Transitions Effects in Premiere Pro? Here Are the Steps to Add and Edit Transitions in Premiere Pro and an Alternative Way to Video Transitions
Looking for the Steps to Add Transitions Effects in Premiere Pro? Here Are the Steps to Add and Edit Transitions in Premiere Pro and an Alternative Way to Video Transitions
Shooting a video is a job half done and editing the video is equally important. The way you edit your recorded video determines how good your video will look in the end. When it comes to professional video editing, Adobe Premiere Pro is the most preferred premium video editor. Premiere Pro comes with a wide range of transitions to apply in your videos and make jump-cuts smooth for the eyes.
Premiere Pro is not the most user-friendly video editor, and the learning curve is rather steep. That is why you need to know how to add transitions in Premiere accurately so that the cuts in your videos look eye-soothing. You also need to learn about how to edit the transition effects in Premier Pro to suit your requirements and preferences. We have illustrated how to add and edit transitions in Premium Pro as well as mentioned an alternative way to add video transitions easily.
Part 1. How to add transitions in Premiere
Adding transitions to videos is very common in video editing. Premiere Pro is popular for its variety of video transition effects. Applying video transition effects in Premiere Pro is very easy. You get access to transitions from Effects panel that is located at the topmost bar. Here are the steps on how to add transition effects in Premiere Pro.
Step1 Open Adobe Premiere Pro and go to File> Import. Select a video clip from your hard drive and click on Open button.

Step2 Drag the video clip from the Project panel and drop it to Timeline for adding transitions.

Step3 Go to Effects tab located at the top and click on Video transitions option.

Step4 You will see different categories of video transitions and select your desired transition.
Step5 Click and drag the selected transition and drop it to the Timeline and place it anywhere on the clip where you want the transition to play.

Generally, a video transition is placed in between two video clips so that jumping from one clip to another is seamless. After placing the transition, play the video to check out how it looks.
Part 2. How to edit transitions in Premiere
Now that you know how to add transition Premiere Pro, you should also know how to edit the transitions after applying them. This is because when you drag and drop the transition on the Timeline, the transition comes with default duration. You can edit the duration as per your video requirements. Besides, Premiere Pro lets you edit different settings of the video transitions for customization. Here are the steps on how to edit transitions in Premiere.
Step1 Click on the transition you have applied on the Timeline.
Step2 Go to Effect Controls tab located at the top by the side of Effects tab.
Step3 You will see a mini timeline under Effect Controls and labels A and B denoting the start and end time.

Step4 You can adjust the slider below A label to change the start time of the transition. Similarly, you can change the slider below B label to change the end time of the transition.
Step5 Instead of setting the start and end time of the transition, you can set the duration of the transition as a whole. Go to Duration option located above A and B labels and drag right and left to change the duration.

Step6 You can also change the Alignment to place the transition as a Center at cut, Star at Cut, and End at cut of video clips.

You can play the video and watch the changes you make to the transitions in real-time. Different transitions will have different options under Effect Controls tab.
Part 3. Premiere alternative way to add video transitions
There could be multiple reasons why you are looking for a Premiere alternative ways to add video transitions. You might be finding Premiere Pro difficult to learn. Besides, you may not be satisfied with the collection of video transitions in Premiere Pro. We recommend Wondershare Filmora as the best Premiere alternative to add video transitions to your video clips.
Filmora is a professional video editor like Premiere Pro but there are more transition effects available. Filmora team keeps on adding latest and trending transitions from time to time and you can download them easily. In fact, Filmora is a more user-friendly video editor in comparison to Premiere Pro. That is why Filmora is equally popular among beginners and professionals in video editing. Here is how to add video transitions in Filmora .
Free Download For Win 7 or later(64-bit)
Free Download For macOS 10.14 or later
Step1 Open Filmora and click on New Project. Drag and drop your video clips under Project Media folder.

Step2 Drag and drop the video clips on Timeline. If it is one video clip, you can cut it into multiple clips to add transitions in between them.

Step3 There are different categories of transition effects and drag and drop your desired transition on the Timeline.

Step4 Place the transitions in between video clips and drag the transition as per the duration requirements. Play the video and once you are satisfied, click on Export button to save the video.

Part 4. Related FAQs about Premiere Transitions
How do I add transitions to all clips in Premiere?
Import all the video clips to Timeline in Premiere. Go to Effects> Video Transitions and drag and drop the video transitions of your choice to Timeline. You should place the transitions in between the video clips and adjust their duration as per your requirements for smoother transition for jump cuts.
Where are the transitions in Premiere Pro?
The transitions are present under Effects tab located at the topmost bar. There are different types of video transitions as well as audio transitions available. If you are looking for how to add text transitions in Premiere Pro, you can type the text and add effects from Graphics tab.
How to add transitions to photos in Premiere Pro?
Adding transitions to photos in Premiere Pro is the same as videos. Therefore, you should import photos to Project panel and drag and drop them to Timeline. Go to Effects> Video Transitions and drop the selected transitions in between the photos.
Conclusion
We have illustrated how to add a transition in Premiere in simple steps. Besides, we have also explained how to edit the transitions in Premiere to fit in your video clips perfectly. If you are looking for an alternative to Premiere Pro for adding video transitions, we recommend Wondershare Filmora where there are more transitions, and the user interface is super easy and intuitive.
Free Download For macOS 10.14 or later
Step1 Open Filmora and click on New Project. Drag and drop your video clips under Project Media folder.
Step2 Drag and drop the video clips on Timeline. If it is one video clip, you can cut it into multiple clips to add transitions in between them.
Step3 There are different categories of transition effects and drag and drop your desired transition on the Timeline.
Step4 Place the transitions in between video clips and drag the transition as per the duration requirements. Play the video and once you are satisfied, click on Export button to save the video.
Part 4. Related FAQs about Premiere Transitions
How do I add transitions to all clips in Premiere?
Import all the video clips to Timeline in Premiere. Go to Effects> Video Transitions and drag and drop the video transitions of your choice to Timeline. You should place the transitions in between the video clips and adjust their duration as per your requirements for smoother transition for jump cuts.
Where are the transitions in Premiere Pro?
The transitions are present under Effects tab located at the topmost bar. There are different types of video transitions as well as audio transitions available. If you are looking for how to add text transitions in Premiere Pro, you can type the text and add effects from Graphics tab.
How to add transitions to photos in Premiere Pro?
Adding transitions to photos in Premiere Pro is the same as videos. Therefore, you should import photos to Project panel and drag and drop them to Timeline. Go to Effects> Video Transitions and drop the selected transitions in between the photos.
Conclusion
We have illustrated how to add a transition in Premiere in simple steps. Besides, we have also explained how to edit the transitions in Premiere to fit in your video clips perfectly. If you are looking for an alternative to Premiere Pro for adding video transitions, we recommend Wondershare Filmora where there are more transitions, and the user interface is super easy and intuitive.
Blender - A Video Editor for Every Professional
Video editing has become one of the most necessary steps in designing quality content because of the rise in popularity of video streaming platforms. There are nearly hundreds of video editing applications available in the market that facilitate video enhancement tools. And one such application is the Blender, which is available on both macOS and Windows. However, what makes this application stand out from others is its feature-loaded interface that can modify any ordinary video into cinematic clips.
Blender editor is a professional software used even by filmmakers to create stunning visual content as well as animated videos that can attract the attention of a larger audience. Its interface is very simple and easy to use which enables the new users to interact and learn with the different tools available in the application.
1. How to download and install Blender?
Blender is believed to be one of the most advanced and very capable video editors that have been used for over a decade now by content creators. The variety of options for import and export quality of any video content is what attracts most users. The tools are also very useful to all kinds of video content creators no matter the scale of their project. And if you want Blender download and installation on your device, then here is how you can do it:
First, go to the search bar of your web browser and type “Download Blender for Windows” or “Download Blender for macOS” depending on your PC operating system.
Then from the search results, click on the first result and navigate to the official website of Blender where you will see “Download Blender to Windows device” for Windows users.

For the macOS users, they will find the option to “Download Blender to Mac device”.
Click on that and the file will be downloaded to your PC over a short time. Then click on it and with the help of the installation wizard, allow the permissions for installation.

The installation will take some time and when it is finished, you will be able to edit videos using Blender without any difficulty.

2. Key Features of Blender
Some of the key features of Blender are as follows:
- Blender is an open-source application ready for your customization
- Easy-to-use interface with tutorial videos for different tools
- Real-time viewport availability with luma waveform
- Blender video editing provides the availability of both CPU & GPU rendering
- Multiple format support for both imports and export
- VR video editing support for 360° video contents
- Syncing, scrubbing, and easy audio mixing
- Powerful color grading tools for a cinematic look
3. How to edit videos with Blender?
Blender has an intuitive user interface that allows its users to interact with the different video editing tools to edit videos. It also provides tutorials for beginners who don’t know how to edit the videos. But sometimes all these varieties of tools may seem overwhelming. And if you are looking for a guide to editing videos using Blender, then you can follow these steps:
**Stepwise process

First, open the Blender application and when the interface opens, you will see the video preview mode on the top. At the bottom, you will find the video sequencing tool.

Now, drag and drop any media file that you want to edit and the cyan color will appear as an audio strip and the video strip will have a blue color.

Here, you can play the clip to view it, and then you are available with tools to cut, split, trim, and crop the video clips according to your preference. The green bar at the start and end of video clips is the intro and outro and dragging it you will be able to adjust the duration of your clips.
After you are done with the individual clips, you can sequence them as per your needs on the sequence bar available at the bottom of your screen.
You can change the default audio of your media files by clicking on the “Audio” option given in the menu bar and then selecting any audio track according to your preference.
After you are done with all the necessary modifications to your clips, you will need to click on the “Output” option on the left. Here you can change the path for your saved projects.
From the output menu, click on the “Animation’ option and then save your video. This will export your video to the desired location on your device.
4. Blender Alternative to Edit Videos
Blender is one of the most amazing video editors of all time and most video creators use it daily to edit their content. But for some reason, if you are looking at alternatives to Blender video editor, then Filmora can be a great replacement for this application. Filmora features some of the best video editing tools that are easy yet effective to use. And Filmora also comes with a free trial for you to test run the application and its several features.

Here is how you can download and install Filmora on your device:
For Win 7 or later (64-bit)
For macOS 10.12 or later
**Stepwise process
- First, go to your web browser and then search “Download Filmora for Windows” if you are using a Windows device. And if you are using an Apple device, then you will need to search for “Download Filmora for macOS”.
- Then you need to click on the first search result which will take you to the official website of Filmora. There you will see “Filmora for Windows” or “Filmora for macOS” depending on your device. Then click on that and you will be asked to choose between “Free trial” or “Buy Filmora” fordownloading the application.
- Choose the version you want to download for your device and after the application is downloaded to your PC. After that install the application and open it.
- Inside the Filmora interface, you will need to first click on “Create project” where you can import any media file to edit.
- The video clips will be shown on a timeline as thumbnails at the bottom of your screen. You can trim or crop the video clips from there. You are also available with the option to rearrange the clips according to your preference.
- After you are done with the sequence of the clips, you can add transitions, effects, and presets to the video clips to make them more attractive.
- Now you can add a music track or voice-over to the video and select the span of timeline for which you want the audio to be played.
- Before exporting you will have the option to change the video quality and framerate and when done, the changes will be saved. When you are done with all the changes, you need to click on the “Export” project to save it to your device.
5. FAQs about Blender
1.Is Blender video editor free to use?
Yes, Blender video editor is completely free to use and it doesn’t need any special payment for accessing any of its tools. You can search for the official Blender installation package and download it for free to edit your videos.
2.Can Blender edit 4K quality videos?
There are multiple quality and framerate support to import media files to Blender video editor and export them. And you can edit your 4K video contents by changing the settings inside the Blender application.
3.Is Blender good for beginners?
Yes, Blender video editor is very good for beginners since it features an easy-to-use intuitive user interface that can be used by almost anyone. And it also features tutorials that can help beginners understand the different tools of the Blender video editor.
Conclusion
The popularity of video streaming platforms has made the quality of content in videos very demanding. And this rise in demand for high-quality videos needs an appropriate video editor. The article discussed the downloading and installation process of Blender and the complete procedure of how you can use it to edit videos. Also, if you are looking for alternatives to Blender, then we have discussed the Filmora application and a complete stepwise guide about how you can use it.
3. How to edit videos with Blender?
Blender has an intuitive user interface that allows its users to interact with the different video editing tools to edit videos. It also provides tutorials for beginners who don’t know how to edit the videos. But sometimes all these varieties of tools may seem overwhelming. And if you are looking for a guide to editing videos using Blender, then you can follow these steps:
**Stepwise process
First, open the Blender application and when the interface opens, you will see the video preview mode on the top. At the bottom, you will find the video sequencing tool.
Now, drag and drop any media file that you want to edit and the cyan color will appear as an audio strip and the video strip will have a blue color.
Here, you can play the clip to view it, and then you are available with tools to cut, split, trim, and crop the video clips according to your preference. The green bar at the start and end of video clips is the intro and outro and dragging it you will be able to adjust the duration of your clips.
After you are done with the individual clips, you can sequence them as per your needs on the sequence bar available at the bottom of your screen.
You can change the default audio of your media files by clicking on the “Audio” option given in the menu bar and then selecting any audio track according to your preference.
After you are done with all the necessary modifications to your clips, you will need to click on the “Output” option on the left. Here you can change the path for your saved projects.
From the output menu, click on the “Animation’ option and then save your video. This will export your video to the desired location on your device.
4. Blender Alternative to Edit Videos
Blender is one of the most amazing video editors of all time and most video creators use it daily to edit their content. But for some reason, if you are looking at alternatives to Blender video editor, then Filmora can be a great replacement for this application. Filmora features some of the best video editing tools that are easy yet effective to use. And Filmora also comes with a free trial for you to test run the application and its several features.
Here is how you can download and install Filmora on your device:
For Win 7 or later (64-bit)
For macOS 10.12 or later
**Stepwise process
- First, go to your web browser and then search “Download Filmora for Windows” if you are using a Windows device. And if you are using an Apple device, then you will need to search for “Download Filmora for macOS”.
- Then you need to click on the first search result which will take you to the official website of Filmora. There you will see “Filmora for Windows” or “Filmora for macOS” depending on your device. Then click on that and you will be asked to choose between “Free trial” or “Buy Filmora” fordownloading the application.
- Choose the version you want to download for your device and after the application is downloaded to your PC. After that install the application and open it.
- Inside the Filmora interface, you will need to first click on “Create project” where you can import any media file to edit.
- The video clips will be shown on a timeline as thumbnails at the bottom of your screen. You can trim or crop the video clips from there. You are also available with the option to rearrange the clips according to your preference.
- After you are done with the sequence of the clips, you can add transitions, effects, and presets to the video clips to make them more attractive.
- Now you can add a music track or voice-over to the video and select the span of timeline for which you want the audio to be played.
- Before exporting you will have the option to change the video quality and framerate and when done, the changes will be saved. When you are done with all the changes, you need to click on the “Export” project to save it to your device.
5. FAQs about Blender
1.Is Blender video editor free to use?
Yes, Blender video editor is completely free to use and it doesn’t need any special payment for accessing any of its tools. You can search for the official Blender installation package and download it for free to edit your videos.
2.Can Blender edit 4K quality videos?
There are multiple quality and framerate support to import media files to Blender video editor and export them. And you can edit your 4K video contents by changing the settings inside the Blender application.
3.Is Blender good for beginners?
Yes, Blender video editor is very good for beginners since it features an easy-to-use intuitive user interface that can be used by almost anyone. And it also features tutorials that can help beginners understand the different tools of the Blender video editor.
Conclusion
The popularity of video streaming platforms has made the quality of content in videos very demanding. And this rise in demand for high-quality videos needs an appropriate video editor. The article discussed the downloading and installation process of Blender and the complete procedure of how you can use it to edit videos. Also, if you are looking for alternatives to Blender, then we have discussed the Filmora application and a complete stepwise guide about how you can use it.
Step by Step to Rotate Videos Using OBS
Obs is video editing software that is used to create and edit videos. It is a powerful tool that can be used to do a variety of things, such as add text, music, and special effects to videos. It also allows you to cut and trim videos, and to merge them with other videos. Additionally, obs allows you to live stream your videos, which can be a great way to share them with others. Overall, obs is a powerful tool that can be used to create and edit amazing videos.
The main interface of Obs Studio is relatively simple, and it is easy to use. The top of the screen contains a number of icons that allow you to access different features of the software, such as the video editor, the live streamer, and the settings. The bottom of the screen contains a timeline, which allows you to easily edit your videos. The timeline also contains a number of tools that allow you to trim your videos, add text and music, and more. Overall, the main interface of Obs Studio is simple and easy to use.
There are many benefits to using obs, including:
- It is free to download and use.
- It is a powerful tool that can be used to create and edit amazing videos.
- It allows you to live stream your videos, which can be a great way to share them with others.
- There are many online communities where you can find help and advice from other users.
- Overall, obs is a great program that can be used to create and edit amazing videos.
There are many reasons why you might want to rotate a video. For example, if you captured a video of a person or object upside down, you would want to rotate it so that it is right-side up. Or, if you recorded a video in landscape mode but want to view it in portrait mode, you would need to rotate the video.
Luckily, there are a number of ways to rotate videos on different devices. In this article, we will show you how to rotate videos using Obs.
Step-by-step on how to rotate videos using Obs
How to rotate using the rotate tool in the video editor?
First, to use the rotate tool in the Edit tab, simply follow the steps below:
Step 1: Open the video editor and drag your video to the editor.

Step 2: Click on the Edit > Transform > Rotate 90 degrees CW tool to rotate it 90 degrees clockwise.

Step 3: Click on the Edit > Transform > Rotate 90 degrees CW tool to rotate it 90 degrees counterclockwise.

Step 4: Click on the Edit > Transform > Rotate 180 degrees tool to rotate it 180 degrees.

How to rotate using the advance controls in obs?
Second, to use the filters in obs, follow the steps below:
Step 1: Open obs and click on the Edit tab > Transform > Edit transform. You can also click Ctrl + E.

Step 2: Go to the Rotation section.

Step 3: Select the rotation degree you want to use.

Step 4: Click on enter on your keyboard to rotate it.
How to rotate using right-clicking on the video?
Third, to use right-clicking on the video, follow the following:
Step 1: Open obs and right-click on the clip that you want to rotate.
Step 2: Click on the Transform > Rotate 90 degrees CW tool to rotate it 90 degrees clockwise.

Step 3: Click on the Transform > Rotate 90 degrees CW tool to rotate it 90 degrees counterclockwise.

Step 4: Click on the Edit > Transform > Rotate 180 degrees tool to rotate it 180 degrees.

An Easy Way to Rotate Videos Using Filmora
To conclude, there are a number of ways to rotate videos on different devices. In this article, we have shown you how to rotate videos using Obs. Meanwhile, we have another suggestion which is using Filmora Video Editor to rotate videos. Filmora is a Wondershare product that helps you to rotate videos without quality loss. With its easy-to-use interface, you can rotate videos with just a few clicks. If you are interested in it, please feel free to check the guide below:
For Win 7 or later (64-bit)
For macOS 10.14 or later
Step-by-step on how to rotate videos using Filmora
How to rotate videos using Filmora?
First, to rotate videos using Filmora, follow the steps below:
Step 1: Import the video you want to rotate into Filmora.

Step 2: Click on the “Edit” button in the toolbar.

Step 3: Go to Transform > Rotate.

Step 4: Select the rotation angle you want to use.

Step 5: Click on the ‘Ok’ to rotate it.

Second, if you want to rotate a video and flip it, follow the steps below:
Click on the flip option that you want to use, either upside down or sideways, vertically or horizontally.

Click on ‘Ok’ to apply the rotation and the flip.
Third, if you want to rotate a video by a specific number of degrees, follow the steps below:
To conclude, Filmora provides a number of ways for you to rotate your videos as well as using Obs. If you are looking for an easy way to rotate your videos without quality loss, then Filmora is the best option for you.
Step 2: Click on the Edit > Transform > Rotate 90 degrees CW tool to rotate it 90 degrees clockwise.
Step 3: Click on the Edit > Transform > Rotate 90 degrees CW tool to rotate it 90 degrees counterclockwise.
Step 4: Click on the Edit > Transform > Rotate 180 degrees tool to rotate it 180 degrees.
How to rotate using the advance controls in obs?
Second, to use the filters in obs, follow the steps below:
Step 1: Open obs and click on the Edit tab > Transform > Edit transform. You can also click Ctrl + E.
Step 2: Go to the Rotation section.
Step 3: Select the rotation degree you want to use.
Step 4: Click on enter on your keyboard to rotate it.
How to rotate using right-clicking on the video?
Third, to use right-clicking on the video, follow the following:
Step 1: Open obs and right-click on the clip that you want to rotate.
Step 2: Click on the Transform > Rotate 90 degrees CW tool to rotate it 90 degrees clockwise.
Step 3: Click on the Transform > Rotate 90 degrees CW tool to rotate it 90 degrees counterclockwise.
Step 4: Click on the Edit > Transform > Rotate 180 degrees tool to rotate it 180 degrees.
An Easy Way to Rotate Videos Using Filmora
To conclude, there are a number of ways to rotate videos on different devices. In this article, we have shown you how to rotate videos using Obs. Meanwhile, we have another suggestion which is using Filmora Video Editor to rotate videos. Filmora is a Wondershare product that helps you to rotate videos without quality loss. With its easy-to-use interface, you can rotate videos with just a few clicks. If you are interested in it, please feel free to check the guide below:
For Win 7 or later (64-bit)
For macOS 10.14 or later
Step-by-step on how to rotate videos using Filmora
How to rotate videos using Filmora?
First, to rotate videos using Filmora, follow the steps below:
Step 1: Import the video you want to rotate into Filmora.
Step 2: Click on the “Edit” button in the toolbar.
Step 3: Go to Transform > Rotate.
Step 4: Select the rotation angle you want to use.
Step 5: Click on the ‘Ok’ to rotate it.
Second, if you want to rotate a video and flip it, follow the steps below:
Click on the flip option that you want to use, either upside down or sideways, vertically or horizontally.
Click on ‘Ok’ to apply the rotation and the flip.
Third, if you want to rotate a video by a specific number of degrees, follow the steps below:
To conclude, Filmora provides a number of ways for you to rotate your videos as well as using Obs. If you are looking for an easy way to rotate your videos without quality loss, then Filmora is the best option for you.
How to Use Visual Effect for Zoom
Zoom, a video calling software, has been quite popular over the last several months and is still one of the most used videos calling applications by millions of people worldwide. The site is a favorite among working professionals, but it is also utilized by individuals to connect with their friends and loved ones. Additionally, despite the app’s abundance of practical built-in tools and functions, it lacks the fun filters and special effects that the majority of users are used to when using a camera. Zoom has ingrained itself in our vocabulary during the last year. It seemed almost inevitable given that everything, from meetings to parties, has moved online.
You don’t need to seek farther than Zoom visual effects to inject a little jazz into the routine Zoom meetings during these hard times. By making adjustments to your Video configuration either before or during a video call, you may add visual effects in Zoom. Zoom meetings may be tedious to conduct over extended periods of time. Additionally, it would be helpful if you recorded the condition of your room before any Zoom meetings. You wouldn’t want to reveal your disorganized space while in a meeting. In these situations, adding visual effects will keep your private area private while also making your Zoom meetings entertaining and exciting. It will also prevent others from seeing your filthy room. This tutorial will walk you through the process of adding visual effects to Zoom step-by-step. In addition, you will get acquainted with the numerous camera functions and visual effects that you may employ during a Zoom video conversation.
- 1. What apps can add visual effect on Zoom?
- 2. How do I add visual effects to Zoom in Mobile?
- 3. How do you download Zoom effects?
Part 1: Popular Visual Effects you can add to Zoom
You may apply one of four main graphic effects to your Zoom meetings. The visual effects that you may use in your next Zoom video chat are briefly summarized below.
1. Visual Backgrounds
Virtual backdrops may transform any plain wall into an artistic setting. Zoom provides you the choice to add photographs to your backdrop in addition to offering you a few pre-made backdrops. Zoom lets you add a movie to your backdrop in addition to simply photographs. With the help of this imaginative feature, gather your pals and enjoy your favorite meme or video. A presentation’s collection of photos, a video, or a single image may all serve as virtual backdrops. A green screen would often be used as your real backdrop and consistent lighting would be required.
To avoid having to reveal your real surroundings while in a conference, you may add any picture or video as a virtual backdrop in Zoom. You have the option of adding own photos and movies or selecting from the pre-existing backdrop films and images. The file type for video backgrounds should be MP4 or MOV, and the resolution should range from 360p to a maximum of 1080p. Ensure that the mirroring of your video is deselected in the Zoom’s Video settings if your backdrop picture has text that may be read. By using virtual backdrops, you may alter the background of your video as it appears to the audience member with whom you are speaking. During the video conference you’re in, the other participants will be able to view your face and body overlaid on the backdrop of your choice.
2. Filters
With these filters, you can have fun in all of your Zoom meetings! Filters are a fun way to spend time with loved ones who are far away, particularly at a period when maintaining social distance is crucial. Filters are the modifications you make to yourself during Zoom meetings (such as a mustache, beard, etc.). They enliven the proceedings and contribute to the fun and memorability of your Zoom meetings.
Your films’ colors may be changed, and video filters can also add new aspects. By selecting a filter appropriate for each event, like team meetings or game nights, you may create the right atmosphere. You may embellish your face in the video with flowers or animal traits by using Zoom’s various filters. Alternately, you might just convert your video’s color to black and white. The video filters from a different program, however, allow you to apply more vibrant filters and place a greater emphasis on special effects.
3. Lighting and Touch-ups
The Lighting function enhances lighting effects and makes adjustments for low light situations to make you seem more professional during a Zoom conference. Similar to this, Touch-up enhances your facial characteristics by making your skin shine, erasing wrinkles, and giving your face a radiant appearance.
On your Zoom videos, changing your lighting and applying touch-ups may improve how you seem. By adjusting your lighting, you can make even dim illumination look bright. By doing touch-ups, you may get a smoother skin texture and get rid of any obvious imperfections.
4. Studio Effects
Zoom has been developing on a new feature called Studio Effects that would give customers the option of using virtual cosmetics in their movies. They are still checking it out before formally releasing it since it is still in beta. However, it is still available to users under the Backgrounds & Filters area. You may adjust the opacity as you like. You have the option to choose a new color or one of the predefined colors. Additionally, you may decide to employ the face effects in all of your next meetings, albeit doing so might be problematic if you use Zoom for business. Don’t worry if you’re running late. Zoom can give your face a natural-looking cosmetic makeover in only one minute!
This function is intended for less formal settings, such as gatherings of friends or family. Anyone who wants to seem more professional during meetings has access to Studio Effects, which offers the choice of various eyebrow colors, beards, and lipsticks. These are a few recently added features. You may add mustaches, beards, and brows in a variety of designs, hues, and intensities. Additionally, you have the option of coloring your lips.
Part 2: How to Add Visual Effects to Zoom
Along with facilitating online meetings, the Zoom program also lets you play with its visual effects. You just need to make a few adjustments to the video settings or utilize another third-party program to be ready to go.
Step1Start a Zoom meeting
You can download Zoom, install it on your computer, and log into your account if you don’t already have it if you don’t already have it.
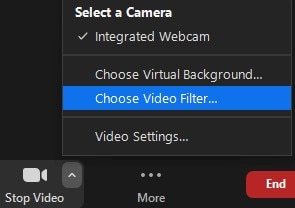
Step2Tap Background and Filters
After logging in to Zoom, use these settings. - Options > Camera > Video

Step3Faucet Filters
Here, you may play with a variety of visual effects and customize them to suit your tastes. Pick one of the numerous filters that are offered. To activate the filter, tap it.
Step4Set Lighting Effects to on
Select “Adjust for low light” in the video options. For your lighting, you may choose between Auto and Manual effects. Zoom will automatically detect and adapt for the lighting in your room if you choose Auto.
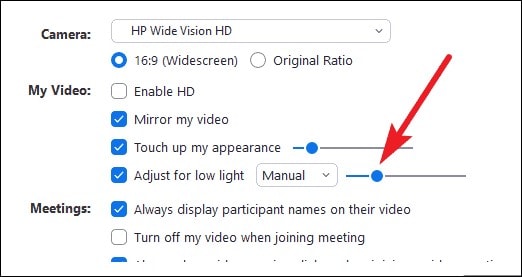
Use Zoom’s noise reduction option to keep your conversation focused during your video conference in addition to adding visual elements. To do this, go to “Audio Settings” and choose “High” under “Suppress background noise.” Once you start speaking during the video conference, this essentially cancels out any background noise.
Part 3: Related FAQs
1. What apps can add visual effect on Zoom?
Following is the list of top three apps that you can use to utilize visual effects Zoom application:
Snap Camera is regarded as the most user-friendly. It is a software that you can download for Windows or Mac that works with live broadcasts and video chats. Because it was created by the people who founded Snapchat, it shares a broad variety of filters with that platform.
Link: Snap Camera
The Mac is the only platform on which CamTwist may be used. You may also use it to give your movies additional filters and unique effects. This program lets you pick from a variety of pre-made effects while also allowing you to create your own.
Link: CamTwist
Another desktop application that lets you change and even blur your backdrop is ManyCam. It enables you to apply digital effects, filters, and 3-D masks to your face. Using this tool, you can also build layers and presets.
Link: ManyCam
2. How do I add visual effects to Zoom in Mobile?
Zoom includes a function that might be useful if you don’t want to tidy up or want to add some entertainment to your calls. You may utilize Zoom virtual backdrops to alter your surroundings and take you to a more pleasant location on both the desktop and mobile apps. After joining one on a mobile device, pick Virtual backdrop by tapping the More icon in the bottom right corner. Choose a photo from the list of choices, or click the plus sign (+) to add a photo or video from your gallery.
3. How do you download Zoom effects?
Pressing the Studio Effects button after installing Zoom for the first time will prompt a pop-up asking you to download the Studio Effects package. Several filters, suited for both business meetings and conversations with friends, let you customize the video and audio during your video calls. To start downloading the Effects bundle, click the Download button. The “Studio Effects” window will appear on the right-hand side of the Background & Filter page after the download is finished. All the face components and choices are available in this Studio Effects window.
Conclusion
The most popular video meeting tool worldwide is Zoom. Family, friends, coworkers, and any two people who want to video chat utilize it. Zoom visual effects are the ideal tool for injecting some humor into otherwise dull Zoom sessions and meetings. A few simple steps will get you a striking backdrop, a humorous filter, and some interesting effects. Since the majority of formal work is now completed from home, Zoom has taken over as the standard video conferencing program. Try out as many of the effects as you like, and use this page as a companion and a map to help you along the way.
- 1. What apps can add visual effect on Zoom?
- 2. How do I add visual effects to Zoom in Mobile?
- 3. How do you download Zoom effects?
Part 1: Popular Visual Effects you can add to Zoom
You may apply one of four main graphic effects to your Zoom meetings. The visual effects that you may use in your next Zoom video chat are briefly summarized below.
1. Visual Backgrounds
Virtual backdrops may transform any plain wall into an artistic setting. Zoom provides you the choice to add photographs to your backdrop in addition to offering you a few pre-made backdrops. Zoom lets you add a movie to your backdrop in addition to simply photographs. With the help of this imaginative feature, gather your pals and enjoy your favorite meme or video. A presentation’s collection of photos, a video, or a single image may all serve as virtual backdrops. A green screen would often be used as your real backdrop and consistent lighting would be required.
To avoid having to reveal your real surroundings while in a conference, you may add any picture or video as a virtual backdrop in Zoom. You have the option of adding own photos and movies or selecting from the pre-existing backdrop films and images. The file type for video backgrounds should be MP4 or MOV, and the resolution should range from 360p to a maximum of 1080p. Ensure that the mirroring of your video is deselected in the Zoom’s Video settings if your backdrop picture has text that may be read. By using virtual backdrops, you may alter the background of your video as it appears to the audience member with whom you are speaking. During the video conference you’re in, the other participants will be able to view your face and body overlaid on the backdrop of your choice.
2. Filters
With these filters, you can have fun in all of your Zoom meetings! Filters are a fun way to spend time with loved ones who are far away, particularly at a period when maintaining social distance is crucial. Filters are the modifications you make to yourself during Zoom meetings (such as a mustache, beard, etc.). They enliven the proceedings and contribute to the fun and memorability of your Zoom meetings.
Your films’ colors may be changed, and video filters can also add new aspects. By selecting a filter appropriate for each event, like team meetings or game nights, you may create the right atmosphere. You may embellish your face in the video with flowers or animal traits by using Zoom’s various filters. Alternately, you might just convert your video’s color to black and white. The video filters from a different program, however, allow you to apply more vibrant filters and place a greater emphasis on special effects.
3. Lighting and Touch-ups
The Lighting function enhances lighting effects and makes adjustments for low light situations to make you seem more professional during a Zoom conference. Similar to this, Touch-up enhances your facial characteristics by making your skin shine, erasing wrinkles, and giving your face a radiant appearance.
On your Zoom videos, changing your lighting and applying touch-ups may improve how you seem. By adjusting your lighting, you can make even dim illumination look bright. By doing touch-ups, you may get a smoother skin texture and get rid of any obvious imperfections.
4. Studio Effects
Zoom has been developing on a new feature called Studio Effects that would give customers the option of using virtual cosmetics in their movies. They are still checking it out before formally releasing it since it is still in beta. However, it is still available to users under the Backgrounds & Filters area. You may adjust the opacity as you like. You have the option to choose a new color or one of the predefined colors. Additionally, you may decide to employ the face effects in all of your next meetings, albeit doing so might be problematic if you use Zoom for business. Don’t worry if you’re running late. Zoom can give your face a natural-looking cosmetic makeover in only one minute!
This function is intended for less formal settings, such as gatherings of friends or family. Anyone who wants to seem more professional during meetings has access to Studio Effects, which offers the choice of various eyebrow colors, beards, and lipsticks. These are a few recently added features. You may add mustaches, beards, and brows in a variety of designs, hues, and intensities. Additionally, you have the option of coloring your lips.
Part 2: How to Add Visual Effects to Zoom
Along with facilitating online meetings, the Zoom program also lets you play with its visual effects. You just need to make a few adjustments to the video settings or utilize another third-party program to be ready to go.
Step1Start a Zoom meeting
You can download Zoom, install it on your computer, and log into your account if you don’t already have it if you don’t already have it.
Step2Tap Background and Filters
After logging in to Zoom, use these settings. - Options > Camera > Video
Step3Faucet Filters
Here, you may play with a variety of visual effects and customize them to suit your tastes. Pick one of the numerous filters that are offered. To activate the filter, tap it.
Step4Set Lighting Effects to on
Select “Adjust for low light” in the video options. For your lighting, you may choose between Auto and Manual effects. Zoom will automatically detect and adapt for the lighting in your room if you choose Auto.
Use Zoom’s noise reduction option to keep your conversation focused during your video conference in addition to adding visual elements. To do this, go to “Audio Settings” and choose “High” under “Suppress background noise.” Once you start speaking during the video conference, this essentially cancels out any background noise.
Part 3: Related FAQs
1. What apps can add visual effect on Zoom?
Following is the list of top three apps that you can use to utilize visual effects Zoom application:
Snap Camera is regarded as the most user-friendly. It is a software that you can download for Windows or Mac that works with live broadcasts and video chats. Because it was created by the people who founded Snapchat, it shares a broad variety of filters with that platform.
Link: Snap Camera
The Mac is the only platform on which CamTwist may be used. You may also use it to give your movies additional filters and unique effects. This program lets you pick from a variety of pre-made effects while also allowing you to create your own.
Link: CamTwist
Another desktop application that lets you change and even blur your backdrop is ManyCam. It enables you to apply digital effects, filters, and 3-D masks to your face. Using this tool, you can also build layers and presets.
Link: ManyCam
2. How do I add visual effects to Zoom in Mobile?
Zoom includes a function that might be useful if you don’t want to tidy up or want to add some entertainment to your calls. You may utilize Zoom virtual backdrops to alter your surroundings and take you to a more pleasant location on both the desktop and mobile apps. After joining one on a mobile device, pick Virtual backdrop by tapping the More icon in the bottom right corner. Choose a photo from the list of choices, or click the plus sign (+) to add a photo or video from your gallery.
3. How do you download Zoom effects?
Pressing the Studio Effects button after installing Zoom for the first time will prompt a pop-up asking you to download the Studio Effects package. Several filters, suited for both business meetings and conversations with friends, let you customize the video and audio during your video calls. To start downloading the Effects bundle, click the Download button. The “Studio Effects” window will appear on the right-hand side of the Background & Filter page after the download is finished. All the face components and choices are available in this Studio Effects window.
Conclusion
The most popular video meeting tool worldwide is Zoom. Family, friends, coworkers, and any two people who want to video chat utilize it. Zoom visual effects are the ideal tool for injecting some humor into otherwise dull Zoom sessions and meetings. A few simple steps will get you a striking backdrop, a humorous filter, and some interesting effects. Since the majority of formal work is now completed from home, Zoom has taken over as the standard video conferencing program. Try out as many of the effects as you like, and use this page as a companion and a map to help you along the way.
Also read:
- New Hitfilm Express Video Editor Review for 2024
- When Struggling to Find a Suitable Game Recorder for Your PC, You Might Come Across Many Options. Explore the Best Game Recorders for Sharing Game Highlights
- New How to Create a Freeze Frame Sequence Effect
- In 2024, How to Add Photos to Tik Tok Video
- New Working Out All Important Details of Slowing Down Video in After Effects for 2024
- 2024 Approved A Complete Guide to Use Distortion Effect in Premiere Pro
- Create True 3D Text Effects Using After Effects for 2024
- LumaFusion – One of the Best Video Editors for iOS
- Get Creative with These 10 Video Editing App With Templates for 2024
- In 2024, Best 20 Slideshow Makers for Win/Mac/Online Review
- In 2024, Zoom In and Out on Snapchat
- New 2024 Approved How to Livestream Zoom on Facebook?
- Updated In 2024, How to Create a Bokeh Effect
- Cropping a Video in Final Cut Pro Step by Step for 2024
- Updated Ways to Learn Discord Game Bots – Even if Youre Just Starting Out for 2024
- Updated Time Lapse Videos Play an Important Part in Videography. If You Want to Start Video Shooting, Then You Shouldnt Miss Time Lapse Video. This Article Will Show You some Ideas over This
- Updated How to Create The Best Video Collages for 2024
- Best Video Grabbers for Chrome for 2024
- New Do You Want to Know How to Convert YouTube SBV Subtitles to SRT Format? Here Is an Ultimate Guide About It
- What Is the Best Filmora Slideshow Templates? Experts Choice
- Updated In 2024, How to Add Zoom Blur Effect In Photoshop
- Updated How To Change Font In Premiere Pro
- 2024 Approved Ultimate Guide on How to Plan and Storyboard a Music Video
- Updated 20 Must-Have Graduation Songs for Slideshow for 2024
- New Learn to Use Montage with These Movies for 2024
- Updated 15 Camera Shake Preset for Adobe Premiere Pro
- Updated 2024 Approved How to Fade in Text in Adobe Premiere Pro
- New A Guide to Use Distortion Effect in Premeiere Pro
- Splice Video Editor Online - Get Your Videos Splice for 2024
- In 2024, Learn About Open Broadcaster Software and How to Perform Obs Color Correction. Also, Explore the Various Aspects of Color Correction Like Contrast, Brightness, Saturation, Among Others
- In 2024, Are You Looking to Make Transparent Background in Canva Then You Can Learn About It in This Article
- New Step by Step to Rotate Videos in Davinci Resolve for 2024
- Updated In 2024, How to Put Emoji on Mac That Take Less Than 10 Mins
- Updated 2024 Approved Step by Step Guide on Make Gimp Transparent Background PNG
- Updated How to Create a Custom Slide Show in PowerPoint for 2024
- How to Combine Videos Into One on Instagram
- Hacks to do pokemon go trainer battles For Vivo S18e | Dr.fone
- In 2024, How to Fake Snapchat Location on Oppo A1 5G | Dr.fone
- How to Erase an Apple iPhone 7 Plus without Apple ID?
- My Videos Arent Playing on Samsung Galaxy A14 4G – What Can I Do? | Dr.fone
- How to Repair Corrupt Pivot Table of PDF File? | Stellar
- In 2024, How Can I Catch the Regional Pokémon without Traveling On Motorola Moto G23 | Dr.fone
- 5 Ways to Reset Oppo A56s 5G Without Volume Buttons | Dr.fone
- Ultimate Guide on Xiaomi Redmi 13C FRP Bypass
- In 2024, Top 10 Telegram Spy Tools On Motorola Edge 40 for Parents | Dr.fone
- In 2024, The Updated Method to Bypass Vivo X Fold 2 FRP
- Guide on How To Erase iPhone XR Devices Entirely | Dr.fone
- Best Anti Tracker Software For Realme GT Neo 5 SE | Dr.fone
- Quickly Remove Google FRP Lock on G42 5G
- How To Change Your SIM PIN Code on Your HTC U23 Pro Phone
- New In 2024, 10 of the Best Disney Animated Shows (Sorted by Popularity Ascending)
- In 2024, 8 Ways to Transfer Photos from Vivo V29e to iPhone Easily | Dr.fone
- In 2024, Is GSM Flasher ADB Legit? Full Review To Bypass Your Itel P55+ Phone FRP Lock
- 10 Easy-to-Use FRP Bypass Tools for Unlocking Google Accounts On Vivo Y36i
- 3 Ways to Unlock iPhone 7 Plus without Passcode or Face ID
- In 2024, How to Watch Hulu Outside US On Xiaomi Redmi Note 12 5G | Dr.fone
- 5 Ways to Restart Oppo Find N3 Without Power Button | Dr.fone
- In 2024, The Best Android SIM Unlock Code Generators Unlock Your Vivo V29 Pro Phone Hassle-Free
- In 2024, Ultimate guide to get the meltan box pokemon go For Samsung Galaxy F34 5G | Dr.fone
- How To Fix Apple ID Verification Code Not Working On iPhone 11 Pro
- Title: Updated Looking for the Steps to Add Transitions Effects in Premiere Pro? Here Are the Steps to Add and Edit Transitions in Premiere Pro and an Alternative Way to Video Transitions
- Author: Chloe
- Created at : 2024-04-24 07:08:22
- Updated at : 2024-04-25 07:08:22
- Link: https://ai-editing-video.techidaily.com/updated-looking-for-the-steps-to-add-transitions-effects-in-premiere-pro-here-are-the-steps-to-add-and-edit-transitions-in-premiere-pro-and-an-alternative-w/
- License: This work is licensed under CC BY-NC-SA 4.0.
