
Updated LumaFusion Offers Various Look Up Table Presets, or LUTs, Such as FiLMiC deLog and FiLMiC DeFlat, and Several Stylistic LUTs for Use with Neutral Use Video. You Can Also Manually Add the LUTs
LumaFusion Offers Various Look Up Table Presets, or LUTs, Such as FiLMiC deLog and FiLMiC DeFlat, and Several Stylistic LUTs for Use with Neutral Use Video. You Can Also Manually Add the LUTs
LumaFusion is one of the most complex iPad and iPhone video editing apps. Many of its customers adore it, and it has some incredible capabilities that you’d find incompetent editing software. They’ve effectively opened up the realm of LUTs to iPhone and iPad users.
LumaFusion LUTs are individual files that act as containers in LumaFusion. This container file includes standard LUT data as well as LumaFusion-specific color preset data. A LumaFusion LUT Preset file is similar to a Super LUT. LumaFusion can only employ one standard LUT at a time; however, LumaFusion LUT presets enable simultaneous Color Grading and Color Corrections.
How will LUTs help with color correction in Lumafusion
Colors in today’s cameras are vibrant, but they may continuously be improved. Color correction corrects the color that’s already there, whether it’s boosting the exposure to brighten a darker photo or increasing the saturation to make the colors pop. Color correction in other NLEs can be difficult, but not in LumaFusion.
The Color Presets tab in the Color & Effects section is where you begin color correcting footage. There are various presets from which to pick. I wouldn’t use these settings on my videos because they’re too stylized, but they’re there. You may alter any of the presets to your taste, so some of the more dramatic ones can be toned down. By picking the original setting, purists can color-fix their raw footage without using LumaFusion. Moving the sliders till the color seems perfect is all that’s required from there.
Exposure, contrast, highlights, shadows, mid-tones, and saturation and hue are all controlled by sliders. The color sliders can be used for a more forceful approach. But proceed with caution. The sliders are delicate, and it’s easy to overdo them. Play around with the sliders until you get the look you want. If you don’t like it, toss it in the trashcan and start over.
Color grading and color correction are not interchangeable terms. Color correction is a technical requirement, but color grading is primarily creative. You’ll have no command over the color grading process if you’re working with film material where primary colors aren’t even visible. Before diving into the creative LUTs, make sure you complete adequate color correcting.
Color grading, unlike color correction, adjusts the shot’s color to modify the atmosphere or feel. The only way to do that in LumaFusion is to play around with the color sliders under the Color Presets tab, but that’s not ideal. As previously stated, the three sliders are sensitive and limited. LumaFusion isn’t designed for color grading, which is OK. Thankfully, LumaFusion allows you to use LUTs.
Always color correct your footage before utilizing any LUTS, which entails changing the White-balance, Highlights, Contrast, and Shadows. Do not apply the LUTS to your footage directly.
How to use LUTs in Lumafusion?
Videographers, colorists, and editors use LUTs because they are efficient. Rather than starting from zero every time you work on a video editing project, you may speed up the color grading process using a LUT with predefined color profiles. It’s elementary to import LUTs. Simply import the preset files into LumaFusion and add the preset to your footage like an Instagram filter.
The Import button in the Color & Effects editor is the easiest way to load LUTs.
- Double click on any video/photo clip on the timeline to access the Clip Editors.
- At the bottom of the Clip Editor UI, select the Color & Effects tab.
- The import button is located directly below the effect preset library.

How to use LUTs in Lumafuison
LUTs must be loaded via the LumaFX clip editor at the moment. Follow the steps below to accomplish this:
- To access the LumaFX UI, double-tap any video/photo clip in the timeline.
- At the bottom of the LumaFX UI, select the ‘Color & Effects’ tool.
- In the upper right panel, press the cube icon.
- The import button is located directly below the effect preset library.

Load LumaFX LUTs
- Once hit, it will display your transfer site options; select your desired transfer site and navigate to the folder where your LUTs are stored.
- Select and import all of the LUTs in the folder.

Import LUTs
Free LUTs Resource for Lumafusion
Choosing the appropriate LUT pack will boost your photography and videography immediately. With our quick guide to the top free LUTs available, you can find the appropriate one for you.
1. Jaun Melara free LUTs
LUTs aren’t simply for stylizing video. They’re frequently employed as a color correction tool to ensure that your colors are shown correctly in various formats. Juan Melara has provided a free LUT set to assist you in color correcting your footage for printing on film stock. These free LUTs will provide modest stylization to your footage if you don’t want to send it to print.
Melara developed this video to demonstrate his free LUTs in action. The colors are more subdued than in the other LUTs on this list. This free LUT pack is ideal if you’re looking to produce a modern-style cinematic color grade. Melara also has a great article about using LUTs to create a lovely color grade. DaVinci PowerGrades are available for several of these LUTs. They color correct your film in the same way as LUTs do, but you’ll have more flexibility over individual PowerGrade components.

Jaun Melara free LUTs
2. Small Hd free LUTs
SmallHD, a company that makes small, full HD on-camera monitors, is giving away a free set of color grades that reproduce the appearance of seven classic movies. The company is also releasing a series of video lessons that show how to get the most out of these effects throughout production and post-production. Everything is completely free. The color grades are provided as a.zip file and are in the form of 3D LUT files created in DaVinci Resolve. If you’re unfamiliar with SmallHD, the company offers free LUTs for on-set monitoring in real-time. This free set of Movie Look LUTs is inspired by seven recent films, including Apocalypse Now’s warmth and The Matrix’s green overtones. Take use of SmallHD’s free LUT set if you want to give your footage a dramatic and cinematic vibe.

Small Hd free LUTs
3. Color Grading Central free LUTs
Color Grading Central is essential knowledge for any aspiring colorist or video editor who takes color seriously. CGC is a company that specializes in color grading. Their website has a wide range of outstanding color-related products, from grain to LUTs. They also provide their email members with a wealth of free color grading information. Free trials of some LUTs are also available, so you may try them out before you buy. They’re giving away an array of color presets, grains, and burns exclusively to their email list and the seven free color LUTs. We strongly recommend them if you want to give your footage a shot-on-film look.

Color Grading Central free LUTs
4. PremiumBeat Free LUTs
PremiumBeat has freely given countless LUT packs as well as other assets to any video editor or filmmaker over the years. Todd Blankenship has designed a fresh new set of FREE LUTs for Shutterstock, which is their latest addition. Todd chose distinct looks from films and pictures that inspire his daily work to create this bundle with attention and love. There are many options, and these looks will offer you a great place to start when it comes to grading your footage. They recently published an in-depth evaluation of Photon.io, a new color grading tool. Todd Blankenship, who ended up utilizing the tool to create these LUTs, wrote the initial review. The pack has been fine-tuned to replicate some clean, cinematic looks that you may use as a jumping-off point for your video.

PremiumBeat Free LUTs
5. Frank Glencairn free LUT
Despite having access to the most advanced filming gear, there’s something about a vintage film aesthetic that looks fantastic. Frank Glencairn has made a nice K-Tone LUT that is meant to look like vintage Kodachrome film. This film grade, which was formerly popular among photographers and filmmakers, has fallen out of favor due to the rise of digital cameras. With this free LUT, you can get the appearance of retro-looking reds, blues, and yellows.

Frank Glencairn free LUT
6. Reverse Tree Media free LUTs
Reverse Tree Media is releasing a new LUTS bundle that is absolutely free. In addition to LUTS, this LUTS collection includes utility LUTS, film grains, and a Black-Bar layer. For the color-grading procedure, this is critical. This bundle contains 56 free LUTS for various scenarios like weddings, television commercials, travel films, landscapes, Rec.709, and so on. It also has several useful LUTS and film grain overlays for 8mm, 16mm, and 35mm video, as well as a cinematic black bar PNG file with a ratio of 2.35:1 to assist you in achieving a more cinematic appearance quickly and save time. Check out the link to learn more about LUTS and to obtain their previous cinematic LUTS bundle, which is also free.

Reverse Tree
Wondershare Filmora11 Express Better
Achieve More
Grow Together
Free Download Free Download Learn More

![]()
Closing Thoughts:
LUTs are most typically used to build and store color profiles that can be utilized in other film projects. By using contrast and design, you can bring logs and flat materials to life. Everything you need to know is right here. You can now rush to your desk and fix your video.
Free Download Free Download Learn More
![]()
Closing Thoughts:
LUTs are most typically used to build and store color profiles that can be utilized in other film projects. By using contrast and design, you can bring logs and flat materials to life. Everything you need to know is right here. You can now rush to your desk and fix your video.
6 Tips for Your First Facebook Ads
Facebook ads can be an effective channel for reaching the right customers, but only if you have a strong strategy in place. If you are new to Facebook ads, don’t rush into creating your first campaign without fully understanding the risks and rewards of advertising on Facebook.

Before you launch your first Facebook ad campaign, here are six tips to keep in mind:
Part1. Define the purpose of your ad
This can be a long-form or short-form question. If a user is browsing Facebook and sees your ad, you want them to know why they should click on it. Is it an offer? If so, what are they getting in return? Is the ad simply a call to action? You may want to include a “Learn more” button that links back to your website so that users can learn more about whatever they need to know before taking the next steps.
There are 11 Facebook Ads campaign objectives to choose from, and you should choose the one that best aligns with your goals.

Awareness:
- Brand awareness - Show your advertisements to individuals who are most likely to recall them.
- Reach - Show your ad to as many people as possible
Consideration:
- Traffic - Send people to your website or app
- Engagement - Increase the number of times people see and interact with your ad.
- App installs - Advertise to individuals who are more likely than others to download and use your app.
- Video views - Increase the number of times people see and interact with your video
- Lead generation - Use forms, calls, or chats to obtain information from people eager in your business.
- Messages - Get more people to message you on Facebook Messenger
Conversion:
- Conversions - Advertise to people who have a higher likelihood of taking action, such as buying something or calling you from your website.
- Catalog sales -Show your potential customers ads for items in your catalog that match their interests, so they are more likely to buy from you.
- Store traffic - This allows you to use your Facebook page as a marketing platform. If you want to run store traffic ads on Facebook, include your shop information there.
Whatever the case, make sure you have a clear goal from start to finish to understand what exactly it is you are trying to accomplish for any given campaign.
Part2. Know your target audience
Before you create any ads, it’s important to define who will see them. You’ll want to think carefully about the type of person who would be interested in what you’re offering and how they would respond when they see the ad. If you can’t answer these questions, it’s time to start considering different audiences.

But how do we begin defining a target audience? To start, let’s look at the different terms used by advertisers:
Customer: The person who has already bought from your company. For example, if you sell coffee makers on Amazon and have an existing customer base from those sales (customers), then this would be the most relevant term for you when deciding who should see specific ads for new products or services that may interest them based on past purchases or interests shown through other online activity such as browsing history or social media engagement with similar content/products/services.
Prospect: A lead that has expressed interest in buying something, but has not yet purchased anything from your company. A prospect does not necessarily mean someone has signed up for an email list or asked for more info; keeping leads fresh is just as important as nurturing prospects into customers later down the road so don’t forget that part!
Now that you know who you are targeting, it’s time to create an avatar for your target customer. An avatar is a fictional character that represents your target customer. This will help you to better understand their needs and wants, and it will also make it easier to create targeted ads.
![]()
There are a few different ways to create an avatar:
1.) Customer profile: This is a simple way to gather information about your target customer. Start by creating a list of demographic information such as age, location, gender, education level, and income level. You can also include interests and behaviors, such as what they like to do for fun, what type of music they listen to, and what type of products they buy.
2.) Persona: A persona is very similar to a customer profile, but it takes things a step further by giving each target customer a name and backstory. This can be helpful if you are targeting a specific niche audience.
3.) Mind-map: If you want to get creative, you can create a mind-map of your target customer. This will allow you to brainstorm everything that you know about them and come up with new ideas.
Once you have created your avatar, make sure that you keep it in mind when creating your Facebook ad campaign. This will help to ensure that your ads are relevant and interesting to your target customer.
Part3. Prepare a decent image for your audience to click on
Images are the most important part of any ad. A good image will help your customers understand what it is that they’re clicking on, and they may even want to share it with their friends. However, if your image is poor quality or irrelevant then, it won’t do as well as it could have done.
You should start by picking a relevant image that shows off your product in the best light possible. If possible, try and get some type of testimonial from customers using your product so that other people can see how great your product really is!

If you don’t have good images available yet, don’t worry! You can always hire a professional photographer who knows what kind of shots work best for advertising purposes but even if this isn’t something that suits every business, there are still plenty of free resources out there too like Unsplash which offers high-quality stock photography under Creative Commons licenses under various conditions such as attribution when used commercially, so make sure whatever method you choose fits within these guidelines!
Part4. Practice Your copywriting skills
You can have the best-developed ad in the world, but if it doesn’t have strong copywriting, your ads won’t work as well. It’s important to know what you’re getting into before spending time and money on Facebook ads.

The following are just some of the ways you can improve your copywriting skills:
- Read other people’s ads and see how they write their copy
- Read books about writing persuasive copy.
Try writing your own copy. Then have someone read it and give feedback on what they like and what they don’t like about it. Try to learn from their suggestions.
There are also many different ways to write copy for a Facebook ad. Some people like to use specific formulas for their ads, such as: AIDA (attention, interest, desire, action). This formula was developed by an American businessman named Claude C. Hopkins in 1898 and is still widely used today. If you’re not sure which method is best for you, it might be worth trying a few different ones. Have someone read your ad and give their opinion on which method was the most effective at convincing them that they should click on your ad.
You can also hire a copywriter to help you with your ad. However, if you don’t have the budget for it at this point in time or just want to try writing your own first before hiring someone else, there are many different apps and websites that will help you to create an ad copy.
Part5. Decide what type of ad format will you use
It is a carousel ad, or single image/video ad, or a combination of both?

If you are going to use a carousel ad, you need at least three images. If you’re using a single image or video ads, then you only need one image or video.
As always, if your budget allows it, try to increase the number of ad sets that are running at once so as not to cannibalize each other’s reach—it’s better to have multiple ads winning than just one.
If you’re running a single video ad for example and your budget is $100 per day, it’s best practice to have to create multiple versions of this single video ad so that they don’t cannibalize each other.
Part6. Plan your ad budget
You need to determine how much you’re willing to spend on your Facebook ads. This will help you to create a budget and also to decide how often you want your ad to be shown.

The average Facebook ad spends between $5 and $10 per day. However, this can vary depending on the type of product or service that you’re promoting, as well as the size of your target audience.
If you have a large target audience, it might be worth increasing your ad budget so that your ad is seen by more people. On the other hand, if you have a smaller target audience, you might want to decrease your ad budget so that you don’t spend too much money on ads that aren’t being seen by as many people.
It’s also important to consider how often you want your ad to be shown. If you want your ad to be seen by as many people as possible, it’s best to have it shown more than once. However, if you only want your ad to be shown to a select group of people, it’s best to have it shown less often.
Both of these factors will help you to determine your Facebook ad spend.
The Bottom Line
If you’re ready to get started with Facebook ads, we encourage you to put these tips into practice. I believe that they will help you make the most of your budget and achieve your goals, whether they be brand awareness, lead generation or sales.
Free Download For Win 7 or later(64-bit)
Free Download For macOS 10.14 or later
Free Download For macOS 10.14 or later
Tips to Make Cinematic Color Grading
New modern color grading software allows you to do point-and-click color grading right in your browser. Color changes are as easy and intuitive as painting or sketching.
You can choose from many different look presets and movie emulations based on Hollywood movies plus real-time previews of your favorite LUTs with this software.
Part 1. What is Cinematic Color Grading?
The cinematic look is all the rage these days and aims to mimic images captured on real film rather than digitally created. To achieve this effect, film directors use various means from lighting to cinematic color gradation. The latter is a powerful tool for bringing a cool or warm tone to a video and providing smooth color transitions to fall on an image that doesn’t look too real but feels emotional.
This kind of post-production processing, which produces beautiful results when used by color magicians, requires a deep understanding of colors and their effect on our psyche and even physiology. It’s not enough to watch a color grading video and use a LUT to get where you want. You should at the very least have an understanding of:
- Color wheel
- Color quality
- Color harmony and discord
- Warm and cool colors
- Color context
Part 2. Tips to make cinematic color grading
Here are three helpful tips to create cinematic-looking images in DaVinci Resolve.
In my 10-year career as a colorist, I’ve worked on every type of content imaginable: short, long, commercial, educational, episodic—you name it. And while each of these formats requires its approach, the one constant that spans them all is the client’s desire for a cinematic look.
Virtually all of us aspire to more cinematic color, but we often come up short—in part because the term itself has become too broad to effectively target. To focus on the goal, I like to think of “cinematic” as “an image whose key visual properties are consistent with those of printed film.”
The print film was the primary medium through which we consumed cinematic images for the first century of filmmaking and is therefore at the very heart of cinematic aesthetics. In this video, I’ll show you my top three secrets to achieving this aesthetic quickly and consistently in Davinci Resolve.
Tips1: Create Color Density
The first secret to film color is to create color density. Another key aesthetic property of film images is that colors can be either highly saturated or highly luminescent but cannot be both.
We can mimic this visual characteristic by identifying strongly saturated colors in our image and using the Hue vs. Lum to reduce their brightness. This simple technique is especially effective on pure primary colors (red, green, and blue).
Tips2: Separation Beats Saturation
The second secret to film color is prioritizing separation over saturation. When you feel like an image lacks overall color or pop, it’s all too easy to reach for the saturation knob, but that’s not a very cinematic solution.
Instead, try using split toning—pushing cool colors into shadows and warm colors into highlights—to increase tonal separation and add depth to an image. This characteristic is present in virtually every film print and is deeply evocative when applied correctly.
Tips3: Strong Contrast is Your Friend
The third secret of film colors is a strong contrast. This is not always easy, as a higher contrast look inherently requires more precision with exposure placement. Too often we pump up some contrast, end up with an image that looks blown out or too crisp, and then immediately back away from editing.
However, if you stick with high contrast long enough to improve your exposure, you’ll get a very different result and be well on your way to a more cinematic image.
Part 3. How to add color cinematic grading by using Filmora?
New modern color grading software allows you to do point-and-click color grading right in your browser. Color changes are as easy and intuitive as painting or sketching.
You can choose from many different look presets and movie emulations based on Hollywood movies plus real-time previews of your favorite LUTs with this software.
Wondershare Filmora is an option if you want to easily change the colors of your projects. You may just double-click the media after dragging it onto the editing timeline to change the contrast, saturation, brightness, and hue.
Despite its speed, it also allows you to merge, edit audio, divide, rotate, and apply as many cool video effects as you like.
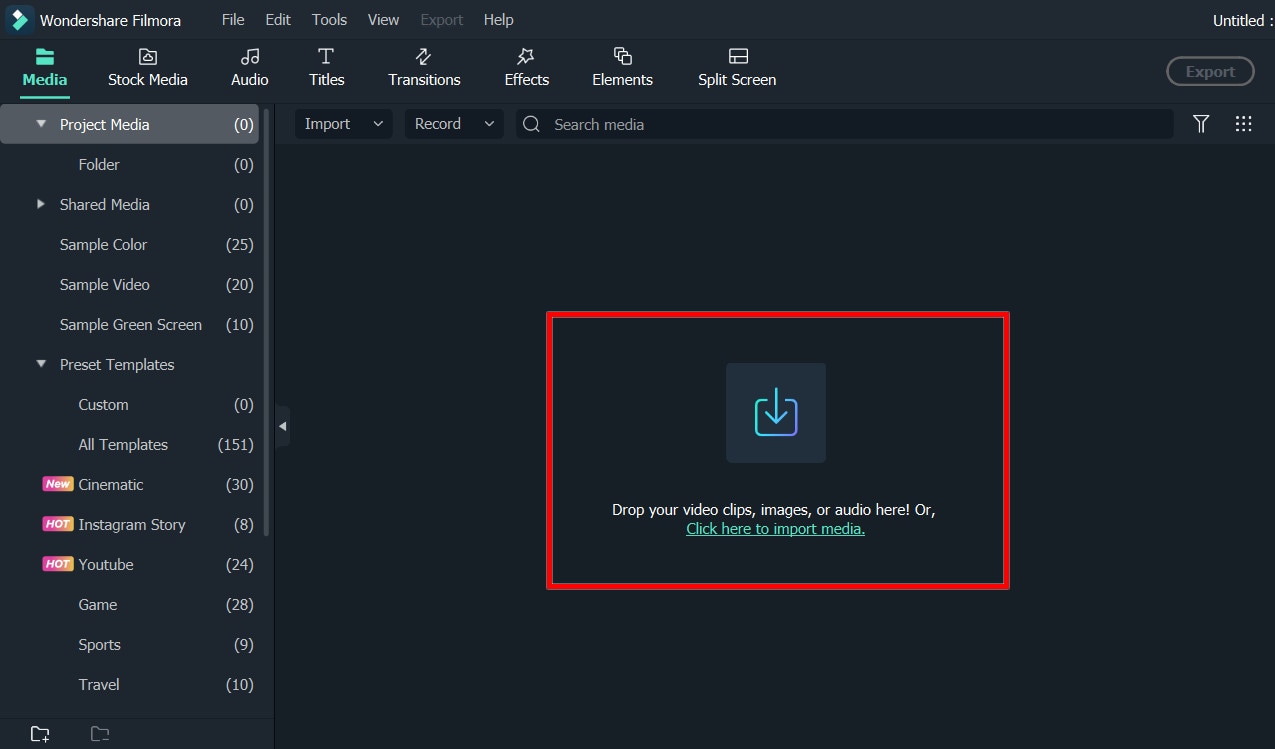
Step1Add the media
After installing Wondershare Filmora, click the New Project and Import button to easily find and load your videos.
Step2Correct the color [Basic and Advanced]
In the timeline, double-click the video editing window. Select the “Color” panel and make adjustments.
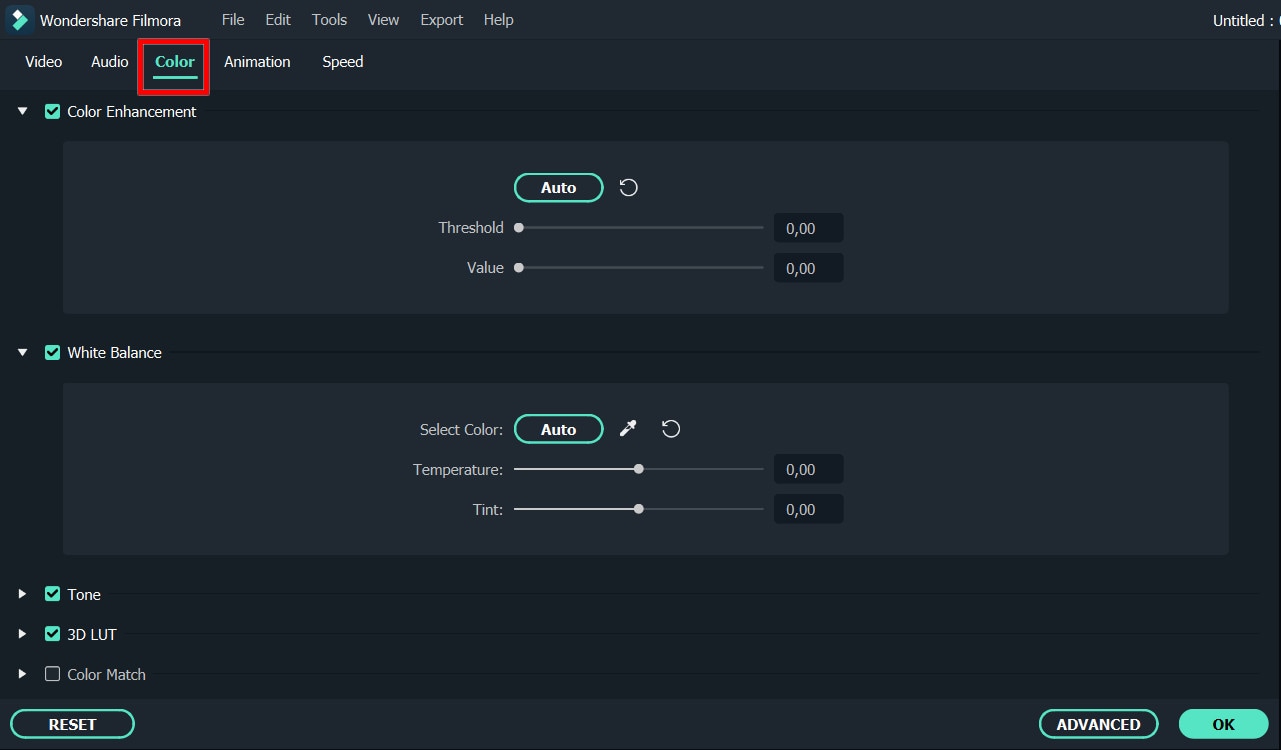
- Contrast: By adjusting this setting, you can control the brightness and color in different parts of the image.
- Saturation: This setting highlights the gray part of the video to a shade. You can adjust it to make the colors of the entire video image appear more saturated or more subdued.
- Brightness: You can change this setting to adjust the overall darkness and lightness of your project.
- Hue: Hue is generally the lightness of a color. Let’s say that when red is saturated with white, it creates a shade of pink.
- 3D LUT: 3D lookup tables provide your media with Hollywood movie color sets like the 007 series, Batman, Harry Porter, etc.
Hover over the indicator to adjust the color correction settings. Then left click on it and move the slider. The corresponding value stabilizes after releasing the mouse button.
With Filmora, you also have access to advanced color correction. Click the Advanced Color Tuning icon to enter the appropriate window where you can fine-tune the color or use preset templates.
The Preferences tab has a variety of templates, including Movie, Normal, 3D LUT, and Vignette. In the Edit tab, you can adjust color temperature, white balance, hue, 3D LUT, color, HSL, light, vignette, etc.
Step3Preview and save the new video
When you are satisfied with your creation, click “Export”. Then click the Settings button and save the new videos in different formats in the Format tab. You can also export the video directly to Vimeo or YouTube or burn it to DVD for better preservation.
Filmora’s color correction tools will make your videos look natural, more attractive, more vibrant, consistent, and professional.
Color Correction Presets
Color correction presets help your video achieve an enhanced cinematic look. Adjust gives you control over fine-tuning the colors in your shots. You can make various adjustments such as color temperature and exposure.
In the “Effects > LUT” tab, you’ll see an extensive selection of preset color settings. These include Vignettes, Movie Looks Like Old Movies, and Cinematic 3D LUT effects such as Harry Potter, Game of Thrones, House of Cards, and Mission Impossible.
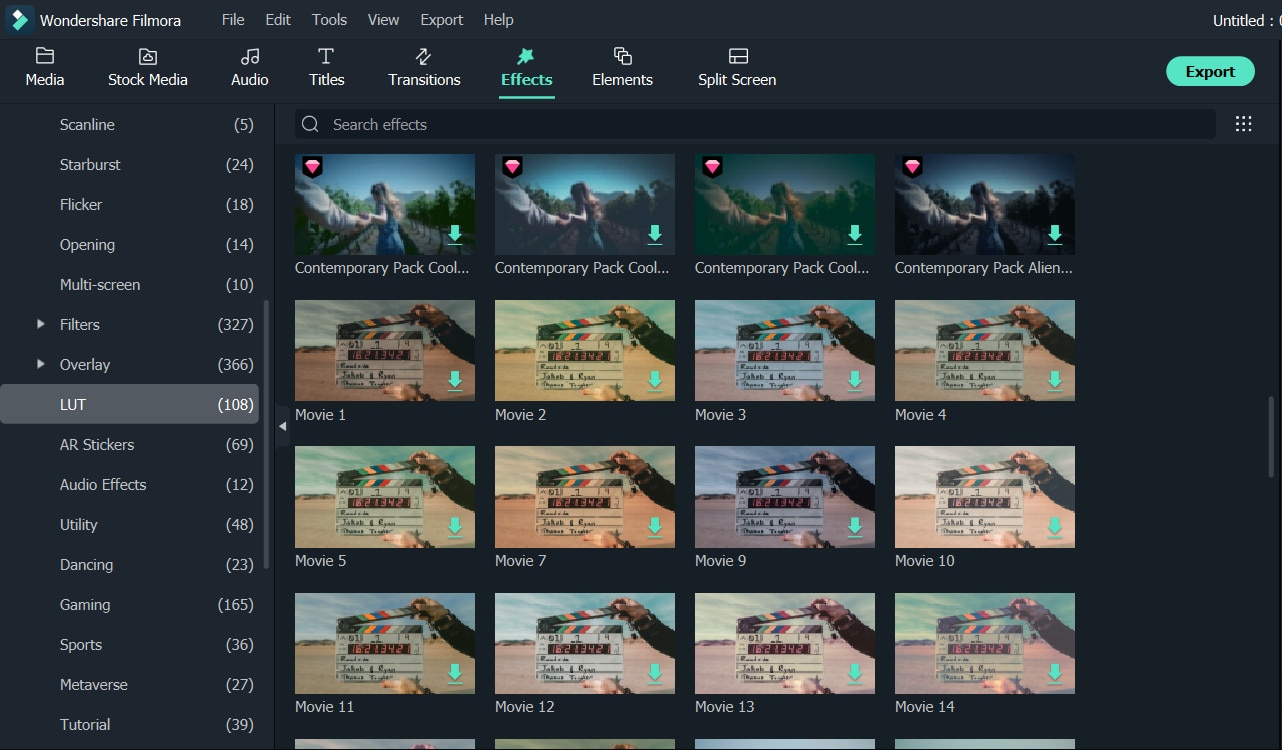
Filmora’s Color Correction Advanced Tool also categorizes your presets. Click on All Presents to see six categories: Favorites, Custom, 3D Lut, Common, Film, and Vignette.
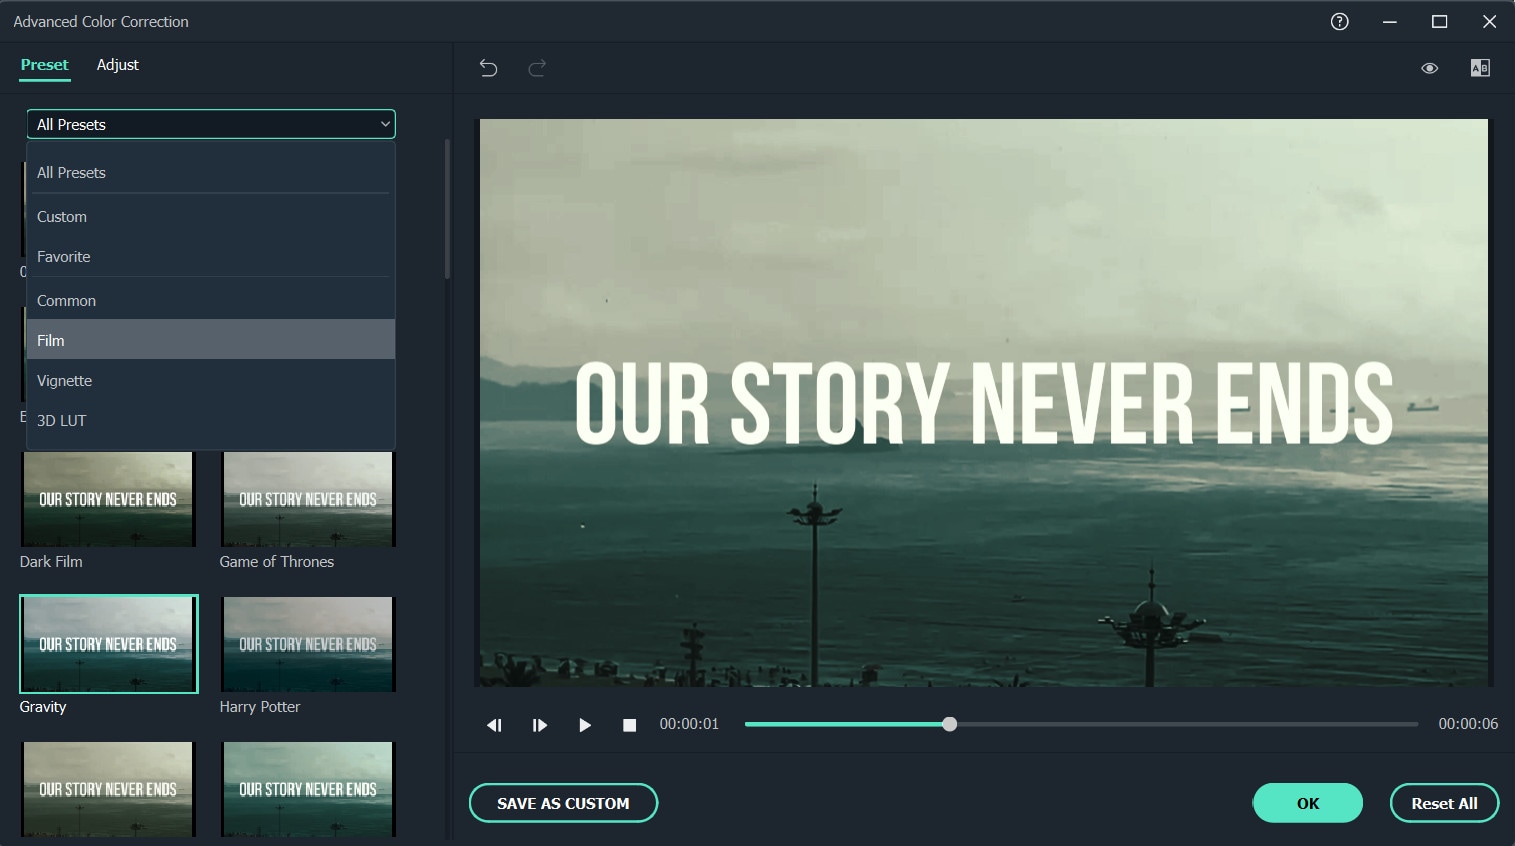
Double-click a preset to apply it to your video. You can see how it looks in the Advanced Color Correction preview window. If you are satisfied with the results, click OK.
Conclusion
Above are the steps to give your video a cinematic look using Wondershare Filmora, hope this helps if you are wondering how to do it. As we can see above, using Filmora video editor will make you more creative in making videos with a suitable emotional tone.
Free Download For Win 7 or later(64-bit)
Free Download For macOS 10.14 or later
How to Make Loop Video in PowerPoint
Loop videos are a great way to showcase your content. They’re easy to make, and they’re also easy to edit. You can have a loop video where the slides keep repeating in the same order, or you can change it up by putting different images on each slide.
You’re probably already familiar with the concept of looping video in PowerPoint. However, there are some instances where looping videos can be a real-time saver. To do this, you need to make sure that your visuals are engaging and unique. You can achieve this by using video loops in PowerPoint presentations.
You can use it if you want to demonstrate an idea or concept by showing several parts of the same thing at once. Or you can use PowerPoint if you have a very long video that you want to show in one go. You can also use it for suggesting different angles for your audience and making their eyes move from one point to another without making them bored.
Part 1: How to Make a Slideshow Loop in PowerPoint
A power-point loop video is the most efficient way to create a slideshow for your presentation. This easy-to-use software utility provides a simple and intuitive interface that lets you add slideshows to your presentations.
This is ideal for creating multi-streaming PowerPoint presentations that can be repeatedly viewed in the same or a different sequence. Create multimedia presentations with an animated slide show, including videos, and music with just a few clicks of the mouse.
The creation of the Slideshow loop in Microsoft PowerPoint is quite easy and simple. To make a looping slideshow, you’ll first need a PowerPoint. A PowerPoint is a set of instructions that allows you to display a series of images and text in the same sequence. This gives your audience the ability to explore the information on the slides in more depth and engage with the content on a more personal level.
If you want to create a looping slideshow in PowerPoint, you can use the following steps.
Step 1: Open Microsoft PowerPoint and select Slide show from Toolbar
The first step is to open Microsoft PowerPoint. To create a looping slideshow in PowerPoint, click on the Slide show feature on the top of the toolbar. Then different features will appear after clicking on it.

Step 2: Set up the Slide show manually
When you open the Slideshow, click on the Set Up Show from the toolbar. Some options will be shown in the drop-down (Manual, Auto, and Set Up Show). Select the option Set Up Show. A dialogue box will appear to select the following check boxes that are shown in the below picture:

Step 3: Select the slides and click on Transition
Select overall slides and click on the Transitions tab. You can see an option of Auto, interval. Uncheck the box of Auto, interval, and choose the time according to your requirements. Adding transitions can help to make your PowerPoint presentation more engaging and visually appealing. When you are adding transitions, make sure to think about how they can help to improve your overall presentation.

PowerPoint has the technology to create an endless loop slideshow that keeps playing without your finger. Loop slideshows are best used with information that is short, repeated, and not too repetitious. For example, if you want to play something on a loop it is better to create a looping slideshow than an extended presentation that repeats itself endlessly.
The power of loop slides is in their ability to engage users. You can have a slideshow that plays automatically or you can have it play when the user enters a specific panel. Slideshow Loops on PowerPoint allow you to play one or more slides over and over again by pressing the Play button. You can also create a time-lapse, which pauses the slideshow at a specific point.
Benefits of making a slideshow in PowerPoint
There are many benefits of using a looping slideshow in PowerPoint. There are many benefits of using loop video in PowerPoint presentations. Loop slideshow gives your audience a sense of continuity and connection, which can help them follow the story and understand the information more easily. It also helps to keep people engaged and interested in your presentation. They can be used to promote a product or service, commemorate a special event, or entertain and inform your audience.
- Slides can be played in a continuous loop, allowing the audience to stay engaged with the presentation from beginning to end.
- The looping feature makes it easy to create a presentation that is tailored to the specific needs of your audience. You can choose to have the slides repeat automatically, or you can control when each slide appears.
- It can help to save time. By using loop video, you can avoid having to constantly start and stop your presentation to show different parts of it. This can save you a lot of time and energy, which can be put into more important things.
- They can be used to commemorate a special event.
- They can be used to entertain and inform your audience.
Part 2: Alternative Way to Create Loop Slideshow Video
If you have been searching for the perfect way to create a loop slideshow video, Filmora video editor might be what you need. It is one of the most popular loop slideshow makers on the market and there is an app for all devices, including PCs and Macs to android phones and tablets. Filmora is a slideshow loop maker that allows you to produce video files quickly and easily with simple drag and drop.
Filmora provides you with seamless loop video for your website, youtube, and other channels, You can create content in various formats and image resolution to any social media like Facebook, Twitter, Instagram, and others with the help of our unique features. Filmora is a professional video editor for Windows. It’s an ideal tool for everyone, from beginners to professionals, as well as a great help for students, researchers, and teachers.
In this article, we’ll show you how to make a looping slideshow in PowerPoint. First, you’ll need to download Filmora. This software is used to create professional-looking videos that can be made at any length.
Step 1: Download Filmora and Import images and videos
Free Download For Win 7 or later(64-bit)
Free Download For macOS 10.14 or later
So first off, we need to create a new project. On the left-hand side, you’ll see your media library and on the right-hand side, there’s a green button that says “create new project”. You’ll notice there are three sections: video, audio, and images. These play a key role in creating your final video so let’s talk about each one individually.

Step 2: Add Title and background to your Slideshow video
This step is totally up to you in which you can add some titles the starting your slideshow. It is not very necessary but gives your slide show a perfect look. It also allows you to select any plain background of any color. You can use multiple transitions, music, and effects to tell your story in exactly the way you want!

Step 3: Make copies of the Slideshow and add transitions
Lastly, make copies of your media or pictures you want to add to your slideshow. Filmora allows you to set the duration of your slideshow. After copying the pictures paste them where the video ends. Then continue pasting according to your requirements. Add a transition “Dissolve” from the Transitions Tab. When you complete your editing export your video to your desktop or where you want to store it.

Benefits of looping Slideshare video in Filmora
There are many benefits of using a loop slideshow video in Filmora. First and foremost, a looping slideshow is a great way to create a presentation or video that is both engaging and professional. Additionally, looping a video makes it easy to keep audiences engaged and on foot, which is especially important for long videos or presentations.
Plus, looping can help to save on file size and memory usage, making it a great option for videos that will be shared online. Finally, looping can add an element of excitement and anticipation to a video, which can help to keep viewers engaged and coming back for more. You could also add animations between the slides that move differently than they would normally do.
Loop Slideshow Video in Filmora is a great option for you. It’s easy to use, and it has a wide range of options that allow you to customize your video output. You can even add music and sound effects to your videos! If you’re looking to make a loop slideshow video, this is the best software for it.
The Bottom Line
Slideshows are very popular, but they can sometimes seem a little boring. If you want to add something new, looping your slideshow will make all the difference. Adding music is easy in PowerPoint. A slideshow loop can be an effective way to keep viewers’ attention, making it an effective tool for presentation. You can renovate your outdated slideshows video with Filmora.
With its loop function, Filmora enables you to incorporate interesting dynamic effects into your videos. So what does it take to set up a PowerPoint loop video? You don’t need a lot of special programs or plugins to make your videos get looped on your presentations. Follow the above simple steps and you’ll have your videos getting looped in no time.
Free Download For macOS 10.14 or later
So first off, we need to create a new project. On the left-hand side, you’ll see your media library and on the right-hand side, there’s a green button that says “create new project”. You’ll notice there are three sections: video, audio, and images. These play a key role in creating your final video so let’s talk about each one individually.
Step 2: Add Title and background to your Slideshow video
This step is totally up to you in which you can add some titles the starting your slideshow. It is not very necessary but gives your slide show a perfect look. It also allows you to select any plain background of any color. You can use multiple transitions, music, and effects to tell your story in exactly the way you want!
Step 3: Make copies of the Slideshow and add transitions
Lastly, make copies of your media or pictures you want to add to your slideshow. Filmora allows you to set the duration of your slideshow. After copying the pictures paste them where the video ends. Then continue pasting according to your requirements. Add a transition “Dissolve” from the Transitions Tab. When you complete your editing export your video to your desktop or where you want to store it.
Benefits of looping Slideshare video in Filmora
There are many benefits of using a loop slideshow video in Filmora. First and foremost, a looping slideshow is a great way to create a presentation or video that is both engaging and professional. Additionally, looping a video makes it easy to keep audiences engaged and on foot, which is especially important for long videos or presentations.
Plus, looping can help to save on file size and memory usage, making it a great option for videos that will be shared online. Finally, looping can add an element of excitement and anticipation to a video, which can help to keep viewers engaged and coming back for more. You could also add animations between the slides that move differently than they would normally do.
Loop Slideshow Video in Filmora is a great option for you. It’s easy to use, and it has a wide range of options that allow you to customize your video output. You can even add music and sound effects to your videos! If you’re looking to make a loop slideshow video, this is the best software for it.
The Bottom Line
Slideshows are very popular, but they can sometimes seem a little boring. If you want to add something new, looping your slideshow will make all the difference. Adding music is easy in PowerPoint. A slideshow loop can be an effective way to keep viewers’ attention, making it an effective tool for presentation. You can renovate your outdated slideshows video with Filmora.
With its loop function, Filmora enables you to incorporate interesting dynamic effects into your videos. So what does it take to set up a PowerPoint loop video? You don’t need a lot of special programs or plugins to make your videos get looped on your presentations. Follow the above simple steps and you’ll have your videos getting looped in no time.
Also read:
- [Updated] 2024 Approved The Future Awaits Elevate Your FB Chronicles for FREE
- [Updated] Crafting Compact Cities for a Sustainable Future for 2024
- [Updated] Unveiling the Secrets of KineMaster Usage & Ranking Alternatives 1-10 for 2024
- 3 Ways To Stream And Record At The Same Time
- Benefits of Live Streaming on YouTube for 2024
- Do You Want to Create a Zoom Motion Blur Effect Using Photoshop? If You Are Unaware of How to Do This, Read This Article to Learn Simple yet Authentic Instructions
- How to Cast Xiaomi Civi 3 Disney 100th Anniversary Edition Screen to PC Using WiFi | Dr.fone
- In 2024, 3 Ways To Stream And Record At The Same Time
- In 2024, A Quick Guide to Honor Magic 6 FRP Bypass Instantly
- In 2024, Overview of Best LUTs for Vlog
- Sound Strategy Selecting Perfect DJ Visuals for 2024
- Step Inside the World of Handheld Gaming with Steam Link
- Top 5 AI-Enhanced Platforms for Personalized Book Suggestions
- Unleashing Potential: WoW's Full Spectrum 3D Support
- Updated In 2024, How to Apply Gaussian Blur Effect to Videos In Premiere Pro?
- Updated In 2024, What You Should Know About Speech-to-Text Technology
- Title: Updated LumaFusion Offers Various Look Up Table Presets, or LUTs, Such as FiLMiC deLog and FiLMiC DeFlat, and Several Stylistic LUTs for Use with Neutral Use Video. You Can Also Manually Add the LUTs
- Author: Chloe
- Created at : 2025-03-03 07:02:49
- Updated at : 2025-03-03 18:24:04
- Link: https://ai-editing-video.techidaily.com/updated-lumafusion-offers-various-look-up-table-presets-or-luts-such-as-filmic-delog-and-filmic-deflat-and-several-stylistic-luts-for-use-with-neutral-use-v/
- License: This work is licensed under CC BY-NC-SA 4.0.