:max_bytes(150000):strip_icc():format(webp)/GettyImages-515810476-aabe0e5a88b44bb1ae49a5bfa97bec62.jpg)
Updated Make Eye Zoom Transition Effect with Filmora

Make Eye Zoom Transition Effect with Filmora
What is an eye zoom transition effect? It’s a close-up video effect allowing viewers to transit to the next clip from the eye. This effect is commonly used by musicians and travel bloggers to give their videos a more cinematic feel. So, without wasting time, let’s learn how to create an eye zoom transition with Wondershare Filmora .
Free Download For Win 7 or later(64-bit)
Free Download For macOS 10.14 or later
Preparation:
First, you need to create a close-up eye video. Although you can do that with your digital camera, a standard smartphone should do it just fine. Just ask a friend or family member to use your phone’s rear camera to record your eye centered on the screen. Ensure that the eye is as close as possible and you don’t lose focus. The camera should be around 10cm away from your face. And lest I forget, the flash should be ON.

How to Create an Eye-zoom Transition
Step 1 Align the video clips on Filmora
After recording a close-up eye video, add it on Wondershare Filmora and duplicate it. Alternatively, you can add the video to the first and second tracks.

Step 2 Add a freeze frame to the video
Next, we want to add a freeze frame to the section where the eye opens fully. To do that, select the second video track and place the playhead where the eye is fully open. After that, right-click the video track, then choose the Add Freeze Frame option.

Now trim the first video track from where the freeze frame starts on the second video. Also, cut the second video track to leave only the freeze frame
Step 3 Add a masking effect to the eye
With the two video tracks ready, it’s time to apply a masking effect. Tap the Effect tab on the top menu bar and then find the Shape Mask under the utility section. Now drag and drop the effect to the freeze frame.

Double-click on the freeze frame clip to adjust the Shape Mask on the preview screen. Ensure the mask reveals the eye pupil only and check the Invert Mask box. Also, set the Feather number to 10.

Step 4 Add the transition video
Next, add the video you want to edit with an eye-zoom effect next to the first video track. Preview the video, and you’ll notice your new video playing inside the eye mask.
With that done, move the playhead to the start of the freeze frame video and double-click the video clip to launch the settings window. Click the Animation tab before clicking Customize to see the keyframe settings. Tap the Add button to add a keyframe. Then, add a few frames using the playhead before clicking Add. But because we’re zooming in, increase the scale to 160%. You can also add the rotation and position.

After setting the second keyframe, move the playhead to the right and add the third keyframe. This time, increase the scale number to 400%, as well as the rotation and position. Now preview the video, and you’ll notice the rotating eye-zoom effect.
Summary
There you go! That’s how to create an eye-zoom transition using Wondershare Filmora. Don’t forget to play around with this feature-rich video editor to unlock its full capabilities. Enjoy!
Free Download For macOS 10.14 or later
Preparation:
First, you need to create a close-up eye video. Although you can do that with your digital camera, a standard smartphone should do it just fine. Just ask a friend or family member to use your phone’s rear camera to record your eye centered on the screen. Ensure that the eye is as close as possible and you don’t lose focus. The camera should be around 10cm away from your face. And lest I forget, the flash should be ON.

How to Create an Eye-zoom Transition
Step 1 Align the video clips on Filmora
After recording a close-up eye video, add it on Wondershare Filmora and duplicate it. Alternatively, you can add the video to the first and second tracks.

Step 2 Add a freeze frame to the video
Next, we want to add a freeze frame to the section where the eye opens fully. To do that, select the second video track and place the playhead where the eye is fully open. After that, right-click the video track, then choose the Add Freeze Frame option.

Now trim the first video track from where the freeze frame starts on the second video. Also, cut the second video track to leave only the freeze frame
Step 3 Add a masking effect to the eye
With the two video tracks ready, it’s time to apply a masking effect. Tap the Effect tab on the top menu bar and then find the Shape Mask under the utility section. Now drag and drop the effect to the freeze frame.

Double-click on the freeze frame clip to adjust the Shape Mask on the preview screen. Ensure the mask reveals the eye pupil only and check the Invert Mask box. Also, set the Feather number to 10.

Step 4 Add the transition video
Next, add the video you want to edit with an eye-zoom effect next to the first video track. Preview the video, and you’ll notice your new video playing inside the eye mask.
With that done, move the playhead to the start of the freeze frame video and double-click the video clip to launch the settings window. Click the Animation tab before clicking Customize to see the keyframe settings. Tap the Add button to add a keyframe. Then, add a few frames using the playhead before clicking Add. But because we’re zooming in, increase the scale to 160%. You can also add the rotation and position.

After setting the second keyframe, move the playhead to the right and add the third keyframe. This time, increase the scale number to 400%, as well as the rotation and position. Now preview the video, and you’ll notice the rotating eye-zoom effect.
Summary
There you go! That’s how to create an eye-zoom transition using Wondershare Filmora. Don’t forget to play around with this feature-rich video editor to unlock its full capabilities. Enjoy!
Free Download For macOS 10.14 or later
Preparation:
First, you need to create a close-up eye video. Although you can do that with your digital camera, a standard smartphone should do it just fine. Just ask a friend or family member to use your phone’s rear camera to record your eye centered on the screen. Ensure that the eye is as close as possible and you don’t lose focus. The camera should be around 10cm away from your face. And lest I forget, the flash should be ON.

How to Create an Eye-zoom Transition
Step 1 Align the video clips on Filmora
After recording a close-up eye video, add it on Wondershare Filmora and duplicate it. Alternatively, you can add the video to the first and second tracks.

Step 2 Add a freeze frame to the video
Next, we want to add a freeze frame to the section where the eye opens fully. To do that, select the second video track and place the playhead where the eye is fully open. After that, right-click the video track, then choose the Add Freeze Frame option.

Now trim the first video track from where the freeze frame starts on the second video. Also, cut the second video track to leave only the freeze frame
Step 3 Add a masking effect to the eye
With the two video tracks ready, it’s time to apply a masking effect. Tap the Effect tab on the top menu bar and then find the Shape Mask under the utility section. Now drag and drop the effect to the freeze frame.

Double-click on the freeze frame clip to adjust the Shape Mask on the preview screen. Ensure the mask reveals the eye pupil only and check the Invert Mask box. Also, set the Feather number to 10.

Step 4 Add the transition video
Next, add the video you want to edit with an eye-zoom effect next to the first video track. Preview the video, and you’ll notice your new video playing inside the eye mask.
With that done, move the playhead to the start of the freeze frame video and double-click the video clip to launch the settings window. Click the Animation tab before clicking Customize to see the keyframe settings. Tap the Add button to add a keyframe. Then, add a few frames using the playhead before clicking Add. But because we’re zooming in, increase the scale to 160%. You can also add the rotation and position.

After setting the second keyframe, move the playhead to the right and add the third keyframe. This time, increase the scale number to 400%, as well as the rotation and position. Now preview the video, and you’ll notice the rotating eye-zoom effect.
Summary
There you go! That’s how to create an eye-zoom transition using Wondershare Filmora. Don’t forget to play around with this feature-rich video editor to unlock its full capabilities. Enjoy!
Free Download For macOS 10.14 or later
Preparation:
First, you need to create a close-up eye video. Although you can do that with your digital camera, a standard smartphone should do it just fine. Just ask a friend or family member to use your phone’s rear camera to record your eye centered on the screen. Ensure that the eye is as close as possible and you don’t lose focus. The camera should be around 10cm away from your face. And lest I forget, the flash should be ON.

How to Create an Eye-zoom Transition
Step 1 Align the video clips on Filmora
After recording a close-up eye video, add it on Wondershare Filmora and duplicate it. Alternatively, you can add the video to the first and second tracks.

Step 2 Add a freeze frame to the video
Next, we want to add a freeze frame to the section where the eye opens fully. To do that, select the second video track and place the playhead where the eye is fully open. After that, right-click the video track, then choose the Add Freeze Frame option.

Now trim the first video track from where the freeze frame starts on the second video. Also, cut the second video track to leave only the freeze frame
Step 3 Add a masking effect to the eye
With the two video tracks ready, it’s time to apply a masking effect. Tap the Effect tab on the top menu bar and then find the Shape Mask under the utility section. Now drag and drop the effect to the freeze frame.

Double-click on the freeze frame clip to adjust the Shape Mask on the preview screen. Ensure the mask reveals the eye pupil only and check the Invert Mask box. Also, set the Feather number to 10.

Step 4 Add the transition video
Next, add the video you want to edit with an eye-zoom effect next to the first video track. Preview the video, and you’ll notice your new video playing inside the eye mask.
With that done, move the playhead to the start of the freeze frame video and double-click the video clip to launch the settings window. Click the Animation tab before clicking Customize to see the keyframe settings. Tap the Add button to add a keyframe. Then, add a few frames using the playhead before clicking Add. But because we’re zooming in, increase the scale to 160%. You can also add the rotation and position.

After setting the second keyframe, move the playhead to the right and add the third keyframe. This time, increase the scale number to 400%, as well as the rotation and position. Now preview the video, and you’ll notice the rotating eye-zoom effect.
Summary
There you go! That’s how to create an eye-zoom transition using Wondershare Filmora. Don’t forget to play around with this feature-rich video editor to unlock its full capabilities. Enjoy!
Kdenlive Review – Is It The Best Video Editor?
When you look for an open source video editor online, you will come across several popular video editors. One of them has to be Kdenlive video editor that is available free and compatible across all desktop operating systems. The video editor claims to be suitable for beginners as well as for professional video editors.
Starting from multi-track video editing and support for different file formats to loads to effects and flexible interface, Kdenlive video editor seems to be truly powerful. But is it comparable to premium video editors and is it suitable for standard and advanced video editing? Read our Kdenlive tutorial and review for everything you need to know.
Part 1. Key Features of Kdenlive
If you need to edit videos occasionally, a free video editor is what you will be looking for. Unfortunately, most free videos have very basic video editing tools and they are suitable for editing personal videos only. On the contrary, Kdenlive comes with all the standard as well as some advanced video editing features. Here are all the key features of Kdenlive video editor that you should be aware of.
Multi-track editing – Kdenlive comes with a versatile timeline where you can have multiple tracks consisting of video clips, audio files and different effects and objects. You can lock the tracks as well as mute them so that you can experiment as you edit your video.
Effects and Transitions – Even though limited, there are eye-catching effects and transitions available. You can also go for color correction as well as minor adjustments in your audio. Besides, the titler lets you create amazing 2D texts and titles.
Proxy Editing – Kdenlive uses proxy editing technique to lower the resolution of high-resolution videos while you edit them. This takes away the pressure on the CPU resources, but when it renders, the original resolution gets restored back. That is why Kdenlive has been effective in low-end computers as well.
Flexible User Interface – Kdenlive comes with a customizable user interface. This means you can arrange the layouts of your workflow as per your requirements. Besides, there are configurable keyboard shortcuts. There are also different themes available for the user interface.
Keyframing – One of the advanced features of Kdenlive is that you can keyframe any effect. This means you can change the parameters of the effects with time using curves. Besides, the software supports green screen effect.
Miscellaneous – The software supports almost all types of audio and video file formats. There is an option for automatic backup which is highly useful in any video editing software. The software also supports online resources and add-ons.
Part 2. Basic Editing with Kdenlive
Kdenlive is available for free and you should definitely try it out. Thereafter, you decide whether it is perfect for you or not. After Kdenlive download, here are all the steps for basic video editing with Kdenlive.
Import a clip:
Step 1: Launch Kdenlive on your computer and make sure you have the video clip ready on your hard drive.
Step 2: Go to Project menu option. Click on “Add Clip or Folder” option. You can include all the video clips on any folder.
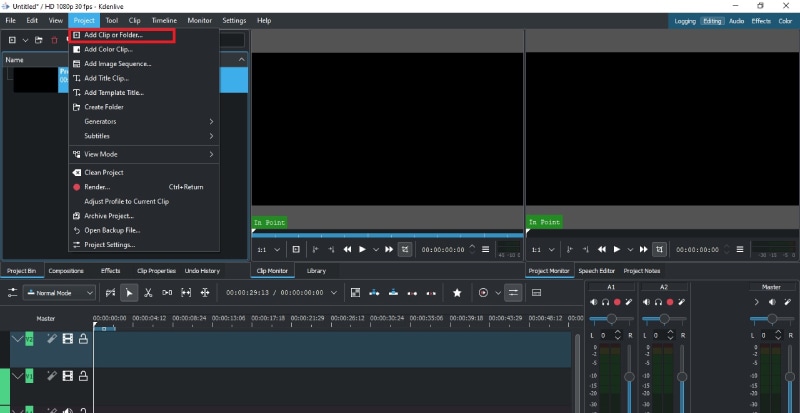
Step 3: The imported clips will then have to be dragged and dropped on the timeline from Project Bin.
Trim and Export:
Step 1: Import the video clip on Kdenlive and drag and drop the clip on the timeline.
Step 2: Put the timeline cursor over the point on the video clip from where you want to trim it.
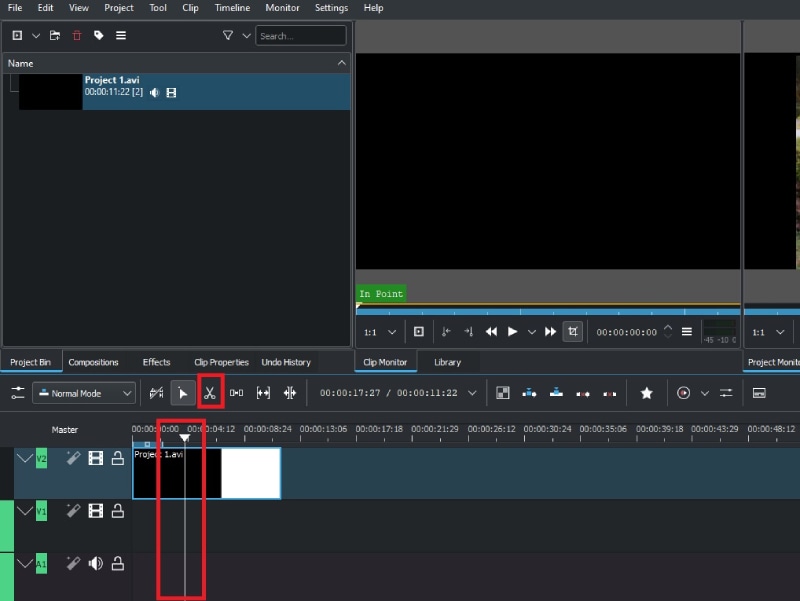
Step 3: Click on Scissor icon to start trimming. Thereafter, move the red timeline cursor to the point where you want the trimming to end.
![]()
Add multiple tracks:
There is enough number of tracks already available on Kdenlive timeline. However, when you are editing a large video project, you may need more tracks that already present.
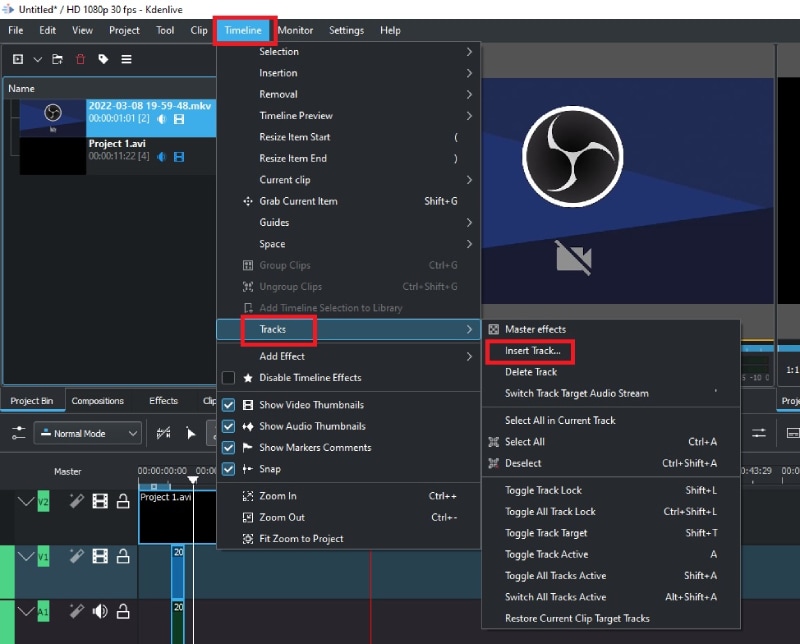
Step 1: Go to Timeline menu option.
Step 2: Go to Tracks> Inset Track option.
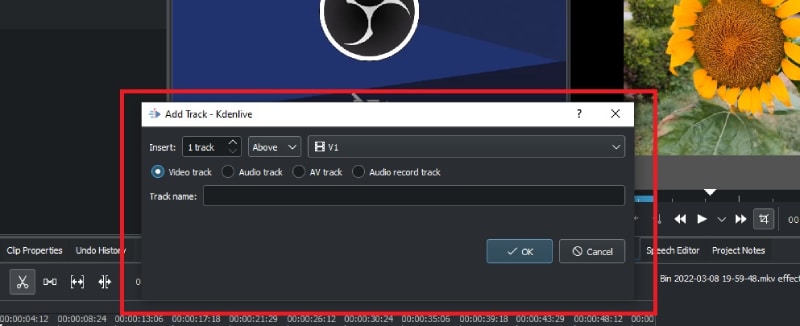
Step 3: Enter a name for the track and select the type of track and click on Ok button.
Adjust brightness and contrast:
Step 1: Go to Effects> Color and Image Correction.
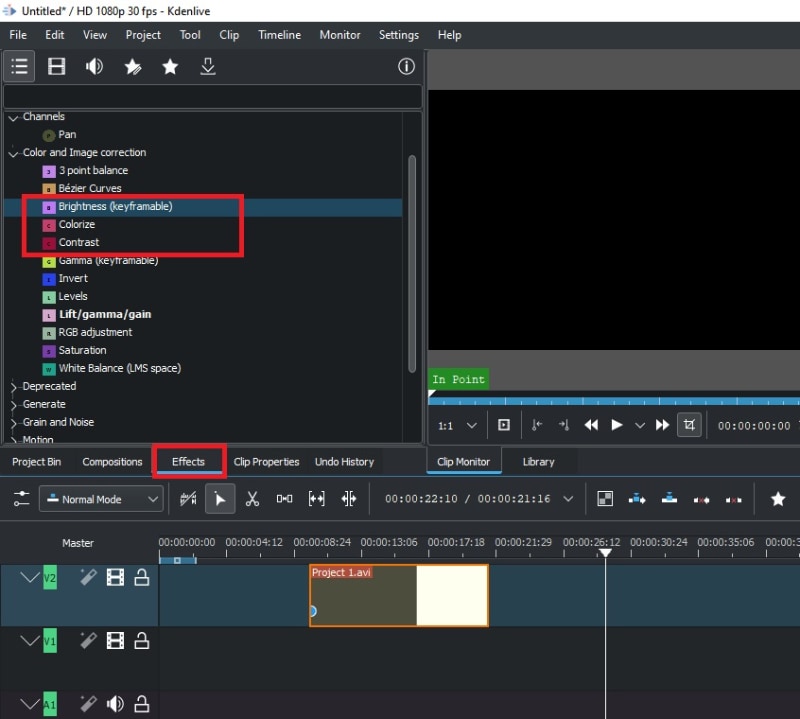
Step 2: Drag and drop Brightness or Contrast directly on the video clip.
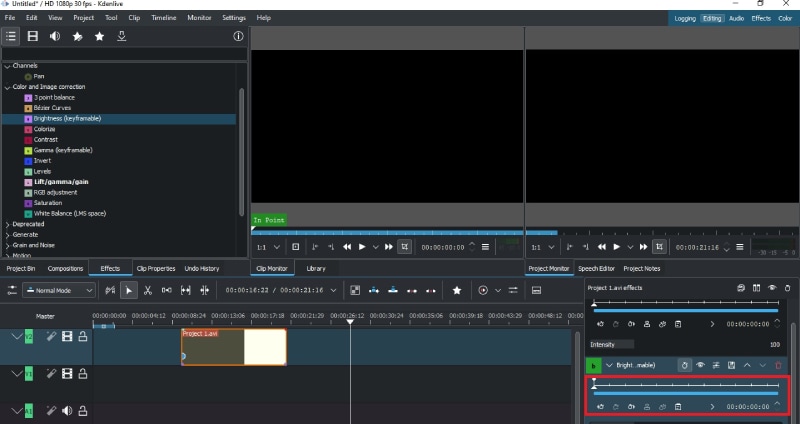
Step 3: Click on Brightness that you just placed on the video clip and adjust the parameter from its slider.
Speed up or slow down:
Step 1: Right-click on the video clip that is on the timeline and click on Change Speed option.
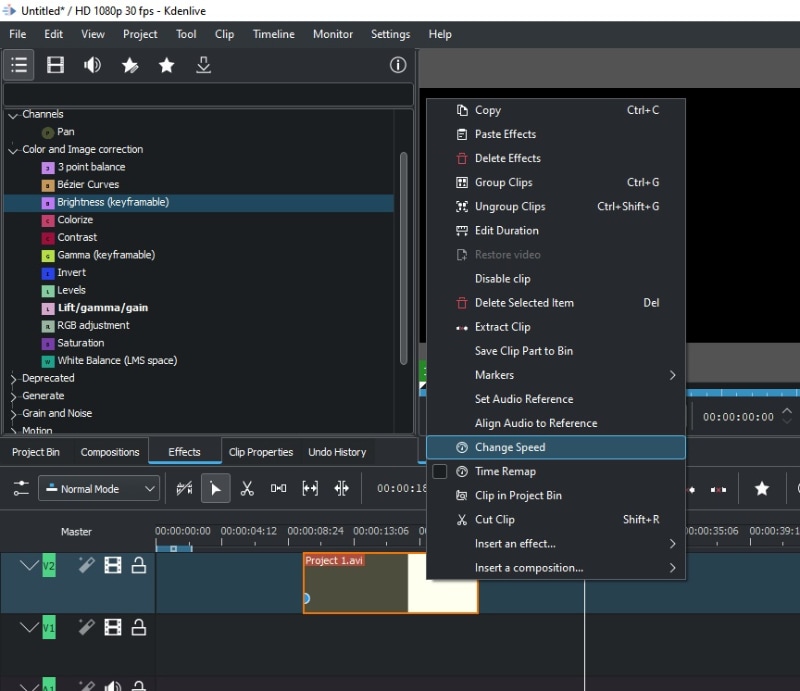
Step 2: Adjust the slider to increase or decrease video clip speed and click on Ok button.

Part 3. Advanced Editing with Kdenlive
Now that we have discussed the basic editing Kdenlive tutorial, let us focus on a couple of useful advanced editing features of Kdenlive.
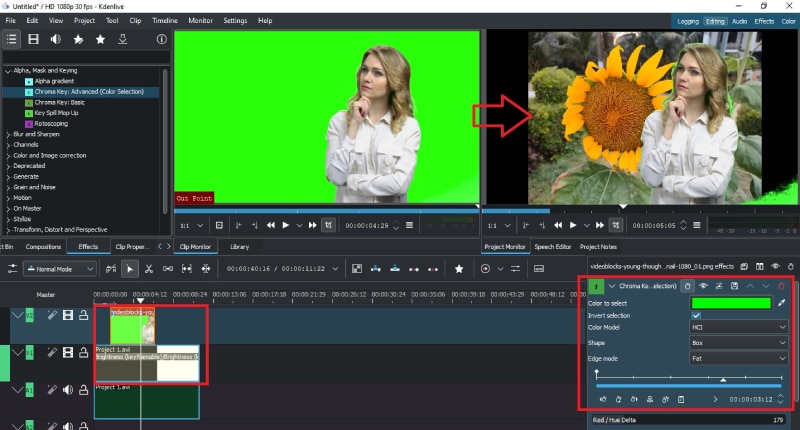
Use green screen effects:
You must have the video clip with green screen background on the timeline. Below the green screen clip should be the background image with which you want to replace the green screen background.
Step 1: Go to Effect> Alpha, Mask and Keying option.
Step 2: Drag and drop “Chroma Key : Advanced” on the video clip where there is a green screen.
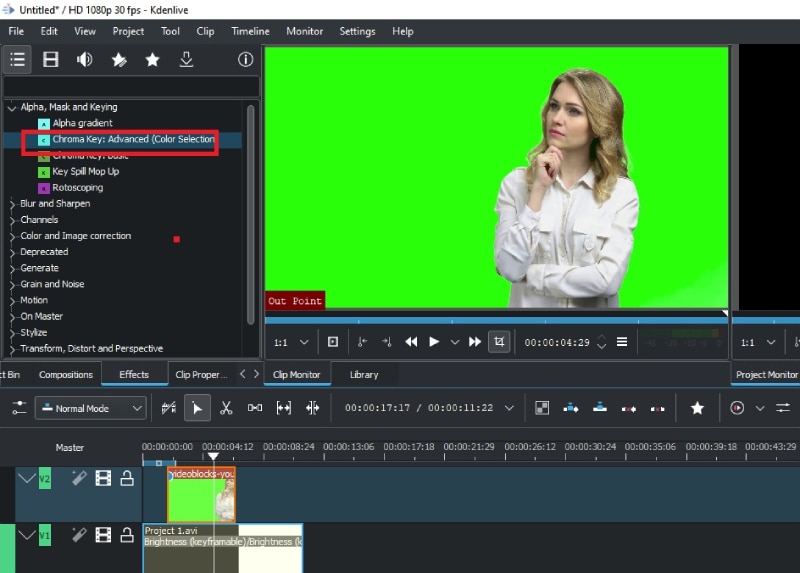
Step 3: Click on video clip and adjust the parameters to soften the edges and make it as natural as possible.
**Add audio:
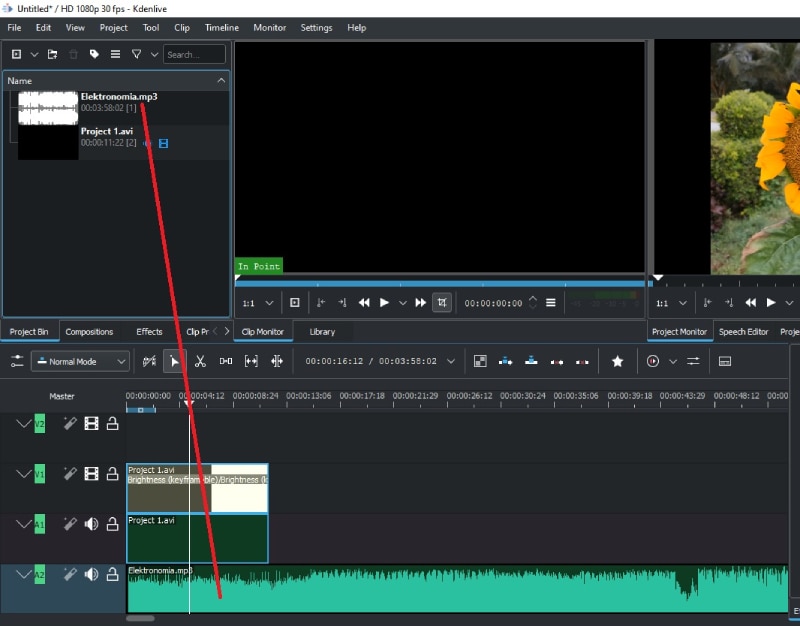
Adding audio files and music files to the video is as easy as adding video clips. You should have your audio file ready on your hard drive.
Step 1: Go to Project menu option. Click on “Add Clip or Folder” option. Select the audio file or folder from your hard drive.

Step 2: The imported audio files will have to be dragged and dropped on the timeline from Project Bin.
Part 4. Best Kdenlive Alternative to Edit Videos
Kdenlive has several drawbacks that prevent it from becoming the best video editor. Even though the features are sufficient for beginners, it is not suitable for professional editing. There is a lack of advanced options such as motion tracking or faster video production. Besides, the effects are very limited in number and so are the text and audio effects. That is why we recommend Wondershare Filmora as the best alternative to Kdenlive Mac and Windows.
Filmora is a premium video editor with video capturing feature. You can record your screen and webcam video. There is no dearth of effects, filters, elements and royalty-free media files. The user interface is cleaner and hence, it is suitable for both beginners and professionals. Here are the key features of Filmora.

For Win 7 or later (64-bit)
For macOS 10.12 or later
- 4K video editing and exporting without lag.
- Noise removal, color tuning, and video stabilization.
- Standard editing like trim, crop, split, join, rotate etc.
- Advanced text styles, audio mixing options, and audio equalizers.
- Wide range of stock media files. Supports different file formats.
- Capture screen and webcam video with internal and external audio.
Frequently Asked Questions
**Is Kdenlive a good editor?
Kdenlive is a good editor if you are getting started in video editing or you are editing your video for personal usage. However, for professional and even social media videos, a premium video editor will be better. We recommend Filmora over Kdenlive because Kdenlive lacks advanced video editing options.
**Does Kdenlive cost money?
Kdenlive Windows, Mac, and Linux are available free of cost as it belongs to the open-source software category. There is also no premium version available, and hence, all the features are unlocked in the free version.
**What can you do with Kdenlive?
You can trim your video, add music, add effects, adjust speed, correct colors, and add green screen effect. Besides, you can add multiple video clips and audio files to the timeline. There are options for keyframable effects as well.
End Screen Makers
A YouTube end screen is the final section of a YouTube video and generally makes up the final 5-20 seconds of the video. Video creators often use this section of the video to add calls-to-action, playlists, links to videos, and more.
It can therefore be a very crucial 5-20 seconds and you may want to make sure that the end screen works for your brand. To do that, you need to make use of a good end screen maker that will ensure you are taking full advantage of this final part of the video. Here, we will look at some of the best end screen makers for you to choose from.
Best End Screen Makers
The following are the best end screen makers that you can use to finish your YouTube videos in style;
Filmora
Wondershare Filmora is one of the best video creation and editing tools in the market and as such you can be sure that it has all the necessary features to help you create and edit an end screen for your YouTube video that users will interact with. It has a lot of different features that make the process easy and allows you to customize our video in so many ways.

You can add all kinds of assets to the video project including images, video clips, text, and more, and use Filmora’s filters, animated elements, and video effects to put them together. All these features come in a very simple-to-use interface that makes the often-complicated process of creating and editing videos very easy.
For Win 7 or later (64-bit)
For macOS 10.12 or later
Key Features
- You can export the completed video in very high quality
- It can be used to create and edit GIFs
- It has numerous editing tools including noise removal options, advanced color tuning, advanced text editor, scene stabilization, and more.
- You can add audio including voiceover and music to the video
- It has a very simple user interface that makes it very easy to use
Canva
Canva is a simple-to-use animated YouTube end screen maker that has a large library of resources ideal for creating different types of end screens. One of the best things about Canva is the numerous templates that you can choose from, along with effects and media files including stock photos that can be very useful when creating your video.
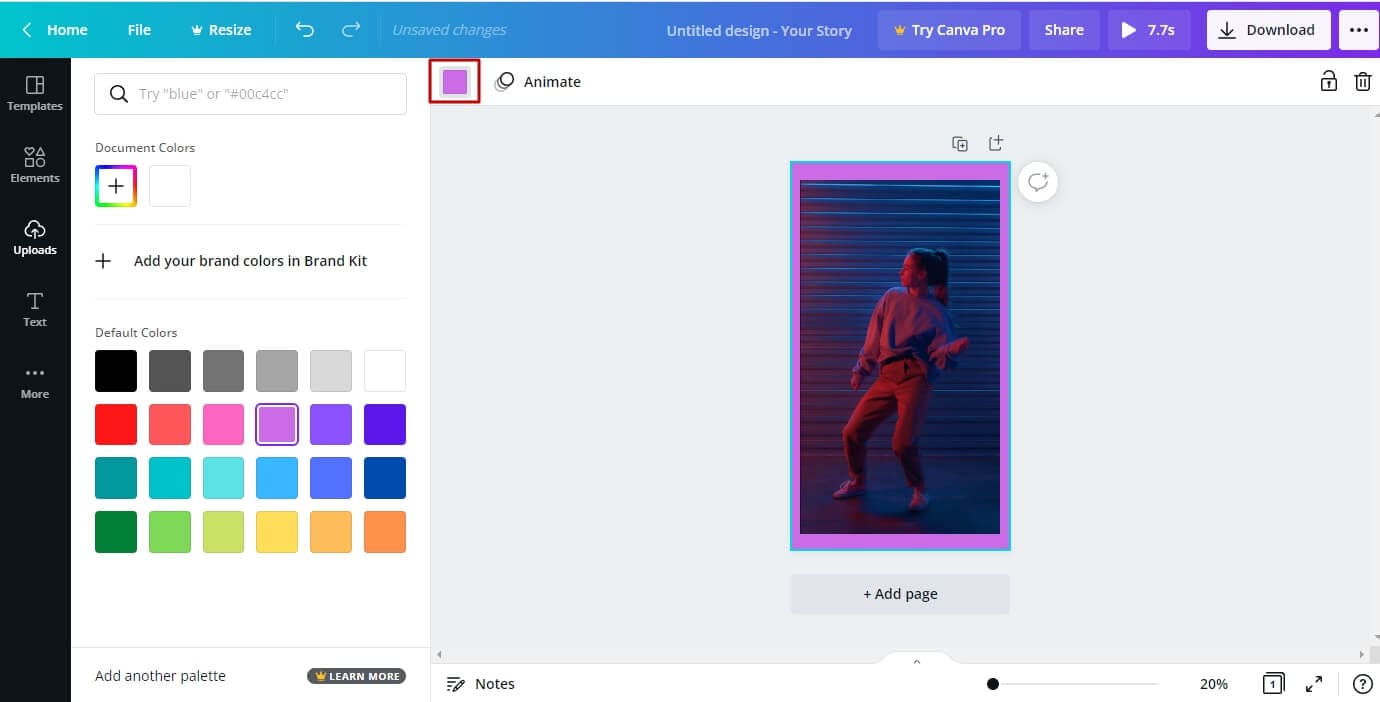
Although most of the features, including many of the templates, are free, the best resources are only available on the premium plan. Using a premium photo or template will mean that a watermark is added to your design.
Key Features
- Most of the resources you need to create your end screen on Canva are free
- The interface is very easy to use, with tutorials that can help when you get stuck.
- It has many great resources including stock images and unique templates
- You can add many effects to the end screen
Fotor
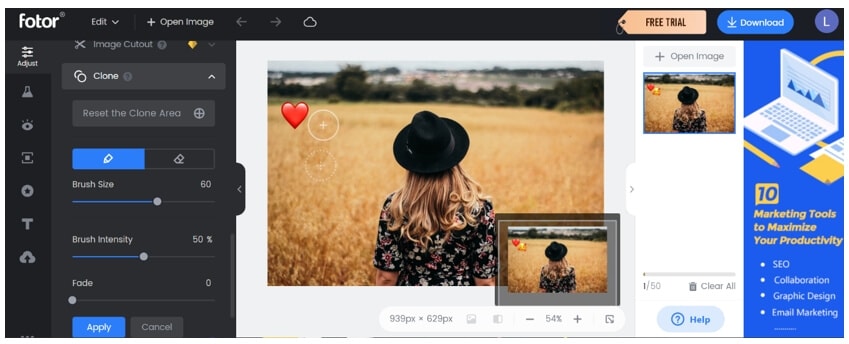
Fotor is another great solution that can be very useful in creating the YouTube end screen. It comes with a lot of different templates to choose from, allowing you to customize the end screen for maximum engagement. You can also upload your images to use in the project or choose from the Fotor library which offers options for different kinds of videos.
Key Features
- Most of the templates that you can choose are completely free to use
- The templates also come in different sizes to suit all needs
- You can use one of the many effects to further customize the end screen.
- The templates and effects are also customizable
Snappa
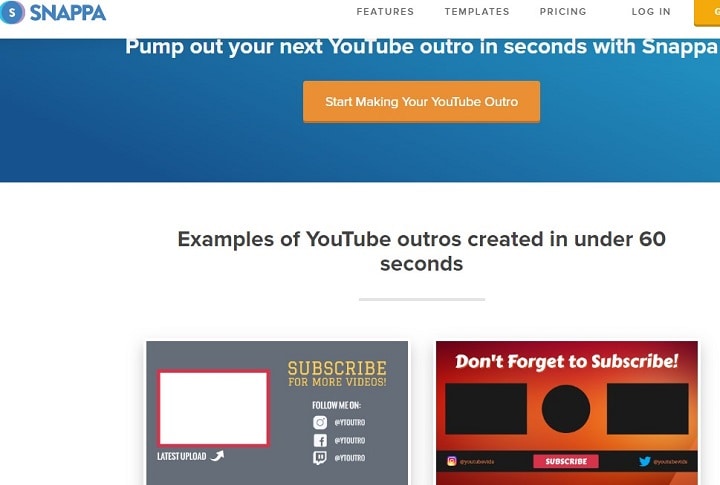
Snappa can also be a good way to create the perfect end screen for your YouTube video. It is a versatile solution with a lot of options to help you customize the end screen to suit your brand and targets. One such resource is the huge library of stock images as well as icons and shapes that you can choose from. Snappa makes the process much easier by allowing you to start from a suitable template that you can then customize as desired.
Key Features
- There are a lot of templates to choose from
- You can import your media files to customize the design
- You can also start from a blank canvas and work from there
- There is also a large library of stock photos that you can choose from
Placeit.net
This is an online solution that is one of the best ways to create an end screen for your YouTube video. The user interface is very simple to navigate and very well designed, allowing you to easily create the end screen even if you are a beginner.
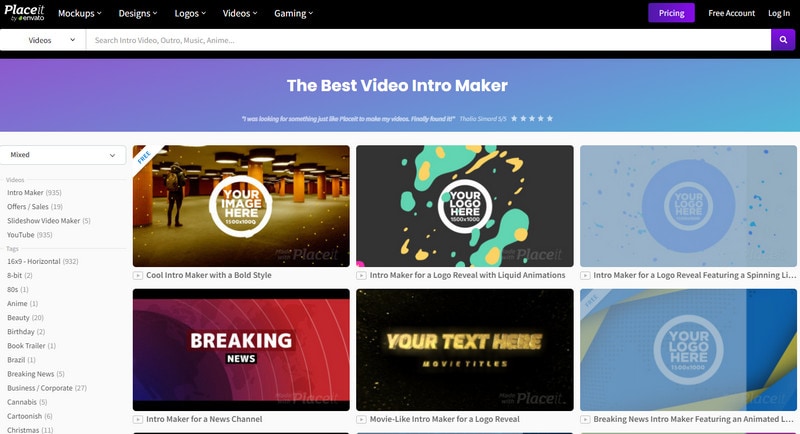
You can upload your images to add to the design or choose from the large library of resources that Placeit.net provides. You also have numerous export options to choose from.
Key Features
- There are numerous templates to choose from
- You can export the end screen with transparency
- The interface is very easy to use
- Most of the resources are available for free
Kapwing
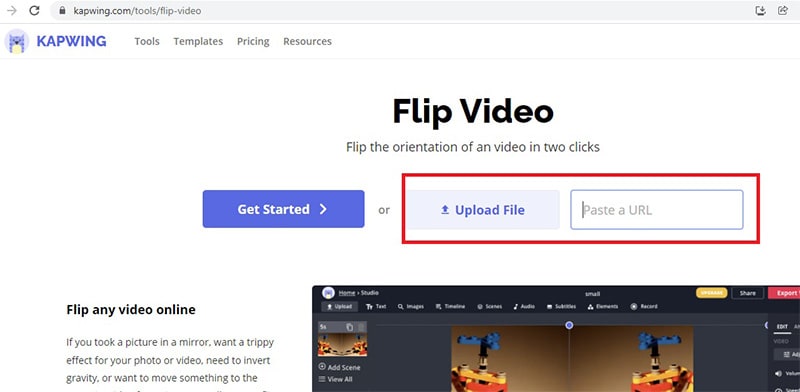
Kapwing is an online video editing solution that you can also use to create an end screen for your YouTube video. It has extensive features that can allow you to customize your end screen any way you want to. It has numerous templates to choose from and the simple drag-and-drop interface makes creating the end screen very easy.
Key Features
- You can choose the size of the end screen to use
- There are a lot of templates to choose from
- You can upload your images and other elements to the project
- You get to choose the duration of the end screen before you begin the project
How to Make an End Screen with Filmora
Creating an end screen for your YouTube video using Filmora is a very simple process. Use these steps to do it;
Step 1: The first thing you need to do is install Filmora on your computer. You can download the setup file from the main website and then follow the instructions on the setup wizard to install the program.
Once the installation is complete, open the program and click on “New Project” to start.
Step 2: Click on the “Titles” section and search for “End Screen” using the search bar. Select the best template for your end screen and drag it into the timeline.
Step 3: Now you are ready to add elements to the end screen. Add your profile picture on a new track across the timeline and stretch it to fit the screen as desired.
Step 4: Click on “Effects” and use the search function to search for the “Mask” effect. When you find it, add it across the timeline and double-click on it to open its settings and adjust the effect accordingly.
Step 5: You may also want to add your social media handles to the end screen. To do that, use the “Titles” tab to find the different social media handles and add each one to the timeline.
You are now ready to save and export the end screen and add it to your YouTube video.
Related FAQs About End Screen Maker
1. How Do You Make an End Screen?
Making an end screen is different depending on the tool that you use to create the end screen as well as the number of elements that you choose to add to it. But usually, you would start with a template and begin adding elements to the project one by one.
2.What is the Best Free Outro Maker?
The best tool to create an end screen for YouTube videos is Filmora simply because it makes the process very easy while allowing you to customize your creation as much as you need. But even though it has a free trial version, most of the features you need to create a unique end screen are not available on the free plan.
A good free solution would be Canva because it has numerous free resources that can create a decent end screen. Although we must point out that many of the best templates and elements on Canva are also not available for free.
3.How Long can a YouTube End Screen Be?
A typical end screen is often 5-20 seconds long. You don’t need any more than 20 seconds because it is only used as a way to promote additional content or add a call to action. So when creating an End screen, ensure that all elements are clear enough as your audience will have only 20 seconds to see it.
Even though it is just 20 seconds long, the end screen of your YouTube video can be the most important aspect of the entire video. It is a great way to further engage with your audience and with the tools on
this list, you can now create the best end screen for your video.
For macOS 10.12 or later
Key Features
- You can export the completed video in very high quality
- It can be used to create and edit GIFs
- It has numerous editing tools including noise removal options, advanced color tuning, advanced text editor, scene stabilization, and more.
- You can add audio including voiceover and music to the video
- It has a very simple user interface that makes it very easy to use
Canva
Canva is a simple-to-use animated YouTube end screen maker that has a large library of resources ideal for creating different types of end screens. One of the best things about Canva is the numerous templates that you can choose from, along with effects and media files including stock photos that can be very useful when creating your video.

Although most of the features, including many of the templates, are free, the best resources are only available on the premium plan. Using a premium photo or template will mean that a watermark is added to your design.
Key Features
- Most of the resources you need to create your end screen on Canva are free
- The interface is very easy to use, with tutorials that can help when you get stuck.
- It has many great resources including stock images and unique templates
- You can add many effects to the end screen
Fotor
Fotor is another great solution that can be very useful in creating the YouTube end screen. It comes with a lot of different templates to choose from, allowing you to customize the end screen for maximum engagement. You can also upload your images to use in the project or choose from the Fotor library which offers options for different kinds of videos.

Key Features
- Most of the templates that you can choose are completely free to use
- The templates also come in different sizes to suit all needs
- You can use one of the many effects to further customize the end screen.
- The templates and effects are also customizable
Snappa
Snappa can also be a good way to create the perfect end screen for your YouTube video. It is a versatile solution with a lot of options to help you customize the end screen to suit your brand and targets. One such resource is the huge library of stock images as well as icons and shapes that you can choose from. Snappa makes the process much easier by allowing you to start from a suitable template that you can then customize as desired.

Key Features
- There are a lot of templates to choose from
- You can import your media files to customize the design
- You can also start from a blank canvas and work from there
- There is also a large library of stock photos that you can choose from
Placeit.net
This is an online solution that is one of the best ways to create an end screen for your YouTube video. The user interface is very simple to navigate and very well designed, allowing you to easily create the end screen even if you are a beginner.

You can upload your images to add to the design or choose from the large library of resources that Placeit.net provides. You also have numerous export options to choose from.
Key Features
- There are numerous templates to choose from
- You can export the end screen with transparency
- The interface is very easy to use
- Most of the resources are available for free
Kapwing
Kapwing is an online video editing solution that you can also use to create an end screen for your YouTube video. It has extensive features that can allow you to customize your end screen any way you want to. It has numerous templates to choose from and the simple drag-and-drop interface makes creating the end screen very easy.

Key Features
- You can choose the size of the end screen to use
- There are a lot of templates to choose from
- You can upload your images and other elements to the project
- You get to choose the duration of the end screen before you begin the project
How to Make an End Screen with Filmora
Creating an end screen for your YouTube video using Filmora is a very simple process. Use these steps to do it;
Step 1: The first thing you need to do is install Filmora on your computer. You can download the setup file from the main website and then follow the instructions on the setup wizard to install the program.
Once the installation is complete, open the program and click on “New Project” to start.
Step 2: Click on the “Titles” section and search for “End Screen” using the search bar. Select the best template for your end screen and drag it into the timeline.
Step 3: Now you are ready to add elements to the end screen. Add your profile picture on a new track across the timeline and stretch it to fit the screen as desired.
Step 4: Click on “Effects” and use the search function to search for the “Mask” effect. When you find it, add it across the timeline and double-click on it to open its settings and adjust the effect accordingly.
Step 5: You may also want to add your social media handles to the end screen. To do that, use the “Titles” tab to find the different social media handles and add each one to the timeline.
You are now ready to save and export the end screen and add it to your YouTube video.
Related FAQs About End Screen Maker
1. How Do You Make an End Screen?
Making an end screen is different depending on the tool that you use to create the end screen as well as the number of elements that you choose to add to it. But usually, you would start with a template and begin adding elements to the project one by one.
2.What is the Best Free Outro Maker?
The best tool to create an end screen for YouTube videos is Filmora simply because it makes the process very easy while allowing you to customize your creation as much as you need. But even though it has a free trial version, most of the features you need to create a unique end screen are not available on the free plan.
A good free solution would be Canva because it has numerous free resources that can create a decent end screen. Although we must point out that many of the best templates and elements on Canva are also not available for free.
3.How Long can a YouTube End Screen Be?
A typical end screen is often 5-20 seconds long. You don’t need any more than 20 seconds because it is only used as a way to promote additional content or add a call to action. So when creating an End screen, ensure that all elements are clear enough as your audience will have only 20 seconds to see it.
Even though it is just 20 seconds long, the end screen of your YouTube video can be the most important aspect of the entire video. It is a great way to further engage with your audience and with the tools on
this list, you can now create the best end screen for your video.
For macOS 10.12 or later
Key Features
- You can export the completed video in very high quality
- It can be used to create and edit GIFs
- It has numerous editing tools including noise removal options, advanced color tuning, advanced text editor, scene stabilization, and more.
- You can add audio including voiceover and music to the video
- It has a very simple user interface that makes it very easy to use
Canva
Canva is a simple-to-use animated YouTube end screen maker that has a large library of resources ideal for creating different types of end screens. One of the best things about Canva is the numerous templates that you can choose from, along with effects and media files including stock photos that can be very useful when creating your video.

Although most of the features, including many of the templates, are free, the best resources are only available on the premium plan. Using a premium photo or template will mean that a watermark is added to your design.
Key Features
- Most of the resources you need to create your end screen on Canva are free
- The interface is very easy to use, with tutorials that can help when you get stuck.
- It has many great resources including stock images and unique templates
- You can add many effects to the end screen
Fotor
Fotor is another great solution that can be very useful in creating the YouTube end screen. It comes with a lot of different templates to choose from, allowing you to customize the end screen for maximum engagement. You can also upload your images to use in the project or choose from the Fotor library which offers options for different kinds of videos.

Key Features
- Most of the templates that you can choose are completely free to use
- The templates also come in different sizes to suit all needs
- You can use one of the many effects to further customize the end screen.
- The templates and effects are also customizable
Snappa
Snappa can also be a good way to create the perfect end screen for your YouTube video. It is a versatile solution with a lot of options to help you customize the end screen to suit your brand and targets. One such resource is the huge library of stock images as well as icons and shapes that you can choose from. Snappa makes the process much easier by allowing you to start from a suitable template that you can then customize as desired.

Key Features
- There are a lot of templates to choose from
- You can import your media files to customize the design
- You can also start from a blank canvas and work from there
- There is also a large library of stock photos that you can choose from
Placeit.net
This is an online solution that is one of the best ways to create an end screen for your YouTube video. The user interface is very simple to navigate and very well designed, allowing you to easily create the end screen even if you are a beginner.

You can upload your images to add to the design or choose from the large library of resources that Placeit.net provides. You also have numerous export options to choose from.
Key Features
- There are numerous templates to choose from
- You can export the end screen with transparency
- The interface is very easy to use
- Most of the resources are available for free
Kapwing
Kapwing is an online video editing solution that you can also use to create an end screen for your YouTube video. It has extensive features that can allow you to customize your end screen any way you want to. It has numerous templates to choose from and the simple drag-and-drop interface makes creating the end screen very easy.

Key Features
- You can choose the size of the end screen to use
- There are a lot of templates to choose from
- You can upload your images and other elements to the project
- You get to choose the duration of the end screen before you begin the project
How to Make an End Screen with Filmora
Creating an end screen for your YouTube video using Filmora is a very simple process. Use these steps to do it;
Step 1: The first thing you need to do is install Filmora on your computer. You can download the setup file from the main website and then follow the instructions on the setup wizard to install the program.
Once the installation is complete, open the program and click on “New Project” to start.
Step 2: Click on the “Titles” section and search for “End Screen” using the search bar. Select the best template for your end screen and drag it into the timeline.
Step 3: Now you are ready to add elements to the end screen. Add your profile picture on a new track across the timeline and stretch it to fit the screen as desired.
Step 4: Click on “Effects” and use the search function to search for the “Mask” effect. When you find it, add it across the timeline and double-click on it to open its settings and adjust the effect accordingly.
Step 5: You may also want to add your social media handles to the end screen. To do that, use the “Titles” tab to find the different social media handles and add each one to the timeline.
You are now ready to save and export the end screen and add it to your YouTube video.
Related FAQs About End Screen Maker
1. How Do You Make an End Screen?
Making an end screen is different depending on the tool that you use to create the end screen as well as the number of elements that you choose to add to it. But usually, you would start with a template and begin adding elements to the project one by one.
2.What is the Best Free Outro Maker?
The best tool to create an end screen for YouTube videos is Filmora simply because it makes the process very easy while allowing you to customize your creation as much as you need. But even though it has a free trial version, most of the features you need to create a unique end screen are not available on the free plan.
A good free solution would be Canva because it has numerous free resources that can create a decent end screen. Although we must point out that many of the best templates and elements on Canva are also not available for free.
3.How Long can a YouTube End Screen Be?
A typical end screen is often 5-20 seconds long. You don’t need any more than 20 seconds because it is only used as a way to promote additional content or add a call to action. So when creating an End screen, ensure that all elements are clear enough as your audience will have only 20 seconds to see it.
Even though it is just 20 seconds long, the end screen of your YouTube video can be the most important aspect of the entire video. It is a great way to further engage with your audience and with the tools on
this list, you can now create the best end screen for your video.
For macOS 10.12 or later
Key Features
- You can export the completed video in very high quality
- It can be used to create and edit GIFs
- It has numerous editing tools including noise removal options, advanced color tuning, advanced text editor, scene stabilization, and more.
- You can add audio including voiceover and music to the video
- It has a very simple user interface that makes it very easy to use
Canva
Canva is a simple-to-use animated YouTube end screen maker that has a large library of resources ideal for creating different types of end screens. One of the best things about Canva is the numerous templates that you can choose from, along with effects and media files including stock photos that can be very useful when creating your video.

Although most of the features, including many of the templates, are free, the best resources are only available on the premium plan. Using a premium photo or template will mean that a watermark is added to your design.
Key Features
- Most of the resources you need to create your end screen on Canva are free
- The interface is very easy to use, with tutorials that can help when you get stuck.
- It has many great resources including stock images and unique templates
- You can add many effects to the end screen
Fotor
Fotor is another great solution that can be very useful in creating the YouTube end screen. It comes with a lot of different templates to choose from, allowing you to customize the end screen for maximum engagement. You can also upload your images to use in the project or choose from the Fotor library which offers options for different kinds of videos.

Key Features
- Most of the templates that you can choose are completely free to use
- The templates also come in different sizes to suit all needs
- You can use one of the many effects to further customize the end screen.
- The templates and effects are also customizable
Snappa
Snappa can also be a good way to create the perfect end screen for your YouTube video. It is a versatile solution with a lot of options to help you customize the end screen to suit your brand and targets. One such resource is the huge library of stock images as well as icons and shapes that you can choose from. Snappa makes the process much easier by allowing you to start from a suitable template that you can then customize as desired.

Key Features
- There are a lot of templates to choose from
- You can import your media files to customize the design
- You can also start from a blank canvas and work from there
- There is also a large library of stock photos that you can choose from
Placeit.net
This is an online solution that is one of the best ways to create an end screen for your YouTube video. The user interface is very simple to navigate and very well designed, allowing you to easily create the end screen even if you are a beginner.

You can upload your images to add to the design or choose from the large library of resources that Placeit.net provides. You also have numerous export options to choose from.
Key Features
- There are numerous templates to choose from
- You can export the end screen with transparency
- The interface is very easy to use
- Most of the resources are available for free
Kapwing
Kapwing is an online video editing solution that you can also use to create an end screen for your YouTube video. It has extensive features that can allow you to customize your end screen any way you want to. It has numerous templates to choose from and the simple drag-and-drop interface makes creating the end screen very easy.

Key Features
- You can choose the size of the end screen to use
- There are a lot of templates to choose from
- You can upload your images and other elements to the project
- You get to choose the duration of the end screen before you begin the project
How to Make an End Screen with Filmora
Creating an end screen for your YouTube video using Filmora is a very simple process. Use these steps to do it;
Step 1: The first thing you need to do is install Filmora on your computer. You can download the setup file from the main website and then follow the instructions on the setup wizard to install the program.
Once the installation is complete, open the program and click on “New Project” to start.
Step 2: Click on the “Titles” section and search for “End Screen” using the search bar. Select the best template for your end screen and drag it into the timeline.
Step 3: Now you are ready to add elements to the end screen. Add your profile picture on a new track across the timeline and stretch it to fit the screen as desired.
Step 4: Click on “Effects” and use the search function to search for the “Mask” effect. When you find it, add it across the timeline and double-click on it to open its settings and adjust the effect accordingly.
Step 5: You may also want to add your social media handles to the end screen. To do that, use the “Titles” tab to find the different social media handles and add each one to the timeline.
You are now ready to save and export the end screen and add it to your YouTube video.
Related FAQs About End Screen Maker
1. How Do You Make an End Screen?
Making an end screen is different depending on the tool that you use to create the end screen as well as the number of elements that you choose to add to it. But usually, you would start with a template and begin adding elements to the project one by one.
2.What is the Best Free Outro Maker?
The best tool to create an end screen for YouTube videos is Filmora simply because it makes the process very easy while allowing you to customize your creation as much as you need. But even though it has a free trial version, most of the features you need to create a unique end screen are not available on the free plan.
A good free solution would be Canva because it has numerous free resources that can create a decent end screen. Although we must point out that many of the best templates and elements on Canva are also not available for free.
3.How Long can a YouTube End Screen Be?
A typical end screen is often 5-20 seconds long. You don’t need any more than 20 seconds because it is only used as a way to promote additional content or add a call to action. So when creating an End screen, ensure that all elements are clear enough as your audience will have only 20 seconds to see it.
Even though it is just 20 seconds long, the end screen of your YouTube video can be the most important aspect of the entire video. It is a great way to further engage with your audience and with the tools on
this list, you can now create the best end screen for your video.
Adjust Background to Black for Your Product Review Video
Are you planning to make a product review video but wondering how to set up your background? If so, then you’re in the right place. This post will show you how to adjust the background to black for your product review video.
It’s essential to have a smooth black background without texture for your product review videos. Having a clean background is visually appealing and enhances the video. It will make sure that your viewers can see the product clearly without any distractions.
Do the following steps to change the background to black for your product review video:

Part 1. How to change the parameters in Filmora
For this tutorial, we will do it using Wondershare Filmora . So, if you haven’t installed it yet, you can download it here:
Free Download For Win 7 or later(64-bit)
Free Download For macOS 10.14 or later
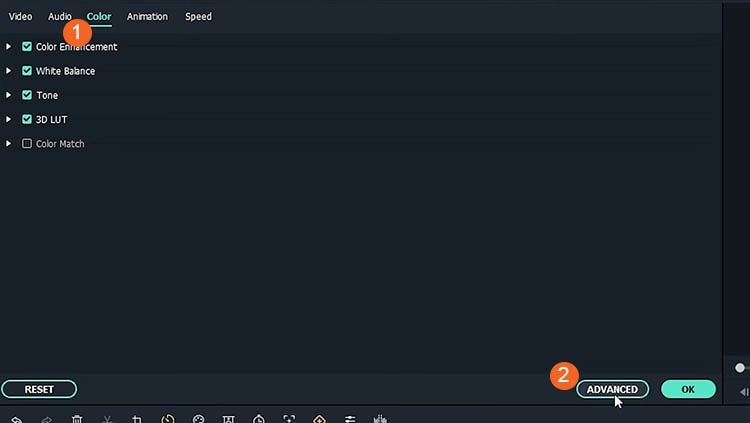
Step1 Right-click the clip in the editing timeline > Edit Properties.
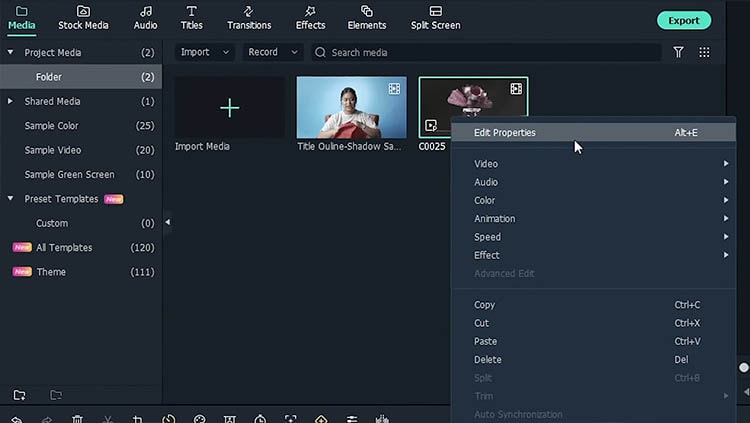
Step2 Select the Color menu > Advanced.
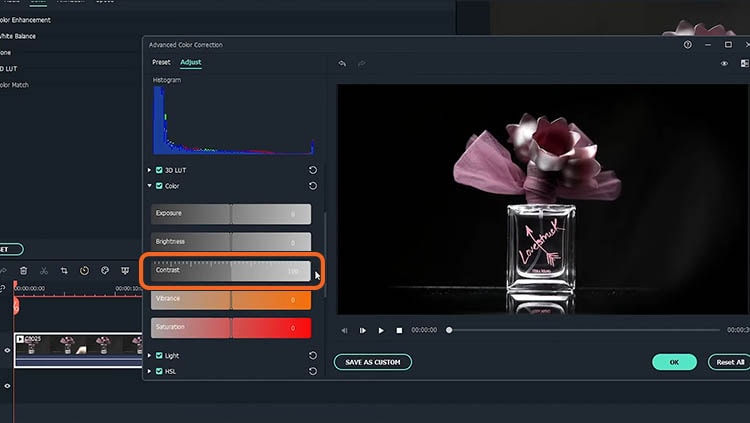
Step3 Setting the color parameters.
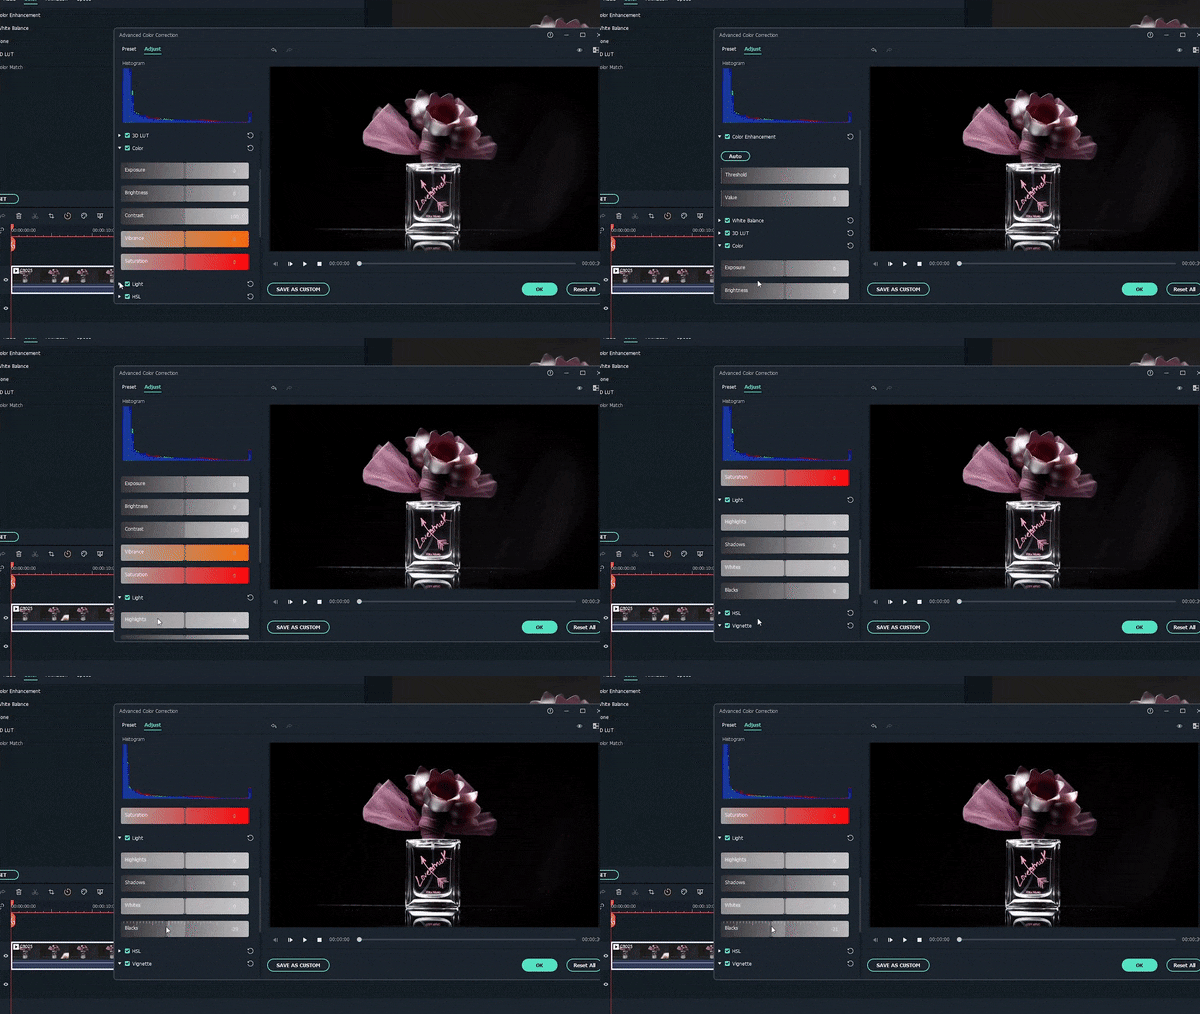
Click the adjust button in the upper left, scroll down to the vignette, and then decrease the amount and size value until the oval surrounds the subject.

Scroll up to the color options and increase the contrast to 100.
Go to the light menu, then decrease the shadows to cover any remaining light spots.
Part 2. Tips: How to improve product review video
Following these tips will help you improve the quality of your product review videos and make them more enjoyable for your audience.
1) Make sure your video has the correct resolution and scale
Having the correct resolution and scale for your video will make sure that it has a high-definition (HD) or high-quality resolution. Also, it will ensure that your video is the correct size when exporting.
If the scale is different from the resolution, then the empty space will be filled with black, and you will get black bars border that makes your video smaller.
2) Use proper lighting to ensure your video looks clear and bright
To get proper lighting, you should use natural lighting whenever possible, such as sunlight. However, if you can’t shoot during the day or it’s difficult to get natural light, you will need to use artificial lighting.
Next, adjust the white balance on your camera. You can also edit the color grading to finalize the look and improve the overall color of your video.
3) Make sure the audio quality of your video is good
Poor audio can make your video harder to listen to and turn off viewers.
Summary
It is essential to know how to adjust the background to black in your product review video. This is because it can help to make your video content more professional and stand out. By the end of this tutorial, you can now try and create a professional-looking video with a black background to improve your product review video.
Free Download For macOS 10.14 or later
Step1 Right-click the clip in the editing timeline > Edit Properties.

Step2 Select the Color menu > Advanced.

Step3 Setting the color parameters.
Click the adjust button in the upper left, scroll down to the vignette, and then decrease the amount and size value until the oval surrounds the subject.

Scroll up to the color options and increase the contrast to 100.

Go to the light menu, then decrease the shadows to cover any remaining light spots.

Part 2. Tips: How to improve product review video
Following these tips will help you improve the quality of your product review videos and make them more enjoyable for your audience.
1) Make sure your video has the correct resolution and scale
Having the correct resolution and scale for your video will make sure that it has a high-definition (HD) or high-quality resolution. Also, it will ensure that your video is the correct size when exporting.
If the scale is different from the resolution, then the empty space will be filled with black, and you will get black bars border that makes your video smaller.
2) Use proper lighting to ensure your video looks clear and bright
To get proper lighting, you should use natural lighting whenever possible, such as sunlight. However, if you can’t shoot during the day or it’s difficult to get natural light, you will need to use artificial lighting.
Next, adjust the white balance on your camera. You can also edit the color grading to finalize the look and improve the overall color of your video.
3) Make sure the audio quality of your video is good
Poor audio can make your video harder to listen to and turn off viewers.
Summary
It is essential to know how to adjust the background to black in your product review video. This is because it can help to make your video content more professional and stand out. By the end of this tutorial, you can now try and create a professional-looking video with a black background to improve your product review video.
Also read:
- Updated 10 Best Cartoon Video Makers (Online and Desktop Solution) for 2024
- New In 2024, IMovie Review – Is It The Best Video Editor for Mac Users
- 2024 Approved It Is Crucial to Introduce Your Kids to the Different Colors and Practice the Color Matching Game. So, Here Are the Various Factors Related to Color Matching for Your Child with a Tool to Help You in It Ideally
- In 2024, Add Stylish Text to Videos
- 2024 Approved How to Use Visual Effect for Zoom
- New Have You Been Looking for Online YouTube Video Trimmer? You Will Be Introduced to Different Ways to Trim YouTube Videos as Introduced by YouTube Itself and some Online and Desktop Software to Help You Learn Video Trimming in This Article
- In 2024, How to Use Filmora Slideshow Maker for Making Slideshow? What Is Slideshow Filmora? Know the Steps to Make Filmora Slideshow. What Are Steps to Make Filmora Slideshow Template?
- Updated How to Share YouTube Video on Zoom?
- Updated 2024 Approved What You Should Know About Speech-to-Text Technology
- New 2024 Approved How to Clone Yourself in Videos with Filmora?
- Best Software or Website to Convert Video Format
- 2024 Approved How to Create a Video Slideshow in iMovie
- Best Guide for Setting TikTok Countdown Timer
- Updated Zoom In and Out on Discord for 2024
- New How to Convert Images Into Video - Kapwing Tutorial
- In 2024, 100+ Best TikTok Captions Enhance Your Content
- New 2024 Approved Best Software or Website to Convert Video Format
- Updated AI Features of Wondershare Filmora - Silence Detection in Videos for 2024
- Updated You Can Make Attractive Videos by Adding Text Behind Objects. This Article Will Explain How to Use Wondershare Filmora to Create These Videos
- Updated How to Loop Videos with iMovie for 2024
- Updated 2024 Approved How to Create a Dynamic Text Animation in Filmora — Step-By-Step
- What Is an Eye Zoom Transition Effect? Its a Close-Up Video Effect Allowing Viewers to Transit to the Next Clip From the Eye
- How to Record Super Slow Motion Videos on Your Phone for 2024
- In 2024, Best GIF to MOV Converters
- Updated 2024 Approved AVI Video Format How to Open, Play, Edit AVI File?
- Updated Best 6 WMV to GIF Converters
- In 2024, With the Datamoshing Effect, the User Can Damage the Video Clips to Offer a Glitch Effect. The Article Introduces Datamosh After Effects Its Workability in the Industry
- TikTok Face Zoom | Create Your Face Zoom TikTok Now for 2024
- Updated 7 Tips to Create Teaching Videos
- The Article Shall Offer an Overview to Create a Promising Sports Intro and Edit a YouTube Outro for a Sports Channel. There Will Also Be Three Recommended Apps to Download Background Music for Exercise for 2024
- Updated A Guide to Find a High-Quality Video Marketing Agency
- Updated Overview About Supported iPhone Video Formats and Best iPhone Video Editor & Converter for 2024
- Make Super Easy Coin Magic With Filmora
- Updated 11 Ways To Speed Up A Video On iPhone for 2024
- New 2024 Approved How to Find a High-Quality Video Marketing Agency?
- 2024 Approved Top 7 Color Match Paint Apps
- Updated Know How to Make a Video Background Transparent? Export Transparent Background Video After Adding Effects. Steps to Remove White Background From Video
- Updated In 2024, 2 Solutions to Crop a Video Using After Effects
- New How to Change the Speed of Video in DaVinci Resolve?
- How to Create and Add an Adjustment Layer in Final Cut Pro
- New 2024 Approved Detailed Steps to Cut a Video in QuickTime
- New 8 Apps to Custom GIF Stickers
- New How to Perfectly Use Canva Color Match for 2024
- In 2024, Are You Searching for the Best Cinematic LUTs for Premiere Pro? You Are in the Right Place because This Article Is Dedicated to LUTs
- How to Add Green Screen in OBS
- 2024 Approved If You Want an App to Make Videos with Pictures and Music for Social Media Posts, We Are with the Best Apps to Make Videos with Music and Pictures
- In 2024, Top 15 LUTS to Buy
- How to Track Realme C53 Location by Number | Dr.fone
- In 2024, Additional Tips About Sinnoh Stone For OnePlus Nord CE 3 5G | Dr.fone
- In 2024, How To Unlock Any Itel A05s Phone Password Using Emergency Call
- How Can We Bypass Oppo F23 5G FRP?
- In 2024, Proven Ways in How To Hide Location on Life360 For Oppo Reno 8T | Dr.fone
- How to use Device Manager to update drivers on Windows 11
- In 2024, 6 Proven Ways to Unlock Poco F5 Pro 5G Phone When You Forget the Password
- Identify malfunctioning your drivers with Windows Device Manager on Windows 10
- 11 Proven Solutions to Fix Google Play Store Not Working Issue on Itel A05s | Dr.fone
- How to Fix Locked Apple ID from Apple iPhone 13
- How to Change Netflix Location to Get More Country Version On OnePlus Nord N30 SE | Dr.fone
- How to Change/Add Location Filters on Snapchat For your Vivo Y27 4G | Dr.fone
- In 2024, Bypassing Google Account With vnROM Bypass For ZTE Nubia Flip 5G
- How to Fix ZTE Blade A73 5G Find My Friends No Location Found? | Dr.fone
- New How To Watch NBA Live Stream Free Anywhere for 2024
- Best 3 Vivo Y100t Emulator for Mac to Run Your Wanted Android Apps | Dr.fone
- Title: Updated Make Eye Zoom Transition Effect with Filmora
- Author: Chloe
- Created at : 2024-04-24 07:08:13
- Updated at : 2024-04-25 07:08:13
- Link: https://ai-editing-video.techidaily.com/updated-make-eye-zoom-transition-effect-with-filmora/
- License: This work is licensed under CC BY-NC-SA 4.0.

