
Updated Motion Blur Photo With GIMP Step-By-Step Guide

Motion Blur Photo With GIMP: Step-By-Step Guide
GIMP is a cross-platform image editing software that you can use to edit photos and create graphics. The software is available for Linux, Windows, and macOS and can add a motion blur effect (A sense of movement in the photo), making your pictures look more realistic and professional.
So to help you tone your skills, we’ve written a comprehensive guide on how to apply the GIMP motion blur effect to your photos!
Part I. What Is GIMP?
GIMP software, a GNU Image Manipulation Program, is an open-source raster graphics editor used for image editing and retouching, converting between different image formats, free-form drawing, and more.
GIMP is frequently used as a Photoshop alternative. The software boasts a wide range of features, including support for layers, masks, color management, and third-party plugins.
Key Features
Here are some key features of the GIMP software:
- Quickly hide panels and menus to let you switch to a full-screen mode to preview pictures
- Fixes distorted images
- Available for Windows, Linux, Mac OS, and other operating systems
- Automatic image enhancement tool
- Lets you remove all the panels and tools from the workflow except the one you are working with.
- Released under a license called GNU General Public License v3 and later, which makes it free to use and distribute
- Add overlays and crop or resize an image
- Wide range of file formats that it can read and write, making it a versatile tool for working with images
Part II. How To Add The Motion Blur Effect To Your Photos in GIMP?
Below we’ve provided the step-by-step tutorial to add a motion blur effect to your photos in GIMP:
Step1 In the first step, launch a browser on your device, head to the GIMP website , and download the installation file according to your operating system. Now, click the downloaded installer, install the software on your system and launch it.

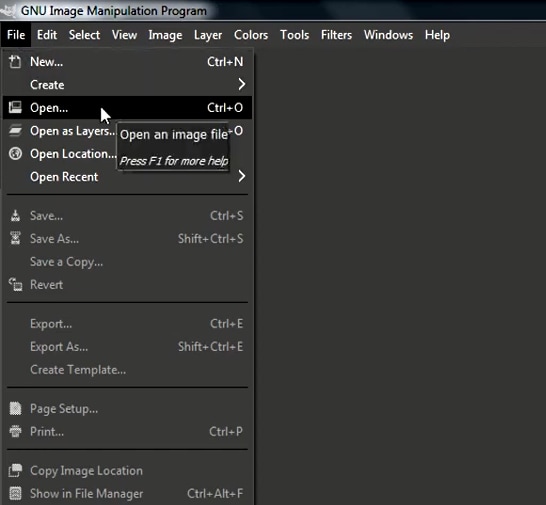
Step2 In the next step, click “File” on the GIMP dashboard, and select “Open” to access the Open Image window. Select your image file from your system and click “Open” to import the file.
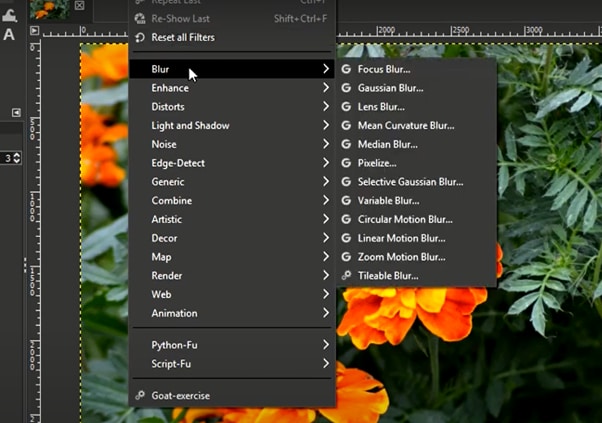
Step3 Next, click the “Filters” option from the top toolbar, select “Blur,” and choose “Motion Blur” from the drop-down menu. A dialogue box will now open where you can preview the effect and adjust the settings, including Blur Type, Blur Center, and Blur Parameters.
Step4 Once you are satisfied with your changes, click “OK” to apply the effect to the image, and make some other edits if needed. Finally, click “File” from the top toolbar, choose “Export As,” click “File Type” to select the format, and select the “Export” option to save your file.
Bonus Tips – The Alternative To GIMP To Create Motion Blur Effect
GIMP is a popular image editor that you can use to create motion blur effects. However, some users find it difficult to use the software for this purpose.
To simplify the process, we recommend usingWondershare Filmora an all-in-one editing software that offers multiple advanced features to help you quickly enhance your project.
Free Download For Win 7 or later(64-bit)
Free Download For macOS 10.14 or later
Here’s why Filmora is the best alternative to GIMP for creating motion blur effects:
- A user-friendly interface where you can quickly create the motion blur effect without spending hours learning the process
- Advanced video editing tools, such as keyframing, speed ramping, green screen, title editing, motion tracking, screen recorder, and preset templates
- Royalty-free music library where you can access millions of music and soundtracks
- Adds the motion blur effect to your videos as well as images
- Comes with multiple parameters to adjust the effect on your clip or image
To add the radial blur effect to images using Filmora, here are the quick and easy-to-follow steps:
Step1 Download the Filmora software on your PC, launch it, and click “Create New Project” on the main panel. Use the “Click Here to Import your Media File” option to import your photo and drag and drop it into the timeline.

Step2 Now, head to the “Effects” tab from the taskbar. Use the search option to find the Blur effect. Afterward, drag & drop it in the timeline and adjust it on your selected clip.
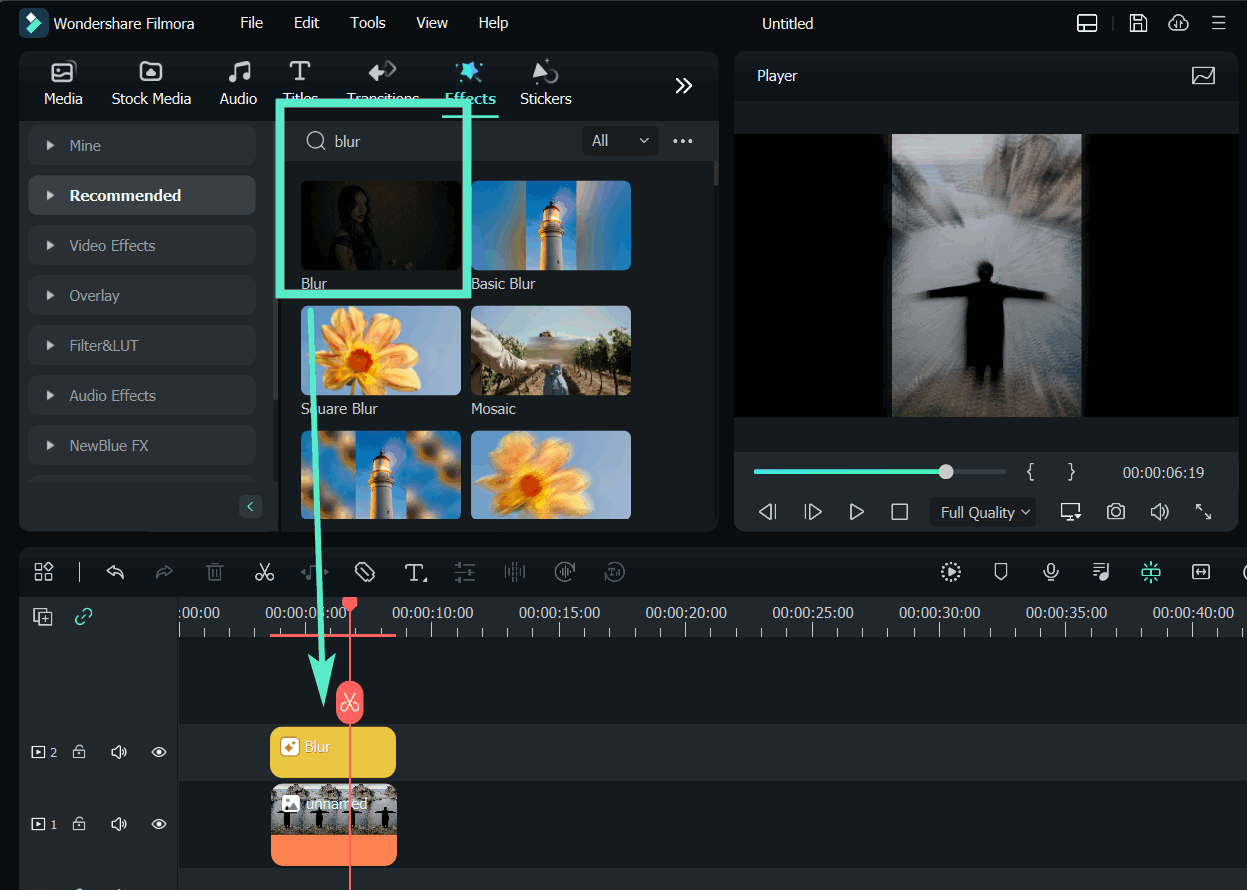
Step3 Please note that motion blur is now a dynamic effect on the image. That means you can add multiple photos and make them into a slideshow with a blur effect transition. Or, press the “Play” icon to preview your photo and pause the clip where you think motion blur works best.
Step4 Click the effect in the timeline to open its settings. Now, play your clip to preview and adjust the parameters as you want to smooth down the motion effect.
Step5 Once satisfied with the outcome, click the “Export” option, go to the “Local” tab, select a file format to save the images, and click “Export” again to save your project.
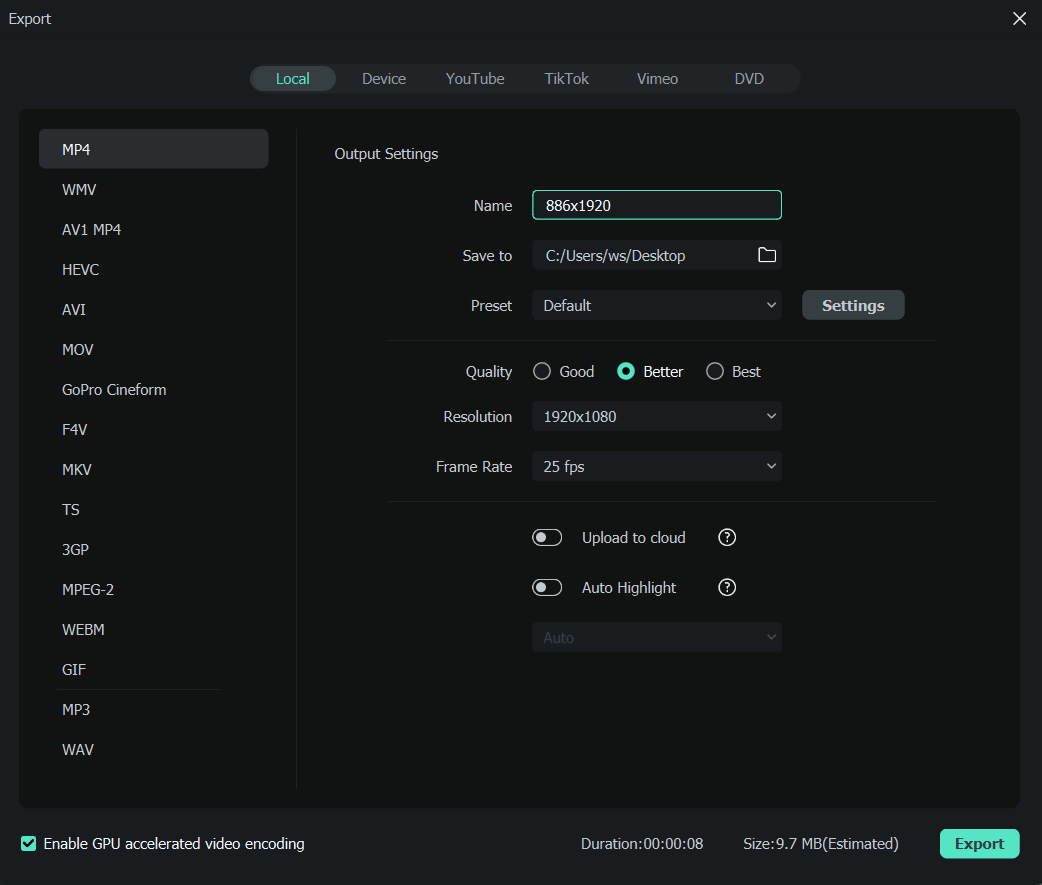
Filmora offers many export options, such as your device, YouTube, Vimeo, and DVD, with just a few clicks.
Last Words
In this detailed tutorial, we’ve discussed what GIMP is and its key features. We’ve provided a step-by-step guide to walk you through the process of creating the motion blur effect using the GIMP software.
In addition, we’ve provided a bonus tip to recommend Filmora as the best alternative to GIMP for creating the motion blur effect.
Hopefully, you found this article helpful in resolving your queries, and you can now add a smooth motion blur effect to your images.
Free Download For macOS 10.14 or later
Here’s why Filmora is the best alternative to GIMP for creating motion blur effects:
- A user-friendly interface where you can quickly create the motion blur effect without spending hours learning the process
- Advanced video editing tools, such as keyframing, speed ramping, green screen, title editing, motion tracking, screen recorder, and preset templates
- Royalty-free music library where you can access millions of music and soundtracks
- Adds the motion blur effect to your videos as well as images
- Comes with multiple parameters to adjust the effect on your clip or image
To add the radial blur effect to images using Filmora, here are the quick and easy-to-follow steps:
Step1 Download the Filmora software on your PC, launch it, and click “Create New Project” on the main panel. Use the “Click Here to Import your Media File” option to import your photo and drag and drop it into the timeline.

Step2 Now, head to the “Effects” tab from the taskbar. Use the search option to find the Blur effect. Afterward, drag & drop it in the timeline and adjust it on your selected clip.

Step3 Please note that motion blur is now a dynamic effect on the image. That means you can add multiple photos and make them into a slideshow with a blur effect transition. Or, press the “Play” icon to preview your photo and pause the clip where you think motion blur works best.
Step4 Click the effect in the timeline to open its settings. Now, play your clip to preview and adjust the parameters as you want to smooth down the motion effect.
Step5 Once satisfied with the outcome, click the “Export” option, go to the “Local” tab, select a file format to save the images, and click “Export” again to save your project.

Filmora offers many export options, such as your device, YouTube, Vimeo, and DVD, with just a few clicks.
Last Words
In this detailed tutorial, we’ve discussed what GIMP is and its key features. We’ve provided a step-by-step guide to walk you through the process of creating the motion blur effect using the GIMP software.
In addition, we’ve provided a bonus tip to recommend Filmora as the best alternative to GIMP for creating the motion blur effect.
Hopefully, you found this article helpful in resolving your queries, and you can now add a smooth motion blur effect to your images.
What Is First Impression Review Video
There are many types of first impression reviews, it can be for gadgets, it can also be for products like skin care, makeup or it can also be home related like appliances, home decor etc. or any products that is available in the market. It depends on the content you choose but this are all example of some products that people want to see impression reviews before buying products.
Doing a first impression review is important specially for companies, because they want to know how the public will accept their products or what else should be changed in the products. The views and opinion of content creator and also for buyer are much needed of this company.
Using this video content to market will benefits the company and products, this is because people engage more with videos than with words or static photo.In this article I will share to you the information about first impression review video and tips on how to make an effective first impression product review.
First Impression Review Video
First impression review is more likely product reviews or live review, products reviews are the videos where you are explaining, products features, pros and cons are describe while first time to see the products. It include also a little of unboxing reviews, because when doing a first impression review, it show how you accept the product looks or what can you say about the product even if it’s the first time you see it.
A review has a simple goal, to check if the products is worth buying or not. It covers how the products helps you. This can involve examining or test the products performance, cost and more.

How this kind of content will help you
Let’s say you want to create content and you have thought or chosen to create these kind of video, so below are the benefits of how it can help to grow your channel.
- Strengthening your online presence
- Engaging viewers
- Building stronger community
- Converting viewers into buyers
- Opportunity to work with Brand
- Product Sponsorship
Tips on How to Perform Product First Impression Review
Include unboxing Video
Unboxing video is recording yourself while opening item for the first time. This opportunity can benefit people who are weighing multiple products before making a purchase. Unboxing videos can recreate the feeling of getting something new and enjoying it for the first time.
Its seems that it is same as you make a first impression video and It would be better if includes this type of video the unboxing of the product in front of the viewers so they see how you react about the product. The genuine reaction upon opening the product is always the best reaction they will see.
Unboxing video make people feel that way and the people behind the camera have knack for building excitement.

Detailed explanation
Detailed explanation meaning starting from the moment you open the package to details that are into the packaging of the products like the ingredients, manufacturer, expiration etc. Introduce the product properly and talk about the where you saw it or how you found out about this. Explain also the product claims that sometime you will read on the packaging but if luck of information you also need to search in their website or pages. Just don’t forget to include everything that you think people need to know about the product.
What include in the video is a commentary explaining to the viewers the features of a particular product. The review may typically includes the strengths and weaknesses of the products.
Talk about Product features and benefits
Products features are the characteristics of the products you are making a vlog. These are the plain facts about the products like the sizes, weight, functionality and benefits because viewers or customers are more likely to know the products performance. Make a list about all the features of the product you are reviewing, explain briefly each one so that viewers can better understand. The same with the benefits they will get if they buy this products.
When you use features in this manner, you help customers who have already decided to buy the product decide which version they are going to buy.

Share personal thoughts
Of course it’s important here that you can share your personal thoughts for the first time you see or touch the product. As an influencer for your viewers to believe and trust you, you just need to give your honest review about the product. Also share them your thoughts about the appearance, what should be change or fixed in the products if any.
Don’t forget to update your viewers when you already use the products. Make another video on how the product perform on you or how the product effects. So that the viewers know immediately if they will buy or not or if it is worth to buy.
Be honest when reviewing especially many viewers only rely on the video review of the influencers.

For Effective Video Performance and Promotion
You need to make the video better so that the brand will be more happy when they see that apart from your effort to search for good things about the products, they will also see your effort when it comes to video editing.
I’m talking about video editing software, you can see many in the market that can be downloaded for free but of course make sure if it’s performance wise to use.
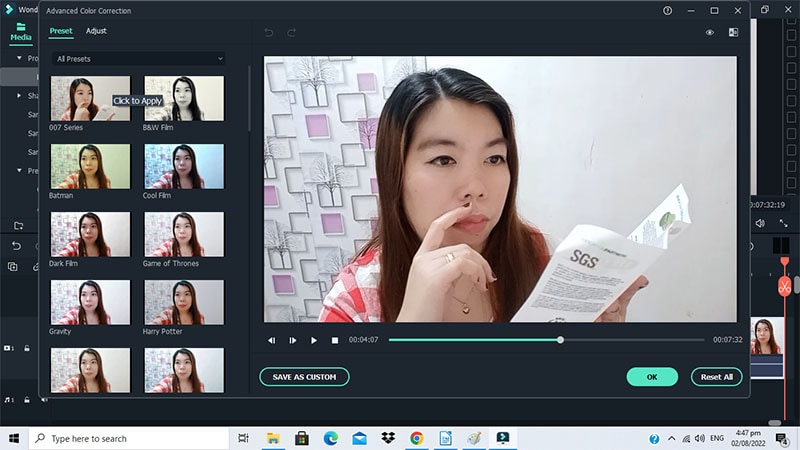
Wondershare Filmora is one of the effective video editing software that can be use especially if you are a beginner in this kind of work.
Filmora has many great features that you can use to enhance the video you make. Use the color enhancer to make the color of the product you show in the video even better. Also use effects to make the video more creative and nice, don’t forget to use background music so the video isn’t boring. There are viewers that beside of how effective you are in doing product review, they are also commenting about the video editing. You have to make your video creative and stand out so that you can attract more viewers to your channel.
Free Download For Win 7 or later(64-bit)
Free Download For macOS 10.14 or later
After making your video creative by editing, it is important that you always promote your videos on all your social media or pages, so that many people can see your hard work, make all effort to get your video noticed by social networks, because nowadays social network make easy for people to share information thru videos. This sharing gives your vlog the potential to reach out to the audiences exponentially. The more entertaining and helpful you make your vlogs the better the chances of sharing.
Conclusion
For Business owners, they will get great benefits when they use influencer to promote their new products because apart from the great help of online promotion, many people also listen to what influencers or vlogger say, especially when they show how effective the product is or how the product perform well. The reason why other brand owner refers to vlogger to promote their brand is because it gives a sense of transparency in communication for the consumers. Although the vlog varies slightly different depending on the vlog, the vlogger appears in the video in a tone that sounds like telling a story to the friends or acquaintance.
5 Tools to Create a Time-Lapse Video Online
If you’re looking for a way to create a time-lapse video online, you have come to the right place. There are different reasons why people use online time-lapse video makers. Let us take an example, if you want to make a time-lapse video of someone holding a phone in their hand then this would be pretty easy to do with the help of an online time-lapse maker.
Why do people use an online time-lapse maker because they want to get some good quality videos without spending much money on them? That’s something that many people who are just starting their business can do easily since it can be done by anyone who knows how to use online time-lapse makers properly! Let’s have a look at some online tools on which you can make time-lapse videos online.
1. Clideo Timelapse Video Tool
A video timelapse video is a type of video that shows the progression of time. It allows you to create an engaging experience for your viewers, and it can also be used to promote your business. Whether you’re a content creator, brand manager, or just a fan of videos, creating a time-lapse video is one of the most popular and effective ways to produce impressive content.
With Clideo Time-lapse Video Tool you can create incredible videos with ease. You can choose from dozens of beautiful templates, music tracks, transitions, and more. You can also add your photos or video clips and make your unique time-lapse video. By using this tool, you can:
- Capture your events in real-time and save them for later. Once captured, you can use the timeline function to move backward or forwards through the events of your day.
- Add filters and effects such as blur or freeze frame.
- Share your videos on social media with ease!
Steps to make a time-lapse video on Clideo:
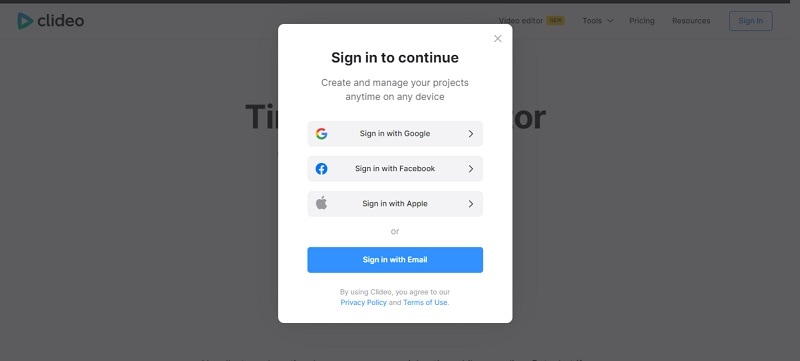
Step1 Open Clideo and Create an account
You can use this online time-lapse maker from any browser e.g Google Chrome, Mozilla Firefox, Internet Explorer, etc. After that you don’t have an account on it then you have to create it first. You can Sign in by using different platforms like Google, Facebook, apple, etc.
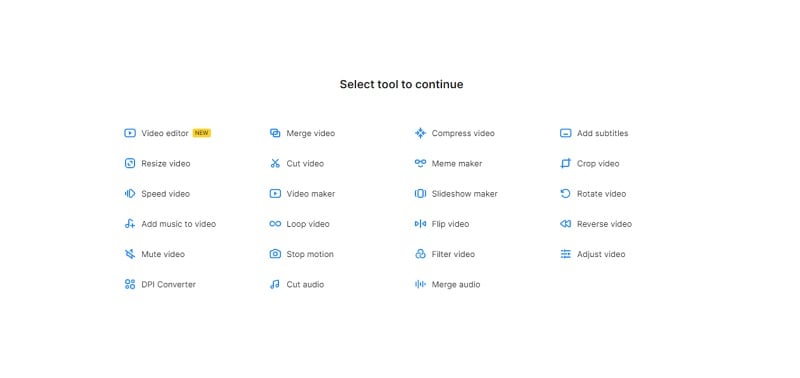
Step2 Create a project and select a tool
When you create an account on Clideo, a page appears where you will get the option of creating a project. A list of several features will be provided by this online time-lapse video maker. You will get to add subtitles, compress videos, resize the video, and many more features in it.
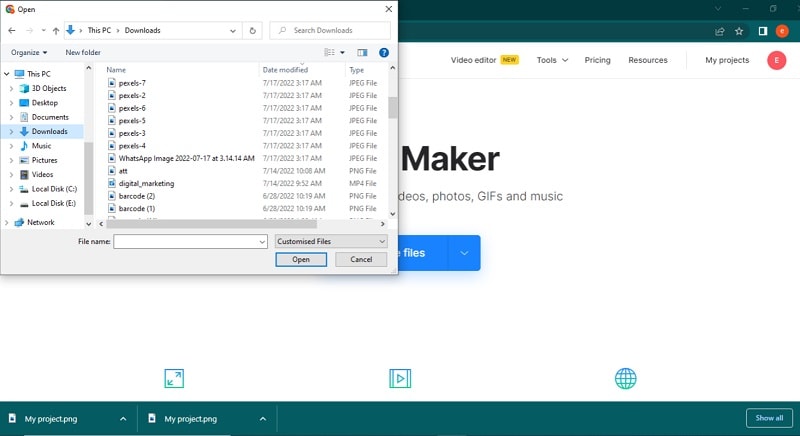
Step3 Create a video on Clideo
If you want to create a video then click on video maker and after that choose a file whether it is an image, video, gif, or music.
Step4 Edit the video and export
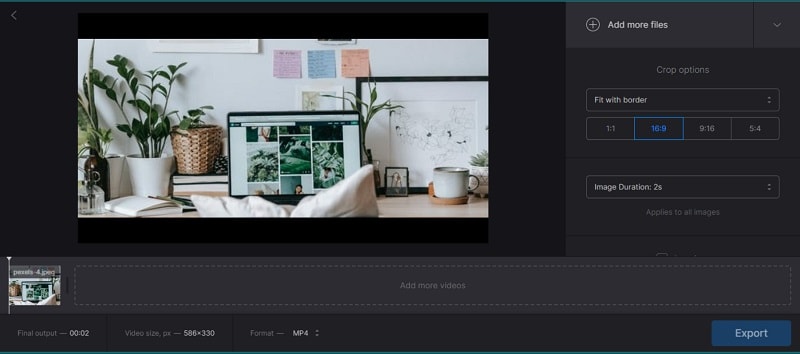
With Clideo, you can make amazing videos with just one click. You can choose the length of your video, as well as the format, and save it to your computer’s hard drive.
You can also adjust the duration of your video and add music to make it more interesting. This way you can make sure that your video is the right length for the content you’re putting in it.
2. Flixier Timelapse Video Maker
Flixier Timelapse Video Maker is the easiest way to create beautiful timelapse videos. You can create beautiful, high-quality videos with ease. What’s more, you don’t have to know any programming languages! You’ll be able to export your videos in just one step.
The program’s intuitive user interface makes it easy for beginners to get started while still providing advanced features that professionals will love. The program supports drag-and-drop editing and has an intuitive layout designed for maximum efficiency.
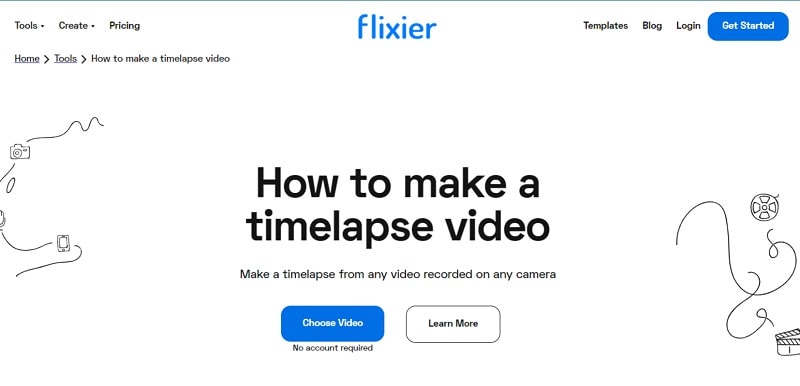
Step1 Create a video without having an account
Flixier Timelapse Video Maker is a powerful video editing tool that allows you to create beautiful, high-quality timelapse videos. The best thing about Flixier is it does not require any account. You can easily click on Get Started and move on to the next step.
Step2 Drop and Browse any file
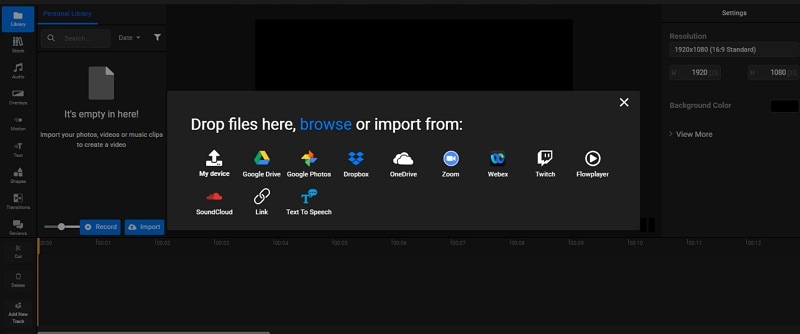
The Flixier Timelapse Video Maker is a new and exciting way to create HD videos from your favorite photos. It makes it easy for you to choose the photo you want to use, and then attach it to your video.
Flixier works with all of your favorite services: Google Drive, Google Photos, Dropbox, Flowplayer, and more! Flixier has a massive library of videos that you can use as inspiration for your project. There are thousands of them, some of which are free.
Step3 Edit the video and save it
This online time-lapse maker is easy to use, and it allows you to edit your videos in a few simple steps. You can add text, motion, position, and scale to your videos in just a few clicks. After that, you can export it to your hard drive.
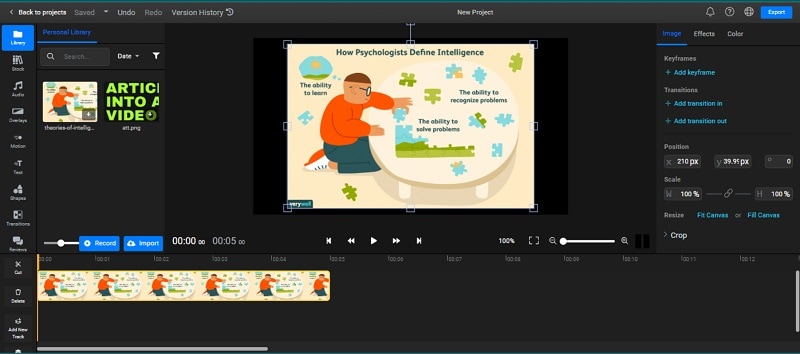
Flixier has tons of useful features for creating content for social media marketing. You can upload multiple clips at once and easily customize the length and format of each clip. You can also add music to your videos and adjust the volume levels for each clip individually so that they blend seamlessly when viewed as a whole.
3. Kapwing
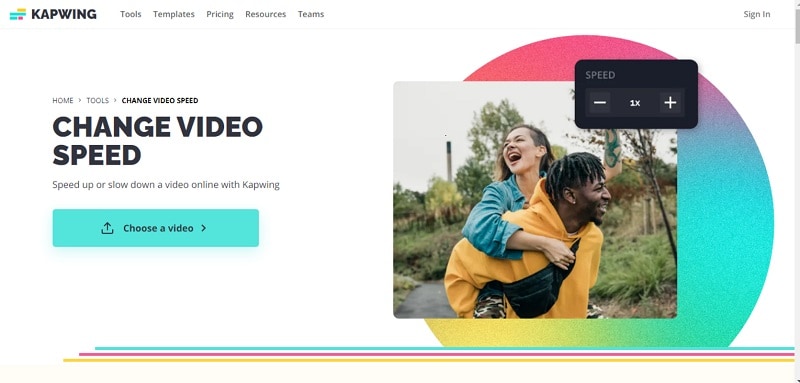
Are you looking for a way to speed up and down your video without having to rewind and fast-forward? Kapwing is the tool that can help you do just that. With Kapwing, you can change the speed of your video from 1x to 10x faster. And because it’s easy to use and can be used on any device, you can take your videos anywhere!
There’s nothing worse than having your video slowdown in the middle of a high-speed chase. That’s why, this tool can speed up and down your videos as much as you want, whenever you want it. Now move to steps that how can we use it:
Step1 Sign in and export the file
If you’re looking for a way to speed up your video editing process, look no further. Kapwing Video Speed Changer is here to help!
With Kapwing, you have to create an account, add media like pictures and videos, and then easily tweak the speed of your video without ever having to create a new one.
Step2 Create video and change speed
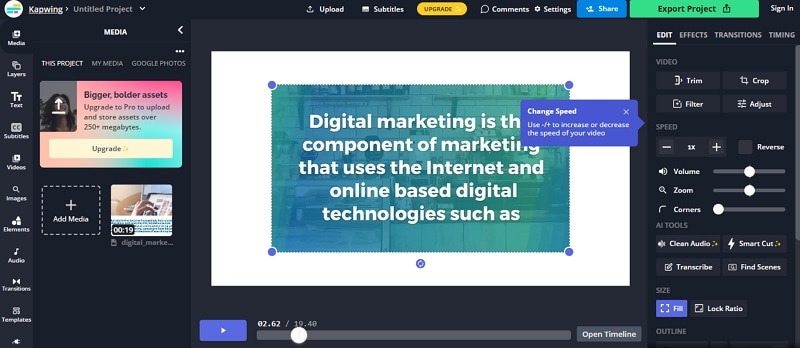
Kapwing is a video editing software that lets you create videos as well as control the speed according to your needs. This feature makes it easy for you to create videos with different features. You can create videos with size, transitions, layers, and fonts. You can add text to your video as well as record audio from your computer’s microphone.
The software also includes other tools such as watermarking and adding subtitles to your video.
Step3 Export the video
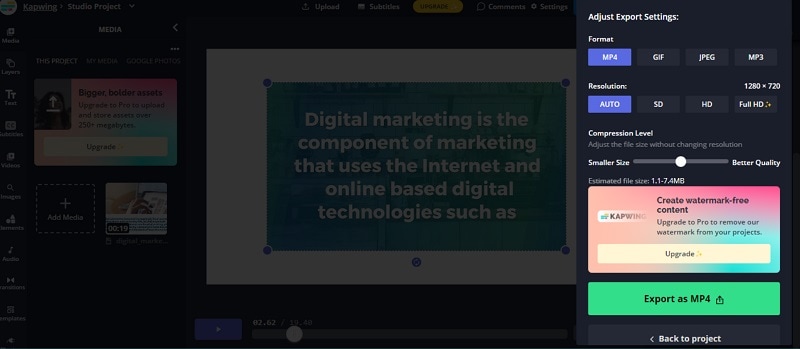
This online tool provides you with different formats to export your video like mp4, mp3, GIF, and JPEG. You can download or export your video in full HD form. It provides you full resolution video.
4. Veed.io Video Speed Controller
Are you looking to speed up or slow down your videos? We’ve got you covered. With Veed.io, you can easily adjust the speed of your video to your liking. You can also use a slider to control the speed of the video itself, which allows for more flexibility and control.
To use this tool, all you have to do is enter the URL of your video and select how fast you want it to be played back. And if you need even more flexibility, go ahead and add buttons so that you can easily change between faster and slower speeds without having to pause or rewind your video at all!
How can we control the speed on Veed.io let’s have a look at some steps:
Step1 Open the tool and create an account
Check out Veed.io Video Speed Controller, a new tool that allows you to control the speed of your videos. It’s super easy to use and can be accessed from any browser. Just create an account and you’ll be able to adjust the speed of your video on the go!

Step2 Create, edit the video and add subtitles
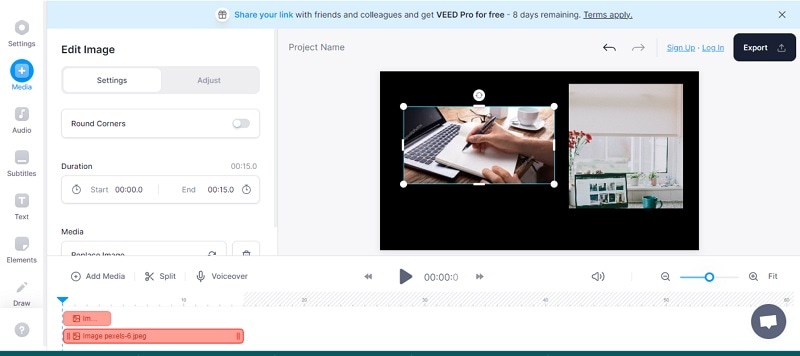
Veed.io is a video speed controller that allows you to create videos, edit your footage, and add voice-over in one simple app.
This is perfect for content creators who want to create more engaging videos and increase their profits by selling subscriptions or advertising within their content. With Veed.io, you can use the built-in editor to easily add text overlays, adjust the speed of your video, and add voice-over effects to create professional videos that people will love watching!
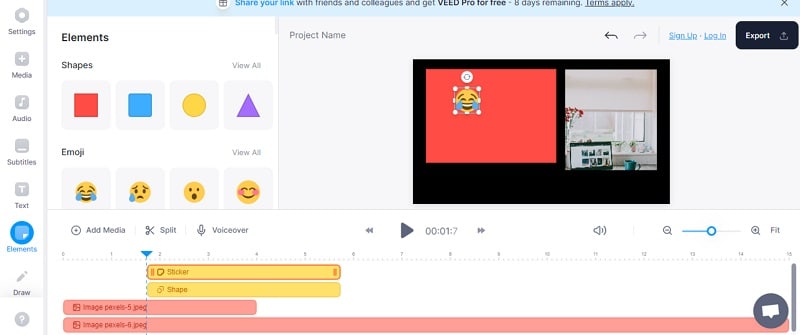
Step3 Add elements, and emojis in the video
Are you tired of your videos just being boring? Worried that they’re not engaging enough? Don’t worry, Veed.io has a solution for that.
With this editor, you can add elements to your videos to increase engagement and make them more interesting. You can also select the size and color of each element, so you can customize the look of your video to stand out from the crowd!
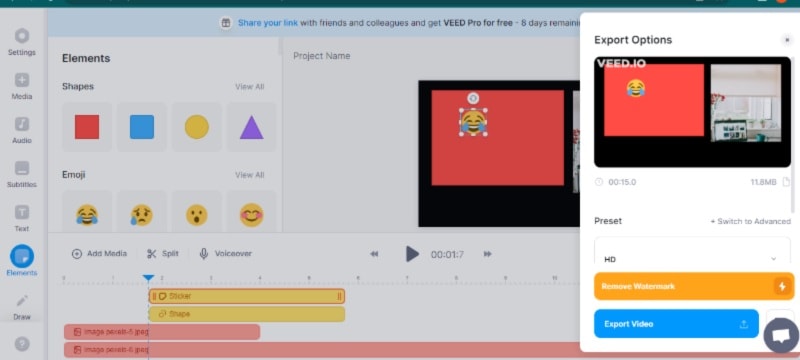
Step4 Export video without the watermark
After all the editing you can export or download the video without watermarks. The resolution of the video will be HD.
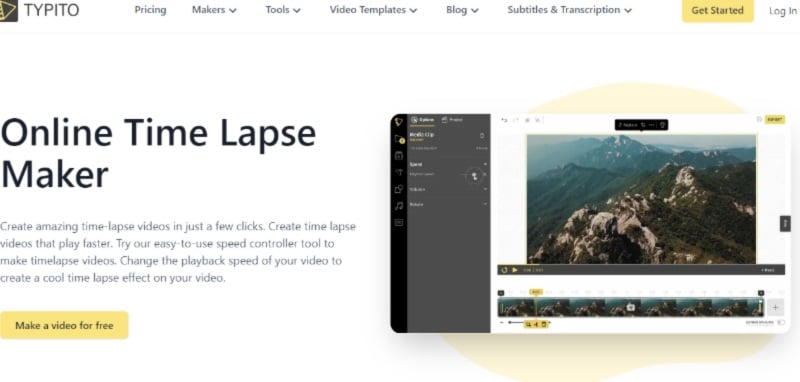
5. Typito Time Lapse Maker
Typito Time Lapse Maker is a tool that allows you to create videos with a timelapse effect. It is easy to use, and the interface is extremely simple. The first step is to select your video source and output format. You can choose from several different video formats, including MP4, MOV, and AVI.
Next, you’ll be prompted to select what you want your video to do. You have the option of creating a looping video or not it’s up to you! Once you’ve made your choices, you will be taken to the final step: entering text into the text editor for your video. This is where you can add captions or text overlays to spice up your video’s storyline.
Move to steps to create a lapse video online:
Step1 Create an account and make a video
Firstly, create an account on Typito and once you are done with the creation of the account click on the “Create Video” button in the middle of the screen. The video creation tool will begin loading, so please be patient!
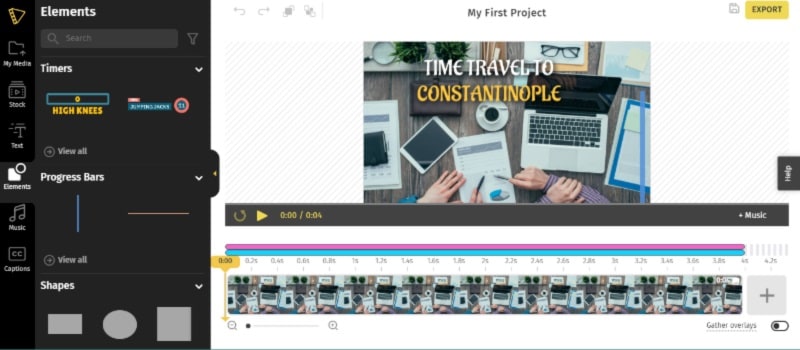
Step2 Add media, title, elements, music
Time-lapse is a great way to create visual content. But how do you do it without spending a fortune? Typito Time Lapse Maker can help you make your time-lapse videos with the click of a button!
Just select media, add titles, elements, and anything else you want, and we’ll handle the rest—whether you’re using your music or not. You can add music according to your taste.
Step3 Export video and re-edit
When you are done with the video export it. And the great thing is video can be re-edited again and again. You can apply changes many times.

Conclusion
We hope that these ideas can motivate you to make timelapse videos. If you want to create a time-lapse video but don’t want to use a big and expensive camera just set up your online time-lapse. Moreover, there are lots of excellent platforms out there to share the finished product. Refer to the above recommendations to choose your favorite one.
Free Download For Win 7 or later(64-bit)
Free Download For macOS 10.14 or later
Free Download For macOS 10.14 or later
3 Best Effects to Appear on Camera Made with Filmora
We all want to improve our video editing skills and give them more of a wow factor. A fantastic method of achieving this is using different effects and tricks on Filmora .
Appearance effects are optical illusions used to replicate imagined occurrences in a narrative or made-up universe. These effects can be effective narrative devices. As a result, they are widely employed in the theater, film, television, and video game industries. Here is what you need to do to add appearance effects to your videos:
Part 1: Why are Appearance Effects Important?
A good branding and advertising strategy must include video. You can raise the caliber of clients who utilize your product by improving the image you provide.
How can video help you build your brand? How well do you look? Although there is no quick fix to seem nice on-screen instantly, you can employ several appearance effects to enhance the general flow of your videos. Appearance effects are significant because they add a slight twist to your videos. They can help you stand out, add some humor and draw attention from your audience. These simple tricks could add extra fun and Spark to your videos.
Part 2: How to Make Cloth Appearance
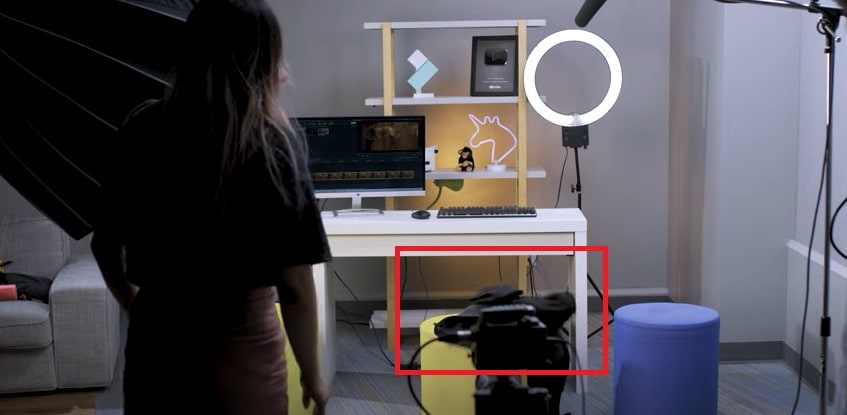
Let’s start with the first one. Before you start, make sure you put the camera on a tripod or a steady surface, so it doesn’t move while filming.
Step1 For the first shot, you must throw a jacket on a stool. Make sure it lands on the stool or wherever your talent is going to sit.
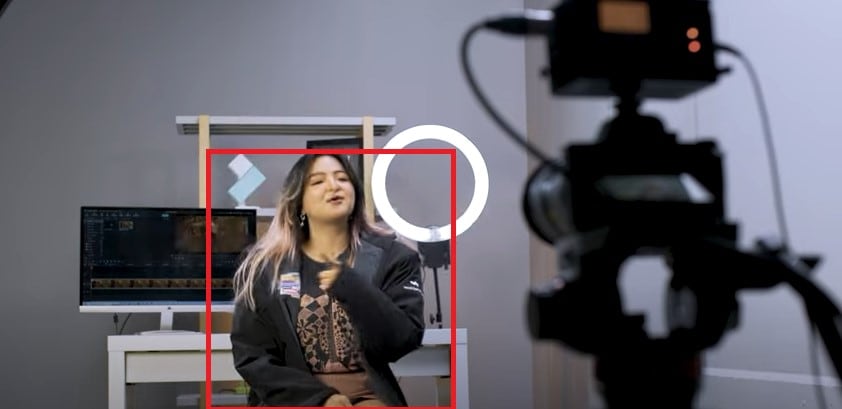
Step2 Make a shot of your talent appearing from where the jacket landed. You can add some acting skills to make this shot more realistic.
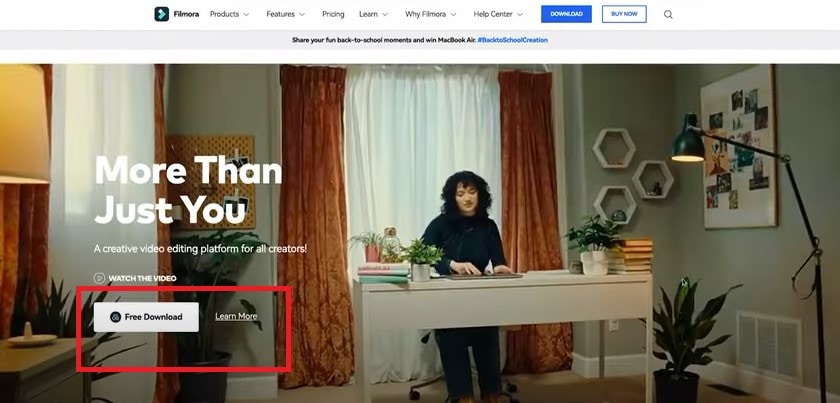
Step3 Download Filmora to edit your footage. You can get started by going to their official website.
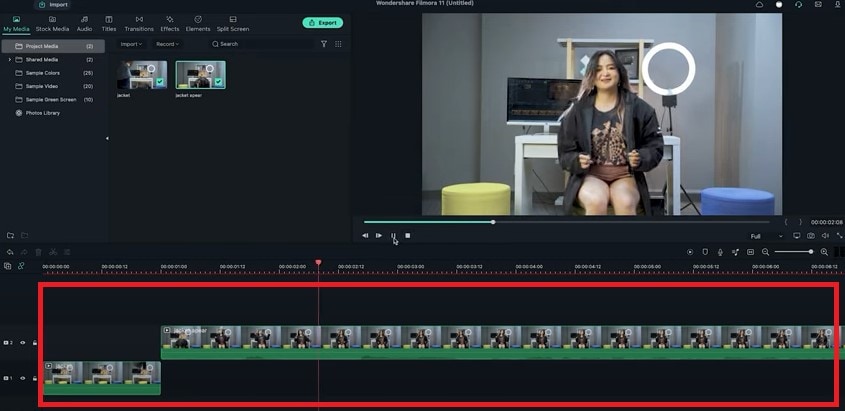
Step4 Now split the first clip on the frame where your jacket lands on the stool. Place it on the first track.
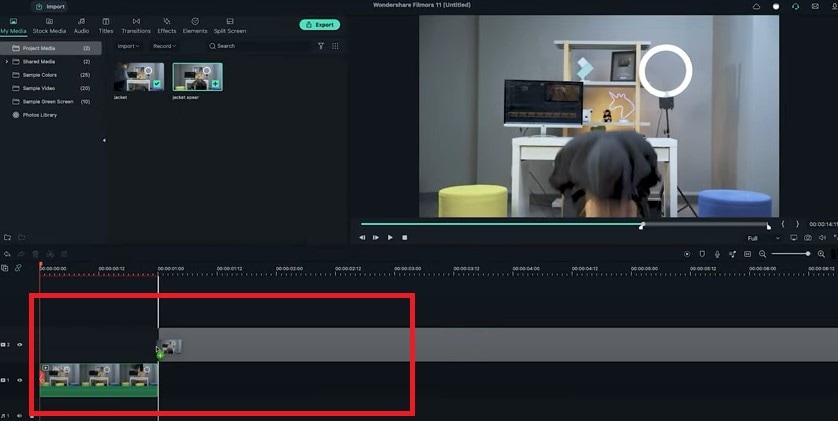
Step5 Trim the second shot until the talents start acting and place it on the second track to match the first clip.
Part 3: How to Make an Explosion Appearance
Step1 This effect is the easiest. You need to film the empty plate with just a background. Then let the talent enter the frame and jump into the place.
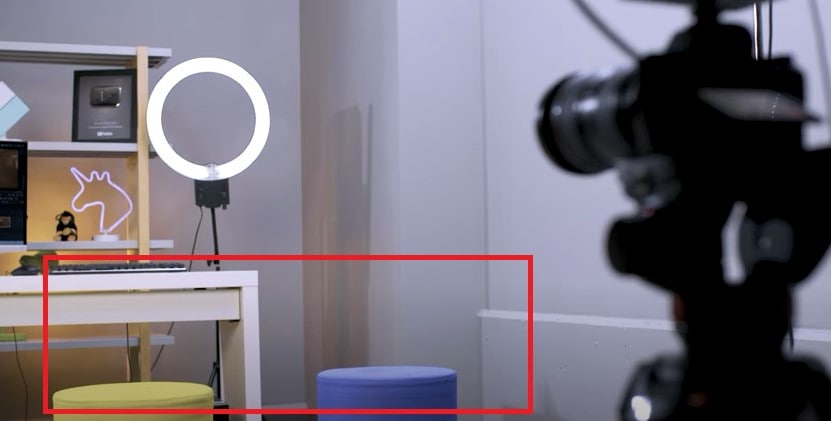
Step2 Now import the clip into Filmora and place it onto the first video track.
Step3 Freeze the frame of the empty plate with just the background and extend it as necessary. Place the clip onto the second video track and trim it until the action of the talent jump starts.
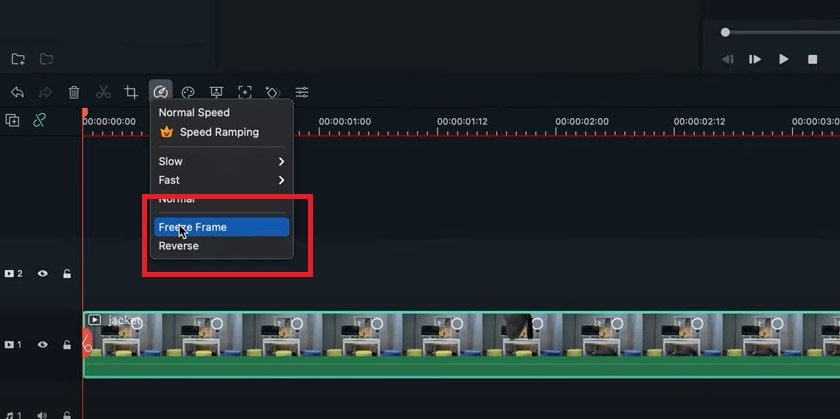
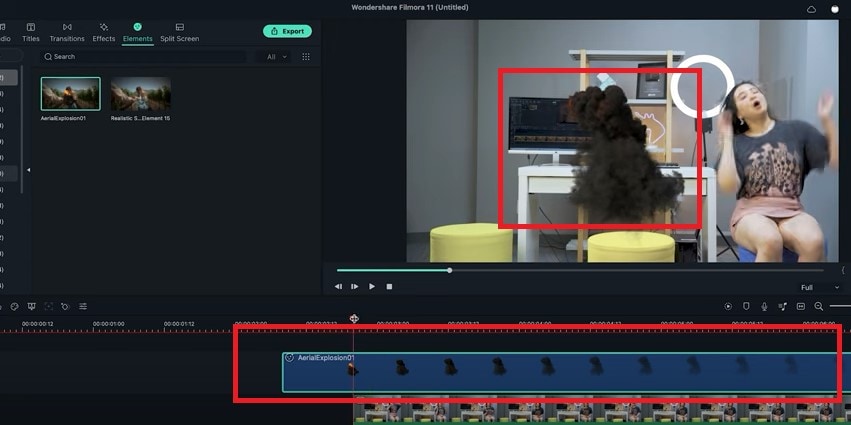
Step4 Delete the rest on the left. The trick is to use some explosion or smoke effect to hide the transition.
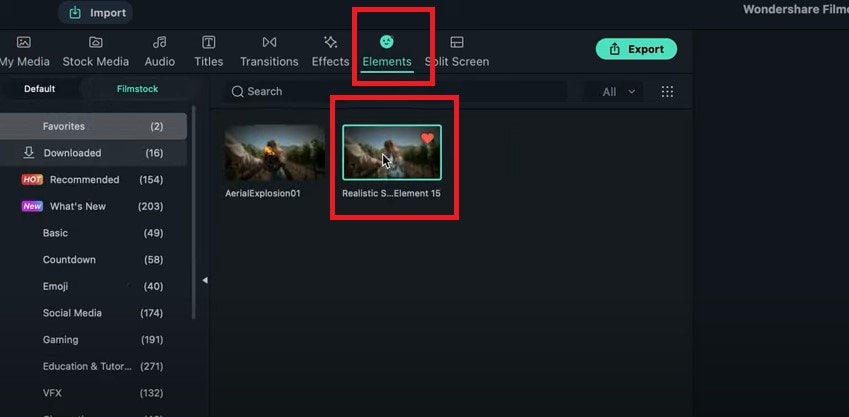
Step5 Use the green screen sample in the default menu here. Add some smoke effects available in film stock. Place it on the third video track and move it to hide the transition.
Part 4: How to Make Roof Appearance
The last trick here is combining the techniques from the two previous effects.
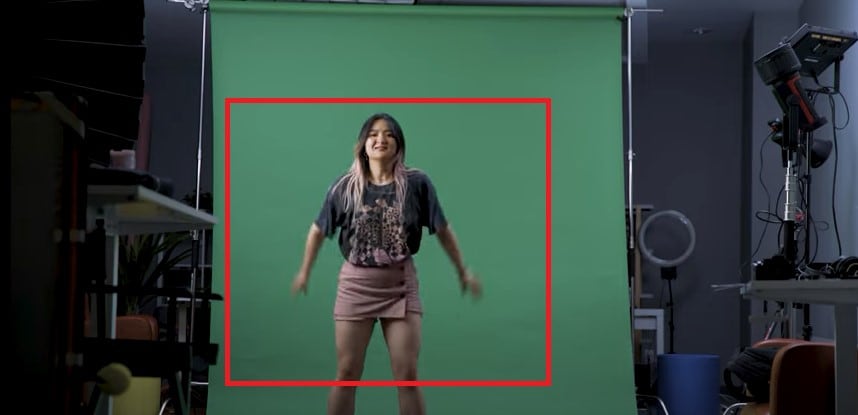
Step1 First, record the empty plate with just a background. Let the talent jump in the frame and set up a green screen for the talent to jump in front of it. It will look like they’re falling from the ceiling.
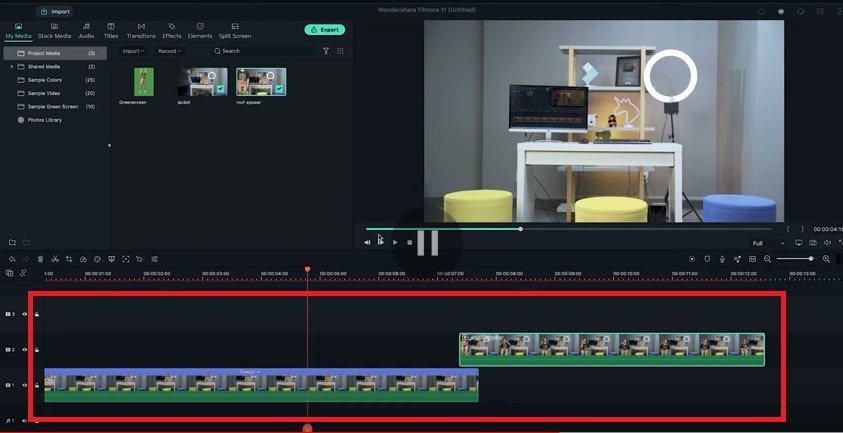
Step2 Now import the clip into Filmora again. Follow the steps from the second example so we have the subject appearing on the screen like this.
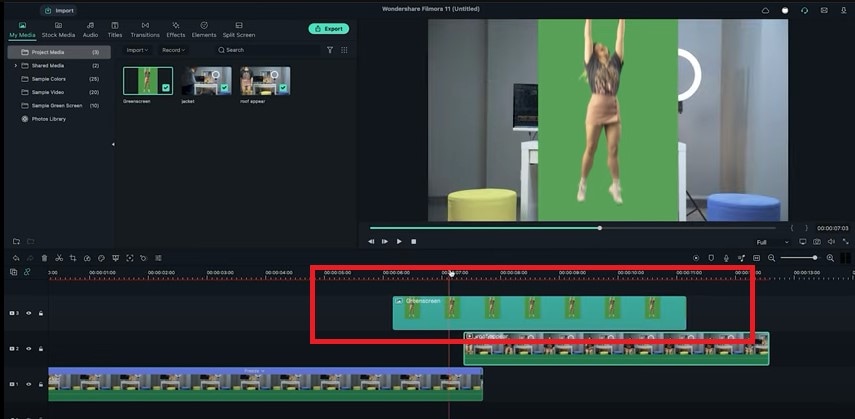
Step3 Add the green screenshot onto the third video track.
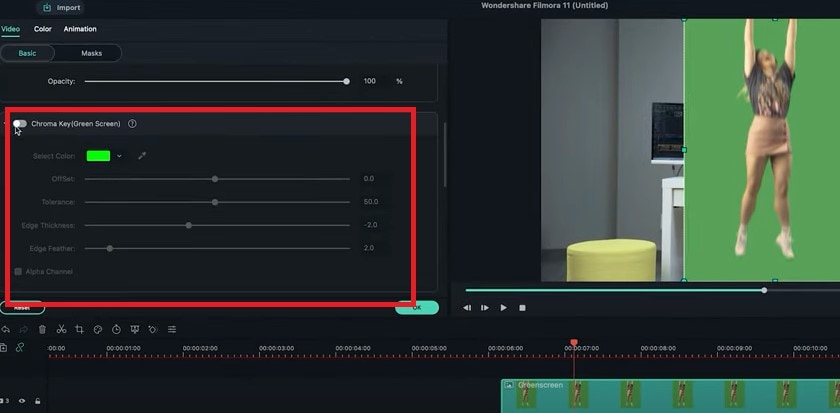
Step4 Double-click on it, activate the setting window and then key out the background using the chroma key feature.
Step5 Move the clip until it covers only the first frame of the appearing clip. Now keyframe the following subject from the outer frame to the final position.
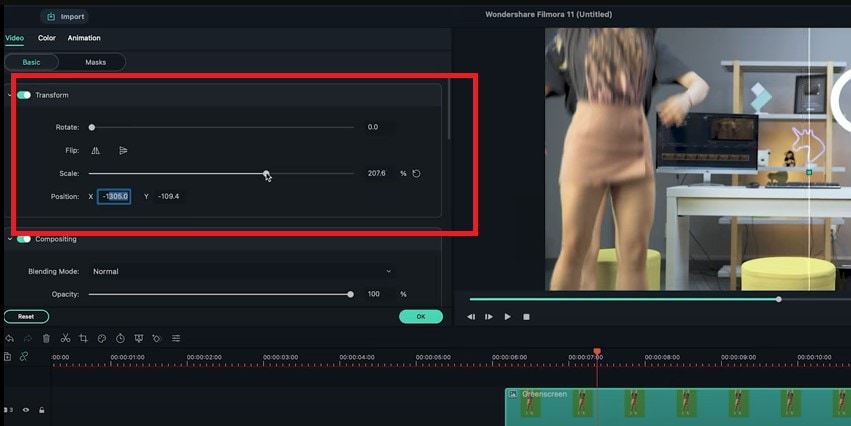
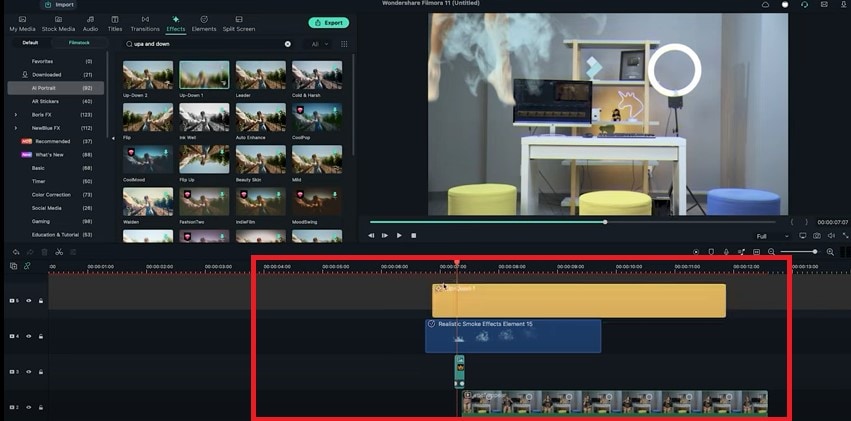
Step6 Now search for some smoke effects and put it upside down. So it looks like the ceiling is broken when the subject falls. Then add some camera shake to the fall.
Step7 Drag the camera shake effect back to the top track and shorten it to an ideal length. You can also add some sound effects if you want to this video.
Part 5: Tips to Look Good in Your Next Video
1. Be Clear About the Topic
Intellectuals frequently complain that everyone has attention deficit disorder due to the Internet. According to studies, we only have an attention span of 8 seconds today. You need a punchy, concise message to keep viewers watching your video.
2. Don’t Forget to Smile
Individuals who smile frequently are perceived to be more confident and successful. Therefore, showing your audience that you are confident in your company and services is the best method to gain their trust.
3. Look into the Camera
Direct eye contact with the camera lens is essential. Although it may seem enticing, your sole audience is the person directly in front of you when you’re speaking.
Be mindful of the camera’s confined area. Bring it up to eye level and keep your gaze there rather than elsewhere.
Summary
There are several fantastic camera effects that you can experiment with in your videos. While some are well-known, others are less well-known and often used. We have mentioned the three fun ways to appear on camera above. We suggest using video editing software like Filmora to use these effects more effectively. You can use these appearance effects to create an atmosphere, make your story more understandable, or spice up the video.
Free Download For Win 7 or later(64-bit)
Free Download For macOS 10.14 or later
Free Download For macOS 10.14 or later
Also read:
- [New] Step-by-Step Guide to Saving Google Meet Interactions
- [New] Ultimate Simplicity Guide to iPhone Screen Recordings
- [Updated] Engage Efficiently Leading Insta Filters
- [Updated] Essential Tips for Configuring and Measuring Facebook's In-Stream Ads
- 2024 Approved Kinetic Typography Text Effect 【EASY&FAST】
- How To Bypass Realme 11 Pro FRP In 3 Different Ways
- In 2024, Learn to Use Montage with These Movies
- In 2024, Transform Viewing Experience with These Leading Top-Ranked, Cost-Free & On-Demand Video Downloaders
- New 2 Methods to Cut Video in VLC on Windows
- Updated 2024 Approved How to Loop Videos with iMovie
- Title: Updated Motion Blur Photo With GIMP Step-By-Step Guide
- Author: Chloe
- Created at : 2024-12-09 23:59:37
- Updated at : 2024-12-12 11:18:56
- Link: https://ai-editing-video.techidaily.com/updated-motion-blur-photo-with-gimp-step-by-step-guide/
- License: This work is licensed under CC BY-NC-SA 4.0.