
:max_bytes(150000):strip_icc():format(webp)/patch-tuesday-2625783-d6bcf232b3c64fc5958037ad31299bd9.png)
Updated Perfect Moody LUTs for VN Editor An Overview
Perfect Moody LUTs for VN Editor: An Overview
Content creators and professionals express their emotions and mood through our photos and videos. You can also convey your feelings through your content by using LUTs. With the help of color grading and color adjustments, you can enhance the mood and tone of our content. Moody LUTs are a popular element many use to highlight their mood and emotions in their work.
These LUTs are designed to add a unique color grade to your footage to change the mood and feel. Additionally, with certain changes, you can change the perspective of your story. This article recognizes some top LUTs that you can use to create a mood for your video that is being edited on a mobile video editor, VN Editor.
- Part 2: Learning The Top Best Moody LUTs for Easy Video Editing
- Part 3: How to Use Moody LUTs for VN Editor?
- Bonus Part: Find Better LUTs in Wondershare Filmora for Video Editing
Part 1: Where Should You Use a Moody LUT in Video Editing?
Moody LUTs are a type of lookup table to show a specific mood in your content. There are many LUTs available that add emotion and feel to your photos and videos. Some of its uses are discussed below.
- Narrative Films: If you’re making a story-based film, using a moody LUT can help you set the right tone for your audience. It can make your content feel more cinematic and add a dark or dramatic mood to the story.
- Music Videos: Using such LUTs in a music video can help match the song’s emotions. It can enhance the feelings conveyed in the lyrics and music and make the video more impactful.
- Fashion Films: These LUTs can also make fashion films or lookbook videos look more high-end and editorial. You can add depth and drama to the footage that matches the clothing style being showcased.
- Travel Videos: If you’re making a travel video, these LUTs can help you improve the mood and feel of the location. You can add a sense of mystery or moodiness to your videos, making the location more cinematic.
- Horror Films: Finally, moody LUTs can help create a dark and unsettling atmosphere if you’re making a horror film. Applying such LUT can change the color composition to make your content feel more ghostly and scary.
Part 2: Learning The Top Best Moody LUTs for Easy Video Editing
We all know it gets difficult when you have so many options available. You don’t need to search for moody LUTs for premiere pro free download because here are some of the best mentioned for you.
1.Free LUTs Mood
The Free LUTs Mood pack includes different LUTs presets for different moods. You can add a feel to your photos and videos using this pack. Moreover, you add a warm, inviting, cold, and sad feel to your content. These LUTs can help you to give your content a new look and feel by changing and adjusting its colors. This pack can be used on travel, Instagram, or professional videos.

2.Moody LUT Pack | 30 Creative Film LUTs
The Moody LUT Pack includes 30 creative film LUTs that can be used to add mood and emotion to your photos and videos. These LUTs give your content a film-like look and feel with a range of moods to select. It darkens your shades and highlights certain colors to give your photos and videos a dramatic look. Moreover, it also adds a perspective to your content.

3. Axinite
Axinite is packed with multiple LUTs, each with its unique mood and style. This LUT pack shows a brighter and lighter mood in your videos and pictures. It increases the white balance in your media files, giving your content a calmer and lighter perspective. Furthermore, you can create more elegant content with a brighter touch to your digital files.

4. Raw Layer
The Raw Layer LUT pack provides 4 moody LUTs that can add a cinematic touch to your edits. This pack provides a darker version that gives your media files a dramatic feel. It changes your color composition in such a way that it highlights the subject and creates a more serious mood. You can use these LUTs to give your media files a more serious and dramatic appeal.

5. Moody Lake
Moody Lake is a LUT pack that gives your photos and videos a colder look. It exposes your image or video footage and adds shades of blue to give a colder mood feel. These shades will add a more serious perspective to your digital media files. You can change your happy-looking media file to a more cold and sad-looking story using this LUT.

6.15 Earth Tones Moody Lightroom Preset
Another impressive moody LUTs pack that comes with multiple options is Earth Tones Lightroom Preset. It includes 15 presets that can add a moody and atmospheric look to your photos and videos. Moreover, this preset highlights the natural colors to give your content an earthy feel. This LUT pack is perfect for color-grading traveling videos and photos.

7.Wedding & Rich LUTs by Moody Presets
Wedding & Rich LUTs by Moody Presets is a collection of LUT packs that adds a romantic mood to your wedding videos and photos. This pack of 66 LUTs adds a soft, dreamy look to your content by highlighting light colors. Moreover, it softens the light and increases the white balance of your media files to give a romantic and soft feel. Each LUT creates a newer impression on your digital media files in this pack.

Part 3: How to Use Moody LUTs for VN Editor?
If you are searching for how to use your favorite moody LUTs for VN Editor, you are at the right place. These simple steps allow you to apply any LUT in your VN Editor app.
Step1 Open the App to Import LUTs
Open the VN Editor and select the “+” sign. Then a new window will appear where you should choose the “Creation Kits” option. After this, tap the “Filters” button, and lead into the “My Filter” option. After selecting that, tap on “Import Filter” to import your LUT. Then, choose the folder where you want to import your favorite LUT.

Step2 Apply LUTs and Save the File
After choosing the LUT you want to use, VN Editor will extract and process it. You can find the LUT in the “Filters” section and apply it to your media file. You can also adjust the intensity of the LUT to your liking. Once done with your adjustments, save your file by tapping the “Save” button.

Bonus Part: Find Better LUTs in Wondershare Filmora for Video Editing
Wondershare Filmora is an amazing video editing software that has a library of over 200 LUTs available. These LUTs can help you give your content a feel and emotion by enhancing the mood and atmosphere of your videos. Many LUTs change the color grade of your footage, creating a dark, dramatic, or sad mood.
Nevertheless, you can adjust the LUT’s intensity with its latest update. Moreover, you can change the hue of mid-tones, shadows, and highlights of your digital files. In addition, you can get sharper and more improved results in its latest version.

Key Features of The Exceptional LUTs Editor
Wondershare Filmora provides an exquisite suit for applying and editing LUTs on videos. Being a complete video editor, it offers other exceptional features, out of which a few are mentioned as follows:
- With AI Smart Cutout, you can easily remove the background of your videos and change it. This feature uses AI technology to accurately cut out the subject of your video to add new background.
- Auto Reframe is a feature that automatically changes the aspect ratio of your video. You can easily change the size and shape of your video to fit different screens and platforms.
- Filmora has an amazing feature that syncs your digital files’ audio with the length of your video. With AI Audio Stretch, you don’t have to worry about matching your audio with your video.
Empower your videos with a new mood using different LUTs. Filmora now offers 100+ top-quality 3D LUTs cover a broad range of scenarios. Transform your videos with Filmora’s powerful 3D LUTs.
Apply LUT on Videos Apply LUT on Videos Learn More


Conclusion
In conclusion, adding mood and emotion to your digital content can improve its impact on the viewer. Lookup tables are a great option to add a specific mood to your media files by changing colors. Furthermore, with many moody LUTs for VN Editor, you can apply LUTs using your smartphone. However, Wondershare Filmora is another tool that can be used to apply and explore different LUTs
- Part 3: How to Use Moody LUTs for VN Editor?
- Bonus Part: Find Better LUTs in Wondershare Filmora for Video Editing
Part 1: Where Should You Use a Moody LUT in Video Editing?
Moody LUTs are a type of lookup table to show a specific mood in your content. There are many LUTs available that add emotion and feel to your photos and videos. Some of its uses are discussed below.
- Narrative Films: If you’re making a story-based film, using a moody LUT can help you set the right tone for your audience. It can make your content feel more cinematic and add a dark or dramatic mood to the story.
- Music Videos: Using such LUTs in a music video can help match the song’s emotions. It can enhance the feelings conveyed in the lyrics and music and make the video more impactful.
- Fashion Films: These LUTs can also make fashion films or lookbook videos look more high-end and editorial. You can add depth and drama to the footage that matches the clothing style being showcased.
- Travel Videos: If you’re making a travel video, these LUTs can help you improve the mood and feel of the location. You can add a sense of mystery or moodiness to your videos, making the location more cinematic.
- Horror Films: Finally, moody LUTs can help create a dark and unsettling atmosphere if you’re making a horror film. Applying such LUT can change the color composition to make your content feel more ghostly and scary.
Part 2: Learning The Top Best Moody LUTs for Easy Video Editing
We all know it gets difficult when you have so many options available. You don’t need to search for moody LUTs for premiere pro free download because here are some of the best mentioned for you.
1.Free LUTs Mood
The Free LUTs Mood pack includes different LUTs presets for different moods. You can add a feel to your photos and videos using this pack. Moreover, you add a warm, inviting, cold, and sad feel to your content. These LUTs can help you to give your content a new look and feel by changing and adjusting its colors. This pack can be used on travel, Instagram, or professional videos.
2.Moody LUT Pack | 30 Creative Film LUTs
The Moody LUT Pack includes 30 creative film LUTs that can be used to add mood and emotion to your photos and videos. These LUTs give your content a film-like look and feel with a range of moods to select. It darkens your shades and highlights certain colors to give your photos and videos a dramatic look. Moreover, it also adds a perspective to your content.
3. Axinite
Axinite is packed with multiple LUTs, each with its unique mood and style. This LUT pack shows a brighter and lighter mood in your videos and pictures. It increases the white balance in your media files, giving your content a calmer and lighter perspective. Furthermore, you can create more elegant content with a brighter touch to your digital files.
4. Raw Layer
The Raw Layer LUT pack provides 4 moody LUTs that can add a cinematic touch to your edits. This pack provides a darker version that gives your media files a dramatic feel. It changes your color composition in such a way that it highlights the subject and creates a more serious mood. You can use these LUTs to give your media files a more serious and dramatic appeal.
5. Moody Lake
Moody Lake is a LUT pack that gives your photos and videos a colder look. It exposes your image or video footage and adds shades of blue to give a colder mood feel. These shades will add a more serious perspective to your digital media files. You can change your happy-looking media file to a more cold and sad-looking story using this LUT.
6.15 Earth Tones Moody Lightroom Preset
Another impressive moody LUTs pack that comes with multiple options is Earth Tones Lightroom Preset. It includes 15 presets that can add a moody and atmospheric look to your photos and videos. Moreover, this preset highlights the natural colors to give your content an earthy feel. This LUT pack is perfect for color-grading traveling videos and photos.
7.Wedding & Rich LUTs by Moody Presets
Wedding & Rich LUTs by Moody Presets is a collection of LUT packs that adds a romantic mood to your wedding videos and photos. This pack of 66 LUTs adds a soft, dreamy look to your content by highlighting light colors. Moreover, it softens the light and increases the white balance of your media files to give a romantic and soft feel. Each LUT creates a newer impression on your digital media files in this pack.
Part 3: How to Use Moody LUTs for VN Editor?
If you are searching for how to use your favorite moody LUTs for VN Editor, you are at the right place. These simple steps allow you to apply any LUT in your VN Editor app.
Step1 Open the App to Import LUTs
Open the VN Editor and select the “+” sign. Then a new window will appear where you should choose the “Creation Kits” option. After this, tap the “Filters” button, and lead into the “My Filter” option. After selecting that, tap on “Import Filter” to import your LUT. Then, choose the folder where you want to import your favorite LUT.
Step2 Apply LUTs and Save the File
After choosing the LUT you want to use, VN Editor will extract and process it. You can find the LUT in the “Filters” section and apply it to your media file. You can also adjust the intensity of the LUT to your liking. Once done with your adjustments, save your file by tapping the “Save” button.
Bonus Part: Find Better LUTs in Wondershare Filmora for Video Editing
Wondershare Filmora is an amazing video editing software that has a library of over 200 LUTs available. These LUTs can help you give your content a feel and emotion by enhancing the mood and atmosphere of your videos. Many LUTs change the color grade of your footage, creating a dark, dramatic, or sad mood.
Nevertheless, you can adjust the LUT’s intensity with its latest update. Moreover, you can change the hue of mid-tones, shadows, and highlights of your digital files. In addition, you can get sharper and more improved results in its latest version.
Key Features of The Exceptional LUTs Editor
Wondershare Filmora provides an exquisite suit for applying and editing LUTs on videos. Being a complete video editor, it offers other exceptional features, out of which a few are mentioned as follows:
- With AI Smart Cutout, you can easily remove the background of your videos and change it. This feature uses AI technology to accurately cut out the subject of your video to add new background.
- Auto Reframe is a feature that automatically changes the aspect ratio of your video. You can easily change the size and shape of your video to fit different screens and platforms.
- Filmora has an amazing feature that syncs your digital files’ audio with the length of your video. With AI Audio Stretch, you don’t have to worry about matching your audio with your video.
Empower your videos with a new mood using different LUTs. Filmora now offers 100+ top-quality 3D LUTs cover a broad range of scenarios. Transform your videos with Filmora’s powerful 3D LUTs.
Apply LUT on Videos Apply LUT on Videos Learn More
Conclusion
In conclusion, adding mood and emotion to your digital content can improve its impact on the viewer. Lookup tables are a great option to add a specific mood to your media files by changing colors. Furthermore, with many moody LUTs for VN Editor, you can apply LUTs using your smartphone. However, Wondershare Filmora is another tool that can be used to apply and explore different LUTs
Are You Eager to Know How to Create an Adjustment Layer in Premiere Pro? This Article Will Highlight the Significance of Adding an Adjustment Layer in Premiere Pro
Are you using Premiere Pro frequently? Adobe Premiere Pro is considered advanced software for editing video clips proficiently. You can find a diverse range of features in Premiere Pro that allows you to transform your videos immensely.
If you want to be a professional video editor, you must know the basic techniques of executing video editing. In Premiere Pro, there are various options and features that can help you in enhancing your productivity. For instance, the use of adjustment layers in video editing can make a huge difference. By reading this article, you can come to know about the Premiere Pro adjustment layer efficiently.

Part 1: What is Adjustment Layer in Premiere Pro?
In Premiere Pro, you can save time efficiently by editing each layer individually. To do so, you can find the feature of the adjustment layer in Premiere Pro that enables you to apply the same effect to multiple clips instantly. This will eventually save you time and manual effort. However, you must ensure that the adjustment layer has been placed on top of the layers stack section.
In an adjustment layer in Premiere Pro, you can add multiple effects to create a captivating illustration in your video clips. Moreover, you can also create multiple adjustment layers in Premiere Pro to handle and apply the effects in your clips proficiently. Also, you can easily move, remove, or cut the Premiere Pro adjustment layer anytime within a few clicks.

Furthermore, you can also remove the adjustment layer from your timeline easily without modifying the composition settings of your video. If you get a basic understanding of creating and managing the adjustment layer in Premiere Pro, you can efficiently enhance the visual appeal of your videos. To learn more about the Premiere Pro adjustment layer, continue reading.
Part 2: How to Add an Adjustment Layer in Premiere Pro?
In this section, we will briefly address how to add an adjustment layer in Premiere Pro in a simpler manner.
Step1 Once you have uploaded your project in Premiere Pro, go to the “File” tab and select the “New” option. Afterward, tap on “Adjustment Layer.”

Step2 You can also go to the bottom of your project’s panel and tap on the “New Item” icon. After clicking on this icon, you can click on the “Adjustment layer” option. Afterward, you can modify the video settings to change the settings of the adjustment layer. Once done, hit the “OK” button.

Step3 Once the adjustment layer has been created, you can drag and drop it into the timeline. To change its name, you can right-click on it.

Part 3: Three Ways to Use Adjustment Layer in Premiere Pro
Do you want to use the Premiere Pro adjustment layer significantly? In this section, we will highlight three ways through which you can use the adjustment layer in Premiere Pro to edit your videos.
1. Color Grading
Color grading in Premiere Pro can help you to adjust the balance and tone of your video. You can use the color grading effects and tools to set the exposure, brightness, saturation, and light according to your preference. It will also let you redefine the colors in your video efficiently. To use the adjustment layer for color grading, you can read the below instructions:
Step1 After uploading the video clip in Premiere Pro, create a new adjustment layer in the timeline. Drag and adjust it according to the duration of your video clip. Once done, go to the “Effects” tab and search for “FilmConvert Nitrate.”

Step2 Apply this effect to the adjustment layer and choose your camera to match the color profile. Afterward, you can adjust the saturation, exposure filmstock, and curves according to your choice. You can also increase the vibrancy and hue saturation curves for more enhancement. You can also navigate to the basic correction section to modify the contrast value accordingly.
2. Transition
To merge multiple video clips smoothly and efficiently, transitional effects can assist you. By adding a suitable transition effect, you can make your whole video look clean and cinematic. Moreover, you can use adjustment layers in Premiere Pro to add transition effects to your effect professionally. To do the transition effect, you can proceed to the following instructions:
Step1 First, drag and drop your video clips into the timeline. Once done, create the adjustment layer and apply it above the layers of video clips. Once done, search the “Offset” effect and apply it to the adjustment layer.
Step2 Now add the keyframe to the position where you want to start and end the transition effect. Afterward, right-click on the first keyframe and select “Temporal Interpolation.” From there, choose “Ease Out.” Repeat the same process with the last keyframe. Once done, add the “Directional blur” effect to the adjustment layer for a smoother look.

3. Mask
By using masks in Premiere Pro, you can efficiently blur, highlight, or add an effect to a specific area of your video clip. With this tool, you can draw different mask shapes, such as ellipses, rectangles, etc. Thus, it’s a great way to edit any particular part of the video clip effortlessly. Here are the simple steps to add masks to the video clips using the adjustment layer:
Step1 Add the adjustment layer to the timeline and head to the “Effects” library to locate the “Crop” effect. Add this effect to the adjustment layer and then head to the Effects control.

Step2 Now enhance the top and bottom properties to 15%. You can also adjust the headspace of the person accordingly. Also, you can animate the black bars to produce a more cinematic look in your video.
Part 4: FAQ about Adjustment Layers in Premiere Pro
If you have some questions or concerns about using the adjustment layer in Premiere Pro, we have discussed the commonly asked question below.
Why is the adjustment layer greyed out in my Premiere Pro?
To fix grayed adjustment layer in Premiere Pro, there are two methods that you can follow:
Method 1: At the bottom of your project panel, click on the “New Item” icon and select “Adjustment Layer.” Once done, adjust the settings and press the “OK” button. Now you can drag and drop the adjustment layer in the timeline.
Method 2: Click on your “Project Panel” and then navigate to the “File” tab. From there, select “New” and then click on “Adjustment Layer.” Once done, you can drag and drop the adjustment layer at the timeline.
Conclusion
Premiere Pro is a famous video editing software that lets you enhance your videos proficiently. In this tool, using adjustment layers can help you in making your editing process quicker and easier. That’s why, in this article, we have focused on how to add an adjustment layer in Premiere Pro. Moreover, we have also shed light on how to use the adjustment layer precisely with various effects to enhance your videos.
Are you using Premiere Pro frequently? Adobe Premiere Pro is considered advanced software for editing video clips proficiently. You can find a diverse range of features in Premiere Pro that allows you to transform your videos immensely.
If you want to be a professional video editor, you must know the basic techniques of executing video editing. In Premiere Pro, there are various options and features that can help you in enhancing your productivity. For instance, the use of adjustment layers in video editing can make a huge difference. By reading this article, you can come to know about the Premiere Pro adjustment layer efficiently.
Part 1: What is Adjustment Layer in Premiere Pro?
In Premiere Pro, you can save time efficiently by editing each layer individually. To do so, you can find the feature of the adjustment layer in Premiere Pro that enables you to apply the same effect to multiple clips instantly. This will eventually save you time and manual effort. However, you must ensure that the adjustment layer has been placed on top of the layers stack section.
In an adjustment layer in Premiere Pro, you can add multiple effects to create a captivating illustration in your video clips. Moreover, you can also create multiple adjustment layers in Premiere Pro to handle and apply the effects in your clips proficiently. Also, you can easily move, remove, or cut the Premiere Pro adjustment layer anytime within a few clicks.
Furthermore, you can also remove the adjustment layer from your timeline easily without modifying the composition settings of your video. If you get a basic understanding of creating and managing the adjustment layer in Premiere Pro, you can efficiently enhance the visual appeal of your videos. To learn more about the Premiere Pro adjustment layer, continue reading.
Part 2: How to Add an Adjustment Layer in Premiere Pro?
In this section, we will briefly address how to add an adjustment layer in Premiere Pro in a simpler manner.
Step1 Once you have uploaded your project in Premiere Pro, go to the “File” tab and select the “New” option. Afterward, tap on “Adjustment Layer.”
Step2 You can also go to the bottom of your project’s panel and tap on the “New Item” icon. After clicking on this icon, you can click on the “Adjustment layer” option. Afterward, you can modify the video settings to change the settings of the adjustment layer. Once done, hit the “OK” button.
Step3 Once the adjustment layer has been created, you can drag and drop it into the timeline. To change its name, you can right-click on it.
Part 3: Three Ways to Use Adjustment Layer in Premiere Pro
Do you want to use the Premiere Pro adjustment layer significantly? In this section, we will highlight three ways through which you can use the adjustment layer in Premiere Pro to edit your videos.
1. Color Grading
Color grading in Premiere Pro can help you to adjust the balance and tone of your video. You can use the color grading effects and tools to set the exposure, brightness, saturation, and light according to your preference. It will also let you redefine the colors in your video efficiently. To use the adjustment layer for color grading, you can read the below instructions:
Step1 After uploading the video clip in Premiere Pro, create a new adjustment layer in the timeline. Drag and adjust it according to the duration of your video clip. Once done, go to the “Effects” tab and search for “FilmConvert Nitrate.”
Step2 Apply this effect to the adjustment layer and choose your camera to match the color profile. Afterward, you can adjust the saturation, exposure filmstock, and curves according to your choice. You can also increase the vibrancy and hue saturation curves for more enhancement. You can also navigate to the basic correction section to modify the contrast value accordingly.
2. Transition
To merge multiple video clips smoothly and efficiently, transitional effects can assist you. By adding a suitable transition effect, you can make your whole video look clean and cinematic. Moreover, you can use adjustment layers in Premiere Pro to add transition effects to your effect professionally. To do the transition effect, you can proceed to the following instructions:
Step1 First, drag and drop your video clips into the timeline. Once done, create the adjustment layer and apply it above the layers of video clips. Once done, search the “Offset” effect and apply it to the adjustment layer.
Step2 Now add the keyframe to the position where you want to start and end the transition effect. Afterward, right-click on the first keyframe and select “Temporal Interpolation.” From there, choose “Ease Out.” Repeat the same process with the last keyframe. Once done, add the “Directional blur” effect to the adjustment layer for a smoother look.
3. Mask
By using masks in Premiere Pro, you can efficiently blur, highlight, or add an effect to a specific area of your video clip. With this tool, you can draw different mask shapes, such as ellipses, rectangles, etc. Thus, it’s a great way to edit any particular part of the video clip effortlessly. Here are the simple steps to add masks to the video clips using the adjustment layer:
Step1 Add the adjustment layer to the timeline and head to the “Effects” library to locate the “Crop” effect. Add this effect to the adjustment layer and then head to the Effects control.
Step2 Now enhance the top and bottom properties to 15%. You can also adjust the headspace of the person accordingly. Also, you can animate the black bars to produce a more cinematic look in your video.
Part 4: FAQ about Adjustment Layers in Premiere Pro
If you have some questions or concerns about using the adjustment layer in Premiere Pro, we have discussed the commonly asked question below.
Why is the adjustment layer greyed out in my Premiere Pro?
To fix grayed adjustment layer in Premiere Pro, there are two methods that you can follow:
Method 1: At the bottom of your project panel, click on the “New Item” icon and select “Adjustment Layer.” Once done, adjust the settings and press the “OK” button. Now you can drag and drop the adjustment layer in the timeline.
Method 2: Click on your “Project Panel” and then navigate to the “File” tab. From there, select “New” and then click on “Adjustment Layer.” Once done, you can drag and drop the adjustment layer at the timeline.
Conclusion
Premiere Pro is a famous video editing software that lets you enhance your videos proficiently. In this tool, using adjustment layers can help you in making your editing process quicker and easier. That’s why, in this article, we have focused on how to add an adjustment layer in Premiere Pro. Moreover, we have also shed light on how to use the adjustment layer precisely with various effects to enhance your videos.
Change Video Speed with FFmpeg
Have you ever wanted to speed up or slow down a video? Maybe it was too long, or you wanted to draw out an exciting part of the video without having to watch the boring parts.
In this article, we will be showing you how to use FFmpeg to speed up and slow down your videos using CLI. You’ll also find some other useful FFmpeg commands that you can use on your videos.
Finally, we will explain how to automate these commands so that you can run them on all your videos with ease.

Part 1. What is FFmpeg?
FFmpeg is a free and open-source cross-platform software project that can record, convert, and stream audio and video. It was developed by Fabrice Bellard in 2000. It has since become one of the most popular tools for transcoding media content on Linux, Unix, Mac OS X, Windows NT, and more.
One of its lesser-known capabilities is to speed up or slow down videos in just about any design you can think of — with either the audio or the video synced to the other if desired.
Uses of FFmpeg
FFMPEG is a command-line tool that can manipulate and transcode video files. Its uses are as follows:
- FFmpeg can create, trim, join or separate video clips on the fly and encode them into formats including MPEG, VOB, M2TS, TS, RMVB, or AVI.
- It can be used for Video processing, Video packaging support, Video compression, Audio, and Video container support, FFplay, and FFprobe.
- It also has extensive options for altering the look of an image in just about any way imaginable. Whether you want to change the brightness, hue, saturation, or perform multiple operations like subsampling (resizing) without reducing quality—the list goes on!
You could think of it as the Swiss army knife for video manipulation tasks. The interface might seem intimidating at first, but once you get the hang of it, all commands are broken down into simple English phrases.
The most important thing to know before getting started with this is how to use FFmpeg’s -i and -v flags for input and output, respectively. To apply effects like slow motion playback or fast motion playback, use these flags in tandem with one another when specifying which file should be edited.
Benefits and Disadvantages of FFmpeg
FFmpeg has many benefits over other video editing software because it is free and open source, meaning that you have access to the code so that you can modify it if needed. Thus, it’s a better option when compared to other video editing software such as Avidemux, QuickTime Pro 7, and Adobe Premiere Elements 12. Some of these benefits include:
- Being able to edit videos on multiple platforms (Windows, Mac OS X);
- FFmpeg has features to speed up and slow down video;
- Being able to convert from one format into another seamlessly;
- An extensive amount of features are at your disposal.
Some of the drawbacks are that some settings are not configurable, like with YouTube’s built-in editor. The main disadvantage, though, would be the lengthiness of the program’s installation process: not only do you need to download FFmpeg itself but also three external libraries like libx264, libmp3lame, and libfaac; then you must compile all six packages before the installation completes. Luckily this process doesn’t take very long.
Another possible disadvantage is the time required for downloading the various resources since they may not be readily available on standard file hosting sites such as Mediafire or Dropbox (though they can be found through third-party websites). If you’re looking for something more robust than Windows Movie Maker or iMovie, we recommend checking out FFmpeg.
Part 2. How to Speed Up a Video in FFmpeg?
FFmpeg can be used to speed up videos. It’s not the only option, but it’s one of the most common ways to make your videos faster. If you want your video to be faster, then FFmpeg is the right tool for the job. Some speed-up features include: FFmpeg speed up video and audio, ffmpeg speed up video mp4, ffmpeg change video speed, and so on.
The Ultimate Step-by-Step Guide to speed up a video in FFmpeg
The presentation timestamp (PTS) of each video frame can be modified to alter the pace of a video stream.
Step1 Open a terminal and type in FFmpeg. This will open the program.

Step2 Drag and drop the video file onto the window.
Step3 This is accomplished with the command -filter:v “setpts=.”
Step4 According to the documentation, fast motion requires: -filter:v setpts=0.5*PTS.

Step5 Click Enter.

Step6 The result would be a sped-up version of your video.
Part 3. An Alternative to FFmpeg: Wondershare Filmora
FFmpeg is the best video editor in this e-market, and it’s totally free! The only problem with this software, however, is that it isn’t very easy to use for some newbies. If you’re looking for an alternative to FFmpeg but want one with amazing editing capabilities, Wondershare Filmora should be on top of your list! Here are some key features that make Filmora stand out among other video editors.
Wondershare Filmora has all the features you need in a video editor and is also easy enough for beginners to use. It is also compatible with Windows and Mac OS, which means there are no issues with compatibility.
One of the best features of this software, compared to FFmpeg, is its simplicity. With just a few clicks and by following the on-screen instructions, it can be used to create videos that are visually appealing and fun.
Free Download For Win 7 or later(64-bit)
Free Download For macOS 10.14 or later
The supported formats of Filmora are Video formats (AVI, MPEG-2, MPEG-4, MKV, WMV), Video codecs (AVC1, MPEG-4 AVC, VC1/WMV3), Audio formats (AC3/DTS), Picture formats (JPG/JPEG). Supports up to 4K resolution.
Filmora also offers extensive editing features, including:
- Speed Ramping: To produce distinctive dramatic effects, change the speed of your film while having more control over your keyframes.
- Preset Templates: Making a creative film is straightforward using the built-in Filmora Preset template
- Mask and Blend: The masking and blending features in Filmora are user-friendly and packed with valuable capabilities.
- AI Portrait: Easily identify people in your film and increase the fun factor when editing it.
Major approaches to speed up a video in Filmora
As we know that Filmora has the option to change the speed of a video, so let’s find out step-by-step how to do that; you can also watch this Tutorial on Youtube :
Method 1: Use the ‘Fast’ or ‘Slow’ option to change the speed
Just as simple as the heading is, this option is pretty straightforward, but you cannot decide how much speed you want to add to your video or how slow you want it to be.
Method 2: Changing Uniform Speed in Wondershare Filmora
You need to check your video’s FPS and import your clip first.
Pick your preferred video. Go to the menu and select “Download.” After hitting the “Plus” button, you may maintain the video’s quality by choosing “Match to Media.”

After the movie has loaded, you have two options: double-clicking the clip or selecting the speed option provided below the screen.

A window appears when we double-click the chosen video. We shall navigate to the “SPEED” section beneath this window. Additional “Uniform Speed” and “Speed Ramping” panels may be found on this speed panel. We shall operate within the uniform speed panel to alter the video’s tempo consistently. A slider is provided for us to adjust the movie’s pacing.
The general speed of the film is continually increased or decreased when we choose the option for constant pace. If we choose the speed option on the screen, it gives us a built-in range of numbers that we can use to change the video’s pace in addition to presets like rapid and regular slow.

Once we click “OK,” the video’s tempo adjusts automatically.
Method 3: Adjusting the Fast/Slow motion to fit your movie using the Speed Ramping option
To set up the speed ramping feature for your video, double-clicking the video will give us access to the “SPEED RAMPING” option in the speed panel. When we select the speed ramping option, we see a range of graphs. Each graph shows a number of tempo variations that we may use in our movie.
For Instance, when we select the “MONTAGE” preset, the video’s tempo changes based on how many keyframes we choose and at what rate. As previously stated, as the graph rises above one and falls below one, the movie’s tempo will slow down, increasing its regular speed.

Moving these keyframes higher will make the video go more quickly, while moving them downward will make the movie move more slowly. We may also add more keyframes by using the add button up top, as seen in the image. When satisfied with our results, we will produce the video after pressing the “OK” button.
Watch this video and know more about speed ramping.
Conclusion
In conclusion, the first thing you can do to speed up your video is to use FFmpeg. The FFmpeg project is a community-driven, non-profit collaborative project to develop and maintain an open-source code library for handling multimedia files, including video. It has many features including ffmpeg speed-up video, ffmpeg slow-down video, etc. FFmpeg is free software and supports many platforms, including Linux, macOS, iOS, and Android.
Filmora is another great alternative that allows users to speed up their videos much more easily than using FFmpeg alone. Moreover, it has built-in tools that allow users to automatically detect if there are any issues with their videos. Filmora also offers a wide range of features that you may not find in FFmpeg.
Free Download For macOS 10.14 or later
The supported formats of Filmora are Video formats (AVI, MPEG-2, MPEG-4, MKV, WMV), Video codecs (AVC1, MPEG-4 AVC, VC1/WMV3), Audio formats (AC3/DTS), Picture formats (JPG/JPEG). Supports up to 4K resolution.
Filmora also offers extensive editing features, including:
- Speed Ramping: To produce distinctive dramatic effects, change the speed of your film while having more control over your keyframes.
- Preset Templates: Making a creative film is straightforward using the built-in Filmora Preset template
- Mask and Blend: The masking and blending features in Filmora are user-friendly and packed with valuable capabilities.
- AI Portrait: Easily identify people in your film and increase the fun factor when editing it.
Major approaches to speed up a video in Filmora
As we know that Filmora has the option to change the speed of a video, so let’s find out step-by-step how to do that; you can also watch this Tutorial on Youtube :
Method 1: Use the ‘Fast’ or ‘Slow’ option to change the speed
Just as simple as the heading is, this option is pretty straightforward, but you cannot decide how much speed you want to add to your video or how slow you want it to be.
Method 2: Changing Uniform Speed in Wondershare Filmora
You need to check your video’s FPS and import your clip first.
Pick your preferred video. Go to the menu and select “Download.” After hitting the “Plus” button, you may maintain the video’s quality by choosing “Match to Media.”
After the movie has loaded, you have two options: double-clicking the clip or selecting the speed option provided below the screen.
A window appears when we double-click the chosen video. We shall navigate to the “SPEED” section beneath this window. Additional “Uniform Speed” and “Speed Ramping” panels may be found on this speed panel. We shall operate within the uniform speed panel to alter the video’s tempo consistently. A slider is provided for us to adjust the movie’s pacing.
The general speed of the film is continually increased or decreased when we choose the option for constant pace. If we choose the speed option on the screen, it gives us a built-in range of numbers that we can use to change the video’s pace in addition to presets like rapid and regular slow.
Once we click “OK,” the video’s tempo adjusts automatically.
Method 3: Adjusting the Fast/Slow motion to fit your movie using the Speed Ramping option
To set up the speed ramping feature for your video, double-clicking the video will give us access to the “SPEED RAMPING” option in the speed panel. When we select the speed ramping option, we see a range of graphs. Each graph shows a number of tempo variations that we may use in our movie.
For Instance, when we select the “MONTAGE” preset, the video’s tempo changes based on how many keyframes we choose and at what rate. As previously stated, as the graph rises above one and falls below one, the movie’s tempo will slow down, increasing its regular speed.
Moving these keyframes higher will make the video go more quickly, while moving them downward will make the movie move more slowly. We may also add more keyframes by using the add button up top, as seen in the image. When satisfied with our results, we will produce the video after pressing the “OK” button.
Watch this video and know more about speed ramping.
Conclusion
In conclusion, the first thing you can do to speed up your video is to use FFmpeg. The FFmpeg project is a community-driven, non-profit collaborative project to develop and maintain an open-source code library for handling multimedia files, including video. It has many features including ffmpeg speed-up video, ffmpeg slow-down video, etc. FFmpeg is free software and supports many platforms, including Linux, macOS, iOS, and Android.
Filmora is another great alternative that allows users to speed up their videos much more easily than using FFmpeg alone. Moreover, it has built-in tools that allow users to automatically detect if there are any issues with their videos. Filmora also offers a wide range of features that you may not find in FFmpeg.
Add Green Screen Video on TikTok
TikTok is the most popular platform for making short videos. You can create creative short videos and upload to TikTok so that they can entertain your followers and make your videos go viral. To add variety to your video content, the use of green screen in short videos is a great idea. You can replace the green screen with any background in your TikTok video. You need to know how to add green screen video on TikTok.
Adding green screen on TikTok videos has become a trend now as there are several green screen TikTok videos that have gone viral. In fact, creative green screen videos are extremely popular on social media platforms. Instead of replacing the green screen in your video with a single photo, you can replace it with multiple pictures on TikTok. We will illustrate how to add multiple pictures on TikTok green screen.
Part 1. How to Add Green Screen on TikTok?
To add green screen on TikTok video, you need to have a background of uniform color. It does not necessarily have to be a green screen. For example, if you are shooting a video of your legs and the floor tiles have uniform color, you can use green screen on TikTok to replace the tiles with any picture. Instead of using one picture on TikTok short video, you can use multiple pictures in the background to create stunning TikTok videos. Here are the steps on how to add multiple pictures to TikTok green screen.
Step1 Open TikTok app on your phone. Tap on Plus icon located at the bottom of the app screen to make a new video.
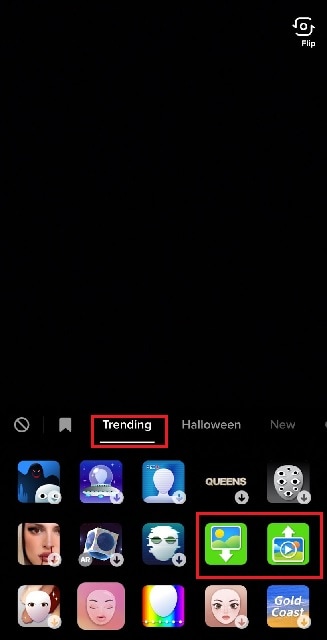
Step2 Choose the duration of the video as per your preference. Thereafter, tap on Effects option located at the bottom-left corner to see the different effects available on TikTok.
![]()
Step3 Go to Trending tab and you will see Green Screen and Green Screen Video icons. If you want your video to have green screen photo, tap on Green Screen icon. If you want your video to have green screen video, tap on Green Screen Video icon.
Step4 You will get a generic background and you can choose any preset background or select photo or video from your phone gallery by tapping on Plus icon. Once you are done, tap on Record button.
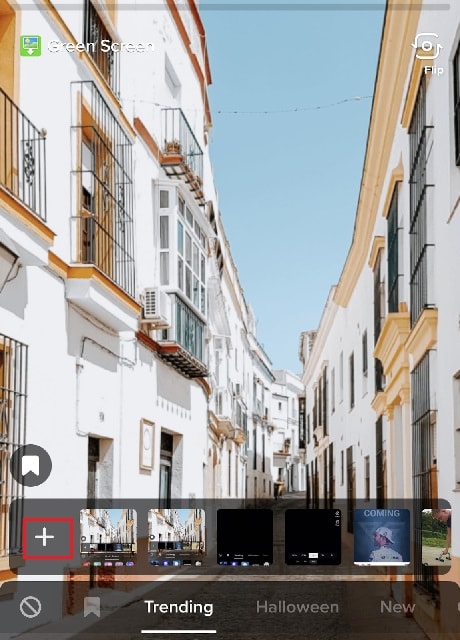
Step5 In order to use multiple pictures, you should stop recording in between and change your green screen image to anything you desire. Then tap on Record button again. TikTok will string your clips and it would appear that you have been changing multiple pictures of your background for your video.
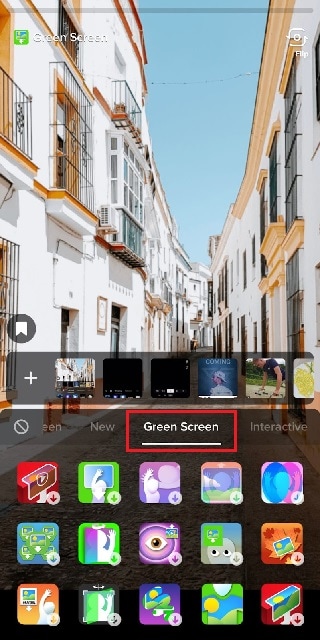
If you want to experiment with green scree effects, you can scroll down after tapping on Green Screen icon under Effects. You will see different types of green screen videos possible on TikTok to choose from.
Part 2. Creative Ideas to Make TikTok Green Screen Video
Now that you know how to add a video on TikTok green screen, you have to make the most out of it. If you are wondering how you can use green screen in your TikTok videos, here are some creative ideas for you.
Walking Out Videos – You can use green screen effect to show that you are walking out of plane, walking vertically on the wall like inception, walking on the roof of a building. In fact, you can show that you are walking out of popular monuments and palaces and trick your viewers into thinking that you were actually there.
Photoshoot Location – Create a TikTok video showing your favorite locations across the world where you dream of doing photoshoot. You can pose differently and place the location in your background through green screen effect.
How-To Video – If your TikTok channel is about tutorial and learning videos, you can explain things better by putting screenshots and multiple relevant pictures in the background so that viewers can get a pictorial representation of what you are speaking to them.
Mystery Story – You can a create short video describing unknowing facts and mysteries around certain places in the world. You can put photos or video clips of those mysterious places in your background to keep your viewers hooked and related to your narration.
Rate Them Video – You can use green screen effect to showcase your old Instagram photos or videos and rate them. This is an extremely popular trend in TikTok where people show their old photos, display work from the past, and rate them today.
Reveal Your Creation – Share your secrets or interesting stories behind some of the photos or videos you took in the past. You can talk about how creatively you took certain photos and put those photos in the background while discussing them.
Part 3. How to Make Green Screen Video on Computer?
If you have a computer and a webcam, you can record a green screen video on your computer. You can place the green screen in the background perfectly and place the webcam so that the background stays within the green screen. You will need a video recorder and a video editor to make green screen video as well as replace the green screen with any photo or video. We recommend Wondershare Filmora where you can record as well as edit green screen video.
Filmora is a professional video editor where you can record your computer screen as well as your webcam video with green screen background in Picture-in-Picture mode. After recording the video, you can replace the green screen with any video clip or photo instantly in a few steps. You can also fine-tune green screen effect for perfection. Therefore, you can save the video in any resolution and file format as per your preference.

Free Download For Win 7 or later(64-bit)
Free Download For macOS 10.14 or later
Conclusion
Adding green screen effect on TikTok videos can make your videos stand out. We have illustrated how to add multiple green screen videos on TikTok and your videos will have a better chance of getting viral. Keep the green screen ideas in mind while making TikTok green screen videos. If you want to make and edit green screen videos on computer, Wondershare Filmora is the best application available for Windows and Mac users.
Also read:
- Create Risograph Effect In Photoshop A Beginners Guide for 2024
- Tutorial How To Add Motion Blur in Blender, In 2024
- New 2024 Approved How to Make Text Reveal Effect Easily
- New 2 Actionable Ways to Extract Subtitles From MKV Videos without Quality Loss for 2024
- New How to Make a PowerPoint Looping Slideshow
- 2024 Approved Do You Know There Are Websites to Download Free Glitch Transition Effects for Premiere Pro? You Can Easily Download Them and Make Awesome Videos
- Updated As an Online Marketer, It Is Important to Know the Algorithm of YouTube Platform. Ill Share You the History of Algorithm of YouTube and the New Changes in This Year
- How to Turn Text Into a Podcast for 2024
- 2024 Approved Many People Choose Video Editing or Post-Editing as Their Career in These Days. Is This a Good Choice? How to Start a Video Editing Career? This Article Will Tell You the Complete Details
- New In 2024, 18 Video Editors Weve Tested Heres What We Learned
- Updated Tips That Show Anybody How To Create Youtube Slideshow – Guaranteed
- 2024 Approved How Can You Get VHS Filter and Glitch Filter to Your Images or Videos?
- Updated Easy Ways to Remove Motion Blur In Photoshop
- New Zoom In and Out on Discord
- 2024 Approved Making Creative and Engaging Youtube Videos Is Now Easy with Several Tools. Now, YouTube Also Offers You Its Own Built-In Video Editor Through Which You Can Edit and Enhance the Video Quality
- Full Guide to Unlock Apple iPhone 13 Pro with iTunes | Dr.fone
- Does Samsung Galaxy A15 5G support MOV videos ?
- How to Screen Share Mac to Apple iPhone 11 Pro Max? | Dr.fone
- Home Button Not Working on Asus ROG Phone 7 Ultimate? Here Are Real Fixes | Dr.fone
- Does Oppo K11 5G Have Find My Friends? | Dr.fone
- In 2024, Easy Guide to Xiaomi 14 Ultra FRP Bypass With Best Methods
- Double Location Dongle All to Know About Apple iPhone 15/iPad GPS Spoofing | Dr.fone
- How to Lock Apps on Vivo Y200e 5G to Protect Your Individual Information
- 3 Effective Ways to Unlock iCloud Account Without Password From Apple iPhone 13 Pro Max
- In 2024, Additional Tips About Sinnoh Stone For Nokia C32 | Dr.fone
- Title: Updated Perfect Moody LUTs for VN Editor An Overview
- Author: Chloe
- Created at : 2024-05-20 03:38:16
- Updated at : 2024-05-21 03:38:16
- Link: https://ai-editing-video.techidaily.com/updated-perfect-moody-luts-for-vn-editor-an-overview/
- License: This work is licensed under CC BY-NC-SA 4.0.
