
:max_bytes(150000):strip_icc():format(webp)/removerokuchannel-c354faa0f712495384a4d5888017e30c.png)
Updated Repeated Text Animation Tutorial in Filmora
Repeated Text Animation Tutorial in Filmora
Preparation
What you need to prepare:
- A computer (Windows or macOS)
- Your video materials.
- Filmora video editor
Step 1
Download Filmora . Let it install and wait for it to run. Then, click on “New Project”. Now, you’re ready to edit!
Step 2
First, go to Titles and drag the Default Title to the Timeline.

Step 3
Now, double-click on the Default Title clip. Here, change its font to any bold font. Increase the text size to 120. Type in your text in the box. Scroll a bit down and change the Text Spacing to 8. Click OK.

Step 4
Take a Snapshot of this Default Title.

Step 5
Double-click on the Default Title clip once again. This time, click on its Advanced settings. Here, turn OFF Text Fill → turn ON Outline → change the Outline color to White → reduce Thickness to 1. Click OK. Now, take another Snapshot.

Step 6
Delete the Default Title clip from the Timeline. Now, drag the Outline snapshot that we just created to the Timeline. Open the Crop tool → change the Ratio to Custom → replace “1080” with “540”. Lastly, move the highlighted crop section to the top. Click OK.

Step 7
Double-click on the Snapshot to open its settings panel. Go to the Animation tab. Here, change the value of the Y-axis to “275”**.** Click OK. Now, take a Snapshot.

Step 8
Next, click on the Crop tool again and simply move the highlighted crop section to the bottom part of the screen. Click OK. Then, double-click on the snapshot clip in the Timeline and change the value of the Y-axis from “275” to “-275”**.** Click OK. Take a Snapshot again.
Step 9
Import a background image to My Media. Drag the background image to the Timeline. Double-click on it and drag the Scale bar until the background image covers the whole screen. Click OK. You should cut the background clip to make it 3 seconds long as well.

Step 10
Lock this track in the Timeline by pressing the highlighted button on the left. Then, go to “Track Manager” and add 6 new Tracks to the Timeline. Click OK.

Step 11
Drag the first Snapshot we made before to Track 6. Cut it so it’s 3 seconds long. Then, Lock the Track.

Step 12
Set the Playhead at the 15th frame on the Timeline. Then, drag the Upward Outline snapshot to this point. Double-click on it and change the Y-axis value to “**-4%**”. Then, reduce the Opacity to 0%. Now, move the Playhead 5 frames further. Next, increase the Opacity to 100% and increase the Y-axis value to around “105”. Don’t click OK yet.
Step 13
Move the Playhead to 1 minute and 5 seconds on the Timeline. Add a keyframe by clicking on the “+Add” button. Then, move the Playhead 5 frames forward. Here, change the Zoom Level to 25%.

Step 14
Double-click on the clip in Track 5. Drag the text like in the image below. Then, delete the part of the clip on the right side after 1 minute and 15 seconds.

Step 15
Hide the clips on Track 6 and Track 1 by clicking the “eye” icons next to them. Then, take a Snapshot. Now, drag this Snapshot right next to the clip on Track 5.

Step 16
Move the Playhead 3 frames forward from the starting point of the clip you just added. Unhide Track 6. Double-click on the clip on the right side of Track 5 and click on “+Add”. Move the Playhead 5 seconds forward and adjust the Upward Outline to fit the text.

Step 17
Move the Playhead 5 frames forward again. Drag the Y-axis value to the left until the outline clip overlaps the main text. Then, reduce the Opacity to 0%. Move the Playhead to 2 minutes and 10 seconds. Cut the Track and delete the clip on the right side. Lastly, Lock Track 5.

Step 18
Drag the Downward Outline snapshot to Track 4. Then, repeat the same process as in Step 16 and Step 17.
Step 19
Drag the Upward Outline snapshot to Track 3 at the 17th frame. Double-click on it and change the Opacity to 0%.

Step 20
Now, move 5 frames forward and increase the Opacity back to 100%. Then, drag the Y-axis value to the right until the screen looks like this.

Step 21
Move the Playhead to 1 minute and 5 seconds. Click on “+Add” to add a keyframe. Then, move the Playhead 5 frames forward. Double-click on the clip and stretch it from side to side to match something like this.

Step 22
Move the Playhead to 1 minute and 16 seconds. Split the clip and delete the part on the right side. Hide Track 4, 5, and 6. Then, take a Snapshot. Drag this Snapshot next to the clip on Track 3. Place the Playhead on 1 minute and 18 seconds. Then, unhide Track 4, 5, and 6.
Step 23
Double-click on the clip on the right side of Track 3. Add a keyframe by pressing “+Add”. Move the Playhead to 1 minute and 23 seconds. Now, resize the clip back to its original size by moving the rectangle left and right. Right now, it should look like this.

Step 24
Move the Playhead 5 frames forward. Drag the Y-axis value to the left until the screen looks like this.

Step 25
Move the Playhead 5 frames forward again. Drag the value of the Y-axis to the left until the screen looks like this. Then, change the Opacity to 0%. Finally, split the clip at 2 minutes and 10 seconds. Delete the part on the right side. Lock Track 3.

Step 26
Next, drag the Downward Snapshot on Track 2 and follow the same process as in Steps 19 through 25.
Step 27
Unhide the Background clip at the bottom of the Timeline. Then, Unlock Track 6. Split the clip on Track 6 at the 15th frame.

Step 28
Move the Playhead at the beginning of the Timeline. Click on the first part of the clip on Track 6. Add a keyframe. Drag the X-axis value to the right until the word disappears out of the screen. Like this. 👇Then, move the Playhead to the 6th frame and Reset the X-axis value to 0.0.

Step 29
Take the Playhead to 2 minutes and 10 seconds. Split it. Now, move the Playhead to 2 minutes and 19 seconds and add a keyframe. Lastly, take the Playhead to the very end of the clip and drag the text to the right side until it’s out of the screen once again.

Step 30
Go to the Effects tab. Select Glitch from the panel on the left. Then, apply “Glitch Dispersion” and “Glitch Stripe 2” to the clips at the start and at the end.

Step 31
Finally, Render the video to watch the final preview. And, you’re done! Congratulations on creating a repeated text animation in Filmora.

Summary
What you’ve learned:
- How to create text animations in Filmora
- Applying animation effects
- Make advanced edits on Titles in Filmora
- Hide and lock Tracks and Clips in Filmora
What you need to prepare:
- A computer (Windows or macOS)
- Your video materials.
- Filmora video editor
Step 1
Download Filmora . Let it install and wait for it to run. Then, click on “New Project”. Now, you’re ready to edit!
Step 2
First, go to Titles and drag the Default Title to the Timeline.
Step 3
Now, double-click on the Default Title clip. Here, change its font to any bold font. Increase the text size to 120. Type in your text in the box. Scroll a bit down and change the Text Spacing to 8. Click OK.
Step 4
Take a Snapshot of this Default Title.
Step 5
Double-click on the Default Title clip once again. This time, click on its Advanced settings. Here, turn OFF Text Fill → turn ON Outline → change the Outline color to White → reduce Thickness to 1. Click OK. Now, take another Snapshot.
Step 6
Delete the Default Title clip from the Timeline. Now, drag the Outline snapshot that we just created to the Timeline. Open the Crop tool → change the Ratio to Custom → replace “1080” with “540”. Lastly, move the highlighted crop section to the top. Click OK.
Step 7
Double-click on the Snapshot to open its settings panel. Go to the Animation tab. Here, change the value of the Y-axis to “275”**.** Click OK. Now, take a Snapshot.
Step 8
Next, click on the Crop tool again and simply move the highlighted crop section to the bottom part of the screen. Click OK. Then, double-click on the snapshot clip in the Timeline and change the value of the Y-axis from “275” to “-275”**.** Click OK. Take a Snapshot again.
Step 9
Import a background image to My Media. Drag the background image to the Timeline. Double-click on it and drag the Scale bar until the background image covers the whole screen. Click OK. You should cut the background clip to make it 3 seconds long as well.
Step 10
Lock this track in the Timeline by pressing the highlighted button on the left. Then, go to “Track Manager” and add 6 new Tracks to the Timeline. Click OK.
Step 11
Drag the first Snapshot we made before to Track 6. Cut it so it’s 3 seconds long. Then, Lock the Track.
Step 12
Set the Playhead at the 15th frame on the Timeline. Then, drag the Upward Outline snapshot to this point. Double-click on it and change the Y-axis value to “**-4%**”. Then, reduce the Opacity to 0%. Now, move the Playhead 5 frames further. Next, increase the Opacity to 100% and increase the Y-axis value to around “105”. Don’t click OK yet.
Step 13
Move the Playhead to 1 minute and 5 seconds on the Timeline. Add a keyframe by clicking on the “+Add” button. Then, move the Playhead 5 frames forward. Here, change the Zoom Level to 25%.
Step 14
Double-click on the clip in Track 5. Drag the text like in the image below. Then, delete the part of the clip on the right side after 1 minute and 15 seconds.
Step 15
Hide the clips on Track 6 and Track 1 by clicking the “eye” icons next to them. Then, take a Snapshot. Now, drag this Snapshot right next to the clip on Track 5.
Step 16
Move the Playhead 3 frames forward from the starting point of the clip you just added. Unhide Track 6. Double-click on the clip on the right side of Track 5 and click on “+Add”. Move the Playhead 5 seconds forward and adjust the Upward Outline to fit the text.
Step 17
Move the Playhead 5 frames forward again. Drag the Y-axis value to the left until the outline clip overlaps the main text. Then, reduce the Opacity to 0%. Move the Playhead to 2 minutes and 10 seconds. Cut the Track and delete the clip on the right side. Lastly, Lock Track 5.
Step 18
Drag the Downward Outline snapshot to Track 4. Then, repeat the same process as in Step 16 and Step 17.
Step 19
Drag the Upward Outline snapshot to Track 3 at the 17th frame. Double-click on it and change the Opacity to 0%.
Step 20
Now, move 5 frames forward and increase the Opacity back to 100%. Then, drag the Y-axis value to the right until the screen looks like this.
Step 21
Move the Playhead to 1 minute and 5 seconds. Click on “+Add” to add a keyframe. Then, move the Playhead 5 frames forward. Double-click on the clip and stretch it from side to side to match something like this.
Step 22
Move the Playhead to 1 minute and 16 seconds. Split the clip and delete the part on the right side. Hide Track 4, 5, and 6. Then, take a Snapshot. Drag this Snapshot next to the clip on Track 3. Place the Playhead on 1 minute and 18 seconds. Then, unhide Track 4, 5, and 6.
Step 23
Double-click on the clip on the right side of Track 3. Add a keyframe by pressing “+Add”. Move the Playhead to 1 minute and 23 seconds. Now, resize the clip back to its original size by moving the rectangle left and right. Right now, it should look like this.
Step 24
Move the Playhead 5 frames forward. Drag the Y-axis value to the left until the screen looks like this.
Step 25
Move the Playhead 5 frames forward again. Drag the value of the Y-axis to the left until the screen looks like this. Then, change the Opacity to 0%. Finally, split the clip at 2 minutes and 10 seconds. Delete the part on the right side. Lock Track 3.
Step 26
Next, drag the Downward Snapshot on Track 2 and follow the same process as in Steps 19 through 25.
Step 27
Unhide the Background clip at the bottom of the Timeline. Then, Unlock Track 6. Split the clip on Track 6 at the 15th frame.
Step 28
Move the Playhead at the beginning of the Timeline. Click on the first part of the clip on Track 6. Add a keyframe. Drag the X-axis value to the right until the word disappears out of the screen. Like this. 👇Then, move the Playhead to the 6th frame and Reset the X-axis value to 0.0.
Step 29
Take the Playhead to 2 minutes and 10 seconds. Split it. Now, move the Playhead to 2 minutes and 19 seconds and add a keyframe. Lastly, take the Playhead to the very end of the clip and drag the text to the right side until it’s out of the screen once again.
Step 30
Go to the Effects tab. Select Glitch from the panel on the left. Then, apply “Glitch Dispersion” and “Glitch Stripe 2” to the clips at the start and at the end.
Step 31
Finally, Render the video to watch the final preview. And, you’re done! Congratulations on creating a repeated text animation in Filmora.
Summary
What you’ve learned:
- How to create text animations in Filmora
- Applying animation effects
- Make advanced edits on Titles in Filmora
- Hide and lock Tracks and Clips in Filmora
How to Easily Convert SRT to VTT
While there are numerous subtitle formats, two of the most commonly used formats are SRT and Web VTT. SRT is also known as SubRip. The format got its name from a DVD ripping software that extracted subtitles from DVDs.
Web VTT stands for Web Video Text Track. Web VTT is a W3C standard that allows you to display the text in sync with the HTML 5
Both of them are quite similar; however, slight differences might make you choose one over the other.
- What Does It Look Like
- Timecode Format
- Metadata
- Basic Text Formats (Bold, Italic, Underline)
- Advanced Styling Fonts
- Support Changing The Position Of Subtitles
- Summary
- How to Convert SRT to VTT Manually
- Video Guide Tutorial to easily Convert SRT to VTT with Subtitle Edit
- Pro Tip: The Best Way to Edit the Styling of Your SRT file and Merge Subtitles with Videos
Is Web VTT the Same as SRT?
While SRT is a popular text file used for captions, Web VTT is not far behind. Web VTT is similar to SRT but includes more styling options and editing. Web VTT works exceptionally well with media players but might not work efficiently on social media platforms.
Besides that, it also contains metadata making it more robust than SRT. But this is not all that is different between SRT and Web VTT. Let’s dive into the details of how both are different even though they are sometimes used interchangeably:
What Does It Look Like
Mostly, SRT and Web VTT files are similar, so one can easily be converted to another or edited. A Web VTT file starts with Web VTT at the top and the file’s title next to it. An SRT file does not have any of that. Then the caption sequences are separated with blank lines in Web VTT files. The SRT file is messy, with captions not separated by lines but all clustered together.

| Features/Subtitle Formats | SRT | VTT |
|---|---|---|
| Timesconde Format | Hours:minutes: seconds. milliseconds | minutes: seconds. milliseconds |
| Metadata | No | Yes |
| Title | No | Yes |
| A Numbering of The Subtitle Lines | Yes | No |
| Basic Text Formats | Not supported | Yes |
| Advanced Styling Fonts | Simple | More robust styling including bold, italics, etc |
| Support Changing the position of subtitles | No | Yes |
Timecode Format
The timecode format for an SRT file begins with hours:minutes: seconds. milliseconds. On the other hand, the timecode format for a Web VTT file is minutes: seconds. milliseconds. This difference in timecode is extremely important to keep in mind while manually editing SRT or Web VTT files.
Metadata
A web VTT file includes metadata, unlike an SRT file. This means that a web VTT file includes extra information like author, title, and additional comments.
Basic Text Formats (Bold, Italic, Underline)
Web VTT is equipped with basic styling formats like bold italic and underline, which makes it more robust than SRT. Its styling formats are supported by all browsers. On the other hand, SRT files do not support any styling.
Advanced Styling Fonts
Web VTT supports a more robust format that includes whistles and bells, distinguishing it from the simpler SRT format. This adds a very nice touch, especially if the text file is for a tv episode.
Support Changing The Position Of Subtitles
Along with all its other fantastic features, Web VTT files also allow you to change the position of the subtitles easily. SRT files do not give you the liberty to do that.
Summary
So, in short, Web VTT is more user friendly offering a lot more than what a simple SRT file may offer. Apart from differences in styling, time, and text formats, Web VTT files are incredibly easier to read and edit. You can also add comments which will remain hidden from the display.
How to Generate VTT Subtitles from SRT using an Online subtitle converter
If you want a quick solution to convert SRT files to Web VTT, then there are a lot of converters available online that will convert your SRT file in seconds, however long it many be. Some notable converters online are given below. Depending on their features and results, you can use the one that suits you the most.
Go Transcript

Go Transcript is an excellent online service that is mainly known for providing transcriptions for audio and videos. Their human transcribers provide transcriptions with almost 100% accuracy, even when the voices are heavily accented.
Apart from that, GoTranscript allows you to convert files into 15 different text formats including csv, srt, vtt, sbv and rt. The website is extremely easy to navigate, and you can upload your file and convert it within minutes.
Pros
- Mobile app is available for use
- Easy to navigate interface
- Free conversions to different file types
Cons
- Lots of extra costs if purchasing premium services
- Web editor is not very great
Veed.io
Veed.io is another excellent website for converting SRT files to Web VTT format. The website has a very intuitive interface with everything in front of you. By clicking on the upload button, you can upload your file and convert it. Other than that, you can also download closed captions from the Veed.io website, as it allows you to transcribe audios and edit videos.

Pros
- Easy to Use
- Can be easily integrated with Youtube
- Can download closed captions and use them for other purposes
Cons
- No mobile app is available
Subtitle Edit
Subtitle Edit is also an online SRT to Web VTT convertor that has an extremely user-friendly interface. Subtitle edit is free of any ads or distractions, allowing you to work on your file with your complete focus. Subtitle Edit also provides transcription and video editing services along with free file conversions.

Pros
- User-friendly
- No clutter or distractions
Cons
- Only creates and edits SRT files
- Expensive premium services
How to Convert SRT to Web VTT using GoTranscript
As mentioned above, GoTranscript is extremely easy to navigate and allows you to quickly convert your files from one format to the other. Here is a detailed process that shows how you can convert your SRT file to Web VTT in GoTranscript.
To convert an SRT file to Web VTT using GoTranscript, follow the steps below:
- Open the Gotranscriptsubtitle converter in your browser.
- Now press the Upload button to upload the file to the website.

- From the second section, select the file format you want to convert it in. Since you want to convert it to Web VTT format, select “.”

- Lastly, click on Convert to convert your file. Once your file is converted, press download to download the file.
Now the file will be downloaded to your computer and you can use it as you desire.
Online converters are an extremely easy way to convert your SRT files to Web VTT. However, sometimes you might want to manually edit them if you are not satisfied with the results of the online converter.
How to Convert SRT to VTT Manually?
Both SRT and Web VTT files are easily editable in Notepad or TextEdit if you are using Mac, so you can manually change both of them there when needed. SRT and Web VTT files are mostly the same, with just a few distinguishable differences.
By understanding those differences between them, you can easily convert an SRT file to Web VTT or a Web VTT file to SRT. Here is how you can convert an SRT to VTT manually:
Step-by-step guidelines to Convert SRT to VTT Manually
Open in Notepad:
- In order to convert SRT files into VTT manually, search the SRT file in file explorer and open it in Notepad.
Edit the File and save:
- When you open the file, you will see that all the text is quite close together with no black lines to separate sequences. If the file is small, putting blank lines in between would not be too difficult. However, it can be quite a time taking process if the file is large.

- To do it manually, you can add spaces between sequences.
- Replace all the periods with commas. Press Crtl+H on your keyboard to open the replace toolbar and select replace all to replace all periods with commas.
- The next step is adding WebVTT to the top of the file. You can also add a comment or title for the file right next to it.

- Lastly, remove 1 from the start of each time code. For example, if the time code is “100:00:11.580,” write “00:00:11.580”.

Change the extension from SRT to VVT:
- Now save all the changes, rename it by replacing the suffix “SRT ‘’ with “VVT .’’
If you do not see the extension in the name of the file,
- Go to the top menu in Windows Explorer
- Go to view
- Click on the check box for “File name extensions”

Now you can easily change the extension from SRT to VVT.

The manual process is not too difficult. It can be extremely time taking to change each time code and adding blank lines in between. However, this is an easy fix when you cannot access a converter.
Video Guide Tutorial to easily Convert SRT to VTT with Subtitle Edit
Here is a video tutorial to guide you to convert SRT to VTT:
How to Easily Convert SRT to VTT and VTT to SRT
Pro Tip: The Best Way to Edit the Styling of Your SRT file and Merge Subtitles with Videos
While we have discussed most of the solutions with you, the easiest and the best solution is saved for the last. You must be aware of Wondershare Filmora , but did you know that you can easily edit your SRT file there and merge the subtitles with your video! Filmora offers you to edit SRT files and conveniently arrange the captions however you want.
Wondershare Filmora
Filmora is truly a work of art that allows beginners and professionals to create and edit world class videos. With an easy to navigate interface, you can find everything within seconds, even if you are a novice at video editing.

Filmora is especiially useful in creating YouTube videos, instagram reels, or TikToks that will wow your audience. With such an incredible video editing tool at your hand, all you need to worry about is good content, and Filmora will enhance the rest of the things with its spectacular video editing.
For that part, Filmora offers a range of tools, effects, stickers, and transitions that will give you a professional quality video.
You can also add subtitles, text, or animations to your videos.
As this article focuses on editing your SRT file in Filmora, we will dive directly into that. Here is how you can edit your SRT file in Filmora:
Step-by-step guidelines
Free Download For Win 7 or later(64-bit)
Free Download For macOS 10.14 or later
- Open Wondershare Fimora on your PC. If you do not have the Filmora app on your PC, you can download it from here .
- The first step is uploading the SRT file directly into the media resource area. You can directly import the file using the import media files option.

- The next step is editing the file. Drag the SRT file to the timeline and right click on it. Now, select Advanced Edit. You can also double click on the SRT file in the timeline to open Advanced Edit options.

There will be multiple options for you to edit your SRT file in Filmora including:
- Edit Time Code: Here, you can edit the time code and change the placement of your captions depending on when you want them to appear.
- Change Subtitles: You can add new subtitles, remove any or edit a few to make them more accurate.
- Subtitle Style: This option allows you to edit the font and size of your captions. You can change the style to fit your video.
- Merge Subtitles: This option allows you to merge subtitles.

- Once you are done editing the SRT file, right click on the file and click on the Export Subtitle file.

By following the simple steps above you can edit your SRT file conveniently in no time.
Final Words
So, here is all you need to know about converting an SRT file to Web VTT. Hopefully, you will find these methods helpful and easy to convert SRT files to Web VTT on daily basis. Don’t forget to give Filmora a try! Editing your SRT file in Filmora is effortless with all the advanced tools available. You can edit your videos and captions and then download them to your computer in no time.
- Go Transcript
- Veed.io
- Subtitle Edit
- How to Convert SRT to Web VTT usingGoTranscript
- How to Convert SRT to VTT Manually
- Video Guide Tutorial to easily Convert SRT to VTT with Subtitle Edit
- Pro Tip: The Best Way to Edit the Styling of Your SRT file and Merge Subtitles with Videos
Is Web VTT the Same as SRT?
While SRT is a popular text file used for captions, Web VTT is not far behind. Web VTT is similar to SRT but includes more styling options and editing. Web VTT works exceptionally well with media players but might not work efficiently on social media platforms.
Besides that, it also contains metadata making it more robust than SRT. But this is not all that is different between SRT and Web VTT. Let’s dive into the details of how both are different even though they are sometimes used interchangeably:
What Does It Look Like
Mostly, SRT and Web VTT files are similar, so one can easily be converted to another or edited. A Web VTT file starts with Web VTT at the top and the file’s title next to it. An SRT file does not have any of that. Then the caption sequences are separated with blank lines in Web VTT files. The SRT file is messy, with captions not separated by lines but all clustered together.
| Features/Subtitle Formats | SRT | VTT |
|---|---|---|
| Timesconde Format | Hours:minutes: seconds. milliseconds | minutes: seconds. milliseconds |
| Metadata | No | Yes |
| Title | No | Yes |
| A Numbering of The Subtitle Lines | Yes | No |
| Basic Text Formats | Not supported | Yes |
| Advanced Styling Fonts | Simple | More robust styling including bold, italics, etc |
| Support Changing the position of subtitles | No | Yes |
Timecode Format
The timecode format for an SRT file begins with hours:minutes: seconds. milliseconds. On the other hand, the timecode format for a Web VTT file is minutes: seconds. milliseconds. This difference in timecode is extremely important to keep in mind while manually editing SRT or Web VTT files.
Metadata
A web VTT file includes metadata, unlike an SRT file. This means that a web VTT file includes extra information like author, title, and additional comments.
Basic Text Formats (Bold, Italic, Underline)
Web VTT is equipped with basic styling formats like bold italic and underline, which makes it more robust than SRT. Its styling formats are supported by all browsers. On the other hand, SRT files do not support any styling.
Advanced Styling Fonts
Web VTT supports a more robust format that includes whistles and bells, distinguishing it from the simpler SRT format. This adds a very nice touch, especially if the text file is for a tv episode.
Support Changing The Position Of Subtitles
Along with all its other fantastic features, Web VTT files also allow you to change the position of the subtitles easily. SRT files do not give you the liberty to do that.
Summary
So, in short, Web VTT is more user friendly offering a lot more than what a simple SRT file may offer. Apart from differences in styling, time, and text formats, Web VTT files are incredibly easier to read and edit. You can also add comments which will remain hidden from the display.
How to Generate VTT Subtitles from SRT using an Online subtitle converter
If you want a quick solution to convert SRT files to Web VTT, then there are a lot of converters available online that will convert your SRT file in seconds, however long it many be. Some notable converters online are given below. Depending on their features and results, you can use the one that suits you the most.
Go Transcript
Go Transcript is an excellent online service that is mainly known for providing transcriptions for audio and videos. Their human transcribers provide transcriptions with almost 100% accuracy, even when the voices are heavily accented.
Apart from that, GoTranscript allows you to convert files into 15 different text formats including csv, srt, vtt, sbv and rt. The website is extremely easy to navigate, and you can upload your file and convert it within minutes.
Pros
- Mobile app is available for use
- Easy to navigate interface
- Free conversions to different file types
Cons
- Lots of extra costs if purchasing premium services
- Web editor is not very great
Veed.io
Veed.io is another excellent website for converting SRT files to Web VTT format. The website has a very intuitive interface with everything in front of you. By clicking on the upload button, you can upload your file and convert it. Other than that, you can also download closed captions from the Veed.io website, as it allows you to transcribe audios and edit videos.
Pros
- Easy to Use
- Can be easily integrated with Youtube
- Can download closed captions and use them for other purposes
Cons
- No mobile app is available
Subtitle Edit
Subtitle Edit is also an online SRT to Web VTT convertor that has an extremely user-friendly interface. Subtitle edit is free of any ads or distractions, allowing you to work on your file with your complete focus. Subtitle Edit also provides transcription and video editing services along with free file conversions.
Pros
- User-friendly
- No clutter or distractions
Cons
- Only creates and edits SRT files
- Expensive premium services
How to Convert SRT to Web VTT using GoTranscript
As mentioned above, GoTranscript is extremely easy to navigate and allows you to quickly convert your files from one format to the other. Here is a detailed process that shows how you can convert your SRT file to Web VTT in GoTranscript.
To convert an SRT file to Web VTT using GoTranscript, follow the steps below:
- Open the Gotranscriptsubtitle converter in your browser.
- Now press the Upload button to upload the file to the website.
- From the second section, select the file format you want to convert it in. Since you want to convert it to Web VTT format, select “.”
- Lastly, click on Convert to convert your file. Once your file is converted, press download to download the file.
Now the file will be downloaded to your computer and you can use it as you desire.
Online converters are an extremely easy way to convert your SRT files to Web VTT. However, sometimes you might want to manually edit them if you are not satisfied with the results of the online converter.
How to Convert SRT to VTT Manually?
Both SRT and Web VTT files are easily editable in Notepad or TextEdit if you are using Mac, so you can manually change both of them there when needed. SRT and Web VTT files are mostly the same, with just a few distinguishable differences.
By understanding those differences between them, you can easily convert an SRT file to Web VTT or a Web VTT file to SRT. Here is how you can convert an SRT to VTT manually:
Step-by-step guidelines to Convert SRT to VTT Manually
Open in Notepad:
- In order to convert SRT files into VTT manually, search the SRT file in file explorer and open it in Notepad.
Edit the File and save:
- When you open the file, you will see that all the text is quite close together with no black lines to separate sequences. If the file is small, putting blank lines in between would not be too difficult. However, it can be quite a time taking process if the file is large.
- To do it manually, you can add spaces between sequences.
- Replace all the periods with commas. Press Crtl+H on your keyboard to open the replace toolbar and select replace all to replace all periods with commas.
- The next step is adding WebVTT to the top of the file. You can also add a comment or title for the file right next to it.
- Lastly, remove 1 from the start of each time code. For example, if the time code is “100:00:11.580,” write “00:00:11.580”.
Change the extension from SRT to VVT:
- Now save all the changes, rename it by replacing the suffix “SRT ‘’ with “VVT .’’
If you do not see the extension in the name of the file,
- Go to the top menu in Windows Explorer
- Go to view
- Click on the check box for “File name extensions”
Now you can easily change the extension from SRT to VVT.
The manual process is not too difficult. It can be extremely time taking to change each time code and adding blank lines in between. However, this is an easy fix when you cannot access a converter.
Video Guide Tutorial to easily Convert SRT to VTT with Subtitle Edit
Here is a video tutorial to guide you to convert SRT to VTT:
How to Easily Convert SRT to VTT and VTT to SRT
Pro Tip: The Best Way to Edit the Styling of Your SRT file and Merge Subtitles with Videos
While we have discussed most of the solutions with you, the easiest and the best solution is saved for the last. You must be aware of Wondershare Filmora , but did you know that you can easily edit your SRT file there and merge the subtitles with your video! Filmora offers you to edit SRT files and conveniently arrange the captions however you want.
Wondershare Filmora
Filmora is truly a work of art that allows beginners and professionals to create and edit world class videos. With an easy to navigate interface, you can find everything within seconds, even if you are a novice at video editing.
Filmora is especiially useful in creating YouTube videos, instagram reels, or TikToks that will wow your audience. With such an incredible video editing tool at your hand, all you need to worry about is good content, and Filmora will enhance the rest of the things with its spectacular video editing.
For that part, Filmora offers a range of tools, effects, stickers, and transitions that will give you a professional quality video.
You can also add subtitles, text, or animations to your videos.
As this article focuses on editing your SRT file in Filmora, we will dive directly into that. Here is how you can edit your SRT file in Filmora:
Step-by-step guidelines
Free Download For Win 7 or later(64-bit)
Free Download For macOS 10.14 or later
- Open Wondershare Fimora on your PC. If you do not have the Filmora app on your PC, you can download it from here .
- The first step is uploading the SRT file directly into the media resource area. You can directly import the file using the import media files option.
- The next step is editing the file. Drag the SRT file to the timeline and right click on it. Now, select Advanced Edit. You can also double click on the SRT file in the timeline to open Advanced Edit options.
There will be multiple options for you to edit your SRT file in Filmora including:
- Edit Time Code: Here, you can edit the time code and change the placement of your captions depending on when you want them to appear.
- Change Subtitles: You can add new subtitles, remove any or edit a few to make them more accurate.
- Subtitle Style: This option allows you to edit the font and size of your captions. You can change the style to fit your video.
- Merge Subtitles: This option allows you to merge subtitles.
- Once you are done editing the SRT file, right click on the file and click on the Export Subtitle file.
By following the simple steps above you can edit your SRT file conveniently in no time.
Final Words
So, here is all you need to know about converting an SRT file to Web VTT. Hopefully, you will find these methods helpful and easy to convert SRT files to Web VTT on daily basis. Don’t forget to give Filmora a try! Editing your SRT file in Filmora is effortless with all the advanced tools available. You can edit your videos and captions and then download them to your computer in no time.
How To Fade Audio With Movavi Editor
Movavi Video Editor Plus is the best option if you want to use its user-friendly Movavi fade audio feature set with plenty of functionality. There are versions of the app on Mac and Windows. For all intents and purposes, Movavi fade out music functionality is an excellent piece of this video editing software. The Movavi Video Editor Plus package comes with standard advanced features and functionality. You may also store your work and share your Movavi fade out audio exports across devices that have the software installed.
Looking for how to fade out music in Movavi? We’ve got you solutions to it. The ability to quickly and simply check that the beginning and conclusion of any audio is one of the best Movavi fade audio features. Prior to the audio, there must be a distinct period of quiet. Finding the program, like Movavi Audio fade out, that best suits your requirements is essential whether you want to fade-in, fad-out, trim, crop, clip, or combine audio files or segments of a music. Find out the details in the upcoming sections.
Part 1. How to Fade Audio with Movavi Editor
When the song’s ending is not featured in the video, fade-out is used to provide an added level of professionalism. Even if you’ve never altered a video before, using Movavi Video Editor Plus is simple. A step-by-step tutorial that walks you through all the tools you’ll need is shown to you when the software initially launches. Additionally, you may always search the Movavi official website for advice.
Steps to use Movavi Fade Audio:
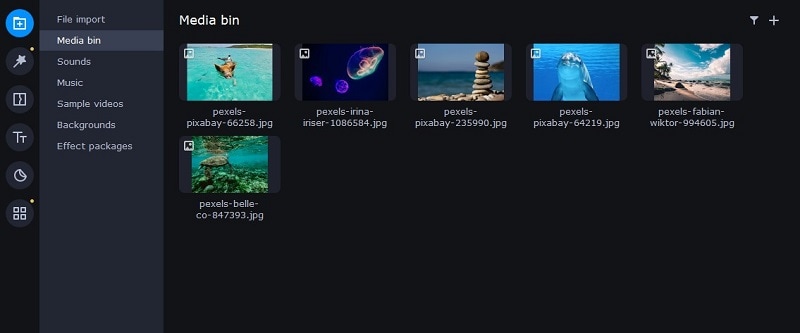
Step1The first step is to import the audio and video files you want to utilize. Drag and drop the files into the software or choose “Add Files” from the Media Bin area to do this. Drag and drop the clip into the timeline after that.
Step2Select the disconnect audio option from the edit menu. Additionally, you can see that the audio and video will no longer be connected by a little connection. Your titles’ location, color, and font may all be changed.
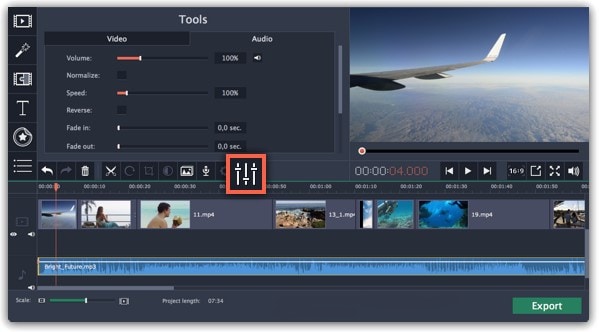
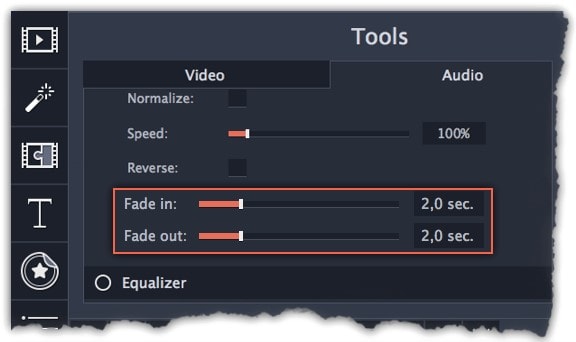
Step3Use the sliders on the Audio tab to set the fade duration by referring to the Audio Properties. Additional options may be used to increase the audio’s loudness, eliminate ambient noise, or even create an echo effect.
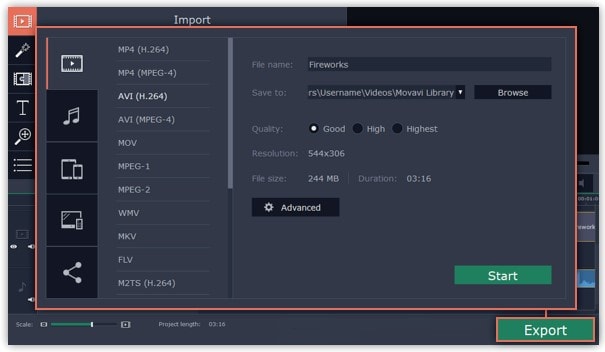
Step4Click on the export option to save this audio as an MP3. Select Audio Export. The MP3 choice is used by default. Select the Save Audio File tab after clicking the Export button. Choose the preferred format and press Start.
Part 2. Movavi Alternative to Fade Audio
Look no further than Filmora by Wondershare if you’re seeking for an effective and user-friendly Movavi audio fade out substitute. This program has all the tools you need to edit, apply special effects, and make titles for videos of a professional caliber. In contrast to Movavi, Filmora gives you the ability to create fade out music without requiring you to install a separate extension. In order to help you understand how to use this function using the Filmora video editing interface, we have enlisted the step-by-step guide for you as well.
Although there are several video editors on the market, Filmora has successfully carved out a position for itself with a variety of intriguing features. The application is appropriate for both new and more experienced users and was designed with novice users in mind. Its user interface (UI), which is rather simple when compared to professional applications. Among all the free video editing programs for beginners, Filmora also offers a far larger selection of effects, customizability, and correction tools, and its screen-splitting capability is much handier than Movavi fade audio feature.
Steps to Fade Out Audio in Filmora:
Step1Install Wondershare Filmora
The straightforward platform to start editing your audio and music files is Filmora, which is available for free. You must first download and install this application on your windows computer in order to utilize it without difficulty. Download the most current edition of this application first. It’s now time to install it on your computer when you’ve completed that. Simply install this program on your computer by following the standard setup instructions if you want to do it fast.
Step2Open Filmora Editor and Import Audio Files
In the step that follows, we’ll show you how to use this platform to fade in and out audio. Filmora may be immediately launched from your desktop or the search bar, then opened as seen below to begin going. By choosing the Video Editor option from the software’s home screen, you may now investigate the basic principles of editing. This will bring up the main interface for Filmora. To import your music and video files, just choose the Import button from the software’s main screen, as seen below:

Step3Load Built-in Audio Editor
You must drag the media files into the program’s timeline after importing them into Filmora. You may modify your media files using every tool in the timeline. To utilize the audio editor in Filmora, just right-click on the specific audio file and choose “Edit Audio” from the list, as seen below.

Step4Use Audio Fade-in/Fade-out
The initial step is to learn how to use Filmora to start fading in and, afterwards, fading out your audio recordings. The best aspect of Filmora is how simple it is to employ these techniques from the timeline. To achieve this, focus on the audio file that you want to change in the timeline; after you’ve picked it, the two icons will show up above the audio file. Drag the first one to the desired duration for the audio fade-in option, as demonstrated:

Step5Edit and Share Video/Sound
In addition to an audio editor, Filmora has a built-in toolset for video editing. You may utilize basic to sophisticated editing techniques inside the program. To choose the basic editor, just click on the video file within the timeline as seen below. There is support for all widely used video and audio formats, including MP3. Click “Export” and choose “File Format” to do this.
By pressing the Format button, choose the required configuration from the list. On a computer, the particular document will be saved to the designated directory.
The Bottom Line
Have you learned how to fade out music in Movavi? If so, then you would also find out that the Movavi fade audio alternative, Filmora , provides a selection of audio editing options in addition to video editing features. The Movavi editor is capable of spicing up your videos and audios, however; Filmora’s workflow is a little more established and well-defined than Movavi’s, which is what propels it to the top of the audio editing field. As a result, Filmora would be the better option if you intend to work as a video editor for a long time.
Free Download For Win 7 or later(64-bit)
Free Download For macOS 10.14 or later
Best 4 Love Video Maker with Music
What could be more amazing than sharing a love video on a special day through social media platforms? How about showing your beloved person a special love video containing all of your special moments? Even though every lover wants to make a special video for their loved ones, the idea of creating video with knowledge scares them off. However, it is very easy these days to create a love video with a love video marker.
If you have the photos of your beautiful memories with your loved one readily available on your computer, we have the best love video maker selected for you. You are more likely to have the photos on your phone as most people use phone camera to capture photos. Therefore, we have listed the best love video maker apps with music to create amazing love videos.
Part 1. Best Love Video Maker for PC and Mac
If you are a computer user and you want to make your special love video on your computer from your photos, we recommend Wondershare Filmora. Filmora is a professional video creator and editor that is available for Windows and Mac users. But the user interface is highly intuitive so that all users can use the application without any prior experience.
You can stretch any photo according to the duration you want in the video. There are beautiful love transitions and effects available to make the video eye-catching. Most importantly, you can import any love song and add that as the background music so that the video feels truly special. Here are the steps to make a love video with Filmora.
For Win 7 or later (64-bit)
For macOS 10.12 or later
**Step 1: Install Filmora and Start Your Video Project
Download and install Wondershare Filmora. Launch Filmora and click on New Project from the welcome screen. Drag and drop your love photos into Project Media folder.
**Step 2: Arrange The Photos on Timeline
Drag and drop the imported photos on the timeline. Arrange them in proper order so that they appear perfectly on the video. You can stretch the duration of photos as per your requirements. Make sure there is no gap in between the photos on the timeline to avoid a black screen during the transition from one photo to another.

**Step 3: Add Beautiful Transition Effects
It is time to apply transition effects so that the photos change from one another with beautiful graphical effects. There are dedicated wedding and love transition effects available to select from. Drag and drop the transitions and place them on the photos one by one.

**Step 4: Add Background Music
Now, drag and drop the love song on Project Media folder that you want the video to play in the background. Drag and drop on the audio timeline below the existing timeline.

**Step 5: Export Your Video
Play the video on Filmora and make any adjustment as you think appropriate. Thereafter, click on Export button and export your video to your hard drive in your desired file format.

Part 2. Best Love Video Creator Apps
If you want to make a love video with your photos on your smartphone, here are the best love maker apps you can consider for the best result.
1. Love Video Maker with Music
Love Video Maker with Music is a popular video maker app where you can instantly make love videos from your photos and share anywhere you want. In fact, social media users prefer the app to create short videos from photos and add romantic music and publish them online. There are beautiful frames available where the photos will be featured and thereby, making the video eye-catching and engaging.
Along with frames, there are different types of romantic text styles available to write anything on the photos and frames. Moreover, you can use different love stickers to enhance the video content. The app allows creating HD quality videos and it is best for Android users. Here are the top features of Love Video Maker with Music app.
- Import as many as 60 photos for video creation.
- Includes photo editor that comes with filters and collage feature.
- Different themes, frames, and text designs available.
- Add music file and trim as per length requirements.
- Add different background effects and adjust speed.
- Square format to post on Instagram and Facebook.
2. Love Video Maker with Songs
Love Video Maker with Songs is exclusively available for iOS users. You can create romantic videos, and you will get all the options to enhance your video quality and content exactly the way you want to. You can add different transitions and animations. The app allows adding music from different sources including iTunes. You can even add your voiceover for personalization.
There are standard video editing options available such as trimming, cropping, changing speed, and much more. There is also no dearth of love stickers and frames. You can also add stylish texts and share the video directly from the app to online platforms. Here are the top features of Love Video Maker with Songs.
- Wide range of video filters and graphical effects.
- Standard video editor for trim, crop, speed change.
- Latest love stickers and frames present.
- Add music from iTunes, other videos, and voiceover.
- Set photo animation duration and stylish texts.
- Instant share on social media platforms directly from the app.
3. Love Video Maker from Microsoft
If you are for a love video maker app for your Windows 10 phone, tablet, or even computer, Love Video Maker from Microsoft is a great choice. Creating a love video from your romantic photos is super easy. Select the photos, add a theme, add background music and thereafter, add stunning filters and your video will be ready to instant saving.
The app comes with a standard photo editing tool where you can edit the photos before adding them to the video. You can blur background, add borders and frames, attach cute stickers and custom texts as per your preference. Here are the top features of Love Video Maker.
- Unlimited photos can be selected for video creation.
- Add different themes and overlay effects with filters.
- Add different borders, frames, and stickers to your photos.
- Blur background, add effects, and custom texts to your photos.
- Save and share videos on social media platforms.
Conclusion
Making love and romantic videos for personal collection as well as sharing them on social media platforms is quite a regular thing. You should have a high-quality love video maker where you should have all the different romantic video making tools and options. We have picked the best video maker for computer users as well as top love video making apps for smartphone users. We recommend Wondershare Filmora as there are unlimited effects, elements, and music for publishing best-quality love videos.
For macOS 10.12 or later
**Step 1: Install Filmora and Start Your Video Project
Download and install Wondershare Filmora. Launch Filmora and click on New Project from the welcome screen. Drag and drop your love photos into Project Media folder.
**Step 2: Arrange The Photos on Timeline
Drag and drop the imported photos on the timeline. Arrange them in proper order so that they appear perfectly on the video. You can stretch the duration of photos as per your requirements. Make sure there is no gap in between the photos on the timeline to avoid a black screen during the transition from one photo to another.
**Step 3: Add Beautiful Transition Effects
It is time to apply transition effects so that the photos change from one another with beautiful graphical effects. There are dedicated wedding and love transition effects available to select from. Drag and drop the transitions and place them on the photos one by one.
**Step 4: Add Background Music
Now, drag and drop the love song on Project Media folder that you want the video to play in the background. Drag and drop on the audio timeline below the existing timeline.
**Step 5: Export Your Video
Play the video on Filmora and make any adjustment as you think appropriate. Thereafter, click on Export button and export your video to your hard drive in your desired file format.
Part 2. Best Love Video Creator Apps
If you want to make a love video with your photos on your smartphone, here are the best love maker apps you can consider for the best result.
1. Love Video Maker with Music
Love Video Maker with Music is a popular video maker app where you can instantly make love videos from your photos and share anywhere you want. In fact, social media users prefer the app to create short videos from photos and add romantic music and publish them online. There are beautiful frames available where the photos will be featured and thereby, making the video eye-catching and engaging.
Along with frames, there are different types of romantic text styles available to write anything on the photos and frames. Moreover, you can use different love stickers to enhance the video content. The app allows creating HD quality videos and it is best for Android users. Here are the top features of Love Video Maker with Music app.
- Import as many as 60 photos for video creation.
- Includes photo editor that comes with filters and collage feature.
- Different themes, frames, and text designs available.
- Add music file and trim as per length requirements.
- Add different background effects and adjust speed.
- Square format to post on Instagram and Facebook.
2. Love Video Maker with Songs
Love Video Maker with Songs is exclusively available for iOS users. You can create romantic videos, and you will get all the options to enhance your video quality and content exactly the way you want to. You can add different transitions and animations. The app allows adding music from different sources including iTunes. You can even add your voiceover for personalization.
There are standard video editing options available such as trimming, cropping, changing speed, and much more. There is also no dearth of love stickers and frames. You can also add stylish texts and share the video directly from the app to online platforms. Here are the top features of Love Video Maker with Songs.
- Wide range of video filters and graphical effects.
- Standard video editor for trim, crop, speed change.
- Latest love stickers and frames present.
- Add music from iTunes, other videos, and voiceover.
- Set photo animation duration and stylish texts.
- Instant share on social media platforms directly from the app.
3. Love Video Maker from Microsoft
If you are for a love video maker app for your Windows 10 phone, tablet, or even computer, Love Video Maker from Microsoft is a great choice. Creating a love video from your romantic photos is super easy. Select the photos, add a theme, add background music and thereafter, add stunning filters and your video will be ready to instant saving.
The app comes with a standard photo editing tool where you can edit the photos before adding them to the video. You can blur background, add borders and frames, attach cute stickers and custom texts as per your preference. Here are the top features of Love Video Maker.
- Unlimited photos can be selected for video creation.
- Add different themes and overlay effects with filters.
- Add different borders, frames, and stickers to your photos.
- Blur background, add effects, and custom texts to your photos.
- Save and share videos on social media platforms.
Conclusion
Making love and romantic videos for personal collection as well as sharing them on social media platforms is quite a regular thing. You should have a high-quality love video maker where you should have all the different romantic video making tools and options. We have picked the best video maker for computer users as well as top love video making apps for smartphone users. We recommend Wondershare Filmora as there are unlimited effects, elements, and music for publishing best-quality love videos.
Also read:
- In 2024, Use The Best LUTs for Lightroom
- When It Comes to Video Editing, There Are Countless Software Options Available on the Market. However, Not All of Them Come with Useful Masking Tools. In This Article, We Will Be Discussing the Top 8 Video Editor with Useful Masking Tools for 2024
- Updated How to Add Text in Adobe Rush
- Do You Still Waste Time Making Transparent Background in Paint
- Updated How to Spruce Up Your Telegram Profile
- Updated Best LUTs for Vlog A 2024 Overview
- In 2024, 10 Best Old Film Overlays to Make Your Videos Look Vintage
- Updated In 2024, Everything About Adding Effects In Kinemaster
- Updated Top 6 MP4 Mergers to Join Videos Easily
- 2024 Approved How to Save As MP4 File on Windows Movie Maker?
- In 2024, Do You Use Premiere Pro and Want to Learn How to Change a Videos Frame Rate Using the Tool? Here Are the Steps that You Need to Follow
- New In 2024, VSDC Free Video Editor Review
- 2024 Approved Want to Capture Captivating, Detailed Videos? If Yes, Then You Need to Learn the Recording of Super Slow Motion Videos. In This Article, I Will Show You How to Record a Super Slow-Motion Video on Your Android and iPhone
- Updated So, without Wasting Time, Let Me Show You How to Mask a Video in Wondershare Filmora. Lets Get Started
- New Have You Ever Tried to Remove the Transparent Background of Gif and Failed? This Blog Will Help You with This Issue. Also, We Will Discuss How to Create Animated Gifs and the Best Tools for Them
- 7 Solutions to Edit GoPro Video on Mac
- Extracting Audio From Videos Is a Key to Better Storytelling. Learn How Filmoras Audio Removal Feature Can Enhance Your Video Stories
- New Voice Changer for Discord | Use Voicemod on Discord for 2024
- Updated What Is Animated GIF | GIF Example & Advantages of GIF
- Updated Top 6 Best Alternatives to Clownfish Voice Changer
- 2024 Approved Replacing Sky Background Using Adobe Photoshop A Comprehensive Guide
- 2024 Approved Learn How to Easily Concatenate Videos Using FFmpeg in This Step-by-Step Guide. From Installation to Execution, We Cover It All to Streamline Your Video Editing Process
- Updated In 2024, Best Software or Website to Convert Video Format
- Updated How to Make Flying Objects in Wondershare Filmora for 2024
- In 2024, Do You Want to Crop a TikTok Video? In This Article, We Will Provide You with Detailed Steps Through Which You Can Discover How to Crop TikTok Videos Easily
- 2024 Approved Are You Looking for Different Solutions to Add VHS Effects to Your Videos? Dont Worry; This Article Will Provide Easy Solutions to Apply VHS
- New In 2024, Guide To Cropping and Combining Content in Wondershare Filmora Latest
- New 2024 Approved VSCO Slow Motion
- In 2024, How to Perfect Quick and Efficient Video Editing | Keyboard Shortcuts in Filmora
- New 8 Apps to Custom GIF Stickers
- New Top GIF to MP4 Converters
- Updated 10 Creative AR Teaching Examples to Tell You What Is AR in Teaching for 2024
- Ultimate Guide on Making A Slideshow Video for 2024
- Updated 2024 Approved Creating Testimonial Videos For Health And Wellness Business Industry
- How to share/fake gps on Uber for Apple iPhone XR | Dr.fone
- In 2024, New Multiple Ways How To Remove iCloud Activation Lock From your Apple iPhone SE (2022)
- In 2024, Is it Possible to Use Miracast with Apple iPhone 11 Pro Max? | Dr.fone
- In 2024, How To Fix Apple ID Verification Code Not Working From Apple iPhone 11 Pro
- The Best Android SIM Unlock Code Generators Unlock Your Lava Yuva 3 Pro Phone Hassle-Free
- MP4 Video Repair Tool - Repair corrupt, damaged, unplayable video files of Lava Blaze Pro 5G
- In 2024, All You Need To Know About Mega Greninja For Nokia C12 Plus | Dr.fone
- New 2024 Approved How To Use Korean to English Video Translators for Creators
- In 2024, 5 Ways to Track Samsung Galaxy XCover 6 Pro Tactical Edition without App | Dr.fone
- In 2024, Pokémon Go Cooldown Chart On Poco C65 | Dr.fone
- Super Easy Ways To Deal with Xiaomi Redmi Note 13 5G Unresponsive Screen | Dr.fone
- Preparation to Beat Giovani in Pokemon Go For Asus ROG Phone 8 Pro | Dr.fone
- Easy Ways to Manage Your Infinix Zero 30 5G Location Settings | Dr.fone
- In 2024, Proven Ways in How To Hide Location on Life360 For Apple iPhone 8 | Dr.fone
- In 2024, 9 Best Phone Monitoring Apps for Apple iPhone 8 Plus | Dr.fone
- How to Reset your Realme Lock Screen Password
- Title: Updated Repeated Text Animation Tutorial in Filmora
- Author: Chloe
- Created at : 2024-04-24 07:08:14
- Updated at : 2024-04-25 07:08:14
- Link: https://ai-editing-video.techidaily.com/updated-repeated-text-animation-tutorial-in-filmora/
- License: This work is licensed under CC BY-NC-SA 4.0.
