
Updated Slowing Down GIF With The Best Available Methods
Slowing Down GIF With The Best Available Methods
Graphic interchange format, mostly known as GIF, is extensively used to convey information. GIF is a communication tool in bitmap image format that clearly conveys your online content. When sharing GIF images, playback speed is the most important thing to count. If the playback speed of the GIF is faster than usual, viewers may skip their focus essential data.
As a solution, you must learn how to adjust slow motion GIF’s speed. This article will teach you the stepwise methods to achieve a slow-motion GIF. Before heading towards the methods, learn about some GIF video platforms. By the end, you will be able to make a matchless slow-mo GIF through a desktop solution.
Slow Motion Video Maker Slow your video’s speed with better control of your keyframes to create unique cinematic effects  Make A Slow Motion Video More Features

Part 1: Where Can I Get Impressive Slow-Motion GIFs for Myself?
Slowing down GIFs brings viewers’ attention to specific actions in video content. It exaggerates facial expressions or movements in the videos, leading to humorous results. Creators choose to slow down GIFs to convey particular moods and styles. Different contexts require different slow-mo GIF videos; below are some platforms to cater to all of them.
1. Giphy
One of the famous platforms for GIFs is Giphy, which offers an extensive collection of GIFs. If you want a GIF that can add humor to your content, pick the entertainment category from Giphy. It provides different domains of GIFs for your ease of selection. Some of its categories include sports, gaming, animals, and cartoons.

Key Features
- Using this platform, you can not only get a GIF but also upload one. Graphics designers or GIF creators can use this place to publish their work globally.
- After selecting one GIF, you can share it on any platform. It allows you to embed the GIF directly on websites or share it through links.
- Every GIF on Giphy provides in-depth details like size, frame, and source. This way, you can instantly choose one that matches your project’s requirements.
2. Tenor
Another popular platform to get high-quality GIFs is Tenor. It supports multiple languages in its interface so international users can better comprehend it. Apart from that, there are many categories in the trending searches of GIFs. It shows which domain of GIFs is ranking the most. Some trending tenors include cars, snow, happy holidays, good nights, and GIFs.

Key Features
- When you pick one GIF, you can change its format before downloading. In this regard, you can choose HD, MP4, and SD quality options.
- This platform detects your selection and suggests relevant GIFs afterward. For instance, if you pick a cat GIF, then you will find a cat GIF when scrolling down.
- Tenor provides GIF specification details under each. Besides, you can share the selected GIF image through the URL and embedded link.
Part 2: What to Do If You Want to Slow Down GIFs: The Best Tools
Knowing platforms, as mentioned above, makes it easier for you to avail the desired GIF. After grabbing one of your choices, you can make it a slow-motion GIF, if required. To do so, there are several tools in the market. Some of them are explained below, along with step-by-step instructions on how to use them.
List of Best Tools to Slow Down GIFs
1. Ezgif.com
This tool is primarily responsible for online GIF making and image editing. Besides, it can convert your video into GIF, resize, cut, crop, and optimize them. Moreover, you can add effects and text to your videos or GIFs to make them appealing. GIF animation speed changers are the real game changers among online solutions:
Step 1
Browse the official site of Ezgif.com and tap on the “Effects” section. Afterward, choose the “Adjust GIF Speed” section to proceed to further options. There, click the “Choose File” white button and look for the file you want to slow down. Optionally, paste the URL link in the given section and tap “Upload” to continue.

Step 2
Scroll down the window and insert the digits on which percentage you want to slow down the speed. Afterward, click the “Change Speed” button and find a slow-motion GIF in the output image.

2. VEED.io
VEED.io is a preferred choice by many creators for professional or high-quality videos. It offers screen recording, video editing, and subtitle translation services. Apart from that, it can fix GIF speed with the GIF speed changer feature. After changing speed, you can add transitions and animation effects in Veed.io. For now, let’s just stick to the slow-mo GIF in the following steps:
Step 1
Access the “GIF Speed Changer” in VEED.io, start by tapping “Choose GIF File” and enter the editing screen.

Step 2
From the next screen, you will get a pop-up menu first. You have to hit the “Upload a File” option and select a GIF file to import into VEED.io. Under the video preview, click on the “Speed” icon next to the “Sound” symbol. Then, choose “0.5x” and get a slow-down GIF preview in front of you.

3. Canva
Students must be aware of this platform as a presentation template provider. Canva is a tool that provides stunning templates to customize with its cloud storage system. Gradually, it’s turning more into a video editing platform. Regarding slow-motion GIFs, it can change the GIF speed online. After slowing down the GIF, you can convert it into MP4 or enhance it by adding graphics.
Step 1
Reach out to the GIF Speed Changer feature of Canva’s video editing. Then, tap the “Change GIF Speed” button to access the editing screen.

Step 2
Navigate towards the left-side panel and hit the “Upload Files.” Now, search and select your GIF to import in Canva’s editing window. Afterward, go to the “Playback” option at the top left and then direct to the left panel. Move the “Video Speed” slider to the left for a Slow-mo GIF. Click on the video for a preview, or look for any other playback adjustments.

Part 3: Make Impressive Slow Mo GIFs Using Desktop Solution
Are you getting customized speed adjustment options using any of the above tools? The answer is quite clear: no online tools do not offer personalization for slow-motion GIFs. That’s where you need Wondershare Filmora as a better alternative. It is currently the best video editor that transforms your videos into art pieces.
With more than 10 billion stock media, you don’t have to browse different sites. Filmora is an all-in-all platform that can not only edit your video but also aims to polish it to the next level. Besides, editors can use Filmora anywhere with just a password.
Free Download For Win 7 or later(64-bit)
Free Download For macOS 10.14 or later
How to Make Slow-motion GIF with Filmora
After discovering the top-notch features of Filmora, it’s time to use it. Although it’s very simple to operate, this step-by-step guide will help you process faster:
Step 1Launch Filmora and Import GIF to the Timeline
Download Wondershare Filmora from its official site. After a successful launch, you will enter its main screen. Look for the “New Project” option from the main interface. Tapping on the New Project, you will find the editing screen. Import your GIF in the media panel and drag it into the timeline section to begin the process.

Step 2Slow Down the GIF with Optical Flow
Right-click on the video and pick the “Uniform Speed” option from the list. This way, you will find an editing panel on the right side. Now, you can move the “Speed” slider towards the left. You can press the space bar and get the slow-motion GIF preview. Direct downward and choose the “Optical Flow” option from the extended menu of “AI Interpolation.”

Step 3Continue to Edit or Head to Export the Media
Finally, you will get a slow but high-quality GIF. Now, it’s up to you to continue exploring other features of Filmora or head to save the file. To save the file, go to the top right corner and press the “Export” button.

Key Features Marking Filmora’s Greatness
Filmora is proven to be the easiest software with the most powerful editing features. As proof, you can read the main features of Filmora to comprehend its functionalities better.
1. Speed Ramping
Create a unique cinematic effect in your video by adjusting keyframes. Filmora offers speed ramping features to bring a smooth transition in slow-motion or fast motions. In speed ramping, you get 6 templates, such as bullet time, montage, and jumper. Using those templates, you don’t need to manually adjust keyframes for speed ramping. Also, you can retain the original pitch of the audio after changing the speed.
2. AI Copilot Editing
To boost productivity, Filmora provides an AI Copilot editor option. It saves time that could be wasted searching for some feature or making the editing perfect. Users can ask anything to copilot in natural language. They can take help from an already existing question in the copilot editors. This feature will guide you toward practical actions through navigation buttons.
3. AI Music Generator
Who else is fed up with finding the perfect music for Vlog? Commonly, you didn’t find a video of exact length and mood. Thus, Filmora enables you to generate a soundtrack according to your mood and video length. Using it, you just have to prompt with the number of tracks, mood, and length. The AI-generated music will not require copyrights, so you can use it freely anywhere.
4. AI Image
Have you ever heard that any video editor can convert your text prompts into images? Filmora is offering this option, especially for people who are struggling to get their desired image. For this purpose, they need to describe images in simple language. Afterward, they are required to pick one style for accurate results.
5. AI Copywriting
Do you have a deadline for script submission, but it is not ready yet? Leave this headache to Filmora’s AI copywriting feature, which aims to produce engaging scripts. With ChatGPT integration, it can generate YouTube titles and descriptions. Furthermore, you can ask AI to convert your script into an appealing video.
Conclusion
To summarize, slowing down is the ultimate solution to retain the viewer’s attention. In this article, you have seen the top-notch platforms for slow-motion GIFs. They are not enough for remarkable videos because of the limited speed adjustment options. So, using Filmora remains the best option in providing easier ways to customize the speed of GIFs.
Make A Slow Motion Video Make A Slow Motion Video More Features
Part 1: Where Can I Get Impressive Slow-Motion GIFs for Myself?
Slowing down GIFs brings viewers’ attention to specific actions in video content. It exaggerates facial expressions or movements in the videos, leading to humorous results. Creators choose to slow down GIFs to convey particular moods and styles. Different contexts require different slow-mo GIF videos; below are some platforms to cater to all of them.
1. Giphy
One of the famous platforms for GIFs is Giphy, which offers an extensive collection of GIFs. If you want a GIF that can add humor to your content, pick the entertainment category from Giphy. It provides different domains of GIFs for your ease of selection. Some of its categories include sports, gaming, animals, and cartoons.
Key Features
- Using this platform, you can not only get a GIF but also upload one. Graphics designers or GIF creators can use this place to publish their work globally.
- After selecting one GIF, you can share it on any platform. It allows you to embed the GIF directly on websites or share it through links.
- Every GIF on Giphy provides in-depth details like size, frame, and source. This way, you can instantly choose one that matches your project’s requirements.
2. Tenor
Another popular platform to get high-quality GIFs is Tenor. It supports multiple languages in its interface so international users can better comprehend it. Apart from that, there are many categories in the trending searches of GIFs. It shows which domain of GIFs is ranking the most. Some trending tenors include cars, snow, happy holidays, good nights, and GIFs.
Key Features
- When you pick one GIF, you can change its format before downloading. In this regard, you can choose HD, MP4, and SD quality options.
- This platform detects your selection and suggests relevant GIFs afterward. For instance, if you pick a cat GIF, then you will find a cat GIF when scrolling down.
- Tenor provides GIF specification details under each. Besides, you can share the selected GIF image through the URL and embedded link.
Part 2: What to Do If You Want to Slow Down GIFs: The Best Tools
Knowing platforms, as mentioned above, makes it easier for you to avail the desired GIF. After grabbing one of your choices, you can make it a slow-motion GIF, if required. To do so, there are several tools in the market. Some of them are explained below, along with step-by-step instructions on how to use them.
List of Best Tools to Slow Down GIFs
1. Ezgif.com
This tool is primarily responsible for online GIF making and image editing. Besides, it can convert your video into GIF, resize, cut, crop, and optimize them. Moreover, you can add effects and text to your videos or GIFs to make them appealing. GIF animation speed changers are the real game changers among online solutions:
Step 1
Browse the official site of Ezgif.com and tap on the “Effects” section. Afterward, choose the “Adjust GIF Speed” section to proceed to further options. There, click the “Choose File” white button and look for the file you want to slow down. Optionally, paste the URL link in the given section and tap “Upload” to continue.
Step 2
Scroll down the window and insert the digits on which percentage you want to slow down the speed. Afterward, click the “Change Speed” button and find a slow-motion GIF in the output image.
2. VEED.io
VEED.io is a preferred choice by many creators for professional or high-quality videos. It offers screen recording, video editing, and subtitle translation services. Apart from that, it can fix GIF speed with the GIF speed changer feature. After changing speed, you can add transitions and animation effects in Veed.io. For now, let’s just stick to the slow-mo GIF in the following steps:
Step 1
Access the “GIF Speed Changer” in VEED.io, start by tapping “Choose GIF File” and enter the editing screen.
Step 2
From the next screen, you will get a pop-up menu first. You have to hit the “Upload a File” option and select a GIF file to import into VEED.io. Under the video preview, click on the “Speed” icon next to the “Sound” symbol. Then, choose “0.5x” and get a slow-down GIF preview in front of you.
3. Canva
Students must be aware of this platform as a presentation template provider. Canva is a tool that provides stunning templates to customize with its cloud storage system. Gradually, it’s turning more into a video editing platform. Regarding slow-motion GIFs, it can change the GIF speed online. After slowing down the GIF, you can convert it into MP4 or enhance it by adding graphics.
Step 1
Reach out to the GIF Speed Changer feature of Canva’s video editing. Then, tap the “Change GIF Speed” button to access the editing screen.
Step 2
Navigate towards the left-side panel and hit the “Upload Files.” Now, search and select your GIF to import in Canva’s editing window. Afterward, go to the “Playback” option at the top left and then direct to the left panel. Move the “Video Speed” slider to the left for a Slow-mo GIF. Click on the video for a preview, or look for any other playback adjustments.
Part 3: Make Impressive Slow Mo GIFs Using Desktop Solution
Are you getting customized speed adjustment options using any of the above tools? The answer is quite clear: no online tools do not offer personalization for slow-motion GIFs. That’s where you need Wondershare Filmora as a better alternative. It is currently the best video editor that transforms your videos into art pieces.
With more than 10 billion stock media, you don’t have to browse different sites. Filmora is an all-in-all platform that can not only edit your video but also aims to polish it to the next level. Besides, editors can use Filmora anywhere with just a password.
Free Download For Win 7 or later(64-bit)
Free Download For macOS 10.14 or later
How to Make Slow-motion GIF with Filmora
After discovering the top-notch features of Filmora, it’s time to use it. Although it’s very simple to operate, this step-by-step guide will help you process faster:
Step 1Launch Filmora and Import GIF to the Timeline
Download Wondershare Filmora from its official site. After a successful launch, you will enter its main screen. Look for the “New Project” option from the main interface. Tapping on the New Project, you will find the editing screen. Import your GIF in the media panel and drag it into the timeline section to begin the process.
Step 2Slow Down the GIF with Optical Flow
Right-click on the video and pick the “Uniform Speed” option from the list. This way, you will find an editing panel on the right side. Now, you can move the “Speed” slider towards the left. You can press the space bar and get the slow-motion GIF preview. Direct downward and choose the “Optical Flow” option from the extended menu of “AI Interpolation.”
Step 3Continue to Edit or Head to Export the Media
Finally, you will get a slow but high-quality GIF. Now, it’s up to you to continue exploring other features of Filmora or head to save the file. To save the file, go to the top right corner and press the “Export” button.
Key Features Marking Filmora’s Greatness
Filmora is proven to be the easiest software with the most powerful editing features. As proof, you can read the main features of Filmora to comprehend its functionalities better.
1. Speed Ramping
Create a unique cinematic effect in your video by adjusting keyframes. Filmora offers speed ramping features to bring a smooth transition in slow-motion or fast motions. In speed ramping, you get 6 templates, such as bullet time, montage, and jumper. Using those templates, you don’t need to manually adjust keyframes for speed ramping. Also, you can retain the original pitch of the audio after changing the speed.
2. AI Copilot Editing
To boost productivity, Filmora provides an AI Copilot editor option. It saves time that could be wasted searching for some feature or making the editing perfect. Users can ask anything to copilot in natural language. They can take help from an already existing question in the copilot editors. This feature will guide you toward practical actions through navigation buttons.
3. AI Music Generator
Who else is fed up with finding the perfect music for Vlog? Commonly, you didn’t find a video of exact length and mood. Thus, Filmora enables you to generate a soundtrack according to your mood and video length. Using it, you just have to prompt with the number of tracks, mood, and length. The AI-generated music will not require copyrights, so you can use it freely anywhere.
4. AI Image
Have you ever heard that any video editor can convert your text prompts into images? Filmora is offering this option, especially for people who are struggling to get their desired image. For this purpose, they need to describe images in simple language. Afterward, they are required to pick one style for accurate results.
5. AI Copywriting
Do you have a deadline for script submission, but it is not ready yet? Leave this headache to Filmora’s AI copywriting feature, which aims to produce engaging scripts. With ChatGPT integration, it can generate YouTube titles and descriptions. Furthermore, you can ask AI to convert your script into an appealing video.
Conclusion
To summarize, slowing down is the ultimate solution to retain the viewer’s attention. In this article, you have seen the top-notch platforms for slow-motion GIFs. They are not enough for remarkable videos because of the limited speed adjustment options. So, using Filmora remains the best option in providing easier ways to customize the speed of GIFs.
How to Zoom Webcam on PC
Making certain our digital presence is the best it can be pays dividends as more and more of what we do online; similar is the case with how to zoom out webcam windows 10. The majority of experts advise against using the built-in camera that comes with your laptop or computer and instead advocate getting a webcam or an HD camera. These, however, may be hard to come by and pricy if you locate a nice one. If the built-in camera on your laptop doesn’t perform effectively during Zoom meetings, you may want to consider about investing in a separate, better webcam. Webcams offer automatic settings that are intended to function with the largest variety of lighting situations possible. This suggests that they average out a great number of responses to the content of the frame. Because of this, we have incorporated basic PC webcam zooming settings. These answers may be found in the portions that follow.
It’s vital to know how to zoom in on a webcam before visiting there. The camera wasn’t always as vital as it is today, and only very large corporations could afford to employ it as a convenience. But today, nearly everyone, from huge organizations to little firms, acknowledges its value. Everybody needs a webcam that works properly. The camera control software you are using determines the zoom function. The resolution of your picture window and the capabilities of the application dictate how far you can zoom in on the webcam’s video image. You can zoom in and out on camera photos using tools like YouCam and Windows Live Messenger. The most critical camera capabilities for the ideal video conferencing experience are zoom in and zoom out, which at first look may appear trivial. Here, we’ll walk you through each step, in detail. Continue reading, and we’ll check your understanding of webcam zoom in and zoom out skills!
Way 1: Zoom with Windows Live Messenger
When utilizing a camera for video conferencing, you may zoom in on a user’s face to get rid of the background. Webcam settings are not accessible by default in Microsoft Windows. However, camera zoom settings may be changed in instant chat systems. Through an instant messaging tool, such as Windows Live Messenger, you may simply access these options. This application provides private offline chat, video messaging, image and video sharing, and video chatting.
Step1Start Windows Live Messenger on your PC or laptop first. Enter your login name and password by clicking the “Sign In” button.

Step2On the top menu bar, pick “Tools.” And then select the “Audio and Video Setup”. Drag the slider next to “Speaker” to modify the speaker volume. Drag the slider next to “Microphone” to modify the microphone sensitivity. Press “Next.”

Step3From the drop-down list, pick the webcam. The “Camera Control” option is situated on the top; pick “Webcam Settings” after that.
Step4Now, to alter the zoom settings, drag the “Zoom” slider. To zoom in or out, drag the slider to the left or right. Press “OK.”
Way 2: Use Windows 10 Camera App
Wondering how to zoom your camera in the Windows 10 Camera app? The Camera app enables you to zoom in or out on your webcam in both image and video modes. To accomplish so, click or push the Magnification button, and then use the slider to modify the webcam’s zoom level. To operate the zoom feature manually, pick “Manual Zoom.” In the preview window, a square appears when you pick this option. To zoom in on a specific region of the capture window, drag the square there. To expand the image that was acquired by the webcam, slide the slider bar. In simply, The Camera app enables you zoom in or out of photographs and movies shot with your webcam. To do this, click on the “Zoom” button and drag the slider to the left or right as appropriate on your Windows 10 camera. the following steps:
Step1To open the “Start Menu,” make a right-click on “Start.” Now, to access the Camera app, type “Camera App” into the start menu’s search box.

Step2Tap the Camera Control icon when you start or join a meeting. To zoom and pan the camera to the appropriate spot, utilize the icons on the Camera Control panel.
![]()
Step3To exit the Camera Control window and return to the Meeting Controls, touch outside of it.
Way 3: Zoom with YouCam
Unfortunately, the default cameras or webcams bundled with the majority of Windows laptops and desktops don’t have an automatic zoom option. In fact, the only method to adjust their crop is to switch from “Standard” to “Widescreen,” which does slightly zoom in on you but not in the manner we’d want. This makes it inescapable that the only method to manually alter a webcam’s magnification is to acquire one separately and apply its software settings. , like YouCam. YouCam provides video calling, streaming, and broadcasting. includes an integrated app. To employ Zoom with YouCam, refer to the methods given below:
Step1Launch the YouCam camera program and activate the webcam.

Step2In the camera preview window, pick Settings. Then, select “Enable Video Zoom” from the menu.
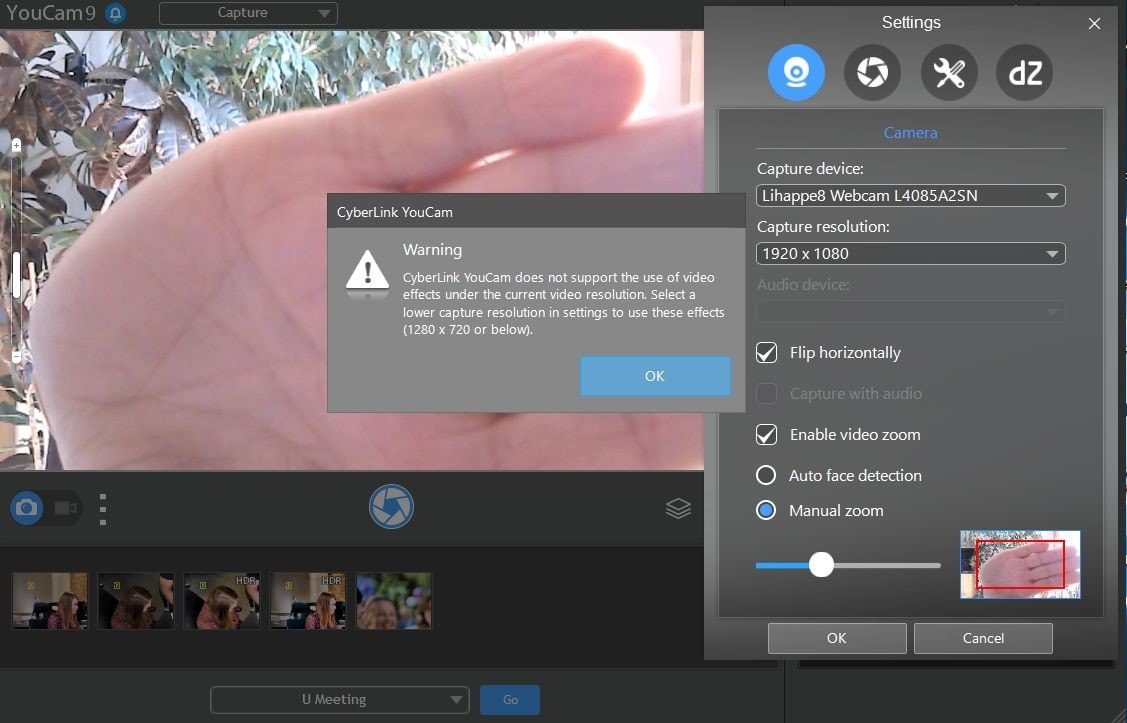
Step3Select “Automatic Face Detection” from the menu. As you wander about in the capture window, the camera watches your face and automatically zooms in on your photo as shown above.
Step4To handle the zoom feature manually, pick “Manual Zoom.” In the preview window, a square appears when you pick this option. To zoom in on a specific region of the capture window, drag the square there. To expand the image that was acquired by the webcam, slide the slider bar.

Way 4: Use iGlasses on Mac
For the perfect webcam look on a MAC, install the Chrome plugin iGlasses for video effects and style tweaks. Your videos will appear better on Zoom as a consequence. You may instantly enhance the appearance of your video interactions by utilizing the digital zoom on your iGlasses. Digital pan, tilt, and zoom are all possible with easy controls. For Macs that support it, an Apple Remote may be used to operate. iGlasses will become an option in Zoom’s video settings when it has been installed. You may improve your camera by altering the settings in iGlasses. You may experiment with a range of amusing effects, like 3-D distortions, using the virtual camera. Let’s learn how to utilize iGlasses on a Mac:
Step1Installing Ecamm’s iGlasses on a MacBook in the first step.
Step2To activate the camera, go to your video settings and pick iGlasses.
Step3Choose the Zoom window and execute the appropriate operations using the Zoom and Flip options. You may now zoom in and out using the camera on your MacBook as you like.

Conclusion
In conclusion, so many people currently take part in online conferences and virtual meetings. You want to create a lasting impression, don’t you? Not or whether you are the host of an online meeting or event, you must now maintain a professional image to prevent turning off attendees. You have discovered how to utilize the tools at your disposal to boost the zoom in and out quality of your camera in this post. However, as will be explained in the sections ahead, you may do it without the third-party plugins. With just one quick plugin, you can significantly transform how you look on a camera. Hence, try out the easy method from the above enlisted ones to get hold on your PC webcam to zoom in or out purposes.
Making certain our digital presence is the best it can be pays dividends as more and more of what we do online; similar is the case with how to zoom out webcam windows 10. The majority of experts advise against using the built-in camera that comes with your laptop or computer and instead advocate getting a webcam or an HD camera. These, however, may be hard to come by and pricy if you locate a nice one. If the built-in camera on your laptop doesn’t perform effectively during Zoom meetings, you may want to consider about investing in a separate, better webcam. Webcams offer automatic settings that are intended to function with the largest variety of lighting situations possible. This suggests that they average out a great number of responses to the content of the frame. Because of this, we have incorporated basic PC webcam zooming settings. These answers may be found in the portions that follow.
It’s vital to know how to zoom in on a webcam before visiting there. The camera wasn’t always as vital as it is today, and only very large corporations could afford to employ it as a convenience. But today, nearly everyone, from huge organizations to little firms, acknowledges its value. Everybody needs a webcam that works properly. The camera control software you are using determines the zoom function. The resolution of your picture window and the capabilities of the application dictate how far you can zoom in on the webcam’s video image. You can zoom in and out on camera photos using tools like YouCam and Windows Live Messenger. The most critical camera capabilities for the ideal video conferencing experience are zoom in and zoom out, which at first look may appear trivial. Here, we’ll walk you through each step, in detail. Continue reading, and we’ll check your understanding of webcam zoom in and zoom out skills!
Way 1: Zoom with Windows Live Messenger
When utilizing a camera for video conferencing, you may zoom in on a user’s face to get rid of the background. Webcam settings are not accessible by default in Microsoft Windows. However, camera zoom settings may be changed in instant chat systems. Through an instant messaging tool, such as Windows Live Messenger, you may simply access these options. This application provides private offline chat, video messaging, image and video sharing, and video chatting.
Step1Start Windows Live Messenger on your PC or laptop first. Enter your login name and password by clicking the “Sign In” button.
Step2On the top menu bar, pick “Tools.” And then select the “Audio and Video Setup”. Drag the slider next to “Speaker” to modify the speaker volume. Drag the slider next to “Microphone” to modify the microphone sensitivity. Press “Next.”
Step3From the drop-down list, pick the webcam. The “Camera Control” option is situated on the top; pick “Webcam Settings” after that.
Step4Now, to alter the zoom settings, drag the “Zoom” slider. To zoom in or out, drag the slider to the left or right. Press “OK.”
Way 2: Use Windows 10 Camera App
Wondering how to zoom your camera in the Windows 10 Camera app? The Camera app enables you to zoom in or out on your webcam in both image and video modes. To accomplish so, click or push the Magnification button, and then use the slider to modify the webcam’s zoom level. To operate the zoom feature manually, pick “Manual Zoom.” In the preview window, a square appears when you pick this option. To zoom in on a specific region of the capture window, drag the square there. To expand the image that was acquired by the webcam, slide the slider bar. In simply, The Camera app enables you zoom in or out of photographs and movies shot with your webcam. To do this, click on the “Zoom” button and drag the slider to the left or right as appropriate on your Windows 10 camera. the following steps:
Step1To open the “Start Menu,” make a right-click on “Start.” Now, to access the Camera app, type “Camera App” into the start menu’s search box.
Step2Tap the Camera Control icon when you start or join a meeting. To zoom and pan the camera to the appropriate spot, utilize the icons on the Camera Control panel.
![]()
Step3To exit the Camera Control window and return to the Meeting Controls, touch outside of it.
Way 3: Zoom with YouCam
Unfortunately, the default cameras or webcams bundled with the majority of Windows laptops and desktops don’t have an automatic zoom option. In fact, the only method to adjust their crop is to switch from “Standard” to “Widescreen,” which does slightly zoom in on you but not in the manner we’d want. This makes it inescapable that the only method to manually alter a webcam’s magnification is to acquire one separately and apply its software settings. , like YouCam. YouCam provides video calling, streaming, and broadcasting. includes an integrated app. To employ Zoom with YouCam, refer to the methods given below:
Step1Launch the YouCam camera program and activate the webcam.
Step2In the camera preview window, pick Settings. Then, select “Enable Video Zoom” from the menu.
Step3Select “Automatic Face Detection” from the menu. As you wander about in the capture window, the camera watches your face and automatically zooms in on your photo as shown above.
Step4To handle the zoom feature manually, pick “Manual Zoom.” In the preview window, a square appears when you pick this option. To zoom in on a specific region of the capture window, drag the square there. To expand the image that was acquired by the webcam, slide the slider bar.
Way 4: Use iGlasses on Mac
For the perfect webcam look on a MAC, install the Chrome plugin iGlasses for video effects and style tweaks. Your videos will appear better on Zoom as a consequence. You may instantly enhance the appearance of your video interactions by utilizing the digital zoom on your iGlasses. Digital pan, tilt, and zoom are all possible with easy controls. For Macs that support it, an Apple Remote may be used to operate. iGlasses will become an option in Zoom’s video settings when it has been installed. You may improve your camera by altering the settings in iGlasses. You may experiment with a range of amusing effects, like 3-D distortions, using the virtual camera. Let’s learn how to utilize iGlasses on a Mac:
Step1Installing Ecamm’s iGlasses on a MacBook in the first step.
Step2To activate the camera, go to your video settings and pick iGlasses.
Step3Choose the Zoom window and execute the appropriate operations using the Zoom and Flip options. You may now zoom in and out using the camera on your MacBook as you like.
Conclusion
In conclusion, so many people currently take part in online conferences and virtual meetings. You want to create a lasting impression, don’t you? Not or whether you are the host of an online meeting or event, you must now maintain a professional image to prevent turning off attendees. You have discovered how to utilize the tools at your disposal to boost the zoom in and out quality of your camera in this post. However, as will be explained in the sections ahead, you may do it without the third-party plugins. With just one quick plugin, you can significantly transform how you look on a camera. Hence, try out the easy method from the above enlisted ones to get hold on your PC webcam to zoom in or out purposes.
If You Want to Add an Effect Like a VHS Overlay Free Effect to Enhance Your Videos, You Can Do It on After Effects. Read More to Learn How
The 90s generation is familiar with Video Home System video. Today, Moviemakers use VHS static overlay to give their videos an antique and vintage look.
The VHS glitch overlay has become increasingly popular as it changes the video’s theme, tone, and whole look. Let’s see how we can add DIY VHS overlay in after effects-
Part 1:Step by Step DIY VHS Overlay in After Effects?
The retro “VHS Look” has become relatively trendy in recent years. The memories associated with the popular VHS trend has helped the trend make a comeback. Creating this effect in After Effects may seem to be a complicated process if you have not tried it before. But we have made it easier for you to add VHS overlay in Adobe After Effects. Follow the steps to add it in after effects-
Before you begin, download and install VHS preset if you haven’t already. Remember that VHS preset only works with After Effects CC 2018 and up. So, make sure you have the recent version of After Effects or the one not older than the 2018 version.
Step 1: To create a VHS look on your video, drop any video of your choice into the project panel and give it a name, let’s say, “VCR static overlay”. Set the width and height to 1920 and 1080 px, respectively.

Step 2: Right-click on your video and select New Comp from Selection. Drag your video to a new composition and then go to Lumetri Color < Basic Correction. Add some contrast. You can set it to 50 or any other number of your choice. Then bring the white level down to -55.

Then open the Creative tab. Increase the faded film to 40. Set sharpening to -70. Bring vibrance to -30.
Note: Here, I changed the number to get the effect I wanted. You can change the numbers and set the values as per your requirements.
Now, click on the Curves option. Drag down the white curve and then align it with the original curve. Move the green curve up a bit and bring down the blue curve. Then comes the Vignette tab. Open it and set the number to -1.

Step 3: Now, we will give our video a subtle RGB spit appearance. For that, we need to use the Channel Blur effect twice. First, go to Effect < Blur & Sharpen < Channel Blur. Set red blurriness to 20. Turn on the repeat edge pixels. Then change the Blur Dimensions from horizontal and vertical to vertical.

Step 4: Again, go to Effect < Blur & Sharpen < Channel Blur. Set blue blurriness to 30. Repeat the process of checking the repeat edge pixels box. Change the Blue Dimensions from horizontal and vertical to horizontal.
Step 5: Next comes giving the video artificial sharpening look using Unsharp Mask. So, go to Effect < Blur & Sharpen < Unsharp Mask. Under the Unmask Mask menu, set the amount to 100 and the radius to 10.

Step 6: To add a font to your video, simply search VHS font on Google. Look for the one you want to use in your video and download it. To give your video that authentic VHS-style look, we suggest downloading free VCR OSD Mono font and installing the font on your system.
Step 7: Go to Layer < New < Solid and choose any color. We chose white. Now, under Effects & Presets, search for a number. Drag it to the white solid. Choose the font VCR OSD Mono. You can change the number to time or date. You can also add time manually. Select the text tool, go to the source text, hold alt, and click on the stopwatch. Write “timeToCurrentFormat() and time will be displayed on the video. Let us say we want to see the date on the video instead of time. So, change the time to date. Drag the date to the bottom right of the video to give it the look of an old VHS tape.
If you are a beginner and want a simple VHS effect, you can follow these easy steps and create the VHS video that will transport you back to the 90s.
BONUS TIP: How to Add VHS Overlays and Glitch Effects to Make Retro Videos in Filmora Video Editor?
Do you remember the look of the VHS and miss it? You can bring your memories back! With Wondershare Filmora, you can add this effect easily to your videos. Adding a VHS overlay transparent brings drama and creates an atmosphere of distortion. It can significantly change the appearance and feel of your video.
So, if you want to create professional-looking VHS overlay free, the only thing you need is Filmora video editing software . Filmora allows you to add three different overlay VHS effects that you can use along with other overlays to create retro videos.
For Win 7 or later (64-bit)
For macOS 10.12 or later
Do you want to add retro videos on Filmora? It is simple!
To create a VHS overlay video, you should first download the Filmora app for free if you haven’t! Let’s learn how the effect can transform your video. You will have to choose various effects and values to get the final VHS overlay video. These effects can be added to any lyric video, intro, outro, and many others.
Let’s look at the steps:
Open your draft in Filmora software and select sample colors from the Media tab on the top left.

You can drag and drop the photo on a track on the timeline. Then adjust the trim handles to change the duration to match the section of the video to be transformed.
In sequence, add these three overlays by dragging them from the Effects panel at the top to their own individual tracks on the timeline: VHS Distortion Bad (alpha = 25), VHS Distortion (alpha = 35), and VHS Rewind (alpha = 10).
You can also add effects like Strong Glitch, Chromatic Aberration, Glitch Distortion, Distort, etc., to enhance the vintage look of the video.
When finished, click export and choose the format and target folder to save the processed file with the added effects.

The smart generation has access to HD videos and high-tech devices, yet VHS is an exciting concept for them. The videos created with this effect resemble those from the 90s era. You have to customize everything when you add a VHS effect, including the title, background noise, overlay, and credits.
By choosing a video-editing software like Wondershare Filmora, users can make such videos and add retro glitch overlay professionally. You can also access Filmstock to download any video effects, stock media, templates, or sound effects for Filmora.
Conclusion
Video editing is now easy and fun. The trend of VCR overlay is now back as VHR overlay. With Wondershare Filmora, you can easily create classic videos with 90’s effects. Take your video editing to the next big level with Filmora Video Editor. We can help you make the best use of this tool to create glitch effect videos and add a VHS tape overlay.
Versatile Video Editor - Wondershare Filmora
An easy yet powerful editor
Numerous effects to choose from
Detailed tutorials provided by the official channel
For macOS 10.12 or later
Do you want to add retro videos on Filmora? It is simple!
To create a VHS overlay video, you should first download the Filmora app for free if you haven’t! Let’s learn how the effect can transform your video. You will have to choose various effects and values to get the final VHS overlay video. These effects can be added to any lyric video, intro, outro, and many others.
Let’s look at the steps:
Open your draft in Filmora software and select sample colors from the Media tab on the top left.
You can drag and drop the photo on a track on the timeline. Then adjust the trim handles to change the duration to match the section of the video to be transformed.
In sequence, add these three overlays by dragging them from the Effects panel at the top to their own individual tracks on the timeline: VHS Distortion Bad (alpha = 25), VHS Distortion (alpha = 35), and VHS Rewind (alpha = 10).
You can also add effects like Strong Glitch, Chromatic Aberration, Glitch Distortion, Distort, etc., to enhance the vintage look of the video.
When finished, click export and choose the format and target folder to save the processed file with the added effects.
The smart generation has access to HD videos and high-tech devices, yet VHS is an exciting concept for them. The videos created with this effect resemble those from the 90s era. You have to customize everything when you add a VHS effect, including the title, background noise, overlay, and credits.
By choosing a video-editing software like Wondershare Filmora, users can make such videos and add retro glitch overlay professionally. You can also access Filmstock to download any video effects, stock media, templates, or sound effects for Filmora.
Conclusion
Video editing is now easy and fun. The trend of VCR overlay is now back as VHR overlay. With Wondershare Filmora, you can easily create classic videos with 90’s effects. Take your video editing to the next big level with Filmora Video Editor. We can help you make the best use of this tool to create glitch effect videos and add a VHS tape overlay.
Versatile Video Editor - Wondershare Filmora
An easy yet powerful editor
Numerous effects to choose from
Detailed tutorials provided by the official channel
Looking Into How Slow Mo Guys Have Changed the Dynamics of Slow-Motion
All the aspects of our lives are inspired by someone, and we try to follow in their footsteps. Sometimes, it can be a person in your life, an influential personality, or YouTube. When it comes to editing, beginners often try to follow those who have mastered it. In a similar way, you might seek inspiration from social media or websites to create slomos.
One of the greatest inspirations in the realm of slow-motion videos is The Slow Mo Guys . Continue reading this article for a brief review of The Slow Mo Guys. In addition, the article will give you a basic guide on creating slo-mos. You can also learn how to create high-quality slo-mo videos like the Slow Motion Guys.
Slow Motion Video Maker Slow your video’s speed with better control of your keyframes to create unique cinematic effects Make A Slow Motion Video More Features
Part 1: The Slow Mo Guys: A Real-Life Sensation in Creating Slow Motion Videos
The Slow Mo Guys is a YouTube channel with over 14.8M subscribers and is determined to deliver high-quality content. The channel appeared as a collaboration between Gavin Free and Daniel Gruchy. Both had a history of using high-speed slow-motion cameras and set their channel in 2010. The channel began to gain recognition in 2012 and became a living sensation in the slo-mo world.

In this era, if you are looking for a start to create slomos, Slow Motion Guys come to mind. One of the many things that took the channel to heights is their ability to explain everything. The normal slow-mo speed by most editors is either 120 or 240 fps. However, The Slow Mo Guys shoot videos at 1000 fps, which is ultra-slow motion. The channel usually features natural phenomena, pranks, and relevant content.
Part 2: Want to Make Such Slow-Motion Videos on Your Smartphone? Learn How
The most used and dear gadget to all of us in this era is our smartphones. It has also become a requirement to stay connected, and so we often shoot on them. To retain the video quality, we try to edit it through built-in features. This section highlights creating slow-motion videos using iPhone or Android. Learn to create professional slo-mos like Gave Slow Mo Guys here:
Step-by-Step Guide to Create a Slow Motion in iPhone
Apple offers a pre-developed feature to create slomos using a simple method. In this section, we will discuss how to shoot a video in slow motion using an iPhone. Follow the lead and create results like The Slow Mo Guys camera:
Instruction: Once you launch the “Camera” application, open the recorder and select “SLO-MO.” Now, redirect to your camera and hit the recorder button to start recording a solo.

Step-by-Step Guide to Creating a Slow Motion in Android
The Android has also introduced a slo-mo feature to record content in slow motion. It helps creators in crafting transitions or aesthetic videos. We have given a detailed procedure for recording a slow-motion video in Android:
Step 1
Locate and launch the “Camera” application on your Android. In the bottom bar, you’ll find multiple camera modes and settings. Drag and find the “More” option in this settings bar.

Step 2
In the appearing menu, locate and select the “Slow motion” option. After setting these preferences, hit the recorder button and record the video. The video will record normally, but when you preview it later, you’ll have a slomo.

Part 3: Slow Motion Video Making and Wondershare Filmora: Make Videos Like Slow Mo Guys
All the above methods of creating slow motion are effective, but there is a drawback. You’ll have to record the complete video in slow motion, and there are no custom options. Wondershare Filmora is a professional video editing software that can resolve this. This software will help you create videos similar to Dan Slow Mo Guys.
In addition, you can infuse your slomo with multiple visual effects, transitions, and more. Filmora displays two features to create a slow-motion video, one of which is Uniform Speed. The other feature is Speed Ramping with pre-assembled slow-motion presets. With its AI-backed technology, you can increase the video frame rate as well.
Free Download For Win 7 or later(64-bit)
Free Download For macOS 10.14 or later
Using Uniform Speed to Create a Slow-Motion Video in Filmora
Uniform Speed is the basic method of creating slow motion in Filmora. It simply modifies the playback speed of video with the help of a slider. The procedure of slomo creation, like The Slow Mo Guys in Filmora, is given below:
Step 1Import Media to Start Slomo Creation
After downloading Filmora on your device, click the “New Project” button to start. From the editing interface, click the “Ctrl + I” keys, choose the video, and bring it to the timeline after import. Select the clip in the timeline and use your cursor to reach the settings panel. Go to the “Uniform Speed” section under the “Speed” tab and change the speed slider settings.

Step 2Start AI Frame Interpolation Settings
This is the AI feature that increases the video frame rate for a smooth, slow-motion effect. You can access this option at the bottom of Uniform Speed settings. Expand it and select the “Optical Flow” option for your purpose.

Step 3Enable Render Preview to See Results
Once all is set and done, navigate towards the timeline panel to select this video again. With the help of your cursor, access the “File” tab at the top toolbar. Select the “Render Preview” option from the expanding menu. After rendering is complete, use the preview screen to observe the slo-mo and export it.

Using Speed Ramping to Create a Slow-Motion Video in Filmora
The second method is also simple, but it has more precise options to create a slow-mo. It uses the velocity graph to rise or decline video speed at certain intervals. Gather the knowledge about how The Slow Mo Guys YouTube creates slow-mo here:
Step 1Access the Speed Ramping Feature
After importing and bringing media to the timeline, select it and reach the settings panel. Access the “Speed” > “Speed Ramping” option to start editing. There, you can find many custom speed presets for automated editing. However, you can also use the “Customize” preset to create from scratch. Then, reach the speed graph and move the slider downward to bring the slo-mo effect.

Step 2Enable the Optical Flow Option
Navigate to the bottom of this panel and expand the AI Frame Interpolation menu. Choose the “Optical Flow” option to achieve your desired outcome.

Step 3Activate Render Preview for Confirmed Results
After configuring your settings, return to the timeline panel and reselect the video. From the timeline toolbar, click the “Render Preview” option. Once the rendering process ends, see the preview before exporting.

Conclusion
This article introduced readers to The Slow Mo Guys and their work. If you haven’t heard about them before, you are now familiar with them. You can head over to YouTube to find their channel and see their work. After guiding users on creating slo-mos on Android and iPhone, we introduced Filmora.
It’s a proficient way of creating slo-mo with AI assistance and custom settings. It has recently launched the V13 upgrade, which is full of AI features and editing possibilities. Head over to their official site and download it to edit like The Slow Mo Guys.
Make A Slow Motion Video Make A Slow Motion Video More Features
Part 1: The Slow Mo Guys: A Real-Life Sensation in Creating Slow Motion Videos
The Slow Mo Guys is a YouTube channel with over 14.8M subscribers and is determined to deliver high-quality content. The channel appeared as a collaboration between Gavin Free and Daniel Gruchy. Both had a history of using high-speed slow-motion cameras and set their channel in 2010. The channel began to gain recognition in 2012 and became a living sensation in the slo-mo world.
In this era, if you are looking for a start to create slomos, Slow Motion Guys come to mind. One of the many things that took the channel to heights is their ability to explain everything. The normal slow-mo speed by most editors is either 120 or 240 fps. However, The Slow Mo Guys shoot videos at 1000 fps, which is ultra-slow motion. The channel usually features natural phenomena, pranks, and relevant content.
Part 2: Want to Make Such Slow-Motion Videos on Your Smartphone? Learn How
The most used and dear gadget to all of us in this era is our smartphones. It has also become a requirement to stay connected, and so we often shoot on them. To retain the video quality, we try to edit it through built-in features. This section highlights creating slow-motion videos using iPhone or Android. Learn to create professional slo-mos like Gave Slow Mo Guys here:
Step-by-Step Guide to Create a Slow Motion in iPhone
Apple offers a pre-developed feature to create slomos using a simple method. In this section, we will discuss how to shoot a video in slow motion using an iPhone. Follow the lead and create results like The Slow Mo Guys camera:
Instruction: Once you launch the “Camera” application, open the recorder and select “SLO-MO.” Now, redirect to your camera and hit the recorder button to start recording a solo.
Step-by-Step Guide to Creating a Slow Motion in Android
The Android has also introduced a slo-mo feature to record content in slow motion. It helps creators in crafting transitions or aesthetic videos. We have given a detailed procedure for recording a slow-motion video in Android:
Step 1
Locate and launch the “Camera” application on your Android. In the bottom bar, you’ll find multiple camera modes and settings. Drag and find the “More” option in this settings bar.
Step 2
In the appearing menu, locate and select the “Slow motion” option. After setting these preferences, hit the recorder button and record the video. The video will record normally, but when you preview it later, you’ll have a slomo.
Part 3: Slow Motion Video Making and Wondershare Filmora: Make Videos Like Slow Mo Guys
All the above methods of creating slow motion are effective, but there is a drawback. You’ll have to record the complete video in slow motion, and there are no custom options. Wondershare Filmora is a professional video editing software that can resolve this. This software will help you create videos similar to Dan Slow Mo Guys.
In addition, you can infuse your slomo with multiple visual effects, transitions, and more. Filmora displays two features to create a slow-motion video, one of which is Uniform Speed. The other feature is Speed Ramping with pre-assembled slow-motion presets. With its AI-backed technology, you can increase the video frame rate as well.
Free Download For Win 7 or later(64-bit)
Free Download For macOS 10.14 or later
Using Uniform Speed to Create a Slow-Motion Video in Filmora
Uniform Speed is the basic method of creating slow motion in Filmora. It simply modifies the playback speed of video with the help of a slider. The procedure of slomo creation, like The Slow Mo Guys in Filmora, is given below:
Step 1Import Media to Start Slomo Creation
After downloading Filmora on your device, click the “New Project” button to start. From the editing interface, click the “Ctrl + I” keys, choose the video, and bring it to the timeline after import. Select the clip in the timeline and use your cursor to reach the settings panel. Go to the “Uniform Speed” section under the “Speed” tab and change the speed slider settings.
Step 2Start AI Frame Interpolation Settings
This is the AI feature that increases the video frame rate for a smooth, slow-motion effect. You can access this option at the bottom of Uniform Speed settings. Expand it and select the “Optical Flow” option for your purpose.
Step 3Enable Render Preview to See Results
Once all is set and done, navigate towards the timeline panel to select this video again. With the help of your cursor, access the “File” tab at the top toolbar. Select the “Render Preview” option from the expanding menu. After rendering is complete, use the preview screen to observe the slo-mo and export it.
Using Speed Ramping to Create a Slow-Motion Video in Filmora
The second method is also simple, but it has more precise options to create a slow-mo. It uses the velocity graph to rise or decline video speed at certain intervals. Gather the knowledge about how The Slow Mo Guys YouTube creates slow-mo here:
Step 1Access the Speed Ramping Feature
After importing and bringing media to the timeline, select it and reach the settings panel. Access the “Speed” > “Speed Ramping” option to start editing. There, you can find many custom speed presets for automated editing. However, you can also use the “Customize” preset to create from scratch. Then, reach the speed graph and move the slider downward to bring the slo-mo effect.
Step 2Enable the Optical Flow Option
Navigate to the bottom of this panel and expand the AI Frame Interpolation menu. Choose the “Optical Flow” option to achieve your desired outcome.
Step 3Activate Render Preview for Confirmed Results
After configuring your settings, return to the timeline panel and reselect the video. From the timeline toolbar, click the “Render Preview” option. Once the rendering process ends, see the preview before exporting.
Conclusion
This article introduced readers to The Slow Mo Guys and their work. If you haven’t heard about them before, you are now familiar with them. You can head over to YouTube to find their channel and see their work. After guiding users on creating slo-mos on Android and iPhone, we introduced Filmora.
It’s a proficient way of creating slo-mo with AI assistance and custom settings. It has recently launched the V13 upgrade, which is full of AI features and editing possibilities. Head over to their official site and download it to edit like The Slow Mo Guys.
Also read:
- New How to Make Video Fade to Black in Movie Maker Easily for 2024
- New Top 6 Text to Speech Generators for YouTube Videos Windows, Mac, And
- Bored with Those Normal Background Images and that Ordinary Still Capture Feel? Take Your Creativity to the Next Level with Amazing Image Transparency Ideas for 2024
- Updated Best 10 Tools to Convert a GIF Into a PDF
- New How to Create an URL for Your Video for 2024
- Let Us Talk About the Famous Photoshop and Most Commonly Used Glitch Effect. The Article Understudy Will Discuss in Detail About Photo Glitch Effect
- Updated In 2024, How to Add Expression in After Effects
- Updated In 2024, Discover Vintage LUTs Premiere Pro Free and Paid Options Available
- 2024 Approved How to Download Windows Movie Maker 2012 Version
- New How to Make First Impression Review Video
- New 8 Frame Rate Video Converters for a Professional Finish
- Updated How To Change Font In Premiere Pro
- Slideshow Makers Are On-Demand as They Come with Multiple Possibilities for Both Professional and Personal Uses. Gradually, the Best Software to Make Slideshows Is Always Welcomed to Save Time and Effort without Compromising the Quality
- Updated In 2024, How to Make an Aesthetic Slideshow
- New Best Video Title Generators
- In 2024, The Only Guide Youll Ever Need to Learn GIF Design
- Updated In 2024, Adobe Premiere Pro Rec 709 LUTs Finding The Best Choices
- Updated All Things About Adding Effects In Kinemaster
- New 6 Free Tools To Radial Blur Photos Online for 2024
- New In 2024, Want Make a Slide Show Video? Heres How
- New In 2024, Best Frame Rate for 4K Video
- Updated Create Your Own Subscribe Channel Graphics for 2024
- Updated Ideas to Make A Perfect Café Vlog
- New In 2024, 10 Crazy-Cool Examples of AR Video
- Updated 2024 Approved Best Dark Moody LUTs During Editing
- New Benefits of Live Streaming on YouTube
- Splitting Audio From Video in Sony Vegas Step by Step for 2024
- In 2024, How to Start a Video Editing Career
- Updated Change Speed of a Video on iPhone
- New 2024 Approved Add Neon Effects to Your Dance Videos with the Help of Wondershare Filmora After Reading This Article. It Will Give a More Thrilling and Exciting Appearance
- New Free Ways To Split Video For Whatsapp Status On All Platforms for 2024
- In 2024, Finding LUTs Made by Danny Gevirtz
- How to Create Video in Text Intro, In 2024
- In 2024, Fast and Easy Method to Match Color in Photoshop
- In 2024, Event Videography Is Popular in Weddings, Graduation, Family Reunion and Other Great Moments. Here Im Going to Share some of the Tips to Make a Better Event Videography
- New 2024 Approved Best GIF to AVI Converters
- Updated In 2024, How to Convert Videos to Slow Motion?
- New In 2024, How To Change Font In Premiere Pro
- How To Repair iPhone 14 Pro iOS System? | Dr.fone
- How to Unlock iPhone 12 mini without Passcode or Face ID
- How to get back lost photos from Asus ROG Phone 8 Pro.
- In 2024, Will Pokémon Go Ban the Account if You Use PGSharp On Motorola Defy 2 | Dr.fone
- In 2024, 3 Things You Must Know about Fake Snapchat Location On Realme 12+ 5G | Dr.fone
- Restore Missing App Icon on Motorola Razr 40 Step-by-Step Solutions | Dr.fone
- In 2024, Android to Apple How To Transfer Photos From Vivo Y100 to iPad Easily | Dr.fone
- 4 Easy Ways for Your Tecno Pop 7 Pro Hard Reset | Dr.fone
- Pokémon Go Cooldown Chart On Lava Yuva 2 Pro | Dr.fone
- How to Perform Hard Reset on Xiaomi Civi 3? | Dr.fone
- In 2024, Different Methods To Unlock Your Apple iPhone 15 Pro Max
- In 2024, Easy Ways to Manage Your Honor X50i Location Settings | Dr.fone
- Full Guide to Fix iToolab AnyGO Not Working On Samsung Galaxy M34 | Dr.fone
- Title: Updated Slowing Down GIF With The Best Available Methods
- Author: Chloe
- Created at : 2024-06-26 06:23:57
- Updated at : 2024-06-27 06:23:57
- Link: https://ai-editing-video.techidaily.com/updated-slowing-down-gif-with-the-best-available-methods/
- License: This work is licensed under CC BY-NC-SA 4.0.
