
:max_bytes(150000):strip_icc():format(webp)/GettyImages-944229088-5bd1f61e46e0fb0026fdf2f0.jpg)
Updated Steps To Fade Audio In Premier Pro
Steps To Fade Audio In Premier Pro
Audio is a very big part of any video project and it can make or break the video project. This is why it is very important to not just choose a video editor that also offers audio editing, but one that is easy to use and offers a lot of editing options. This way, you can edit the audio in your project to suit your video’s production and end up with a great professional final product.
One of the video editing tools that offer features that can accomplish all that is Adobe Premier Pro. In this article, we will look at how you can use Premier Pro to fade audio in or out.
Steps to Fade Audio in Premier Pro
Premier Pro gives you two different options to fade audio in or out. Let’s look at both options and then you can choose the one that suits you best;
Fade Audio using Crossfade Audio Transition
Step1To begin, open Premier Pro on your computer and then open the audio that you want to edit.
Step2Once it is open, select the audio clip in the timeline and then click on “Sequence” at the top menu and select “Apply Audio Transition.”
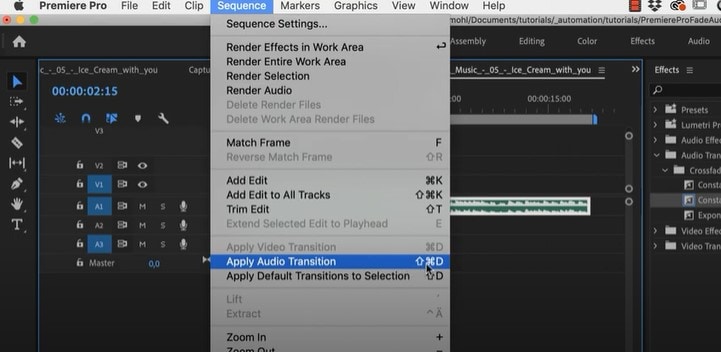
You can also use the keyboard shortcut Shift + Command + D (macOS) or Shift+ Ctrl + D (PC). This will add the “Constant Power Cross Fade” effect at the beginning and the end of the clip.
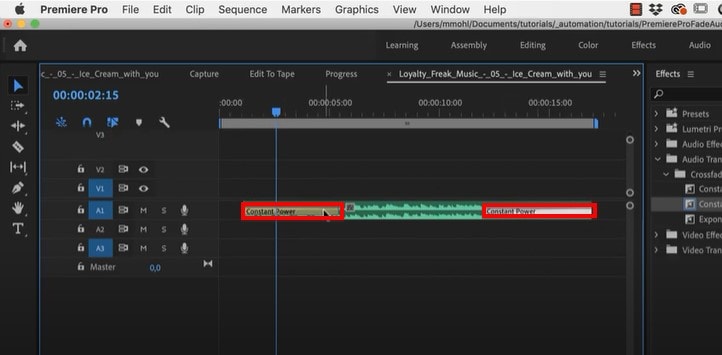
Step3You can then just change the duration of the effect by simply dragging the end of the transition.
Fade Audio using Clip Keyframes
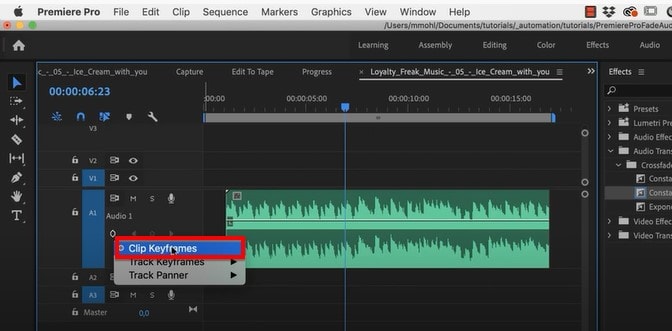
Step1Adobe Premier Pro has two volume keyframes; Track and Clip. Make the audio larger so you can see the volume line and then under the audio name, click on the volume keyframes option to make sure “Clip Keyframes” is enabled.
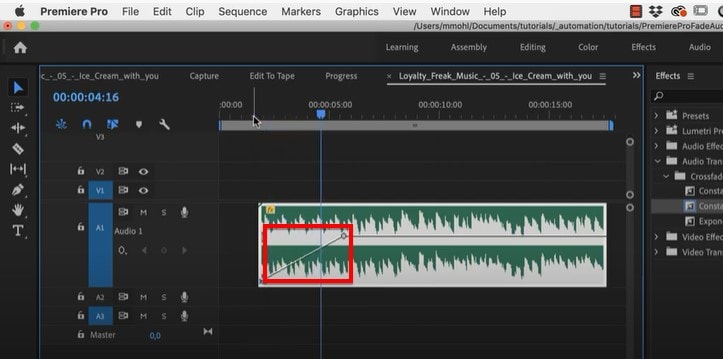
Step2You can then press down on the Command Key (macOS) or the Control Key (PC) and drag the volume line down to add a fade-in or fade-out effect.
Adobe Premiere Alternative Way to Fade Audio
If you are like most people and you find Adobe Premier Pro to be very difficult you use, we have a tool that is just as effective but also simplifies the process. This is the very simple to use Wondershare Filmora .
Just like Premier Pro, Filmora gives you two options to fade audio in and out. Let’s look at both options;
Adding Fade in and Out in Audio Pane
Step1Download and install Wondershare Filmora onto your computer, open the program and then import the audio clip that you want to edit.
Step2Once the video has been added to the timeline, double-click on it to access the “Audio” editing panel.
Step3Here, you can very simply add the fade-in and fade-out effects by simply dragging the sliders to the desired duration or by manually entering the duration in seconds.

Using the Audio Waveform
You can also use the fade icons on the left and right edges of the audio waveform to quickly add a fade in and out.
To add a fade-in effect, drag the fade-in maker to the right. Then go to the end of the clip to drag the fade-out maker to the left to add a fade-out effect.

Related FAQs about Audio Fade
1. How Do I Fade to Black in Adobe Premiere Pro?
You can easily add the Fade to Black transition in Adobe Premiere Pro using the “Effects” tab. Just open the two clips in Premiere Pro and go to “Effects.” Type in “dip to black” in the search box and when you find the effect, drag it between the two clips in the timeline. The effect will appear on the right side of the project.
You also have several customization options that you can apply to the effect to get it just right. To see these options, go to Effect Controls and you should be able to change the alignment of the effect to “Center at Cut” so that the first video fades out to black before the second video appears.
2. Premiere Pro Audio Fade Not Working?
Sometimes you can complete all the editing steps we have described above but you are unable to tell if the fade-in and fade-out effects are working because you can’t play the audio in Premiere. This is a very common problem that can easily be fixed using the following troubleshooting steps;
Check the master volume on your computer to see if this is the problem
Then check the volume in Premiere to see if the audio meter is moving as you play the clip. It is the green bar usually in the lower right corner.
If your volume is fine but you still can’t hear the audio, you may need to adjust several settings. Go to Edit > Preferences (on PC) or Preferences menu under the main Premiere Pro CC menu (macOS) and select “Audio Hardware” in the options that appear. You can then change the “Default Output” device to something else.
3. How Do You do Audio Transitions in Premiere Pro
Adding audio transitions in Premiere Pro is very easy; just open the audio that you want to edit and then Right-click (PC) or Control- Click (macOS) on either the “Constant Gain” or “Constant Power” effect from the Effects panel. Then choose “Set Selected as Default Transition” from the options in the menu.
To add a duration for the audio transitions, go to Edit > Preferences > Timeline (PC) or Premiere Pro Menu > Preferences (macOS) and enter the duration value under “Audio Transition Default Duration.”
Free Download For Win 7 or later(64-bit)
Free Download For macOS 10.14 or later
Top Tips on How to Design Travel Slideshow
Best Tips on How to Design Travel Slideshow
An easy yet powerful editor
Numerous effects to choose from
Detailed tutorials provided by the official channel
A single travel trip besides numerous memories also has innumerable pictures and videos. Sharing all of these pictures and videos with your friends, and dear ones are tedious and not a practical thing to do. Here comes your creativity, where you can make an impressive slideshow using some of the most interesting images and videos from your clips. Creating a digital slideshow will not only help you to share your files online with your loved ones but will also work as a keepsake where you relive the moments later.

So now when decided to create a slideshow, the next question is how, tips, tools, templates, and software can be used. The article below will cover all these aspects that will help you in designing and creating a wonderful travel slideshow.
In this article
01 [Tips and steps for creating a travel slideshow](#Part 1)
02 [Importance of using a travel slideshow template](#Part 2)
03 [Best tool for creating a travel slideshow- Wondershare Filmora](#Part 3)
Part 1 Tips and steps for creating a travel slideshow
Want to hear the words- cool and wow when you play your slideshow in front of your dear ones. The below-listed tips will help you create an engaging and engrossing slideshow.

01Identify the audience
Before creating a slideshow, you first need to ascertain who is your target audience. The slideshow can be created for your friends, family, relatives, or YouTube or social media platform viewers. Depending on the target audience, the content and other slideshow elements will vary.
02Choose a travel story
Next, you need to decide upon the story of your travel slideshow. Depending on the story, you can pick up the content to be included. The story can be based on the places you visited, food, local shopping, and others. Also draft a story that has an introduction, a middle part, and an end.
03Sort the pictures and videos
Next comes the trickiest part of selecting the pictures and videos to be added to the slideshow. For any trip, there are hundreds of images but you cannot add them all to your slideshow. So, depending on the target audience and your travel story, pick up the most appropriate ones. Pick up the number of images and videos so that the total slideshow length is around 5-7 minutes.
04Edit images and add effects
Next comes the editing part. Check out the images that need editing like cropping, color correction, and others. Also, you can add some effects to make your slideshow interesting. To edit the files and add effects, there are several editing online and desktop-based tools available. You can choose the ones that meet your requirements.
05Add transitions
Next, choose the transitions you want to add between the images and the videos. There are slideshow-making tools where you can check out different types of transition effects and use them.
06Add Music
Music will set the right tone and mood for your slideshow. You can either download the relevant song from any online site or a music library or can also combine multiple audio clips to be added to the slideshow.
Part 2 Importance of using a travel slideshow template
For some, slideshow creation can be a simple task of adding a few images and videos but for the ones who need to create something interesting, several elements go into the making of a slideshow. Moreover, when it comes to travel, the task becomes even trickier with so many things to include and grab the attention of the viewers.
So, if you are not experienced or a pro at making a slideshow but want to create something impressive, templates come to a great rescue. The templates are like ready-to-use designs where you simply need to add the required elements that in turn will create a travel slideshow.
Using a template for creating a travel slideshow served several benefits as enlisted below.
● Save time in drafting a design.
● Save efforts.
● Helps in creating a professional-looking impressive slideshow.
● Multiple elements can be added.
● Helps in creating a slideshow with some story.
There are several online sites and tools available from where you can select and pick a travel slideshow template of your choice.

Part 3 Best tool for creating a travel slideshow- Wondershare Filmora
For creating your travel slideshow in an interesting manner and that too in a hassle-free manner, Wondershare Filmora Video Editor is excellent. Though it is a professional video editing tool with advanced features, it supports multiple additional tasks as well including slideshow making. Using the software, your slideshow having pictures, videos, and music files can be created in no time.
For Win 7 or later (64-bit)
For macOS 10.12 or later
You can even edit the files for further customization using the built-in functions. Add transitions, filters, effects, and other elements for creating a slideshow of your choice. An array of templates in different categories will further help you to quickly create a presentation based on your theme. There is also a stock collection of videos, images, and other files that can be used for your slideshow.

Steps to create a travel slideshow using Wondershare Filmora
Step 1. From the official software page, download and install the program, and at the main interface choose the New Project option.
Step 2. Next, the videos and images that need to be included in the slideshow have to be imported and added to the Media Library of the software. Next, drag and move these files to the timeline. The sequence can be changed as desired.
Note: Before moving the files to the timeline, you can edit and customize them by using the built-in features of the software like rotate, crop, and zoom.
Step 3. An array of transitions is available in the software from which you can choose the ones that fit into your theme. Some of the popular ones are cross-merge, sweep clockwise, cross split, and others.
Step 4. Also add filters, overlays, effects, and other elements to your slideshow.
Step 5. Next comes the music, add the local music file or use the one from the inbuilt audio library. The Voice-over recording option is also available in the software.
Step 6. Finally, export and save the slideshow. You can save it to your local system, or DVD, or can even share it directly to YouTube or Vimeo.
● Ending Thoughts →
● For creating an interesting travel slideshow consider all the important elements like the story, theme, pictures, music, and others.
● Templates help to a great extent for creating a slideshow in a simple quick-manner.
● Wondershare Filmora is an excellent tool for finding a template as well as creating a travel slideshow.
A single travel trip besides numerous memories also has innumerable pictures and videos. Sharing all of these pictures and videos with your friends, and dear ones are tedious and not a practical thing to do. Here comes your creativity, where you can make an impressive slideshow using some of the most interesting images and videos from your clips. Creating a digital slideshow will not only help you to share your files online with your loved ones but will also work as a keepsake where you relive the moments later.
So now when decided to create a slideshow, the next question is how, tips, tools, templates, and software can be used. The article below will cover all these aspects that will help you in designing and creating a wonderful travel slideshow.
In this article
01 [Tips and steps for creating a travel slideshow](#Part 1)
02 [Importance of using a travel slideshow template](#Part 2)
03 [Best tool for creating a travel slideshow- Wondershare Filmora](#Part 3)
Part 1 Tips and steps for creating a travel slideshow
Want to hear the words- cool and wow when you play your slideshow in front of your dear ones. The below-listed tips will help you create an engaging and engrossing slideshow.
01Identify the audience
Before creating a slideshow, you first need to ascertain who is your target audience. The slideshow can be created for your friends, family, relatives, or YouTube or social media platform viewers. Depending on the target audience, the content and other slideshow elements will vary.
02Choose a travel story
Next, you need to decide upon the story of your travel slideshow. Depending on the story, you can pick up the content to be included. The story can be based on the places you visited, food, local shopping, and others. Also draft a story that has an introduction, a middle part, and an end.
03Sort the pictures and videos
Next comes the trickiest part of selecting the pictures and videos to be added to the slideshow. For any trip, there are hundreds of images but you cannot add them all to your slideshow. So, depending on the target audience and your travel story, pick up the most appropriate ones. Pick up the number of images and videos so that the total slideshow length is around 5-7 minutes.
04Edit images and add effects
Next comes the editing part. Check out the images that need editing like cropping, color correction, and others. Also, you can add some effects to make your slideshow interesting. To edit the files and add effects, there are several editing online and desktop-based tools available. You can choose the ones that meet your requirements.
05Add transitions
Next, choose the transitions you want to add between the images and the videos. There are slideshow-making tools where you can check out different types of transition effects and use them.
06Add Music
Music will set the right tone and mood for your slideshow. You can either download the relevant song from any online site or a music library or can also combine multiple audio clips to be added to the slideshow.
Part 2 Importance of using a travel slideshow template
For some, slideshow creation can be a simple task of adding a few images and videos but for the ones who need to create something interesting, several elements go into the making of a slideshow. Moreover, when it comes to travel, the task becomes even trickier with so many things to include and grab the attention of the viewers.
So, if you are not experienced or a pro at making a slideshow but want to create something impressive, templates come to a great rescue. The templates are like ready-to-use designs where you simply need to add the required elements that in turn will create a travel slideshow.
Using a template for creating a travel slideshow served several benefits as enlisted below.
● Save time in drafting a design.
● Save efforts.
● Helps in creating a professional-looking impressive slideshow.
● Multiple elements can be added.
● Helps in creating a slideshow with some story.
There are several online sites and tools available from where you can select and pick a travel slideshow template of your choice.
Part 3 Best tool for creating a travel slideshow- Wondershare Filmora
For creating your travel slideshow in an interesting manner and that too in a hassle-free manner, Wondershare Filmora Video Editor is excellent. Though it is a professional video editing tool with advanced features, it supports multiple additional tasks as well including slideshow making. Using the software, your slideshow having pictures, videos, and music files can be created in no time.
For Win 7 or later (64-bit)
For macOS 10.12 or later
You can even edit the files for further customization using the built-in functions. Add transitions, filters, effects, and other elements for creating a slideshow of your choice. An array of templates in different categories will further help you to quickly create a presentation based on your theme. There is also a stock collection of videos, images, and other files that can be used for your slideshow.
Steps to create a travel slideshow using Wondershare Filmora
Step 1. From the official software page, download and install the program, and at the main interface choose the New Project option.
Step 2. Next, the videos and images that need to be included in the slideshow have to be imported and added to the Media Library of the software. Next, drag and move these files to the timeline. The sequence can be changed as desired.
Note: Before moving the files to the timeline, you can edit and customize them by using the built-in features of the software like rotate, crop, and zoom.
Step 3. An array of transitions is available in the software from which you can choose the ones that fit into your theme. Some of the popular ones are cross-merge, sweep clockwise, cross split, and others.
Step 4. Also add filters, overlays, effects, and other elements to your slideshow.
Step 5. Next comes the music, add the local music file or use the one from the inbuilt audio library. The Voice-over recording option is also available in the software.
Step 6. Finally, export and save the slideshow. You can save it to your local system, or DVD, or can even share it directly to YouTube or Vimeo.
● Ending Thoughts →
● For creating an interesting travel slideshow consider all the important elements like the story, theme, pictures, music, and others.
● Templates help to a great extent for creating a slideshow in a simple quick-manner.
● Wondershare Filmora is an excellent tool for finding a template as well as creating a travel slideshow.
What Is AI Composite Video App and AI Composite Video Tutorial
What is AI Composite Video App and AI Composite Video Tutorial
An easy yet powerful editor
Numerous effects to choose from
Detailed tutorials provided by the official channel
The internet space is all dominated by video content these days. Be it a blog, social media site, or any other platform, interesting videos, and images are grabbing the attention of the viewers and visitors. So, whether you wish to create an interesting video for your loved one, or make one for your brand promotion, a good editing tool is a must. Among the long list of these tools available, AI Composite Video Application is one of the latest additions. This article will help you know all about this app, its supported features, functions, and a lot more. Keep reading.
![]()
A cross-platform for making videos anywhere for all creators

Why your video editing isn’t good enough? How about some creative inspo?
- 100 Million+ Users
- 150+ Countries and Regions
- 4 Million+ Social Media Followers
- 5 Million+ Stock Media for Use
* Secure Download

In this article
01 [What is AI Composite Video App?](#Part 1)
02 [The Best Alternative To Ai Composite Video App For Adding Special Effects And Transitions](#Part 2)
Part 1 What is AI Composite Video App?
The AI Composite Video App is a new editing app that is available for free download on Android and iOS devices. The app allows creating of interesting and professional-looking videos using a wide range of editing features supported. An array of templates, stickers, filters, transitions, and other elements in the tool can be used for creating the desired video.
Key features of AI Composite Video App
● Video editing app available for Android and iOS devices.
● Simple and user-friendly interface.
● Comes with pre-designed templates for creating the desired video.
● Multiple options for filters, stickers, transitions, effects, and other elements.
● Support to multiple languages.
● Facilitates adding music to the videos.
● Option to change and customize the sound quality using Introduct56n beat effects, and filters.
● Allows to use the saved videos as well as capture them.
● Free app without ads.
● Share videos on social networking sites.
Pros:
● Free to use app with a user-friendly interface.
● The app can be downloaded directly from the third-party website and thus the downloading is quick and instant.
● The APK files are saved to your system memory or the card. You can now install and uninstall it multiple times as needed without downloading it.
Cons:
● Being an APK file, the tool is susceptible to having viruses that may lead to device damage or stealing data.
● If you are using the mod version of the tempo AI composite video app, the update will not be done automatically.
Language supported
The AI Composite Video App supports 10 languages which include English, Dutch, French, Korean, Polish, Japanese, Hindi, Malaysian, Indonesian, and Taiwanese.
Steps to download and use AI Composite Video Mod Apk Latest Version
The official app is available at the Google Play Store with IAP but if you need to unlock and use all the premium features without any payment, you can use the mod version. The steps for AI Composite video apps download using the Mod version are as follows
Step 1. On your Android or iOS device, at the Security settings, permit to enable the unknown sources.
Step 2. Download, install and open the app.
Step 3. The templates will now appear on the main dashboard of the app. There are templates in multiple categories, you can choose the one as desired.
Step 4. Add the desired video or image and edit them using several functions and features.
Step 5. The created video can be saved or shared on social media sites as needed.

Part 2 The Best Alternative To AI Composite Video App – Filmora
The AI Composite Video App is a mobile-based app that also has several limitations as discussed above. So, if you are in search of a professional alternative tool, we recommend Wondershare Filmora as the best option. This powerful video editing tool will let you unleash your creativity and make professional-looking videos.
For Win 7 or later (64-bit)
For macOS 10.14 or later
download filmora app for ios ](https://app.adjust.com/b0k9hf2%5F4bsu85t ) download filmora app for android ](https://app.adjust.com/b0k9hf2%5F4bsu85t )
Click here to get Filmora for PC by email
You just need to image and the tools in the software will let you create the desired piece of the video.
Key features of the software
● Windows and Mac-based professional video editing software.
● Comes with customized animations for creating personalized videos.
● Comes with features like motion tracking, pan & zoom, ease-in, ease-out, and more.
● Multiple features and effects can be added to the videos like text & titles, warp & distort, masking, lights & flares, and more.
● Enhance videos using features like auto-correction, control settings, color wheels, scopes, and more.
● Multiple audio-related functions are also supported like audio compression, automatic audio-syncing, audio transitions, audio noise correction, and more.
● Windows and Mac support.
● Ending Thoughts →
● A good editing tool lets you edit your videos efficiently and quickly.
● AI Composite Video App is one such Android and iOS-based editing app.
● The AI Composite app comes with decent features but there are several limitations to using the app as well.
● To create magical videos like a pro, Wondershare Filmora works as an excellent tool.
The internet space is all dominated by video content these days. Be it a blog, social media site, or any other platform, interesting videos, and images are grabbing the attention of the viewers and visitors. So, whether you wish to create an interesting video for your loved one, or make one for your brand promotion, a good editing tool is a must. Among the long list of these tools available, AI Composite Video Application is one of the latest additions. This article will help you know all about this app, its supported features, functions, and a lot more. Keep reading.
![]()
A cross-platform for making videos anywhere for all creators
Why your video editing isn’t good enough? How about some creative inspo?
- 100 Million+ Users
- 150+ Countries and Regions
- 4 Million+ Social Media Followers
- 5 Million+ Stock Media for Use
* Secure Download
In this article
01 [What is AI Composite Video App?](#Part 1)
02 [The Best Alternative To Ai Composite Video App For Adding Special Effects And Transitions](#Part 2)
Part 1 What is AI Composite Video App?
The AI Composite Video App is a new editing app that is available for free download on Android and iOS devices. The app allows creating of interesting and professional-looking videos using a wide range of editing features supported. An array of templates, stickers, filters, transitions, and other elements in the tool can be used for creating the desired video.
Key features of AI Composite Video App
● Video editing app available for Android and iOS devices.
● Simple and user-friendly interface.
● Comes with pre-designed templates for creating the desired video.
● Multiple options for filters, stickers, transitions, effects, and other elements.
● Support to multiple languages.
● Facilitates adding music to the videos.
● Option to change and customize the sound quality using Introduct56n beat effects, and filters.
● Allows to use the saved videos as well as capture them.
● Free app without ads.
● Share videos on social networking sites.
Pros:
● Free to use app with a user-friendly interface.
● The app can be downloaded directly from the third-party website and thus the downloading is quick and instant.
● The APK files are saved to your system memory or the card. You can now install and uninstall it multiple times as needed without downloading it.
Cons:
● Being an APK file, the tool is susceptible to having viruses that may lead to device damage or stealing data.
● If you are using the mod version of the tempo AI composite video app, the update will not be done automatically.
Language supported
The AI Composite Video App supports 10 languages which include English, Dutch, French, Korean, Polish, Japanese, Hindi, Malaysian, Indonesian, and Taiwanese.
Steps to download and use AI Composite Video Mod Apk Latest Version
The official app is available at the Google Play Store with IAP but if you need to unlock and use all the premium features without any payment, you can use the mod version. The steps for AI Composite video apps download using the Mod version are as follows
Step 1. On your Android or iOS device, at the Security settings, permit to enable the unknown sources.
Step 2. Download, install and open the app.
Step 3. The templates will now appear on the main dashboard of the app. There are templates in multiple categories, you can choose the one as desired.
Step 4. Add the desired video or image and edit them using several functions and features.
Step 5. The created video can be saved or shared on social media sites as needed.
Part 2 The Best Alternative To AI Composite Video App – Filmora
The AI Composite Video App is a mobile-based app that also has several limitations as discussed above. So, if you are in search of a professional alternative tool, we recommend Wondershare Filmora as the best option. This powerful video editing tool will let you unleash your creativity and make professional-looking videos.
For Win 7 or later (64-bit)
For macOS 10.14 or later
download filmora app for ios ](https://app.adjust.com/b0k9hf2%5F4bsu85t ) download filmora app for android ](https://app.adjust.com/b0k9hf2%5F4bsu85t )
Click here to get Filmora for PC by email
You just need to image and the tools in the software will let you create the desired piece of the video.
Key features of the software
● Windows and Mac-based professional video editing software.
● Comes with customized animations for creating personalized videos.
● Comes with features like motion tracking, pan & zoom, ease-in, ease-out, and more.
● Multiple features and effects can be added to the videos like text & titles, warp & distort, masking, lights & flares, and more.
● Enhance videos using features like auto-correction, control settings, color wheels, scopes, and more.
● Multiple audio-related functions are also supported like audio compression, automatic audio-syncing, audio transitions, audio noise correction, and more.
● Windows and Mac support.
● Ending Thoughts →
● A good editing tool lets you edit your videos efficiently and quickly.
● AI Composite Video App is one such Android and iOS-based editing app.
● The AI Composite app comes with decent features but there are several limitations to using the app as well.
● To create magical videos like a pro, Wondershare Filmora works as an excellent tool.
Free Ways to Download Mobile Phone Green Screen Videos and Pictures: No Copyright
The digital landscape is bustling with content creators showcasing their talent, brands promoting their products, and educators teaching various skills. Amidst all this digital hustle, have you ever stopped to wonder how some creators seamlessly integrate themselves into dreamy, otherworldly, or even fantastical backgrounds?
How does one moment show them standing in their living room, and the next, they’re strolling through the sandy beaches of the Maldives or floating in space?
The answer to these mesmerizing effects is the magic of green screens.
Part1:What is Green Screen Footages and Application Scenarios
The concept of the green screen, or the green screen mobile frame, isn’t new. Hollywood has used it for decades to transport actors to distant planets, into the heart of battles, or atop treacherous mountain peaks. The principle is simple: film your subject against a vibrant green backdrop, then use software to replace that green with any video or image you choose.
So, why green?
The color green is distinct, easily distinguishable, and not typically worn as a primary color in clothing. This makes it simpler for software to isolate and replace without accidentally morphing the subject into the new background. The result is a clean, nearly flawless integration of the subject with whatever setting or scene you can imagine.
But it’s not just about transporting subjects to new locations. A green screen mobile frame or video green screen frame allows for interactive presentations, imaginative storytelling, and even sophisticated effects, like adding dynamic weather elements or supernatural phenomena. It can turn a static, dull scene into something vibrant, interactive, and engaging.
Application Scenarios:
- Entertainment & Films: This is the most obvious. From massive Hollywood productions to amateur short films, green screens create different worlds, enhance scenes with visual effects, or simply transport characters to diverse locations.
- Education: Educators use green screens for virtual field trips or to create interactive lessons, making learning more dynamic and interesting.
- Gaming & Streaming: Have you ever seen a game streamer with just their figure visible over the gameplay? That’s a green screen at work.
- Digital Marketing: Brands use it to produce compelling ads without the hefty cost of actual locations or sets.
- Social Media Content: TikTokers, YouTubers, and Instagram influencers employ green screens to add a layer of creativity and uniqueness to their content, standing out in the ever-crowded space.
The magic of green screens is everywhere, bridging the gap between imagination and reality. With the rise of accessible technology and software, what was once restricted to big-budget studios is now at the fingertips of anyone with a camera, a green cloth, and a vision. And with the platforms we’re about to delve into, sourcing green screen mobile frame HD content has never been easier. So, ready to jump into this world?
Part2: Free Websites to Download Mobile Phone Green Screen Videos and Pictures
In today’s digital age, the demand for high-quality visuals is at an all-time high. Green-screen videos and images can elevate your content, whether you’re a budding YouTuber, a professional filmmaker, or someone trying to make a memorable Instagram story. Thankfully, there are numerous platforms where you can find green-screen mobile frame content; even better, they’re free! Let’s dive deeper into these treasure troves:
01Adobe Stock
While Adobe Stock is renowned for its premium visuals, a lesser-known section offers complimentary content. Once in a while, you can find a beautiful green screen mobile frame HD ready for download. The content here is curated, ensuring that even the freebies maintain a high-quality standard. This makes it a great starting point for those new to the green screen world.
02iStock
Another heavyweight in the digital asset market, iStock occasionally surprises its users with free content. By rummaging through their vast library, you might come across a perfect video frame green screen for your next project. It’s a testament to their commitment to cater to all types of users, regardless of budget.
03Videezy
Videezy stands out for its user-friendly interface and many free green screen video frame options. Ranging from simple mobile frames to intricate animations, the platform has a rich variety. This makes Videezy a favorite for both novices and professionals. Its community-driven approach ensures a constant influx of fresh content.
04Pixabay
One can’t discuss free visual content without mentioning Pixabay. This platform is a goldmine for both videos and images. Their collection of background green screen mobile frame assets is extensive. The community-driven nature means there’s a diverse range of content, suitable for different cultural and thematic needs. Plus, the no-copyright angle ensures peace of mind.
05Pexels
Pexels mirrors Pixabay in many ways, offering various video green screen frame content. However, what sets Pexels apart is its emphasis on contemporary and trendy visuals. For those keen on staying ahead of the curve and ensuring their content resonates with younger audiences, Pexels is a go-to resource.
06Coverr
While it might not have the extensive library of the earlier mentions, Coverr compensates with uniqueness. Their green screen video frame content leans more towards the artistic side, making it ideal for projects that require a distinct touch. If you’re after something that stands out and deviates from the norm, Coverr should be on your radar.
07Shutterstock
Typically, Shutterstock would be the last place to look for free content. Known for its premium offerings, the platform occasionally throws in some freebies. It’s like a lucky draw. When you find a green screen frame video without the price tag, rest assured, it’s a high-quality piece.
Part3: Summary
So, there you have it. Green screens are the secret behind those cool videos where anything seems possible. And now, you can make those videos with all these resources too. Dive in, get creative, and have fun with it!
Also read:
- How Have Game Recording Software Improved Their Stature in the Market? An Overview for 2024
- New Fixing The Slow Playback Issues in DaVinci Resolve for 2024
- New Secret Tips & Tricks to Use in Filmora
- New 2024 Approved 4 Ways to Merge MP4 and MP3
- In 2024, Convert Time-Lapse to Normal Video
- New Do You Want to Know How to Edit a Time Lapse Video on iPhone, Interesting Ideas, and some Tips and Pointers for Shooting a Professional Time Lapse Video? Find Out Everything in This Guide
- How to Make Subtitle Videos for 2024
- In 2024, How to Make a Video with My Phone
- Best Cloud Storage Service for Videos for 2024
- Finding LUTs Made by Danny Gevirtz for 2024
- 2024 Approved Top 6 Drones for Videography
- Updated In 2024, Camtasia Vs Captivate Which Is Better
- How to Speed Up Video with Canva Online Tool for 2024
- How to Create Loop Videos with Filmora for 2024
- 2024 Approved 7 Best Green Screen Software for Beginners on Mac
- Updated 2024 Approved Best Photo Video Maker Apps with Song PC, Mobile, Online
- New 2024 Approved Tips That Show Anybody How To Make Youtube Slideshow – Guaranteed
- New 2024 Approved Quickly Turn Any Video Into a Paper Rip Effect
- New Best 5 Solutions on How to Add Emojis to iPhone for 2024
- New Here, You Will Learn How to Add a Realistic Fire Effect Using Wondershare Filmora. That Will Help to Boost Your Channel and Decorate Your YouTube Channel with Creative and Unique Effects
- Would You Like to Know How to Change the Ratio of the Video or Which Is the Correct Aspect Ratio for Uploading to the Online Platform? Then, Go Through the Article to Get Complete Details About the Video Aspect Ratio for 2024
- New Are You Stuck with How to Use Discord GIF Ideally? Check that Out in This Article, as We Will Guide You on All You Need to Know About GIFs for Discord
- Updated How to Make a Video Slideshow in iMovie
- Getting To Know More About the Video Editing Interface of Wondershare Filmora for 2024
- New Designed for You! Best Image (JPG/PNG) to GIF Converters for 2024
- Updated Adobe Premiere Pro Guide to Slow-Down Video for 2024
- Updated 3D Ray Traced Settings In After Effects A Comprehensive Guide
- New 4 Solutions to Resize a WebM File
- Focusing On The Best Ways To Convert Slow-Motion Video to Normal for 2024
- New Learn How to Slow Down Time-Lapse Videos on iPhone to Make Detailed and Captivating Slow-Motion Effects in Your Time-Lapse Captures
- 2024 Approved OBS Studio Is a Free and Open-Source App for Screen-Casting and Live Streaming
- Is your Motorola Defy 2 working too slow? Heres how you can hard reset it | Dr.fone
- In 2024, How to Unlock a Network Locked Samsung Galaxy S23 FE Phone?
- In 2024, How to Change Location on TikTok to See More Content On your Samsung Galaxy Z Fold 5 | Dr.fone
- How does the stardust trade cost In pokemon go On Apple iPhone XS Max? | Dr.fone
- In 2024, How to Cast Realme C33 2023 to Computer for iPhone and Android? | Dr.fone
- In 2024, Forgot Apple iPhone 12 Pro Max Backup Password? Heres What to Do
- In 2024, How to Detect and Stop mSpy from Spying on Your Oppo A58 4G | Dr.fone
- Does Airplane Mode Turn off GPS Location On Honor 90 Pro? | Dr.fone
- In 2024, Top 4 Ways to Trace Nokia 105 Classic Location | Dr.fone
- In 2024, How to Unlock Realme 11 Pro+ Bootloader Easily
- In 2024, How To Unlock Vivo Y56 5G Phone Without Password?
- How to Change Your ZTE Axon 40 Lite Location on life360 Without Anyone Knowing? | Dr.fone
- In 2024, How to use iSpoofer on OnePlus Ace 3? | Dr.fone
- Forgotten The Voicemail Password Of Honor X50i+? Try These Fixes
- In 2024, How Can I Use a Fake GPS Without Mock Location On Samsung Galaxy S24? | Dr.fone
- In 2024, Top 12 Prominent Realme V30 Fingerprint Not Working Solutions
- How can I get more stardust in pokemon go On Samsung Galaxy F34 5G? | Dr.fone
- How to retrieve lost files from Nokia C02?
- Super Easy Ways To Deal with Realme V30 Unresponsive Screen | Dr.fone
- Title: Updated Steps To Fade Audio In Premier Pro
- Author: Chloe
- Created at : 2024-04-24 07:08:14
- Updated at : 2024-04-25 07:08:14
- Link: https://ai-editing-video.techidaily.com/updated-steps-to-fade-audio-in-premier-pro/
- License: This work is licensed under CC BY-NC-SA 4.0.
