
:max_bytes(150000):strip_icc():format(webp)/netgear-default-password-list-2619154-b581fdcf136848d29e944638cd2ad444.png)
Updated The Most Efficient Ways to Manage Your Timeline
The Most Efficient Ways to Manage Your Timeline
Do you still have a lot of editing to do after spending hours creating a video for your client? Though you already have a lot on your plate, you can’t continue to devote all of your working hours to only video editing. What if we told you there is a way to make this video editing process much quicker and easier? Keep reading this article to learn how to make the video editing process simpler and more effective.
Part 1: Best Way to Manage your Timeline
We all know that keeping good habits while editing could be helpful, whether you are a professional or a newbie. It could make editing so much more efficient. Today, we will show you some easy tips to organize your media browser and timeline while editing videos. But before we begin, download Filmora from their official website so you can follow all the steps easily.
Free Download For Win 7 or later(64-bit)
Free Download For macOS 10.14 or later
1. Create folders in Filmora
If you have footage from multiple cameras, it is best to create some folders first.
Step1 Create a Folder for Camera 1
If you have video footage from three cameras, you can create one folder for each camera.
Go to the default folder on the top left and rename it Cam_A.

Step2 Create a Folder for Camera 2
Then go to the bottom left of the media browser and click on this icon to add a new folder. Rename it to Cam_B.

Step3 Create a Folder for Camera 3
Repeat the steps to create another folder called Cam_C. Now you can import footage from your different cameras into each folder.

Step4 Create a Folder for Production Sound
After that, add three new folders and rename them to Production Sound, SFX, and Music. Production sound is usually the sound that is recorded on set. If you have recorded all dialects from the subjects on the location, you can put them into this folder.

Step5 Create a Folder for SFX
SFX stands for sound effects. You can add push clapping, laughing and other Folly sounds into this folder.

Step6 Create a Folder for Music
Next, import all music files into the music folder. You can create folders for your graphics, B-roll, and stock footage if needed.

2. Organize your Timeline and Video Tracks
Step1 Create Tracks for Picture Editing
Keep the first three tracks for picture editing. These tracks are usually for picture editing that includes footage with no effects or some simple effects—for example resizing, keyframing, transitions, or Green Screen.

Step2 Create Tracks for Temporary Footage
Set up the fourth track for the temporary footage or placeholders so you can quickly switch the temporary footage without spending extra time looking for them.

Step3 Create Tracks for Effects
Set the fifth video track as the effect track. It will include all effects from firmware that do not apply to the footage directly.

Step4 Create Tracks for On and Off Content
Next, on the sixth video track, you can add the content that you would want to turn on and off from time to time. In this example, you can put the subtitles here.

3. Organize your Audio Tracks
Step1 Create Tracks for Dialects
The first two tracks are usually for dialects. You can include all the dialects of characters in these tracks. Keep one track for each character. If you have more characters, feel free to assign more tracks to them.

Step2 Create Tracks for Additional Audio
The third audio track could be for any additional audio, such as voiceover. If you don’t have a voiceover in your video, you can leave it empty.

Step3 Create Tracks for Sound Effects
The fourth track could usually be the sound effects track. You can add all the clapping sounds, laughing, and all kinds of other foley sound here.

Step4 Create Tracks for Ambient Sound
Keep the fifth track for Ambient sound and room tone. You can use it to keep a very subtle environment sound in specific scenes. For example, you can use the room tone recorded on sets.

Step5 Create Tracks for Background Music
Finally, the sixth track is usually for background music. But, of course, you could also keep it empty if your project has no background music.

4. Color Code Your Clips
Suppose you want to make the timeline even easier to view. In that case, you can select all clips from a camera or a subject and color code them into a specific color. For example, you can color code the footage from camera A in red, camera B in yellow, and Camera C in blue. Now, when you look at the Timeline, you can quickly distinguish footage from different cameras.

Part 2: Pro Tips about Improving Video Editing Efficiency
1. Rename Individual Clips
It would be much simpler to organize the timeline if you could quickly rename individual clips. Cut a clip into smaller segments and give each clip a different name. Make sure these clips have a name other than the source video to avoid confusion.
2. Remove Empty Timeline
For quick video editing, timeline organization is essential. Organize your materials and footage at all times to prevent delays. Put everything in the correct folders with the proper labels. To keep your timeline organized, select “Delete Empty Tracks” from the context menu when right-clicking on the track window on the left.
3. Use Keyboard Shortcuts
Knowing keyboard shortcuts allows you to carry out the editing process quickly and precisely.
4. Select Good Music
Don’t only concentrate on the images; the music also affects how well your video comes out. For example, suppose you’re making a drama movie. In that case, you should pick the right music track to evoke particular emotions in your viewers.
5. Add Text and Graphics
Depending on the style of the video, adding text, graphics, or stock video to your project could be helpful. You should provide more text than just the title for some videos.
Summary
You don’t need to be an expert in video editing to produce high-quality videos. In reality, you can complete the task without any expensive, high-end professional training. So how? Well, with the proper video editing tools like Wondershare Filmora, anything is possible. Follow the above guide, organize your timeline and keep the tracks consistent while video editing on Filmora so it’s easier to come back and edit a project or share with other editors.
Free Download For macOS 10.14 or later
1. Create folders in Filmora
If you have footage from multiple cameras, it is best to create some folders first.
Step1 Create a Folder for Camera 1
If you have video footage from three cameras, you can create one folder for each camera.
Go to the default folder on the top left and rename it Cam_A.
Step2 Create a Folder for Camera 2
Then go to the bottom left of the media browser and click on this icon to add a new folder. Rename it to Cam_B.
Step3 Create a Folder for Camera 3
Repeat the steps to create another folder called Cam_C. Now you can import footage from your different cameras into each folder.
Step4 Create a Folder for Production Sound
After that, add three new folders and rename them to Production Sound, SFX, and Music. Production sound is usually the sound that is recorded on set. If you have recorded all dialects from the subjects on the location, you can put them into this folder.
Step5 Create a Folder for SFX
SFX stands for sound effects. You can add push clapping, laughing and other Folly sounds into this folder.
Step6 Create a Folder for Music
Next, import all music files into the music folder. You can create folders for your graphics, B-roll, and stock footage if needed.
2. Organize your Timeline and Video Tracks
Step1 Create Tracks for Picture Editing
Keep the first three tracks for picture editing. These tracks are usually for picture editing that includes footage with no effects or some simple effects—for example resizing, keyframing, transitions, or Green Screen.
Step2 Create Tracks for Temporary Footage
Set up the fourth track for the temporary footage or placeholders so you can quickly switch the temporary footage without spending extra time looking for them.
Step3 Create Tracks for Effects
Set the fifth video track as the effect track. It will include all effects from firmware that do not apply to the footage directly.
Step4 Create Tracks for On and Off Content
Next, on the sixth video track, you can add the content that you would want to turn on and off from time to time. In this example, you can put the subtitles here.
3. Organize your Audio Tracks
Step1 Create Tracks for Dialects
The first two tracks are usually for dialects. You can include all the dialects of characters in these tracks. Keep one track for each character. If you have more characters, feel free to assign more tracks to them.
Step2 Create Tracks for Additional Audio
The third audio track could be for any additional audio, such as voiceover. If you don’t have a voiceover in your video, you can leave it empty.
Step3 Create Tracks for Sound Effects
The fourth track could usually be the sound effects track. You can add all the clapping sounds, laughing, and all kinds of other foley sound here.
Step4 Create Tracks for Ambient Sound
Keep the fifth track for Ambient sound and room tone. You can use it to keep a very subtle environment sound in specific scenes. For example, you can use the room tone recorded on sets.
Step5 Create Tracks for Background Music
Finally, the sixth track is usually for background music. But, of course, you could also keep it empty if your project has no background music.
4. Color Code Your Clips
Suppose you want to make the timeline even easier to view. In that case, you can select all clips from a camera or a subject and color code them into a specific color. For example, you can color code the footage from camera A in red, camera B in yellow, and Camera C in blue. Now, when you look at the Timeline, you can quickly distinguish footage from different cameras.
Part 2: Pro Tips about Improving Video Editing Efficiency
1. Rename Individual Clips
It would be much simpler to organize the timeline if you could quickly rename individual clips. Cut a clip into smaller segments and give each clip a different name. Make sure these clips have a name other than the source video to avoid confusion.
2. Remove Empty Timeline
For quick video editing, timeline organization is essential. Organize your materials and footage at all times to prevent delays. Put everything in the correct folders with the proper labels. To keep your timeline organized, select “Delete Empty Tracks” from the context menu when right-clicking on the track window on the left.
3. Use Keyboard Shortcuts
Knowing keyboard shortcuts allows you to carry out the editing process quickly and precisely.
4. Select Good Music
Don’t only concentrate on the images; the music also affects how well your video comes out. For example, suppose you’re making a drama movie. In that case, you should pick the right music track to evoke particular emotions in your viewers.
5. Add Text and Graphics
Depending on the style of the video, adding text, graphics, or stock video to your project could be helpful. You should provide more text than just the title for some videos.
Summary
You don’t need to be an expert in video editing to produce high-quality videos. In reality, you can complete the task without any expensive, high-end professional training. So how? Well, with the proper video editing tools like Wondershare Filmora, anything is possible. Follow the above guide, organize your timeline and keep the tracks consistent while video editing on Filmora so it’s easier to come back and edit a project or share with other editors.
Top 12 Sony Vegas Slideshow Templates for Free Download
Top 12 Sony Vegas Slideshow Templates for Free Download
An easy yet powerful editor
Numerous effects to choose from
Detailed tutorials provided by the official channel
Sometimes you need a quick and reliable way to add the contents to your favourite social media websites where you have your accounts created for multiple activities, whether it is personal or professional. No matter how much and in what manner you are using them, you always required a full flow of the contents to attract the intended audience. You can make some content right from the scratch in the form of videos, audio, textual, or mostly a mix of them, but at the same time, it needs a lot of time and effort to do so. There is another option for you to make use of professionally demanding and powerful tools to complete your journey of creating the desired level of content in no time. With an option to use pictures, videos, or texts, for your presentations these Sony Vegas template slideshow options can let you ease your creation process.

In this article
01 [What is Sony Vegas & What are Its Advantages?](#Part 1)
02 [Best 12 Sony Vegas Slideshow Templates for Free Download](#Part 2)
03 [FAQ of Sony Vegas Slideshow Templates](#Part 3)
Part 1 What is Sony Vegas & What are Its Advantages?

The Sony Vegas is one of the most interesting and professional video editing tools that can be utilized for a wide range of activities like the creation of an amazing video on YouTube and making use of the same for uploading desired content to relevant social media accounts with preformatted information.
Sometimes creators need a quick and reliable tool to easily get away with the desired level of content sharing on different social media accounts in just a few clicks. This is where templates play a vital role. Whether it is about your need of creating or adding content for YouTube or just want to post something new and relevant for your audience on the Facebook wall, you will find Sony Vegas Template Slideshow ever amazing.
Here is the list of 12 amazing Sony Vegas Slideshow templates for free to download & use with only a few demands subscription for full access.
Part 2 Best 12 Sony Vegas Slideshow Templates for Free Download

01Title Slides
In case you are searching for the best possible and premium level of Sony-Vegas title templates then you are at the right place. Title Slides is the most amazing template with duration of around 40 seconds but you will never be going to use all of those. The title slides give title animations in the form of an intro for creating attractive videos. At the same time, you can make use of various seconds to give a detailed overview of the main titles to get mentioned inside the intended video. To get full-access, you need to buy this template from the creator’s website.
02Swift Slideshow
The 2nd template on the list of Sony-Vegas templates is also among the paid ones but worth every single penny because this can give you totally different yet professional look. In terms of slideshow and text overlay, one can make use of this in terms of a header for the website or your social media account to post an ad for the desired product/service you are offering or want to offer. It is also very simple to edit this template in terms of changing images, text or videos.
03Glitch Intro
Among the list of Sony Vegas Slideshow Templates, Glitch Intro is the free template and also the coolest one which can be utilized for creating videos on the YouTube or various other platforms. In the Glitch formation of template, you will see a text appears &disappears in quick succession with the background keeps on flickering just behind. You are just required to change the text as per your convenience to write name of your channel, program, episode, or anything else as per your needs. There is also an option to change the colour. For the light & casual videos you can make use of Glitch Intro template.

04Minimal-Motion Graphic Logo Revealing Template
You are going to love this intro template from the list of Sony Vegas Premium Templates because of its swiftness and gives you professional looks in no time. You just need to download it & then it is ready to use it without any over colouring or disturbance. With lots of features this must be in your Sony Vegas Slideshow Templates to Free Download.
05Sony Vegas Pro-Intro Template
This is a top-level Sony Vegas Template but you need slightly more time to come-up nicely with this template but the result will be completely awesome. This template contains two colors and with its USP of elementary motion you will surely put this in your top 5 list of templates for strange features.
06SVP11 +
When it comes to professionalism, then SVP11+ is the pro one. With bold & authentic features, you can make use of it for different varieties of purposes. Also, using it in between the segments will add to the credibility of your video. In just 3-4 seconds you will be able to put text information in an animated form.
07Modern-Juicy Outro Template
Versatile in nature, the Modern Juicy is an Outro template for any purpose, although it is made entirely for the You Tubers, but in case you have a profile of a channel on other platforms also, you can easily use it
08SVFX Outro Template
SVFX is basically a channel on a YouTube platform that creates many amazing Sony Vegas templates and SVFX outro template is one of those. Simply add this template at the end of your YouTube, or Facebook video, then it’s done you are ready to experience the change in appearance. One can easily change text, audio, and graphics for your videos in different social media accounts.
09The Sony Vegas Outro Template
This one is yet another outro template on the list of Sony Vegas Slideshow Template Free. You can easily download it at no cost and you will also get a description about how to use this template in terms of preview. Without changing anything, just add credentials of yours and then you are good to go with publishing.
10Lower Thirds Pack
When it comes to the task of creating lower-thirds then among the creators this is very hectic task to face. In terms of professionalism they take so much time to give a unique look together with an animation to come-in & out of any video. But don’t worry; this lower third template pack by Sony Vegas is easy on its mission. With great combination of colours and other textual information, this is just amazing to use.
11Text Promo
In case you want to impress the audience in a quick manner then just choose this reliable and dynamic template. Text Promo is very fast and comes with unique designing features to perfectly suit lifestyle &travel videos. Although paid, but it comes with an ability to easily customize as per the needs & comfort. You will get option to change colors, text, and images with addition of newer effects to give it a professional look.
12Modern Slideshow Template
Yet another slideshow template from Sony Vegas that is free to download and mainly utilized for videos & pictures. Just add the videos in the box provided and get all your dimensions easily fit inside the given boxes. When it comes to creating a unique presentation for your product or service then has it to save time and efforts.

Is There Any Alternative to Sony Vegas Templates?
If you are finding a great alternative option to Sony Vegas then Filmora should be on your list. With exact same features to the Sony Vegas is it easy to use and comes with user-friendly interface. If you don’t have any experience in terms of video editing then Wondershare Filmora Video Editor is a good option to consider.
For Win 7 or later (64-bit)
For macOS 10.12 or later
The template mode can provide you pre-created format to help you easily build professional videos in no time without any experience. This usually comes with wide range of explanation videos in order to showcase how to use any particular template.
No Doubt Filmora is an ideal choice for the creation of pro-videos in few minutes and in its library, you can easily find varieties of intros, outros, promos, slideshows, and animation with endless effects.
Part 3 FAQ of Sony Vegas Slideshow Templates

Is Sony Vegas Is Available To Use Without A Watermark?
In case of free version of the Sony Vegas, you will get a watermark attached to your videos, just after exporting them. If you want to remove the watermark, then you can purchase a pro version to just remove it easily or get watermark-free videos.
How to Edit Text in Any Sony Vegas Template?
The editing text feature to use at any template is very easy. You just required to move ahead at Media Generator tab & here just click on the text, you will see a ‘pop-up’ window will appear in front for editing desired text. With the same steps you can change color, size, font etc. as and when required.
● Ending Thoughts →
● The Sony Vegas templates are quite useful and give a handy solution for addition of intro, outro, and other relevant elements in just a few minutes.
● Even if you are not a professional video editing expert, the templates can do their job easily with its end results are just astonishing.
● It is sometimes recommended for you to go for the Filmora App to edit the contents much faster over the other apps for the templates making. With Filmora, there is no need to feel disappointed as you are getting some wonderful end results in the form of amazing videos.
Sometimes you need a quick and reliable way to add the contents to your favourite social media websites where you have your accounts created for multiple activities, whether it is personal or professional. No matter how much and in what manner you are using them, you always required a full flow of the contents to attract the intended audience. You can make some content right from the scratch in the form of videos, audio, textual, or mostly a mix of them, but at the same time, it needs a lot of time and effort to do so. There is another option for you to make use of professionally demanding and powerful tools to complete your journey of creating the desired level of content in no time. With an option to use pictures, videos, or texts, for your presentations these Sony Vegas template slideshow options can let you ease your creation process.
In this article
01 [What is Sony Vegas & What are Its Advantages?](#Part 1)
02 [Best 12 Sony Vegas Slideshow Templates for Free Download](#Part 2)
03 [FAQ of Sony Vegas Slideshow Templates](#Part 3)
Part 1 What is Sony Vegas & What are Its Advantages?
The Sony Vegas is one of the most interesting and professional video editing tools that can be utilized for a wide range of activities like the creation of an amazing video on YouTube and making use of the same for uploading desired content to relevant social media accounts with preformatted information.
Sometimes creators need a quick and reliable tool to easily get away with the desired level of content sharing on different social media accounts in just a few clicks. This is where templates play a vital role. Whether it is about your need of creating or adding content for YouTube or just want to post something new and relevant for your audience on the Facebook wall, you will find Sony Vegas Template Slideshow ever amazing.
Here is the list of 12 amazing Sony Vegas Slideshow templates for free to download & use with only a few demands subscription for full access.
Part 2 Best 12 Sony Vegas Slideshow Templates for Free Download
01Title Slides
In case you are searching for the best possible and premium level of Sony-Vegas title templates then you are at the right place. Title Slides is the most amazing template with duration of around 40 seconds but you will never be going to use all of those. The title slides give title animations in the form of an intro for creating attractive videos. At the same time, you can make use of various seconds to give a detailed overview of the main titles to get mentioned inside the intended video. To get full-access, you need to buy this template from the creator’s website.
02Swift Slideshow
The 2nd template on the list of Sony-Vegas templates is also among the paid ones but worth every single penny because this can give you totally different yet professional look. In terms of slideshow and text overlay, one can make use of this in terms of a header for the website or your social media account to post an ad for the desired product/service you are offering or want to offer. It is also very simple to edit this template in terms of changing images, text or videos.
03Glitch Intro
Among the list of Sony Vegas Slideshow Templates, Glitch Intro is the free template and also the coolest one which can be utilized for creating videos on the YouTube or various other platforms. In the Glitch formation of template, you will see a text appears &disappears in quick succession with the background keeps on flickering just behind. You are just required to change the text as per your convenience to write name of your channel, program, episode, or anything else as per your needs. There is also an option to change the colour. For the light & casual videos you can make use of Glitch Intro template.
04Minimal-Motion Graphic Logo Revealing Template
You are going to love this intro template from the list of Sony Vegas Premium Templates because of its swiftness and gives you professional looks in no time. You just need to download it & then it is ready to use it without any over colouring or disturbance. With lots of features this must be in your Sony Vegas Slideshow Templates to Free Download.
05Sony Vegas Pro-Intro Template
This is a top-level Sony Vegas Template but you need slightly more time to come-up nicely with this template but the result will be completely awesome. This template contains two colors and with its USP of elementary motion you will surely put this in your top 5 list of templates for strange features.
06SVP11 +
When it comes to professionalism, then SVP11+ is the pro one. With bold & authentic features, you can make use of it for different varieties of purposes. Also, using it in between the segments will add to the credibility of your video. In just 3-4 seconds you will be able to put text information in an animated form.
07Modern-Juicy Outro Template
Versatile in nature, the Modern Juicy is an Outro template for any purpose, although it is made entirely for the You Tubers, but in case you have a profile of a channel on other platforms also, you can easily use it
08SVFX Outro Template
SVFX is basically a channel on a YouTube platform that creates many amazing Sony Vegas templates and SVFX outro template is one of those. Simply add this template at the end of your YouTube, or Facebook video, then it’s done you are ready to experience the change in appearance. One can easily change text, audio, and graphics for your videos in different social media accounts.
09The Sony Vegas Outro Template
This one is yet another outro template on the list of Sony Vegas Slideshow Template Free. You can easily download it at no cost and you will also get a description about how to use this template in terms of preview. Without changing anything, just add credentials of yours and then you are good to go with publishing.
10Lower Thirds Pack
When it comes to the task of creating lower-thirds then among the creators this is very hectic task to face. In terms of professionalism they take so much time to give a unique look together with an animation to come-in & out of any video. But don’t worry; this lower third template pack by Sony Vegas is easy on its mission. With great combination of colours and other textual information, this is just amazing to use.
11Text Promo
In case you want to impress the audience in a quick manner then just choose this reliable and dynamic template. Text Promo is very fast and comes with unique designing features to perfectly suit lifestyle &travel videos. Although paid, but it comes with an ability to easily customize as per the needs & comfort. You will get option to change colors, text, and images with addition of newer effects to give it a professional look.
12Modern Slideshow Template
Yet another slideshow template from Sony Vegas that is free to download and mainly utilized for videos & pictures. Just add the videos in the box provided and get all your dimensions easily fit inside the given boxes. When it comes to creating a unique presentation for your product or service then has it to save time and efforts.
Is There Any Alternative to Sony Vegas Templates?
If you are finding a great alternative option to Sony Vegas then Filmora should be on your list. With exact same features to the Sony Vegas is it easy to use and comes with user-friendly interface. If you don’t have any experience in terms of video editing then Wondershare Filmora Video Editor is a good option to consider.
For Win 7 or later (64-bit)
For macOS 10.12 or later
The template mode can provide you pre-created format to help you easily build professional videos in no time without any experience. This usually comes with wide range of explanation videos in order to showcase how to use any particular template.
No Doubt Filmora is an ideal choice for the creation of pro-videos in few minutes and in its library, you can easily find varieties of intros, outros, promos, slideshows, and animation with endless effects.
Part 3 FAQ of Sony Vegas Slideshow Templates
Is Sony Vegas Is Available To Use Without A Watermark?
In case of free version of the Sony Vegas, you will get a watermark attached to your videos, just after exporting them. If you want to remove the watermark, then you can purchase a pro version to just remove it easily or get watermark-free videos.
How to Edit Text in Any Sony Vegas Template?
The editing text feature to use at any template is very easy. You just required to move ahead at Media Generator tab & here just click on the text, you will see a ‘pop-up’ window will appear in front for editing desired text. With the same steps you can change color, size, font etc. as and when required.
● Ending Thoughts →
● The Sony Vegas templates are quite useful and give a handy solution for addition of intro, outro, and other relevant elements in just a few minutes.
● Even if you are not a professional video editing expert, the templates can do their job easily with its end results are just astonishing.
● It is sometimes recommended for you to go for the Filmora App to edit the contents much faster over the other apps for the templates making. With Filmora, there is no need to feel disappointed as you are getting some wonderful end results in the form of amazing videos.
Adobe After Effects Review
Make cinematic films, movies, intros, and transitions. Delete people from clips. Start fires or create a foggy weather. With Adobe After Effects, the industry-standard motion graphics and visual effects software, you are able to take any idea and make it come to life. Animate titles, credits, and lower thirds. Begin editing from scratch or with presets available. Combine photos and video footage to create anything you can think of.
Choose amazing effects from hundreds of options, remove unwanted parts from the frame, people or objects, and make VR videos to push your audience into the action. This software lets professionals configure keyframes, allow them to create compositing operations. Features of Adobe After Effects include a content library, digital asset management, video rendering, data import/export, and much more. In this article we will give you a brief overview of what After Effects is, what it’s used for and by who and the overall experience!
With that said, let’s get started!
1. Speed and Stability
When talking about speed and stability, After Effects has the latest release packed with improvements. All the developers have focused themselves on speed and also performance. The team at Adobe have worked very hard to make this application more responsive and when we go along in this article, that can be seen in many ways
The main improvement which is immediately clear to all users, is the renewed preview playback optimization. What we noticed is that After Effects is creating the ram preview for your projects a lot faster. However, while working with the software for this article, we did find the user interface to be more responsive, the playback is way smoother, so is it a lot more stable overall.
While using shape layers, there was a significant improvement. A few expressions are a lot faster. This alone is worth upgrading to the latest version of After Effects.

2. User Interface
The After Effects interface is constructed up of four main parts. The Timeline panel, the Project panel, the Composition panel and the Effects panel.
The Timeline Panel
In the Timeline panel, you edit all the footage and clips to create your rough cut. You can find the Timeline panel on the bottom of the workspace.
The Project Panel
It’s pretty straightforward that in the Project panel you import your footage and create your project. This is located on the top left of the standard After Effects workspace.
The Composition Panel
The Composition panel is where you will see the final product. This is located in the middle of your workspace.
The Effects Panel
In order to make creative changes to your video, use the preview, audio, effects, and Preset Panels. These panels are located on the upper right area of your workspace, each one also has its dropdown.
3. Learning Curve
The learning curve for After Effects depends on your background, the best way to find out if you like it is starting a free trial. Go through some tutorials online or paid courses. You’ll also want to spend time with the User Guide. The Search Help field in the top right corner provides you an easier search for answers to most questions that you have. Speaking of YouTube and online learning, most of the video tutorials you will find have been created by people that are experienced in After Effects and know their way around it.
4. VFX
There’s a time-period when video editors require strengthening their skills, calling it imperative software for improving editing skills is nowhere near an exaggeration. it really helps prospective professionals improve their learning experience through visual effects, camera tracking, text animation, motion tracking, color grading, etc. All of these methodologies do help in improving the VFX learning process in the long run.
Video editing happens to be a crucial part of film production. Making videos in a fantastic process can indulge in building professional videos via motion graphics animation. This is where Adobe After Effects become an excellent learning tool.
5. Motion Graphics
Motion graphics can sound quite scary. It’s a new term for a specific genre of animation. Motion graphics is the intersection between animation and graphic design. These are purpose-driven visual aspects with the goal of showing information to the viewer through the use of animated graphics or text. Sometimes they include voice-overs narrating what the text or graphics are showing. Where it gets a little complex is that the more popular the term motion graphics becomes, the more people are misaligning animations to it. They need to represent information and illustrate the idea to the viewer clearly, so they do that using animation and motion graphics.
6. Titles and Outros
Adobe released a new combination of features for you. For Adobe Stock: Graphics templates. Those pre-made templates give you a super smooth way to discover new motion graphics within Premiere Pro, without needing to spend time creating titles, overlays, or animations from scratch. The world has digitalized, and videos often need visual aspects such as titles, lower thirds, to present information. The templates not only assist video editors increase the quality of the content by showing certain information, but they also give a strong visual touch to keep the viewer engaged throughout the video. The audience nowadays is a lot more sophisticated, meaning that motion graphics are a necessity in a driven media world.
Motion Graphics templates are valuable for video editors of all levels. For the beginning content creators, the templates offer great quality, ready-made footage to help their creative goal. They can explore and work on their skills. Motion graphics that are pre-made are an excellent way to express the vision and express inspiration to new opportunities.
So now that you are aware of what After Effects templates are, we can move on to the actual workflow, why it is important, and how to use it as efficient as possible.
7. Workflow
Whether you are using Adobe After Effects to create motion graphics, or composite realistic visuals, you usually follow the same workflow, you may repeat the process of adjusting layer properties, editing, and compositing until everything looks good. You can change any property of any element, such as position, opacity and size. Make use of motion tracking to stabilize footage so that it follows the motion from another clip, and so much more!
8. Rendering Speed
When it comes to exporting your project in After Effects, you don’t need to buy an expensive workstation. You can speed up your rendering process from your own laptop without investing too much and by using the following tips we have for you below!
Tip #1: Enable Multiprocessing
What exactly is multiprocessing? That is when After Effects uses multiple cores from your CPU to export multiple frames at once. If your processor has one or more cores, you can enable this feature to reduce your rendering time. We want to mention that you need to check whether or not this option is turned on. Once enabled, you’ll see a great decrease in export time.
To enable Multiprocessing, navigate to Preferences > Memory & Multiprocessing. Then you click the check box next to ‘Render Multiple Frames Simultaneously’ and remember also to adjust the settings that you need.
Tip #2: Optimize Your RAM Usage
The RAM memory inside your workstation can be used to write and read data at a lot higher speeds than regular hard drives and portable drives. Configuring your RAM in a system is one of the easiest upgrades for better performance. Giving you affordable solutions for both desktop and laptop systems, the RAM memory upgrade does not require a lot of knowledge. The more RAM you allow applications to use, the higher the performance you will get out of it.
It also shows a noticeable increase in rendering speed. When the export time in your work is longer than needed, look at your RAM memory and see if you can make the necessary changes or upgrades.
Tip #3: Use the Media Encoder
Let’s talk about the Media Encoder. It’s the software that comes up with Adobe Creative Cloud products such as After Effects and Premiere Pro to simplify the export process. You can easily render your project from After Effects to Adobe Media Encoder and begin the project render process from that point on. The Media Encoder will increase your rendering performance and will significantly decrease rendering time.
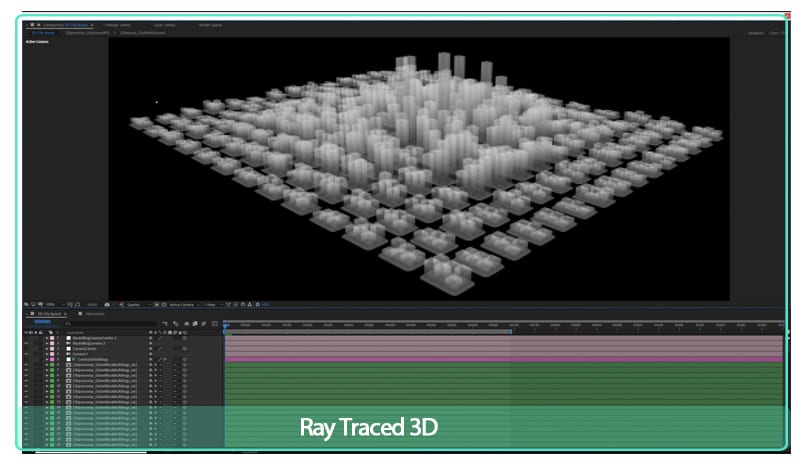
Tip #4: Disable Ray-Traced 3D
The included After Effects Ray-Traced 3D feature enables you to produce 3D models within After Effects without any struggle. Calculating all the motions and visual graphics is such a heavy process for your workstation. When you disable raytracing, you will get a faster export time. By looking that ‘Classic 3D’ is checked instead of ‘Ray-Traced 3D’ from your composition preferences, you can speed your rendering speed up to 50%. Isn’t that incredible?
Tip #5: Activate GPU Exporting with Cuda Acceleration
Exporting your videos with GPU rather than CPU will increase the efficiency of your render process. The export length will decrease a whole lot when you activate Mercury GPU Acceleration, also known as ‘CUDA’ from the ‘Project Settings’.
After Effects doesn’t really require CUDA features from a special kind of Nvidia GPU. Only the GPU accelerated 3D renderer, that is based on the raytracing algorithm, requires that. The other GPU features are running on any GPU that meets the basic minimums, including Intel and AMD GPUs.
9. System Requirements for Windows
These are the minimum specifications needed to use After Effects on PC:
OS: Windows 10 (64-bit) versions 1909 and later, or Windows 11
CPU: Intel or AMD Quad-Core Processor (Intel i5 and i7 will do the job)
RAM: 16 GB
Monitor resolution: 1280 x 1080
An internet connection
Free storage: 15 GB
GPU: Minimum 2 GB of VRAM
10. System Requirements for macOS
OS: macOS 10.13 or later
RAM: 16 GB
CPU: Intel and Apple Silicon (Rosetta2 Supported) Quad-Core Processor
GPU: 2GB of VRAM
Monitor resolution: 1440×900
Free storage: 15 GB
An internet connection
11. Keyboard Shortcuts
You can work visually when you configure your keyboard shortcuts with the visual keyboard shortcut editor within After Effects. You can use the keyboard user interface to show the keys that have been assigned to shortcuts, the available keys for assignment, and edit assigned shortcuts to make your workflow even easier.
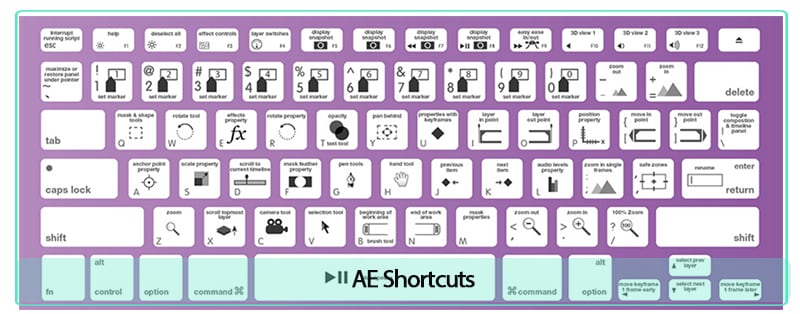
The keyboard layout:
This is a representation of your physical keyboard where you can see which keys have been assigned a shortcut, and which are available.
Command list:
The list displays all the commands that can be assigned shortcuts.
Key modifier list:
This list shows you all the modifier combinations and assigned shortcuts associated with the key you select on your physical keyboard.
After Effects does not allow you to reassign the following keys:
- A
- AA
- E
- EE
- F
- FF
- L
- LL
- M
- MM
- P
- PP
- R
- RR
- S
- SS
- T
- TT
- U
- UU
12. Should You Buy It?
Well first, you cannot buy After Effects, Premiere Pro or other software from Adobe. You have to rent them by paying monthly. After Effects is primarily a compositing and graphics software. Premiere is primarily a video editing program. In the case of After Effects and Premiere Pro, it’s not really an either/or. They’re both software with different purposes. After Effects is a lot more powerful and essentially showcases most of Premiere’s functionality, but according to our experience, the Premiere Pro interface and workflow is way more superior for video editing.
Premiere Pro is essentially built around its timeline, the region where you cut your video clips and drag and place them into your appropriate sequence. Hollywood filmmakers and professional YouTube content creators are using Premiere Pro to edit high-performing content and award-winning films. The software is very intuitive and easy for beginners to start with.
Are going to work with After Effects to create an income? Or are just going to use it for a hobby? It’s crucial to mention that question because Adobe After Effects is not something that is cheaply available. You will be investing much money on the program, and if you are working to use the software, paying a good amount, and earning nothing in return, then you might want to shift to another alternative which would cost you less. For instance, let’s assume you are using the application to earn an income, and have a few low-paying clients. In such a situation, you will have to rethink your options of software and analyze whether what you are paying in comparison to what you are getting is enough for you or not. We all are different individuals and have different preferences. Once we can see what is more important to us, or what is our need at this moment, then we will be able to judge the worth of purchasing Adobe After Effects better.
Are you going to use After Effects to earn an income? Or are just using it as a hobby? It is very important to address this question because Adobe After Effects is not something cheaply accessible. You will be investing a lot of money into this software, if you are using the software while paying a good amount and earning nothing in return yet, then you could shift to a different alternative which will cost you a lot less. Let’s say you are using After Effects to earn an income and have some low-paying work. In that case, you will have to reconsider your options of video editing software and look at whether what you are paying in comparison to what you are getting is possible for you. When we can see what is more important to us, we will be able to see the worth of buying After Effects.
Did you previously use After Effects or are you new to the program? The return that you will get using Adobe After Effects, depends on how good you know how to work with the options, functions and features in the software.
The Bottom Line
So summing it all together, Adobe After Effects takes care of all your assets and creates a final product, considering that After Effects is usually an asset-generation tool. Most video editors complete their projects in After Effects non-stop. It’s excellent for making visual videos come to life.
AE version 22.3 is very impressive. Giving you a wealth of new features created to make VFX editing a lot faster and easier. Offering new features on a regular basis, improving their subscription model making it more attractive. Especially if you’re a professional editor and designer.
Once you get comfortable with Adobe After Effects, you learn how to dynamically combine After Effects compositions to your Premiere projects. You are able to access both assets at the same time if needed!
Free Download For Win 7 or later(64-bit)
Free Download For macOS 10.14 or later
Understanding More About CapCut Lenta Template and Slow-Motion Videos
Slow-motion videos in black and white filters are trending on social media these days. You might be curious how everyone creates such cool videos. It is possible with CapCut, a video editor associated with TikTok. The question arises: is it difficult to achieve perfection in such slow-motion videos? Then, let us tell you there is a camera Lenta CapCut template for this purpose.
Using it, you just have to import the media of your choice and leave the process on CapCut. This article will guide you on making a slow-motion video with customization. Also, you will learn more about Camera Lenta CapCut to explore it quickly. Keep reading to create perfect slow motion by identifying the most powerful alternative.
Slow Motion Video Maker Slow your video’s speed with better control of your keyframes to create unique cinematic effects!
Make A Slow Motion Video Make A Slow Motion Video More Features

Part 1. An Introductory Review of CapCut Video Editor
CapCut is a smart and high-efficiency tool to ease your content creation journey. Beginners and professionals use this platform for captivating social media content. It’s a handy tool to collaborate with teammates on projects within a secure workspace. Unfortunately, it’s a full-featured software but still far from many major video editing software.

Key Features of CapCut
This versatile tool simplifies complex editing tasks with its straightforward interface. It’s a default video editor for TikTok, the most popular video-sharing platform. You can download CapCut on Windows, macOS, and smartphones or use it online. If you want to explore its functionalities before using it, then keep reading.
- Predesigned Templates: CapCut is trending on TikTok due to its templates. It offers predesigned templates in which users do nothing except import videos. Such templates contain pre-existing music, effects, text, and transitions. You can browse desired templates by tapping on categories like For You, Meme, and Beat.
- Editing Functions: Like other editing platforms, CapCut offers common trimming and merging features. You can annotate videos and add customized text with adjustable font sizes and shapes. Besides, users can adjust the speed of video to create slow-mo or fast-forward clips. It allows you to reverse footage to add a fun factor to the content.
- Audio Editing: This video editor makes copyrighted music library accessible to users. You can import audio from your gallery if you fail to find your desired music. Also, it allows you to extract a soundtrack from a video. Users can cut down audio parts to adjust their duration with the video. You will also get the flexibility to improve the audio quality of your added sound.
- Keyframe and Tracking: With AI integration, this tool detects the motion of video objects. Afterward, it changes the background of the video while retaining the main objects. Plus, you can create stunning motion graphics and animated effects with its keyframe option. It can adjust the color, opacity, shape, and position of the added keyframe animations.
Part 2. CapCut Lenta Template: What Is It and How It Benefits Slow Motion Video Creation?
As highlighted above, CapCut is widely famous for its video templates. Among some popular and massively used templates is the Lenta video template. It shows blurry faces and objects at first glance with a black-and-white filter. Moving forward with this, you will see an unblur video revealing with a beat. The Lenta template format is now available in 10 more options added by famous creators.
Camera Lenta CapCut has crossed the usage of over 500 million. The video created with such a template provides a cool look and glorifies your social persona. Anyone without a basic knowledge of video editing can make slow-motion videos by adding clips. This template has enabled you to create a slow-motion video with effects quickly.

Part 3. A Simple Guide to Creating Slow Motion Videos with CapCut
Despite using the Camera Lenta CapCut Template, you can also create slow motion . If the template does not emphasize details in slow-mo, edit it yourself. In this regard, you should follow the steps below to access and use the slow-motion option.
Step 1: Launch the CapCut application in your system and access its main interface. Click on the “New Project” to enter the editing window of this platform. Go to the media panel and tap “Add” to select media for the process. Drag material to the timeline section below and begin the editing.

Step 2: After dropping the video, you will see the editing panel on the right side. Move there and hit the “Speed” option next to the “Split.” Then, choose “Curve” and find speed ramping templates. You can pick one otherwise, tap “Customize” and find a graph below. Adjust the dots on the graph downward to slow down or upward to fast forward the video smoothly.

Step 3: After making the desired slow motion, go to the top right corner to hit the “Export” button. Set parameters from the “Export” screen and press the “Export” again to get the video in the gallery.

Part 4. The Perfect Desktop Alternative in the Form of Wondershare Filmora for Slow Motion Videos
There is a need to manually edit the video for desired changes. Shifting video in slow motion effect by Camera Lenta CapCut is time-consuming and difficult. The best alternative to this slow-motion video app is Wondershare Filmora . It is easily available on the desktop rather than browsing the apps on the internet. Filmora is an AI-powered video editing tool that gives high-quality results.
Users can get screen recording, AI text-to-speech, and many other benefits from this tool. They can apply the slow-motion effect in video with its Uniform Speed feature. Plus, these AI features make the editing process easier than the CapCut video editor.
Free Download For Win 7 or later(64-bit)
Free Download For macOS 10.14 or later
How to Create Slow-Motion Video by Filmora
Filmora makes the slow-motion video process easy due to advanced features. You do not need to be a professional editor to edit the video on Filmora. It has easy-to-follow steps to create a slow-motion video. So, let’s go through the steps to understand the video editing process.
Step 1Install the Filmora to Import Media
Install the Filmora on your desktop and open it to explore it. After that, click on the “New Project” option from the main interface. This option helps to access the editing screen to import the required file by pressing the “Ctrl+I” keys.

Step 2Use the Uniform Speed Feature to Slow Down the Video
After importing the file, drag the file to the timeline panel and hit “Ctrl + R” on the video to access the speed options. From the displayed “Uniform Speed” panel, Slow down the video with the “Speed” slider. Retain the quality of the video by heading to the “AI Frame Interpolation” drop-down list. Click on the “AI Frame Interpolation” downward icon to choose the “Optical Flow” option.

Step 3Finalize the Process and Save it
Make further editing if required or get a final preview to see the applied changes. After finalizing, save the project by selecting the “Export” button in the top right corner.

Key Features of Filmora in Video Editing
The key functionalities of this editing tool have been discussed in this part. You can go through this to understand the workings of this editor and get maximum benefits:
1. AI Image
Users can visualize their words through the AI Image generator feature of Filmora. In this regard, they should add a proper description in the text to generate the image. The description should include the composition, content, and other details for the exact image. It also offers aspect ratio and image style options to generate accurate AI images.
2. AI Thumbnail Creator
Influencers and social media activists post videos regularly. Thumbnails boost viewer engagement, so they add the thumbnail after finalizing the video. Filmora offers the AI Thumbnail feature to generate template-driven thumbnails for video. AI generates the thumbnail automatically by analyzing the best shots from the content.
3. AI Portrait
CapCut is used to change the background of the video. This background-changing process can cause errors in the final video. Filmora has an AI portrait feature to change the background accurately. It also offers versatility by offering 70+ stickers and AR effects. AI integration tracks the main object and facial features to add effects frame-by-frame.
Conclusion
CapCut is famous because it provides ease in editing to non-tech persons. As highlighted, the camera Lenta CapCut template requires clips to generate slow-mo videos. In this regard, users don’t need to put any effort and get appealing content automatically. Besides, this article has shown the steps to slow down video manually.
CapCut proves difficult for beginners to slow down video with speed ramping. So, if you need an easier but more advanced solution, you can benefit from Wondershare Filmora. It can ease your tasks and take your video editing to a professional level.
Make A Slow Motion Video Make A Slow Motion Video More Features
Part 1. An Introductory Review of CapCut Video Editor
CapCut is a smart and high-efficiency tool to ease your content creation journey. Beginners and professionals use this platform for captivating social media content. It’s a handy tool to collaborate with teammates on projects within a secure workspace. Unfortunately, it’s a full-featured software but still far from many major video editing software.
Key Features of CapCut
This versatile tool simplifies complex editing tasks with its straightforward interface. It’s a default video editor for TikTok, the most popular video-sharing platform. You can download CapCut on Windows, macOS, and smartphones or use it online. If you want to explore its functionalities before using it, then keep reading.
- Predesigned Templates: CapCut is trending on TikTok due to its templates. It offers predesigned templates in which users do nothing except import videos. Such templates contain pre-existing music, effects, text, and transitions. You can browse desired templates by tapping on categories like For You, Meme, and Beat.
- Editing Functions: Like other editing platforms, CapCut offers common trimming and merging features. You can annotate videos and add customized text with adjustable font sizes and shapes. Besides, users can adjust the speed of video to create slow-mo or fast-forward clips. It allows you to reverse footage to add a fun factor to the content.
- Audio Editing: This video editor makes copyrighted music library accessible to users. You can import audio from your gallery if you fail to find your desired music. Also, it allows you to extract a soundtrack from a video. Users can cut down audio parts to adjust their duration with the video. You will also get the flexibility to improve the audio quality of your added sound.
- Keyframe and Tracking: With AI integration, this tool detects the motion of video objects. Afterward, it changes the background of the video while retaining the main objects. Plus, you can create stunning motion graphics and animated effects with its keyframe option. It can adjust the color, opacity, shape, and position of the added keyframe animations.
Part 2. CapCut Lenta Template: What Is It and How It Benefits Slow Motion Video Creation?
As highlighted above, CapCut is widely famous for its video templates. Among some popular and massively used templates is the Lenta video template. It shows blurry faces and objects at first glance with a black-and-white filter. Moving forward with this, you will see an unblur video revealing with a beat. The Lenta template format is now available in 10 more options added by famous creators.
Camera Lenta CapCut has crossed the usage of over 500 million. The video created with such a template provides a cool look and glorifies your social persona. Anyone without a basic knowledge of video editing can make slow-motion videos by adding clips. This template has enabled you to create a slow-motion video with effects quickly.
Part 3. A Simple Guide to Creating Slow Motion Videos with CapCut
Despite using the Camera Lenta CapCut Template, you can also create slow motion . If the template does not emphasize details in slow-mo, edit it yourself. In this regard, you should follow the steps below to access and use the slow-motion option.
Step 1: Launch the CapCut application in your system and access its main interface. Click on the “New Project” to enter the editing window of this platform. Go to the media panel and tap “Add” to select media for the process. Drag material to the timeline section below and begin the editing.
Step 2: After dropping the video, you will see the editing panel on the right side. Move there and hit the “Speed” option next to the “Split.” Then, choose “Curve” and find speed ramping templates. You can pick one otherwise, tap “Customize” and find a graph below. Adjust the dots on the graph downward to slow down or upward to fast forward the video smoothly.
Step 3: After making the desired slow motion, go to the top right corner to hit the “Export” button. Set parameters from the “Export” screen and press the “Export” again to get the video in the gallery.
Part 4. The Perfect Desktop Alternative in the Form of Wondershare Filmora for Slow Motion Videos
There is a need to manually edit the video for desired changes. Shifting video in slow motion effect by Camera Lenta CapCut is time-consuming and difficult. The best alternative to this slow-motion video app is Wondershare Filmora . It is easily available on the desktop rather than browsing the apps on the internet. Filmora is an AI-powered video editing tool that gives high-quality results.
Users can get screen recording, AI text-to-speech, and many other benefits from this tool. They can apply the slow-motion effect in video with its Uniform Speed feature. Plus, these AI features make the editing process easier than the CapCut video editor.
Free Download For Win 7 or later(64-bit)
Free Download For macOS 10.14 or later
How to Create Slow-Motion Video by Filmora
Filmora makes the slow-motion video process easy due to advanced features. You do not need to be a professional editor to edit the video on Filmora. It has easy-to-follow steps to create a slow-motion video. So, let’s go through the steps to understand the video editing process.
Step 1Install the Filmora to Import Media
Install the Filmora on your desktop and open it to explore it. After that, click on the “New Project” option from the main interface. This option helps to access the editing screen to import the required file by pressing the “Ctrl+I” keys.
Step 2Use the Uniform Speed Feature to Slow Down the Video
After importing the file, drag the file to the timeline panel and hit “Ctrl + R” on the video to access the speed options. From the displayed “Uniform Speed” panel, Slow down the video with the “Speed” slider. Retain the quality of the video by heading to the “AI Frame Interpolation” drop-down list. Click on the “AI Frame Interpolation” downward icon to choose the “Optical Flow” option.
Step 3Finalize the Process and Save it
Make further editing if required or get a final preview to see the applied changes. After finalizing, save the project by selecting the “Export” button in the top right corner.
Key Features of Filmora in Video Editing
The key functionalities of this editing tool have been discussed in this part. You can go through this to understand the workings of this editor and get maximum benefits:
1. AI Image
Users can visualize their words through the AI Image generator feature of Filmora. In this regard, they should add a proper description in the text to generate the image. The description should include the composition, content, and other details for the exact image. It also offers aspect ratio and image style options to generate accurate AI images.
2. AI Thumbnail Creator
Influencers and social media activists post videos regularly. Thumbnails boost viewer engagement, so they add the thumbnail after finalizing the video. Filmora offers the AI Thumbnail feature to generate template-driven thumbnails for video. AI generates the thumbnail automatically by analyzing the best shots from the content.
3. AI Portrait
CapCut is used to change the background of the video. This background-changing process can cause errors in the final video. Filmora has an AI portrait feature to change the background accurately. It also offers versatility by offering 70+ stickers and AR effects. AI integration tracks the main object and facial features to add effects frame-by-frame.
Conclusion
CapCut is famous because it provides ease in editing to non-tech persons. As highlighted, the camera Lenta CapCut template requires clips to generate slow-mo videos. In this regard, users don’t need to put any effort and get appealing content automatically. Besides, this article has shown the steps to slow down video manually.
CapCut proves difficult for beginners to slow down video with speed ramping. So, if you need an easier but more advanced solution, you can benefit from Wondershare Filmora. It can ease your tasks and take your video editing to a professional level.
Also read:
- How to Create An Eye-Catching Intro Videos with InVideo
- Add Stylish Text to Videos
- New Do You Find Choosing a Good LUT to Color-Correct Your Media Files Difficult? Discover some of the Best Professional LUTs From 3D LUT Creator to Download
- In 2024, Do You Want to Create Adjustment Layers in Final Cut Pro? This Article Will Discuss a Simple yet Efficient Method to Generate Adjustment Layers in Final Cut Pro
- Updated This Article Is a Guide on How to Download and Install Final Cut Pro, Its Key Features, and More. It Also Discusses an Alternative Option to It so the Creators or Editors Can Opt for Editing Videos Accordingly
- Updated How to Add a Slideshow in PowerPoint for 2024
- New In 2024, Detailed Steps to Rotate Videos in Lightworks
- In 2024, How to Split a Video Into Parts on All Platforms
- Updated In 2024, How to Color Correct in OBS
- How to Add Text Effects in Adobe Premiere Pro for 2024
- In 2024, How to Make Coin Magic With Filmora
- New 100+ Best TikTok Captions Enhance Your Content
- How to Make GIF With Transparent Background for 2024
- New Do You Know CapCut Has some Amazing Slow-Motion Templates You Can Utilize? Read This Article to Access the Slow-Motion CapCut Templates Link
- 2024 Approved Steps to Denoise in Final Cut Pro – Reduce Video and Audio Noise
- Updated How to Start a Vlog
- Updated Making Slow Motion Videos in Final Cut Pro The Best Methods
- New Bandicut Video Editor Review for 2024
- Updated Get to Know How Excellent Sparkle Video Effects Can Significantly Impact Different Projects. Its Miraculous. Read Below to Learn More and Add Sparkle Effect to Your Videos
- Ideas That Will Help You Out in Converting AVI to GIF for 2024
- New Recording Video in Slow Motion Some Considerable Points
- 2024 Approved Add Some Shake to Videos with Alight Motion
- How Do You Remove Restricted Mode on Apple iPhone 12 Pro
- What is Fake GPS Location Pro and Is It Good On Oppo Find X7? | Dr.fone
- In 2024, How to Mirror PC Screen to Xiaomi Redmi Note 12R Phones? | Dr.fone
- In 2024, 3 Facts You Need to Know about Screen Mirroring ZTE Axon 40 Lite | Dr.fone
- In 2024, 5 Solutions For Realme GT Neo 5 SE Unlock Without Password
- How to recover old call logs from your Samsung Galaxy S21 FE 5G (2023)?
- Where Is the Best Place to Catch Dratini On Honor Magic 5 Lite | Dr.fone
- In 2024, How to Transfer Data After Switching From Honor Magic 6 to Latest Samsung | Dr.fone
- In 2024, Full guide to Apple iPhone 15 Pro Max iCloud Bypass
- Additional Tips About Sinnoh Stone For Lava Blaze 2 5G | Dr.fone
- In 2024, Fake the Location to Get Around the MLB Blackouts on Samsung Galaxy S23+ | Dr.fone
- In 2024, A Comprehensive Guide to iCloud Unlock From Apple iPhone 12 Pro Max Online
- In 2024, Infinix Note 30 ADB Format Tool for PC vs. Other Unlocking Tools Which One is the Best?
- Title: Updated The Most Efficient Ways to Manage Your Timeline
- Author: Chloe
- Created at : 2024-05-20 03:38:18
- Updated at : 2024-05-21 03:38:18
- Link: https://ai-editing-video.techidaily.com/updated-the-most-efficient-ways-to-manage-your-timeline/
- License: This work is licensed under CC BY-NC-SA 4.0.
