
:max_bytes(150000):strip_icc():format(webp)/ArtificalIntelligenceChatbotConcept-c0e491e36fae46ef84b670334af5095f.jpg)
Updated Tips to Make Cinematic Color Grading for 2024
Tips to Make Cinematic Color Grading
New modern color grading software allows you to do point-and-click color grading right in your browser. Color changes are as easy and intuitive as painting or sketching.
You can choose from many different look presets and movie emulations based on Hollywood movies plus real-time previews of your favorite LUTs with this software.
Part 1. What is Cinematic Color Grading?
The cinematic look is all the rage these days and aims to mimic images captured on real film rather than digitally created. To achieve this effect, film directors use various means from lighting to cinematic color gradation. The latter is a powerful tool for bringing a cool or warm tone to a video and providing smooth color transitions to fall on an image that doesn’t look too real but feels emotional.
This kind of post-production processing, which produces beautiful results when used by color magicians, requires a deep understanding of colors and their effect on our psyche and even physiology. It’s not enough to watch a color grading video and use a LUT to get where you want. You should at the very least have an understanding of:
- Color wheel
- Color quality
- Color harmony and discord
- Warm and cool colors
- Color context
Part 2. Tips to make cinematic color grading
Here are three helpful tips to create cinematic-looking images in DaVinci Resolve.
In my 10-year career as a colorist, I’ve worked on every type of content imaginable: short, long, commercial, educational, episodic—you name it. And while each of these formats requires its approach, the one constant that spans them all is the client’s desire for a cinematic look.
Virtually all of us aspire to more cinematic color, but we often come up short—in part because the term itself has become too broad to effectively target. To focus on the goal, I like to think of “cinematic” as “an image whose key visual properties are consistent with those of printed film.”
The print film was the primary medium through which we consumed cinematic images for the first century of filmmaking and is therefore at the very heart of cinematic aesthetics. In this video, I’ll show you my top three secrets to achieving this aesthetic quickly and consistently in Davinci Resolve.
Tips1: Create Color Density
The first secret to film color is to create color density. Another key aesthetic property of film images is that colors can be either highly saturated or highly luminescent but cannot be both.
We can mimic this visual characteristic by identifying strongly saturated colors in our image and using the Hue vs. Lum to reduce their brightness. This simple technique is especially effective on pure primary colors (red, green, and blue).
Tips2: Separation Beats Saturation
The second secret to film color is prioritizing separation over saturation. When you feel like an image lacks overall color or pop, it’s all too easy to reach for the saturation knob, but that’s not a very cinematic solution.
Instead, try using split toning—pushing cool colors into shadows and warm colors into highlights—to increase tonal separation and add depth to an image. This characteristic is present in virtually every film print and is deeply evocative when applied correctly.
Tips3: Strong Contrast is Your Friend
The third secret of film colors is a strong contrast. This is not always easy, as a higher contrast look inherently requires more precision with exposure placement. Too often we pump up some contrast, end up with an image that looks blown out or too crisp, and then immediately back away from editing.
However, if you stick with high contrast long enough to improve your exposure, you’ll get a very different result and be well on your way to a more cinematic image.
Part 3. How to add color cinematic grading by using Filmora?
New modern color grading software allows you to do point-and-click color grading right in your browser. Color changes are as easy and intuitive as painting or sketching.
You can choose from many different look presets and movie emulations based on Hollywood movies plus real-time previews of your favorite LUTs with this software.
Wondershare Filmora is an option if you want to easily change the colors of your projects. You may just double-click the media after dragging it onto the editing timeline to change the contrast, saturation, brightness, and hue.
Despite its speed, it also allows you to merge, edit audio, divide, rotate, and apply as many cool video effects as you like.
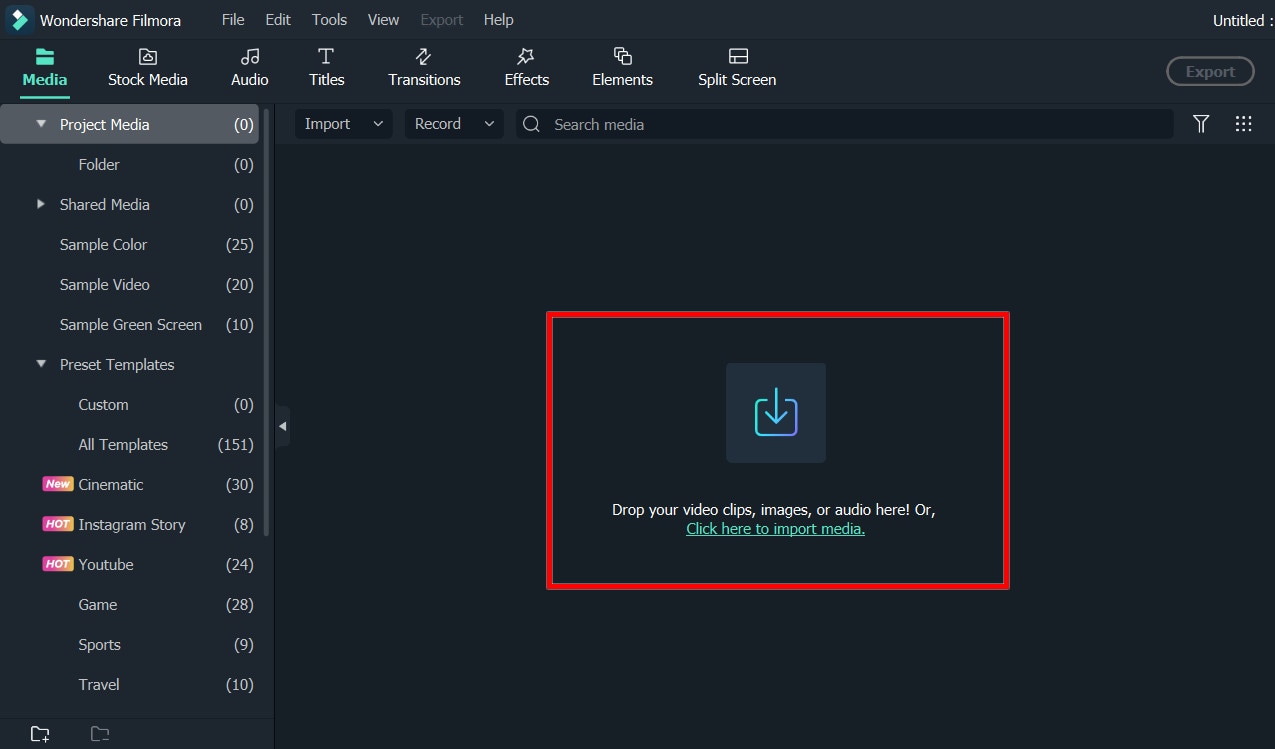
Step1Add the media
After installing Wondershare Filmora, click the New Project and Import button to easily find and load your videos.
Step2Correct the color [Basic and Advanced]
In the timeline, double-click the video editing window. Select the “Color” panel and make adjustments.
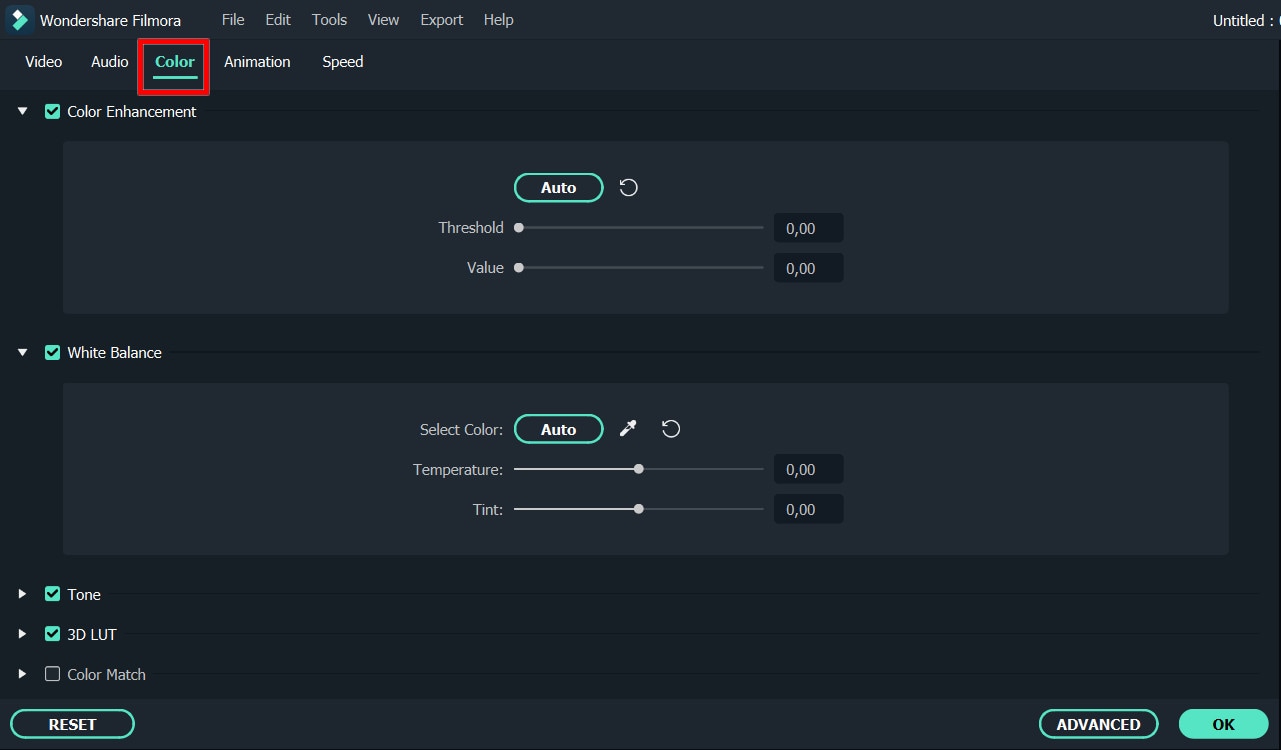
- Contrast: By adjusting this setting, you can control the brightness and color in different parts of the image.
- Saturation: This setting highlights the gray part of the video to a shade. You can adjust it to make the colors of the entire video image appear more saturated or more subdued.
- Brightness: You can change this setting to adjust the overall darkness and lightness of your project.
- Hue: Hue is generally the lightness of a color. Let’s say that when red is saturated with white, it creates a shade of pink.
- 3D LUT: 3D lookup tables provide your media with Hollywood movie color sets like the 007 series, Batman, Harry Porter, etc.
Hover over the indicator to adjust the color correction settings. Then left click on it and move the slider. The corresponding value stabilizes after releasing the mouse button.
With Filmora, you also have access to advanced color correction. Click the Advanced Color Tuning icon to enter the appropriate window where you can fine-tune the color or use preset templates.
The Preferences tab has a variety of templates, including Movie, Normal, 3D LUT, and Vignette. In the Edit tab, you can adjust color temperature, white balance, hue, 3D LUT, color, HSL, light, vignette, etc.
Step3Preview and save the new video
When you are satisfied with your creation, click “Export”. Then click the Settings button and save the new videos in different formats in the Format tab. You can also export the video directly to Vimeo or YouTube or burn it to DVD for better preservation.
Filmora’s color correction tools will make your videos look natural, more attractive, more vibrant, consistent, and professional.
Color Correction Presets
Color correction presets help your video achieve an enhanced cinematic look. Adjust gives you control over fine-tuning the colors in your shots. You can make various adjustments such as color temperature and exposure.
In the “Effects > LUT” tab, you’ll see an extensive selection of preset color settings. These include Vignettes, Movie Looks Like Old Movies, and Cinematic 3D LUT effects such as Harry Potter, Game of Thrones, House of Cards, and Mission Impossible.
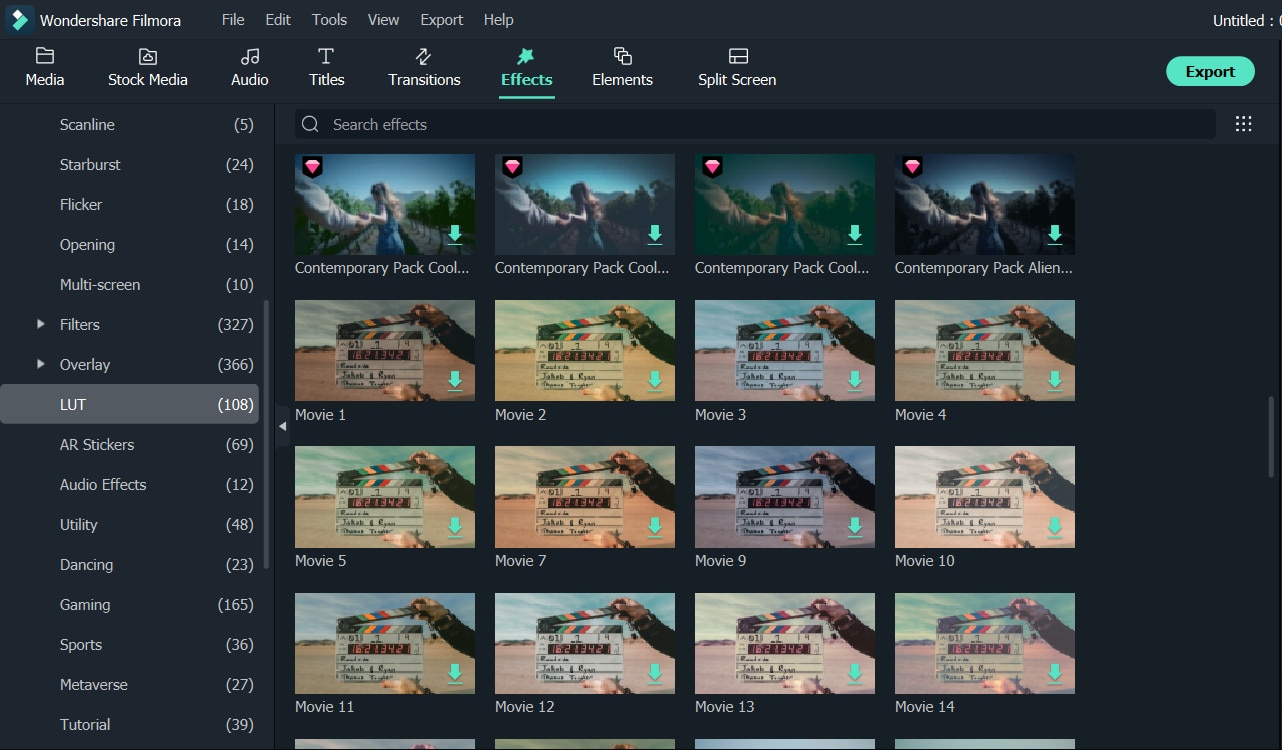
Filmora’s Color Correction Advanced Tool also categorizes your presets. Click on All Presents to see six categories: Favorites, Custom, 3D Lut, Common, Film, and Vignette.
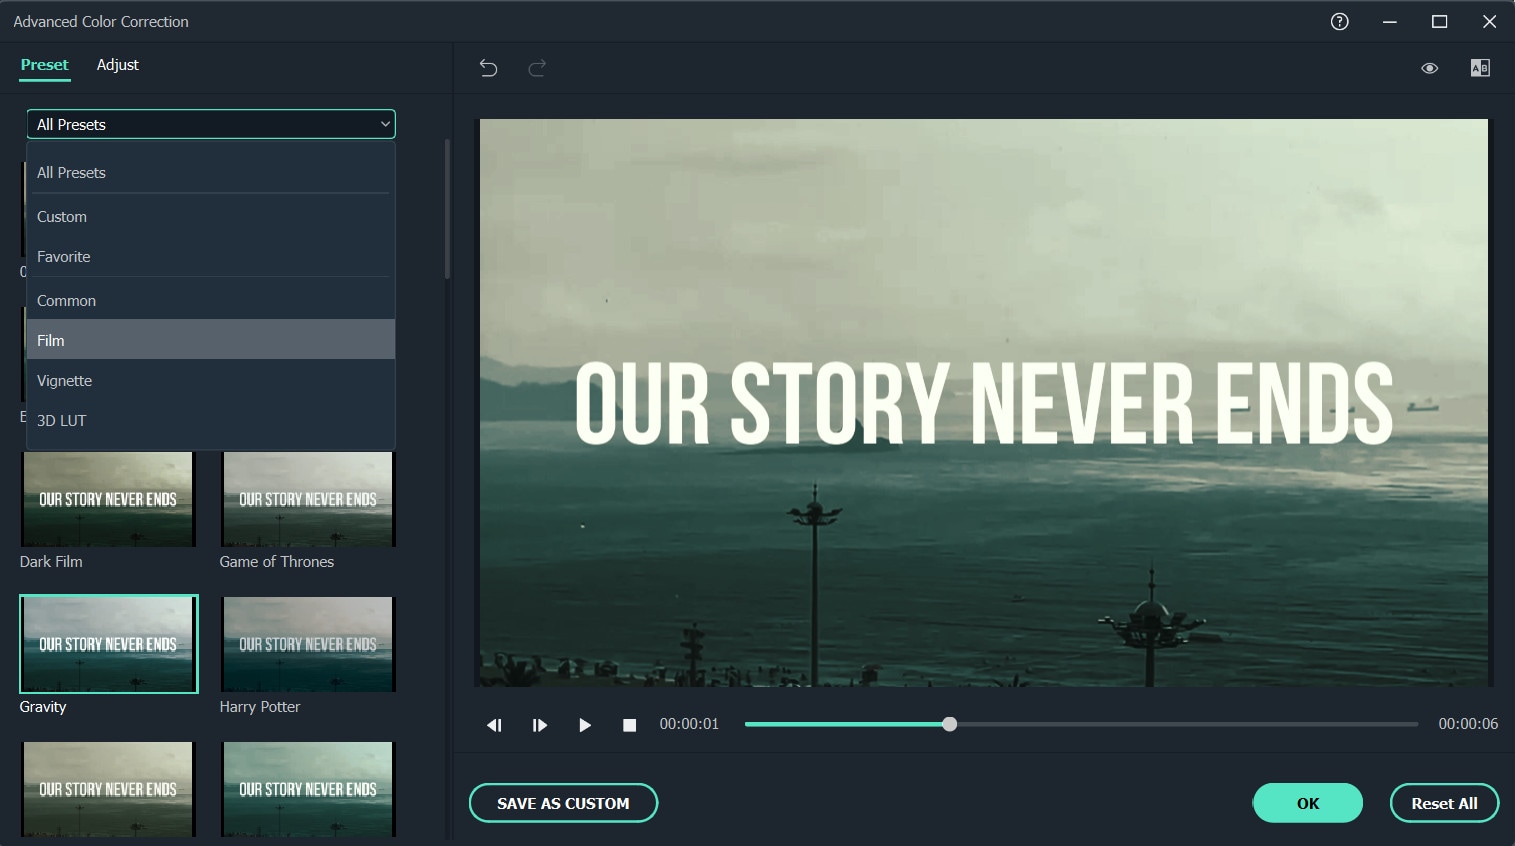
Double-click a preset to apply it to your video. You can see how it looks in the Advanced Color Correction preview window. If you are satisfied with the results, click OK.
Conclusion
Above are the steps to give your video a cinematic look using Wondershare Filmora, hope this helps if you are wondering how to do it. As we can see above, using Filmora video editor will make you more creative in making videos with a suitable emotional tone.
Free Download For Win 7 or later(64-bit)
Free Download For macOS 10.14 or later
Best Youtube Video Meme Maker
The memes in videos have become a common practice now. Majority of YouTube videos you come across today have certain memes in them that audiences can relate to and get entertained. If you are a video creator, you can embed the trending memes in your video to enhance your video content as well as add variety to your video. You can create YouTube meme video with animated memes as well as meme images.
If you do not want to take the pain of creating YouTube meme video from scratch, you should use a YouTube video meme maker. This is because a meme maker comes with video meme templates which you can use to make any desired meme video instantly in a few steps. Besides, you can add stock meme images and GIFs as well as meme titles to your video. Here are the steps to create funny YouTube videos from YouTube meme template.
Part 1. Create YouTube Meme Video on Computer
If you are using your computer to create meme videos for YouTube, you will need a professional YouTube video meme maker. We recommend Wondershare Filmora which is available for both Windows and Mac users. Filmora is an extremely popular video editor among YouTubers thanks to its super intuitive user interface and wide range of video effects.
There are many video templates and stock memes available that you can embed into your video as well as edit them instantly. Therefore, you can save yourself from the burden of collecting popular meme clips and images from the internet and adding them to your video. You can create YouTube shorts and regular video meme in a few steps like a professional without prior experience. Here are the steps to create a meme video for YouTube.
Free Download For Win 7 or later(64-bit)
Free Download For macOS 10.14 or later
Step1 Download and install Filmora on your computer as per your operating system. Launch the application and click on New Project button on the welcome screen. Alternatively, you can go to File> New Project option to get started.

Step2 You can import your video from File> Import Media> Import Media files. Thereafter, drop the video clips on Timeline and add funny elements, trending memes and animated texts.

Alternatively, you can start from scratch and select a video template from Stock Media> Pexels> Videos. You can also check out video templates from Pixabay. There are also background photos available to create YouTube shorts meme videos.

Step3 If you want to include trending animated memes in your video, you need to go to Stock Media> GIPHY. Drag and drop your selected GIFs on the Timeline and arrange them properly. If the meme duration is short, you can copy and paste it multiple times on the Timeline for the meme to play for a longer duration.

Step4 If you want to add funny titles to your meme video, head over to Titles> Social Media and select any desired title template and drop it on the Timeline above the video clips. These title templates come with a background which you can select and delete from the Viewer so that the background video shows up.

Step5 Move around the text to place them in the perfect place on the video From the Viewer. Double-click on the Title template located on the Timeline and edit the title as per your meme text. You can select different styles, animations, WordArt and much more. Click on Ok button when you are done. Adjust the duration of the title as long as you want it to appear in the video.

You can also check out Elements, Effects, and Audio options located at the top to add them to your video wherever appropriate.
Step6 Once you have completed creating YouTube meme video, click on Export button and save the video in your desired file format.
Part 2. How to Make Meme video for YouTube Online
If you do not want to download a premium meme maker for your YouTube videos, you can use an online meme maker where you can get to edit YouTube meme template. Veed.io is a popular online video editor where you can create YouTube video meme from its video templates instantly. In fact, you can edit your video and add meme videos and images wherever you feel like.
You get stock meme templates from GIPHY, and you can make use of the animated stickers to create creative YouTube video memes. There are also featured elements available that can go along with your meme video perfectly. Moreover, you can make meme video from any YouTube video by pasting its URL and cutting out clips to make memes. Here are the steps to create YouTube meme videos using Veed.io.
Step1 Open your web browser and visit “www.veed.io/create/meme-maker” . Click on Choose Video button to get started.

Step2 You can drop your video and add meme content in between by click on Upload a Video option. You can paste YouTube video URL by clicking on YouTube button. You can also select a stock video to get started. If you want to make YouTube meme video from scratch, you can click on Blank Canvas.

If you want to start creating meme video by selecting a video template and editing it as per your requirements, go to Use Template option from the left panel. Check out different video templates and select as per your preference.

Step3 If you have selected a video template, click on Start Editing button on the next screen.

Thereafter, you can edit every element of the video template by double-clicking on them in the Viewer.

Step4 Go to Elements from the left panel and check out GIFs by GIPHY, Animated Stickers and Featured Stickers. You can add any element to your video template to make the meme stand out easily. Drag and drop the element on the video template in the Viewer.

You can even edit the element you bring into your video template as per your requirements so that it fits perfectly in the overall video content seamlessly.

Step5 If you are satisfied with YouTube meme video you have created, click on Export button in the top-right corner and save it on your storage device.
Conclusion
Making YouTube meme videos and going viral is no more a game of the professionals. If you prefer an online video editor, Veed.io meme maker has video templates as well as option to import YouTube video to edit and include funny elements to make creative meme videos. If you want more templates and elements for meme videos, we recommend Wondershare Filmora where you can create professional YouTube meme videos in a few minutes with a few simple steps.
Free Download For macOS 10.14 or later
Step1 Download and install Filmora on your computer as per your operating system. Launch the application and click on New Project button on the welcome screen. Alternatively, you can go to File> New Project option to get started.
Step2 You can import your video from File> Import Media> Import Media files. Thereafter, drop the video clips on Timeline and add funny elements, trending memes and animated texts.
Alternatively, you can start from scratch and select a video template from Stock Media> Pexels> Videos. You can also check out video templates from Pixabay. There are also background photos available to create YouTube shorts meme videos.
Step3 If you want to include trending animated memes in your video, you need to go to Stock Media> GIPHY. Drag and drop your selected GIFs on the Timeline and arrange them properly. If the meme duration is short, you can copy and paste it multiple times on the Timeline for the meme to play for a longer duration.
Step4 If you want to add funny titles to your meme video, head over to Titles> Social Media and select any desired title template and drop it on the Timeline above the video clips. These title templates come with a background which you can select and delete from the Viewer so that the background video shows up.
Step5 Move around the text to place them in the perfect place on the video From the Viewer. Double-click on the Title template located on the Timeline and edit the title as per your meme text. You can select different styles, animations, WordArt and much more. Click on Ok button when you are done. Adjust the duration of the title as long as you want it to appear in the video.
You can also check out Elements, Effects, and Audio options located at the top to add them to your video wherever appropriate.
Step6 Once you have completed creating YouTube meme video, click on Export button and save the video in your desired file format.
Part 2. How to Make Meme video for YouTube Online
If you do not want to download a premium meme maker for your YouTube videos, you can use an online meme maker where you can get to edit YouTube meme template. Veed.io is a popular online video editor where you can create YouTube video meme from its video templates instantly. In fact, you can edit your video and add meme videos and images wherever you feel like.
You get stock meme templates from GIPHY, and you can make use of the animated stickers to create creative YouTube video memes. There are also featured elements available that can go along with your meme video perfectly. Moreover, you can make meme video from any YouTube video by pasting its URL and cutting out clips to make memes. Here are the steps to create YouTube meme videos using Veed.io.
Step1 Open your web browser and visit “www.veed.io/create/meme-maker” . Click on Choose Video button to get started.
Step2 You can drop your video and add meme content in between by click on Upload a Video option. You can paste YouTube video URL by clicking on YouTube button. You can also select a stock video to get started. If you want to make YouTube meme video from scratch, you can click on Blank Canvas.
If you want to start creating meme video by selecting a video template and editing it as per your requirements, go to Use Template option from the left panel. Check out different video templates and select as per your preference.
Step3 If you have selected a video template, click on Start Editing button on the next screen.
Thereafter, you can edit every element of the video template by double-clicking on them in the Viewer.
Step4 Go to Elements from the left panel and check out GIFs by GIPHY, Animated Stickers and Featured Stickers. You can add any element to your video template to make the meme stand out easily. Drag and drop the element on the video template in the Viewer.
You can even edit the element you bring into your video template as per your requirements so that it fits perfectly in the overall video content seamlessly.
Step5 If you are satisfied with YouTube meme video you have created, click on Export button in the top-right corner and save it on your storage device.
Conclusion
Making YouTube meme videos and going viral is no more a game of the professionals. If you prefer an online video editor, Veed.io meme maker has video templates as well as option to import YouTube video to edit and include funny elements to make creative meme videos. If you want more templates and elements for meme videos, we recommend Wondershare Filmora where you can create professional YouTube meme videos in a few minutes with a few simple steps.
The Complete Guide to Making Fortnite Montage
If you’re skilled at playing Fortnite, you’ll probably want to share your gameplay clips as montages with other players. The popularity of Fortnite montage videos is rapidly growing because millions of people play the game. Tons of people also like watching their peers play this online video game in the form of gaming montages. We’ll explain how to make a montage Fortnite that will get views when you upload it on social media platforms.
What Is Fortnite?
Fortnite is a popular online game developed by the American game studio Epic Games. The video game was released in 2017, and it’s available in three-game mode versions with the same game engine and gameplay. These are:
- Fortnite: Save the World: Set on contemporary Earth, Save the World is a co-op hybrid third-person shooter (TPS), tower defense (TD), and survival game. The game allows a maximum of four players to fight off creatures that look like zombies and defend objects with traps or fortifications they have built.
- Fortnite Battle Royale: This is a free-to-play (F2P) battle royale video game that allows up to one hundred players to fight against each other until only one person remains.
- Fortnite Creative: Released in 2018, Fortnite Creative allows players to create battle arenas and worlds. They can then share these predetermined structures with up to 16 other players for a range of multiplayer game modes that have customizable rules.
Since its release, Fortnite has become a worldwide phenomenon, with more than 350 million people playing the game across the globe. In the first year of Fortnite’s release, players downloaded its mobile version 78 million times.
The game became such a global hit because it’s free to play. It’s also available on most gaming platforms and features an engaging theme. Additionally, because Battle Royale allows up to 100 gamers to fight it out until they find the last man standing, this means the replayability of this online video game is infinite. What’s more? Each game is unique.
Fortnite has also become popular because users can purchase DLC (downloadable content) to enhance their gaming experience.
Things to Prepare before making a Fortnite Montage video
You have to prepare several things if you want to make an epic Fortnite montage video that will keep your audience watching. These include:
1. Fortnite Gaming Clips
Epic Games developed a system that allows you to save your best gameplay performances. You can then export the Fortnite replays that you have saved.
To save the beautiful moments of the game, you have to know where to find the Replays videos; this is how to find them:
- Head over to Career and select the Replays option. You’ll see all the replay clips, including their date, finish, and length.

Get Fortnite Video Clip
- Select the clips and watch them so that you can choose the ones you want to use in your Fortnite montage video.
Now that you know where the Replay videos are, you have to save them on your computer. You can only save the Replay videos on your PC using a screen capture tool that allows you to record the videos.
ApowerREC is one of the most popular tools that people use to record and download Fortnite’s Replays videos. This screen capture tool allows you to create high-quality Fortnite videos with a one-press shortcut.
To start using this software, follow the steps below:
- Launch the software and set some preferences by heading to Settings.

Record Fortnite video clip
- Set the video and audio quality, hotkeys, and more.

ApowerRec Setting
- To record the screen and sound, enable this option.

Enable option to record
- If you’ll be using a microphone, click on the speaker symbol and enable audio boost and noise cancellation.

Audio Setting
- Set the recording mode that you want. You can use Regional mode or Game mode.
- Open your Fortnite game and got to the Replay videos.
- Play the Replay video you want.
- Click on Regional and set the recording frame along the area you want to record.
- Hit the Recording button to initiate the recording process.

Start Recording
- You can add annotations as you prefer while the tool is recording the Replay video.
- Use the zoom function if you want to look closely at something.
- When you’re done, hit the stop button. The recorded file will pop up in the program’s recording list.
- Repeat the process for the rest of the video clips you want to use in your montage Fortnite.

Complete Recording
2. Pick the Right Background Music
To make your Fortnite montage video engaging, you’ll need to choose background music that fits your montage videos. Music is one of the key elements in creating an exhilarating viewing experience for your audience.
Make sure you pick royalty-free music that fits the genre of your Fortnite montage video. Choose a song that expresses the themes and personality of the game.
You cannot use your favorite song from the radio, as your copyright law prohibits people from using the work of others without permission or paying a royalty.
If you are caught using copyrighted music, you might have to pay the music owner monetary damages. You can also go to jail because of copyright infringement.
There are loads of platforms that offer non-copyrighted music that you can use in your montage Fortnite. These include YouTube, Twitch, and Pixabay.
3. Choose the Correct Video Editing Software
Now that you have downloaded all the Fortnite video clips and saved them on your computer, you need to choose the correct video editing software. Here are three of the most reliable programs that you can use to make a montage Fortnite video.
Filmora
Filmora is a video editing software compatible with Windows and macOS devices. Filmora’s Template Mode allows you to create impressive Fortnite montage videos that will get more views on social media platforms.
You’ll find ready-made, stylish video templates that you can use to create epic gaming montage videos. It’s easy to use this tool, and you do not need any experience to create visually striking montage videos.
Wondershare Filmora11 Express Better
Achieve More
Grow Together
Free Download Free Download Learn More

![]()
Premiere Pro CC
Designed for the most demanding users, Premiere Pro CC is a comprehensive video editing program developed by Adobe Inc. The software includes audio editing functionality.
This Fortnite montage editor is a subscription-based version of Adobe Premiere Pro, and the CC represents “Creative Cloud.”
You can use Premiere Pro CC effects to add spice to your montage video. These include spark effects, glitch transitions, and light leak overlay.
VideoProc Vlogger
Developed by Digiarty, VideoProc Vlogger is a multitrack video editing software for Mac and Windows users. The program supports speed ramping effects. You can also use the audio analyzer if you want to mark out the beat and edit the highlight to match the energy of the music. You can also add audio and visual effects, text effects, glitch effects, and light glaring and flashy effects.
How to Make a Fortnite Montage with Filmora
It’s easy to make a Fortnite montage with Filmora. The software was designed to be user-friendly and save you time while creating montages. This Fortnite montage editor has tons of tools that make it the go-to software for players who want to share stunning gaming montages with other gamers on social media platforms.
Follow these steps to learn how to make a Fortnite montage video with Filmora:
Step1Import Media File
Choose the New Project option. Import your video clips to Filmora’s media library. You can do this by heading to File>Import Media> Import Media Files. You can then locate the video files on your computer and import them to the media library by selecting them and hitting the Open button.

Import Media
Step2Add Effects to Your Footage
Select your videos and drag them from the media library then drop them on your timeline. Now, right-click on the video in the timeline to make some edits to your video. Essentially, you can trim, split, crop, and zoom your video. You can also add velocity effects.
Navigate to the Stock Media tab, where you can choose royalty-free music and use it as your background music.
Go to the Effects tab, and select the Overlay option, where you can choose the overlay you want to add to your video. Filmora has tons of overlays that you can use to add emotions and set the tone in your Fortnite montage videos.

Add Effects
Step3Add Filters
Under the Effects tab, go to Filters to add filters to your montage video. The program has many filters that you can choose from, such as glitch, shake, and mosaic. Use these two effects to add transitions to your video clip.

Add Filters
Closing Thoughts:
To make a Fortnite montage video, you need to know how to save and download the clips you will use, get the right background music, and find a reliable montage editor. Use Filmora to edit Fortnite Tik Tok montage videos. The software has some cool effects that will make your gaming montage stand out and get more views.
Free Download Free Download Learn More
![]()
Premiere Pro CC
Designed for the most demanding users, Premiere Pro CC is a comprehensive video editing program developed by Adobe Inc. The software includes audio editing functionality.
This Fortnite montage editor is a subscription-based version of Adobe Premiere Pro, and the CC represents “Creative Cloud.”
You can use Premiere Pro CC effects to add spice to your montage video. These include spark effects, glitch transitions, and light leak overlay.
VideoProc Vlogger
Developed by Digiarty, VideoProc Vlogger is a multitrack video editing software for Mac and Windows users. The program supports speed ramping effects. You can also use the audio analyzer if you want to mark out the beat and edit the highlight to match the energy of the music. You can also add audio and visual effects, text effects, glitch effects, and light glaring and flashy effects.
How to Make a Fortnite Montage with Filmora
It’s easy to make a Fortnite montage with Filmora. The software was designed to be user-friendly and save you time while creating montages. This Fortnite montage editor has tons of tools that make it the go-to software for players who want to share stunning gaming montages with other gamers on social media platforms.
Follow these steps to learn how to make a Fortnite montage video with Filmora:
Step1Import Media File
Choose the New Project option. Import your video clips to Filmora’s media library. You can do this by heading to File>Import Media> Import Media Files. You can then locate the video files on your computer and import them to the media library by selecting them and hitting the Open button.
Import Media
Step2Add Effects to Your Footage
Select your videos and drag them from the media library then drop them on your timeline. Now, right-click on the video in the timeline to make some edits to your video. Essentially, you can trim, split, crop, and zoom your video. You can also add velocity effects.
Navigate to the Stock Media tab, where you can choose royalty-free music and use it as your background music.
Go to the Effects tab, and select the Overlay option, where you can choose the overlay you want to add to your video. Filmora has tons of overlays that you can use to add emotions and set the tone in your Fortnite montage videos.
Add Effects
Step3Add Filters
Under the Effects tab, go to Filters to add filters to your montage video. The program has many filters that you can choose from, such as glitch, shake, and mosaic. Use these two effects to add transitions to your video clip.
Add Filters
Closing Thoughts:
To make a Fortnite montage video, you need to know how to save and download the clips you will use, get the right background music, and find a reliable montage editor. Use Filmora to edit Fortnite Tik Tok montage videos. The software has some cool effects that will make your gaming montage stand out and get more views.
Speed Up/Down Videos in VLC
You can add fun by modifying the video speed when you play a video. To perform the detailed effects on the content, you need sophisticated programs that are reliable and user-friendly. Do you know about the VLC playback speed? Are there any options in the VLC app to edit the playback speed as per your needs?
Here, you will be learning about the precise video edits you can perform effortlessly on your captured content using VLC and its alternative application. Stay connected and scroll down for enlightening facts on it.

In this article
01 What is VLC?
02 How to speed up/down videos in VLC
03 Alternative for changing speed for videos
Part 1: What is VLC?
VLC is an open-source program, and it supports media files to play on its interface efficiently. This app supports different file formats and is available in many versions. You can use VLC players on Windows, Mac, and Linux platforms. There are options to play a part of a file using this program when trying to download any video file into your system.

Here, you can find video edit features like you can add subtitles and modifying the playback speed precisely. It is a flexible player with a simple user interface. You do not require any prior knowledge to play the desired content on this interface. All the essential controls are explicit and you can reach for them quickly.
Part 2: How to speed up/down videos in VLC
It is high time to learn about the VLC playback speed that you can implement on your video effortlessly. You must carefully follow up the below instructions and perform the right clicks to edit the video speed.
The stepwise guidelines to modify the video speed using the VLC application.
Step 1
Install VLC from its official webpage according to your system OS type and then upload the desired video into its working space.

Step 2
Now, tap the Playback option from the menu and choose the required speed duration of the content from the expanded items. Select faster, slower, normal speed in pace with your needs and modify the video speed accordingly.

Save the changes you had performed on the video and play the track to view the changes done on this media space.
The Filmora video editor is the reliable and performable tool that edits the video beyond limitations. The above instructions will guide you to edit the video speed using the VLC player. If you search for an alternative tool to perform further edits on your captures, then quickly scroll down for more enlightening facts.
Part 3: Alternative for changing speed for videos
The Filmora video editor provides you with in-built templates, filter effects, transitions to make the content attractive. If you take closer looks at the filters, you will find mesmerizing special effects available as ready to use the element to edit your uploaded content on the timeline. Few clicks are enough to bring the best in your video in no time. It is easy to use and you can embed efficient elements to the video precisely. There are options to insert desired elements from integrated libraries like Filmstock, Giphy to add flavors to your video content.
The Key Features of Filmora Video Editor program.
- This app supports all file types effortlessly, and you can import any media file quickly despite its size.
- Simple clicks are sufficient to include desired effects on the video content.
- Filters, transitions, and special elements to insert into the uploaded file.
- Use audio customization features like Audio ducking, audio equalizers, and detach audio to personalize the content.
- Tap the preview option to view the edited file before finalizing the export option.
Connect with the integrated libraries and download the desired elements to customize the uploaded content. During the export action, you can change its file type, resolution, and size to add compatibility for end streaming devices. Drag and drop the elements into the working timeline to insert the changes to the captured media.
The detailed guide on how to change the video speed using the Filmora video editor tool.
Step 1: Install the program
Download the application from its official website and install it by following the instruction wizard. Then, launch the app and import the media file into the working space. To make further edits, drag and drop the file into the timeline.

Step 2: Customize the video speed
Next, make a right-click on the imported media file and select the Speed and Duration option from the expanded list. Adjust the speed slider from the pop-up window to change the video duration while playing. Finally, save the changes by tapping the OK button.

Now, play the edited content to witness the changes in the video speed. The video plays according to the customized value, and you can have a preview before exporting it to the necessary storage space.
Conclusion
Wondershare Filmora
Get started easily with Filmora’s powerful performance, intuitive interface, and countless effects!
Try It Free Try It Free Try It Free Learn More about Filmora>

Thus, in detail, you had an enlightening discussion on the VLC playback speed. You would have understood the tips and tricks associated with these video edits. Use the Filmora video editor application to create stunning videos for your needs. It is a reliable program, and you can go for it without any hesitation. You can customize the content by modifying every detail of the content precisely. Choose Filmora and enjoy the video edits beyond boundaries. Create content as per your requirements without sacrificing any parameters. Stay tuned for many more facts on video edits using the Filmora video editor application.
02 How to speed up/down videos in VLC
03 Alternative for changing speed for videos
Part 1: What is VLC?
VLC is an open-source program, and it supports media files to play on its interface efficiently. This app supports different file formats and is available in many versions. You can use VLC players on Windows, Mac, and Linux platforms. There are options to play a part of a file using this program when trying to download any video file into your system.
Here, you can find video edit features like you can add subtitles and modifying the playback speed precisely. It is a flexible player with a simple user interface. You do not require any prior knowledge to play the desired content on this interface. All the essential controls are explicit and you can reach for them quickly.
Part 2: How to speed up/down videos in VLC
It is high time to learn about the VLC playback speed that you can implement on your video effortlessly. You must carefully follow up the below instructions and perform the right clicks to edit the video speed.
The stepwise guidelines to modify the video speed using the VLC application.
Step 1
Install VLC from its official webpage according to your system OS type and then upload the desired video into its working space.
Step 2
Now, tap the Playback option from the menu and choose the required speed duration of the content from the expanded items. Select faster, slower, normal speed in pace with your needs and modify the video speed accordingly.
Save the changes you had performed on the video and play the track to view the changes done on this media space.
The Filmora video editor is the reliable and performable tool that edits the video beyond limitations. The above instructions will guide you to edit the video speed using the VLC player. If you search for an alternative tool to perform further edits on your captures, then quickly scroll down for more enlightening facts.
Part 3: Alternative for changing speed for videos
The Filmora video editor provides you with in-built templates, filter effects, transitions to make the content attractive. If you take closer looks at the filters, you will find mesmerizing special effects available as ready to use the element to edit your uploaded content on the timeline. Few clicks are enough to bring the best in your video in no time. It is easy to use and you can embed efficient elements to the video precisely. There are options to insert desired elements from integrated libraries like Filmstock, Giphy to add flavors to your video content.
The Key Features of Filmora Video Editor program.
- This app supports all file types effortlessly, and you can import any media file quickly despite its size.
- Simple clicks are sufficient to include desired effects on the video content.
- Filters, transitions, and special elements to insert into the uploaded file.
- Use audio customization features like Audio ducking, audio equalizers, and detach audio to personalize the content.
- Tap the preview option to view the edited file before finalizing the export option.
Connect with the integrated libraries and download the desired elements to customize the uploaded content. During the export action, you can change its file type, resolution, and size to add compatibility for end streaming devices. Drag and drop the elements into the working timeline to insert the changes to the captured media.
The detailed guide on how to change the video speed using the Filmora video editor tool.
Step 1: Install the program
Download the application from its official website and install it by following the instruction wizard. Then, launch the app and import the media file into the working space. To make further edits, drag and drop the file into the timeline.
Step 2: Customize the video speed
Next, make a right-click on the imported media file and select the Speed and Duration option from the expanded list. Adjust the speed slider from the pop-up window to change the video duration while playing. Finally, save the changes by tapping the OK button.
Now, play the edited content to witness the changes in the video speed. The video plays according to the customized value, and you can have a preview before exporting it to the necessary storage space.
Conclusion
Wondershare Filmora
Get started easily with Filmora’s powerful performance, intuitive interface, and countless effects!
Try It Free Try It Free Try It Free Learn More about Filmora>
Thus, in detail, you had an enlightening discussion on the VLC playback speed. You would have understood the tips and tricks associated with these video edits. Use the Filmora video editor application to create stunning videos for your needs. It is a reliable program, and you can go for it without any hesitation. You can customize the content by modifying every detail of the content precisely. Choose Filmora and enjoy the video edits beyond boundaries. Create content as per your requirements without sacrificing any parameters. Stay tuned for many more facts on video edits using the Filmora video editor application.
Also read:
- Best Applications That Can Help Apply The Best VHS Camera Effect
- Dollar-Store DIY Hacks to Use for Filmmaking
- Updated Best Ideas for Time Lapse Video for 2024
- Updated In 2024, Guide to Add Transition Effects in Premiere Pro
- Updated In 2024, A Guide to Find a High-Quality Video Marketing Agency
- In 2024, Applications and Software Take up Your Devices Storage to Create Slow-Mo. Explore This Piece to Learn About some Slow-Motion Video Online Makers
- Updated Recording Video in Slow Motion Some Considerable Points for 2024
- New Vlogs and Travel Content Are Incomplete without a Fast-Motion Effect. Learn Step-by-Step How to Make Fast Motion Video on an iPhone in This Article
- New Adding a Spooky Shadow Effect with Filmora for 2024
- Want to Learn How to Make Gaming Montage Videos? You Have Come to the Right Place. This Guide Will Teach You All You Need to Know to Create Montages of Video Games and Share Them with Other Players for 2024
- Updated In 2024, How to Speed Up and Slow Down a Video
- New In 2024, How to Create and Add an Adjustment Layer in Final Cut Pro
- New How to Export iMovie?
- What If YouTube Zoom to Fill Not Working, In 2024
- 2024 Approved 10 Best Free Spanish Text To Speech Converter Websites
- 2024 Approved If You Are a Teacher or People Who Want to Share Their Ideas via Vides, You Can Always Make It on Your Own. This Article Will Share You 7 Tips to Create an Educational Video Easily
- New Wish to Rock on YouTube, but Lacking Tricks? Here, We Will Tell You Everything About How the YouTube Algorithm AI Works and How You Can Perform Well According to AI
- Updated 2024 Approved How To Quick Guide for Making Google Slideshows
- Updated Discover the Essential Steps for Editing a Music Video in This Guide. Learn About Aspect Ratio and the First Cut Process to Create a Visually Captivating Video
- New 2024 Approved How to Crop Videos in Windows Media Player
- New General Knowledge About MP4 Format and Best MP4 Video Editor for 2024
- New Best 10 Tools To Make Quiz Videos
- New 2 Actionable Ways to Extract Subtitles From MKV Videos without Quality Loss for 2024
- Updated 3D Ray Traced Settings In After Effects A Comprehensive Guide for 2024
- New 2024 Approved Best Tips on How to Design Travel Slideshow
- Updated Stunning Glitch Effect and Its Creation Steps for Premiere Pro for 2024
- In 2024, Adobe Premiere Pro Guide to Slow-Down Video
- New Best 16 Motion Blur Apps for Videos & Photos
- Can Life360 Track Or See Text Messages? What Can You Do with Life360 On Lenovo ThinkPhone? | Dr.fone
- In 2024, How to Track Apple iPhone 14 Pro Max by Phone Number | Dr.fone
- New 10 Cartoon Photo Converters
- Full Guide How To Fix Connection Is Not Private on Honor Magic 6 Pro | Dr.fone
- Best Anti Tracker Software For Lava Yuva 2 Pro | Dr.fone
- In 2024, Hassle-Free Ways to Remove FRP Lock from Nokia C12 Phones with/without a PC
- In 2024, Top 12 Prominent Samsung Galaxy S23 Fingerprint Not Working Solutions
- A Detailed VPNa Fake GPS Location Free Review On Itel A70 | Dr.fone
- How to Detect and Remove Spyware on Apple iPhone 14 Plus? | Dr.fone
- In 2024, How to get the dragon scale and evolution-enabled pokemon On Honor 90 GT? | Dr.fone
- Hacks to do pokemon go trainer battles For Oppo A58 4G | Dr.fone
- In 2024, 9 Best Phone Monitoring Apps for Sony Xperia 10 V | Dr.fone
- How to Mirror Your Itel P55+ Screen to PC with Chromecast | Dr.fone
- In 2024, The Magnificent Art of Pokemon Go Streaming On Apple iPhone 6? | Dr.fone
- Updated Step-by-Step Guide How to Translate TikTok Videos for 2024
- In 2024, Delete Gmail Account With/Without Password On Xiaomi
- In 2024, How To Get the Apple ID Verification Code From Apple iPhone 11 in the Best Ways
- How to Fix the Unable to Record Macro Error in Excel 2016?
- Title: Updated Tips to Make Cinematic Color Grading for 2024
- Author: Chloe
- Created at : 2024-04-24 07:08:38
- Updated at : 2024-04-25 07:08:38
- Link: https://ai-editing-video.techidaily.com/updated-tips-to-make-cinematic-color-grading-for-2024/
- License: This work is licensed under CC BY-NC-SA 4.0.
