
:max_bytes(150000):strip_icc():format(webp)/how-to-safely-use-airport-charging-stations-4690583-01-6085c56e46b34f84b5f5d2d976e20677.jpg)
Updated Trailer Guide for Creators and Developers
Trailer Guide for Creators and Developers
Trailers are a popular means to showcase a product you are about to release to the market. Teasers and trailers are traditionally created for movies, but have eventually evolved to include book trailers, game trailers, and app trailers. In this article, we will explain the key details of a trailer, highlight some examples, and show you how to create an effective trailer.
Part 1. What is a Trailer?
A trailer is a type of video commercial advertisement made to advertise and inform audiences about a specific program or item. To persuade customers to view or use the product, it includes a brief series of previews of the entire material. It also serves as a means of creating anticipation for a show or product that is about to hit the market.
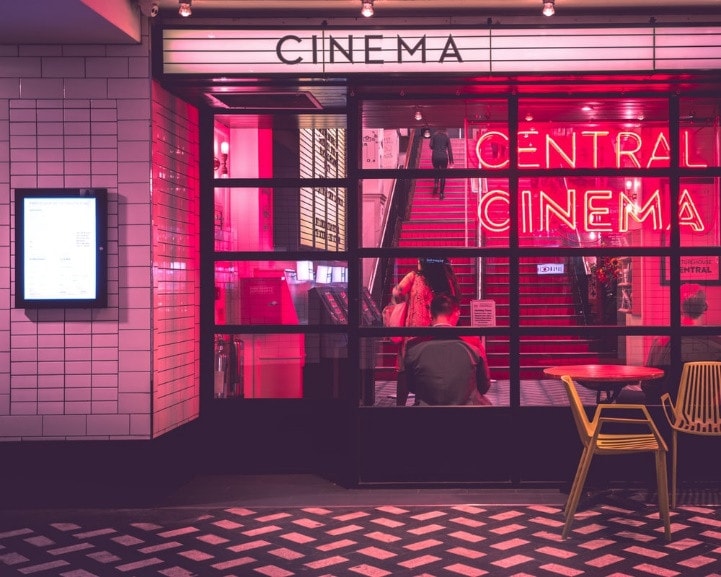
Trailers were originally made for cinema movies. Nowadays, trailers are created for different forms of media like shows, apps, programs, video games, and book videos. A typical traditional trailer lasts between 1 to 3 minutes.
Part 2. What Are the Similarities and Differences Between a Teaser and Trailer?
Teasers and trailers can often be confused with each other. After all, they pretty much have the same objective.
Both are created for the purpose of advertising an upcoming show, product, or service. Teasers and trailers are similarly shown to audiences prior to the release of the thing they are advertising. They are meant to show a small portion of the full experience to create curiosity and excitement towards a targeted market. Both videos are typically short in length - taking up only a maximum of 3 minutes in duration.
The differences between them lie in their content, timeline, and duration. A teaser is much shorter than a trailer - the former runs for only 20-30 seconds while the latter can go between 1-3 minutes in length. This is because teasers are typically made before or during the production process of a movie or feature, whilst trailers are commonly made at the end.
For films, movies, and shows, teasers generally capture only a single part of that media. It focuses on the most intense or impactful scene. Trailers are formed from a series of clips depicting striking scenes derived from the beginning, middle, and end of the show. These scenes are normally arranged in a nonlinear structure, allowing viewers to have a general understanding of the story without revealing the entirety of the plot.
Part 3. Examples of good trailers
An excellent trailer is one who can effectively attract and maintain the audience’s attention. It satisfies its objective of showcasing striking and captivating pieces of the main product and entices viewers to experience its entirety. Here are some examples of trailers who have well fulfilled the criteria of a good trailer.
1. The Suicide Squad
The Suicide Squad is a fresh take featuring DC’s anti-heroes assemble in a single chaotic and unconventional team. James Gunn’s iteration on these characters is brought to life in the trailer with a majestic cast including John Cena, Idris Elba, Margot Robbie, and David Dastmalchian. Several key scenes are shown, highlighting its standout characters in the process while portraying the movie’s setting.
2. Raya and the Last Dragon
The trailer starts out innocently and comes with an adorable and surprising twist. The brief 2-minute trailer is packed with relevant scenes that depict the character’s quest without revealing too much. Many action-packed scenes and emotional interactions are satisfactorily squeezed into the trailer. Excitement builds further with Tamara Bubble’s “I’m That Good” playing in the background on the last minute of the video.
3. Men (2022)
Ingenious combination of sound effects and background music play a distinct role in this 2022 trailer. The female lead’s voice echoing from a tunnel, the haunting piano keys gradually building up the suspense, and the common but cleverly used horror audio effects create a chilling ensemble of haunting scenes in the movie. The sounds gradually rise up as more aggressive and energized scenes flash on the screen, and eventually end back into the sombre intro that leaves the audience with questions.
4. The Farewell
Lulu Wang’s dramatic comedy The Farewell is all about a family hiding the truth of a family member’s terminal illness from the person herself. What makes the trailer special is that it steers away from the sad, melancholic direction and veers toward a feel-good movie vibe. The conflict, struggle, and the beliefs featured in the movie are depicted in the trailer. However, the clever placement of interactions and the uplifting music tug at the audience’s heartstrings and urge them to want to see more.
5. Pokémon Go
Pokémon has become a culture to several generations. Becoming a Pokémon trainer is a secret dream that almost all of us have, even as adults. Niantic’s collaboration with the Pokémon franchise brings people closer to that reality by introducing its AR and location-powered app Pokémon Go. The trailer shows people of all ages living out their trainer dreams in the real world and interacting with Pokémon. The different features of the game are dramatized in a real-life setting, inciting more excitement, and pulling out the nostalgia from its market. The trailer keeps the actual app showcase to a minimum, instead focusing on once again selling that dream to audiences and bringing out the inner child in everyone.
Part 4. How to bring your trailer to the next level?
While it may seem intimidating to create a trailer for your upcoming product, there is no need to worry. It is now easier than ever to create a well-crafted trailer by taking advantage of a program’s tools and templates.
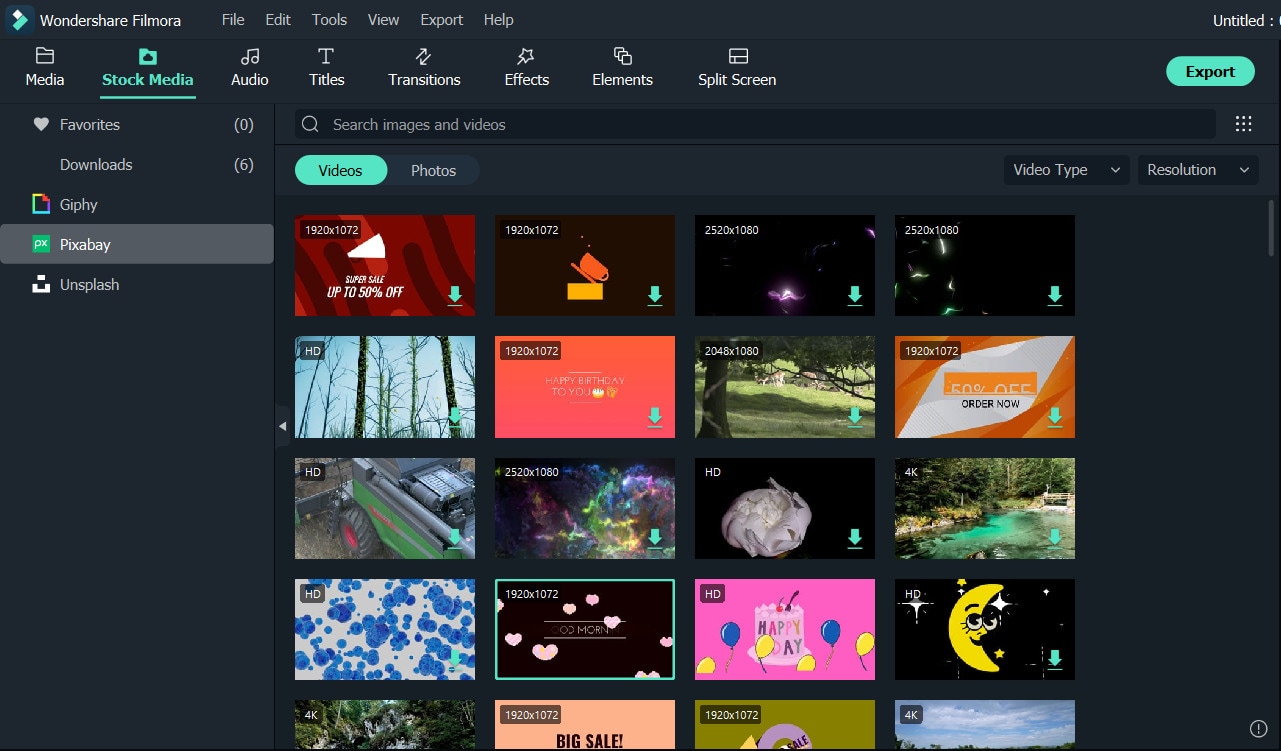
- Stock media
Filmora makes it easy to craft a trailer with only a few clicks. Make use of the program’s media library to gain access to a wealth of resources like stock photos, videos, music, and audio files.
- Keyframing
Keyframing lets you smoothly transition from one scene to another, making it an effective tool for trailers. It is particularly appealing for shows that highlight motion like sports, dancing, and action. Experiment with more than 80 preset templates and create smooth scene transitions with ease.
- Speed Ramping
Speed Ramping is a feature that works perfectly with keyframing. Increase the energy and dynamics in your trailer with 6 preset speed types. You can also customize these templates. There is also no need for concern about the audio - Filmora lets you maintain the audio pitch even when using these features.
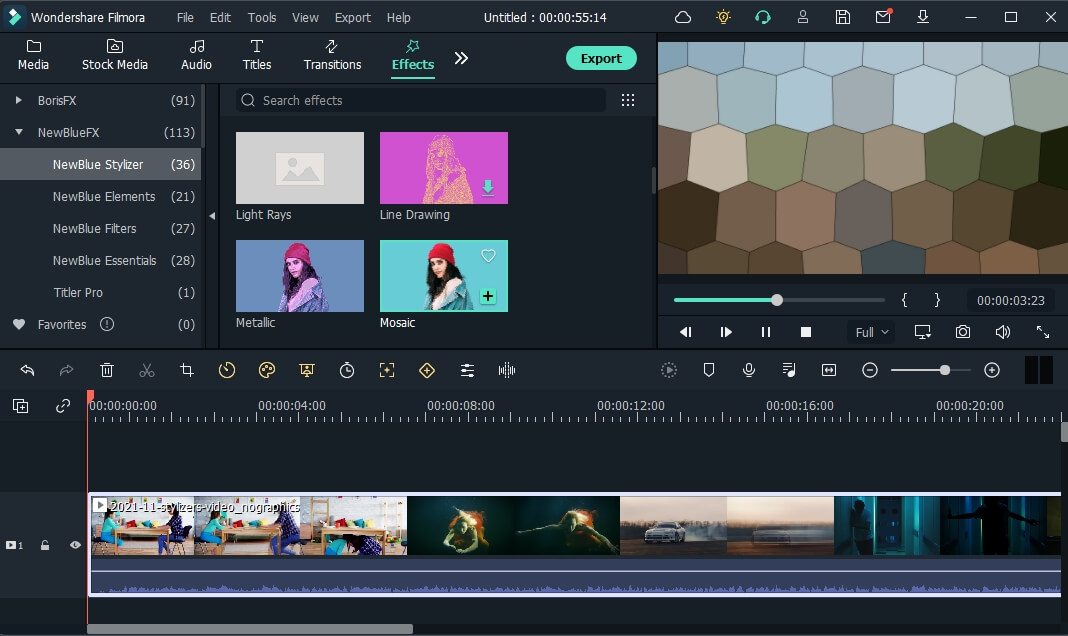
- FX Effects
The program also offers many effects and filters for an extra element in your trailer. The Borix FX is an example of that. Designed in collaboration with the award-winning developer of the same name, Boris FX and its extension Continuum features a wide array of tasteful effects for your convenience. There are over 91 customizable and adjustable presets including types like blurs, stylization, and lights. NewBlue is another option that carries choices of filters, titlers, and stylizers.
Filmora offers different features, tools, and effects to explore that can help make your trailer editing objectives easier and more convenient. Save time and resources by taking advantage of its powerful yet easy-to-use tools.
Free Download For Win 7 or later(64-bit)
Free Download For macOS 10.14 or later
2. Raya and the Last Dragon
The trailer starts out innocently and comes with an adorable and surprising twist. The brief 2-minute trailer is packed with relevant scenes that depict the character’s quest without revealing too much. Many action-packed scenes and emotional interactions are satisfactorily squeezed into the trailer. Excitement builds further with Tamara Bubble’s “I’m That Good” playing in the background on the last minute of the video.
3. Men (2022)
Ingenious combination of sound effects and background music play a distinct role in this 2022 trailer. The female lead’s voice echoing from a tunnel, the haunting piano keys gradually building up the suspense, and the common but cleverly used horror audio effects create a chilling ensemble of haunting scenes in the movie. The sounds gradually rise up as more aggressive and energized scenes flash on the screen, and eventually end back into the sombre intro that leaves the audience with questions.
4. The Farewell
Lulu Wang’s dramatic comedy The Farewell is all about a family hiding the truth of a family member’s terminal illness from the person herself. What makes the trailer special is that it steers away from the sad, melancholic direction and veers toward a feel-good movie vibe. The conflict, struggle, and the beliefs featured in the movie are depicted in the trailer. However, the clever placement of interactions and the uplifting music tug at the audience’s heartstrings and urge them to want to see more.
5. Pokémon Go
Pokémon has become a culture to several generations. Becoming a Pokémon trainer is a secret dream that almost all of us have, even as adults. Niantic’s collaboration with the Pokémon franchise brings people closer to that reality by introducing its AR and location-powered app Pokémon Go. The trailer shows people of all ages living out their trainer dreams in the real world and interacting with Pokémon. The different features of the game are dramatized in a real-life setting, inciting more excitement, and pulling out the nostalgia from its market. The trailer keeps the actual app showcase to a minimum, instead focusing on once again selling that dream to audiences and bringing out the inner child in everyone.
Part 4. How to bring your trailer to the next level?
While it may seem intimidating to create a trailer for your upcoming product, there is no need to worry. It is now easier than ever to create a well-crafted trailer by taking advantage of a program’s tools and templates.
- Stock media
Filmora makes it easy to craft a trailer with only a few clicks. Make use of the program’s media library to gain access to a wealth of resources like stock photos, videos, music, and audio files.
- Keyframing
Keyframing lets you smoothly transition from one scene to another, making it an effective tool for trailers. It is particularly appealing for shows that highlight motion like sports, dancing, and action. Experiment with more than 80 preset templates and create smooth scene transitions with ease.
- Speed Ramping
Speed Ramping is a feature that works perfectly with keyframing. Increase the energy and dynamics in your trailer with 6 preset speed types. You can also customize these templates. There is also no need for concern about the audio - Filmora lets you maintain the audio pitch even when using these features.
- FX Effects
The program also offers many effects and filters for an extra element in your trailer. The Borix FX is an example of that. Designed in collaboration with the award-winning developer of the same name, Boris FX and its extension Continuum features a wide array of tasteful effects for your convenience. There are over 91 customizable and adjustable presets including types like blurs, stylization, and lights. NewBlue is another option that carries choices of filters, titlers, and stylizers.
Filmora offers different features, tools, and effects to explore that can help make your trailer editing objectives easier and more convenient. Save time and resources by taking advantage of its powerful yet easy-to-use tools.
Free Download For Win 7 or later(64-bit)
Free Download For macOS 10.14 or later
Complete Guide to Make a Super Easy Rotating Video Effect
Controlling camera direction to the subject’s hands and filming is trending nowadays. Create this effect by using easy film hacks, as shown in this article.
Many users make rotating illusion videos for TikTok or any branding video. The foremost items to record are explained in this article with detailed instructions. The best editing tool is also clarified below for instant results. So keep reading to get a hand with filming and editing a professional rotating transition video!
Part 1. What is a Rotating Video Illusion/Effect
Rotating transition video is a trending feature used by models and influencers. The brands also use this style to record the model’s videos in advertisements. It could be any makeup transition or clothing transition video.

It helps to indulge the audience with your content and show the after and before transitions. You can try this with any object or any character. But first, let’s figure out the requirements for rotating effects.
Part 2. Prerequisites to Make a Rotating Video Effect
You will need a few items to create a rotating transition video. First, look at the fundamental priorities for creating this feature.
The Subject Matters
To record a successful rotating video, you need a person or a subject to perform in front of the camera. It can be a model hired by a brand, a social influencer, or maybe it’s you. Keep in mind the following things before recording:
- The person should get two different costumes.
- All the actions need to be rehearsed before shooting
- Show affinity and control of the camera.

Shotting Equipment
To record a professional video, you need a good camera. You can use a smartphone to record this footage. There is no need to have a tripod stand or any gear to hold the camera because the camera will be in a rotating position, the same as the subject’s hand.
For this, you need a filmmaker or any person living with you. Just give instructions as shown below to him to record a perfect video for yourself:
- Record the whole video in just one direction.
- Don’t shake the camera because it gives blurry footage.
- Ensure to focus on the subject during recording.
- Don’t zoom in or out while recording the video.
- Keep the subject in the middle of the frame during the recording process.
- The hand rotation timing is the same as the camera’s rotation.
![]()
Note: Ensure to record one footage multiple times so that you can choose the perfect one later for editing.

Filming of the First Footage
To make the footage for the rotating video illusion, we have to record it at least twice to get crystal clear and high-resolution results. Therefore, ensure that we have camera movement in the same direction during all recording times.
![]()
Note: You can film the video either in the vertical format of the camera or in horizontal format. It all depends upon your script!
Follow the below-mentioned steps to record the first footage for the video:
- Hold the camera in a perfect format, whatever you choose.
- Let the subject stand or sit in the middle of the frame.
- The filmmaker can rotate the camera when the subject’s hand rotates.
- Try your best to rotate the camera 180 degrees.
- Ensure that the camera lens faces the ground at the end of the rotation.

After filming the first footage for the video, it’s time to record the second footage to transition between the two.
Filming of the Second Footage
To create a second shot, you have to remember that the costume and location of the filming are different from the first footage. Follow the below steps to record it:
- The first step is to hold the camera in the same direction as the first footage.
- When editing, make sure the subject’s position matches the first footage.
- Make sure the subject’s hand movement is in the opposite direction from the first shot.

Now you have both scenes and footage ready. Next, you have to edit them by inserting them into editing software. Follow the step guides below to perform this action!
Part 3. Step-by-Step Guide to Edit on Filmora
To create a professional rotating video illusion, Wondershare Filmora is an ideal tool. Even beginners can quickly get the hang of it due to its highly engaging system user interface (UI). You will discover how to create a rotating video effect in a few clicks.
Free Download For Win 7 or later(64-bit)
Free Download For macOS 10.14 or later

Step1 Download Wondershare Filmora
To edit your video like a pro, download the most recent version of Wondershare Filmora.
- Download and open Wondershare Filmora on your PC or Mac.
Step2 Import the Footage
Import recorded footage to start the editing process. It is better to have all your footage in one folder before importing all the clips. The main import window locates in the upper left corner when it is first launched.
- Click on the Import icon in the import window’s center.
- Wondershare Filmora will then immediately point you toward your PC
- Navigate to the location where your preferred Videos and Photos are kept.
- Choose every footage you wish to import.
- Once you click Open, the files will import.

It’s time to prepare the footage for editing after inserting it into the Filmora. Follow the next steps to do this!
Step3 Add Footage to the Timeline
The videos you’ve imported will be added to the timeline after that. You can import both footages at once and put them all at once into the timeline.
Alternatively, you can add them one at a time as needed. Follow the procedures as shown to add an item to your timeline.
- To choose a photo or movie, use the right-click
- Holding the Right-click, and move it to the timeline from the bottom.

Your images and videos have been imported into the timeline; now it’s time to trim them according to requirements.
Step4 Trim the Clips
To insert transition effects, you must trim the clip at a specific point and speed up the clip at the required duration. For this, follow the next actions as shown below:
- Playback clips and stop the playhead where you want by pressing the Space button from the Keyboard.
- Then, click on the Split icon present on the playhead.
- It will trim the clip from that point and separate it from its former one.

After splitting or trimming the clips, you now have to adjust the speed of the clips, as shown below!
Step5 Adjust Speed and Duration
There is a need to increase the speed of some scenes where the transition starts or ends. For this, follow the below actions:
- Find the section which needs to speed up, such as in the last half of each rotation.
- Right-click on the section of the clip in the timeline.
- Then, select the Speed option as shown in the icon of the timer present on the upper tab of the timeline.
- Select the Fast option, and if you want to lower the speed, select the Slow option**.**
- Choose the speed range according to your requirement.
- Select that required option and play it back to check if it is correct.

The video is all set; give it the final touches by following the last step, as shown below!
Step6 Playback the Video
After adding and adjusting all the features, double-check the video by playback. If you find any duration issue, review it and adjust it according to your requirement.
You can playback the video by clicking on the Play button. Perform this a few more times to ensure the speed looks okay and adjust if it is too slow or too fast.

You can also view it in full screen by selecting the last option on the tab. If there is no problem, you can export it locally or directly share it on TikTok or anywhere you want to gain views and attract an audience. You can also use it as a magic trick to inspire other people or as a transition for videos!
Conclusion
Keep creating and experimenting with other features on Wondershare Filmora. For example, you can use different effects, try on stock media, and then create or film your own. In this way, you’ll get professional results.
If you are showing new strategies daily to your viewers, they will hook up with you, and it’ll assist in the algorithm working by your side. That’s why keep doing it and enjoying the rest!
Filming of the First Footage
To make the footage for the rotating video illusion, we have to record it at least twice to get crystal clear and high-resolution results. Therefore, ensure that we have camera movement in the same direction during all recording times.
![]()
Note: You can film the video either in the vertical format of the camera or in horizontal format. It all depends upon your script!
Follow the below-mentioned steps to record the first footage for the video:
- Hold the camera in a perfect format, whatever you choose.
- Let the subject stand or sit in the middle of the frame.
- The filmmaker can rotate the camera when the subject’s hand rotates.
- Try your best to rotate the camera 180 degrees.
- Ensure that the camera lens faces the ground at the end of the rotation.
After filming the first footage for the video, it’s time to record the second footage to transition between the two.
Filming of the Second Footage
To create a second shot, you have to remember that the costume and location of the filming are different from the first footage. Follow the below steps to record it:
- The first step is to hold the camera in the same direction as the first footage.
- When editing, make sure the subject’s position matches the first footage.
- Make sure the subject’s hand movement is in the opposite direction from the first shot.
Now you have both scenes and footage ready. Next, you have to edit them by inserting them into editing software. Follow the step guides below to perform this action!
Part 3. Step-by-Step Guide to Edit on Filmora
To create a professional rotating video illusion, Wondershare Filmora is an ideal tool. Even beginners can quickly get the hang of it due to its highly engaging system user interface (UI). You will discover how to create a rotating video effect in a few clicks.
Free Download For Win 7 or later(64-bit)
Free Download For macOS 10.14 or later
Step1 Download Wondershare Filmora
To edit your video like a pro, download the most recent version of Wondershare Filmora.
- Download and open Wondershare Filmora on your PC or Mac.
Step2 Import the Footage
Import recorded footage to start the editing process. It is better to have all your footage in one folder before importing all the clips. The main import window locates in the upper left corner when it is first launched.
- Click on the Import icon in the import window’s center.
- Wondershare Filmora will then immediately point you toward your PC
- Navigate to the location where your preferred Videos and Photos are kept.
- Choose every footage you wish to import.
- Once you click Open, the files will import.
It’s time to prepare the footage for editing after inserting it into the Filmora. Follow the next steps to do this!
Step3 Add Footage to the Timeline
The videos you’ve imported will be added to the timeline after that. You can import both footages at once and put them all at once into the timeline.
Alternatively, you can add them one at a time as needed. Follow the procedures as shown to add an item to your timeline.
- To choose a photo or movie, use the right-click
- Holding the Right-click, and move it to the timeline from the bottom.
Your images and videos have been imported into the timeline; now it’s time to trim them according to requirements.
Step4 Trim the Clips
To insert transition effects, you must trim the clip at a specific point and speed up the clip at the required duration. For this, follow the next actions as shown below:
- Playback clips and stop the playhead where you want by pressing the Space button from the Keyboard.
- Then, click on the Split icon present on the playhead.
- It will trim the clip from that point and separate it from its former one.
After splitting or trimming the clips, you now have to adjust the speed of the clips, as shown below!
Step5 Adjust Speed and Duration
There is a need to increase the speed of some scenes where the transition starts or ends. For this, follow the below actions:
- Find the section which needs to speed up, such as in the last half of each rotation.
- Right-click on the section of the clip in the timeline.
- Then, select the Speed option as shown in the icon of the timer present on the upper tab of the timeline.
- Select the Fast option, and if you want to lower the speed, select the Slow option**.**
- Choose the speed range according to your requirement.
- Select that required option and play it back to check if it is correct.
The video is all set; give it the final touches by following the last step, as shown below!
Step6 Playback the Video
After adding and adjusting all the features, double-check the video by playback. If you find any duration issue, review it and adjust it according to your requirement.
You can playback the video by clicking on the Play button. Perform this a few more times to ensure the speed looks okay and adjust if it is too slow or too fast.
You can also view it in full screen by selecting the last option on the tab. If there is no problem, you can export it locally or directly share it on TikTok or anywhere you want to gain views and attract an audience. You can also use it as a magic trick to inspire other people or as a transition for videos!
Conclusion
Keep creating and experimenting with other features on Wondershare Filmora. For example, you can use different effects, try on stock media, and then create or film your own. In this way, you’ll get professional results.
If you are showing new strategies daily to your viewers, they will hook up with you, and it’ll assist in the algorithm working by your side. That’s why keep doing it and enjoying the rest!
Create a Brand Video to Make Your Business Shine
Brand Video Maker - Wondershare Filmora
Provide abundant video effects - A creative video editor
Powerful color correction and grading
Detailed tutorials provided by the official channel
Create a Brand Video to Make Your Business Shine
Did you know that 8 out of 10 people go ahead and purchase a product just by watching brand videos?
I’m sure you are looking for similar success when it comes to your brand video.
But you can’t just compel the audience by making any video!
- It has to be entertaining and inspirational.
- It has to be innovative.
- It needs to have something that grabs the audience’s attention.
And, with all this, it should also successfully share your brand’s core values.
So, how do you create such a video?
It’s not about simply whipping out a camera and pressing the record button. A lot of thought is involved in creating a brand video, but most importantly, you need a high-quality video editor to refine your video and make it more fun, entertaining, and innovative - A video editor like Wondershare Filmora.
And that’s what this article is about - How to use the various basic and advanced editing tools in Filmora to create a brand video that makes a difference!
But first, let’s have a look at…
Wondershare Filmora’s Brand Video
What’s so special about it, you ask?
For starters, it fits right into the criteria we mentioned above. It’s innovative, entertaining, vibrant, and fun and showcases all the features of Filmora 11.
Here, see for yourself…
From all the new effects to the AR sticker themes and other video editing features like speed ramping, masking, and green screen effect, the video successfully lets the audience know how creative they can get with Filmora.
But did you see that they didn’t put the features out there just like that! They actually used all the basic and advanced video editing features in the video to give us an idea of what it looks like when put in action.
And the video quality, the content, and the flow of the video speak for themselves.
I mean, I watched the video all the way to the end without getting bored for even a single second. And, being a video editor, I might as well get Filmora 11 after watching the highly compelling video!
Now, if you’re also wow-ed by the video and would like to create a similar one, here are some tips on making a successful brand video using Wondershare Filmora.
Tips to Make a Compelling Brand Video
Like I said earlier, making a video is not simply about getting out your camera and starting recording. Many aspects need to be considered for your video to make the desired impact.
Therefore, here are some tips that might come in handy when making your brand video:
1. Define Your Objective and Audience
The very first thing that you need to think about before starting work on your brand video is its objective and audience.

What are you trying to achieve from the video? Do you want to create brand awareness, or do you wish to promote a certain product?
Secondly, who’s your target audience? Is your video projected toward people who have no idea who you and your company are? Or are you addressing an existing customer base? Also, are the audience kids or adults? Because you certainly can’t make a video with cartoon characters for an audience who’s looking for something calm and relaxing, and vice versa.
Once you have your objective and audience sorted, it’s time to get busy!
2. Video Scripting
Based on what you’re trying to achieve from your brand video and the target audience, you can decide on the video’s script. This includes the content, the length, and the editing requirements.

Let’s take your video’s content, for instance:
- If you’re creating a video for an audience that doesn’t know you, you’ll have to start from the basics, explaining who you are, what you do, and the services you offer.
- If you’re trying to create a video that tells your brand’s story, you can either keep it inspirational or you could create fun content that will be remembered for years to come!
- If you’re creating something for the kids, you need to keep it short yet interesting, with many effects that help in grabbing their attention.
Once you have decided what to add to the video, how long it will be, and what its content will be like, you can finally record your video!
3. Video Recording
Now, for many people, recording simply means hitting the record button.
Yes, that might work for vlogs, but when it comes to making a brand video, you need to really put in effort when recording.

For instance, you should have all the video clips and images you want to include in the video at hand. And they should resonate with your brand voice and match with each other as well.
If we take Wondershare Filmora’s brand video as an example, you can see that the whole video has a vibrant and warm feel to it, which can be seen throughout. It’s not that one clip is darker and the other is lighter; the whole thing sort of blends into each other.
That’s what you should take care of when recording your video. Make sure the background, hues, and overall feel of the video clips and images match each other.
4. Using Your Brand Colors and Logo
Another thing that you should keep in mind when recording is to incorporate your brand colors in the video and throw in your logo. For instance, if your brand colors are red and green, make sure to use them in the text in the video. However, if you’re not using text, you can use the colors in the video frame by having a wall or something in the background of the same colors.

As for the logo, it can be placed anywhere in the video so that the audience learns to recognize it.
But why is using your brand colors and logo so important?
Because your brand colors and logo represent your brand and become its identity in the long run. For example, yellow and red are McDonald’s brand colors and its logo, the yellow ‘M’ in arch form, is recognizable even from a distance.
5. Video Editing
Now comes the most important part of making a brand video: The editing! The part where you refine your video and add final touches to it. If you’ve got a stellar video editing software like Wondershare Filmora, it can do wonders for your video.
Wondershare Filmora at a Glance

Wondershare Filmora has plenty of basic and advanced video editing features to add that wow factor to your video. It can turn a plain boring video into something fun, exciting, and watch-worthy.
For example, the motion tracking feature lets you add an object that follows a certain movement in the video. Then we have the AR stickers that help enhance emotions and add personality to your video. Also, the green screen feature lets you add amazing background to your video to give the desired effect.
Filmora also has many video effects, templates, speed ramping, masking, auto beat sync, voice recording, and other features that can really take your brand video to the next level.
I’m sure you now have the hang of how to make a brand video that makes your business pop. But, you still might be confused about how to make the most of these features using Wondershare Filmora.
Therefore, here are some helpful tips on using these features to make an effective brand video that creates brand awareness and drives sales!
Creative Ideas to Make Brand Videos Using Filmora
If you’re up for making a video just like the video we shared earlier, you’ll need to download Wondershare Filmora from the website. And, once you’re through with this guide, nothing can stop you from making a brand video that sells!
With that sorted, here are some valuable tips and ideas to help you along the way:
1. Level Up Your Motion Tracking
As we mentioned earlier, motion tracking means tracking the movement of an object in the video and then applying the same movement to a newly added object, like text, image, logo, or any clipart.
But that’s quite a common practice, right? I mean, every video editor out there is doing it!
However, there are some ways in which you can get creative with the motion tracking feature using Filmora.
Like…
Using Motion-Tracked Texts
While the text in a video looks pretty good itself, you can make it even more impressive by motion tracking it.
For example:
- Attach a piece of text to your introductory title. If there’s a logo or brand name in the introduction, you can add a tagline, a website address, or your Instagram or Twitter handle to it.
- If you want to create a context for the audience, add motion-tracked captions in your brand video. This means the captions move with the movement of the subject. It looks stylish, gives relevant information, and helps tell your brand’s story without any narration.
This Fitbit commercial would be an excellent example of motion-tracked captions:
- If your video has an introductory scene where the frame is moving from one side to the other, you can motion-track the credits so that they move along with the scene and disappear gradually instead of dedicating a single clip to the credits.
- Highlighting important aspects in a video, like places or names of objects with motion-tracked text, can make your video truly amazing and fun to watch. This would be quite essential if you’re making a video for the real estate or travel business.
Here’s an example:
Hence, when working with Filmora, you can do plenty with the motion tracking feature to make a truly amazing video.
2. Add a Fun Factor with AR Stickers
Now that you know how to use the motion tracking feature in Filmora, let me tell you a secret!
If you incorporate face-tracking AR stickers into your video, you can succeed in creating a brand video that will have the audience glued to the screen!
The purpose of adding AR stickers to your videos is to emphasize reactions, portray enhanced emotions, and add an element of fun. This feature works best if you’re creating a brand video projected toward kids.

So, how can you make the most of these AR stickers?
Create Multiple Characters
If you don’t have people to play different characters, don’t fret! With the AR sticker effect, you can create multiple characters for your video.
For example:
If your video has 3 animal characters, you can use AR stickers depicting a panda, cat, and bunny to show the different characters. Similarly, you can add the sticker with glasses to show a nerdy character. Or, if you’re really getting into the story-telling mode, you can use the pirate sticker to show a pirate.
Magnify Emotions
Sometimes it gets challenging to portray a certain emotion in your video. This is where AR stickers come to the rescue!
If you want to show someone in love, you can use the heart-eyes effect. Or, if you want to show that someone is being good, you can use the angel sticker to put a halo on their head.
There are many options! You just have to use your creative cells and conjure up something that’s unique and stands out from the rest.
3. Ace Your Shoot with the Green Screen Effect
A green-screen effect is quite important when it comes to making an exceptional brand video. It has been used in almost all blockbuster movies, and if you’re looking to make a video of a similar level, we’ve got some tried and tested tips to use the green screen effect to its fullest!
Make Sure the Lighting is Even
When it comes to a green screen, the lighting plays an important part. Make sure the green screen is one shade of green, and the lighting on the screen is even. If parts of the green screen are darker than the rest, the chroma key effect won’t be able to distinguish the different shades.
Contrasting Colors
Make sure the subject in the video isn’t wearing any green clothing, or there aren’t many green objects around, as they might disappear when you apply the green screen effect.
Prevent Motion Blur with High Shutter Speed
When shooting with a green screen background, make sure you keep the shutter speed high to avoid motion blur. Ideally, it should be 2x your frame rate for optimum results. But, at the same time, it shouldn’t be too high, as it can lead to a change in video exposure.
If you keep these tips in mind when shooting a video, you can easily use the chroma key effect in Wondershare Filmora to add your desired background and create an outstanding video.
4. Be Innovative with Effects
A video without effects is as bland as water! So, make your video innovative with the impressive variety of effects available in Wondershare Filmora.
But you can’t just add effects to your video like that! You need to understand when and where to use a certain effect properly.
For example:
Tell Your Story With Split Screen Effect
If you’re telling your brand story from the perspective of different individuals, using the split-screen effect is recommended. You can also use this effect to showcase how one thing is related to another in a cause-and-effect way.
Take this Lexus commercial, for example:
It shows the view from inside the car and from a viewer’s perspective.
Emphasize with Pan and Zoom Effect
As the topic of concern of this article is brand videos, the pan and zoom is an ideal effect for it.
You can easily emphasize its importance and give off an emotional storytelling vibe by zooming in on a person’s face or any other object in the frame. You can also use pan and zoom to add a transition to your video. Here’s an example:
Add Thrill with Transitions
To move from one shot to another, it’s important to add a transition effect in between. You can add different transition styles to link the shots with one another, for instance, the match cut transition to match scenes that are not otherwise linked visually. Or the whip pan transition, which involves a quick rotation of the camera’s axis to give the impression that the scene was shot in one take, although it is two separate clips.
Take Wondershare Filmora’s brand video, for example. You can see how seamlessly it moves from one effect to another. It adds value and makes the video fun to watch.
With the variety of transitions in Filmora’s library, you can add all the effects discussed above to your video for stunning results.
You’ve added motion tracking, used AR stickers, created a mystical background with the green screen effect, and gone innovative with effects. Now, it’s time to wrap up this article with…
5. Energize Your Videos with Speed Ramping
Did you know that speed ramping can actually improve your videos tenfold? Speeding up and slowing down the footage at certain points can have a significant impact. For example, the bullet dodge scene in “Matrix” wouldn’t have been so famous if it wasn’t for the slo-mo effect!

You can’t just randomly add speed ramps to your video. There has to be a purpose behind it! Do you want to emphasize something? Do you want to show a transition? Regardless, you need to time your speed ramping properly.
And here are a few tips for it!
Use Slo-Mo For Action Sequences
If your video has an amazing action scene in it, slow down the speed at that point to emphasize the action and movement. For example, a karate kick in slow motion very clearly shows us how the move is actually performed.
Don’t Use Slo-Mo For Too Long
Another tip is to use the slow-mo only for a few seconds to emphasize something. If you prolong it, it won’t have the desired impact and might even cause the audience to lose focus.
Speed Up Footage for Long Processes
If your video shows a long process, like a time-lapse, it is the perfect time to speed up the footage. Not only do long shots lose the viewer’s attention, but they can also get boring too. A sped up footage on the other hand makes your video aesthetically pleasing and entertaining.
Add Music
Using music in videos is quite a common practice; however, it becomes quite exciting if you speed ramp your video according to the music. For example, time the slo-mo effect with the more silent or riverbed parts of the music, and speed it up when the crescendo comes.
You can do this easily with the auto beat-sync feature in Filmora that matches the music with the footage.

How’s that for a thrilling video?
Speed Ramp for Transitions
Here’s a bonus tip! Use speed ramping at the end of one clip and the beginning of the next one to create a seamless flow between the two. It’ll also give a transition effect and make your brand video look professional.
So you see, you have ample options to add a touch of creativity to your brand videos. The key is to use a good video editor and the right video editing tools.
Wrapping Up
Shooting a brand video is easy, and it’s even easier to edit it. All you need is to let your creativity flow!
With Wondershare Filmora 11’s new and advanced editing features, making watch-worthy brand videos that give out the desired message and compel the audience to take some action has never been easier!
And, with the useful video editing tips that we have shared, you are just a click away from taking your business to new heights!
So, if you also want to create a video successfully, just like Filmora’s brand video, follow our tips, use the tricks, and edit away!
Create a Brand Video to Make Your Business Shine
Did you know that 8 out of 10 people go ahead and purchase a product just by watching brand videos?
I’m sure you are looking for similar success when it comes to your brand video.
But you can’t just compel the audience by making any video!
- It has to be entertaining and inspirational.
- It has to be innovative.
- It needs to have something that grabs the audience’s attention.
And, with all this, it should also successfully share your brand’s core values.
So, how do you create such a video?
It’s not about simply whipping out a camera and pressing the record button. A lot of thought is involved in creating a brand video, but most importantly, you need a high-quality video editor to refine your video and make it more fun, entertaining, and innovative - A video editor like Wondershare Filmora.
And that’s what this article is about - How to use the various basic and advanced editing tools in Filmora to create a brand video that makes a difference!
But first, let’s have a look at…
Wondershare Filmora’s Brand Video
What’s so special about it, you ask?
For starters, it fits right into the criteria we mentioned above. It’s innovative, entertaining, vibrant, and fun and showcases all the features of Filmora 11.
Here, see for yourself…
From all the new effects to the AR sticker themes and other video editing features like speed ramping, masking, and green screen effect, the video successfully lets the audience know how creative they can get with Filmora.
But did you see that they didn’t put the features out there just like that! They actually used all the basic and advanced video editing features in the video to give us an idea of what it looks like when put in action.
And the video quality, the content, and the flow of the video speak for themselves.
I mean, I watched the video all the way to the end without getting bored for even a single second. And, being a video editor, I might as well get Filmora 11 after watching the highly compelling video!
Now, if you’re also wow-ed by the video and would like to create a similar one, here are some tips on making a successful brand video using Wondershare Filmora.
Tips to Make a Compelling Brand Video
Like I said earlier, making a video is not simply about getting out your camera and starting recording. Many aspects need to be considered for your video to make the desired impact.
Therefore, here are some tips that might come in handy when making your brand video:
1. Define Your Objective and Audience
The very first thing that you need to think about before starting work on your brand video is its objective and audience.
What are you trying to achieve from the video? Do you want to create brand awareness, or do you wish to promote a certain product?
Secondly, who’s your target audience? Is your video projected toward people who have no idea who you and your company are? Or are you addressing an existing customer base? Also, are the audience kids or adults? Because you certainly can’t make a video with cartoon characters for an audience who’s looking for something calm and relaxing, and vice versa.
Once you have your objective and audience sorted, it’s time to get busy!
2. Video Scripting
Based on what you’re trying to achieve from your brand video and the target audience, you can decide on the video’s script. This includes the content, the length, and the editing requirements.
Let’s take your video’s content, for instance:
- If you’re creating a video for an audience that doesn’t know you, you’ll have to start from the basics, explaining who you are, what you do, and the services you offer.
- If you’re trying to create a video that tells your brand’s story, you can either keep it inspirational or you could create fun content that will be remembered for years to come!
- If you’re creating something for the kids, you need to keep it short yet interesting, with many effects that help in grabbing their attention.
Once you have decided what to add to the video, how long it will be, and what its content will be like, you can finally record your video!
3. Video Recording
Now, for many people, recording simply means hitting the record button.
Yes, that might work for vlogs, but when it comes to making a brand video, you need to really put in effort when recording.
For instance, you should have all the video clips and images you want to include in the video at hand. And they should resonate with your brand voice and match with each other as well.
If we take Wondershare Filmora’s brand video as an example, you can see that the whole video has a vibrant and warm feel to it, which can be seen throughout. It’s not that one clip is darker and the other is lighter; the whole thing sort of blends into each other.
That’s what you should take care of when recording your video. Make sure the background, hues, and overall feel of the video clips and images match each other.
4. Using Your Brand Colors and Logo
Another thing that you should keep in mind when recording is to incorporate your brand colors in the video and throw in your logo. For instance, if your brand colors are red and green, make sure to use them in the text in the video. However, if you’re not using text, you can use the colors in the video frame by having a wall or something in the background of the same colors.
As for the logo, it can be placed anywhere in the video so that the audience learns to recognize it.
But why is using your brand colors and logo so important?
Because your brand colors and logo represent your brand and become its identity in the long run. For example, yellow and red are McDonald’s brand colors and its logo, the yellow ‘M’ in arch form, is recognizable even from a distance.
5. Video Editing
Now comes the most important part of making a brand video: The editing! The part where you refine your video and add final touches to it. If you’ve got a stellar video editing software like Wondershare Filmora, it can do wonders for your video.
Wondershare Filmora at a Glance
Wondershare Filmora has plenty of basic and advanced video editing features to add that wow factor to your video. It can turn a plain boring video into something fun, exciting, and watch-worthy.
For example, the motion tracking feature lets you add an object that follows a certain movement in the video. Then we have the AR stickers that help enhance emotions and add personality to your video. Also, the green screen feature lets you add amazing background to your video to give the desired effect.
Filmora also has many video effects, templates, speed ramping, masking, auto beat sync, voice recording, and other features that can really take your brand video to the next level.
I’m sure you now have the hang of how to make a brand video that makes your business pop. But, you still might be confused about how to make the most of these features using Wondershare Filmora.
Therefore, here are some helpful tips on using these features to make an effective brand video that creates brand awareness and drives sales!
Creative Ideas to Make Brand Videos Using Filmora
If you’re up for making a video just like the video we shared earlier, you’ll need to download Wondershare Filmora from the website. And, once you’re through with this guide, nothing can stop you from making a brand video that sells!
With that sorted, here are some valuable tips and ideas to help you along the way:
1. Level Up Your Motion Tracking
As we mentioned earlier, motion tracking means tracking the movement of an object in the video and then applying the same movement to a newly added object, like text, image, logo, or any clipart.
But that’s quite a common practice, right? I mean, every video editor out there is doing it!
However, there are some ways in which you can get creative with the motion tracking feature using Filmora.
Like…
Using Motion-Tracked Texts
While the text in a video looks pretty good itself, you can make it even more impressive by motion tracking it.
For example:
- Attach a piece of text to your introductory title. If there’s a logo or brand name in the introduction, you can add a tagline, a website address, or your Instagram or Twitter handle to it.
- If you want to create a context for the audience, add motion-tracked captions in your brand video. This means the captions move with the movement of the subject. It looks stylish, gives relevant information, and helps tell your brand’s story without any narration.
This Fitbit commercial would be an excellent example of motion-tracked captions:
- If your video has an introductory scene where the frame is moving from one side to the other, you can motion-track the credits so that they move along with the scene and disappear gradually instead of dedicating a single clip to the credits.
- Highlighting important aspects in a video, like places or names of objects with motion-tracked text, can make your video truly amazing and fun to watch. This would be quite essential if you’re making a video for the real estate or travel business.
Here’s an example:
Hence, when working with Filmora, you can do plenty with the motion tracking feature to make a truly amazing video.
2. Add a Fun Factor with AR Stickers
Now that you know how to use the motion tracking feature in Filmora, let me tell you a secret!
If you incorporate face-tracking AR stickers into your video, you can succeed in creating a brand video that will have the audience glued to the screen!
The purpose of adding AR stickers to your videos is to emphasize reactions, portray enhanced emotions, and add an element of fun. This feature works best if you’re creating a brand video projected toward kids.
So, how can you make the most of these AR stickers?
Create Multiple Characters
If you don’t have people to play different characters, don’t fret! With the AR sticker effect, you can create multiple characters for your video.
For example:
If your video has 3 animal characters, you can use AR stickers depicting a panda, cat, and bunny to show the different characters. Similarly, you can add the sticker with glasses to show a nerdy character. Or, if you’re really getting into the story-telling mode, you can use the pirate sticker to show a pirate.
Magnify Emotions
Sometimes it gets challenging to portray a certain emotion in your video. This is where AR stickers come to the rescue!
If you want to show someone in love, you can use the heart-eyes effect. Or, if you want to show that someone is being good, you can use the angel sticker to put a halo on their head.
There are many options! You just have to use your creative cells and conjure up something that’s unique and stands out from the rest.
3. Ace Your Shoot with the Green Screen Effect
A green-screen effect is quite important when it comes to making an exceptional brand video. It has been used in almost all blockbuster movies, and if you’re looking to make a video of a similar level, we’ve got some tried and tested tips to use the green screen effect to its fullest!
Make Sure the Lighting is Even
When it comes to a green screen, the lighting plays an important part. Make sure the green screen is one shade of green, and the lighting on the screen is even. If parts of the green screen are darker than the rest, the chroma key effect won’t be able to distinguish the different shades.
Contrasting Colors
Make sure the subject in the video isn’t wearing any green clothing, or there aren’t many green objects around, as they might disappear when you apply the green screen effect.
Prevent Motion Blur with High Shutter Speed
When shooting with a green screen background, make sure you keep the shutter speed high to avoid motion blur. Ideally, it should be 2x your frame rate for optimum results. But, at the same time, it shouldn’t be too high, as it can lead to a change in video exposure.
If you keep these tips in mind when shooting a video, you can easily use the chroma key effect in Wondershare Filmora to add your desired background and create an outstanding video.
4. Be Innovative with Effects
A video without effects is as bland as water! So, make your video innovative with the impressive variety of effects available in Wondershare Filmora.
But you can’t just add effects to your video like that! You need to understand when and where to use a certain effect properly.
For example:
Tell Your Story With Split Screen Effect
If you’re telling your brand story from the perspective of different individuals, using the split-screen effect is recommended. You can also use this effect to showcase how one thing is related to another in a cause-and-effect way.
Take this Lexus commercial, for example:
It shows the view from inside the car and from a viewer’s perspective.
Emphasize with Pan and Zoom Effect
As the topic of concern of this article is brand videos, the pan and zoom is an ideal effect for it.
You can easily emphasize its importance and give off an emotional storytelling vibe by zooming in on a person’s face or any other object in the frame. You can also use pan and zoom to add a transition to your video. Here’s an example:
Add Thrill with Transitions
To move from one shot to another, it’s important to add a transition effect in between. You can add different transition styles to link the shots with one another, for instance, the match cut transition to match scenes that are not otherwise linked visually. Or the whip pan transition, which involves a quick rotation of the camera’s axis to give the impression that the scene was shot in one take, although it is two separate clips.
Take Wondershare Filmora’s brand video, for example. You can see how seamlessly it moves from one effect to another. It adds value and makes the video fun to watch.
With the variety of transitions in Filmora’s library, you can add all the effects discussed above to your video for stunning results.
You’ve added motion tracking, used AR stickers, created a mystical background with the green screen effect, and gone innovative with effects. Now, it’s time to wrap up this article with…
5. Energize Your Videos with Speed Ramping
Did you know that speed ramping can actually improve your videos tenfold? Speeding up and slowing down the footage at certain points can have a significant impact. For example, the bullet dodge scene in “Matrix” wouldn’t have been so famous if it wasn’t for the slo-mo effect!
You can’t just randomly add speed ramps to your video. There has to be a purpose behind it! Do you want to emphasize something? Do you want to show a transition? Regardless, you need to time your speed ramping properly.
And here are a few tips for it!
Use Slo-Mo For Action Sequences
If your video has an amazing action scene in it, slow down the speed at that point to emphasize the action and movement. For example, a karate kick in slow motion very clearly shows us how the move is actually performed.
Don’t Use Slo-Mo For Too Long
Another tip is to use the slow-mo only for a few seconds to emphasize something. If you prolong it, it won’t have the desired impact and might even cause the audience to lose focus.
Speed Up Footage for Long Processes
If your video shows a long process, like a time-lapse, it is the perfect time to speed up the footage. Not only do long shots lose the viewer’s attention, but they can also get boring too. A sped up footage on the other hand makes your video aesthetically pleasing and entertaining.
Add Music
Using music in videos is quite a common practice; however, it becomes quite exciting if you speed ramp your video according to the music. For example, time the slo-mo effect with the more silent or riverbed parts of the music, and speed it up when the crescendo comes.
You can do this easily with the auto beat-sync feature in Filmora that matches the music with the footage.
How’s that for a thrilling video?
Speed Ramp for Transitions
Here’s a bonus tip! Use speed ramping at the end of one clip and the beginning of the next one to create a seamless flow between the two. It’ll also give a transition effect and make your brand video look professional.
So you see, you have ample options to add a touch of creativity to your brand videos. The key is to use a good video editor and the right video editing tools.
Wrapping Up
Shooting a brand video is easy, and it’s even easier to edit it. All you need is to let your creativity flow!
With Wondershare Filmora 11’s new and advanced editing features, making watch-worthy brand videos that give out the desired message and compel the audience to take some action has never been easier!
And, with the useful video editing tips that we have shared, you are just a click away from taking your business to new heights!
So, if you also want to create a video successfully, just like Filmora’s brand video, follow our tips, use the tricks, and edit away!
Thousands Already Know What Ezgif Is and So Can You
Thousands Already Know Ezgif and So Can You
An easy yet powerful editor
Numerous effects to choose from
Detailed tutorials provided by the official channel
Everything about the know-how of Ezgif creator is here!
In this article
01 [How to Make a GIF on Ezgif](#Part 1)
02 [Video to GIF Made Easy Only With Ezgif](#Part 2)
03 [How to Crop a Video With Ezgif & Filmora](#Part 3)
Part 1 How to Make a GIF on Ezgif
GIFs take you to an exciting journey of expression and impact. With the introduction of GIF keyboards and a variety of creator tools, you are granted the liberty to use pre made GIFs as well as create stirring ones of your own to deliver your messages in unique and impactful ways. When it comes to creating GIFs, the online market is always ready with a heap of creator choices. While each of these tools is distinctive in its own way, some of them are leaders in making the mark among users.
About the Ezgif GIF Maker
Ezgif online GIF maker tool is amongst the most preferred GIF creators in today’s times. This one is a free and super convenient online tool that lets you create and convert animated GIFs in just a few clicks. Compatible with your Windows or MacOS devices, this tool is evidently among the fastest GIF creators of its time.
Apart from creating GIFs, you can also use this tool to cut, crop, trim and resize videos, ass and remove GIF backgrounds and much more. The tool is compatible with almost all common video and image formats; hence you can easily escape the glitch of sticking to a particular format for using this tool.
Here’s how you can use this tool for making next level GIFs:
Step 1: Launch the Tool
Open the Ezgif maker tool in your favorite browser. In the site’s welcome page, tap on ‘GIF Maker’ from the top toolbar.

Step 2: Upload Your Media
Click on ‘Browse’ to select your desired video or a set of still captures from your device and upload the same to the GIF maker timeline. You can choose from a manually or an alphabetically ordered upload. Ensure that the total file size is restricted within 100 MB.


Step 3: Let’s Create!
Click on ‘Upload and Make a GIF’. You will be shown a preview of your creation. At this point, you can customize the GIF with effects, filters and texts.

Step 4: Visual Adjustments
When using still images, consider arranging them in a particular order with the ‘Drag and Drop method’. You can skip this step if you are satisfied with the default arrangement. If you are creating a GIF from a video, pay attention to adjust its play duration.

Step 5: Beautify and Save Your Artwork
When you are satisfied with your work, tap ‘Make a GIF’. You can see your final creation appear. Click on ‘Save’ to add your artwork to your device memory. You can also customize your creation from the toolbar below the created GIF before saving it.

Part 2 Video to GIF Made Easy Only With Ezgif
As stated earlier, you can create GIFs from images and convert videos to GIFs using the Ezgif converter. What’s interesting is that the conversion process is quite fast and you are allowed to play with your editing skills to your heart’s content while customizing your artwork. Given below is a quick guide to convert videos in any common file format into impressive GIFs:
● Step 1
Visit ezgif.com, the official site of the Ezgif creator tool, in any suitable browser of your choice. In the homepage of the tool’s website, navigate to the toolbar at the top and click on ‘Video to GIF’.
Ezgif Video to GIF Converter Link:

● Step 2
In the converter interface, you can either upload a locally saved video from your device by clicking on ‘Browse’ or copy-paste a desired video URL in the address box and tap ‘Upload Video’.

● Step 3
In the tool’s editing interface, set required play duration for your video by setting the start and end points of the clip.
● Step 4
When you are done, click on ‘Convert to GIF’ and wait for the conversion process to finish. You can now see your created GIF in the pop up window that appears next. Click on ‘Save’ option in the toolbar beneath the created GIF to download your creation to your device.
Part 3 How to Crop a Video With Ezgif & Filmora
Ezgif is a multi faceted online tool that allows you to take up a variety of tasks in addition to just creating classy GIFs. Video to GIF conversion is one thing, besides that, you can also crop your videos using this tool. Wondering how to go about the process? Here’s a quick, stepwise tutorial to answer this for you. Follow the steps given below to crop your videos with a blink:
● Step 1: Launch the Ezgif Crop Tool
Open the official Ezgif website and navigate to the ‘Crop Video’ tab on the top toolbar in the welcome page. You can alternatively click on the link given below to reach the ‘Crop Video’ interface directly.
● Step 2: Upload Your Video
To upload a locally saved video, click on the ‘Choose File’ button. You will see the file name appear beside it. You can alternatively, copy-paste the URL of a desired video in the address box. Click on ‘Upload Video’ for the file to get uploaded.

● Step 3: Adjust Video Borders
To crop the video to a desired part, you need to set its borders within the required section. To do this, ‘Hold and Drag’ the mouse to highlight a desired section. Now leave the mouse to see the highlighted section within a frame.

● Step 4: Final Touches
After you have the desired section, scroll down to find some adjustment options. Here, you can resize, set aspect ratio and make frame adjustments to your cropping clip. When selecting the output video format, you can either choose to stick with the original file format or change to mp4.
Tap on ‘Crop Video’ when you are done making the changes. The conversion process may take a few seconds. You can enjoy looking at the swaying kitten in the meantime.

● Step 5: Download and Save
Once the conversion finishes, you will see your cropped video appear on the screen. Click on ‘Save’ from the toolbar below the video to download the sane to your device.

Ezgif is certainly an affordable GIF creator and video cropper tool, no doubt about that, but if you are looking for an alternative, you can consider using the Filmora GIF creator software for cropping a video to your favorite part. This one is a free to use, quick and smart tool with the most convenient user interface.
The huge audio-visual effects library of this software allows you to add sound, music and overlays to your clips and intensify them with text and filters. Here’s a quick tutorial on cropping videos with this software:
● Step 1
Download and install Filmora in your device. When finished, launch the software to reach its editor timeline.
Filmora Crop Video Tool Direct Link:
● Step 2
Within the timeline, select and right click on a desired video. Select ‘Crop and Zoom’ for the drop down menu. You can alternatively click on the ‘Crop’ icon.
● Step 3
In the pop-up window that follows, either choose a preset aspect ratio, or click on ‘Custom’ and navigate the rectangle to select a clip area to crop.

Wondershare Filmora - Best Video Editor for Mac/Windows
5,481,435 people have downloaded it.
Build unique custom animations without breaking a sweat.
Focus on creating epic stories and leave the details to Filmora’s auto features.
Start a creative adventure with drag & drop effects and endless possibilities.
Filmora simplifies advanced features to save you time and effort.
Filmora cuts out repetition so you can move on to your next creative breakthrough.
● Key Takeaways from This Episode →
● Ezgif is one of the most suitable GIF creator and converter tools available online that allows you to explore your skills and create top quality GIFs, convert videos to GIFs and crop video clips, all at one place.
●This one is a quick and hassle free solution to your video and GIF editing concerns. When browsing through its feasible alternatives, you can safely count upon the Filmora video editor and GIF creator software for making and customizing GIFs and video clips.
Everything about the know-how of Ezgif creator is here!
In this article
01 [How to Make a GIF on Ezgif](#Part 1)
02 [Video to GIF Made Easy Only With Ezgif](#Part 2)
03 [How to Crop a Video With Ezgif & Filmora](#Part 3)
Part 1 How to Make a GIF on Ezgif
GIFs take you to an exciting journey of expression and impact. With the introduction of GIF keyboards and a variety of creator tools, you are granted the liberty to use pre made GIFs as well as create stirring ones of your own to deliver your messages in unique and impactful ways. When it comes to creating GIFs, the online market is always ready with a heap of creator choices. While each of these tools is distinctive in its own way, some of them are leaders in making the mark among users.
About the Ezgif GIF Maker
Ezgif online GIF maker tool is amongst the most preferred GIF creators in today’s times. This one is a free and super convenient online tool that lets you create and convert animated GIFs in just a few clicks. Compatible with your Windows or MacOS devices, this tool is evidently among the fastest GIF creators of its time.
Apart from creating GIFs, you can also use this tool to cut, crop, trim and resize videos, ass and remove GIF backgrounds and much more. The tool is compatible with almost all common video and image formats; hence you can easily escape the glitch of sticking to a particular format for using this tool.
Here’s how you can use this tool for making next level GIFs:
Step 1: Launch the Tool
Open the Ezgif maker tool in your favorite browser. In the site’s welcome page, tap on ‘GIF Maker’ from the top toolbar.
Step 2: Upload Your Media
Click on ‘Browse’ to select your desired video or a set of still captures from your device and upload the same to the GIF maker timeline. You can choose from a manually or an alphabetically ordered upload. Ensure that the total file size is restricted within 100 MB.
Step 3: Let’s Create!
Click on ‘Upload and Make a GIF’. You will be shown a preview of your creation. At this point, you can customize the GIF with effects, filters and texts.
Step 4: Visual Adjustments
When using still images, consider arranging them in a particular order with the ‘Drag and Drop method’. You can skip this step if you are satisfied with the default arrangement. If you are creating a GIF from a video, pay attention to adjust its play duration.
Step 5: Beautify and Save Your Artwork
When you are satisfied with your work, tap ‘Make a GIF’. You can see your final creation appear. Click on ‘Save’ to add your artwork to your device memory. You can also customize your creation from the toolbar below the created GIF before saving it.
Part 2 Video to GIF Made Easy Only With Ezgif
As stated earlier, you can create GIFs from images and convert videos to GIFs using the Ezgif converter. What’s interesting is that the conversion process is quite fast and you are allowed to play with your editing skills to your heart’s content while customizing your artwork. Given below is a quick guide to convert videos in any common file format into impressive GIFs:
● Step 1
Visit ezgif.com, the official site of the Ezgif creator tool, in any suitable browser of your choice. In the homepage of the tool’s website, navigate to the toolbar at the top and click on ‘Video to GIF’.
Ezgif Video to GIF Converter Link:
● Step 2
In the converter interface, you can either upload a locally saved video from your device by clicking on ‘Browse’ or copy-paste a desired video URL in the address box and tap ‘Upload Video’.
● Step 3
In the tool’s editing interface, set required play duration for your video by setting the start and end points of the clip.
● Step 4
When you are done, click on ‘Convert to GIF’ and wait for the conversion process to finish. You can now see your created GIF in the pop up window that appears next. Click on ‘Save’ option in the toolbar beneath the created GIF to download your creation to your device.
Part 3 How to Crop a Video With Ezgif & Filmora
Ezgif is a multi faceted online tool that allows you to take up a variety of tasks in addition to just creating classy GIFs. Video to GIF conversion is one thing, besides that, you can also crop your videos using this tool. Wondering how to go about the process? Here’s a quick, stepwise tutorial to answer this for you. Follow the steps given below to crop your videos with a blink:
● Step 1: Launch the Ezgif Crop Tool
Open the official Ezgif website and navigate to the ‘Crop Video’ tab on the top toolbar in the welcome page. You can alternatively click on the link given below to reach the ‘Crop Video’ interface directly.
● Step 2: Upload Your Video
To upload a locally saved video, click on the ‘Choose File’ button. You will see the file name appear beside it. You can alternatively, copy-paste the URL of a desired video in the address box. Click on ‘Upload Video’ for the file to get uploaded.
● Step 3: Adjust Video Borders
To crop the video to a desired part, you need to set its borders within the required section. To do this, ‘Hold and Drag’ the mouse to highlight a desired section. Now leave the mouse to see the highlighted section within a frame.
● Step 4: Final Touches
After you have the desired section, scroll down to find some adjustment options. Here, you can resize, set aspect ratio and make frame adjustments to your cropping clip. When selecting the output video format, you can either choose to stick with the original file format or change to mp4.
Tap on ‘Crop Video’ when you are done making the changes. The conversion process may take a few seconds. You can enjoy looking at the swaying kitten in the meantime.
● Step 5: Download and Save
Once the conversion finishes, you will see your cropped video appear on the screen. Click on ‘Save’ from the toolbar below the video to download the sane to your device.
Ezgif is certainly an affordable GIF creator and video cropper tool, no doubt about that, but if you are looking for an alternative, you can consider using the Filmora GIF creator software for cropping a video to your favorite part. This one is a free to use, quick and smart tool with the most convenient user interface.
The huge audio-visual effects library of this software allows you to add sound, music and overlays to your clips and intensify them with text and filters. Here’s a quick tutorial on cropping videos with this software:
● Step 1
Download and install Filmora in your device. When finished, launch the software to reach its editor timeline.
Filmora Crop Video Tool Direct Link:
● Step 2
Within the timeline, select and right click on a desired video. Select ‘Crop and Zoom’ for the drop down menu. You can alternatively click on the ‘Crop’ icon.
● Step 3
In the pop-up window that follows, either choose a preset aspect ratio, or click on ‘Custom’ and navigate the rectangle to select a clip area to crop.
Wondershare Filmora - Best Video Editor for Mac/Windows
5,481,435 people have downloaded it.
Build unique custom animations without breaking a sweat.
Focus on creating epic stories and leave the details to Filmora’s auto features.
Start a creative adventure with drag & drop effects and endless possibilities.
Filmora simplifies advanced features to save you time and effort.
Filmora cuts out repetition so you can move on to your next creative breakthrough.
● Key Takeaways from This Episode →
● Ezgif is one of the most suitable GIF creator and converter tools available online that allows you to explore your skills and create top quality GIFs, convert videos to GIFs and crop video clips, all at one place.
●This one is a quick and hassle free solution to your video and GIF editing concerns. When browsing through its feasible alternatives, you can safely count upon the Filmora video editor and GIF creator software for making and customizing GIFs and video clips.
Also read:
- In 2024, Vintage Film Effect 1980S - How to Create
- How to Make A Jaw-Dropping Time Lapse Video? Full Guide for 2024
- In 2024, Are You Looking for the Best App to Prank Your Friends? Here Is a Complete Guide on the Funcall App, How to Use It to Change Your Voice, and Its Best Alternatives
- 2024 Approved Top 10 Best Free Video Compressors
- 2024 Approved How To Make Ninja Jump Effect
- 3 Effective Methods to Correct Color Distortion in Videos for 2024
- Updated Step by Step to Split a Clip in VLC
- Updated 10+ Top Unlimited FCPX Slideshow Templates
- Have You Ever Wondered How to Add Camera Shake to Video in Adobe After Effects? Let Us Share with You some Tips and Tricks on How to Do Just That
- New How to Splice Videos Together on iPhone
- New How to Add Green Screen Effects In Phhotoshop for 2024
- What Is a Transparent Logo and Why Do You Need It for 2024
- New In 2024, Best 6 Online MP4 Croppers
- New How to Create OBS Slideshow for 2024
- Updated So, without Wasting Time, Let Me Show You How to Mask a Video in Wondershare Filmora. Lets Get Started
- New Top Ever Ways Make Tiktok Slideshow Solved
- Updated 5 Simple Tools to Merge Video and Audio Online
- Updated 2024 Approved What Are AR Emoji Stickers & How to Add Them to Your Video
- New How To Change Text Color In Premiere Pro for 2024
- Updated 11 Ways To Radial Blur To Images (iPhone/Android/Mac/Windows) for 2024
- Best Jump Cut Editing Tricks for 2024
- New In 2024, Little Known Ways of Adding Emojis to Photos on iPhone & Android 2023
- New In 2024, How to Create Sports Intro and YouTube Endscreen?
- Updated How to Create a Video Slideshow in iMovie
- New In 2024, Add Emoji to Linkedin Post – 5 Tips You Would Like to Know
- Updated 2024 Approved How to Loop YouTube Videos on iPhone
- Updated In 2024, 7 Ways to Make GIF From Videos on Mac
- How to Shoot Cinematic Footage From a Smartphone for 2024
- Offering The Best Understanding of Performing iMovie Slow Motion Video for 2024
- 2024 Approved The Best Way To Color Grading & Color Correction in Filmora
- New In 2024, How to Add Filter to Video in Premiere Pro?
- In 2024, Are You Seeking an Answer for What Is a LUT in the Video? In This Article, We Will Provide You with Detailed Information About LUTs and Their Utility
- New 2024 Approved Best 6 WebM to GIF Converters
- What Is Lumetri Color and How Do You Use It in Adobe After Effects? Find Out the Numerous Functions of Lumetri Panel and Ways to Apply Them to Your Video for 2024
- 2024 Approved How to Loop Videos with iMovie
- Updated 2024 Approved Updated 8 Ways to Merge SRT with MP4
- Add Zoom Blur Effect In Photoshop Step by Step for 2024
- Updated 2024 Approved 3D LUT Mobile App Review - A Composite Application for Editing Media
- Updated Best 12 Best Freeze Frame Video Editing Examples for 2024
- Updated Color Correction Basics (S-LOG Footage) for 2024
- Updated A Review On 3D LUT Creator for 2024
- Updated Learn How to Make a Gaming Montage - Guide & Tips
- How to Get VHS Filter and Glitch Filter to Your Images or Videos for 2024
- Updated How to Create a Dynamic Text Animation in Filmora — Step-By-Step for 2024
- New 2024 Approved Working Through the Details of iMovie Slow Motion Video Making 100 Effective
- 2024 Approved Top 10 Audio Visualizers Windows, Mac, Android, iPhone & Online
- New 2024 Approved General Knowledge About MP4 Format and Best MP4 Video Editor
- Updated How to Make a Smooth Speed Ramping in Premiere Pro?
- In 2024, Here are Some Pro Tips for Pokemon Go PvP Battles On OnePlus Open | Dr.fone
- How to Track Samsung Galaxy S24 by Phone Number | Dr.fone
- Remove Oppo Lock Screen without Password(Oppo A38)
- Set Your Preferred Job Location on LinkedIn App of your Apple iPhone 8 | Dr.fone
- How to Spy on Text Messages from Computer & Xiaomi Redmi Note 13 Pro 5G | Dr.fone
- In 2024, CatchEmAll Celebrate National Pokémon Day with Virtual Location On Oppo A79 5G | Dr.fone
- 5 Solutions For Realme 10T 5G Unlock Without Password
- Reset pattern lock Tutorial for Honor Magic V2
- In 2024, The Top 5 Android Apps That Use Fingerprint Sensor to Lock Your Apps On Xiaomi Redmi 13C
- In 2024, Best 3 Realme C51 Emulator for Mac to Run Your Wanted Android Apps | Dr.fone
- The Magnificent Art of Pokemon Go Streaming On Honor 100 Pro? | Dr.fone
- In 2024, Remove Device Supervision From your iPhone 6 Plus
- Easy Tutorial for Activating iCloud on iPhone 11 Pro Max Safe and Legal
- Ways to stop parent tracking your Motorola Edge 2023 | Dr.fone
- How do i sign a .xls files electronically
- In 2024, Why is iPogo not working On Tecno Spark 20C? Fixed | Dr.fone
- 5 Quick Methods to Bypass Samsung Galaxy M34 5G FRP
- How to Bypass Android Lock Screen Using Emergency Call On Poco M6 5G?
- 3 Things You Must Know about Fake Snapchat Location On Samsung Galaxy A54 5G | Dr.fone
- Stellar Data Recovery for iPhone 6s failed to recognize my iPhone. How to fix it? | Stellar
- Full Guide to Unlock Your Samsung Galaxy M54 5G
- Mastering Android Device Manager The Ultimate Guide to Unlocking Your Itel P55 5G Device
- Updated Best 4 Morgan Freeman Voice Generator Tools for Voice Cloning
- How To Remove Screen Lock PIN On Xiaomi Redmi 12 5G Like A Pro 5 Easy Ways
- Google Play Services Wont Update? 12 Fixes are Here on Infinix Smart 8 HD | Dr.fone
- Full Guide to Bypass Samsung FRP
- How to Unlock SIM Card on Nokia G22 online without jailbreak
- How To Transfer WhatsApp From Apple iPhone 15 Pro Max to other iPhone 15 devices? | Dr.fone
- Can you play MP4 on Motorola Razr 40?
- 9 Best Free Android Monitoring Apps to Monitor Phone Remotely For your OnePlus 11R | Dr.fone
- In 2024, How To Track IMEI Number Of Samsung Galaxy S24 Through Google Earth?
- In 2024, 5 Ways To Teach You To Transfer Files from Itel P40+ to Other Android Devices Easily | Dr.fone
- In 2024, Top 10 Free Football Streaming Websites for Live Matches
- 9 Best Free Android Monitoring Apps to Monitor Phone Remotely For your Google Pixel 8 | Dr.fone
- Title: Updated Trailer Guide for Creators and Developers
- Author: Chloe
- Created at : 2024-04-24 07:08:15
- Updated at : 2024-04-25 07:08:15
- Link: https://ai-editing-video.techidaily.com/updated-trailer-guide-for-creators-and-developers/
- License: This work is licensed under CC BY-NC-SA 4.0.
