
:max_bytes(150000):strip_icc():format(webp)/how-to-watch-tiktok-without-the-app-63a4562e4c4b4bd69477425853809a35.jpg)
Updated Using One of the Best Converter Tools to Turn GIFs Into PNG or JPG. Here, Learn About the Ten Best Ones for Different Operating Systems, with Details on Features, Prices, and More
Using One of the Best Converter Tools to Turn GIFs Into PNG or JPG. Here, Learn About the Ten Best Ones for Different Operating Systems, with Details on Features, Prices, and More
A GIF to JPG converter software is responsible for altering files in the animated GIF format to static JPG or PNG image format. Since GIFs are not compatible with some sites, platforms, or documentation types, this is a safer alternative.
JPG, PNG, and even APNG formats are easier to download, work on most device/OS types, and are simpler to print. They have a lesser size as well.
If you are looking for a stable converter, we present the top tools for that here, no matter what kind of devices you use! Read to know which ones you can use based on their features, usability, and support.
10 Best Tools to convert GIF into JPG/PNG/APNG
The following are the best converters for turning GIF into JPG, APNG, or PNG formats.
1. OnlineConvert
One of the simplest GIF to JPG converter types is OnlineConvert. It has diverse customization settings. For example, you can choose the image size and quality or use AI-powered optimization support.

How to download: iOS , Android , Online tool , Chrome extension , Firefox extension
Rating: 3.7 stars out of 5 (Google Play Store)
Compatible OS: web-based, iOS, Android
Price: Free
Main Features:
- Advanced features like Equalize, Stabilize, etc.
- Decide the black/white threshold limits.
- Activate AI enable for optimized conversion.
- Set cropping limits.
Pros
- Decide the image quality.
- Choose image width/height.
- Add an example file.
Cons
- The maximum size of the file is 100 MB.
- It cannot convert encrypted files.
2. Ezgif
Ezgif is another simple-to-use online tool with substantial image conversion benefits. You can add your GIF files from the Cloud account or computer and directly get JPG files. PNG does not have a direct conversion here, though.

How to download: Online tool
Rating: 100 out of 100 (Scam Detector)
Compatible OS: web-based browsers
Price: Free
Main Features:
- Support a maximum of 50 MB file size for images.
- Direct converter to JPG.
- Set background color to white.
- Add URL link of online GIF files.
Pros
- Instant conversion.
- No changes to original file quality.
- Add from the device.
Cons
- Upload and convert files one by one.
- No cloud support.
3. CloudConvert
CloudConvert is a high-quality online GIF to PNG converter that people can use to convert high-quality image files with no quality loss. First, choose your files, go for settings, and then the converting will be finished in minutes.

How to download: Online tool
Rating: 4.5 stars of 5 (Capterra)
Compatible OS: web-based
Price: Packages/Subscriptions- Costs start at USD 8 per conversion minute.
Main Features:
- Select a file from various formats, like URL, Device, or cloud accounts.
- Set crop/scape adjustments.
- Note image width and height.
- Select to strip or vice versa.
Pros
- Customize output file type.
- Support watermark security feature. It protects your images and graphic files from being stolen, used, or altered without the owner’s permission.
- High-quality image resolution is available.
Cons
- Slightly complex for beginners to understand or use initially.
- Bigger files take a longer time to load.
4. Convertio
Convertio is another top-grade GIF to JPGF converter which people can utilize to prepare high-definition image files from animated pictures. You can make multiple conversions and get high-priority customer support.

How to download: Online tool
Rating: 4.9 stars of 5 (Capterra)
Compatible OS: web-based
Price: Light- USD 9.99/month, Basic- USD 14.99/month, Unlimited- USD 25.99/month
Main Features:
- Get at least 25 concurrent conversion benefits with paid plans.
- Adfree pages.
- Unlimited conversions are only supported by the highest-paid plan.
- Unlimited allowed conversion minutes for users daily.
Pros
- The drag and drop function is smooth to use.
- Add files with at least 100 MB file size.
- Multiple formats are supported.
Cons
- Signup is necessary for a higher file size allowance.
- More limited service for free.
5. Soda PDF
This GIF to PNG converter is top-notch and used for changing big and small-sized GIF files into static PNG or JPG formats. However, no issues with image quality would be noticeable. You can use it for multiple conversions.

How to download: Online tool
Rating: 3.4 stars of 5 (Capterra)
Compatible OS: Online, Mac, Windows, Linux
Price: Standard- USD 6.73/month, Pro- USD 8.23/month, Business- USD 16.63/month
Main Features:
- Add GIF files from the computer, Dropbox, or Google Drive.
- Files are stored for a full day.
- Direct download button available.
- Redo conversion in case of issues.
Pros
- A desktop version with offline usage is available.
- The drag and drop function makes the converting process more convenient.
- Quick file saving.
Cons
- Cannot access old converted files from servers.
- Ads are available.
6. FreeConvert.com
FreeConvert is operable for multiple types of file conversions. In addition, you can store your files in the cloud and handle various tasks simultaneously, depending on your plan.

How to download: Online tool , Chrome extension
Rating: 58.40 out of 100 (Scam Detector)
Compatible OS: Windows, Mac, Linux
Price: 24-hour Pass- USD 12.99, Pro- USD 25.99/month, Basic- USD 9.99/month, Standard- USD 14.99/month.
Main Features:
- Max 1GB of size allows for free conversion.
- Auto-orientation setting available.
- Choose to compress the file or not.
- Insert from device or cloud.
Pros
- You can add files from the computer, Dropbox, Google Drive, or URL.
- It enables you to strip attached metadata.
- Adjust image size freely.
Cons
- Limited customizations.
- No free plan.
7. Zamzar
You can efficiently utilize this online tool to convert different file formats into another, like GIF into PNG. You can access the files you created for at least 24 hours after the conversion. For more time, upgrade your account.

How to download: Online tool
Rating: 4.5 stars out of 5 (Capterra)
Compatible OS: web-based
Price: Basic- USD 8.60/month, Pro- USD 15.18/month, Business- USD 24.04/month
Main Features:
- It supports multiple file formats for converting.
- Add a file from the device or cloud.
- Insert online URL of files.
- 50 MB is the maximum file size.
Pros
- All saved files for free users can be saved for 24 hours.
- Paid users can decide to remove files from storage.
- Email notification for downloading is possible.
Cons
- Convert/save only two files per day for free.
- You need to register an account when using.
8. Browserling
Browserling is one of the most accessible and high-quality conversion tools for turning GIFs into PNG, JPG, or any other format. The settings are simple to understand and use, and one can convert multiple files.

How to download: Online tool
Rating: 4 stars out of 5 (G2)
Compatible OS: web-based, Windows/Android devices.
Price: Free, Developer- USD 19/month, Team- USD 29+/month
Main Features:
- Insert from the device.
- You can add GIFs of any size.
- Drag and drop functionality is available.
- Automatically saves to the device.
Pros
- Quick conversion.
- Zero complex steps.
- Easy to use for all users at different stages.
Cons
- No batch processing is allowed.
- The free version is only web-based and not compatible with most OS/devices/browsers.
9. iLoveIMG
Another top-notch online GIF to PNG converter is iLoveIMG, with which you can add and alter multiple GIF files simultaneously. Then, after the conversion, share to social media accounts from Facebook or others easily.

How to download: Online tool
Rating: 3.6 stars out of 5 (TrustPilot)
Compatible OS: web-based
Price: Free, Business- custom price, Premium- USD 3.79
Main Features:
- Insert from a folder, Dropbox, or Google Drive.
- Add multiple images.
- Rotate the files.
- Share to social media.
Pros
- Add from the device.
- Cloud support is available.
- Align files alphabetically.
Cons
- Does not work offline.
- Limited batch process for free users.
10. Convertfiles
This online tool can easily include and change GIFs into PNG files. The conversions occur quickly, and you can add your email account to get quick alerts for the completion of the process.

How to download: Online tool
Rating: 4.6 stars out of 5 (mywot.com)
Compatible OS: web-based
Price: Free
Main Features:
- Add specific input format.
- Include the preferred output format.
- Insert email for notifications.
- Support files to be added from the device library.
Pros
- Quicker process of conversion.
- A variety of file formats are compatible.
- Categorized list of formats like documents, images, videos, etc.
Cons
- Can include third-party unauthorized sites that transfer users to other pages.
- No video formats for output.
Pro Tips: How to Convert GIF to Video for Free?
Besides utilizing suitable tools to convert GIFs into PNG or other image files, you can also use the best GIF to video converters. For example, with Wondershare Filmora , you can easily convert GIFs or other image files into video files. In addition, some editing options, like GIFs, allow users to create videos after merging image files.
Free Download For Win 7 or later(64-bit)
Free Download For macOS 10.14 or later
Step1Launch the Filmora software.
Step2Press the “New Project” section and then access “Click to import media files.”

Add the image files, like GIFs, into the editor.

Step3Drag the files to the editing timeline. Use customization settings like Speed, Animation, Audio, Effects, etc., to edit the file.

Step4Click on Export > Local > Mp4. You can choose other video formats too.
Step5Add file information like saving location, name, and formatting specification.

Step6Click on the Export button.
Final Words
You can easily use one of the given tools to convert GIF files into varying image file types. There are fully online options like CloudConvert, and certain choices with a software version, like Online Convert. Try each at least once for the best results to know which fits your needs perfectly.
2. Ezgif
Ezgif is another simple-to-use online tool with substantial image conversion benefits. You can add your GIF files from the Cloud account or computer and directly get JPG files. PNG does not have a direct conversion here, though.
How to download: Online tool
Rating: 100 out of 100 (Scam Detector)
Compatible OS: web-based browsers
Price: Free
Main Features:
- Support a maximum of 50 MB file size for images.
- Direct converter to JPG.
- Set background color to white.
- Add URL link of online GIF files.
Pros
- Instant conversion.
- No changes to original file quality.
- Add from the device.
Cons
- Upload and convert files one by one.
- No cloud support.
3. CloudConvert
CloudConvert is a high-quality online GIF to PNG converter that people can use to convert high-quality image files with no quality loss. First, choose your files, go for settings, and then the converting will be finished in minutes.
How to download: Online tool
Rating: 4.5 stars of 5 (Capterra)
Compatible OS: web-based
Price: Packages/Subscriptions- Costs start at USD 8 per conversion minute.
Main Features:
- Select a file from various formats, like URL, Device, or cloud accounts.
- Set crop/scape adjustments.
- Note image width and height.
- Select to strip or vice versa.
Pros
- Customize output file type.
- Support watermark security feature. It protects your images and graphic files from being stolen, used, or altered without the owner’s permission.
- High-quality image resolution is available.
Cons
- Slightly complex for beginners to understand or use initially.
- Bigger files take a longer time to load.
4. Convertio
Convertio is another top-grade GIF to JPGF converter which people can utilize to prepare high-definition image files from animated pictures. You can make multiple conversions and get high-priority customer support.
How to download: Online tool
Rating: 4.9 stars of 5 (Capterra)
Compatible OS: web-based
Price: Light- USD 9.99/month, Basic- USD 14.99/month, Unlimited- USD 25.99/month
Main Features:
- Get at least 25 concurrent conversion benefits with paid plans.
- Adfree pages.
- Unlimited conversions are only supported by the highest-paid plan.
- Unlimited allowed conversion minutes for users daily.
Pros
- The drag and drop function is smooth to use.
- Add files with at least 100 MB file size.
- Multiple formats are supported.
Cons
- Signup is necessary for a higher file size allowance.
- More limited service for free.
5. Soda PDF
This GIF to PNG converter is top-notch and used for changing big and small-sized GIF files into static PNG or JPG formats. However, no issues with image quality would be noticeable. You can use it for multiple conversions.
How to download: Online tool
Rating: 3.4 stars of 5 (Capterra)
Compatible OS: Online, Mac, Windows, Linux
Price: Standard- USD 6.73/month, Pro- USD 8.23/month, Business- USD 16.63/month
Main Features:
- Add GIF files from the computer, Dropbox, or Google Drive.
- Files are stored for a full day.
- Direct download button available.
- Redo conversion in case of issues.
Pros
- A desktop version with offline usage is available.
- The drag and drop function makes the converting process more convenient.
- Quick file saving.
Cons
- Cannot access old converted files from servers.
- Ads are available.
6. FreeConvert.com
FreeConvert is operable for multiple types of file conversions. In addition, you can store your files in the cloud and handle various tasks simultaneously, depending on your plan.
How to download: Online tool , Chrome extension
Rating: 58.40 out of 100 (Scam Detector)
Compatible OS: Windows, Mac, Linux
Price: 24-hour Pass- USD 12.99, Pro- USD 25.99/month, Basic- USD 9.99/month, Standard- USD 14.99/month.
Main Features:
- Max 1GB of size allows for free conversion.
- Auto-orientation setting available.
- Choose to compress the file or not.
- Insert from device or cloud.
Pros
- You can add files from the computer, Dropbox, Google Drive, or URL.
- It enables you to strip attached metadata.
- Adjust image size freely.
Cons
- Limited customizations.
- No free plan.
7. Zamzar
You can efficiently utilize this online tool to convert different file formats into another, like GIF into PNG. You can access the files you created for at least 24 hours after the conversion. For more time, upgrade your account.
How to download: Online tool
Rating: 4.5 stars out of 5 (Capterra)
Compatible OS: web-based
Price: Basic- USD 8.60/month, Pro- USD 15.18/month, Business- USD 24.04/month
Main Features:
- It supports multiple file formats for converting.
- Add a file from the device or cloud.
- Insert online URL of files.
- 50 MB is the maximum file size.
Pros
- All saved files for free users can be saved for 24 hours.
- Paid users can decide to remove files from storage.
- Email notification for downloading is possible.
Cons
- Convert/save only two files per day for free.
- You need to register an account when using.
8. Browserling
Browserling is one of the most accessible and high-quality conversion tools for turning GIFs into PNG, JPG, or any other format. The settings are simple to understand and use, and one can convert multiple files.
How to download: Online tool
Rating: 4 stars out of 5 (G2)
Compatible OS: web-based, Windows/Android devices.
Price: Free, Developer- USD 19/month, Team- USD 29+/month
Main Features:
- Insert from the device.
- You can add GIFs of any size.
- Drag and drop functionality is available.
- Automatically saves to the device.
Pros
- Quick conversion.
- Zero complex steps.
- Easy to use for all users at different stages.
Cons
- No batch processing is allowed.
- The free version is only web-based and not compatible with most OS/devices/browsers.
9. iLoveIMG
Another top-notch online GIF to PNG converter is iLoveIMG, with which you can add and alter multiple GIF files simultaneously. Then, after the conversion, share to social media accounts from Facebook or others easily.
How to download: Online tool
Rating: 3.6 stars out of 5 (TrustPilot)
Compatible OS: web-based
Price: Free, Business- custom price, Premium- USD 3.79
Main Features:
- Insert from a folder, Dropbox, or Google Drive.
- Add multiple images.
- Rotate the files.
- Share to social media.
Pros
- Add from the device.
- Cloud support is available.
- Align files alphabetically.
Cons
- Does not work offline.
- Limited batch process for free users.
10. Convertfiles
This online tool can easily include and change GIFs into PNG files. The conversions occur quickly, and you can add your email account to get quick alerts for the completion of the process.
How to download: Online tool
Rating: 4.6 stars out of 5 (mywot.com)
Compatible OS: web-based
Price: Free
Main Features:
- Add specific input format.
- Include the preferred output format.
- Insert email for notifications.
- Support files to be added from the device library.
Pros
- Quicker process of conversion.
- A variety of file formats are compatible.
- Categorized list of formats like documents, images, videos, etc.
Cons
- Can include third-party unauthorized sites that transfer users to other pages.
- No video formats for output.
Pro Tips: How to Convert GIF to Video for Free?
Besides utilizing suitable tools to convert GIFs into PNG or other image files, you can also use the best GIF to video converters. For example, with Wondershare Filmora , you can easily convert GIFs or other image files into video files. In addition, some editing options, like GIFs, allow users to create videos after merging image files.
Free Download For Win 7 or later(64-bit)
Free Download For macOS 10.14 or later
Step1Launch the Filmora software.
Step2Press the “New Project” section and then access “Click to import media files.”
Add the image files, like GIFs, into the editor.
Step3Drag the files to the editing timeline. Use customization settings like Speed, Animation, Audio, Effects, etc., to edit the file.
Step4Click on Export > Local > Mp4. You can choose other video formats too.
Step5Add file information like saving location, name, and formatting specification.
Step6Click on the Export button.
Final Words
You can easily use one of the given tools to convert GIF files into varying image file types. There are fully online options like CloudConvert, and certain choices with a software version, like Online Convert. Try each at least once for the best results to know which fits your needs perfectly.
How to Create Photoshop GIF The Easy Way
How to Create Photoshop GIF The 100% Easy Way
An easy yet powerful editor
Numerous effects to choose from
Detailed tutorials provided by the official channel
Having trouble creating Photoshop GIFs? Stay tuned to set everything straight.
In this article
01 [Easy Ways to Create an Animated GIF in Photoshop](#Part 1)
02 [6 Ways To Make An Animated GIF Without Photoshop](#Part 2)
Part 1 Easy Ways to Create an Animated GIF in Photoshop
Animated GIFs are a naturally captivating means of information exchange and entertainment. When the talk is about creating these, you can visibly see a flood of creation tools and software solutions. However, standing out in the crowd, are those catchy Photoshop snippets that certainly have the potential to leave you jaw dropped.
A Photoshop GIF is bound to capture attention, owing to its high quality imaging and top rated professional editing outlook. If you possess the editing flare, do try creating one for an amazing editing experience.
Creating Animated Photoshop GIFs: Easiest Solutions
Let’s take a look into some easy and interesting ways of creating a GIF in Photoshop, to leave you with handy solutions, just in case you feel motivated to take up the creation idea.
Before you begin, make sure to install and launch a suitable version the Photoshop application in your device and keep a set of selected images at hand that you will require for GIF creation.
● Step 1: Load Image Files
Photoshop requires you to load your selected files into its creation stack. There is no limit on the image count, but make sure you choose images in a natural series so that the GIF doesn’t give an out of the box feel.

Reach the ‘File’ tab at the top and load your image files into the Photoshop stack using the following path:
File -> Scripts -> Load Files into Stack

● Step 2: Image Selection
In the next pop-up window, click ‘Browse’ and choose the image file you wish to load into the Photoshop stack. In case the selected images seem tom lack proper alignment, click on the ‘Attempt to Automatically Align Source Images’ checkbox to set this straight and make your GIF frame stable.

Click on ‘OK’ when you are happy with your selections.

At this instant, Photoshop starts creating layers for the uploaded images, which you can see in the ‘Layers’ panel at the bottom-right. You are allowed to rearrange the image layers by selecting and dragging them or click on layer names to rename them.

If you notice distortion in Photoshop’s automatic alignment of your images, just crop the images frames to sort this out. Here’s how you can get this done:
● Tap the ‘Crop’ symbol.
● Adjust the crop frame to select the desired portion.
● Click on ‘Enter’ to confirm the action.
If you didn’t permit auto alignment previously, no worries, you can move ahead.
● Step 3: Make a Timeline Setup
Navigate to the ‘Window’ tab in the top menu and click the ’Timeline’ checkbox. You will see the ‘Timeline Window’ pop up below the Photoshop workspace, where you need to select the ‘Create Frame Animation’ tab. This will cause the options for frame animation to pop-up.

Select you topmost image layer, followed by clicking on the ‘Duplicate’ icon to generate a copy of the image frame.

● Step 4: Decide Time Frames
Select your topmost image frame to see a play duration of ‘0 sec’ below its thumbnail. Click to open the drop-down menu beside it and choose suitable time duration for the frame to run. Allot time durations to all successive frames in a similar manner.

● Step 5: Conceal Top Layers
You will see am combination of the first and second image layers in the image thumbnail. To set this right, navigate to ‘Layers’ to hide the top layer.

Continue to hide previous layers in successive frames so that each layer appears in its respective frame at the end of the process.

● Step 6: Preview Your Creation
Tap the ‘Play’ button to see your GIF preview. Ensure a smooth run with correct appearance order of images and precise frame durations.

● Step 7: Time to Share.
When you are satisfied, navigate to the ‘File’ tab and select ‘Save As’. From the menu that drops down, choose the GIF file format and click on ‘Save’.

In the ’GIF Save Options’ that follows, adjust file settings suited to your preference and tap ‘OK’.

As an alternative you can take the following path to open the ‘GIF Preview Window’:
File -> Export -> Save for Web

In the top-right comer, choose the GIF file format from the drop-down menu. There is also an option to resize your image at the bottom-right. It is advisable to keep the image size within 500 pixels for a convenient export across various media sharing platforms. When you finish, click on ‘Save’. Your creation is now ready for a media export.

Part 2 6 Ways to Make an Animated GIF Without Photoshop
The idea to create GIF in Photoshop is fun and exciting, no doubt on that, but you may often want to switch to a different platform. No issues with that, the web is there to sort out everything for you. All you need to do is open your favorite browser to land across a heap of welcoming solutions to create GIFs without Photoshop. Let’s have a look through the best ones:
01**Wondershare Filmora Video Editor **
Filmora by Wondershare is probably the best GIF maker tool you can rely on. This is packed with a diverse inventory of exciting design features that are ready to provide a creative boost to your editing skills. Loaded with a ton of classic audio visual effects, this software is certainly comprises of everything you need to create static and animated GIFs like a pro.

Wondershare Filmora - Best Video Editor for Mac/Windows
5,481,435 people have downloaded it.
Build unique custom animations without breaking a sweat.
Focus on creating epic stories and leave the details to Filmora’s auto features.
Start a creative adventure with drag & drop effects and endless possibilities.
Filmora simplifies advanced features to save you time and effort.
Filmora cuts out repetition so you can move on to your next creative breakthrough.
Key Features
● This is free software with possibly the most convenient interface.
● You get the freedom to play with hundreds of audio-visual effects to your heart’s content.
● You can create GIFs with static images and videos that are simply awesome to say the least.
● You need not worry about specific file formats. The software is compatible with almost all commonly known ones.
● Filmora allows you to expand and explore your editing talent to the fullest. You can play with tools like, cut, trim or combine image frames and make color and speed adjustments to get the perfect results for your artwork.
02Photoscape
This is another GIF maker tool you can choose to create catchy and interesting GIFs. Photoscape is a simple graphic editor that makes GIF creation exciting and fun. Available to you for free, this software allows you to design and edit animated GIFs with a series of image enhancements, like, resizing, color selection, image prints, etc. Photoscape is compatible with your Windows, Linux and Mac supported devices and has a clean interface. However, the program may sometimes take up a slow run.

Key Features
● You can improvise you GIF with image editing tools, like, color and size adjustments, clip arts, effects, overlays, etc.
● It has a unique ‘Photo Batch’ tool that you can use to process and rename multiple images simultaneously.
● Photoscape allows you to create interesting collages by merging a series of images into a single one.
● You can create captivating animated GIFs with multiple still images.
● The software is loaded with a bunch of utilities like, photo splitter, page merger, color picker, image viewer and others to give that perfect professional outlook to your creations.
03Gifted Motion
This is also among the commonly preferred GIF creator software. The best this about the tool is that it is platform independent and compatible with almost any Operating System. Another choice appeal of the software is its direct workability that is, you don’t require any program installations to create GIFs using this tool.

Key Features
● This is a simple graphic editor that runs on JAVA and is quite convenient to use.
● You can use this software to edit and create GIFs with images saved locally in your device.
● File formats supported by the software include PNG, JPEG, BMP and GIF.
● You don’t need to worry about licensing costs or in-app purchases; this tool is absolutely free to use.
● Loading big image files on this software may however, cost you some extra time.
01SSuite GIF Animator
This one is Windows compatible software that works well with both, 32 and 64-bit Operating System configurations. It lies among those ’Green Software Programs’ that cut down on your net energy cost. Apart from high quality animated GIFs, y6ou can also create movies and slides shows with this software.

Key Features
● This is a free of cost, clean and user-friendly graphic editor software.
● You don’t require Windows registration to use this software
● You can conveniently save the software into any USB or memory device; it is easily portable.
● It facilitates a speedy GIF creation and editing.
● You can explore a variety of editing features and add separate time frames to each image using this software.
● Picasion
This is a free, online GIF maker tool that gives you the liberty to import images and videos from different app galleries, like, Picasa, Flickr and others to create and edit motion GIFs. The tool, though having a simple interface and feature packed, is quite ad-stricken, but you can skip that by sticking to the right webpage.

Key Features
● The tool crosses language borders and is available to you in English, Spanish, Portuguese and Russian.
● You can make size adjustments to the GIF images, or add a completely new avatar of your own.
● The tool offers you a variety of editing effects and filters to enhance and improvise your created GIFs.
● You need not limit yourself to specific file formats with this tool; all common ones are conveniently supported.
● It is a quick and clean tool that rescues you from the glitch of a messy interface.
05GifPal
This one is also a free, online GIF creator with amazing editing features and tools. It comes with a diverse library of 20 frames and 30 effects to choose from, for creating normal and animated GIFs. It further has a variety of drawing and text editing tools you can use to add messages to your GIFs to make more impactful.

Key Features
● The tool is packed with a vast set of quality image editing tools that can create attractive motion and animated GIFs.
● The tool allows you to adjust and change the speed of image frames to give a natural flow to your GIF.
● An exclusive feature of the tool is that it allows you to edit frames in its timeline.
● Your creations with the tools are deprived of any default watermarks. You can either add one of your choice, or even create GIFs without a watermark.
● The tool site is free of unwanted and irrelevant ads.
● Key Takeaways from This Episode →
● Making a GIF in Photoshop is a great idea to design animation snippets, both for fun and a target purpose. Using the Photoshop GIF maker ensures quality and class in complete professional styles.
● However, if you are keen on browsing through other GIF creator alternatives, you can safely pick the Filmora GIF Maher software for creating excellent, next level animated GIFs.
Having trouble creating Photoshop GIFs? Stay tuned to set everything straight.
In this article
01 [Easy Ways to Create an Animated GIF in Photoshop](#Part 1)
02 [6 Ways To Make An Animated GIF Without Photoshop](#Part 2)
Part 1 Easy Ways to Create an Animated GIF in Photoshop
Animated GIFs are a naturally captivating means of information exchange and entertainment. When the talk is about creating these, you can visibly see a flood of creation tools and software solutions. However, standing out in the crowd, are those catchy Photoshop snippets that certainly have the potential to leave you jaw dropped.
A Photoshop GIF is bound to capture attention, owing to its high quality imaging and top rated professional editing outlook. If you possess the editing flare, do try creating one for an amazing editing experience.
Creating Animated Photoshop GIFs: Easiest Solutions
Let’s take a look into some easy and interesting ways of creating a GIF in Photoshop, to leave you with handy solutions, just in case you feel motivated to take up the creation idea.
Before you begin, make sure to install and launch a suitable version the Photoshop application in your device and keep a set of selected images at hand that you will require for GIF creation.
● Step 1: Load Image Files
Photoshop requires you to load your selected files into its creation stack. There is no limit on the image count, but make sure you choose images in a natural series so that the GIF doesn’t give an out of the box feel.
Reach the ‘File’ tab at the top and load your image files into the Photoshop stack using the following path:
File -> Scripts -> Load Files into Stack
● Step 2: Image Selection
In the next pop-up window, click ‘Browse’ and choose the image file you wish to load into the Photoshop stack. In case the selected images seem tom lack proper alignment, click on the ‘Attempt to Automatically Align Source Images’ checkbox to set this straight and make your GIF frame stable.
Click on ‘OK’ when you are happy with your selections.
At this instant, Photoshop starts creating layers for the uploaded images, which you can see in the ‘Layers’ panel at the bottom-right. You are allowed to rearrange the image layers by selecting and dragging them or click on layer names to rename them.
If you notice distortion in Photoshop’s automatic alignment of your images, just crop the images frames to sort this out. Here’s how you can get this done:
● Tap the ‘Crop’ symbol.
● Adjust the crop frame to select the desired portion.
● Click on ‘Enter’ to confirm the action.
If you didn’t permit auto alignment previously, no worries, you can move ahead.
● Step 3: Make a Timeline Setup
Navigate to the ‘Window’ tab in the top menu and click the ’Timeline’ checkbox. You will see the ‘Timeline Window’ pop up below the Photoshop workspace, where you need to select the ‘Create Frame Animation’ tab. This will cause the options for frame animation to pop-up.
Select you topmost image layer, followed by clicking on the ‘Duplicate’ icon to generate a copy of the image frame.
● Step 4: Decide Time Frames
Select your topmost image frame to see a play duration of ‘0 sec’ below its thumbnail. Click to open the drop-down menu beside it and choose suitable time duration for the frame to run. Allot time durations to all successive frames in a similar manner.
● Step 5: Conceal Top Layers
You will see am combination of the first and second image layers in the image thumbnail. To set this right, navigate to ‘Layers’ to hide the top layer.
Continue to hide previous layers in successive frames so that each layer appears in its respective frame at the end of the process.
● Step 6: Preview Your Creation
Tap the ‘Play’ button to see your GIF preview. Ensure a smooth run with correct appearance order of images and precise frame durations.
● Step 7: Time to Share.
When you are satisfied, navigate to the ‘File’ tab and select ‘Save As’. From the menu that drops down, choose the GIF file format and click on ‘Save’.
In the ’GIF Save Options’ that follows, adjust file settings suited to your preference and tap ‘OK’.
As an alternative you can take the following path to open the ‘GIF Preview Window’:
File -> Export -> Save for Web
In the top-right comer, choose the GIF file format from the drop-down menu. There is also an option to resize your image at the bottom-right. It is advisable to keep the image size within 500 pixels for a convenient export across various media sharing platforms. When you finish, click on ‘Save’. Your creation is now ready for a media export.
Part 2 6 Ways to Make an Animated GIF Without Photoshop
The idea to create GIF in Photoshop is fun and exciting, no doubt on that, but you may often want to switch to a different platform. No issues with that, the web is there to sort out everything for you. All you need to do is open your favorite browser to land across a heap of welcoming solutions to create GIFs without Photoshop. Let’s have a look through the best ones:
01**Wondershare Filmora Video Editor **
Filmora by Wondershare is probably the best GIF maker tool you can rely on. This is packed with a diverse inventory of exciting design features that are ready to provide a creative boost to your editing skills. Loaded with a ton of classic audio visual effects, this software is certainly comprises of everything you need to create static and animated GIFs like a pro.
Wondershare Filmora - Best Video Editor for Mac/Windows
5,481,435 people have downloaded it.
Build unique custom animations without breaking a sweat.
Focus on creating epic stories and leave the details to Filmora’s auto features.
Start a creative adventure with drag & drop effects and endless possibilities.
Filmora simplifies advanced features to save you time and effort.
Filmora cuts out repetition so you can move on to your next creative breakthrough.
Key Features
● This is free software with possibly the most convenient interface.
● You get the freedom to play with hundreds of audio-visual effects to your heart’s content.
● You can create GIFs with static images and videos that are simply awesome to say the least.
● You need not worry about specific file formats. The software is compatible with almost all commonly known ones.
● Filmora allows you to expand and explore your editing talent to the fullest. You can play with tools like, cut, trim or combine image frames and make color and speed adjustments to get the perfect results for your artwork.
02Photoscape
This is another GIF maker tool you can choose to create catchy and interesting GIFs. Photoscape is a simple graphic editor that makes GIF creation exciting and fun. Available to you for free, this software allows you to design and edit animated GIFs with a series of image enhancements, like, resizing, color selection, image prints, etc. Photoscape is compatible with your Windows, Linux and Mac supported devices and has a clean interface. However, the program may sometimes take up a slow run.
Key Features
● You can improvise you GIF with image editing tools, like, color and size adjustments, clip arts, effects, overlays, etc.
● It has a unique ‘Photo Batch’ tool that you can use to process and rename multiple images simultaneously.
● Photoscape allows you to create interesting collages by merging a series of images into a single one.
● You can create captivating animated GIFs with multiple still images.
● The software is loaded with a bunch of utilities like, photo splitter, page merger, color picker, image viewer and others to give that perfect professional outlook to your creations.
03Gifted Motion
This is also among the commonly preferred GIF creator software. The best this about the tool is that it is platform independent and compatible with almost any Operating System. Another choice appeal of the software is its direct workability that is, you don’t require any program installations to create GIFs using this tool.
Key Features
● This is a simple graphic editor that runs on JAVA and is quite convenient to use.
● You can use this software to edit and create GIFs with images saved locally in your device.
● File formats supported by the software include PNG, JPEG, BMP and GIF.
● You don’t need to worry about licensing costs or in-app purchases; this tool is absolutely free to use.
● Loading big image files on this software may however, cost you some extra time.
01SSuite GIF Animator
This one is Windows compatible software that works well with both, 32 and 64-bit Operating System configurations. It lies among those ’Green Software Programs’ that cut down on your net energy cost. Apart from high quality animated GIFs, y6ou can also create movies and slides shows with this software.
Key Features
● This is a free of cost, clean and user-friendly graphic editor software.
● You don’t require Windows registration to use this software
● You can conveniently save the software into any USB or memory device; it is easily portable.
● It facilitates a speedy GIF creation and editing.
● You can explore a variety of editing features and add separate time frames to each image using this software.
● Picasion
This is a free, online GIF maker tool that gives you the liberty to import images and videos from different app galleries, like, Picasa, Flickr and others to create and edit motion GIFs. The tool, though having a simple interface and feature packed, is quite ad-stricken, but you can skip that by sticking to the right webpage.
Key Features
● The tool crosses language borders and is available to you in English, Spanish, Portuguese and Russian.
● You can make size adjustments to the GIF images, or add a completely new avatar of your own.
● The tool offers you a variety of editing effects and filters to enhance and improvise your created GIFs.
● You need not limit yourself to specific file formats with this tool; all common ones are conveniently supported.
● It is a quick and clean tool that rescues you from the glitch of a messy interface.
05GifPal
This one is also a free, online GIF creator with amazing editing features and tools. It comes with a diverse library of 20 frames and 30 effects to choose from, for creating normal and animated GIFs. It further has a variety of drawing and text editing tools you can use to add messages to your GIFs to make more impactful.
Key Features
● The tool is packed with a vast set of quality image editing tools that can create attractive motion and animated GIFs.
● The tool allows you to adjust and change the speed of image frames to give a natural flow to your GIF.
● An exclusive feature of the tool is that it allows you to edit frames in its timeline.
● Your creations with the tools are deprived of any default watermarks. You can either add one of your choice, or even create GIFs without a watermark.
● The tool site is free of unwanted and irrelevant ads.
● Key Takeaways from This Episode →
● Making a GIF in Photoshop is a great idea to design animation snippets, both for fun and a target purpose. Using the Photoshop GIF maker ensures quality and class in complete professional styles.
● However, if you are keen on browsing through other GIF creator alternatives, you can safely pick the Filmora GIF Maher software for creating excellent, next level animated GIFs.
Adjust the TikTok Videos Length to Make Them Captivating
While shouting a TikTok video, sometimes uninvited people jump in the clip from nowhere. It is time taking and a wastage of energy to capture the video again from the start. Can you adjust the TikTok clip length? For sure, it is possible to change the video’s length and trim out unnecessary parts. But the question is how to adjust the length of clips on TikTok.
You can use TikTok’s built-in function to change the length of a video clip or use a third-party application. Making such adjustments will also help you to match the video length according to the duration of the added song. The following article will help you learn how to adjust the length of clips on TikTok and with the best third-party TikTok video editor.

Part 1. How to Adjust the Length of Uploaded Clips on TikTok
Mostly lengthy videos are scarcely watched, limiting the likes count on your TikTok video. For such reason, you should maintain the length of the TikTok video such that it is neither too short nor too long. You can easily create a concise video full of entertainment on TikTok by following the below given two methods:
Method 1: Use the In-Built Function to Adjust the Draft Video’s Length Directly
In this part of the article, you will learn how to adjust the length of clips on TikTok by using its built-in feature**:**
Step 1: Open the TikTok app on your mobile phone and press the “Profile” icon lying in the bottom toolbar. Access the TikTok drafts and select the draft whose length you want to adjust.

Step 2: Hit the “Edit” icon present at the first position of the right panel. Select the video present in the timeline and drag it to the required length using the sliders. After adjusting the length of the video, tap on the “Save” button and upload your TikTok video.

Method 2: How to Adjust the Length When Recording
Do you want to adjust the length of the TikTok video before recording it? It is possible to do that task by following the simple steps present underneath:
Step 1: Launch the TikTok application on your smartphone and hit the “Plus” icon. After the camera of TikTok opens, select the video length range by pressing the options available like 15s, 60s, 3m, and 10m options.

Step 2: Thereafter, press the “Capture” button available in red color. Your recording will automatically stop once the selected time gets completed. You can also use filters, a flashlight, beauty effects, a flip screen, and many other features for your recording.

Step 3: Afterwards, press the “Tick” icon and then the “Next” button. Now, you can use the hashtag and mention option to add a description to your video. Finally, press the “Post” icon to share the TikTok video with followers.

Part 2. Using The Third-party Tool to Adjust the Length Before Uploading to TikTok
The above-given steps are helpful in adjusting the clip length on TikTok, but what if TikTok does not support your created video? Yes, there are chances that the video you have created for TikTok cannot be uploaded straight away, mostly because the video length is too large.
For such a situation, it is best to adjust the length of the video according to the requirement of TikTok with a powerful mobile video called Wondershare Filmora .
Steps to Adjust the Length of Video Using Filmora
Filmora is a third-party app that can be used for editing videos in different styles. From this powerful application, you can adjust the length of the video in no time. In the following steps, you will know the procedure for adjusting the video length using Wondershare Filmora:
Step 1: Download Filmora on your Smartphone
Download Filmora mobile app and launch it on your smartphone. Tap the “New Project” and allow access to photos. Now select the TikTok clip by tapping on it. Hit the “Import” button to import it successfully on Filmora.

Step 2: Adjust the Video Length
Use the “Split” feature to adjust the video length. For that, select the video present in the timeline and drag it to the required length by keeping an eye on the length scale present above the timeline.

Step 3: Complete the Process and Upload
Select the part you want to remove and then press the “Delete”’ icon. After completing the process, hit the “Export” button and then post it on TikTok.

Bonus Tip: Requirements and Specifications of TikTok Video
If you are confused about the details related to the TikTok video specifications, then look at the following specs table:
| Resolution | 1080 x 1920 px |
|---|---|
| Aspect Ration | 9:16 (Recommended) |
| File Format | MP4 or MOV |
| Video Length | 15s, 60s, 3m, or 10m |
Part 3. The Common Reasons If You Can’t Adjust the Length of TikTok Video
Hope the above part will prove helpful to you in terms of adjusting the TikTok video using Wondershare Filmora. Now, let’s see what the common reasons which hinder users from adjusting the length of TikTok Videos are:
1. The Video is Too Short
Most TikTok users worry about why they can’t adjust TikTok clip length. The common reason behind this query is the short length of the video. If your video length is 3 seconds, then it would not be possible to shorten it further on TikTok. Thus, try to make a Video of at least 15 seconds to upload it on TikTok successfully.
2. The Video is Too Long
If you have recorded a too-long video, it would not be possible to adjust its length on TikTok. Too long videos, especially more than 10 minutes, are less likely to be modified by TikTok. For that, you can take the help of Filmora to adjust its size. Filmora will trim the video to a suitable length within seconds.
3. Using Green Screen or Other Incompatible Effects
Sometimes people use those effects in videos that are difficult to edit. For example, using a green screen creates some technical issues in your video, which gets weirder when you try to adjust the length of such a video. Due to this, proper adjustments in such videos are difficult to do on TikTok.
4. App Glitch
As many people are engaged in using TikTok, so sometimes the app slows down. It becomes pretty difficult to adjust the length of TikTok videos when the app shows glitches. However, on Filmora, the case is totally the opposite. You will never face any difficulty, no matter how many users are using it.
download filmora app for ios ](https://app.adjust.com/b0k9hf2%5F4bsu85t ) download filmora app for android ](https://app.adjust.com/b0k9hf2%5F4bsu85t )
Conclusion
From the above discussion, it is clear how to adjust the length of clips on TikTok and Filmora. Without a second thought, Filmora is the best application for trimming video size. Apart from size adjustment, it can also make other desirable changes to the TikTok video.
This video editing application is fast and free of bugs, thus allowing you to perform edits in no time. So, download Wondershare Filmora today on your smartphone and stand out on TikTok.
Steps To Fade Audio In Premier Pro
Audio is a very big part of any video project and it can make or break the video project. This is why it is very important to not just choose a video editor that also offers audio editing, but one that is easy to use and offers a lot of editing options. This way, you can edit the audio in your project to suit your video’s production and end up with a great professional final product.
One of the video editing tools that offer features that can accomplish all that is Adobe Premier Pro. In this article, we will look at how you can use Premier Pro to fade audio in or out.
Steps to Fade Audio in Premier Pro
Premier Pro gives you two different options to fade audio in or out. Let’s look at both options and then you can choose the one that suits you best;
Fade Audio using Crossfade Audio Transition
Step1To begin, open Premier Pro on your computer and then open the audio that you want to edit.
Step2Once it is open, select the audio clip in the timeline and then click on “Sequence” at the top menu and select “Apply Audio Transition.”
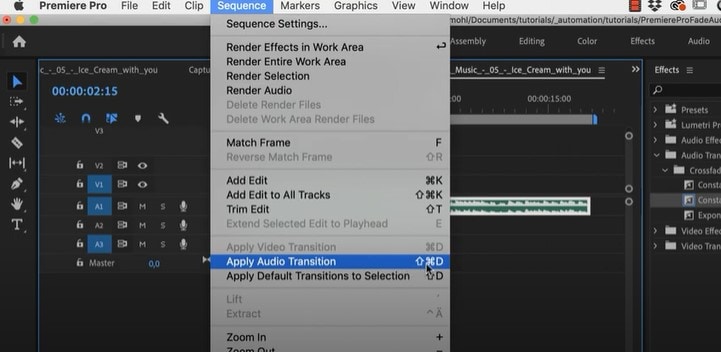
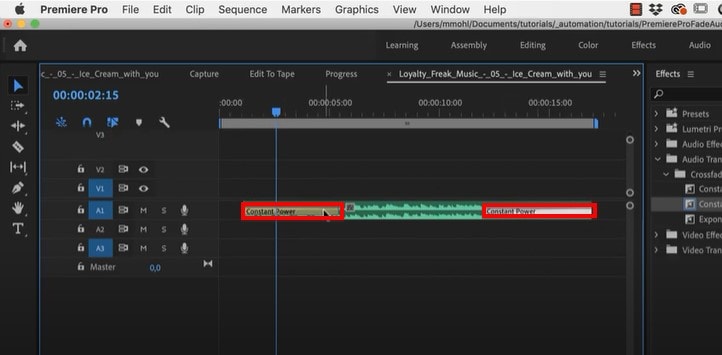
You can also use the keyboard shortcut Shift + Command + D (macOS) or Shift+ Ctrl + D (PC). This will add the “Constant Power Cross Fade” effect at the beginning and the end of the clip.
Step3You can then just change the duration of the effect by simply dragging the end of the transition.
Fade Audio using Clip Keyframes
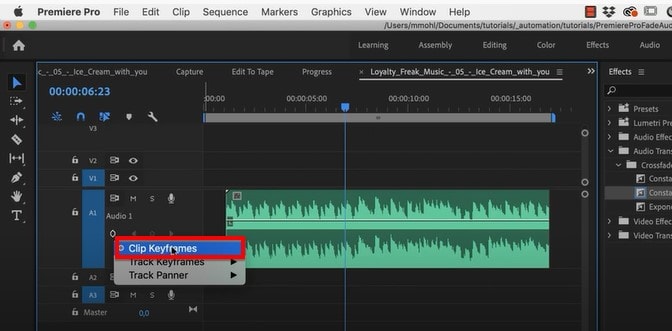
Step1Adobe Premier Pro has two volume keyframes; Track and Clip. Make the audio larger so you can see the volume line and then under the audio name, click on the volume keyframes option to make sure “Clip Keyframes” is enabled.
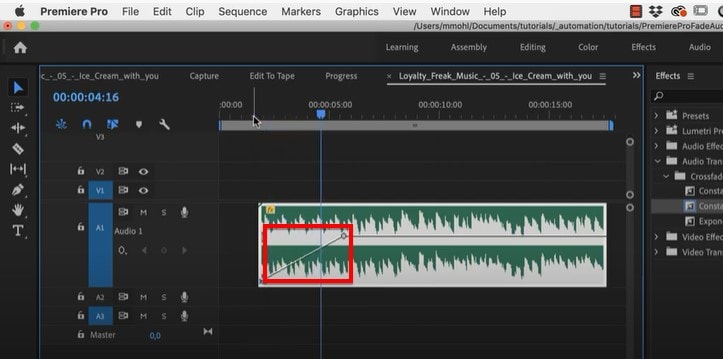
Step2You can then press down on the Command Key (macOS) or the Control Key (PC) and drag the volume line down to add a fade-in or fade-out effect.
Adobe Premiere Alternative Way to Fade Audio
If you are like most people and you find Adobe Premier Pro to be very difficult you use, we have a tool that is just as effective but also simplifies the process. This is the very simple to use Wondershare Filmora .
Just like Premier Pro, Filmora gives you two options to fade audio in and out. Let’s look at both options;
Adding Fade in and Out in Audio Pane
Step1Download and install Wondershare Filmora onto your computer, open the program and then import the audio clip that you want to edit.
Step2Once the video has been added to the timeline, double-click on it to access the “Audio” editing panel.
Step3Here, you can very simply add the fade-in and fade-out effects by simply dragging the sliders to the desired duration or by manually entering the duration in seconds.

Using the Audio Waveform
You can also use the fade icons on the left and right edges of the audio waveform to quickly add a fade in and out.
To add a fade-in effect, drag the fade-in maker to the right. Then go to the end of the clip to drag the fade-out maker to the left to add a fade-out effect.

Related FAQs about Audio Fade
1. How Do I Fade to Black in Adobe Premiere Pro?
You can easily add the Fade to Black transition in Adobe Premiere Pro using the “Effects” tab. Just open the two clips in Premiere Pro and go to “Effects.” Type in “dip to black” in the search box and when you find the effect, drag it between the two clips in the timeline. The effect will appear on the right side of the project.
You also have several customization options that you can apply to the effect to get it just right. To see these options, go to Effect Controls and you should be able to change the alignment of the effect to “Center at Cut” so that the first video fades out to black before the second video appears.
2. Premiere Pro Audio Fade Not Working?
Sometimes you can complete all the editing steps we have described above but you are unable to tell if the fade-in and fade-out effects are working because you can’t play the audio in Premiere. This is a very common problem that can easily be fixed using the following troubleshooting steps;
Check the master volume on your computer to see if this is the problem
Then check the volume in Premiere to see if the audio meter is moving as you play the clip. It is the green bar usually in the lower right corner.
If your volume is fine but you still can’t hear the audio, you may need to adjust several settings. Go to Edit > Preferences (on PC) or Preferences menu under the main Premiere Pro CC menu (macOS) and select “Audio Hardware” in the options that appear. You can then change the “Default Output” device to something else.
3. How Do You do Audio Transitions in Premiere Pro
Adding audio transitions in Premiere Pro is very easy; just open the audio that you want to edit and then Right-click (PC) or Control- Click (macOS) on either the “Constant Gain” or “Constant Power” effect from the Effects panel. Then choose “Set Selected as Default Transition” from the options in the menu.
To add a duration for the audio transitions, go to Edit > Preferences > Timeline (PC) or Premiere Pro Menu > Preferences (macOS) and enter the duration value under “Audio Transition Default Duration.”
Free Download For Win 7 or later(64-bit)
Free Download For macOS 10.14 or later
Also read:
- 2024 Approved How Important It Is to Perform Color Correction to Your Video? Here Is a Solution with After Effects Color Correction with Illustrative Videos
- 2024 Approved Learn How to Create Animated Titles and Text in the Filmora Video Editor. This Is a Simple Step-by-Step Tutorial for Any Skill Level
- Updated 2024 Approved Top 5 Tips to Freeze-Frame in After Effects
- New How To Make An Interactive Quiz Video? Step-by-Step Guide
- New Ways to Make Sure Your Recording Slideshow in Powerpoint Is Not Wrong
- Find Out What Track Mattes Are in After Effects and Learn How to Find and Use It with Simple and Easy-to-Follow Instructions for 2024
- New How to Create Cinematic Style Videos, In 2024
- Updated In 2024, How to Do Motion Graphics in Filmora
- Bandicut Video Editor Download and Review
- The Complete Guide to Converting GIF to SVG With Ease for 2024
- Easy Guide to Overlay Videos in Premiere Pro for 2024
- New A Guide to Speed up a Video on Splice for 2024
- If Youre Trying to Create a Countdown Effect, but Youre Not Sure Where to Start, Then This Post Is Going to Show You some Ways to Create a Countdown Animation for Your Videos
- New 7 Solutions to Cut Video on Mac without Using FFmpeg, In 2024
- Cropping a Video in Final Cut Pro Step by Step
- 2024 Approved Live Stream on YouTube Using Zoom
- Updated In 2024, How to Create a Custom Slide Show in PowerPoint
- 2024 Approved Wondering About Vimeo Slideshow Maker? Know Everything About the Platform Which Is Gaining Much Popularity. Also, Browse some Tips to Create Appealing Video Slideshows
- New Discover a Quick Guide to Add Personalized Video Filters in VN App. Learn How to Use Built-In Filters and Import External Ones for Creative Video Editing
- Updated In 2024, 20 Best Text To Speech Software Windows, Mac, Android, iPhone & O
- New Do You Want to Use the Best LUTs for Your Media Content but Need Help Finding Them? Here Is the Overview of the Best Free LUTs for You to Use
- Freeze Frame Clone Effect Is a Creative Effect to Use for Many Video Creators. This Article Will Show You How to Use Filmora to Make a Frozen Frame Clone Video Effect
- New In 2024, A Comprehensive Guide on Converting Slo-Mo Videos to Normal Speed Videos On iPhone
- New How to Make A Jaw-Dropping Time Lapse Video?
- New Best Ideas on Using Green Screen with Filmora for 2024
- Updated Why Vimeo Slideshow Maker Become Popular for 2024
- Updated In 2024, A Complete Guide to the Best Brand Story Videos
- Updated Basic Knowledge About WMV Format and Best WMV Video Editor
- About Itel P55+ FRP Bypass
- In 2024, Hacks to do pokemon go trainer battles For Realme V30 | Dr.fone
- In 2024, Apple ID Unlock From Apple iPhone 11? How to Fix it?
- 11 Ways to Fix it When My Vivo V29 Pro Wont Charge | Dr.fone
- What is Geo-Blocking and How to Bypass it On Samsung Galaxy A05s? | Dr.fone
- The Ultimate Guide to Get the Rare Candy on Pokemon Go Fire Red On Samsung Galaxy F15 5G | Dr.fone
- 3 Solutions to Hard Reset Nokia C12 Pro Phone Using PC | Dr.fone
- iSpoofer is not working On Samsung Galaxy A25 5G? Fixed | Dr.fone
- Cellular Network Not Available for Voice Calls On Infinix Note 30i | Dr.fone
- In 2024, How to Transfer Apple iPhone XS Data to iPhone 12 A Complete Guide | Dr.fone
- Latest Guide on iPad 2/3 and iPhone XR iCloud Activation Lock Bypass
- In 2024, How to Bypass Android Lock Screen Using Emergency Call On Vivo Y100i Power 5G?
- Samsung Data Recovery – recover lost data from Samsung Galaxy S24+
- Can I Bypass a Forgotten Phone Password Of Samsung Galaxy Z Fold 5?
- Recover Lost Photos during Transfer from iPhone 13 Pro to PC or Mac | Stellar
- In 2024, How To Remove Passcode From iPhone 11 Pro? Complete Guide
- Title: Updated Using One of the Best Converter Tools to Turn GIFs Into PNG or JPG. Here, Learn About the Ten Best Ones for Different Operating Systems, with Details on Features, Prices, and More
- Author: Chloe
- Created at : 2024-04-24 07:08:23
- Updated at : 2024-04-25 07:08:23
- Link: https://ai-editing-video.techidaily.com/updated-using-one-of-the-best-converter-tools-to-turn-gifs-into-png-or-jpg-here-learn-about-the-ten-best-ones-for-different-operating-systems-with-details-o/
- License: This work is licensed under CC BY-NC-SA 4.0.
