:max_bytes(150000):strip_icc():format(webp)/the-17-best-graphic-design-software-2024-1dd6c15b34124b25b65e4b096e4e6ba4.jpg)
Updated Video in Text Cinematic Intro【Filmora Tutorial】

Video in Text Cinematic Intro【Filmora Tutorial】
Preparation
What you need to prepare:
- A computer (Windows or macOS)
- Your video materials.
- Filmora video editor
Step 1
Visit filmora.wondershare.com and download the Filmora video editor . Hit Install. When it’s done installing, the app will start automatically. When it does, click on New Project.
Step 2
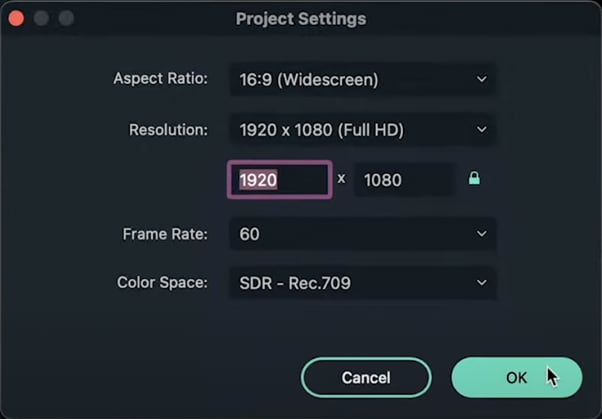
Before we start editing, go to File from the navigation panel at the top and select Project Settings. Then, set the resolution settings like in the example here.
Step 3
Now, download any background image you want. Make sure its resolution is 1920x1080. Import it and drag it to the Timeline.
Step 4
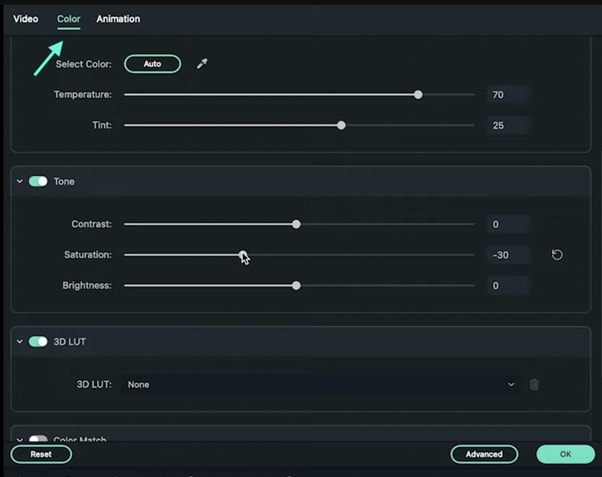
From the Timeline, double-click on the Background clip and decrease its opacity to 70%. Then, click on Color from the upper-left corner and change the settings as you wish.
Step 5
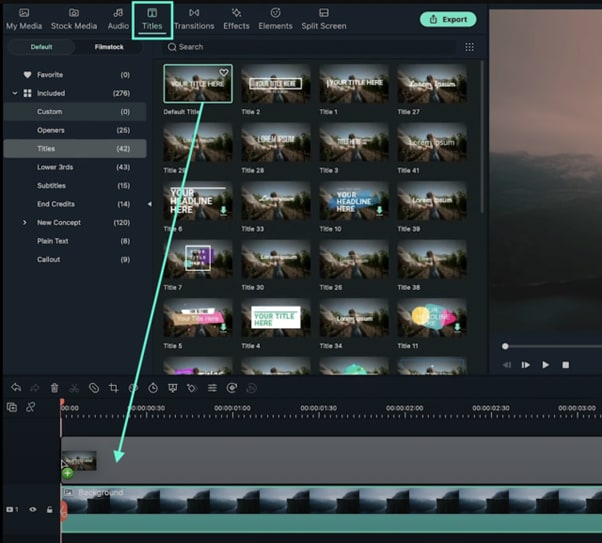
Go to the Titles tab and drag the Default Title to the Timeline. Double-click on the Default Title clip and change fonts, type in your text, etc.
Step 6
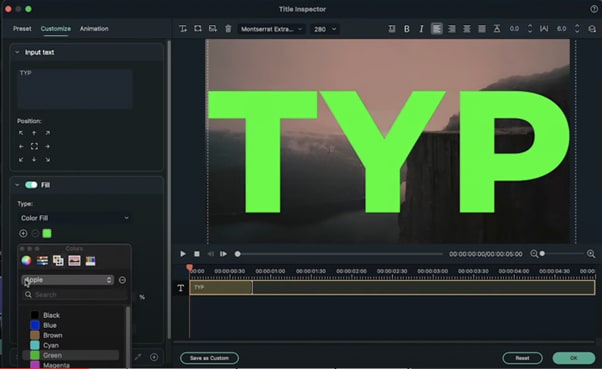
Drag the text to enlarge it so it fits the entire screen. Then, change its color to green. Press OK. Now, Export this clip and name it “1st Text”.
Step 7
Now, open a new Filmora project and edit the Project Settings like we did before. Then, go to Sample Color and drag the white color to the Timeline.
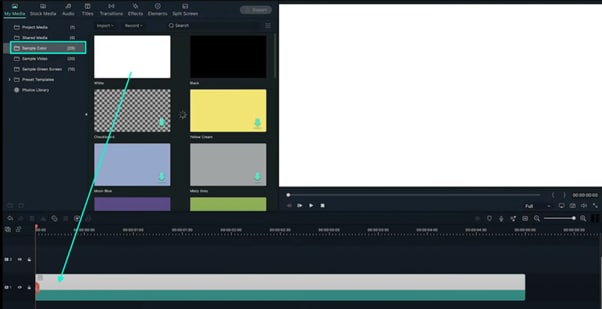
Step 8
Drag the Playhead to the 2-second marker. Drag the same Background image as before to this point. Then, double-click on the Background clip and increase the Brightness and Saturation bars to 50. Click OK.
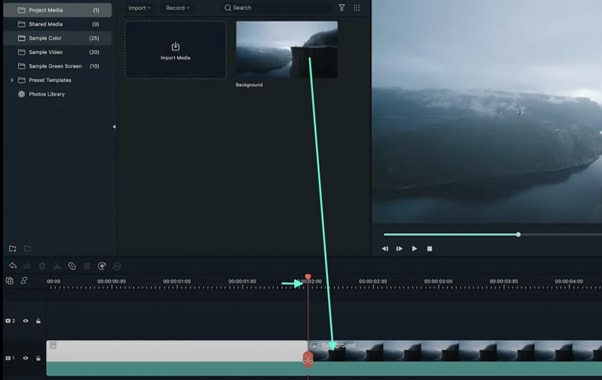
Step 9
Go to Transitions and type in “Push”. Drag the Push transition between the White layer and your Background image. Click on Export once again and name this clip “Transition”.
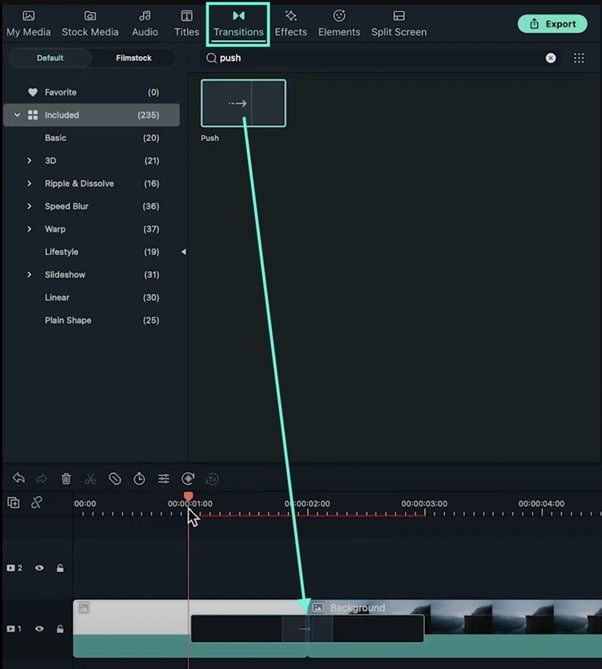
Step 10
Open a new Filmora project and adjust the Project Settings like we did the first time. Then, go to Sample Color and drag the White color to the Timeline once more.
Step 11
Go to Titles and drag the Default Title to the Timeline, above the White Sample Color clip. Now, double-click the Default Title clip and go to ADVANCED. Here, set the text color to green, choose a font you like, and increase the text size. Click OK. Export it and name it “Temporary”.
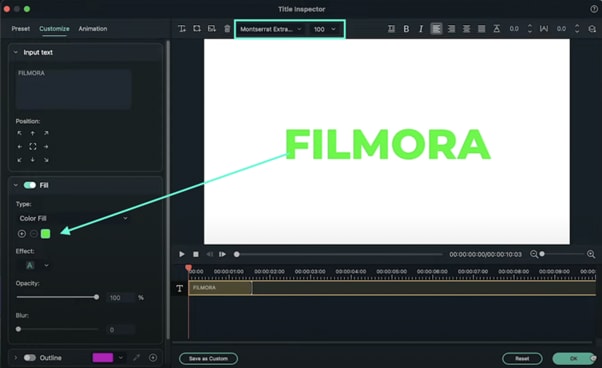
Step 12
Open a new project in Filmora. Import and Drag the same background image you used before to the Timeline. Double-click on it and drag the Saturation bar to -100. Now, drag the file you named “Temporary” into the Timeline.
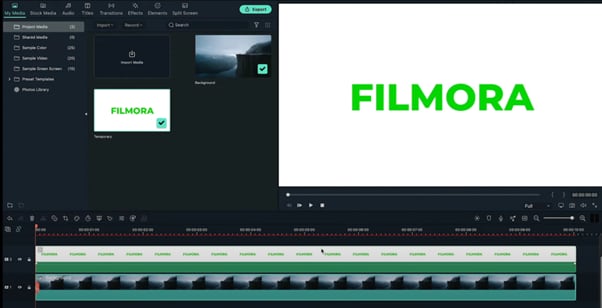
Step 13
Double-click on the Temporary clip, scroll down when the new window appears, and find the Chroma key section. Enable this. Now, drag the Edge Feather bar to 0. Export this video and name it “2nd Text”.
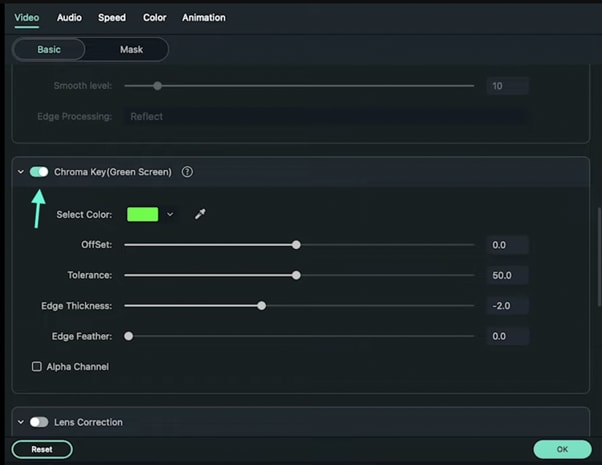
Step 14
Open one more new project in Filmora and import the following files. There should be four, titled “Background”, “Transition”, “1st Text”, and “2nd Text”.
Step 15
Click on Sample Color and drag the Black color to the 1st Track of the Timeline. Then, move the Playhead to the 1-second marker and drag the “Transition” clip to the same Track within the Timeline.
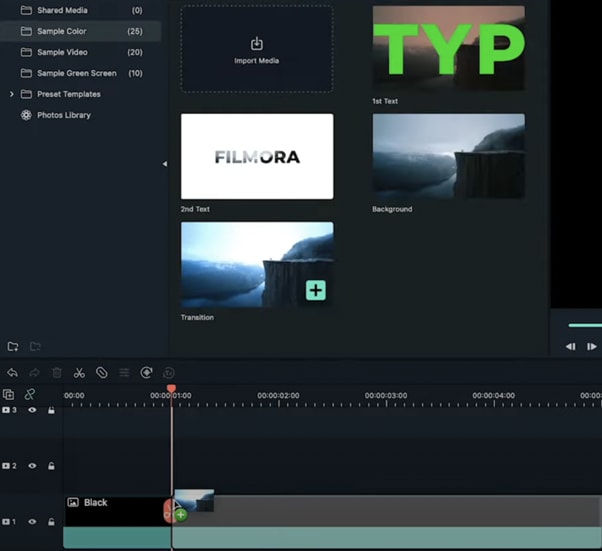
Step 16
From the Transitions tab, select the Push transition and drag it to the Timeline.
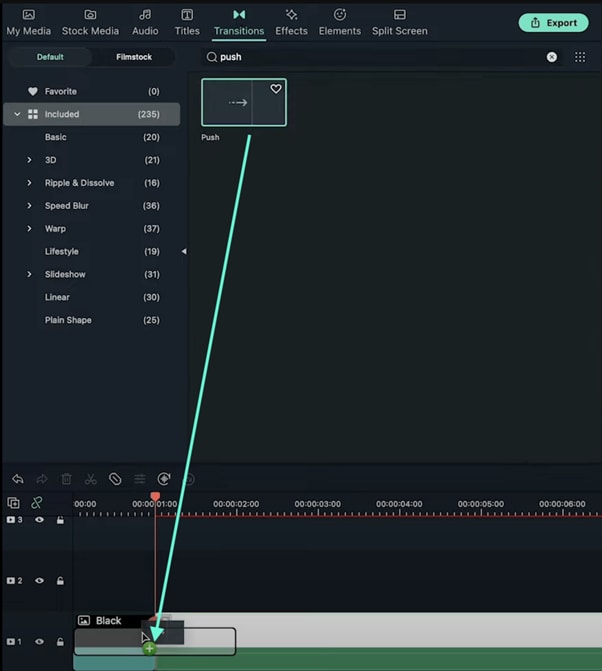
Step 17
Set the Playhead at the 1-second marker once again. First, add the “1st Text” clip into Track 2 of the Timeline. Then, add another Push transition at the beginning of this clip.
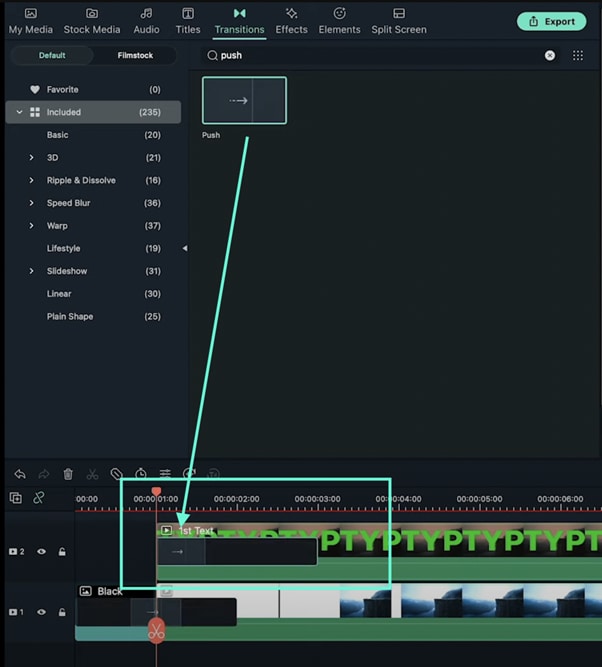
Step 18
Now, double-click on the “1st Text” clip and enable the Chroma Key option. Then, set the Edge Thickness and Edge Feather bars to 0.
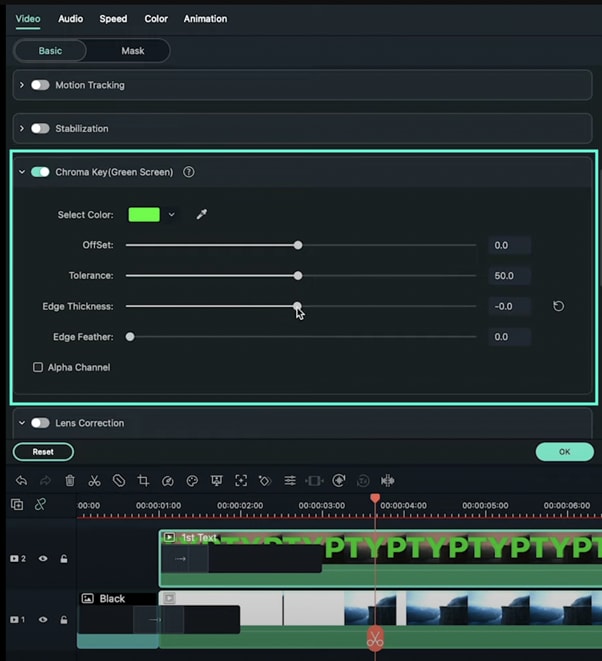
Step 19
Set the Playhead at 4.5 seconds. Snip the Timeline. Then, add a new Default Title on the right side of the Playhead on Track 2.
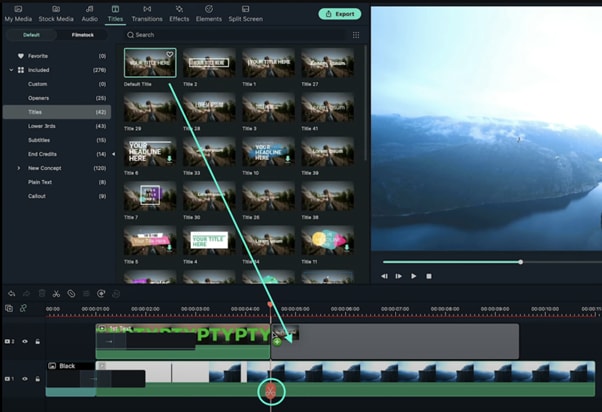
Step 20
Double-click on the Default Title and go to Advanced settings. From there, delete the default text and click on the highlighted button like in the image below to add a new background to this clip. Add the same background you’ve used throughout the entire video.
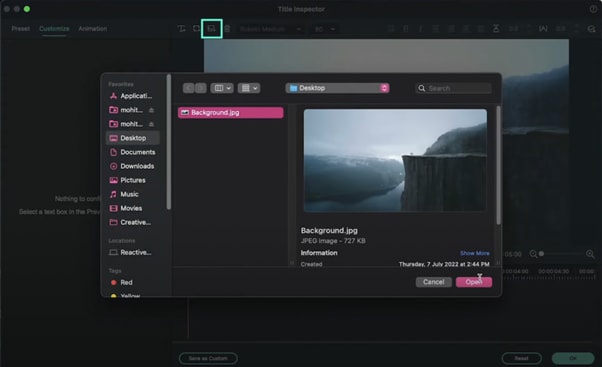
Step 21
Add a new text here and customize it to match the text style in your “2nd Text” clip you exported earlier. Click OK.
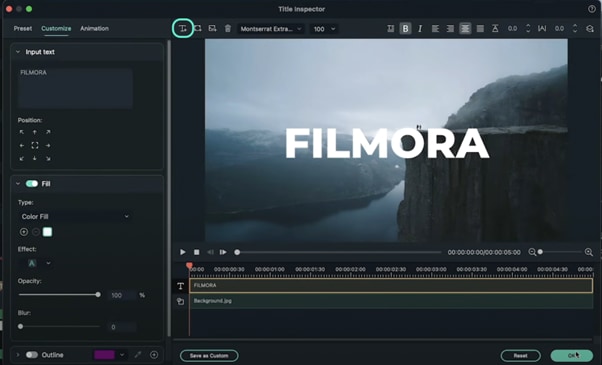
Step 22
Next, go to the Transitions tab and drag the “Row Split” transition clip between Track 2 and the New Default Title you just created. Then, double-click on the transition and change its duration to 1 second.
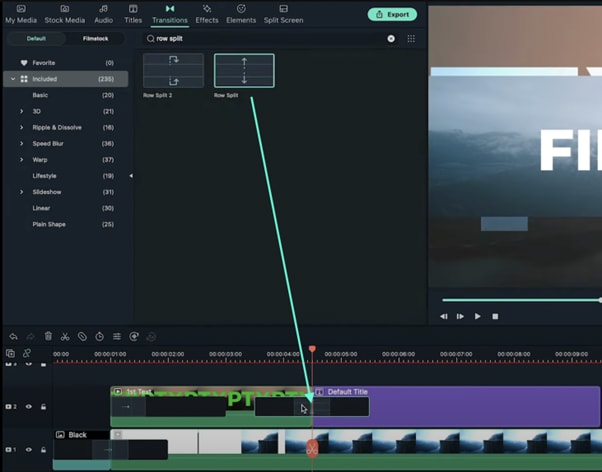
Step 23
Set the Playhead to the 5.5 seconds marker. Drag the “2nd Text” clip you exported earlier here. Then, simply add another Row Split transition between this clip and the Default Title.
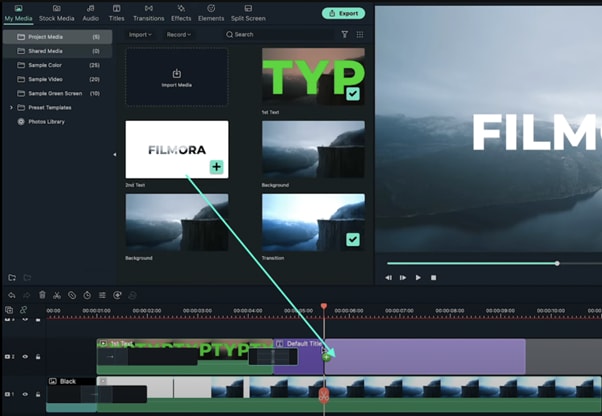
Step 24
That’s it! You’re done. All that’s left is to Render and export the video. Congratulations on creating a video in text cinematic intro in Filmora.
Summary
What you’ve learned:
- How to make advanced edits on titles in Filmora
- Basics of using green screen effects on text
- Using transitions in Filmora
- Exporting and re-using edited clips
- Creating a unique video in text cinematic intro
What you need to prepare:
- A computer (Windows or macOS)
- Your video materials.
- Filmora video editor
Step 1
Visit filmora.wondershare.com and download the Filmora video editor . Hit Install. When it’s done installing, the app will start automatically. When it does, click on New Project.
Step 2
Before we start editing, go to File from the navigation panel at the top and select Project Settings. Then, set the resolution settings like in the example here.

Step 3
Now, download any background image you want. Make sure its resolution is 1920x1080. Import it and drag it to the Timeline.
Step 4
From the Timeline, double-click on the Background clip and decrease its opacity to 70%. Then, click on Color from the upper-left corner and change the settings as you wish.

Step 5
Go to the Titles tab and drag the Default Title to the Timeline. Double-click on the Default Title clip and change fonts, type in your text, etc.

Step 6
Drag the text to enlarge it so it fits the entire screen. Then, change its color to green. Press OK. Now, Export this clip and name it “1st Text”.

Step 7
Now, open a new Filmora project and edit the Project Settings like we did before. Then, go to Sample Color and drag the white color to the Timeline.

Step 8
Drag the Playhead to the 2-second marker. Drag the same Background image as before to this point. Then, double-click on the Background clip and increase the Brightness and Saturation bars to 50. Click OK.

Step 9
Go to Transitions and type in “Push”. Drag the Push transition between the White layer and your Background image. Click on Export once again and name this clip “Transition”.

Step 10
Open a new Filmora project and adjust the Project Settings like we did the first time. Then, go to Sample Color and drag the White color to the Timeline once more.
Step 11
Go to Titles and drag the Default Title to the Timeline, above the White Sample Color clip. Now, double-click the Default Title clip and go to ADVANCED. Here, set the text color to green, choose a font you like, and increase the text size. Click OK. Export it and name it “Temporary”.

Step 12
Open a new project in Filmora. Import and Drag the same background image you used before to the Timeline. Double-click on it and drag the Saturation bar to -100. Now, drag the file you named “Temporary” into the Timeline.

Step 13
Double-click on the Temporary clip, scroll down when the new window appears, and find the Chroma key section. Enable this. Now, drag the Edge Feather bar to 0. Export this video and name it “2nd Text”.

Step 14
Open one more new project in Filmora and import the following files. There should be four, titled “Background”, “Transition”, “1st Text”, and “2nd Text”.
Step 15
Click on Sample Color and drag the Black color to the 1st Track of the Timeline. Then, move the Playhead to the 1-second marker and drag the “Transition” clip to the same Track within the Timeline.

Step 16
From the Transitions tab, select the Push transition and drag it to the Timeline.

Step 17
Set the Playhead at the 1-second marker once again. First, add the “1st Text” clip into Track 2 of the Timeline. Then, add another Push transition at the beginning of this clip.

Step 18
Now, double-click on the “1st Text” clip and enable the Chroma Key option. Then, set the Edge Thickness and Edge Feather bars to 0.

Step 19
Set the Playhead at 4.5 seconds. Snip the Timeline. Then, add a new Default Title on the right side of the Playhead on Track 2.

Step 20
Double-click on the Default Title and go to Advanced settings. From there, delete the default text and click on the highlighted button like in the image below to add a new background to this clip. Add the same background you’ve used throughout the entire video.

Step 21
Add a new text here and customize it to match the text style in your “2nd Text” clip you exported earlier. Click OK.

Step 22
Next, go to the Transitions tab and drag the “Row Split” transition clip between Track 2 and the New Default Title you just created. Then, double-click on the transition and change its duration to 1 second.

Step 23
Set the Playhead to the 5.5 seconds marker. Drag the “2nd Text” clip you exported earlier here. Then, simply add another Row Split transition between this clip and the Default Title.

Step 24
That’s it! You’re done. All that’s left is to Render and export the video. Congratulations on creating a video in text cinematic intro in Filmora.
Summary
What you’ve learned:
- How to make advanced edits on titles in Filmora
- Basics of using green screen effects on text
- Using transitions in Filmora
- Exporting and re-using edited clips
- Creating a unique video in text cinematic intro
What you need to prepare:
- A computer (Windows or macOS)
- Your video materials.
- Filmora video editor
Step 1
Visit filmora.wondershare.com and download the Filmora video editor . Hit Install. When it’s done installing, the app will start automatically. When it does, click on New Project.
Step 2
Before we start editing, go to File from the navigation panel at the top and select Project Settings. Then, set the resolution settings like in the example here.

Step 3
Now, download any background image you want. Make sure its resolution is 1920x1080. Import it and drag it to the Timeline.
Step 4
From the Timeline, double-click on the Background clip and decrease its opacity to 70%. Then, click on Color from the upper-left corner and change the settings as you wish.

Step 5
Go to the Titles tab and drag the Default Title to the Timeline. Double-click on the Default Title clip and change fonts, type in your text, etc.

Step 6
Drag the text to enlarge it so it fits the entire screen. Then, change its color to green. Press OK. Now, Export this clip and name it “1st Text”.

Step 7
Now, open a new Filmora project and edit the Project Settings like we did before. Then, go to Sample Color and drag the white color to the Timeline.

Step 8
Drag the Playhead to the 2-second marker. Drag the same Background image as before to this point. Then, double-click on the Background clip and increase the Brightness and Saturation bars to 50. Click OK.

Step 9
Go to Transitions and type in “Push”. Drag the Push transition between the White layer and your Background image. Click on Export once again and name this clip “Transition”.

Step 10
Open a new Filmora project and adjust the Project Settings like we did the first time. Then, go to Sample Color and drag the White color to the Timeline once more.
Step 11
Go to Titles and drag the Default Title to the Timeline, above the White Sample Color clip. Now, double-click the Default Title clip and go to ADVANCED. Here, set the text color to green, choose a font you like, and increase the text size. Click OK. Export it and name it “Temporary”.

Step 12
Open a new project in Filmora. Import and Drag the same background image you used before to the Timeline. Double-click on it and drag the Saturation bar to -100. Now, drag the file you named “Temporary” into the Timeline.

Step 13
Double-click on the Temporary clip, scroll down when the new window appears, and find the Chroma key section. Enable this. Now, drag the Edge Feather bar to 0. Export this video and name it “2nd Text”.

Step 14
Open one more new project in Filmora and import the following files. There should be four, titled “Background”, “Transition”, “1st Text”, and “2nd Text”.
Step 15
Click on Sample Color and drag the Black color to the 1st Track of the Timeline. Then, move the Playhead to the 1-second marker and drag the “Transition” clip to the same Track within the Timeline.

Step 16
From the Transitions tab, select the Push transition and drag it to the Timeline.

Step 17
Set the Playhead at the 1-second marker once again. First, add the “1st Text” clip into Track 2 of the Timeline. Then, add another Push transition at the beginning of this clip.

Step 18
Now, double-click on the “1st Text” clip and enable the Chroma Key option. Then, set the Edge Thickness and Edge Feather bars to 0.

Step 19
Set the Playhead at 4.5 seconds. Snip the Timeline. Then, add a new Default Title on the right side of the Playhead on Track 2.

Step 20
Double-click on the Default Title and go to Advanced settings. From there, delete the default text and click on the highlighted button like in the image below to add a new background to this clip. Add the same background you’ve used throughout the entire video.

Step 21
Add a new text here and customize it to match the text style in your “2nd Text” clip you exported earlier. Click OK.

Step 22
Next, go to the Transitions tab and drag the “Row Split” transition clip between Track 2 and the New Default Title you just created. Then, double-click on the transition and change its duration to 1 second.

Step 23
Set the Playhead to the 5.5 seconds marker. Drag the “2nd Text” clip you exported earlier here. Then, simply add another Row Split transition between this clip and the Default Title.

Step 24
That’s it! You’re done. All that’s left is to Render and export the video. Congratulations on creating a video in text cinematic intro in Filmora.
Summary
What you’ve learned:
- How to make advanced edits on titles in Filmora
- Basics of using green screen effects on text
- Using transitions in Filmora
- Exporting and re-using edited clips
- Creating a unique video in text cinematic intro
What you need to prepare:
- A computer (Windows or macOS)
- Your video materials.
- Filmora video editor
Step 1
Visit filmora.wondershare.com and download the Filmora video editor . Hit Install. When it’s done installing, the app will start automatically. When it does, click on New Project.
Step 2
Before we start editing, go to File from the navigation panel at the top and select Project Settings. Then, set the resolution settings like in the example here.

Step 3
Now, download any background image you want. Make sure its resolution is 1920x1080. Import it and drag it to the Timeline.
Step 4
From the Timeline, double-click on the Background clip and decrease its opacity to 70%. Then, click on Color from the upper-left corner and change the settings as you wish.

Step 5
Go to the Titles tab and drag the Default Title to the Timeline. Double-click on the Default Title clip and change fonts, type in your text, etc.

Step 6
Drag the text to enlarge it so it fits the entire screen. Then, change its color to green. Press OK. Now, Export this clip and name it “1st Text”.

Step 7
Now, open a new Filmora project and edit the Project Settings like we did before. Then, go to Sample Color and drag the white color to the Timeline.

Step 8
Drag the Playhead to the 2-second marker. Drag the same Background image as before to this point. Then, double-click on the Background clip and increase the Brightness and Saturation bars to 50. Click OK.

Step 9
Go to Transitions and type in “Push”. Drag the Push transition between the White layer and your Background image. Click on Export once again and name this clip “Transition”.

Step 10
Open a new Filmora project and adjust the Project Settings like we did the first time. Then, go to Sample Color and drag the White color to the Timeline once more.
Step 11
Go to Titles and drag the Default Title to the Timeline, above the White Sample Color clip. Now, double-click the Default Title clip and go to ADVANCED. Here, set the text color to green, choose a font you like, and increase the text size. Click OK. Export it and name it “Temporary”.

Step 12
Open a new project in Filmora. Import and Drag the same background image you used before to the Timeline. Double-click on it and drag the Saturation bar to -100. Now, drag the file you named “Temporary” into the Timeline.

Step 13
Double-click on the Temporary clip, scroll down when the new window appears, and find the Chroma key section. Enable this. Now, drag the Edge Feather bar to 0. Export this video and name it “2nd Text”.

Step 14
Open one more new project in Filmora and import the following files. There should be four, titled “Background”, “Transition”, “1st Text”, and “2nd Text”.
Step 15
Click on Sample Color and drag the Black color to the 1st Track of the Timeline. Then, move the Playhead to the 1-second marker and drag the “Transition” clip to the same Track within the Timeline.

Step 16
From the Transitions tab, select the Push transition and drag it to the Timeline.

Step 17
Set the Playhead at the 1-second marker once again. First, add the “1st Text” clip into Track 2 of the Timeline. Then, add another Push transition at the beginning of this clip.

Step 18
Now, double-click on the “1st Text” clip and enable the Chroma Key option. Then, set the Edge Thickness and Edge Feather bars to 0.

Step 19
Set the Playhead at 4.5 seconds. Snip the Timeline. Then, add a new Default Title on the right side of the Playhead on Track 2.

Step 20
Double-click on the Default Title and go to Advanced settings. From there, delete the default text and click on the highlighted button like in the image below to add a new background to this clip. Add the same background you’ve used throughout the entire video.

Step 21
Add a new text here and customize it to match the text style in your “2nd Text” clip you exported earlier. Click OK.

Step 22
Next, go to the Transitions tab and drag the “Row Split” transition clip between Track 2 and the New Default Title you just created. Then, double-click on the transition and change its duration to 1 second.

Step 23
Set the Playhead to the 5.5 seconds marker. Drag the “2nd Text” clip you exported earlier here. Then, simply add another Row Split transition between this clip and the Default Title.

Step 24
That’s it! You’re done. All that’s left is to Render and export the video. Congratulations on creating a video in text cinematic intro in Filmora.
Summary
What you’ve learned:
- How to make advanced edits on titles in Filmora
- Basics of using green screen effects on text
- Using transitions in Filmora
- Exporting and re-using edited clips
- Creating a unique video in text cinematic intro
Best Things People Know About Wedding Slideshow
Top Things People Know About Wedding Slideshow
An easy yet powerful editor
Numerous effects to choose from
Detailed tutorials provided by the official channel
A wedding slideshow is a great way not only to save memories of your special day but also to connect with your guests and let them know your love story in an interesting and creative manner. A well-made wedding slideshow will certainly spice up the entire event and will make it a memorable day for you as well as your dear ones.

To create an eye-grabbing and engaging wedding slideshow there are several factors to be considered as the right selection of the images, effects, music, and much more. The content below will you to know about these factors and tools that will help you create a memorable slideshow.
In this article
01 [Key Steps for Creating a Wedding Slideshow](#Part 1)
02 [Tips to Further Spice Up and Make the Wedding Slideshow Even More Interesting](#Part 2)
03 [Hassle-free Tool for Finding Templates and Creating a Slideshow- Wondershare Filmora](#Part 3)
Part 1 Key Steps For Creating A Wedding Slideshow
There are key steps that go into the making of a wedding slideshow. Check them as below.
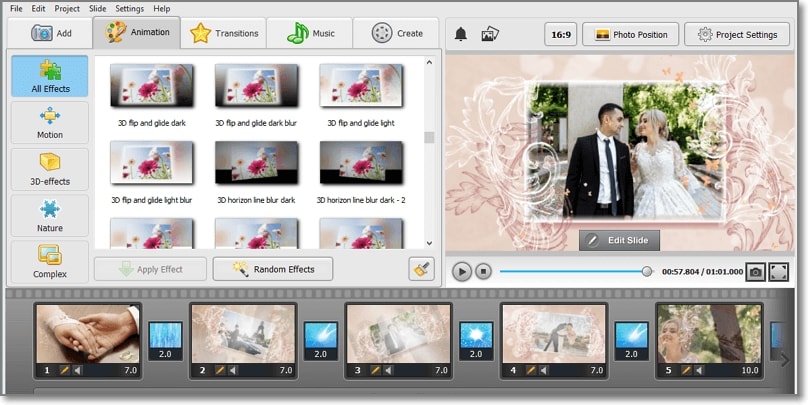
01Choose The Appropriate Software
For creating an impressive and engaging wedding slideshow it is very important to choose the right software that comes packed in with all your required features. There is an array of these online and desktop-based programs available. Check out the features, pros, and cons of each of these wedding slideshow maker, and then make a choice. Some of the popular ones include Wondershare Filmora, Animotica, Animoto, Adobe Spark, and others.
02Select A Theme And A Story
Another important thing to be considered before you start making the actual slideshow is deciding the story or the theme. Depending on the theme, the images, videos, and other elements of the wedding photo slideshow will be added. Choose a theme that matches the personality of the couple. The selection of the theme can make a huge difference to the overall creation of the slideshow.
03Duration Of The Slideshow
Next, you need to decide on the total duration for which you need to create the slideshow. A too-short video will not be able to convey your story while a long one can be boring for the viewers. So ideally, a slideshow between 7-10 minutes is good enough.
04Pick Up The Best Images And Videos
Next, comes the crucial and the major part of the slideshow- videos and images. First of all, make sure to choose high-quality clear images that if seen from a distance and on a bigger screen looks clear. Choose the pictures and the videos that go along with your selected story and the theme and portray the couple’s romance and relationship. In addition to the couple, the images of friends, relatives, colleagues, and other dear ones can be included.
Add effects, filters, templates, and other elements
To further spice up your slideshow and make it more interesting, add some filters, transitions, text, effects, and other elements. A lot of professional slideshow-making tools come with built-in effects that can be added. Wedding slide template also work as a great tool for making a slideshow in a hassle-free manner. Choose a design and keep adding the elements.
05Add An Appropriate Music
No matter how well created your wedding slideshow is, it looks incomplete until a music file is added. Depending on your slideshow theme you can either choose simple soft music, a peppy latest song, or any other audio file. The favorite song of the couple can also be included. Using an audio editing tool, you can add multiple audio clips to create a single file to be used for the slideshow.
Part 2 Tips To Further Spice Up And Make The Wedding Slideshow Even More Interesting
Above we have listed the key steps for creating a wedding slideshow. So, if you want to spice up and make your slideshow even more engaging and make it different from all regular others, the below-listed tips will be useful.
● Including some short video clips and images of relatives, best friends, and other dear ones.
● Add short video-based interviews of parents, siblings, and other dear ones about the couple, their relationship, and more.
● Marriage advise from married colleagues and friends.
● Wishes from the relatives and friends who cannot make it to the wedding for some reason.
● Including short clips of the wedding preparations.
● A voiceover of a friend or a relative can be added to the slideshow in a manner as if some script is being narrated.
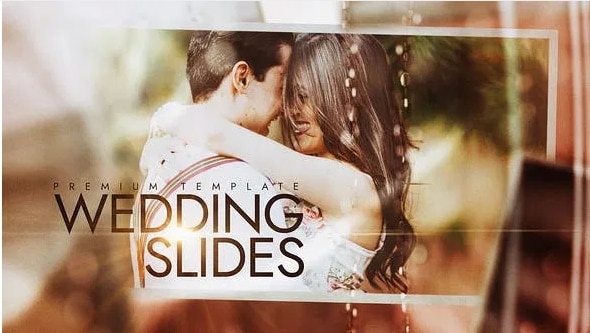
Part 3 Hassle-Free Tool For Finding Templates And Creating A Slideshow- Wondershare Filmora
Wondershare Filmora Video Editor is a one-stop solution for all your wedding slideshow creation needs. This excellent Windows and Mac-based software is a professional video editing tool supporting advanced features. All your slideshow clips and videos can be processed and customized like a pro using the built-in features of the software like effects, filters, transitions, and more.
For Win 7 or later (64-bit)
For macOS 10.12 or later
A wide range of templates in different categories for creating a slideshow is also available and above all the software allows for creating an impressive slideshow in just a few simple steps. If needed, you can even use the stock footage as well as music files available at the site for your slideshow.
Steps to create a wedding slideshow using Wondershare Filmora
Step 1. Launch the installed software on your system and on the main interface choose the New Project button.
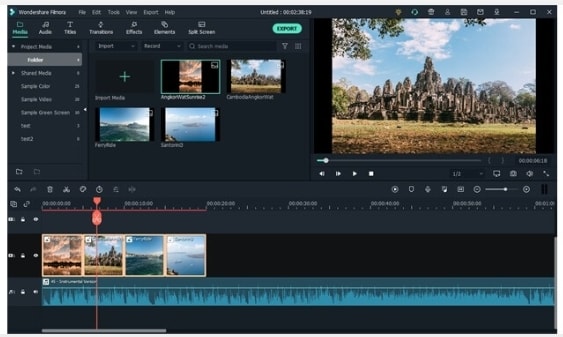
Step 2. The videos and the images that have to be added to the slideshow now have to be imported to the software Media Library.
The added media files can be customized using the editing tool in the software.
Now drag and move the images and videos to the timeline.
Step 3. Next comes the step of adding transitions. Multiple styles of transitions are available in the tool to choose from. You can also adjust the transition duration as needed.
Step 4. Next, add the music to your slideshow. Use a locally saved music file or choose the one from the software media library. The option for adding a voice-over is also there.
Step 5. Finally, save and then export the slideshow. You can save it locally or to a DVD. Sharing option on social media sites is also present.
● Ending Thoughts →
● A wedding slideshow helps the guests at the wedding to know about the love story of the couple and is also a presentation to relive the wedding moments forever.
● There are several key factors and tips that should be followed for creating an engaging, and interesting slideshow.
● Wondershare Filmora is the best slideshow maker for wedding as it comes with variety of templates, editing tools and other functions.
A wedding slideshow is a great way not only to save memories of your special day but also to connect with your guests and let them know your love story in an interesting and creative manner. A well-made wedding slideshow will certainly spice up the entire event and will make it a memorable day for you as well as your dear ones.

To create an eye-grabbing and engaging wedding slideshow there are several factors to be considered as the right selection of the images, effects, music, and much more. The content below will you to know about these factors and tools that will help you create a memorable slideshow.
In this article
01 [Key Steps for Creating a Wedding Slideshow](#Part 1)
02 [Tips to Further Spice Up and Make the Wedding Slideshow Even More Interesting](#Part 2)
03 [Hassle-free Tool for Finding Templates and Creating a Slideshow- Wondershare Filmora](#Part 3)
Part 1 Key Steps For Creating A Wedding Slideshow
There are key steps that go into the making of a wedding slideshow. Check them as below.

01Choose The Appropriate Software
For creating an impressive and engaging wedding slideshow it is very important to choose the right software that comes packed in with all your required features. There is an array of these online and desktop-based programs available. Check out the features, pros, and cons of each of these wedding slideshow maker, and then make a choice. Some of the popular ones include Wondershare Filmora, Animotica, Animoto, Adobe Spark, and others.
02Select A Theme And A Story
Another important thing to be considered before you start making the actual slideshow is deciding the story or the theme. Depending on the theme, the images, videos, and other elements of the wedding photo slideshow will be added. Choose a theme that matches the personality of the couple. The selection of the theme can make a huge difference to the overall creation of the slideshow.
03Duration Of The Slideshow
Next, you need to decide on the total duration for which you need to create the slideshow. A too-short video will not be able to convey your story while a long one can be boring for the viewers. So ideally, a slideshow between 7-10 minutes is good enough.
04Pick Up The Best Images And Videos
Next, comes the crucial and the major part of the slideshow- videos and images. First of all, make sure to choose high-quality clear images that if seen from a distance and on a bigger screen looks clear. Choose the pictures and the videos that go along with your selected story and the theme and portray the couple’s romance and relationship. In addition to the couple, the images of friends, relatives, colleagues, and other dear ones can be included.
Add effects, filters, templates, and other elements
To further spice up your slideshow and make it more interesting, add some filters, transitions, text, effects, and other elements. A lot of professional slideshow-making tools come with built-in effects that can be added. Wedding slide template also work as a great tool for making a slideshow in a hassle-free manner. Choose a design and keep adding the elements.
05Add An Appropriate Music
No matter how well created your wedding slideshow is, it looks incomplete until a music file is added. Depending on your slideshow theme you can either choose simple soft music, a peppy latest song, or any other audio file. The favorite song of the couple can also be included. Using an audio editing tool, you can add multiple audio clips to create a single file to be used for the slideshow.
Part 2 Tips To Further Spice Up And Make The Wedding Slideshow Even More Interesting
Above we have listed the key steps for creating a wedding slideshow. So, if you want to spice up and make your slideshow even more engaging and make it different from all regular others, the below-listed tips will be useful.
● Including some short video clips and images of relatives, best friends, and other dear ones.
● Add short video-based interviews of parents, siblings, and other dear ones about the couple, their relationship, and more.
● Marriage advise from married colleagues and friends.
● Wishes from the relatives and friends who cannot make it to the wedding for some reason.
● Including short clips of the wedding preparations.
● A voiceover of a friend or a relative can be added to the slideshow in a manner as if some script is being narrated.

Part 3 Hassle-Free Tool For Finding Templates And Creating A Slideshow- Wondershare Filmora
Wondershare Filmora Video Editor is a one-stop solution for all your wedding slideshow creation needs. This excellent Windows and Mac-based software is a professional video editing tool supporting advanced features. All your slideshow clips and videos can be processed and customized like a pro using the built-in features of the software like effects, filters, transitions, and more.
For Win 7 or later (64-bit)
For macOS 10.12 or later
A wide range of templates in different categories for creating a slideshow is also available and above all the software allows for creating an impressive slideshow in just a few simple steps. If needed, you can even use the stock footage as well as music files available at the site for your slideshow.
Steps to create a wedding slideshow using Wondershare Filmora
Step 1. Launch the installed software on your system and on the main interface choose the New Project button.
Step 2. The videos and the images that have to be added to the slideshow now have to be imported to the software Media Library.
The added media files can be customized using the editing tool in the software.
Now drag and move the images and videos to the timeline.
Step 3. Next comes the step of adding transitions. Multiple styles of transitions are available in the tool to choose from. You can also adjust the transition duration as needed.
Step 4. Next, add the music to your slideshow. Use a locally saved music file or choose the one from the software media library. The option for adding a voice-over is also there.
Step 5. Finally, save and then export the slideshow. You can save it locally or to a DVD. Sharing option on social media sites is also present.

● Ending Thoughts →
● A wedding slideshow helps the guests at the wedding to know about the love story of the couple and is also a presentation to relive the wedding moments forever.
● There are several key factors and tips that should be followed for creating an engaging, and interesting slideshow.
● Wondershare Filmora is the best slideshow maker for wedding as it comes with variety of templates, editing tools and other functions.
A wedding slideshow is a great way not only to save memories of your special day but also to connect with your guests and let them know your love story in an interesting and creative manner. A well-made wedding slideshow will certainly spice up the entire event and will make it a memorable day for you as well as your dear ones.

To create an eye-grabbing and engaging wedding slideshow there are several factors to be considered as the right selection of the images, effects, music, and much more. The content below will you to know about these factors and tools that will help you create a memorable slideshow.
In this article
01 [Key Steps for Creating a Wedding Slideshow](#Part 1)
02 [Tips to Further Spice Up and Make the Wedding Slideshow Even More Interesting](#Part 2)
03 [Hassle-free Tool for Finding Templates and Creating a Slideshow- Wondershare Filmora](#Part 3)
Part 1 Key Steps For Creating A Wedding Slideshow
There are key steps that go into the making of a wedding slideshow. Check them as below.

01Choose The Appropriate Software
For creating an impressive and engaging wedding slideshow it is very important to choose the right software that comes packed in with all your required features. There is an array of these online and desktop-based programs available. Check out the features, pros, and cons of each of these wedding slideshow maker, and then make a choice. Some of the popular ones include Wondershare Filmora, Animotica, Animoto, Adobe Spark, and others.
02Select A Theme And A Story
Another important thing to be considered before you start making the actual slideshow is deciding the story or the theme. Depending on the theme, the images, videos, and other elements of the wedding photo slideshow will be added. Choose a theme that matches the personality of the couple. The selection of the theme can make a huge difference to the overall creation of the slideshow.
03Duration Of The Slideshow
Next, you need to decide on the total duration for which you need to create the slideshow. A too-short video will not be able to convey your story while a long one can be boring for the viewers. So ideally, a slideshow between 7-10 minutes is good enough.
04Pick Up The Best Images And Videos
Next, comes the crucial and the major part of the slideshow- videos and images. First of all, make sure to choose high-quality clear images that if seen from a distance and on a bigger screen looks clear. Choose the pictures and the videos that go along with your selected story and the theme and portray the couple’s romance and relationship. In addition to the couple, the images of friends, relatives, colleagues, and other dear ones can be included.
Add effects, filters, templates, and other elements
To further spice up your slideshow and make it more interesting, add some filters, transitions, text, effects, and other elements. A lot of professional slideshow-making tools come with built-in effects that can be added. Wedding slide template also work as a great tool for making a slideshow in a hassle-free manner. Choose a design and keep adding the elements.
05Add An Appropriate Music
No matter how well created your wedding slideshow is, it looks incomplete until a music file is added. Depending on your slideshow theme you can either choose simple soft music, a peppy latest song, or any other audio file. The favorite song of the couple can also be included. Using an audio editing tool, you can add multiple audio clips to create a single file to be used for the slideshow.
Part 2 Tips To Further Spice Up And Make The Wedding Slideshow Even More Interesting
Above we have listed the key steps for creating a wedding slideshow. So, if you want to spice up and make your slideshow even more engaging and make it different from all regular others, the below-listed tips will be useful.
● Including some short video clips and images of relatives, best friends, and other dear ones.
● Add short video-based interviews of parents, siblings, and other dear ones about the couple, their relationship, and more.
● Marriage advise from married colleagues and friends.
● Wishes from the relatives and friends who cannot make it to the wedding for some reason.
● Including short clips of the wedding preparations.
● A voiceover of a friend or a relative can be added to the slideshow in a manner as if some script is being narrated.

Part 3 Hassle-Free Tool For Finding Templates And Creating A Slideshow- Wondershare Filmora
Wondershare Filmora Video Editor is a one-stop solution for all your wedding slideshow creation needs. This excellent Windows and Mac-based software is a professional video editing tool supporting advanced features. All your slideshow clips and videos can be processed and customized like a pro using the built-in features of the software like effects, filters, transitions, and more.
For Win 7 or later (64-bit)
For macOS 10.12 or later
A wide range of templates in different categories for creating a slideshow is also available and above all the software allows for creating an impressive slideshow in just a few simple steps. If needed, you can even use the stock footage as well as music files available at the site for your slideshow.
Steps to create a wedding slideshow using Wondershare Filmora
Step 1. Launch the installed software on your system and on the main interface choose the New Project button.
Step 2. The videos and the images that have to be added to the slideshow now have to be imported to the software Media Library.
The added media files can be customized using the editing tool in the software.
Now drag and move the images and videos to the timeline.
Step 3. Next comes the step of adding transitions. Multiple styles of transitions are available in the tool to choose from. You can also adjust the transition duration as needed.
Step 4. Next, add the music to your slideshow. Use a locally saved music file or choose the one from the software media library. The option for adding a voice-over is also there.
Step 5. Finally, save and then export the slideshow. You can save it locally or to a DVD. Sharing option on social media sites is also present.

● Ending Thoughts →
● A wedding slideshow helps the guests at the wedding to know about the love story of the couple and is also a presentation to relive the wedding moments forever.
● There are several key factors and tips that should be followed for creating an engaging, and interesting slideshow.
● Wondershare Filmora is the best slideshow maker for wedding as it comes with variety of templates, editing tools and other functions.
A wedding slideshow is a great way not only to save memories of your special day but also to connect with your guests and let them know your love story in an interesting and creative manner. A well-made wedding slideshow will certainly spice up the entire event and will make it a memorable day for you as well as your dear ones.

To create an eye-grabbing and engaging wedding slideshow there are several factors to be considered as the right selection of the images, effects, music, and much more. The content below will you to know about these factors and tools that will help you create a memorable slideshow.
In this article
01 [Key Steps for Creating a Wedding Slideshow](#Part 1)
02 [Tips to Further Spice Up and Make the Wedding Slideshow Even More Interesting](#Part 2)
03 [Hassle-free Tool for Finding Templates and Creating a Slideshow- Wondershare Filmora](#Part 3)
Part 1 Key Steps For Creating A Wedding Slideshow
There are key steps that go into the making of a wedding slideshow. Check them as below.

01Choose The Appropriate Software
For creating an impressive and engaging wedding slideshow it is very important to choose the right software that comes packed in with all your required features. There is an array of these online and desktop-based programs available. Check out the features, pros, and cons of each of these wedding slideshow maker, and then make a choice. Some of the popular ones include Wondershare Filmora, Animotica, Animoto, Adobe Spark, and others.
02Select A Theme And A Story
Another important thing to be considered before you start making the actual slideshow is deciding the story or the theme. Depending on the theme, the images, videos, and other elements of the wedding photo slideshow will be added. Choose a theme that matches the personality of the couple. The selection of the theme can make a huge difference to the overall creation of the slideshow.
03Duration Of The Slideshow
Next, you need to decide on the total duration for which you need to create the slideshow. A too-short video will not be able to convey your story while a long one can be boring for the viewers. So ideally, a slideshow between 7-10 minutes is good enough.
04Pick Up The Best Images And Videos
Next, comes the crucial and the major part of the slideshow- videos and images. First of all, make sure to choose high-quality clear images that if seen from a distance and on a bigger screen looks clear. Choose the pictures and the videos that go along with your selected story and the theme and portray the couple’s romance and relationship. In addition to the couple, the images of friends, relatives, colleagues, and other dear ones can be included.
Add effects, filters, templates, and other elements
To further spice up your slideshow and make it more interesting, add some filters, transitions, text, effects, and other elements. A lot of professional slideshow-making tools come with built-in effects that can be added. Wedding slide template also work as a great tool for making a slideshow in a hassle-free manner. Choose a design and keep adding the elements.
05Add An Appropriate Music
No matter how well created your wedding slideshow is, it looks incomplete until a music file is added. Depending on your slideshow theme you can either choose simple soft music, a peppy latest song, or any other audio file. The favorite song of the couple can also be included. Using an audio editing tool, you can add multiple audio clips to create a single file to be used for the slideshow.
Part 2 Tips To Further Spice Up And Make The Wedding Slideshow Even More Interesting
Above we have listed the key steps for creating a wedding slideshow. So, if you want to spice up and make your slideshow even more engaging and make it different from all regular others, the below-listed tips will be useful.
● Including some short video clips and images of relatives, best friends, and other dear ones.
● Add short video-based interviews of parents, siblings, and other dear ones about the couple, their relationship, and more.
● Marriage advise from married colleagues and friends.
● Wishes from the relatives and friends who cannot make it to the wedding for some reason.
● Including short clips of the wedding preparations.
● A voiceover of a friend or a relative can be added to the slideshow in a manner as if some script is being narrated.

Part 3 Hassle-Free Tool For Finding Templates And Creating A Slideshow- Wondershare Filmora
Wondershare Filmora Video Editor is a one-stop solution for all your wedding slideshow creation needs. This excellent Windows and Mac-based software is a professional video editing tool supporting advanced features. All your slideshow clips and videos can be processed and customized like a pro using the built-in features of the software like effects, filters, transitions, and more.
For Win 7 or later (64-bit)
For macOS 10.12 or later
A wide range of templates in different categories for creating a slideshow is also available and above all the software allows for creating an impressive slideshow in just a few simple steps. If needed, you can even use the stock footage as well as music files available at the site for your slideshow.
Steps to create a wedding slideshow using Wondershare Filmora
Step 1. Launch the installed software on your system and on the main interface choose the New Project button.
Step 2. The videos and the images that have to be added to the slideshow now have to be imported to the software Media Library.
The added media files can be customized using the editing tool in the software.
Now drag and move the images and videos to the timeline.
Step 3. Next comes the step of adding transitions. Multiple styles of transitions are available in the tool to choose from. You can also adjust the transition duration as needed.
Step 4. Next, add the music to your slideshow. Use a locally saved music file or choose the one from the software media library. The option for adding a voice-over is also there.
Step 5. Finally, save and then export the slideshow. You can save it locally or to a DVD. Sharing option on social media sites is also present.

● Ending Thoughts →
● A wedding slideshow helps the guests at the wedding to know about the love story of the couple and is also a presentation to relive the wedding moments forever.
● There are several key factors and tips that should be followed for creating an engaging, and interesting slideshow.
● Wondershare Filmora is the best slideshow maker for wedding as it comes with variety of templates, editing tools and other functions.
Camtasia Vs. Final Cut Pro
With many available video editing solutions in the market today, it is a bit hard to choose the best video editing software for your unique needs. Remember, it’s all about investing money. In every purchase, you need to be sure about purchasing no matter the amount. In the case of video editing software, the concern is just significant as you should find software that perfectly suits your requirements. A video editing software may be having excellent features, but become complex when working with. On the other hand, the software may be quite user-friendly, but its range of tools is not as large.
Implementing tools such as Camtasia or Final Cut Pro requires a great deal of contemplating and comparison of crucial factors. You may be wondering, when you compare Camtasia vs Final cut pro, which is the best to use. To make a clear comparison between these two video editing programs, one has to judge all the crucial elements. Though the two programs share some degree of similarity, this article will help you understand if Final Cut Pro is better than Camtasia. We are going to compare Final Cut Pro X vs Techsmith Camtasia using their features, pros, and Cons, market prices, functionality, and customer support to help you fully understand them.
Overall Comparison
This table will help you compare Camtasia vs Final cut pro.
674 reviews341 reviews$ 249.99 for a user license$139.99 upgrade$299.99 per licenseRelatively easy to use A bit complicated for beginners</6h>
| | Camtasia | Final Cut Pro | |
| ——————— | ————————————————————————————————————————- | ————————————————————————————————————————— |
| Overall rating | 674 reviews | 341 reviews |
| Entry-level Price | $ 249.99 for a user license $139.99 upgrade | $299.99 per license |
| Ease of use | Relatively easy to use | A bit complicated for beginners |
| Market share | Small-Business (50.5% of reviews) Mid-Market (26.0% of reviews) Enterprise (23.4% of reviews) | Small-Business (71.0% of reviews) Mid-Market (17.05 reviews) Enterprise (11.9% of reviews) |
| Value of money | 2/10 – low cost | 4/10 – average cost |
| Customer support | Provide Email Languages supported; English, French, Germany, Japanese. | Email Languages supported; English |
| Functionality | Speed is a bit slow Various exporting settings. Enough editing capability. Does not support live recording from a camera. | Speed is higher than its comparison Exporting settings are limited Not as efficient as its comparison Has DV camera support |
| Support system | Desktop, Cloud | Desktop, Cloud, Mobile |
As you can see in the table above there is no great deference seen when comparing Final cut pro X vs Techsmith Camtasia, but it can tell you if is Final cut pro better than Camtasia or reverse is the case.
Final Cut Pro
Final Cut Pro is the perfect macOS video editing software that can help you achieve a professional-looking video. This software is built with the latest and most powerful tools that make it an effortless tool for video editing. It has impressive filters, graphics, and a range of other cool video editing features. Its coolest part is its ability to enable 360-degree video editing for VR and VR headset playback. This program uses multi-core multi-thread machines quickly to allow you to import the videos in different formats faster than others.

Like any other software, Final Cut Pro possesses some pros and cons as listed below;
Pros:
- It is a stable program that can be very useful in small businesses.
- It has a powerful architecture for your complex and heavy projects.
- Its fast rendering speed can allow you to conduct Multicam editing.
- It has classic GPU utilization and powerful media organization to allow you to organize assets such as audio and video carefully.
- Its easy audio modification capabilities can allow you to create impeccable VR videos.
- It has a customizable and streamlined share interface that makes high-quality file delivery easy and fast.
- It can edit videos offline.
- It is tailored with real-time graphics and cool effects like text and blurs that are easy to apply.
Cons:
- It is complex and thus difficult for beginners.
- It has limited export options.
- It only works on Mac computers.
Editing video with Final Cut Pro is not a complicated process. Here are the steps to help a beginner get started.
Step1: Create a new project & import media
When you Launch the Final Cut Pro interface, Libraries and Events are automatically created. You only need to create a new project.
At the top menu bar, click File > New > Project to create a new project. Here you will have to type in a new name of the project and then select ‘Use Automatic Settings’.
At the top menu bar again, click File > Import > Media to enable the program to bring up the Media Import window where you can select the video and audio files you want to import into your new project.
After selecting all the media you want to include in your project press ‘Import Selected’ and then close the media window.
Step 2: Add your trimmed clips to the timeline.
The thumbnails of all the media you have imported will be appearing in the browser. For you to create a new video you need to arrange and trim that media in the timeline.
In your browser, you can set the ‘In and Out’ points for each video clip by holding ‘_Option_’. To do this you will have to click the thumbnail and drag it. The yellow timeline that appears on the clip represents the range that will be added to your video timeline.
After arranging them in the order that you want them to play, trim your clips by moving the mouse cursor to the edge of its thumbnail. This is done by using the ‘Trim tool’. Drag forward or backward to adjust the clip’s endings.
If you are arranging the clips in your sequence, you need to drag and drop any of the clips from the timeline into a different position. Final Cut Pro has a tool known as Magnetic timeline that will automatically insert and arrange the clips for you. You just need to ensure that your clips do not overlap or lay on top of each other.
To preview your video in the viewer, press the space bar on your keyboard or the Play icon in your software interface.
Step 3: Add Title, Texts, Transitions, and Effects
Title and Texts: Final Cut Pro has many Titles located in the browser where you imported your media. You can add them by dragging them into your video’s timeline. To access those titles you can press the ‘Title and Generators’ icon in the sidebar to open it.
Transitions: When adding Transitions, there is nothing wrong with a “hard cut_” between 2 clips. Use the transitions only where they make sense so as not to ruin your video. To add these transitions, you need to open the ‘_Transition browser’ by clicking on its indicated icon.
The transition’s length can be adjusted by dragging inwards or outwards. To customize your transition you can open the inspector by pressing ‘Command + 4’ and make the adjustments.
Effects: With Final Cut Pro inbuilt Effects, you can add some more value to your video after you are done with basic arrangements in the timeline. To add the effects click on the ‘Effects browser’ icon to open it.
Next to the effects browser icon, choose your preferred effect and add it between any 2 clips. By doing this you will have added animation effect between them.
Step 4: Add Audio, Music, and Color.
Audio & Music: At this point, you can import and add your music. Photos and Audio sidebar icon is located above the browser and you can click to open, and then select Sound Effects.
To see all the songs available in Final Cut Pro, you can type the word ‘Jingle‘ and you can preview them by pressing the small play button.
Color correction: By highlighting all the video clips in your video timeline, you can see a yellow outline around them.
Then open the drop-down menu by clicking the ‘_Enhancement_’ icon situated below the Viewer.
To improve the color and contrast, select Balance Color or ‘Option + Cmd + B’.
Now that you are done editing your video, you can save and share as you prefer.
Camtasia
Camtasia is a perfect all-in-one video editing and screen recording program. If you compare Camtasia vs Final cut pro, Camtasia is quite easy to use even for beginners. It can work in both Windows and macOS and provides the user with a demonstration and education video platform. It contains cool features to help you capture and edit your videos and audios appropriately.

Here are some pros and cons of Camtasia.
Pros:
- It is easy to learn.
- It has a good capture feature.
- Impressive cursor effects.
- It has Interactivity features.
- It has a good asset library
- Availability of mobile version.
- It offers great customer service.
- Available at a low cost.
Cons:
- Constant crashes and bugs.
- Limited customization
- No key tracking.
Here are key steps to follow when editing a video with Camtasia.
Step 1: Break up steps of a process with lower thirds.
Break any long multi-step video to help lower the viewer’s cognitive load.
Step 2: Reinforce texts with video.
Remove any mistakes and extra content such as unnecessary footage from the ends of your recording. If you trim too much drag the clip back to restore. This process is known as trimming.
You can zoom in on the most important section to focus your viewer’s attention there.
Step 3: Add narrative to video
Alternative Way to Edit Videos
Getting an appropriate video editing software is quite challenging as the makers of these software sometimes get confused about if the programs needed are for home videos or professional-quality work such as Hollywood movies. This is why you will find that some programs are complex to use while others lack essential features to make your work efficient.
Filmora video editor is one of the most efficient for video editing. This software is powerful and easy to use and it is built with many features to make your vision come true. It is fit for small scale, medium scale and large businesses.
For Win 7 or later (64-bit)
For macOS 10.12 or later
These steps will help you to know how to edit video with Filmora software;
Step 1: Start a new project.

After making sure that you have Filmora video editor installed on your computer, start a new project. Open the app then choose a dropdown option from the Select Project Aspect Ratio.
Step 2: Import your media

The footage, photos, and audios you use in your video are the key basic aspects of your video. Organizing all the files you are going to use in a single file. You can do this by browsing the file menu. Click the ‘File > Import Media Folder’ menu in Filmora and select the folder that contains your video files.
After importing your video files the thumbnails for each file will appear in one half of the application. Double-click on the thumbnails for a preview.
These thumbnails prove that all your captured video clips are already in the application and ready to be edited. Click on the Filmora video editing guide to get to help you know what to do.
Step 3: Add clips to the timeline, trim, adjust appropriately and sequence them.

Now that you have reviewed your video library and seen that they are there, you need to add them to the video editing timeline at the bottom of your app. This is quite easy as you can view all your video clips and determine which is to be added first.
Drag and drop each video or photo in the timeline to add it to your project.
After adding the clips, you can trim and adjust them appropriately. Click on the right or left edges of the clip you want to shorten in the timeline and drag it to shorten.
If you want to split a clip in the timeline, pick the scissors by clicking on the ‘_Scissors_’ icon.
When working on your video footage, click the spacebar of your computer keyboard to preview. By doing this, you will be able to see how your clips are joined together.
Trim appropriately and perfect the runtime of every single clip and re-order your clips where there is a need to do so. This can be done by clicking on the targeted clip and dragging it to where you want it to be.
Step 4: Add video Effects, Transmissions between the clips, and Text overlays

Click on the Effect icon at the top of the app and a deep visual library of effects will be visible. If you want to add a certain effect to your active clip, just double-click it.
Add transitions in your video timeline to cut the scene-to-scene. They are quite necessary as they help establish your audience’s attention.
The next thing after adding the transmissions will be adding the overlays and exporting your video by clicking on the ‘Export‘ button.
Step 5: Export your finished video.

You can click the ‘Export’ button and switch to the platform you want your video to be exported.
Conclusion
Choosing an appropriate video editing tool is equally as important as the video itself. And with the availability of so many of these video editing tools, choosing among them is quite hard. You can easily get confused especially if you are a beginner in the video editing industry. To avoid the complications you need to know what editing software is the best for your project.
As you can see in the table above there is no great deference seen when comparing Final cut pro X vs Techsmith Camtasia, but it can tell you if is Final cut pro better than Camtasia or reverse is the case.
Final Cut Pro
Final Cut Pro is the perfect macOS video editing software that can help you achieve a professional-looking video. This software is built with the latest and most powerful tools that make it an effortless tool for video editing. It has impressive filters, graphics, and a range of other cool video editing features. Its coolest part is its ability to enable 360-degree video editing for VR and VR headset playback. This program uses multi-core multi-thread machines quickly to allow you to import the videos in different formats faster than others.

Like any other software, Final Cut Pro possesses some pros and cons as listed below;
Pros:
- It is a stable program that can be very useful in small businesses.
- It has a powerful architecture for your complex and heavy projects.
- Its fast rendering speed can allow you to conduct Multicam editing.
- It has classic GPU utilization and powerful media organization to allow you to organize assets such as audio and video carefully.
- Its easy audio modification capabilities can allow you to create impeccable VR videos.
- It has a customizable and streamlined share interface that makes high-quality file delivery easy and fast.
- It can edit videos offline.
- It is tailored with real-time graphics and cool effects like text and blurs that are easy to apply.
Cons:
- It is complex and thus difficult for beginners.
- It has limited export options.
- It only works on Mac computers.
Editing video with Final Cut Pro is not a complicated process. Here are the steps to help a beginner get started.
Step1: Create a new project & import media
When you Launch the Final Cut Pro interface, Libraries and Events are automatically created. You only need to create a new project.
At the top menu bar, click File > New > Project to create a new project. Here you will have to type in a new name of the project and then select ‘Use Automatic Settings’.
At the top menu bar again, click File > Import > Media to enable the program to bring up the Media Import window where you can select the video and audio files you want to import into your new project.
After selecting all the media you want to include in your project press ‘Import Selected’ and then close the media window.
Step 2: Add your trimmed clips to the timeline.
The thumbnails of all the media you have imported will be appearing in the browser. For you to create a new video you need to arrange and trim that media in the timeline.
In your browser, you can set the ‘In and Out’ points for each video clip by holding ‘_Option_’. To do this you will have to click the thumbnail and drag it. The yellow timeline that appears on the clip represents the range that will be added to your video timeline.
After arranging them in the order that you want them to play, trim your clips by moving the mouse cursor to the edge of its thumbnail. This is done by using the ‘Trim tool’. Drag forward or backward to adjust the clip’s endings.
If you are arranging the clips in your sequence, you need to drag and drop any of the clips from the timeline into a different position. Final Cut Pro has a tool known as Magnetic timeline that will automatically insert and arrange the clips for you. You just need to ensure that your clips do not overlap or lay on top of each other.
To preview your video in the viewer, press the space bar on your keyboard or the Play icon in your software interface.
Step 3: Add Title, Texts, Transitions, and Effects
Title and Texts: Final Cut Pro has many Titles located in the browser where you imported your media. You can add them by dragging them into your video’s timeline. To access those titles you can press the ‘Title and Generators’ icon in the sidebar to open it.
Transitions: When adding Transitions, there is nothing wrong with a “hard cut_” between 2 clips. Use the transitions only where they make sense so as not to ruin your video. To add these transitions, you need to open the ‘_Transition browser’ by clicking on its indicated icon.
The transition’s length can be adjusted by dragging inwards or outwards. To customize your transition you can open the inspector by pressing ‘Command + 4’ and make the adjustments.
Effects: With Final Cut Pro inbuilt Effects, you can add some more value to your video after you are done with basic arrangements in the timeline. To add the effects click on the ‘Effects browser’ icon to open it.
Next to the effects browser icon, choose your preferred effect and add it between any 2 clips. By doing this you will have added animation effect between them.
Step 4: Add Audio, Music, and Color.
Audio & Music: At this point, you can import and add your music. Photos and Audio sidebar icon is located above the browser and you can click to open, and then select Sound Effects.
To see all the songs available in Final Cut Pro, you can type the word ‘Jingle‘ and you can preview them by pressing the small play button.
Color correction: By highlighting all the video clips in your video timeline, you can see a yellow outline around them.
Then open the drop-down menu by clicking the ‘_Enhancement_’ icon situated below the Viewer.
To improve the color and contrast, select Balance Color or ‘Option + Cmd + B’.
Now that you are done editing your video, you can save and share as you prefer.
Camtasia
Camtasia is a perfect all-in-one video editing and screen recording program. If you compare Camtasia vs Final cut pro, Camtasia is quite easy to use even for beginners. It can work in both Windows and macOS and provides the user with a demonstration and education video platform. It contains cool features to help you capture and edit your videos and audios appropriately.

Here are some pros and cons of Camtasia.
Pros:
- It is easy to learn.
- It has a good capture feature.
- Impressive cursor effects.
- It has Interactivity features.
- It has a good asset library
- Availability of mobile version.
- It offers great customer service.
- Available at a low cost.
Cons:
- Constant crashes and bugs.
- Limited customization
- No key tracking.
Here are key steps to follow when editing a video with Camtasia.
Step 1: Break up steps of a process with lower thirds.
Break any long multi-step video to help lower the viewer’s cognitive load.
Step 2: Reinforce texts with video.
Remove any mistakes and extra content such as unnecessary footage from the ends of your recording. If you trim too much drag the clip back to restore. This process is known as trimming.
You can zoom in on the most important section to focus your viewer’s attention there.
Step 3: Add narrative to video
Alternative Way to Edit Videos
Getting an appropriate video editing software is quite challenging as the makers of these software sometimes get confused about if the programs needed are for home videos or professional-quality work such as Hollywood movies. This is why you will find that some programs are complex to use while others lack essential features to make your work efficient.
Filmora video editor is one of the most efficient for video editing. This software is powerful and easy to use and it is built with many features to make your vision come true. It is fit for small scale, medium scale and large businesses.
For Win 7 or later (64-bit)
For macOS 10.12 or later
These steps will help you to know how to edit video with Filmora software;
Step 1: Start a new project.

After making sure that you have Filmora video editor installed on your computer, start a new project. Open the app then choose a dropdown option from the Select Project Aspect Ratio.
Step 2: Import your media

The footage, photos, and audios you use in your video are the key basic aspects of your video. Organizing all the files you are going to use in a single file. You can do this by browsing the file menu. Click the ‘File > Import Media Folder’ menu in Filmora and select the folder that contains your video files.
After importing your video files the thumbnails for each file will appear in one half of the application. Double-click on the thumbnails for a preview.
These thumbnails prove that all your captured video clips are already in the application and ready to be edited. Click on the Filmora video editing guide to get to help you know what to do.
Step 3: Add clips to the timeline, trim, adjust appropriately and sequence them.

Now that you have reviewed your video library and seen that they are there, you need to add them to the video editing timeline at the bottom of your app. This is quite easy as you can view all your video clips and determine which is to be added first.
Drag and drop each video or photo in the timeline to add it to your project.
After adding the clips, you can trim and adjust them appropriately. Click on the right or left edges of the clip you want to shorten in the timeline and drag it to shorten.
If you want to split a clip in the timeline, pick the scissors by clicking on the ‘_Scissors_’ icon.
When working on your video footage, click the spacebar of your computer keyboard to preview. By doing this, you will be able to see how your clips are joined together.
Trim appropriately and perfect the runtime of every single clip and re-order your clips where there is a need to do so. This can be done by clicking on the targeted clip and dragging it to where you want it to be.
Step 4: Add video Effects, Transmissions between the clips, and Text overlays

Click on the Effect icon at the top of the app and a deep visual library of effects will be visible. If you want to add a certain effect to your active clip, just double-click it.
Add transitions in your video timeline to cut the scene-to-scene. They are quite necessary as they help establish your audience’s attention.
The next thing after adding the transmissions will be adding the overlays and exporting your video by clicking on the ‘Export‘ button.
Step 5: Export your finished video.

You can click the ‘Export’ button and switch to the platform you want your video to be exported.
Conclusion
Choosing an appropriate video editing tool is equally as important as the video itself. And with the availability of so many of these video editing tools, choosing among them is quite hard. You can easily get confused especially if you are a beginner in the video editing industry. To avoid the complications you need to know what editing software is the best for your project.
As you can see in the table above there is no great deference seen when comparing Final cut pro X vs Techsmith Camtasia, but it can tell you if is Final cut pro better than Camtasia or reverse is the case.
Final Cut Pro
Final Cut Pro is the perfect macOS video editing software that can help you achieve a professional-looking video. This software is built with the latest and most powerful tools that make it an effortless tool for video editing. It has impressive filters, graphics, and a range of other cool video editing features. Its coolest part is its ability to enable 360-degree video editing for VR and VR headset playback. This program uses multi-core multi-thread machines quickly to allow you to import the videos in different formats faster than others.

Like any other software, Final Cut Pro possesses some pros and cons as listed below;
Pros:
- It is a stable program that can be very useful in small businesses.
- It has a powerful architecture for your complex and heavy projects.
- Its fast rendering speed can allow you to conduct Multicam editing.
- It has classic GPU utilization and powerful media organization to allow you to organize assets such as audio and video carefully.
- Its easy audio modification capabilities can allow you to create impeccable VR videos.
- It has a customizable and streamlined share interface that makes high-quality file delivery easy and fast.
- It can edit videos offline.
- It is tailored with real-time graphics and cool effects like text and blurs that are easy to apply.
Cons:
- It is complex and thus difficult for beginners.
- It has limited export options.
- It only works on Mac computers.
Editing video with Final Cut Pro is not a complicated process. Here are the steps to help a beginner get started.
Step1: Create a new project & import media
When you Launch the Final Cut Pro interface, Libraries and Events are automatically created. You only need to create a new project.
At the top menu bar, click File > New > Project to create a new project. Here you will have to type in a new name of the project and then select ‘Use Automatic Settings’.
At the top menu bar again, click File > Import > Media to enable the program to bring up the Media Import window where you can select the video and audio files you want to import into your new project.
After selecting all the media you want to include in your project press ‘Import Selected’ and then close the media window.
Step 2: Add your trimmed clips to the timeline.
The thumbnails of all the media you have imported will be appearing in the browser. For you to create a new video you need to arrange and trim that media in the timeline.
In your browser, you can set the ‘In and Out’ points for each video clip by holding ‘_Option_’. To do this you will have to click the thumbnail and drag it. The yellow timeline that appears on the clip represents the range that will be added to your video timeline.
After arranging them in the order that you want them to play, trim your clips by moving the mouse cursor to the edge of its thumbnail. This is done by using the ‘Trim tool’. Drag forward or backward to adjust the clip’s endings.
If you are arranging the clips in your sequence, you need to drag and drop any of the clips from the timeline into a different position. Final Cut Pro has a tool known as Magnetic timeline that will automatically insert and arrange the clips for you. You just need to ensure that your clips do not overlap or lay on top of each other.
To preview your video in the viewer, press the space bar on your keyboard or the Play icon in your software interface.
Step 3: Add Title, Texts, Transitions, and Effects
Title and Texts: Final Cut Pro has many Titles located in the browser where you imported your media. You can add them by dragging them into your video’s timeline. To access those titles you can press the ‘Title and Generators’ icon in the sidebar to open it.
Transitions: When adding Transitions, there is nothing wrong with a “hard cut_” between 2 clips. Use the transitions only where they make sense so as not to ruin your video. To add these transitions, you need to open the ‘_Transition browser’ by clicking on its indicated icon.
The transition’s length can be adjusted by dragging inwards or outwards. To customize your transition you can open the inspector by pressing ‘Command + 4’ and make the adjustments.
Effects: With Final Cut Pro inbuilt Effects, you can add some more value to your video after you are done with basic arrangements in the timeline. To add the effects click on the ‘Effects browser’ icon to open it.
Next to the effects browser icon, choose your preferred effect and add it between any 2 clips. By doing this you will have added animation effect between them.
Step 4: Add Audio, Music, and Color.
Audio & Music: At this point, you can import and add your music. Photos and Audio sidebar icon is located above the browser and you can click to open, and then select Sound Effects.
To see all the songs available in Final Cut Pro, you can type the word ‘Jingle‘ and you can preview them by pressing the small play button.
Color correction: By highlighting all the video clips in your video timeline, you can see a yellow outline around them.
Then open the drop-down menu by clicking the ‘_Enhancement_’ icon situated below the Viewer.
To improve the color and contrast, select Balance Color or ‘Option + Cmd + B’.
Now that you are done editing your video, you can save and share as you prefer.
Camtasia
Camtasia is a perfect all-in-one video editing and screen recording program. If you compare Camtasia vs Final cut pro, Camtasia is quite easy to use even for beginners. It can work in both Windows and macOS and provides the user with a demonstration and education video platform. It contains cool features to help you capture and edit your videos and audios appropriately.

Here are some pros and cons of Camtasia.
Pros:
- It is easy to learn.
- It has a good capture feature.
- Impressive cursor effects.
- It has Interactivity features.
- It has a good asset library
- Availability of mobile version.
- It offers great customer service.
- Available at a low cost.
Cons:
- Constant crashes and bugs.
- Limited customization
- No key tracking.
Here are key steps to follow when editing a video with Camtasia.
Step 1: Break up steps of a process with lower thirds.
Break any long multi-step video to help lower the viewer’s cognitive load.
Step 2: Reinforce texts with video.
Remove any mistakes and extra content such as unnecessary footage from the ends of your recording. If you trim too much drag the clip back to restore. This process is known as trimming.
You can zoom in on the most important section to focus your viewer’s attention there.
Step 3: Add narrative to video
Alternative Way to Edit Videos
Getting an appropriate video editing software is quite challenging as the makers of these software sometimes get confused about if the programs needed are for home videos or professional-quality work such as Hollywood movies. This is why you will find that some programs are complex to use while others lack essential features to make your work efficient.
Filmora video editor is one of the most efficient for video editing. This software is powerful and easy to use and it is built with many features to make your vision come true. It is fit for small scale, medium scale and large businesses.
For Win 7 or later (64-bit)
For macOS 10.12 or later
These steps will help you to know how to edit video with Filmora software;
Step 1: Start a new project.

After making sure that you have Filmora video editor installed on your computer, start a new project. Open the app then choose a dropdown option from the Select Project Aspect Ratio.
Step 2: Import your media

The footage, photos, and audios you use in your video are the key basic aspects of your video. Organizing all the files you are going to use in a single file. You can do this by browsing the file menu. Click the ‘File > Import Media Folder’ menu in Filmora and select the folder that contains your video files.
After importing your video files the thumbnails for each file will appear in one half of the application. Double-click on the thumbnails for a preview.
These thumbnails prove that all your captured video clips are already in the application and ready to be edited. Click on the Filmora video editing guide to get to help you know what to do.
Step 3: Add clips to the timeline, trim, adjust appropriately and sequence them.

Now that you have reviewed your video library and seen that they are there, you need to add them to the video editing timeline at the bottom of your app. This is quite easy as you can view all your video clips and determine which is to be added first.
Drag and drop each video or photo in the timeline to add it to your project.
After adding the clips, you can trim and adjust them appropriately. Click on the right or left edges of the clip you want to shorten in the timeline and drag it to shorten.
If you want to split a clip in the timeline, pick the scissors by clicking on the ‘_Scissors_’ icon.
When working on your video footage, click the spacebar of your computer keyboard to preview. By doing this, you will be able to see how your clips are joined together.
Trim appropriately and perfect the runtime of every single clip and re-order your clips where there is a need to do so. This can be done by clicking on the targeted clip and dragging it to where you want it to be.
Step 4: Add video Effects, Transmissions between the clips, and Text overlays

Click on the Effect icon at the top of the app and a deep visual library of effects will be visible. If you want to add a certain effect to your active clip, just double-click it.
Add transitions in your video timeline to cut the scene-to-scene. They are quite necessary as they help establish your audience’s attention.
The next thing after adding the transmissions will be adding the overlays and exporting your video by clicking on the ‘Export‘ button.
Step 5: Export your finished video.

You can click the ‘Export’ button and switch to the platform you want your video to be exported.
Conclusion
Choosing an appropriate video editing tool is equally as important as the video itself. And with the availability of so many of these video editing tools, choosing among them is quite hard. You can easily get confused especially if you are a beginner in the video editing industry. To avoid the complications you need to know what editing software is the best for your project.
As you can see in the table above there is no great deference seen when comparing Final cut pro X vs Techsmith Camtasia, but it can tell you if is Final cut pro better than Camtasia or reverse is the case.
Final Cut Pro
Final Cut Pro is the perfect macOS video editing software that can help you achieve a professional-looking video. This software is built with the latest and most powerful tools that make it an effortless tool for video editing. It has impressive filters, graphics, and a range of other cool video editing features. Its coolest part is its ability to enable 360-degree video editing for VR and VR headset playback. This program uses multi-core multi-thread machines quickly to allow you to import the videos in different formats faster than others.

Like any other software, Final Cut Pro possesses some pros and cons as listed below;
Pros:
- It is a stable program that can be very useful in small businesses.
- It has a powerful architecture for your complex and heavy projects.
- Its fast rendering speed can allow you to conduct Multicam editing.
- It has classic GPU utilization and powerful media organization to allow you to organize assets such as audio and video carefully.
- Its easy audio modification capabilities can allow you to create impeccable VR videos.
- It has a customizable and streamlined share interface that makes high-quality file delivery easy and fast.
- It can edit videos offline.
- It is tailored with real-time graphics and cool effects like text and blurs that are easy to apply.
Cons:
- It is complex and thus difficult for beginners.
- It has limited export options.
- It only works on Mac computers.
Editing video with Final Cut Pro is not a complicated process. Here are the steps to help a beginner get started.
Step1: Create a new project & import media
When you Launch the Final Cut Pro interface, Libraries and Events are automatically created. You only need to create a new project.
At the top menu bar, click File > New > Project to create a new project. Here you will have to type in a new name of the project and then select ‘Use Automatic Settings’.
At the top menu bar again, click File > Import > Media to enable the program to bring up the Media Import window where you can select the video and audio files you want to import into your new project.
After selecting all the media you want to include in your project press ‘Import Selected’ and then close the media window.
Step 2: Add your trimmed clips to the timeline.
The thumbnails of all the media you have imported will be appearing in the browser. For you to create a new video you need to arrange and trim that media in the timeline.
In your browser, you can set the ‘In and Out’ points for each video clip by holding ‘_Option_’. To do this you will have to click the thumbnail and drag it. The yellow timeline that appears on the clip represents the range that will be added to your video timeline.
After arranging them in the order that you want them to play, trim your clips by moving the mouse cursor to the edge of its thumbnail. This is done by using the ‘Trim tool’. Drag forward or backward to adjust the clip’s endings.
If you are arranging the clips in your sequence, you need to drag and drop any of the clips from the timeline into a different position. Final Cut Pro has a tool known as Magnetic timeline that will automatically insert and arrange the clips for you. You just need to ensure that your clips do not overlap or lay on top of each other.
To preview your video in the viewer, press the space bar on your keyboard or the Play icon in your software interface.
Step 3: Add Title, Texts, Transitions, and Effects
Title and Texts: Final Cut Pro has many Titles located in the browser where you imported your media. You can add them by dragging them into your video’s timeline. To access those titles you can press the ‘Title and Generators’ icon in the sidebar to open it.
Transitions: When adding Transitions, there is nothing wrong with a “hard cut_” between 2 clips. Use the transitions only where they make sense so as not to ruin your video. To add these transitions, you need to open the ‘_Transition browser’ by clicking on its indicated icon.
The transition’s length can be adjusted by dragging inwards or outwards. To customize your transition you can open the inspector by pressing ‘Command + 4’ and make the adjustments.
Effects: With Final Cut Pro inbuilt Effects, you can add some more value to your video after you are done with basic arrangements in the timeline. To add the effects click on the ‘Effects browser’ icon to open it.
Next to the effects browser icon, choose your preferred effect and add it between any 2 clips. By doing this you will have added animation effect between them.
Step 4: Add Audio, Music, and Color.
Audio & Music: At this point, you can import and add your music. Photos and Audio sidebar icon is located above the browser and you can click to open, and then select Sound Effects.
To see all the songs available in Final Cut Pro, you can type the word ‘Jingle‘ and you can preview them by pressing the small play button.
Color correction: By highlighting all the video clips in your video timeline, you can see a yellow outline around them.
Then open the drop-down menu by clicking the ‘_Enhancement_’ icon situated below the Viewer.
To improve the color and contrast, select Balance Color or ‘Option + Cmd + B’.
Now that you are done editing your video, you can save and share as you prefer.
Camtasia
Camtasia is a perfect all-in-one video editing and screen recording program. If you compare Camtasia vs Final cut pro, Camtasia is quite easy to use even for beginners. It can work in both Windows and macOS and provides the user with a demonstration and education video platform. It contains cool features to help you capture and edit your videos and audios appropriately.

Here are some pros and cons of Camtasia.
Pros:
- It is easy to learn.
- It has a good capture feature.
- Impressive cursor effects.
- It has Interactivity features.
- It has a good asset library
- Availability of mobile version.
- It offers great customer service.
- Available at a low cost.
Cons:
- Constant crashes and bugs.
- Limited customization
- No key tracking.
Here are key steps to follow when editing a video with Camtasia.
Step 1: Break up steps of a process with lower thirds.
Break any long multi-step video to help lower the viewer’s cognitive load.
Step 2: Reinforce texts with video.
Remove any mistakes and extra content such as unnecessary footage from the ends of your recording. If you trim too much drag the clip back to restore. This process is known as trimming.
You can zoom in on the most important section to focus your viewer’s attention there.
Step 3: Add narrative to video
Alternative Way to Edit Videos
Getting an appropriate video editing software is quite challenging as the makers of these software sometimes get confused about if the programs needed are for home videos or professional-quality work such as Hollywood movies. This is why you will find that some programs are complex to use while others lack essential features to make your work efficient.
Filmora video editor is one of the most efficient for video editing. This software is powerful and easy to use and it is built with many features to make your vision come true. It is fit for small scale, medium scale and large businesses.
For Win 7 or later (64-bit)
For macOS 10.12 or later
These steps will help you to know how to edit video with Filmora software;
Step 1: Start a new project.

After making sure that you have Filmora video editor installed on your computer, start a new project. Open the app then choose a dropdown option from the Select Project Aspect Ratio.
Step 2: Import your media

The footage, photos, and audios you use in your video are the key basic aspects of your video. Organizing all the files you are going to use in a single file. You can do this by browsing the file menu. Click the ‘File > Import Media Folder’ menu in Filmora and select the folder that contains your video files.
After importing your video files the thumbnails for each file will appear in one half of the application. Double-click on the thumbnails for a preview.
These thumbnails prove that all your captured video clips are already in the application and ready to be edited. Click on the Filmora video editing guide to get to help you know what to do.
Step 3: Add clips to the timeline, trim, adjust appropriately and sequence them.

Now that you have reviewed your video library and seen that they are there, you need to add them to the video editing timeline at the bottom of your app. This is quite easy as you can view all your video clips and determine which is to be added first.
Drag and drop each video or photo in the timeline to add it to your project.
After adding the clips, you can trim and adjust them appropriately. Click on the right or left edges of the clip you want to shorten in the timeline and drag it to shorten.
If you want to split a clip in the timeline, pick the scissors by clicking on the ‘_Scissors_’ icon.
When working on your video footage, click the spacebar of your computer keyboard to preview. By doing this, you will be able to see how your clips are joined together.
Trim appropriately and perfect the runtime of every single clip and re-order your clips where there is a need to do so. This can be done by clicking on the targeted clip and dragging it to where you want it to be.
Step 4: Add video Effects, Transmissions between the clips, and Text overlays

Click on the Effect icon at the top of the app and a deep visual library of effects will be visible. If you want to add a certain effect to your active clip, just double-click it.
Add transitions in your video timeline to cut the scene-to-scene. They are quite necessary as they help establish your audience’s attention.
The next thing after adding the transmissions will be adding the overlays and exporting your video by clicking on the ‘Export‘ button.
Step 5: Export your finished video.

You can click the ‘Export’ button and switch to the platform you want your video to be exported.
Conclusion
Choosing an appropriate video editing tool is equally as important as the video itself. And with the availability of so many of these video editing tools, choosing among them is quite hard. You can easily get confused especially if you are a beginner in the video editing industry. To avoid the complications you need to know what editing software is the best for your project.
How to Be a Good Podcast Host (2024 Updated)
You may be a blogger who has the habit of writing long articles. Or you may be a YouTuber with a hi-fi channel with many subscribers, but a podcast is a different thing in general.
This article will look at how to prepare, call guests, warm them up, and give practical ideas about how to host a podcast. Let’s start the article by learning how to get prepared to host a podcast.
#1 Get prepared to host a podcast
A good podcast host always gets prepared, sets up his goals, and gets easy tips to set apart from everyone in the marketplace. For this, you have to follow the below instructions and tips:
1. A proper pre-interview process
Before starting the podcast, the host should have quality and organic content. The content is related to the guest or any foremost personality related to the topic.
The host should be confident and relaxed to kill the anxiety process. If the host has low confidence, he may suffer from nervousness. This will kill the authenticity.
2. Share questions with the audience
A good understanding of how to pan out a situation makes you a good host. You must share the question on and off during podcasts to build engaging criteria with the audience.
You don’t need to sound the script on the screen like a robot. Scripts can be helpful but only if read in a conversational mood.
3. Find the right location
A good location means good conversation. A proper set prepared for the guest and the podcast will help you boost your conversation skills and get yourself and the guest into the mood of your show.
Before the show, you can change the settings or have a monotone set that fits every mood.
#2 Warm up the audience
Warming up is a necessary part of the show. A warmup works just like gas in a car before a long drive. You have to do this by asking any question or by telling them an inspirational or motivational story.
A good host must realize that a warm show has a high chance of becoming viral, and you won’t get that if the guest is nervous, tired, or not in the mood.
Tip 1. Setting the mood
Your goal is to set the mood of the audience according to the topic. Warming up the audience before getting to the guest.
You have to set the tone according to the topic of your podcast to warm them up. In this way, you need to make the connection between the guest, you, and your voice.
Tip 2. Build an emotional connection
Building an emotional connection helps to engage the audience till the end of the show. To make this possible, you can share a funny story with them or about a recent event or any recent incident.
Tip 3. Polls and questionnaires
Modern media has connected everything through the internet. You need to interact with the audience by asking questions from them and giving them a chance to answer them by live calling or on social media.
You can also do this on Instagram polls or by posting a story and asking them to select an upcoming topic for the podcast. Introducing this concept will boost your podcast views and help you engage more followers on your other social media platforms.
#3 Try to be authenticity
You need to have authenticity if you want your podcast to be successful. An authentic show attracts a larger audience, while a show whose mood resembles a person with a multiple personality disorder will throw off the whole vibe of the podcast. And the listeners will eventually press back buttons to escape the colossal wreck.
Tips to have authentic content
- Your topic may be emotional, happy, or of any other information.
- A good host needs to have the skills of a good actor to convey the emotions that the audience will perceive more efficiently.
- An idea of how the audience will perceive you and how to make your voice tone with emotions on podcasts.
- Don’t go for a more serious tone.
Things to Avoid
- What you should opt away from is, faking
- Don’t try to get excited about something that you’re not.
- Do not pretend to care about something when you do not.
- The fakeness will only result in the downfall of your podcast, as the listeners will eventually grow tired and leave.
- You must act well and sell yourself more efficiently to develop that trust with the audience.
The more the audience trusts you, the more authentic you seem.
#4 Storytelling
Tales are as old as time. As time moves on, more and more stories pile up. Your podcast has the potential to be the best if you know how to utilize those storytelling skills of yours. It’s never about information alone!
You may have a bland topic to discuss or a guest who is tough to break character. These are the situations where your charm and concern will play their part. So you also want to learn how to make your podcasts enjoyable through stories? Then check out the short tips below:
How to add stories to your podcasts
- First, you should have the skill to read the room and the mood.
- If you start telling a story about yourself that has no relation to the topic whatsoever will only lead to the guest being annoyed.
- You may have called the guest for a reason. This reason should tally with your topic as it will make you ask about their experience.
- Asking the right questions is important.
- You’d better not begin with leading statements such as, “Obi-wan Kenobi is a good TV show.” the guest may simply reply, “I do not care.”
- You should approach with question statements such as, “Did you know that your son is a big fan of the Obi-wan Kenobi TV show.” These are indulging questions to help your audience be more involved in your podcasts.
The audience and the guest will also develop an interest in the conversation that will lead to a successful show for the day.
#5 Transcribe your episodes
A good podcast also looks to give you quality content for each episode. You may call on guests upon guests and promote your podcasts in many ways. One of the ways you can also allow your podcasts to be recognized more is by the use of transcribing.
What is transcribing?
Transcribing means converting the speech in the audio of your podcasts to a text format. Your podcast may raise some eyes if the content is desirable to the audience.
It may happen your podcast gets around a person whose brother suffers from hearing loss. By a transcription, you offer a chance to let them involved in your podcast. You can accomplish this feat in one of two ways.
- Either use an AI-powered audio editing program, like Wondershare Filmora , to get you through the speech-to-text transcription by default or a more auto way.
- Convert your text into audio, but this article will not look at it.
Free Download For Win 7 or later(64-bit)
Free Download For macOS 10.14 or later
Our main focus would be manually converting speech to text using a human transcriber. And we will be doing so by using the Wondershare Filmora app.
Transcribing podcasts with Wondershare Filmora
Filmora is an all-in-one video editing tool. In the following steps, we will learn the step-by-step process of transcribing podcast by using Wondershare Filmora.
Step1Add audio files or footage
- First of all, drag the imported audio files or footage into the timeline.
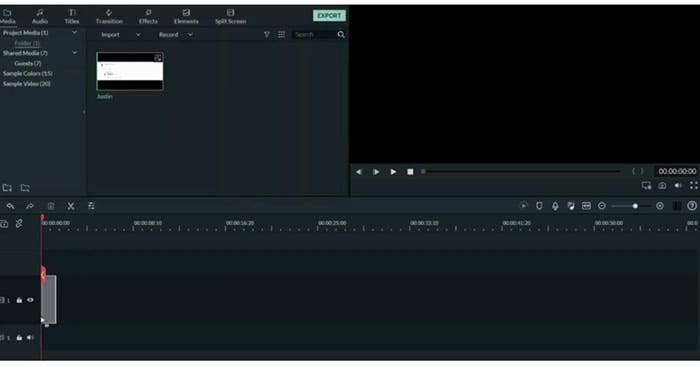
Step2Add subtitles
To show the transcription of the podcast’s audio, you have to add sbtitles for better understanding. For this, perform these steps:
- Select the tile icon on the bar above.
- In the window that pops up, select your favorite subtitle format.
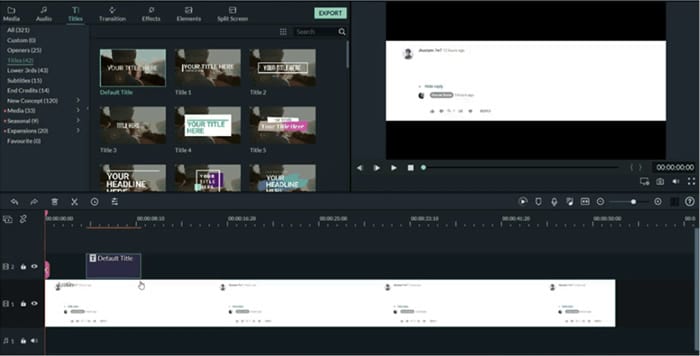
Step3Adjust the size
For better playout and matching the audio with subtitles, you have to adjust the size of the video as:
- Add a subtitle tile above the video.
- Then adjust the size of the video.
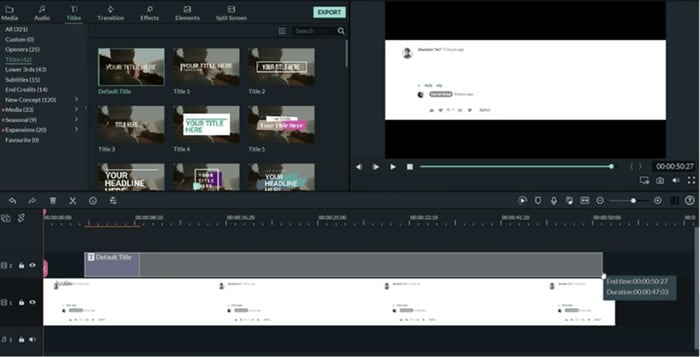
Step4Convert speech into text
- At last, type the speech into text in the subtitle box.
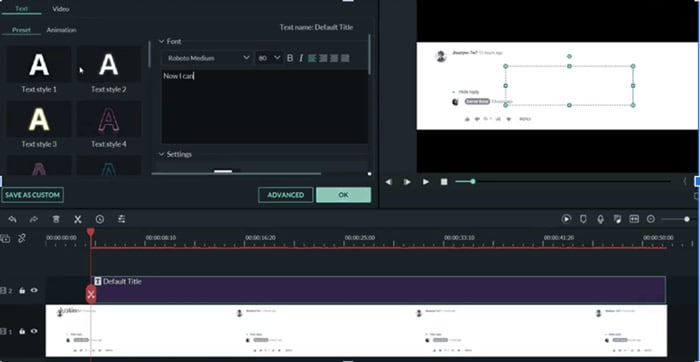
In this way, you have created speech-to-text using a human transcriber rather than an AI. Doing this will ensure no mistakes are recorded and make it even more efficient.
#6 Put yourself in audiences’ shoes
And if you feel like the general audience would want to make sense of a particular statement, ask the guest about it. This is what differentiates a good host from a bad one! A general understanding of the audience’s point of view would always allow you to process your podcast accordingly.
- You should understand the general sentiments of the audience.
- When you feel a particular subject will attract more audience, do the process accordingly.
- Maybe they like how you process a story and evaluate it. Do that!
All qualities of a good podcast are there, and it’s your job to identify them and make the most of them.
#7 Understand why the guest is here
You are the host of the podcast. Your job is to be sincere with the guest. Moreover, useful information or a valued thought might be a reason why the guest has come to your show. Understand that reason and try to make the most of it.
- The guest might have heard about your podcast, or they could be a constant
- Your approach to the guest should tally with the topic of the podcast.
- The guest might be going through a tough time that makes them a suitable guest for that particular episode.
- Or it could be that your podcast attracted them, and now they want to use your interview to promote a book or any other service they think is best.
- As a host, you should allow the guest to have some control over the podcast.
- Develop a sense of trust between the host and the guest.
- The more you allow the guest to speak freely about themselves, the more they will feel interested in your podcast.
Your goal should be to captivate the guest as much as you can. If the guest is entertained, the more chances are that they will recommend you to other guests. An experience gone wrong will be bad for the podcast.
#8 Invite the right guest
A podcast can be an excellent tool for attracting the audience to your content. And as podcast hosts guests, your first step is finding the right guests for your audience.
Is it necessary to search for a host before calling? Yes! It’s quite a complicated and sensitive step to call out guests. A guest is the only one who can make or break the Podcast show. It’s important to study the nature of guests too. Because a guest is also considered as a co-host of the show.
If a guest is bored and doesn’t take much interest, then there are 100% chance that the show will fail. To find who is more compatible, we have to take assistance from a tool.
You can do this by plugging your podcast into a tool like Sparktoro. Sparktoro allows you to see what your audience is engaging with. It could be other platforms of podcasts such as youtube or other social media platforms.
For example, If we search for “the art of product podcast” on the Sparktoro website. It will direct us to demographic data, providing information about the content the audience is interacting with.
- It will show different hashtags and frequently used phrases.
- Here you can see the top words in bios, hashtags, and frequent phrases.
- On the left window, you can search for other related podcasts your viewers are watching.

- Similarly, you can also use the YouTube option to look at what kind of content your audience watches on youtube.
Following the above methods could give you 50-100 potential clients. Your main goal will be creating a list allowing you to call guests on your show. You can divide the list according to the priorities.
- Close friends: the ones who are going to be available whenever you call upon them.
- The probable list: the ones who would most probably agree to come on your podcast.
- The premium list: these guests will resemble a dream list of guests you want to call on your podcast.
Start by writing emails and promoting content that will attract these guests. Your chances are increased by how much you polish your podcast into creating premium content. The more premium the content is, the more premium your chances are of inviting those dream guests.
The Bottom Line
Podcasts are tricky to promote. Many other alternatives are available in the market that provides a more Visual representation. And it’s no lie; an audience like to sit and watch rather than sit and listen.
Following the steps, tips, and tricks mentioned above, you can build a strong base for being a good podcast host. Although it will take time to set off on your dreams, consistency and determination will eventually bear fruit.
Free Download For macOS 10.14 or later
Our main focus would be manually converting speech to text using a human transcriber. And we will be doing so by using the Wondershare Filmora app.
Transcribing podcasts with Wondershare Filmora
Filmora is an all-in-one video editing tool. In the following steps, we will learn the step-by-step process of transcribing podcast by using Wondershare Filmora.
Step1Add audio files or footage
- First of all, drag the imported audio files or footage into the timeline.

Step2Add subtitles
To show the transcription of the podcast’s audio, you have to add sbtitles for better understanding. For this, perform these steps:
- Select the tile icon on the bar above.
- In the window that pops up, select your favorite subtitle format.

Step3Adjust the size
For better playout and matching the audio with subtitles, you have to adjust the size of the video as:
- Add a subtitle tile above the video.
- Then adjust the size of the video.

Step4Convert speech into text
- At last, type the speech into text in the subtitle box.

In this way, you have created speech-to-text using a human transcriber rather than an AI. Doing this will ensure no mistakes are recorded and make it even more efficient.
#6 Put yourself in audiences’ shoes
And if you feel like the general audience would want to make sense of a particular statement, ask the guest about it. This is what differentiates a good host from a bad one! A general understanding of the audience’s point of view would always allow you to process your podcast accordingly.
- You should understand the general sentiments of the audience.
- When you feel a particular subject will attract more audience, do the process accordingly.
- Maybe they like how you process a story and evaluate it. Do that!
All qualities of a good podcast are there, and it’s your job to identify them and make the most of them.
#7 Understand why the guest is here
You are the host of the podcast. Your job is to be sincere with the guest. Moreover, useful information or a valued thought might be a reason why the guest has come to your show. Understand that reason and try to make the most of it.
- The guest might have heard about your podcast, or they could be a constant
- Your approach to the guest should tally with the topic of the podcast.
- The guest might be going through a tough time that makes them a suitable guest for that particular episode.
- Or it could be that your podcast attracted them, and now they want to use your interview to promote a book or any other service they think is best.
- As a host, you should allow the guest to have some control over the podcast.
- Develop a sense of trust between the host and the guest.
- The more you allow the guest to speak freely about themselves, the more they will feel interested in your podcast.
Your goal should be to captivate the guest as much as you can. If the guest is entertained, the more chances are that they will recommend you to other guests. An experience gone wrong will be bad for the podcast.
#8 Invite the right guest
A podcast can be an excellent tool for attracting the audience to your content. And as podcast hosts guests, your first step is finding the right guests for your audience.
Is it necessary to search for a host before calling? Yes! It’s quite a complicated and sensitive step to call out guests. A guest is the only one who can make or break the Podcast show. It’s important to study the nature of guests too. Because a guest is also considered as a co-host of the show.
If a guest is bored and doesn’t take much interest, then there are 100% chance that the show will fail. To find who is more compatible, we have to take assistance from a tool.
You can do this by plugging your podcast into a tool like Sparktoro. Sparktoro allows you to see what your audience is engaging with. It could be other platforms of podcasts such as youtube or other social media platforms.
For example, If we search for “the art of product podcast” on the Sparktoro website. It will direct us to demographic data, providing information about the content the audience is interacting with.
- It will show different hashtags and frequently used phrases.

- Here you can see the top words in bios, hashtags, and frequent phrases.
- On the left window, you can search for other related podcasts your viewers are watching.

- Similarly, you can also use the YouTube option to look at what kind of content your audience watches on youtube.
Following the above methods could give you 50-100 potential clients. Your main goal will be creating a list allowing you to call guests on your show. You can divide the list according to the priorities.
- Close friends: the ones who are going to be available whenever you call upon them.
- The probable list: the ones who would most probably agree to come on your podcast.
- The premium list: these guests will resemble a dream list of guests you want to call on your podcast.
Start by writing emails and promoting content that will attract these guests. Your chances are increased by how much you polish your podcast into creating premium content. The more premium the content is, the more premium your chances are of inviting those dream guests.
The Bottom Line
Podcasts are tricky to promote. Many other alternatives are available in the market that provides a more Visual representation. And it’s no lie; an audience like to sit and watch rather than sit and listen.
Following the steps, tips, and tricks mentioned above, you can build a strong base for being a good podcast host. Although it will take time to set off on your dreams, consistency and determination will eventually bear fruit.
Also read:
- New Detailed Guide to Crop Videos in Sony Vegas Pro
- New In 2024, Best 10 Crazy-Cool Examples of AR Video
- New The Latest 100+ Best TikTok Captions to Improve Your Next Post
- Updated The Complete Guide to GIF for Discord Profile
- 2024 Approved Learn How to Create a Kinetic Typography Text Effect in Filmora, One of the Best Video Editors for All Skill Levels. Check Out This Simple Step-by-Step Guide
- New Windows Movie Maker Review
- New Backup and Organize Your Footage in Minutes
- Learn About Open Broadcaster Software and How to Perform Obs Color Correction. Also, Explore the Various Aspects of Color Correction Like Contrast, Brightness, Saturation, Among Others
- New 2024 Approved Finest Approach to Slow Down a Video CapCut All-in-One Video Editor
- Want to Explore the Exciting World of GIFs? Here Is Everything You Will Ever Want to Know and Learn About the Most Appealing GIF Libraries, All at Once Place for 2024
- New Splitting Audio From a Video in Sony Vegas Step by Step
- Updated 2024 Approved Discover the Ultimate LUTs for Wondershare Filmora Uncover the Answer
- This Article Presents a Guide to Using the Keyframe Feature for Creating Competent Films with Detailed Instructions and Filmoras Grow and Win Program Contest for 2024
- New Top 9 Best Solutions To Go For When Creating an AI Thumbnail for 2024
- How to Make a Vacation Slideshow in 5 Minutes
- Updated Bored with Those Normal Background Images and that Ordinary Still Capture Feel? Take Your Creativity to the Next Level with Amazing Image Transparency Ideas
- New Best 7 Color Match Paint Apps for 2024
- Make Time-Lapse Video on MacBook Complete Guide
- Here Is a Step-by-Step Guide to Color Correct and Color Grade a Video Professionally with Wondershare Filmora. Lets Get Going for 2024
- Updated 2024 Approved Steps to Remove Background Noise From Video Sony Vegas
- In 2024, Merge MP4 Online? Its Easy With These 5 Tools
- New In 2024, Ways to Make Sure Your Video Editing Course Is Worthing to Watch
- Updated How to Create Realistic Fire Effects
- Updated End Your Struggles with Choppy Playback on DaVinci Resolve. Read This Guide to Find Effective Fixes and Reliable DaVinci Resolve Slow Playback Alternatives
- Updated Video Editing Tips to Know Before Editing First Draft
- Updated Best 12 Sony Vegas Slideshow Templates for Free Download for 2024
- New 5 Tips for Aquasoft Slideshow
- New In 2024, Funny Content Ideas for YouTube Videos
- New In 2024, 15 Best CapCut Templates for Slow Motion Editing
- Gmail Not Working on Honor 70 Lite 5G 7 Common Problems & Fixes | Dr.fone
- In 2024, How To Remove iCloud From Apple iPhone 6s Plus Smoothly
- Your Account Has Been Disabled in the App Store and iTunes From iPhone 12 Pro Max?
- Complete guide for recovering photos files on Honor 90.
- In 2024, Revolutionize Creative Tasks With Proficiency AI Voice Cloning
- In 2024, How to Spy on Text Messages from Computer & OnePlus Nord CE 3 Lite 5G | Dr.fone
- In 2024, How to use Pokemon Go Joystick on Realme C67 4G? | Dr.fone
- In 2024, How to Migrate Android Data From Realme GT 5 to New Android Phone? | Dr.fone
- In 2024, 3 Methods to Mirror Nubia Red Magic 9 Pro to Roku | Dr.fone
- Updated 2024 Approved Best 5 Quandale Dingle Voice Generators
- How to Access Your iPhone 12 Pro When You Forget the Passcode?
- Apple ID Unlock On Apple iPhone XS Max? How to Fix it?
- In 2024, Unlock Your Nokia C12 Pluss Potential The Top 20 Lock Screen Apps You Need to Try
- What Legendaries Are In Pokemon Platinum On Vivo Y78+ (T1) Edition? | Dr.fone
- 7 Solutions to Fix Error Code 963 on Google Play Of Itel P40 | Dr.fone
- Prevent Cross-Site Tracking on Vivo V30 Lite 5G and Browser | Dr.fone
- Unlocking iPhone XS Lock Screen 3 Foolproof Methods that Actually Work
- How To Remove Screen Lock PIN On Samsung Galaxy F14 5G Like A Pro 5 Easy Ways
- In 2024, How to Fake Snapchat Location without Jailbreak On Motorola Razr 40 Ultra | Dr.fone
- How To Erase iPhone 7 Plus Data Permanently | Dr.fone
- 3 Ways to Fake GPS Without Root On Vivo Y28 5G | Dr.fone
- In 2024, How to Track Apple iPhone 15 Plus Location without Installing Software? | Dr.fone
- In 2024, 5 Quick Methods to Bypass Samsung Galaxy A15 4G FRP
- Title: Updated Video in Text Cinematic Intro【Filmora Tutorial】
- Author: Chloe
- Created at : 2024-04-24 07:08:16
- Updated at : 2024-04-25 07:08:16
- Link: https://ai-editing-video.techidaily.com/updated-video-in-text-cinematic-introfilmora-tutorial/
- License: This work is licensed under CC BY-NC-SA 4.0.

