
:max_bytes(150000):strip_icc():format(webp)/how-to-set-up-a-ps5-5088641-1bcc6bca24cd460bb2b276fdeb6cb830.jpg)
Updated Voice Changer for Discord | Use Voicemod on Discord
Voice Changer for Discord | Use Voicemod on Discord
Powerful Video Editor - Wondershare Filmora
Provide abundant video effects - A creative video editor
Powerful color correction and grading
Detailed tutorials are provided by the official channel
Introduction
In today’s world, these voice-changing tools are in use by a lot of online gamers for them to remain anonymous on popular game streaming platforms like Twitch. However, we are more focused on Discord in this article. With everything that’s happening in the world today, voice changers can be used for good or can be misused, depending on who is using them. However, we promote such tools for the immerse benefits they offer users as we do not condone the suggestive use of such devices.
Therefore, in a bid to rave about this phenomenal voice-changing tool, we will talk about the best voice changer for Discord which is Voicemod.
Voicemod is an excellent tool with an impressive list of voice filters at its disposal. With this tool, users can choose from a wide range of voice effects that can have both fun and practical uses. Also, if you are looking to use the tool like a robot, Voicemod can help you do that. The tool is spectacularly easy to use, free across all Windows platforms, and operates in real-time. Additionally, the software can work on Skype, Twitch, and other online chat or streaming platforms.
In this article
01 How to Use Voicemod Voice Changer for Discord on Desktop (Win+Mac)?
02 How to Use Voicemod Voice Changer for Discord on Mobile (Android+iPhone)?

Part 1: How to Use Voicemod Voice Changer for Discord on Desktop (Win+Mac)?
Voicemod Discord works for Windows and Mac operating systems smoothly. Its new Mac OS version is on its way, and you can choose to get notified once it launches.
With a voice changer for Discord, you can add sound effects and change your voice in your communication. You can download this free application on your Windows 10/11 (64-bit) desktop. Its 90 different voices and effects integrate perfectly with Discord to give you strict and most efficient performance.
Now that you know about Voicemod, explore how to use Voicemod on Discord for Desktop.
Step 1: Install Voicemod
Before jumping straight to how we can use Discord for Desktop, we must first know how to install it on our Windows and Mac PC. Here is how to install Voicemod:
- First of all, visit the Voicemod website to start the download process.
- Next, you will see the “Get Voicemod Free” screen. Click it!
- After clicking, you will need to sign in to your account from Discord, Twitch, to Google. Make sure you use your Discord login details to sign in.
- After signing in, the “.exe” file will download to your Windows and Mac download folder. Open it.
- Then an install wizard opens. Navigate through it to install the program on your Windows and Mac computer.
- After complete installation, the installation wizard will ask you to restart your Windows’ or Mac computer.
- However, you can skip the restart process, but it’s best to restart it for smooth operations. Once your Mac or Windows computer restarts, you will see the Voicemod application icon on your desktop screen.
Step 2. Go to Settings>Voice and Video
To configure Voicemod with Discord, open your discord account and go to the settings option located in the screen’s bottom-left corner. Then tap on the “Voice and Video” option right under the app settings.
Step 3. In the “Input Device” section, Choose “Microphone Voicemod Virtual Audio.”
To make Voicemod usable, you are required to change the Voice settings. So, navigate within the “Input Device” option and select the option that says “Microphone Voicemod Virtual Audio.” Once the audio setting changes, it makes it easy for you to change the voice within the program. Also, other users can hear your audio alteration.
Step 4. Choose Your Favorite Voice
In the “basic version,” you have the authorization to change seven free voice choices each day. In addition, with the “pro-version,” you have access to more than 80 different voice options.
Therefore, if you are looking for a simple and easy Windows and Mac application, do not look further than Voicemod!

Part 2: How to Use Voicemod Voice Changer for Discord on Mobile (Android+iPhone)?
“Voicemod clips” is the version that is available for both Apple and Android devices. The application help users to make very high-quality content using its wide selection of one-of-a-kind effects that will change your voice so that you won’t even recognize yourself. Additionally, you can add filters connected to your cell phone’s camera to create hilarious, exciting videos. Also, you get the option to select from 10 different voices, and you can also make infinite videos and audio from the humorous to the terrifying.
Some of the Voicemod for Discord voices that are available on mobile devices include;
- Male-to-female
- Different robot effects
- Celebrities
- Scary voices, etc.
Also, the changes are on how you would like to modify your voice. It can also be cross-share to popular social networking platforms such as Facebook, Twitter, Instagram, TikTok, and Snapchat using your smartphone.
Here are step-by-step instructions:
Step 1: Download Voicemod for Mobile
Ensure you have downloaded the Voicemod application on your Android and iPhone and appropriately configured it. To configure, follow the step below;
- Open it to set your profile using Discord. Additionally, you can view all the different filters for videos and available voices.
- Also, you can decide the type of content you want to create, whether it is a video clip or audio.

Step 2: Access Sound Effects
Open Discord and tap the “cogwheel icon” near your name and avatar. You will see a “settings” page located within it. Tap the “Voice & Video” option. Then under the “Input Device” option, select Voicemod and the headset under the “Output Device” option and tap escape. Then you will have access to numerous exciting sounds.

Finally, add your favorite effect, save and start using your new enhanced voice from Voicemod Discord.
Part 3: People Also Want to Know
This section will look at some basic questions about Voicemod Discord that appeared in Q&A forums.
Is Voicemod safe for Discord?
Yes, Voicemod is safe, but you must download it from its official website or the Google Playstore and Apple’s App Store, as there are many cracked versions of Voicemod online.
Is there a voice changer for Discord?
Yes, a voice changer for Discord and Voicemod is known to be the best. It is an advanced and easy-to-use voice changer that allows you to sound like a man, woman, robot, or anything else you can ever imagine.
Key Takeaways from This Episode
Thus, as you saw, in this report, we have summarised a few essential points that you should know regarding Voicemod Discord. You learned:
- The best voice changer for Discordis Voicemod
- How to use Voicemod for Windows and Mac computers
- How to use Voicemod for mobile (iPhone and Android)
- Finally, a few FAQs for users to better understand the discord voice changer (Voicemod).
So, use the new knowledge about how to use Voicemod on Discord you acquired above and spin some voice changes.
Introduction
In today’s world, these voice-changing tools are in use by a lot of online gamers for them to remain anonymous on popular game streaming platforms like Twitch. However, we are more focused on Discord in this article. With everything that’s happening in the world today, voice changers can be used for good or can be misused, depending on who is using them. However, we promote such tools for the immerse benefits they offer users as we do not condone the suggestive use of such devices.
Therefore, in a bid to rave about this phenomenal voice-changing tool, we will talk about the best voice changer for Discord which is Voicemod.
Voicemod is an excellent tool with an impressive list of voice filters at its disposal. With this tool, users can choose from a wide range of voice effects that can have both fun and practical uses. Also, if you are looking to use the tool like a robot, Voicemod can help you do that. The tool is spectacularly easy to use, free across all Windows platforms, and operates in real-time. Additionally, the software can work on Skype, Twitch, and other online chat or streaming platforms.
In this article
01 How to Use Voicemod Voice Changer for Discord on Desktop (Win+Mac)?
02 How to Use Voicemod Voice Changer for Discord on Mobile (Android+iPhone)?

Part 1: How to Use Voicemod Voice Changer for Discord on Desktop (Win+Mac)?
Voicemod Discord works for Windows and Mac operating systems smoothly. Its new Mac OS version is on its way, and you can choose to get notified once it launches.
With a voice changer for Discord, you can add sound effects and change your voice in your communication. You can download this free application on your Windows 10/11 (64-bit) desktop. Its 90 different voices and effects integrate perfectly with Discord to give you strict and most efficient performance.
Now that you know about Voicemod, explore how to use Voicemod on Discord for Desktop.
Step 1: Install Voicemod
Before jumping straight to how we can use Discord for Desktop, we must first know how to install it on our Windows and Mac PC. Here is how to install Voicemod:
- First of all, visit the Voicemod website to start the download process.
- Next, you will see the “Get Voicemod Free” screen. Click it!
- After clicking, you will need to sign in to your account from Discord, Twitch, to Google. Make sure you use your Discord login details to sign in.
- After signing in, the “.exe” file will download to your Windows and Mac download folder. Open it.
- Then an install wizard opens. Navigate through it to install the program on your Windows and Mac computer.
- After complete installation, the installation wizard will ask you to restart your Windows’ or Mac computer.
- However, you can skip the restart process, but it’s best to restart it for smooth operations. Once your Mac or Windows computer restarts, you will see the Voicemod application icon on your desktop screen.
Step 2. Go to Settings>Voice and Video
To configure Voicemod with Discord, open your discord account and go to the settings option located in the screen’s bottom-left corner. Then tap on the “Voice and Video” option right under the app settings.
Step 3. In the “Input Device” section, Choose “Microphone Voicemod Virtual Audio.”
To make Voicemod usable, you are required to change the Voice settings. So, navigate within the “Input Device” option and select the option that says “Microphone Voicemod Virtual Audio.” Once the audio setting changes, it makes it easy for you to change the voice within the program. Also, other users can hear your audio alteration.
Step 4. Choose Your Favorite Voice
In the “basic version,” you have the authorization to change seven free voice choices each day. In addition, with the “pro-version,” you have access to more than 80 different voice options.
Therefore, if you are looking for a simple and easy Windows and Mac application, do not look further than Voicemod!
Part 2: How to Use Voicemod Voice Changer for Discord on Mobile (Android+iPhone)?
“Voicemod clips” is the version that is available for both Apple and Android devices. The application help users to make very high-quality content using its wide selection of one-of-a-kind effects that will change your voice so that you won’t even recognize yourself. Additionally, you can add filters connected to your cell phone’s camera to create hilarious, exciting videos. Also, you get the option to select from 10 different voices, and you can also make infinite videos and audio from the humorous to the terrifying.
Some of the Voicemod for Discord voices that are available on mobile devices include;
- Male-to-female
- Different robot effects
- Celebrities
- Scary voices, etc.
Also, the changes are on how you would like to modify your voice. It can also be cross-share to popular social networking platforms such as Facebook, Twitter, Instagram, TikTok, and Snapchat using your smartphone.
Here are step-by-step instructions:
Step 1: Download Voicemod for Mobile
Ensure you have downloaded the Voicemod application on your Android and iPhone and appropriately configured it. To configure, follow the step below;
- Open it to set your profile using Discord. Additionally, you can view all the different filters for videos and available voices.
- Also, you can decide the type of content you want to create, whether it is a video clip or audio.

Step 2: Access Sound Effects
Open Discord and tap the “cogwheel icon” near your name and avatar. You will see a “settings” page located within it. Tap the “Voice & Video” option. Then under the “Input Device” option, select Voicemod and the headset under the “Output Device” option and tap escape. Then you will have access to numerous exciting sounds.

Finally, add your favorite effect, save and start using your new enhanced voice from Voicemod Discord.
Part 3: People Also Want to Know
This section will look at some basic questions about Voicemod Discord that appeared in Q&A forums.
Is Voicemod safe for Discord?
Yes, Voicemod is safe, but you must download it from its official website or the Google Playstore and Apple’s App Store, as there are many cracked versions of Voicemod online.
Is there a voice changer for Discord?
Yes, a voice changer for Discord and Voicemod is known to be the best. It is an advanced and easy-to-use voice changer that allows you to sound like a man, woman, robot, or anything else you can ever imagine.
Key Takeaways from This Episode
Thus, as you saw, in this report, we have summarised a few essential points that you should know regarding Voicemod Discord. You learned:
- The best voice changer for Discordis Voicemod
- How to use Voicemod for Windows and Mac computers
- How to use Voicemod for mobile (iPhone and Android)
- Finally, a few FAQs for users to better understand the discord voice changer (Voicemod).
So, use the new knowledge about how to use Voicemod on Discord you acquired above and spin some voice changes.
How To Split Screen On Tiktok
TikTok is probably the most popular video-sharing app in the world right now. Many TikTokers have become famous for making videos that have a significant impact and encourage creativity and new ideas. One of the most popular TikTok trends is the split-screen effect. You’ve probably seen a lot of TikTok split-screen videos with cool effects that made you wonder how the user split their screen. Becoming skilled in using TikTok effects is not as difficult as it might look. It only requires a significant amount of practice. Read on as we show you how to make a TikTok split-screen video.
Using CapCut To Split Screen
CapCut is the official free TikTok Video Maker and Video Editor with Music for TikTok that is multifunctional. Its interface is quite similar and easy to use.
CapCut includes free advanced capabilities such as keyframe animation, stabilization, and Picture-in-Picture (PIP). These are in addition to its fundamental functions, such as video editing, adding stickers, text, and music.
Steps to Split Screen Video with CapCut On Android and IOS Devices
- To use the app, you need to install it first. iPhone and Android users can download CapCut. Navigate to the appropriate app store of your choice and download CapCut.
- After installation, launch the app.
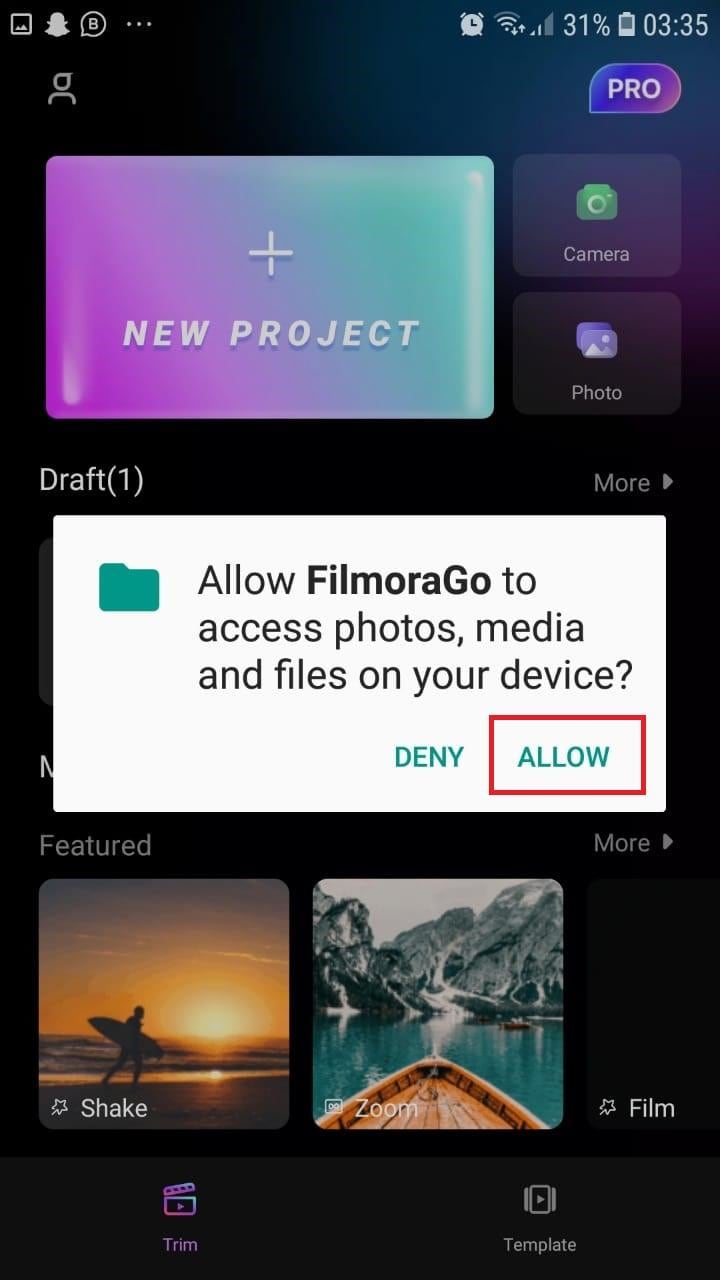
- Then go ahead and grant CapCut permission to view your camera roll. Incorporating video clips into your project has never been easier. Go to the app’s main screen and select “New Project“ from the drop-down menu.
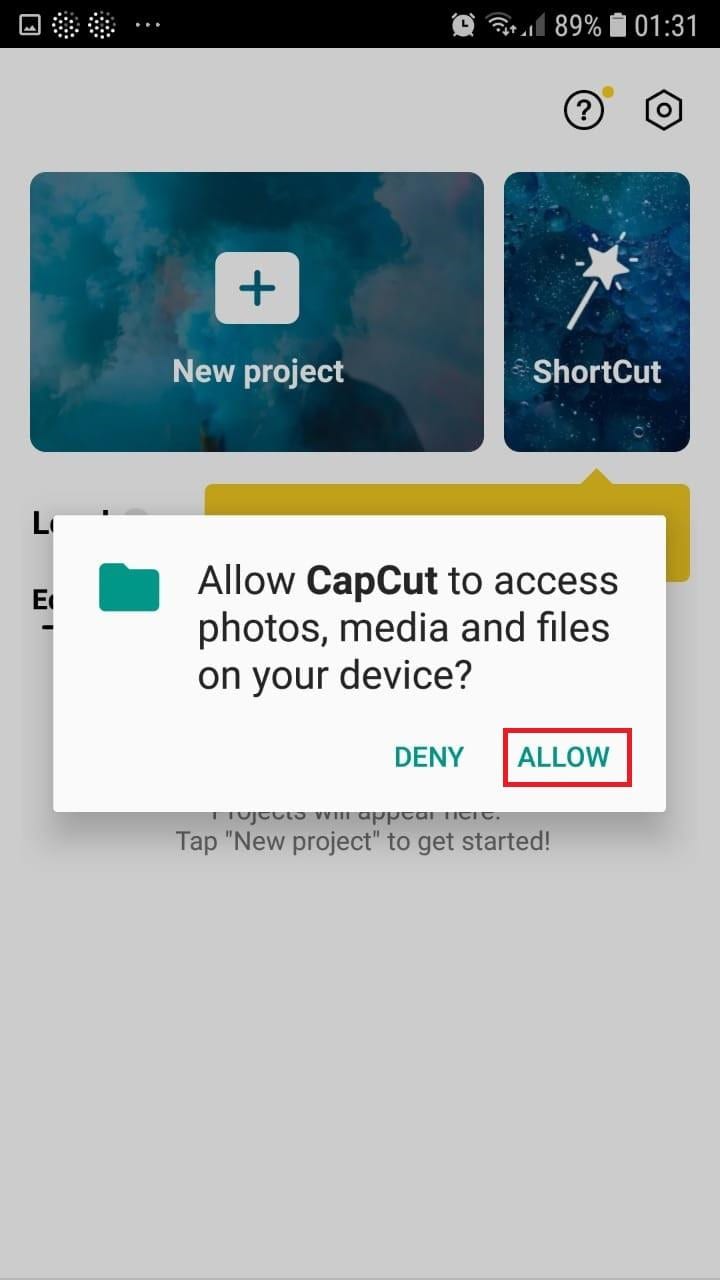
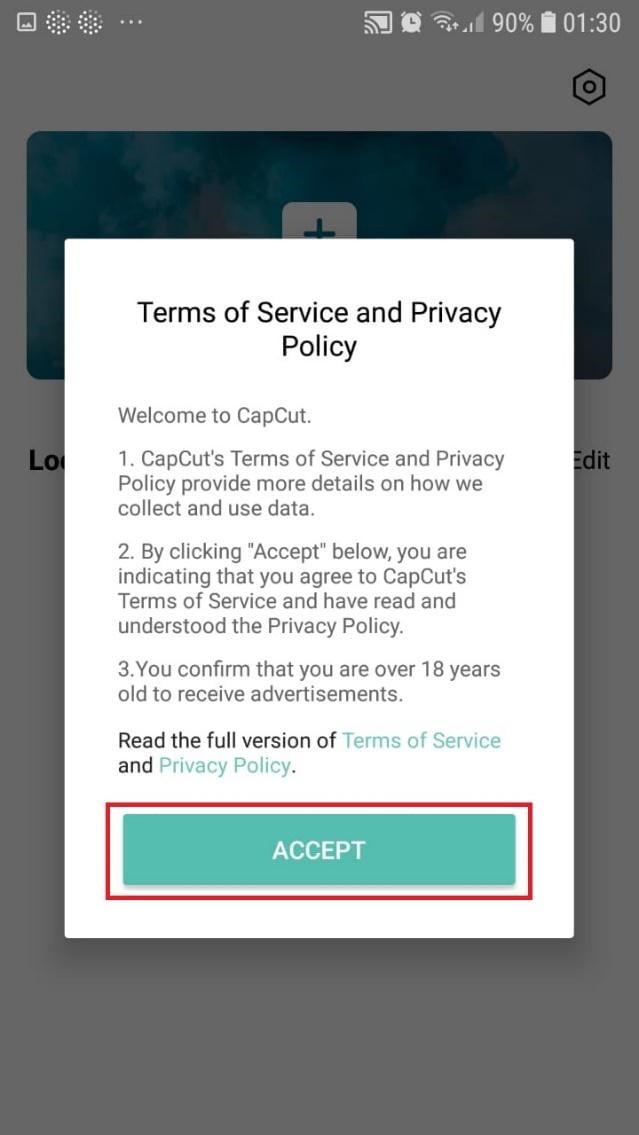
- To confirm your selection, click the green Accept This confirms that CapCut requires access to your photographs to function correctly. Tap on the button on the following pop-up window to gain access to all the photos. This is a one-time process that must be carried out the first time you launch the application.
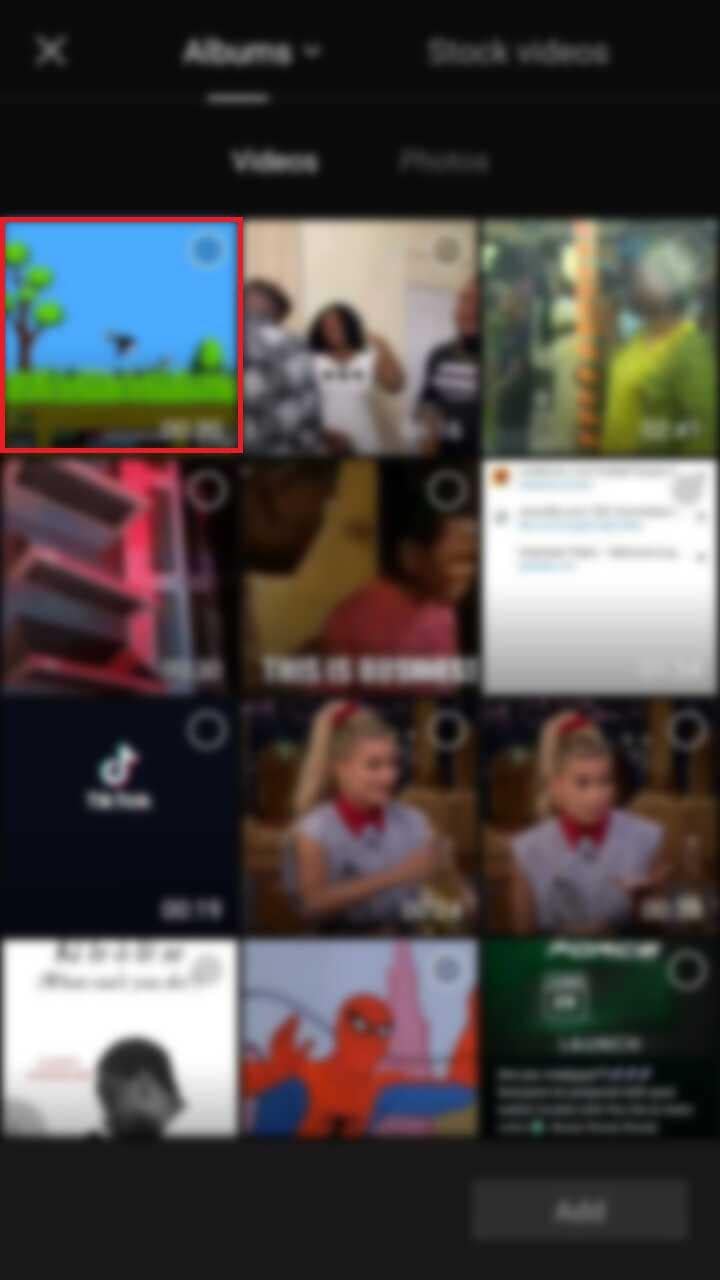
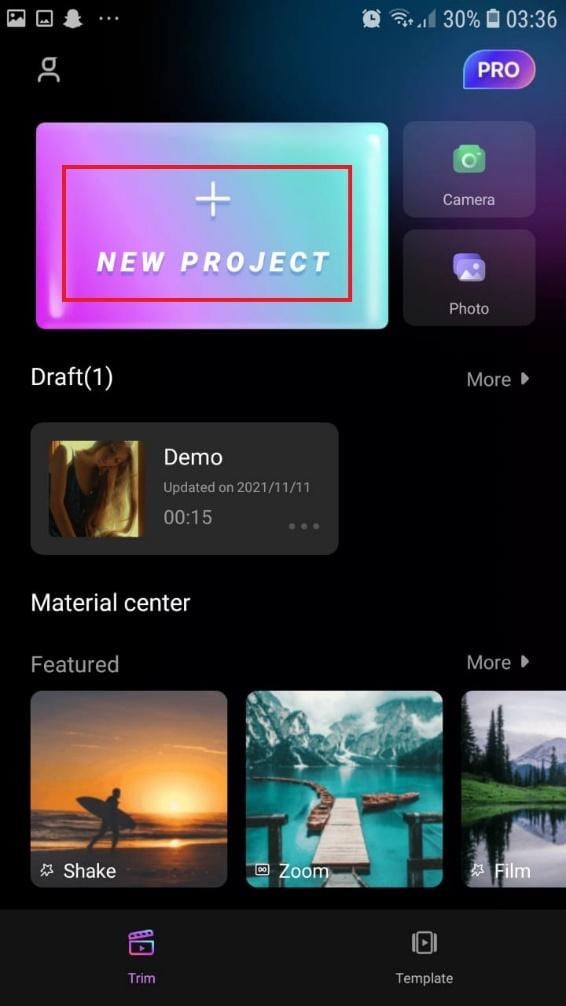
- Begin a New Project. After opening the app, press the “New Project“ icon to bring up a new screen showing your device’s videos.

- Choose a video clip. Locate the desired video clip for your project by scrolling through the pages displaying your camera roll. Tap the video’s thumbnail and then tap the “Add“ icon in the screen’s lower part.
- Get familiar with your workspace. Upon uploading your first clip, CapCut leads you to the primary workspace. This is where you will spend most of your time within the app. The preview panel, the timeline, and the toolbar are in order from top to bottom.
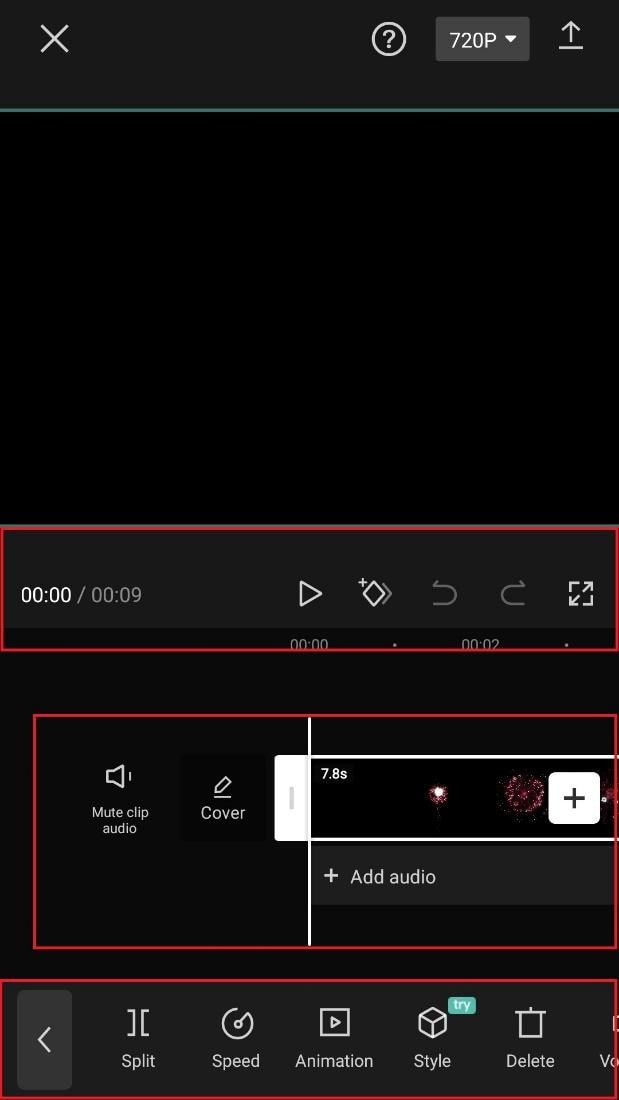
- View the toolbar and timeline. They represent your screen’s bottom half. The timeline, located below the preview panel, is where you’ll make all your adjustments. You can access all your video editing tools, including split, text, audio, effects, stickers, and more, on the toolbar at the bottom of your screen.
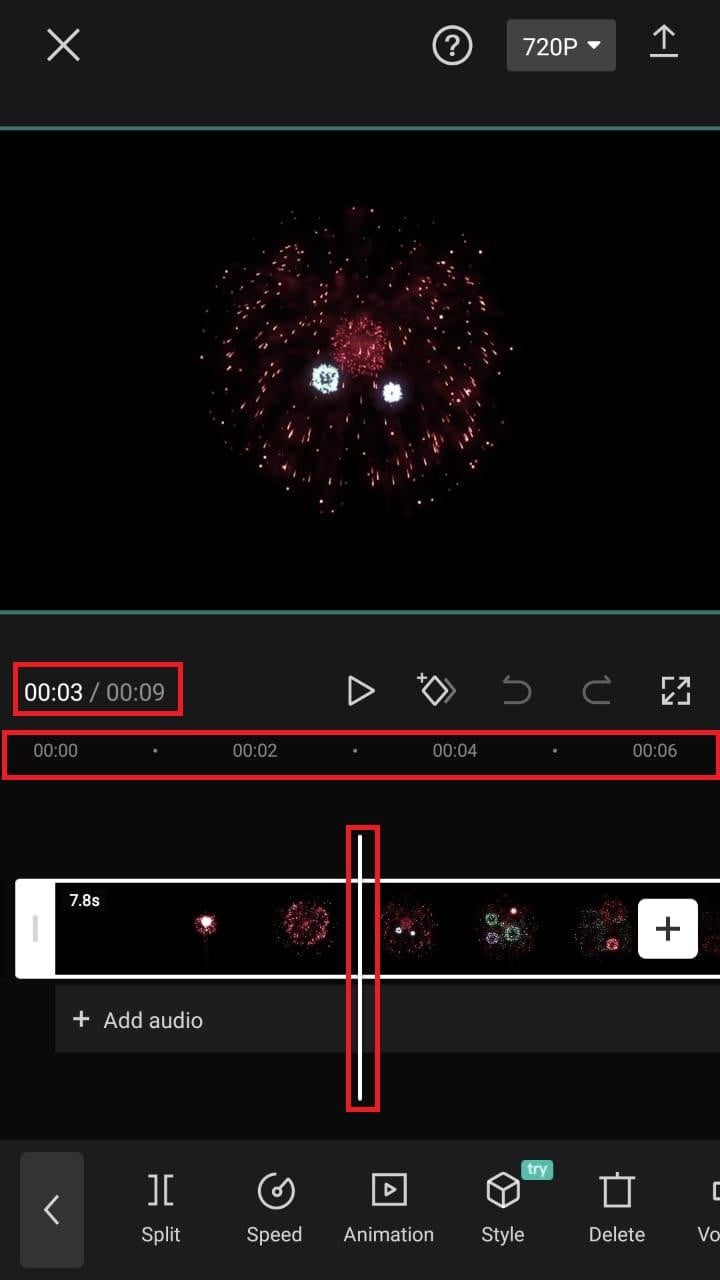
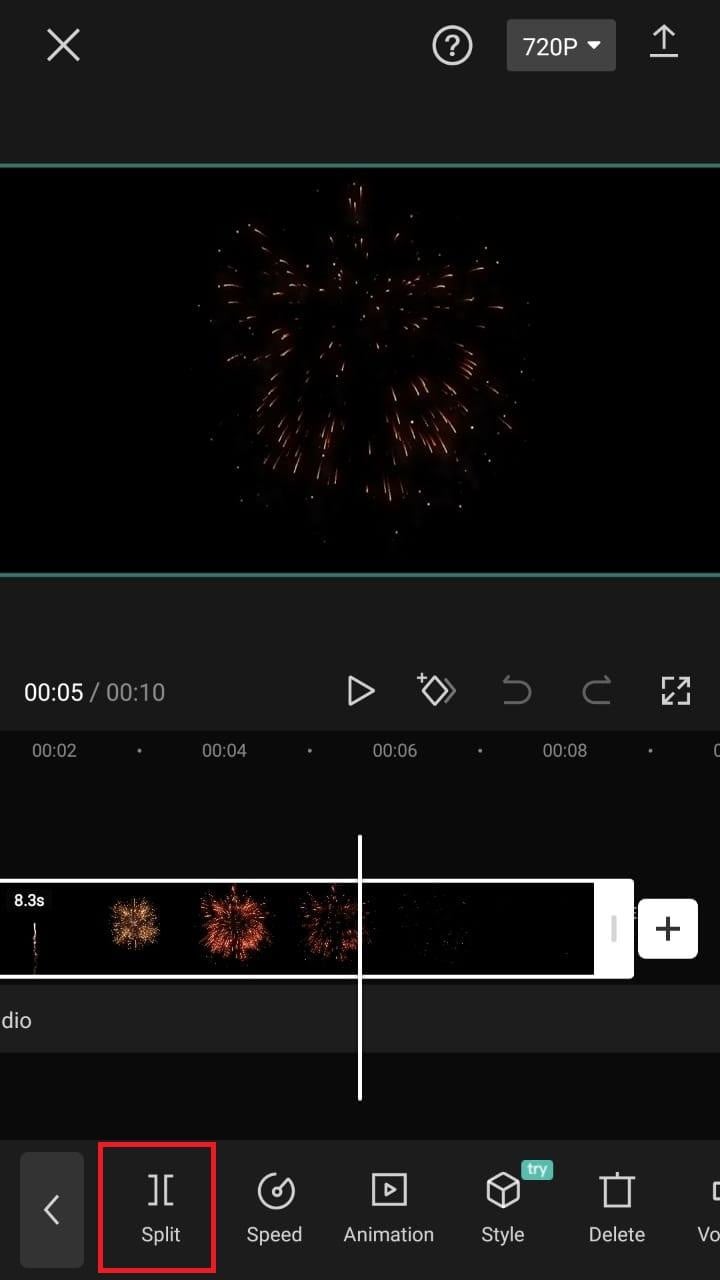
- Split video clips. To split a video clip in half, move the play head to the desired location on the timeline. Tap on your clip, then press the “Split“ toolbar icon. Your result now shows two different clips, not just one.
A Better Split-Screen Effect Video Editor
Filmora is one of the best free HD video makers and video editors with several functionalities, including text, backgrounds, filters, special effects, emoji, audio, and special effects.
Filmora is a feature-packed video editor which has a variety of tools to work with. With this video editor, producing memes, videos with images, pictures, music, stickers, and sound effects and editing videos for YouTube, Twitter, WhatsApp, Facebook, TikTok, and Instagram is simple and entertaining.
Free Download For Win 7 or later(64-bit)
Free Download For macOS 10.14 or later
Steps to Split Screen Video with Filmora
- Download Filmora from the App store
- After installation, launch it.
- Click on “Continue” to continue to use the app.

- Click on Allow to grant Filmora access to your photos and videos.
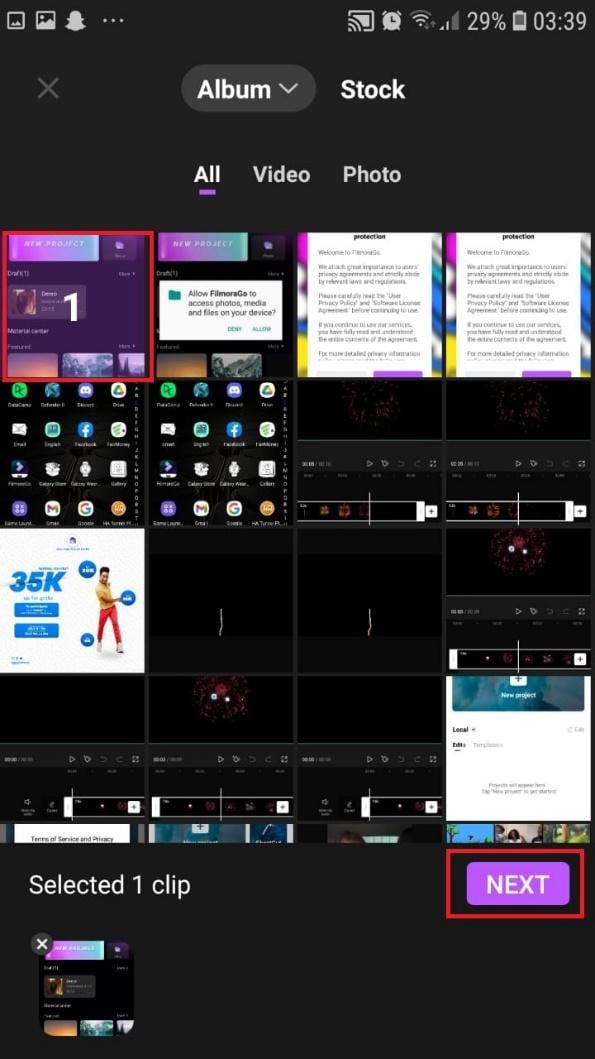
- You can now tap on “New Project” with the + Symbol.
- Select your desired video and tap on “Next” at the bottom right of your screen
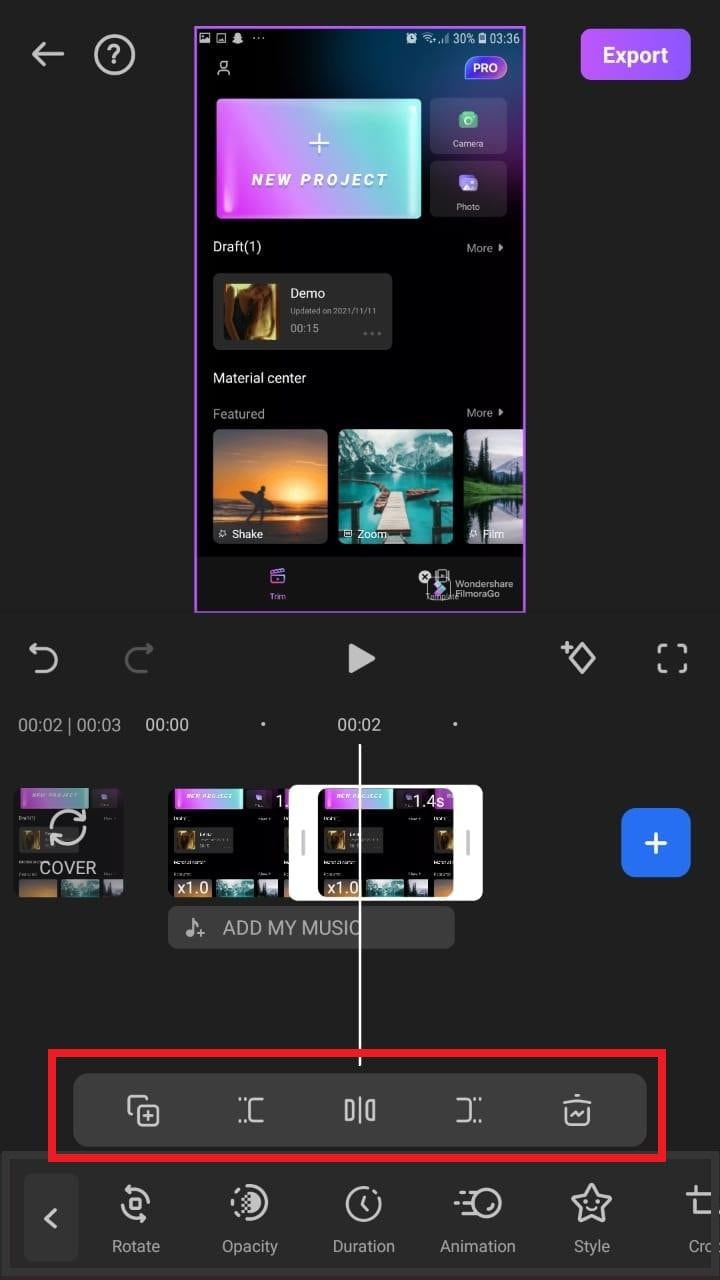
- You can select various options from the bottom of your screen to edit the selected video the way you like.

- Click on trim, and then you will see the different split-screen and collage feature options. Pick any that appeals to you.
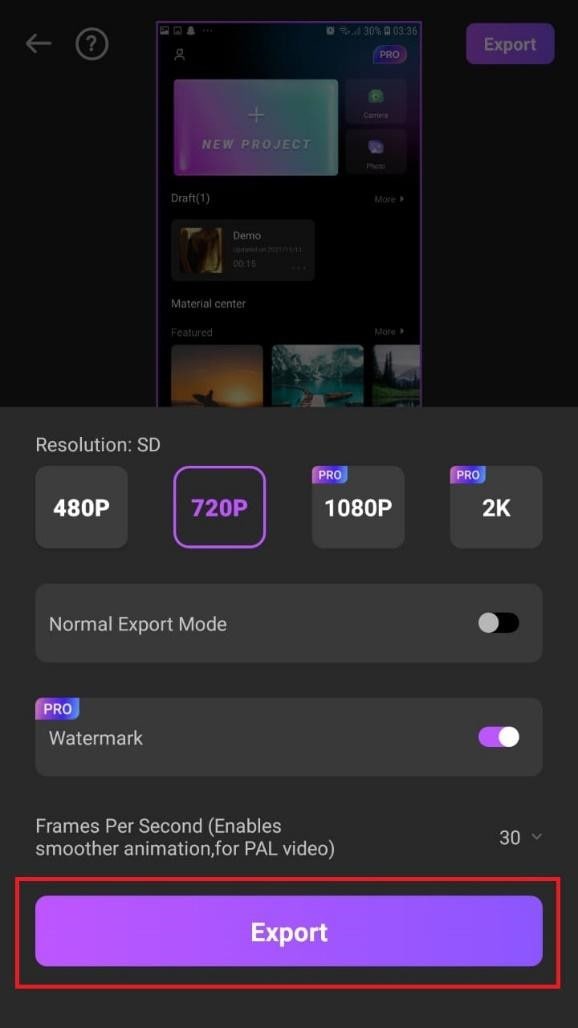
- When you are done with the editing, tap on “Export” at the top right of your screen.

- Go ahead and tap on “Export” on the next screen. Your video will be successfully exported and saved to your camera roll.
Using Filmora is very efficient in splitting your videos and making collage features for TikTok. It is a very simplified app available on both the Google Play Store and Apple Appstore.
Conclusion
TikTok is a platform that users use worldwide to create and share content. It could be pictures, videos, reels, or any other media type. Some people create videos for their audience on TikTok to educate them, while others do it to entertain them.
In any case, the goal is to build a more significant following on TikTok and garner greater attention from its users. You could even make money off the app.
One of the methods to impress your fans and explore multiple possibilities to build unique reels is to use the TikTok split-screen and collage feature effect available on TikTok. Although there are a few different ways to create a Split Screen on TikTok, the steps highlighted in this article are the most straightforward.
Free Download For macOS 10.14 or later
Steps to Split Screen Video with Filmora
- Download Filmora from the App store
- After installation, launch it.
- Click on “Continue” to continue to use the app.
- Click on Allow to grant Filmora access to your photos and videos.
- You can now tap on “New Project” with the + Symbol.
- Select your desired video and tap on “Next” at the bottom right of your screen
- You can select various options from the bottom of your screen to edit the selected video the way you like.
- Click on trim, and then you will see the different split-screen and collage feature options. Pick any that appeals to you.
- When you are done with the editing, tap on “Export” at the top right of your screen.
- Go ahead and tap on “Export” on the next screen. Your video will be successfully exported and saved to your camera roll.
Using Filmora is very efficient in splitting your videos and making collage features for TikTok. It is a very simplified app available on both the Google Play Store and Apple Appstore.
Conclusion
TikTok is a platform that users use worldwide to create and share content. It could be pictures, videos, reels, or any other media type. Some people create videos for their audience on TikTok to educate them, while others do it to entertain them.
In any case, the goal is to build a more significant following on TikTok and garner greater attention from its users. You could even make money off the app.
One of the methods to impress your fans and explore multiple possibilities to build unique reels is to use the TikTok split-screen and collage feature effect available on TikTok. Although there are a few different ways to create a Split Screen on TikTok, the steps highlighted in this article are the most straightforward.
Learn About How You Can Create a Smooth Speed Ramp with Premiere Pro. Also, Find Alternative Software “WonderShare Filmora” For the Same Purpose with a Much Easier User Interface
Versatile Video Editor - Wondershare Filmora
An easy and powerful editor
Numerous effects to choose from
Detailed tutorials are provided by the official channel
Speed ramping is a popular Premiere Pro effect for good reason: it looks fantastic! When utilized simultaneously to spice up a video clip, slow motion and quick motion may both be great aesthetic choices. This practice may save you time by enabling you to show more about what you want to see in your edit without using harsh jump cuts.

This effect may be used for a number of reasons, including clip transitions, speeding up a clip to make it shorter, and slowing down a clip to make it longer. Speed ramping may be used with a number of various effects.
According to the business, Adobe Premiere Pro is one of the most widely used video editing products on the market today. The ability to alter the speed of individual clips is one of Premiere Pro’s most important capabilities. While speed ramping is often used in sports highlights, changing the speed of video may be useful for a number of other types of material.
You’ll learn how to construct a spectacular speed ramp in Adobe Premiere Pro, beginning with capturing the proper kind of video and moving to advanced tips and methods. Following that, we’ll go through some ideas and inspiration for when to use a speed ramp in your circumstance.
What is Speed Ramping?
A speed ramp is used to gradually increase the speed of a video clip as it accelerates or decelerates. It is guaranteed that a smooth transition between two separate speeds will take place. The method is crucial in changing the tempo of the film and, as a consequence, creating a dramatic impression. The film’s required velocity is achieved by the employment of super-fast visual effects.
A speed ramp, as opposed to a rapid shift in speed, provides for a more smooth transition between two drastically differing speeds. This method is used to focus attention on certain parts of your video, which has a huge impact on your editing. It provides just the right amount of zing to keep your audience interested and excited about your presentation.
Examples of Speed Ramping
It works especially well when utilized to focus the viewer’s attention on a certain moment or action in your videos, such as a tough jump or an impending bullet. Another name for this approach speeds ramping (sometimes known as time remapping). It may also be used to create a visually pleasing transition between two clips or pictures inside a single movie.
You may also use Speed Ramping to alter the runtime of your video to fit the time limits of other social media sites, such as Instagram and Vine. If you just have 30 seconds to deliver your video, the following are the two most common places where people apply speed ramping techniques:
Assume you are shooting a person walking and want the clip to play in slow motion so that viewers can clearly see the person’s face. In this scenario, speed ramping is precisely what you need since it enables you to do precisely that.
Do you remember the famous movie “The Matrix” scene, when Neo dodges the bullets? It’s not some typical scene; it’s a pretty good example of speed ramping.
How to Create Speed Ramping/Time Remapping in Premiere Pro?
Speed Ramping premiere pro is an excellent tool for speeding up video clips. ‘ In order to speed up or slow down the speed of a video clip, this effect may be employed. In this article, you’ll learn how to make the most of this fantastic tool in Adobe Premiere Pro.

While using Premiere Pro, the ability to change a clip’s speed without altering its pitch is a very useful feature. An example of how this feature comes in helpful is when you have a clip that shows someone or something moving from left to right or vice versa.
Advanced Premiere Pro Time Remapping
The fact that this effect is so simple to use is its main benefit. By moving handles around on the clip, you may quickly choose different regions of the clip to be influenced by the adjustment when you apply it. This makes achieving the required result extremely quick and easy.

If you want to go deep into the game, Speed Ramp offers some more advanced options that give you even more control over your speed modifications. The properties section allows you to designate which portions of the timeline are affected by the ramp, as well as change factors like the curve type and bias.
Steps To Use Speed Ramping In Premiere Pro
Follow the below-mentioned steps to learn how to use speed ramping in premiere pro:
- Download and install Adobe Premiere Pro. Once installed, launch the application.
- Create a new project in Premiere by clicking the New Project button. After that, import the film that you want to speed ramp. It is the simplest and most straightforward method of importing film into Premiere to just click and drag the clip into the project window.
- Before commencing any work with speed, click and drag the video track in the timeline to make it taller by increasing the height of the track. This will guarantee that you can see the speed ramp as you go to the next stages.
- To create a sequence if you don’t already have one, drag a clip into the timeline and drop it where you want it to appear. Using the clip’s parameters, Premiere will automatically generate a sequence with the necessary settings.
- Decide when you want to apply the speed ramp and mark the spot on the screen where you will do so. The key to a pleasant speed ramp is movement, so choose a time when the environment is very active. You can specify in and out points, cut the clip with “Command+K,” or divide the clip into parts using the razor blade tool (which is accessible through the “Command+K” shortcut).
- Keyframes will be created at this point. It’s first and foremost important that the keyframes be clearly visible. Access the proper view by selecting “Show Clip Keyframes” from the context menu when you right-click on your clip.
- Another drop-down option will appear, from which you’ll choose “Time Remapping” and then press the “Enter” key.
- Select “Speed” from the drop-down menu.
- To create a keyframe, choose the pen from the toolbar (or just use the “P” key on your keyboard) and click on the white line running across the video track. If you wish to make a speed ramp, you’ll need at least two keyframes: one to indicate where the speed ramp should begin and another to indicate where it should terminate.
- If you wish to create more sophisticated speed ramps, you may do so by including more keyframes in your animation.
- Switch back to the selection tool when you’ve finished placing your keyframes. “V” is the shortcut key for this.
- Now comes the critical moment: it’s time to change the speed. This is a task that Premiere Pro makes rather simple. The only thing you have to do now is click on the white line between the keyframes you have created and drag it either up or down, depending on your preference for speed or slowness.
- It’s not finished yet; we still need to smooth it out a little more. With the selection tool selected, click and drag one of the keyframe markers to the other side of the screen. The number of frames across which the speed shift will occur will be stretched out as a result of this. The longer and more gradual the speed ramp will be, the greater the distance between the two sides of the keyframe indication is separated.
- Complete the process with the other keyframe, and your speed ramp will be complete!
Techniques to Make Speed Ramping Smooth
In this section, we will be viewing some advanced time remapping features of Adobe Premiere Pro, which are as follows.
Keyframe Interpolation
When creating a speed ramp, keyframes are used to indicate the beginning and finishing points of the speed shift. However, there are a number of methods in which Premiere may transport the clip from point A to point B.
In the video industry, filling in the data between the two locations is known as keyframe interpolation.
- Simply dragging to divide a keyframe, like in the previous example, results in an equitable speed increase between the keyframes in the animation. Linear interpolation is the term used to describe this process.
- Instead of using Bezier Interpolation, you may utilize it to produce a smoother, more natural speed ramp. With Bezier Interpolation, the pace at which the speed increases will likewise accelerate, giving the effect of a more pronounced ramp.
- To build an S-curve shape, choose a keyframe and drag the Bezier handles to the desired position. Make adjustments until you are satisfied with the outcome.
Speed Ramp Transition
Speed ramp transitions are easy to make and may be utilized to add visual interest to a wide range of video genres. This effect is achieved by boosting the clip speed at the end of a clip before transitioning into a cut.
- In the second clip, the tempo is abruptly boosted and subsequently decreased to provide a smooth transition between situations. It may symbolize the passage of time, a character’s perplexity, or simply add flair to a commercial film.
- Using Premiere Pro, create a ramp-up at the end of your first clip and a ramp-down at the start of your second clip. The speed rubber band will be curved like a bell curve across the two clips when finished.
Adding speed ramps to films in Premiere Pro may improve the usefulness and looks of a variety of movies, from narrative features to social media posts. In Premiere, you may easily create and adjust speed duration directly in the timeline to meet any needs.
Speed Ramping In Wondershare Filmora
We understood how to do speed ramping in Premiere Pro. You can also get the same results using a much easier software that is “Wondershare Filmora”.
What is Wondershare Filmora?
Filmora is a video editor that is best suited for social video editors, vloggers, home movies, and other video projects. In addition, it may be used on both Macs and PCs. To begin using Filmora, you just need to pay a one-time registration fee of $0! You’ll notice a watermark when you export from the free version. For $59.99, Filmora’s latest version is a one-time purchase that doesn’t need a subscription!
Amazing Features
Filmora is an award-winning video editing program, that allows users to create visually stunning videos without the need for complex editing techniques.
Video playback in Filmora’s latest version may be accelerated by the graphics card (GPU). It’s accelerating at an alarming rate right now. It’s also possible to lower the resolution of a 4K or higher video for quicker playing. Cuts and splits are a snap using Filmora. Make a cut by dragging your play head to the location where you want to split the footage. Then, to remove the additional clip from the clip, use the delete key.
Even those with the most basic PC hardware may use this video editing software to create high-quality movies. Moreover, the most anticipated features that Filmora’s latest version offers are as follows:
- Motion Tracking
- Keyframing Animations
- Audio Ducking
- Split Screen
- Video Transitions
- Speed Control
- Color Grading
- Filmstock Effects
- Multiple Formats Exporting
Users may utilize the color tuning option to change the white balance and dynamic range of their video clip, among other things. You may alter the audio levels of each track using the audio mixer tool. The advanced Text Editor function allows you to adjust the color, size, font, and even the motion of text. The screen recording tool enables you to capture your computer’s screen as well as your webcam in excellent quality. The video stabilization feature lowers or eliminates the effect of camera shake on video.
Speed Ramping In Filmora
The method is crucial in changing the tempo of the film and, as a consequence, creating a dramatic impression. The film’s required speed is achieved by the employment of super-fast visual effects.
When using a camera with a much higher frame rate, the speed ramping approach may provide excellent effects. It aids in the production of the most dramatic impression.
Speed ramping effects are available in six presets, which include Montage, Hero Moment, Bullet Time, Jumper, and Flash In, all of which will add a theatrical element to your movie that will leave your viewers in awe.

Creative pros can swiftly and effectively speed up a movie with Wondershare Filmora. However, in order to get the intended results, it is essential to completely understand and adhere to the approach.
Wondershare Filmora 11 has a variety of tools and features to help you create a visually stunning film in a short period of time. Its Instant Mode allows you to produce a video creation from start to finish in less than 5 minutes.
Steps
- Download and Install Filmora. Launch the application on your system.

- Navigate to the chosen video and open it in the program to speed up and lengthen it. You may also add the movie to the interface by dragging and dropping it there.

- When the video appears in the timeline, right-click it to begin playback. As a consequence, a context menu is displayed.

- Select Speed from the pop-up editing window, and then select Speed Ramping from the drop-down menu.

- Alternatively, right-click on the video or audio clip, choose Speed from the drop-down menu, and select Speed Ramping.

- In the Speed Ramping panel, you may adjust the speed or choose from a number of presets, including Montage, Hero Moment, Bullet Time, Jumper, Flash in, and Flash out, to use as templates. You have the option of using the Preset speed ramps. Alternatively, you may personalize your own innovative ones.

- Move the play head to the point where you wish to increase or decrease the speed of the video or audio. Then, to add speed keyframes, choose the Add icon from the toolbar. The video or audio clips will be marked as Speed Ramping when the speed ramp has been added by Filmora.

- If you want to delete a keyframe, you can do so by selecting that particular keyframe and selecting the delete button like in the image:

- As we go on to the video keyframe speed adjustment, just slide the keyframe dot upward or downward to alter the point speed of the movie. Aside from that, you can keep the audio pitch constant regardless of how fast or slow the video is moving.

- The settings will be saved if you are pleased with them after you make the necessary modifications. In any other case, you may use the Reset button to return to the original configuration.
- When you’ve finished your work, go to the “File” panel and choose “Save Project” from the list of options that display. Change the name of the project and then click “Save.”
- Additionally, the movie may be exported using Filmora’s “Export” feature; just choose “Export” and then specify a new name for the file. The video may be exported to a device, a system, or even YouTube. After that, choose “Export.”

Speed Ramping Tips
- High Frame Rate: The frame rate is an important consideration when it comes to speed ramping. If you wish to slow down the video after it’s been recorded, shoot it at a frame rate higher than 60 frames per second. When a video is slowed down, there should be enough frames to guarantee that the video passes the 24 frames per second threshold frame rate.
- Choose The Appropriate Frame Resolution: Another possibility is to modify your video’s frame resolution. The tip has the ability to edit the clip’s properties from the Slowing down the video is achieved by changing the frame rate in the clip’s parameters from 120 to 24 frames per second. As a consequence, the frames will be expanded to the proper frame rate. As a consequence, the video is slowed down but not jerked.
- Purposeful Time Remapping: Instead of keeping the same pace throughout the film, a deliberate speed ramp should be implemented. A video has emotional, mysterious, exciting, and slow-motion Why is this the case? The usage of the same video speed throughout the film may have a negative influence on the watching experience. As a result, it is critical that videos be separated into genres and that the tempo of the videos is modified accordingly.
Conclusion
The use of the ideal cinematic effect at the right time boosts the audience and engagement with the material. This respective article explored speed ramping in-depth and oughts to teach creative pros how to slow down a video and speed up a movie. It covers speed raming in premiere pro and then moves toward Wondershare Filmora which seems a bit easier. Wondershare Filmora is a good choice for completing the task as quickly as possible. You will have access to all of the effects and tools mentioned, as well as the ability to keep the audio pitch consistent throughout the effect, which is critical while altering the video speed.
Speed ramping is a popular Premiere Pro effect for good reason: it looks fantastic! When utilized simultaneously to spice up a video clip, slow motion and quick motion may both be great aesthetic choices. This practice may save you time by enabling you to show more about what you want to see in your edit without using harsh jump cuts.
This effect may be used for a number of reasons, including clip transitions, speeding up a clip to make it shorter, and slowing down a clip to make it longer. Speed ramping may be used with a number of various effects.
According to the business, Adobe Premiere Pro is one of the most widely used video editing products on the market today. The ability to alter the speed of individual clips is one of Premiere Pro’s most important capabilities. While speed ramping is often used in sports highlights, changing the speed of video may be useful for a number of other types of material.
You’ll learn how to construct a spectacular speed ramp in Adobe Premiere Pro, beginning with capturing the proper kind of video and moving to advanced tips and methods. Following that, we’ll go through some ideas and inspiration for when to use a speed ramp in your circumstance.
What is Speed Ramping?
A speed ramp is used to gradually increase the speed of a video clip as it accelerates or decelerates. It is guaranteed that a smooth transition between two separate speeds will take place. The method is crucial in changing the tempo of the film and, as a consequence, creating a dramatic impression. The film’s required velocity is achieved by the employment of super-fast visual effects.
A speed ramp, as opposed to a rapid shift in speed, provides for a more smooth transition between two drastically differing speeds. This method is used to focus attention on certain parts of your video, which has a huge impact on your editing. It provides just the right amount of zing to keep your audience interested and excited about your presentation.
Examples of Speed Ramping
It works especially well when utilized to focus the viewer’s attention on a certain moment or action in your videos, such as a tough jump or an impending bullet. Another name for this approach speeds ramping (sometimes known as time remapping). It may also be used to create a visually pleasing transition between two clips or pictures inside a single movie.
You may also use Speed Ramping to alter the runtime of your video to fit the time limits of other social media sites, such as Instagram and Vine. If you just have 30 seconds to deliver your video, the following are the two most common places where people apply speed ramping techniques:
Assume you are shooting a person walking and want the clip to play in slow motion so that viewers can clearly see the person’s face. In this scenario, speed ramping is precisely what you need since it enables you to do precisely that.
Do you remember the famous movie “The Matrix” scene, when Neo dodges the bullets? It’s not some typical scene; it’s a pretty good example of speed ramping.
How to Create Speed Ramping/Time Remapping in Premiere Pro?
Speed Ramping premiere pro is an excellent tool for speeding up video clips. ‘ In order to speed up or slow down the speed of a video clip, this effect may be employed. In this article, you’ll learn how to make the most of this fantastic tool in Adobe Premiere Pro.
While using Premiere Pro, the ability to change a clip’s speed without altering its pitch is a very useful feature. An example of how this feature comes in helpful is when you have a clip that shows someone or something moving from left to right or vice versa.
Advanced Premiere Pro Time Remapping
The fact that this effect is so simple to use is its main benefit. By moving handles around on the clip, you may quickly choose different regions of the clip to be influenced by the adjustment when you apply it. This makes achieving the required result extremely quick and easy.
If you want to go deep into the game, Speed Ramp offers some more advanced options that give you even more control over your speed modifications. The properties section allows you to designate which portions of the timeline are affected by the ramp, as well as change factors like the curve type and bias.
Steps To Use Speed Ramping In Premiere Pro
Follow the below-mentioned steps to learn how to use speed ramping in premiere pro:
- Download and install Adobe Premiere Pro. Once installed, launch the application.
- Create a new project in Premiere by clicking the New Project button. After that, import the film that you want to speed ramp. It is the simplest and most straightforward method of importing film into Premiere to just click and drag the clip into the project window.
- Before commencing any work with speed, click and drag the video track in the timeline to make it taller by increasing the height of the track. This will guarantee that you can see the speed ramp as you go to the next stages.
- To create a sequence if you don’t already have one, drag a clip into the timeline and drop it where you want it to appear. Using the clip’s parameters, Premiere will automatically generate a sequence with the necessary settings.
- Decide when you want to apply the speed ramp and mark the spot on the screen where you will do so. The key to a pleasant speed ramp is movement, so choose a time when the environment is very active. You can specify in and out points, cut the clip with “Command+K,” or divide the clip into parts using the razor blade tool (which is accessible through the “Command+K” shortcut).
- Keyframes will be created at this point. It’s first and foremost important that the keyframes be clearly visible. Access the proper view by selecting “Show Clip Keyframes” from the context menu when you right-click on your clip.
- Another drop-down option will appear, from which you’ll choose “Time Remapping” and then press the “Enter” key.
- Select “Speed” from the drop-down menu.
- To create a keyframe, choose the pen from the toolbar (or just use the “P” key on your keyboard) and click on the white line running across the video track. If you wish to make a speed ramp, you’ll need at least two keyframes: one to indicate where the speed ramp should begin and another to indicate where it should terminate.
- If you wish to create more sophisticated speed ramps, you may do so by including more keyframes in your animation.
- Switch back to the selection tool when you’ve finished placing your keyframes. “V” is the shortcut key for this.
- Now comes the critical moment: it’s time to change the speed. This is a task that Premiere Pro makes rather simple. The only thing you have to do now is click on the white line between the keyframes you have created and drag it either up or down, depending on your preference for speed or slowness.
- It’s not finished yet; we still need to smooth it out a little more. With the selection tool selected, click and drag one of the keyframe markers to the other side of the screen. The number of frames across which the speed shift will occur will be stretched out as a result of this. The longer and more gradual the speed ramp will be, the greater the distance between the two sides of the keyframe indication is separated.
- Complete the process with the other keyframe, and your speed ramp will be complete!
Techniques to Make Speed Ramping Smooth
In this section, we will be viewing some advanced time remapping features of Adobe Premiere Pro, which are as follows.
Keyframe Interpolation
When creating a speed ramp, keyframes are used to indicate the beginning and finishing points of the speed shift. However, there are a number of methods in which Premiere may transport the clip from point A to point B.
In the video industry, filling in the data between the two locations is known as keyframe interpolation.
- Simply dragging to divide a keyframe, like in the previous example, results in an equitable speed increase between the keyframes in the animation. Linear interpolation is the term used to describe this process.
- Instead of using Bezier Interpolation, you may utilize it to produce a smoother, more natural speed ramp. With Bezier Interpolation, the pace at which the speed increases will likewise accelerate, giving the effect of a more pronounced ramp.
- To build an S-curve shape, choose a keyframe and drag the Bezier handles to the desired position. Make adjustments until you are satisfied with the outcome.
Speed Ramp Transition
Speed ramp transitions are easy to make and may be utilized to add visual interest to a wide range of video genres. This effect is achieved by boosting the clip speed at the end of a clip before transitioning into a cut.
- In the second clip, the tempo is abruptly boosted and subsequently decreased to provide a smooth transition between situations. It may symbolize the passage of time, a character’s perplexity, or simply add flair to a commercial film.
- Using Premiere Pro, create a ramp-up at the end of your first clip and a ramp-down at the start of your second clip. The speed rubber band will be curved like a bell curve across the two clips when finished.
Adding speed ramps to films in Premiere Pro may improve the usefulness and looks of a variety of movies, from narrative features to social media posts. In Premiere, you may easily create and adjust speed duration directly in the timeline to meet any needs.
Speed Ramping In Wondershare Filmora
We understood how to do speed ramping in Premiere Pro. You can also get the same results using a much easier software that is “Wondershare Filmora”.
What is Wondershare Filmora?
Filmora is a video editor that is best suited for social video editors, vloggers, home movies, and other video projects. In addition, it may be used on both Macs and PCs. To begin using Filmora, you just need to pay a one-time registration fee of $0! You’ll notice a watermark when you export from the free version. For $59.99, Filmora’s latest version is a one-time purchase that doesn’t need a subscription!
Amazing Features
Filmora is an award-winning video editing program, that allows users to create visually stunning videos without the need for complex editing techniques.
Video playback in Filmora’s latest version may be accelerated by the graphics card (GPU). It’s accelerating at an alarming rate right now. It’s also possible to lower the resolution of a 4K or higher video for quicker playing. Cuts and splits are a snap using Filmora. Make a cut by dragging your play head to the location where you want to split the footage. Then, to remove the additional clip from the clip, use the delete key.
Even those with the most basic PC hardware may use this video editing software to create high-quality movies. Moreover, the most anticipated features that Filmora’s latest version offers are as follows:
- Motion Tracking
- Keyframing Animations
- Audio Ducking
- Split Screen
- Video Transitions
- Speed Control
- Color Grading
- Filmstock Effects
- Multiple Formats Exporting
Users may utilize the color tuning option to change the white balance and dynamic range of their video clip, among other things. You may alter the audio levels of each track using the audio mixer tool. The advanced Text Editor function allows you to adjust the color, size, font, and even the motion of text. The screen recording tool enables you to capture your computer’s screen as well as your webcam in excellent quality. The video stabilization feature lowers or eliminates the effect of camera shake on video.
Speed Ramping In Filmora
The method is crucial in changing the tempo of the film and, as a consequence, creating a dramatic impression. The film’s required speed is achieved by the employment of super-fast visual effects.
When using a camera with a much higher frame rate, the speed ramping approach may provide excellent effects. It aids in the production of the most dramatic impression.
Speed ramping effects are available in six presets, which include Montage, Hero Moment, Bullet Time, Jumper, and Flash In, all of which will add a theatrical element to your movie that will leave your viewers in awe.
Creative pros can swiftly and effectively speed up a movie with Wondershare Filmora. However, in order to get the intended results, it is essential to completely understand and adhere to the approach.
Wondershare Filmora 11 has a variety of tools and features to help you create a visually stunning film in a short period of time. Its Instant Mode allows you to produce a video creation from start to finish in less than 5 minutes.
Steps
- Download and Install Filmora. Launch the application on your system.
- Navigate to the chosen video and open it in the program to speed up and lengthen it. You may also add the movie to the interface by dragging and dropping it there.
- When the video appears in the timeline, right-click it to begin playback. As a consequence, a context menu is displayed.
- Select Speed from the pop-up editing window, and then select Speed Ramping from the drop-down menu.
- Alternatively, right-click on the video or audio clip, choose Speed from the drop-down menu, and select Speed Ramping.
- In the Speed Ramping panel, you may adjust the speed or choose from a number of presets, including Montage, Hero Moment, Bullet Time, Jumper, Flash in, and Flash out, to use as templates. You have the option of using the Preset speed ramps. Alternatively, you may personalize your own innovative ones.
- Move the play head to the point where you wish to increase or decrease the speed of the video or audio. Then, to add speed keyframes, choose the Add icon from the toolbar. The video or audio clips will be marked as Speed Ramping when the speed ramp has been added by Filmora.
- If you want to delete a keyframe, you can do so by selecting that particular keyframe and selecting the delete button like in the image:
- As we go on to the video keyframe speed adjustment, just slide the keyframe dot upward or downward to alter the point speed of the movie. Aside from that, you can keep the audio pitch constant regardless of how fast or slow the video is moving.
- The settings will be saved if you are pleased with them after you make the necessary modifications. In any other case, you may use the Reset button to return to the original configuration.
- When you’ve finished your work, go to the “File” panel and choose “Save Project” from the list of options that display. Change the name of the project and then click “Save.”
- Additionally, the movie may be exported using Filmora’s “Export” feature; just choose “Export” and then specify a new name for the file. The video may be exported to a device, a system, or even YouTube. After that, choose “Export.”
Speed Ramping Tips
- High Frame Rate: The frame rate is an important consideration when it comes to speed ramping. If you wish to slow down the video after it’s been recorded, shoot it at a frame rate higher than 60 frames per second. When a video is slowed down, there should be enough frames to guarantee that the video passes the 24 frames per second threshold frame rate.
- Choose The Appropriate Frame Resolution: Another possibility is to modify your video’s frame resolution. The tip has the ability to edit the clip’s properties from the Slowing down the video is achieved by changing the frame rate in the clip’s parameters from 120 to 24 frames per second. As a consequence, the frames will be expanded to the proper frame rate. As a consequence, the video is slowed down but not jerked.
- Purposeful Time Remapping: Instead of keeping the same pace throughout the film, a deliberate speed ramp should be implemented. A video has emotional, mysterious, exciting, and slow-motion Why is this the case? The usage of the same video speed throughout the film may have a negative influence on the watching experience. As a result, it is critical that videos be separated into genres and that the tempo of the videos is modified accordingly.
Conclusion
The use of the ideal cinematic effect at the right time boosts the audience and engagement with the material. This respective article explored speed ramping in-depth and oughts to teach creative pros how to slow down a video and speed up a movie. It covers speed raming in premiere pro and then moves toward Wondershare Filmora which seems a bit easier. Wondershare Filmora is a good choice for completing the task as quickly as possible. You will have access to all of the effects and tools mentioned, as well as the ability to keep the audio pitch consistent throughout the effect, which is critical while altering the video speed.
Experience Time Differently with The Top Slow-Motion Applications
In today’s era, plain and boring views do not get as much audience attention. Effects and presets are important for creating Instagram-worthy reels or content for other social platforms. Adding a slow-motion effect to your videos is one of the tactics to enhance engagement. However, the question comes to downloading slow-motion apps for this purpose.
The Android and iOS devices offer a built-in slo-mo feature for users’ ease. However, when it comes to going to the next level, there are slow-motion video apps downloaded. These apps permit seamless editing tools and techniques for creating effective slo-mos. This article will discuss the top video slow-motion app downloads for both Android and iOS. Ultimately, we’ll give you a tip on creating slo-mos using an alternative.
Slow Motion Video Maker Slow your video’s speed with better control of your keyframes to create unique cinematic effects!
Make A Slow Motion Video Make A Slow Motion Video More Features

Part 1: Leading Down to The Top Slow-Motion App to Download Right Now
This section will cover both users, whether you prefer an Android interface or an iPhone camera. Find the top video editing apps for slow motion for both devices. The brief review and key features of applications are discussed below for your ease:
Slow Motion Applications for Android
Google Play is a versatile platform for downloading slo-mo video apps. However, out of so many options, it might become hard for you to select an app. Hence, in this section, we’ll discuss some reliable Android apps for that purpose:
- Slow Motion: Slow mo, Fast mo
- Slow Motion Video Fast&Slow Mo
- Slow Motion Video Editor
- Slow Motion Video Maker
- Slow Motion Editor
1. Slow Motion: Slow mo, Fast mo
To want an editing application with multiple slow-motion settings is natural. This slow-motion app bestows users with 10 precise playback speed options for creating slow-mos. The playback speed range is from 0.1x to 0.95x, which means a detailed slow-motion appearance. In addition, users can fashion the slo-mos effects at different speeds on different video fragments within a clip.

Key Features
- You can curate a multi-effect video by adding a fast-speed effect at specific frames.
- Trim and cut videos to add different effects to different segments while maintaining quality.
- Enables the previewing option to analyze and alter any mistakes or make further adjustments.
2. Slow Motion Video Fast&Slow Mo
This is a video editing app for slow motion where the creation possibilities do not stop. The application not only offers video speed change options but also audio speed change. This app lets you add funny voices and edit pranking videos easily. The simple settings enable slo-mo on complete video, while the advanced settings can separate video frames.

Key Features
- Add both slow-motion and high-speed effects at once in your dancing videos for inspiration.
- You can slow down a video to 1/2nd, 1/3rd, and 1/5th of its original speed.
- Adding any speed effect doesn’t change video quality, and you can export them in HD quality.
3. Slow Motion Video Editor
Create first-rate slo-mos using this slo-mo video editor app and embed multiple effects in them. This application is curated for content creators to inspire their audience. There are four speed change options for fashioning a slow motion:- 2x,- 4x,- 8x, and 16x. This means the app enables you to decelerate a video to 1/16th of its original speed.

Key Features
- Frame split options to apply slow motion effect to distinct video segments.
- Ability to apply and adjust music tracks on your video within the app.
- Multiple video and image frames enhance the visual stability of your videos.
4. Slow Motion Video Maker
Get a completely creative and innovative package with this app to slow down video. The application enables the reduction of video speed along with the option to apply music. You can even record a video in slow motion or add the slow motion to a pre-recorded one. Adjust your video duration according to the requirements using the Trim tool.

Key Features
- Add the element of laughter to your videos using the high playback speed options 2x, 3x, and 4x.
- Avoid losing video pixels and publish videos directly to Instagram, Facebook, and more.
- Speed up your videos at different durations to express your artistic ideas.
5. Slow Motion Editor
Instead of completing the formality of creating a slow motion, use this app to create compelling slow motion. The video editor offers multiple filters and effects to uplift a video and make it worthy of viewing. The app offers professional tools to cut and customize videos according to your taste. If your phone’s Slomo camera doesn’t respond, utilize this app to capture scenes in slow motion.

Key Features
- Add diverse speed effects like time-lapse, reverse speed, and live camera capturing.
- This slow-motion app is compatible with Android 4.0 and higher versions.
- The application offers special slow-motion effects like Hair Flips, Baseball Swings, and more.
Slow Motion Applications for iPhone
The app store choices may confuse the audience when choosing a suitable app. This section reflects some reliable iPhone applications tailored to fulfill slo-mo creation:
- SloMo Slow Motion Video Editor
- Slow Motion Video Editor
- Slow Mo & Fast Motion
- Slow Motion Video Fx Editor
- TimeFreeze
1. SloMo Slow Motion Video Editor
Step into epic creativity with this slow video app to craft high-quality slo-mos. The application creates smooth slow motion by manipulating the frame rate to 120 or 240 fps. You can manipulate frames at specific durations to add craft to a cinematic scene. Change the video playback speed for slow motion up to 12x and add a freeze frame effect for highlighting several points.

Key Features
- Share your creation directly on social apps to gain popularity.
- Multiple video export ratios to fulfill the requirements for each application.
- Bring the best out of your creation via colors by employing 40+ built-in features.
2. Slow Motion Video Editor
Say goodbye to the manual methods of creating slow motions and use this automated slow video app. It offers various speed templates to add uniqueness to your content. To create a pure slow-motion video, you can use the custom playback option. While creating slow motion, the app offers an audio speed adjustment option to optimize the video.

Key Features
- Immerse your videos with this application’s amazing and interactive built-in music collection.
- Use this app as a source to directly share your creations with friends and audience.
- This app is accessible on iOS 11.0 and newer versions with support for other Apple devices.
3. Slow Mo & Fast Motion
Shoot slow-motion videos directly with this slow-motion video maker app. Along with a Slomo recorder, the app also has a speed changer that transforms basic videos into slow motion. Its multiple ranged speed options can add details to your videos. The timeline interface enables users to seamlessly add slow-motion effects to some scenes.

Key Features
- Trim your videos to eliminate any unnecessary or glitched scenes.
- Turn up the fastest speed for a scene and give it a funny effect.
- The application is only available for iOS 14.0, macOS 14.0, and higher versions.
4. Slow Motion Video Fx Editor
Utilize the powers of this iOS app to create the slowest slow-motioned video on 12x playback speed along with 240 fps framerate. This Slomo video editor app can turn the whole video upside down with its amazing live speed control action. In addition, there are no limits to its other editing features to enhance the video graphics.

Key Features
- Liberates you from low-quality content and offers the high-resolution export option.
- Works seamlessly with social platforms to help you showcase your creations.
- A laid-back user interface to help both skilled and seasoned editors to craft perfection.
5. TimeFreeze
This is one of the best slow-motion apps to fashion smooth, slow-motion videos. TimeFreeze uses frame rate functioning to curate slow motion in a professional manner. Users can select from 4 frame rate options: 24 fps, 60 fps, 120 fps, and 240 fps. The 120 and 240 fps are usually integrated framerates of professional cameras to record with precision.

Key Features
- Simple and intuitive interface crafted specifically for the creation of slo-mo videos.
- Supports iOS 12.1 and higher versions to craft slow motions seamlessly.
- The application is free to utilize and takes up only 25.3 MB of your iOS storage.
Part 2: Desktop Alternative: Make Better Slow-Motion Videos with Wondershare Filmora
Filmora is considered the best slow-motion app for making videos in slow motion with just a few clicks. The speed ramping feature is user-friendly and caters to both beginners and seasoned video editors. It provides the flexibility to select various speeds for your videos to grant precise control. Moreover, the software lets you edit video by highlighting a serene moment or adding excitement to an action scene.
Additionally, this feature simplifies the process of crafting professional-looking videos. Filmora offers an array of templates, filters, and transitions to add cinematic quality. Plus, it works with different types of video files, and you can export high-quality videos. This slow-motion app is nothing but a game changer for those who like to use speed effects.
Free Download For Win 7 or later(64-bit)
Free Download For macOS 10.14 or later
Steps to Slow Down Video with Speed Ramping
Speed Ramping lets you smoothly switch between fast and slow motion in one video. It’s not just fancy but helps you make certain parts stand out or show off details. Now, let’s learn the detailed steps to slow down video by utilizing this feature of Filmora:
Step 1Download the Software and Import the Video File
Initiate the process by downloading Filmora’s latest version, 13, from your favorite web browser. Now, complete the installation process and launch the software at your end. Then, proceed further by accessing the main interface of the tool and selecting the “New Project.” This action will lead you to a new window and allow you to import media from your system.

Step 2Access the Speed Ramping Feature and Choose Template
Once you have imported your video file, drag it to the timeline section. Now, navigate to the video and right-click to access the “Speed Ramping” feature by searching a drop-down menu. Then, you will find an editing panel on the right of the same window. Here, you can choose any of the templates according to your requirements for seamless speed ramping.

Step 3Personalize Video via Speed Ramping Adjustments
In addition to choosing preset templates, you can click on the “Customize” tab and move downward. Afterward, visit the editing panel and place the dots to move downward to slow down the speed. Plus, if you hold the dots upward, this action will speed up the playback speed of the video. After making all required changes, preview your changes and move forward to save changes through the “Export” button.

Exclusive AI Video Editing Features of Wondershare Filmora
Wondershare Filmora is a modern video editing application that is capable of much more than just being a slow video app. The below section contains a brief introduction to a few of its AI editing features. Read the following segment to enhance your video editing experience in Filmora:
1. Remove Background
Filmora’s intuitive background remover feature removes unwanted backgrounds from your videos. You can say goodbye to the green screen as it also provides various visual effects. Moreover, create exotic compositions by transporting yourself to different locations. This tool is perfect for vloggers as they can unlock endless editing possibilities. You can also make unforgettable storylines with your videos and amaze your audience.
2. Motion Tracking
The motion tracking feature brings magic to videos by tracking down moving objects. Consider capturing a stunning scenic view with your camera. With the help of motion tracking, you can add various texts along the waterfall. Furthermore, imagine highlighting the special moments in an epic advantage with dynamic effects. Therefore, take a leap of faith by captivating the audience with your stunning videos.
3. Auto Beat Sync
Auto beat sync by Filmora is like having a personal DJ that helps edit your videos. This tool perfectly matches the music to the rhythm of your moving video. Additionally, create an epic montage with the beat syncing with your video. The feature adds professionalism to your videos and makes them note-worthy. That is why you take your videos to the next level with auto beta sync.
4. Auto Reframe
The auto reframe feature adjusts your footage to fit various ratios perfectly. Say you want to upload that landscape image you took to other mediums. Therefore, with auto reframe, you can select the desired aspect ratio. It crops and pans out the video within the respect frame of choice. Furthermore, you can save a lot of time and resources and ensure a stunning video.
Conclusion
Upon reaching a conclusion, this article has provided users with some insights into the significance of slow-motion apps. The article took into consideration some of the download slow-motion apps that show compatibility with iPhone and Android.
In times when you need to create professional slo-mos, we suggest using Wondershare Filmora. This editing software isn’t just compatible with iOS and Android but also with macOS, Windows, and Linux systems. In addition, the application offers multiple editing tools and techniques to create and enhance slo-mos.
Make A Slow Motion Video Make A Slow Motion Video More Features
Part 1: Leading Down to The Top Slow-Motion App to Download Right Now
This section will cover both users, whether you prefer an Android interface or an iPhone camera. Find the top video editing apps for slow motion for both devices. The brief review and key features of applications are discussed below for your ease:
Slow Motion Applications for Android
Google Play is a versatile platform for downloading slo-mo video apps. However, out of so many options, it might become hard for you to select an app. Hence, in this section, we’ll discuss some reliable Android apps for that purpose:
- Slow Motion: Slow mo, Fast mo
- Slow Motion Video Fast&Slow Mo
- Slow Motion Video Editor
- Slow Motion Video Maker
- Slow Motion Editor
1. Slow Motion: Slow mo, Fast mo
To want an editing application with multiple slow-motion settings is natural. This slow-motion app bestows users with 10 precise playback speed options for creating slow-mos. The playback speed range is from 0.1x to 0.95x, which means a detailed slow-motion appearance. In addition, users can fashion the slo-mos effects at different speeds on different video fragments within a clip.
Key Features
- You can curate a multi-effect video by adding a fast-speed effect at specific frames.
- Trim and cut videos to add different effects to different segments while maintaining quality.
- Enables the previewing option to analyze and alter any mistakes or make further adjustments.
2. Slow Motion Video Fast&Slow Mo
This is a video editing app for slow motion where the creation possibilities do not stop. The application not only offers video speed change options but also audio speed change. This app lets you add funny voices and edit pranking videos easily. The simple settings enable slo-mo on complete video, while the advanced settings can separate video frames.
Key Features
- Add both slow-motion and high-speed effects at once in your dancing videos for inspiration.
- You can slow down a video to 1/2nd, 1/3rd, and 1/5th of its original speed.
- Adding any speed effect doesn’t change video quality, and you can export them in HD quality.
3. Slow Motion Video Editor
Create first-rate slo-mos using this slo-mo video editor app and embed multiple effects in them. This application is curated for content creators to inspire their audience. There are four speed change options for fashioning a slow motion:- 2x,- 4x,- 8x, and 16x. This means the app enables you to decelerate a video to 1/16th of its original speed.
Key Features
- Frame split options to apply slow motion effect to distinct video segments.
- Ability to apply and adjust music tracks on your video within the app.
- Multiple video and image frames enhance the visual stability of your videos.
4. Slow Motion Video Maker
Get a completely creative and innovative package with this app to slow down video. The application enables the reduction of video speed along with the option to apply music. You can even record a video in slow motion or add the slow motion to a pre-recorded one. Adjust your video duration according to the requirements using the Trim tool.
Key Features
- Add the element of laughter to your videos using the high playback speed options 2x, 3x, and 4x.
- Avoid losing video pixels and publish videos directly to Instagram, Facebook, and more.
- Speed up your videos at different durations to express your artistic ideas.
5. Slow Motion Editor
Instead of completing the formality of creating a slow motion, use this app to create compelling slow motion. The video editor offers multiple filters and effects to uplift a video and make it worthy of viewing. The app offers professional tools to cut and customize videos according to your taste. If your phone’s Slomo camera doesn’t respond, utilize this app to capture scenes in slow motion.
Key Features
- Add diverse speed effects like time-lapse, reverse speed, and live camera capturing.
- This slow-motion app is compatible with Android 4.0 and higher versions.
- The application offers special slow-motion effects like Hair Flips, Baseball Swings, and more.
Slow Motion Applications for iPhone
The app store choices may confuse the audience when choosing a suitable app. This section reflects some reliable iPhone applications tailored to fulfill slo-mo creation:
- SloMo Slow Motion Video Editor
- Slow Motion Video Editor
- Slow Mo & Fast Motion
- Slow Motion Video Fx Editor
- TimeFreeze
1. SloMo Slow Motion Video Editor
Step into epic creativity with this slow video app to craft high-quality slo-mos. The application creates smooth slow motion by manipulating the frame rate to 120 or 240 fps. You can manipulate frames at specific durations to add craft to a cinematic scene. Change the video playback speed for slow motion up to 12x and add a freeze frame effect for highlighting several points.
Key Features
- Share your creation directly on social apps to gain popularity.
- Multiple video export ratios to fulfill the requirements for each application.
- Bring the best out of your creation via colors by employing 40+ built-in features.
2. Slow Motion Video Editor
Say goodbye to the manual methods of creating slow motions and use this automated slow video app. It offers various speed templates to add uniqueness to your content. To create a pure slow-motion video, you can use the custom playback option. While creating slow motion, the app offers an audio speed adjustment option to optimize the video.
Key Features
- Immerse your videos with this application’s amazing and interactive built-in music collection.
- Use this app as a source to directly share your creations with friends and audience.
- This app is accessible on iOS 11.0 and newer versions with support for other Apple devices.
3. Slow Mo & Fast Motion
Shoot slow-motion videos directly with this slow-motion video maker app. Along with a Slomo recorder, the app also has a speed changer that transforms basic videos into slow motion. Its multiple ranged speed options can add details to your videos. The timeline interface enables users to seamlessly add slow-motion effects to some scenes.
Key Features
- Trim your videos to eliminate any unnecessary or glitched scenes.
- Turn up the fastest speed for a scene and give it a funny effect.
- The application is only available for iOS 14.0, macOS 14.0, and higher versions.
4. Slow Motion Video Fx Editor
Utilize the powers of this iOS app to create the slowest slow-motioned video on 12x playback speed along with 240 fps framerate. This Slomo video editor app can turn the whole video upside down with its amazing live speed control action. In addition, there are no limits to its other editing features to enhance the video graphics.
Key Features
- Liberates you from low-quality content and offers the high-resolution export option.
- Works seamlessly with social platforms to help you showcase your creations.
- A laid-back user interface to help both skilled and seasoned editors to craft perfection.
5. TimeFreeze
This is one of the best slow-motion apps to fashion smooth, slow-motion videos. TimeFreeze uses frame rate functioning to curate slow motion in a professional manner. Users can select from 4 frame rate options: 24 fps, 60 fps, 120 fps, and 240 fps. The 120 and 240 fps are usually integrated framerates of professional cameras to record with precision.
Key Features
- Simple and intuitive interface crafted specifically for the creation of slo-mo videos.
- Supports iOS 12.1 and higher versions to craft slow motions seamlessly.
- The application is free to utilize and takes up only 25.3 MB of your iOS storage.
Part 2: Desktop Alternative: Make Better Slow-Motion Videos with Wondershare Filmora
Filmora is considered the best slow-motion app for making videos in slow motion with just a few clicks. The speed ramping feature is user-friendly and caters to both beginners and seasoned video editors. It provides the flexibility to select various speeds for your videos to grant precise control. Moreover, the software lets you edit video by highlighting a serene moment or adding excitement to an action scene.
Additionally, this feature simplifies the process of crafting professional-looking videos. Filmora offers an array of templates, filters, and transitions to add cinematic quality. Plus, it works with different types of video files, and you can export high-quality videos. This slow-motion app is nothing but a game changer for those who like to use speed effects.
Free Download For Win 7 or later(64-bit)
Free Download For macOS 10.14 or later
Steps to Slow Down Video with Speed Ramping
Speed Ramping lets you smoothly switch between fast and slow motion in one video. It’s not just fancy but helps you make certain parts stand out or show off details. Now, let’s learn the detailed steps to slow down video by utilizing this feature of Filmora:
Step 1Download the Software and Import the Video File
Initiate the process by downloading Filmora’s latest version, 13, from your favorite web browser. Now, complete the installation process and launch the software at your end. Then, proceed further by accessing the main interface of the tool and selecting the “New Project.” This action will lead you to a new window and allow you to import media from your system.
Step 2Access the Speed Ramping Feature and Choose Template
Once you have imported your video file, drag it to the timeline section. Now, navigate to the video and right-click to access the “Speed Ramping” feature by searching a drop-down menu. Then, you will find an editing panel on the right of the same window. Here, you can choose any of the templates according to your requirements for seamless speed ramping.
Step 3Personalize Video via Speed Ramping Adjustments
In addition to choosing preset templates, you can click on the “Customize” tab and move downward. Afterward, visit the editing panel and place the dots to move downward to slow down the speed. Plus, if you hold the dots upward, this action will speed up the playback speed of the video. After making all required changes, preview your changes and move forward to save changes through the “Export” button.
Exclusive AI Video Editing Features of Wondershare Filmora
Wondershare Filmora is a modern video editing application that is capable of much more than just being a slow video app. The below section contains a brief introduction to a few of its AI editing features. Read the following segment to enhance your video editing experience in Filmora:
1. Remove Background
Filmora’s intuitive background remover feature removes unwanted backgrounds from your videos. You can say goodbye to the green screen as it also provides various visual effects. Moreover, create exotic compositions by transporting yourself to different locations. This tool is perfect for vloggers as they can unlock endless editing possibilities. You can also make unforgettable storylines with your videos and amaze your audience.
2. Motion Tracking
The motion tracking feature brings magic to videos by tracking down moving objects. Consider capturing a stunning scenic view with your camera. With the help of motion tracking, you can add various texts along the waterfall. Furthermore, imagine highlighting the special moments in an epic advantage with dynamic effects. Therefore, take a leap of faith by captivating the audience with your stunning videos.
3. Auto Beat Sync
Auto beat sync by Filmora is like having a personal DJ that helps edit your videos. This tool perfectly matches the music to the rhythm of your moving video. Additionally, create an epic montage with the beat syncing with your video. The feature adds professionalism to your videos and makes them note-worthy. That is why you take your videos to the next level with auto beta sync.
4. Auto Reframe
The auto reframe feature adjusts your footage to fit various ratios perfectly. Say you want to upload that landscape image you took to other mediums. Therefore, with auto reframe, you can select the desired aspect ratio. It crops and pans out the video within the respect frame of choice. Furthermore, you can save a lot of time and resources and ensure a stunning video.
Conclusion
Upon reaching a conclusion, this article has provided users with some insights into the significance of slow-motion apps. The article took into consideration some of the download slow-motion apps that show compatibility with iPhone and Android.
In times when you need to create professional slo-mos, we suggest using Wondershare Filmora. This editing software isn’t just compatible with iOS and Android but also with macOS, Windows, and Linux systems. In addition, the application offers multiple editing tools and techniques to create and enhance slo-mos.
Also read:
- Reversing Time Lapse Videos on iPhone Using Top Applications
- New Best 10 Tools To Make Quiz Videos
- New Legend Intro Maker – Create Intro Video with Ease
- Updated In 2024, 7 Best MP4 Video Editors on Mac Edit MP4 Videos Easily
- Updated 10 Best Meme Text to Speech Tools Windows, Mac, Android, iPhone&Online for 2024
- How Have Game Recording Software Improved Their Stature in the Market? An Overview
- Updated Top 7 Best GoPro Video Editors for Mac
- Updated 8 Frame Rate Video Converters You Must Try
- Updated Easy Guide to Use a Stabilization Tool in Filmora
- Updated How to Create Your Own LOL Montage Video
- Updated How to Make Video Fade to Black in Movie Maker Easily for 2024
- New In 2024, How To Add Motion Blur On CapCut? (IPhone & Android)
- Whatre the Best Alternatives to Pexels?
- 2024 Approved How to Make a YouTube Intro by Filmora
- New End This Problem! Make Transparent Background Video Today
- Updated How to Create a Slideshow with Movavi Slideshow Maker for 2024
- 2024 Approved Editing Videos Was Never so Easy as It Is Now. With Video Enhancer Ai, This Task Is Very Simple to Do and No Trouble Will Be There in Getting the Things Done as Needed. Choose the Right AI Video Enhancer for Task Completion
- In 2024, Are You Looking to Find Out How to Loop YouTube Videos on iPhone? Learn How to Loop Your Favorite YouTube Video on Your iPhone, so You Can Play that Part over and Over
- Updated 2024 Approved Enhance Your Video Color Accuracy with Video Scopes
- New Customize PowerPoint Slideshow Icon in Simple Ways for 2024
- Updated Exploring Tools to Integrate Special Mask Effects Into Your Content. Read the Following Article to Master some Tools Experts in Mask Tracking
- Updated 2024 Approved How to Cut Videos on Mac without Using FFmpeg?
- 2024 Approved Did You Know Cameras Have a Built-In Feature to Shoot Slow-Motion Clips? This Article Is About Using Sony S&Q to Capture Slow-Motion Scenes
- Updated Want to Know How to Slow Down a Video on iPhone or Speed It Up? This Guide Provides Step by Step Method to Do so Using Simple Techniques. Find Out More About It
- In 2024, Is Augmented Reality Conferencing the Future of Workplace Collaboratio
- Updated Guide To Slowing Down Videos in Snapchat Discussing the Details
- The Complete Guide to Zoho Slides with Ease for 2024
- In 2024, Want to Find a Good Camera for YouTube? This Article Brings You some of the Best Options of Different Varieties for Your Channel
- New How to Speed up a Video on Splice for 2024
- New Tips That Show Anybody How To Create Youtube Slideshow – Guaranteed
- This Article Talks in Detail About How to Export iMovie Video From iPhone, Mac, Etc. It Also Covers the Process of Using iMovie Alternative to Edit Videos on Mac. Check Out Now for 2024
- Updated In 2024, Best 5 Tools to Help You Know More Freeze-Frame Video Editing Skills
- New Best 10 Tools To Make Quiz Videos for 2024
- Updated 2024 Approved Splice App for Android - Guide to Download & Use
- Convert Slow Motion Videos to Regular Videos in Your iOS Device |A How for 2024
- Updated How to Make Discord GIF Avatar in Depth Guide
- Detailed Tutorial to Crop Video in KineMaster for 2024
- In 2024, How To Export Video in Filmora
- Best Free Slow Motion Apps For Android and iPhone
- VSCO Slow Motion
- In 2024, Premiere Pro Text Effects Beginner Guide
- New Let Us Talk About the Famous Photoshop and Most Commonly Used Glitch Effect. The Article Understudy Will Discuss in Detail About Photo Glitch Effect
- 2024 Approved Google Meet Green Screen
- New The After-Effects Match Colour Feature Bestows Numerous Benefits. Thus, in the Following Discussion, We Will Discuss This Feature and an Equally Proficient Efficient Alternative Tool for Colour Matching
- Do You Know How You Can Trim or Merge Using Wondershare Filmora? Trimming and Merging Using This Tool Is an Easy Task; Learn How for 2024
- New 2024 Approved The Ultimate Guide to Make a Text Collage
- 2024 Approved How to Create an Adobe Slideshow the Easy Way
- In 2024, What Pokémon Evolve with A Dawn Stone For Apple iPhone 7? | Dr.fone
- Unlock android phone if you forget the Realme 11 Pro password or pattern lock
- How to Detect and Stop mSpy from Spying on Your OnePlus Nord 3 5G | Dr.fone
- In 2024, Best Ways on How to Unlock/Bypass/Swipe/Remove Vivo V30 Pro Fingerprint Lock
- In 2024, How to Delete iCloud Account On Apple iPhone 11 without Password?
- How to Unlock iPhone 6 with a Mask On
- How To Transfer WhatsApp From iPhone XR to others devices? | Dr.fone
- How To Transfer WhatsApp From Apple iPhone 6s Plus to others devices? | Dr.fone
- 3 Methods to Mirror Oppo Find X6 Pro to Roku | Dr.fone
- 7 Solutions to Fix Error Code 963 on Google Play Of Realme Narzo 60 5G | Dr.fone
- Updated How to Make a Funny Meme on MacBook
- Updated Is It That Easy to Make My Own Animated Character, In 2024
- In 2024, How to Unlock Vivo X100 Pro Pattern Lock if Forgotten? 6 Ways
- Unlock Apple iPhone 7 With Forgotten Passcode Different Methods You Can Try
- Title: Updated Voice Changer for Discord | Use Voicemod on Discord
- Author: Chloe
- Created at : 2024-05-20 03:38:22
- Updated at : 2024-05-21 03:38:22
- Link: https://ai-editing-video.techidaily.com/updated-voice-changer-for-discord-use-voicemod-on-discord/
- License: This work is licensed under CC BY-NC-SA 4.0.
