
:max_bytes(150000):strip_icc():format(webp)/001_2654847-5b99b903c9e77c005077d0d8.jpg)
Updated Want to Add Subtitles to Netflix Videos in Your Preferred Language? Read This Article to Learn Two Different Methods for Uploading Custom Subtitles to Netflix
Want to Add Subtitles to Netflix Videos in Your Preferred Language? Read This Article to Learn Two Different Methods for Uploading Custom Subtitles to Netflix
Netflix is the most popular streaming service in the world. It offers loads of movies and series that you can watch on smartphones, tablets, and computers. Over the years, Netflix has become a one-stop destination for watching movies and TV shows in different languages.
While the user base of Netflix is quite diverse, the platform offers subtitles in limited languages for most movies and series. Suppose you want to view a Korean Drama on Netflix with French subtitles. However, you found that French subtitles are unavailable for that Korean Drama. In such a case, you might wonder if adding custom subtitles to Netflix is possible.
Well, you can add subtitles to Netflix, and there are two different methods to do the same. This guide will help you learn both methods available for adding custom subtitles to Netflix. So, let’s get started!
Method 1. Upload Your Custom Subtitle to Netflix
Before proceeding with this method, you must remember that it only works if you are a Netflix Premium user. Now, let’s discuss how to add subtitles to Netflix with this method.
Key Steps to Follow
Below are the steps for adding custom subtitles to Netflix.
Step 1 First of all, you need to install and add Language Learning with Netflix & YouTube™ extension to your web browser (Chrome or Edge).
Step 2 Make sure the extension is activated.
Step 3 Download the .srt file that contains the subtitles in your preferred language for a particular movie or TV show.
Step 4 Open Netflix on a Chrome or Edge browser and sign into your account.
Step 5 Play the movie or TV show for which you have downloaded the subtitles.
Step 6 Within the Netflix player, you will see a settings icon left to the Subtitles icon. Click on it.
Step 7 Among the various setting options, you need to choose the screen and find the one with the label “Lower Subtitles (Mother Language)”. You need to click on its field and select the “Upload Subtitle” option.
Step 8 You will see a pop-up window at the top of the screen where you need to click the “Choose File” button.
Step 9 You then need to navigate to the directory on your computer where you have downloaded the subtitles file, select it, and click the “Open” button.
Step 10 Click the “Okay” button to upload the subtitles to Netflix.
Step 11 Close the settings window and play the video. You can view the uploaded subtitles at the bottom of the player.
Method 2. Add Custom Subtitles to Netflix with Extensions
If you’re not a Netflix Premium user, you can still add subtitles to Netflix with the help of certain browser extensions. We’ll list them down and discuss the steps for using one of them; the basic steps for using all such extensions are pretty much the same.
1. Substital
Supported web browsers: C hrome | Firefox | Edge
Substital is among the most popular extensions that allow you to add subtitles to several online on-demand video streaming platforms, including Netflix. It has more than 100K users on the Chome Web Store.
Key Features
- Offers a built-in subtitles search feature.
- Supports .srt files and .zip files containing subtitles in the .srt format.
- You can manually sync the subtitles with the video.
- It allows you to customize the appearance of subtitles.
Steps to Add Custom Subtitles to Netflix with Substital
Following are the key steps to add custom subtitles to Netflix using the Substital extension:
Step 1 The first thing you need to do is to download and install the Substital extension on your browser.
Step 2 Open Netflix on the same browser and log in to your account.
Step 3 Play the movie or episode from a TV series for which you want to add custom subtitles.
Step 4 Download the subtitles file for the same movie or episode in your preferred language from the web.
Step 5 Now open the extensions menu in your browser and click on the Substital icon.
Step 6 You will see the name of the movie or TV show that you are watching on Netflix. Click on it.
Step 7 In this step, you need to drag and drop the subtitle file from your system (that you downloaded earlier) to the browser window.
Step 8 Finally, you can notice that the subtitles are loaded in the Netflix player.
2. Super Netflix
Web browsers: Chrome
Super Netflix is yet another reliable extension to add subtitles to Netflix. Apart from adding custom subtitles, this extension allows you to change the video playback speed. Like Substital, the Super Netflix extension on Chrome Web Store also has 100K+ users.
Key Features
- It can help you avoid spoilers by blurring images and episode descriptions.
- You can use the extension to skip intros automatically.
- Offers 5 different video modes.
- You get the option to change the Netflix streaming server.
3. Netflix SubStyler: customize subtitles
Web browsers: Chrome
Unlike the other two extensions mentioned above, Netflix SubStyler only allows you to change the styling of subtitles on Netflix. However, the thing that makes this extension worthy of your attention is that it comes loaded with several customization options.
Key Features
- You can choose a custom text color for the subtitles either with the help of an in-built color picker or by entering the RGB value of the color.
- The extension lets you add text outlines and change the size of the text.
- You can even add a text background and change its color and opacity.
Bonus Tip: How to Edit and Add Subtitles to Videos Available Offline
In certain cases, you may want to edit the subtitles of videos probably because either the subtitles are not available for a certain part of the video, or they are not correct. So, if you want to edit subtitles of videos that you have downloaded with ease, you can consider using Wondershare Filmora .
Free Download For Win 7 or later(64-bit)
Free Download For macOS 10.14 or later

Filmora is one of the most popular and powerful video editors out there. Developed by Wondershare, it allows you to import subtitle files in various formats, including .srt, and edit them directly. Some noteworthy features of Filmora for subtitles and video editing include the manual addition of subtitles, speech-to-text conversion, green screen, video stabilization, and color correction.
Wondershare Filmora also offers several advanced text editing tools that make it possible to customize the appearance of subtitles that you add to a video. You can change the color and size of the fonts and add a gradient effect to the text. Additionally, you can animate text to make it stand out.
Add Custom Subtitles with Filmora: A Step-by-Step Guide
If you want to add subtitles to any video using Filmora, you simply need to follow the steps mentioned below. Please note that for this tutorial, we’ll be using Filmora 11.
Step 1 Launch the Filmora app on your computer and create a new project.
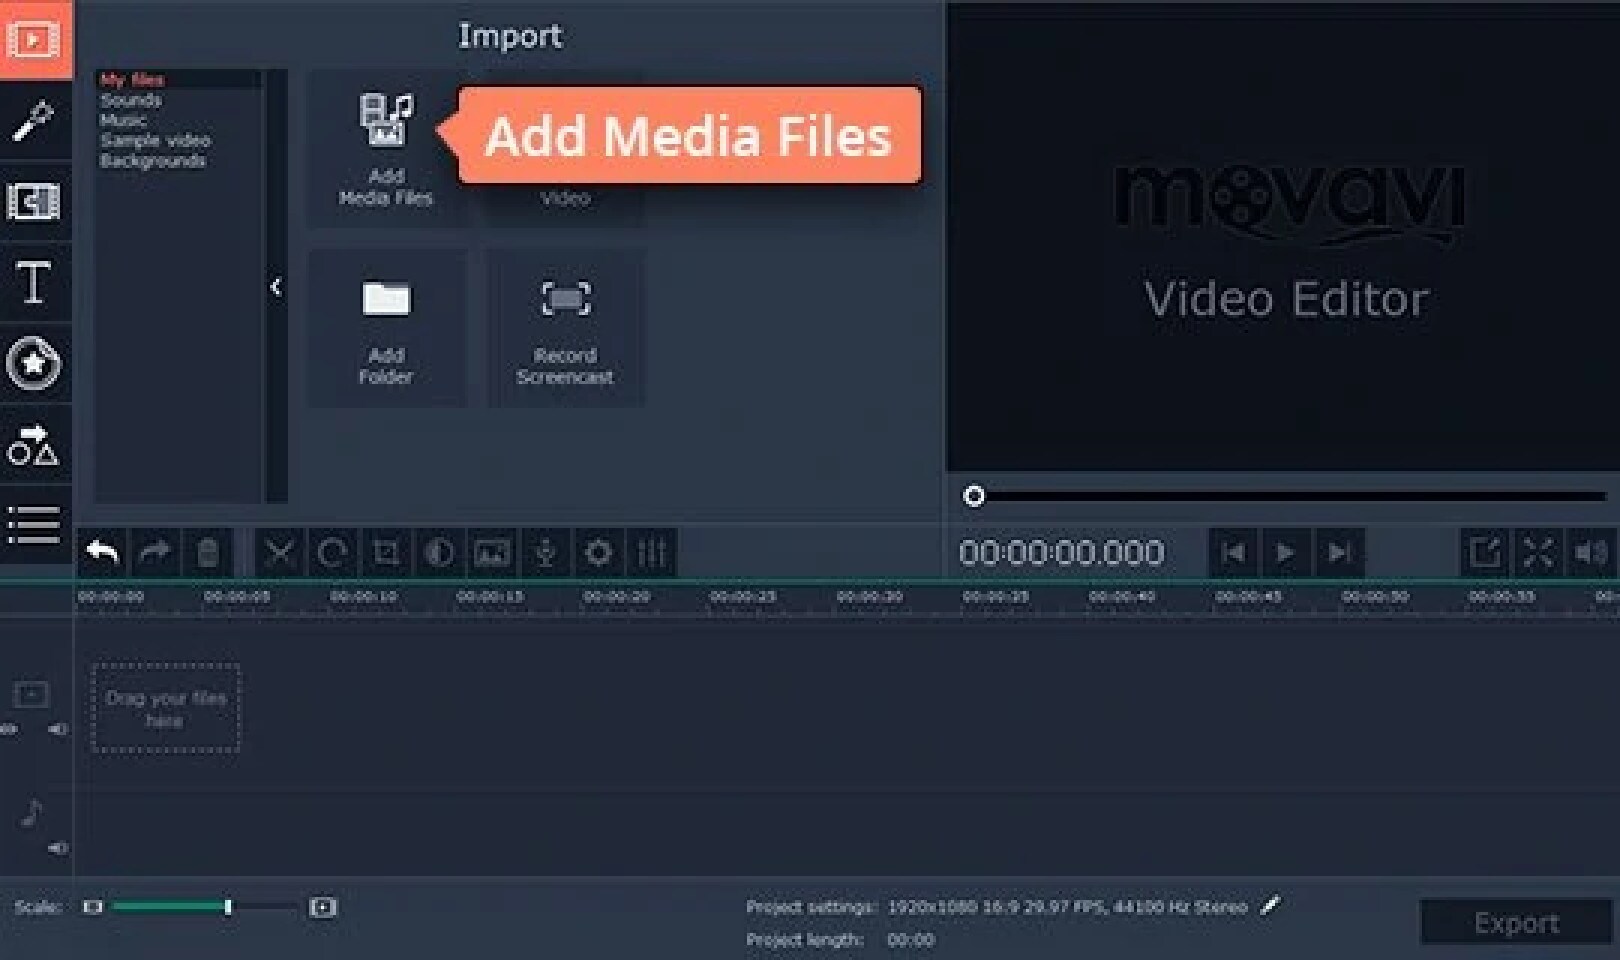
Step 2 You can simply click the “Import media” button and load the video onto it.
Step 3 Hover over the video’s thumbnail and click on the (+) button to add it to the timeline.
Step 4 Now, you need to play the video and find the section of the video where you need to add subtitles. Pause the video and add a mark by pressing the M key on your keyboard. You can also do the same by clicking the marker button, which is located beside the microphone icon in the top right of the timeline tab.
Step 5 To add the subtitle, you need to click on the “Titles” button that you can see at the top of the Filmora window. You can see several subtitle templates available there.
Step 6 Download, preview, and choose a subtitle template that seems most appropriate.
Step 7 You can then drag and drop the subtitle to the timeline above the video timeline. You can also trim the subtitle length from any side of the subtitle timeline box.
Step 8 You need to double-click on the subtitle timeline box to add custom text, change font size, color, and alignment, and add animations.
Step 9 Once done, you can click on the “Ok” button to save the changes.
Step 10 Similarly, you can add subtitles for different sections of the video.
Conclusion
If you want to add custom subtitles to Netflix movies and TV shows, you can achieve the same with the two different methods mentioned above. For the first method to work, you must be a Netflix Premium user. On the other hand, the second method will work fine even if you aren’t a Netflix Premium user. Also, you can add custom subtitles to any offline videos using the Wondershare Filmora video editor.
Free Download For macOS 10.14 or later
Filmora is one of the most popular and powerful video editors out there. Developed by Wondershare, it allows you to import subtitle files in various formats, including .srt, and edit them directly. Some noteworthy features of Filmora for subtitles and video editing include the manual addition of subtitles, speech-to-text conversion, green screen, video stabilization, and color correction.
Wondershare Filmora also offers several advanced text editing tools that make it possible to customize the appearance of subtitles that you add to a video. You can change the color and size of the fonts and add a gradient effect to the text. Additionally, you can animate text to make it stand out.
Add Custom Subtitles with Filmora: A Step-by-Step Guide
If you want to add subtitles to any video using Filmora, you simply need to follow the steps mentioned below. Please note that for this tutorial, we’ll be using Filmora 11.
Step 1 Launch the Filmora app on your computer and create a new project.
Step 2 You can simply click the “Import media” button and load the video onto it.
Step 3 Hover over the video’s thumbnail and click on the (+) button to add it to the timeline.
Step 4 Now, you need to play the video and find the section of the video where you need to add subtitles. Pause the video and add a mark by pressing the M key on your keyboard. You can also do the same by clicking the marker button, which is located beside the microphone icon in the top right of the timeline tab.
Step 5 To add the subtitle, you need to click on the “Titles” button that you can see at the top of the Filmora window. You can see several subtitle templates available there.
Step 6 Download, preview, and choose a subtitle template that seems most appropriate.
Step 7 You can then drag and drop the subtitle to the timeline above the video timeline. You can also trim the subtitle length from any side of the subtitle timeline box.
Step 8 You need to double-click on the subtitle timeline box to add custom text, change font size, color, and alignment, and add animations.
Step 9 Once done, you can click on the “Ok” button to save the changes.
Step 10 Similarly, you can add subtitles for different sections of the video.
Conclusion
If you want to add custom subtitles to Netflix movies and TV shows, you can achieve the same with the two different methods mentioned above. For the first method to work, you must be a Netflix Premium user. On the other hand, the second method will work fine even if you aren’t a Netflix Premium user. Also, you can add custom subtitles to any offline videos using the Wondershare Filmora video editor.
How to Create Discord Logo GIF
How to Make Discord Logo GIF
An easy yet powerful editor
Numerous effects to choose from
Detailed tutorials provided by the official channel
The craze to get a personalized Discord animated icon is increasing with time. As it can deliver your favorite vibe to you and your friends, it’s exciting. Moreover, there are so many options in logos to choose from.
But what if you want a Discord GIF icon for your account? Maybe you’ve seen your friends using it and it’s stunning, isn’t it? That’s why this article is containing all the latest and easiest tricks to make the desired GIF icons Discord. Get the three best ways to make your own Discord logo. And let your friends ask you for the secret.
In this article
01 [Why Discord GIF Become Popular Recently?](#Part 1)
02 [How to Make an Animated Discord Logo Icon (Free Template)](#Part 2)
03 [How to Get Animated Discord PFP](#Part 3)
04 [How to Make Your Discord PFP a GIF on Wondershare Filmora](#Part 4)
Part 1 Why Discord GIF Become Popular Recently?
Think of one online entertainment that Discord is not serving right now. It’s hard to get one in mind. From chatting with friends to watching a movie together, from listening to music to playing together, all the entertainment is under a roof. And who doesn’t want the best appearance on such an engaging platform?
On the other hand, animated icons Discord is immensely popular as they can replicate your expression and mood as you want. Normal profile pictures are back-dated now as these GIFs can make the profile more interesting. You can pick any character or Discord animated icon as per your wish. Moreover, many of these are for free. While using these GIFs on multiple online chatting platforms, users can express their exact thoughts behind a message or reaction. Similarly, by using Discord icons GIFs, people can make their profile more lively and personalized.
Not sure of using GIFs? Imagine your Discord profile with your favorite anime character or a suitable clip. On some social media platforms, we need to be formal out of the profession. But on Discord, you can chill, so your profile. So, why not give it a try?
If you’re here to know the quick guide to set your Discord logo GIF or if you’re facing any error while setting the logo, this article will help you in no time.
Part 2 How to Make an Animated Discord Logo Icon (Free Template)
If you have already decided what will be the type of GIF icon Discord you want, that’s great. Otherwise, decide whether you need something funny or relaxed or it depends on a brand. This decision would help you to pick the template. Similarly, you can make the best Discord GIF icon with the following steps.


● To make a GIF with your choice, use this tool and click on “Edit this template”. This will let you make a customized GIF from any video from your personal collection or download from the Internet.
![]()
● In the next step, you have to choose the template size from the right-hand side of the window. You can keep to the custom 512x512 size as well.
● Now, on the topmost bar in the window, you can find an option named “Upload”. Click on this option to upload the video from where you want to make your Discord icon GIF.
![]()
● You can upload the video from the gallery or drag-and-drop to the uploader window. You can also get videos from Google Drive.
● Now, as the video gets uploaded, you need to edit within the edit window. You can set the frame, time, and size from the tools highlighted in the image.
![]()
● Now, from the top-right side of the window, get the “Export Video” button. Click on the green arrow beside the button to get a drop-down list. From there click on the “Export as GIF” button to save your Discord icon GIF.
![]()
● You can check the download status from the next window.
![]()
● To save the recent GIF, click on “Download”. It will take some seconds to get saved to your system.
![]()
● Now, open Discord in your system and right-click on your “Server” icon from the left-hand side of the window. As a drop-down menu appears, select “Server Settings” followed by “Overview”.
![]()
● A new window will be opened with the existing profile picture of the server. To add the GIF icon Discord, click on “Upload Image”.
![]()
● From the location where you’ve saved the GIF, select it. Then, click on “Apply” to upload the GIF icon to the server profile.
![]()
● When uploading is completed, click on the green button named “Save Changes” to save the GIF icons Discord. Make sure that your GIF file size is less than 10.24 MB. Otherwise, you cannot save the GIF and have to resize it again.
![]()
Part 3 How to Get Animated Discord PFP
To set an exciting avatar in your Discord profile, you need to go through the following quick steps. Firstly, note that you need to have Discord Nitro to set a Discord logo GIF in your user profile. Without Nitro, GIF cannot be used as a PFP. Get all the answers for how to use Discord Nitro or how to get animated Discord PFP here.
● Open Discord and from the bottom-left side panel, click on the “Gear” icon that is the “User Settings”. It will present beside your user name on the “Home” window itself.
![]()
● As the new window gets opened, go to “Discord Nitro” under “Payment Settings”.
![]()
● If you don’t have activated Nitro, then click on “Subscribe” to get a suitable subscription to initiate animated icons Discord for your profile.
![]()
● Then, you’ll be redirected to the subscription options. Choose “Monthly” or “Yearly” subscription and to confirm it, click “Select”. If you choose the yearly plan, you’ll get an additional 16% off.
![]()
● As Discord Nitro is activated after payment and agreeing to the terms and conditions, you can see a pop-up window. Click on “Sweet” to get started.
![]()
● To set your profile avatar with GIF icon Discord, you need some GIFs downloaded to your system. So, make your GIF according to the last technique we mentioned. Or you can search for GIFs on the Internet like Giphy”, “Tenor”, or “Gfycat”. Save the GIFs as images to the system.
● Go the the “Gear” icon like the 1st step and open “User Settings”. Then, Go to the second option under user settings, “User Profile”. In this window, you can find a blue button named “Change Avatar”. Click on this button to set the Discord icon GIF.
![]()
● Now, you need to find the desired GIF from the “File Explorer” opened. Go to the folder where you saved the GIF file. Then, select it and click on “Open”.
![]()
● You can edit the frame of your Discord animated icons in the “edit image’ pop-up window. Then, click on “Apply” to set it finally. If you don’t want to edit the size, click on “Skip” to save the GIF as your profile picture on Discord.
![]()
● Check your profile picture now and match it with your expectations. Then click on “Save Changes” to save the icon. If you want some changes, click on “Change Avatar” and select any GIF from the saved discord icons GIF from the file explorer.
![]()
Part 4 How to Make Your Discord PFP a GIF on Wondershare Filmora
Wondershare Filmora Video Editor is the latest software where you can create a GIF easily to set as a discord GIF icon. Instead of using the same, existing GIFs, you can make your own now. It will help you to make a unique impression and be satisfied with your personalized account. Moreover, this software is just 4 KB in storage size. So, instan5 download and installation is not a problem at all.

Wondershare Filmora - Best Video Editor for Mac/Windows
5,481,435 people have downloaded it.
Build unique custom animations without breaking a sweat.
Focus on creating epic stories and leave the details to Filmora’s auto features.
Start a creative adventure with drag & drop effects and endless possibilities.
Filmora simplifies advanced features to save you time and effort.
Filmora cuts out repetition so you can move on to your next creative breakthrough.
Let’s go through the steps to understand the procedure to make GIF icons discord on Wondershare Filmora.
● Download and Install Wondershare Filmora in your system. It won’t take more than 10 minutes for the complete installation process. This software is available for both Windows and Mac OS.
![]()
● You can observe the installation status on your screen.
![]()
● As the installation is done, click on “Start Now” to open the software on the computer. A new black window will be opened on the screen.
![]()
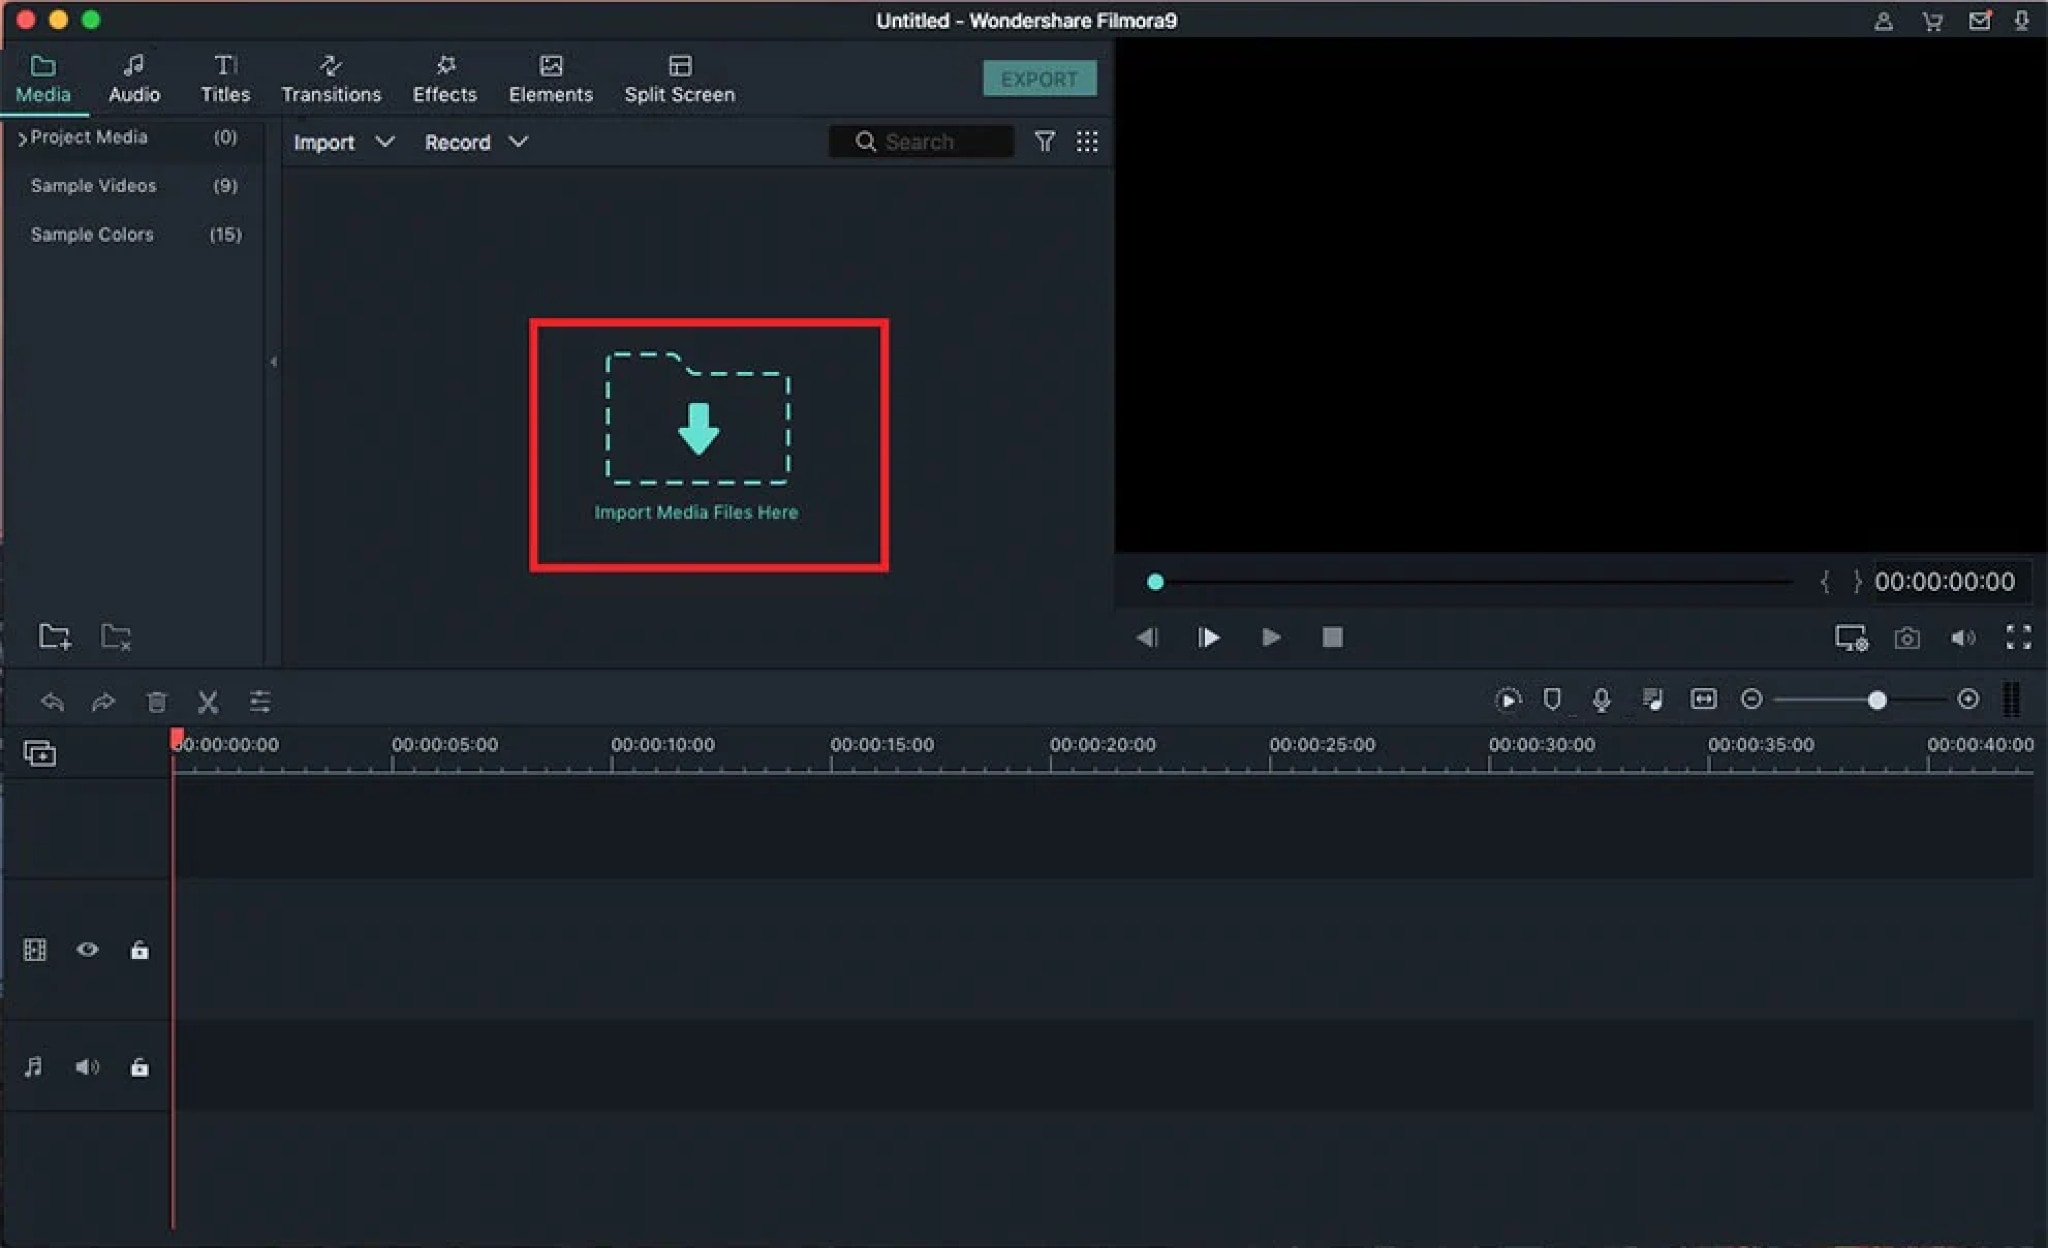
● Click on the “Import Media Files Here” section to select an editable video file or a collection of photos to make the GIF.
![]()
● As you select the desired video or images to make a discord animated icon from, you can find plenty of editing tools in the bottom section of the window. You can “crop”, “edit”, change the “duration” or apply “chroma-key” to the selected file. You can observe the respective changes on the right-hand side of the window.
![]()
● When you complete the editing process, move to the right-hand section to play the GIF with the triangular-shaped button. It will give you a preview of your edited GIF for discord.
![]()
● If you want to add text to your GIF to make it more interactive, it’s possible with Wondershare Filmora. Firstly, select the “T” button or “Title” option from the menubar in the window. There’ll be multiple title templates available. Choose any one of them and click on the green “Down arrow” on the template.
![]()
● The template will be loaded and then you can click on the small, green “+” button on the selected template to add it to your GIF. Now, click on the GIF frame to edit the text. Then click on “OK”.
![]()
● Now, save the discord icon GIF with a proper gif extension and then upload it as your profile picture.
![]()
● Ending Thoughts →
● This article includes three different ways to make discord icons GIF easily to make a customized avatar.
● There’s no need to stick to the old profile picture in your discord account.
● With these quick and easy steps, creating and setting a GIF as a profile icon would be very easy.
The craze to get a personalized Discord animated icon is increasing with time. As it can deliver your favorite vibe to you and your friends, it’s exciting. Moreover, there are so many options in logos to choose from.
But what if you want a Discord GIF icon for your account? Maybe you’ve seen your friends using it and it’s stunning, isn’t it? That’s why this article is containing all the latest and easiest tricks to make the desired GIF icons Discord. Get the three best ways to make your own Discord logo. And let your friends ask you for the secret.
In this article
01 [Why Discord GIF Become Popular Recently?](#Part 1)
02 [How to Make an Animated Discord Logo Icon (Free Template)](#Part 2)
03 [How to Get Animated Discord PFP](#Part 3)
04 [How to Make Your Discord PFP a GIF on Wondershare Filmora](#Part 4)
Part 1 Why Discord GIF Become Popular Recently?
Think of one online entertainment that Discord is not serving right now. It’s hard to get one in mind. From chatting with friends to watching a movie together, from listening to music to playing together, all the entertainment is under a roof. And who doesn’t want the best appearance on such an engaging platform?
On the other hand, animated icons Discord is immensely popular as they can replicate your expression and mood as you want. Normal profile pictures are back-dated now as these GIFs can make the profile more interesting. You can pick any character or Discord animated icon as per your wish. Moreover, many of these are for free. While using these GIFs on multiple online chatting platforms, users can express their exact thoughts behind a message or reaction. Similarly, by using Discord icons GIFs, people can make their profile more lively and personalized.
Not sure of using GIFs? Imagine your Discord profile with your favorite anime character or a suitable clip. On some social media platforms, we need to be formal out of the profession. But on Discord, you can chill, so your profile. So, why not give it a try?
If you’re here to know the quick guide to set your Discord logo GIF or if you’re facing any error while setting the logo, this article will help you in no time.
Part 2 How to Make an Animated Discord Logo Icon (Free Template)
If you have already decided what will be the type of GIF icon Discord you want, that’s great. Otherwise, decide whether you need something funny or relaxed or it depends on a brand. This decision would help you to pick the template. Similarly, you can make the best Discord GIF icon with the following steps.
● To make a GIF with your choice, use this tool and click on “Edit this template”. This will let you make a customized GIF from any video from your personal collection or download from the Internet.
![]()
● In the next step, you have to choose the template size from the right-hand side of the window. You can keep to the custom 512x512 size as well.
● Now, on the topmost bar in the window, you can find an option named “Upload”. Click on this option to upload the video from where you want to make your Discord icon GIF.
![]()
● You can upload the video from the gallery or drag-and-drop to the uploader window. You can also get videos from Google Drive.
● Now, as the video gets uploaded, you need to edit within the edit window. You can set the frame, time, and size from the tools highlighted in the image.
![]()
● Now, from the top-right side of the window, get the “Export Video” button. Click on the green arrow beside the button to get a drop-down list. From there click on the “Export as GIF” button to save your Discord icon GIF.
![]()
● You can check the download status from the next window.
![]()
● To save the recent GIF, click on “Download”. It will take some seconds to get saved to your system.
![]()
● Now, open Discord in your system and right-click on your “Server” icon from the left-hand side of the window. As a drop-down menu appears, select “Server Settings” followed by “Overview”.
![]()
● A new window will be opened with the existing profile picture of the server. To add the GIF icon Discord, click on “Upload Image”.
![]()
● From the location where you’ve saved the GIF, select it. Then, click on “Apply” to upload the GIF icon to the server profile.
![]()
● When uploading is completed, click on the green button named “Save Changes” to save the GIF icons Discord. Make sure that your GIF file size is less than 10.24 MB. Otherwise, you cannot save the GIF and have to resize it again.
![]()
Part 3 How to Get Animated Discord PFP
To set an exciting avatar in your Discord profile, you need to go through the following quick steps. Firstly, note that you need to have Discord Nitro to set a Discord logo GIF in your user profile. Without Nitro, GIF cannot be used as a PFP. Get all the answers for how to use Discord Nitro or how to get animated Discord PFP here.
● Open Discord and from the bottom-left side panel, click on the “Gear” icon that is the “User Settings”. It will present beside your user name on the “Home” window itself.
![]()
● As the new window gets opened, go to “Discord Nitro” under “Payment Settings”.
![]()
● If you don’t have activated Nitro, then click on “Subscribe” to get a suitable subscription to initiate animated icons Discord for your profile.
![]()
● Then, you’ll be redirected to the subscription options. Choose “Monthly” or “Yearly” subscription and to confirm it, click “Select”. If you choose the yearly plan, you’ll get an additional 16% off.
![]()
● As Discord Nitro is activated after payment and agreeing to the terms and conditions, you can see a pop-up window. Click on “Sweet” to get started.
![]()
● To set your profile avatar with GIF icon Discord, you need some GIFs downloaded to your system. So, make your GIF according to the last technique we mentioned. Or you can search for GIFs on the Internet like Giphy”, “Tenor”, or “Gfycat”. Save the GIFs as images to the system.
● Go the the “Gear” icon like the 1st step and open “User Settings”. Then, Go to the second option under user settings, “User Profile”. In this window, you can find a blue button named “Change Avatar”. Click on this button to set the Discord icon GIF.
![]()
● Now, you need to find the desired GIF from the “File Explorer” opened. Go to the folder where you saved the GIF file. Then, select it and click on “Open”.
![]()
● You can edit the frame of your Discord animated icons in the “edit image’ pop-up window. Then, click on “Apply” to set it finally. If you don’t want to edit the size, click on “Skip” to save the GIF as your profile picture on Discord.
![]()
● Check your profile picture now and match it with your expectations. Then click on “Save Changes” to save the icon. If you want some changes, click on “Change Avatar” and select any GIF from the saved discord icons GIF from the file explorer.
![]()
Part 4 How to Make Your Discord PFP a GIF on Wondershare Filmora
Wondershare Filmora Video Editor is the latest software where you can create a GIF easily to set as a discord GIF icon. Instead of using the same, existing GIFs, you can make your own now. It will help you to make a unique impression and be satisfied with your personalized account. Moreover, this software is just 4 KB in storage size. So, instan5 download and installation is not a problem at all.
Wondershare Filmora - Best Video Editor for Mac/Windows
5,481,435 people have downloaded it.
Build unique custom animations without breaking a sweat.
Focus on creating epic stories and leave the details to Filmora’s auto features.
Start a creative adventure with drag & drop effects and endless possibilities.
Filmora simplifies advanced features to save you time and effort.
Filmora cuts out repetition so you can move on to your next creative breakthrough.
Let’s go through the steps to understand the procedure to make GIF icons discord on Wondershare Filmora.
● Download and Install Wondershare Filmora in your system. It won’t take more than 10 minutes for the complete installation process. This software is available for both Windows and Mac OS.
![]()
● You can observe the installation status on your screen.
![]()
● As the installation is done, click on “Start Now” to open the software on the computer. A new black window will be opened on the screen.
![]()
● Click on the “Import Media Files Here” section to select an editable video file or a collection of photos to make the GIF.
![]()
● As you select the desired video or images to make a discord animated icon from, you can find plenty of editing tools in the bottom section of the window. You can “crop”, “edit”, change the “duration” or apply “chroma-key” to the selected file. You can observe the respective changes on the right-hand side of the window.
![]()
● When you complete the editing process, move to the right-hand section to play the GIF with the triangular-shaped button. It will give you a preview of your edited GIF for discord.
![]()
● If you want to add text to your GIF to make it more interactive, it’s possible with Wondershare Filmora. Firstly, select the “T” button or “Title” option from the menubar in the window. There’ll be multiple title templates available. Choose any one of them and click on the green “Down arrow” on the template.
![]()
● The template will be loaded and then you can click on the small, green “+” button on the selected template to add it to your GIF. Now, click on the GIF frame to edit the text. Then click on “OK”.
![]()
● Now, save the discord icon GIF with a proper gif extension and then upload it as your profile picture.
![]()
● Ending Thoughts →
● This article includes three different ways to make discord icons GIF easily to make a customized avatar.
● There’s no need to stick to the old profile picture in your discord account.
● With these quick and easy steps, creating and setting a GIF as a profile icon would be very easy.
How to Create an Alternate Reality Effect
Ditch boring one-dimensional videos and create a mesmerizing video with this alternative reality effect you can easily create using Wondershare Filmora.
This cool effect enables you to show a dream-like scene where two mirrored footages appear within the same frame using the Masking feature. But why stop there?
Keep reading to find out how you can use this style of effect to spice up your daily vlog bumper intro or even for your upcoming sci-fi content.

Preparing the footage
There are not many restrictions on preparing the footage for this effect. However, depending on the results you’re aiming for, you might need to consider a few things.
First, a wider view and some camera panning, or tilting will deliver a better result as it provides angle variations. This will later enhance the dynamic of the scene, making it feels even more uncanny.
Then, while you’re at it, you need to also figure out the purpose of the video itself. If you want to upload it to certain platforms where vertical videos are more popular, you will want to work on that as well. When you’re shooting your footage, make sure that you’re taking it at the correct angle that would fit the ratio you’re aiming for.
Last but not least, consider the length of the footage. If you’re planning to make a bumper video, you might want a quick yet comprehensive shot of the objects you want to highlight. You can always trim and adjust the timing later, but it is better to also plan it early.
Editing the video
If you have your footage or stock video ready, then you can start editing. Follow this simple step-by-step guide to create your own alternate reality using Filmora .
Free Download For Win 7 or later(64-bit)
Free Download For macOS 10.14 or later
Step 1: Drag and drop the video footage into the timeline - this will be the bottom part of the scene. Go to Effect > Utility > Image Mask. Drag and drop it onto the video footage.

Step 2: Adjust the mask by double-clicking the video footage. Go to Setting > Mask Setting and choose any shape you like. Set the feather number to 100.

Step 3: Scroll up the Setting > Transform. Adjust the position of the video footage on the x and y-axis to ensure that the mask shows the bottom of the landscape view. Click Ok.

Step 4: Drag and drop the same video footage onto the timeline next to the first video footage. Place an Image Mask as well on this footage. This will be the upper part of the scene.

Step 5: Double-click the second footage to open the Setting menu on the top left. Choose Transform > Vertical Flip.

Step 6: Scroll down the Setting menu to find the mask settings. Choose an opposing mask shape for this second footage then set the feather number to 100 as well.

Step 7: Adjust the video footage position by dragging the second footage to the second video track and aligning it with the first video footage.

Step 8: Double-click to open the Setting > Transform, then, adjust the x and y-axis numbers to ensure that the mask reveals only the top half of the landscape. Click Ok.

You can recheck the preview at this stage and just save it as it is if you’re already satisfied with the result. However, if you want a more dynamic alternate reality scene, continue reading to see advanced tips you can follow to make your video looks even more otherworldly.
Enhancing the effect with rotation keyframes
If you’re using stock videos or encountering limitations when making your footage, chances are your alternate reality is not looking as dynamic as you want it to be. Go all out by adding the rotation keyframes to the video footage so that the alternate reality looks more unreal.
Step 1: Double-click the video footage on the first video track to open the Animation Settings > Customize.

Step 2: Move the playhead to the beginning of the first video footage and add a keyframe by clicking on the Add button. Set the rotation of this keyframe at 0 and the scale at 100.

Step 3: Now move the playhead to the end of the video footage and add another keyframe. This time, set the rotation to 20 and adjust the scale number to 115.

Step 4: Do Steps 1 to 3 to the second video footage. Don’t forget to preview the result to see if both footages are rotated properly.

Your alternate reality is now more dynamic with more movement. You can also add more filters or effects to further enhance the sci-fi ambiance. Once you’re satisfied, you can export the file to a format that is compatible with your destination platform.
Conclusion
Wondershare Filmora aims to empower your inner video creator with its robust yet easy-to-use editing suite. You can easily mimic the scenes from the latest blockbuster superhero movies with some simple clicks.
Not only it offers a strapping video editing menu with simple visual effects plug-ins and beginner-friendly smart templates, but you can also access its rich royalty-free stock media library. You can operate the program on both Windows and Mac. Install the program and let it do wonders to your content.
Free Download For macOS 10.14 or later
Step 1: Drag and drop the video footage into the timeline - this will be the bottom part of the scene. Go to Effect > Utility > Image Mask. Drag and drop it onto the video footage.
Step 2: Adjust the mask by double-clicking the video footage. Go to Setting > Mask Setting and choose any shape you like. Set the feather number to 100.
Step 3: Scroll up the Setting > Transform. Adjust the position of the video footage on the x and y-axis to ensure that the mask shows the bottom of the landscape view. Click Ok.
Step 4: Drag and drop the same video footage onto the timeline next to the first video footage. Place an Image Mask as well on this footage. This will be the upper part of the scene.
Step 5: Double-click the second footage to open the Setting menu on the top left. Choose Transform > Vertical Flip.
Step 6: Scroll down the Setting menu to find the mask settings. Choose an opposing mask shape for this second footage then set the feather number to 100 as well.
Step 7: Adjust the video footage position by dragging the second footage to the second video track and aligning it with the first video footage.
Step 8: Double-click to open the Setting > Transform, then, adjust the x and y-axis numbers to ensure that the mask reveals only the top half of the landscape. Click Ok.
You can recheck the preview at this stage and just save it as it is if you’re already satisfied with the result. However, if you want a more dynamic alternate reality scene, continue reading to see advanced tips you can follow to make your video looks even more otherworldly.
Enhancing the effect with rotation keyframes
If you’re using stock videos or encountering limitations when making your footage, chances are your alternate reality is not looking as dynamic as you want it to be. Go all out by adding the rotation keyframes to the video footage so that the alternate reality looks more unreal.
Step 1: Double-click the video footage on the first video track to open the Animation Settings > Customize.
Step 2: Move the playhead to the beginning of the first video footage and add a keyframe by clicking on the Add button. Set the rotation of this keyframe at 0 and the scale at 100.
Step 3: Now move the playhead to the end of the video footage and add another keyframe. This time, set the rotation to 20 and adjust the scale number to 115.
Step 4: Do Steps 1 to 3 to the second video footage. Don’t forget to preview the result to see if both footages are rotated properly.
Your alternate reality is now more dynamic with more movement. You can also add more filters or effects to further enhance the sci-fi ambiance. Once you’re satisfied, you can export the file to a format that is compatible with your destination platform.
Conclusion
Wondershare Filmora aims to empower your inner video creator with its robust yet easy-to-use editing suite. You can easily mimic the scenes from the latest blockbuster superhero movies with some simple clicks.
Not only it offers a strapping video editing menu with simple visual effects plug-ins and beginner-friendly smart templates, but you can also access its rich royalty-free stock media library. You can operate the program on both Windows and Mac. Install the program and let it do wonders to your content.
7 Solutions to Cut Video on Mac without Using FFmpeg?
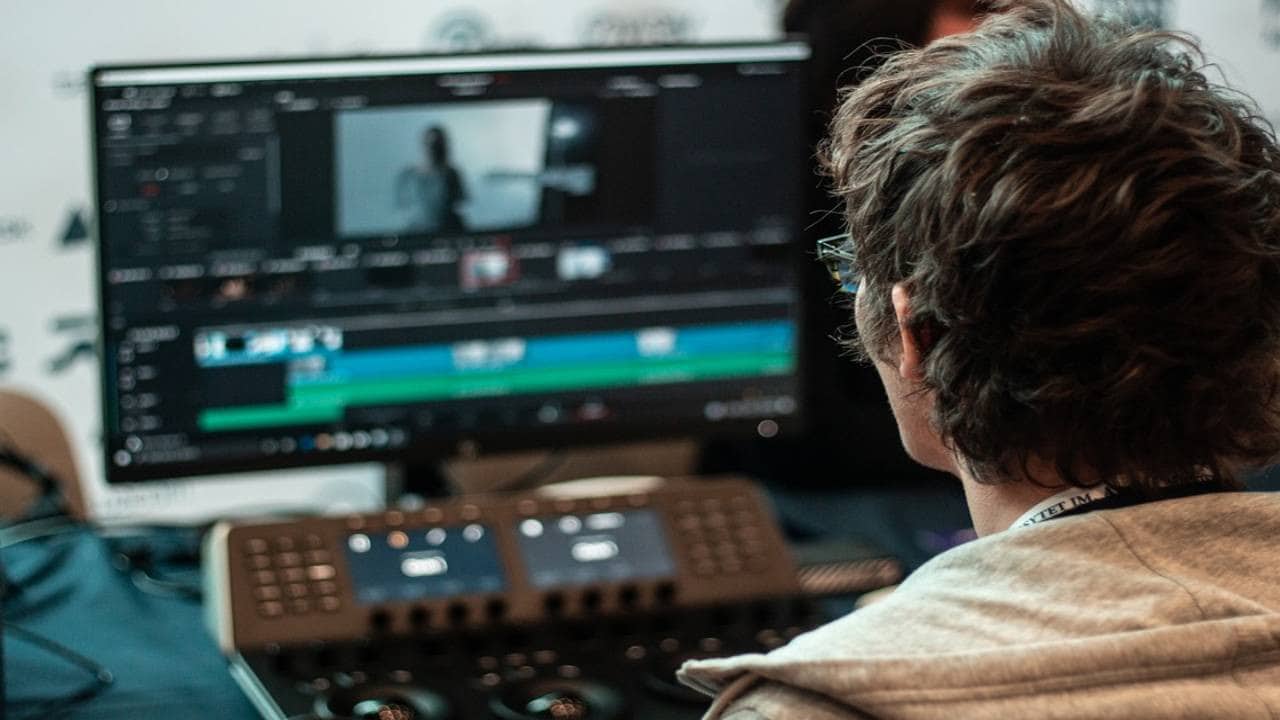
Tiktok, Instagram reels, and Ads are well-known short video platforms that are popular due to their ease of use. Making film collections for entertainment purposes is a popular trend. As the previous user mentioned, sometimes all you want is a section of your movie, which can be the highlight or any other part you want to keep. Long videos are no longer a problem with such a video cutter for Mac. If that’s what you’re looking for, you might want to look into some of the software that’s available here.
HOW TO CUT VIDEO ON MAC WITHOUT USING FFMPEG?
What are FFmpeg and its cons for cut videos?
Without transcoding the media, FFmpeg can cut, trim, and extract videos. This is an excellent method for preserving original quality and avoiding generation loss.
Because of how keyframes work, it is impossible to cut at an exact point in time using FFmpeg without transcoding the video. As a result, you’re left with a cut at the nearest keyframe.
BEST FREE FFMPEG ALTERNATIVE TO CUT VIDEO ON MAC

FILMORA VIDEO EDITOR
Supported OS: Windows and Mac
Filmora Video Editor is another well-known video editor that is widely used for video editing. It was released two decades ago to provide low-cost video editing software. Aside from video cutting and joining, it has some great features such as adding filters, titles, texts, and so on. You can also record your voice or live music, mix audio and video tracks, and do other things. It is simple to use and is available for both Mac and Windows users.
Filmora includes an instant cutter tool that can be used throughout clip import and is designed for use with large amounts of high-resolution content. As the names indicate, it is very simple and serves only one purpose. You can drag multiple clips onto its window, but only if the Merge sub-mode is enabled. Trim mode is only for trimming the ends of a single clip, and its interface only displays one clip in the left-size source tray. You can Add Segments, which creates a new clip based on your trimmed original, but you can’t split a clip explicitly.
For Win 7 or later (64-bit)
For macOS 10.14 or later
Features:
- All editing tools and features are well-displayed in the main windows, which can be found and used easily;
- Very easy to cut or trim video files just with a few clicks;
- Lots of filters, overlays, motion graphics, titles, and more special effects can be added to the video.
- More features like Picture in Picture and Green Screen and Split Screen can be used to make videos more unique.
Pros:
- Intuitive Interface
- Easy To Use
- Great Features
- Affordable Perpetual License
- Great Final Video Results
- Faster Renders And Previews
- Supports Screen Capturing
- Support Wide Range Of File Formats
- User Support Is Good
Cons:
- Lacks Advanced Feature
- Free Version Has Watermark
- Not Available For Linux And Phones
- Pricing Is Expensive
- Software Lagging
Steps On How To Cut Video On Mac Using Filmora Video Editor
Step 1: Import Video Files
You will begin by importing the video files into the project window of your program through dragging and dropping.
Step 2: Add Video To The Timeline
Drag and dropping are the easiest way to add the video to the timeline.
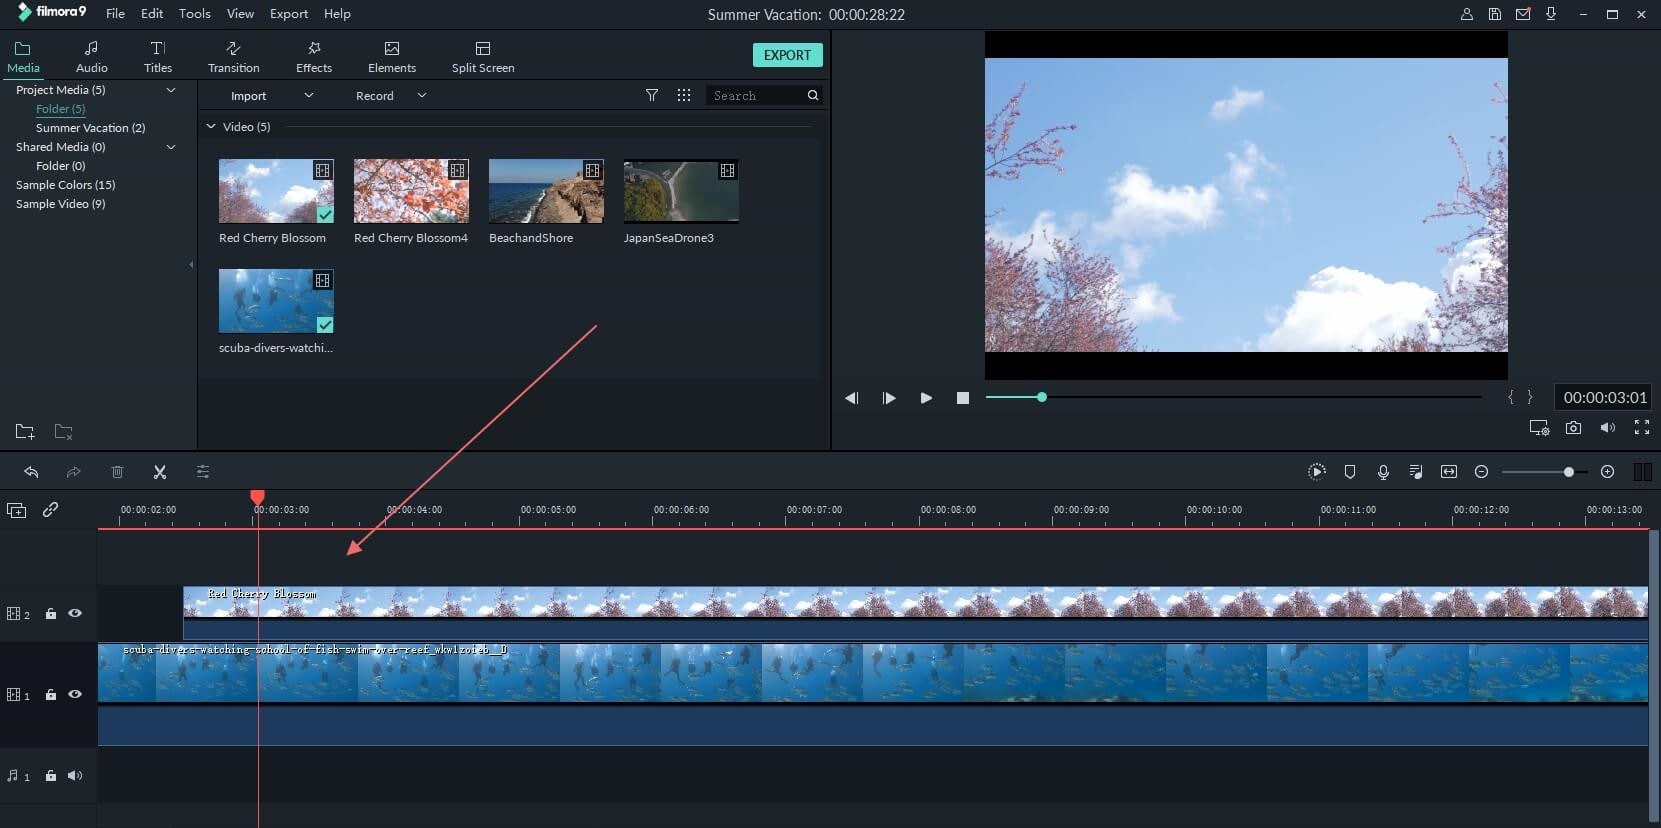
Step 3: Cut Video
If you want to trim the video, just move the cursor at the beginning or end of the video. When the cursor becomes a cross, move it forward or backward. Trimming only allows you to cut the beginning or end of a video.
If you need to cut a section of a video, you should follow do this: move the cursor at the beginning of the video section you want to cut, then click the scissors icon > Next, move the cursor to the end of the video section you want to cut and click scissors icon > Right-click on the video section you want to cut and click “Delete“.
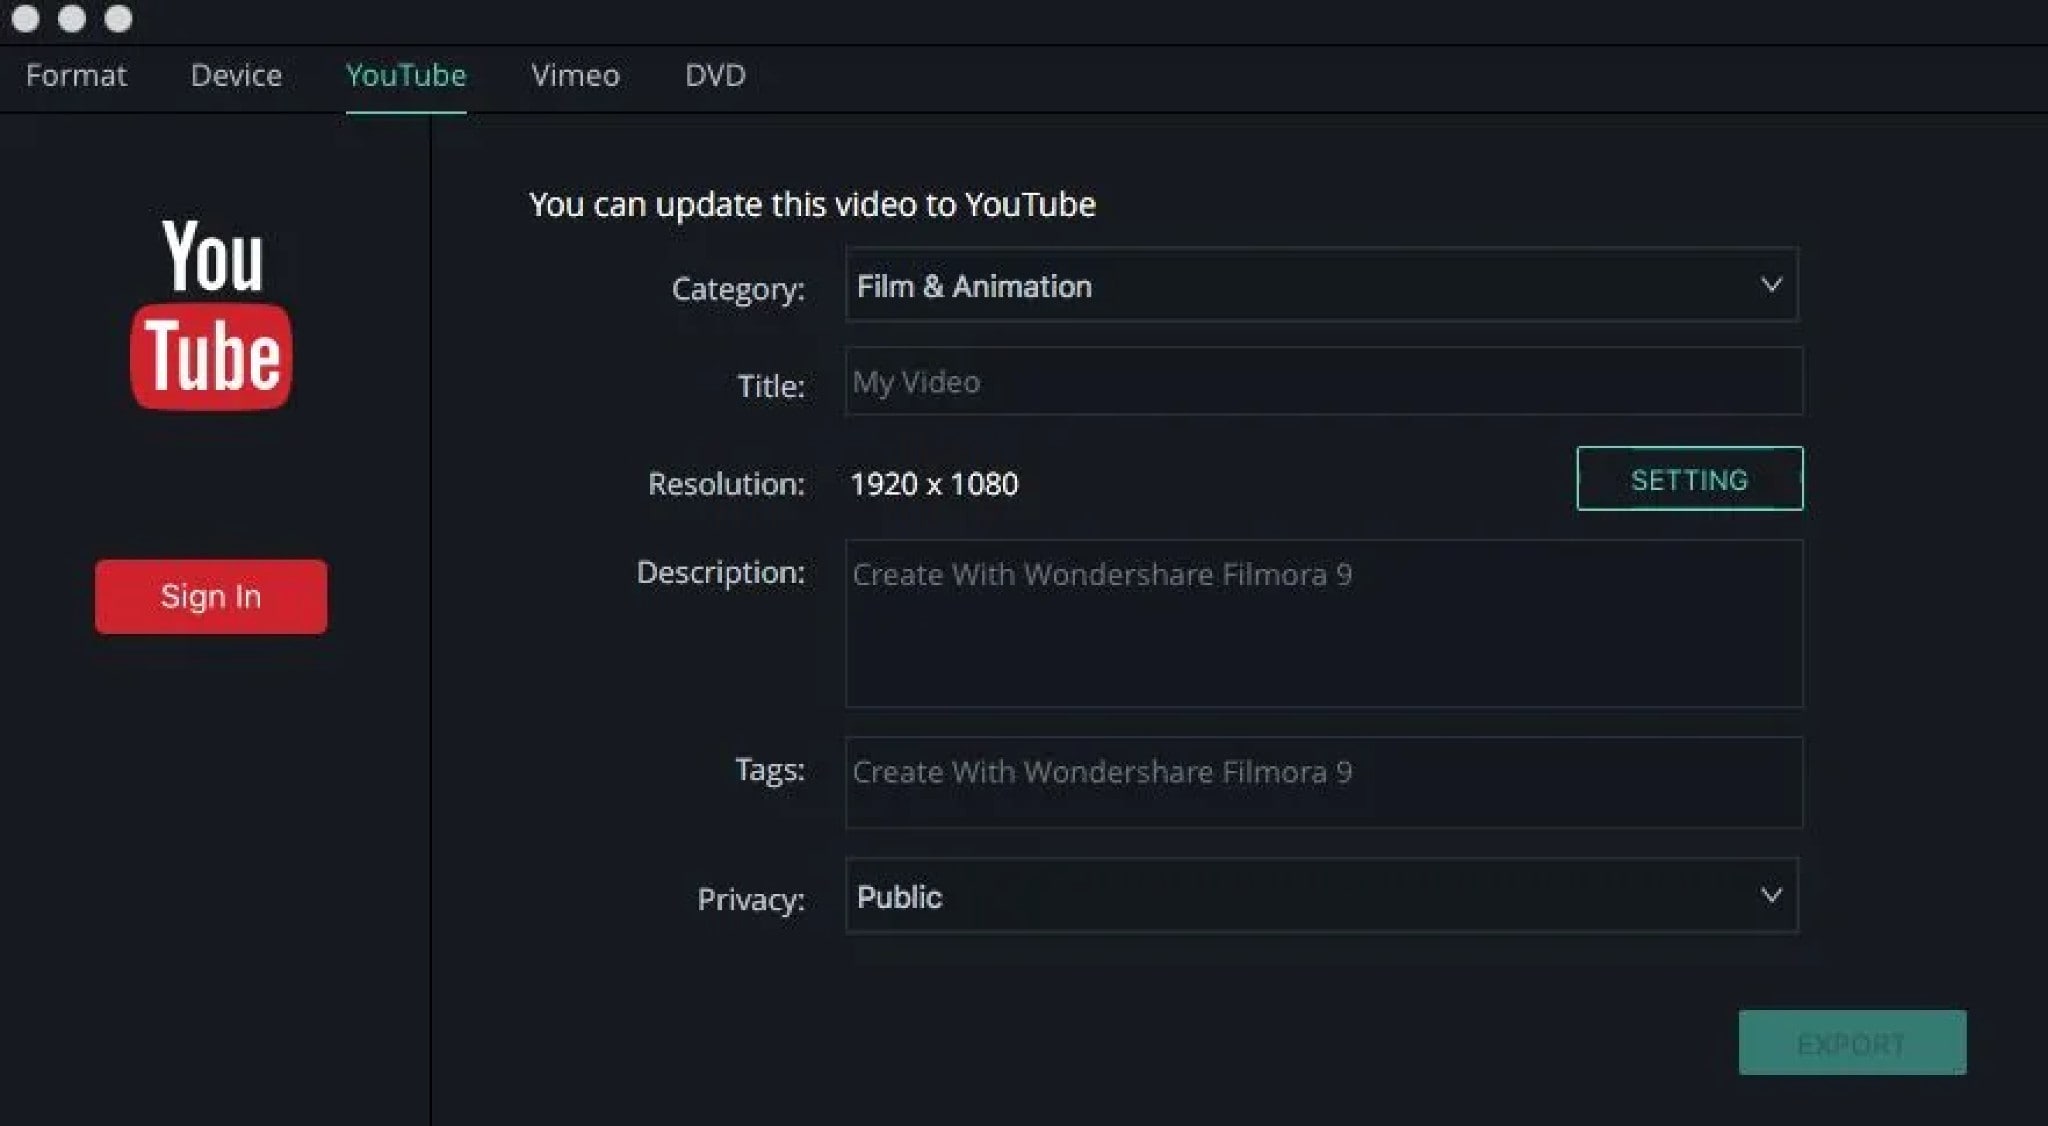
Step 4: Export the Video
To export your video, click the “export” button and choose the local tab. After selecting the output device and format, just click “Create” to save it.
HANDBRAKE
Supported OS: Linux, Windows, and Mac
HandBrake is a multithreaded video transcoder that is unfastened and open source. It can compress and convert nearly any virtual media layout to another. HandBrake is able to rip encrypted DVDs the usage of libdvdcss (libdvdcss is covered with the VLC media participant on macOS and AnyDVD/DVD forty three on Windows).
This software program additionally enables batch processing, which converts a couple of video files at the same time. Additionally, a plethora of presets are available to guide you to the preferred output without having to tinker with a plethora of options.
Handbrake is a powerful and excellent video converter for Windows, Mac, and Linux that should not be overlooked. It provides all of the necessary features in a simple tool that gives the user complete control over the output. Before we get into the specifics, here’s a rundown of Handbrake’s advantages and disadvantages.
Features:
- Support of chapter selections
- Support of subtitles
- Integrated bitrate calculator
- Picture deinterlacing, cropping, and scaling
- Live Video Preview
Pros:
- HandBrake has a very simple layout which makes the video converter very easy to use, even for those who are converting videos for the first time.
- The live preview helps.
- The fact that the software is free and has device presets for iOS and Android certainly makes HandBrake a welcome video converter.
- The queuing tray for batch conversions is particularly nice.
- People who convert a lot of videos will find it very helpful.
Cons:
- On the flip side, the settings are not always easy to deal with.
- It takes a lot of time and then there are errors. The latest version fixes some old bugs but there are hiccups.
- The live preview is for up to four minutes of a video.
- It is futile for very long videos.
- The settings interface and that of the live preview could be better.
- The open-source software also doesn’t support all video formats.
- Given the diversity of devices and the multitude of formats in use today, HandBrake needs more compatibility.
Steps On How To Compress Video Using Handbrake
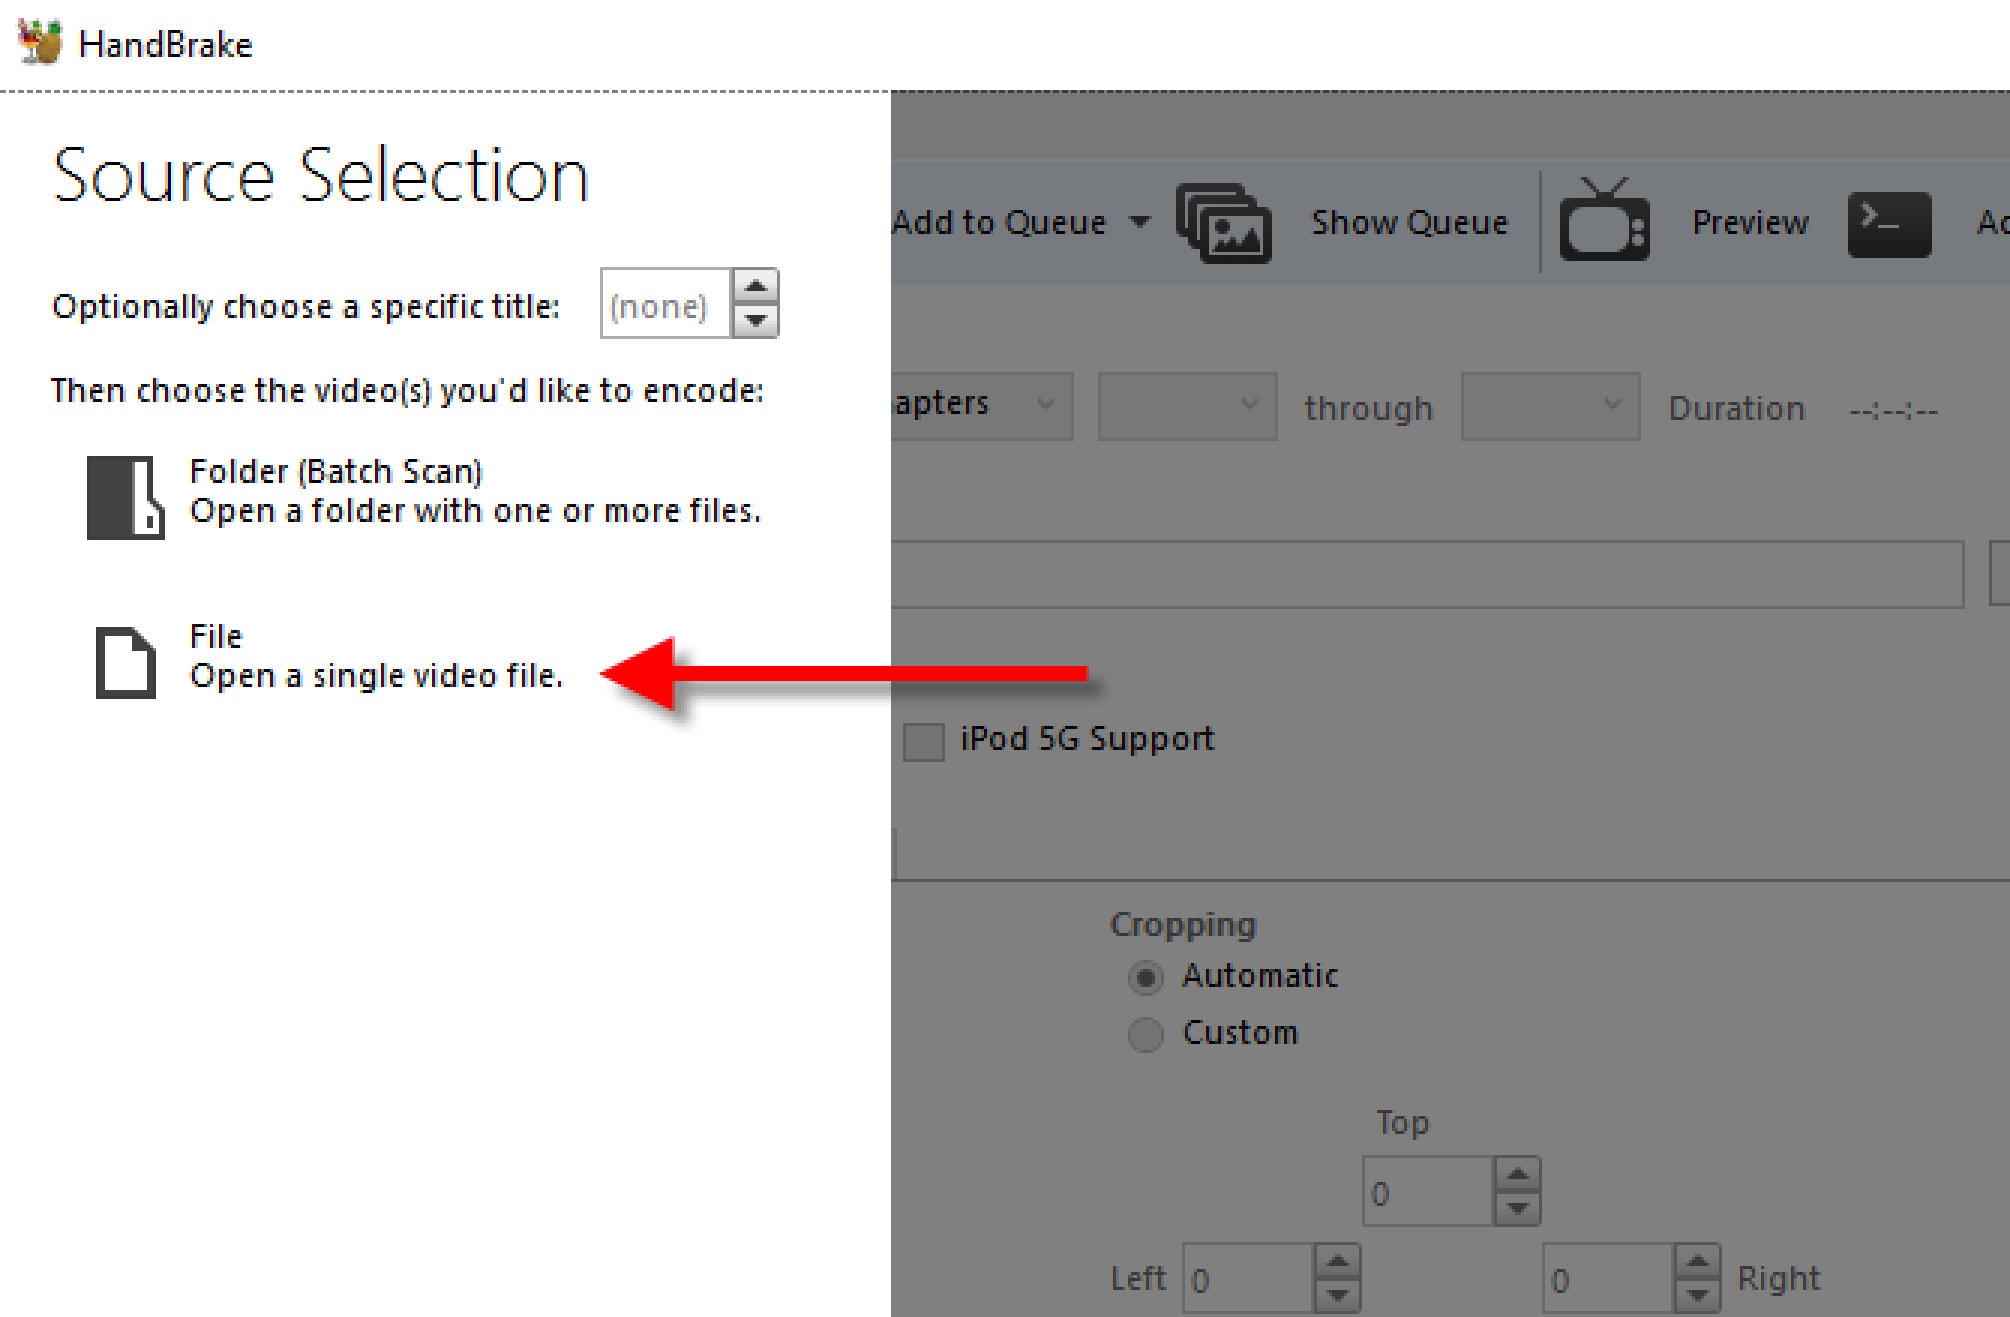
- After you download and install Handbrake, open the app. On the left side, under ‘Source Selection’, click ‘File’. Select the file from the folder and then click ‘open’.
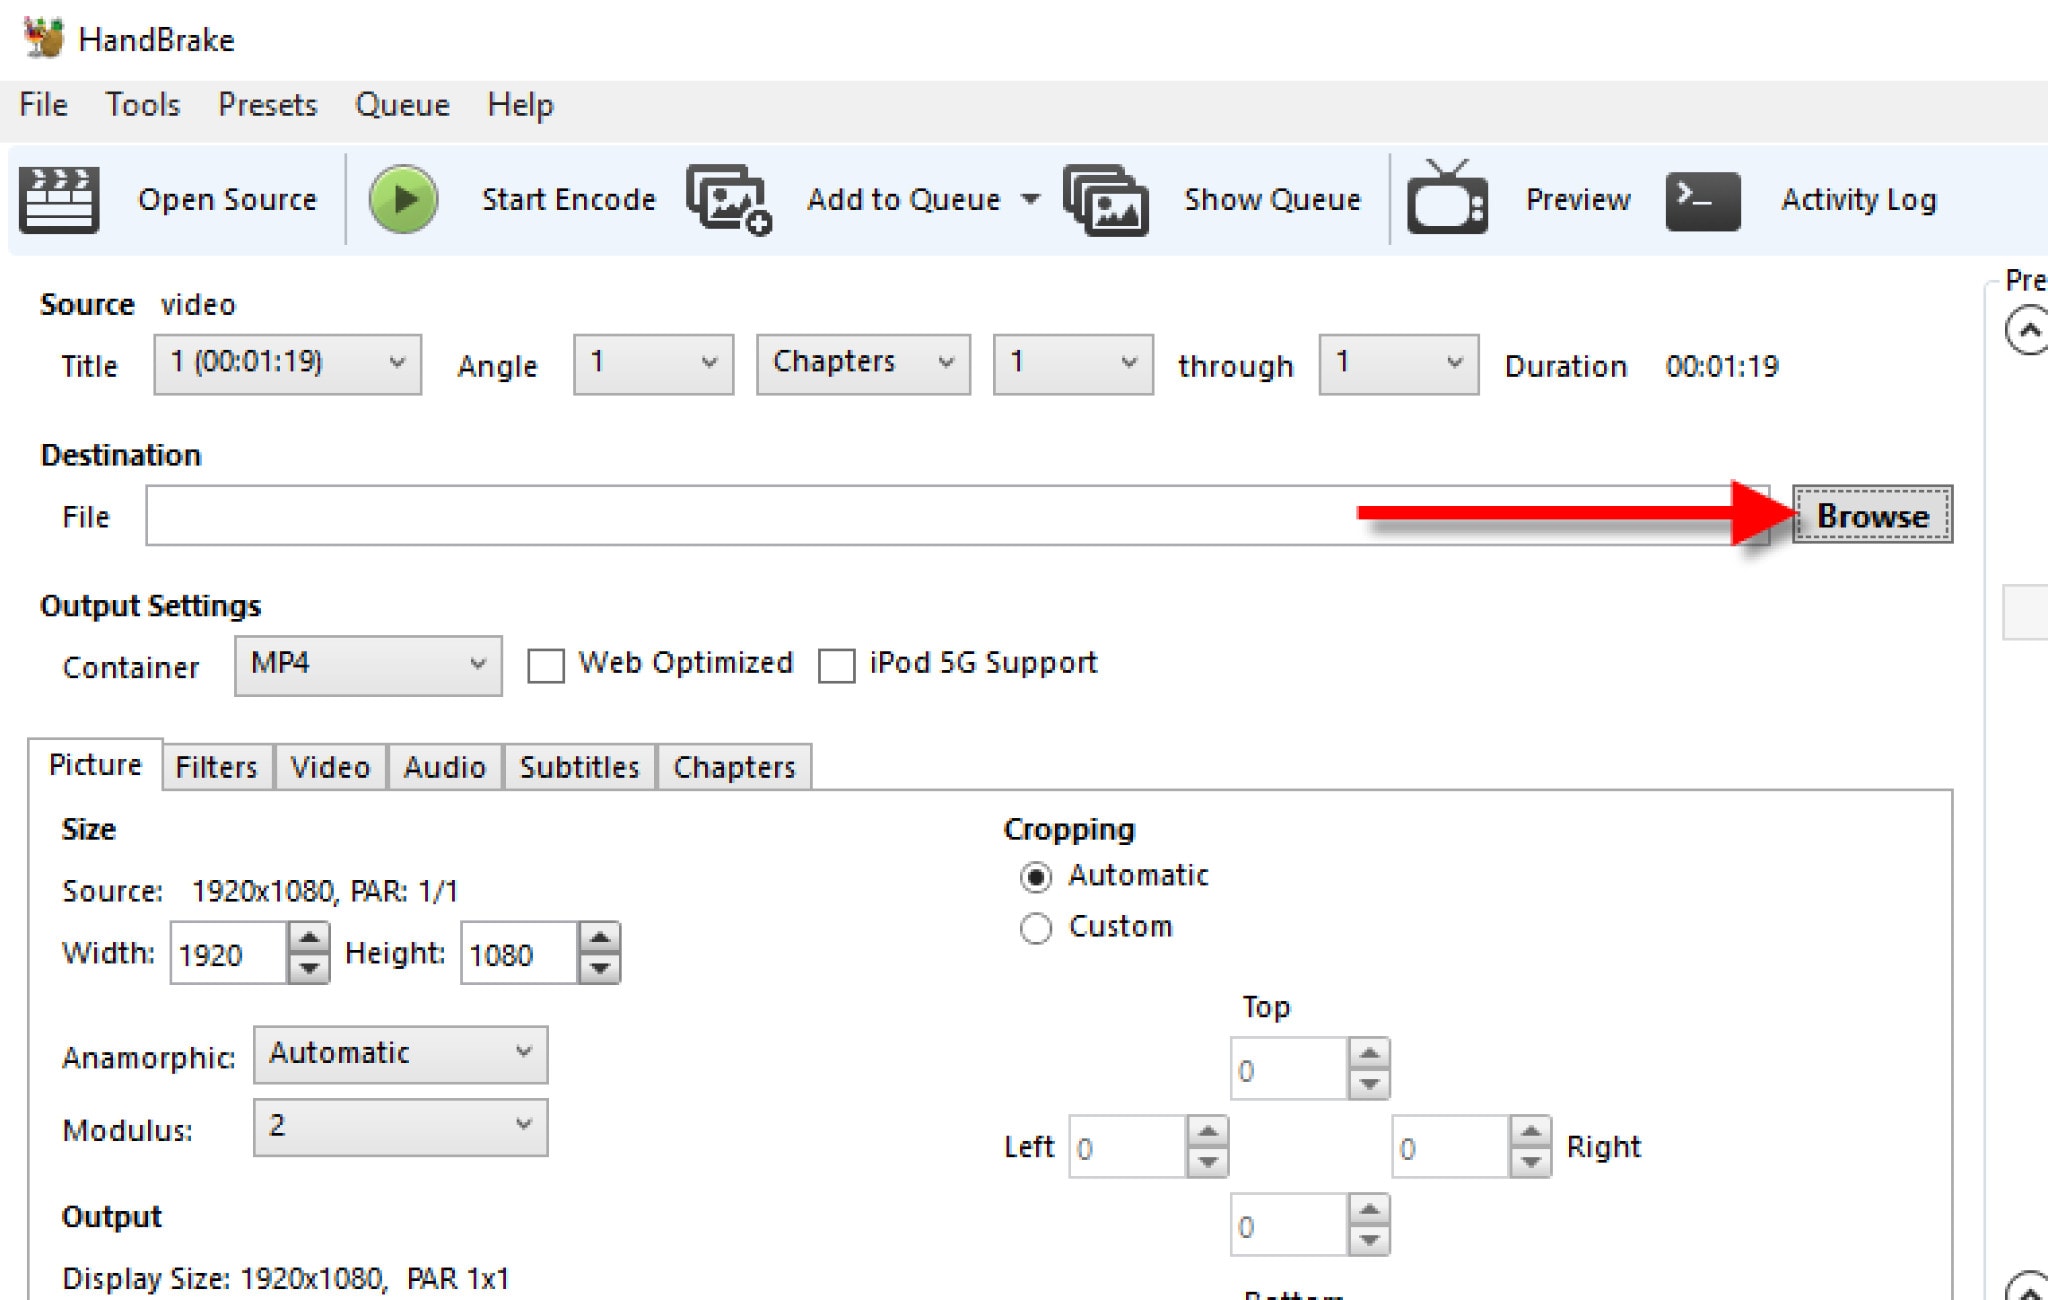
- Choose where you want the compressed video to be saved by clicking ‘Browse’.
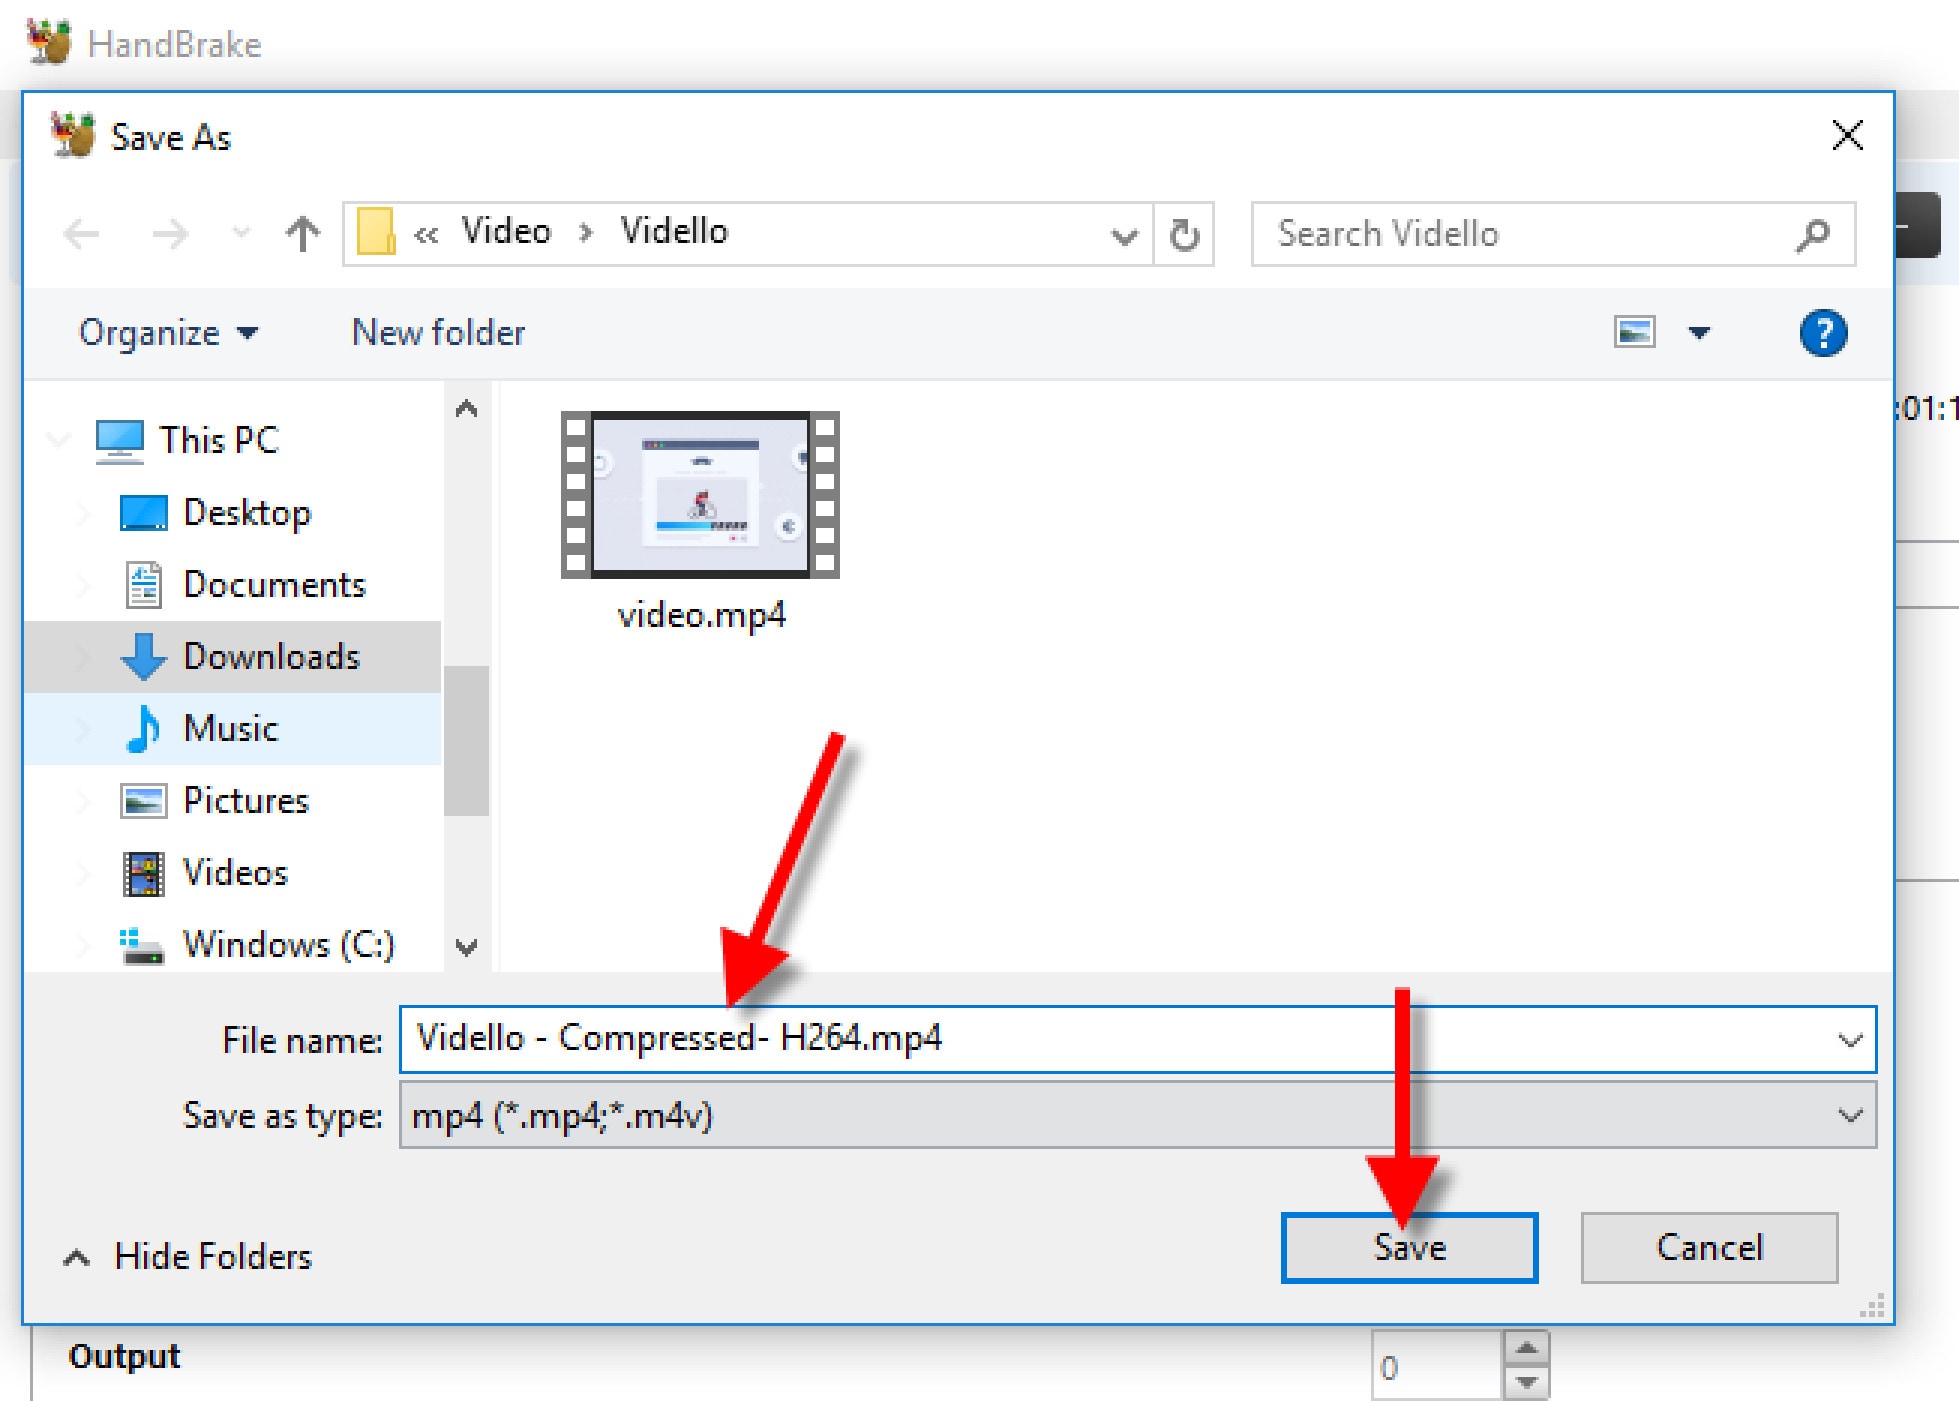
- Enter a name for the video, and click ‘Save’.
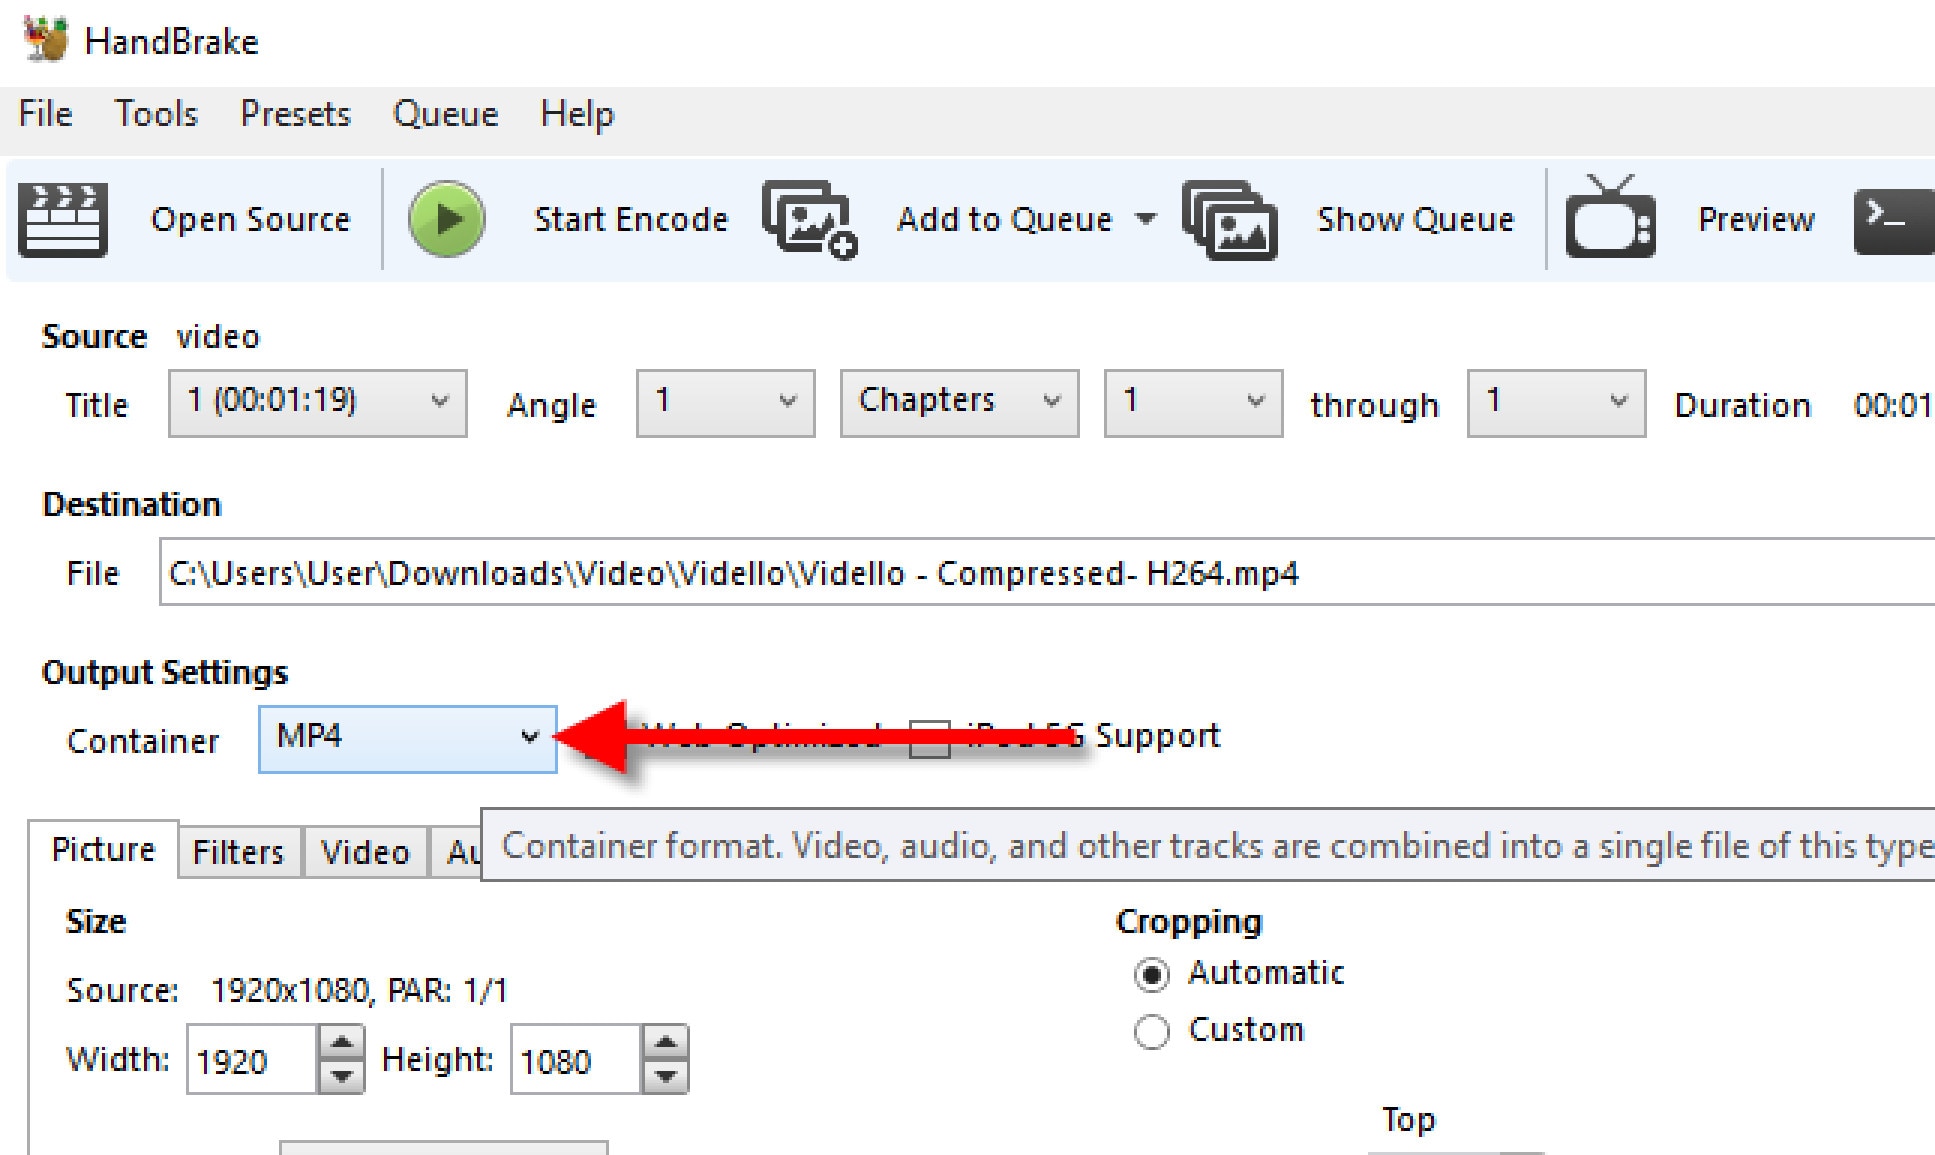
- Under ‘Output Settings’, choose MP4 for ‘Container’.
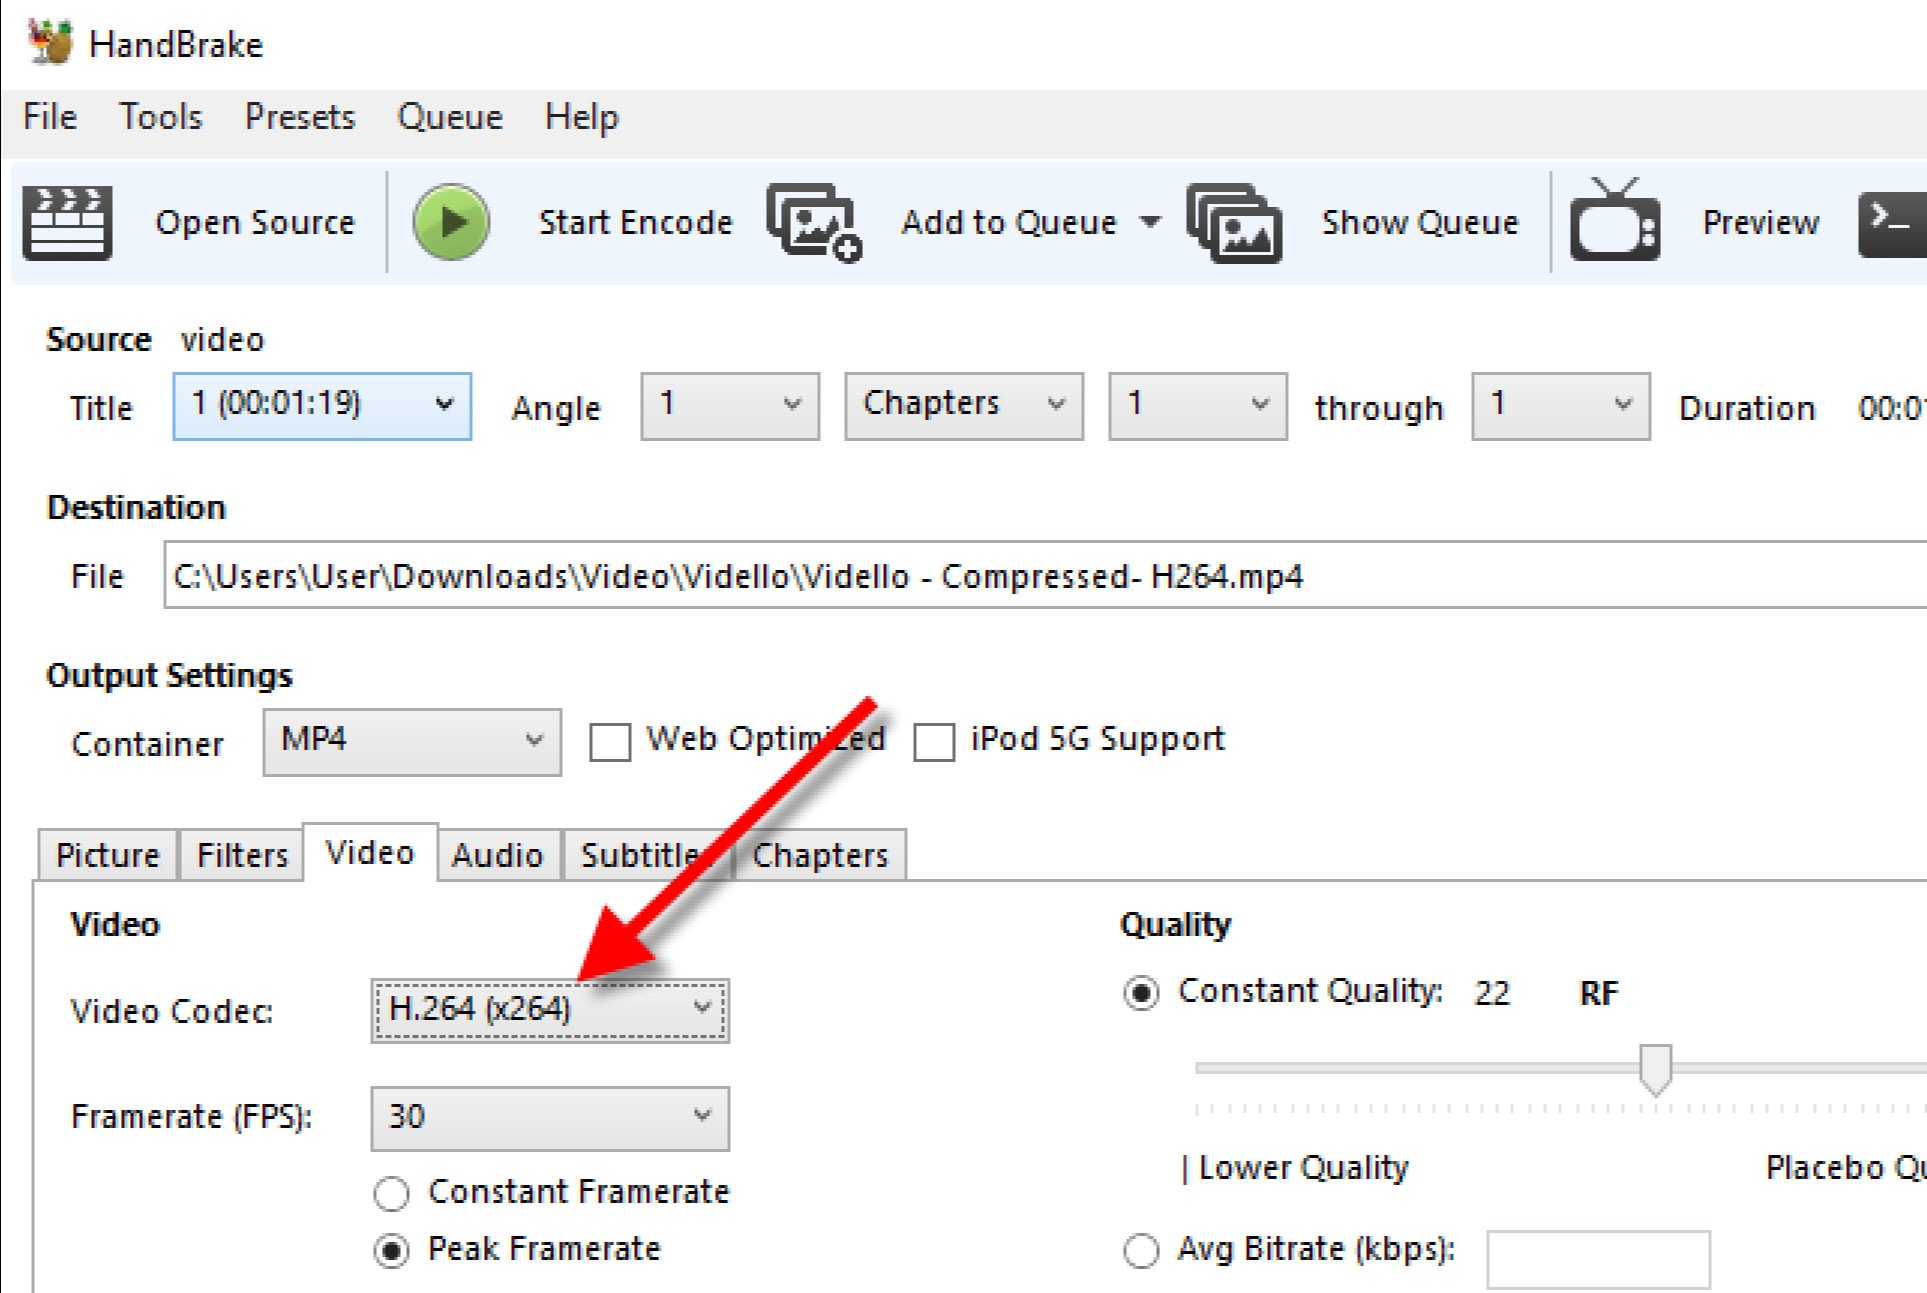
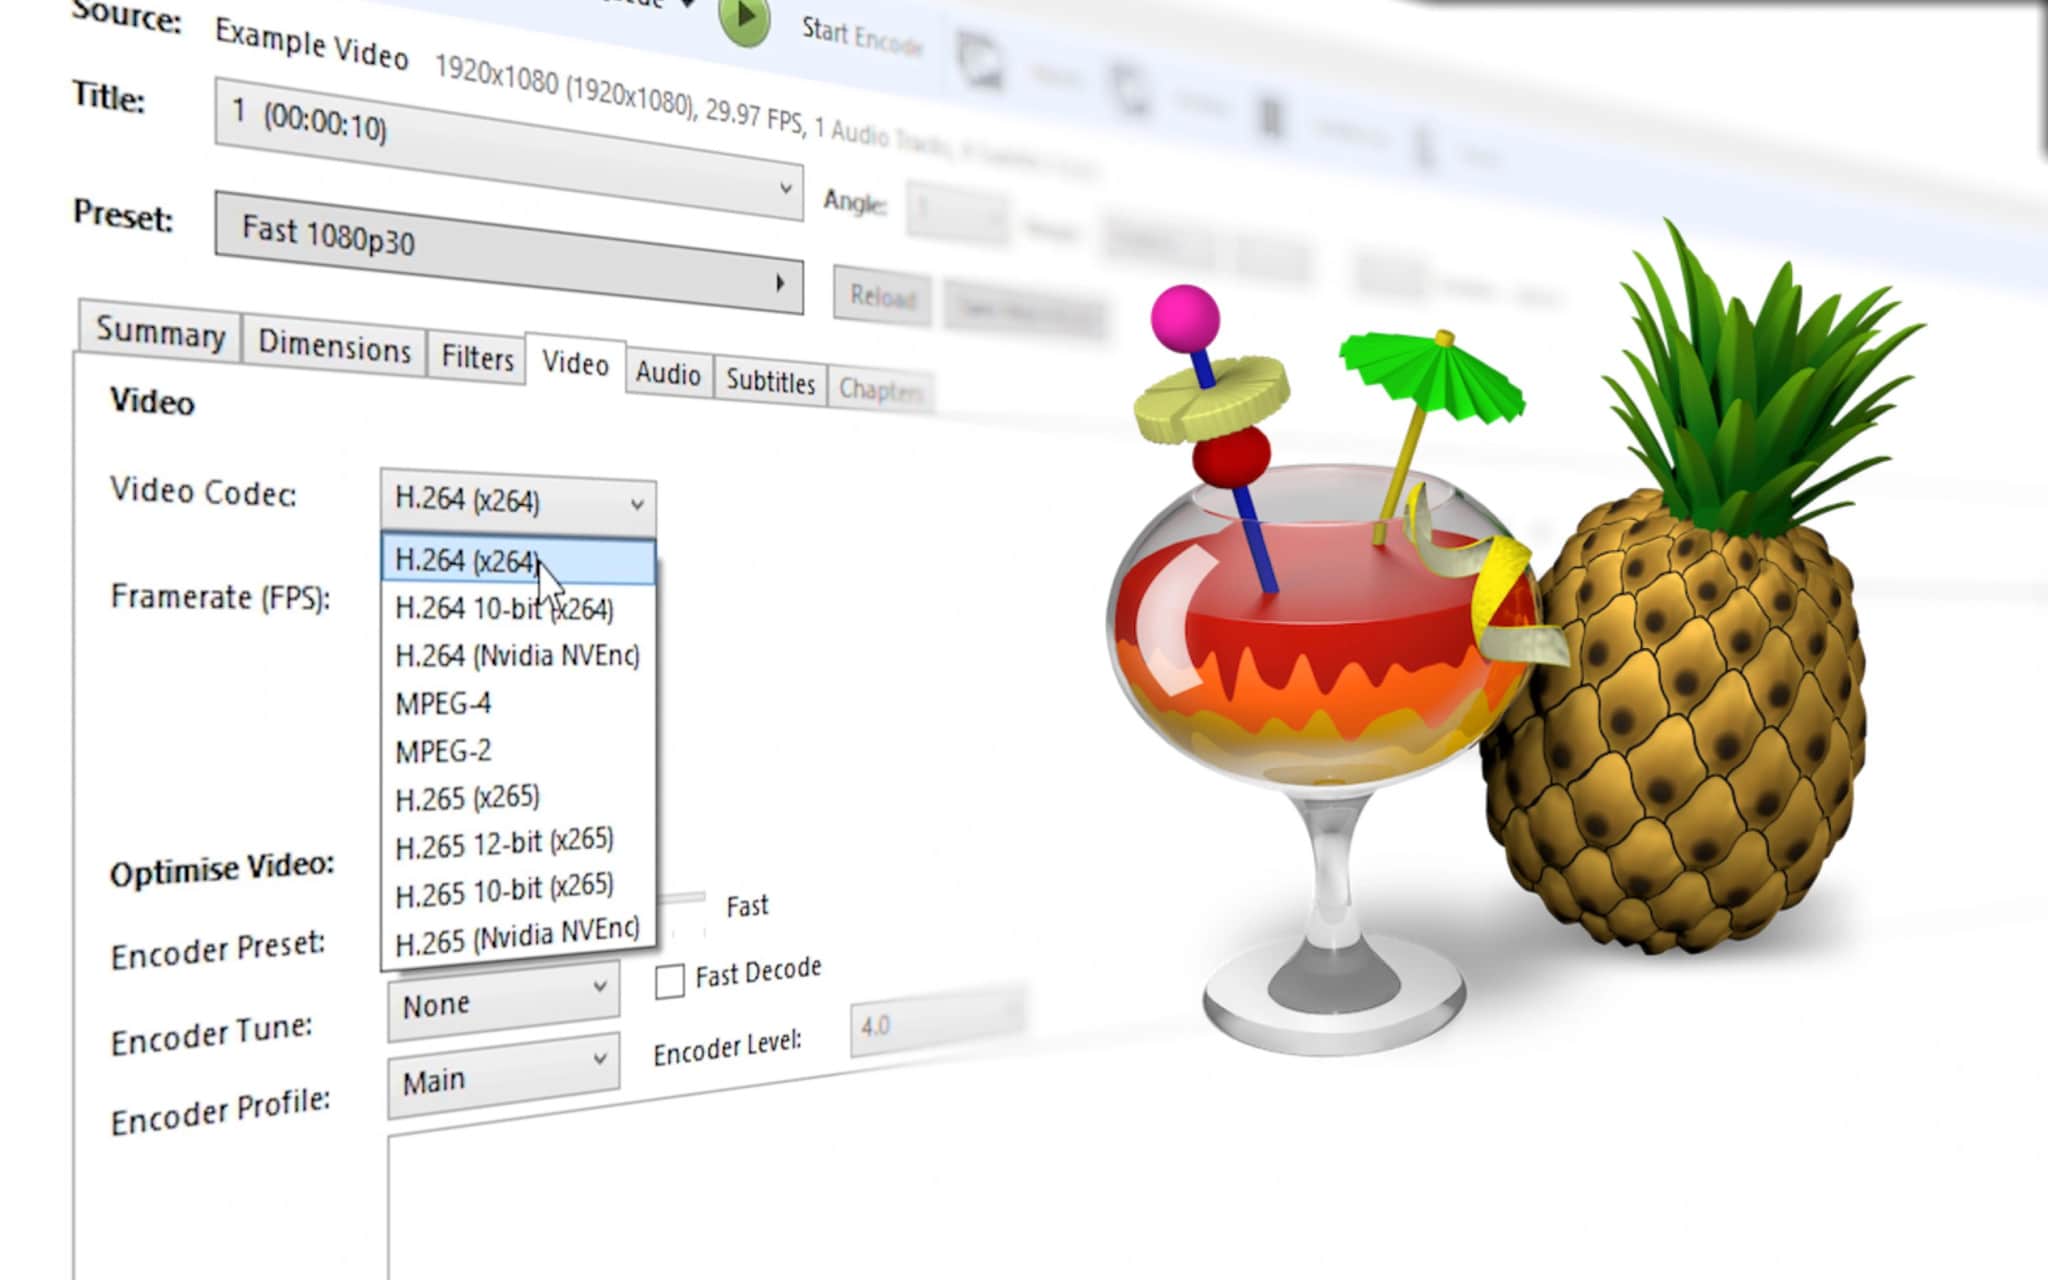
- Click the ‘Video’ tab, under it, is the ‘Video Codec’, choose (x264).
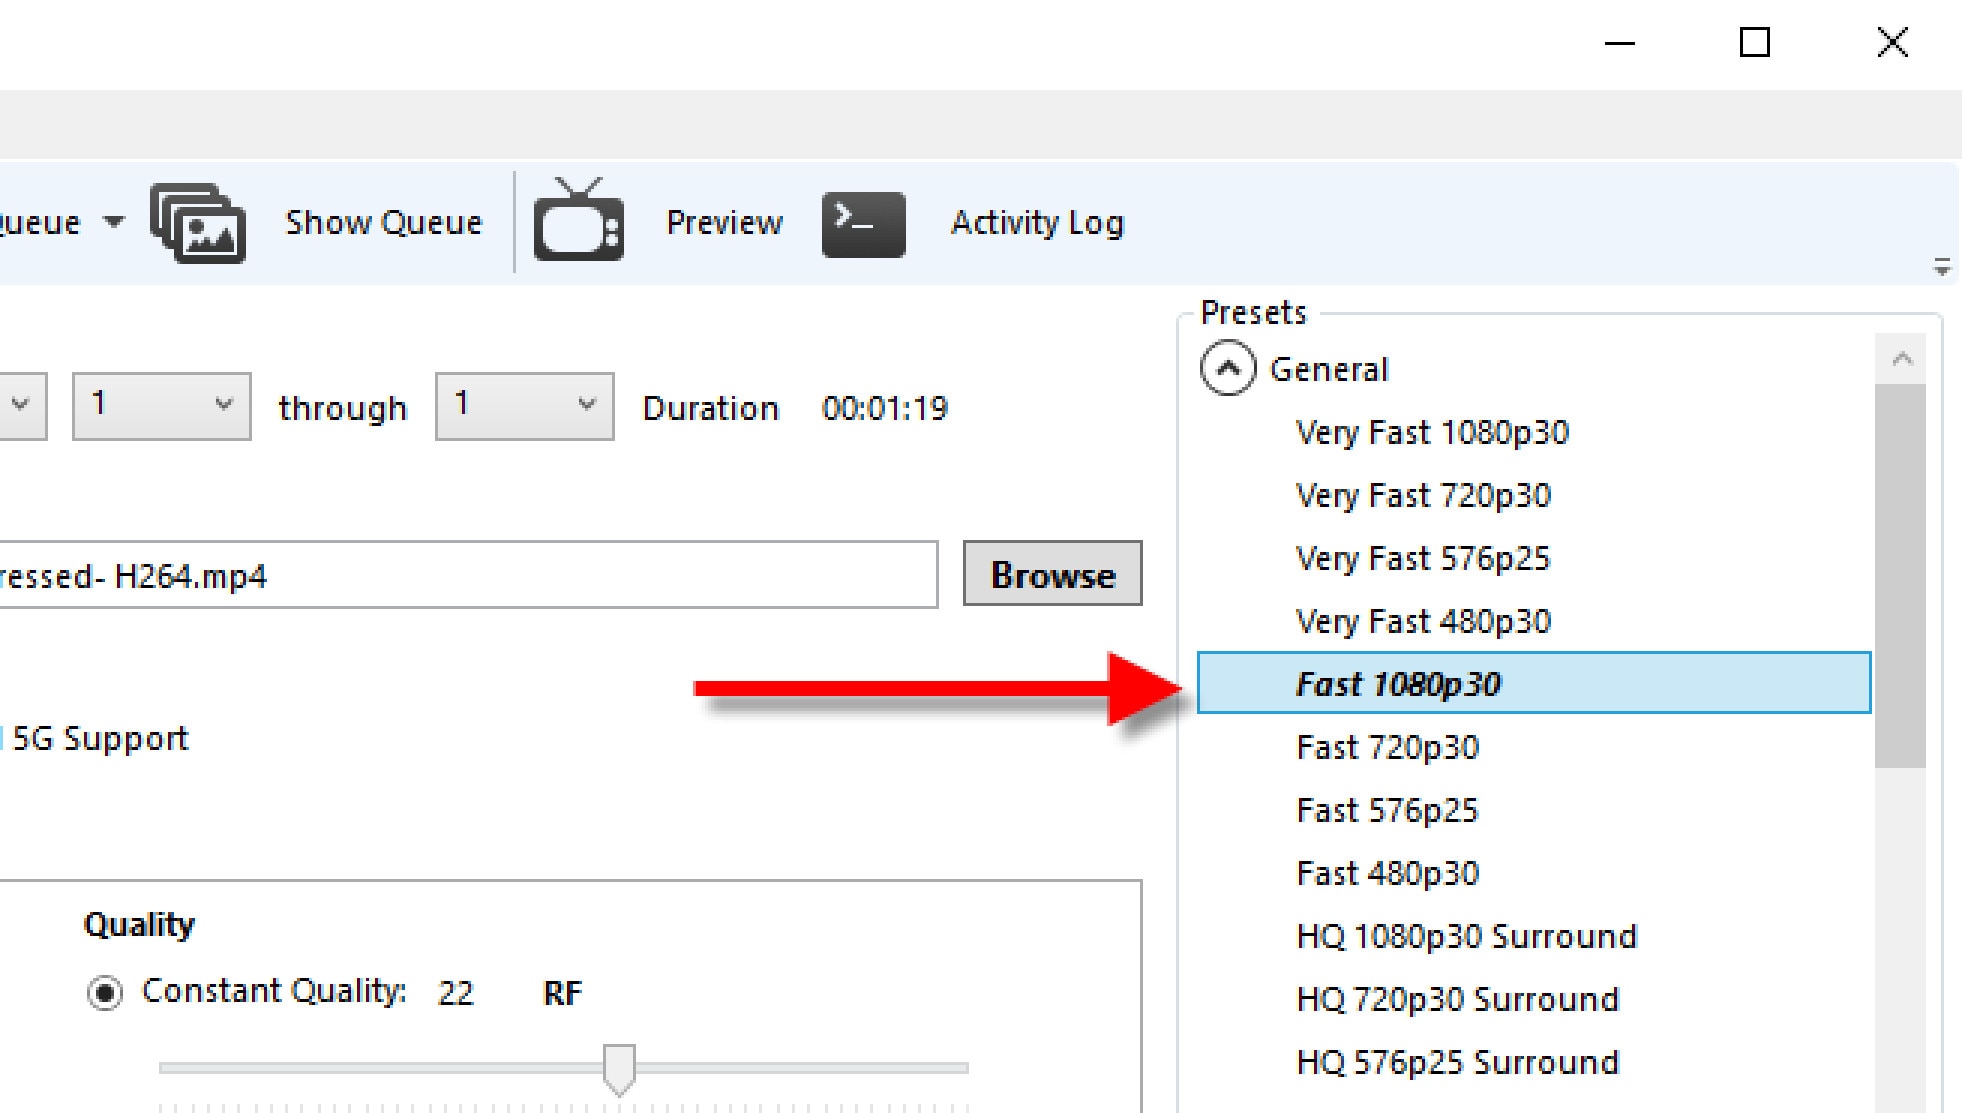
- Select a Preset from the ‘Preset Drawer’. We recommend you choose Fast1030p 30 for high quality.
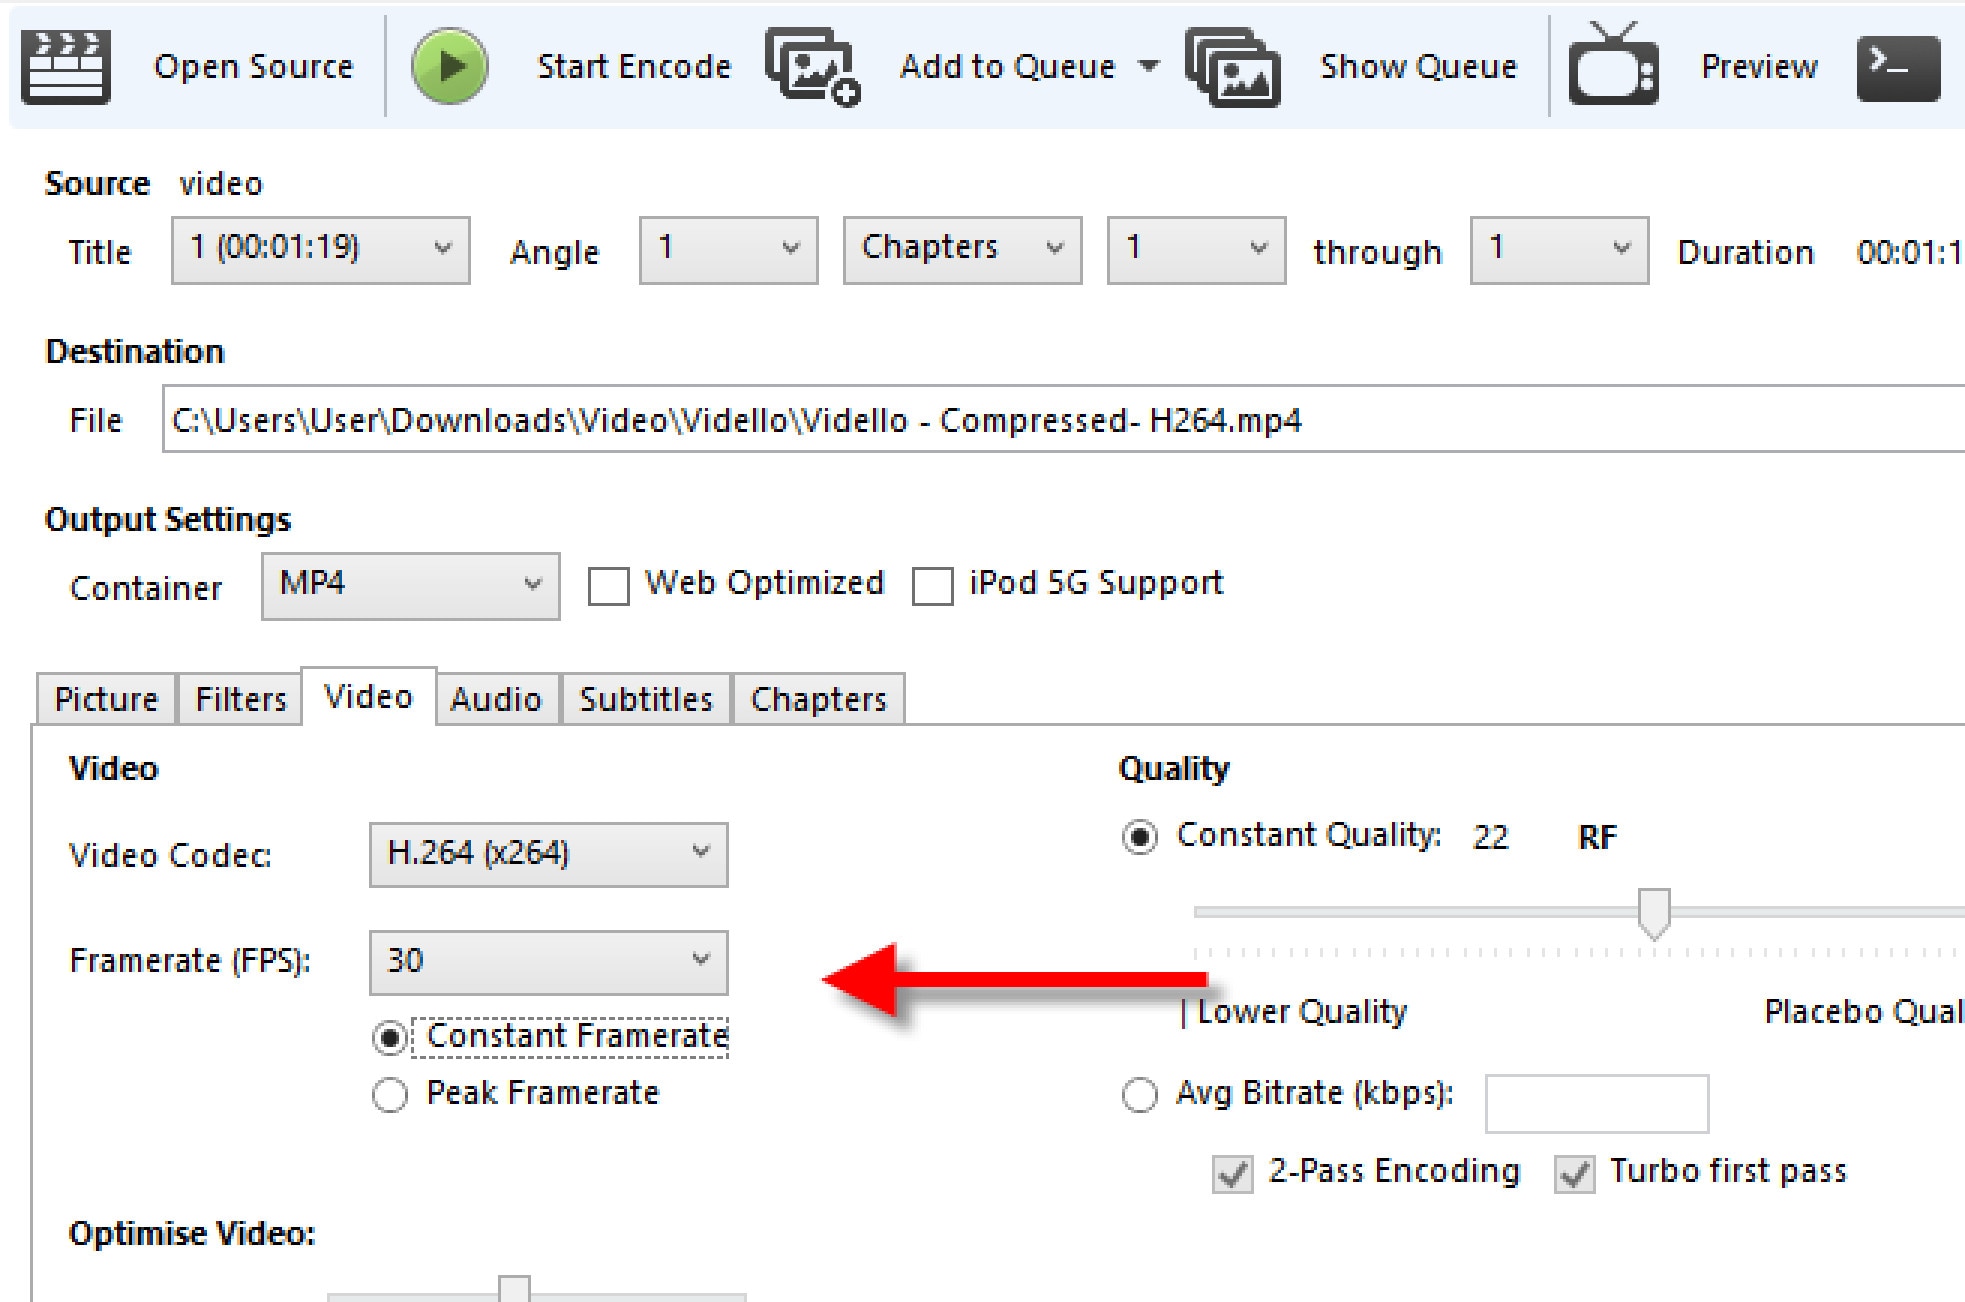
- Choose the ‘framerate’, depending on your source video i.e. NTSC (29.97fps), then make it 30fps by choosing 30. Also, tick the ‘Constant Framerate’ to ensure better compatibility.
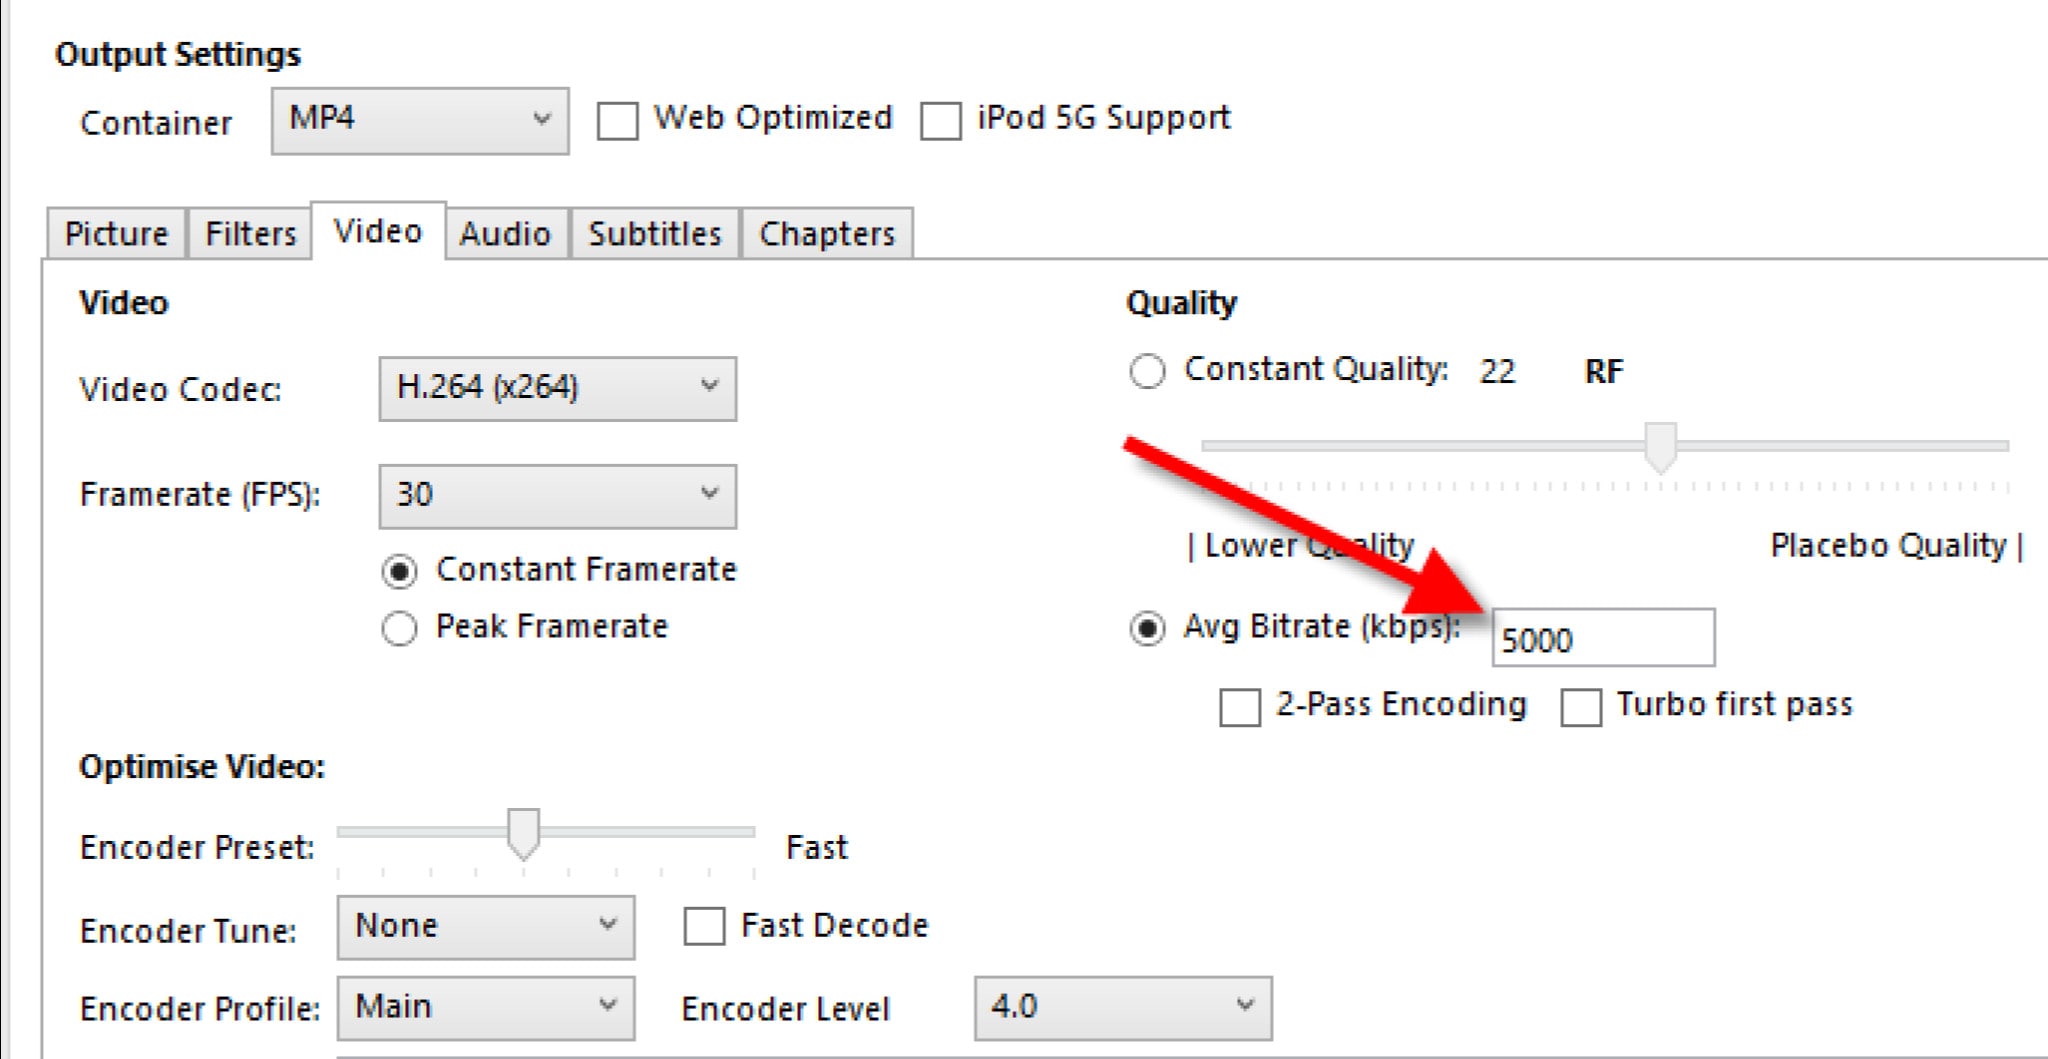
- Enter an ‘Average Bitrate (kbps)’ for the video between 5,000-10,000 (take note: higher bitrate has higher quality video but will take longer to upload and download).
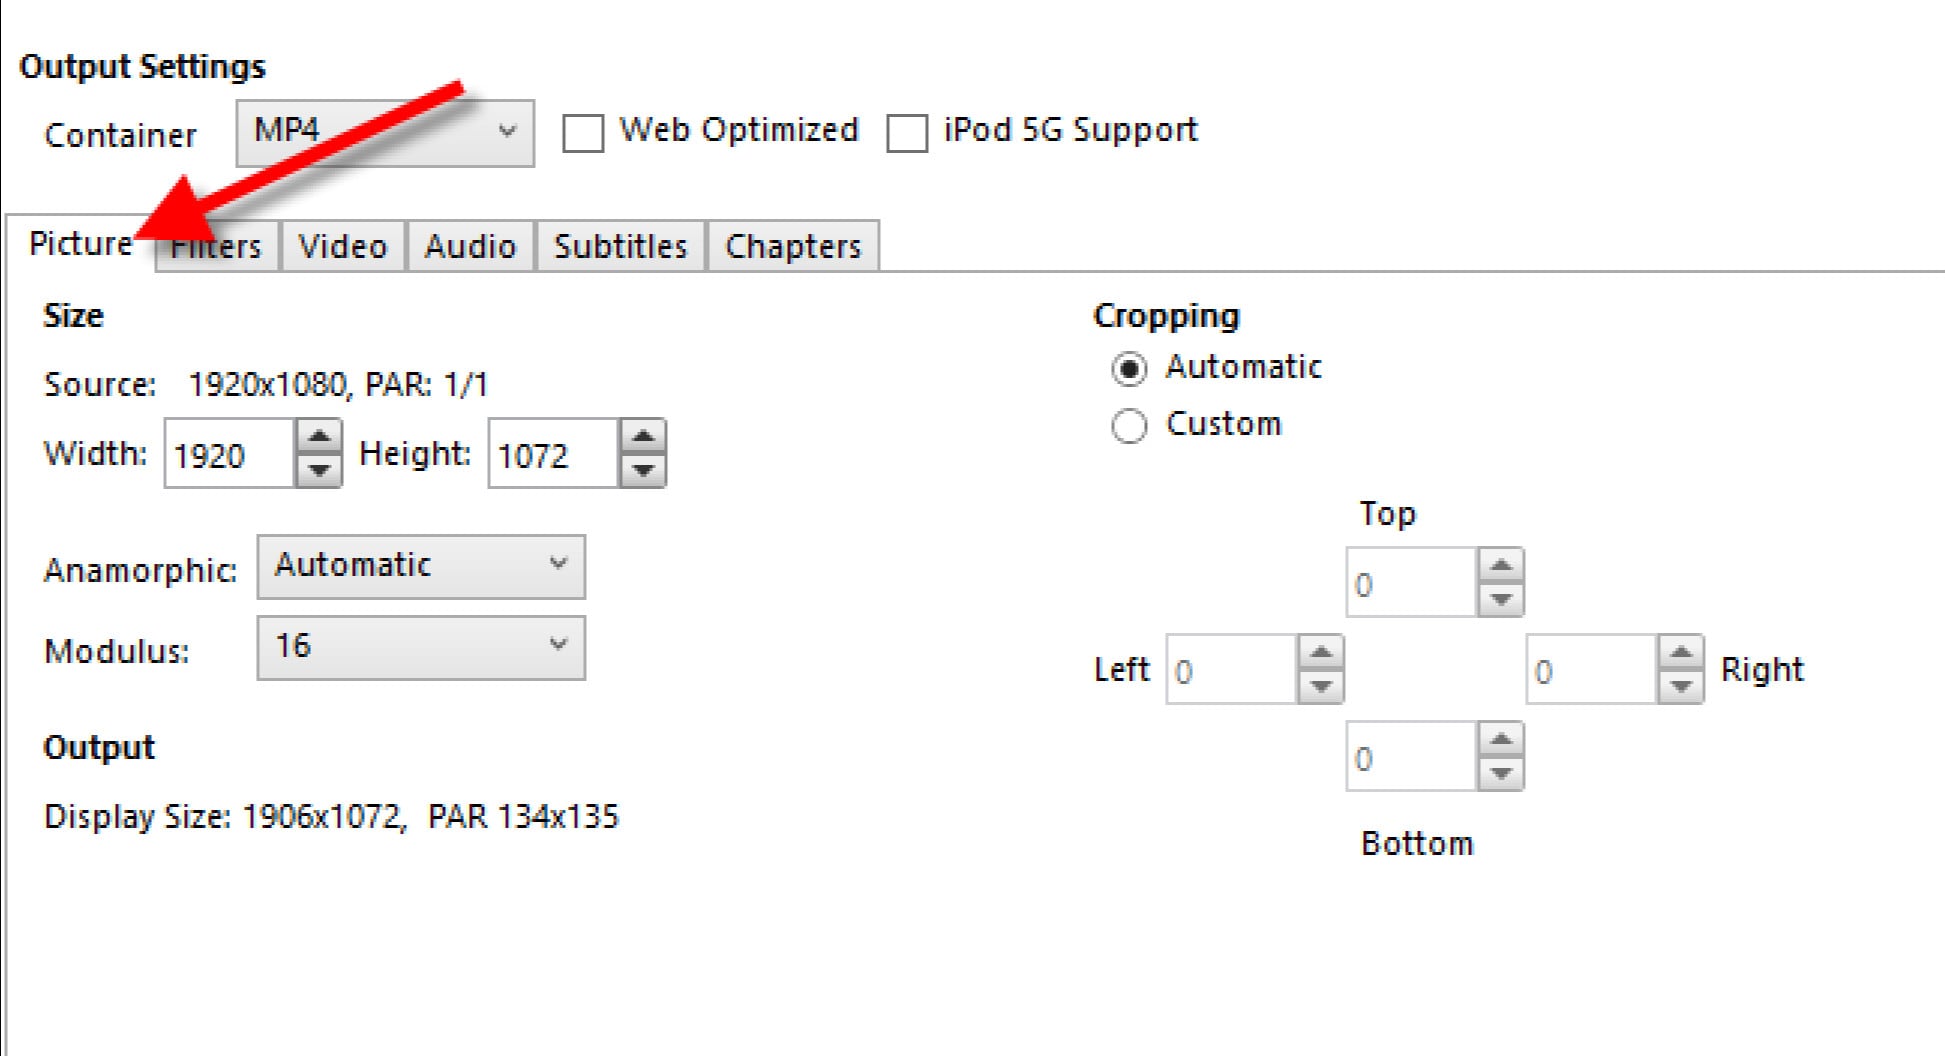
- Click the ‘Picture’ tab if you want to change the video frame size or resolution.
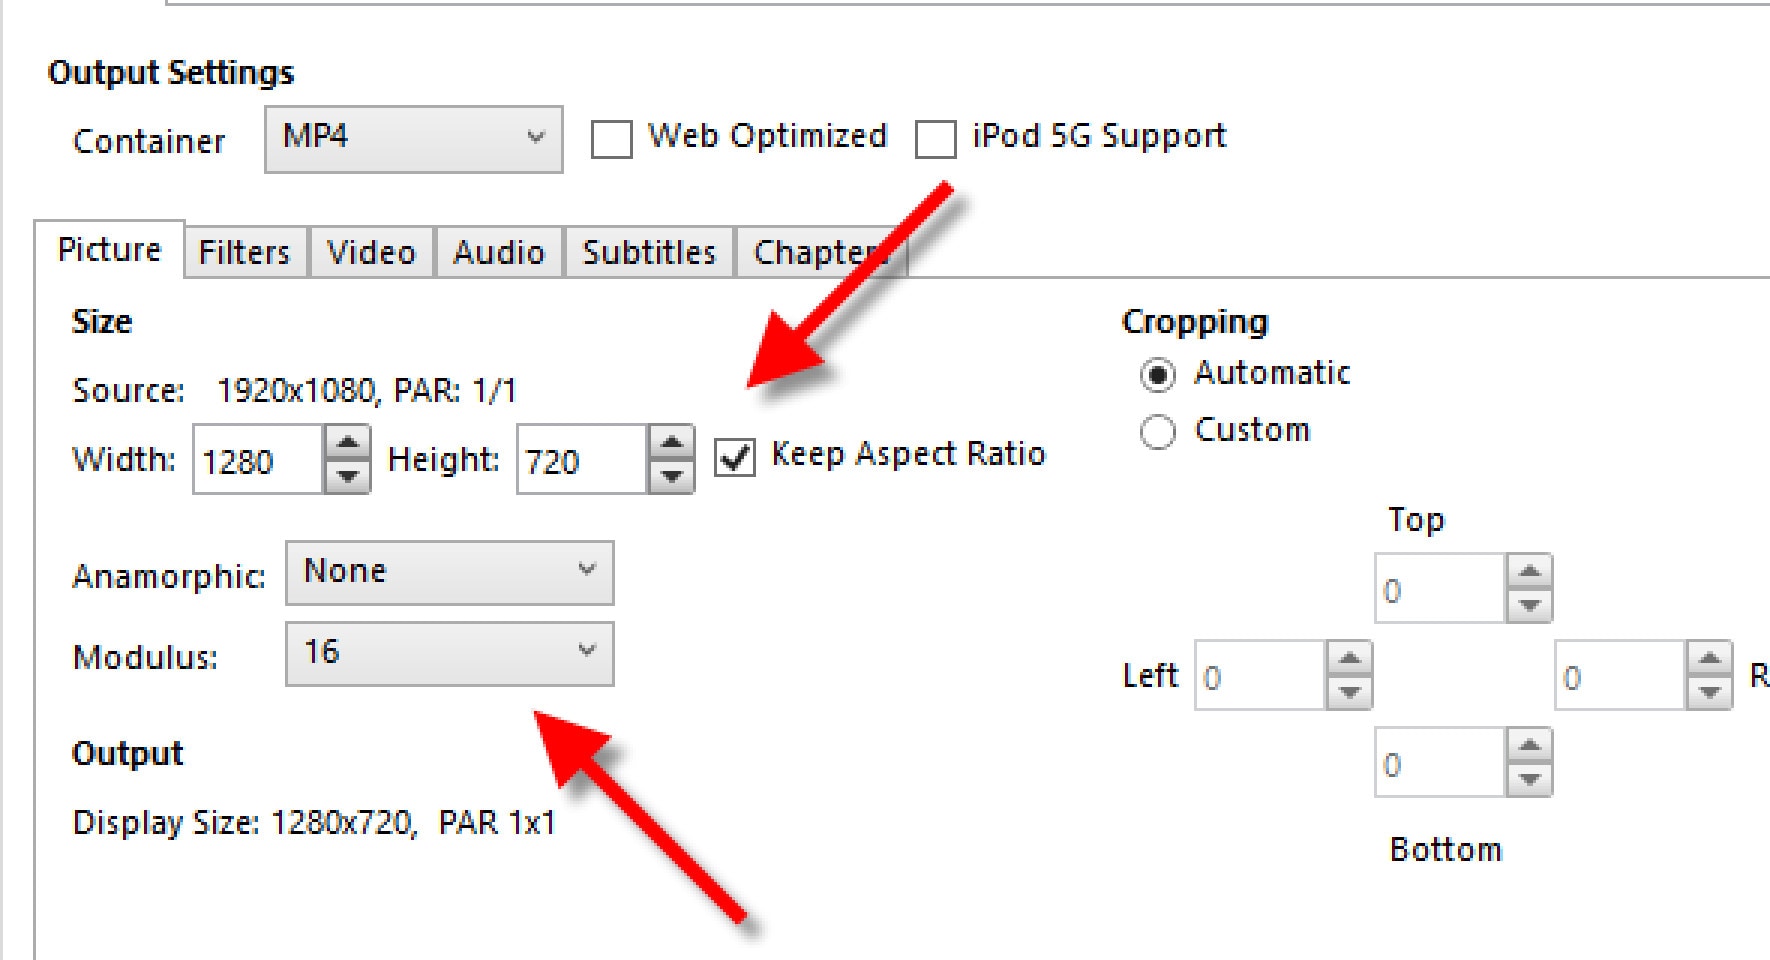

Change ‘Anamorphic’ to ‘None’, and ‘Modulus’ to ‘16’. And tick ‘Keep Aspect Ratio’. Use the arrow down on Width to change from 1920 (full HD) down to 1280.
Select the ‘Audio’ tab and choose 48 for the Samplerate. Choose Stereo for Mixdown. Choose 320 for your audio Bitrate.
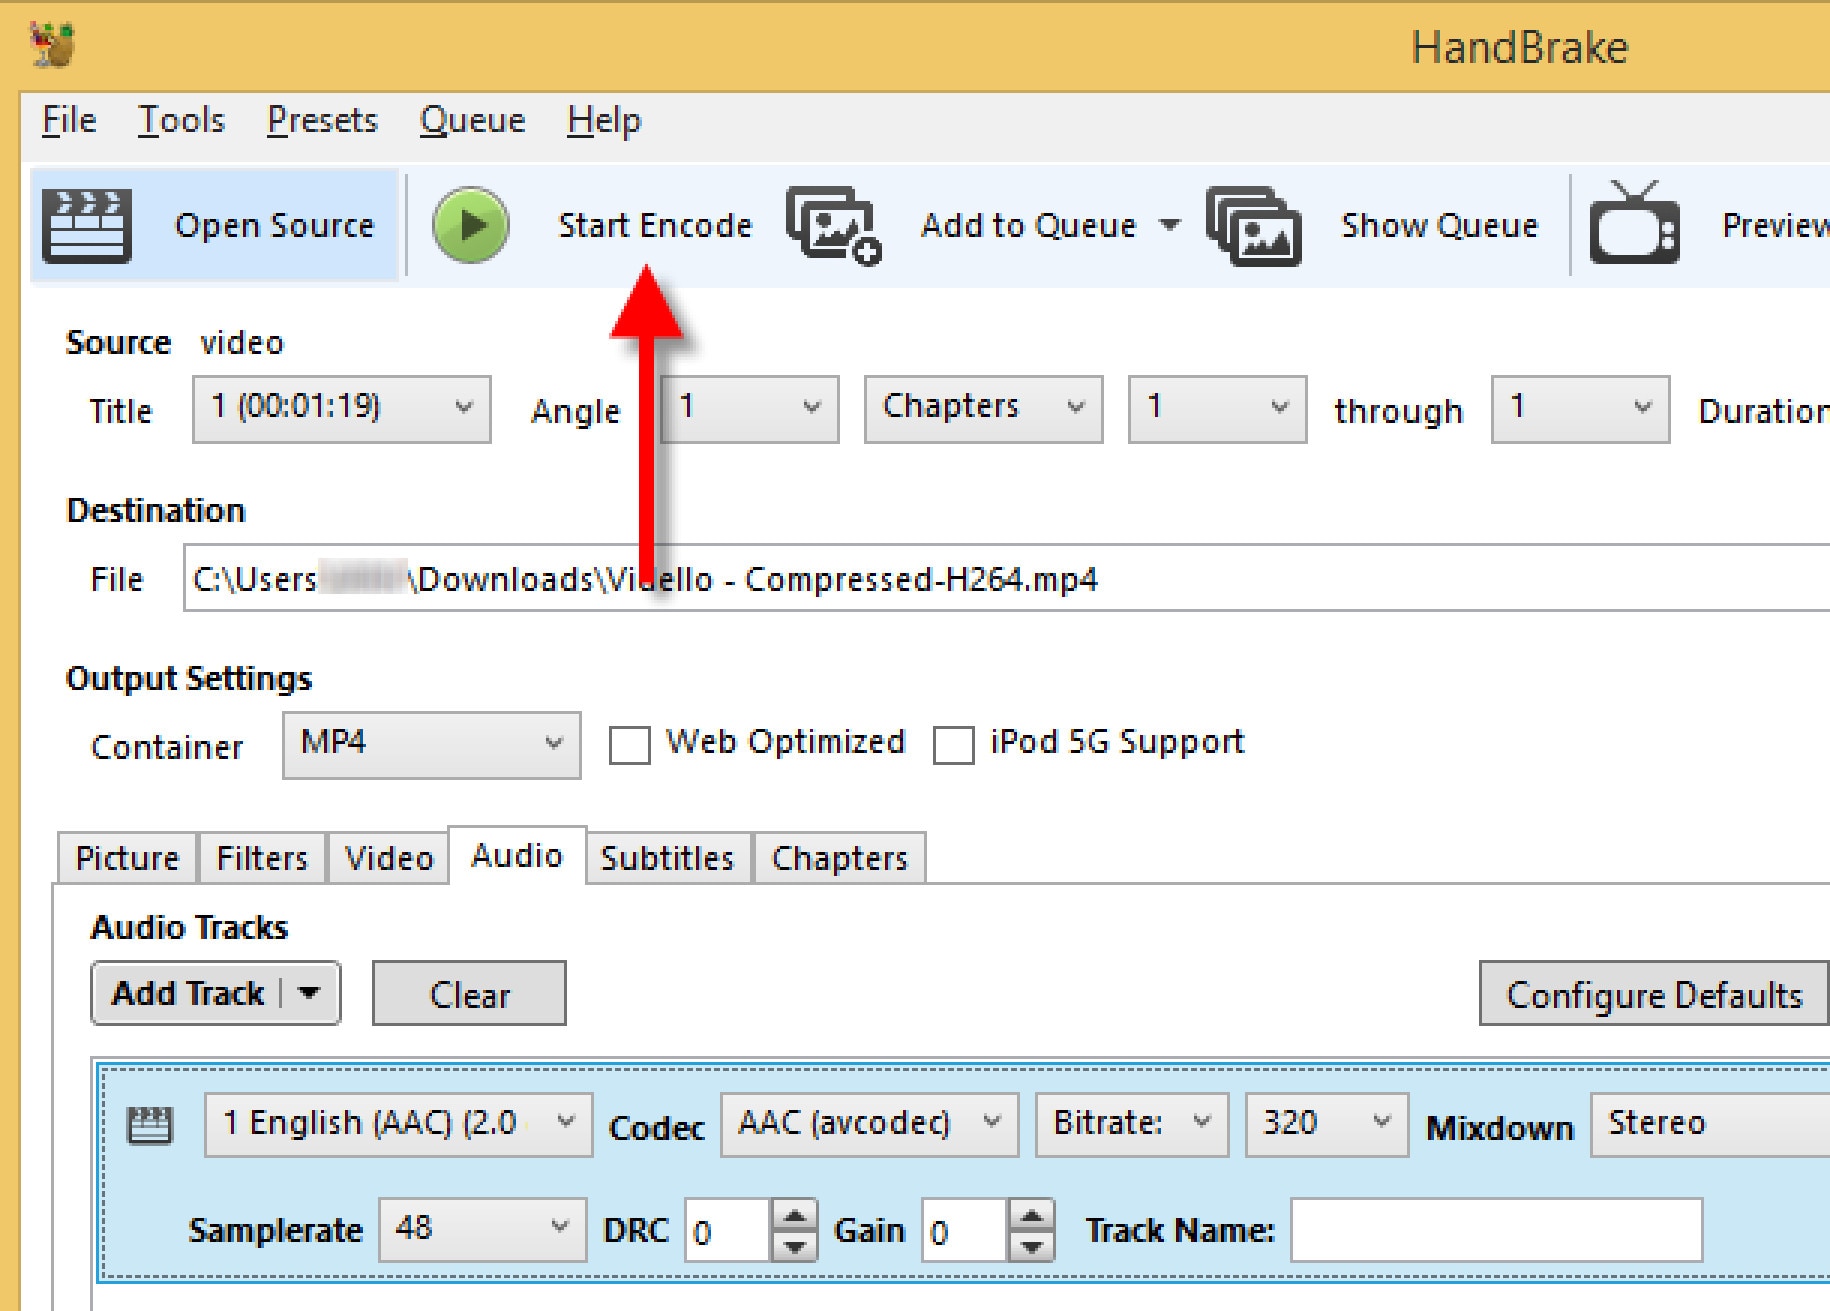
- Hit the ‘Start Encode’ button and wait until the video has finished compressing. Handbrake will let you know when it has finished.
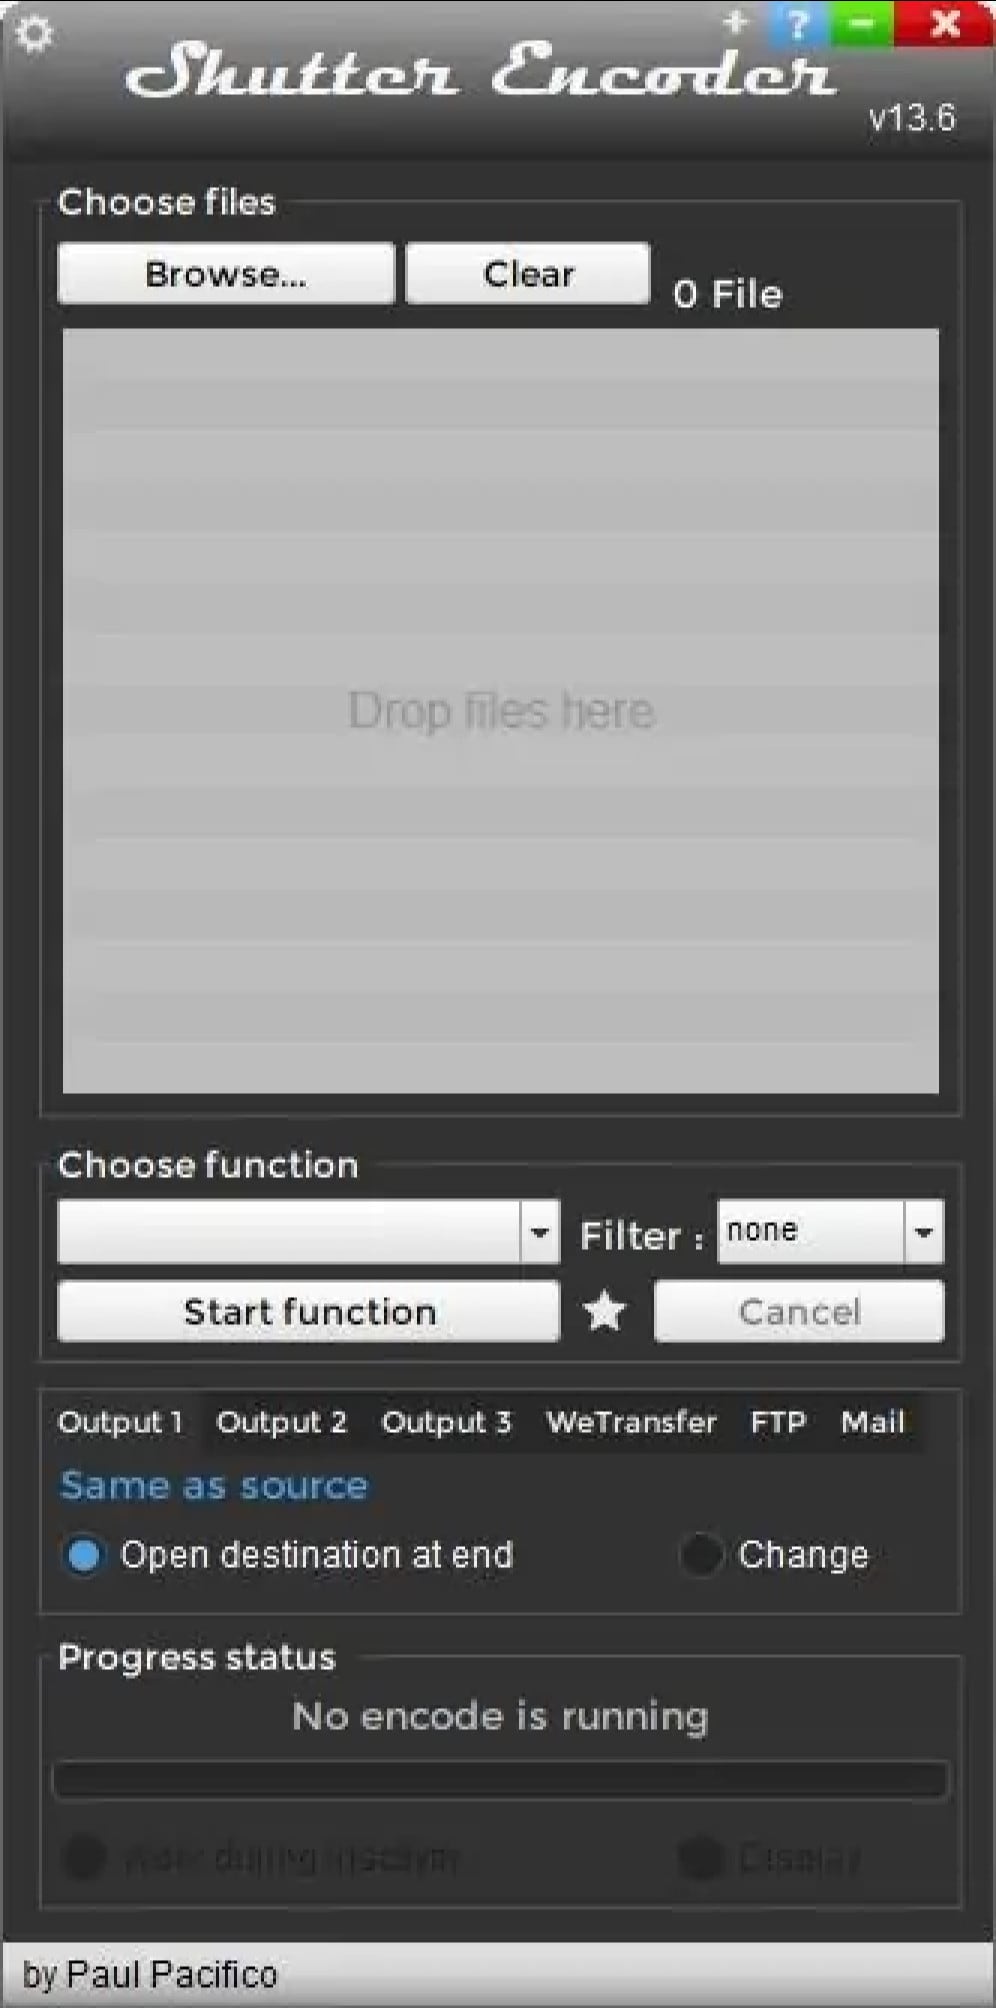
SHUTTER ENCODER
Supported OS: Mac, Linux, and Windows
Shutter Encoder offers a complimentary codec and conversion tool for everyone that was created in collaboration with video editors.
Convert your videos, images, and audio files to OP-Atom format, which is compatible with Avid Media Composer and Pro Tools. Encode your files, replace audio, burn to DVD, analyze audio volume, download web videos, and create your own timelapse.
Analyze audio loudness, replace audio, author DVDs and Blu-rays, create image sequences, download web videos, and more. Everything is done as simply and efficiently as possible
Shutter Encoder makes use of Java as well as other tools such as 7za, VLC, FFmpeg, ExifTool, MKVMerge (part of MKVToolNix), MediaInfo, DVDAuthor, youtube-dl, and others.
Shutter Encoder offers advanced users the option to tailor the conversion individually. You can, for example, manually change the bitrate of audio and video, but you can also set a file size limit and perform the conversion based on that. Further work techniques, such as the ability to enable hardware of the computer itself and complete the conversion according to a predefined profile, are available in a separate box.
Features:
- Without conversion: Cut without re-encoding, Replace audio, Rewrap, Conform, Merge, Subtitling (create subtitles for a video), Video inserts
- Sound conversion: WAV, AIFF, FLAC, MP3, AC3, OPUS, OGG
- Editing codecs: DNxHD, DNxHR, Apple ProRes, QT Animation, Uncompressed YUV
- Output codecs: , DV PAL, XDCAM HD422, AVC-Intra 100, XAVC, HAP, , VP9, AV1, OGV, MJPEG, Xvid, WMV, MPEG
- Archiving codec: FFV1
- Image creation: JPEG, PNG, TIF, TGA, DPX, BPM, ICO, WEBP
- Burn & Rip: DVD, Blu-ray, DVD RIP
- Analysis: Loudness & True Peak, Audio normalization, Cut detection, Black detection
- Download web videos using youtube-dl
Pros:
- Conversion according to profiles
- Extensive advanced options
- Built-in editing capabilities
Cons:
- Limited preview capability
Steps On How To Use Shutter Encoder
- To start, drag the video from your file manager and drop it onto the Shutter Encoder window, or use the ‘Browse’ button available in the upper left-hand side corner of the window to add a video.
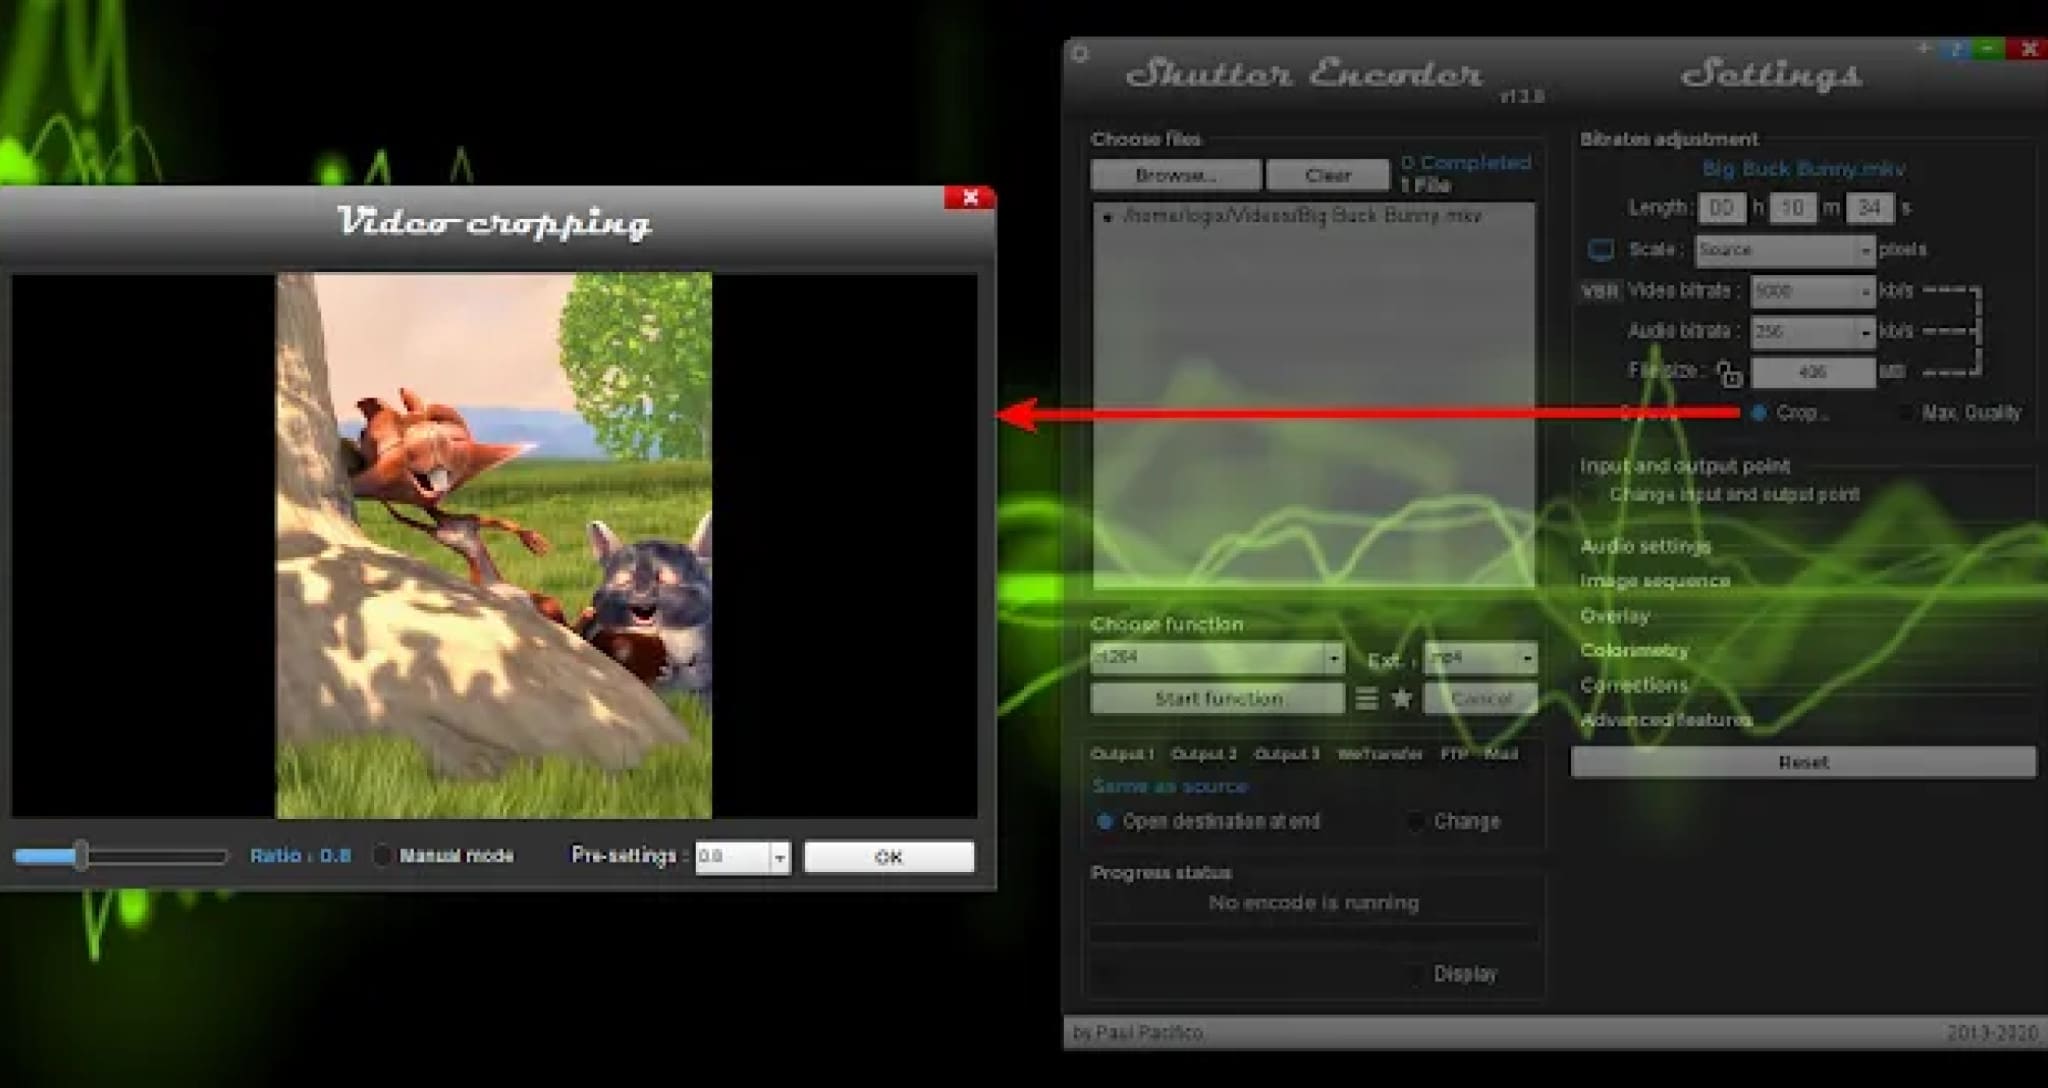
- Next, from the ‘Choose function’ drop-down menu, scroll to (it’s the first under Output codecs). You will now see some new options in a new panel that appears on the right-hand side of the Shutter Encoder window. From there, if you want to crop the video, click the Crop checkbox:
A new window will pop up where you can use your mouse to crop the video to the desired size. If you want to change it to a predefined, fixed-size ratio value, uncheck the ‘Manual mode’ box, and you’ll be able to choose a ratio from the ‘Pre-settings’ drop-down.
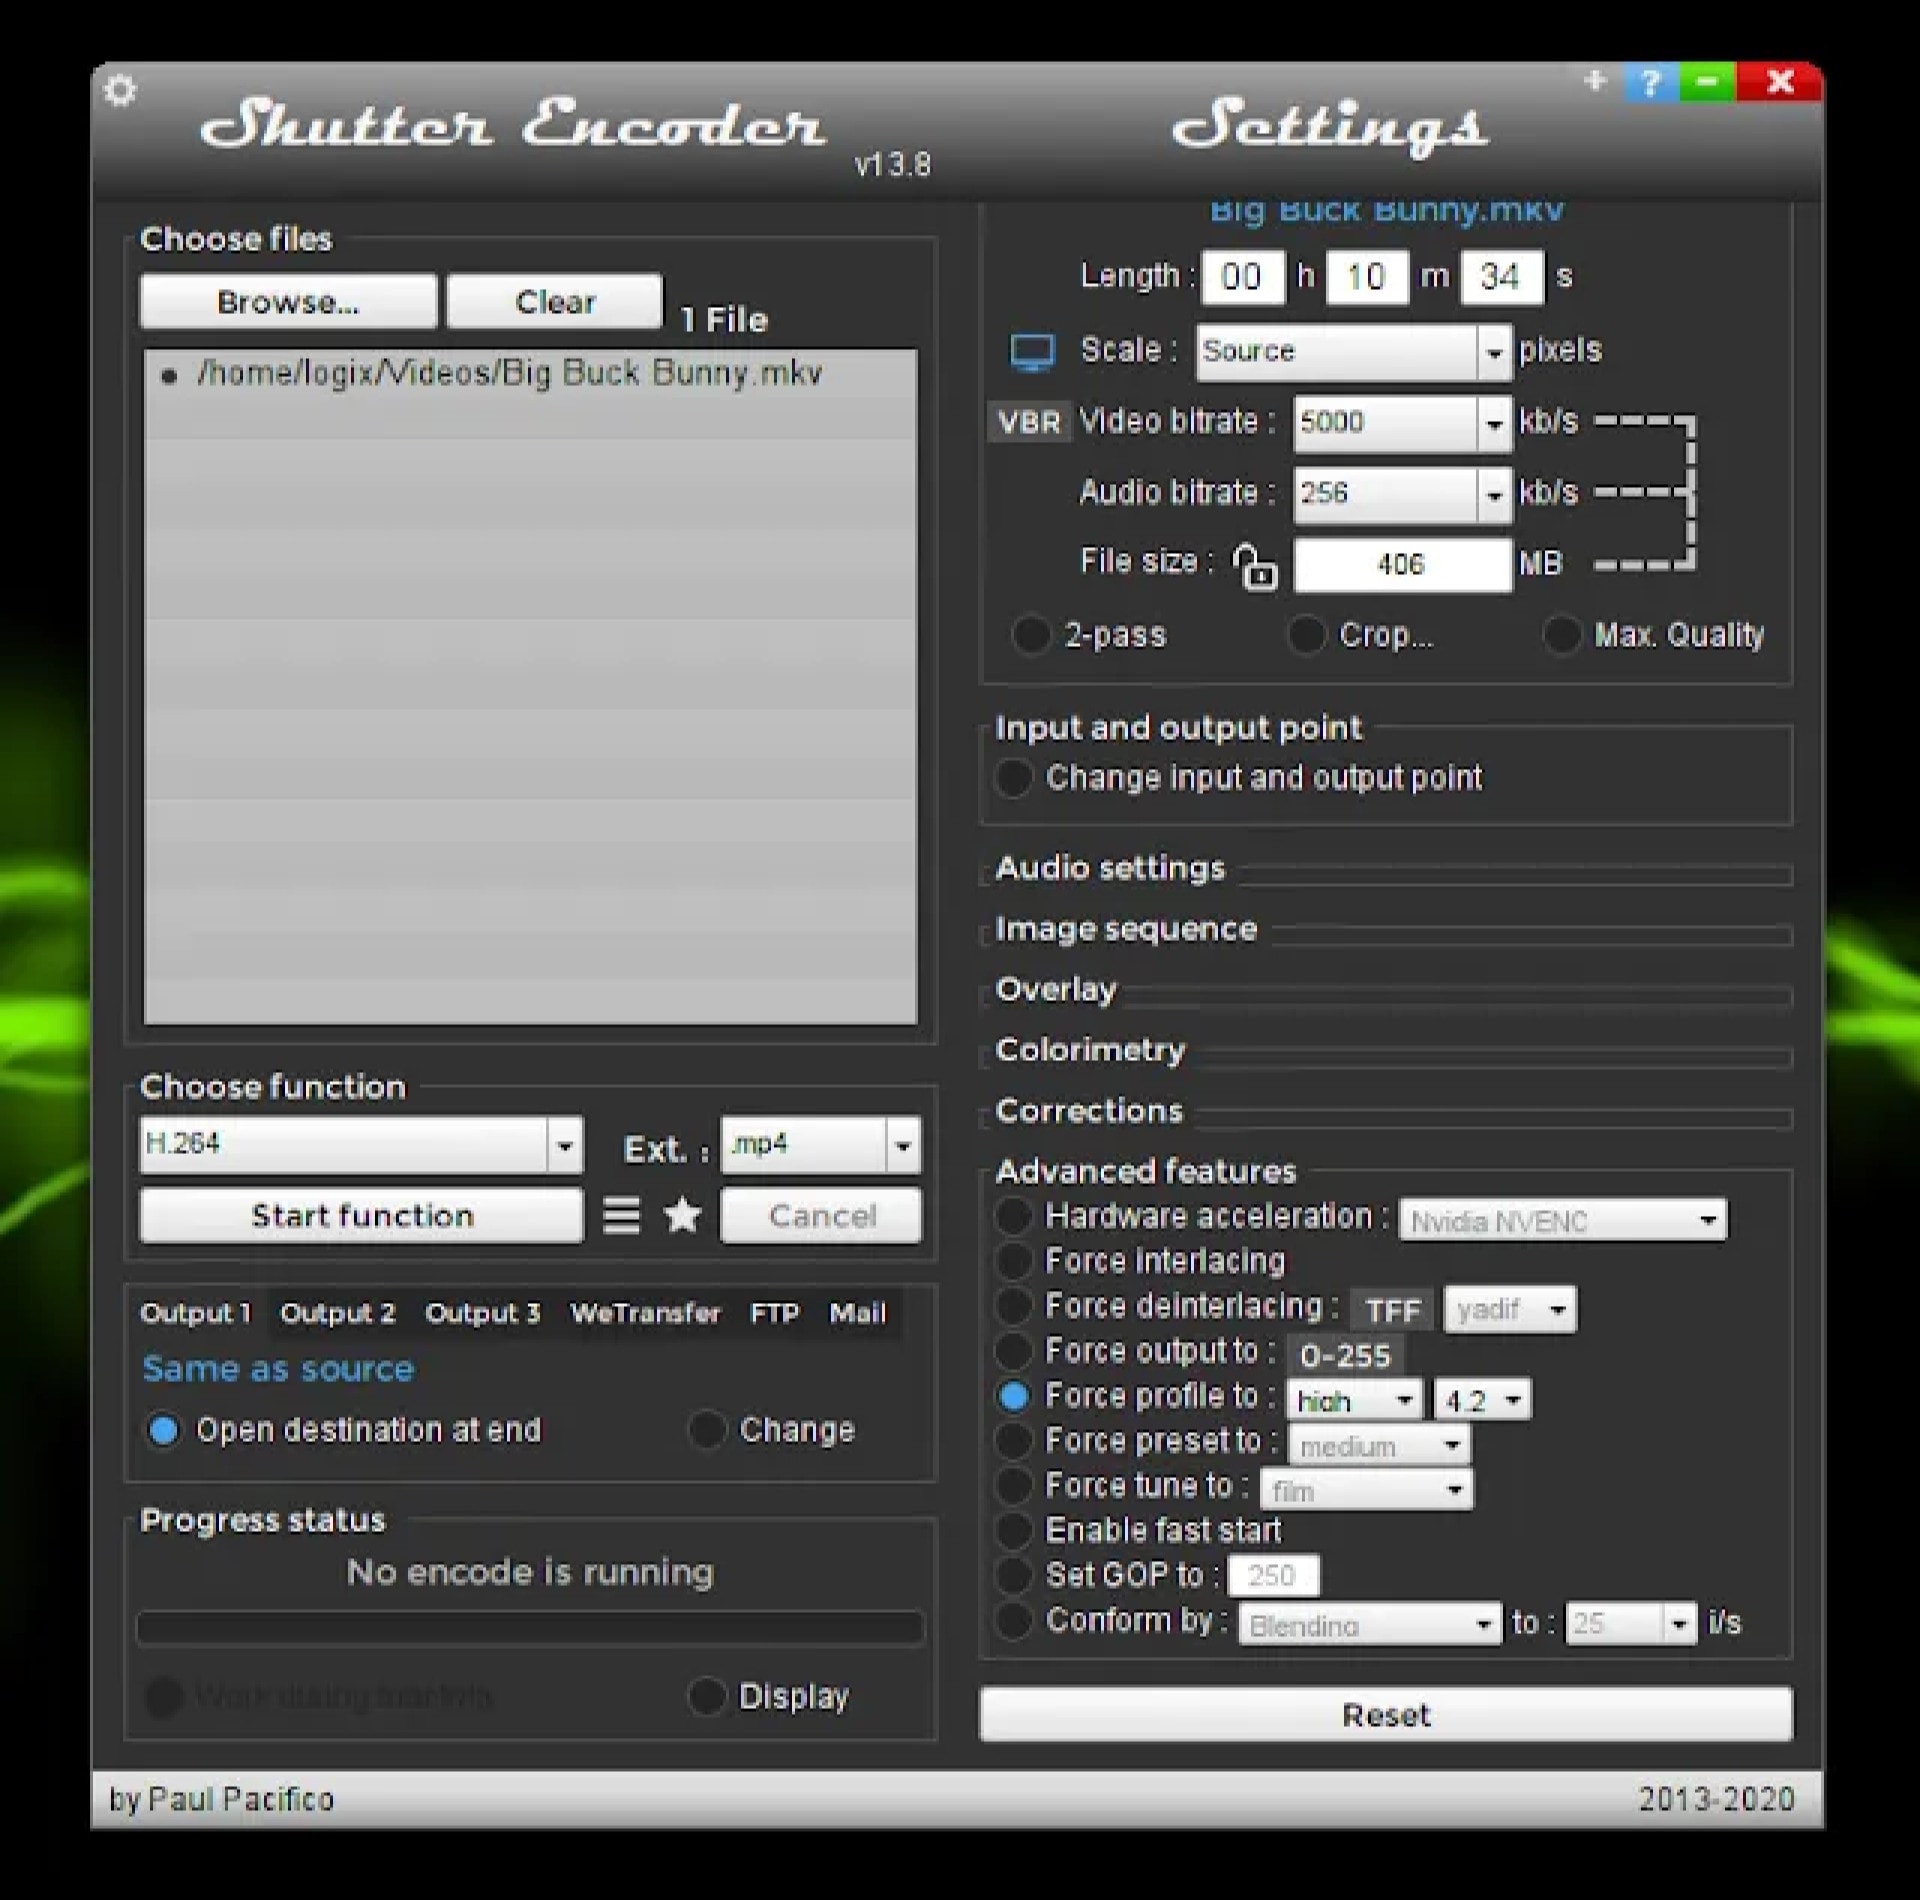
Next, if you want to change the profile, expand the ‘Advanced features’ item in the Shutter Encoder sidebar, check the box for the Force profile option, then change the profile to what you want to use:
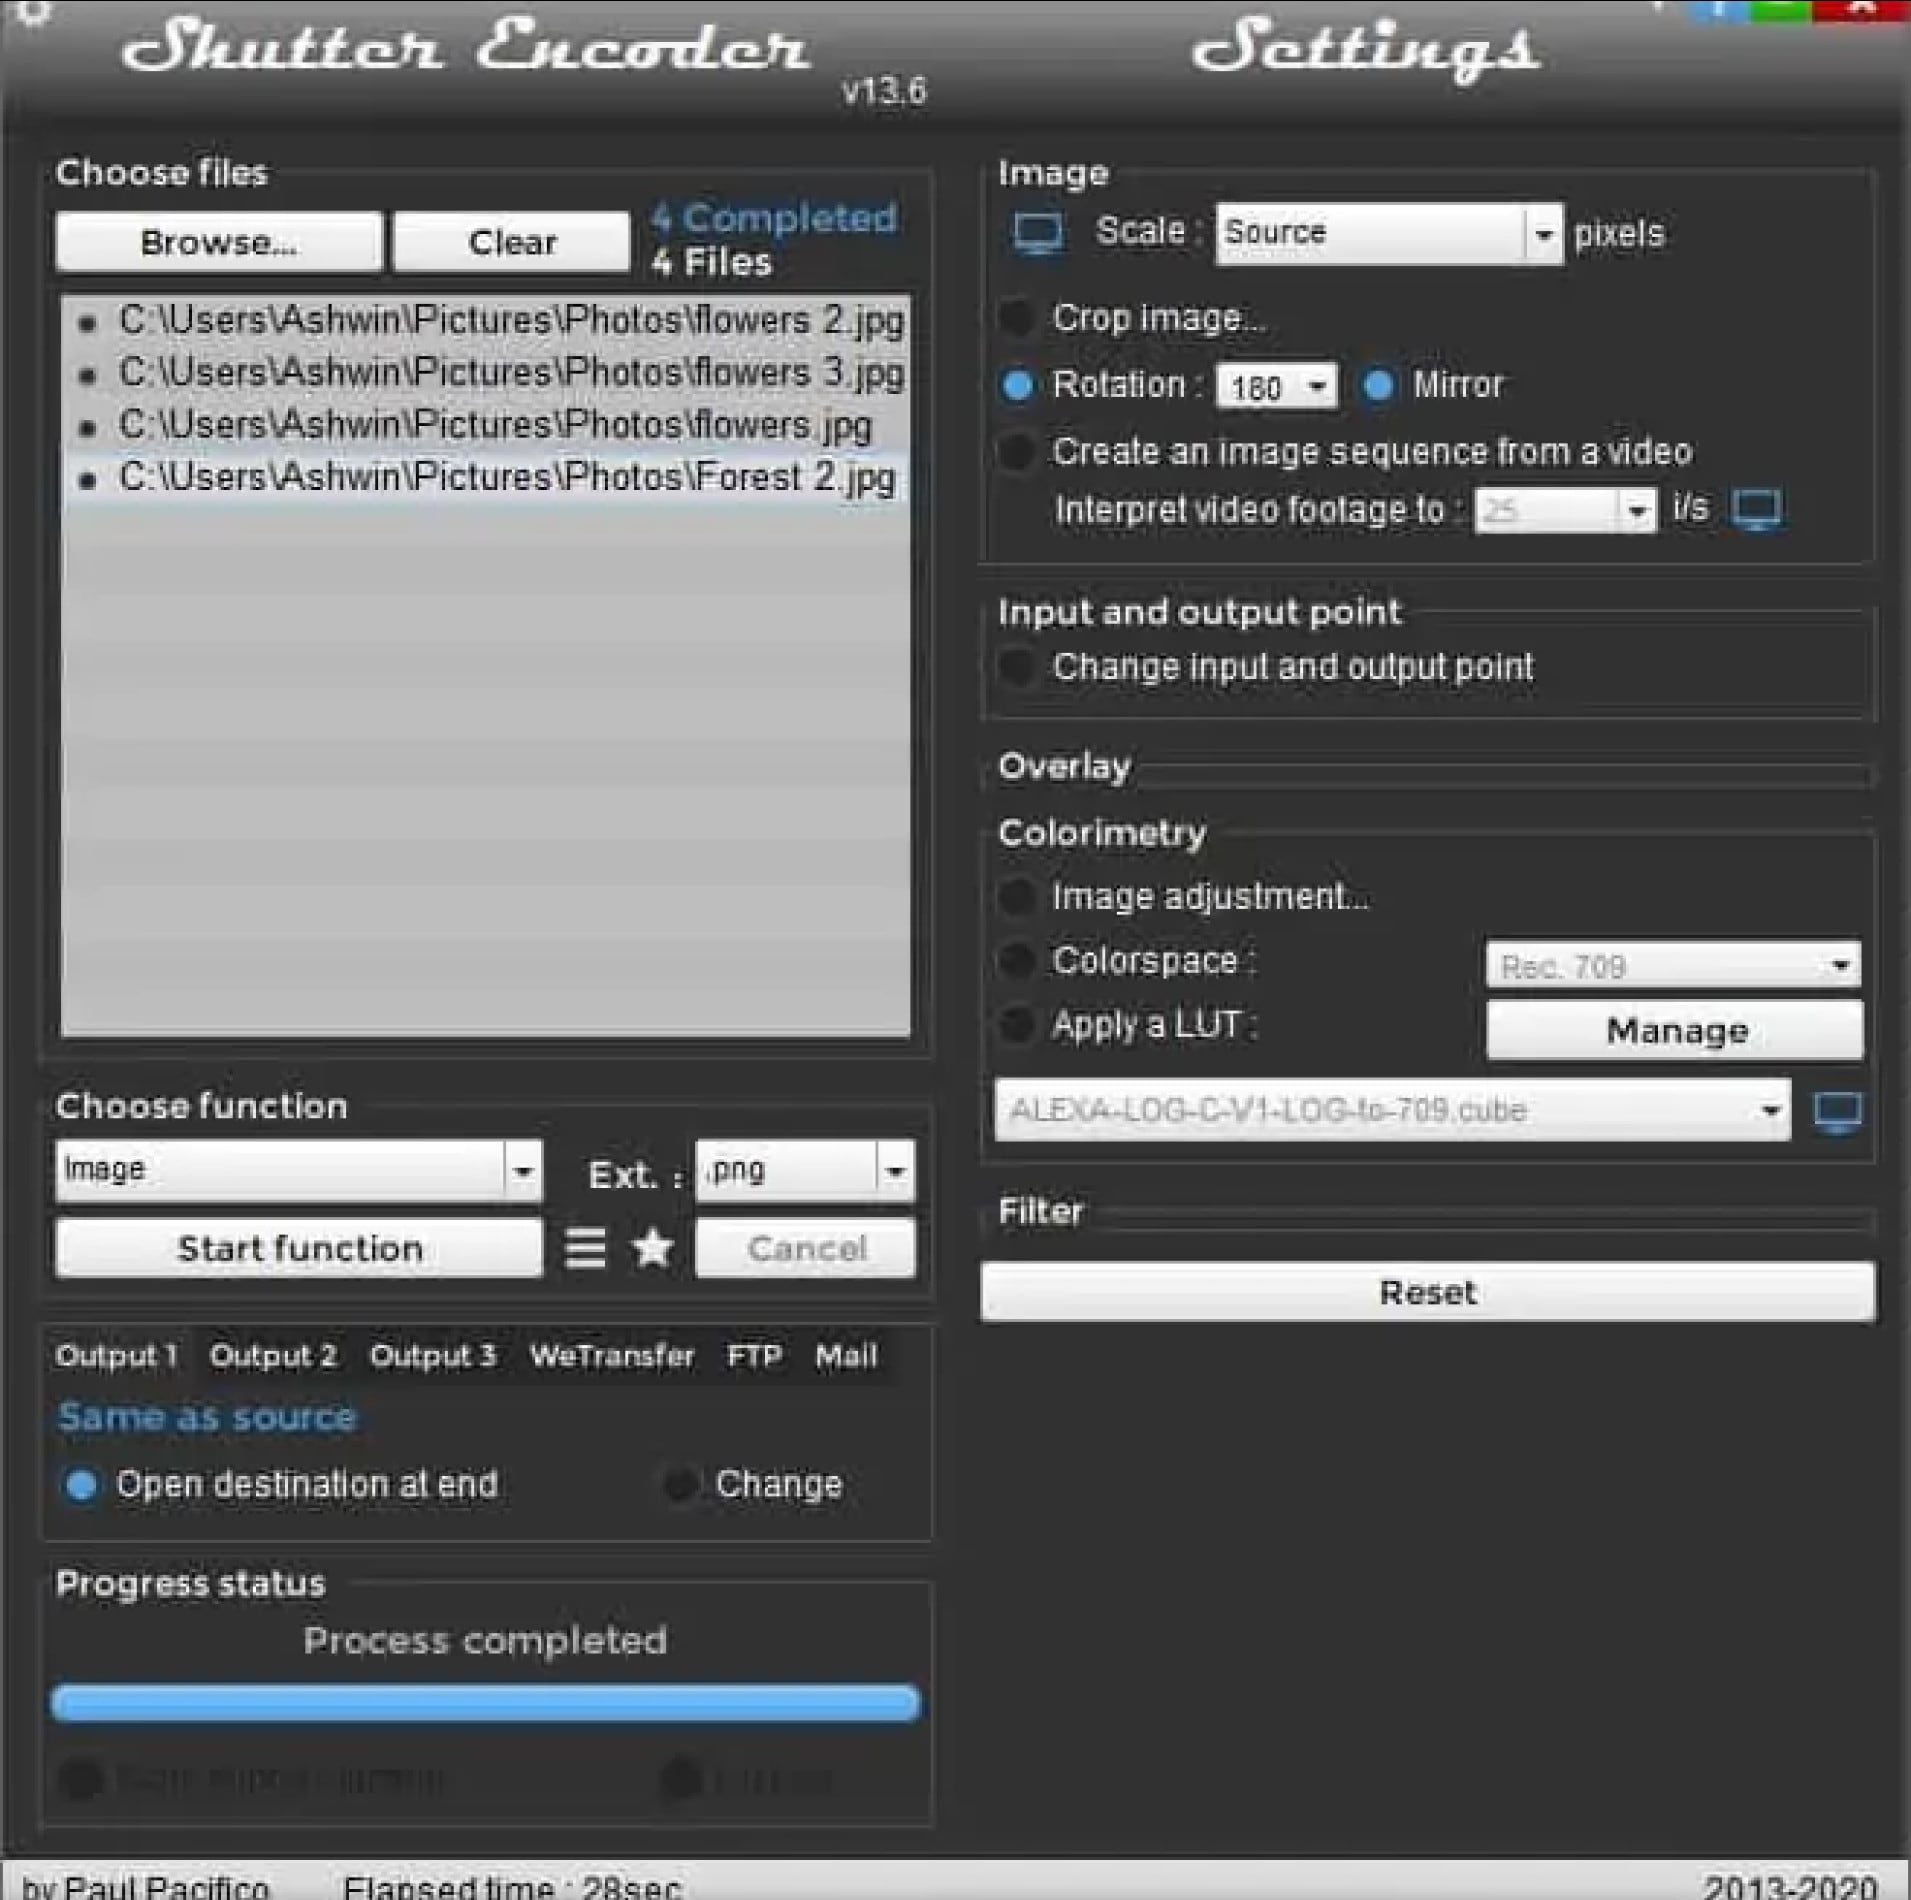
- When you’re done with the video adjustments you want to make, click the ‘Start function’ button, and Shutter Encoder will begin encoding your new video.
AVIDEMUX
Supported OS: Linux, BSD, Mac OS X, and Microsoft Windows
Avidemux offers three fundamental operations: cutting, encoding, and filtering. Cutting allows users to copy, paste, save, or delete a specific part of a video and is incredibly beneficial when users are only interested in a small portion of a video or want to remove commercials from a TV show that they have recorded.
Encoding, on the other contrary, is the way of transforming a video to various formats so that it can be played on different players. Users of Avidemux can use this feature on videos they want to use for business or archive for personal use. They could also use this to convert a video that they intend to post online.
Users can also use Avidemux to filter their videos, which include incorporating subtitles and color profiles, deinterlacing, resizing and sharpening the image of a video, and increasing or decreasing the overall volume of the audio.
Meanwhile, Avidemux has task automation features that make video processing and editing quick and painless. A feature called Joblist allows users to organize their projects in a queue so that they can access their files from a single location. They can use this queue to handle videos in bulk as well.
Features:
- Multiple Formats
- Video Filters
- Advanced Interlacing
- Full Editing Control
- Simple Interface
- Open Source
Pros:
- Covers standard formats.
- All essential features are present.
- Surprisingly advanced filtering, processing, editing, and filtering controls.
- The interface is easy to learn.
- Open-source
Cons:
- The interface is very legacy and needs remodeling
- No longer updated
- No support
Steps On How To Cut Videos On Avidemux:
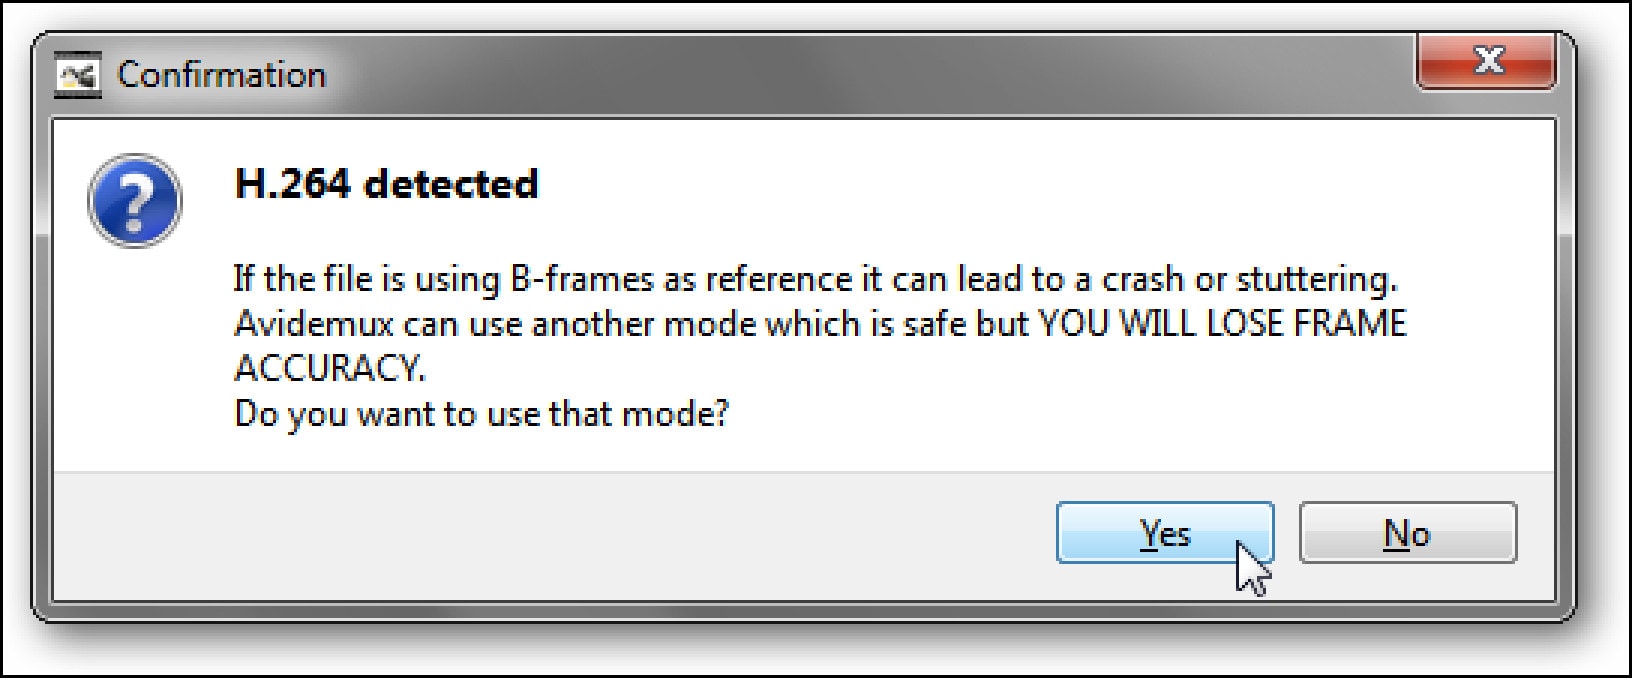
- Open up Avidemux, and load the video file that you want to work with. If you get a prompt like this one: we recommend clicking Yes to use the safer mode.


Find the portion of the video that you’d like to isolate. Get as close as you can to the start of the clip you want to cut.
You want it to read I; if it isn’t framed type I, then use the single left and right arrow buttons to go forward or backward one frame until you find an appropriate I frame.
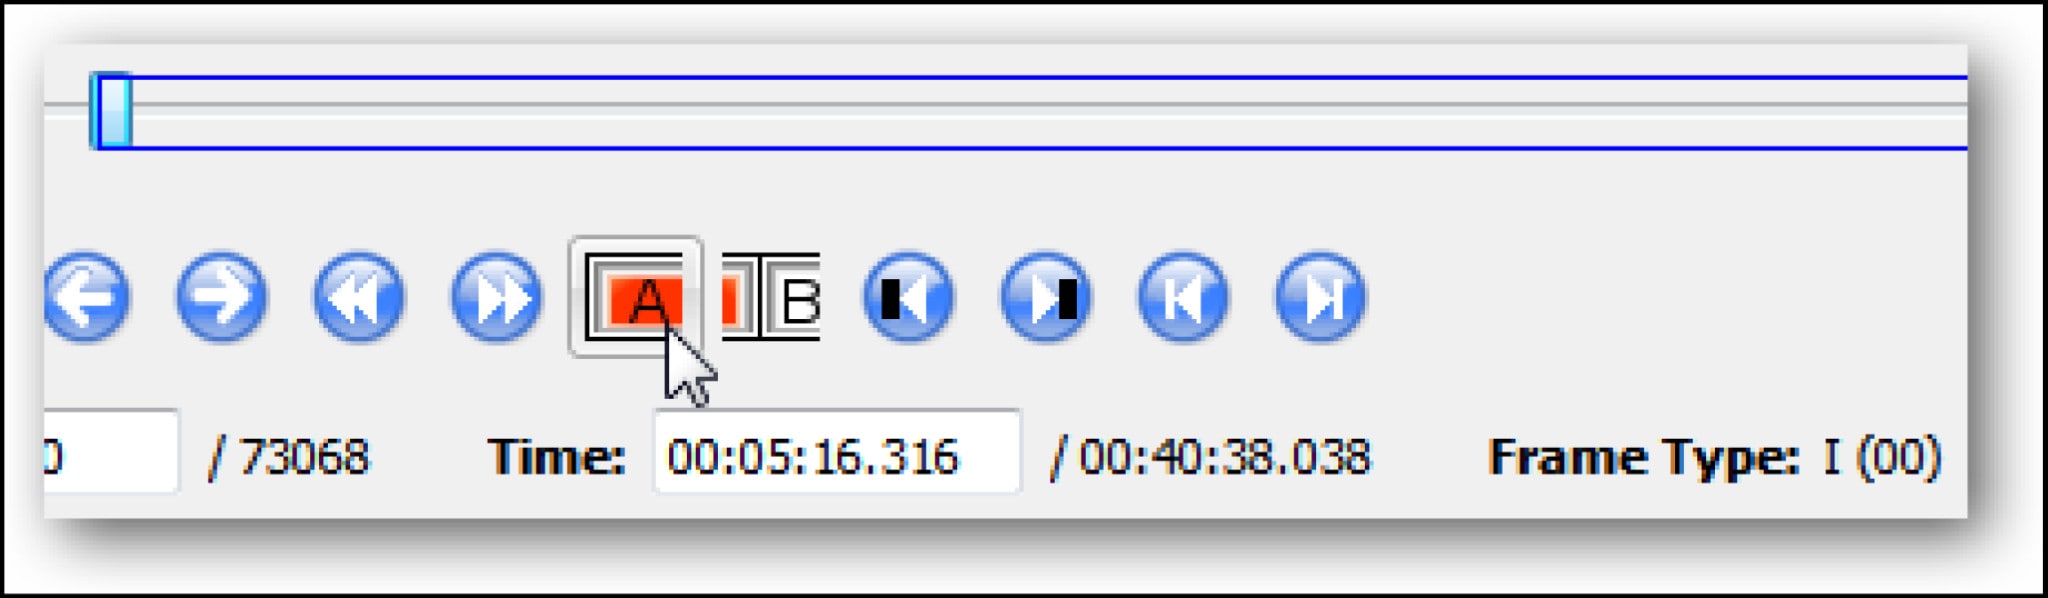
- Once you’ve found the right starting frame, click the button with the A over a red bar. This will set the start of the clip.
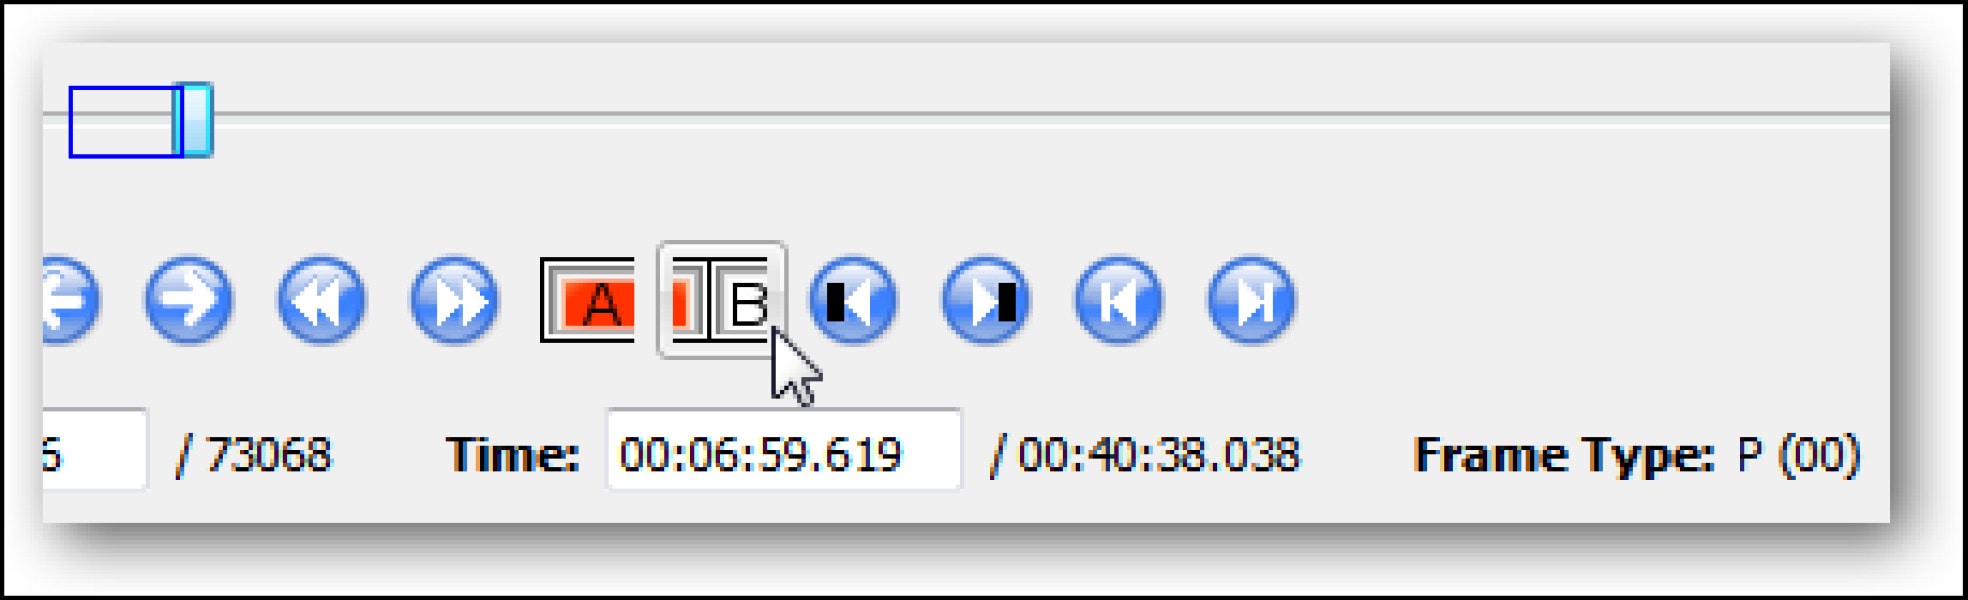
- Advance to where you want your clip to end. Click on the button with a B when you’ve found the appropriate frame. This frame can be of any type.
- You can now save the clip, either by going to File –> Save –> Save Video, or by pressing Ctrl+S. Give the file a name, and Avidemux will prepare your clip.
BEST PAID FFMPEG ALTERNATIVE TO CUT VIDEO ON MAC
JOYOSHARE MEDIA CUTTER
Supported OS: Mac and Windows
The best video cutting tool is Joyoshare Media Cutter for Windows (or Mac). As a professional video trimmer, it allows you to cut your media files at a 60X faster rate, allowing you to clip a 60-minute video or audio file in just one minute. The interface design is also simple and clean, allowing you to do it quickly.
Another noteworthy feature is the ability to easily cut and merge both video and audio without sacrificing quality. The cropper supports a variety of video and audio formats, including AVI, MP4, MPEG, VOB, WMV, ASF, RM, RMVB, 3GP, MP3, WMA, M4R, and others, allowing you to save the file in any format and on any device, including Apple.
More notably, this is a capable all-in-one video cutter. In addition to cutting videos and audio, it can convert all popular video formats, extract audio from video files, and merge video and audio files from the same source into a new one.
Features:
Convert to Any File Format
Merge Video and Audio Files into Multiple Formats
Improved Accuracy & Efficiency in Cutting Videos
60X Fast Conversion
Pros:
- Offers an easy way to cut, merge, and convert video files
- Blazing fast video-cutting and file-conversion speed
- Supports multiple audio and video file formats
Cons:
- Can only merge videos from the same source. That means you can’t use the program to merge separate videos from your gallery.
- The program doesn’t offer an easy way to remove an unwanted part of a video if it’s in the middle of the video. The only way to do that is by cutting the section before and after the video, then merging them into one.
Steps:
Step 1: Adding Video
To add a video, click the “Open” button. Locate the video you want to trim from your collection and open it. Alternatively, you can use the drag-and-drop feature.
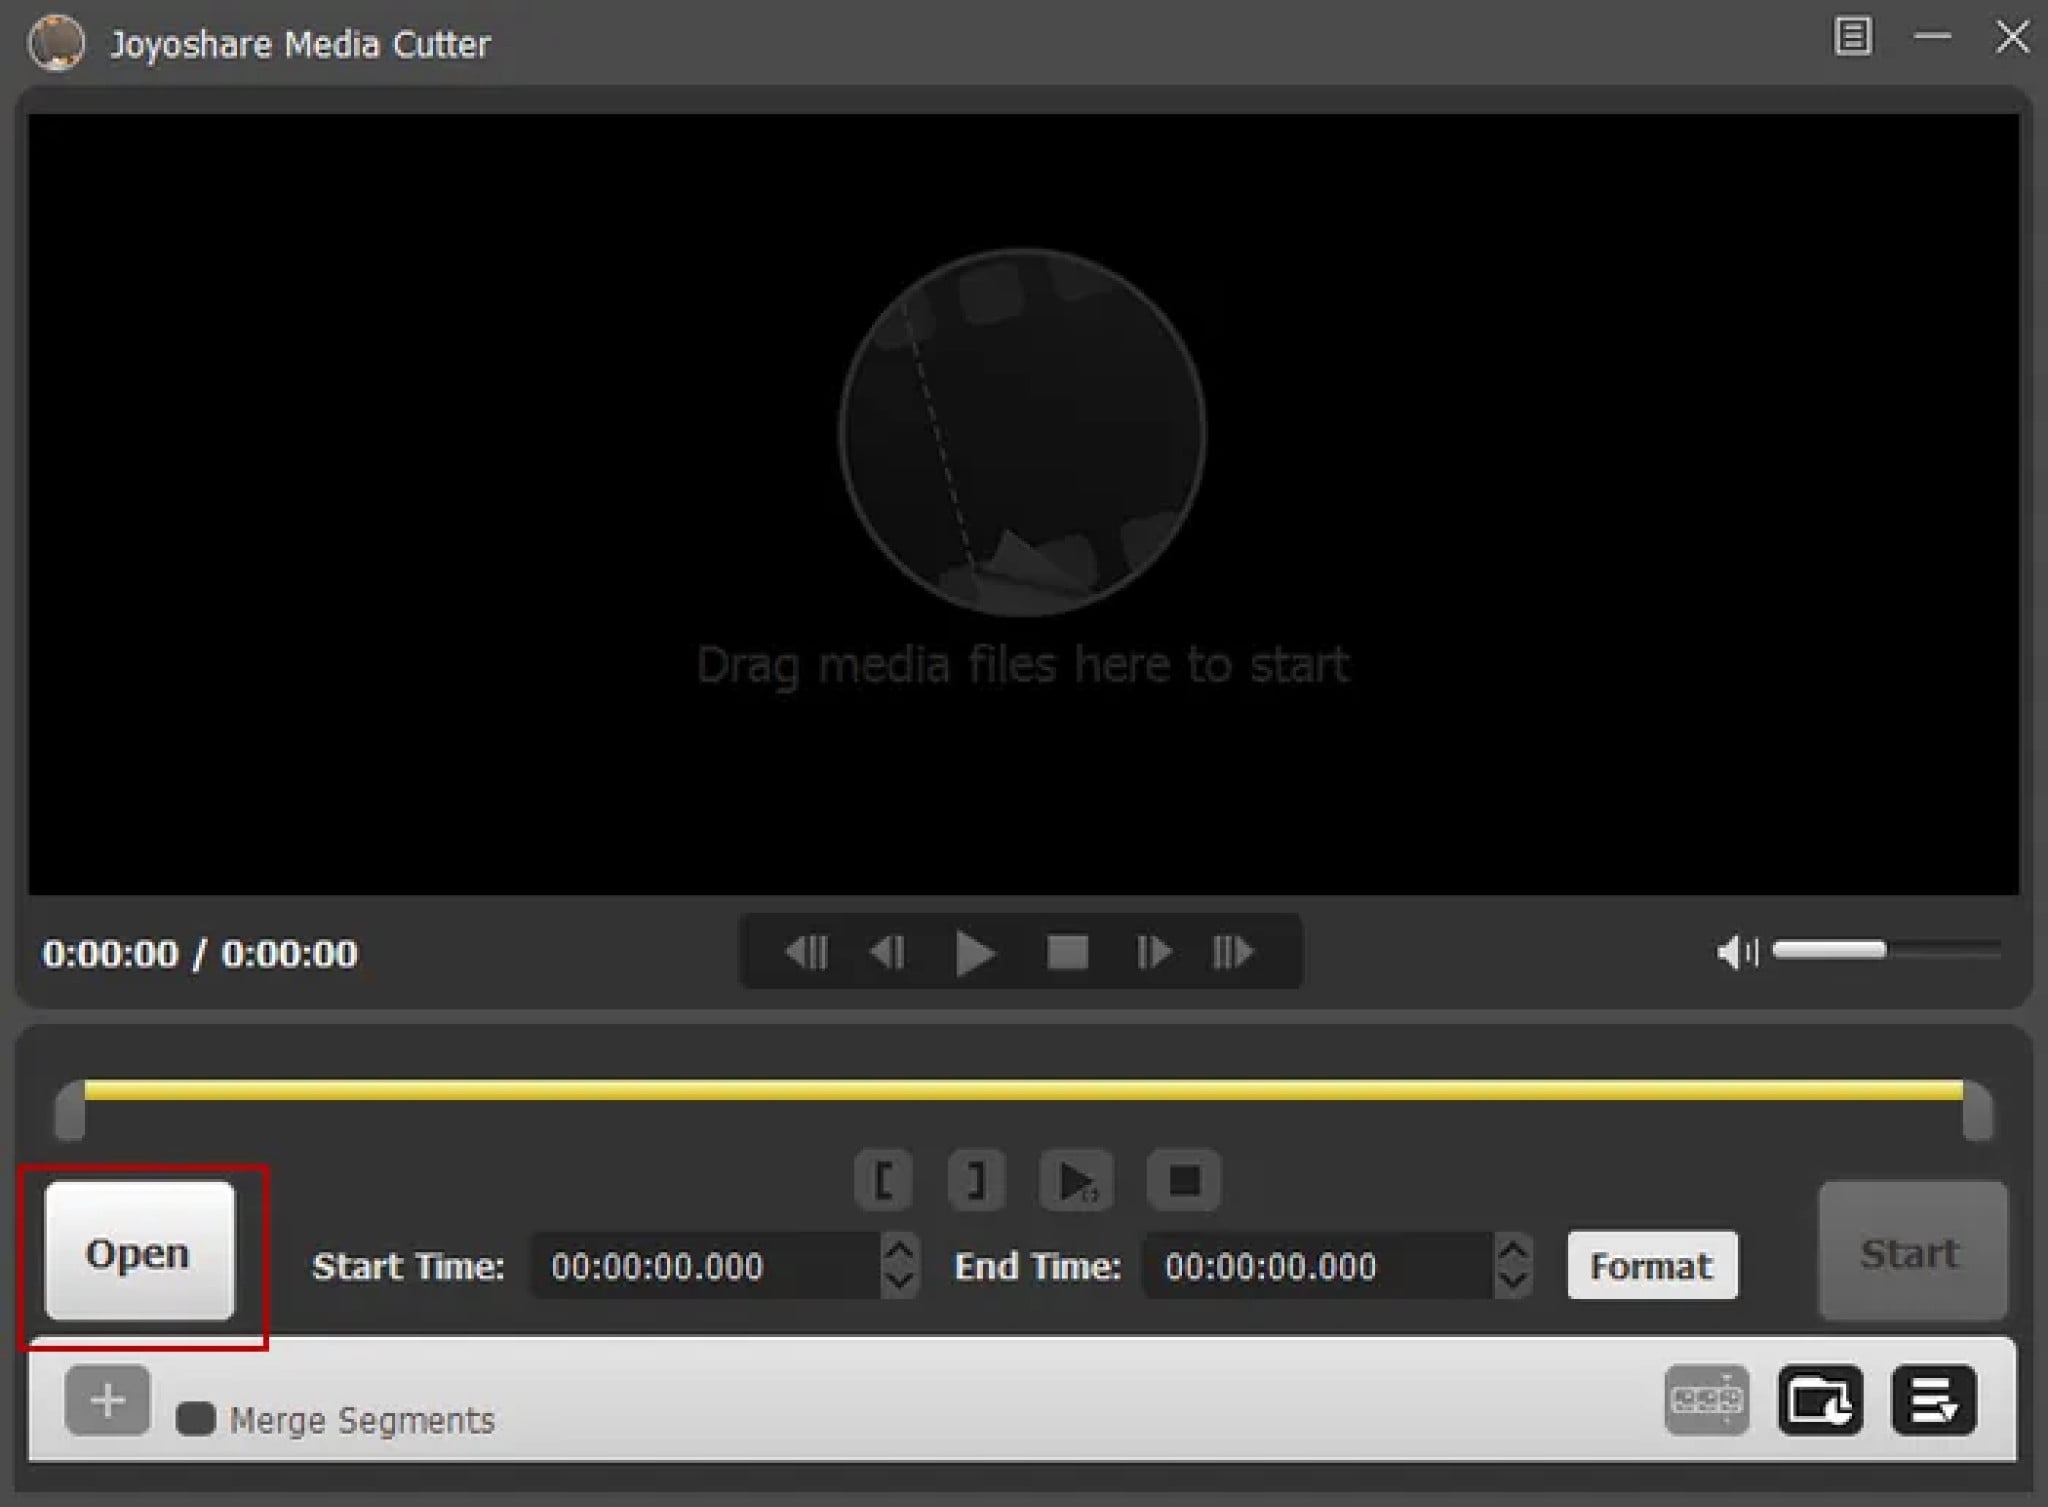
Step 2: Select the Segment to Be Trimmed
At the bottom of the Joyoshare video window, you’ll be able to see a time slider through which you can skip to your desired timeframe. Move the slider handles attached to the yellow timeline bar to set the starting and ending points of your video.
Once you’ve set your desired starting point, click on the “[” button to highlight the starting segment, then move the right-hand slider to select the ending point, and click the ] button to set the end segment.
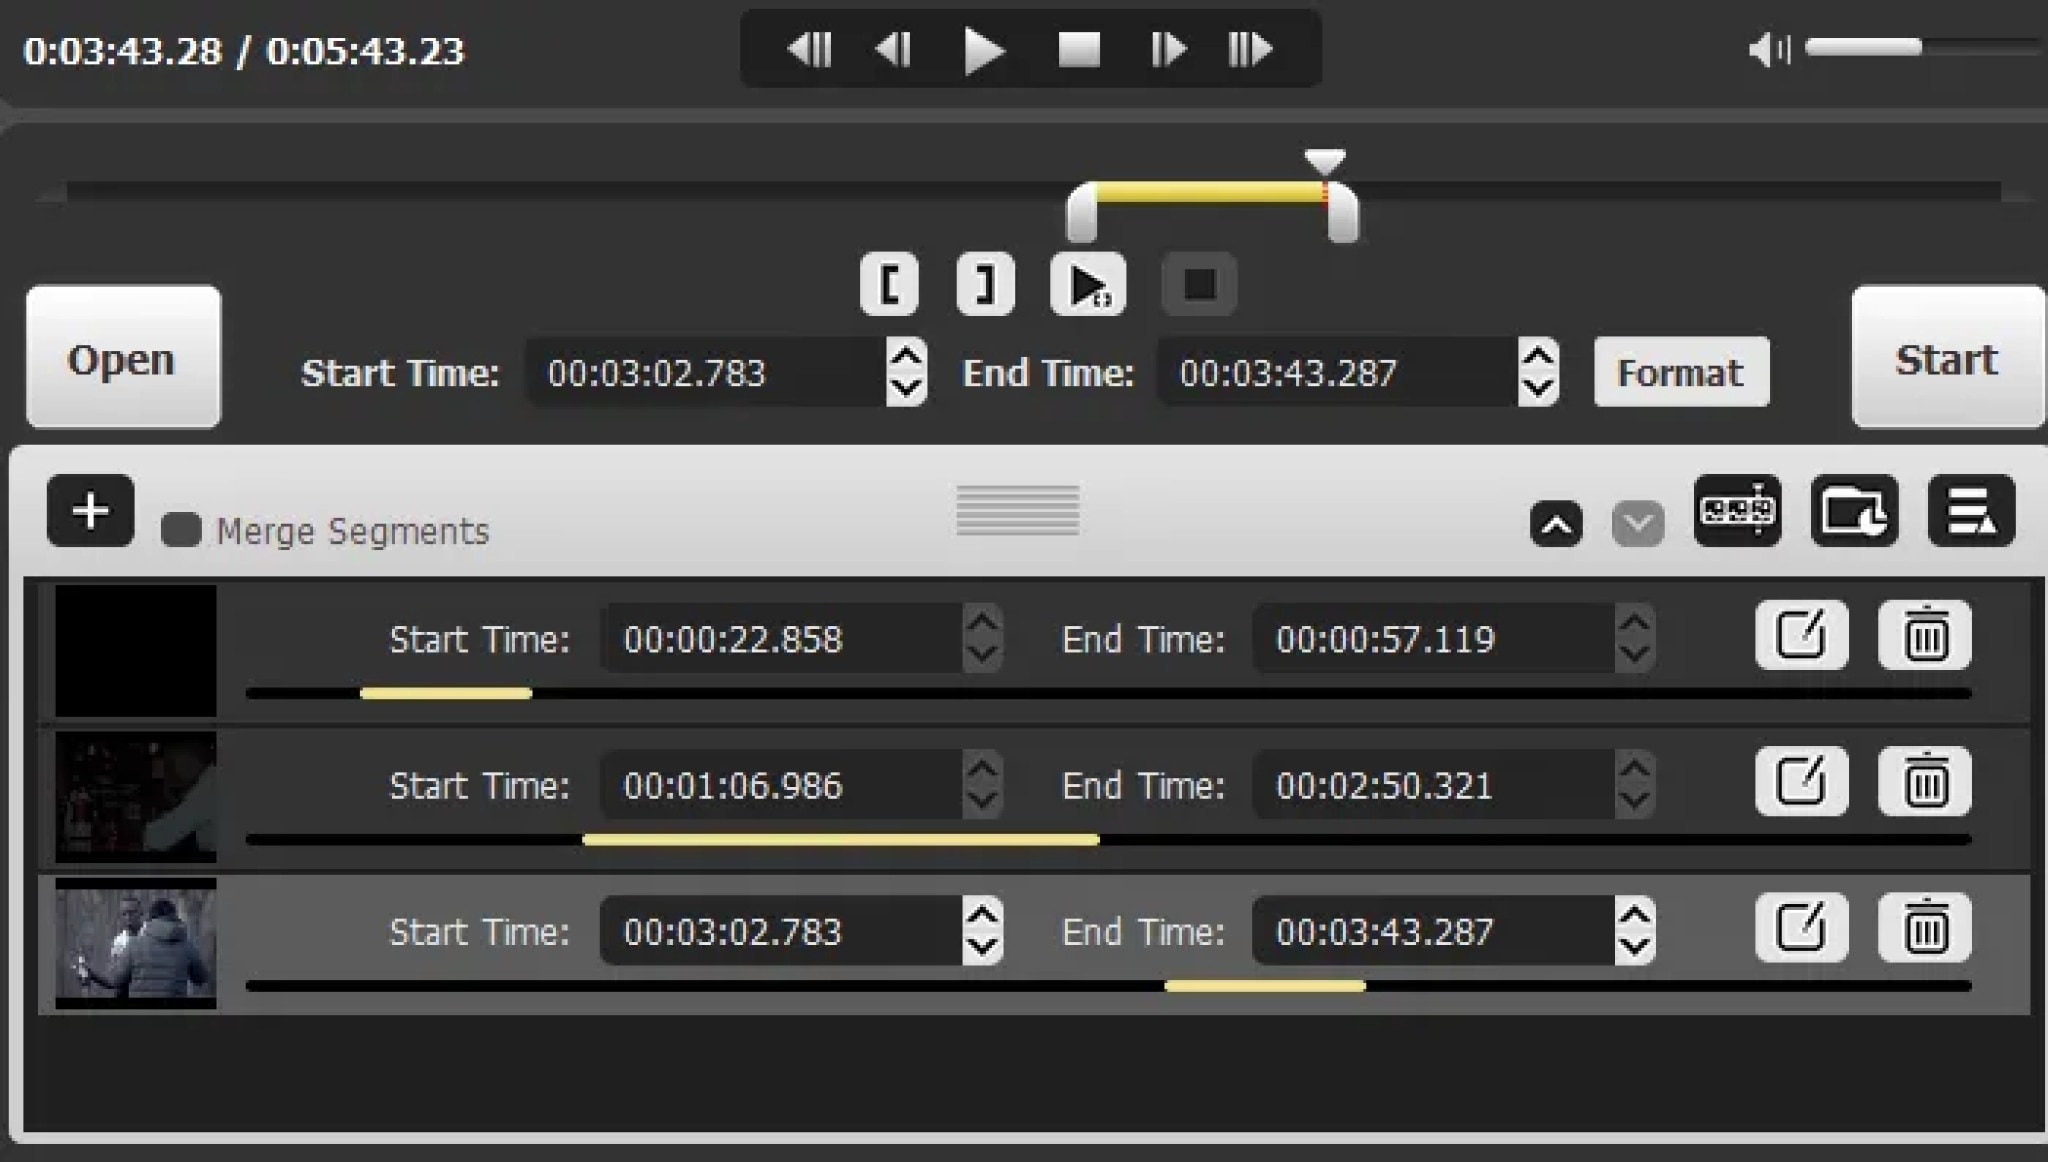
Step 3: Choose Your Desired Output Format and Destination Folder
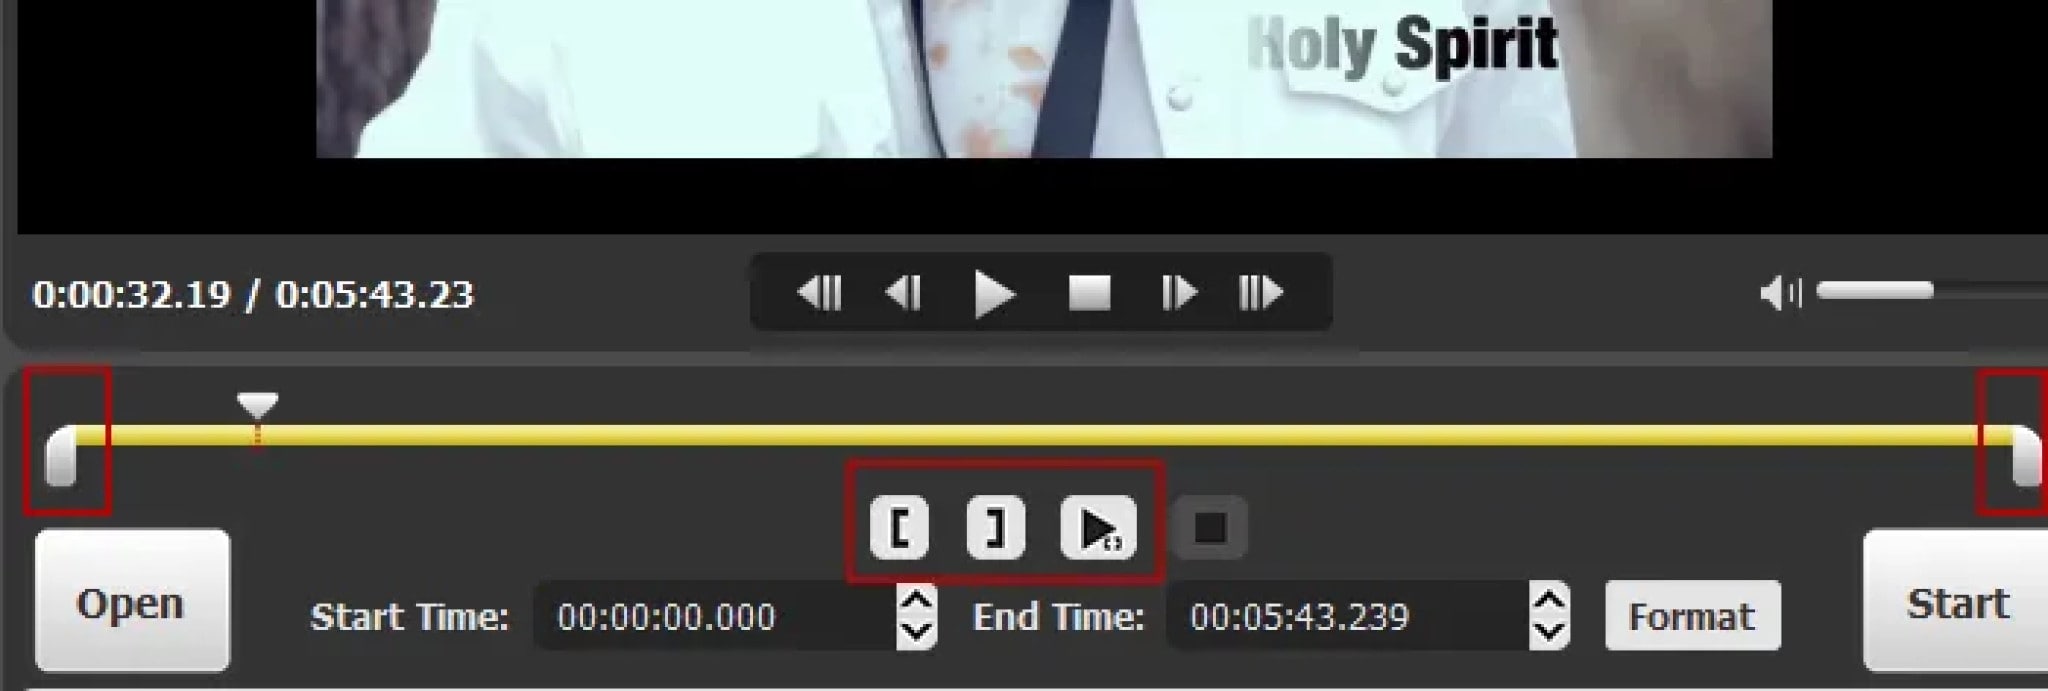
Click the “Format” button, and a new window will pop up where you’ll be able to choose your preferred output format.
Step 4: Trim the Video
Click the “Start” button to begin trimming the segment. Wait for a minute for the program to finalize trimming the segment, then click the save button. That’s it! You’ve successfully trimmed your first video.
If you wish to cut and merge several segments, click the “+” icon at the bottom of the segments tab, then follow the above procedure to create several segments.
MOVAVI VIDEO EDITOR
Supported OS: Mac and Windows
Movavi Video Editor for Mac and Windows is a simple-to-use yet effective video editor and cutter. Aside from cutting and joining short videos, it can apply various video effects, add music and titles, and so on to make your movie more visually appealing. The video cutter tool has an easy-to-use interface and outstanding instructional videos, so you can get started quickly.
Movavi comes with a bunch of video editing controls into a straightforward, user-friendly interface. PiP, chroma-key, titling, basic keyframing, and even motion tracking are included. It isn’t as feature-rich or as fast as most of the competition, but it allows you to easily create visually appealing work.
The tool is not free, but it does offer a limited-time free trial to users. However, it is a little irritating when the ad appears after you install and launch the trial version.
Features:
- Media Library
- Templates
- Upload video or audio file
- Video and image management
- Title Editor
- Trim & Slice
- Video Effect
- Slow Motion & Time Effect
- Social Sharing
- Brand Overlay
- Text Overlay
- Audio Tools
- Speed Adjustment
- Split / Merge
- Video Stabilization
Pros:
- Easy-to-understand user interface
- Transitions with sound
- Motion tracking and picture-in-picture tools
- Chroma keying
- Quick movie-creation tool
Cons:
- Lacks advanced trim modes and clip pre-trimming
- Rendering on the slow side
- Not compatible with Apple Silicon M1
Steps:
- Add Video Files
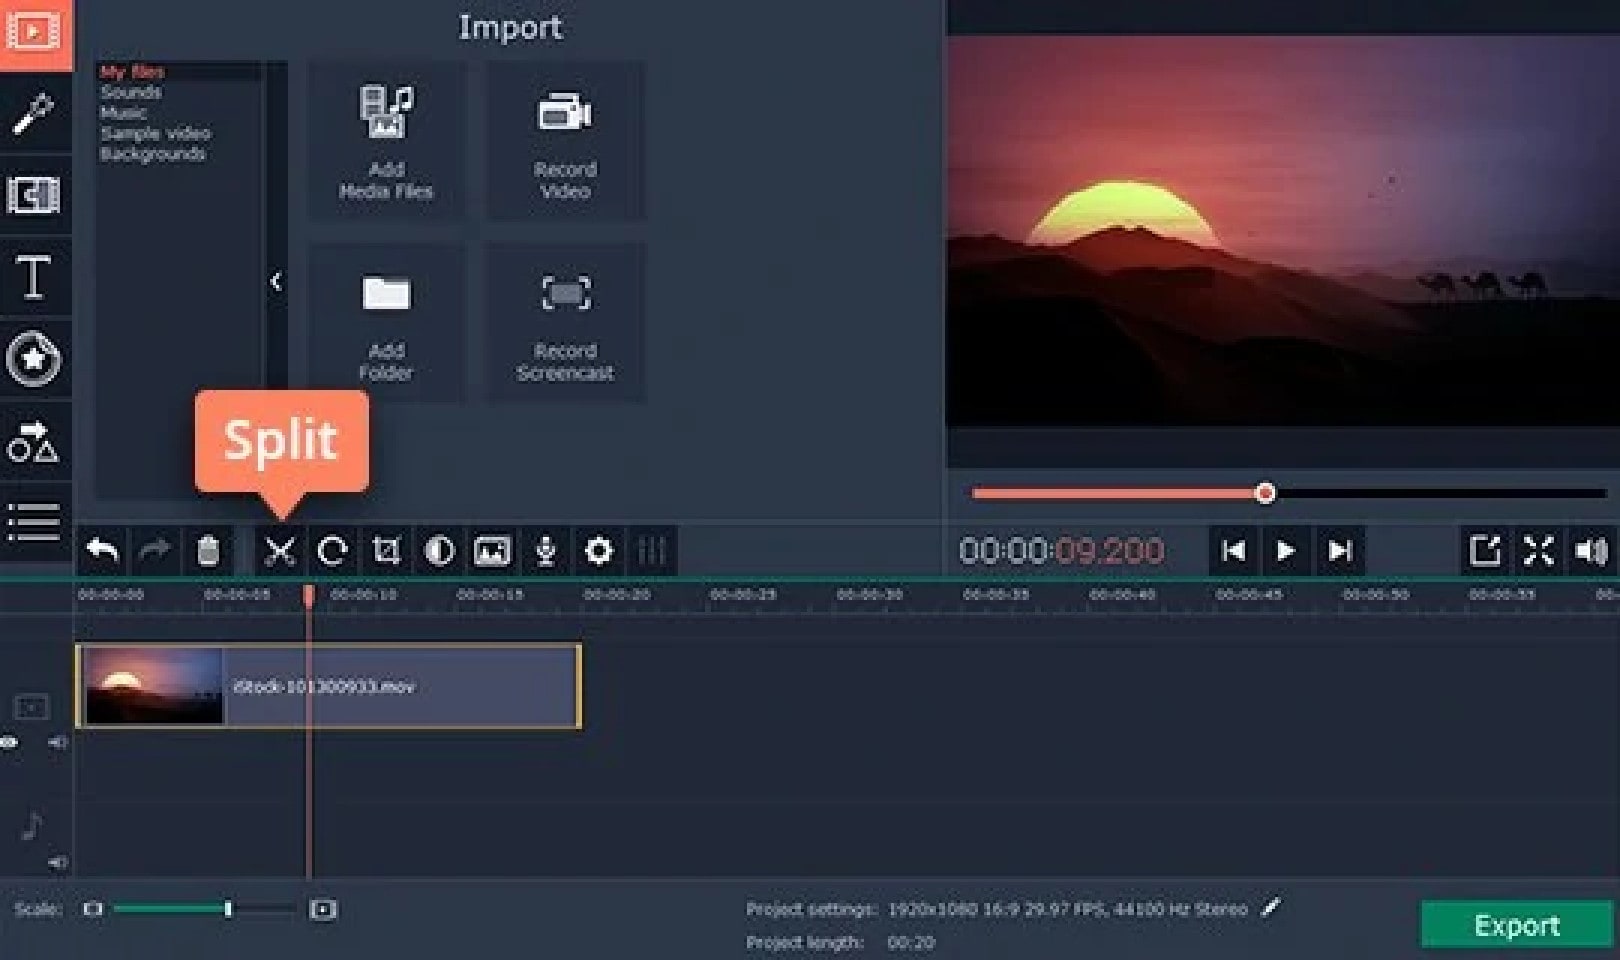
Launch Movavi’s MP4 trimmer, click the Add Media Files button, and upload the MP4 files you want to work with. The videos you’ve added will appear on the Timeline in the lower part of the program window.
- Cut And Trim Your Videos

So how to cut MP4 video with Movavi Video Editor Plus? If you want to snip a video into two or more parts, click the file on the Timeline and move the red marker to the place where you want to make the first cut. Then click the Split button with the scissors icon or hit Ctrl+B. Repeat the process as many times as you need.
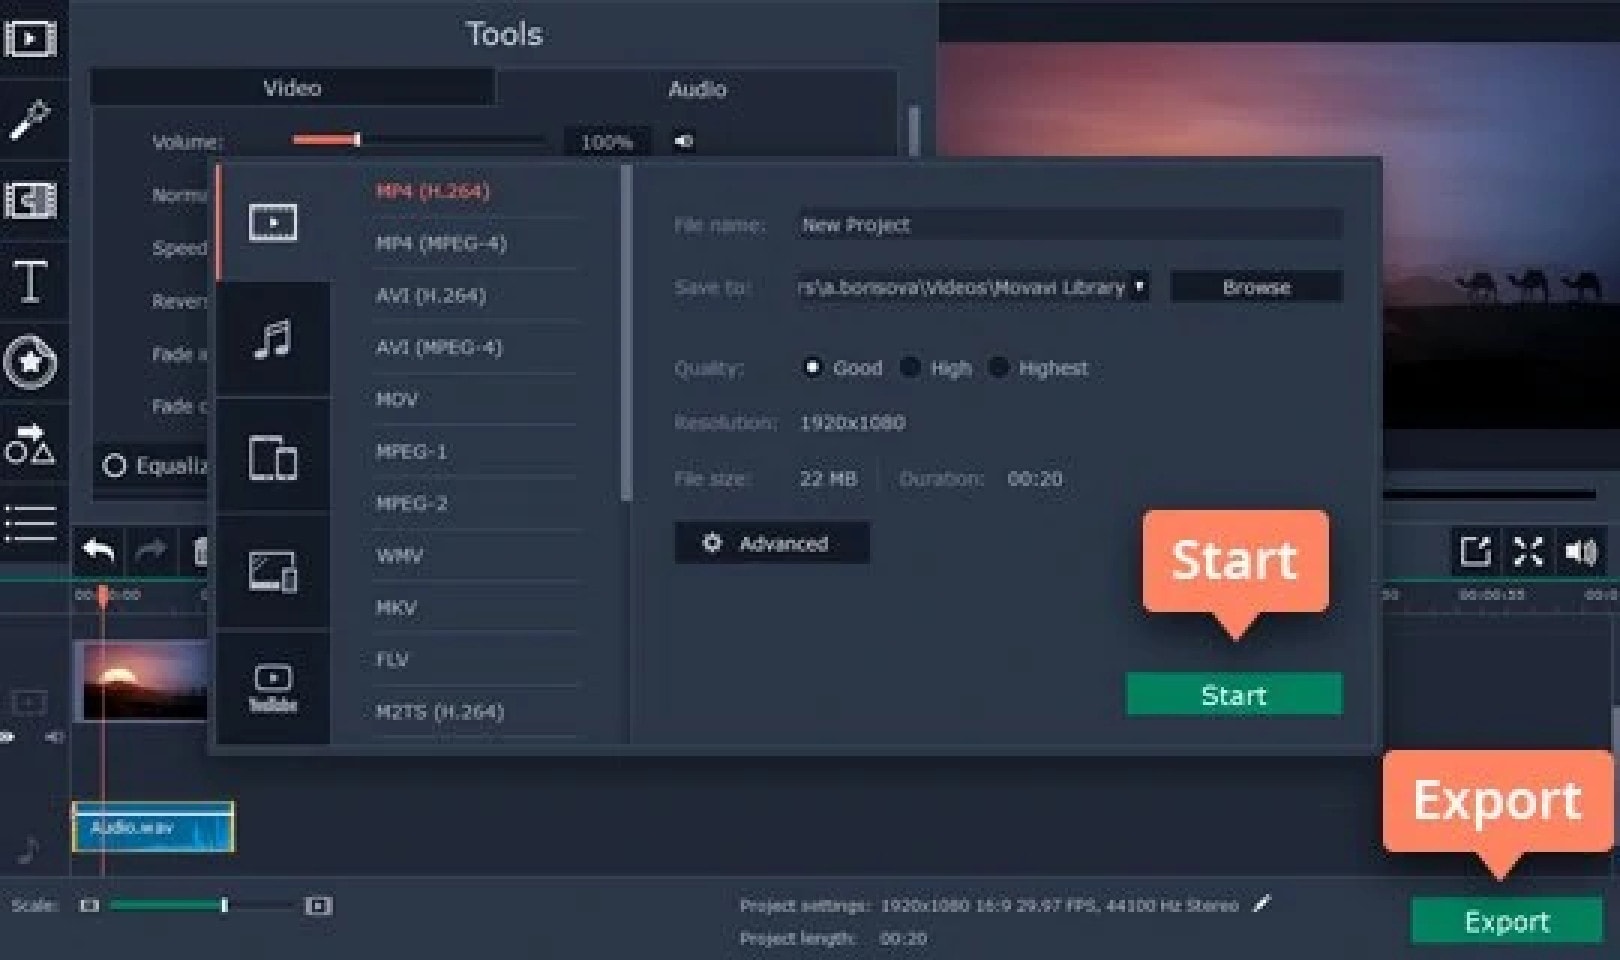
If you want to trim your video clip, select the file on the Timeline and then just pull the edge of the clip to shorten it as shown in the picture.
- Save The Result
All that’s left to do is save your edited video. Click the Export button, choose the appropriate video format, and hit Start.
XILISOFT VIDEO CUTTER

Supported OS: Mac and Windows
Xilisoft Video Cutter is an effective programming cutter that lets you choose and cut your preferred segments in a single file as well as cut out the segments you don’t like. It is compatible with almost all popular video formats, including VCD, AVI, MPEG, MP4, WMV, 3GP, /MPEG-4 AVC, /PSP AVC, MOV, ASF, and others. It enables you to precisely set the start and end points.
While the software cannot cut segments from multiple input files at the same time, it can cut your selected source video into the number of clips you require in a single step. Xilisoft Video Cutter goes beyond standard cutting or slicing by allowing you to convert your video input files to a variety of well-known codecs. It is possible to convert the entire source file or just a specific segment, but this requires removing those unnecessary parts that frequently cause problems (TV advertisements, trailers, etc.).
Features:
Easily Cut Video Clips
Multi-trim Video to Whole
Output Clips to Multiple Formats
Instant Preview
Clear Timeline
Advanced Editing
1-2-3 Interface
Multilingual Interface
Pros:
Supports all of the most widely used video file formats
Converts your videos between formats
Simple cutting interface
Allows for multiple cuttings from a single source file
Cons:
Does not support batch processing
Steps On How To Cut Your Favored Segments:
- Add Source Video File

Click the “Open“ button on the main interface, and select a video file in the pop-up window.
- Set Clip Segments
Click “Play” and click the “Set Start Point” and “Set End Point” buttons successively during playing the video to set the start point and endpoint of the clip.
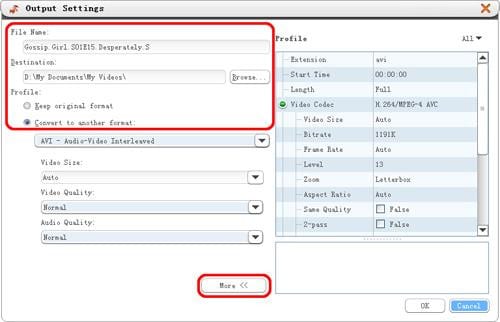
You can also set several segments. Click the “Show Advanced Mode” button and click the “New Clip” button in advanced mode to set the start and endpoints of the segments. Repeat the above steps to set several segments.
Tip: To delete a segment, please choose the segment in the segment list, and click the “Delete Clip” button on the toolbar; to adjust the segment order, please choose the segment and click the “Move Up” or “Move Down” button to adjust its order.
- Output Settings
Click the “Cut” button at the bottom of the window to open the “Output Settings” window.
- Start Cutting
Click the “OK” button to start video cutting. During cutting, you can check the cutting status by dragging the process bar or canceling the cutting. Tip: After cutting is done, click the “Open Output Folder” button to open the destination folder to check the clippings. Click the “Done” button to go back to the main window.
WHICH SHOULD I CHOOSE: FREE OR PAID VIDEO CUTTER ON MAC?
Whether you choose Free or Paid Video Cutter, it still depends on your edit and navigation if the project will succeed like what you’re anticipating. Beginners in the industry can go for Free Video Cutters to practice the craft without worrying about the monthly subscription.
However, if you’re a professional, I highly suggest that you choose Paid Video Cutter to lessen the hassle and create amazing output.
FAQS ABOUT CUTTING VIDEOS
- How can I cut a video without losing quality?
Trimming VLC through LosslessCut
LosslessCut is an open-source video cutter that runs on Windows, Linux, and Mac. Like Filmora, this software also allows you to cut videos without re-encoding, so there is no loss of quality.
- Who is the best video cutter?
Filmora is one of the best video cutter software that allows you to change the aesthetic of your video with one click. It comes with a wide range of video effects that enable you to make clips look good. Features: This tool provides fast editing processing and adjustable preview quality.
- Why does trimming videos reduce quality?
In most cases, trimming only causes a minor loss of video quality. And there is no clear causal relationship between trimming and losing video quality. The main factors that influence video quality are Resolution, Bitrate, and Frame size.
If you are longing to pick up the best video cutter for Mac, you are supposed to evaluate it from different aspects, like operating interface, cutting features, output quality, post-processing ability, etc. Frankly speaking, there is no fixed answer. Everything depends on your actual requirements. If you want to cut videos on Mac with the forthright method, iMovie can be your top priority. If you prefer top-leading editing features, Blender is competitive enough for you.
Conclusion:
There you have it! Here is the alternative software to cut/shorten your video without using FFmpeg. All these editors cater to different needs, so be sure to try them out, understand your requirements, and use the right one for your project!
FILMORA VIDEO EDITOR
Supported OS: Windows and Mac
Filmora Video Editor is another well-known video editor that is widely used for video editing. It was released two decades ago to provide low-cost video editing software. Aside from video cutting and joining, it has some great features such as adding filters, titles, texts, and so on. You can also record your voice or live music, mix audio and video tracks, and do other things. It is simple to use and is available for both Mac and Windows users.
Filmora includes an instant cutter tool that can be used throughout clip import and is designed for use with large amounts of high-resolution content. As the names indicate, it is very simple and serves only one purpose. You can drag multiple clips onto its window, but only if the Merge sub-mode is enabled. Trim mode is only for trimming the ends of a single clip, and its interface only displays one clip in the left-size source tray. You can Add Segments, which creates a new clip based on your trimmed original, but you can’t split a clip explicitly.
For Win 7 or later (64-bit)
For macOS 10.14 or later
Features:
- All editing tools and features are well-displayed in the main windows, which can be found and used easily;
- Very easy to cut or trim video files just with a few clicks;
- Lots of filters, overlays, motion graphics, titles, and more special effects can be added to the video.
- More features like Picture in Picture and Green Screen and Split Screen can be used to make videos more unique.
Pros:
- Intuitive Interface
- Easy To Use
- Great Features
- Affordable Perpetual License
- Great Final Video Results
- Faster Renders And Previews
- Supports Screen Capturing
- Support Wide Range Of File Formats
- User Support Is Good
Cons:
- Lacks Advanced Feature
- Free Version Has Watermark
- Not Available For Linux And Phones
- Pricing Is Expensive
- Software Lagging
Steps On How To Cut Video On Mac Using Filmora Video Editor
Step 1: Import Video Files
You will begin by importing the video files into the project window of your program through dragging and dropping.
Step 2: Add Video To The Timeline
Drag and dropping are the easiest way to add the video to the timeline.
Step 3: Cut Video
If you want to trim the video, just move the cursor at the beginning or end of the video. When the cursor becomes a cross, move it forward or backward. Trimming only allows you to cut the beginning or end of a video.
If you need to cut a section of a video, you should follow do this: move the cursor at the beginning of the video section you want to cut, then click the scissors icon > Next, move the cursor to the end of the video section you want to cut and click scissors icon > Right-click on the video section you want to cut and click “Delete“.
Step 4: Export the Video
To export your video, click the “export” button and choose the local tab. After selecting the output device and format, just click “Create” to save it.
HANDBRAKE
Supported OS: Linux, Windows, and Mac
HandBrake is a multithreaded video transcoder that is unfastened and open source. It can compress and convert nearly any virtual media layout to another. HandBrake is able to rip encrypted DVDs the usage of libdvdcss (libdvdcss is covered with the VLC media participant on macOS and AnyDVD/DVD forty three on Windows).
This software program additionally enables batch processing, which converts a couple of video files at the same time. Additionally, a plethora of presets are available to guide you to the preferred output without having to tinker with a plethora of options.
Handbrake is a powerful and excellent video converter for Windows, Mac, and Linux that should not be overlooked. It provides all of the necessary features in a simple tool that gives the user complete control over the output. Before we get into the specifics, here’s a rundown of Handbrake’s advantages and disadvantages.
Features:
- Support of chapter selections
- Support of subtitles
- Integrated bitrate calculator
- Picture deinterlacing, cropping, and scaling
- Live Video Preview
Pros:
- HandBrake has a very simple layout which makes the video converter very easy to use, even for those who are converting videos for the first time.
- The live preview helps.
- The fact that the software is free and has device presets for iOS and Android certainly makes HandBrake a welcome video converter.
- The queuing tray for batch conversions is particularly nice.
- People who convert a lot of videos will find it very helpful.
Cons:
- On the flip side, the settings are not always easy to deal with.
- It takes a lot of time and then there are errors. The latest version fixes some old bugs but there are hiccups.
- The live preview is for up to four minutes of a video.
- It is futile for very long videos.
- The settings interface and that of the live preview could be better.
- The open-source software also doesn’t support all video formats.
- Given the diversity of devices and the multitude of formats in use today, HandBrake needs more compatibility.
Steps On How To Compress Video Using Handbrake
- After you download and install Handbrake, open the app. On the left side, under ‘Source Selection’, click ‘File’. Select the file from the folder and then click ‘open’.
- Choose where you want the compressed video to be saved by clicking ‘Browse’.
- Enter a name for the video, and click ‘Save’.
- Under ‘Output Settings’, choose MP4 for ‘Container’.
- Click the ‘Video’ tab, under it, is the ‘Video Codec’, choose (x264).
- Select a Preset from the ‘Preset Drawer’. We recommend you choose Fast1030p 30 for high quality.
- Choose the ‘framerate’, depending on your source video i.e. NTSC (29.97fps), then make it 30fps by choosing 30. Also, tick the ‘Constant Framerate’ to ensure better compatibility.
- Enter an ‘Average Bitrate (kbps)’ for the video between 5,000-10,000 (take note: higher bitrate has higher quality video but will take longer to upload and download).
- Click the ‘Picture’ tab if you want to change the video frame size or resolution.
Change ‘Anamorphic’ to ‘None’, and ‘Modulus’ to ‘16’. And tick ‘Keep Aspect Ratio’. Use the arrow down on Width to change from 1920 (full HD) down to 1280.
Select the ‘Audio’ tab and choose 48 for the Samplerate. Choose Stereo for Mixdown. Choose 320 for your audio Bitrate.
- Hit the ‘Start Encode’ button and wait until the video has finished compressing. Handbrake will let you know when it has finished.
SHUTTER ENCODER
Supported OS: Mac, Linux, and Windows
Shutter Encoder offers a complimentary codec and conversion tool for everyone that was created in collaboration with video editors.
Convert your videos, images, and audio files to OP-Atom format, which is compatible with Avid Media Composer and Pro Tools. Encode your files, replace audio, burn to DVD, analyze audio volume, download web videos, and create your own timelapse.
Analyze audio loudness, replace audio, author DVDs and Blu-rays, create image sequences, download web videos, and more. Everything is done as simply and efficiently as possible
Shutter Encoder makes use of Java as well as other tools such as 7za, VLC, FFmpeg, ExifTool, MKVMerge (part of MKVToolNix), MediaInfo, DVDAuthor, youtube-dl, and others.
Shutter Encoder offers advanced users the option to tailor the conversion individually. You can, for example, manually change the bitrate of audio and video, but you can also set a file size limit and perform the conversion based on that. Further work techniques, such as the ability to enable hardware of the computer itself and complete the conversion according to a predefined profile, are available in a separate box.
Features:
- Without conversion: Cut without re-encoding, Replace audio, Rewrap, Conform, Merge, Subtitling (create subtitles for a video), Video inserts
- Sound conversion: WAV, AIFF, FLAC, MP3, AC3, OPUS, OGG
- Editing codecs: DNxHD, DNxHR, Apple ProRes, QT Animation, Uncompressed YUV
- Output codecs: , DV PAL, XDCAM HD422, AVC-Intra 100, XAVC, HAP, , VP9, AV1, OGV, MJPEG, Xvid, WMV, MPEG
- Archiving codec: FFV1
- Image creation: JPEG, PNG, TIF, TGA, DPX, BPM, ICO, WEBP
- Burn & Rip: DVD, Blu-ray, DVD RIP
- Analysis: Loudness & True Peak, Audio normalization, Cut detection, Black detection
- Download web videos using youtube-dl
Pros:
- Conversion according to profiles
- Extensive advanced options
- Built-in editing capabilities
Cons:
- Limited preview capability
Steps On How To Use Shutter Encoder
- To start, drag the video from your file manager and drop it onto the Shutter Encoder window, or use the ‘Browse’ button available in the upper left-hand side corner of the window to add a video.
- Next, from the ‘Choose function’ drop-down menu, scroll to (it’s the first under Output codecs). You will now see some new options in a new panel that appears on the right-hand side of the Shutter Encoder window. From there, if you want to crop the video, click the Crop checkbox:
A new window will pop up where you can use your mouse to crop the video to the desired size. If you want to change it to a predefined, fixed-size ratio value, uncheck the ‘Manual mode’ box, and you’ll be able to choose a ratio from the ‘Pre-settings’ drop-down.
Next, if you want to change the profile, expand the ‘Advanced features’ item in the Shutter Encoder sidebar, check the box for the Force profile option, then change the profile to what you want to use:
- When you’re done with the video adjustments you want to make, click the ‘Start function’ button, and Shutter Encoder will begin encoding your new video.
AVIDEMUX
Supported OS: Linux, BSD, Mac OS X, and Microsoft Windows
Avidemux offers three fundamental operations: cutting, encoding, and filtering. Cutting allows users to copy, paste, save, or delete a specific part of a video and is incredibly beneficial when users are only interested in a small portion of a video or want to remove commercials from a TV show that they have recorded.
Encoding, on the other contrary, is the way of transforming a video to various formats so that it can be played on different players. Users of Avidemux can use this feature on videos they want to use for business or archive for personal use. They could also use this to convert a video that they intend to post online.
Users can also use Avidemux to filter their videos, which include incorporating subtitles and color profiles, deinterlacing, resizing and sharpening the image of a video, and increasing or decreasing the overall volume of the audio.
Meanwhile, Avidemux has task automation features that make video processing and editing quick and painless. A feature called Joblist allows users to organize their projects in a queue so that they can access their files from a single location. They can use this queue to handle videos in bulk as well.
Features:
- Multiple Formats
- Video Filters
- Advanced Interlacing
- Full Editing Control
- Simple Interface
- Open Source
Pros:
- Covers standard formats.
- All essential features are present.
- Surprisingly advanced filtering, processing, editing, and filtering controls.
- The interface is easy to learn.
- Open-source
Cons:
- The interface is very legacy and needs remodeling
- No longer updated
- No support
Steps On How To Cut Videos On Avidemux:
- Open up Avidemux, and load the video file that you want to work with. If you get a prompt like this one: we recommend clicking Yes to use the safer mode.
Find the portion of the video that you’d like to isolate. Get as close as you can to the start of the clip you want to cut.
You want it to read I; if it isn’t framed type I, then use the single left and right arrow buttons to go forward or backward one frame until you find an appropriate I frame.
- Once you’ve found the right starting frame, click the button with the A over a red bar. This will set the start of the clip.
- Advance to where you want your clip to end. Click on the button with a B when you’ve found the appropriate frame. This frame can be of any type.
- You can now save the clip, either by going to File –> Save –> Save Video, or by pressing Ctrl+S. Give the file a name, and Avidemux will prepare your clip.
BEST PAID FFMPEG ALTERNATIVE TO CUT VIDEO ON MAC
JOYOSHARE MEDIA CUTTER
Supported OS: Mac and Windows
The best video cutting tool is Joyoshare Media Cutter for Windows (or Mac). As a professional video trimmer, it allows you to cut your media files at a 60X faster rate, allowing you to clip a 60-minute video or audio file in just one minute. The interface design is also simple and clean, allowing you to do it quickly.
Another noteworthy feature is the ability to easily cut and merge both video and audio without sacrificing quality. The cropper supports a variety of video and audio formats, including AVI, MP4, MPEG, VOB, WMV, ASF, RM, RMVB, 3GP, MP3, WMA, M4R, and others, allowing you to save the file in any format and on any device, including Apple.
More notably, this is a capable all-in-one video cutter. In addition to cutting videos and audio, it can convert all popular video formats, extract audio from video files, and merge video and audio files from the same source into a new one.
Features:
Convert to Any File Format
Merge Video and Audio Files into Multiple Formats
Improved Accuracy & Efficiency in Cutting Videos
60X Fast Conversion
Pros:
- Offers an easy way to cut, merge, and convert video files
- Blazing fast video-cutting and file-conversion speed
- Supports multiple audio and video file formats
Cons:
- Can only merge videos from the same source. That means you can’t use the program to merge separate videos from your gallery.
- The program doesn’t offer an easy way to remove an unwanted part of a video if it’s in the middle of the video. The only way to do that is by cutting the section before and after the video, then merging them into one.
Steps:
Step 1: Adding Video
To add a video, click the “Open” button. Locate the video you want to trim from your collection and open it. Alternatively, you can use the drag-and-drop feature.
Step 2: Select the Segment to Be Trimmed
At the bottom of the Joyoshare video window, you’ll be able to see a time slider through which you can skip to your desired timeframe. Move the slider handles attached to the yellow timeline bar to set the starting and ending points of your video.
Once you’ve set your desired starting point, click on the “[” button to highlight the starting segment, then move the right-hand slider to select the ending point, and click the ] button to set the end segment.
Step 3: Choose Your Desired Output Format and Destination Folder
Click the “Format” button, and a new window will pop up where you’ll be able to choose your preferred output format.
Step 4: Trim the Video
Click the “Start” button to begin trimming the segment. Wait for a minute for the program to finalize trimming the segment, then click the save button. That’s it! You’ve successfully trimmed your first video.
If you wish to cut and merge several segments, click the “+” icon at the bottom of the segments tab, then follow the above procedure to create several segments.
MOVAVI VIDEO EDITOR
Supported OS: Mac and Windows
Movavi Video Editor for Mac and Windows is a simple-to-use yet effective video editor and cutter. Aside from cutting and joining short videos, it can apply various video effects, add music and titles, and so on to make your movie more visually appealing. The video cutter tool has an easy-to-use interface and outstanding instructional videos, so you can get started quickly.
Movavi comes with a bunch of video editing controls into a straightforward, user-friendly interface. PiP, chroma-key, titling, basic keyframing, and even motion tracking are included. It isn’t as feature-rich or as fast as most of the competition, but it allows you to easily create visually appealing work.
The tool is not free, but it does offer a limited-time free trial to users. However, it is a little irritating when the ad appears after you install and launch the trial version.
Features:
- Media Library
- Templates
- Upload video or audio file
- Video and image management
- Title Editor
- Trim & Slice
- Video Effect
- Slow Motion & Time Effect
- Social Sharing
- Brand Overlay
- Text Overlay
- Audio Tools
- Speed Adjustment
- Split / Merge
- Video Stabilization
Pros:
- Easy-to-understand user interface
- Transitions with sound
- Motion tracking and picture-in-picture tools
- Chroma keying
- Quick movie-creation tool
Cons:
- Lacks advanced trim modes and clip pre-trimming
- Rendering on the slow side
- Not compatible with Apple Silicon M1
Steps:
- Add Video Files
Launch Movavi’s MP4 trimmer, click the Add Media Files button, and upload the MP4 files you want to work with. The videos you’ve added will appear on the Timeline in the lower part of the program window.
- Cut And Trim Your Videos
So how to cut MP4 video with Movavi Video Editor Plus? If you want to snip a video into two or more parts, click the file on the Timeline and move the red marker to the place where you want to make the first cut. Then click the Split button with the scissors icon or hit Ctrl+B. Repeat the process as many times as you need.
If you want to trim your video clip, select the file on the Timeline and then just pull the edge of the clip to shorten it as shown in the picture.
- Save The Result
All that’s left to do is save your edited video. Click the Export button, choose the appropriate video format, and hit Start.
XILISOFT VIDEO CUTTER
Supported OS: Mac and Windows
Xilisoft Video Cutter is an effective programming cutter that lets you choose and cut your preferred segments in a single file as well as cut out the segments you don’t like. It is compatible with almost all popular video formats, including VCD, AVI, MPEG, MP4, WMV, 3GP, /MPEG-4 AVC, /PSP AVC, MOV, ASF, and others. It enables you to precisely set the start and end points.
While the software cannot cut segments from multiple input files at the same time, it can cut your selected source video into the number of clips you require in a single step. Xilisoft Video Cutter goes beyond standard cutting or slicing by allowing you to convert your video input files to a variety of well-known codecs. It is possible to convert the entire source file or just a specific segment, but this requires removing those unnecessary parts that frequently cause problems (TV advertisements, trailers, etc.).
Features:
Easily Cut Video Clips
Multi-trim Video to Whole
Output Clips to Multiple Formats
Instant Preview
Clear Timeline
Advanced Editing
1-2-3 Interface
Multilingual Interface
Pros:
Supports all of the most widely used video file formats
Converts your videos between formats
Simple cutting interface
Allows for multiple cuttings from a single source file
Cons:
Does not support batch processing
Steps On How To Cut Your Favored Segments:
- Add Source Video File
Click the “Open“ button on the main interface, and select a video file in the pop-up window.
- Set Clip Segments
Click “Play” and click the “Set Start Point” and “Set End Point” buttons successively during playing the video to set the start point and endpoint of the clip.
You can also set several segments. Click the “Show Advanced Mode” button and click the “New Clip” button in advanced mode to set the start and endpoints of the segments. Repeat the above steps to set several segments.
Tip: To delete a segment, please choose the segment in the segment list, and click the “Delete Clip” button on the toolbar; to adjust the segment order, please choose the segment and click the “Move Up” or “Move Down” button to adjust its order.
- Output Settings
Click the “Cut” button at the bottom of the window to open the “Output Settings” window.
- Start Cutting
Click the “OK” button to start video cutting. During cutting, you can check the cutting status by dragging the process bar or canceling the cutting. Tip: After cutting is done, click the “Open Output Folder” button to open the destination folder to check the clippings. Click the “Done” button to go back to the main window.
WHICH SHOULD I CHOOSE: FREE OR PAID VIDEO CUTTER ON MAC?
Whether you choose Free or Paid Video Cutter, it still depends on your edit and navigation if the project will succeed like what you’re anticipating. Beginners in the industry can go for Free Video Cutters to practice the craft without worrying about the monthly subscription.
However, if you’re a professional, I highly suggest that you choose Paid Video Cutter to lessen the hassle and create amazing output.
FAQS ABOUT CUTTING VIDEOS
- How can I cut a video without losing quality?
Trimming VLC through LosslessCut
LosslessCut is an open-source video cutter that runs on Windows, Linux, and Mac. Like Filmora, this software also allows you to cut videos without re-encoding, so there is no loss of quality.
- Who is the best video cutter?
Filmora is one of the best video cutter software that allows you to change the aesthetic of your video with one click. It comes with a wide range of video effects that enable you to make clips look good. Features: This tool provides fast editing processing and adjustable preview quality.
- Why does trimming videos reduce quality?
In most cases, trimming only causes a minor loss of video quality. And there is no clear causal relationship between trimming and losing video quality. The main factors that influence video quality are Resolution, Bitrate, and Frame size.
If you are longing to pick up the best video cutter for Mac, you are supposed to evaluate it from different aspects, like operating interface, cutting features, output quality, post-processing ability, etc. Frankly speaking, there is no fixed answer. Everything depends on your actual requirements. If you want to cut videos on Mac with the forthright method, iMovie can be your top priority. If you prefer top-leading editing features, Blender is competitive enough for you.
Conclusion:
There you have it! Here is the alternative software to cut/shorten your video without using FFmpeg. All these editors cater to different needs, so be sure to try them out, understand your requirements, and use the right one for your project!
Also read:
- Updated How to Use LUTs in Adobe Premiere Pro for 2024
- New Top 6 End Screen Makers
- New In 2024, 20 Must-Have Graduation Songs
- Updated 2024 Approved Easy Guide to Overlay Videos in Premiere Pro
- New In 2024, Best 9 Amv Makers for Computer
- A Guide to Color Grade Your Picture in LightRoom
- Updated 2024 Approved 18 Video Editors Weve Tested Heres What We Learned
- Your Search for the Best GIF Creator Tools Ends Here for 2024
- Learn to Merge Clips in DaVinci Resolve with Simple Steps for 2024
- Updated Why You Should Master Slideshows In Lightroom, Fresh Insight for 2024
- Updated Detailed Guide to the Best Convertors for Turning GIF Into PDF Files. Know Their Features, Pros, Cons, and More
- In 2024, If You Are Looking for Reliable Solutions to Export Your Musical Slideshow Through a DVD Burning Process, Take a Breath, You Have Landed at the Right Place
- New Best Free Video Editing Software to Boost Your Content Creation
- Have You Ever Created a Slow Motion Video on Your Phonr or Camera? This Article Will Show You some Knowledge About Slow Motion Photography for 2024
- New Steps to Add Subtitles in Canva
- New Dollar-Store DIY Hacks to Use for Filmmaking
- Updated In 2024, Final Cut Pro - How to Download and Install It?
- New Free Ways to Download Mobile Phone Green Screen Videos and Pictures No Copyright
- Updated Separating Audio From Video in DaVinci Resolve Step by Step
- New AVI Video Format Is Known and Famous for Its Features. Many of You Must Have Heard About It but Do You Know some Details About AVI? Lets Increase Your Knowledge and Talk About It
- Updated 2024 Approved How to Create a Slideshow on iPhone
- New As a Designer, Color Is the Most Powerful and the Most Diverse Tool at Your Disposal. Here Are Ten Matching Color Combinations to Get You Started on Your Next Project
- New How to Create Cinematic Style Videos, In 2024
- New 3D LUT Mobile App Review - A Composite Application for Editing Media for 2024
- In 2024, Slideshow Makers Are On-Demand as They Come with Multiple Possibilities for Both Professional and Personal Uses. Gradually, the Best Software to Make Slideshows Is Always Welcomed to Save Time and Effort without Compromising the Quality
- In 2024, Do You Want to Learn How to Film a TikTok with Multiple Clips? Worry No More because You Can Do This by Following the Methods Instructed in This Article
- New All You Need to Know About Transparent Logos and How You Can Make Them. Top Transparent Logos You Can Take Inspiration From
- New What Should Be Considered to Choose A Nice GoPro for Vlogging?
- 2024 Approved Mastering OpenCV Object Tracking A Comprehensive Guide for Beginners and Experts
- 2024 Approved The Ultimate Guide to GIF for Discord Profile
- How to Create an Adobe Slideshow the Easy Way for 2024
- New How to Easily Convert SRT to VTT
- Turn Your Text Into a Podcast Made Possible
- How to Change Video Thumbnail in Google Drive
- Updated Read on to Learn About Multi Object Tracking, Its Types, and Requirements. Youll Also Learn About the Different Approaches Toward Object Tracking
- Updated How To Add Motion Blur In Davinci Resolve for 2024
- Updated In 2024, 100 Working Methods to Learn How to Rotate TikTok Video
- Updated Using AI to Replace Skies Finding the Right Methods
- What Is the Best Voice Changer for WhatsApp? Discover the Seven (7) Best Voice Changers for WhatsApp Here in This Post
- In 2024, 10 Amazing Anime Character Designs to Inspire You
- How Can I Use a Fake GPS Without Mock Location On Honor Magic 5 Lite? | Dr.fone
- How to Restore Deleted Infinix Hot 30i Contacts An Easy Method Explained.
- In 2024, Different Methods To Unlock Your iPhone SE (2022)
- In 2024, How to Successfully Bypass iCloud Activation Lock from iPhone X
- How to Detect and Stop mSpy from Spying on Your Sony Xperia 1 V | Dr.fone
- Apple ID Locked for Security Reasons From iPhone 12? Find the Best Solution Here
- Unlocking the Power of Smart Lock A Beginners Guide for Infinix Hot 30i Users
- How to Transfer Photos from Nubia Red Magic 9 Pro+ to New Android? | Dr.fone
- Full Guide How To Fix Connection Is Not Private on Xiaomi 13T | Dr.fone
- 4 Methods to Turn off Life 360 On Honor X50i without Anyone Knowing | Dr.fone
- 8 Solutions to Solve YouTube App Crashing on Vivo Y78+ | Dr.fone
- In 2024, Did Your Apple iPhone SE (2020) Passcode Change Itself? Unlock It Now | Dr.fone
- In 2024, Unova Stone Pokémon Go Evolution List and How Catch Them For Lava Blaze 2 Pro | Dr.fone
- In 2024, Top 10 Samsung Galaxy F54 5G Android SIM Unlock APK
- New Guide How To Check iCloud Activation Lock Status From Your Apple iPhone 7
- In 2024, How To Stream Anything From Asus ROG Phone 8 Pro to Apple TV | Dr.fone
- In 2024, Best Ways to Bypass iCloud Activation Lock from Apple iPhone 13 Pro/iPad/iPod
- 8 Best Apps for Screen Mirroring Honor Magic 5 PC | Dr.fone
- Bypassing Google Account With vnROM Bypass For OnePlus 12
- 8 Ultimate Fixes for Google Play Your Samsung Galaxy S23 Ultra Isnt Compatible | Dr.fone
- Guide How To Unbrick a Bricked Asus ROG Phone 7 Ultimate Phone | Dr.fone
- In 2024, The Ultimate Guide to Unlocking Your Apple iPhone 8 on MetroPCS
- How To Transfer WhatsApp From iPhone 8 Plus to Android/iOS? | Dr.fone
- In 2024, Here Are Some Reliable Ways to Get Pokemon Go Friend Codes For Nokia 105 Classic | Dr.fone
- 3 Ways to Unlock Apple iPhone 15 without Passcode or Face ID
- How To Fake GPS On Poco C50 For Mobile Legends? | Dr.fone
- How to Use Google Assistant on Your Lock Screen Of Xiaomi Redmi A2 Phone
- How to Remove an AirTag from Your Apple ID Account On Apple iPhone 11 Pro Max?
- Lava Blaze Pro 5G Camera Not Working Unexpected Error? Fix It Now | Dr.fone
- Everything You Need to Know about Lock Screen Settings on your Vivo Y77t
- In 2024, Which Pokémon can Evolve with a Moon Stone For Poco C55? | Dr.fone
- In 2024, How to Make the Most of Your Apple iPhone 15 Plus Lock Screen with Notifications? | Dr.fone
- In 2024, Forgot Locked iPhone 13 mini Password? Learn the Best Methods To Unlock | Dr.fone
- In 2024, How to Transfer Data After Switching From Nokia G42 5G to Latest Samsung | Dr.fone
- What is Fake GPS Location Pro and Is It Good On Samsung Galaxy M34? | Dr.fone
- The Best iSpoofer Alternative to Try On Tecno Camon 30 Pro 5G | Dr.fone
- Title: Updated Want to Add Subtitles to Netflix Videos in Your Preferred Language? Read This Article to Learn Two Different Methods for Uploading Custom Subtitles to Netflix
- Author: Chloe
- Created at : 2024-04-24 07:08:24
- Updated at : 2024-04-25 07:08:24
- Link: https://ai-editing-video.techidaily.com/updated-want-to-add-subtitles-to-netflix-videos-in-your-preferred-language-read-this-article-to-learn-two-different-methods-for-uploading-custom-subtitles-t/
- License: This work is licensed under CC BY-NC-SA 4.0.
