
:max_bytes(150000):strip_icc():format(webp)/how-to-view-instagram-without-an-account-5271416-505eeceaf0e142ed8674d2ce2244a8be.jpg)
Updated What Is HDRI? Everything You Need to Know About HDRI
What Is HDRI? Everything You Need to Know About HDRI
Photography is like art itself. Photographers must carefully select the setting and use the right camera to capture images with lossless quality. However, you’ll realize that some photos appear darker or brighter than in actual life.
In that case, use free HDRI software to change that straightway. But HDRI being a relatively new technique, beginners might struggle to edit the photos, let alone find the perfect HDRI software.
So, in this simple guidepost, we’ll learn how to create an HDRI 3D picture using HDRI for Blender. But first, let’s understand what an HDRI file is and the difference between HDRI and HDR.
Part 1: What is HDRI?
HDRI (High Dynamic Range Image) is simply an image created using multiple image overlays of the same background but with varying exposures. The exposures can range from the brightest highlights to the darkest shadows. So, in short, HDRI expands an image’s dynamic range to brighten or darken it and make it look more natural.
Having said that, HDRI is a raster image created using color pixels. HDRI photos are generally significant in size, so they won’t quickly lose quality like other raster photos such as PNG and JPG. Many formats can store HDRI images, although the most common are OpenEXR (.exr) and Radiance RGBE (.hdr).
Pros
- You can easily create one using HDRI for Blender, Photoshop, EasyHDRI, etc.
- HDRI photos are compatible with many image editing programs.
- Produces crisp images with excellent detail and lighting control.
Cons
- 32-bit HDRI files have significant sizes.
- HDRI can quickly be poorly done without prior experience.
Part 2: What’s the difference between HDR and HDRI
According to Wikipedia, HDR and HDRI are the same things. But is it true? For starters, HDRI is basically a photo with High Dynamic Range qualities. So, yes, HDR and HDRI can mean the same thing in digital image editing.
However, some photo editors argue that there is a difference between these two regarding basic workflow. First, HDR technology increases brightness to show more image details. On the other hand, HDRI performs unique optimization of content and lighting to deliver crisp images. In other words, HDRI brightens the dark shadows without necessarily overexposing the bright image areas.
Some photographers can also consider HDR as images with pixel values higher than 1 or 255. That means that the pixels can be much higher than pure white. But technically speaking, HDR and HDRI can be used interchangeably.
Part 3: When to use HDRI
Now that you have all the information about HDRI, let’s learn about some industries where HDRI is applicable.
1. HDRI for 3D visualization and 3D animation
HDRI 3D is commonplace these days. 3D animation creators can use programs like HDRI Blender to add HDR environments and make the content look detailed and more realistic in high lighting reflections. To put it simply, HDRI makes 3D scenes look lighter, less cartoonish, and more professional. This technology can also be used in interior visualizations in animations.
2. HDRI for architect rendering
Creating HDRI environments is a common practice in 3D architectural designs. For example, designers can create panoramic house designs with varying light tones and interior moods. HDRI helps them give a natural 3D lighting effect on scenes and objects.
3. HDRI monitors and TVs
You’ve probably heard of HDRI 4K when shopping for a smart TV or computer monitor. These TVs offer a lot more than just a wide color gamut, high brightness, and advanced contrast ratio. In addition, HDR TVs and monitors can recognize HDR signals, allowing viewers to watch the content with all studio quality. In short, viewers can see more color details in shadowy and lighter scenes, making them perfect for avid gamers.
Part 4: How do you open an HDRI?
Because HDRIs use low dynamic range rendering, a standard display panel won’t open HDR images. So, to open an HDRI file on a non-HDR display, you’ll need to convert it to a different low dynamic range format using tone mapping technology. For example, you convert HDRI to JPEG or PNG and enjoy regular bitmaps while maintaining the HDRI properties. You can also open and edit HDRI using desktop programs like EasyHDR, Photoshop, and Blender.
Part 5: How to set up an HDR environment background?
Before wrapping up this blog post, let’s discuss how to use HDRI for Blender to apply HDR effects to an image’s background. Blender is a 100% free program for creating jaw-dropping 3D rendering and animations on Mac and Windows computers. With Blender, you’ll get an advanced modeling toolset like retopology, curves, sculpting, and more. But in this post, we’ll learn how to create an HDR environment or add lighting to your image project. Let’s get started!
Step1Install and run Blender and then tap the World Properties tab. Then, click the Color icon and add Environment Texture.

Step2Next, split the window into two and launch the Shader Editor tool. Then, open the Object drop-down menu at the top-left corner and choose World. You’ll see the Environment Texture hooked into the background.

Step3On the Environment Texture, tap Open Image before opening the 3.2 folder inside the Blender Foundation folder. Then, click Data files > Studiolights > Word. Now open a .exr file. For example, open the Interior.exr image.

Step4Click the Viewport Shading icon and tap the drop-down button to choose Interior. You’ll see all the lighting reflections inside the room and customize it as you wish. That’s it!

Conclusion
Using the environment maps is the simplest and most effective way to lighten up your 3D scenes in Blender. This program lets you achieve realistic 3D scenes, mimicking natural world lighting. But note that Blender can be a little confusing for beginners. So, play around with this HDRI tool, and you’ll be a pro in no time.
Free Download For Win 7 or later(64-bit)
Free Download For macOS 10.14 or later
Part 2: What’s the difference between HDR and HDRI
According to Wikipedia, HDR and HDRI are the same things. But is it true? For starters, HDRI is basically a photo with High Dynamic Range qualities. So, yes, HDR and HDRI can mean the same thing in digital image editing.
However, some photo editors argue that there is a difference between these two regarding basic workflow. First, HDR technology increases brightness to show more image details. On the other hand, HDRI performs unique optimization of content and lighting to deliver crisp images. In other words, HDRI brightens the dark shadows without necessarily overexposing the bright image areas.
Some photographers can also consider HDR as images with pixel values higher than 1 or 255. That means that the pixels can be much higher than pure white. But technically speaking, HDR and HDRI can be used interchangeably.
Part 3: When to use HDRI
Now that you have all the information about HDRI, let’s learn about some industries where HDRI is applicable.
1. HDRI for 3D visualization and 3D animation
HDRI 3D is commonplace these days. 3D animation creators can use programs like HDRI Blender to add HDR environments and make the content look detailed and more realistic in high lighting reflections. To put it simply, HDRI makes 3D scenes look lighter, less cartoonish, and more professional. This technology can also be used in interior visualizations in animations.
2. HDRI for architect rendering
Creating HDRI environments is a common practice in 3D architectural designs. For example, designers can create panoramic house designs with varying light tones and interior moods. HDRI helps them give a natural 3D lighting effect on scenes and objects.
3. HDRI monitors and TVs
You’ve probably heard of HDRI 4K when shopping for a smart TV or computer monitor. These TVs offer a lot more than just a wide color gamut, high brightness, and advanced contrast ratio. In addition, HDR TVs and monitors can recognize HDR signals, allowing viewers to watch the content with all studio quality. In short, viewers can see more color details in shadowy and lighter scenes, making them perfect for avid gamers.
Part 4: How do you open an HDRI?
Because HDRIs use low dynamic range rendering, a standard display panel won’t open HDR images. So, to open an HDRI file on a non-HDR display, you’ll need to convert it to a different low dynamic range format using tone mapping technology. For example, you convert HDRI to JPEG or PNG and enjoy regular bitmaps while maintaining the HDRI properties. You can also open and edit HDRI using desktop programs like EasyHDR, Photoshop, and Blender.
Part 5: How to set up an HDR environment background?
Before wrapping up this blog post, let’s discuss how to use HDRI for Blender to apply HDR effects to an image’s background. Blender is a 100% free program for creating jaw-dropping 3D rendering and animations on Mac and Windows computers. With Blender, you’ll get an advanced modeling toolset like retopology, curves, sculpting, and more. But in this post, we’ll learn how to create an HDR environment or add lighting to your image project. Let’s get started!
Step1Install and run Blender and then tap the World Properties tab. Then, click the Color icon and add Environment Texture.
Step2Next, split the window into two and launch the Shader Editor tool. Then, open the Object drop-down menu at the top-left corner and choose World. You’ll see the Environment Texture hooked into the background.
Step3On the Environment Texture, tap Open Image before opening the 3.2 folder inside the Blender Foundation folder. Then, click Data files > Studiolights > Word. Now open a .exr file. For example, open the Interior.exr image.
Step4Click the Viewport Shading icon and tap the drop-down button to choose Interior. You’ll see all the lighting reflections inside the room and customize it as you wish. That’s it!
Conclusion
Using the environment maps is the simplest and most effective way to lighten up your 3D scenes in Blender. This program lets you achieve realistic 3D scenes, mimicking natural world lighting. But note that Blender can be a little confusing for beginners. So, play around with this HDRI tool, and you’ll be a pro in no time.
Free Download For Win 7 or later(64-bit)
Free Download For macOS 10.14 or later
How To Add Text In After Effects
In almost every video you come across, you will see text added to the video in different parts. There are various reasons why adding text to videos becomes a necessity. First of all, you can highlight the underlying message or key points in your video. Along with audio and video, the viewers will have another cue point in the form of text that they can retain in their memory for longer. You add animated texts to video to make the video interesting to watch and break the monotony of visual cues only.
Besides, you may have to want credits and add intro as well as outro to your video where adding text is almost a necessity. Text can help your viewer get the context of your video and make sense of the content. After Effects is a popular video editor thanks to its visual effects, text animation animations, and instant video enhancement tools. We will illustrate the different ways of adding text in After Effects in simple steps.
Part 1. Add Text in After Effects with Horizontal Type Tool
Once you have imported your video clip into the Timeline, there are several ways you can add text to your video. First of all, you can right-click on the Timeline and select New> Text to create an empty text layer and add any text you want. Similarly, you can go to Layer> New> Text option to do the same. But the easiest way of adding text in After Effects is by using Horizontal Type Tool. Here are the steps on how you can add text in AE with the type tool.
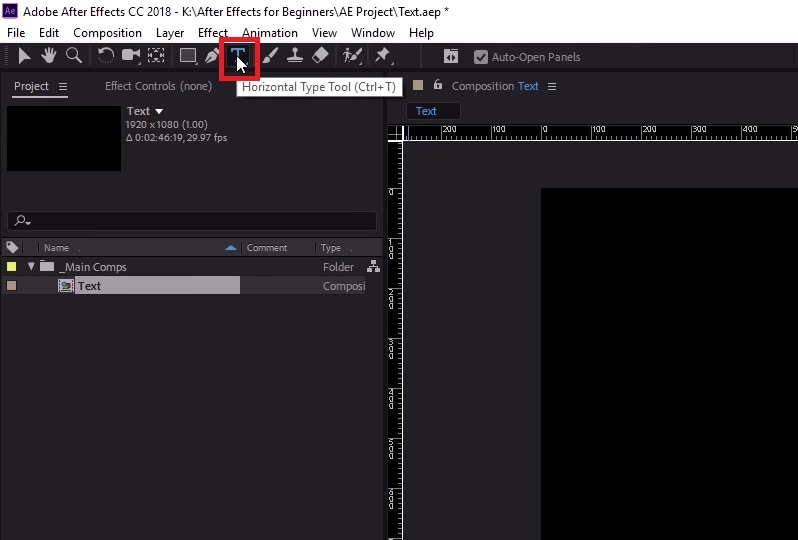
Step1Once you have imported your video into the Timeline, click on Horizontal Type Tool located in the top bar to add any text. You can press Ctrl+T(Windows) or Command+H(Mac) to get it instantly.
Step2Click on the video where you want to place the text and type your desired text there. After you are done adding your text, press Enter key in Num pad to exit out of the text field in the video.
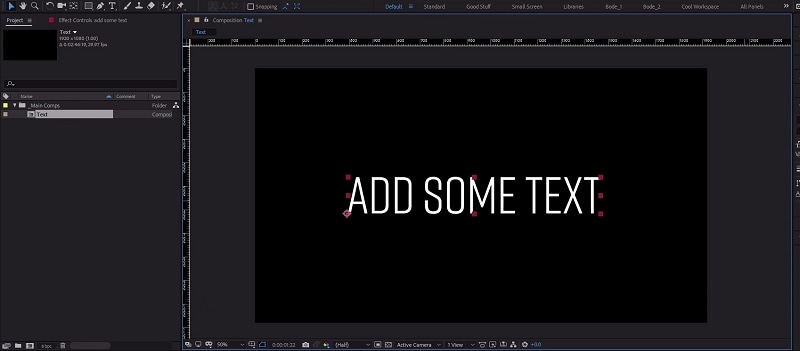
Step3This will automatically create a text layer on Timeline. You can now move the text and place it anywhere you want. You can also modify the text style and add animation which we will illustrate in the next section.
Part 2. Use the Character Panel to Edit Text in AE
When you select Type tool and add your desired text, you get a default style for the text. It is most likely that you have to modify the text style such as changing color, font, and size to fit in your video seamlessly. That is when you have to visit the Character Panel. Character Panel is where you get to edit the font of the text you have typed, increase or decrease the font size, change the font color, and much more. Apart from that, you can increase the spacing between lines when your text is a paragraph instead of a few words. Here are the steps to use Character Panel to edit text in AE.
Step1Once you have typed your text using Horizontal Type tool on the video, click on the text.
Step2Go to Character panel located in the right side of the screen. If it is minimized, click on the panel to expand it.
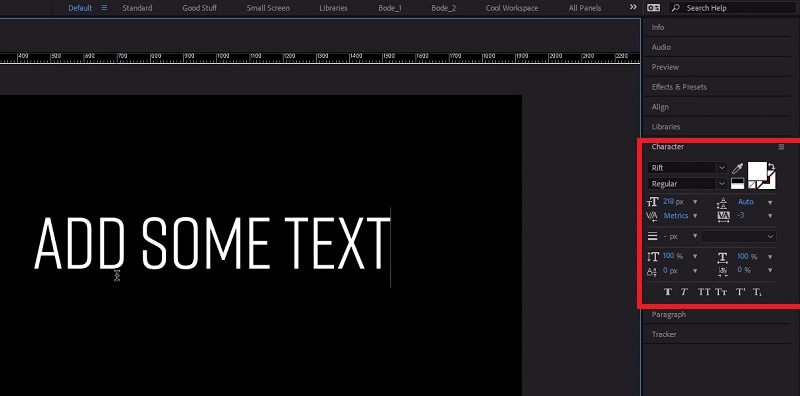
Step3The first option in the panel is the font of the text. By the side of the font is the text color. You can use the color picker tool to choose any color as per your preference.
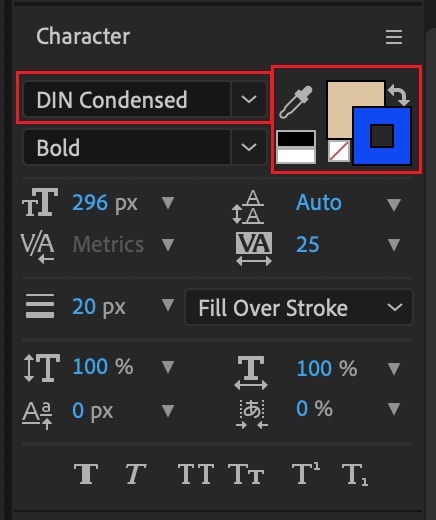
Step4Below the font, you can select the font style such as regular, bold, italics, and likewise. The subsequent part is to change the font size and adjust vertical spacing between lines and horizontal spacing between characters.
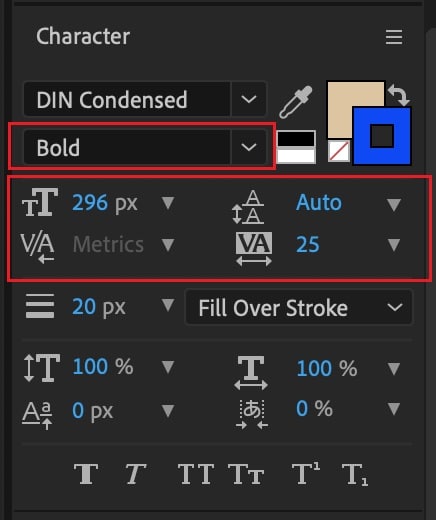
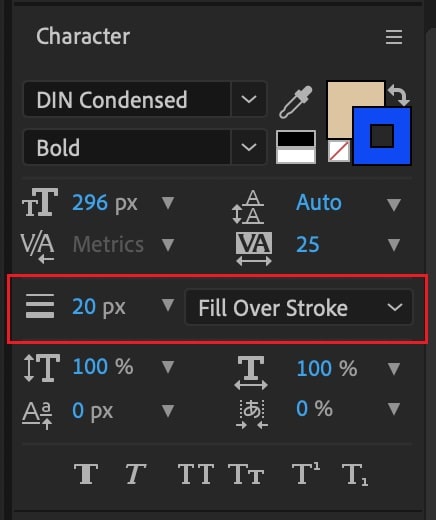
Step5The next section deals with Stroke option as well as fill the text option. You can fill the background of the text with any desired color.
Part 3. Add Animated Text to Video with Animation Presets
Now that you have added a static text and set the text format as per your preference, it is time to animate the text. A static text in a video does not look appealing, and animated texts make the video eye-catching instantly. You can use text animation presets in After Effects to add animated text to video. Here are the steps to add animated text to video with animation presets and effects.
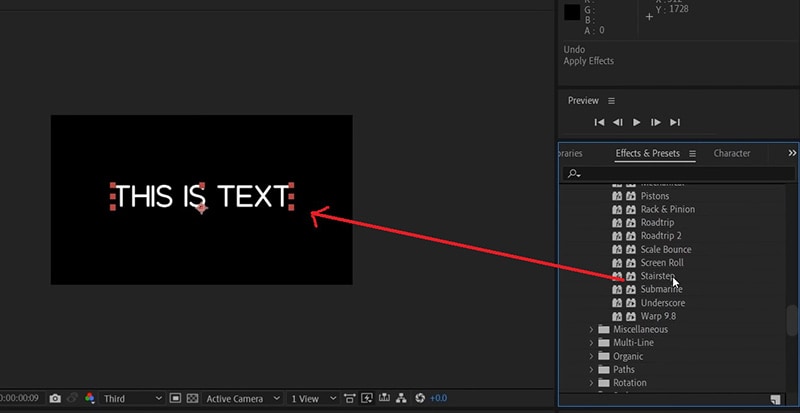
Step1Click on the text on your video that you want to animate. Go to Effects and Presets panel located on the right side.
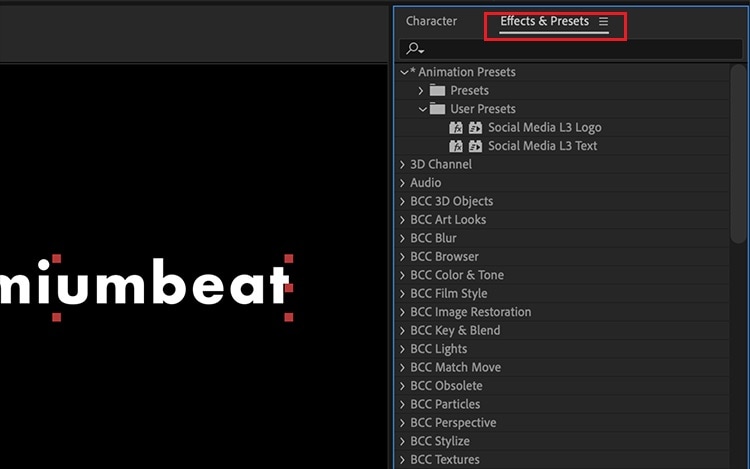
Step2Under Effects and Presets panel, Click on Text option. This will open all the different categories of animation presets available that you can apply to the text on your video.
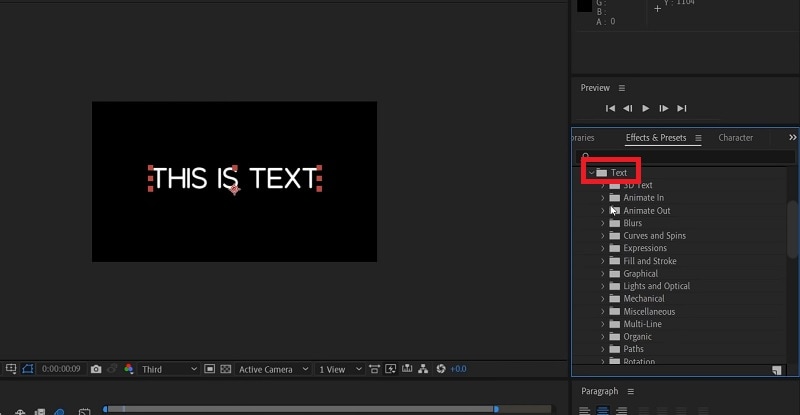
Step3Select any desired animation that you want to apply to the text and drag and drop the animation on the text in the composition window. Play the video and watch the applied animation on the text.
Part 4. Alternative Way to Add Text to Videos
If you are not comfortable with After Effects as a video editor, we recommend Wondershare as the best AE alternative. This is because the user interface of Filmora is super simple and there are loads of text effects and animations available to enhance your video content. Filmora is a professional video editor that is extremely popular among amateur and professional video editors. The application is available for both Windows and Mac users. Here are the steps for adding animated text to video using Filmora.
Step1Install Wondershare Filmora on your computer and launch the application. Click on New Project option on the welcome screen. Otherwise, you can go to File> New Project option.

Step2Go to File> Import Media> Import Media Files to import your video file. You can also drop the video file directly into Project Media folder.

Step3Drag and drop the video file from Project Media folder into the Timeline. If you have multiple video clips, you need to arrange them sequentially on the Timeline.
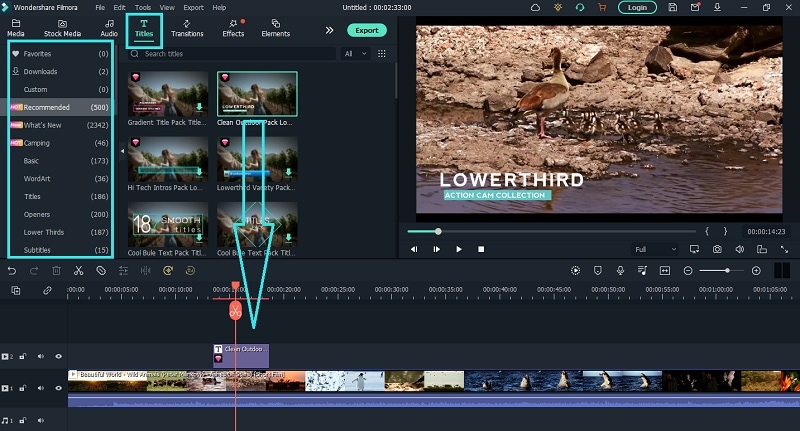
Step4To add text to your video, go to Titles located at the top bar. Check the left panel where you can see different categories of text effects. Select any desired text effect and drop into the Timeline. Make sure that the text layer is above the video layer on Timeline. You can shift the text layer on Timeline to place it where you want it to appear. You can also stretch the duration of the text effect as per your requirements.
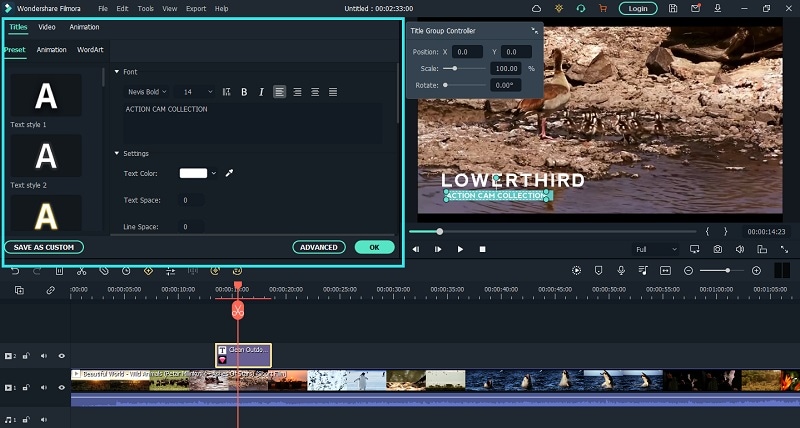
Step5You can edit the text effect by double clicking on the text layer on Timeline. Under Preset tab, you can change the text, font type and size, text color and much more. For further customization, you can click on Advanced button. At last, click on OK button to save the edits done.
The Bottom Line
If you want to add animated text to photo and video, After Effects is a great editor you can use. We have illustrated how you can add text and customize the text and finally, animate it as per your preference. However, if you are looking for AE alternative, we recommend Wondershare Filmora where you can add text to video instantly and choose from a wide range of text effects and animations.
Free Download For Win 7 or later(64-bit)
Free Download For macOS 10.14 or later
How to Animate Text in A Video
If you need to add text to video, you should animate the text part so that it looks attractive and enhance the video content. When you want to animate the texts and titles in your video, you should have the best animated text video tools where there is a wide range of text effects and animations templates and presets.
We have listed the best platforms for animating texts and titles in your video. You can check out their pros and cons and select the perfect one to get started. We have illustrated the simple steps for stunning text animation using Wondershare Filmora.
Part 1. Best Animated Text Video Tools
Here is the list of the best tools that you can use to animate the text in your video. Starting from desktop applications to online platforms, we have reviewed them for your easy selection.
1. Premiere Pro
Best for: Professional video editors
Price: $20.99 per month(subscription)
Compatible OS: Windows and macOS
Adobe Premiere Pro is one of the most preferred video editors in the professional video editing world. Premiere Pro is designed for experienced video editors and amateur video editors can find its user interface difficult to get used to without thorough tutorials. In fact, it is a great platform to work as a team for editing a large video project.

There are advanced video editing options available that you generally do not get in a regular video editor. Starting from video effects, color correction to audio editing and text effects, all the different features are available. As a matter of fact, you can edit VR as well as multi-cam videos as well. The software also supports importing and exporting different types of video file formats.
Pros
- Huge library of video and text effects and presets.
- Multi-cam editing and VR support.
- Dedicated options for audio editing and mixing.
- Stunning stabilization and color grading options.
- Supports a wide range of video file formats.
- Easy workflow for a team of video editors.
Cons
- Required high-end systems for smooth operation.
- Learning curve is steep for amateurs and beginners.
2. Filmora
Best for: beginners as well as professionals who are looking for a wide range of text effects.
Price: $49.99 annually
Compatible OS: Windows and macOS
Wondershare Filmora is the best animated text maker. In comparison to popular video editors, Filmora has the widest range of text effects and animations that you can apply to the text in your video instantly. Most importantly, you can customize and personalize the effects and animations as per your requirements.

The user interface is super intuitive and hence, both beginners as well as professionals prefer it. There are tons of stock photos, videos, and backgrounds that you can use in your video without any copyright claim. This is why Filmora is one of the most preferred video editors among video creators for social media and video streaming platforms.
Pros
- Vast stock media library of photos, videos, and GIFs.
- Various graphical elements, transitions, and audio.
- Motion tracking, audio ducking, and color matching.
- Wide collection of text effects and animation.
- User-friendly interface and faster rendering.
- Supports different types of video file formats.
- Highly affordable pricing and responsive support team.
Cons
- There is scope for improvement in advanced video editing features.
3. iMovie
Best for: beginners who use Apple computers and mobile devices.
Price: Free
Compatible OS: macOS and iOS

iMovie by Apple comes pre-installed on MacBook and Mac. It is the most preferred video editor for beginners who do not want to invest in purchasing a premium video editor. iMovie is a standard video editor where you can get all the basic tools for effects and animations. There are themes and templates available with easy customization options. Most importantly, iMovie has cross-device support as iMovie is available for all Apple devices.
Pros
- Cinematic effects, beautiful styles, and chrome key.
- Decent range of text effect, video effects, and enhancements.
- User-friendly interface for easy operation.
- Easy sharing on cloud, video streaming, and social media platforms.
- Work on any Apple device starting from MacBook to iPad.
Cons
- The output file size is huge.
- Importing MP4 file format is complicated.
- You can work with two video tracks only.
4. Veed.io
Best for: those who prefer online text animation maker.
Price: $12 per month
Compatible OS: Windows, Linux, macOS, Android, and iOS.

Veed.io is a popular online video editor and it is perfect for you if you do not want to install a dedicated video editor on your computer. In fact, it is suitable for low-end computers without low storage space. You can add text effects and animations on the go from your web browser. The platform also supports collaborative video project editing. There are loads of text effects and animation templates available to pick from.
Pros
- Powerful video editor and comparable to premium ones.
- Wide range of video effects, text animation templates available.
- The user interface is intuitive and suitable for everyone.
- Option to add subtitle and supports various video file formats.
- The support team is highly responsive.
Cons
- Users have complained about bugs and hangs.
- Advanced text animation editing options not available.
- Does not have a dedicated app for mobile users.
5. Kapwing
Best for: social media video creators who need videos in different aspect ratios.
Price: $16 per month
Compatible OS: Windows, Linux, and macOS.

Kapwing is a great online editor where you can get to animate the texts and titles in your videos pretty easily. Starting from editing your photos to videos and even creating GIFs, the platform serves all the needs of the users completely. It is particularly popular among social media video creators as there are several aspect ratios and templates available for creating shorts, stories, and regular videos. There is a dedicated app available for mobile users.
Pros
- Different types of text and video templates available.
- Wide range of elements, transitions, and stock media files.
- Quick transformation into different aspect ratio.
- Multi-lingual subtitle support and direct recording option.
- User-friendly and intuitive interface and support for plugins.
Cons
- It gets slower on a low-end computer.
- Does not support a wide range of file formats.
- The support team is not that responsive.
6. Flixier
Best for: those looking for faster and cheaper online text animation maker
Price: $8 per month
Compatible OS: Windows, Linux, macOS and mobile OS.

Flixier is a powerful video editor that you can access from any popular web browser from any device. It is one of the fastest text animation makers and the pricing is highly affordable. The platform is quite popular among social media video creators. There are dedicated formats available for Facebook, Instagram, and YouTube. The user interface feels like a premium video editor with timeline and you can even record video through Flixier.
Pros
- Different text motion presets for animations and effects.
- Allows working with multiple tracks.
- Stock media files such as photos, videos, and audio files.
- Simple but powerful user interface for smooth operation.
- Speeds up collaborative work and cloud integration.
Cons
- Lacks certain advanced editing features.
- Limited file format support and compatibility.
Part 2. Creative Fonts Resource for The Animated Text
Fonts play an important role in text animations. If the typography of the text is not up to the mark, the animation won’t come out as intended. Therefore, you should have trendy and dynamic fonts in your possession to type in your texts and titles.
Trendy Fonts to Use
You have to follow the trend in the animation so that your text animation gets instant traction and stays relevant. You will need to have trendy fonts so that your creative text animations look eye-catching and engaging. Here is the list of the best trendy fonts to use in the animated text.
- Redwing font
If you want to display titles in uppercase as well as in large-sized letters, Redwing should match your requirements perfectly. The font can be considered an upgrade over the popular Impact font that most people use for showing one-word texts and titles in bold style and large sizes.

- Takota font
If you are looking for something cool and funky, Takota font should be at the top of your list. You will find people using similar fonts for showing cool text animations over beautiful landscapes in the background. Every character in this font has its individuality and uniqueness in design.

- Basement grotesque font
This font is inspired by 19th-century typeface where boldness gets the upper hand. It is one of the best display typefaces to showcase titles in brutal fashion. The font strikes a mark in the mind of the viewers instantly. You might see this font in newspapers especially in the titles and headlines.

- Meraki
If you are looking for a compact and modern font to animate the text, Meraki is perfect. You can fit more words in a sentence within a video frame. You must have seen this font in games, t-shirts, logos, and much more. You can consider an upgrade to Sans Serif font.

- Ashfiana
Ashfiana is another upgrade to the regular Sans Serif font but this one has high contrast and it looks more elegant. It is quite slim and you can use the font for titles and text blocks and you can use it more elegantly in oblique style.

- Clap hand
If you are looking for a fun and cute typeface, clap hand font can be great. It is particularly popular among video creators who make videos for kids. You must have seen similar font among brands selling kids’ products. The font is impactful for titles, banners, logos, and short paragraphs.

- Made mellow
You can consider this a serious typeface of Clap Hand font. You get different variations in weights from light to black and it is particularly popular for showing full screen texts and titles. You can apply several stunning text effects on it so that the effects become prominently visible and the animation comes out superb.

- Wonder type
This font has unique design for each character and it gives out cuteness as well as positivity. The font is bold and it has a rustic look. There are several numeral text styles and there are different textures for uppercase and lowercase. The font is modern as well as elegant for all types of text effects and animations.

Dynamic Fonts to Choose
A dynamic font is highly useful in text animation as the characters are not static and they have their own individuality. The characters could have their own texture even though the overall theme of the font stays the same. Besides, the characters have their own animations and effects. Here are some of the popular dynamic fonts to choose from.
- Wicked Mouse Font
If you want to have a cartoon-based text effect and animation, Wicked mouse font is the best option. The font style is large and bold and the characters come in uppercase. When you type in lowercase and uppercase characters, you can notice certain variations and there is 3D text version available.

- Animated Alphabet
It is needless to say that the animated alphabet font is the go-to font when there are texts in a video that needs to be animated. There are so many different variations of animated alphabet fonts that you will find on popular font resource websites and you should download as per your preference.

- Halloween Titles
When you add mysterious or suspenseful typography to your texts and titles, it gets more traction than usual. In this pack, you will get different types of dynamic fonts and text animations that are simple yet impactful. You can use them to create unique and engaging text animations for your video.

- Instagram Title Pack
If you are making videos for Instagram or social media platforms, this is a pack that you should definitely have. In this pack, you will get text fonts for stories and posts, animated titles, dynamic texts for transitions and swipe up activities. For each category, there are several variations to post creative text animations.

- Chalkboard Animated Handwriting
The chalkboard animated handwriting pack has the classic text animation with customization options. There are different variations available along with rubbing the displayed text off with duster animation. It is great for titles as well as showing lengthy text and you can change the texture, border, color, and much more.

- Glitch Titles
The glitch text animation is one of the trending text effects in the modern videos. The glitch animation is often accompanied by heavy bass sound effect for opening and closing titles. The glitch titles preset comes with several variations so that your videos do not look the same to the viewers and get appreciation of the text animations.

- Glow Text Animations
The glow text animations font is suitable for titles, transitions, as well as low thirds. The font has 3D effect along with the glow effect and both of them make the text instantly engaging. There are different variations available such as cool glow, fiery glow, sober glow, and icy glow effect.

- Neon Short Circuit Titles
For text animations, dynamic fonts based on neon effects are always in high demand. Neon short circuit titles combine the neon as well as the short circuit animation together. That is why it is more refreshing and eye-catching than regular neon fonts and you must use it for text animations especially when you have a darker background.

Part 3. How to Animate Text in A Video
Out of the top video tools to animate text in a video, we have picked Wondershare Filmora as the best animated text maker. Filmora Video Editor has all the different categories of text animations to cater to all the different video niches. Therefore, you can have appropriate and creative text animations based on your video content to make it eye-catching and engaging. Here are the detailed steps to animate the text in video.
Free Download For Win 7 or later(64-bit)
Free Download For macOS 10.14 or later
- How to add text in Filmora?
First of all, you need to add text to your video project to get started. Launch Filmora and import any video that you want to place in the background. You can also go to Stock Media and select any background photo or video as per your preference. Click on Quick Text option from the toolbar above the timeline.
This will add a text layer on the timeline with a default text. Double-click on the text layer and edit the default text. The text layer should be over the background layer and you can reposition the text layer depending on where you want the text to appear on the video. You can adjust the position of the text on the video from Viewer.

- How to edit font in Filmora?
Now that you have placed and positioned the text in your video properly, it is time to edit the text style. Double-click on the text layer and go to Title>Preset> Font section. Select the font, size, and alignment. If there are multiple texts in the template, select them one by one from Viewer and edit them. Go to Settings section and change text color and spacing as appropriate. There are also several text style templates available to choose from if you want to.

- How to use animation in text in Filmora?
Double-click on the text layer again and this time, you need to go to Animation tab. You will see all the popular text animation templates on the left panel. Place your mouse pointer over them to get a preview. Select any one of these animations by double-clicking on the animation and click on Ok button. Play the video to watch the applied animation.

- How to use text preset in Filmora?
If you want to make the text animation eye-catching and attention-grabbing, you need to select a text animation preset in Filmora. Go to Titles and check out the left panel where you will find all the different categories of text effects and animations. Go to the category that matches your video content and select any template and drop it on the timeline. Double-click on the text layer to edit the default text and text style as per your preference.

Part 4. How to Make Creative Text Animation?
Depending on the video content, you have to select the text effect and create text animation accordingly. We have already stated that Filmora has different categories of text animation templates to satisfy all your video requirements perfectly. You can choose appropriate text animation templates that go well with your video category and use them to come up with creative text animations.
- Social media
If you are making videos for social media platforms such as Facebook or for video streaming platforms like YouTube, you should select text animations from Social Media category in Filmora. There are over 200+ text animation templates available that have all the common text animations you usually see as well as creative text animations that will make your video stand out.

All you need to do is import your video and place it in the background. Go to Titles and select Social Media category and drop any desired text animation on the timeline. Thereafter, edit and customize the text layer and style along with the animation as per your preference.
- Education
If your video belongs to education nice such as you are explaining a concept or demonstrating a tutorial, you need to use text animations that are graceful for your video content. Filmora has a dedicated section for text animations related to education. Go to Titles> Tutorials and you will see around 400 text effects and animations that you can use in your educational video effectively.

- Business
If you are creating videos for brands and businesses, there are certain creative text animations you have to use in order to get traction from the target audiences. Filmora comes with over 150 text effects and animations specifically for business videos so that the branding gets strong and leaves a good impression in the mind of the viewers. Go to Titles> Business and choose the desired text animations and customize them to fit into your brand image.

- Travel
If you are into making traveling vlogs or informational travel videos, Filmora has a specific set of text effects and creative animations. You get to choose from over 250 templates to represent any text and title you want to display in your video. The beautiful and eye-catching animated text will definitely get your message across to the viewers pleasantly. Go to Titles> Travel section and check out all the text animations to choose from.

- Gaming
There are so many gamers who put up their gameplay videos on social media and video streaming platforms. While editing the video, they need to put up animated text so that the video content looks interesting and engaging. If you have a gaming video, Filmora has around 500 text effects and animations to use in your video. Go to Titles> Gaming and select from any creative text animations as per your preference.

2. Filmora
Best for: beginners as well as professionals who are looking for a wide range of text effects.
Price: $49.99 annually
Compatible OS: Windows and macOS
Wondershare Filmora is the best animated text maker. In comparison to popular video editors, Filmora has the widest range of text effects and animations that you can apply to the text in your video instantly. Most importantly, you can customize and personalize the effects and animations as per your requirements.
The user interface is super intuitive and hence, both beginners as well as professionals prefer it. There are tons of stock photos, videos, and backgrounds that you can use in your video without any copyright claim. This is why Filmora is one of the most preferred video editors among video creators for social media and video streaming platforms.
Pros
- Vast stock media library of photos, videos, and GIFs.
- Various graphical elements, transitions, and audio.
- Motion tracking, audio ducking, and color matching.
- Wide collection of text effects and animation.
- User-friendly interface and faster rendering.
- Supports different types of video file formats.
- Highly affordable pricing and responsive support team.
Cons
- There is scope for improvement in advanced video editing features.
3. iMovie
Best for: beginners who use Apple computers and mobile devices.
Price: Free
Compatible OS: macOS and iOS
iMovie by Apple comes pre-installed on MacBook and Mac. It is the most preferred video editor for beginners who do not want to invest in purchasing a premium video editor. iMovie is a standard video editor where you can get all the basic tools for effects and animations. There are themes and templates available with easy customization options. Most importantly, iMovie has cross-device support as iMovie is available for all Apple devices.
Pros
- Cinematic effects, beautiful styles, and chrome key.
- Decent range of text effect, video effects, and enhancements.
- User-friendly interface for easy operation.
- Easy sharing on cloud, video streaming, and social media platforms.
- Work on any Apple device starting from MacBook to iPad.
Cons
- The output file size is huge.
- Importing MP4 file format is complicated.
- You can work with two video tracks only.
4. Veed.io
Best for: those who prefer online text animation maker.
Price: $12 per month
Compatible OS: Windows, Linux, macOS, Android, and iOS.
Veed.io is a popular online video editor and it is perfect for you if you do not want to install a dedicated video editor on your computer. In fact, it is suitable for low-end computers without low storage space. You can add text effects and animations on the go from your web browser. The platform also supports collaborative video project editing. There are loads of text effects and animation templates available to pick from.
Pros
- Powerful video editor and comparable to premium ones.
- Wide range of video effects, text animation templates available.
- The user interface is intuitive and suitable for everyone.
- Option to add subtitle and supports various video file formats.
- The support team is highly responsive.
Cons
- Users have complained about bugs and hangs.
- Advanced text animation editing options not available.
- Does not have a dedicated app for mobile users.
5. Kapwing
Best for: social media video creators who need videos in different aspect ratios.
Price: $16 per month
Compatible OS: Windows, Linux, and macOS.
Kapwing is a great online editor where you can get to animate the texts and titles in your videos pretty easily. Starting from editing your photos to videos and even creating GIFs, the platform serves all the needs of the users completely. It is particularly popular among social media video creators as there are several aspect ratios and templates available for creating shorts, stories, and regular videos. There is a dedicated app available for mobile users.
Pros
- Different types of text and video templates available.
- Wide range of elements, transitions, and stock media files.
- Quick transformation into different aspect ratio.
- Multi-lingual subtitle support and direct recording option.
- User-friendly and intuitive interface and support for plugins.
Cons
- It gets slower on a low-end computer.
- Does not support a wide range of file formats.
- The support team is not that responsive.
6. Flixier
Best for: those looking for faster and cheaper online text animation maker
Price: $8 per month
Compatible OS: Windows, Linux, macOS and mobile OS.
Flixier is a powerful video editor that you can access from any popular web browser from any device. It is one of the fastest text animation makers and the pricing is highly affordable. The platform is quite popular among social media video creators. There are dedicated formats available for Facebook, Instagram, and YouTube. The user interface feels like a premium video editor with timeline and you can even record video through Flixier.
Pros
- Different text motion presets for animations and effects.
- Allows working with multiple tracks.
- Stock media files such as photos, videos, and audio files.
- Simple but powerful user interface for smooth operation.
- Speeds up collaborative work and cloud integration.
Cons
- Lacks certain advanced editing features.
- Limited file format support and compatibility.
Part 2. Creative Fonts Resource for The Animated Text
Fonts play an important role in text animations. If the typography of the text is not up to the mark, the animation won’t come out as intended. Therefore, you should have trendy and dynamic fonts in your possession to type in your texts and titles.
Trendy Fonts to Use
You have to follow the trend in the animation so that your text animation gets instant traction and stays relevant. You will need to have trendy fonts so that your creative text animations look eye-catching and engaging. Here is the list of the best trendy fonts to use in the animated text.
- Redwing font
If you want to display titles in uppercase as well as in large-sized letters, Redwing should match your requirements perfectly. The font can be considered an upgrade over the popular Impact font that most people use for showing one-word texts and titles in bold style and large sizes.
- Takota font
If you are looking for something cool and funky, Takota font should be at the top of your list. You will find people using similar fonts for showing cool text animations over beautiful landscapes in the background. Every character in this font has its individuality and uniqueness in design.
- Basement grotesque font
This font is inspired by 19th-century typeface where boldness gets the upper hand. It is one of the best display typefaces to showcase titles in brutal fashion. The font strikes a mark in the mind of the viewers instantly. You might see this font in newspapers especially in the titles and headlines.
- Meraki
If you are looking for a compact and modern font to animate the text, Meraki is perfect. You can fit more words in a sentence within a video frame. You must have seen this font in games, t-shirts, logos, and much more. You can consider an upgrade to Sans Serif font.
- Ashfiana
Ashfiana is another upgrade to the regular Sans Serif font but this one has high contrast and it looks more elegant. It is quite slim and you can use the font for titles and text blocks and you can use it more elegantly in oblique style.
- Clap hand
If you are looking for a fun and cute typeface, clap hand font can be great. It is particularly popular among video creators who make videos for kids. You must have seen similar font among brands selling kids’ products. The font is impactful for titles, banners, logos, and short paragraphs.
- Made mellow
You can consider this a serious typeface of Clap Hand font. You get different variations in weights from light to black and it is particularly popular for showing full screen texts and titles. You can apply several stunning text effects on it so that the effects become prominently visible and the animation comes out superb.
- Wonder type
This font has unique design for each character and it gives out cuteness as well as positivity. The font is bold and it has a rustic look. There are several numeral text styles and there are different textures for uppercase and lowercase. The font is modern as well as elegant for all types of text effects and animations.
Dynamic Fonts to Choose
A dynamic font is highly useful in text animation as the characters are not static and they have their own individuality. The characters could have their own texture even though the overall theme of the font stays the same. Besides, the characters have their own animations and effects. Here are some of the popular dynamic fonts to choose from.
- Wicked Mouse Font
If you want to have a cartoon-based text effect and animation, Wicked mouse font is the best option. The font style is large and bold and the characters come in uppercase. When you type in lowercase and uppercase characters, you can notice certain variations and there is 3D text version available.
- Animated Alphabet
It is needless to say that the animated alphabet font is the go-to font when there are texts in a video that needs to be animated. There are so many different variations of animated alphabet fonts that you will find on popular font resource websites and you should download as per your preference.
- Halloween Titles
When you add mysterious or suspenseful typography to your texts and titles, it gets more traction than usual. In this pack, you will get different types of dynamic fonts and text animations that are simple yet impactful. You can use them to create unique and engaging text animations for your video.
- Instagram Title Pack
If you are making videos for Instagram or social media platforms, this is a pack that you should definitely have. In this pack, you will get text fonts for stories and posts, animated titles, dynamic texts for transitions and swipe up activities. For each category, there are several variations to post creative text animations.
- Chalkboard Animated Handwriting
The chalkboard animated handwriting pack has the classic text animation with customization options. There are different variations available along with rubbing the displayed text off with duster animation. It is great for titles as well as showing lengthy text and you can change the texture, border, color, and much more.
- Glitch Titles
The glitch text animation is one of the trending text effects in the modern videos. The glitch animation is often accompanied by heavy bass sound effect for opening and closing titles. The glitch titles preset comes with several variations so that your videos do not look the same to the viewers and get appreciation of the text animations.
- Glow Text Animations
The glow text animations font is suitable for titles, transitions, as well as low thirds. The font has 3D effect along with the glow effect and both of them make the text instantly engaging. There are different variations available such as cool glow, fiery glow, sober glow, and icy glow effect.
- Neon Short Circuit Titles
For text animations, dynamic fonts based on neon effects are always in high demand. Neon short circuit titles combine the neon as well as the short circuit animation together. That is why it is more refreshing and eye-catching than regular neon fonts and you must use it for text animations especially when you have a darker background.
Part 3. How to Animate Text in A Video
Out of the top video tools to animate text in a video, we have picked Wondershare Filmora as the best animated text maker. Filmora Video Editor has all the different categories of text animations to cater to all the different video niches. Therefore, you can have appropriate and creative text animations based on your video content to make it eye-catching and engaging. Here are the detailed steps to animate the text in video.
Free Download For Win 7 or later(64-bit)
Free Download For macOS 10.14 or later
- How to add text in Filmora?
First of all, you need to add text to your video project to get started. Launch Filmora and import any video that you want to place in the background. You can also go to Stock Media and select any background photo or video as per your preference. Click on Quick Text option from the toolbar above the timeline.
This will add a text layer on the timeline with a default text. Double-click on the text layer and edit the default text. The text layer should be over the background layer and you can reposition the text layer depending on where you want the text to appear on the video. You can adjust the position of the text on the video from Viewer.
- How to edit font in Filmora?
Now that you have placed and positioned the text in your video properly, it is time to edit the text style. Double-click on the text layer and go to Title>Preset> Font section. Select the font, size, and alignment. If there are multiple texts in the template, select them one by one from Viewer and edit them. Go to Settings section and change text color and spacing as appropriate. There are also several text style templates available to choose from if you want to.
- How to use animation in text in Filmora?
Double-click on the text layer again and this time, you need to go to Animation tab. You will see all the popular text animation templates on the left panel. Place your mouse pointer over them to get a preview. Select any one of these animations by double-clicking on the animation and click on Ok button. Play the video to watch the applied animation.
- How to use text preset in Filmora?
If you want to make the text animation eye-catching and attention-grabbing, you need to select a text animation preset in Filmora. Go to Titles and check out the left panel where you will find all the different categories of text effects and animations. Go to the category that matches your video content and select any template and drop it on the timeline. Double-click on the text layer to edit the default text and text style as per your preference.
Part 4. How to Make Creative Text Animation?
Depending on the video content, you have to select the text effect and create text animation accordingly. We have already stated that Filmora has different categories of text animation templates to satisfy all your video requirements perfectly. You can choose appropriate text animation templates that go well with your video category and use them to come up with creative text animations.
- Social media
If you are making videos for social media platforms such as Facebook or for video streaming platforms like YouTube, you should select text animations from Social Media category in Filmora. There are over 200+ text animation templates available that have all the common text animations you usually see as well as creative text animations that will make your video stand out.
All you need to do is import your video and place it in the background. Go to Titles and select Social Media category and drop any desired text animation on the timeline. Thereafter, edit and customize the text layer and style along with the animation as per your preference.
- Education
If your video belongs to education nice such as you are explaining a concept or demonstrating a tutorial, you need to use text animations that are graceful for your video content. Filmora has a dedicated section for text animations related to education. Go to Titles> Tutorials and you will see around 400 text effects and animations that you can use in your educational video effectively.
- Business
If you are creating videos for brands and businesses, there are certain creative text animations you have to use in order to get traction from the target audiences. Filmora comes with over 150 text effects and animations specifically for business videos so that the branding gets strong and leaves a good impression in the mind of the viewers. Go to Titles> Business and choose the desired text animations and customize them to fit into your brand image.
- Travel
If you are into making traveling vlogs or informational travel videos, Filmora has a specific set of text effects and creative animations. You get to choose from over 250 templates to represent any text and title you want to display in your video. The beautiful and eye-catching animated text will definitely get your message across to the viewers pleasantly. Go to Titles> Travel section and check out all the text animations to choose from.
- Gaming
There are so many gamers who put up their gameplay videos on social media and video streaming platforms. While editing the video, they need to put up animated text so that the video content looks interesting and engaging. If you have a gaming video, Filmora has around 500 text effects and animations to use in your video. Go to Titles> Gaming and select from any creative text animations as per your preference.
Unlink Audio and Video in DaVinci Resolve [Detailed Steps]
There are various reasons why someone might want to remove audio from a video. Some of the film shots will have a lot of background noise, which might be distracting while watching the video. Some people like to include alternative audio or a soundtrack to make their films more presentable and attract people. So, whether you want to watch a silent video or one with a separate audio file, you’ll have to erase the original audio.
How To Detach Audio and Video in Da Vinci Resolve
DaVinci Resolve is a sound and video editing program for all types of files. It has numerous applications. Let’s begin with audio extraction from a video clip below:
- Launch the DaVinci Resolve and open the file from File>Open>Select video clip.

- All you have to do with DaVinci Resolve is tap on the chain link in the toolbar above to delete audio from any clip. Alternatively, you may just press down the “ctrl + shift + I” keys to connect and unlink the audio from your clip. Inspect the equalizer after that, and you’re done.

- You can now export the footage on your computer once you’ve finished editing and are pleased with the progress.
Other Alternatives
Suppose you find Da Vinci Resolve very complicated, and you get confused a lot while using it. I prepared a list of a few alternatives that you may use to detach the audio to your videos.
Besides extracting sound from video, the software listed below also has functionality for editing the audio file. Here are some of the most excellent and most popular audio separation and replacement tools:
#1: Wondershare Filmora – Overall Best
It is available on Windows and Mac.
Wondershare Filmora is a popular video editing program used all over the world. Filmora includes all the capabilities that will give you the most outstanding results, whether you’re doing easy video editing, advanced video editing, or even making movies. It also has specific editing features for social media videos.
Follow these steps below, and let’s look at how to detach audio from a video file with Filmora:
- Launch Filmora, then click on File-Import Media and load the video clip to the Media Library, wherein the sound needs to be deleted.

- Drag and drop using the mouse the video clips from the Media Library to the Timeline when it has been imported.
- Click Detach Audio from the context menu of the video file on the timeline.

- The audio will now show on the audio track below in a different format.

- To completely remove the audio file, press on it and simply tap the Delete icon.

You may add a new sound to your video clip in the same manner, you did with the video (import, drag, and drop). Filmora also offers options that enable you to edit and add effects to an audio track.
#2: VSDC Video Editor
It is available on Windows and Mac.
VSDC is a popular video editing program that can handle high-resolution videos such as VR 360-degree, 4K UHD, and 3D films. It also allows users to capture speech and film from the screen and save the material in any format they want. Let’s look at how VSDC can be used to eliminate audio from video:
- Upload the clips you want to edit into VSDC.
- Pick the Properties option from the toolbar by right-clicking on the file with the cursor. A small window will drop down from the right side of the screen.

- You will find a Split to Audio and Video tab at the very bottom of the window; select it.

- On the timeline, the sound will now be divided from the video.

- Erase the audio file by clicking on it. Then, the video is now playable without audio.
VSDC also gives you the option of muting the audio rather than deleting it; however, deleting the audio is preferred.
#3: AudioRemover Tool
It is available on Windows, Mac, and Online.
The AudioRemover Tool is a program that allows you to eliminate audio from any video without having to re-encode it. It is an online service that can be accessed using a browser on Windows and Mac computers. The AudioRemover program can be used by those who do not want to download and install video editing software or just wish to remove audio from video files without additional editing. It can handle any video format, including MP4, MOV, and AVI.
Let’s look at how you can use this application to delete audio:
- Open the online AudioRemover.
- Choose the source video using the Browse tab, then press the Upload Video icon.

- You can save the media files (without audio) once the uploading is finished by clicking the Download File button next to the Completed indication.

This program requires an active connection to the internet, and you cannot upload files larger than 500 MB.
#4: Windows Movie Maker
It is available on Windows.
Because it used to be included in the Windows Essentials software set, Windows Movie Maker is among the most popular accessible editing programs. Let’s have a look at how Movie Maker handles audio extraction.
- Upload the video you want to modify into Windows Movie Maker.

- Create a timeline for the video. Remove audio by right-clicking it (You may also click Detach Audio, and then it will detach the sound from the audio track)

- It will immediately erase the sound, and it will not show any Audio input anymore.

Wrapping Things Up
People’s viewing experiences are greatly influenced by the audio accompanying a video. No matter how wonderful or perfect a video clip is, if the audio playing while watching it is terrible, it may be a very frustrating experience. So, we’ve gone over a few different software options for removing audio from a video file and replacing it with another audio in a couple of moments.
Frequently Asked Questions
How to Insert Audio to Video Clip in Da Vinci Resolve?
There may be times that your video may require the addition of music, background audio, or wooshing sounds.
To begin, open Resolve and import your audio clip:
- Navigate to the “Edit” page.
- Select the tab “Media Pool.”
- Right-click and choose “Import Media” or push “Ctrl + i.”
- Pick your audio clip and browse to your location.
- Select “Open.”
The audio clip is now imported into the “Media Pool.” After that, you’ll need to figure out which part of the audio track you’ll use.
Double-click the audio clip to play it. In the “Source Viewer,” it will appear.
Set the needed audio parts in (press I) and out (press O). Alternatively, if you need the entire soundtrack, there’s no need to set in and out.
Drag & drop the audio track (from the media pool) underneath the video you want to use. It will then add the sound file with the selected portion of the audio. You can now modify the audio to match the visual.
How to Link Your Audio and Video in DaVinci Resolve?
It’s best to link the soundtrack (music, sound effect, or background music) to the relevant video once you’ve adjusted the audio file.
Here’s how to connect audio and video in a timeline:
- Press “Ctrl” or “Cmd” to toggle both the video and audio.
- Right-click and choose “Link Clips.” You may also use the shortcuts “Ctrl + Alt + L” or “Option + Command + L.”
- The sound and visual are now both connected.
Thus, you can rest guaranteed that the audio will follow your movie wherever it goes. There will be no issues with out-of-sync!
How Do You Link Many Audio and Video Files Together in DaVinci Resolve?
Several video and audio segments can be linked together to form a single one. You can rearrange them anywhere in the timeline, and they will not be out of sync.
This is how you connect many clips:
- By holding down the “Ctrl” or “Cmd” key, you can choose all the video and audio clips you want.
- Right-click and choose “Link Clips.” You may also use the shortcut keys “Ctrl + Alt + L” or “Option + Command + L”.
- Now, all your video or audio files are linked together.
Is Any Music Available to Use for Editing?
Understanding copyright law can be complicated. It’s best to use free music for video editing if you don’t want to be accused of copyright violation.
Additionally, you can purchase two licenses to avoid copyright concerns. The producer controls the synchronization license, and the master license to use the song recording is managed by the publishing company.
If you don’t want to go into legal trouble, the only thing you need to remember is never to utilize any illegal video.
Is There Any Free Music in DaVinci Resolve?
DaVinci Resolve does not include any free music; however, it does include royalty-free sound effects noise. To get started, you can download and install the available sound package.
What Software Provides Free Music?
The Audio Collection in Wondershare Filmora has over 50 royalty-free audio tracks for videos, with more to come.
For video production, you can acquire free background music.
In addition, Filmora has 25 sound effects, including animal sounds, video game sounds, and beeps. With Filmora, you may use more advanced editing features like keyframing, background noise elimination, cut, trim, crop, PIP effects, green-screen effects, and more to add free-choice music to your film.
Filmora will enhance the appeal of your video by giving free background music. You may also tweak the background sound, such as speeding up and slowing down, fade-in and fade-out.
- All you have to do with DaVinci Resolve is tap on the chain link in the toolbar above to delete audio from any clip. Alternatively, you may just press down the “ctrl + shift + I” keys to connect and unlink the audio from your clip. Inspect the equalizer after that, and you’re done.
- You can now export the footage on your computer once you’ve finished editing and are pleased with the progress.
Other Alternatives
Suppose you find Da Vinci Resolve very complicated, and you get confused a lot while using it. I prepared a list of a few alternatives that you may use to detach the audio to your videos.
Besides extracting sound from video, the software listed below also has functionality for editing the audio file. Here are some of the most excellent and most popular audio separation and replacement tools:
#1: Wondershare Filmora – Overall Best
It is available on Windows and Mac.
Wondershare Filmora is a popular video editing program used all over the world. Filmora includes all the capabilities that will give you the most outstanding results, whether you’re doing easy video editing, advanced video editing, or even making movies. It also has specific editing features for social media videos.
Follow these steps below, and let’s look at how to detach audio from a video file with Filmora:
- Launch Filmora, then click on File-Import Media and load the video clip to the Media Library, wherein the sound needs to be deleted.
- Drag and drop using the mouse the video clips from the Media Library to the Timeline when it has been imported.
- Click Detach Audio from the context menu of the video file on the timeline.
- The audio will now show on the audio track below in a different format.
- To completely remove the audio file, press on it and simply tap the Delete icon.
You may add a new sound to your video clip in the same manner, you did with the video (import, drag, and drop). Filmora also offers options that enable you to edit and add effects to an audio track.
#2: VSDC Video Editor
It is available on Windows and Mac.
VSDC is a popular video editing program that can handle high-resolution videos such as VR 360-degree, 4K UHD, and 3D films. It also allows users to capture speech and film from the screen and save the material in any format they want. Let’s look at how VSDC can be used to eliminate audio from video:
- Upload the clips you want to edit into VSDC.
- Pick the Properties option from the toolbar by right-clicking on the file with the cursor. A small window will drop down from the right side of the screen.
- You will find a Split to Audio and Video tab at the very bottom of the window; select it.
- On the timeline, the sound will now be divided from the video.
- Erase the audio file by clicking on it. Then, the video is now playable without audio.
VSDC also gives you the option of muting the audio rather than deleting it; however, deleting the audio is preferred.
#3: AudioRemover Tool
It is available on Windows, Mac, and Online.
The AudioRemover Tool is a program that allows you to eliminate audio from any video without having to re-encode it. It is an online service that can be accessed using a browser on Windows and Mac computers. The AudioRemover program can be used by those who do not want to download and install video editing software or just wish to remove audio from video files without additional editing. It can handle any video format, including MP4, MOV, and AVI.
Let’s look at how you can use this application to delete audio:
- Open the online AudioRemover.
- Choose the source video using the Browse tab, then press the Upload Video icon.
- You can save the media files (without audio) once the uploading is finished by clicking the Download File button next to the Completed indication.
This program requires an active connection to the internet, and you cannot upload files larger than 500 MB.
#4: Windows Movie Maker
It is available on Windows.
Because it used to be included in the Windows Essentials software set, Windows Movie Maker is among the most popular accessible editing programs. Let’s have a look at how Movie Maker handles audio extraction.
- Upload the video you want to modify into Windows Movie Maker.
- Create a timeline for the video. Remove audio by right-clicking it (You may also click Detach Audio, and then it will detach the sound from the audio track)
- It will immediately erase the sound, and it will not show any Audio input anymore.
Wrapping Things Up
People’s viewing experiences are greatly influenced by the audio accompanying a video. No matter how wonderful or perfect a video clip is, if the audio playing while watching it is terrible, it may be a very frustrating experience. So, we’ve gone over a few different software options for removing audio from a video file and replacing it with another audio in a couple of moments.
Frequently Asked Questions
How to Insert Audio to Video Clip in Da Vinci Resolve?
There may be times that your video may require the addition of music, background audio, or wooshing sounds.
To begin, open Resolve and import your audio clip:
- Navigate to the “Edit” page.
- Select the tab “Media Pool.”
- Right-click and choose “Import Media” or push “Ctrl + i.”
- Pick your audio clip and browse to your location.
- Select “Open.”
The audio clip is now imported into the “Media Pool.” After that, you’ll need to figure out which part of the audio track you’ll use.
Double-click the audio clip to play it. In the “Source Viewer,” it will appear.
Set the needed audio parts in (press I) and out (press O). Alternatively, if you need the entire soundtrack, there’s no need to set in and out.
Drag & drop the audio track (from the media pool) underneath the video you want to use. It will then add the sound file with the selected portion of the audio. You can now modify the audio to match the visual.
How to Link Your Audio and Video in DaVinci Resolve?
It’s best to link the soundtrack (music, sound effect, or background music) to the relevant video once you’ve adjusted the audio file.
Here’s how to connect audio and video in a timeline:
- Press “Ctrl” or “Cmd” to toggle both the video and audio.
- Right-click and choose “Link Clips.” You may also use the shortcuts “Ctrl + Alt + L” or “Option + Command + L.”
- The sound and visual are now both connected.
Thus, you can rest guaranteed that the audio will follow your movie wherever it goes. There will be no issues with out-of-sync!
How Do You Link Many Audio and Video Files Together in DaVinci Resolve?
Several video and audio segments can be linked together to form a single one. You can rearrange them anywhere in the timeline, and they will not be out of sync.
This is how you connect many clips:
- By holding down the “Ctrl” or “Cmd” key, you can choose all the video and audio clips you want.
- Right-click and choose “Link Clips.” You may also use the shortcut keys “Ctrl + Alt + L” or “Option + Command + L”.
- Now, all your video or audio files are linked together.
Is Any Music Available to Use for Editing?
Understanding copyright law can be complicated. It’s best to use free music for video editing if you don’t want to be accused of copyright violation.
Additionally, you can purchase two licenses to avoid copyright concerns. The producer controls the synchronization license, and the master license to use the song recording is managed by the publishing company.
If you don’t want to go into legal trouble, the only thing you need to remember is never to utilize any illegal video.
Is There Any Free Music in DaVinci Resolve?
DaVinci Resolve does not include any free music; however, it does include royalty-free sound effects noise. To get started, you can download and install the available sound package.
What Software Provides Free Music?
The Audio Collection in Wondershare Filmora has over 50 royalty-free audio tracks for videos, with more to come.
For video production, you can acquire free background music.
In addition, Filmora has 25 sound effects, including animal sounds, video game sounds, and beeps. With Filmora, you may use more advanced editing features like keyframing, background noise elimination, cut, trim, crop, PIP effects, green-screen effects, and more to add free-choice music to your film.
Filmora will enhance the appeal of your video by giving free background music. You may also tweak the background sound, such as speeding up and slowing down, fade-in and fade-out.
Also read:
- Updated 2024 Approved 10 Best Video Editing Apps With Templates
- Updated 2024 Approved The Right Ways to Slow Down a Video on iPhone
- In 2024, How to Make Discord GIF PFP
- Updated Do You Want to Learn How to Film a TikTok with Multiple Clips? Worry No More because You Can Do This by Following the Methods Instructed in This Article
- Updated Best GIF to AVI Converters
- Updated How Can You Deny These Best 10 Free Speech to Text Software for 2024
- Updated Top Online Video Background Changers Transform Your Videos with Ease for 2024
- Updated Got No Luck with MP4 Video Joining Software? Try These 6 Best MP4 Mergers to Combine Videos on Your MAC and Windows
- New Updated 8 Ways to Merge SRT with MP4 for 2024
- Wondershare Filmora Tutorial | Using The AI Auto Reframe Feature for 2024
- Updated 2024 Approved Best 12 AI Video Generators to Pick
- New How to Add Photos to Tik Tok Video for 2024
- New The Right Ways to Slow Down a Video on iPhone for 2024
- For Converting GIF to MOV Format, You Dont Need to Search From A-Z. Here Is an Amazing Guide, that Gives You Complete Details About Both Offline and Online Gif-to-MOV Converters. Catch Them Below and Experience a Pro Editing Time
- New Explore Our Comprehensive Guide to the 10 Best Cameras . Unlock the World of Advanced Technology Perfect for Capturing Slow-Motion Footage in Various Scenarios
- Ultimate Guide to Countdown Animation in Videos
- 2024 Approved What Is Motion Blur in the Game? Do You Really Need It?
- Updated In 2024, How to Correct Lens Distortion With Filmora
- 2024 Approved Make Videos with Pictures and Music-10 Apps
- Splitting the Clips in Adobe After Effects Step by Step
- Updated How to Make Falling Text Effect in Filmora?
- Facts About GIF Background You Didnt Know for 2024
- Easy Guide to Overlay Videos in Premiere Pro for 2024
- Updated How to Create Intro Video with Filmora for 2024
- New In 2024, Top 10 iPad Slideshow Apps to Create a Slideshow
- 2024 Approved Searching for the Best Video Editor to Make Your Video More Attractive? This Article Introduce You Everything About Choosing a Video Editing Software
- Top 10 iPad Slideshow Apps to Create a Slideshow for 2024
- In 2024, A Complete Guide To OEM Unlocking on Xiaomi Redmi K70E
- In 2024, 2 Ways to Monitor Motorola Moto E13 Activity | Dr.fone
- 9 Best Free Android Monitoring Apps to Monitor Phone Remotely For your Tecno Phantom V Flip | Dr.fone
- Best Anti Tracker Software For Honor X50i | Dr.fone
- In 2024, What Pokémon Evolve with A Dawn Stone For Motorola Edge 2023? | Dr.fone
- In 2024, How to fix iCloud lock on your iPhone 12 Pro Max and iPad
- In 2024, 2 Ways to Transfer Text Messages from ZTE Nubia Z60 Ultra to iPhone 15/14/13/12/11/X/8/ | Dr.fone
- How To Change Your Apple ID Password On your Apple iPhone SE | Dr.fone
- Free electronic signature - For .docx
- MKV stutters on Moto G Stylus (2023) and stops randomly
- In 2024, 3 Effective Methods to Fake GPS location on Android For your Motorola Moto G13 | Dr.fone
- Easy steps to recover deleted pictures from Xiaomi 13T.
- 8 Solutions to Fix Find My Friends Location Not Available On Vivo Y55s 5G (2023) | Dr.fone
- Hard Resetting an Nokia C12 Device Made Easy | Dr.fone
- In 2024, How To Fix iPhone 14 Plus Could Not Be Activated/Reached Issue
- Top 4 SIM Location Trackers To Easily Find Your Lost Realme C55 Device
- Recover your pictures after Honor Magic 6 Lite has been deleted.
- In 2024, Solutions to Spy on OnePlus 12R with and without jailbreak | Dr.fone
- In 2024, The Ultimate Guide to Get the Rare Candy on Pokemon Go Fire Red On Vivo V30 Pro | Dr.fone
- 3 Best Tools to Hard Reset Samsung Galaxy S23 | Dr.fone
- How To Restore Missing Call Logs from Nokia 130 Music
- In 2024, Easiest Guide How to Clone Vivo S17t Phone? | Dr.fone
- In 2024, How to Create Photo Collage Frame for Free in Minutes?
- In 2024, Top 15 Augmented Reality Games Like Pokémon GO To Play On OnePlus Ace 2V | Dr.fone
- In 2024, Does find my friends work on Apple iPhone 12 | Dr.fone
- In 2024, How to Enable, Disable, and Change Safari Location on Apple iPhone 15 Pro Max | Dr.fone
- Title: Updated What Is HDRI? Everything You Need to Know About HDRI
- Author: Chloe
- Created at : 2024-04-24 07:08:16
- Updated at : 2024-04-25 07:08:16
- Link: https://ai-editing-video.techidaily.com/updated-what-is-hdri-everything-you-need-to-know-about-hdri/
- License: This work is licensed under CC BY-NC-SA 4.0.
