
:max_bytes(150000):strip_icc():format(webp)/coffeecup-free-html-editor-profile-3467555-8876645f89c444c8b94addcf4307b22d.png)
Updated What Is MOV Format and How to Edit MOV Video Better, In 2024
What Is MOV Format and How to Edit MOV Video Better?
We come across different media files every day, and surprisingly, every file has a unique format. Different devices and different programs support and entertain different file formats. It is hard to find the correct file format for your device.
The following article will shed light on MOV format. Not just this, apart from its introduction, pros and cons, if you plan to edit your MOV video format, we will also introduce a video editor. Let’s start!
In this article
02 What Are Pros and Coins about MOV Video Format?
03 Best MOV Video Editor- Filmora Video Editor
04 How to Edit MOV Video Files in An Creative Way?
05 Differences Between MP4 and MOV
Part 1. What Is MOV Format?
You might be using the MOV format without noticing and knowing what it is? MOV is a QuickTime file developed by Apple Inc. It is a multimedia container file. MOV file format is capable of keeping multiple types of data on different tracks, which may include audio, video, or even texts.

Does the MOV video format only work on Mac? MOV is developed by Apple, but it does not mean that it is not compatible with other devices. You can use it on Windows along with Sony and DVD. MOV file format is the same as MPEG-4 format file. It is sometimes considered as the basis for the MPEG-4 file format.
Part 2. What Are Pros and Coins about MOV Video Format
Do you know what benefits you get from the MOV video format? Or else, why not discuss its disadvantages? The following section of this article will shed light on both the advantages and also disadvantages of the MOV format.
Advantages of MOV Format
MOV file format is a famous format because of the simplicity it provides in editing and also because it embeds well in different programs. The format is very convenient as it holds various media content like videos, audio, everything in one compact place. MOV video files are easily edited as the primary elements are adjusted.
MOV format is widely used on the web, and because of this reason, the format is ideal for sharing files on the internet. The format is perfect for Mac and QuickTime Player. It is highly compatible with different platforms like Mac, Windows, iOS, and Android. Do you know about the storage space of MOV? The format acquires low storage space, making it a great file format.
Drawbacks of MOV Format
Moving on to its drawbacks, MOV has lossy compression of video tracks. The overall quality of the video might also be damaged while compressing the video. Every track of the MOV format file is encoded with a specific codec. Only those apps can smoothly play a MOV file that supports and recognize the encoded codec. In this case, you might need to convert the file format.
Part 3. Best MOV Video Editor- Filmora Video Editor
Are you looking for a great video editor to edit your MOV format videos? We might have something for you. Let’s introduce Wondershare Filmora to edit drastic videos. The software is very easy to understand and use. Its intuitive interface guides the user about every step.

For Win 7 or later (64-bit)
For macOS 10.12 or later
Filmora Video Editor has enormous features that could make a stunning video. You cannot find a better video editor than Filmora because of its features like cutting, trimming, joining, splitting, and so much more than this. Let’s share a few more features of Filmora:
Auto Reframe
Isn’t it easy if your video gets automatically focused? With Filmora, Auto Reframe feature, the AI technology automatically detects the focal point of the video and keeps it in the frame. With this feature, the main object of the video always remains in focus.
Stabilize Video
Do you know what wonders Stabilize Video feature can do? While filming a video, your hand might shake, and your video quality is disturbed, but with Filmora, you can fix the video. Use its Stabilize Video feature and smooth the shaky footage.
Silence Detection
You are not always speaking in a video; some parts of the video are silent. What to do with such parts? Well, take help from Filmora and remove the silent instances from your video. The Silence Detection feature spontaneously detects the silent parts of the MOV file format video and removes them, saving your precious time.
Split Screen
Are you creating a tutorial? Split Screen is the ideal feature to use for creating such videos. Filmora lets you display multiple videos on a single screen with this feature. You can simultaneously incorporate various clips by using the different provided templates.
Part 4. How to Edit MOV Video Files in An Creative Way?
Filmora is a stunning video editor with uncountable features. You can create mind-blowing videos with Wondershare Filmora. Apart from features like trim, cut, join, split, you also get some great advanced features like Motion Tracking, AI Portrait, Pan & Zoom, and a lot more.
The video editor is easy to use, and even novice users can understand the software and work with it. Filmora is a famous editor because of its functionalities. If you are looking for a video editor to edit your MOV file format, try Filmora, you will not be disappointed. Follow the steps below for assistance:
Step 1: Importing Media
After installing Filmora, launch it on your device. From the home screen, head to the ‘File’ tab and look for the ‘Import Media’ option. A sub-menu will appear as you hover on the option, click on the ‘Import Media Files’, and locate the MOV format file from the device to work with.

Step 2: Add Audio Effects
Do you want to make your video interesting? Try by adding some sound effects. For this, head to the ‘Audio’ section from the top menu and look for your preferred effect.

Step 3: Add Transitions
You might mix and join various videos but do they look good? For smooth transitions, move to the ‘Transition’ tab and select a cool effect.

Step 4: Elements and Titles
Have you tried adding any cool elements to your MOV video? From the ‘Elements’ section, add things like Laser Eye, fun emoji, and a lot more. Along with this, add titles to your video from the ‘Titles’ tab.

Step 5: Export MOV File
Are you satisfied with the final MOV video format file? If you are, export the video to your device. Hit the ‘Export’ button and select ‘MOV’ format as your output format to save the video.

Part 5. Differences Between MP4 and MOV
Both MP4 and MOV file format is almost the same thing. Some of the minor differences that exist are MOV format is recommended best for Mac devices. On the contrary, MP4 is universal that can be used on any device irrespective of the operating system or the software.

MP4 files are more compressed, thus taking less space than MOV video format, which takes slightly more space. The quality of payback that MP4 provides is less than what the MOV file format provides. MOV format, thus, for this reason, is used more by professionals.
Final Thoughts
The article has everything you need to know about the MOV format. From its introduction to the steps of editing a MOV video format, we shared everything in detail. It’s time to talk about a nice video creator and also a video editor. We are talking about Wondershare Filmora. The video editor will wow you with its features and editing capabilities.
The video editor offers regular options like split, cut, trim, join, etc. Whereas it also comes with advanced editing features like Color Match, Chroma Key Background, Auto Highlight, and whatnot. If you want to create a stunning and eye-catching video, take help from Filmora.
Wondershare Filmora
Get started easily with Filmora’s powerful performance, intuitive interface, and countless effects!
Try It Free Try It Free Try It Free Learn More >

02 What Are Pros and Coins about MOV Video Format?
03 Best MOV Video Editor- Filmora Video Editor
04 How to Edit MOV Video Files in An Creative Way?
05 Differences Between MP4 and MOV
Part 1. What Is MOV Format?
You might be using the MOV format without noticing and knowing what it is? MOV is a QuickTime file developed by Apple Inc. It is a multimedia container file. MOV file format is capable of keeping multiple types of data on different tracks, which may include audio, video, or even texts.
Does the MOV video format only work on Mac? MOV is developed by Apple, but it does not mean that it is not compatible with other devices. You can use it on Windows along with Sony and DVD. MOV file format is the same as MPEG-4 format file. It is sometimes considered as the basis for the MPEG-4 file format.
Part 2. What Are Pros and Coins about MOV Video Format
Do you know what benefits you get from the MOV video format? Or else, why not discuss its disadvantages? The following section of this article will shed light on both the advantages and also disadvantages of the MOV format.
Advantages of MOV Format
MOV file format is a famous format because of the simplicity it provides in editing and also because it embeds well in different programs. The format is very convenient as it holds various media content like videos, audio, everything in one compact place. MOV video files are easily edited as the primary elements are adjusted.
MOV format is widely used on the web, and because of this reason, the format is ideal for sharing files on the internet. The format is perfect for Mac and QuickTime Player. It is highly compatible with different platforms like Mac, Windows, iOS, and Android. Do you know about the storage space of MOV? The format acquires low storage space, making it a great file format.
Drawbacks of MOV Format
Moving on to its drawbacks, MOV has lossy compression of video tracks. The overall quality of the video might also be damaged while compressing the video. Every track of the MOV format file is encoded with a specific codec. Only those apps can smoothly play a MOV file that supports and recognize the encoded codec. In this case, you might need to convert the file format.
Part 3. Best MOV Video Editor- Filmora Video Editor
Are you looking for a great video editor to edit your MOV format videos? We might have something for you. Let’s introduce Wondershare Filmora to edit drastic videos. The software is very easy to understand and use. Its intuitive interface guides the user about every step.
For Win 7 or later (64-bit)
For macOS 10.12 or later
Filmora Video Editor has enormous features that could make a stunning video. You cannot find a better video editor than Filmora because of its features like cutting, trimming, joining, splitting, and so much more than this. Let’s share a few more features of Filmora:
Auto Reframe
Isn’t it easy if your video gets automatically focused? With Filmora, Auto Reframe feature, the AI technology automatically detects the focal point of the video and keeps it in the frame. With this feature, the main object of the video always remains in focus.
Stabilize Video
Do you know what wonders Stabilize Video feature can do? While filming a video, your hand might shake, and your video quality is disturbed, but with Filmora, you can fix the video. Use its Stabilize Video feature and smooth the shaky footage.
Silence Detection
You are not always speaking in a video; some parts of the video are silent. What to do with such parts? Well, take help from Filmora and remove the silent instances from your video. The Silence Detection feature spontaneously detects the silent parts of the MOV file format video and removes them, saving your precious time.
Split Screen
Are you creating a tutorial? Split Screen is the ideal feature to use for creating such videos. Filmora lets you display multiple videos on a single screen with this feature. You can simultaneously incorporate various clips by using the different provided templates.
Part 4. How to Edit MOV Video Files in An Creative Way?
Filmora is a stunning video editor with uncountable features. You can create mind-blowing videos with Wondershare Filmora. Apart from features like trim, cut, join, split, you also get some great advanced features like Motion Tracking, AI Portrait, Pan & Zoom, and a lot more.
The video editor is easy to use, and even novice users can understand the software and work with it. Filmora is a famous editor because of its functionalities. If you are looking for a video editor to edit your MOV file format, try Filmora, you will not be disappointed. Follow the steps below for assistance:
Step 1: Importing Media
After installing Filmora, launch it on your device. From the home screen, head to the ‘File’ tab and look for the ‘Import Media’ option. A sub-menu will appear as you hover on the option, click on the ‘Import Media Files’, and locate the MOV format file from the device to work with.
Step 2: Add Audio Effects
Do you want to make your video interesting? Try by adding some sound effects. For this, head to the ‘Audio’ section from the top menu and look for your preferred effect.
Step 3: Add Transitions
You might mix and join various videos but do they look good? For smooth transitions, move to the ‘Transition’ tab and select a cool effect.
Step 4: Elements and Titles
Have you tried adding any cool elements to your MOV video? From the ‘Elements’ section, add things like Laser Eye, fun emoji, and a lot more. Along with this, add titles to your video from the ‘Titles’ tab.
Step 5: Export MOV File
Are you satisfied with the final MOV video format file? If you are, export the video to your device. Hit the ‘Export’ button and select ‘MOV’ format as your output format to save the video.
Part 5. Differences Between MP4 and MOV
Both MP4 and MOV file format is almost the same thing. Some of the minor differences that exist are MOV format is recommended best for Mac devices. On the contrary, MP4 is universal that can be used on any device irrespective of the operating system or the software.
MP4 files are more compressed, thus taking less space than MOV video format, which takes slightly more space. The quality of payback that MP4 provides is less than what the MOV file format provides. MOV format, thus, for this reason, is used more by professionals.
Final Thoughts
The article has everything you need to know about the MOV format. From its introduction to the steps of editing a MOV video format, we shared everything in detail. It’s time to talk about a nice video creator and also a video editor. We are talking about Wondershare Filmora. The video editor will wow you with its features and editing capabilities.
The video editor offers regular options like split, cut, trim, join, etc. Whereas it also comes with advanced editing features like Color Match, Chroma Key Background, Auto Highlight, and whatnot. If you want to create a stunning and eye-catching video, take help from Filmora.
Wondershare Filmora
Get started easily with Filmora’s powerful performance, intuitive interface, and countless effects!
Try It Free Try It Free Try It Free Learn More >
12 Impressive AI Video Ideas for Making Engaging Video Content
12 Impressive AI Video Ideas for Creating Engaging Video Content
An easy yet powerful editor
Numerous effects to choose from
Detailed tutorials provided by the official channel
In recent times, AI technology has become more useful for content creators to get more effective and engaging AI video ideas. Various AI video idea generator tools like Jasper, WeShare, etc., save con-tent creators time by giving the latest trending video ideas. These tools made content creators work easy as they need not spend much time on video ideas.
Most of us know AI-Artificial Intelligence and its role in achieving better and fast results in different areas. This article will let us know the position of YouTube video idea generator AI in generating engaging video content using Artificial Intelligence. Nowadays, these tools also help add audio/video summary and animations for the videos.
In this article
01 [What’s Video Ideas Generator and How to Use This Tool to Get More Views](#Part 1)
02 [12 Great AI Video Ideas to Bring More Traffic](#Part 2)
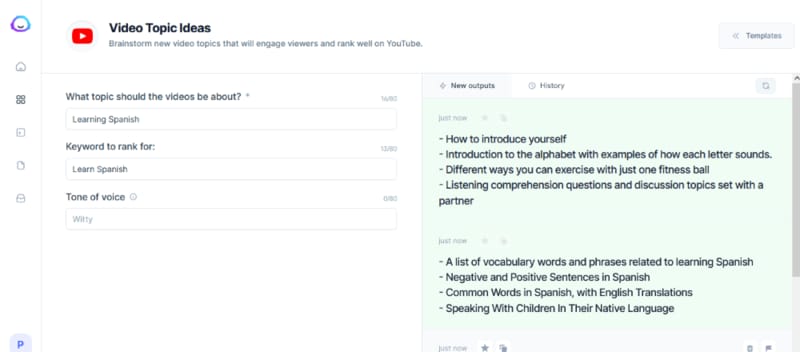
Part 1 What’s Video Ideas Generator and How to Use This Tool to Get More Views
It’s not enough to create a YouTube channel and post some video that does not have informative content. Sometimes, even though the video has informative content, the content might not be attractive to the viewers for various reasons, like the content might be routine and does not have more reach, likes, or shares. Along with good content, we also need new and creative ideas to get more viewers. Thus, we have some tools to provide unique and innovative ideas based on the niche you choose.
Videos Idea Generator is a tool that gives ideas for YouTube videos, and it works based on AI technology (Neural Networks). This tool will be more beneficial for the content creators to get more AI video ideas. Naturally, you might be out of ideas for your channel, or sometimes it takes more time to get an idea, or it could be a routine idea that does not sound interesting to the viewers. In such cases, an AI video idea generator is more helpful in suggesting new and innovative ideas for the content creators based on their interesting topics.
Some of the advantages of a video idea generator are:
● Time-saving – as one can utilize the time in other work, such as editing the video/ adding subtitles, etc., instead of thinking of an idea.
● Engaging with the audience – can utilize the time in engaging with the audience by answering their questions.
● Promote videos – can utilize time to promote their videos on other social media platforms or collaborate with other content creators for promotions.
● Add animations – animations and other visual effects can be added to the videos using AI. Also, we can add video and audio summaries after each video so that the viewers can get brief detailing of the whole video.
How to use Videos Idea Generator:
There are different AI video idea generator tools, and most of them work similarly. The most common steps are:
Step 1: Provide Topic
Here you need to provide the topic’s name on which we are planning to create the video.
Step 2: Provide Keywords
After providing a topic, give the keywords required for publishing. The video needs to have all the keywords so that the main content of the video can project adequately.
Based on the topic name and keywords, the tool will generate suggestions for the video ideas using the Neural Network concept of Artificial Learning.
Part 2 12 Great AI Video Ideas to Bring More Traffic
Now, let us know 12 AI video ideas that can become viral and get more likes and views :
01Idea 1: Know your Interest
Before starting a YouTube channel or posting a video, know your area of interest first. Once you get clarity on the area of interest, it’s easy to pick a topic from that and create an innovative video. Try to be more specific in the topic you choose. Also, have clarity on the section of audience you want to target.
For example, if your topic is more related to children, add more animations of animals/ cartoons that interest children. If you choose a related topic, do not add more animations that might confuse the audience. Add more reference links so that they can refer to those and be more particular on the specific topic you are trying to explain through the video. Similarly, if you choose a gaming-related topic, do not be more general about gaming.
Be specific towards a particular section of games like mobile gaming/ desktop/ virtual to reach more audience, and it does not seem boring to the audience.
02Idea 2: Interview Questions
As many students graduate every year, the competition for jobs has increased. People are more interested in getting an appointment as soon as possible, and for that, they need to prepare for the interview thoroughly. A video containing the main topics for the discussion that has references for the interview questions would benefit the students. It can engage with people within no time. Also, if the video is more specific to the department-wise interview questions/ job-level interview questions, it would reach more people and be more helpful to them.
03Idea 3: Full Course in Any Technology
Apart from the entertainment-related videos, education-related videos will be more helpful and engaging. Any video related to any technology course can get more views. Using the YouTube video idea generator AI tool, you can generate more unique videos related to education. Instead of giving a brief idea of the technology, it’s better to pick up a few topics and explain them in detail so that it would be helpful for interviews too. You can use AI technology to add a voice-over and a small summary at the end of the video so that the main points get revised once again.
04Idea 4: Cooking Ideas
Cooking is one of the most trending topics on YouTube. Whatever the language might be, cooking-related videos can get more views, create more creativity, and engage with the audience. You can choose a dish from any cuisine and make a video. You can add slow motion/ fast forward actions and small creative animations using AI. Using AI video ideas tools, you can get more creative ideas related to cooking that can increase views, as viewers will be more interested if the videos are innovative.
05Idea 5: Art and Craft ideas
Recently, people have seem more interested in the interior design of the house. For such people, art and craft ideas might be more helpful. Also, nowadays, schools are encouraging students in other circular activities and studies. These videos might be more attractive to the school’s students. Also, in crafts, select a specific area and make videos on that so that the video will be short and crisp, and easily understandable to the viewers. You can also add a voice-over while doing the craftwork to make it more transparent for the viewers.
06Idea 6: Photo and Video Editing Related Videos
People have become more addicted to taking photos and storing them. Any video related to editing the photos/ videos will engage more with viewers as it is not associated with any section of people. Anyone from any place and with any qualification can understand such videos. Consider a few topics related to the editing and give a detailed description/ explanation of those ideas, or consider any photo/ video editing app and explain how the app works in the video so that it might be helpful for the people who are using the app for the first time. Also, please reply to the frequently asked questions related to the app in the form of comments or summary so that it can reach more people, and there is a chance that the viewers might suggest the video to others who are about to use the app.
07Idea 7: Movies Related Videos
In every country, people are more addicted to movies regardless of language. Movies have become a part of daily life for almost all people. Some of the movie-related video ideas can be:
● Video regarding actor interviews.
● Video regarding the movie review/ collections.
● Video regarding highlights/ mistakes in the movie.
● Video related to small clips/ songs in the film.
● Video related to the spoof of the central theme of the film.
Any video related to a movie can be more viral. To create new content, use AI video idea generator tools so that the videos can be more engaging and creative.
08Idea 8: Lifehacks Related Videos
Simple daily life hack idea-related videos will be more helpful to people irrespective of their living. Any statements about keeping the house clean/clothing/makeup/skincare can be beneficial. You can take simple concepts related to our daily life like:
● How to use a few tools in our everyday life.
● Simple cleaning techniques.
● Folding clothes easily saves time.
09Idea 9: Earning Related Ideas
Videos related to earning can get more views and become more viral among people. Any detailed description of any earning app/ small startup ideas can be helpful. The video ideas generator tool can give more suggestions related to such trending topics.
10Idea 10: Sports related ideas
A large population is into sports, like football and cricket. People enjoy watching and playing these sports regularly from young to old age. It will be a good idea if you can try videos on sports. Using the video generator AI, you can generate animation videos playing cricket and add small clips of old generation cricket players as examples. You may also create small teaching videos on other sports for children. Through animation, giving the latest sports updates worldwide will also be a better idea to get more views for videos.
11Idea 11: Current Affairs Related Videos
Current affairs and general knowledge-related videos will be more helpful to people preparing for competitive exams as most people are learning through the internet rather than from books. If you can take a specific subject and give a detailed description of its past and current updates, it can be helpful for many people. And also, while doing such information-related videos, you get a chance to research it, and it will help improve your knowledge of the subject and searching skills.
12Idea 12: Gadget And Product Review Ideas
Reportedly, there has been a tremendous increase in new products related to mobiles, laptops, TV, other hardware tools, skin, hair care products, etc. You can take a specific product and create innovative ideas on how to use the product using animations/ cartoons and give a short review of the product. Through this, you can earn as you promote a company product, and people will know about the product. This is beneficial in both ways. If the product is related to electronic gadgets, make a video explaining the product’s features and how to use them. If it is hair or skincare related, include the ingredients used, advantages of the product, how to use the product, and any disadvantages, etc. Based on the product you choose, the content of the video should change.
Bonus Idea:
Use an innovative and powerful tool like Wondershare Filmora Video Editor to beautify your AI videos in the shortest time frame.
Filmora’s latest version offers various upgraded tools like:
● Instant Mode to create accessible and quick videos.
● A shop of preset templates to power up your videos.
● The Filmora Auto Beat Sync can match your clip with music.
● Adjust the speed of your video and introduce cinematic effects.
● You can even record your screen with Filmora and use that in your AI videos ideas.

Wondershare Filmora - Best Video Editor for Mac/Windows
5,481,435 people have downloaded it.
Build unique custom animations without breaking a sweat.
Focus on creating epic stories and leave the details to Filmora’s auto features.
Start a creative adventure with drag & drop effects and endless possibilities.
Filmora simplifies advanced features to save you time and effort.
Filmora cuts out repetition so you can move on to your next creative breakthrough.
● Ending Thoughts →
● Finally, that you have a fair idea of what a YouTube video idea generator is about and how it helps content creators in daily life get more innovative ideas for YouTube videos.
● Make use of this tool to get more engaging and creative content and more AI video ideas so that the views for the video increase and the audience receives good knowledge through the videos. Try out these ideas, use Filmora to create exceptional animations on your videos, and watch your YouTube channel grow as expected.
In recent times, AI technology has become more useful for content creators to get more effective and engaging AI video ideas. Various AI video idea generator tools like Jasper, WeShare, etc., save con-tent creators time by giving the latest trending video ideas. These tools made content creators work easy as they need not spend much time on video ideas.
Most of us know AI-Artificial Intelligence and its role in achieving better and fast results in different areas. This article will let us know the position of YouTube video idea generator AI in generating engaging video content using Artificial Intelligence. Nowadays, these tools also help add audio/video summary and animations for the videos.
In this article
01 [What’s Video Ideas Generator and How to Use This Tool to Get More Views](#Part 1)
02 [12 Great AI Video Ideas to Bring More Traffic](#Part 2)
Part 1 What’s Video Ideas Generator and How to Use This Tool to Get More Views
It’s not enough to create a YouTube channel and post some video that does not have informative content. Sometimes, even though the video has informative content, the content might not be attractive to the viewers for various reasons, like the content might be routine and does not have more reach, likes, or shares. Along with good content, we also need new and creative ideas to get more viewers. Thus, we have some tools to provide unique and innovative ideas based on the niche you choose.
Videos Idea Generator is a tool that gives ideas for YouTube videos, and it works based on AI technology (Neural Networks). This tool will be more beneficial for the content creators to get more AI video ideas. Naturally, you might be out of ideas for your channel, or sometimes it takes more time to get an idea, or it could be a routine idea that does not sound interesting to the viewers. In such cases, an AI video idea generator is more helpful in suggesting new and innovative ideas for the content creators based on their interesting topics.
Some of the advantages of a video idea generator are:
● Time-saving – as one can utilize the time in other work, such as editing the video/ adding subtitles, etc., instead of thinking of an idea.
● Engaging with the audience – can utilize the time in engaging with the audience by answering their questions.
● Promote videos – can utilize time to promote their videos on other social media platforms or collaborate with other content creators for promotions.
● Add animations – animations and other visual effects can be added to the videos using AI. Also, we can add video and audio summaries after each video so that the viewers can get brief detailing of the whole video.
How to use Videos Idea Generator:
There are different AI video idea generator tools, and most of them work similarly. The most common steps are:
Step 1: Provide Topic
Here you need to provide the topic’s name on which we are planning to create the video.
Step 2: Provide Keywords
After providing a topic, give the keywords required for publishing. The video needs to have all the keywords so that the main content of the video can project adequately.
Based on the topic name and keywords, the tool will generate suggestions for the video ideas using the Neural Network concept of Artificial Learning.
Part 2 12 Great AI Video Ideas to Bring More Traffic
Now, let us know 12 AI video ideas that can become viral and get more likes and views :
01Idea 1: Know your Interest
Before starting a YouTube channel or posting a video, know your area of interest first. Once you get clarity on the area of interest, it’s easy to pick a topic from that and create an innovative video. Try to be more specific in the topic you choose. Also, have clarity on the section of audience you want to target.
For example, if your topic is more related to children, add more animations of animals/ cartoons that interest children. If you choose a related topic, do not add more animations that might confuse the audience. Add more reference links so that they can refer to those and be more particular on the specific topic you are trying to explain through the video. Similarly, if you choose a gaming-related topic, do not be more general about gaming.
Be specific towards a particular section of games like mobile gaming/ desktop/ virtual to reach more audience, and it does not seem boring to the audience.
02Idea 2: Interview Questions
As many students graduate every year, the competition for jobs has increased. People are more interested in getting an appointment as soon as possible, and for that, they need to prepare for the interview thoroughly. A video containing the main topics for the discussion that has references for the interview questions would benefit the students. It can engage with people within no time. Also, if the video is more specific to the department-wise interview questions/ job-level interview questions, it would reach more people and be more helpful to them.
03Idea 3: Full Course in Any Technology
Apart from the entertainment-related videos, education-related videos will be more helpful and engaging. Any video related to any technology course can get more views. Using the YouTube video idea generator AI tool, you can generate more unique videos related to education. Instead of giving a brief idea of the technology, it’s better to pick up a few topics and explain them in detail so that it would be helpful for interviews too. You can use AI technology to add a voice-over and a small summary at the end of the video so that the main points get revised once again.
04Idea 4: Cooking Ideas
Cooking is one of the most trending topics on YouTube. Whatever the language might be, cooking-related videos can get more views, create more creativity, and engage with the audience. You can choose a dish from any cuisine and make a video. You can add slow motion/ fast forward actions and small creative animations using AI. Using AI video ideas tools, you can get more creative ideas related to cooking that can increase views, as viewers will be more interested if the videos are innovative.
05Idea 5: Art and Craft ideas
Recently, people have seem more interested in the interior design of the house. For such people, art and craft ideas might be more helpful. Also, nowadays, schools are encouraging students in other circular activities and studies. These videos might be more attractive to the school’s students. Also, in crafts, select a specific area and make videos on that so that the video will be short and crisp, and easily understandable to the viewers. You can also add a voice-over while doing the craftwork to make it more transparent for the viewers.
06Idea 6: Photo and Video Editing Related Videos
People have become more addicted to taking photos and storing them. Any video related to editing the photos/ videos will engage more with viewers as it is not associated with any section of people. Anyone from any place and with any qualification can understand such videos. Consider a few topics related to the editing and give a detailed description/ explanation of those ideas, or consider any photo/ video editing app and explain how the app works in the video so that it might be helpful for the people who are using the app for the first time. Also, please reply to the frequently asked questions related to the app in the form of comments or summary so that it can reach more people, and there is a chance that the viewers might suggest the video to others who are about to use the app.
07Idea 7: Movies Related Videos
In every country, people are more addicted to movies regardless of language. Movies have become a part of daily life for almost all people. Some of the movie-related video ideas can be:
● Video regarding actor interviews.
● Video regarding the movie review/ collections.
● Video regarding highlights/ mistakes in the movie.
● Video related to small clips/ songs in the film.
● Video related to the spoof of the central theme of the film.
Any video related to a movie can be more viral. To create new content, use AI video idea generator tools so that the videos can be more engaging and creative.
08Idea 8: Lifehacks Related Videos
Simple daily life hack idea-related videos will be more helpful to people irrespective of their living. Any statements about keeping the house clean/clothing/makeup/skincare can be beneficial. You can take simple concepts related to our daily life like:
● How to use a few tools in our everyday life.
● Simple cleaning techniques.
● Folding clothes easily saves time.
09Idea 9: Earning Related Ideas
Videos related to earning can get more views and become more viral among people. Any detailed description of any earning app/ small startup ideas can be helpful. The video ideas generator tool can give more suggestions related to such trending topics.
10Idea 10: Sports related ideas
A large population is into sports, like football and cricket. People enjoy watching and playing these sports regularly from young to old age. It will be a good idea if you can try videos on sports. Using the video generator AI, you can generate animation videos playing cricket and add small clips of old generation cricket players as examples. You may also create small teaching videos on other sports for children. Through animation, giving the latest sports updates worldwide will also be a better idea to get more views for videos.
11Idea 11: Current Affairs Related Videos
Current affairs and general knowledge-related videos will be more helpful to people preparing for competitive exams as most people are learning through the internet rather than from books. If you can take a specific subject and give a detailed description of its past and current updates, it can be helpful for many people. And also, while doing such information-related videos, you get a chance to research it, and it will help improve your knowledge of the subject and searching skills.
12Idea 12: Gadget And Product Review Ideas
Reportedly, there has been a tremendous increase in new products related to mobiles, laptops, TV, other hardware tools, skin, hair care products, etc. You can take a specific product and create innovative ideas on how to use the product using animations/ cartoons and give a short review of the product. Through this, you can earn as you promote a company product, and people will know about the product. This is beneficial in both ways. If the product is related to electronic gadgets, make a video explaining the product’s features and how to use them. If it is hair or skincare related, include the ingredients used, advantages of the product, how to use the product, and any disadvantages, etc. Based on the product you choose, the content of the video should change.
Bonus Idea:
Use an innovative and powerful tool like Wondershare Filmora Video Editor to beautify your AI videos in the shortest time frame.
Filmora’s latest version offers various upgraded tools like:
● Instant Mode to create accessible and quick videos.
● A shop of preset templates to power up your videos.
● The Filmora Auto Beat Sync can match your clip with music.
● Adjust the speed of your video and introduce cinematic effects.
● You can even record your screen with Filmora and use that in your AI videos ideas.
Wondershare Filmora - Best Video Editor for Mac/Windows
5,481,435 people have downloaded it.
Build unique custom animations without breaking a sweat.
Focus on creating epic stories and leave the details to Filmora’s auto features.
Start a creative adventure with drag & drop effects and endless possibilities.
Filmora simplifies advanced features to save you time and effort.
Filmora cuts out repetition so you can move on to your next creative breakthrough.
● Ending Thoughts →
● Finally, that you have a fair idea of what a YouTube video idea generator is about and how it helps content creators in daily life get more innovative ideas for YouTube videos.
● Make use of this tool to get more engaging and creative content and more AI video ideas so that the views for the video increase and the audience receives good knowledge through the videos. Try out these ideas, use Filmora to create exceptional animations on your videos, and watch your YouTube channel grow as expected.
How to Make Loop Video in PowerPoint
Loop videos are a great way to showcase your content. They’re easy to make, and they’re also easy to edit. You can have a loop video where the slides keep repeating in the same order, or you can change it up by putting different images on each slide.
You’re probably already familiar with the concept of looping video in PowerPoint. However, there are some instances where looping videos can be a real-time saver. To do this, you need to make sure that your visuals are engaging and unique. You can achieve this by using video loops in PowerPoint presentations.
You can use it if you want to demonstrate an idea or concept by showing several parts of the same thing at once. Or you can use PowerPoint if you have a very long video that you want to show in one go. You can also use it for suggesting different angles for your audience and making their eyes move from one point to another without making them bored.
Part 1: How to Make a Slideshow Loop in PowerPoint
A power-point loop video is the most efficient way to create a slideshow for your presentation. This easy-to-use software utility provides a simple and intuitive interface that lets you add slideshows to your presentations.
This is ideal for creating multi-streaming PowerPoint presentations that can be repeatedly viewed in the same or a different sequence. Create multimedia presentations with an animated slide show, including videos, and music with just a few clicks of the mouse.
The creation of the Slideshow loop in Microsoft PowerPoint is quite easy and simple. To make a looping slideshow, you’ll first need a PowerPoint. A PowerPoint is a set of instructions that allows you to display a series of images and text in the same sequence. This gives your audience the ability to explore the information on the slides in more depth and engage with the content on a more personal level.
If you want to create a looping slideshow in PowerPoint, you can use the following steps.
Step 1: Open Microsoft PowerPoint and select Slide show from Toolbar
The first step is to open Microsoft PowerPoint. To create a looping slideshow in PowerPoint, click on the Slide show feature on the top of the toolbar. Then different features will appear after clicking on it.

Step 2: Set up the Slide show manually
When you open the Slideshow, click on the Set Up Show from the toolbar. Some options will be shown in the drop-down (Manual, Auto, and Set Up Show). Select the option Set Up Show. A dialogue box will appear to select the following check boxes that are shown in the below picture:

Step 3: Select the slides and click on Transition
Select overall slides and click on the Transitions tab. You can see an option of Auto, interval. Uncheck the box of Auto, interval, and choose the time according to your requirements. Adding transitions can help to make your PowerPoint presentation more engaging and visually appealing. When you are adding transitions, make sure to think about how they can help to improve your overall presentation.

PowerPoint has the technology to create an endless loop slideshow that keeps playing without your finger. Loop slideshows are best used with information that is short, repeated, and not too repetitious. For example, if you want to play something on a loop it is better to create a looping slideshow than an extended presentation that repeats itself endlessly.
The power of loop slides is in their ability to engage users. You can have a slideshow that plays automatically or you can have it play when the user enters a specific panel. Slideshow Loops on PowerPoint allow you to play one or more slides over and over again by pressing the Play button. You can also create a time-lapse, which pauses the slideshow at a specific point.
Benefits of making a slideshow in PowerPoint
There are many benefits of using a looping slideshow in PowerPoint. There are many benefits of using loop video in PowerPoint presentations. Loop slideshow gives your audience a sense of continuity and connection, which can help them follow the story and understand the information more easily. It also helps to keep people engaged and interested in your presentation. They can be used to promote a product or service, commemorate a special event, or entertain and inform your audience.
- Slides can be played in a continuous loop, allowing the audience to stay engaged with the presentation from beginning to end.
- The looping feature makes it easy to create a presentation that is tailored to the specific needs of your audience. You can choose to have the slides repeat automatically, or you can control when each slide appears.
- It can help to save time. By using loop video, you can avoid having to constantly start and stop your presentation to show different parts of it. This can save you a lot of time and energy, which can be put into more important things.
- They can be used to commemorate a special event.
- They can be used to entertain and inform your audience.
Part 2: Alternative Way to Create Loop Slideshow Video
If you have been searching for the perfect way to create a loop slideshow video, Filmora video editor might be what you need. It is one of the most popular loop slideshow makers on the market and there is an app for all devices, including PCs and Macs to android phones and tablets. Filmora is a slideshow loop maker that allows you to produce video files quickly and easily with simple drag and drop.
Filmora provides you with seamless loop video for your website, youtube, and other channels, You can create content in various formats and image resolution to any social media like Facebook, Twitter, Instagram, and others with the help of our unique features. Filmora is a professional video editor for Windows. It’s an ideal tool for everyone, from beginners to professionals, as well as a great help for students, researchers, and teachers.
In this article, we’ll show you how to make a looping slideshow in PowerPoint. First, you’ll need to download Filmora. This software is used to create professional-looking videos that can be made at any length.
Step 1: Download Filmora and Import images and videos
Free Download For Win 7 or later(64-bit)
Free Download For macOS 10.14 or later
So first off, we need to create a new project. On the left-hand side, you’ll see your media library and on the right-hand side, there’s a green button that says “create new project”. You’ll notice there are three sections: video, audio, and images. These play a key role in creating your final video so let’s talk about each one individually.

Step 2: Add Title and background to your Slideshow video
This step is totally up to you in which you can add some titles the starting your slideshow. It is not very necessary but gives your slide show a perfect look. It also allows you to select any plain background of any color. You can use multiple transitions, music, and effects to tell your story in exactly the way you want!

Step 3: Make copies of the Slideshow and add transitions
Lastly, make copies of your media or pictures you want to add to your slideshow. Filmora allows you to set the duration of your slideshow. After copying the pictures paste them where the video ends. Then continue pasting according to your requirements. Add a transition “Dissolve” from the Transitions Tab. When you complete your editing export your video to your desktop or where you want to store it.

Benefits of looping Slideshare video in Filmora
There are many benefits of using a loop slideshow video in Filmora. First and foremost, a looping slideshow is a great way to create a presentation or video that is both engaging and professional. Additionally, looping a video makes it easy to keep audiences engaged and on foot, which is especially important for long videos or presentations.
Plus, looping can help to save on file size and memory usage, making it a great option for videos that will be shared online. Finally, looping can add an element of excitement and anticipation to a video, which can help to keep viewers engaged and coming back for more. You could also add animations between the slides that move differently than they would normally do.
Loop Slideshow Video in Filmora is a great option for you. It’s easy to use, and it has a wide range of options that allow you to customize your video output. You can even add music and sound effects to your videos! If you’re looking to make a loop slideshow video, this is the best software for it.
The Bottom Line
Slideshows are very popular, but they can sometimes seem a little boring. If you want to add something new, looping your slideshow will make all the difference. Adding music is easy in PowerPoint. A slideshow loop can be an effective way to keep viewers’ attention, making it an effective tool for presentation. You can renovate your outdated slideshows video with Filmora.
With its loop function, Filmora enables you to incorporate interesting dynamic effects into your videos. So what does it take to set up a PowerPoint loop video? You don’t need a lot of special programs or plugins to make your videos get looped on your presentations. Follow the above simple steps and you’ll have your videos getting looped in no time.
Free Download For macOS 10.14 or later
So first off, we need to create a new project. On the left-hand side, you’ll see your media library and on the right-hand side, there’s a green button that says “create new project”. You’ll notice there are three sections: video, audio, and images. These play a key role in creating your final video so let’s talk about each one individually.
Step 2: Add Title and background to your Slideshow video
This step is totally up to you in which you can add some titles the starting your slideshow. It is not very necessary but gives your slide show a perfect look. It also allows you to select any plain background of any color. You can use multiple transitions, music, and effects to tell your story in exactly the way you want!
Step 3: Make copies of the Slideshow and add transitions
Lastly, make copies of your media or pictures you want to add to your slideshow. Filmora allows you to set the duration of your slideshow. After copying the pictures paste them where the video ends. Then continue pasting according to your requirements. Add a transition “Dissolve” from the Transitions Tab. When you complete your editing export your video to your desktop or where you want to store it.
Benefits of looping Slideshare video in Filmora
There are many benefits of using a loop slideshow video in Filmora. First and foremost, a looping slideshow is a great way to create a presentation or video that is both engaging and professional. Additionally, looping a video makes it easy to keep audiences engaged and on foot, which is especially important for long videos or presentations.
Plus, looping can help to save on file size and memory usage, making it a great option for videos that will be shared online. Finally, looping can add an element of excitement and anticipation to a video, which can help to keep viewers engaged and coming back for more. You could also add animations between the slides that move differently than they would normally do.
Loop Slideshow Video in Filmora is a great option for you. It’s easy to use, and it has a wide range of options that allow you to customize your video output. You can even add music and sound effects to your videos! If you’re looking to make a loop slideshow video, this is the best software for it.
The Bottom Line
Slideshows are very popular, but they can sometimes seem a little boring. If you want to add something new, looping your slideshow will make all the difference. Adding music is easy in PowerPoint. A slideshow loop can be an effective way to keep viewers’ attention, making it an effective tool for presentation. You can renovate your outdated slideshows video with Filmora.
With its loop function, Filmora enables you to incorporate interesting dynamic effects into your videos. So what does it take to set up a PowerPoint loop video? You don’t need a lot of special programs or plugins to make your videos get looped on your presentations. Follow the above simple steps and you’ll have your videos getting looped in no time.
Deleting White Background in Photoshop Is Hard?
Deleting White Background in Photoshop Is Hard? No
An easy yet powerful editor
Numerous effects to choose from
Detailed tutorials provided by the official channel
Know how Photoshop make white background transparent. Learn to create transparent background in Photoshop in simple steps. How to delete white background in image?
In this article
01 [Why Shooting with a White Background Makes Sense](#Part 1)
02 [When We Need to Delete White Background and when Not?](#Part 2)
03 [How to Delete White Background in Photoshop (5 Fast Ways)](#Part 3)
04 [Which Photoshop Selection Tool is Best for White Backdrop Removal](#Part 4)
Part 1 Why Shooting with a White Background Makes Sense

Products have gone online with E-commerce and people explore the products over internet more than they pick it from the stores. So, every business needs to showcase their products in a attractive way to get more customers. This needs an attractive photography by experts. Photography for e-commerce products requires expert product photography or commercial photography. They are very important for a business to get success in long run. To do branding the product image should be accurate and attractive.
So, if your company is going online, your products photography should be attractive enough to make buyers purchase your products. Background is essential part of any photography or video making. Whether it is product catalogue, shoot, advertising or commercial videos, white backdrop and white background are always good. With white background one can pay attention to the product. Every details of the product are highlighted when a white background is used.
When you need bright and highlighted images for any commercial videos, using a right technique for background color is must. White background creates a clean and bright commercial photo. If the same is not done correctly, the white background may turn to be off white or grey. A white background is good for isolating an object in the picture.
So, let’s know why shooting with white background make sense. Here are some reasons for it:

Removal of background becomes Easy and quick:
The most important benefit of applying white background is that it can be easily removed or replaced. In place of the blank white background, one can easily apply other background color or make it transparent. The white background has a speciality that it reflects the color of the product better which makes the product image visually good. This can be done with the help of any tool or application. Thus, using a white background gives an opportunity to apply any other background on it.
Promoting product in every occasion: An image with colorful background may not be useful to present in every event or occasion. For example a simple image with colorful background will not look good in a promotional event, while a colorful background will look happening in any festival event celebration. This, a blank background has the option to change as per the need of the occasion.
An image with white background can be changed as per the occasion. This helps a business to use a single image throughout the year without any additional cost for making a different picture. You can just change the white background of any image through various application or software.
Time saving: Removing white background is easy and streamlined as compared to any other color. The reason is that it does not require much editing and work on the edges. So, the steps in removing the white background are less and thus it saves time of the artist and the editors.
Saves location and bulk shooting expenses: When shooting with a white background is done; the same picture with some changes can be reused for number of times in several occasions. Thus, it saves the cost of shooting different in pictures in different location.
Good to celebrate every special day: A picture with white background is perfect and ready to edit for any special day. Whether it I a father’s day, mother’s day or any special day, a single picture can be edited as per the requirement. It will be a great gifting idea also after changing white background of the picture as per the special day.
Part 2 When We Need to Delete White Background and when Not?

A single picture of a person or product cannot be used for a single instance or purpose. Especially when it is a promotional campaign or commercial advertisements, a product is required to be showcased in several marketing campaign for different categories of consumers. Thus, a white background image is good for several purposes while in some circumstances, it requires changes. So, let’s see when to delete white background and when not:
When a picture requires special editing: When a picture requires some special effects like reflection, highlights and shadow effects, the picture with white background is required to be changed. When improvement in picture is requires, the white, transparent and color background can be changed accordingly.
Enhancing the visual impact of the picture: A white background picture grab the attention of the customers. So, it is good for advertising and promotion. While this needs to be removed when one desire to add some visual impact on the pictures or deliver some message to the viewers. So, it requires adding colorful and visually good background in a picture.
Adding more items to a picture: A white background need to be removed when more items are required to be included in it. Special edits and enhancing the pictures requires removing or adding a white background as per the purpose of the picture.
Part 3 How to Delete White Background in Photoshop (5 Fast Ways)

Editing a picture with white background can be done in easy steps through various applications. Deleting white background in Photoshop can be done through various tools. Some of the top 5 fast ways to clear background Photoshop are**:**
With the object selection tool:
● Start Photoshop and open the picture. Select the “object selection” from the tool bar. Hover cursor over subject till it turns blue. The subject is selected.
● Press the shift key to remove the background while selecting the objects which you want in the picture.
● To invert the selection go to Select>Inverse.
● Unlock the image based on what you want in the background. It will no longer be a background. It can be also used to create transparent background Photoshop.
● Click on Erase tool and start erasing the background.
Removing background with quick action
This is the quick method for removing a background when a user is going for own purpose. It is in-built quick action in Photoshop for removing the background. Although it is good for performing work, but the same cannot meet the perfection level that any other method does. It can be done by following the mentioned steps:
● Open the image in Photoshop, right click on background layer and click Duplicate layer. Then click on OK.
● Always try to open the properties panel by going to Window>Properties.
● Click on new layer at Layer panel. Go to Quick action and click on Remove Background.
● The background gets removed with quick action.
● At this point refinements and adjustments can be made.
Using pen tool to remove the background
● Open image in Photoshop, right click on background layer and go to Duplicate Layer. Name the layer and click OK.
● Select the Pen tool from the toolbox. Zoom the area. Start at the edge of subject. Start working on the object; add anchors which will outline the subject.
● Click-hold-drag to produce a curved line.
● Use the Direct Selection tool in the toolbox if you want to adjust an anchor point or directional lines for fine tuning
● Complete the path from where you started and save it by going to Windows>paths. Go to three bar menu, click New Path to name it and then save.
● Go to path panel and right click New Path. Choose Make selection and click OK. This will give the outline of the path.
● Go to Select> Inverse if you don’t want to delete what is inside the selection. An outline can be seen around the image.
● Press delete to delete the background. It can be also done to add Adobe Photoshop transparent background.
With Magnetic Lasso Tool
● Right click Background layer and click duplicate layer on the image opened in Photoshop. Name the layer and then click OK. From the toolbox, select Magic Lasso tool. Start drawing at the edges of subject.
● Move around the subject and complete till the start point. Marching ants can be seen around the selection.
● Go to Selection>Save selection to save and give it a name.
● Select>Inverse to delete the background. Photoshop checkered background is visible now.
With quick selection tool
● Click on Duplicate Layer by right clicking on background layer of the picture opened on the Photoshop. Name the layer and click OK.
● Go to the tool box and select quick selection tool.
● Paint the subject by using tool.
● Clean up the selection path with click by holding the Option key (macOS) or Alt key (Windows).
● Go to Selection>Save selection to save and give it a name.
● Select>Inverse to delete the background. The white background can be seen now.
Part 4 Which Photoshop Selection Tool is Best for White Backdrop Removal

There are various tools available at Photoshop to turn a background white. Each one of them has great utility based on the applications. Background Eraser tool is one of the good tools if there is need of more control over removing the background in Photoshop. It is highly effective and saves time of the user. It gives the desired outcome with perfection to an image. The visualization of image becomes better when the background is turned into white with the help of Background Eraser tool.
The other application that is very helpful in making background white to any image is Filmora.
Filmora is an excellent image and video editing software which helps the users in creating some amazing images and videos. It has wide range of image and video editing tools that can make any user a professional in image and video editing. It has features to add or remove background of an image to make it more visually good. Changing background and adding special effects to images and videos can be easily done through filmora.
Wondershare Filmora Video Editor allows transformation of pictures and videos in a better way by adding filters and graphics. Availability of support, drawing tools, editing tools, special effects and sound make it a complete application for both beginners and professionals. It can be used with various other applications also. Those who wish to know how to make a layer transparent in Photoshop can learn it from Filmora.
For Win 7 or later (64-bit)
For macOS 10.12 or later
● Ending Thoughts →
● Making white background or transparent background adobe photoshop has many benefits like it highlight the picture and make it good for various applications and occasions. It saves money and cost for the image editors and video makers.
● One should also know when to use the white background for images, catalogue and video shoot. Adding and deleting white background can only be done when required as per the demand of the occasion and the category of the user like marketing, media, customers etc.
● Various tools on Photoshop make it easy for the users to add or remove white background of images. Filmora is one of the applications that is very popular for its image editing features. It can be used to give special effects to any image or video.
Know how Photoshop make white background transparent. Learn to create transparent background in Photoshop in simple steps. How to delete white background in image?
In this article
01 [Why Shooting with a White Background Makes Sense](#Part 1)
02 [When We Need to Delete White Background and when Not?](#Part 2)
03 [How to Delete White Background in Photoshop (5 Fast Ways)](#Part 3)
04 [Which Photoshop Selection Tool is Best for White Backdrop Removal](#Part 4)
Part 1 Why Shooting with a White Background Makes Sense
Products have gone online with E-commerce and people explore the products over internet more than they pick it from the stores. So, every business needs to showcase their products in a attractive way to get more customers. This needs an attractive photography by experts. Photography for e-commerce products requires expert product photography or commercial photography. They are very important for a business to get success in long run. To do branding the product image should be accurate and attractive.
So, if your company is going online, your products photography should be attractive enough to make buyers purchase your products. Background is essential part of any photography or video making. Whether it is product catalogue, shoot, advertising or commercial videos, white backdrop and white background are always good. With white background one can pay attention to the product. Every details of the product are highlighted when a white background is used.
When you need bright and highlighted images for any commercial videos, using a right technique for background color is must. White background creates a clean and bright commercial photo. If the same is not done correctly, the white background may turn to be off white or grey. A white background is good for isolating an object in the picture.
So, let’s know why shooting with white background make sense. Here are some reasons for it:
Removal of background becomes Easy and quick:
The most important benefit of applying white background is that it can be easily removed or replaced. In place of the blank white background, one can easily apply other background color or make it transparent. The white background has a speciality that it reflects the color of the product better which makes the product image visually good. This can be done with the help of any tool or application. Thus, using a white background gives an opportunity to apply any other background on it.
Promoting product in every occasion: An image with colorful background may not be useful to present in every event or occasion. For example a simple image with colorful background will not look good in a promotional event, while a colorful background will look happening in any festival event celebration. This, a blank background has the option to change as per the need of the occasion.
An image with white background can be changed as per the occasion. This helps a business to use a single image throughout the year without any additional cost for making a different picture. You can just change the white background of any image through various application or software.
Time saving: Removing white background is easy and streamlined as compared to any other color. The reason is that it does not require much editing and work on the edges. So, the steps in removing the white background are less and thus it saves time of the artist and the editors.
Saves location and bulk shooting expenses: When shooting with a white background is done; the same picture with some changes can be reused for number of times in several occasions. Thus, it saves the cost of shooting different in pictures in different location.
Good to celebrate every special day: A picture with white background is perfect and ready to edit for any special day. Whether it I a father’s day, mother’s day or any special day, a single picture can be edited as per the requirement. It will be a great gifting idea also after changing white background of the picture as per the special day.
Part 2 When We Need to Delete White Background and when Not?
A single picture of a person or product cannot be used for a single instance or purpose. Especially when it is a promotional campaign or commercial advertisements, a product is required to be showcased in several marketing campaign for different categories of consumers. Thus, a white background image is good for several purposes while in some circumstances, it requires changes. So, let’s see when to delete white background and when not:
When a picture requires special editing: When a picture requires some special effects like reflection, highlights and shadow effects, the picture with white background is required to be changed. When improvement in picture is requires, the white, transparent and color background can be changed accordingly.
Enhancing the visual impact of the picture: A white background picture grab the attention of the customers. So, it is good for advertising and promotion. While this needs to be removed when one desire to add some visual impact on the pictures or deliver some message to the viewers. So, it requires adding colorful and visually good background in a picture.
Adding more items to a picture: A white background need to be removed when more items are required to be included in it. Special edits and enhancing the pictures requires removing or adding a white background as per the purpose of the picture.
Part 3 How to Delete White Background in Photoshop (5 Fast Ways)
Editing a picture with white background can be done in easy steps through various applications. Deleting white background in Photoshop can be done through various tools. Some of the top 5 fast ways to clear background Photoshop are**:**
With the object selection tool:
● Start Photoshop and open the picture. Select the “object selection” from the tool bar. Hover cursor over subject till it turns blue. The subject is selected.
● Press the shift key to remove the background while selecting the objects which you want in the picture.
● To invert the selection go to Select>Inverse.
● Unlock the image based on what you want in the background. It will no longer be a background. It can be also used to create transparent background Photoshop.
● Click on Erase tool and start erasing the background.
Removing background with quick action
This is the quick method for removing a background when a user is going for own purpose. It is in-built quick action in Photoshop for removing the background. Although it is good for performing work, but the same cannot meet the perfection level that any other method does. It can be done by following the mentioned steps:
● Open the image in Photoshop, right click on background layer and click Duplicate layer. Then click on OK.
● Always try to open the properties panel by going to Window>Properties.
● Click on new layer at Layer panel. Go to Quick action and click on Remove Background.
● The background gets removed with quick action.
● At this point refinements and adjustments can be made.
Using pen tool to remove the background
● Open image in Photoshop, right click on background layer and go to Duplicate Layer. Name the layer and click OK.
● Select the Pen tool from the toolbox. Zoom the area. Start at the edge of subject. Start working on the object; add anchors which will outline the subject.
● Click-hold-drag to produce a curved line.
● Use the Direct Selection tool in the toolbox if you want to adjust an anchor point or directional lines for fine tuning
● Complete the path from where you started and save it by going to Windows>paths. Go to three bar menu, click New Path to name it and then save.
● Go to path panel and right click New Path. Choose Make selection and click OK. This will give the outline of the path.
● Go to Select> Inverse if you don’t want to delete what is inside the selection. An outline can be seen around the image.
● Press delete to delete the background. It can be also done to add Adobe Photoshop transparent background.
With Magnetic Lasso Tool
● Right click Background layer and click duplicate layer on the image opened in Photoshop. Name the layer and then click OK. From the toolbox, select Magic Lasso tool. Start drawing at the edges of subject.
● Move around the subject and complete till the start point. Marching ants can be seen around the selection.
● Go to Selection>Save selection to save and give it a name.
● Select>Inverse to delete the background. Photoshop checkered background is visible now.
With quick selection tool
● Click on Duplicate Layer by right clicking on background layer of the picture opened on the Photoshop. Name the layer and click OK.
● Go to the tool box and select quick selection tool.
● Paint the subject by using tool.
● Clean up the selection path with click by holding the Option key (macOS) or Alt key (Windows).
● Go to Selection>Save selection to save and give it a name.
● Select>Inverse to delete the background. The white background can be seen now.
Part 4 Which Photoshop Selection Tool is Best for White Backdrop Removal
There are various tools available at Photoshop to turn a background white. Each one of them has great utility based on the applications. Background Eraser tool is one of the good tools if there is need of more control over removing the background in Photoshop. It is highly effective and saves time of the user. It gives the desired outcome with perfection to an image. The visualization of image becomes better when the background is turned into white with the help of Background Eraser tool.
The other application that is very helpful in making background white to any image is Filmora.
Filmora is an excellent image and video editing software which helps the users in creating some amazing images and videos. It has wide range of image and video editing tools that can make any user a professional in image and video editing. It has features to add or remove background of an image to make it more visually good. Changing background and adding special effects to images and videos can be easily done through filmora.
Wondershare Filmora Video Editor allows transformation of pictures and videos in a better way by adding filters and graphics. Availability of support, drawing tools, editing tools, special effects and sound make it a complete application for both beginners and professionals. It can be used with various other applications also. Those who wish to know how to make a layer transparent in Photoshop can learn it from Filmora.
For Win 7 or later (64-bit)
For macOS 10.12 or later
● Ending Thoughts →
● Making white background or transparent background adobe photoshop has many benefits like it highlight the picture and make it good for various applications and occasions. It saves money and cost for the image editors and video makers.
● One should also know when to use the white background for images, catalogue and video shoot. Adding and deleting white background can only be done when required as per the demand of the occasion and the category of the user like marketing, media, customers etc.
● Various tools on Photoshop make it easy for the users to add or remove white background of images. Filmora is one of the applications that is very popular for its image editing features. It can be used to give special effects to any image or video.
Also read:
- New 2024 Approved General Knowledge About MP4 Format and Best MP4 Video Editor
- Updated How to Brighten Video in Premiere Pro
- In 2024, Find Out What Ray Tracing Is in After Effects, How It Works, and Learn About Ray-Traced 3D Settings with Simple Instructions
- Updated In 2024, Do You Know Anything About the Video Format Supported by WhatsApp? If Not, Then This Is the Right Time to Learn About WhatsApp-Supported Video Formats
- New 33 Best Video Splitter Recommended
- In 2024, How to Use Color Grading in Final Cut Pro
- In 2024, How to Make a Slow Motion Video Complete Guide
- Detailed Steps to Cut a Video in QuickTime
- Updated 2024 Approved Top 8 Augmented Reality Video Games
- New Learn to Merge Clips in DaVinci Resolve with Simple Steps for 2024
- Updated 2024 Approved 10 Best Cartoon Video Makers (Online and Desktop Solution)
- Updated How to Create LUTs with LUTs Generator for 2024
- This Article Is Actually the Guide Regarding Editing the Videos Through VEED. As a Substitute, Wondershare Filmora Is Also Under Discussion that Is Also Available for the Same Purpose
- Updated What Is a Memoji and How to Make a Memoji? You Can Learn Top 8 Memoji Makers for PC, Android, or iOS, and the Steps to Make a Memoji
- New In 2024, 10 Top Innovative AR Video Effects to Check Out
- New How to Use GIMP GREEN SCREEN
- How to Loop a Video on Vimeo?
- New In This Article, We Will Review Movavi Video Editor and List Out Movavi Video Suites Features
- New Best Applications That Can Help Apply The Best VHS Camera Effect
- Updated Ll About GIF Keyboard That You Want to Know
- How To Add Scrolling Text Effect for 2024
- In 2024, Slow-Motion Edits Are Pretty Mesmerizing, and Weve All Imagined Ourselves in One of Those Visually Appealing, Slowed-Down Movies. Well Teach You How to Make a Smooth Slo-Mo Video Using Twixtor in This Article. Stay Tuned Until the End
- In 2024, 12 Impressive AI Video Ideas for Creating Engaging Video Content
- New In 2024, 20 Must-Have Graduation Songs
- In 2024, 10 Best Slow-Motion Cameras to Try
- New 2024 Approved 10 Best Cartoon Video Makers (Online and Desktop Solution)
- Updated To Know How to Add Effects in Premiere Pro, You Need to Follow This Guide as It Has All You Need to Know to Add Effects in Premiere Pro. Learn More Here
- New In 2024, 3 Best Motion Blur Plugins for Adobe After Effects
- Updated 2024 Approved Top Free Video Editing Software Enhance Your Content with These Essential Tools
- Updated 2024 Approved Best CapCut Templates for Slow Motion Video Trend
- New What Is the Top Filmora Slideshow Templates? Experts Choice
- In 2024, Let Us Help You with Something that You Might Not Know. Have You Ever Worked with MOV File Format Before? Or Do You Know What that Is? Lets Talk About It
- In 2024, How to Make a Smooth Speed Ramping in Premiere Pro?
- How to Create Cinematic Style Videos? Easy Guide for Beginners
- New 2024 Approved What Is TS Format and How To Play TS Files?
- New Learn How to Blur the Background in Adobe Premiere Pro with Our Quick and Simple Step-by-Step Instructions to Make Your Subject More Attention-Grabbing
- Updated In 2024, Best Method to Split the Video Into Parts Online
- In 2024, How to Change Aspect Ratio of Video?
- Updated Do You Want to Learn About the iPhone LUT? Have You Used Them on Your iOS Device? Use This Article to Get Valuable Insights on the Same
- 3 Ways to Make Time-Lapse Video on MacBook for 2024
- Updated 2024 Approved Step by Step Guide on Make Gimp Transparent Background PNG
- New What Is MOV Format and How To Edit MOV Video Creatively?
- How to Unlock Poco C65 Phone Password Without Factory Reset?
- Wondering the Best Alternative to Hola On Tecno Spark 20 Pro+? Here Is the Answer | Dr.fone
- New 2024 Approved Top 10 AI Avatar Generators
- In 2024, Pokémon Go Cooldown Chart On Poco F5 5G | Dr.fone
- Sony support - Forgotten screen lock.
- In 2024, How Xiaomi 13T Pro Mirror Screen to PC? | Dr.fone
- What Legendaries Are In Pokemon Platinum On Nokia 130 Music? | Dr.fone
- How To Use Allshare Cast To Turn On Screen Mirroring On Xiaomi Redmi K70 | Dr.fone
- Unlocking Apple iPhone 13 Passcode without a Computer
- In 2024, The Most Useful Tips for Pokemon Go Ultra League On Vivo Y200 | Dr.fone
- 10 Best Fake GPS Location Spoofers for Vivo Y100i Power 5G | Dr.fone
- File Format and Extension of filename dont Match in Excel 2010 File
- In 2024, Complete Guide on Unlocking Apple iPhone 6s with a Broken Screen?
- In 2024, How to Track Xiaomi Redmi 12 Location by Number | Dr.fone
- In 2024, Does Vivo Y100 Have Find My Friends? | Dr.fone
- Does Life360 Notify When You Log Out On Oppo A78? | Dr.fone
- In 2024, 4 Feasible Ways to Fake Location on Facebook For your Nokia 130 Music | Dr.fone
- In 2024, How to Unlock Apple iPhone SE (2022) with a Mask On | Dr.fone
- In 2024, Overview of the Best Lava Blaze Curve 5G Screen Mirroring App | Dr.fone
- Title: Updated What Is MOV Format and How to Edit MOV Video Better, In 2024
- Author: Chloe
- Created at : 2024-04-24 07:08:40
- Updated at : 2024-04-25 07:08:40
- Link: https://ai-editing-video.techidaily.com/updated-what-is-mov-format-and-how-to-edit-mov-video-better-in-2024/
- License: This work is licensed under CC BY-NC-SA 4.0.
