
:max_bytes(150000):strip_icc():format(webp)/GettyImages-1218764238-30613399ad1b4cffab4ab474184b9c88.jpg)
Updated Which 10 Best Video Editing Online Makers Is Worth Your Attention for 2024
Top 10 Video Editing Online Makers Is Worth Your Attention
Which 10 Best Video Editing Online Makers is Worth Your Attention in 2022
An easy yet powerful editor
Numerous effects to choose from
Detailed tutorials provided by the official channel
In this article
01 [Best 10 Free Video Editing Software Online](#Part 1)
02 [Video Editing Online Q&A](#Part 2)
Part 1 Best 10 Free Video Editing Software Online
Video editing and customization is an essential aspect of graphic design and allied applications. Entering into the domain, the IT and software market presents a diverse range of solutions to work on the concern. While there are numerous software alternatives and programs to download and use, such utilities may sometime come up with a time consuming and rigorous editing process.
Another aspect that stops editors, especially beginners and newbies from picking the software alternatives is their high end working interface that may often be difficult to understand and navigate through. Sorting out all the aforesaid issues, there comes the extensive range of online and web based video editing utilities to perfectly cater to all the video customization needs in a spic and span process.
In the light of the aforesaid merits that you get to access with an online video editing program, let us try hands at having an insight into some of the best online alternatives to customize your videos in what follows next:
01Wave.video
Adaptable Systems: All common operating systems
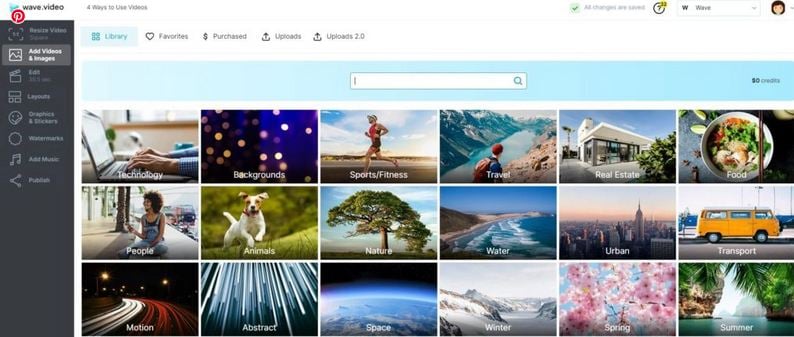
Inaugurating the list, here is the Wave.video online editing website that you can work with to create, edit, share and host video footages and clips. The best utility of the program is that it caters a diverse range of film customization requirements, from personal, candid creations to high end professional editing needs of business enterprises, media enthusiasts, blogging and entrepreneurship platforms and a variety of other sectors.
Talking of the platform workability, you get to access a responsive and non-messy editing interface, with a convenient navigation for newbies and non tech savvy users. Going through the demos and informative articles, tutorials and blogs, you can design professionally sound presentations with utmost ease. The platform houses the widest video template library with over 400 million preset customizable stock videos to choose from.
The utility expands a range of customization choices to spark up your edits, such as including self-created logos, fonts and watermarks on the videos. Talking of video export options, the platform grants you the liberty to directly share your video edits across all popular media sharing handles and online storage accounts, like, Facebook, Twitter, YouTube, Dropbox, Google Drive, etc. in more than 30 different file formats.
You can also save the customized video to the local media gallery of your device in the MP4 file format. An exclusive video sharing feature of the site works to create an editable ‘Video Landing Page’ consisting of the created video edit, its title and a call-to-action button. You can also embed your creation to blogs and websites from the platforms. You can work with the program absolutely free of cost.
Pros
● Tons of stock videos, music and fun elements to complement your footage.
● Most convenient editing timeline for an enjoyable editing experience.
● The customization process is very fast.
Cons
● The video uploading process is quite time consuming.
● Some features have a confusing work pattern.
● The program leaves its watermark on the customized clips.
02InVideo
Adaptable Systems: All popular operating systems
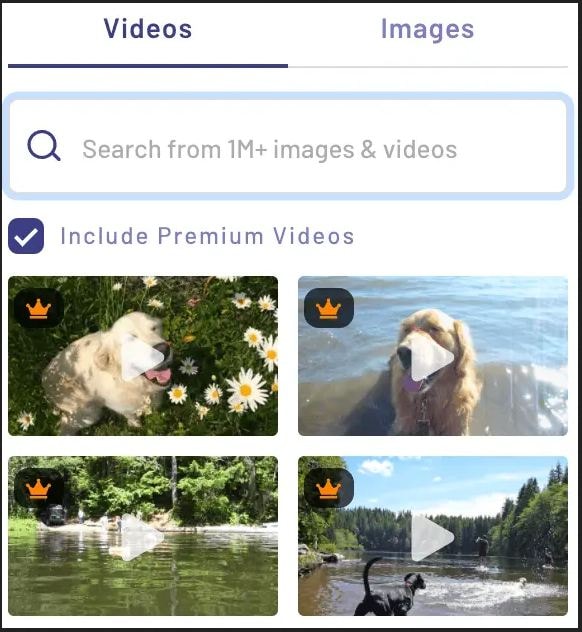
The InVideo online editing tool is probably the best alternative you can get for a quick customization of your video footage. The utility houses a series of tools and features to create classic masterpieces of clip edits. The program’s library allows you to expand your graphic design creativity with its extensive variety of in built editing templates. The add-on elements are no less with an appealing range of masks, stickers and vector shapes to spark up your creations.
The tool has a paid collection of more than 3 million preset templates, which get reduced to a count of 1 million for free version users. This is however, a cumulative figure with an addition of premium features. The free template options, though limited, are appealing to work with. As far as the customization options are concerned, the utility recommends you to create your brand prior to beginning with the editing process.
You can set a brand by adding the name and logo of your company, along with specific colors to a preferred default template. This causes your brand elements to stay in the tool’s editing dashboard for an instant access in times of need. The tool allows you to create video edits in the vertical, square and wide aspect ratios, which you can switch between, while customizing the preset video template.
When it comes to exporting your creation, the free version of the tool limits you to a local save of the edits in your device’s media gallery in a 720 pixel resolution, along with a direct sharing facility for Facebook, Twitter and YouTube. The utility additionally leaves its watermark on the output video. The aforesaid limitations can however be overcome by availing a paid subscription of the online editing program.
Pros
● The program undergoes a regular update in line with user feedback.
● You are granted a complete control on the video customization process to add the elements of your choice.
● The program’s back end user support is highly active with a 24 x 7 chat service.
Cons
● You cannot add sound elements to the video edits.
● The tool’s Text-to-speech recognition abilities are somewhat of the mediocre level.
● The free version of the tool has a limited number of video export options.
03Adobe Spark
Adaptable Systems: All popular operating systems
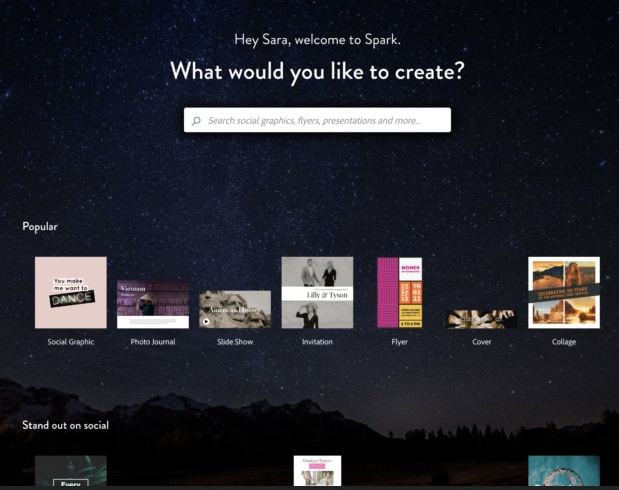
Presently known as Adobe Creative Cloud Express, this one is a sophisticated video customization tool, suited best for experienced users to address the needs of creating professionally sound video, graphic and web page edits. The tool greets you with a quite upgraded interface, although the workability and template selection is not that complex. Working with the tool, you can create customized videos in landscape and square formats with respective aspect ratios of 16:9 and 1:1.
Talking of the customization options, you get to access and work with tons of preset video customization templates within the Adobe Stock library of the tool. The templates are free to use, but however, leave a watermark on the final edited output. As far as other editing elements are concerned, the tool presents a huge set of choices to match the feel, flavor, theme and style of your videos and graphic footages.
You are also allowed to edit a brand with the aforesaid tool, but catering to the concern however, requires a paid subscription of the utility. Moving into the tool’s creation export facility, you may face a downside with respect to the time constraint of the video upload process. The export interface takes a sufficient time to fetch a download of the customized video, while compressing the output file.
Pros
● The output quality of the customized video is quite impressive.
● The tool’s working interface is simple, with stepwise, onscreen usage instructions guiding you through the editing process.
● The utility is known to create excellent web design projects in a minimal amount of time.
Cons
● The software does not allow you to embed your video edits on blogs and websites.
● The video export process takes a considerable amount of time.
● The free version leaves the tool’s watermark on the customized video output.
04Animoto
Adaptable Platforms: All popular operating systems
Moving ahead with the list, there is the Animoto online video editor program that lets you work towards creating customized video edits in 2 separate modes, depending on your requirement niche. If you are keen on making customized video edits from personal or family centered events to share on social media handles, it would be great to pick the ‘Animoto Memories’ customization service. On the contrary, the ‘Animoto Marketing’ service is best suited to create professional video edits.
To have an in-depth understanding of the customization process within each of the editing modes, you can refer the inbuilt tutorials offered by the tool. The program interface additionally guides you through the customization process with stepwise on screen instructions when you are using the tool to create your first ever video edit. The interface is clean, responsive and easy to navigate.
Talking of the video customization facilities, you are allowed to access a refined audio and template library with a host of thematic choices to select and work upon. The tool lets you upload and edit video files from the local media gallery of your system, as well as import the same from a preferred online or external platform. You can even capture fresh video clips and begin editing them with the program.
The preset template library of the program houses a decent range of 60 different options to create amazing video edits that suit a diversity of purposes, like that of social and professional events, photography sessions, short content clips, recipes, YouTube ads and much more. You can work to customize the font, size, color and segments of the footage.
As of the editing formats, you are permitted to create landscape and square artworks in 16:9 and 1:1 aspect ratio respectively. When proceeding to export your creation, the tool presents before you with HD and SD resolutions, with 720 and 1080 pixels in the former, while 360 and 480 pixels in the latter. You can easily share your creations across popular media platforms and online storage accounts, or host them on websites, and also save them locally to your device.
Pros
● The tool caters to generate high quality edited video outputs.
● You can customize the videos with personalized tags.
● The program lets you create advertisement videos with ease.
Cons
● The editing process takes enough time to make you feel distracted.
● You cannot cancel the paid subscription at a later stage.
● The free version has a limited set of features, and premium version is too pricey.
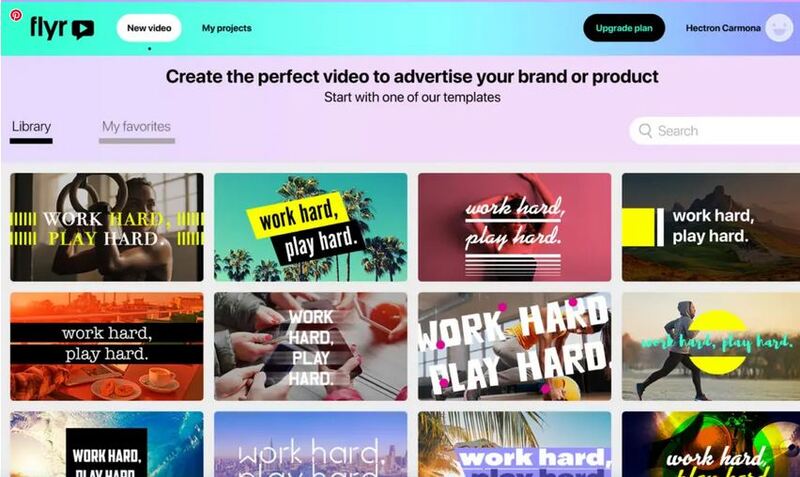
05Flyr
Adaptable Platforms: All popular operating systems
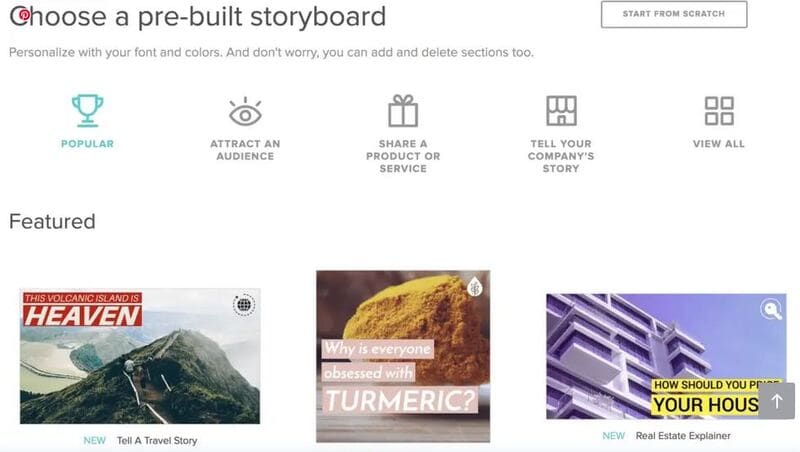
For those who are keen on following social media trends, or looking for high end business presentation ideas, Flyr is the just perfect choice. The elegantly professional pre designed template options within the tool’s library are effortless dedicated towards helping you create top class customized video footages and presentations. With millions of HD video backgrounds and templates to pick from, this program literally has everything to address the most expanded editing requirements.
Moving towards the workability convenience, the program greets you with an elementary interface, and the simplest of customization processes. To edit videos with this online tool, all you need to do is, sign up to the utility, pick an editable template, add a desired text in the message field and scale up the video background, if required. You will however, get to access a limited number of templates with a one-time download facility, when using the tool’s free version.
Extending the dimensions of customization flexibilities, you can complement the video edits with vibrant shades of your choice to render them with a personalized appearance. You are further, allowed to make a choice among the portrait, landscape and square formats for generating the customized output footage. While permitting you to export the edited footage in a variety of file formats with a 1080 pixel HD or SD resolution, the tool facilitates a local save of the generated clip exclusively to its paid subscribers.
Pros
● The program comes to you with the simplest of interfaces to work with.
● You can export your creations in a diversity of aspect ratios and output formats.
● The tool has some AI based features to cater a quick and smart video output.
Cons
● The tool’s subscription plans cannot be customized.
● The free version of the program houses a restricted number of customization features.
● The output generation process may ask you to wait a bit longer than usual.
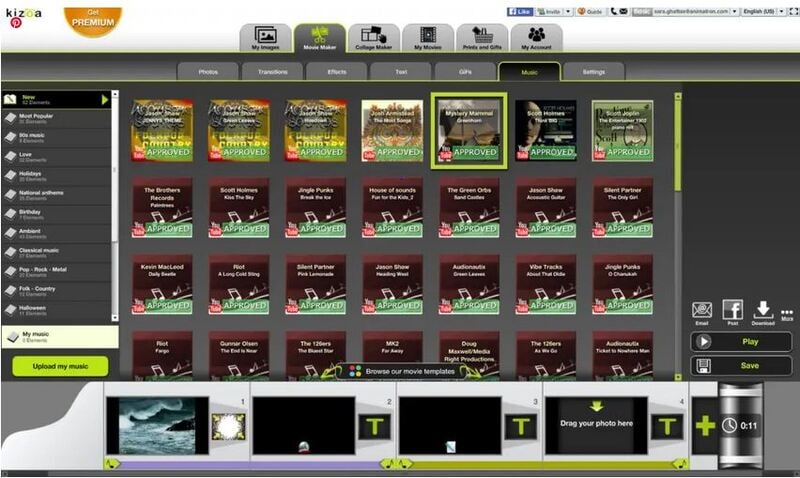
06Kizoa
Adaptable Systems: All popular operating systems
This one is a reliable online video editing app that caters to the most diverse customization requirements, all with its elementary set of utilities and features. Though the program interface may appear a bit chuncked up and messy, the featuristic viability of the platform is a convenient compensation of the same. Some of the choicest appeals of the program include a diverse range of clip aspect ratios and an instant video playback facility.
Compensating for its crowded interface to a further extent, Kizoa works to walk you through the footage customization process via step wise on screen instructions. If you ever find it difficult to navigate through the tool’s editing workspace, additional help is catered by a series of reminder prompts. As of the inbuilt customization utilities, the platform opens up a huge library of preset template options to pick and use.
The photo album and music library are however, a downside with about 20 default images and a limited number of royalty free audio tracks. While there is an additional range of surplus audio tracks, you are permitted to access the same only through a paid subscription of the program. Talking of the available video formats to work with editing your videos, you can pick from the 4:3, 3:2 and 16:9 landscape options, 9:16, 2:3 and 3:4 portrait choices, or a 1:1 square format.
Exploring the customization features to a deeper extent, you get to work with a decent and updated variety of fonts and color switches. When it comes to exporting your creation, the tool offers an expanded set of choices to present your artwork across popular social media and networking platforms and online media storage accounts, such as, Twitter, Facebook, YouTube, E-mail, Google Drive, etc.
You can additionally, download the edited footage to your device, host it on a on a website or blog, and burn the same to an external disk. The tool comes with a ‘Pay Once’ premium subscription to access hidden features.
Pros
● The tool backs up your editing queries with a 24 x 7 responsive customer support system.
● You can avail a lifetime membership of the program to avoid periodic renewal.
● The export facility of the tool is quite expanded.
Cons
● The tool often encounters content mismanagement.
● The working interface is quite crowded.
● Uploading videos to the program’s workspace is a time taking process.
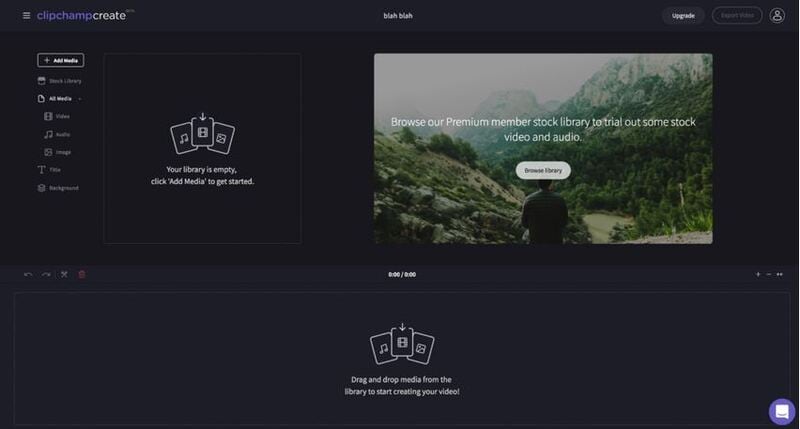
07ClipChamp
Adaptable Systems: All popular operating systems
If you are a newbie in the arena of graphic and video editing applications, this one is a perfect choice to proceed with the task of video customization. The aforesaid online utility to edit clips and footages is extremely useful to the ones who have just landed into the creative domain and try hands at creating customized clips with an online aid. The tool facilitates you with a guided search and customization to let you create a visual masterpiece in a quick time span.
While the editing process is affordably simple, the working interface leaves nothing unturned to help you with a clean layout and prompting on screen instructions. The interface elements have a well-defined organization, displaying first things first, making it possible for you to conveniently design extensive video projects with a high end professional quality.
This online tool however, does not facilitate preset features and templates to free users. Although you can have a glimpse of the assorted range of sound effects, video templates, music tracks, animated themes and backgrounds, accessing the same essentially requires you to avail a paid subscription of the program. Additional customization features of the tool include an instant playback option, several title transitions and a decent font selection range.
As a free user of the tool, you are entitled to export your video edits in an affordably low resolution of 480 pixels. Premium users are however, benefited with a 720 pixel export facility, but the real element of surprise is that the platform does not allow a 1080 pixel export at all. While the tool does not present you with video export choices at all, you can anyway make a free download of your creation to the local media gallery of your system.
Pros
● The utility is one of the most preferred video customization programs for freelancers.
● The working interface has a calming and easy to go outlook.
● The program is quite suitable to be used by beginners.
Cons
● As reported by premium users, the media import process is not so welcoming.
● The project media gets stored in your device’s internal memory instead of a cloud space.
● Output quality for free users is disappointingly low.
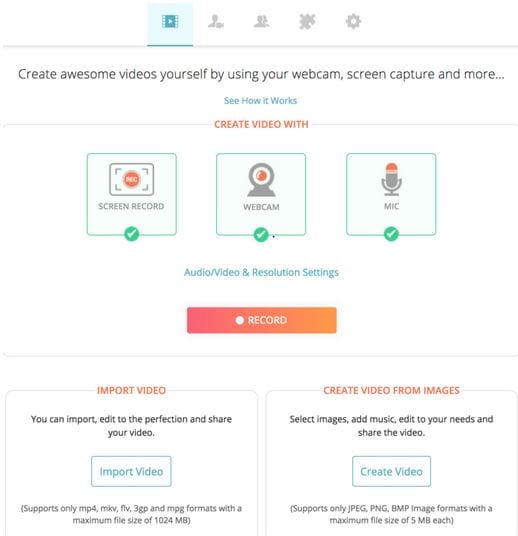
08HippoVideo
Adaptable Systems: All popular operating systems
Launched as an extension to the Google Chrome web browser, the aforesaid online video editor program is chiefly designed to address the screen recording concerns of business and academic personnel, YouTubers and gamers. Ahead of the aforesaid facility, the tool is an excellent choice to sort out video customization needs as well. You can access the latter’s free tom use audio and image library to select and include these media into your video edits.
When addressing the concern of editing motion centered screen captures and video overlays, you can supplement the same with a single music piece, which is quite limiting. The program allows you to export your customized video edits to a variety of media sharing platforms, such as, Facebook, Twitter, LinkedIn, Google, etc., through a sign up to the respective website. If however, you wish to make a direct share, there is an option to use the HippoVideo integration of these media sites.
You can further, stock up your creations to online storage accounts, like, Vimeo, Google Drive, etc. If you wish to export the edited videos exclusively on Slack, the program lets you do that by generating a direct share link. There is also a choice to save the edits locally to your system. Talking of the output formats; the utility keeps you devoid of any aspect ratio options, but facilitates a 720 and 1080 pixel video output resolution for free and paid users respectively.
Pros
● The tool boasts of a responsive and dedicated customer support service.
● The program greets you with a welcoming interface that is handy to use and navigate through.
● The tool undergoes periodic bug fixes to further upgrade and improve its workability.
Cons
● The output video quality is visibly limited.
● The video upload process occasionally encounters an appreciable time lag.
● The Google Chrome extension often causes the program to crash down.
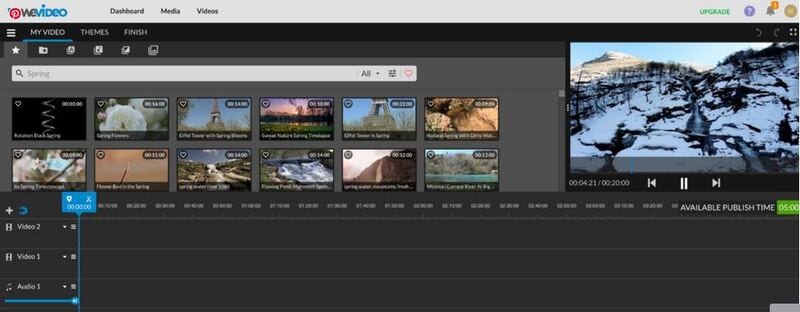
09WeVideo
Adaptable Systems: All popular operating systems
If you are looking for an affordable solution to customize videos online for academic purposes, this one is possibly the most suitable web based alternative that you can rely on. The tool facilitates the students with creating educational video edits within a protected cloud interface, under a convenient supervision of the educators. The tool further caters an extensive editing portability on your preferred time, device and place.
Your video edits remain safe with the tool, with the flexibility to avail them at your fingertips, as and when required. The seamless transition of the edits via a ‘Drag and Drop’ method creates the illusion of an instant playback. As of the preset editing facilities, you can at the most see teaser previews of the tool’s extensive media library that houses over 4.5 million images and 1 million music tracks as an unpaid user. You can however, pick one from the 22 free audio tracks.
Diving deeper into the customization features, the paid users get to work with transitions, text, overlays and music tracks. Picking up a preset template to create the video edits however, puts a limitation on the aforesaid self-customization flexibilities. Talking of the video formats, they are an absolute ‘No’ for the free users of the tool. The paid subscribers however, can switch between the 16:9 landscape and 1:1 square alternatives with the most economical purchase plan.
You can avail the free trial up to one customization and save your edited videos to the local media gallery of your system with the tool’s watermark. Exporting your creations to the popular media sharing platforms, like YouTube, Twitter, LinkedIn, Facebook, etc., relies on you paying for the utility. The watermark however remains with the paid subscription as well. The tool greatly compromises on the output video quality of the edits, with a mere 480 pixel resolution.
Pros
● Though a paid feature, the tool houses an extensive library of preset video, image and audio templates.
● The user interface is clean and responsive, with no messy presentation of elements around.
● The transition flow within the created edits is effortlessly smooth.
Cons
● The tool does not allow you to rotate and crop the video edits.
● Publishing the edits with the tool sometimes gets confusing due to the difficultly of locating the videos within the program library.
● Some of the customization features rendered by the tool are difficult to understand and work with.
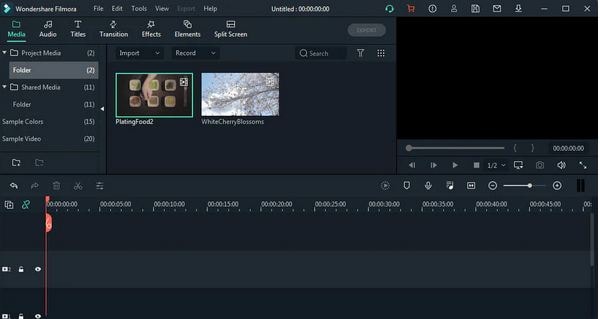
10**Wondershare Filmora Video Editor **
Adaptable Systems: Windows and MacOS
If you have been wondering lately of picking the best free video editing software of all times to create high end graphic masterpieces with footage customization, the Wondershare Filmora video editing program is here to end your worries. The software conveniently lands among the most preferred graphic design tool across the globe to address a series of editing and creation requirements. An obvious cause of the above is the latter’s extensive collection of editing tools and features.
The software’s editing library is known to house an updated diversity of video customization tools and effects that you can play with to create classic pieces of video artworks. Ahead of the basic editing tools to cut, trim, crop and rotate videos, the Filmora library houses some of the latest and advanced video customization features, such as, green screen, split screen, auto synchronization, motion tracking, color match, and lots more.
For Win 7 or later (64-bit)
For macOS 10.12 or later
Diving a bit deeper into the expanse of editing features and effects, the software allows you to add a series of filters, animated elements, text customizations, lower thirds, titles, video and image combinations and graphic inclusions to the clip being edited. The program audio library is another content storehouse with a huge collection of free to use background music tracks to complement your videos with.
While you can customize and export videos in 4K resolution with Filmora, the software allows you to import and edit GIF videos. Additional utilities of the program are a noise attenuator to eliminate background noise, color tuner for adjusting the dynamic range and white balance, audio mixer and video stabilizer for respectively, changing the music track and removing camera shake effects, and a screen recorder for a high resolution capture of the webcam and system screens.
Pros
● The software comes with a good number of video editing tutorials that explain the usage pattern diverse range of features and effects.
● The video import and export process of the software is quick and efficient.
● The program is known to possess one of the best working interfaces to guide you throughout the video editing process.
Cons
● Importing media files can sometime pose format compatibility issues.
● The text customization features offered by the program are somewhat basic.
● You may encounter occasional software crashes while working with the program.
Part 2 Video Editing Online Q&A
● What is the fundamental concept behind online video editing?
When working with creating video footages, online editing comes at the end of the production agenda and is performed after the video has been customized at the offline level. As of today, the task of online video customization is efficiently taken care of by the most advanced and diverse range of video editing programs that work in line with nonlinear editing (NLE) systems.
● What is the main benefit of using online video editing tools to customize videos?
Online video editing programs grant you the liberty to customize your footages and clips without the compulsion of downloading heavy and expensive software packages. You are further allowed to access and use a diverse range of editing effects and features with absolutely no or minimal subscription cost.
● What are the essential applications of video editing?
Video editing refers to the art of creating a structured presentation of different elements within footages to showcase the required content in an engaging and interesting style. Talking of the content variations that can be edited, you can experiment with video essays, documentaries films and video advertisements.
● What are the prerequisites of a professional quality video edit?
When aiming to create a professionally sound video edit, take care of the final output quality and prefer a fine video resolution of 4K or 1080 pixels. You should additionally, prefer using a reliable video hosting website to facilitate a quick loading of your video, while using the same as an effective SEO strategy.
● What are the various categories of online video editing?
Speaking sin professional terms, you can categorize online video customization into 5 major types that are, mechanical editing, line editing, copy editing, structural editing and substantive, content or developmental editing. Using a mix and match of these customization categories renders a classic and fine quality video edit.
● Ending Thoughts →
● Editing videos online is a quick and smart way of transforming your videos, clips and footages into graphic artworks without the hustle of downloading extensive software.
● Browsing through the web, you can come across a plethora of online editing tools and platforms to create high quality video edits.
● When looking for a reliable video editing software alternative, you can make an intelligent choice by picking the Wondershare Filmora video editor program.
In this article
01 [Best 10 Free Video Editing Software Online](#Part 1)
02 [Video Editing Online Q&A](#Part 2)
Part 1 Best 10 Free Video Editing Software Online
Video editing and customization is an essential aspect of graphic design and allied applications. Entering into the domain, the IT and software market presents a diverse range of solutions to work on the concern. While there are numerous software alternatives and programs to download and use, such utilities may sometime come up with a time consuming and rigorous editing process.
Another aspect that stops editors, especially beginners and newbies from picking the software alternatives is their high end working interface that may often be difficult to understand and navigate through. Sorting out all the aforesaid issues, there comes the extensive range of online and web based video editing utilities to perfectly cater to all the video customization needs in a spic and span process.
In the light of the aforesaid merits that you get to access with an online video editing program, let us try hands at having an insight into some of the best online alternatives to customize your videos in what follows next:
01Wave.video
Adaptable Systems: All common operating systems
Inaugurating the list, here is the Wave.video online editing website that you can work with to create, edit, share and host video footages and clips. The best utility of the program is that it caters a diverse range of film customization requirements, from personal, candid creations to high end professional editing needs of business enterprises, media enthusiasts, blogging and entrepreneurship platforms and a variety of other sectors.
Talking of the platform workability, you get to access a responsive and non-messy editing interface, with a convenient navigation for newbies and non tech savvy users. Going through the demos and informative articles, tutorials and blogs, you can design professionally sound presentations with utmost ease. The platform houses the widest video template library with over 400 million preset customizable stock videos to choose from.
The utility expands a range of customization choices to spark up your edits, such as including self-created logos, fonts and watermarks on the videos. Talking of video export options, the platform grants you the liberty to directly share your video edits across all popular media sharing handles and online storage accounts, like, Facebook, Twitter, YouTube, Dropbox, Google Drive, etc. in more than 30 different file formats.
You can also save the customized video to the local media gallery of your device in the MP4 file format. An exclusive video sharing feature of the site works to create an editable ‘Video Landing Page’ consisting of the created video edit, its title and a call-to-action button. You can also embed your creation to blogs and websites from the platforms. You can work with the program absolutely free of cost.
Pros
● Tons of stock videos, music and fun elements to complement your footage.
● Most convenient editing timeline for an enjoyable editing experience.
● The customization process is very fast.
Cons
● The video uploading process is quite time consuming.
● Some features have a confusing work pattern.
● The program leaves its watermark on the customized clips.
02InVideo
Adaptable Systems: All popular operating systems
The InVideo online editing tool is probably the best alternative you can get for a quick customization of your video footage. The utility houses a series of tools and features to create classic masterpieces of clip edits. The program’s library allows you to expand your graphic design creativity with its extensive variety of in built editing templates. The add-on elements are no less with an appealing range of masks, stickers and vector shapes to spark up your creations.
The tool has a paid collection of more than 3 million preset templates, which get reduced to a count of 1 million for free version users. This is however, a cumulative figure with an addition of premium features. The free template options, though limited, are appealing to work with. As far as the customization options are concerned, the utility recommends you to create your brand prior to beginning with the editing process.
You can set a brand by adding the name and logo of your company, along with specific colors to a preferred default template. This causes your brand elements to stay in the tool’s editing dashboard for an instant access in times of need. The tool allows you to create video edits in the vertical, square and wide aspect ratios, which you can switch between, while customizing the preset video template.
When it comes to exporting your creation, the free version of the tool limits you to a local save of the edits in your device’s media gallery in a 720 pixel resolution, along with a direct sharing facility for Facebook, Twitter and YouTube. The utility additionally leaves its watermark on the output video. The aforesaid limitations can however be overcome by availing a paid subscription of the online editing program.
Pros
● The program undergoes a regular update in line with user feedback.
● You are granted a complete control on the video customization process to add the elements of your choice.
● The program’s back end user support is highly active with a 24 x 7 chat service.
Cons
● You cannot add sound elements to the video edits.
● The tool’s Text-to-speech recognition abilities are somewhat of the mediocre level.
● The free version of the tool has a limited number of video export options.
03Adobe Spark
Adaptable Systems: All popular operating systems
Presently known as Adobe Creative Cloud Express, this one is a sophisticated video customization tool, suited best for experienced users to address the needs of creating professionally sound video, graphic and web page edits. The tool greets you with a quite upgraded interface, although the workability and template selection is not that complex. Working with the tool, you can create customized videos in landscape and square formats with respective aspect ratios of 16:9 and 1:1.
Talking of the customization options, you get to access and work with tons of preset video customization templates within the Adobe Stock library of the tool. The templates are free to use, but however, leave a watermark on the final edited output. As far as other editing elements are concerned, the tool presents a huge set of choices to match the feel, flavor, theme and style of your videos and graphic footages.
You are also allowed to edit a brand with the aforesaid tool, but catering to the concern however, requires a paid subscription of the utility. Moving into the tool’s creation export facility, you may face a downside with respect to the time constraint of the video upload process. The export interface takes a sufficient time to fetch a download of the customized video, while compressing the output file.
Pros
● The output quality of the customized video is quite impressive.
● The tool’s working interface is simple, with stepwise, onscreen usage instructions guiding you through the editing process.
● The utility is known to create excellent web design projects in a minimal amount of time.
Cons
● The software does not allow you to embed your video edits on blogs and websites.
● The video export process takes a considerable amount of time.
● The free version leaves the tool’s watermark on the customized video output.
04Animoto
Adaptable Platforms: All popular operating systems
Moving ahead with the list, there is the Animoto online video editor program that lets you work towards creating customized video edits in 2 separate modes, depending on your requirement niche. If you are keen on making customized video edits from personal or family centered events to share on social media handles, it would be great to pick the ‘Animoto Memories’ customization service. On the contrary, the ‘Animoto Marketing’ service is best suited to create professional video edits.
To have an in-depth understanding of the customization process within each of the editing modes, you can refer the inbuilt tutorials offered by the tool. The program interface additionally guides you through the customization process with stepwise on screen instructions when you are using the tool to create your first ever video edit. The interface is clean, responsive and easy to navigate.
Talking of the video customization facilities, you are allowed to access a refined audio and template library with a host of thematic choices to select and work upon. The tool lets you upload and edit video files from the local media gallery of your system, as well as import the same from a preferred online or external platform. You can even capture fresh video clips and begin editing them with the program.
The preset template library of the program houses a decent range of 60 different options to create amazing video edits that suit a diversity of purposes, like that of social and professional events, photography sessions, short content clips, recipes, YouTube ads and much more. You can work to customize the font, size, color and segments of the footage.
As of the editing formats, you are permitted to create landscape and square artworks in 16:9 and 1:1 aspect ratio respectively. When proceeding to export your creation, the tool presents before you with HD and SD resolutions, with 720 and 1080 pixels in the former, while 360 and 480 pixels in the latter. You can easily share your creations across popular media platforms and online storage accounts, or host them on websites, and also save them locally to your device.
Pros
● The tool caters to generate high quality edited video outputs.
● You can customize the videos with personalized tags.
● The program lets you create advertisement videos with ease.
Cons
● The editing process takes enough time to make you feel distracted.
● You cannot cancel the paid subscription at a later stage.
● The free version has a limited set of features, and premium version is too pricey.
05Flyr
Adaptable Platforms: All popular operating systems
For those who are keen on following social media trends, or looking for high end business presentation ideas, Flyr is the just perfect choice. The elegantly professional pre designed template options within the tool’s library are effortless dedicated towards helping you create top class customized video footages and presentations. With millions of HD video backgrounds and templates to pick from, this program literally has everything to address the most expanded editing requirements.
Moving towards the workability convenience, the program greets you with an elementary interface, and the simplest of customization processes. To edit videos with this online tool, all you need to do is, sign up to the utility, pick an editable template, add a desired text in the message field and scale up the video background, if required. You will however, get to access a limited number of templates with a one-time download facility, when using the tool’s free version.
Extending the dimensions of customization flexibilities, you can complement the video edits with vibrant shades of your choice to render them with a personalized appearance. You are further, allowed to make a choice among the portrait, landscape and square formats for generating the customized output footage. While permitting you to export the edited footage in a variety of file formats with a 1080 pixel HD or SD resolution, the tool facilitates a local save of the generated clip exclusively to its paid subscribers.
Pros
● The program comes to you with the simplest of interfaces to work with.
● You can export your creations in a diversity of aspect ratios and output formats.
● The tool has some AI based features to cater a quick and smart video output.
Cons
● The tool’s subscription plans cannot be customized.
● The free version of the program houses a restricted number of customization features.
● The output generation process may ask you to wait a bit longer than usual.
06Kizoa
Adaptable Systems: All popular operating systems
This one is a reliable online video editing app that caters to the most diverse customization requirements, all with its elementary set of utilities and features. Though the program interface may appear a bit chuncked up and messy, the featuristic viability of the platform is a convenient compensation of the same. Some of the choicest appeals of the program include a diverse range of clip aspect ratios and an instant video playback facility.
Compensating for its crowded interface to a further extent, Kizoa works to walk you through the footage customization process via step wise on screen instructions. If you ever find it difficult to navigate through the tool’s editing workspace, additional help is catered by a series of reminder prompts. As of the inbuilt customization utilities, the platform opens up a huge library of preset template options to pick and use.
The photo album and music library are however, a downside with about 20 default images and a limited number of royalty free audio tracks. While there is an additional range of surplus audio tracks, you are permitted to access the same only through a paid subscription of the program. Talking of the available video formats to work with editing your videos, you can pick from the 4:3, 3:2 and 16:9 landscape options, 9:16, 2:3 and 3:4 portrait choices, or a 1:1 square format.
Exploring the customization features to a deeper extent, you get to work with a decent and updated variety of fonts and color switches. When it comes to exporting your creation, the tool offers an expanded set of choices to present your artwork across popular social media and networking platforms and online media storage accounts, such as, Twitter, Facebook, YouTube, E-mail, Google Drive, etc.
You can additionally, download the edited footage to your device, host it on a on a website or blog, and burn the same to an external disk. The tool comes with a ‘Pay Once’ premium subscription to access hidden features.
Pros
● The tool backs up your editing queries with a 24 x 7 responsive customer support system.
● You can avail a lifetime membership of the program to avoid periodic renewal.
● The export facility of the tool is quite expanded.
Cons
● The tool often encounters content mismanagement.
● The working interface is quite crowded.
● Uploading videos to the program’s workspace is a time taking process.
07ClipChamp
Adaptable Systems: All popular operating systems
If you are a newbie in the arena of graphic and video editing applications, this one is a perfect choice to proceed with the task of video customization. The aforesaid online utility to edit clips and footages is extremely useful to the ones who have just landed into the creative domain and try hands at creating customized clips with an online aid. The tool facilitates you with a guided search and customization to let you create a visual masterpiece in a quick time span.
While the editing process is affordably simple, the working interface leaves nothing unturned to help you with a clean layout and prompting on screen instructions. The interface elements have a well-defined organization, displaying first things first, making it possible for you to conveniently design extensive video projects with a high end professional quality.
This online tool however, does not facilitate preset features and templates to free users. Although you can have a glimpse of the assorted range of sound effects, video templates, music tracks, animated themes and backgrounds, accessing the same essentially requires you to avail a paid subscription of the program. Additional customization features of the tool include an instant playback option, several title transitions and a decent font selection range.
As a free user of the tool, you are entitled to export your video edits in an affordably low resolution of 480 pixels. Premium users are however, benefited with a 720 pixel export facility, but the real element of surprise is that the platform does not allow a 1080 pixel export at all. While the tool does not present you with video export choices at all, you can anyway make a free download of your creation to the local media gallery of your system.
Pros
● The utility is one of the most preferred video customization programs for freelancers.
● The working interface has a calming and easy to go outlook.
● The program is quite suitable to be used by beginners.
Cons
● As reported by premium users, the media import process is not so welcoming.
● The project media gets stored in your device’s internal memory instead of a cloud space.
● Output quality for free users is disappointingly low.
08HippoVideo
Adaptable Systems: All popular operating systems
Launched as an extension to the Google Chrome web browser, the aforesaid online video editor program is chiefly designed to address the screen recording concerns of business and academic personnel, YouTubers and gamers. Ahead of the aforesaid facility, the tool is an excellent choice to sort out video customization needs as well. You can access the latter’s free tom use audio and image library to select and include these media into your video edits.
When addressing the concern of editing motion centered screen captures and video overlays, you can supplement the same with a single music piece, which is quite limiting. The program allows you to export your customized video edits to a variety of media sharing platforms, such as, Facebook, Twitter, LinkedIn, Google, etc., through a sign up to the respective website. If however, you wish to make a direct share, there is an option to use the HippoVideo integration of these media sites.
You can further, stock up your creations to online storage accounts, like, Vimeo, Google Drive, etc. If you wish to export the edited videos exclusively on Slack, the program lets you do that by generating a direct share link. There is also a choice to save the edits locally to your system. Talking of the output formats; the utility keeps you devoid of any aspect ratio options, but facilitates a 720 and 1080 pixel video output resolution for free and paid users respectively.
Pros
● The tool boasts of a responsive and dedicated customer support service.
● The program greets you with a welcoming interface that is handy to use and navigate through.
● The tool undergoes periodic bug fixes to further upgrade and improve its workability.
Cons
● The output video quality is visibly limited.
● The video upload process occasionally encounters an appreciable time lag.
● The Google Chrome extension often causes the program to crash down.
09WeVideo
Adaptable Systems: All popular operating systems
If you are looking for an affordable solution to customize videos online for academic purposes, this one is possibly the most suitable web based alternative that you can rely on. The tool facilitates the students with creating educational video edits within a protected cloud interface, under a convenient supervision of the educators. The tool further caters an extensive editing portability on your preferred time, device and place.
Your video edits remain safe with the tool, with the flexibility to avail them at your fingertips, as and when required. The seamless transition of the edits via a ‘Drag and Drop’ method creates the illusion of an instant playback. As of the preset editing facilities, you can at the most see teaser previews of the tool’s extensive media library that houses over 4.5 million images and 1 million music tracks as an unpaid user. You can however, pick one from the 22 free audio tracks.
Diving deeper into the customization features, the paid users get to work with transitions, text, overlays and music tracks. Picking up a preset template to create the video edits however, puts a limitation on the aforesaid self-customization flexibilities. Talking of the video formats, they are an absolute ‘No’ for the free users of the tool. The paid subscribers however, can switch between the 16:9 landscape and 1:1 square alternatives with the most economical purchase plan.
You can avail the free trial up to one customization and save your edited videos to the local media gallery of your system with the tool’s watermark. Exporting your creations to the popular media sharing platforms, like YouTube, Twitter, LinkedIn, Facebook, etc., relies on you paying for the utility. The watermark however remains with the paid subscription as well. The tool greatly compromises on the output video quality of the edits, with a mere 480 pixel resolution.
Pros
● Though a paid feature, the tool houses an extensive library of preset video, image and audio templates.
● The user interface is clean and responsive, with no messy presentation of elements around.
● The transition flow within the created edits is effortlessly smooth.
Cons
● The tool does not allow you to rotate and crop the video edits.
● Publishing the edits with the tool sometimes gets confusing due to the difficultly of locating the videos within the program library.
● Some of the customization features rendered by the tool are difficult to understand and work with.
10**Wondershare Filmora Video Editor **
Adaptable Systems: Windows and MacOS
If you have been wondering lately of picking the best free video editing software of all times to create high end graphic masterpieces with footage customization, the Wondershare Filmora video editing program is here to end your worries. The software conveniently lands among the most preferred graphic design tool across the globe to address a series of editing and creation requirements. An obvious cause of the above is the latter’s extensive collection of editing tools and features.
The software’s editing library is known to house an updated diversity of video customization tools and effects that you can play with to create classic pieces of video artworks. Ahead of the basic editing tools to cut, trim, crop and rotate videos, the Filmora library houses some of the latest and advanced video customization features, such as, green screen, split screen, auto synchronization, motion tracking, color match, and lots more.
For Win 7 or later (64-bit)
For macOS 10.12 or later
Diving a bit deeper into the expanse of editing features and effects, the software allows you to add a series of filters, animated elements, text customizations, lower thirds, titles, video and image combinations and graphic inclusions to the clip being edited. The program audio library is another content storehouse with a huge collection of free to use background music tracks to complement your videos with.
While you can customize and export videos in 4K resolution with Filmora, the software allows you to import and edit GIF videos. Additional utilities of the program are a noise attenuator to eliminate background noise, color tuner for adjusting the dynamic range and white balance, audio mixer and video stabilizer for respectively, changing the music track and removing camera shake effects, and a screen recorder for a high resolution capture of the webcam and system screens.
Pros
● The software comes with a good number of video editing tutorials that explain the usage pattern diverse range of features and effects.
● The video import and export process of the software is quick and efficient.
● The program is known to possess one of the best working interfaces to guide you throughout the video editing process.
Cons
● Importing media files can sometime pose format compatibility issues.
● The text customization features offered by the program are somewhat basic.
● You may encounter occasional software crashes while working with the program.
Part 2 Video Editing Online Q&A
● What is the fundamental concept behind online video editing?
When working with creating video footages, online editing comes at the end of the production agenda and is performed after the video has been customized at the offline level. As of today, the task of online video customization is efficiently taken care of by the most advanced and diverse range of video editing programs that work in line with nonlinear editing (NLE) systems.
● What is the main benefit of using online video editing tools to customize videos?
Online video editing programs grant you the liberty to customize your footages and clips without the compulsion of downloading heavy and expensive software packages. You are further allowed to access and use a diverse range of editing effects and features with absolutely no or minimal subscription cost.
● What are the essential applications of video editing?
Video editing refers to the art of creating a structured presentation of different elements within footages to showcase the required content in an engaging and interesting style. Talking of the content variations that can be edited, you can experiment with video essays, documentaries films and video advertisements.
● What are the prerequisites of a professional quality video edit?
When aiming to create a professionally sound video edit, take care of the final output quality and prefer a fine video resolution of 4K or 1080 pixels. You should additionally, prefer using a reliable video hosting website to facilitate a quick loading of your video, while using the same as an effective SEO strategy.
● What are the various categories of online video editing?
Speaking sin professional terms, you can categorize online video customization into 5 major types that are, mechanical editing, line editing, copy editing, structural editing and substantive, content or developmental editing. Using a mix and match of these customization categories renders a classic and fine quality video edit.
● Ending Thoughts →
● Editing videos online is a quick and smart way of transforming your videos, clips and footages into graphic artworks without the hustle of downloading extensive software.
● Browsing through the web, you can come across a plethora of online editing tools and platforms to create high quality video edits.
● When looking for a reliable video editing software alternative, you can make an intelligent choice by picking the Wondershare Filmora video editor program.
Merging Videos Like a Pro: A Step-by-Step Guide to Use FFmpeg
Video editing is a crucial aspect of creating content for many people. Whether you’re a YouTuber, a marketer, or just someone who wants to share videos with friends and family, being able to edit and manipulate your videos is key. One of the most basic video editing tasks is concatenating videos, which combines multiple files to create one cohesive video.
FFmpeg is a powerful tool that allows you to do just that, and in this guide, we’ll walk you through the process of FFmpeg concatenate videos. Whether a beginner or an experienced video editor, this guide will provide you with all the information you need to seamlessly merge your videos. From installation to execution, we’ll cover it all so you can streamline your video editing process.

Overview and Installation of FFmpeg
FFmpeg is free, open-source project that allows you to record, convert, and stream digital audio and video. It is a command-line tool widely used in video editing and transcoding. FFmpeg can be used to concatenate videos and other tasks, such as adding subtitles, changing video resolution, and more. It is available for Windows, Mac, and Linux, making it a versatile and accessible tool for anyone to use.
Here’s how to install FFmpeg:
Step1 Log in to your Ubuntu server via SSH and update the package index.
$ sudo apt update
Step2 Install FFmpeg and all the required dependencies
$ sudo apt install ffmpeg
Step3 Verify the version of FFmpeg that you’ve installed.
$ ffmpeg -version
Prerequisite
Before we merge videos using FFmpeg, we must understand the various methods available to us. FFmpeg offers three ways to concatenate videos: a demuxer, a filter, or a protocol. However, each method has its own set of considerations, and the best method for you will depend on the properties of the videos you’re working with.
It’s crucial to ensure that all encoding-related properties align with your chosen method. This includes the timebase, height and width, codecs, and pixel format. Some methods require the videos you’re merging to have the same encoding, while others allow for different encodings. It’s essential to keep this in mind to ensure that the final video is seamless without any breaks. Remember that these prerequisites will help you have a smooth process.
Concatenate Videos With Same Codecs Using FFmpeg
If the videos you want to concatenate have the same codec, you can use the FFmpeg “concat” demuxer or protocol to join them together. This simple and efficient method doesn’t require re-encoding the videos, saving time and preserving the original quality. This section will review the steps to concatenate videos using the “concat” demuxer and “concat” protocols in FFmpeg.
Merge Videos With the “Concat” Demuxer
The concat demuxer in FFmpeg allows you to join together multiple video files with the same codecs by reading a list of file paths from a text file and demuxing them in sequence. Each video starts where the previous one finishes without needing to re-encode the videos. Here’s how to do it:
Step1 Create a .txt file and list the paths of the video files you want to merge.
Join_video.txt
file /Users/Video/input1.mp4
file /Users/Video/input2.mp4
![]()
Note: You can add more than two video files.
Step2 Run the FFmpeg command:
ffmpeg -f concat -safe 0 -i join_video.txt -c copy output_demuxer.mp4
![]()
Note: -safe 0 is added to accept any file name.
-c copy will copy all the streams.
As this method allows you to “stream copy” the files instead of re-encoding them, the concatenation is very fast. This can be a good option if you have videos with the same codecs and want to join them quickly without losing quality.
Join Videos With the “Concat” Protocol
The concat protocol in FFmpeg allows you to join together multiple video files in a specific format that supports file-level concatenation, such as MPEG-2 TS. However, it cannot be used for other video formats like MP4 and WEBM.
Here’s how to use the “concat protocol:
Step1 Run the FFmpeg command:
ffmpeg -i “concat:input1.ts|input2.ts” -c copy output_protocol.ts
![]()
Note: The concat protocol allows you to “stream copy” the files by adding the option -c copy.
Step2 Input the file name of the video using this code:
ffmpeg -i “concat:input1.mp4|input2.mp4” -c copy output_protocol.mp4
![]()
Note: If you try to use this method on video formats that are not supported, only the first input video will be saved in the output video. And the video ends after the first video.
Although this method is limited in terms of supported video formats, it’s very easy to use if you merge videos in the supported formats. It’s a single command in the terminal without needing a text file. Additionally, using the -c copy option makes it efficient as it doesn’t require re-encoding, saving time.
Concatenate MP4 Video Files of Different Codecs & Resolutions Using FFmpeg
If the videos you want to concatenate have different codecs or resolutions, you can still use FFmpeg to join them together. However, this method requires re-encoding the videos, which can take longer and may result in a loss of quality. This section will cover the steps to concatenate videos with different codecs or resolutions using FFmpeg.
Here’s how to do it:
Step1 Provide the names of the input files to FFmpeg.
ffmpeg -i file1.mp4 -i file2.mp4 -i file3.mp4 \
Step2 Use the filter_complex filtergraph parameter to instruct FFmpeg from where to take the audio and video.
-filter_complex “[0:v] [0:a] [1:v] [1:a] [2:v] [2:a]
![]()
Note: [0:v][0:a] means FFmpeg needs to take the video and audio from the 0th video (file1.mp4).
Step3 Tell FFmpeg to concatenate three files (n=3).
concat=n=3:v=1:a=1 [vv] [aa]“ \
![]()
Note: The v=1:a=1 implies one stream for the audio and one stream for the video.
Step4 Map these audio and video outputs to the final video container. This is done as follows:
-map “[vv]“ -map “[aa]“ mergedVideo.mp4
It is important to note that this method requires re-encoding the videos, which can take more time and may result in a loss of quality. However, it offers the flexibility of filtering the videos before concatenating them. The filter_complex method in FFmpeg allows you to concatenate videos of different codecs and resolutions. The final step is to map the audio and video outputs to the final video container. This can be done using the -map command.
Concatenate Videos With Multiple Audio Streams Using FFmpeg
Concatenating videos with multiple audio streams can be more complex than concatenating videos with a single audio stream. This section will cover the steps to concatenate videos with multiple audio streams using FFmpeg. We’ll be using the filter_complex method in FFmpeg, which allows you to manipulate and concatenate multiple audio and video streams in a single command. This method is more advanced but allows you to join videos with different audio streams and create a final video with multiple audio tracks.
Step1 Specify the input files and opening.mkv, episode.mkv, and ending.mkv:
$ ffmpeg -i opening.mkv -i episode.mkv -i ending.mkv -filter_complex
Step2 Use the filter_complex parameter in FFmpeg to specify the input streams for the video and audio.
[0:0] [0:1] [0:2] [1:0] [1:1] [1:2] [2:0] [2:1] [2:2]
![]()
Note: Single video stream ([0:0], [1:0], [2:0])
Dual audio streams ([0:1][0:2], [1:1][1:2], [2:1][2:2])
Step3 Use the concat filter to specify that you want to concatenate 3 files (n=3) with 1 video stream (v=1) and 2 audio streams (a=2). Specify the output streams as [v], [a1], [a2]:
concat=n=3:v=1:a=2 [v] [a1] [a2]
Step4 Use the -map option to map the output streams to the final video container:
-map ‘[v]‘ -map ‘[a1]‘ -map ‘[a2]‘ output.mkv
[Bonus] Join Videos Together With Filmora
While FFmpeg offers a wide range of options for joining videos together, it can have a steep learning curve for some users. An alternative method for joining videos is using Filmora. Wondershare Filmora is a user-friendly video editing software that allows you to easily join multiple videos. It’s a great option for users new to video editing or needing experience with command-line tools like FFmpeg.
Free Download For Win 7 or later(64-bit)
Free Download For macOS 10.14 or later
Filmora has a simple drag-and-drop interface, making adding, arranging, and editing videos and audio tracks easy. Additionally, it offers various features like split, trim, crop, merge, and more. It also has various effects, transitions, and animations to enhance the overall look of your video. With Filmora, you can create professional-looking videos with minimal effort.
How-to Steps
Here’s how to merge videos using Filmora:
Step1 Open Filmora and click “New Project.”

Step2 Go to “File“ > “Import Media“ > “Import Media Files“ to add your video files to the media library.

Step3 Drag and drop the files you want to merge from the media library to the timeline, and then you’ll get the merged video seamlessly.

Step4 Edit your video.

Step5 After editing, click the “Export“ tab to save your videos.

Conclusion
FFmpeg is a powerful tool that allows you to concatenate videos in various ways. Whether you’re working with videos of the same codecs and resolutions or videos with multiple audio streams, FFmpeg can handle it. However, for users new to video editing or needing experience with command-line tools, using Filmora can be a more user-friendly option. It offers a simple drag-and-drop interface and a variety of features and effects to enhance the overall look of your video.
Step2 Run the FFmpeg command:
ffmpeg -f concat -safe 0 -i join_video.txt -c copy output_demuxer.mp4
![]()
Note: -safe 0 is added to accept any file name.
-c copy will copy all the streams.
As this method allows you to “stream copy” the files instead of re-encoding them, the concatenation is very fast. This can be a good option if you have videos with the same codecs and want to join them quickly without losing quality.
Join Videos With the “Concat” Protocol
The concat protocol in FFmpeg allows you to join together multiple video files in a specific format that supports file-level concatenation, such as MPEG-2 TS. However, it cannot be used for other video formats like MP4 and WEBM.
Here’s how to use the “concat protocol:
Step1 Run the FFmpeg command:
ffmpeg -i “concat:input1.ts|input2.ts” -c copy output_protocol.ts
![]()
Note: The concat protocol allows you to “stream copy” the files by adding the option -c copy.
Step2 Input the file name of the video using this code:
ffmpeg -i “concat:input1.mp4|input2.mp4” -c copy output_protocol.mp4
![]()
Note: If you try to use this method on video formats that are not supported, only the first input video will be saved in the output video. And the video ends after the first video.
Although this method is limited in terms of supported video formats, it’s very easy to use if you merge videos in the supported formats. It’s a single command in the terminal without needing a text file. Additionally, using the -c copy option makes it efficient as it doesn’t require re-encoding, saving time.
Concatenate MP4 Video Files of Different Codecs & Resolutions Using FFmpeg
If the videos you want to concatenate have different codecs or resolutions, you can still use FFmpeg to join them together. However, this method requires re-encoding the videos, which can take longer and may result in a loss of quality. This section will cover the steps to concatenate videos with different codecs or resolutions using FFmpeg.
Here’s how to do it:
Step1 Provide the names of the input files to FFmpeg.
ffmpeg -i file1.mp4 -i file2.mp4 -i file3.mp4 \
Step2 Use the filter_complex filtergraph parameter to instruct FFmpeg from where to take the audio and video.
-filter_complex “[0:v] [0:a] [1:v] [1:a] [2:v] [2:a]
![]()
Note: [0:v][0:a] means FFmpeg needs to take the video and audio from the 0th video (file1.mp4).
Step3 Tell FFmpeg to concatenate three files (n=3).
concat=n=3:v=1:a=1 [vv] [aa]“ \
![]()
Note: The v=1:a=1 implies one stream for the audio and one stream for the video.
Step4 Map these audio and video outputs to the final video container. This is done as follows:
-map “[vv]“ -map “[aa]“ mergedVideo.mp4
It is important to note that this method requires re-encoding the videos, which can take more time and may result in a loss of quality. However, it offers the flexibility of filtering the videos before concatenating them. The filter_complex method in FFmpeg allows you to concatenate videos of different codecs and resolutions. The final step is to map the audio and video outputs to the final video container. This can be done using the -map command.
Concatenate Videos With Multiple Audio Streams Using FFmpeg
Concatenating videos with multiple audio streams can be more complex than concatenating videos with a single audio stream. This section will cover the steps to concatenate videos with multiple audio streams using FFmpeg. We’ll be using the filter_complex method in FFmpeg, which allows you to manipulate and concatenate multiple audio and video streams in a single command. This method is more advanced but allows you to join videos with different audio streams and create a final video with multiple audio tracks.
Step1 Specify the input files and opening.mkv, episode.mkv, and ending.mkv:
$ ffmpeg -i opening.mkv -i episode.mkv -i ending.mkv -filter_complex
Step2 Use the filter_complex parameter in FFmpeg to specify the input streams for the video and audio.
[0:0] [0:1] [0:2] [1:0] [1:1] [1:2] [2:0] [2:1] [2:2]
![]()
Note: Single video stream ([0:0], [1:0], [2:0])
Dual audio streams ([0:1][0:2], [1:1][1:2], [2:1][2:2])
Step3 Use the concat filter to specify that you want to concatenate 3 files (n=3) with 1 video stream (v=1) and 2 audio streams (a=2). Specify the output streams as [v], [a1], [a2]:
concat=n=3:v=1:a=2 [v] [a1] [a2]
Step4 Use the -map option to map the output streams to the final video container:
-map ‘[v]‘ -map ‘[a1]‘ -map ‘[a2]‘ output.mkv
[Bonus] Join Videos Together With Filmora
While FFmpeg offers a wide range of options for joining videos together, it can have a steep learning curve for some users. An alternative method for joining videos is using Filmora. Wondershare Filmora is a user-friendly video editing software that allows you to easily join multiple videos. It’s a great option for users new to video editing or needing experience with command-line tools like FFmpeg.
Free Download For Win 7 or later(64-bit)
Free Download For macOS 10.14 or later
Filmora has a simple drag-and-drop interface, making adding, arranging, and editing videos and audio tracks easy. Additionally, it offers various features like split, trim, crop, merge, and more. It also has various effects, transitions, and animations to enhance the overall look of your video. With Filmora, you can create professional-looking videos with minimal effort.
How-to Steps
Here’s how to merge videos using Filmora:
Step1 Open Filmora and click “New Project.”
Step2 Go to “File“ > “Import Media“ > “Import Media Files“ to add your video files to the media library.
Step3 Drag and drop the files you want to merge from the media library to the timeline, and then you’ll get the merged video seamlessly.
Step4 Edit your video.
Step5 After editing, click the “Export“ tab to save your videos.
Conclusion
FFmpeg is a powerful tool that allows you to concatenate videos in various ways. Whether you’re working with videos of the same codecs and resolutions or videos with multiple audio streams, FFmpeg can handle it. However, for users new to video editing or needing experience with command-line tools, using Filmora can be a more user-friendly option. It offers a simple drag-and-drop interface and a variety of features and effects to enhance the overall look of your video.
Create Motion Effect with Path Blur In Photoshop
There are different kinds of blur effects that redefine the movement and intensity of an image. By applying a suitable blur effect, you can increase the visual appeal of your still photo by emphasizing a certain motion. Path blur is one of the trending motion blur effects that people use to enhance their photos instantly. Through this article, you can learn how to use path blur in Photoshop conveniently.
Part 1: What is Path Blur and How Does It Work?
Path blur is a kind of motion blur that highlights a motion and speed in a certain direction. It helps to create a sense of movement by adjusting the blur intensity and central point. If you want to display a stimulating motion in an image, path blur can assist you in this regard.
Path blur works by adjusting two variables: Speed and Taper. By adjusting the speed slider, you can specify the amount of path blur. In addition to speed, you can adjust the taper value accordingly to determine the blur trail.

This effect can instantly add new dimensions to your captured photo. For instance, if you have captured a photo of a racing car, you can add a path blur effect to give a sense of speed to it. You can easily find this special effect in Adobe Photoshop. By using the selection tools, you can effectively add a path blur effect to your image in the selected area. To know more about path blur in Photoshop, continue reading this article.
Part 2: How to Use Path Blur in Photoshop?
Photoshop is undoubtedly the most commonly used tool to edit pictures with great configuration options. After uploading the image, you can quickly transform it by adding new effects, filters, and layers. You can retouch your photography efficiently through this tool by increasing the quality of pictures. Moreover, the clean user interface of Photoshop allows you to utilize the advanced functions without any interruptions.
Are you ready to use Photoshop path blur? Read this part of the article to find out two interesting ways to create a path blur effect in the images.
Add Dynamic Effect to Your Static Images
Step1 Open Photoshop and import the desired picture. Once done, go to the “Layers” section and copy the background layer. For this, press “Ctrl + J” in Windows and “Command + J” for MacBook.

Step2 Now proceed to the “Filter” section and locate the option “Blur Gallery”. From there, choose the “Path Blur” option. Now you would be able to see an arrow on your screen. Using this arrow, you can specify the path blur motion. Drag and close the arrow where you want to show the speed. Also, set a higher value for the speed given on the right side. Once done, hit the “OK” button.

Create a Long Exposure Picture
Step1 Navigate to the Adobe Photoshop tool and begin by uploading a picture. Afterward, go to the “Filter” tab and select “Convert for Small Filters.”

Step2 Now go to the “Filter” tab again and choose the “Blur Gallery” option. From there, select the “Path Blur” option. Now adjust the displayed arrow in a particular direction to decide the starting and endpoint of the path blur. Moreover, modify the “Speed” slider according to your choice.

Step3 After dragging the arrow in a particular direction, a blue dot will appear at the center. Press the “Delete” button to eliminate that point. Now select the endpoint of the arrow and change its blur shape.

Step4 Utilize the noise section to add a grainy effect in the blurred area. Once done, click on the “OK” button. Now select the masking tool to select the area in your picture. Afterward, choose the “Smart Mask” filter and then navigate to the “Fill” option given in the “Edit” section.

Step5 In the fill menu, choose the color “Black.” Now go to the “Select” section and click “Deselect.” To soften the whole look, you can go to the “Properties” panel and adjust the “Feather” properties.

Step6 Now add the first layer and choose the option “Convert for Smart Filters.” Again, go to the “Filter” section, select “Blur Gallery,” and uncheck the option called “Edit Blur Screen.”

Step7 Now increase the length of the arrow and press “Ctrl + Click” for Windows or “Command + Click” for Mac to reposition the path. You can also add a curve to the arrow. Enhance the speed from the right panel and uncheck the option of “Center Blur.” You can increase the taper value to make the blur gradually trail off. Add a grainy filter for more enhancements.

Bonus Tips – The Alternative to Photoshop to Create Motion Blur Effect
Many users find the interface of Adobe Photoshop intimidating or challenging to operate. If you want an alternative to Photoshop, the best choice you can make is to use Wondershare Filmora . For beginners, this tool adds built-in presets that are professionally made.
Free Download For Win 7 or later(64-bit)
Free Download For macOS 10.14 or later
It offers more than 900 effects that you can use to add new dimensions to your photos and videos. Moreover, it provides fast processing speed for photo and video editing to help you achieve your goals conveniently.
Steps to Produce Motion Blur Effect in Filmora
If you are a beginner and want to create a motion blur effect, then use the steps mentioned below:
Step1 Add the Image to Timeline
After launching Filmora, select “Create New Project” and import the desired picture. After dragging it to the timeline, you have to split it to proceed.

Step2 Choose the Background Blur
To split, choose the starting and ending point in the clip where you want to add the motion blur effect. Once done, go to the “Effects” tab and search for the “Background Blur” effect section. Pick and apply the desired blur filter to the split section of the video.

Step3 Apply the Transition
Once you have added the motion blur effect, you can check the results from the preview window. You can also apply the “Dissolve” transition from the “Transitions” tab to generate a smooth result.

Conclusion
If you want to display a sense of speed and movement in the picture, you can add a path blur effect. It’s one of the types of motion blur effects that many people use in their pictures to add a dynamic element. By reading this article, you have learned how to add path blur in Photoshop through simple means. Moreover, you can also explore the tool Filmora to create a motion blur effect in the photos effortlessly.
Free Download For macOS 10.14 or later
It offers more than 900 effects that you can use to add new dimensions to your photos and videos. Moreover, it provides fast processing speed for photo and video editing to help you achieve your goals conveniently.
Steps to Produce Motion Blur Effect in Filmora
If you are a beginner and want to create a motion blur effect, then use the steps mentioned below:
Step1 Add the Image to Timeline
After launching Filmora, select “Create New Project” and import the desired picture. After dragging it to the timeline, you have to split it to proceed.
Step2 Choose the Background Blur
To split, choose the starting and ending point in the clip where you want to add the motion blur effect. Once done, go to the “Effects” tab and search for the “Background Blur” effect section. Pick and apply the desired blur filter to the split section of the video.
Step3 Apply the Transition
Once you have added the motion blur effect, you can check the results from the preview window. You can also apply the “Dissolve” transition from the “Transitions” tab to generate a smooth result.
Conclusion
If you want to display a sense of speed and movement in the picture, you can add a path blur effect. It’s one of the types of motion blur effects that many people use in their pictures to add a dynamic element. By reading this article, you have learned how to add path blur in Photoshop through simple means. Moreover, you can also explore the tool Filmora to create a motion blur effect in the photos effortlessly.
Have You a Desire to Imbibe Your PowerPoint Presentations with Custom Effects and Tools? Be There to Learn All About Creating Custom Slideshows in PowerPoint with Utmost Ease
How to Create a Custom Slide Shows in Powerpoint
An easy yet powerful editor
Numerous effects to choose from
Detailed tutorials provided by the official channel
Designing custom slideshows in PowerPoint is an absolute fun to do activity for infotainment and information sharing needs. Stay here to get an insight into creating the same, all in a wink!
In this article
01 [How to Create a Custom Slide Show in PowerPoint?](#Part 1)
02 [How to Show a Custom Show in PowerPoint?](#Part 2)
03 [How to Hide Slides in PowerPoint?](#Part 3)
Part 1 How to Create a Custom Slide Show in PowerPoint?
PowerPoint presentations are an already elusive and captivating media of information delivery and content sharing, be it a personal entertainment need or a high end professional requirement, PowerPoint presentations can do it all! Responding to the day to day IT upgrades of modern times, the aforesaid MS Office utility program has introduced its custom slideshow feature, which you can work upon to expand your creative skills in graphic design.
Custom slideshows are a convenient means of abstracting a required set of contents from a rather detailed slideshow presentation to address the needs of a specific audience, instead of distracting them with showcasing the entire content, most of which turns irrelevant to their exclusive requirements.
Talking about the knowhow to work with the feature, the following section encompasses a comprehensive understanding of the custom slide show creation process with the finest details:
User’s Guide to Create Custom Slideshows in PowerPoint
Step 1: Launch the PowerPoint Tool
Start the custom slide show PowerPoint creation process with launching the PowerPoint tool in any of your preferred devices. It would be better to work on a desktop or a PC. Proceed to open the presentation that you wish to create a custom slideshow from.
Step 2: Custom Slide Show Option
In the welcome interface of PowerPoint, navigate to the ribbon at the top and hit the ‘Slide Show’ tab, followed by clicking on the ‘Custom Slide Show’ button from the ‘Options Panel’ that appears. As you tap the aforesaid button, a dropdown menu follows next, from where you need to choose the ‘Custom Shows…’ option.

Step 3: Custom Shows Dialog Box
The completion of Step 2 brings up the ‘Custom Shows’ dialog box, with a blank area at the left, indicating the absence of any custom slide show as yet. To create one, navigate to and click on the ‘New’ button at the right side within the dialog box.

Step 4: Define Custom Show Dialog Box
As you tap the ‘New’ button, the ‘Define Custom Shows’ dialog box pops up with a display of the following fields and buttons:
● Slide Show Name Box
Use this field to assign a name to your custom slideshow. In case you don’t add a name of your choice, PowerPoint will assign the name ‘Custom Show 1’ to your custom presentation.
● Slides in Presentation
Below the ‘Slide Show Name’ box, appears a list of slides in the chosen presentation which you can use to create the custom slide show. To add slides to the same, click on the respective slide names.
● Add Button
The ‘Add’ button in the middle of the ‘Define Custom Show’ dialog box is used to include selected slides from the main list explained above to the ‘Slides in Custom Show’ list at the right. The ‘Add’ button however, remains disabled until you make a selection from the main slides list to include within the custom slides list. Take note that you can choose to repeat the slides within the custom list.
● Remove Button
You can use this button to select and delete specific slides from the ‘Slides in Custom Show’ list. The button however, remains disabled till you make a slide selection to be removed.
● Slides in Custom Show
This is a list of slides that you have selected from the main slides list to include in the custom slideshow.
● Re-Order Buttons
These are ‘Up’ and ‘Down’ arrows at the right side of the ‘Define Custom Show’ dialog box, which are active only if the ‘Slides in Custom Show’ list has more than one slide to its credit. In such a case, you can use these arrows to change the sequence of appearance of the slides within the custom presentation.

Step 5: Back to Custom Shows Dialog Box
When you have finished making all the required entries in the aforesaid fields, click on ‘OK’ to create your custom slideshow, which is visible in the ‘Custom Shows’ dialog box. You can preview the just created custom presentation by selecting the slideshow in the ‘Custom Shows’ list, followed by clicking on the ‘Show’ button at the bottom right of the dialog box.

The ‘Custom Shows’ dialog box has an additional list of buttons, which are explained as follows:
● The ‘New’ button, which you can click on to continue creating as many custom slideshows as you like.
● The ‘Edit’ button, which allows you to make changes to a specific custom slideshow.
● The ‘Remove’ button, which you can use to select and delete an existing custom presentation.
● The ‘Copy’ button, that lets you create multiple copies of a selected slideshow. This utility comes handy when you need to work on creating similar custom presentations with an affordably small number of differential elements.
When you are satisfied with your work, navigate to and hit the ‘Close’ button to finalize and save the custom presentation within your device.

Part 2 How to Show a Custom Show in PowerPoint?
When working to share any kind of information through slideshow presentations, creating a custom show is just half the job, with the significant part of a flawless content presentation remains still under the line. Having understood the process of creating a custom slide show in PowerPoint in enough detail, let us now move ahead with learning how to show the same in PowerPoint in the following section:
User’s Guide to Play a Custom Slideshow in PowerPoint
Step 1: Launch the Parent Presentation
In any suitable device of your preference, proceed with opening the presentation in which you have worked on creating the custom slideshow, followed by hitting the ‘Slide Show’ tab in the PowerPoint ribbon at the top. From the list of options that appears next, click on the ‘Custom Slide Show’ button.

Step 2: Custom Slideshow Dropdown Menu
Clicking on the ‘Custom Slide Show’ button in step 2 causes the latter’s dropdown menu to get displayed, with a list of all the created custom shows within the currently accessed parent slideshow presentation. Navigate to and click on the name of the custom presentation that you wish to play.

How to Set a Custom Show as the Default Slideshow?
If you are interested in playing the custom show as a default presentation, see through the following stepwise tutorial guide to go ahead with the process:
Step 1: Set Up Slideshow Button
After you have launched the parent presentation, navigate to and click on the ‘Slide Show’ tab within the topmost PowerPoint ribbon and tap the ‘Set Up Slide Show’ button from the list of options that follows.

Step 2: Set Up Show Dialog Box
Clicking on the aforesaid button makes the ‘Set Up Show’ dialog box to appear, where you are required to hit the ‘Custom Show’ radio button. You can now click on the dropdown arrow below the radio buttons to select your specific one from the list of custom shows that pops down. Hit ‘OK’ at the bottom right corner of the dialog box when you have made your choice.

The custom show is now your default slideshow. In your future launches of ‘Slide Show View’, only the selected custom show slides will appear to be used as a presentation.
Part 3 How to Hide Slides in PowerPoint?
In case you have worked on a detailed slideshow presentation in the PowerPoint tool, that consists of selective contents for different audience groups, all within the main presentation, it is a wise step to hide the content slides that are not useful to particular audiences, lest your viewers might get distracted with the irrelevant content.
By far, you must have developed a significant understanding of the custom slideshow PowerPoint creation and presentation procedure in much detail. Moving further into our discussion, let us now work on hiding slides within a PowerPoint presentation through the following step by step guide:
How to Hide or Unhide a Slide in PowerPoint?
Step 1: Launch the PowerPoint Presentation
Start with opening a desired PowerPoint Presentation in your preferred device.
Step 2: Make Your Selection
Visit the slide navigation pane at the left to select slide you wish to delete. Your selections will be highlighted as you tap on them. You can either delete the slides one at a time, or make multiple selections to delete them all at once.

Step 3: Hide Slide Option
When you have made the required selections, right click on the same, followed by choosing the ‘Hide Slide’ option from the dropdown menu that appears next. The selected slides will now be hidden and you can recognize them in the ‘Presenter View’ with lighter thumbnails as compared to the included slides, in the slide navigation pane.


Step 4: Unhiding the Presentation Slides
If you wish to unhide a previously hidden presentation slide, reach to the slide navigation pane in the left and right click on the hidden slide thumbnail. The dropdown menu in Step 3 pops up again, and you need to tap on the ‘Hide Slide’ option. The selected slide will now be included in the presentation.

An alternative to show a hidden slide within a running presentation, while remaining in the ‘Presenter View’, make a random right click anywhere within the currently running slide. The ‘Options Panel’ pops up, and you are required to choose the ‘See All Slides’ option.

All the slides of your presentation will now get displayed in the slide navigation pane, with the hidden ones being grayed out with a crossed slide number. Click on the thumbnail of the respective hidden slides that you want to present before the audience.
asterpieces crea

Creating PowerPoint Presentation Slides in Filmora
The Wondershare Filmora Video Editor franchise of graphic editor software is a pioneer in creating stunning masterpieces of content presentation alternatives. Talking of slideshow presentations, you can work with the software program to create and edit slideshow presentations in high end professional quality. The inbuilt library of the program is a vast trunk of features, effects and tools that allow you to explore your graphic creation abilities to your heart’s content and design top quality slideshows.
For Win 7 or later (64-bit)
For macOS 10.12 or later
Apart from creating slideshow presentations, you can use the software program to convert the same into video edits and customize them to suit your needs. As an example, you can work with removing the slideshow background, overlaying the slide contents; add tons of audio-visual effects and transitions to the slides and supplement them with pleasing background music.
Additional advantages of the application are a welcoming and user cohesive interface, high speed output response characteristics, high end, professional quality slideshow output and an extensive device compatibility. The bottom line is, the Filmora graphic editor package is an all in one solution to your most diverse and specific slideshow creation needs.
● Ending Thoughts →
● Custom slideshows are an important part of PowerPoint presentations, especially when you need to showcase selective contents of a detailed project.
● Apart from creating, you also get to play the custom slideshow, make it your default presentation and hide the latter’s slides using the PowerPoint tool.
● If you are searching for a PowerPoint alternative to create custom slideshows, picking the Wondershare Filmora slideshow creator tool is indeed a smart choice.
Designing custom slideshows in PowerPoint is an absolute fun to do activity for infotainment and information sharing needs. Stay here to get an insight into creating the same, all in a wink!
In this article
01 [How to Create a Custom Slide Show in PowerPoint?](#Part 1)
02 [How to Show a Custom Show in PowerPoint?](#Part 2)
03 [How to Hide Slides in PowerPoint?](#Part 3)
Part 1 How to Create a Custom Slide Show in PowerPoint?
PowerPoint presentations are an already elusive and captivating media of information delivery and content sharing, be it a personal entertainment need or a high end professional requirement, PowerPoint presentations can do it all! Responding to the day to day IT upgrades of modern times, the aforesaid MS Office utility program has introduced its custom slideshow feature, which you can work upon to expand your creative skills in graphic design.
Custom slideshows are a convenient means of abstracting a required set of contents from a rather detailed slideshow presentation to address the needs of a specific audience, instead of distracting them with showcasing the entire content, most of which turns irrelevant to their exclusive requirements.
Talking about the knowhow to work with the feature, the following section encompasses a comprehensive understanding of the custom slide show creation process with the finest details:
User’s Guide to Create Custom Slideshows in PowerPoint
Step 1: Launch the PowerPoint Tool
Start the custom slide show PowerPoint creation process with launching the PowerPoint tool in any of your preferred devices. It would be better to work on a desktop or a PC. Proceed to open the presentation that you wish to create a custom slideshow from.
Step 2: Custom Slide Show Option
In the welcome interface of PowerPoint, navigate to the ribbon at the top and hit the ‘Slide Show’ tab, followed by clicking on the ‘Custom Slide Show’ button from the ‘Options Panel’ that appears. As you tap the aforesaid button, a dropdown menu follows next, from where you need to choose the ‘Custom Shows…’ option.
Step 3: Custom Shows Dialog Box
The completion of Step 2 brings up the ‘Custom Shows’ dialog box, with a blank area at the left, indicating the absence of any custom slide show as yet. To create one, navigate to and click on the ‘New’ button at the right side within the dialog box.
Step 4: Define Custom Show Dialog Box
As you tap the ‘New’ button, the ‘Define Custom Shows’ dialog box pops up with a display of the following fields and buttons:
● Slide Show Name Box
Use this field to assign a name to your custom slideshow. In case you don’t add a name of your choice, PowerPoint will assign the name ‘Custom Show 1’ to your custom presentation.
● Slides in Presentation
Below the ‘Slide Show Name’ box, appears a list of slides in the chosen presentation which you can use to create the custom slide show. To add slides to the same, click on the respective slide names.
● Add Button
The ‘Add’ button in the middle of the ‘Define Custom Show’ dialog box is used to include selected slides from the main list explained above to the ‘Slides in Custom Show’ list at the right. The ‘Add’ button however, remains disabled until you make a selection from the main slides list to include within the custom slides list. Take note that you can choose to repeat the slides within the custom list.
● Remove Button
You can use this button to select and delete specific slides from the ‘Slides in Custom Show’ list. The button however, remains disabled till you make a slide selection to be removed.
● Slides in Custom Show
This is a list of slides that you have selected from the main slides list to include in the custom slideshow.
● Re-Order Buttons
These are ‘Up’ and ‘Down’ arrows at the right side of the ‘Define Custom Show’ dialog box, which are active only if the ‘Slides in Custom Show’ list has more than one slide to its credit. In such a case, you can use these arrows to change the sequence of appearance of the slides within the custom presentation.
Step 5: Back to Custom Shows Dialog Box
When you have finished making all the required entries in the aforesaid fields, click on ‘OK’ to create your custom slideshow, which is visible in the ‘Custom Shows’ dialog box. You can preview the just created custom presentation by selecting the slideshow in the ‘Custom Shows’ list, followed by clicking on the ‘Show’ button at the bottom right of the dialog box.
The ‘Custom Shows’ dialog box has an additional list of buttons, which are explained as follows:
● The ‘New’ button, which you can click on to continue creating as many custom slideshows as you like.
● The ‘Edit’ button, which allows you to make changes to a specific custom slideshow.
● The ‘Remove’ button, which you can use to select and delete an existing custom presentation.
● The ‘Copy’ button, that lets you create multiple copies of a selected slideshow. This utility comes handy when you need to work on creating similar custom presentations with an affordably small number of differential elements.
When you are satisfied with your work, navigate to and hit the ‘Close’ button to finalize and save the custom presentation within your device.
Part 2 How to Show a Custom Show in PowerPoint?
When working to share any kind of information through slideshow presentations, creating a custom show is just half the job, with the significant part of a flawless content presentation remains still under the line. Having understood the process of creating a custom slide show in PowerPoint in enough detail, let us now move ahead with learning how to show the same in PowerPoint in the following section:
User’s Guide to Play a Custom Slideshow in PowerPoint
Step 1: Launch the Parent Presentation
In any suitable device of your preference, proceed with opening the presentation in which you have worked on creating the custom slideshow, followed by hitting the ‘Slide Show’ tab in the PowerPoint ribbon at the top. From the list of options that appears next, click on the ‘Custom Slide Show’ button.
Step 2: Custom Slideshow Dropdown Menu
Clicking on the ‘Custom Slide Show’ button in step 2 causes the latter’s dropdown menu to get displayed, with a list of all the created custom shows within the currently accessed parent slideshow presentation. Navigate to and click on the name of the custom presentation that you wish to play.
How to Set a Custom Show as the Default Slideshow?
If you are interested in playing the custom show as a default presentation, see through the following stepwise tutorial guide to go ahead with the process:
Step 1: Set Up Slideshow Button
After you have launched the parent presentation, navigate to and click on the ‘Slide Show’ tab within the topmost PowerPoint ribbon and tap the ‘Set Up Slide Show’ button from the list of options that follows.
Step 2: Set Up Show Dialog Box
Clicking on the aforesaid button makes the ‘Set Up Show’ dialog box to appear, where you are required to hit the ‘Custom Show’ radio button. You can now click on the dropdown arrow below the radio buttons to select your specific one from the list of custom shows that pops down. Hit ‘OK’ at the bottom right corner of the dialog box when you have made your choice.
The custom show is now your default slideshow. In your future launches of ‘Slide Show View’, only the selected custom show slides will appear to be used as a presentation.
Part 3 How to Hide Slides in PowerPoint?
In case you have worked on a detailed slideshow presentation in the PowerPoint tool, that consists of selective contents for different audience groups, all within the main presentation, it is a wise step to hide the content slides that are not useful to particular audiences, lest your viewers might get distracted with the irrelevant content.
By far, you must have developed a significant understanding of the custom slideshow PowerPoint creation and presentation procedure in much detail. Moving further into our discussion, let us now work on hiding slides within a PowerPoint presentation through the following step by step guide:
How to Hide or Unhide a Slide in PowerPoint?
Step 1: Launch the PowerPoint Presentation
Start with opening a desired PowerPoint Presentation in your preferred device.
Step 2: Make Your Selection
Visit the slide navigation pane at the left to select slide you wish to delete. Your selections will be highlighted as you tap on them. You can either delete the slides one at a time, or make multiple selections to delete them all at once.
Step 3: Hide Slide Option
When you have made the required selections, right click on the same, followed by choosing the ‘Hide Slide’ option from the dropdown menu that appears next. The selected slides will now be hidden and you can recognize them in the ‘Presenter View’ with lighter thumbnails as compared to the included slides, in the slide navigation pane.
Step 4: Unhiding the Presentation Slides
If you wish to unhide a previously hidden presentation slide, reach to the slide navigation pane in the left and right click on the hidden slide thumbnail. The dropdown menu in Step 3 pops up again, and you need to tap on the ‘Hide Slide’ option. The selected slide will now be included in the presentation.
An alternative to show a hidden slide within a running presentation, while remaining in the ‘Presenter View’, make a random right click anywhere within the currently running slide. The ‘Options Panel’ pops up, and you are required to choose the ‘See All Slides’ option.
All the slides of your presentation will now get displayed in the slide navigation pane, with the hidden ones being grayed out with a crossed slide number. Click on the thumbnail of the respective hidden slides that you want to present before the audience.
asterpieces crea
Creating PowerPoint Presentation Slides in Filmora
The Wondershare Filmora Video Editor franchise of graphic editor software is a pioneer in creating stunning masterpieces of content presentation alternatives. Talking of slideshow presentations, you can work with the software program to create and edit slideshow presentations in high end professional quality. The inbuilt library of the program is a vast trunk of features, effects and tools that allow you to explore your graphic creation abilities to your heart’s content and design top quality slideshows.
For Win 7 or later (64-bit)
For macOS 10.12 or later
Apart from creating slideshow presentations, you can use the software program to convert the same into video edits and customize them to suit your needs. As an example, you can work with removing the slideshow background, overlaying the slide contents; add tons of audio-visual effects and transitions to the slides and supplement them with pleasing background music.
Additional advantages of the application are a welcoming and user cohesive interface, high speed output response characteristics, high end, professional quality slideshow output and an extensive device compatibility. The bottom line is, the Filmora graphic editor package is an all in one solution to your most diverse and specific slideshow creation needs.
● Ending Thoughts →
● Custom slideshows are an important part of PowerPoint presentations, especially when you need to showcase selective contents of a detailed project.
● Apart from creating, you also get to play the custom slideshow, make it your default presentation and hide the latter’s slides using the PowerPoint tool.
● If you are searching for a PowerPoint alternative to create custom slideshows, picking the Wondershare Filmora slideshow creator tool is indeed a smart choice.
Also read:
- Updated Guide to Create an Intro Video with Filmora
- Updated How to Zoom In and Out on Mac
- In 2024, How to Make Random Letter Reveal Intro?
- Timeline Template Is a Visual Representation Showing the Passage of Time. It Includes Text, Diagrams, Images and Icons. They Are Perfect for Telling Stories, Events Etc for 2024
- New Top 8 Sites to Download Glitch Transition for Premiere Pro
- New 2024 Approved 20 Must-Have Graduation Songs for Slideshow
- New 2024 Approved Advancements in Game Recording Software A Comprehensive Overview
- Updated In 2024, Camtasia vs Final Cut Pro
- Updated 2024 Approved Add Background to Video With/Without a Green Screen
- In 2024, AVI Editors for Windows 11/10/8.1/8/7 Easily Edit AVI Files on PC
- Updated How To Blur The Video Background in After Effects for 2024
- Updated Are You Aware that You Can Create Your Own Lower Thirds for Video? Read This Article for a Tutorial on How to Customize One
- Updated Useful Guide to Speed Up/Down Videos in VLC
- How to Add Background to Video With/Without a Green Screen
- New Google Meet Green Screen
- 2024 Approved 2 Solutions to Cut Video in VLC on Windows
- Updated In 2024, 10 Mind-Blowing Video Collage Maker for PC
- Updated How to Do Motion Graphics in Filmora
- New In 2024, How to Record Super Slow Motion Videos on Your Phone?
- New 2024 Approved How to Brighten a Video in Windows 10 | Step-By-Step Guide
- Top 10 TEXT TO SPEECH VIDEO MAKERS for 2024
- In 2024, Top 7 MP4 Video Editors on Mac Edit MP4 Videos Easily
- Updated 2024 Approved How to Create Cooking Video Intro and End Screen for YouTube Channel?
- New Want to Add Subtitles to Netflix Videos in Your Preferred Language? Read This Article to Learn Two Different Methods for Uploading Custom Subtitles to Netflix
- In 2024, 4K Videos Are the in Thing because of Their Flexibility and High Resolution. Stick Around to Learn How to Choose the Best Frame Rate for 4K Videos
- Best 5 Apps To Add Song To Video
- 2024 Approved GIF to JPG Is as Simple as a Blink of an Eye
- Updated How to Edit A Time Lapse Video on iPhone?
- Hitfilm Express - A Guide to Download, Install, Key Features for 2024
- In 2024, Using VN Editor To Add Luts for Video Editing
- Updated 2024 Approved Best Ways to Convert Video Frame Rate to 60FPS Software and Online Choices
- New Best Ideas for Time Lapse Video for 2024
- In 2024, Wondering How to Create a Stunning Intro Video with KineMaster? Here Are the Simple Steps to Use KineMaster to Design Your Intro Video in Simple Steps
- New Convert MP4 to 60 FPS GIF A Step-by-Step Guide
- Updated How to Add a Green Screen to Zoom
- Updated 10 Top Vloggers on YouTube for 2024
- What Legendaries Are In Pokemon Platinum On Poco C51? | Dr.fone
- In 2024, How To Change Infinix Note 30 Pro Lock Screen Clock in Seconds
- In 2024, The Most Useful Tips for Pokemon Go Ultra League On Oppo Reno 9A | Dr.fone
- How to Soft Reset ZTE Axon 40 Lite phone? | Dr.fone
- In 2024, How Can I Catch the Regional Pokémon without Traveling On Xiaomi Redmi Note 12 Pro+ 5G | Dr.fone
- In 2024, How to Transfer Contacts from Tecno Spark 20C to iPhone XS/11 | Dr.fone
- Hacks to do pokemon go trainer battles For OnePlus Ace 2V | Dr.fone
- In 2024, How to Unlock Apple iPhone 12 mini?
- How to Change Netflix Location to Get More Country Version On Xiaomi 14 Ultra | Dr.fone
- How to Show Wi-Fi Password on Vivo S18 Pro
- How to Unlock iPhone 13 mini With an Apple Watch & What to Do if It Doesnt Work
- In 2024, Can I use iTools gpx file to catch the rare Pokemon On Lava Blaze 2 5G | Dr.fone
- 3 Ways to Unlock Apple iPhone 6s without Passcode or Face ID | Dr.fone
- Top 6 Apps/Services to Trace Any OnePlus 11R Location By Mobile Number | Dr.fone
- How to Share Location in Messenger On Motorola Moto G24? | Dr.fone
- Edit and Send Fake Location on Telegram For your Infinix Smart 7 HD in 3 Ways | Dr.fone
- Device unlock Vivo Y36
- In 2024, Reset iTunes Backup Password Of iPhone 13 Pro Prevention & Solution | Dr.fone
- In 2024, Rootjunky APK To Bypass Google FRP Lock For Nubia Red Magic 8S Pro+
- How to Fake GPS on Android without Mock Location For your Oppo A2 | Dr.fone
- 10 Easy-to-Use FRP Bypass Tools for Unlocking Google Accounts On Itel S23
- In 2024, Can I Remove the Apple Watch Activation Lock By iPhone XS Max without the Previous Owner?
- In 2024, How to Unlock Verizon Apple iPhone 11 Pro Max
- This is how you can recover deleted pictures from X50i+.
- In 2024, How To Reset the Security Questions of Your Apple ID From Your iPhone 6s
- Authentication Error Occurred on Itel P55 5G? Here Are 10 Proven Fixes | Dr.fone
- In 2024, Best Anti Tracker Software For Oppo A2 | Dr.fone
- Top 4 Android System Repair Software for Vivo Y100i Power 5G Bricked Devices | Dr.fone
- In 2024, How to Sign Out of Apple ID From Apple iPhone XR without Password?
- 2024 Approved Exploring The Best Text-to-Speech Online Tools To Use
- How to Unlock Infinix Hot 30i Phone without Google Account?
- In 2024, 3 Facts You Need to Know about Screen Mirroring Vivo V30 | Dr.fone
- Title: Updated Which 10 Best Video Editing Online Makers Is Worth Your Attention for 2024
- Author: Chloe
- Created at : 2024-04-24 07:08:40
- Updated at : 2024-04-25 07:08:40
- Link: https://ai-editing-video.techidaily.com/updated-which-10-best-video-editing-online-makers-is-worth-your-attention-for-2024/
- License: This work is licensed under CC BY-NC-SA 4.0.
