
:max_bytes(150000):strip_icc():format(webp)/zenbook-17-fold-oled-72de5601b7334834a2962b7a8c7b4e9b-16fb2ba97f414911a71ffd37c82c541e.png)
Updated Wondering How to Stand Out with Your Adobe Slideshow Presentation? Follow the Given Discussion to Learn All About the Easiest Ways of Making a Slideshow at Adobe
Wondering How to Stand Out with Your Adobe Slideshow Presentation? Follow the Given Discussion to Learn All About the Easiest Ways of Making a Slideshow at Adobe
How to Create a Adobe Slideshow the Easy Way
An easy yet powerful editor
Numerous effects to choose from
Detailed tutorials provided by the official channel
Adobe has always been the best tool for any and every purpose. Be it making videos, editing pictures or making the best slideshows; Adobe can assist you for all the purposes. In this discussion, we will be covering the topics about the aspect of creating an adobe acrobat slideshow in the simplest ways.
In this article
01 [Which Adobe Program is Best for Slideshows?](#Part 1)
02 [How to Create an Adobe Slideshow](#Part 2)
03 [How Do I Make a Slideshow with Music in Adobe?](#Part 3)
Part 1 Which Adobe Program is Best for Slideshows?
Most optimal way possible! So, you might ask, which is the best Adobe program for adobe acrobat slideshow? The best adobe program for this purpose is Adobe Premiere Rush. It has the features for transforming the pictures into some of the most incredible slideshow-type videos. And suppose you want to add and use more fascinating features. In that case, you can readily switch to the paid version, Adobe Premiere Rush Pro, for better features and tools for making your images into slideshow videos.
There are many reasons for it being the ideal program for best slideshows, and the reasons are as follows.
● Easy process for converting images into slideshows
The quality of the slideshows you can create using Adobe Premiere Rush will be among the best. But that does not mean the process of creating the slideshows; you have to undergo some complicated steps. The process is straightforward for converting the images into slideshow-type videos through this Adobe program.
● Use in any device you prefer
No matter which device you use, it can be an Android phone, an iOS device, to any desktop. This Adobe program is compatible with any device, so you need not own any specific device to use it. You can access and use any device you prefer and are comfortable with to make the best slideshows using the Adobe Premiere Rush.

● Most precise edits
You can edit each image at a time and edit its duration individually. Also, this Adobe program allows you to make the most precise edits on the desktop. You can change the duration, effects, filters and properties of the images one at a time or many at once with Adobe Premiere Rush.

● Most fantastic use of motion for your slideshows
With Adobe Premiere Rush, you can integrate images alongside as well as on top of the motion footage. Thus, helping you make the most incredible and incomparable adobe photo slideshow.

Part 2 How to Create an Adobe Slideshow
Now that you know the best program of Adobe to create a slideshow, you must know the steps for it as well. So, we will now be continuing the discussion with the steps for making the best and the most incredible slideshow with Adobe.
The steps are as follows.
01Step 1: Download and launch
The first step for it is to download the Adobe program with which you would make the slideshow. There are no charges required for downloading and installing it, as there are free versions available for every Adobe Program. However, you can readily opt for downloading and installing the paid version. Then, after downloading the program, launch or install it on your preferred device.

02Step 2: New Project
On the “Home Screen”, create a “New Project”. It will be like our canvas to put in the images and turn them into some majestic slideshows that you would make.

03Step 3: Locate your device
Open the “Media Browser”. In the “Media Browser”, you will have to locate your device, or more specifically, your phone. It is for importing the images from that device that you will use to make the slideshows.

04Step 4: Import images
After you locate your phone, select and import all the images you want to use in your slideshow.

05Step 5: Make your “Timeline”
You will find the option of “Create”. Click on it and ad the selected images to your newly formed timeline for your slideshow.

06Step 6: Edit the clips and images
Now, arrange and rearrange the order of the photos according to your preference. The drag and drop option make it effortless for you to rearrange the images in sequence on your timeline. You can change the properties of your pictures if you like and add filters to them to make them look more enhanced. You can also trim the clips according to the duration you would want each image to stay on the slideshow.

07Step 7: Add Transitional effects
Use the numerous transition effects available in the Adobe program. Add them to your slideshow and make them look for majestic than ever.

08Step 8: Share or import
After you are done and are satisfied with the end video, you can use the “Share” option to share it on social media platforms or import the film to your preferred folder for later purposes.
These were the steps for using the Adobe program to make images into a slideshow. Suppose you forget to add one or more images to your slideshow and want to add them, you can readily use the “Add Media” option and the plus-shaped tool to add the pictures to your timeline.
We had mentioned that Adobe Premiere Rush is the best Adeb program for making slideshows. However, you can also use the steps mentioned above to make Adobe spark slideshow.

Part 3 How Do I Make a Slideshow with Music in Adobe?
To make your slideshows a notch higher than the best slideshows, you can add some music pr audio files. It is an excellent way of making your slideshows more engaging and exciting. You can use adobe slideshow creator to add music to your slideshows. And the steps are effortless.
Follow the steps mentioned above for making the slideshow. Remember to stop before saving the file, importing and sharing the file before it, access your media, and add the audio files or music that you would like in your slideshows. You can even use any pre-recorded audio for your slideshow.
You can add more than one audio file and manage the duration by clipping and trimming the duration of the audio. It will make your slideshow stand out as one of the unique and most inimitably engaging ones among the rest.

Now that you know how to make the best slideshows using Adobe programs, we will introduce a video editing tool that can help you make equally fantastic and inimitable quality slideshows. The tool is Wondershare Filmora Video Editor , and it has been the best and the most efficient video editing tool.
It has loads of features that can suffice any and every purpose of editing to make your slideshow videos of the most excellent quality. Let us know what the characteristics of Filmora are that make it the best video editing tool.
For Win 7 or later (64-bit)
For macOS 10.12 or later
Effortless steps for editing
One need not have any previous technical expertise or experience using this tool. The steps for editing with Filmora are simple and effortless. You can also take help from the community of Filmora, which is highly responsible and responsive.
Uncountable effects to add to your videos.
There are 800 and more effects in Filmora that you can readily add to your images and videos for editing. And it will make your slideshows look more enhanced, of the best quality and the most engaging.
No restrictions on formats
You can readily import the files and export them in any form, no matter which format it is. So, whether it is an audio, video or any other file format, import it to Filmora and make the best slideshow videos with them.
Then, import them to your preferred file location in the format you like. It can be audio, video or any other form.
There are unending features of Filmora that make it the best video editing tool. You can use the free version. Or, even opt for the paid version if you want to access even the more enhanced and advanced tools and features for editing.
● Ending Thoughts →
● So, now you know how to make the best slideshows with images and add audio to make them more excellent.
● You can use the Adobe Premiere Rush for the best experience, and you can use your slides to make the best adobe portfolio slideshow or any other purpose.
● You can also use Filmora and its incredible features to create and edit the most fascinating and engaging slideshow videos.
● So, bring out your creativity skills and make the most fantastic slideshows with images and audio!
Adobe has always been the best tool for any and every purpose. Be it making videos, editing pictures or making the best slideshows; Adobe can assist you for all the purposes. In this discussion, we will be covering the topics about the aspect of creating an adobe acrobat slideshow in the simplest ways.
In this article
01 [Which Adobe Program is Best for Slideshows?](#Part 1)
02 [How to Create an Adobe Slideshow](#Part 2)
03 [How Do I Make a Slideshow with Music in Adobe?](#Part 3)
Part 1 Which Adobe Program is Best for Slideshows?
Most optimal way possible! So, you might ask, which is the best Adobe program for adobe acrobat slideshow? The best adobe program for this purpose is Adobe Premiere Rush. It has the features for transforming the pictures into some of the most incredible slideshow-type videos. And suppose you want to add and use more fascinating features. In that case, you can readily switch to the paid version, Adobe Premiere Rush Pro, for better features and tools for making your images into slideshow videos.
There are many reasons for it being the ideal program for best slideshows, and the reasons are as follows.
● Easy process for converting images into slideshows
The quality of the slideshows you can create using Adobe Premiere Rush will be among the best. But that does not mean the process of creating the slideshows; you have to undergo some complicated steps. The process is straightforward for converting the images into slideshow-type videos through this Adobe program.
● Use in any device you prefer
No matter which device you use, it can be an Android phone, an iOS device, to any desktop. This Adobe program is compatible with any device, so you need not own any specific device to use it. You can access and use any device you prefer and are comfortable with to make the best slideshows using the Adobe Premiere Rush.
● Most precise edits
You can edit each image at a time and edit its duration individually. Also, this Adobe program allows you to make the most precise edits on the desktop. You can change the duration, effects, filters and properties of the images one at a time or many at once with Adobe Premiere Rush.
● Most fantastic use of motion for your slideshows
With Adobe Premiere Rush, you can integrate images alongside as well as on top of the motion footage. Thus, helping you make the most incredible and incomparable adobe photo slideshow.
Part 2 How to Create an Adobe Slideshow
Now that you know the best program of Adobe to create a slideshow, you must know the steps for it as well. So, we will now be continuing the discussion with the steps for making the best and the most incredible slideshow with Adobe.
The steps are as follows.
01Step 1: Download and launch
The first step for it is to download the Adobe program with which you would make the slideshow. There are no charges required for downloading and installing it, as there are free versions available for every Adobe Program. However, you can readily opt for downloading and installing the paid version. Then, after downloading the program, launch or install it on your preferred device.
02Step 2: New Project
On the “Home Screen”, create a “New Project”. It will be like our canvas to put in the images and turn them into some majestic slideshows that you would make.
03Step 3: Locate your device
Open the “Media Browser”. In the “Media Browser”, you will have to locate your device, or more specifically, your phone. It is for importing the images from that device that you will use to make the slideshows.
04Step 4: Import images
After you locate your phone, select and import all the images you want to use in your slideshow.
05Step 5: Make your “Timeline”
You will find the option of “Create”. Click on it and ad the selected images to your newly formed timeline for your slideshow.
06Step 6: Edit the clips and images
Now, arrange and rearrange the order of the photos according to your preference. The drag and drop option make it effortless for you to rearrange the images in sequence on your timeline. You can change the properties of your pictures if you like and add filters to them to make them look more enhanced. You can also trim the clips according to the duration you would want each image to stay on the slideshow.
07Step 7: Add Transitional effects
Use the numerous transition effects available in the Adobe program. Add them to your slideshow and make them look for majestic than ever.
08Step 8: Share or import
After you are done and are satisfied with the end video, you can use the “Share” option to share it on social media platforms or import the film to your preferred folder for later purposes.
These were the steps for using the Adobe program to make images into a slideshow. Suppose you forget to add one or more images to your slideshow and want to add them, you can readily use the “Add Media” option and the plus-shaped tool to add the pictures to your timeline.
We had mentioned that Adobe Premiere Rush is the best Adeb program for making slideshows. However, you can also use the steps mentioned above to make Adobe spark slideshow.
Part 3 How Do I Make a Slideshow with Music in Adobe?
To make your slideshows a notch higher than the best slideshows, you can add some music pr audio files. It is an excellent way of making your slideshows more engaging and exciting. You can use adobe slideshow creator to add music to your slideshows. And the steps are effortless.
Follow the steps mentioned above for making the slideshow. Remember to stop before saving the file, importing and sharing the file before it, access your media, and add the audio files or music that you would like in your slideshows. You can even use any pre-recorded audio for your slideshow.
You can add more than one audio file and manage the duration by clipping and trimming the duration of the audio. It will make your slideshow stand out as one of the unique and most inimitably engaging ones among the rest.
Now that you know how to make the best slideshows using Adobe programs, we will introduce a video editing tool that can help you make equally fantastic and inimitable quality slideshows. The tool is Wondershare Filmora Video Editor , and it has been the best and the most efficient video editing tool.
It has loads of features that can suffice any and every purpose of editing to make your slideshow videos of the most excellent quality. Let us know what the characteristics of Filmora are that make it the best video editing tool.
For Win 7 or later (64-bit)
For macOS 10.12 or later
Effortless steps for editing
One need not have any previous technical expertise or experience using this tool. The steps for editing with Filmora are simple and effortless. You can also take help from the community of Filmora, which is highly responsible and responsive.
Uncountable effects to add to your videos.
There are 800 and more effects in Filmora that you can readily add to your images and videos for editing. And it will make your slideshows look more enhanced, of the best quality and the most engaging.
No restrictions on formats
You can readily import the files and export them in any form, no matter which format it is. So, whether it is an audio, video or any other file format, import it to Filmora and make the best slideshow videos with them.
Then, import them to your preferred file location in the format you like. It can be audio, video or any other form.
There are unending features of Filmora that make it the best video editing tool. You can use the free version. Or, even opt for the paid version if you want to access even the more enhanced and advanced tools and features for editing.
● Ending Thoughts →
● So, now you know how to make the best slideshows with images and add audio to make them more excellent.
● You can use the Adobe Premiere Rush for the best experience, and you can use your slides to make the best adobe portfolio slideshow or any other purpose.
● You can also use Filmora and its incredible features to create and edit the most fascinating and engaging slideshow videos.
● So, bring out your creativity skills and make the most fantastic slideshows with images and audio!
10 Catchy Pixel Art Wallpapers and How to Custom Your Own
Versatile Video Editor - Wondershare Filmora
An easy yet powerful editor
Numerous effects to choose from
Detailed tutorials provided by the official channel
Pixel art is digital art created through computer software. In this digital art, images are edited on a pixel level. This gives the kind of aesthetic from computer video games using 8-bit and 16-bit technology. In general, this art uses very few color palettes, with some using only two.
The history of pixel art goes back to the 1930s with the monochromatic light bulb displays in New York City.
Pixel art tries to mimic the features of old video game graphics done by computers that were only able to display a few colors at once.
Digital pixel art evolved in such a way that artists are now dedicated to that art, and so create beautiful pixel art wallpapers that we’ll show you in this article.
In this article
01 Where to Look for Pixel Art Wallpapers?
02 10 Attractive Pixel Art Wallpapers Perfect for PC and Mobile
03 How to Customize Your Own Pixel Art Wallpapers
04 How to Make a Pixel Art Wallpaper Gif
Part 1: Where to Look for Pixel Art Wallpapers [for PC and Mobile]
1. alphacoders.com
In Wall.aphacoders you can find more than 900 thousand wallpapers of pixel art wallpapers for every taste. From video game wallpapers to movies and tv shows.
2. Wallpapercave.com
On this easy-to-use website, all you have to do is type what pixel art wallpaper you are looking for on the search bar. In addition, there is a trending section that will guide you through the most popular wallpapers on the website, as well as feature desktop wallpapers.
3. Wallpaperaccess.com [for Mobile]
This website specializes in mobile wallpapers. You can find the latest trending wallpapers. With a large pixel art wallpaper gallery, wallpaperaccess is one of the top wallpaper websites around. It has a search bar at the top to help you navigate the different wallpapers, or you can just scroll down and see trending wallpapers.
Part 2: 10 Attractive Pixel Art Wallpapers Perfect for PC and Mobile
Note: The following images are all from the internet.
1. Modern City
In this pixel art, 4k wallpaper depicts a modern city crossed by a river under an orange sky. It has a color palette ranging from dark gray to light gray and other tones of orange.
![]()
2. The Rainy Night
This is a GIF pixel art wallpaper for mobile. It depicts a town and a street crossing it over. In the background, we can see a bigger city under a starry night. The moving part of the GIF pixel art wallpaper is the continuous rain.
![]()
3. The Forest
In this artistic wallpaper, we have a forest background, seeing it through a margin of a river that crosses it. A fallen log serves as a bridge to cross the river. A deer is standing on the other side under large trees.
![]()
4. The Farm
In this retro wallpaper pixel art, we can see a farm over an orange background. Next to it is a graduation tower—the tones on this wallpaper range from orange to red and brown.
![]()
5. The Sunset City
In this mobile animated pixel art wallpaper, we have the backdrop of a modern city. Tall buildings connected with a bridge can be seen as well as a sun setting that gives the sky tones ranging from purple to light orange.
![]()
6. The Night City
In this mobile pixel art wallpaper, we have a very low palette of colors. It ranges from blue to orange tones. It is a closed street in a city. A person is on the balcony outside.
![]()
7. The Spaceship
In this space-inspired pixel art wallpaper, we can see a spaceship with six people, two onboard, commanding it. One is fixing the spaceship; one is resting on the back, one on top scouting, one on the edging reaching for another in open space. There is also a dog on top of the spaceship and an alien-like creature in open space.
![]()
8. The Old Tree
In this pixel art wallpaper, we have a huge old tree that served as a refuge for passersby. It has a broken wood ladder and a wooden floor on an opening on the tree. The tree is inside a river, and a boat is moored next to it. Two birds rest on rocks on the margin, and we have the perspective behind the birds.
![]()
9. The Broken Earth
In this pixel art wallpaper, we have the planet earth floating in space. One part of the planet is broken and floating away. This pixel art wallpaper uses a black background, as well as blue, green and several tones of blue to make the oceans.
![]()
10. The Airport
In this pixel art wallpaper, we have an airport terminal. We can see a plane landing on the course—workers pulling carts of baggage and other vehicles belonging to that setting. The sun is almost set, and so there is an orange sky above, as well as orange lights.
![]()
Part 3: How to Customize Your Own Pixel Art Wallpapers
It is easy to create your own pixel art wallpapers. There are many free online applications that you can use. For example, Aseprite.
Step 1: Download Aseprite and open.
Step 2: You have tools on the right, click on it and choose the pencil icon, or press “B”. Just click on the left button of your mouse and draw. Left-click to erase it.
Step 3: To change the size of the line, go to the upper menu and type in the size you want by hovering on the search bar.
Step 4: You can also change the size of your brush. Simple go to the upper menu and choose the brush icon. There you have many shapes to choose from.
Step 5: You can choose the color pallet you want to use on your pixel art wallpaper on the left-hand side of the screen.
Step 6: These are the basic tools to start drawing your wallpapers. To save and export your pixel art wallpaper, go to “File” and click on “Export”.
Part 4: How to Make a Pixel Art Wallpaper Gif
Filmora is a video editing software tool focused on editing and making high-quality videos. It supports 4K videos and the latest technologies in that sector. Filmora is also able to create pixel art Gifs, as we will explain below.
Wondershare Filmora
Get started easily with Filmora’s powerful performance, intuitive interface, and countless effects!
Try It Free Try It Free Try It Free Learn More >

Step 1: You can drag and drop your video onto a timeline to better use the editing tools and operate on this file.
Step 2: Once you have your video imported and on the timeline, you can start editing it. Filmora uses all the basic and advanced tools like split, rotate, crop, combine, speed up, speed down, and more.
Step 3: You can also add text, elements, and pixelated effects to your video. It helps explain and add information when editing the video.
Step 4: After you’ve gone through all the steps above, you can export your .gif file. Filmora is linked to the most popular social media platforms, so it is easy for you to share it. To export, go to “File” and click on “Export”. Change the settings as you desire and export your pixel art wallpaper.
Conclusion
Although pixel art is a sort of new art, it is already rich with many artists and people interested in it. It has evolved over the years with the advance of technology, and it has become more complex, even though one of its characteristics is to look dated. This article gives you examples of the different pixel art wallpapers for your computer or mobile phone and how to create your own pixel art wallpapers.
Pixel art is digital art created through computer software. In this digital art, images are edited on a pixel level. This gives the kind of aesthetic from computer video games using 8-bit and 16-bit technology. In general, this art uses very few color palettes, with some using only two.
The history of pixel art goes back to the 1930s with the monochromatic light bulb displays in New York City.
Pixel art tries to mimic the features of old video game graphics done by computers that were only able to display a few colors at once.
Digital pixel art evolved in such a way that artists are now dedicated to that art, and so create beautiful pixel art wallpapers that we’ll show you in this article.
In this article
01 Where to Look for Pixel Art Wallpapers?
02 10 Attractive Pixel Art Wallpapers Perfect for PC and Mobile
03 How to Customize Your Own Pixel Art Wallpapers
04 How to Make a Pixel Art Wallpaper Gif
Part 1: Where to Look for Pixel Art Wallpapers [for PC and Mobile]
1. alphacoders.com
In Wall.aphacoders you can find more than 900 thousand wallpapers of pixel art wallpapers for every taste. From video game wallpapers to movies and tv shows.
2. Wallpapercave.com
On this easy-to-use website, all you have to do is type what pixel art wallpaper you are looking for on the search bar. In addition, there is a trending section that will guide you through the most popular wallpapers on the website, as well as feature desktop wallpapers.
3. Wallpaperaccess.com [for Mobile]
This website specializes in mobile wallpapers. You can find the latest trending wallpapers. With a large pixel art wallpaper gallery, wallpaperaccess is one of the top wallpaper websites around. It has a search bar at the top to help you navigate the different wallpapers, or you can just scroll down and see trending wallpapers.
Part 2: 10 Attractive Pixel Art Wallpapers Perfect for PC and Mobile
Note: The following images are all from the internet.
1. Modern City
In this pixel art, 4k wallpaper depicts a modern city crossed by a river under an orange sky. It has a color palette ranging from dark gray to light gray and other tones of orange.
![]()
2. The Rainy Night
This is a GIF pixel art wallpaper for mobile. It depicts a town and a street crossing it over. In the background, we can see a bigger city under a starry night. The moving part of the GIF pixel art wallpaper is the continuous rain.
![]()
3. The Forest
In this artistic wallpaper, we have a forest background, seeing it through a margin of a river that crosses it. A fallen log serves as a bridge to cross the river. A deer is standing on the other side under large trees.
![]()
4. The Farm
In this retro wallpaper pixel art, we can see a farm over an orange background. Next to it is a graduation tower—the tones on this wallpaper range from orange to red and brown.
![]()
5. The Sunset City
In this mobile animated pixel art wallpaper, we have the backdrop of a modern city. Tall buildings connected with a bridge can be seen as well as a sun setting that gives the sky tones ranging from purple to light orange.
![]()
6. The Night City
In this mobile pixel art wallpaper, we have a very low palette of colors. It ranges from blue to orange tones. It is a closed street in a city. A person is on the balcony outside.
![]()
7. The Spaceship
In this space-inspired pixel art wallpaper, we can see a spaceship with six people, two onboard, commanding it. One is fixing the spaceship; one is resting on the back, one on top scouting, one on the edging reaching for another in open space. There is also a dog on top of the spaceship and an alien-like creature in open space.
![]()
8. The Old Tree
In this pixel art wallpaper, we have a huge old tree that served as a refuge for passersby. It has a broken wood ladder and a wooden floor on an opening on the tree. The tree is inside a river, and a boat is moored next to it. Two birds rest on rocks on the margin, and we have the perspective behind the birds.
![]()
9. The Broken Earth
In this pixel art wallpaper, we have the planet earth floating in space. One part of the planet is broken and floating away. This pixel art wallpaper uses a black background, as well as blue, green and several tones of blue to make the oceans.
![]()
10. The Airport
In this pixel art wallpaper, we have an airport terminal. We can see a plane landing on the course—workers pulling carts of baggage and other vehicles belonging to that setting. The sun is almost set, and so there is an orange sky above, as well as orange lights.
![]()
Part 3: How to Customize Your Own Pixel Art Wallpapers
It is easy to create your own pixel art wallpapers. There are many free online applications that you can use. For example, Aseprite.
Step 1: Download Aseprite and open.
Step 2: You have tools on the right, click on it and choose the pencil icon, or press “B”. Just click on the left button of your mouse and draw. Left-click to erase it.
Step 3: To change the size of the line, go to the upper menu and type in the size you want by hovering on the search bar.
Step 4: You can also change the size of your brush. Simple go to the upper menu and choose the brush icon. There you have many shapes to choose from.
Step 5: You can choose the color pallet you want to use on your pixel art wallpaper on the left-hand side of the screen.
Step 6: These are the basic tools to start drawing your wallpapers. To save and export your pixel art wallpaper, go to “File” and click on “Export”.
Part 4: How to Make a Pixel Art Wallpaper Gif
Filmora is a video editing software tool focused on editing and making high-quality videos. It supports 4K videos and the latest technologies in that sector. Filmora is also able to create pixel art Gifs, as we will explain below.
Wondershare Filmora
Get started easily with Filmora’s powerful performance, intuitive interface, and countless effects!
Try It Free Try It Free Try It Free Learn More >
Step 1: You can drag and drop your video onto a timeline to better use the editing tools and operate on this file.
Step 2: Once you have your video imported and on the timeline, you can start editing it. Filmora uses all the basic and advanced tools like split, rotate, crop, combine, speed up, speed down, and more.
Step 3: You can also add text, elements, and pixelated effects to your video. It helps explain and add information when editing the video.
Step 4: After you’ve gone through all the steps above, you can export your .gif file. Filmora is linked to the most popular social media platforms, so it is easy for you to share it. To export, go to “File” and click on “Export”. Change the settings as you desire and export your pixel art wallpaper.
Conclusion
Although pixel art is a sort of new art, it is already rich with many artists and people interested in it. It has evolved over the years with the advance of technology, and it has become more complex, even though one of its characteristics is to look dated. This article gives you examples of the different pixel art wallpapers for your computer or mobile phone and how to create your own pixel art wallpapers.
Windows Movie Maker Review
Are you considering creating impressive movies from your video clips? Then you need to install this famous Windows movie maker tool to fulfill your job. This is expert video editing Microsoft software that you may use for free. This video editing tool by Windows has received massive recognition due to its simplicity. Also, it makes every task easy and quick, like combining video clips to form digital movies, including various effects, background music, transitions, and titles.
So, Windows Movie Maker is undoubtedly the ideal software for this job. Moreover, video editors using this app experience several attributes in their organization to finally emerge with the perfect videos, like audio options, animations, transitions overlays, and timeline narration. It has user-friendly features, which you’ll enjoy experimenting with. This software also has XML code allowing its end users to modify live effects and transitions or even prepare very new ones.
This brilliant tool can even do primary track editing, including fade-out and fade-in effects in your final audio tracks. Windows movie maker even allows you to post your final project effortlessly on various video sites and social media platforms. Here’s a complete guide:
1. Download and Install Windows Movie Maker
Windows movie maker was previously recognized in Windows 7 as Windows Live Movie Maker. So to experience the features of this software, first, you need to download and install this app which is available free of charge. The steps are as follows.
- Firstly, download the setup file of Windows Live Essentials.
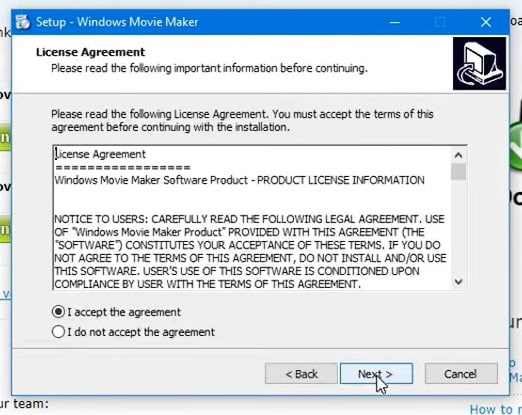
- You’ve to double-click on this setup file called windows-movie-maker.exe. Then tap on ‘Yes’ to permit the setup package to function.
- You’ll now be redirected to the installation window of Windows Essential. Next, you’ll see two options towards the web page’s top, and you’ll have to select the option ‘Install all of Windows Essentials (recommended)’ to continue with the installation process.
Windows Essentials comprise Microsoft OneDrive, Outlook Connector Pack, Movie Maker, Writer, Mail, Photo Gallery, and Messenger.
- Locate ‘View Details’ towards the left end of the page and tap on it. A progress and percentage bar will pop out along with the details regarding the program you’re installing.
- You need to wait a while to install Windows Movie Maker Software. Pause until the program completes its installation. After you find that the program title changes to another program such as Mail, you may proceed again.
- Now click on the Windows icon and then the ‘Start’ menu on the bottom left of your computer screen.
- Type and Search for ‘Windows Movie Maker, and you’ll find the newly downloaded app on the screen.
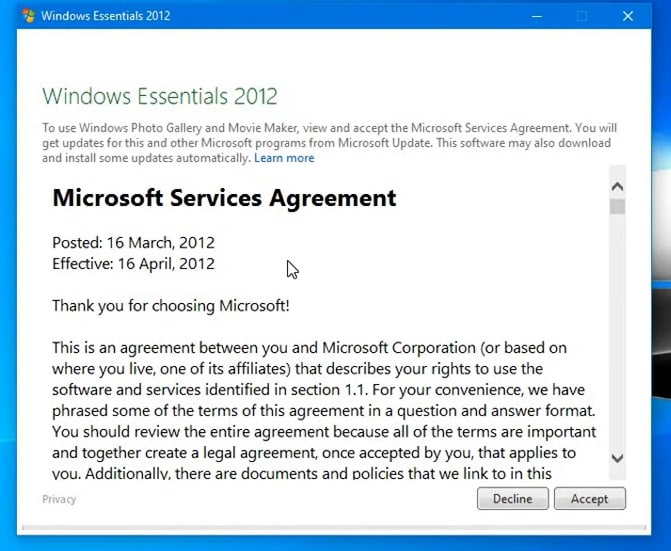
- Click on the icon with film reel, which is the Movie Maker app, and you’ll locate it above the Start menu. Next, you’ll be redirected to the terms of use of Windows Essentials for this Window to begin.
- Find the ‘Accept ‘ button towards the screen’s right-end corner and tap on it. Windows Movie Maker will now open.
- Next, tap on ‘Close’ when prompted with an error message from the installation windows.
You may now Enjoy Windows Movie Maker Live and begin making movies and videos using this software.
2. Interface
The user interface of Winona Movie Maker has three essential areas: the timeline and the storyboard, the panes and the toolbar, and the menu bar. This area covers…
- Timeline and storyboard: It offers a timeline and storyboard usage details for working with the current project clips.
- Panes: It offers details regarding Collections pane usage for viewing all your collections. Furthermore, it offers information regarding the Movie Task pane for all general tasks during movie making or project editing.
- Toolbar and Menubar: Here, you’ll get details regarding toolbar and menu commands usage for different tasks in this software.
3. Basic Editing
Adding clips to your timeline is the most straightforward method for creating digital movies using Movie Maker. Thereby, picking any one AutoMovie Themes out of those seven choices from default, sepia, black and white, pan and zoom, fade, cinematic, and contemporary.
You can enjoy the following choices for editing all your video clips:
- Creating clips: You may create new clips from different video clips after you’re done with capturing and importing in the Windows Movie Maker. You may create clips in the software anytime, according to your convenience.
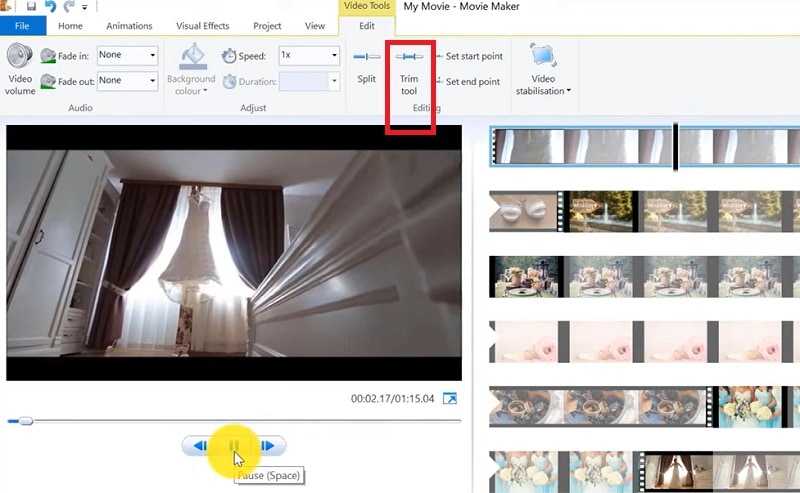
- Trimming any clip: You may hide any clip part you don’t wish to keep in the project. For instance, you may trim the clip’s end or beginning. Also, trimming doesn’t erase the details provided in their source material.
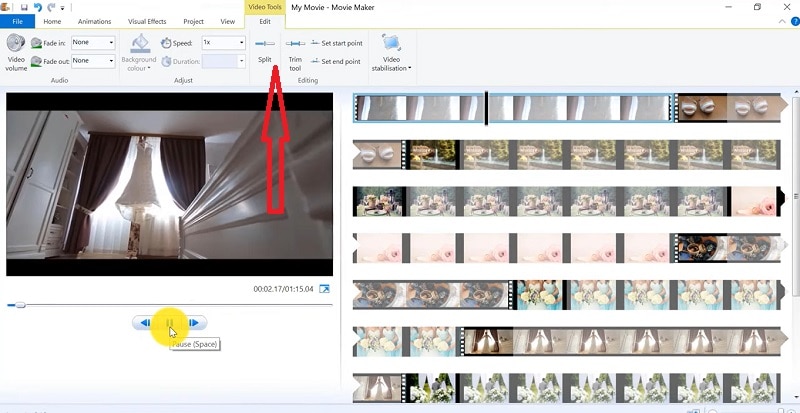
- Splitting Clips: Movie Maker allows you to split any video into two parts which can be helpful when you wish to add a video transition picture between the clips.
- Combining clips: Movie Maker allows you to merge two or multiple contiguous clips. Contiguous indicates that you need to record these clips together so that the beginning and end times are the same as the following video clip.
4. Add Video Effects
Video effects’ ascertain how any title, picture, or video clip displays in the final movie or project. Video effects permit you to include various effects in the movie and are added for the total time that the title, picture, or video clip displays.
Furthermore, you may add various other effects, which you’ll find in the folder of video effects in their Collections pane. You may maintain video effects when moving, copying, cutting, or splitting a picture or video clip.
5. Audio Editing
Windows Movie Maker permits you to operate various audios in several ways. A few specific audio-related jobs you may execute in Windows Movie Live Maker comprise the following:
- Audio levels adjustment: You can adjust your audio level so that you can easily control the audio playback and balance after you have the audio that comes up on Music/ Audio and Audio tracks in your timeline.
- Timeline narration: You may include a voice narration for the picture or video clips, which will appear on the timeline’s video track. There’ll be an automated synchronization of the audio narration with your video, where the narration shall elaborate on the movie event or action when you play it.
- Audio Clips Volume adjustment: You may adjust the audio volume for the video clip’s audio portion or the clips containing only audio. This permits you to control the audio clip’s volume such that you can hear it based on the sound level you’ve set for your audio clip.
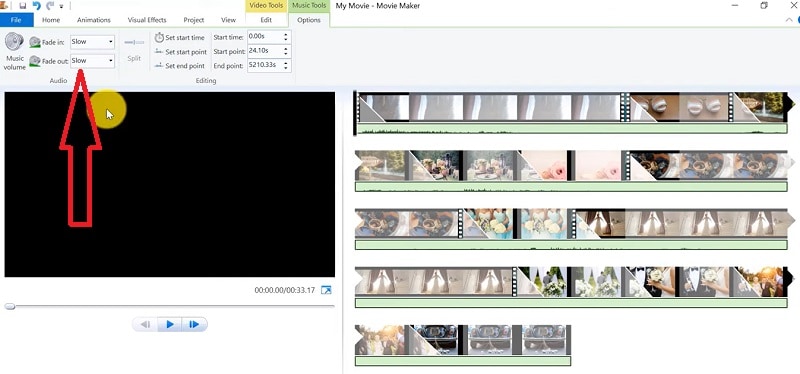
- Adding audio effects: You may add various audio effects like mute, fade out and fade in.
6. Share Files
Are you done with video project editing, and now you wish to share it? Windows Movie Maker offers you various choices for sharing straight away from their app, comprising:
- YouTube
- Vimeo
So with this power, you may guarantee to share the video’s correct aspect ratio and size version to any planned platform. Nevertheless, you don’t require signing in to your Microsoft account for sharing to the preferred platform, which may act as a hurdle for all its users who do not have Microsoft Office accounts.
7. Pros and Cons
The software’s advantages are its automated preview, simple controls, and user-friendliness. Additionally, the following are some clear advantages and disadvantages of using Windows Movie Maker:
Pros
- This app is perfect for all novices and is an ideal introduction as it utilizes several pro editing systems’ general workflow components like assembling timelines and importing. Its interface has easy navigation and is exceptionally intuitive for most new beginners as well.
- Windows Live MovieMaker is a video editing Microsoft application that arrives standard with all Windows computers. It is amongst the most favorite editing apps obtainable and exact, as other programs are user-friendly and fun. This software comes free with Vista, XP, and Windows Me and has effortless usage. Moreover, you may download additional video plugins, plus it won’t give you any chance to complain regarding its free software.
- This app is straightforward to learn, and you won’t require any experience in film editing for using Windows Media Player. You’ll explore more than 130 effects with accessible Fantastic credits, titles, and transitions. Next to this, you may drag and then drop the clip at any place in the timeline.
- Windows Movie Maker is an ideal app for image slide shows and was developed to create photo and home movie slide shows. It presents excellent fun transitions and themes; you may add music easily. This app provides excellent variety, being a free editing application. Furthermore, it offers transitions and striking effects to function with.
- Windows Live Movie Maker is free of cost for all Microsoft Windows users and is basically for clients having zero to minimum experience editing audio and videos. Moreover, it has many special effects you may use while creating videos. Also, you may frag and then place any picture or video anywhere you wish to see it.
- You can choose from several themes, enhancing your film with tools like contemporary themes, fade effects, and sepia toning choices. You have to click once, and then the users can choose and apply from the multiple effects collection.
Cons
- Windows Movie Maker contains unlimited audio and video tracks, yet it provides just one accessible one at a time. Hence, if you wish to include some other audio or music track, you may prepare the video, thereby sending it to the ultimate file.
- It isn’t uninstallable using any remove or add control panel. Also, it is impossible to do video overlaying.
- This app requires much patience because it is prone to crashes. Moreover, you’ll require enough time and effort to do video reversing. It often becomes frustrating for all advanced editors to cut clips into small parts and then add them back. Hence, Windows Movie maker isn’t good for professional video editors.
- Windows Live MovieMaker can crash and freeze and is known to suffer frequent crashes. Hence, ensure saving often and avoid creating complex videos. Also, you cannot perform complex editing and can now prepare single audio and video track.
8. Windows Movie Maker Alternative Software
Wondershare Filmora Video Editor is the best alternative for Windows Movie Live Maker and is a highly favored and most effective software program. You can download it for free, and it is adaptable with Windows 7 OS or above. This app is user-friendly but powerful and allows you to split, merge, crop, and trip various video clips with essential built-in video editing attributes.
Free Download For Win 7 or later(64-bit)
Free Download For macOS 10.14 or later
Additionally, you may get a few advanced properties like video stabilization, color correction, and green screen in Filmora effortlessly. You may even explore several fashionable and modern video effects such as music, text, and intros for topics like games, Education, Travel, Vlogger, Beauty, etc. Here is the comparison between the two software:
Filmora and Windows Movie Maker comparison
| Basis | Windows Movie Maker | Wondershare Filmora |
|---|---|---|
| Pricing | Free/ inexpensive | Quote basedAnnual SubscriptionOne-time paymentMonthly Payment |
| Interface | Pleasing interface | Auto movie options |
| Effects | Several overlays and effects | Special effects choices and transition overlays |
| Integration | YouTubeFacebookVimeoEmail | TwitterInstagramFacebookVimeoYouTube |
Conclusion
You may use Windows Movie Maker Live for capturing videos and audio to the computer using various video sources, including Web Cameras and Video Cameras, thereby using the recorded data in your new movies. You may import still pictures, video, and audio into this application to use in the movies you’re making. Moreover, after you’ve finished with video and audio content editing in this app, which may involve adding effects, video transitions, and titles, you may finally save the ultimate movie and then share and watch it with your family and friends.
Also read:
- Updated The Article Introduces Three Recommended Apps to Download Royalty-Free Cinematic Music and Covers an Extensive Procedure to Create a Cinematic Travel Intro for a Travel Vlog
- New 2024 Approved How To Create The Best AI Thumbnail Using The Right Tools?
- Updated In 2024, How Does Sonys S&Q Feature Help Recording Slow-Motion Video
- Updated In 2024, Overview About Supported iPhone Video Formats and Best iPhone Video Editor & Converter
- New Find Out How to Create Your Own Custom Motion Graphics in Filmora. Add Unique Objects, Manipulate Text, and Animate Anything You Want
- This Article Can Help You Know How to Crop Video in After Effects and on the Alternative by Using Wondershare Filmora. I Know that It May Seem Confusing to Compare These Two at First. But, Ill Provide an Explanation to Get the Cropped Video that You Want
- How to Make a GIF With Transparent Background, In 2024
- 8 Excellent Video and Photo Mergers on Desktop/Mobile/Online for 2024
- New Best Online GIF to Image (PNG/JPG) Converters
- 2024 Approved Many People Choose Video Editing or Post-Editing as Their Career in These Days. Is This a Good Choice? How to Start a Video Editing Career? This Article Will Tell You the Complete Details
- New AR Is a Trend These Days. Here, You Can Browse the List of Top 10 Picks for AR Video Editing Apps
- Steps to Denoise in Final Cut Pro – Reduce Video and Audio Noise for 2024
- Updated Do You Want to Remove the Unnecessary Scene From Your TikTok Video? This Article Will Help You to Adjust the Length of TikTok Clip by Providing Easy Methods
- New Do You Like Clouds or Sky and Want to Use Them as a Video Background? Explore This Article to Learn About the Sky Change Video in Filmora
- Learn How to Seamlessly Merge Audio and Video in VLC Media Player with This Easy-to-Follow Guide. Step-by-Step Instructions Are Included
- Updated 2024 Approved Adjust the TikTok Videos Length to Make Them Captivating
- New In 2024, How to Denoise in Final Cut Pro – Reduce Video and Audio Noise
- Updated 2024 Approved How to Add a Custom Transition to OBS
- 2024 Approved Are You Looking for Software to Convert Word to SRT Format? Here Is a Complete Guide About It
- Updated Ll About GIF Keyboard That You Want to Know for 2024
- New In 2024, How to Add Filter to Video Online
- Updated Are You Looking for a Voice Changer to Make Your Gaming Experience More Fun? Here Is a List of the Top 6 Best Alternatives of Clownfish Voice Changers to Use
- Want to Make a Funny Vlog on TikTok? Trying to Find the Right Topic for It? This Article Presents some Impressive Options for Making a Funny Vlog for TikTok for 2024
- How to Color Grade Your Picture in LightRoom for 2024
- 2024 Approved Explore the Advanced Tools to Help You Reshape the Art of Sky Replacement in Digital Imagery. Discover Methods to Enhance Your Visual Narratives Through AI
- Updated Ideas for Time-Lapse Video
- Make Transparent Background Video Today
- How to Windows Online Movie Maker Complete Guide for 2024
- 2024 Approved Srt File Creator
- 2024 Approved How Much Information Do You Have About MP4 Digital File Storage? Let Us Tell You More About the MP4 File Format; Get Ready to Increase Your Knowledge
- New 4 Methods to Resize a WebM File for 2024
- Guide to Making Cinematography for Music Video for 2024
- New How to Livestream Zoom on Facebook, In 2024
- Stuck at Android System Recovery Of Xiaomi Redmi 13C ? Fix It Easily | Dr.fone
- How to Unlock Apple iPhone X Online? Here are 6 Easy Ways
- In 2024, How to Make the Most of Your Apple iPhone 15 Pro Lock Screen with Notifications?
- How and Where to Find a Shiny Stone Pokémon For Vivo Y56 5G? | Dr.fone
- New 2024 Approved Best 10 Photo Animator Templates
- How to recover old messages from your Nokia 105 Classic
- In 2024, How To Unlock Any Itel P55 5G Phone Password Using Emergency Call
- In 2024, Apple ID Unlock On iPhone 13 Pro? How to Fix it?
- In 2024, Pokemon Go No GPS Signal? Heres Every Possible Solution On Huawei P60 | Dr.fone
- In 2024, Everything You Need to Know about Lock Screen Settings on your Vivo S17e
- In 2024, 3 Facts You Need to Know about Screen Mirroring Honor Magic 5 | Dr.fone
- In 2024, 15 Best Strongest Pokémon To Use in Pokémon GO PvP Leagues For Honor 100 | Dr.fone
- Possible solutions to restore deleted videos from Vivo V29
- Thinking About Changing Your Netflix Region Without a VPN On Xiaomi Redmi Note 13 Pro 5G? | Dr.fone
- The Most Effective Ways to Bypass Apple iPhone SE (2022) Activation Lock
- In 2024, How to Remove Find My iPhone without Apple ID From your iPhone 15 Pro?
- New Best YouTube Video Into Text Converters A Comprehensive Guide for 2024
- How to Resolve Realme C51 Screen Not Working | Dr.fone
- In 2024, How To Delete iCloud Account Remove Your Apple ID Permanently From Apple iPhone 13 Pro Max
- Failed to play HEVC files on Motorola Moto G14
- Updated In 2024, Live Commerce Next Chapter Can AI Unlock Its True Potential?
- In 2024, 5 Ways to Track Realme 11 5G without App | Dr.fone
- How to Change Realme C67 5G Location on Skout | Dr.fone
- In 2024, Top 15 Augmented Reality Games Like Pokémon GO To Play On Realme 11X 5G | Dr.fone
- 8 Workable Fixes to the SIM not provisioned MM#2 Error on Oppo Find N3 | Dr.fone
- In 2024, How To Unlock Any Realme Narzo 60 5G Phone Password Using Emergency Call
- Title: Updated Wondering How to Stand Out with Your Adobe Slideshow Presentation? Follow the Given Discussion to Learn All About the Easiest Ways of Making a Slideshow at Adobe
- Author: Chloe
- Created at : 2024-04-24 07:08:25
- Updated at : 2024-04-25 07:08:25
- Link: https://ai-editing-video.techidaily.com/updated-wondering-how-to-stand-out-with-your-adobe-slideshow-presentation-follow-the-given-discussion-to-learn-all-about-the-easiest-ways-of-making-a-slides/
- License: This work is licensed under CC BY-NC-SA 4.0.
