
:max_bytes(150000):strip_icc():format(webp)/GettyImages-515810476-aabe0e5a88b44bb1ae49a5bfa97bec62.jpg)
Updated YouTube Algorithm Hacks
YouTube Algorithm Hacks
Every day, more than 1 billion hours of YouTube videos are seen by users worldwide, including cat videos and videos for cats. The YouTube algorithm determines the videos YouTube recommends to its more than 2 billion human users (and untold numbers of feline users).

The subject of how to encourage YouTube’s algorithm to promote your videos and give you more likes is crucial for marketers, influencers, and creators alike.
We’ll discuss what the algorithm is (and isn’t), the most recent updates for 2022, and how experts use
YouTube’s search and discovery tools to push their videos in front of viewers in this blog post.
Let’s start!
Part 1. YouTube’s algorithm’s history
The YouTube algorithm: What is it? Let’s take a quick look at how YouTube’s algorithm has evolved through time and how it functions now in order to respond to your question.
2005 to 2011: Click-and-view optimization
In order to crowdsource footage of Janet Jackson and Justin Timberlake’s infamous Superbowl performance, according to YouTube founder Jawed Karim (a.k.a. the star of Me at the Zoo), YouTube was established in 2005. Therefore, it should not be surprising that YouTube’s algorithm for many years displayed suggested videos that had the most views or clicks. Unfortunately, this resulted in an increase in deceptive titles and thumbnails, or clickbait. User experience suffered as a result of videos that made viewers feel duped, dissatisfied, or just plain irritated.
2012: Watch time optimization
YouTube made changes to its recommendation engine in 2012 to account for the amount of time spent watching each video as well as the total amount of time spent on the site. According to theory, when people find videos important and engaging, they watch them for a longer period of time, possibly all the way through. Due to this, some creators tried to make their movies shorter to enhance the likelihood that viewers would watch them through, while others made their videos longer to boost overall viewing time. YouTube maintained the official line—create content your audience wants to watch, and the algorithm will reward you—while refusing to support either of these strategies. However, as anyone who has used the internet for any length of time can attest, not all time spent online is created equal. YouTube has adopted a new strategy.
2015–2016: maximizing fulfillment
In addition to emphasizing direct reaction metrics like Shares, Likes, and Dislikes (and, of course, the extremely cruel “not interested” button), YouTube started monitoring viewer happiness directly using user surveys in 2005. YouTube published a whitepaper titled Deep Neural Networks for YouTube Recommendations in 2016 that detailed some of the inner workings of its AI.
2016-present: demonetization, and brand safety
The size and popularity of YouTube have led to an increase in content moderation difficulties over time, and what the algorithm suggests is now a major topic for news outlets and the government in addition to creators and advertisers.
YouTube has stated that it takes seriously its obligation to promote a variety of viewpoints while limiting the spread of damaging false material. For instance, algorithm modifications implemented in the beginning of 2019 have reduced consumption of questionable content by 70%. (According to YouTube, borderline content is that which is harmful or misleading but doesn’t quite go against community standards. On the other hand, offensive material is taken down right away.)
Creators are impacted by this problem because they worry about unintentionally breaking the constantly evolving community rules and getting punished with strikes, demonetization, or worse. (In fact, enhancing openness for community norms for artists is one of YouTube’s priorities for 2021, according to CEO Susan Wojcicki.) Brands and advertisers are also impacted since they don’t want their name and logo to be associated with white nationalists.
Politicians in America are growing more concerned about the societal impact of social media algorithms like YouTube’s. Democrats introduced the “Protecting Americans from Dangerous Algorithms Act” in early 2021, and YouTube (and other platforms) have been called to testify before Senate committees about their algorithms. Let’s now discuss what is known about this hazardous beast’s mechanism.
Part 2. How will YouTube’s algorithm function in 2022?
The YouTube algorithm chooses videos for users with the intention of finding the most relevant content for them and keeping them interested. When we refer to “the algorithm,” we mean one of three selection or discovery techniques that are related but slightly different: three different algorithms: one that chooses videos for YouTube’s main page, one that ranks the results of any given search, and one that chooses what videos users should watch next are used.
According to YouTube, in 2022 the majority of channels’ top traffic sources would often be their homepage and suggested videos. With the exception of explainer or instructional films, which frequently receive the most traffic via search (e.g., “how to tune up a bicycle”)
Part 3. How is the algorithm set up on YouTube?
What ranking factors does YouTube consider when deciding which videos to display to users? Every traffic source varies a little. But in the end, a combination of factors including customization (the history and preferences of the viewer) performance (the success of the video) external variables (the overall audience or market)
Part 4. How YouTube determines its homepage algorithm
The YouTube algorithm presents a wide selection of videos that it thinks a user might like to view every time they open the YouTube app or type in youtube.com. Because the computer hasn’t yet determined what the viewer wants—acoustic versions of popular songs, for example—this selection is frequently broad. talks that are motivating against procrastination? to watch their preferred possum vlogger? Two categories of ranking signals are used to determine which videos appear on the homepage:
Performance:
YouTube gauges performance using indicators including the click-through rate, typical viewing time, typical percentage of views, likes, and disapproval ratings from viewers. After you upload a video, the algorithm initially displays it to a small number of users on their homepage. If it appeals to, engages, and satisfies those viewers (i.e., they click on it, watch it through, like it, share it, etc.), then it is then presented to an increasing number of users on their homepages.
Personalization:
However, the trending tab does not include YouTube. According to their past activity, also known as their watch history, or personalization, YouTube suggests videos to users based on what it believes are relevant to their interests. More of the same will be presented to a user if they frequently watch a particular channel or show they have an interest in. This element is also responsive to behavioral alterations throughout time as a person’s affinities and interests change.
Conclusion
It’s a fallacy that the algorithm would penalize you for publishing too regularly or insufficiently frequently, even if YouTube undoubtedly promotes the idea of uploading constantly in order to develop and maintain a relationship with your audience. The growth of the audience is unrelated to the interval between uploads. The zeitgeist can change quickly, but by keeping an eye on Google Trends and giving yourself opportunity to explore, you won’t fall behind.
Free Download For Win 7 or later(64-bit)
Free Download For macOS 10.14 or later
Free Download For macOS 10.14 or later
How to Make A Jaw-Dropping Time Lapse Video?
Are you looking for a handy tutorial that will give you a full-fledged time lapse video? Well, here’s some two cents of what would be the ideal guide that you shall refer to! Learn more about the complete steps involved in making your time lapse video. Find out more here:
Part 1: What is Time Lapse?
1. Technical basics of Time Lapse Photography and Videography
Time-lapse is a specialized type of shot that can be achieved in-camera, through editing, or a combination of both. Time-lapse is a technique where frames are shot much slower than a normal rate (e.g., 24 frames per minute instead of per second).
Professional time-lapses are a series of raw photos even though they are sometimes perceived as videos. In a nutshell, a time-lapse is a short video that processes by revealing the evolution of a series of events, invisible to the eye.
The simplest and most useful formula is time per frame (TPF), multiplied by frames per second (FPS), multiplied by 60 seconds. Using this formula will tell you how long to record to end up with your desired time lapse length or “recording time” (RT). TPF x FPS x 60 = RT
2. What is a Time-lapse video used for?
The use of time-lapse photography and video is an excellent storytelling technique since compelling stories are essential to effective marketing. A time-lapse can also offer excellent insight into the advancement of developmental projects.
① Scientific research
- Time-lapses may be utilized to spread the word about scientific investigations to a wide audience. You can use time-lapse photography to gain money by selling the material of interesting scientific investigations to documentary makers or instructional websites.
- Scientists can visualize processes that would be challenging or sometimes even impossible to study in real life, thanks to time-lapse photography
② Individual enjoyment
Time-lapses are also utilized by filmmakers for scenes requiring extended durations of time with little significant activity occurring during the shot (such as night slowly turning into day).
③ Commercial use
- Time-lapse videos are a wonderful instrument for enhancing the perception of your brand because they are. As a result, many consumers find it interesting.
- Time-lapse videos are the epitome of the old saying that “good things come in small packages” for any brand.
3. How to Make a Time-lapse video?
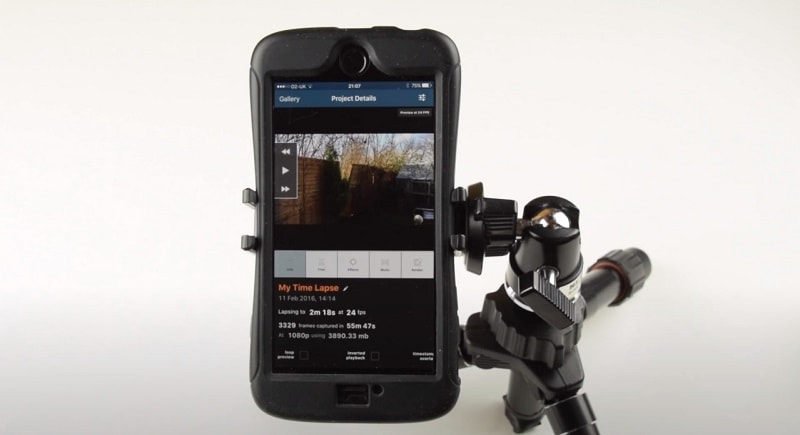
Start with a stable tripod or surface and adjust the settings on your phone camera or DSLR. Use slow shutter speed, use still mode, and don’t forget to use the timer. Find a stable surface and place your camera this way, you can get your hands on a creative time-lapse video.
Part 2: Record or Shoot Your Time-Lapse Video
1. Select Your Subject
The best way to create a time-lapse video is to pick your subject very carefully. Movement is the most crucial factor to consider while selecting a time-lapse subject. Any movement—whether it be caused by people, animals, vehicles, water, clouds, or anything else—can create an exciting and captivating time-lapse.
- Some of the iconic ideas of filming a time-lapse include:
- A stunning glimpse of the day and night cycle of life at sea.
- Construction of a building from ground till its completion
- Capturing the traffic movement
- Ice melting
- Sun setting
- A great shot of a galaxy
2. Prepare Right Equipment
Choose your equipment before heading out to capture time lapses. There are several options available for time-lapse cameras and applications, ranging from basic and affordable to sophisticated and pricy.
① Camera
You cannot make a time-lapse without owning a camera, whether it is a mobile phone, a compact, or a DSLR. The quality of the final result will be as good as the quality of the equipment you use.
- Smartphone camera apps (iPhone/Android)
All good smartphones now possess a built-in camera with good optical quality, for example: recently Apple Company launched its new iPhone 14 with a magnificent 48-megapixel camera. By using such cameras we have been able to produce really good pictures, although not in negative conditions, such as those with low-light, etc.
For apple: use IguanaLapse or TimeLapse to create your great time-lapses
For Android: use Time-Lapse – Lite
- Point-and-shoot cameras
Even though smartphone cameras have taken over in this digital era, it is still not possible to say that point-and-shoot cameras are not doing their magic. A point-and-shoot camera is really handy.
Some examples of point-and-shoot cameras which are best for creating fun time-lapse videos include Olympus Tough TG-6, Nikon Coolpix W300, Fujifilm XP140, Panasonic Lumix ZS70 / TZ90, and many others in the list.
- Action cameras
Action cameras, also known as action cams are compact, rugged, handheld, or mountable digital cameras that are designed to capture what you see when you are immersing in a movement. The action camera is usually mounted to your helmet, chest, handlebars of a bike or motorcycle, or tripod to record life.
The best action cameras for creating time-lapses include GoPro Hero11 Black, Insta360 ONE RS Twin Edition, DJI Action 2, DJI Pocket 2, and GoPro Hero9 Black.
- DSLR cameras
This is the best choice in terms of cost/benefit: it produces excellent results and high image quality. The best and top-rated DSLRs for creating terrific time-lapses include Nikon D850, Canon 80D, Canon EOS 90D, Sony A7 III, and others.
② Tripod/Gimbal/other stabilizers
Owning a solid and stable tripod is essential for the success of a time-lapse video. A good tripod will support the load without any problems and will keep the arsenal stable for the duration of the shooting session. The best way to use a tripod for filming a time-lapse is to use orient on a tripod that is quite high (at least 170cm).
Some best tripods used to record time-lapses include BONFOTO B671c, Patekfly Flexible Tripod, Sirui Easy Traveler ET-2204, and Vanguard Alta Pro 263AB 100.
A gimbal is a tool that uses motors and intelligent sensors to support and stabilize a camera. The best gimbal and other stabilizers used to film time-lapses include Moza Air 2, DJI RS 2, Zhiyun Crane-2S, Benro RedDog R1, iKan EC1 Beholder, and Feiyu AK4500.
③ Intervalometer/other camera shutter triggers
An intervalometer is a small device able to trigger the shutter of your camera every ‘n’ second, ‘n’ times (also infinite). It can be external, or as we saw earlier, integrated into the camera.
Some of the best intervalometer include Nikon Integrated Intervalometer. With a Nikon D3, you can go into Shooting Menu, and then activate” Interval Timer Shooting”.
3. List Pro Tips for Time-lapse Recording
- Make sure batteries are fully charged
- Set interval to match the movement in the scene
- Select music before shooting the time-lapse
- Use your backup camera
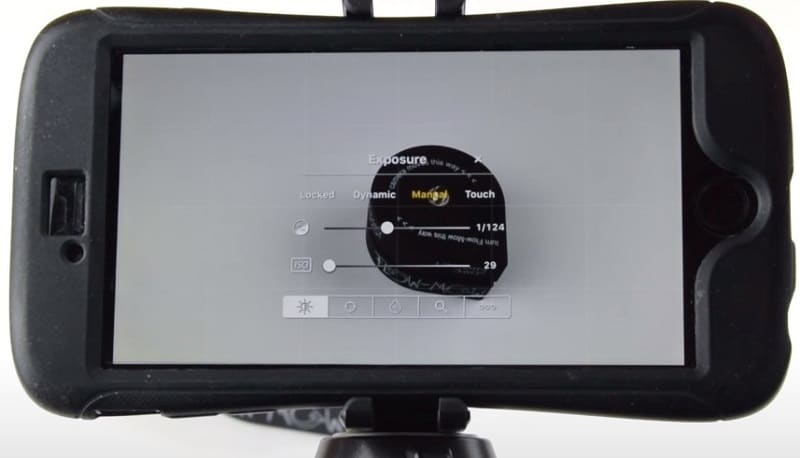
- Shoot in manual mode to avoid flicker
- Lock down focus
- Shoot in RAW format
- Add motion to the time-lapse
- Get comfortable, shoot longer
- Avoid bumping or moving the tripod
- Show shadow movement
- Use apps to plan your shots
- Shoot lots of images
Part 3: Edit Your Time Lapse Video
1. 3 Best Ways to Create Time Lapse from Photos
① Windows Photos App (Windows)
If you are using Windows, you probably are familiar with the general features of the Photos App. One of its distinguishing features is to import the photos and create a mind-blowing time-lapse out of those photos. To create time-lapse on your Windows Photos App, you must follow some simple steps:
- Open the Windows Photos app and import the pictures which you want to transform into a time-lapse.
- Go to Menu > Edit > Speed. For proper time-lapse, select a speed between 4x and 12x.
- Go to Save movie > save the video on your desktop or other device and you’re done with filming a great time-lapse video.
② QuickTime Player (Mac)
In your Apple devices (iPhones, iPads, and MacBook), you can create time-lapses by converting an image sequence to a movie or time-lapse video in QuickTime Player. For this, follow the simple steps and you will get a great time-lapse at the tip of your fingertips.
- Go to QuickTime App on your mac devices and open File > open image sequence.
- Select the image sequence folder and choose media.
- Adjust the quality of the movie by clicking on the options and choosing the resolution, frame rate, and video format.
- Click ‘open’ and time-lapse will be ready for access.
③ Filmora (Windows & Mac)
Through Wondershare Filmora software, it is now possible to drag your favorite image sequence into the timeline and transform it into a cool-looking time-lapse. If you’re looking for easy and efficient software to create attractive time-lapses, Filmora is your best go-to software. Using drag-and-drop, you can create time-lapse effects with Filmora’s built-in slow/fast motion effects. Filmora has over 150 free filters available for you if you wish to apply filters to your movie.
Filmora Video Editor creates a masterpiece for your video with the easiest interface for Windows & Mac users. Wondershare created the Filmora family of video editing and production software. Products on Filmora are available for a variety of users, from novice to expert. A timeline, preview window, and effects library are some of Filmora’s common features. These may all be accessed and managed using a drag-and-drop interface. Both Windows and macOS machines can use the Filmora software library.
How to Create a Time-lapse using Filmora
To create a time-lapse from photos in Filmora software, follow the mentioned steps:
Step 1: Download and install Wondershare Filmora
Go to google chrome and download the setup for Filmora. Install into your desktop.
Free Download For Win 7 or later(64-bit)
Free Download For macOS 10.14 or later
Step 2: Launch Filmora video editor
After downloading and installing, launch the Filmora timeline and import the photos to the media library.
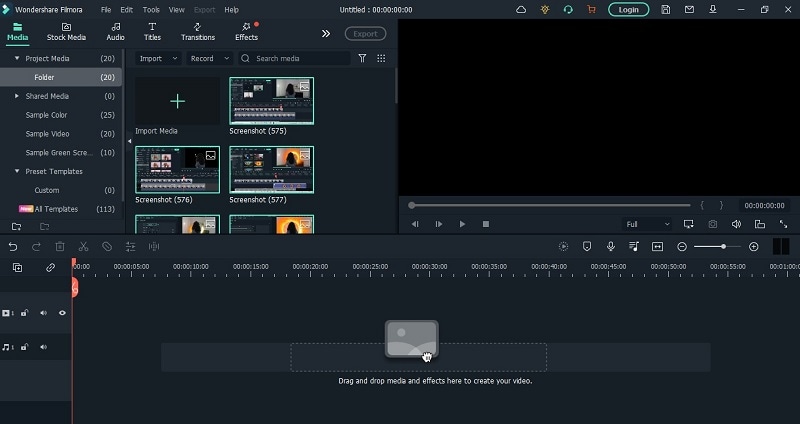
Step 3: Preview and adjust the photos.
Drag the images down to the timeline and move the pointer to reset and order the images according to your required time-lapse video. Don’t forget to resize and match the sizes of all the pictures so make a uniform time-lapse.

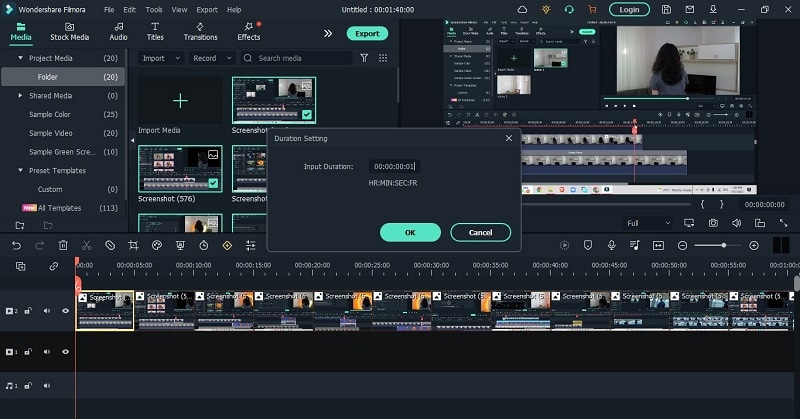
Step 4: Adjust the Speed
Select one of the photos in the timeline and right-click. Click on Speed and Duration > Custom Speed panel > Duration > change the duration of the photo to 00:00:00:01 and hit OK.
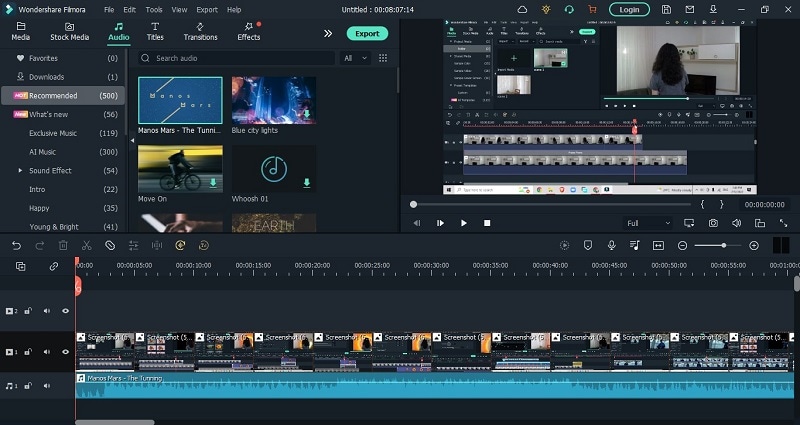
Step 5: Add effects and audio
Even though this step is optional, still it is recommended that to make your time-lapse more presentable, go to effects and choose your favorite pre-set. Go to Audio menu to choose from the music library or add your own custom audio by importing audio file into the timeline.
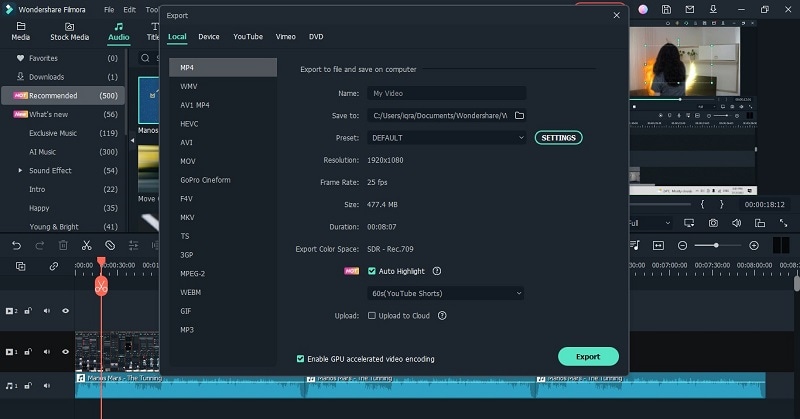
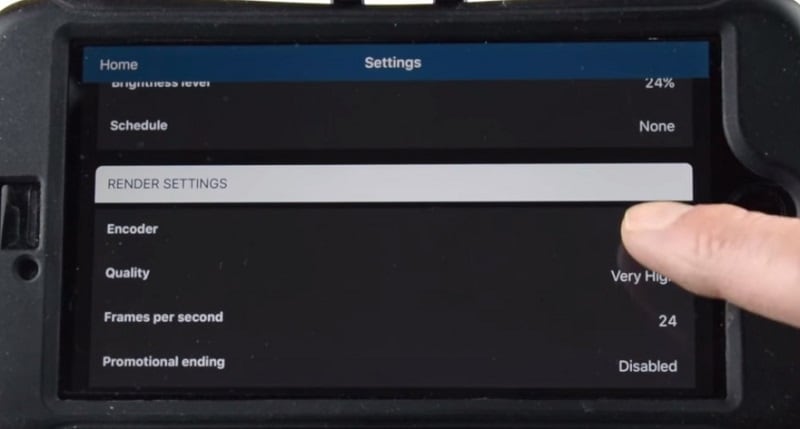
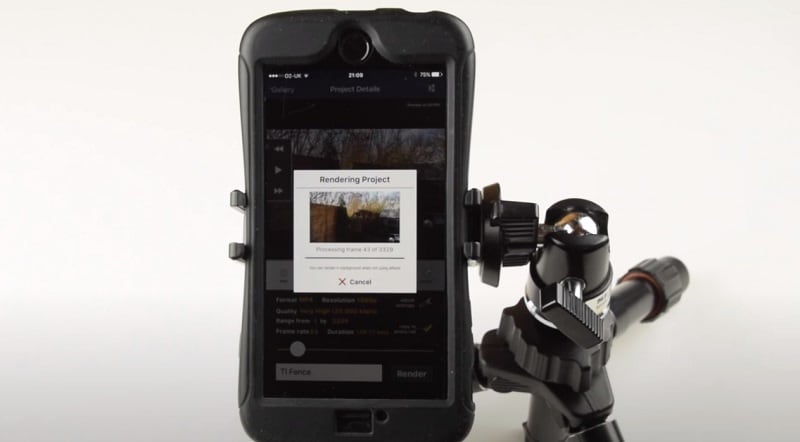
Step 6 Render and Export media
Export your file after rendering it in the full screen. Always check if there are any additional changes required before exporting the media file.

Step 7: Save into your desktop
Change the video format and video and audio parameters such as Bit Rate, Encoder, and Resolution of the video.
Other software for creating time-lapse
Besides Filmora, there are some interesting options for the users which involve:
o iMovie
o LRTimelapse
o Lightroom
o Adobe Premiere Pro
o After Effects
o Photoshop
2. 3 Best Ways to Convert Video to Time Lapse
① Filmora(Windows & Mac)
Filmora offers yet another very distinguishing feature through which it can convert video footage into an excellent time-lapse video. This feature of Filmora empowers the users and boosts their content and increases audience engagement as well.
In a few simple steps, you can get a creative time-lapse on your windows and mac devices.
- Download and install Filmora 11
- Launch Filmora timeline on your device and import the footage to the media library
- Drag your video onto the video column in the timeline. Select the loaded video and click the “Play” button. While playing the video, drag the slider bar at the start time and hit the “Split” icon to cut out the part you want to do time-lapse editing.
- Right-click on the video clip in the timeline to select Speed and Duration. Find the Speed option and drag the slider bar to the right to increase the speed.
- Click the Play button to preview the result. Filmora now supports up to 100x fast motion and 0.01x slow mo.
- Export your video
② Lapse It Pro (Android & iPhone)
One of the top apps for time-lapse photography is Lapse It Pro. A collection of further time lapses made by other people is available on Lapse It. You can post your videos and favorite those of others while using this social function, which also lets you watch other people’s videos. Through user control, the software makes the smartphone’s capacity to record time lapses as effective as possible.
The lapse It pro version is currently not free, although the Lapse its app is free and it is available on both, Android and Apple.
Steps to Use Lapse It Pro:
- Download the app on your android or apple device
- Configure the time interval between the shots and set a time or photo-based limit while clicking pictures.
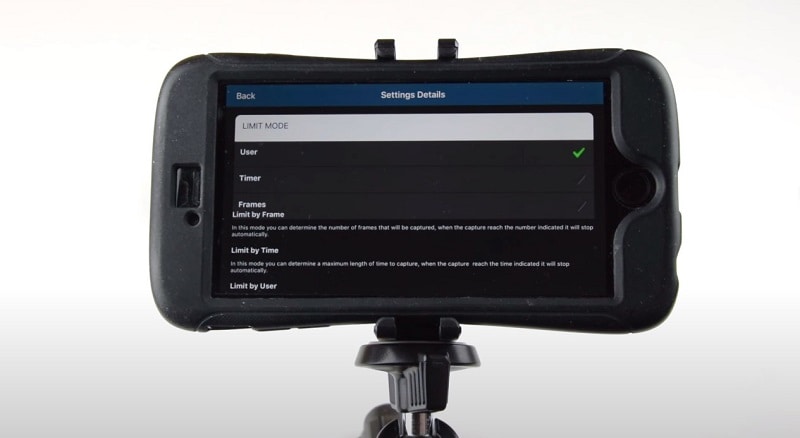
- Adjust the resolution of your camera before taking pictures.
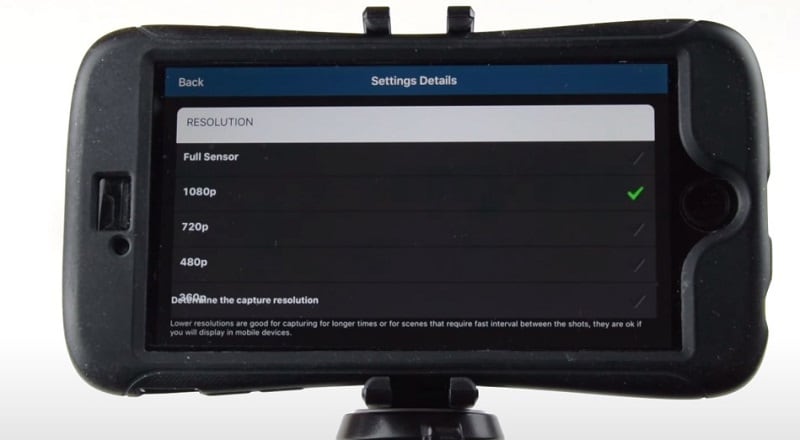
- Take a lot of pictures through the app using your device’s inbuilt camera
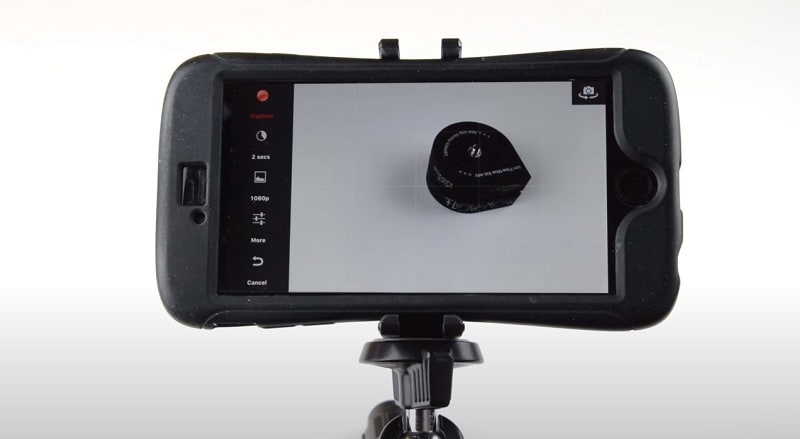
- Edit the order of the pictures
- Stitch the pictures together to form a time-lapse
- Add filters and adjust color settings
- Render and preview
- Export the file to your device
③ Invideo (Online)
InVideo is a do-it-yourself (DIY) video creation platform that enables users to turn their ideas into videos in real time. The platform lets users create, edit, preview, and share videos with team members. It’s a fantastic solution for combining your time-lapse footage into an amazing video project.
InVideo provides three distinct methods for creating videos:
- Text-to-Video: Upload your footage and let InVideo turn it into a series of scenes that you can customize
- Blank Templates: Start with a stripped-down template and craft an amazing video from scratch
- Premade Templates: Pick a template from an extensive library of premade templates
Steps to Use InVideo:
To create a time-lapse through InVideo, follow the mentioned steps:
Step 1. Download and install InVideo
Step 2. Sign up and sign in to your InVideo account
Step 3. Upload your footage to the ‘Add your media files here’ tab.
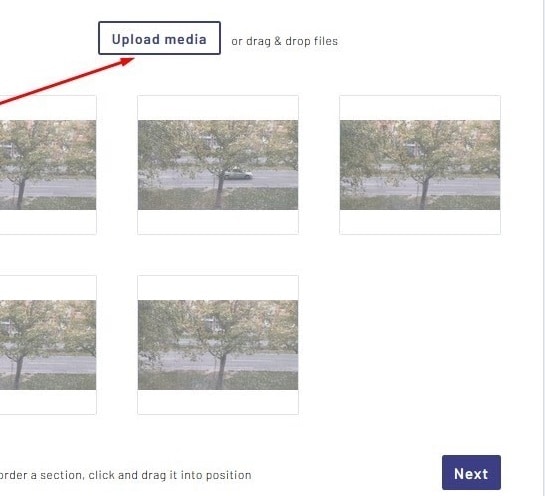
Step 4. Do not upload footage exceeding 200 MBs.
Step 5. Click ‘Next’ and you will be redirected to the Storyboard.
Step 6. Preview all your scenes in Storyboard mode. Rearrange them, add new ones in between, and delete any that you don’t want to use in your project. You can also duplicate scenes if necessary.
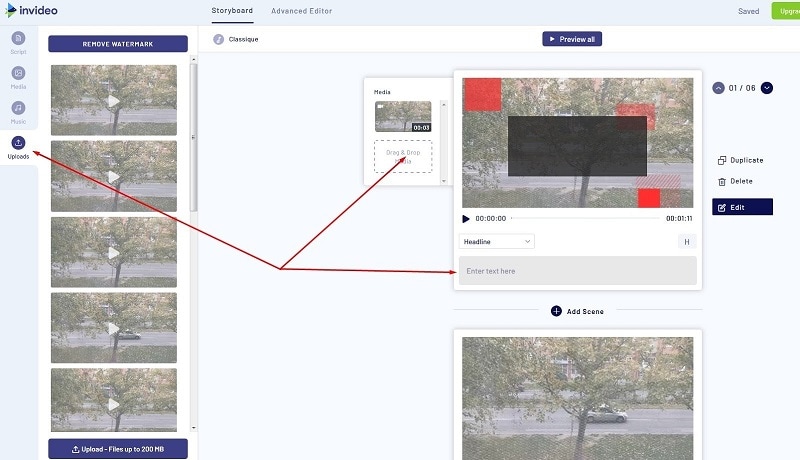
Step 7: You can also add captions to your scenes. To view all the captions you’ve created, go to the Scripts tab. You’ll be able to customize your captions further in the Advanced Editor mode.
Step 8. To add audio files to your video, go to the Music tab.
Step 9. Edit your video by clicking on Advanced Editor.

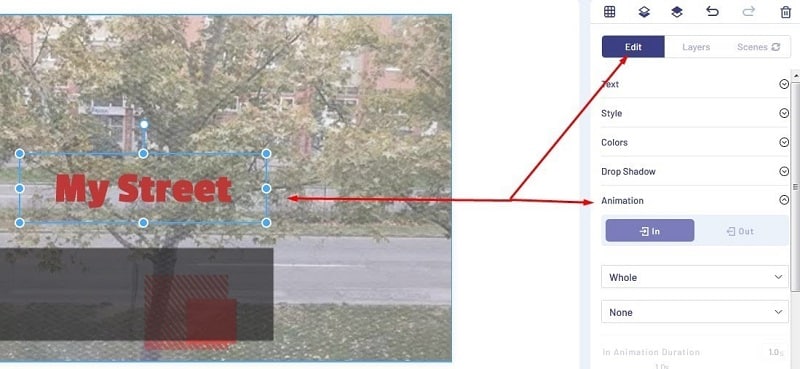
Step 10. Apply filters and review the timeline, export, save the video and you’re good to go.
3. Which Way is Right for You to Edit a Time-Lapse Video?
There are many ways to edit a time-lapse video, with varying degrees of success. Each application and software has its pros and cons. Although some best and most useful methods to create and edit time-lapse videos have been discussed earlier in this essay it is crucial to highlight that Filmora is regarded as software that possesses almost all the assets that we need while we edit our time-lapse videos.
Through Filmora, you can effortlessly make a pro-level time-lapse video either from still images or existing video. Most of the software would offer only one feature at a time so it is tremendous that Filmora lets you easily access multiple options to create a seamless time-lapse video in a spur of some minutes.
Besides multiple ways to create time-lapse, Filmora also offers basic & advanced editing features for time-lapse production. After creating a time-lapse in Filmora, you can drag through the multiple post-production editing features which include: Split Screen, Keyframing, Motion Tracking, Speed Ramping, Screen Recorder, Instant Mode, Pre-set Templates, and Auto Beat Sync. And many others.
Besides these ways of editing your time-lapses, Filmora also offers no disturbing pop-up ad experience while editing which provides a smooth editing platform for editors.
Part 4: Share & Enjoy the Best Time-Lapse Video
1. Share Your Quality Time-Lapse Video Across Social Platforms
Time-lapse & social media serve as the perfect combination in today’s times when social media publicity has become an incredibly important avenue for businesses. You can share your time lapses on different social media platforms including:
- YouTube
When people talk about today’s most popular social sharing websites, YouTube often gets left out of the conversation in favor of sites like Facebook and Twitter. But don’t be fooled: YouTube has a lot going for it.
By uploading your time-lapses on YouTube, you can create a YouTube link and share it with your friends and social circle so they can easily access your content, you can get found in search by uploading your own written transcript about the time-lapse, adding an end screen or cards to promote your time-lapse video, and add creative effects to your time-lapses with YouTube Enhancements.
- TikTok
TikTok is a social media platform for creating, sharing, and discovering short videos. The app is used by young people as an outlet to express themselves through singing, dancing, comedy, and lip-syncing, and allows users to create videos and share them across a community.
Since the duration of the time-lapse videos is mostly kept short, TikTok is the best app to approach if you want to increase your audience engagement.
The Meta app, Instagram is the most used app as per 2022 statistics. Through this app, people used to update their day-to-day routine and check-ins by uploading pictures. Now, the platform has added a ‘Reels’ section which plays the short videos to keep the audience hooked to the app, more than ever.
Upload your time-lapses on Instagram as Reels and see your content boost within hours.
2. Promote Your Time-Lapse Video on Popular Websites
Professional video editors and photographers who are looking for a paid platform to promote their business can access the most widely used and reliable websites which include the following:
- Shutterstock
With this app on your mobile phones and other devices, you can Transform Your Marketing Campaigns, Social Media, Websites, and Designs. Uploading your time-lapse content to earn good money on Shutterstock will work best in your favor.
- Pond5
Pond5 is the world’s largest marketplace for HD & 4K stock video, plus millions of music tracks, SFX, motion graphics, and images. Signing up and posting your time-lapse to promote your digital work can be a good choice if you’re looking for earning money online.
- Adobe Stock
Adobe Stock is a new service that provides designers and businesses with access to millions of high-quality, curated, royalty-free images and videos. This is also a good choice for professional photographers and videographers to post their time-lapses.
- Getty
Getty is an American visual media company and is a supplier of stock images, editorial photography, video, and music for business. By uploading your time lapses on this platform, you can be provided with exceptional opportunities to engage employees, entertain clients, and promote your brand.
3. Enjoy the Attractive Time-Lapse Video Examples
Over the internet, you will find numerous creatively designed time-lapses but a few of them still top the list. Some of the iconic time-lapses created to date include the following:
- Multiverse By Hiroshi Kondo, a mind-bending TimeLapse video of Taiwan
- Paris Day & Night by Teeter-Totter-Tam is a 5-minutes TimeLapse journey through one of the prettiest cities in the world, Paris from day to night.
- Solar Panel Installation from a Crane - David Dupuy
- Death Is the Road to Awe is a sample of TimeLapse video footage from that film shot in the American Southwest.
Part 5: FAQs – Time-Lapse Video Creation
① How to easily make a time-lapse video like a pro?
Most smartphone cameras have their time-lapse feature built in. To shoot your time-lapse video, simply open up the camera on your phone and select the “Time-Lapse” feature.
Place your phone in a secure spot where it won’t move around a lot. Then, tap the record button to start recording your time-lapse. When you’re done, tap it again. Your video will play back compressed into a shorter period for a time lapse effect.
PRO TIP: If you’re planning to make a landscape video, turn your phone so your time-lapse video is wide instead of tall
② What are the best time lapse editors or software?
The top five Best Free TimeLapse Software include:
- Wondershare Filmora- Windows and Mac
- Adobe Premiere Pro – Professional software
- Final Cut Pro – Mac software for time-lapse videos
- iMovie – User-friendly
- LRTimelapse – Sophisticated tool for more experienced users
③ Can I speed up or slow down a time-lapse video using Filmora?
Filmora also allows you to adjust the duration of the video clip to change the video speed. After importing the video clip to the timeline, right-click it and choose Speed and Duration to open the custom speed pop-up. Go to the Duration section and you will see the original duration of the video. Adjusting the duration of the video longer will add a slow-motion effect to the video. Changing the duration of the video to a shorter time will speed up the playback speed of the video. Just directly input the number in the field to speed up/slow down the video.
④ How to make my time-lapse video look better?
- Using a Slow Shutter
One solution to making your time lapses look more natural is to use a slow shutter so that each frame has a bit of motion.
- Blend in Video
Capture a time-lapse with fast movement and then mask in video with slow movement, maybe I could have the best of both worlds.
- Use filters
You can use Filters to spruce up the content with the time-lapse.
- Add Audio
Audio is an essential part if you want to leverage the content reach of your time-lapse video.
Conclusion
Time lapse videos are among the most powerful marketing tactics available in the mass media age of today. Similar to aerial photography, time-lapse videos can tell an engaging story for a low production cost, and they can be viewed fast by the audience. Filmora has helped the professionals as well as the beginners in the photography and videography to boost their content through online platforms.
This article will guide you through the most useful software and ways to promote your content and boost your audience engagement through creating mind-blowing time-lapses. Software like above mentioned ones take extremely little time and focus to comprehend the tale in a time lapse, which is a huge advantage in today’s competitive industry.
Free Download For macOS 10.14 or later
Step 2: Launch Filmora video editor
After downloading and installing, launch the Filmora timeline and import the photos to the media library.
Step 3: Preview and adjust the photos.
Drag the images down to the timeline and move the pointer to reset and order the images according to your required time-lapse video. Don’t forget to resize and match the sizes of all the pictures so make a uniform time-lapse.
Step 4: Adjust the Speed
Select one of the photos in the timeline and right-click. Click on Speed and Duration > Custom Speed panel > Duration > change the duration of the photo to 00:00:00:01 and hit OK.
Step 5: Add effects and audio
Even though this step is optional, still it is recommended that to make your time-lapse more presentable, go to effects and choose your favorite pre-set. Go to Audio menu to choose from the music library or add your own custom audio by importing audio file into the timeline.
Step 6 Render and Export media
Export your file after rendering it in the full screen. Always check if there are any additional changes required before exporting the media file.
Step 7: Save into your desktop
Change the video format and video and audio parameters such as Bit Rate, Encoder, and Resolution of the video.
Other software for creating time-lapse
Besides Filmora, there are some interesting options for the users which involve:
o iMovie
o LRTimelapse
o Lightroom
o Adobe Premiere Pro
o After Effects
o Photoshop
2. 3 Best Ways to Convert Video to Time Lapse
① Filmora(Windows & Mac)
Filmora offers yet another very distinguishing feature through which it can convert video footage into an excellent time-lapse video. This feature of Filmora empowers the users and boosts their content and increases audience engagement as well.
In a few simple steps, you can get a creative time-lapse on your windows and mac devices.
- Download and install Filmora 11
- Launch Filmora timeline on your device and import the footage to the media library
- Drag your video onto the video column in the timeline. Select the loaded video and click the “Play” button. While playing the video, drag the slider bar at the start time and hit the “Split” icon to cut out the part you want to do time-lapse editing.
- Right-click on the video clip in the timeline to select Speed and Duration. Find the Speed option and drag the slider bar to the right to increase the speed.
- Click the Play button to preview the result. Filmora now supports up to 100x fast motion and 0.01x slow mo.
- Export your video
② Lapse It Pro (Android & iPhone)
One of the top apps for time-lapse photography is Lapse It Pro. A collection of further time lapses made by other people is available on Lapse It. You can post your videos and favorite those of others while using this social function, which also lets you watch other people’s videos. Through user control, the software makes the smartphone’s capacity to record time lapses as effective as possible.
The lapse It pro version is currently not free, although the Lapse its app is free and it is available on both, Android and Apple.
Steps to Use Lapse It Pro:
- Download the app on your android or apple device
- Configure the time interval between the shots and set a time or photo-based limit while clicking pictures.
- Adjust the resolution of your camera before taking pictures.
- Take a lot of pictures through the app using your device’s inbuilt camera
- Edit the order of the pictures
- Stitch the pictures together to form a time-lapse
- Add filters and adjust color settings
- Render and preview
- Export the file to your device
③ Invideo (Online)
InVideo is a do-it-yourself (DIY) video creation platform that enables users to turn their ideas into videos in real time. The platform lets users create, edit, preview, and share videos with team members. It’s a fantastic solution for combining your time-lapse footage into an amazing video project.
InVideo provides three distinct methods for creating videos:
- Text-to-Video: Upload your footage and let InVideo turn it into a series of scenes that you can customize
- Blank Templates: Start with a stripped-down template and craft an amazing video from scratch
- Premade Templates: Pick a template from an extensive library of premade templates
Steps to Use InVideo:
To create a time-lapse through InVideo, follow the mentioned steps:
Step 1. Download and install InVideo
Step 2. Sign up and sign in to your InVideo account
Step 3. Upload your footage to the ‘Add your media files here’ tab.
Step 4. Do not upload footage exceeding 200 MBs.
Step 5. Click ‘Next’ and you will be redirected to the Storyboard.
Step 6. Preview all your scenes in Storyboard mode. Rearrange them, add new ones in between, and delete any that you don’t want to use in your project. You can also duplicate scenes if necessary.
Step 7: You can also add captions to your scenes. To view all the captions you’ve created, go to the Scripts tab. You’ll be able to customize your captions further in the Advanced Editor mode.
Step 8. To add audio files to your video, go to the Music tab.
Step 9. Edit your video by clicking on Advanced Editor.
Step 10. Apply filters and review the timeline, export, save the video and you’re good to go.
3. Which Way is Right for You to Edit a Time-Lapse Video?
There are many ways to edit a time-lapse video, with varying degrees of success. Each application and software has its pros and cons. Although some best and most useful methods to create and edit time-lapse videos have been discussed earlier in this essay it is crucial to highlight that Filmora is regarded as software that possesses almost all the assets that we need while we edit our time-lapse videos.
Through Filmora, you can effortlessly make a pro-level time-lapse video either from still images or existing video. Most of the software would offer only one feature at a time so it is tremendous that Filmora lets you easily access multiple options to create a seamless time-lapse video in a spur of some minutes.
Besides multiple ways to create time-lapse, Filmora also offers basic & advanced editing features for time-lapse production. After creating a time-lapse in Filmora, you can drag through the multiple post-production editing features which include: Split Screen, Keyframing, Motion Tracking, Speed Ramping, Screen Recorder, Instant Mode, Pre-set Templates, and Auto Beat Sync. And many others.
Besides these ways of editing your time-lapses, Filmora also offers no disturbing pop-up ad experience while editing which provides a smooth editing platform for editors.
Part 4: Share & Enjoy the Best Time-Lapse Video
1. Share Your Quality Time-Lapse Video Across Social Platforms
Time-lapse & social media serve as the perfect combination in today’s times when social media publicity has become an incredibly important avenue for businesses. You can share your time lapses on different social media platforms including:
- YouTube
When people talk about today’s most popular social sharing websites, YouTube often gets left out of the conversation in favor of sites like Facebook and Twitter. But don’t be fooled: YouTube has a lot going for it.
By uploading your time-lapses on YouTube, you can create a YouTube link and share it with your friends and social circle so they can easily access your content, you can get found in search by uploading your own written transcript about the time-lapse, adding an end screen or cards to promote your time-lapse video, and add creative effects to your time-lapses with YouTube Enhancements.
- TikTok
TikTok is a social media platform for creating, sharing, and discovering short videos. The app is used by young people as an outlet to express themselves through singing, dancing, comedy, and lip-syncing, and allows users to create videos and share them across a community.
Since the duration of the time-lapse videos is mostly kept short, TikTok is the best app to approach if you want to increase your audience engagement.
The Meta app, Instagram is the most used app as per 2022 statistics. Through this app, people used to update their day-to-day routine and check-ins by uploading pictures. Now, the platform has added a ‘Reels’ section which plays the short videos to keep the audience hooked to the app, more than ever.
Upload your time-lapses on Instagram as Reels and see your content boost within hours.
2. Promote Your Time-Lapse Video on Popular Websites
Professional video editors and photographers who are looking for a paid platform to promote their business can access the most widely used and reliable websites which include the following:
- Shutterstock
With this app on your mobile phones and other devices, you can Transform Your Marketing Campaigns, Social Media, Websites, and Designs. Uploading your time-lapse content to earn good money on Shutterstock will work best in your favor.
- Pond5
Pond5 is the world’s largest marketplace for HD & 4K stock video, plus millions of music tracks, SFX, motion graphics, and images. Signing up and posting your time-lapse to promote your digital work can be a good choice if you’re looking for earning money online.
- Adobe Stock
Adobe Stock is a new service that provides designers and businesses with access to millions of high-quality, curated, royalty-free images and videos. This is also a good choice for professional photographers and videographers to post their time-lapses.
- Getty
Getty is an American visual media company and is a supplier of stock images, editorial photography, video, and music for business. By uploading your time lapses on this platform, you can be provided with exceptional opportunities to engage employees, entertain clients, and promote your brand.
3. Enjoy the Attractive Time-Lapse Video Examples
Over the internet, you will find numerous creatively designed time-lapses but a few of them still top the list. Some of the iconic time-lapses created to date include the following:
- Multiverse By Hiroshi Kondo, a mind-bending TimeLapse video of Taiwan
- Paris Day & Night by Teeter-Totter-Tam is a 5-minutes TimeLapse journey through one of the prettiest cities in the world, Paris from day to night.
- Solar Panel Installation from a Crane - David Dupuy
- Death Is the Road to Awe is a sample of TimeLapse video footage from that film shot in the American Southwest.
Part 5: FAQs – Time-Lapse Video Creation
① How to easily make a time-lapse video like a pro?
Most smartphone cameras have their time-lapse feature built in. To shoot your time-lapse video, simply open up the camera on your phone and select the “Time-Lapse” feature.
Place your phone in a secure spot where it won’t move around a lot. Then, tap the record button to start recording your time-lapse. When you’re done, tap it again. Your video will play back compressed into a shorter period for a time lapse effect.
PRO TIP: If you’re planning to make a landscape video, turn your phone so your time-lapse video is wide instead of tall
② What are the best time lapse editors or software?
The top five Best Free TimeLapse Software include:
- Wondershare Filmora- Windows and Mac
- Adobe Premiere Pro – Professional software
- Final Cut Pro – Mac software for time-lapse videos
- iMovie – User-friendly
- LRTimelapse – Sophisticated tool for more experienced users
③ Can I speed up or slow down a time-lapse video using Filmora?
Filmora also allows you to adjust the duration of the video clip to change the video speed. After importing the video clip to the timeline, right-click it and choose Speed and Duration to open the custom speed pop-up. Go to the Duration section and you will see the original duration of the video. Adjusting the duration of the video longer will add a slow-motion effect to the video. Changing the duration of the video to a shorter time will speed up the playback speed of the video. Just directly input the number in the field to speed up/slow down the video.
④ How to make my time-lapse video look better?
- Using a Slow Shutter
One solution to making your time lapses look more natural is to use a slow shutter so that each frame has a bit of motion.
- Blend in Video
Capture a time-lapse with fast movement and then mask in video with slow movement, maybe I could have the best of both worlds.
- Use filters
You can use Filters to spruce up the content with the time-lapse.
- Add Audio
Audio is an essential part if you want to leverage the content reach of your time-lapse video.
Conclusion
Time lapse videos are among the most powerful marketing tactics available in the mass media age of today. Similar to aerial photography, time-lapse videos can tell an engaging story for a low production cost, and they can be viewed fast by the audience. Filmora has helped the professionals as well as the beginners in the photography and videography to boost their content through online platforms.
This article will guide you through the most useful software and ways to promote your content and boost your audience engagement through creating mind-blowing time-lapses. Software like above mentioned ones take extremely little time and focus to comprehend the tale in a time lapse, which is a huge advantage in today’s competitive industry.
10 Crazy-Cool Examples of AR Video
10 Crazy-Cool Examples of AR Video
An easy yet powerful editor
Numerous effects to choose from
Detailed tutorials provided by the official channel
Revolutions in technology have brought about the integration of augmented and virtual reality into marketing strategies. Stay tuned to learn about the most amazing AR video examples!
In this article
01 [What Is AR and the Technology Used for Augmented Reality Development?](#Part 1)
02 [What Is the Difference Between Augmented Reality and Virtual Reality?](#Part 2)
03 [10 Examples of Augmented Reality (AR) In Marketing](#Part 3)
Part 1 What is AR and the Technology Used for Augmented Reality Development?
Expanding the acronym, AR stands for Augmented Reality, a relatively newer concept in the world of graphic imaging and other computer based real-time applications. Talking of the exact explanation, augmented reality refers to a responsive synchronization of real world elements into digital platforms, while upgrading the same with high end perceptual information generated from specialized computer systems.
The entire concept of augmented reality rests on 3 major aspects, viz., a synchronized combination of the virtual and real world environments, a responsive interaction of associated elements in real-time, and a precise 3-dimensional registration of virtual and real elements. The aforesaid aspects of augmented reality are often guaranteed by a number of sensory modalities, like that of auditory, visual, somatosensory, olfactory and haptic ones.
Technology Behind Augmented Reality
As far as the technology behind the development of augmented reality video is concerned, the overall implementation is categorized into 3 different tasks. The process is initiated with generating concise, high resolution images of real world elements, followed by creating an overlay of computer generated 3D images on the previously generated real world images. This is further succeeded by facilitating an interactive user engagement and interaction within the simulated surroundings.
The process of technology implementation is seconded by a responsive display mechanism which can be done conveniently on any one among glasses, smartphones, screens, head-mounted displays and handheld devices. Concerning the factor of output credibility, head-mounted displays take the credit of generating a much more immersive augmented reality in comparison to the other display alternatives.
Part 2 What Is the Difference Between Augmented Reality and Virtual Reality?
Advancements in technology has treated the world with a multitude of concepts to simulate real-time elements into digital environments. In addition to augmented reality, the techniques of virtual and alternate reality have come into focus in recent times to address the diversely specific needs of digital and real world integration.
Lack of proper awareness, however, leads to the treatment of these fundamentally different concepts as one and the same thing. Considering the credibility of such technologies towards addressing certain specific purposes, it becomes important to understand the difference among these apparently similar concepts. Having said that, let us make an attempt to realise the dissimilarity between augmented and virtual reality in the following section:
● Underlying Concept
Stressing on the parameter of conceptual utility, augmented reality refers to the integration of digital aspects into a real-time surrounding, most probably through a smartphone or camera, whereas, virtual reality on the other hand, is responsible for the replacement of a real-time setting with a simulated environment.
● Existence Constraints
Talking about augmented reality, the technique showcases the coexistence of the real and virtual surroundings, with the primary goal of supplying extra information about the real-time environment, which can be accessed without a content search. Conversely, virtual reality is predominantly concerned with bringing about a complete shift of the user’s actual ambiances to an entirely fabricated environment that undertakes an independent existence.
● User Control
Speaking on the extent of user control, augmented reality allows you to monitor your real world presence, mostly with a smartphone, while users of virtual reality are entirely controlled by the system, with strictly no self-access. Also, you would require a headset equipment to make use of virtual reality.
Part 3 Examples of Augmented Reality (AR) In Marketing
Having discussed enough about the fundamental aspects of augmented reality, let us proceed towards understanding the credibility of augmented video in the light of modern day information centered applications. While there are manifold varieties of augmented reality usage, the following section highlights the best examples of integrating AR into brand marketing:
01Walmart- Inventory Control
With the aim to examine the dual credibility of its brand stores as online fulfillment as well as physical shopping centers, Walmart in October 2020, announced the proposition of its 4 shopping units as ‘test centers’ of augmented reality, where the latter was supposed to aid in the management and tracking of company inventories.
The technology was implemented through a smartphone application to quicken the transportation process of item packages from the inventory to the sales area. The utility works when the employees hold a handheld device that highlights the dispatch ready boxes in an augmented reality stock video, instead of scanning each box individually.

02Snap- City Painter
Launched in London in October 2020, the City Painter utility lands among the best augmented reality video examples, allowing you to spray paint on and decorate street shops with pre-designed wall paintings, through the use of augmented reality. The most striking aspect of the aforesaid application is its information sharing feature, which allows the changes introduced by you to be seen by fellow users if the app in real time.
The utility is regarded as first step of Snap towards its aim of developing a shared virtual space via a mapping of potential landmarks. The tool has a progressive future in travel and tourism sector, with brand wanting to invest capital on the newly introduced customer needs of adventure and exploration.

03Asos- See My Fit
While the company is a renowned name in the domain of mobile technology and augmented reality innovation since 2009, the ‘See My Fit’ tool was launched by the latter in the year 2020 amid the pandemic period to assist the company’s models who were bound to work from home during the calamity.
Talking of the application, the tool makes use of augmented reality to fit apparels on the models in a digital manner. Additionally, the app works to provide the customers with a realistic insight into the appearance of the products with respect to size and body structure, which further aids to increase the company sales, while minimizing the return risks.

04 Pull & Bear- Console Game
This one is a famous retail brand, whose owner Inditex, has collaborated with the ‘Creative Shop’ utility of Facebook to launch ‘Pacific Game’, a console relish, with the implementation of augmented reality. The gameplay requires you to undertake a journey from California to Tokyo, where the travel obstacles need to be escaped through cohesive head movements to earn game points.
The game was essentially designed as a social media attraction and can be enjoyed on Instagram, as a Facebook AR video, and even on the official Pull & Bear website. If you are playing the dame on Instagram, do try on using the latter’s front camera feature for a more enhanced gaming experience.

05Burberry- Olympia Pop Up at Harrods
The current post pandemic period is witnessing a creative use of augmented reality by brand companies to attract their customers back to the retail shops. To complement the launch of its Olympia Bag, Burberry had introduced a pronounced AR utility at the Harrods. Customers visiting the shop are allowed to witness the Elphis statue walks in real-time environment through an in-store QR code.
The customers can additionally, click pictures and create videos of the same to share on their social media handles. The integration of augmented reality into retail shopping in such innovative ways has guaranteed an immersive experience of the otherwise ordinary store purchases, with a simultaneous benefit to both, product companies and customers.

06IKEA Studio Application
IKEA is known to have integrated augmented reality into its working protocol for a long time now. Space 10, the company’s design laboratory has recently planned a more immersive relaunch of its AR facility with its brand new IKEA Studio application that allows you to capture and redesign room plans in 3D space, including the finest details of door frames, windows, floor rugs and wall colors.
The application is conceptualized considering the inclusion of LiDAR, that is, Light Detection and Ranging sensors in iPhones and is visibly seen as a precursor to the Apple Glass, a more comprehensive application that promised an escalated and realistic experience of augmented reality.

07Amazon- Hair Coloring and Amazon Salon
Boasting of being the largest e-commerce platform, Amazon took its first step into experimenting with augmented reality by introducing the Amazon Salon. Realized as a digital marketplace, the utility works through a ‘Point and Learn’ approach where customers and view and select any product on the tool’s display shelf to get a detailed information about the same through educational content and brand videos on the product display screen.
If you are interested in buying a particular product, you need to scan the latter’s QR code on the display shelf, which will redirect you to the product’s e-commerce page on Amazon’s official website. The AR utility implemented here also allows you to examine the look of various hair shades, before you actually get into choosing a suitable one for the perfect hairdo.

08Gucci- Virtual Sneakers
Gucci lands among the first luxury retail brands to implement augmented reality in its operation model for facilitating its customers with a comprehensive and informed product buying experience. The company incorporated a feature of ‘try on sneakers’ in its retail application, which allowed users to get an insight into the product’s appearance in real-time, thus reducing the return risks while simultaneously ensuring a better customer satisfaction.
The recently launched ‘virtual sneakers’ on the Gucci app are created to be tried and shared exclusively on the online store. Designed with the collaborative efforts of Gucci and the augmented reality fashion house Wanna, this ‘digital only’ footwear is available on Gucci’s online app for customer buying.

09Wayfair- View in Room
This one is essentially a furniture retail company that makes use of augmented reality to provide its customers with a wholesome shopping experience at the comfort of their homes. Wayfair incorporates the AR utility through the upgraded version of its ‘View in Room’ application that works on the LiDAR and RealityKit technologies to provide an authentic and a better realistic product view to the customers.
A few AR incorporated features of the app include precise cast lighting in real-time, product stacking and a real world interface to stand before and examine the overall product appearance, as the customers would actually do in real-time; thus ensuring a personalized product experience to the potential buyers.

10Machine A- Virtual Concept Store
This one is more of a digital platform to showcase the modern day developments in fashion design. Based in London, the Machine-A virtual store was conceptualized to allow the access of relevant audience to the works of new talent in the fashion field, when the Covid-19 pandemic caused a shutdown of the London Fashion Week.
The store was launched as a virtual boutique that could be visited by interested audience through a QR code, which could be scanned from billboards and posters around the London city, and allowed them to view the latest works of the associated fashion designers through an augmented reality concept video. The major success of the utility lies in the enhancement of the consumer-brand relationship, while focusing primarily on product awareness and customer engagement.

● Working With Augmented Reality Videos in Filmora
If you are keen on exploring your editing creativity in augmented reality with video, do consider working with the Wondershare Filmora Video Editor program. The software is affordably the best AR video editing tools available to you free of cost. While the application greets you with the most responsive and clean interfaces, with a plethora of professional quality video editing features that promise to effectively address your most diverse AR video editing requirements.
The software package comes with an inbuilt screen recorder, which you can use to capture specific video snippets and later on edit them with a variety of audio-visual effects from the app’s huge effects library. Not to forget, the application also grants you the liberty to share and export the edits to your social media handles.
For Win 7 or later (64-bit)
For macOS 10.12 or later
● Ending Thoughts →
● Augmented reality is an interactive means of integrating the real world with digitally simulated components.
● There are a hoard of applications that augmented reality can be put to, marketing field being a significant one among them.
● You can comfortably work with the Wondershare Filmora video editing program to add a variety of AR elements to your videos.
Revolutions in technology have brought about the integration of augmented and virtual reality into marketing strategies. Stay tuned to learn about the most amazing AR video examples!
In this article
01 [What Is AR and the Technology Used for Augmented Reality Development?](#Part 1)
02 [What Is the Difference Between Augmented Reality and Virtual Reality?](#Part 2)
03 [10 Examples of Augmented Reality (AR) In Marketing](#Part 3)
Part 1 What is AR and the Technology Used for Augmented Reality Development?
Expanding the acronym, AR stands for Augmented Reality, a relatively newer concept in the world of graphic imaging and other computer based real-time applications. Talking of the exact explanation, augmented reality refers to a responsive synchronization of real world elements into digital platforms, while upgrading the same with high end perceptual information generated from specialized computer systems.
The entire concept of augmented reality rests on 3 major aspects, viz., a synchronized combination of the virtual and real world environments, a responsive interaction of associated elements in real-time, and a precise 3-dimensional registration of virtual and real elements. The aforesaid aspects of augmented reality are often guaranteed by a number of sensory modalities, like that of auditory, visual, somatosensory, olfactory and haptic ones.
Technology Behind Augmented Reality
As far as the technology behind the development of augmented reality video is concerned, the overall implementation is categorized into 3 different tasks. The process is initiated with generating concise, high resolution images of real world elements, followed by creating an overlay of computer generated 3D images on the previously generated real world images. This is further succeeded by facilitating an interactive user engagement and interaction within the simulated surroundings.
The process of technology implementation is seconded by a responsive display mechanism which can be done conveniently on any one among glasses, smartphones, screens, head-mounted displays and handheld devices. Concerning the factor of output credibility, head-mounted displays take the credit of generating a much more immersive augmented reality in comparison to the other display alternatives.
Part 2 What Is the Difference Between Augmented Reality and Virtual Reality?
Advancements in technology has treated the world with a multitude of concepts to simulate real-time elements into digital environments. In addition to augmented reality, the techniques of virtual and alternate reality have come into focus in recent times to address the diversely specific needs of digital and real world integration.
Lack of proper awareness, however, leads to the treatment of these fundamentally different concepts as one and the same thing. Considering the credibility of such technologies towards addressing certain specific purposes, it becomes important to understand the difference among these apparently similar concepts. Having said that, let us make an attempt to realise the dissimilarity between augmented and virtual reality in the following section:
● Underlying Concept
Stressing on the parameter of conceptual utility, augmented reality refers to the integration of digital aspects into a real-time surrounding, most probably through a smartphone or camera, whereas, virtual reality on the other hand, is responsible for the replacement of a real-time setting with a simulated environment.
● Existence Constraints
Talking about augmented reality, the technique showcases the coexistence of the real and virtual surroundings, with the primary goal of supplying extra information about the real-time environment, which can be accessed without a content search. Conversely, virtual reality is predominantly concerned with bringing about a complete shift of the user’s actual ambiances to an entirely fabricated environment that undertakes an independent existence.
● User Control
Speaking on the extent of user control, augmented reality allows you to monitor your real world presence, mostly with a smartphone, while users of virtual reality are entirely controlled by the system, with strictly no self-access. Also, you would require a headset equipment to make use of virtual reality.
Part 3 Examples of Augmented Reality (AR) In Marketing
Having discussed enough about the fundamental aspects of augmented reality, let us proceed towards understanding the credibility of augmented video in the light of modern day information centered applications. While there are manifold varieties of augmented reality usage, the following section highlights the best examples of integrating AR into brand marketing:
01Walmart- Inventory Control
With the aim to examine the dual credibility of its brand stores as online fulfillment as well as physical shopping centers, Walmart in October 2020, announced the proposition of its 4 shopping units as ‘test centers’ of augmented reality, where the latter was supposed to aid in the management and tracking of company inventories.
The technology was implemented through a smartphone application to quicken the transportation process of item packages from the inventory to the sales area. The utility works when the employees hold a handheld device that highlights the dispatch ready boxes in an augmented reality stock video, instead of scanning each box individually.
02Snap- City Painter
Launched in London in October 2020, the City Painter utility lands among the best augmented reality video examples, allowing you to spray paint on and decorate street shops with pre-designed wall paintings, through the use of augmented reality. The most striking aspect of the aforesaid application is its information sharing feature, which allows the changes introduced by you to be seen by fellow users if the app in real time.
The utility is regarded as first step of Snap towards its aim of developing a shared virtual space via a mapping of potential landmarks. The tool has a progressive future in travel and tourism sector, with brand wanting to invest capital on the newly introduced customer needs of adventure and exploration.
03Asos- See My Fit
While the company is a renowned name in the domain of mobile technology and augmented reality innovation since 2009, the ‘See My Fit’ tool was launched by the latter in the year 2020 amid the pandemic period to assist the company’s models who were bound to work from home during the calamity.
Talking of the application, the tool makes use of augmented reality to fit apparels on the models in a digital manner. Additionally, the app works to provide the customers with a realistic insight into the appearance of the products with respect to size and body structure, which further aids to increase the company sales, while minimizing the return risks.
04 Pull & Bear- Console Game
This one is a famous retail brand, whose owner Inditex, has collaborated with the ‘Creative Shop’ utility of Facebook to launch ‘Pacific Game’, a console relish, with the implementation of augmented reality. The gameplay requires you to undertake a journey from California to Tokyo, where the travel obstacles need to be escaped through cohesive head movements to earn game points.
The game was essentially designed as a social media attraction and can be enjoyed on Instagram, as a Facebook AR video, and even on the official Pull & Bear website. If you are playing the dame on Instagram, do try on using the latter’s front camera feature for a more enhanced gaming experience.
05Burberry- Olympia Pop Up at Harrods
The current post pandemic period is witnessing a creative use of augmented reality by brand companies to attract their customers back to the retail shops. To complement the launch of its Olympia Bag, Burberry had introduced a pronounced AR utility at the Harrods. Customers visiting the shop are allowed to witness the Elphis statue walks in real-time environment through an in-store QR code.
The customers can additionally, click pictures and create videos of the same to share on their social media handles. The integration of augmented reality into retail shopping in such innovative ways has guaranteed an immersive experience of the otherwise ordinary store purchases, with a simultaneous benefit to both, product companies and customers.
06IKEA Studio Application
IKEA is known to have integrated augmented reality into its working protocol for a long time now. Space 10, the company’s design laboratory has recently planned a more immersive relaunch of its AR facility with its brand new IKEA Studio application that allows you to capture and redesign room plans in 3D space, including the finest details of door frames, windows, floor rugs and wall colors.
The application is conceptualized considering the inclusion of LiDAR, that is, Light Detection and Ranging sensors in iPhones and is visibly seen as a precursor to the Apple Glass, a more comprehensive application that promised an escalated and realistic experience of augmented reality.
07Amazon- Hair Coloring and Amazon Salon
Boasting of being the largest e-commerce platform, Amazon took its first step into experimenting with augmented reality by introducing the Amazon Salon. Realized as a digital marketplace, the utility works through a ‘Point and Learn’ approach where customers and view and select any product on the tool’s display shelf to get a detailed information about the same through educational content and brand videos on the product display screen.
If you are interested in buying a particular product, you need to scan the latter’s QR code on the display shelf, which will redirect you to the product’s e-commerce page on Amazon’s official website. The AR utility implemented here also allows you to examine the look of various hair shades, before you actually get into choosing a suitable one for the perfect hairdo.
08Gucci- Virtual Sneakers
Gucci lands among the first luxury retail brands to implement augmented reality in its operation model for facilitating its customers with a comprehensive and informed product buying experience. The company incorporated a feature of ‘try on sneakers’ in its retail application, which allowed users to get an insight into the product’s appearance in real-time, thus reducing the return risks while simultaneously ensuring a better customer satisfaction.
The recently launched ‘virtual sneakers’ on the Gucci app are created to be tried and shared exclusively on the online store. Designed with the collaborative efforts of Gucci and the augmented reality fashion house Wanna, this ‘digital only’ footwear is available on Gucci’s online app for customer buying.
09Wayfair- View in Room
This one is essentially a furniture retail company that makes use of augmented reality to provide its customers with a wholesome shopping experience at the comfort of their homes. Wayfair incorporates the AR utility through the upgraded version of its ‘View in Room’ application that works on the LiDAR and RealityKit technologies to provide an authentic and a better realistic product view to the customers.
A few AR incorporated features of the app include precise cast lighting in real-time, product stacking and a real world interface to stand before and examine the overall product appearance, as the customers would actually do in real-time; thus ensuring a personalized product experience to the potential buyers.
10Machine A- Virtual Concept Store
This one is more of a digital platform to showcase the modern day developments in fashion design. Based in London, the Machine-A virtual store was conceptualized to allow the access of relevant audience to the works of new talent in the fashion field, when the Covid-19 pandemic caused a shutdown of the London Fashion Week.
The store was launched as a virtual boutique that could be visited by interested audience through a QR code, which could be scanned from billboards and posters around the London city, and allowed them to view the latest works of the associated fashion designers through an augmented reality concept video. The major success of the utility lies in the enhancement of the consumer-brand relationship, while focusing primarily on product awareness and customer engagement.
● Working With Augmented Reality Videos in Filmora
If you are keen on exploring your editing creativity in augmented reality with video, do consider working with the Wondershare Filmora Video Editor program. The software is affordably the best AR video editing tools available to you free of cost. While the application greets you with the most responsive and clean interfaces, with a plethora of professional quality video editing features that promise to effectively address your most diverse AR video editing requirements.
The software package comes with an inbuilt screen recorder, which you can use to capture specific video snippets and later on edit them with a variety of audio-visual effects from the app’s huge effects library. Not to forget, the application also grants you the liberty to share and export the edits to your social media handles.
For Win 7 or later (64-bit)
For macOS 10.12 or later
● Ending Thoughts →
● Augmented reality is an interactive means of integrating the real world with digitally simulated components.
● There are a hoard of applications that augmented reality can be put to, marketing field being a significant one among them.
● You can comfortably work with the Wondershare Filmora video editing program to add a variety of AR elements to your videos.
How to Convert Videos to Slow Motion?
Slow Motion films are unique, don’t you think? Occasionally, individuals use their phones to shoot slow-motion films if they have an in-built function, and if their phone does not have an in-built feature, they may use slow-motion video creator applications to assist them.
But what happens if you have previously filmed a video at regular speed and now want the movie to be converted to slow motion?
Maybe a video of you from the pool when you’re flipping your hair, but no one remembers to take it in slow motion? Don’t be concerned! Today, we will show you how to turn any video into a slow-motion video on different operating systems.
In this article
01 How to Turn Videos Into Slow Motion on Windows for Free?
02 How to Convert Normal Video to Slow Motion for Free on Mac?
03 How to turn Normal Video to Slow Motion With VLC On Linux Computer?
04 How to Use Wondershare Filmora Video Editor to Turn Normal Videos to Slow Motion?
05 Best Slow Motion Converters to Convert Video to Slow Motion Online Free?
06 How to Convert Normal Video to Smooth Slow Motion In iPhone And Android Phones
Part 1: How to Turn Videos Into Slow Motion on Windows for Free?
If you need to conduct some simple editing and effects on your films, there is no need to invest hundreds of dollars in a video editing software application. For example, you may use the Photos App pre-installed on Windows 10 machines to apply the slow-motion effect to your photographs.
Step 1: Right click the video and choose Open with Photos. If it has been recorded by an iPhone or Android device and stored up to OneDrive, it should appear in the Microsoft Photos app without any further effort. Just click it to preview the video.
Step 2: Go to the Edit & Create option on the right corner on the top, and then select Add slo-mo option.

Step 3: Using the slider, you can determine how slowly you want it to go. Microsoft has built-in support for “Slow“ and “Super-Slow“ performance levels. Drag the slide to the right end will trigger the super slow mode.

Step 4: Specifiy the part that you want to apply slow motion in the playback bar at the bottom, and then save the video that you have just created with slow motion effects on Windows 10 .
The possibility exists that you are using an older version of Windows 10 on your computer if you do not see the option anywhere in the Photos app. You can also follow the steps above to create a slow motion video on Windows 11.
Browse Windows Update from the system menu and click on the appropriate button. When all of the updates have been installed, you will have the most recent version of the Photos app, which includes this functionality.
Part 2: How to Convert Normal Video to Slow Motion for Free on Mac?
Slow-motion videos are among the most enjoyable parts of utilizing your iPhone for videography. Video may be recorded with a frame rate of 120 or 240 fps and then played back at a considerably slower rate than usual.
However, if you don’t record video on your iPhone, making slow motion out of videos shot on other cameras or devices is more challenging. The good news is that iMovie for Mac can do this for you. We’ll show you how in this guide.
Slow-motion films are easy to make using iMovie on your Mac . Just follow the steps listed below.
Step 1: Click on the Import Media option in iMovie once launched on your Mac.
Step 2: Click on the blue Import Selected button once you’ve selected the video file in the file browser to slow it down.
Step 3: You may now open the movie in iMovie. Creating a Project is required at this stage. To do so, click on the Projects option.
Step 4: Once you’ve entered a name for your project, click the blue OK button.
Step 5: By dragging the movie onto your timeline, you may modify the video. Select the video by clicking on it and clicking on the Speed option to change its speed.
Step 6: The speed-editing interface will be shown here. Change Normal to Slow in the Speed drop-down menu.
Step 7: The duration of your movie will be increased by halves the pace at which it was initially recorded. The video may be slowed down even further by moving the speed slider.
Step 8: Go to the Menu Bar and choose File > Share. Select the file you want to share.
Step 9: Click the blue Next button once you’ve selected the properties you want for the file.
Step 10: Select a name for the file, store it, and then click the blue Save button to save it to your computer.
Part 3: How to turn Normal Video to Slow Motion With VLC On Linux Computer?
The video speed may be controlled in two ways using VLC. Using shortcut keys or hotkeys is one method, while menus and buttons are another. Both methods are OK, but the shortcut option is the quickest and most efficient.
Speed up and speed down buttons appear on the upper right of the movie when you press them. Depending on how much you tweak it, the speed is represented as 1.50x or 0.80x. This option is available for those who like to use other shortcut keys.
Step 1: From the VLC menu bar, head over to the Playback for Speed and choose a speed option: slower, slower (fine), normal, faster (fine), and faster.
Step 2: Right-clicking is also possible to access these parameters from the Playback > Speed menu.
Step 3: The video’s speed may be altered by selecting one of those options and then clicking the appropriate button.
If you are running VLC on Windows and Mac, you can check this article to find out the detailed information about how to playback video in slow motion in VLC .
Related: Best Free Video Editor for Linux .
Part 4: How to Use Wondershare Filmora Video Editor to Turn Normal Videos to Slow Motion?
For Win 7 or later (64-bit)
For macOS 10.12 or later
Wondershare Filmora is a video editor we’d like to show to you. Whether using a Windows or a Mac computer, you can rapidly speed up and slow down films with this easy video editor . With a user-friendly interface, Filmora video editor has many professional-grade editing features to help refine videos with ease. From motion tracking to keyframe animations, Filmora video editor offers a plethora of options.
Step 1: Launch Filmora video editor on your Windows or Mac computer (I’m running Windows 10 here). Click the New Project in the Startup window to create a new project in 16:9 aspect ratio by default.

Step 2: Import the video you want to add slow motion effect to the media library, and then drag and drop it to the timeline.

Step 3: To add slow motion effect to part of the video, you need to split the video first and then right click it to choose Speed and Duration. There will be a pop-up window. The motion effects will be sped up or slowed down based on the speed values.

Step 4: When you increase or decrease the video playing speed, the video audio speed changes. If you wish to retain the video audio’s actual playing speed, you may first Detach Audio from the video and then edit the video to achieve a perfect pitch.

Step 5: Select Export after you’ve completed setting the video speed. By selecting Format, you may save the video in any significant format.
Part 5: Best Slow Motion Converters to Convert Video to Slow Motion Online Free?
1. Online Converter
This Online Converter is one of the best on the internet. It is simple to use and supports various video formats such as MP4, AVI, FLV, MOV, 3GP, MKV, WMV, M4V, and others. This tool can also change the video speed by increasing (speeding up) or decreasing (slowing down). The audio in the video file will also become faster or slower due to using this tool.
Step 1: click on the Choose File option from the website to upload the video (max. 200MB).
Step 2: Now select the Speed of the video from the given options. Since we are going to make a video with slow motion effect, choose 0.5x or 0.8x will work perfectly.

Step 3: click on Confirm to convert the video to your preferred slo-mo video.
Part 6: How to Convert Normal Video to Smooth Slow Motion In iPhone And Android Phones
In addition to the essential editing tools of the famous social media platform, TikTok, CapCut is mobile video editing software for both Android and iOS smartphones that were mainly built to complement them. Here is how you can use CapCut to transform a regular video into a slow-mo one:
Step 1: Create A New Project on the CapCut app’s home screen. Browse and add the video you want to search for in slow-motion to the project.
Step 2: When you’re ready to turn off the sound, go ahead and hit the Mute clip audio button first, so there will be no creep sound after applying the slow-motion effect.

Step 3: In case you just want to add a slo-mo effect to part of the video, you need to split the video accordingly. Split the portion of the video that will be slowed down by clicking on the Split button in the menu. And use the Split tool again to end the slow-motion effect to get a segment of the video.
Step 4: Tap the cut section of the video and then you will see the Speed option. Open the Speed menu by selecting it from the drop-down menu.

Step 5: In CapCut, there are two methods to slow down a video, Normal and Curve, respectively. You may just choose the “Normal“ option to make things easy. It is possible to reduce the video’s frame rate by moving the speed slider to the left. You may, for example, make the pace 0.3 times slower. Apply a slow-motion effect by tapping the Check box.

Make a slow motion video at this stage to spice things up. CapCut allows you to add text, create transition effects, and more.
For more information, you can check: How to slo-mo in Capcut .
Conclusion
In this complete guide on “How to Convert Videos to Slow Motion?”, we hope you have learned all the basics. We have covered different apps that can help you do so. As the steps are straigthforward, make sure you abide by all the basics and transform your videos into catchy ones!
02 How to Convert Normal Video to Slow Motion for Free on Mac?
03 How to turn Normal Video to Slow Motion With VLC On Linux Computer?
04 How to Use Wondershare Filmora Video Editor to Turn Normal Videos to Slow Motion?
05 Best Slow Motion Converters to Convert Video to Slow Motion Online Free?
06 How to Convert Normal Video to Smooth Slow Motion In iPhone And Android Phones
Part 1: How to Turn Videos Into Slow Motion on Windows for Free?
If you need to conduct some simple editing and effects on your films, there is no need to invest hundreds of dollars in a video editing software application. For example, you may use the Photos App pre-installed on Windows 10 machines to apply the slow-motion effect to your photographs.
Step 1: Right click the video and choose Open with Photos. If it has been recorded by an iPhone or Android device and stored up to OneDrive, it should appear in the Microsoft Photos app without any further effort. Just click it to preview the video.
Step 2: Go to the Edit & Create option on the right corner on the top, and then select Add slo-mo option.
Step 3: Using the slider, you can determine how slowly you want it to go. Microsoft has built-in support for “Slow“ and “Super-Slow“ performance levels. Drag the slide to the right end will trigger the super slow mode.
Step 4: Specifiy the part that you want to apply slow motion in the playback bar at the bottom, and then save the video that you have just created with slow motion effects on Windows 10 .
The possibility exists that you are using an older version of Windows 10 on your computer if you do not see the option anywhere in the Photos app. You can also follow the steps above to create a slow motion video on Windows 11.
Browse Windows Update from the system menu and click on the appropriate button. When all of the updates have been installed, you will have the most recent version of the Photos app, which includes this functionality.
Part 2: How to Convert Normal Video to Slow Motion for Free on Mac?
Slow-motion videos are among the most enjoyable parts of utilizing your iPhone for videography. Video may be recorded with a frame rate of 120 or 240 fps and then played back at a considerably slower rate than usual.
However, if you don’t record video on your iPhone, making slow motion out of videos shot on other cameras or devices is more challenging. The good news is that iMovie for Mac can do this for you. We’ll show you how in this guide.
Slow-motion films are easy to make using iMovie on your Mac . Just follow the steps listed below.
Step 1: Click on the Import Media option in iMovie once launched on your Mac.
Step 2: Click on the blue Import Selected button once you’ve selected the video file in the file browser to slow it down.
Step 3: You may now open the movie in iMovie. Creating a Project is required at this stage. To do so, click on the Projects option.
Step 4: Once you’ve entered a name for your project, click the blue OK button.
Step 5: By dragging the movie onto your timeline, you may modify the video. Select the video by clicking on it and clicking on the Speed option to change its speed.
Step 6: The speed-editing interface will be shown here. Change Normal to Slow in the Speed drop-down menu.
Step 7: The duration of your movie will be increased by halves the pace at which it was initially recorded. The video may be slowed down even further by moving the speed slider.
Step 8: Go to the Menu Bar and choose File > Share. Select the file you want to share.
Step 9: Click the blue Next button once you’ve selected the properties you want for the file.
Step 10: Select a name for the file, store it, and then click the blue Save button to save it to your computer.
Part 3: How to turn Normal Video to Slow Motion With VLC On Linux Computer?
The video speed may be controlled in two ways using VLC. Using shortcut keys or hotkeys is one method, while menus and buttons are another. Both methods are OK, but the shortcut option is the quickest and most efficient.
Speed up and speed down buttons appear on the upper right of the movie when you press them. Depending on how much you tweak it, the speed is represented as 1.50x or 0.80x. This option is available for those who like to use other shortcut keys.
Step 1: From the VLC menu bar, head over to the Playback for Speed and choose a speed option: slower, slower (fine), normal, faster (fine), and faster.
Step 2: Right-clicking is also possible to access these parameters from the Playback > Speed menu.
Step 3: The video’s speed may be altered by selecting one of those options and then clicking the appropriate button.
If you are running VLC on Windows and Mac, you can check this article to find out the detailed information about how to playback video in slow motion in VLC .
Related: Best Free Video Editor for Linux .
Part 4: How to Use Wondershare Filmora Video Editor to Turn Normal Videos to Slow Motion?
For Win 7 or later (64-bit)
For macOS 10.12 or later
Wondershare Filmora is a video editor we’d like to show to you. Whether using a Windows or a Mac computer, you can rapidly speed up and slow down films with this easy video editor . With a user-friendly interface, Filmora video editor has many professional-grade editing features to help refine videos with ease. From motion tracking to keyframe animations, Filmora video editor offers a plethora of options.
Step 1: Launch Filmora video editor on your Windows or Mac computer (I’m running Windows 10 here). Click the New Project in the Startup window to create a new project in 16:9 aspect ratio by default.
Step 2: Import the video you want to add slow motion effect to the media library, and then drag and drop it to the timeline.
Step 3: To add slow motion effect to part of the video, you need to split the video first and then right click it to choose Speed and Duration. There will be a pop-up window. The motion effects will be sped up or slowed down based on the speed values.
Step 4: When you increase or decrease the video playing speed, the video audio speed changes. If you wish to retain the video audio’s actual playing speed, you may first Detach Audio from the video and then edit the video to achieve a perfect pitch.
Step 5: Select Export after you’ve completed setting the video speed. By selecting Format, you may save the video in any significant format.
Part 5: Best Slow Motion Converters to Convert Video to Slow Motion Online Free?
1. Online Converter
This Online Converter is one of the best on the internet. It is simple to use and supports various video formats such as MP4, AVI, FLV, MOV, 3GP, MKV, WMV, M4V, and others. This tool can also change the video speed by increasing (speeding up) or decreasing (slowing down). The audio in the video file will also become faster or slower due to using this tool.
Step 1: click on the Choose File option from the website to upload the video (max. 200MB).
Step 2: Now select the Speed of the video from the given options. Since we are going to make a video with slow motion effect, choose 0.5x or 0.8x will work perfectly.
Step 3: click on Confirm to convert the video to your preferred slo-mo video.
Part 6: How to Convert Normal Video to Smooth Slow Motion In iPhone And Android Phones
In addition to the essential editing tools of the famous social media platform, TikTok, CapCut is mobile video editing software for both Android and iOS smartphones that were mainly built to complement them. Here is how you can use CapCut to transform a regular video into a slow-mo one:
Step 1: Create A New Project on the CapCut app’s home screen. Browse and add the video you want to search for in slow-motion to the project.
Step 2: When you’re ready to turn off the sound, go ahead and hit the Mute clip audio button first, so there will be no creep sound after applying the slow-motion effect.
Step 3: In case you just want to add a slo-mo effect to part of the video, you need to split the video accordingly. Split the portion of the video that will be slowed down by clicking on the Split button in the menu. And use the Split tool again to end the slow-motion effect to get a segment of the video.
Step 4: Tap the cut section of the video and then you will see the Speed option. Open the Speed menu by selecting it from the drop-down menu.
Step 5: In CapCut, there are two methods to slow down a video, Normal and Curve, respectively. You may just choose the “Normal“ option to make things easy. It is possible to reduce the video’s frame rate by moving the speed slider to the left. You may, for example, make the pace 0.3 times slower. Apply a slow-motion effect by tapping the Check box.
Make a slow motion video at this stage to spice things up. CapCut allows you to add text, create transition effects, and more.
For more information, you can check: How to slo-mo in Capcut .
Conclusion
In this complete guide on “How to Convert Videos to Slow Motion?”, we hope you have learned all the basics. We have covered different apps that can help you do so. As the steps are straigthforward, make sure you abide by all the basics and transform your videos into catchy ones!
Also read:
- A Detailed Guide to Do Color Correction in OBS
- 2024 Approved You Can Easily Film Rotating Video Illusions From Your Smartphone and Edit Them on Wondershare Filmora in Just a Few Clicks
- 2024 Approved 6 Best MP4 Mergers to Join Videos Easily
- In 2024, Renderforest Is a Great Online Editing Platform to Use for Many Video Creators. If You Want to Make an Intro Video for Your Channel or Daily Vlogs, You Can Follow This Article to Know More Details
- Kdenlive Is a Free, Open-Source Video Editing Software Application. Kdenlive Is a Powerful Video Editor that Can Be Used to Create Professional-Quality Videos
- New In 2024, How to Make Discord GIF PFP? Solved
- In 2024, Everything That You Need to Know About Video Montages- Ideas, Techniques, and Software
- New In 2024, Detailed Steps to Add Border to Video Using Premiere Pro
- Updated 2024 Approved Easy Guide to Zoom Video in VLC
- New 3D LUT Mobile App Review - A Composite Application for Editing Media for 2024
- Updated 2024 Approved Add Subtitles To Videos With Kapwing Step by Step
- Updated 2024 Approved Best Ai Generated Memes
- Updated 2024 Approved Tips to Make Cinematic Color Grading
- Updated In 2024, How to Create a Custom Sequence Preset in Premiere Pro
- Updated The Premiere Pro Video Templates Help Make Original Content of Broadcast Quality. The Article Introduces 10 Free Premiere Pro Templates that Are Sure to Make Your Life Easy
- Updated Complete Tutorial to Make an Impressive Countdown Timer Video for 2024
- Updated In 2024, Focusing On The Best Ways To Convert Slow-Motion Video to Normal
- 2024 Approved What Are the Best 10 GIF Creator?
- New Create the Night-to-Day Effect Videos
- Updated How to Delete White Background in Photoshop. How to Create a Transparent Background in Photoshop? Steps to Get Rid of White Background in Photoshop
- In 2024, How to Remove Activation Lock On the Apple iPhone 14 Without Previous Owner?
- How to Repair a Damaged video file of Xiaomi using Video Repair Utility on Windows?
- Planning to Use a Pokemon Go Joystick on Lava Blaze 2? | Dr.fone
- In 2024, Fake the Location to Get Around the MLB Blackouts on Oppo A78 5G | Dr.fone
- In 2024, Learn How To Lock Stolen Your iPhone 14 Pro Max Properly | Dr.fone
- How to Recover FaceTime Call History on iPhone XS | Stellar
- How to Show Wi-Fi Password on Xiaomi 14 Ultra
- Calls on Lava Yuva 3 Pro Go Straight to Voicemail? 12 Fixes | Dr.fone
- In 2024, Does Apple iPhone 6 Have Find My Friends? | Dr.fone
- In 2024, Does Airplane Mode Turn off GPS Location On Samsung Galaxy Z Fold 5? | Dr.fone
- In 2024, How to Bypass Apple iPhone 13 mini Passcode Easily Video Inside
- How To Create an Apple Developer Account On iPhone XS Max
- In 2024, How to Unlock Vivo Y36i Phone without Any Data Loss
- Beginners Tutorial Stream to Facebook With OBS Studio
- How to Fix It Samsung Galaxy M14 5G Wont Turn On | Dr.fone
- How to Change GPS Location on Nokia G22 Easily & Safely | Dr.fone
- Use Device Manager to identify missing hardware drivers with Windows Device Manager in Windows 11
- In 2024, How to Remove the Activation Lock On your iPad and iPhone SE (2020) without Apple Account
- Title: Updated YouTube Algorithm Hacks
- Author: Chloe
- Created at : 2024-04-24 07:08:17
- Updated at : 2024-04-25 07:08:17
- Link: https://ai-editing-video.techidaily.com/updated-youtube-algorithm-hacks/
- License: This work is licensed under CC BY-NC-SA 4.0.
