
Use The Best LUTs for Lightroom for 2024

Use The Best LUTs for Lightroom
Colors play an essential role in our lives. They add emotions, create moods, and set the tone for our experiences. Using colors in media is significant as they help create an atmosphere that improves your story. That’s why filmmakers and photographers focus so much on color grading and adjustment. For this purpose, they use different tools like LUTs.
You can use LUTs in your images and videos to achieve a particular look or feel in Lightroom. With LUTs, you can make fantastic color grading in Lightroom. Many paid and free LUTs for Lightroom are available to download and use for your media. Moreover, LUTs can save time and give your story perspective and emotion.
Part 1: How Are LUTs Influencing Video Editors?
There are many ways in which LUTs can help and influence content creators and video editors. From Lightroom presets to Premiere Pro presets, you can download any. However, you need to learn the many ways in which LUTs are helping editors.
Efficiency
LUTs (Lookup Tables) are a powerful tool that can help you in many ways if you are a video editor. First, they can make your editing process more efficient. You can apply color grading and correction to your footage, saving you time and increasing productivity. Instead of manually adjusting the colors for each clip, you can use LUTs to achieve a particular look.
Creativity
In addition to efficiency, LUTs also offer a wide range of creative options. You can use LUTs to explore different styles and moods, from vintage looks to modern cinematic ones. It can help you create a unique style for your videos and make them look more meaningful. With LUTs, you can experiment with different colors and effects to achieve the perfect look for your footage.
Consistency
Another benefit of using LUTs is consistency. With LUTs, you can maintain a consistent look and feel across different video clips. It gives all clips in a project a cohesive and professional appearance. These LUTs can be especially helpful if you work on a long-term project or with multiple editors. It will give a uniform look and feel throughout your project.
Accessibility
LUTs are also becoming more accessible than ever before. With free and paid online options, video editors of all skill levels can access these tools for their video projects. You don’t need extensive training or experience in color grading to use LUTs for your videos. Moreover, anyone can use LUTs with simple steps and make their content look more professional.
Part 2: Top Free LUTs for Lightroom
You don’t need to search for free LUTs for Lightroom for your media content. Here is a list of 5 Lightroom LUTs free to download to color grade your media in different tones.
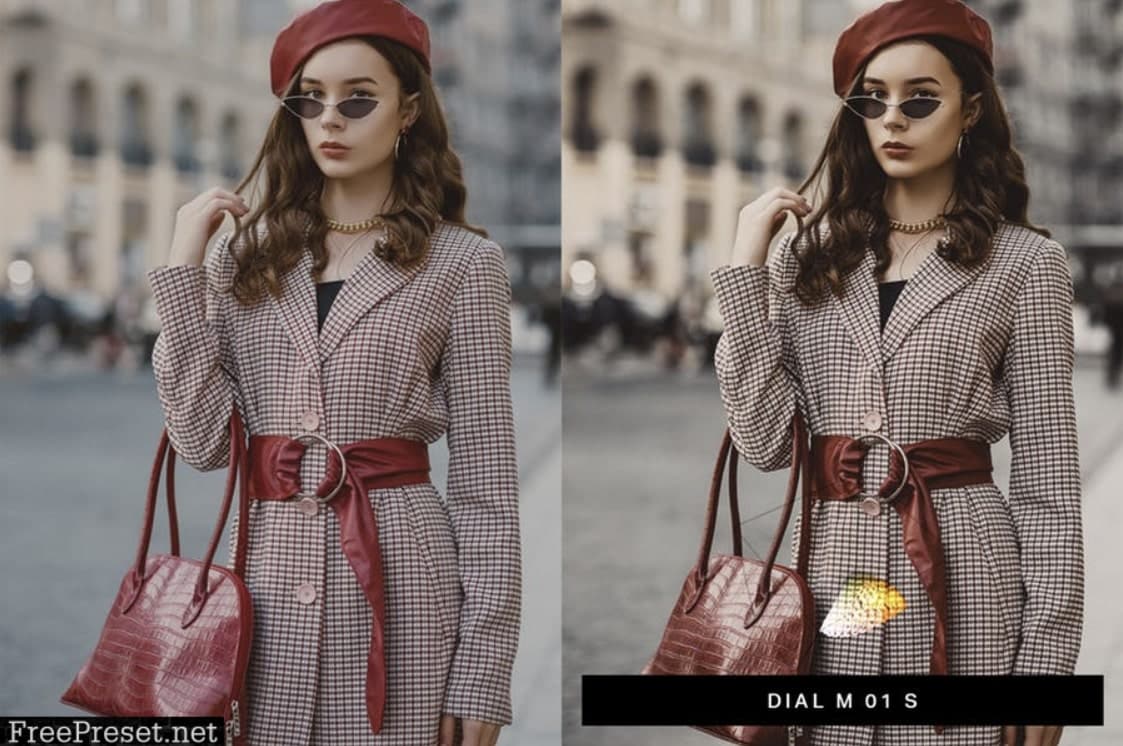
1. 50 Vintage Cinematic Lightroom Presets and LUTs
It is a pack of 50 Cinematic-style vintage LUTs you can apply to your media files. This LUT pack has a warm and orangey tone to give a golden hour and warm color scheme touch. You can use it to create a vintage, nostalgic look for your content. Furthermore, you can use your travel photos or outdoor adventure videos to give them a dreamy rusty vibe.
2. Free LUTs Ciné Green
If you want to add a cool and moody feel to your content, try using this LUT. It has a greenish-blue tone that can give your photos and videos a mysterious and cinematic look. Moreover, this LUT is excellent for nighttime cityscape shots or dramatic portrait photography. Furthermore, you can use it to create a dark and edgy vibe for your content.

3. Urban LUTs
Urban LUT is a pack of 10 rich-color LUTs you can use on your photos and videos. This pack has a bright and cheerful feel to it. It enhances the colors in your photos and videos, making them pop and look more vibrant. Additionally, you can use it to create a fun and lively atmosphere for your content. Moreover, you can try this pack for your vacation photos or family videos to give them an energetic feel.

4. 90’s Vintage LUT Presets
If you want to add a vintage and retro look to your content, 90’s Vintage LUT Presets are perfect. It has a yellow and orange tone that can give your photos and videos an old-fashioned and nostalgic feel. Moreover, it gives your media a 90s feel with ten different LUTs. This pack can create a vintage feel for your content and give your project a throwback look.
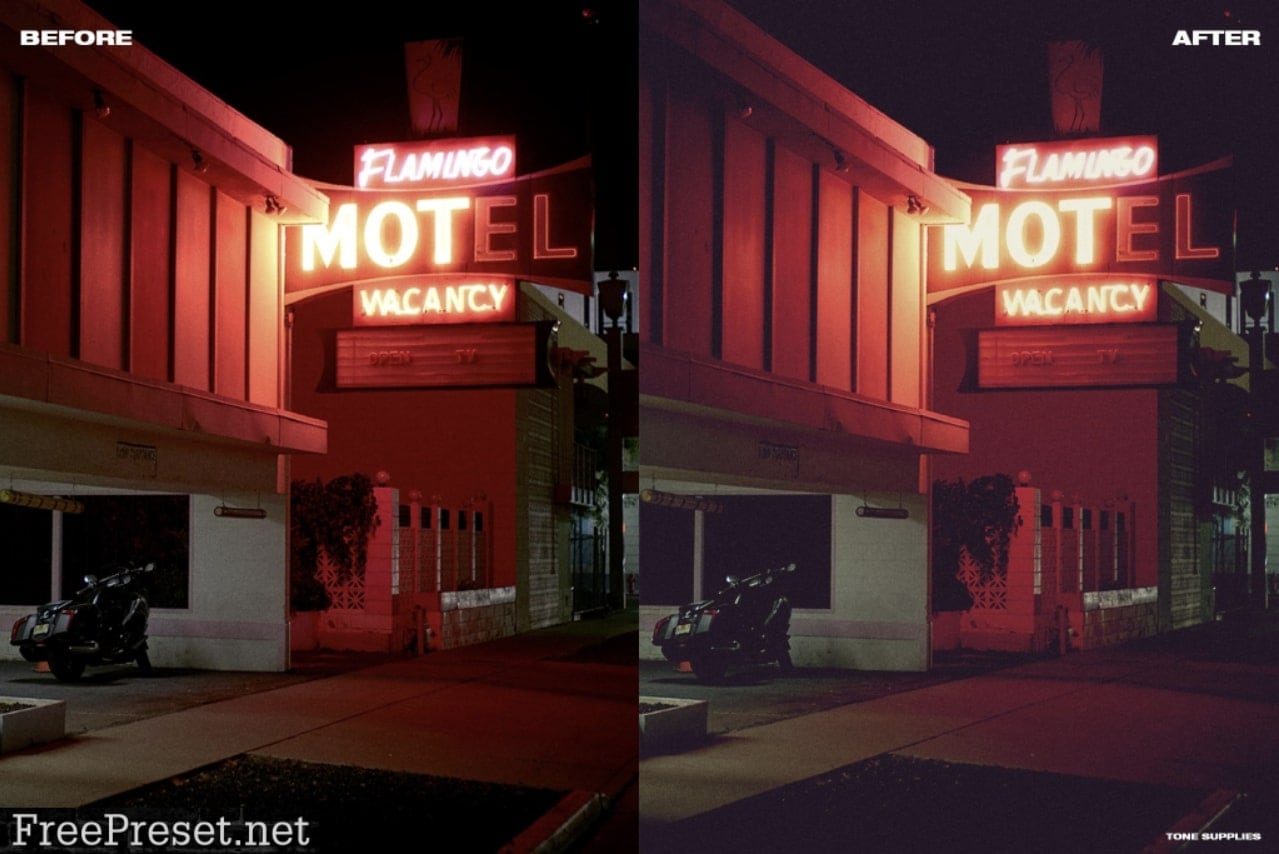
5. 8 Free Pastel Day Lightroom Presets and LUTs
This LUT offers eight paste color-grade presets for photos and videos. This pack has a soft and pastel tone to give your media a dreamy and romantic look for your content. It’s excellent for portrait photography, especially for outdoor shoots with natural lighting. Additionally, you can use it to create a soft and gentle vibe for your content with a more delicate touch.

Bonus Part: Wondershare Filmora: A Great Haven for LUTs
Wondershare Filmora might just be what you need to give your videos a cinematic touch. This powerful tool has over 200+ LUTs in its library to give your videos the perfect tone and color grading. You can even adjust the intensity of the LUTs to match the mood of your videos. Furthermore, you can tweak with basic options like hue, saturation, exposure, white balance, and more.
In addition, Wondershare Filmora offers over 10 billion free stock media for you to use in your photos and videos. Moreover, you can even save your music videos up to 4K resolution with sharper and more detailed results. Additionally, you can use the audio visualizer to match the sound of your video automatically. You can choose from different transitions and effects for your videos as well.

Empower your videos with a new mood using different LUTs. Filmora now offers 100+ top-quality 3D LUTs cover a broad range of scenarios. Transform your videos with Filmora’s powerful 3D LUTs.
Apply LUT on Videos Apply LUT on Videos Learn More

Conclusion
In conclusion, LUTs are a powerful tool for video editors who want to give their videos a cinematic look. You can easily achieve the perfect tone and color grading for your videos and pictures. Moreover, LUTs can save you time and effort in video editing. With many paid and free LUTs for Lightroom available that you can use to create professional-looking videos.
Part 1: How Are LUTs Influencing Video Editors?
There are many ways in which LUTs can help and influence content creators and video editors. From Lightroom presets to Premiere Pro presets, you can download any. However, you need to learn the many ways in which LUTs are helping editors.
Efficiency
LUTs (Lookup Tables) are a powerful tool that can help you in many ways if you are a video editor. First, they can make your editing process more efficient. You can apply color grading and correction to your footage, saving you time and increasing productivity. Instead of manually adjusting the colors for each clip, you can use LUTs to achieve a particular look.
Creativity
In addition to efficiency, LUTs also offer a wide range of creative options. You can use LUTs to explore different styles and moods, from vintage looks to modern cinematic ones. It can help you create a unique style for your videos and make them look more meaningful. With LUTs, you can experiment with different colors and effects to achieve the perfect look for your footage.
Consistency
Another benefit of using LUTs is consistency. With LUTs, you can maintain a consistent look and feel across different video clips. It gives all clips in a project a cohesive and professional appearance. These LUTs can be especially helpful if you work on a long-term project or with multiple editors. It will give a uniform look and feel throughout your project.
Accessibility
LUTs are also becoming more accessible than ever before. With free and paid online options, video editors of all skill levels can access these tools for their video projects. You don’t need extensive training or experience in color grading to use LUTs for your videos. Moreover, anyone can use LUTs with simple steps and make their content look more professional.
Part 2: Top Free LUTs for Lightroom
You don’t need to search for free LUTs for Lightroom for your media content. Here is a list of 5 Lightroom LUTs free to download to color grade your media in different tones.
1. 50 Vintage Cinematic Lightroom Presets and LUTs
It is a pack of 50 Cinematic-style vintage LUTs you can apply to your media files. This LUT pack has a warm and orangey tone to give a golden hour and warm color scheme touch. You can use it to create a vintage, nostalgic look for your content. Furthermore, you can use your travel photos or outdoor adventure videos to give them a dreamy rusty vibe.

2. Free LUTs Ciné Green
If you want to add a cool and moody feel to your content, try using this LUT. It has a greenish-blue tone that can give your photos and videos a mysterious and cinematic look. Moreover, this LUT is excellent for nighttime cityscape shots or dramatic portrait photography. Furthermore, you can use it to create a dark and edgy vibe for your content.

3. Urban LUTs
Urban LUT is a pack of 10 rich-color LUTs you can use on your photos and videos. This pack has a bright and cheerful feel to it. It enhances the colors in your photos and videos, making them pop and look more vibrant. Additionally, you can use it to create a fun and lively atmosphere for your content. Moreover, you can try this pack for your vacation photos or family videos to give them an energetic feel.

4. 90’s Vintage LUT Presets
If you want to add a vintage and retro look to your content, 90’s Vintage LUT Presets are perfect. It has a yellow and orange tone that can give your photos and videos an old-fashioned and nostalgic feel. Moreover, it gives your media a 90s feel with ten different LUTs. This pack can create a vintage feel for your content and give your project a throwback look.

5. 8 Free Pastel Day Lightroom Presets and LUTs
This LUT offers eight paste color-grade presets for photos and videos. This pack has a soft and pastel tone to give your media a dreamy and romantic look for your content. It’s excellent for portrait photography, especially for outdoor shoots with natural lighting. Additionally, you can use it to create a soft and gentle vibe for your content with a more delicate touch.

Bonus Part: Wondershare Filmora: A Great Haven for LUTs
Wondershare Filmora might just be what you need to give your videos a cinematic touch. This powerful tool has over 200+ LUTs in its library to give your videos the perfect tone and color grading. You can even adjust the intensity of the LUTs to match the mood of your videos. Furthermore, you can tweak with basic options like hue, saturation, exposure, white balance, and more.
In addition, Wondershare Filmora offers over 10 billion free stock media for you to use in your photos and videos. Moreover, you can even save your music videos up to 4K resolution with sharper and more detailed results. Additionally, you can use the audio visualizer to match the sound of your video automatically. You can choose from different transitions and effects for your videos as well.

Empower your videos with a new mood using different LUTs. Filmora now offers 100+ top-quality 3D LUTs cover a broad range of scenarios. Transform your videos with Filmora’s powerful 3D LUTs.
Apply LUT on Videos Apply LUT on Videos Learn More

Conclusion
In conclusion, LUTs are a powerful tool for video editors who want to give their videos a cinematic look. You can easily achieve the perfect tone and color grading for your videos and pictures. Moreover, LUTs can save you time and effort in video editing. With many paid and free LUTs for Lightroom available that you can use to create professional-looking videos.
Top Fixes to Resolve Issues with Premiere Pro Slow Playback
Video editors are massively relying on Adobe Premiere Pro for their professional projects. This tool ensures workflow in video production and relieves several complex editing tasks. Unfortunately, it does have some errors, like Premiere Pro playback slow, which users refer to as patience-testing. Apart from being the most stable video editor, Premiere Pro consumes many resources.
Due to this, users encounter Premiere playback issues during video editing. If your choppy playback and unexpected freeze have annoyed you, keep reading this article. Here, you will find the best 8 solutions to instantly fix Premiere Pro’s slow playback. Plus, there will be an alternative that you can consider for error-free video editing.
Slow Motion Video Maker Slow your video’s speed with better control of your keyframes to create unique cinematic effects

Part 1: What Does a Video with a Slow Playback Mean?
Premiere Pro Playback Slow is a common issue faced by editors these days. It refers to playback slowness and choppiness of a fresh or edited video. Many users report a complete blackout in video footage during the playback. Lagging in playback might result from insufficient RAM or inadequate storage space. Maybe an outdated GPU, heavy video effects, or active background programs cause it.
Such playback lagging can prove incredibly frustrating or test your patience beyond limits. It can desync the audio and video components of files during the playback. You can consider it a sign that your computer does not have the right specs for Adobe Premiere Pro . Also, it could mean that this tool is dropping frames in the Playback of videos.
Part 2: Fixing the Premiere Pro Slow Playback Issue [100% Effective Solutions]
If your Premiere Pro is not smoothly playing the videos, this section is for you. Firstly, you should confirm that your playback is lagging or slowing down. To do so, analyze whether your playhead is making small jumps or playing smoothly. There are plenty of things that you can do to reduce or minimize the Premiere playback slow.
- Solution 1: Disable High-Quality Playback
- Solution 2: Delete Media Cache Files
- Solution 3: Optimize Rendering for Performance
- Solution 4: Close Unnecessary Applications
- Solution 5: Turn on GPU Acceleration
- Solution 6: Change Playback Resolution
- Solution 7: Use Proxy Videos in Adobe
- Solution 8: Mute FX Effects
Solution 1: Disable High-Quality Playback
Adobe Premiere Pro enables a High-Quality playback option by default. It helps in watching videos clearly but causes trouble. Thus, turning it off can fix the playback lagging. Tap on the “Settings” icon, which is next to the playback resolution menu. From there, disable the “High-Quality Playback” option by selecting it.

Solution 2: Delete Media Cache Files
In Premiere Pro, the Media cache is a temporary storage space that keeps copies of files. It allows you to access the files faster and cause a good playback. If these media caches use hefty hard disk space, then to enhance playback performance.
To do so, open the Premiere Pro and go to the “Preferences” menu. From the list, select “Media Cache.” Now browse to select the media and tap on the “Delete Unused” next to the “Delete Unused Media Cache Files. After choosing the option to delete cache files, click on “OK and the files will be removed.

Solution 3: Optimize Rendering for Performance
If Premiere Pro slow playback still exists, then use this method to fix it. Set the optimized rendering to fix the performance of playback. Press the “Edit” option from the top toolbar and choose the “Preferences.” Then, navigate toward “Memory” and find a pop-up window. From that screen, click on “Memory” dropdown and pick “Performance.” Finally, tap on “OK” and get a better playback.

Solution 4: Close Unnecessary Applications
Sometimes, lagging in playback occurs when you work on multiple applications. The system gets burdened and might slow down every process at that time. For a quick and effective solution, you should close the other tabs immediately. Only Adobe Premiere Pro and your file manager can remain open for continuous playback.

Solution 5: Turn on GPU Acceleration
There is another fix you can try to overcome Premiere Pro playback slow. Without any delay, ensure that the Render is set to GPU Acceleration. Simply go to the “File” option at the top toolbar and click on the “Project Settings.” Then, pick “General” and set it to “Mercury Playback Engine GPU Acceleration.” This option is under the Playback Section and Video Render.

Solution 6: Change Playback Resolution
Due to the higher resolution of videos, playback lagging occurs. It has a quick solution: changing the playback resolution to a lower rate. For this purpose, go to “Settings” at the top right and choose the “Dynamic Quality” option. Select a lower resolution, like 1:2 or lower. You should look for options that can reduce resolution from the original resolution of the clip.

Solution 7: Use Proxy Videos in Adobe
Proxy videos are proxy files that are compressed versions of original projects. They help users edit heavy and lengthy videos with any Premiere Playback slow. In your project panel, select your video and right-click on it. From the list, choose “Proxy” and explore “Create Proxies.”
Now, pick the “Codec” option from another window and tap “QuickTime.” Specify a location for proxies and try to keep them in a new folder with the original media. Lastly, click “OK,” and Adobe Media Encoder will instantly produce video proxies.

Solution 8: Mute FX Effects
The working size of video files gets increased with visual and audio effects. If your videos are still lagging in playbacks, then head to mute those effects to fix this issue. From the playback toolbar, choose the “fx” button. Alternatively, click on the “+” icon at the top right side of Program Monitor. Drag it to the button panel and press the “fx” button to toggle it “Off.”

Part 3: Make the Slow-Motion Video Making Easy with Wondershare Filmora
Apart from Premiere Pro’s slow playback, it’s a difficult tool to work with. Even professional video editors face several challenges and look for fix guides. As an effective solution, Wondershare Filmora is a good option for all users. It is a great video editor with AI-integrated features. Non-tech persons can even maintain smooth editing with Filmora’s AI assistant.
This software equips you with a complete video editing suit. Using any feature, you will not face laggings during the editing process. Many editors want to add slow motion or speed ramping in their videos to embrace creativity. They can freely use Filmora without fearing system crashes or playback slowing down.
Step-by-Step Guide to Perform Slow Motion Effect with Optical Flow
Without any playback, slow down and enjoy slow-motion effects in your videos. To add such an effect with optical flow, you can follow the steps below.
Free Download For Win 7 or later(64-bit)
Free Download For macOS 10.14 or later
Step 1Import Project in the Timeline Section
Successfully install Filmora and head to its main interface. Start working on your project by tapping “New Project” and importing the file into the timeline. You can press the “Ctrl + I” keys, browse the project to import, and drag it into the timeline.

Step 2Slow Down Video with the Optical Flow Option
Right-click on your clip and pick “Speed Ramping” from the list. Now, choose the “Customize” option and move below to edit it. Hold the dots and adjust their location to change the video speed. You can select Montage and Jumper effects to change the speed of clips.
Now, scroll down and find “AI Frame Interpolation.” Click on the downward icon and tap “Optical Flow” for slow but high-quality video.

Step 3Export After Finalizing
After making edits, look for the “Export” option at the top right side. Make changes in resolution, project name, and other aspects. Press “Export” to get the file to your assigned location.

Effective Key Features of Filmora
Besides smooth playback, Filmora offers powerful AI features to edit videos. Let’s explore some of its dynamic and innovative options.
AI Copilot: This tool provides you with an AI assistant in case you are unfamiliar with editing basics. It can not only guide you but also navigate towards the respective features. Users can ask anything and find solutions with natural language prompts.
AI Music Generator: Are you tired of internet surfing but haven’t found perfect music? Filmora offers AI-generated music that perfectly aligns with your content needs. It allows you to choose the number of music tracks, moods, and duration of the videos.
AI Image: With Filmora, getting a copyright-free image is not a big deal. Users have to describe an image and pick one style to grab their dream image. Also, they can select an aspect ratio to start creating an image.
AI Smart Masking: Often, the best-captured media seems useless because of its messy background. AI masking comes to rescue your projects. You can use the Chroma key or AI portrait to remove or change the backgrounds of the media.
Conclusion
To wrap up, Adobe Premiere Pro’s slow playback can occur for several reasons. Many solutions are discussed above to tackle such errors and avoid frustration. Meanwhile, you can use Wondershare Filmora, which is much easier. Also, it does not cause any errors while working and ensures a smooth workflow. With AI features, users can effectively perform every kind of video editing task.
Make A Slow Motion Video Make A Slow Motion Video More Features

Part 1: What Does a Video with a Slow Playback Mean?
Premiere Pro Playback Slow is a common issue faced by editors these days. It refers to playback slowness and choppiness of a fresh or edited video. Many users report a complete blackout in video footage during the playback. Lagging in playback might result from insufficient RAM or inadequate storage space. Maybe an outdated GPU, heavy video effects, or active background programs cause it.
Such playback lagging can prove incredibly frustrating or test your patience beyond limits. It can desync the audio and video components of files during the playback. You can consider it a sign that your computer does not have the right specs for Adobe Premiere Pro . Also, it could mean that this tool is dropping frames in the Playback of videos.
Part 2: Fixing the Premiere Pro Slow Playback Issue [100% Effective Solutions]
If your Premiere Pro is not smoothly playing the videos, this section is for you. Firstly, you should confirm that your playback is lagging or slowing down. To do so, analyze whether your playhead is making small jumps or playing smoothly. There are plenty of things that you can do to reduce or minimize the Premiere playback slow.
- Solution 1: Disable High-Quality Playback
- Solution 2: Delete Media Cache Files
- Solution 3: Optimize Rendering for Performance
- Solution 4: Close Unnecessary Applications
- Solution 5: Turn on GPU Acceleration
- Solution 6: Change Playback Resolution
- Solution 7: Use Proxy Videos in Adobe
- Solution 8: Mute FX Effects
Solution 1: Disable High-Quality Playback
Adobe Premiere Pro enables a High-Quality playback option by default. It helps in watching videos clearly but causes trouble. Thus, turning it off can fix the playback lagging. Tap on the “Settings” icon, which is next to the playback resolution menu. From there, disable the “High-Quality Playback” option by selecting it.

Solution 2: Delete Media Cache Files
In Premiere Pro, the Media cache is a temporary storage space that keeps copies of files. It allows you to access the files faster and cause a good playback. If these media caches use hefty hard disk space, then to enhance playback performance.
To do so, open the Premiere Pro and go to the “Preferences” menu. From the list, select “Media Cache.” Now browse to select the media and tap on the “Delete Unused” next to the “Delete Unused Media Cache Files. After choosing the option to delete cache files, click on “OK and the files will be removed.

Solution 3: Optimize Rendering for Performance
If Premiere Pro slow playback still exists, then use this method to fix it. Set the optimized rendering to fix the performance of playback. Press the “Edit” option from the top toolbar and choose the “Preferences.” Then, navigate toward “Memory” and find a pop-up window. From that screen, click on “Memory” dropdown and pick “Performance.” Finally, tap on “OK” and get a better playback.

Solution 4: Close Unnecessary Applications
Sometimes, lagging in playback occurs when you work on multiple applications. The system gets burdened and might slow down every process at that time. For a quick and effective solution, you should close the other tabs immediately. Only Adobe Premiere Pro and your file manager can remain open for continuous playback.

Solution 5: Turn on GPU Acceleration
There is another fix you can try to overcome Premiere Pro playback slow. Without any delay, ensure that the Render is set to GPU Acceleration. Simply go to the “File” option at the top toolbar and click on the “Project Settings.” Then, pick “General” and set it to “Mercury Playback Engine GPU Acceleration.” This option is under the Playback Section and Video Render.

Solution 6: Change Playback Resolution
Due to the higher resolution of videos, playback lagging occurs. It has a quick solution: changing the playback resolution to a lower rate. For this purpose, go to “Settings” at the top right and choose the “Dynamic Quality” option. Select a lower resolution, like 1:2 or lower. You should look for options that can reduce resolution from the original resolution of the clip.

Solution 7: Use Proxy Videos in Adobe
Proxy videos are proxy files that are compressed versions of original projects. They help users edit heavy and lengthy videos with any Premiere Playback slow. In your project panel, select your video and right-click on it. From the list, choose “Proxy” and explore “Create Proxies.”
Now, pick the “Codec” option from another window and tap “QuickTime.” Specify a location for proxies and try to keep them in a new folder with the original media. Lastly, click “OK,” and Adobe Media Encoder will instantly produce video proxies.

Solution 8: Mute FX Effects
The working size of video files gets increased with visual and audio effects. If your videos are still lagging in playbacks, then head to mute those effects to fix this issue. From the playback toolbar, choose the “fx” button. Alternatively, click on the “+” icon at the top right side of Program Monitor. Drag it to the button panel and press the “fx” button to toggle it “Off.”

Part 3: Make the Slow-Motion Video Making Easy with Wondershare Filmora
Apart from Premiere Pro’s slow playback, it’s a difficult tool to work with. Even professional video editors face several challenges and look for fix guides. As an effective solution, Wondershare Filmora is a good option for all users. It is a great video editor with AI-integrated features. Non-tech persons can even maintain smooth editing with Filmora’s AI assistant.
This software equips you with a complete video editing suit. Using any feature, you will not face laggings during the editing process. Many editors want to add slow motion or speed ramping in their videos to embrace creativity. They can freely use Filmora without fearing system crashes or playback slowing down.
Step-by-Step Guide to Perform Slow Motion Effect with Optical Flow
Without any playback, slow down and enjoy slow-motion effects in your videos. To add such an effect with optical flow, you can follow the steps below.
Free Download For Win 7 or later(64-bit)
Free Download For macOS 10.14 or later
Step 1Import Project in the Timeline Section
Successfully install Filmora and head to its main interface. Start working on your project by tapping “New Project” and importing the file into the timeline. You can press the “Ctrl + I” keys, browse the project to import, and drag it into the timeline.

Step 2Slow Down Video with the Optical Flow Option
Right-click on your clip and pick “Speed Ramping” from the list. Now, choose the “Customize” option and move below to edit it. Hold the dots and adjust their location to change the video speed. You can select Montage and Jumper effects to change the speed of clips.
Now, scroll down and find “AI Frame Interpolation.” Click on the downward icon and tap “Optical Flow” for slow but high-quality video.

Step 3Export After Finalizing
After making edits, look for the “Export” option at the top right side. Make changes in resolution, project name, and other aspects. Press “Export” to get the file to your assigned location.

Effective Key Features of Filmora
Besides smooth playback, Filmora offers powerful AI features to edit videos. Let’s explore some of its dynamic and innovative options.
AI Copilot: This tool provides you with an AI assistant in case you are unfamiliar with editing basics. It can not only guide you but also navigate towards the respective features. Users can ask anything and find solutions with natural language prompts.
AI Music Generator: Are you tired of internet surfing but haven’t found perfect music? Filmora offers AI-generated music that perfectly aligns with your content needs. It allows you to choose the number of music tracks, moods, and duration of the videos.
AI Image: With Filmora, getting a copyright-free image is not a big deal. Users have to describe an image and pick one style to grab their dream image. Also, they can select an aspect ratio to start creating an image.
AI Smart Masking: Often, the best-captured media seems useless because of its messy background. AI masking comes to rescue your projects. You can use the Chroma key or AI portrait to remove or change the backgrounds of the media.
Conclusion
To wrap up, Adobe Premiere Pro’s slow playback can occur for several reasons. Many solutions are discussed above to tackle such errors and avoid frustration. Meanwhile, you can use Wondershare Filmora, which is much easier. Also, it does not cause any errors while working and ensures a smooth workflow. With AI features, users can effectively perform every kind of video editing task.
Do You Want to Experiment with Various Sky Backgrounds for Your Footage? Learn About Sky Replacement After Effects in This Article with a Step-by-Step Guide
Replacing Sky After Effects can change the essence of your videos with an authentic feel. In sci-fi movies, the colors of the sky add a dramatic, intense, or soft touch to videos. In scenes of war, peace, crime, and love, skies represent the theme. Shooting outdoors cannot always capture the essence of the sky. Replacing skies can help with covering over-exposed or under-exposed skies.
In this article, the focus of the discussion is how to replace Sky After Effects. Users can also learn about the advantages of using background replacers. If you want to learn sky replacement in After Effects, there is an instruction manual. It will give you some tips and tricks for replacing and adjusting the sky. At the end, we will discuss another software for replacing video backgrounds .
Sky Replacement A cross-platform works like magic for background removal or sky replacement photos

Part 1: What Are the Benefits of Having Video Background Replacers?
Along with enhancing the creative element in videos, background replacers help with more. Users can integrate them for both personal and professional uses. The following section will give a sneak peek at the advantages of background removers:
1. Privacy and Concealment
Video background removers extract the real surroundings, which addresses privacy concerns. In addition, they conceal any mess or imperfections in your background.
2. Maintains Professional Appearance
They help you set up professional backgrounds for Zoom meetings or Google Classrooms. In this way, they maintain the professional element of your videos.
3. Marketing Consistency
When it comes to marketing, they help choose a reliable background for the brand. The background becomes the identity of the brand and maintains its consistency.
4. Creative Expression in Movies
In the media industry, backgrounds like the sky help express the emotion of an actor or a mass. If there is anger, the sky will turn red; if there is peace, it will have a calm outlook.
5. Audience Engagement and Focus
A well-aligned background increases the audience’s focus on the theme of the video. This is because irrelevant backgrounds can catch the audience’s interest and distract them.
Part 2: Top Guide Explaining How to Replace Sky in Adobe After Effects?
Do you want to elevate the graphics of your videos professionally? Adobe After Effects is an ideal software for it as it helps professionals to edit films. It offers multiple animations for titles and videos like revolve, rotate, and more. In addition, you can overlap videos with precision using its Rotoscope feature.
There are built-in effects and features to ease the editing process for you. In addition, you can do custom settings in it and save them as presets. One of its many specifications is that it is an elite background remover and replacement. It enables a seamless addition of the sky in the background. We have mentioned the step-by-step procedure of After Effects replace Sky below:
Procedure 1: Removing Video Background
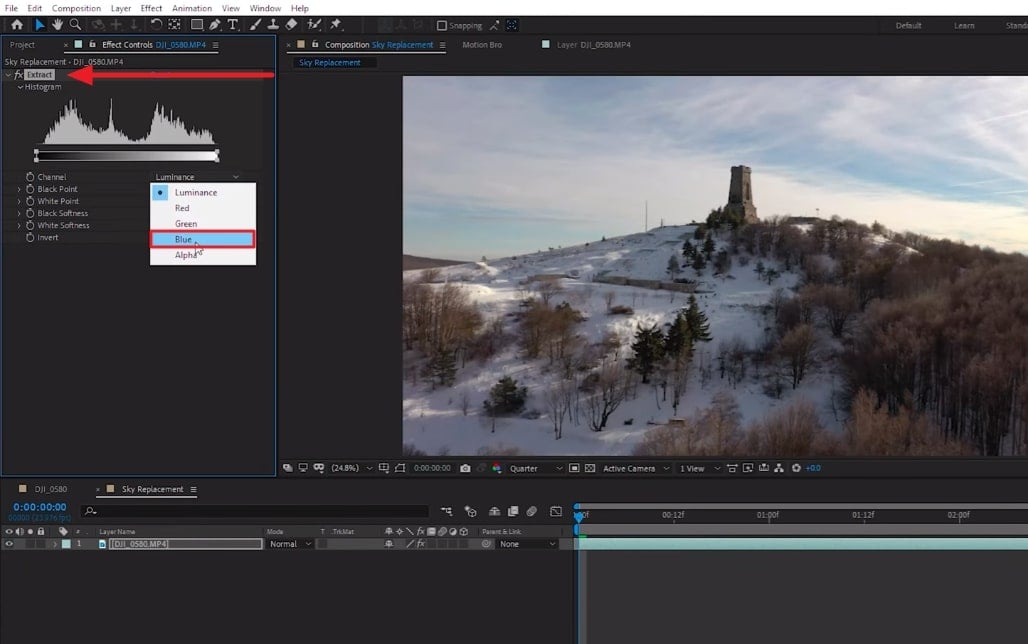
Step 1: After bringing your video to the timeline, navigate towards the top search bar at the left. In the Effects Control option, search for the “Extractor” effect and add it. Then, change the “Channel” of this effect to your “Blue” or “Luminance.” Change the position of both sliders there to remove and feather the background.
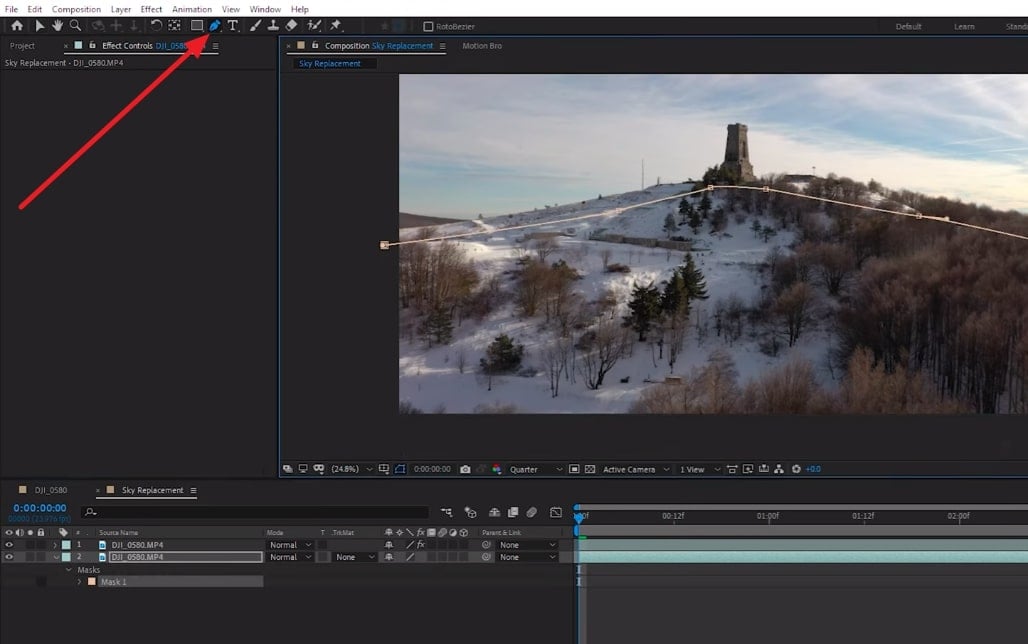
Step 2: To avoid removing parts other than the sky, duplicate this video to the timeline. From the bottom video, eliminate the extractor effect. Navigate towards the top toolbar and select the “Mask” option. Create a mask around the ground at the bottom of the video. In the timeline, click the “Mask Path” option to create the mask throughout the video.
Step 3: Now, select the top video in the timeline and search for “Key Cleaner.” Adjust the values of options under the key cleaner for precision.
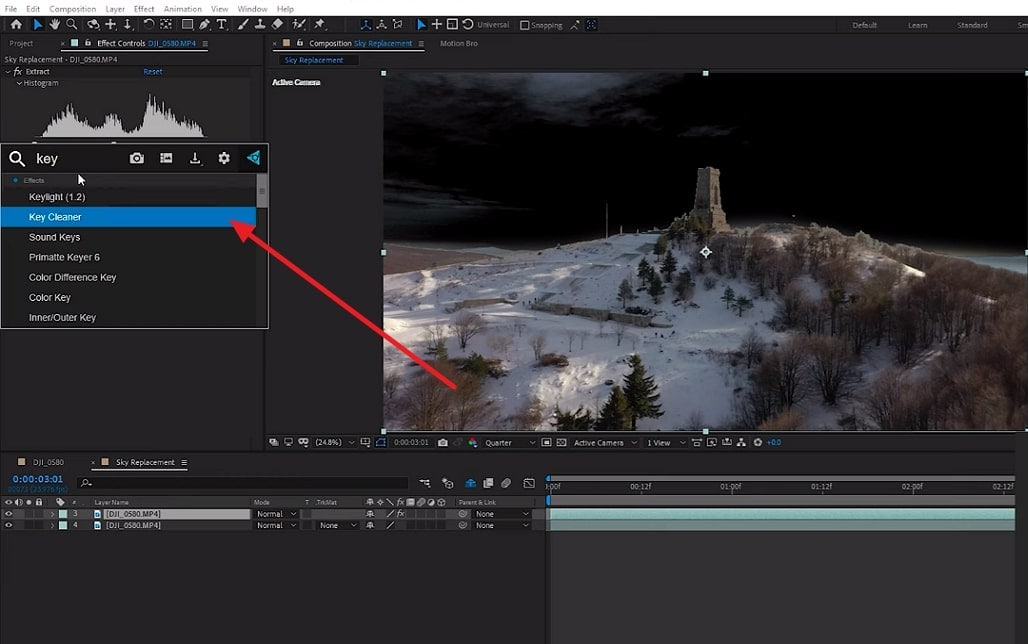
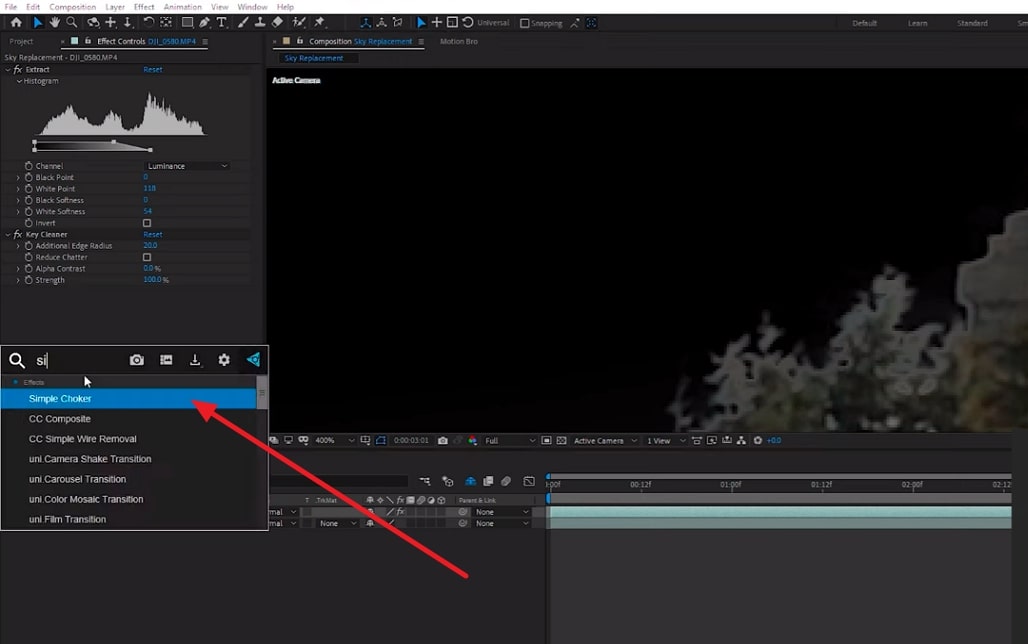
Step 4: If there are still some spaces left, use the “Simple Choker” effect to correct them. You can find it using the search bar and adjust the given values.
Procedure 2: 3D Camera Tracking
Step 1: Now, duplicate the video again on the timeline and remove all its effects. Afterward, add a “3D Camera Tracker” in it. Then click “Analyze” and let the tracker analyze your video.

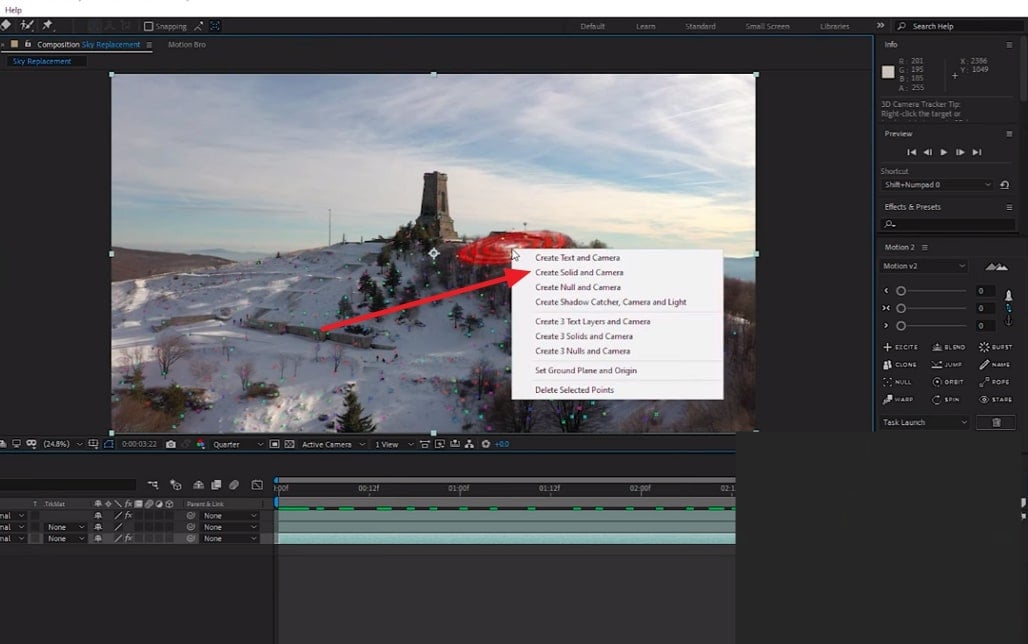
Step 2: Next, select any three points from the footage and right-click on them. From the drop-down menu, select “Create Null and Camera” or “Create Solid and Camera.”
Procedure 3: Replacing the Sky
Step 1: Import the video of your sky and bring it to the timeline. Bring the sky in the back of your footage and change it to a 3D layer. Afterward, change the “Position” of your sky from the timeline. We recommend you set the values as far away as possible for realistic effect.

Step 2: Once you have set the sky’s position, navigate towards the timeline panel again. From there, change the “Scale” of the background to set according to your footage. Afterward, see if the sky needs any flipping. This is because you must align the bright parts of the sky with the bright parts of the ground.

Procedure 4: Color Matching
Step 1: Play with the color setting elements like “Saturation” or “Lightness.” Change the position of their sliders to observe the changes in your footage.
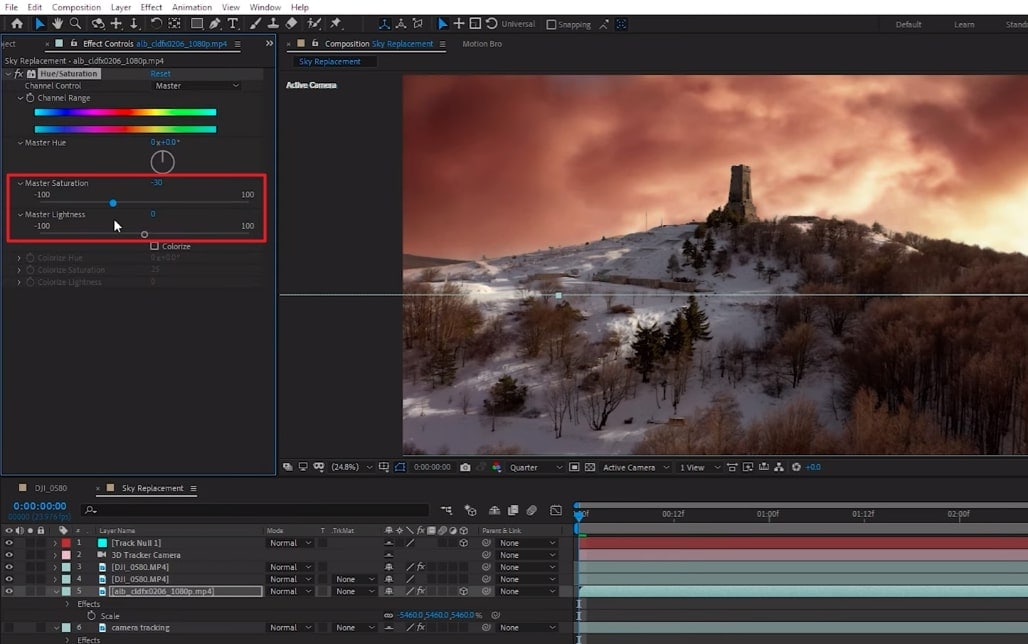
Step 2: Right-click on the timeline and add “New > Adjustment Layer” for settling colors. Afterward, see the preview of your video and export it.

Part 3: Wondershare Filmora: A Breath-taking Alternative to Replacing Backgrounds in Videos
For those who find sky replacement in After Effects difficult, there are alternatives. One of the simplest alternatives to replace sky is Wondershare Filmora . It is a video editor driven by AI technology with multiple effects and presets. Filmora keeps updating its functionalities, and it has recently launched the V13 upgrade. There was the addition of multiple AI tools and enhanced effects for creativity purposes.
Free Download For Win 7 or later(64-bit)
Free Download For macOS 10.14 or later
Filmora’s video background remover uses AI to extract the background with precision. Afterward, users can replace it with Filmora’s pre-assembled background collection. There are multiple colors, gradients, and other replacements for the background. The integration of AI has eliminated the human effort of cutting out background.
Step-by-Step Guide on Replacing Backgrounds in Filmora
Unlike replacing Sky After Effects, it keeps the background changing process simpler. In this guide, we will remove the background first and then replace it. Here is the step-by-step procedure to replace the background using this alternative:
Step 1Create a New Project to Import Media
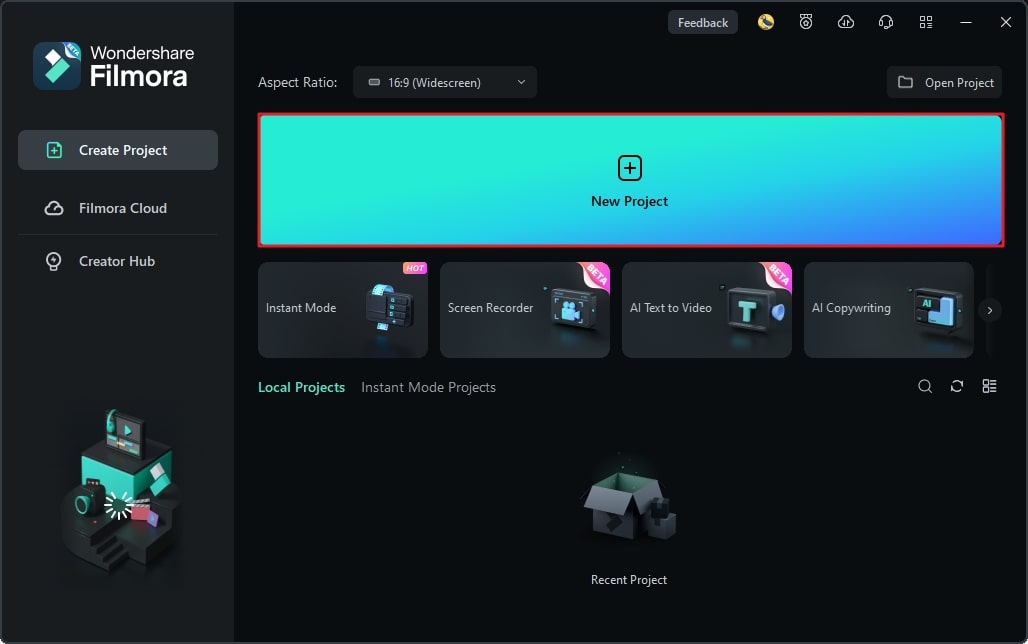
First, install Wondershare Filmora on your device and launch it. Afterward, use the “New Project” button to start a project and enter its editing interface. Use the “Ctrl +I” keys to import your video and drop it on the timeline.
Step 2Enable the Smart Cutout Option
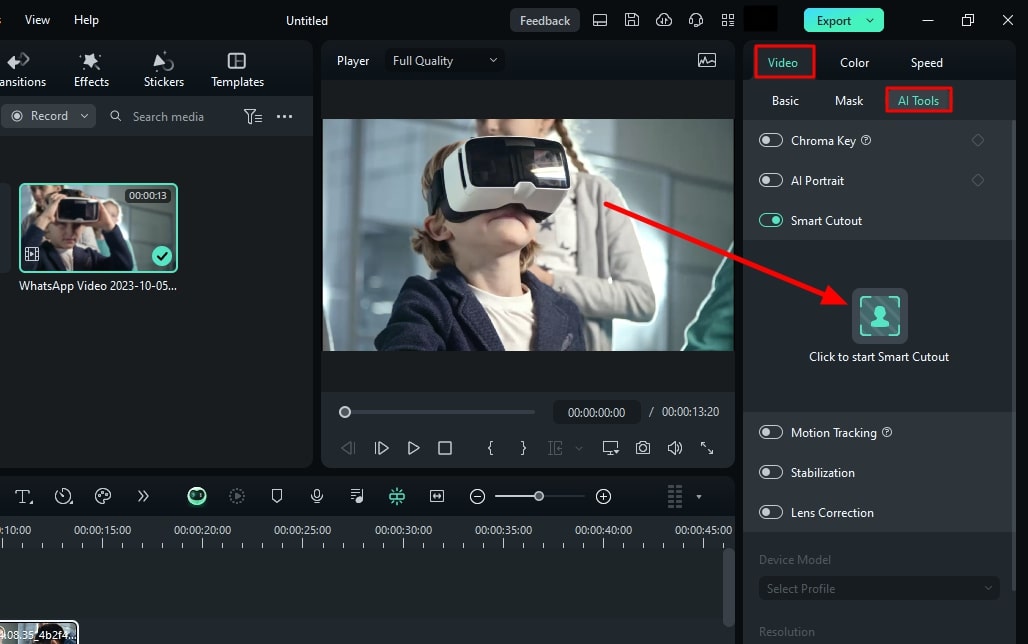
In the timeline panel, select the video and navigate towards the right-side settings panel. Afterwards, go to the “AI Tools” section under the “Video” tab. From there, enable the “Smart Cutout” option and click the Start button below.
Step 3Start Removing Background
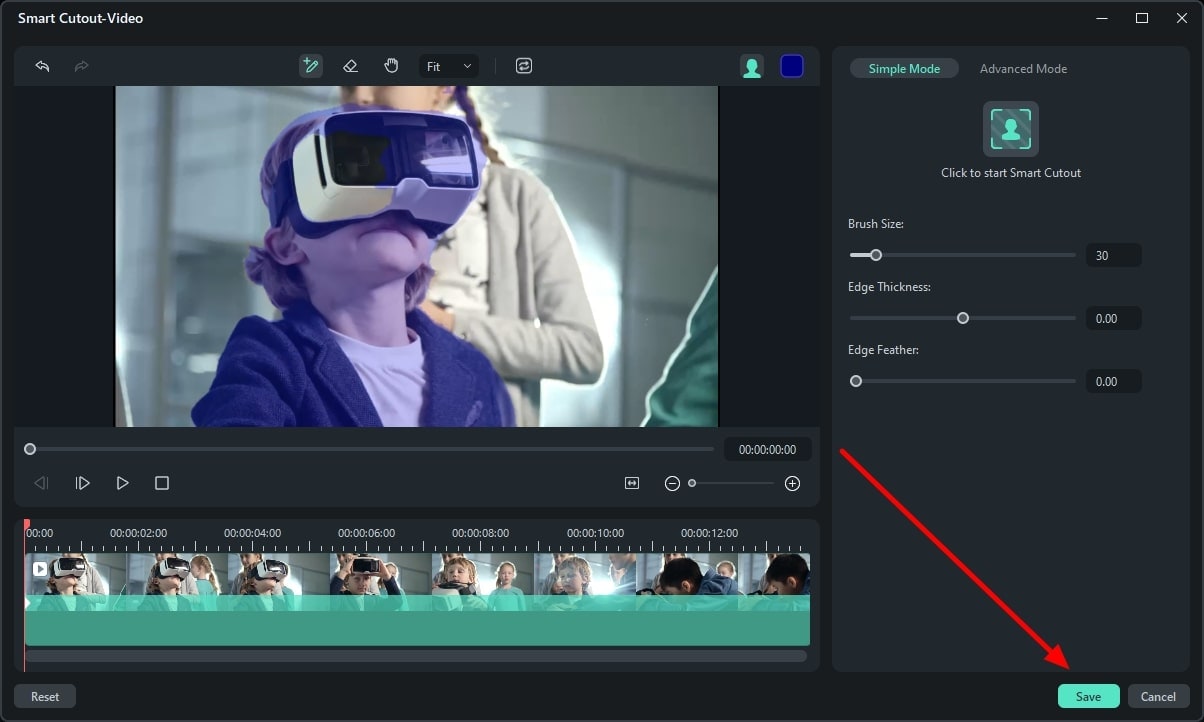
In the Smart Cutout Video window, use the brush to mark the object you want in the video. The AI will auto-select the rest of the object. After that, hit the “Click to start Smart Cutout” option, and it will initiate. Then, click the “Save” button to save the background, removing settings.
Step 4Replace a Background and Export Video
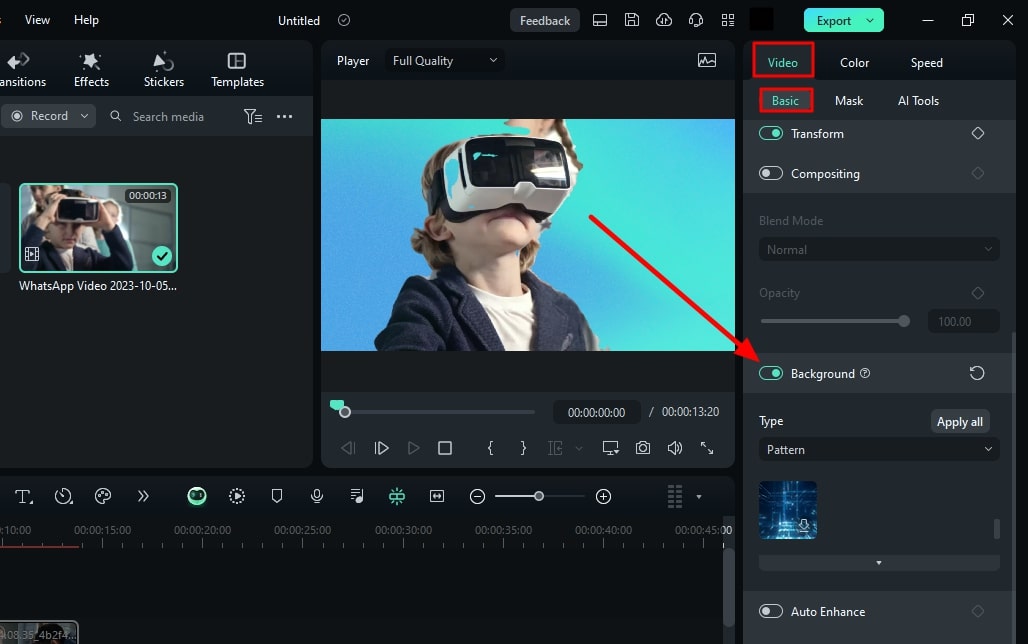
Once the background has been removed, click this video in the timeline. Hover the cursor towards the right settings panel and access the “Video > Basic” tab. Scroll down to find the “Backgrounds” section and enable it. In the “Type” section, select the background type and choose from the options to add. Once you have added the background, click the “Export” button to save this video.
Conclusion
The article emphasized the importance of video background removers and their benefits. In addition, we discussed replacing sky After Effects in detail. In the end, we provided a simple alternative for those looking for it. This is because Adobe After Effects might have a technical editing interface.
Wondershare Filmora, on the other hand, can carry on the process with efficiency and simplicity. If you haven’t yet used this software, visit its website to download it. There are other features that help with uplifting the content. You will also find the detailed user guides to use those functions.
Free Download Free Download Learn More

Part 1: What Are the Benefits of Having Video Background Replacers?
Along with enhancing the creative element in videos, background replacers help with more. Users can integrate them for both personal and professional uses. The following section will give a sneak peek at the advantages of background removers:
1. Privacy and Concealment
Video background removers extract the real surroundings, which addresses privacy concerns. In addition, they conceal any mess or imperfections in your background.
2. Maintains Professional Appearance
They help you set up professional backgrounds for Zoom meetings or Google Classrooms. In this way, they maintain the professional element of your videos.
3. Marketing Consistency
When it comes to marketing, they help choose a reliable background for the brand. The background becomes the identity of the brand and maintains its consistency.
4. Creative Expression in Movies
In the media industry, backgrounds like the sky help express the emotion of an actor or a mass. If there is anger, the sky will turn red; if there is peace, it will have a calm outlook.
5. Audience Engagement and Focus
A well-aligned background increases the audience’s focus on the theme of the video. This is because irrelevant backgrounds can catch the audience’s interest and distract them.
Part 2: Top Guide Explaining How to Replace Sky in Adobe After Effects?
Do you want to elevate the graphics of your videos professionally? Adobe After Effects is an ideal software for it as it helps professionals to edit films. It offers multiple animations for titles and videos like revolve, rotate, and more. In addition, you can overlap videos with precision using its Rotoscope feature.
There are built-in effects and features to ease the editing process for you. In addition, you can do custom settings in it and save them as presets. One of its many specifications is that it is an elite background remover and replacement. It enables a seamless addition of the sky in the background. We have mentioned the step-by-step procedure of After Effects replace Sky below:
Procedure 1: Removing Video Background
Step 1: After bringing your video to the timeline, navigate towards the top search bar at the left. In the Effects Control option, search for the “Extractor” effect and add it. Then, change the “Channel” of this effect to your “Blue” or “Luminance.” Change the position of both sliders there to remove and feather the background.

Step 2: To avoid removing parts other than the sky, duplicate this video to the timeline. From the bottom video, eliminate the extractor effect. Navigate towards the top toolbar and select the “Mask” option. Create a mask around the ground at the bottom of the video. In the timeline, click the “Mask Path” option to create the mask throughout the video.

Step 3: Now, select the top video in the timeline and search for “Key Cleaner.” Adjust the values of options under the key cleaner for precision.

Step 4: If there are still some spaces left, use the “Simple Choker” effect to correct them. You can find it using the search bar and adjust the given values.

Procedure 2: 3D Camera Tracking
Step 1: Now, duplicate the video again on the timeline and remove all its effects. Afterward, add a “3D Camera Tracker” in it. Then click “Analyze” and let the tracker analyze your video.

Step 2: Next, select any three points from the footage and right-click on them. From the drop-down menu, select “Create Null and Camera” or “Create Solid and Camera.”

Procedure 3: Replacing the Sky
Step 1: Import the video of your sky and bring it to the timeline. Bring the sky in the back of your footage and change it to a 3D layer. Afterward, change the “Position” of your sky from the timeline. We recommend you set the values as far away as possible for realistic effect.

Step 2: Once you have set the sky’s position, navigate towards the timeline panel again. From there, change the “Scale” of the background to set according to your footage. Afterward, see if the sky needs any flipping. This is because you must align the bright parts of the sky with the bright parts of the ground.

Procedure 4: Color Matching
Step 1: Play with the color setting elements like “Saturation” or “Lightness.” Change the position of their sliders to observe the changes in your footage.

Step 2: Right-click on the timeline and add “New > Adjustment Layer” for settling colors. Afterward, see the preview of your video and export it.

Part 3: Wondershare Filmora: A Breath-taking Alternative to Replacing Backgrounds in Videos
For those who find sky replacement in After Effects difficult, there are alternatives. One of the simplest alternatives to replace sky is Wondershare Filmora . It is a video editor driven by AI technology with multiple effects and presets. Filmora keeps updating its functionalities, and it has recently launched the V13 upgrade. There was the addition of multiple AI tools and enhanced effects for creativity purposes.
Free Download For Win 7 or later(64-bit)
Free Download For macOS 10.14 or later
Filmora’s video background remover uses AI to extract the background with precision. Afterward, users can replace it with Filmora’s pre-assembled background collection. There are multiple colors, gradients, and other replacements for the background. The integration of AI has eliminated the human effort of cutting out background.
Step-by-Step Guide on Replacing Backgrounds in Filmora
Unlike replacing Sky After Effects, it keeps the background changing process simpler. In this guide, we will remove the background first and then replace it. Here is the step-by-step procedure to replace the background using this alternative:
Step 1Create a New Project to Import Media
First, install Wondershare Filmora on your device and launch it. Afterward, use the “New Project” button to start a project and enter its editing interface. Use the “Ctrl +I” keys to import your video and drop it on the timeline.

Step 2Enable the Smart Cutout Option
In the timeline panel, select the video and navigate towards the right-side settings panel. Afterwards, go to the “AI Tools” section under the “Video” tab. From there, enable the “Smart Cutout” option and click the Start button below.

Step 3Start Removing Background
In the Smart Cutout Video window, use the brush to mark the object you want in the video. The AI will auto-select the rest of the object. After that, hit the “Click to start Smart Cutout” option, and it will initiate. Then, click the “Save” button to save the background, removing settings.

Step 4Replace a Background and Export Video
Once the background has been removed, click this video in the timeline. Hover the cursor towards the right settings panel and access the “Video > Basic” tab. Scroll down to find the “Backgrounds” section and enable it. In the “Type” section, select the background type and choose from the options to add. Once you have added the background, click the “Export” button to save this video.

Conclusion
The article emphasized the importance of video background removers and their benefits. In addition, we discussed replacing sky After Effects in detail. In the end, we provided a simple alternative for those looking for it. This is because Adobe After Effects might have a technical editing interface.
Wondershare Filmora, on the other hand, can carry on the process with efficiency and simplicity. If you haven’t yet used this software, visit its website to download it. There are other features that help with uplifting the content. You will also find the detailed user guides to use those functions.
4 Ways to Merge MP4 and MP3
The rising trends in audio and visual effects have introduced the media industry to new dimensions of technology. The screens around us are flickering 24/7 with videos on several topics. But, without the perfect background audios, their underlying message remains unheard. Hence, a balance of sound and picture is necessary to entice the audience and break the monotony. You can also create personalized videos by merging various video clips and adding the background sound afterwards. For this purpose, all you need is a tool that can add audio to your videos.
Let’s look at four different ways of merging audios and videos. The tools will help you craft high-end videos without involving any complex steps. You can make your videos beautiful by using the following easy to use tools.
- Filmora Wondershare
- VLC
- Photos App on Windows 10
- Using the Online Converter
Merge MP4 and MP3 Using Filmora Wondershare
Filmora Video Editor is an editing tool that brings your creativity and productivity to a whole new level. It comes with several editing options for both audio and video. All you need is to let your imagination run wild to give a personalized touch to your videos.
If you want to record podcasts, narration or voiceovers with lowered background music under speech, itsaudio ducking feature comes in handy. Filmora’sauto-synchronization feature is the cherry on top. It facilitates matching your audio with your video in a crispy way. Thus, making the whole experience of customizing video more professional.
Adding more to it, the Filmora Montage maker edits your video automatically to make it smooth with the music of your choice. Thisauto-beat sync feature is user friendly and convenient. Hence, you cannot deny that from beginners to intermediate, Filmora is empowering creators over the globe.
Filmora comes with an in-built audio library that serves the purpose of adding different sounds in the background. Its drag and drop feature make its interface more user friendly.It allows you to add audio files (.MP3, or .WMA) to videos (.Avi, .MP4, .MKV).It supports different audio and video formats that help you create awesome videos.
For Win 7 or later (64-bit)
For macOS 10.14 or later
Here is a step-by-step guide for adding sound to your videos.
Step 1: Importing the Media files (Both Audio and Video)
After you finish installing Wondershare Filmora from the official website on your computer, launch it.
You can import the MP4 and MP3 files by going to the File menu and then selecting import media files.

Tip: The software comes with a huge built-in library. You can also use it to add sound to your project.
Step 2: Adding media files to Timeline
- Now, hover the mouse over the media files that you have imported.
- Use the drag and drop feature to add the mp4 and mp3 files to the timeline.

If you want to modify the audio, the audio panel can be seen by double-tapping the audio from the timeline. This panel will appear at the top of the screen.

You can explore different options ranging from ducking to denoising.
Step 3: Exporting the File
Now that the audio has been added to the video, select the ‘Export’ tab so that you can export your video.

The exported file can be saved in different formats. (MP4, WMV, etc)
Tip: You can rename and define the resolution for better output.
Merge MP4 and MP3 Using VLC Media Player
VLC is an open-source media player that works for different platforms (Windows, Mac and Linux). The media player comes with features ranging from compression to conversion. This multimedia framework supports audio formats like AC-3, DV Audio, FLAC, MP3, Speex, Vorbis. It also supports different video formats.
If your video has no background sound, you can add it to your videos by following simple steps. Not only that, but you can also change the original audio track to make your video an exquisite piece of art.
The majority of people consider VLC as only a media player. But, it works as a video editor as well. Therefore, it allows you to add background sound to your videos. This handy tool supports various streaming protocols along with almost all multimedia files.
Here is a demonstration for adding audio to your video.
Step 1: Installation
The first step would be installing the VLC media player on your computer and launching it afterward.
Click on Media and then select Convert/Save.

A pop-up window will appear in which you have to select the Add option. This will help you load the targeted video.

Step 2: Playing both audio and video in a synchronous manner
- After loading the video, at the bottom of the dialogue box, tick the Show more options.
- Select the option named ‘Play another media synchronously.

Click Browse to import your desired audio. It will open another window.

Step 3: Adding audio
Click + Add on the second Open Media window. It will load the audio files for the video.
- Now, you’ll have your video and audio files in the formats of mp4 and mp3 respectively.

- Click on Convert/Save
- A pop-up window will appear asking about the format you wish to have for your video.

- Also, by selecting Browse, select the destination where you want to save your video.

- Click on Start so that the video and audio can be merged.

Merge MP4 and MP3 Using Windows Photo App
Windows Photo App is home to all audio and video files on your PC. You can view, edit and store your audio and video files in it. It also allows you to share those among your family and friends. The tool comes with an AI-powered assistant to manage your media efficiently. Hence, you can find your required media files faster.
With its editing features, you can bring dull moments to life. It lets you integrate photos and videos into third-party apps so that you may transform your mundane videos into extraordinary ones.
The App also comes with a backup feature that makes it a safe home for your life’s memories.
If you want to merge recordings of small video clips in no time, then Windows Photo App will assist you in doing it in a jiff. It is a built-in app for Windows 10 and comes with the easiest ways of adding sound to your videos.
Have a look at the following steps.
You can find the Windows Photo app on your desktop or press the Windows + S to open the Start menu search and type Photos in the search box.

- Click on the video editor tab.
- Select the New Video project to start a blank project.

A dialogue box will appear asking to add the desired project name. Enter the name.

You’ll see an add button on the left side. By selecting it, a drop-down menu will appear. It will show you different options for adding video to your project.

Select the desired option and add the video clips.

Adjust the order of your videos by dragging the videos in the storyboard.

- You can trim, split and rotate your videos here.
- It also allows you to use various filters, texts and 3D effects.
- After completing the editing, select the finish video button on the menu bar.
- Select your preferred video quality.
You can add audio by selecting the Custom Audio option.

You will see a window-pane on the right side with different options for adding the sound. You can add it by the drag and drop feature or by clicking on the add file option.


- Select Done to complete the process.
- You have successfully added mp3 to your video file**.**
- Tap on Finish video in the upper right corner to complete the process.

- You can also select the quality of your video.

Click on Export to save your file to your desired destination.
Merge MP4 and MP3 Using Using Online Converter
Different online resources on the internet will help combine videos. You do not have to go through the hassle of downloading and installing third-party apps. Online Converter supports different formats like MP4, AVI, FLV, MOV, 3GP, MKV, etc. With it, you can combine multiple video files into a single file in no time. The most popular output format is MP4.
The procedure is simple. You have to upload your video clips on Online Converter in the order that you want in the final output.

You’ll navigate to a page with options for adding the media files by clicking on the choose file.

After uploading the media files. You will also see options for the audio in a drop-down menu.

Select the Add option to merge mp3 to mp4.

After the mp3 is merged to the mp4, you can download the converted file or share it via social media as well.

Disadvantages
- If your internet connectivity is poor, the videos may take longer to upload.
- If the response time is slow, you need to cancel the process and re-submit the data.
- Encrypted or protected video files are not supported for the merger of the videos.
Conclusion
Each tool comes with its pros and cons. With the wide range of video editing options, you can explore these different platforms and add life to your moments. Whether you are a beginner or an intermediate, editing multimedia files has been made easy by these different tools.
For macOS 10.14 or later
Here is a step-by-step guide for adding sound to your videos.
Step 1: Importing the Media files (Both Audio and Video)
After you finish installing Wondershare Filmora from the official website on your computer, launch it.
You can import the MP4 and MP3 files by going to the File menu and then selecting import media files.

Tip: The software comes with a huge built-in library. You can also use it to add sound to your project.
Step 2: Adding media files to Timeline
- Now, hover the mouse over the media files that you have imported.
- Use the drag and drop feature to add the mp4 and mp3 files to the timeline.

If you want to modify the audio, the audio panel can be seen by double-tapping the audio from the timeline. This panel will appear at the top of the screen.

You can explore different options ranging from ducking to denoising.
Step 3: Exporting the File
Now that the audio has been added to the video, select the ‘Export’ tab so that you can export your video.

The exported file can be saved in different formats. (MP4, WMV, etc)
Tip: You can rename and define the resolution for better output.
Merge MP4 and MP3 Using VLC Media Player
VLC is an open-source media player that works for different platforms (Windows, Mac and Linux). The media player comes with features ranging from compression to conversion. This multimedia framework supports audio formats like AC-3, DV Audio, FLAC, MP3, Speex, Vorbis. It also supports different video formats.
If your video has no background sound, you can add it to your videos by following simple steps. Not only that, but you can also change the original audio track to make your video an exquisite piece of art.
The majority of people consider VLC as only a media player. But, it works as a video editor as well. Therefore, it allows you to add background sound to your videos. This handy tool supports various streaming protocols along with almost all multimedia files.
Here is a demonstration for adding audio to your video.
Step 1: Installation
The first step would be installing the VLC media player on your computer and launching it afterward.
Click on Media and then select Convert/Save.

A pop-up window will appear in which you have to select the Add option. This will help you load the targeted video.

Step 2: Playing both audio and video in a synchronous manner
- After loading the video, at the bottom of the dialogue box, tick the Show more options.
- Select the option named ‘Play another media synchronously.

Click Browse to import your desired audio. It will open another window.

Step 3: Adding audio
Click + Add on the second Open Media window. It will load the audio files for the video.
- Now, you’ll have your video and audio files in the formats of mp4 and mp3 respectively.

- Click on Convert/Save
- A pop-up window will appear asking about the format you wish to have for your video.

- Also, by selecting Browse, select the destination where you want to save your video.

- Click on Start so that the video and audio can be merged.

Merge MP4 and MP3 Using Windows Photo App
Windows Photo App is home to all audio and video files on your PC. You can view, edit and store your audio and video files in it. It also allows you to share those among your family and friends. The tool comes with an AI-powered assistant to manage your media efficiently. Hence, you can find your required media files faster.
With its editing features, you can bring dull moments to life. It lets you integrate photos and videos into third-party apps so that you may transform your mundane videos into extraordinary ones.
The App also comes with a backup feature that makes it a safe home for your life’s memories.
If you want to merge recordings of small video clips in no time, then Windows Photo App will assist you in doing it in a jiff. It is a built-in app for Windows 10 and comes with the easiest ways of adding sound to your videos.
Have a look at the following steps.
You can find the Windows Photo app on your desktop or press the Windows + S to open the Start menu search and type Photos in the search box.

- Click on the video editor tab.
- Select the New Video project to start a blank project.

A dialogue box will appear asking to add the desired project name. Enter the name.

You’ll see an add button on the left side. By selecting it, a drop-down menu will appear. It will show you different options for adding video to your project.

Select the desired option and add the video clips.

Adjust the order of your videos by dragging the videos in the storyboard.

- You can trim, split and rotate your videos here.
- It also allows you to use various filters, texts and 3D effects.
- After completing the editing, select the finish video button on the menu bar.
- Select your preferred video quality.
You can add audio by selecting the Custom Audio option.

You will see a window-pane on the right side with different options for adding the sound. You can add it by the drag and drop feature or by clicking on the add file option.


- Select Done to complete the process.
- You have successfully added mp3 to your video file**.**
- Tap on Finish video in the upper right corner to complete the process.

- You can also select the quality of your video.

Click on Export to save your file to your desired destination.
Merge MP4 and MP3 Using Using Online Converter
Different online resources on the internet will help combine videos. You do not have to go through the hassle of downloading and installing third-party apps. Online Converter supports different formats like MP4, AVI, FLV, MOV, 3GP, MKV, etc. With it, you can combine multiple video files into a single file in no time. The most popular output format is MP4.
The procedure is simple. You have to upload your video clips on Online Converter in the order that you want in the final output.

You’ll navigate to a page with options for adding the media files by clicking on the choose file.

After uploading the media files. You will also see options for the audio in a drop-down menu.

Select the Add option to merge mp3 to mp4.

After the mp3 is merged to the mp4, you can download the converted file or share it via social media as well.

Disadvantages
- If your internet connectivity is poor, the videos may take longer to upload.
- If the response time is slow, you need to cancel the process and re-submit the data.
- Encrypted or protected video files are not supported for the merger of the videos.
Conclusion
Each tool comes with its pros and cons. With the wide range of video editing options, you can explore these different platforms and add life to your moments. Whether you are a beginner or an intermediate, editing multimedia files has been made easy by these different tools.
For macOS 10.14 or later
Here is a step-by-step guide for adding sound to your videos.
Step 1: Importing the Media files (Both Audio and Video)
After you finish installing Wondershare Filmora from the official website on your computer, launch it.
You can import the MP4 and MP3 files by going to the File menu and then selecting import media files.

Tip: The software comes with a huge built-in library. You can also use it to add sound to your project.
Step 2: Adding media files to Timeline
- Now, hover the mouse over the media files that you have imported.
- Use the drag and drop feature to add the mp4 and mp3 files to the timeline.

If you want to modify the audio, the audio panel can be seen by double-tapping the audio from the timeline. This panel will appear at the top of the screen.

You can explore different options ranging from ducking to denoising.
Step 3: Exporting the File
Now that the audio has been added to the video, select the ‘Export’ tab so that you can export your video.

The exported file can be saved in different formats. (MP4, WMV, etc)
Tip: You can rename and define the resolution for better output.
Merge MP4 and MP3 Using VLC Media Player
VLC is an open-source media player that works for different platforms (Windows, Mac and Linux). The media player comes with features ranging from compression to conversion. This multimedia framework supports audio formats like AC-3, DV Audio, FLAC, MP3, Speex, Vorbis. It also supports different video formats.
If your video has no background sound, you can add it to your videos by following simple steps. Not only that, but you can also change the original audio track to make your video an exquisite piece of art.
The majority of people consider VLC as only a media player. But, it works as a video editor as well. Therefore, it allows you to add background sound to your videos. This handy tool supports various streaming protocols along with almost all multimedia files.
Here is a demonstration for adding audio to your video.
Step 1: Installation
The first step would be installing the VLC media player on your computer and launching it afterward.
Click on Media and then select Convert/Save.

A pop-up window will appear in which you have to select the Add option. This will help you load the targeted video.

Step 2: Playing both audio and video in a synchronous manner
- After loading the video, at the bottom of the dialogue box, tick the Show more options.
- Select the option named ‘Play another media synchronously.

Click Browse to import your desired audio. It will open another window.

Step 3: Adding audio
Click + Add on the second Open Media window. It will load the audio files for the video.
- Now, you’ll have your video and audio files in the formats of mp4 and mp3 respectively.

- Click on Convert/Save
- A pop-up window will appear asking about the format you wish to have for your video.

- Also, by selecting Browse, select the destination where you want to save your video.

- Click on Start so that the video and audio can be merged.

Merge MP4 and MP3 Using Windows Photo App
Windows Photo App is home to all audio and video files on your PC. You can view, edit and store your audio and video files in it. It also allows you to share those among your family and friends. The tool comes with an AI-powered assistant to manage your media efficiently. Hence, you can find your required media files faster.
With its editing features, you can bring dull moments to life. It lets you integrate photos and videos into third-party apps so that you may transform your mundane videos into extraordinary ones.
The App also comes with a backup feature that makes it a safe home for your life’s memories.
If you want to merge recordings of small video clips in no time, then Windows Photo App will assist you in doing it in a jiff. It is a built-in app for Windows 10 and comes with the easiest ways of adding sound to your videos.
Have a look at the following steps.
You can find the Windows Photo app on your desktop or press the Windows + S to open the Start menu search and type Photos in the search box.

- Click on the video editor tab.
- Select the New Video project to start a blank project.

A dialogue box will appear asking to add the desired project name. Enter the name.

You’ll see an add button on the left side. By selecting it, a drop-down menu will appear. It will show you different options for adding video to your project.

Select the desired option and add the video clips.

Adjust the order of your videos by dragging the videos in the storyboard.

- You can trim, split and rotate your videos here.
- It also allows you to use various filters, texts and 3D effects.
- After completing the editing, select the finish video button on the menu bar.
- Select your preferred video quality.
You can add audio by selecting the Custom Audio option.

You will see a window-pane on the right side with different options for adding the sound. You can add it by the drag and drop feature or by clicking on the add file option.


- Select Done to complete the process.
- You have successfully added mp3 to your video file**.**
- Tap on Finish video in the upper right corner to complete the process.

- You can also select the quality of your video.

Click on Export to save your file to your desired destination.
Merge MP4 and MP3 Using Using Online Converter
Different online resources on the internet will help combine videos. You do not have to go through the hassle of downloading and installing third-party apps. Online Converter supports different formats like MP4, AVI, FLV, MOV, 3GP, MKV, etc. With it, you can combine multiple video files into a single file in no time. The most popular output format is MP4.
The procedure is simple. You have to upload your video clips on Online Converter in the order that you want in the final output.

You’ll navigate to a page with options for adding the media files by clicking on the choose file.

After uploading the media files. You will also see options for the audio in a drop-down menu.

Select the Add option to merge mp3 to mp4.

After the mp3 is merged to the mp4, you can download the converted file or share it via social media as well.

Disadvantages
- If your internet connectivity is poor, the videos may take longer to upload.
- If the response time is slow, you need to cancel the process and re-submit the data.
- Encrypted or protected video files are not supported for the merger of the videos.
Conclusion
Each tool comes with its pros and cons. With the wide range of video editing options, you can explore these different platforms and add life to your moments. Whether you are a beginner or an intermediate, editing multimedia files has been made easy by these different tools.
For macOS 10.14 or later
Here is a step-by-step guide for adding sound to your videos.
Step 1: Importing the Media files (Both Audio and Video)
After you finish installing Wondershare Filmora from the official website on your computer, launch it.
You can import the MP4 and MP3 files by going to the File menu and then selecting import media files.

Tip: The software comes with a huge built-in library. You can also use it to add sound to your project.
Step 2: Adding media files to Timeline
- Now, hover the mouse over the media files that you have imported.
- Use the drag and drop feature to add the mp4 and mp3 files to the timeline.

If you want to modify the audio, the audio panel can be seen by double-tapping the audio from the timeline. This panel will appear at the top of the screen.

You can explore different options ranging from ducking to denoising.
Step 3: Exporting the File
Now that the audio has been added to the video, select the ‘Export’ tab so that you can export your video.

The exported file can be saved in different formats. (MP4, WMV, etc)
Tip: You can rename and define the resolution for better output.
Merge MP4 and MP3 Using VLC Media Player
VLC is an open-source media player that works for different platforms (Windows, Mac and Linux). The media player comes with features ranging from compression to conversion. This multimedia framework supports audio formats like AC-3, DV Audio, FLAC, MP3, Speex, Vorbis. It also supports different video formats.
If your video has no background sound, you can add it to your videos by following simple steps. Not only that, but you can also change the original audio track to make your video an exquisite piece of art.
The majority of people consider VLC as only a media player. But, it works as a video editor as well. Therefore, it allows you to add background sound to your videos. This handy tool supports various streaming protocols along with almost all multimedia files.
Here is a demonstration for adding audio to your video.
Step 1: Installation
The first step would be installing the VLC media player on your computer and launching it afterward.
Click on Media and then select Convert/Save.

A pop-up window will appear in which you have to select the Add option. This will help you load the targeted video.

Step 2: Playing both audio and video in a synchronous manner
- After loading the video, at the bottom of the dialogue box, tick the Show more options.
- Select the option named ‘Play another media synchronously.

Click Browse to import your desired audio. It will open another window.

Step 3: Adding audio
Click + Add on the second Open Media window. It will load the audio files for the video.
- Now, you’ll have your video and audio files in the formats of mp4 and mp3 respectively.

- Click on Convert/Save
- A pop-up window will appear asking about the format you wish to have for your video.

- Also, by selecting Browse, select the destination where you want to save your video.

- Click on Start so that the video and audio can be merged.

Merge MP4 and MP3 Using Windows Photo App
Windows Photo App is home to all audio and video files on your PC. You can view, edit and store your audio and video files in it. It also allows you to share those among your family and friends. The tool comes with an AI-powered assistant to manage your media efficiently. Hence, you can find your required media files faster.
With its editing features, you can bring dull moments to life. It lets you integrate photos and videos into third-party apps so that you may transform your mundane videos into extraordinary ones.
The App also comes with a backup feature that makes it a safe home for your life’s memories.
If you want to merge recordings of small video clips in no time, then Windows Photo App will assist you in doing it in a jiff. It is a built-in app for Windows 10 and comes with the easiest ways of adding sound to your videos.
Have a look at the following steps.
You can find the Windows Photo app on your desktop or press the Windows + S to open the Start menu search and type Photos in the search box.

- Click on the video editor tab.
- Select the New Video project to start a blank project.

A dialogue box will appear asking to add the desired project name. Enter the name.

You’ll see an add button on the left side. By selecting it, a drop-down menu will appear. It will show you different options for adding video to your project.

Select the desired option and add the video clips.

Adjust the order of your videos by dragging the videos in the storyboard.

- You can trim, split and rotate your videos here.
- It also allows you to use various filters, texts and 3D effects.
- After completing the editing, select the finish video button on the menu bar.
- Select your preferred video quality.
You can add audio by selecting the Custom Audio option.

You will see a window-pane on the right side with different options for adding the sound. You can add it by the drag and drop feature or by clicking on the add file option.


- Select Done to complete the process.
- You have successfully added mp3 to your video file**.**
- Tap on Finish video in the upper right corner to complete the process.

- You can also select the quality of your video.

Click on Export to save your file to your desired destination.
Merge MP4 and MP3 Using Using Online Converter
Different online resources on the internet will help combine videos. You do not have to go through the hassle of downloading and installing third-party apps. Online Converter supports different formats like MP4, AVI, FLV, MOV, 3GP, MKV, etc. With it, you can combine multiple video files into a single file in no time. The most popular output format is MP4.
The procedure is simple. You have to upload your video clips on Online Converter in the order that you want in the final output.

You’ll navigate to a page with options for adding the media files by clicking on the choose file.

After uploading the media files. You will also see options for the audio in a drop-down menu.

Select the Add option to merge mp3 to mp4.

After the mp3 is merged to the mp4, you can download the converted file or share it via social media as well.

Disadvantages
- If your internet connectivity is poor, the videos may take longer to upload.
- If the response time is slow, you need to cancel the process and re-submit the data.
- Encrypted or protected video files are not supported for the merger of the videos.
Conclusion
Each tool comes with its pros and cons. With the wide range of video editing options, you can explore these different platforms and add life to your moments. Whether you are a beginner or an intermediate, editing multimedia files has been made easy by these different tools.
Also read:
- Do You Want to Experiment with Various Sky Backgrounds for Your Footage? Learn About Sky Replacement After Effects in This Article with a Step-by-Step Guide for 2024
- 2024 Approved Reviewing Efectum App and The Best Alternatives for Smartphone Users
- Updated Learn How to Merge Audio and Video Like a Pro with This Step-by-Step Guide to Using FFmpeg. Create Seamless Videos and Improve Your Video Production Skills
- Zoom In and Out on Discord
- New 30+ Amazing Templates for VN Video Editor for 2024
- 2024 Approved Lets Learn How to Convert a Normal Video Into a Film Shot in the 1920S with Wondershare Filmora
- Best Slow Motion Camera Apps for Best Content Creation
- How to Create Cooking Video Intro and End Screen for YouTube Channel for 2024
- In 2024, How to Loop a Video in PowerPoint
- In 2024, Hey! Are You Looking for Video Reverse Effects in Your Videos? Then, You Are at the Right Place. This Article Will Guide You in Creating a Video Reverse Effect
- Updated 2024 Approved How to Got Free After Effects Templates Slideshow with Simple Trick
- New Are You Looking to Store Your Videos Securely and Efficiently? Look No Further than Our Top Pick for the Best Cloud Storage Service for Videos
- New 2024 Approved How to Make Eye Zoom Transition Effect with Filmora
- New Some Effective Slow Motion Video Editors You Can Try
- New 2024 Approved Camtasia Video Editor Review
- Updated 6 Best Methods to Make a Video Longer
- Updated How to Create a DIY Green Screen Video Effect, In 2024
- In 2024, Your Search for the Best GIF Creator Tools Ends Here
- New How to Start a Vlog
- How to Color Correct in OBS
- Are You Excited to Find Out the Top-Class VHS Video Effects Maker? Put Your Worries at Rest because This Article Will Provide the Best VHS Effect Makers for 2024
- New 2024 Approved | Live Stream on YouTube Using Zoom
- New Top 18 Video Editors for PC and Mac for 2024
- Updated How to Use 3D Camera Tracking Effects in After Effects
- 2024 Approved How To Make A Political Video
- 2024 Approved Learn How to Blur the Background in Adobe Premiere Pro with Our Quick and Simple Step-by-Step Instructions to Make Your Subject More Attention-Grabbing
- Updated The Best 10 GIF to JPGPNG Converters
- Updated 2024 Approved How to Rotate AVI in Vertical/Portrait Orientation Windows, Mac,Android, iPhone & Online
- Updated How to Use Kahoot! On Zoom
- New In 2024, How to Use Rule of Thirds in Video
- Updated How To Speed Up Video With Lightworks Video Editor
- 2024 Approved Best Ever Ways Make Tiktok Slideshow Solved
- New Start Your Creative Journey Now. Follow This Step-by-Step Guide on How to Add Double Exposure Effects to Your Personal Videos by Using the Filmora Video Editor
- Updated You Can Splice Video on the iPhone Using Various Applications. This Article Will Guide You Through the Steps Necessary to Splice Your Videos
- Updated In 2024, Why You Should Master Slideshows In Lightroom, Fresh Insight?
- New In 2024, How to Create a Bokeh Effect
- New How to Make Blender Render Transparent Background
- 2024 Approved How to Uue Adobe Lightroom Color Grading
- 4 Ways to Merge MP4 and MP3
- How to Turn Off Google Location to Stop Tracking You on Oppo A1 5G | Dr.fone
- How to Unlock Samsung Galaxy A34 5G Phone without PIN
- In 2024, How To Reset the Security Questions of Your Apple ID On Your Apple iPhone 12
- 2024 Approved How To Make Pinterest Slideshow in Simple Ways
- In 2024, List of Pokémon Go Joysticks On Tecno Spark 20 Pro+ | Dr.fone
- In 2024, How Do I Stop Someone From Tracking My Meizu 21? | Dr.fone
- 5 Easy Ways to Change Location on YouTube TV On Google Pixel 7a | Dr.fone
- In 2024, How to Transfer Data from Oppo A58 4G to Any iOS Devices | Dr.fone
- In 2024, Best Solutions for Oppo Network Unlock
- In 2024, How to Cast Honor Play 7T to Computer for iPhone and Android? | Dr.fone
- How to Transfer Photos from Honor Magic5 Ultimate to New Android? | Dr.fone
- In 2024, How To Transfer From Apple iPhone XS to Samsung Simplified Guide | Dr.fone
- New Best Video Language Changers to Make Your Videos Accessible for 2024
- iCloud Unlocker Download Unlock iCloud Lock for your Apple iPhone 13 mini
- In 2024, 3 Methods to Mirror Infinix GT 10 Pro to Roku | Dr.fone
- Can I recover permanently deleted photos from Honor 80 Pro Straight Screen Edition
- In 2024, Is it Possible to Use Miracast with Apple iPhone 14 Pro Max? | Dr.fone
- New Easy Tutorial How to Record and Send Talking Emoji for iPhone
- How to Fix Android App Not Installed Error on Xiaomi 14 Ultra Quickly? | Dr.fone
- Hard Resetting an Motorola Moto E13 Device Made Easy | Dr.fone
- In 2024, Reasons why Pokémon GPS does not Work On Oppo A2? | Dr.fone
- In 2024, Easy Guide How To Bypass Motorola Moto E13 FRP Android 10/11/12/13
- In 2024, How Do You Get Sun Stone Evolutions in Pokémon For Honor Magic 6 Pro? | Dr.fone
- Title: Use The Best LUTs for Lightroom for 2024
- Author: Chloe
- Created at : 2024-06-18 14:31:13
- Updated at : 2024-06-19 14:31:13
- Link: https://ai-editing-video.techidaily.com/use-the-best-luts-for-lightroom-for-2024/
- License: This work is licensed under CC BY-NC-SA 4.0.


