
:max_bytes(150000):strip_icc():format(webp)/how-to-use-a-ps5-controller-on-your-pc-or-mac-5089439-b56739aa27bd48858200878a6b64f952.jpg)
Vegas Pro - How to Download, Install and Use It, In 2024
Vegas Pro - How to Download, Install and Use It?
Vegas Pro is one of the best video and audio editing software for professionals. It provides one of the best editing tools with which you will be able to create professional videos. It was a product of Sony’s electronic giant, but now it is seen by Magix. It is suitable for serious amateurs and professionals who want to use it as a part of their career. However, the more recent version is a bit user-friendly, but if you are not interested in it seriously, then Vegas Pro is not your cup of tea.
One of the most significant advantages of using the high voltage Vegas Pro is that it gives you all the tools to make a professional video and multiple audio-visual effects. The software is exciting for those who already know about video and audio editing. Moreover, the price of the software is affordable and cost-effective as you get some royalty-free stock content.
How to download and install Vegas Pro?
Unshackle your creativity using Vegas Pro, one of the best professional video and audio editing software. If you have an idea for video editing, you will find the Vegas Pro video editor high on speed and editing. It will be like a new world of various professional editing tools in front of you, sure to keep you in front of the monitor without any distractions. You will be able to add images, sounds, and videos without any effort. The entire work of the software is impressive as you can make changes to your main storyboard according to your convenience.
It is an excellent way of boosting your confidence in professional video editing. Therefore, if you are serious about making professional videos, you must try your hand in Vegas Pros.
Steps to downloading and installing Vegas Pro
Vegas Pro video editor needs a good amount of space on your hard disk. Therefore, it is advisable that you either free the space or install a secondary hard disk for the Vegas Pro. Moreover, you will need Windows 7 to Windows 10 to run the Vegas Pro on your computer.

- If you are using an older version of Vegas Pro, you can upgrade it to a newer version. However, if you are downloading for the first time, you need to open the official website of Vegas Pro.
- Click on purchase.
- You will find the payment option.
- You can choose a monthly or yearly subscription.
- Once you make the payment, you will get a link for the download option.
- You can now download the Vegas Pro on your computer.
- When the process is complete, you will get an icon of Vegas Pro on your desktop.
- Click on the icon and start your exciting journey with Vegas Pro.

Key Features of Vegas Pro
Vegas Pro video editing software has some of the best features to enhance your creativity. Following are some of its key features:
**OFX Plug-ins for special effects
Vegas Pro offers OFX plug-ins that help professionals create their videos with new techniques with various special effects. You can also use different filters in your videos to give them a professional look.
**Picture-in-Picture Plug-ins
With the help of Picture-in-Picture plug-ins, users will be able to edit the pictures of their own will. You will be able to control the movement of the images and even place them accordingly.
**Editing Timeline
One of the most significant advantages of using Vegas Pro video editing software is that the timeline is much simpler and faster. Various features will help you create professional videos with the help of the timeline.
You will be able to arrange the clips in the timeline quickly and smoothly with special effects like crossfades and similar other products.
**Instant Freeze time
With the help of the Freeze option of Vegas Pro, you will be able to control the playback speed of the video. Professionals use the instant freeze time to portray a dramatic scene that requires some special effects.
It is a specific feature where you need to place the cursor on a particular frame to apply the freeze and time.
**Look-up table OFX Plug-in
The look-up table is a handy feature of Vegas Pro as you can access editing software like Adobe. It helps you to edit the images accordingly. You can also modify the clips of a particular video.
There are also various other features of the look-up table like color grading, cinematic effects, camera, and similar other attributes.
**Authoring Blu-Ray Discs and DVDs
With the help of Vegas Pro, you will be able to create exciting videos and be able to create a DVD layout with a professional look. There are various sets of effects and animations that you can choose while making the final layout of your video.
Moreover, you will be able to burn the DVDs and Blu-Ray Discs to end the final process of your video creation.
How to Edit Videos with Vegas Pro?
Video editing is an art. Hence, before creating a video, you need to have a plan. The clips must be in sequential order so that it makes a story. With the help of Vegas Pro, you can turn all your video footage into an exciting account. However, you need to have some basic skills in video editing before you lay your hands on the powerful Vegas Pro video editing software.
Following is a brief guideline that will give you an idea of how to edit videos with Vegas Pro.
**Previewing
The first step in creating a video is to have a plan of action. Before you start making the video, you must decide the clips you want to import. It is because importing all the video clips and selecting them can be a waste of time.

However, do not delete the clips permanently, as you may require them at some point in time if the need arises. Vegas Pro has some exciting editing tools where you will be able to perform color correction and also stabilize the shaky videos.
**Planning
To make an excellent sensible video, you must have a plan. Your video must have a story. Hence, you must decide beforehand how to start the video with a good beginning, the middle, and the end.
It would be best if you placed the clips in sequential order so that it creates a story. It would be best also to decide how to put the text and the transitions in your video.
**A rough cut
It is advisable to place the video clips in sequential order before you start editing, and it will give you a rough idea of the outcome of the video. You can make the changes in the initial stage in the storyboard and check the outcome before you start the editing.
**Editing
Once you are happy with the final layout of the video clips, you can start with your creativity. Vegas Pro has many exciting editing tools to give your video a professional look.
You can use transitions, trimming, fades, and other editing features to make a great video. You can also add titles, music, and other elements to your video.

**Delivery
Now that you are final with the process of creating a video, it is time to show the world your creativity and talent. You will be able to either stream it online or burn a DVD to share with your friends and loved ones.
Vegas Pro Alternative to Edit Videos
If there is one video editing platform where you want to unleash your talent and creativity, then Filmora is the one. It has all the resources you need to edit your videos and exciting editing tools. Moreover, it is easy to use as it offers many tutorials on creating videos in simple steps. With the help of Filmora, you can adjust the speed of your videos and even work on multiple screens. One of the most outstanding features of Filmora is that you use various video effects like filters and titles and even change the background of your video.
For Win 7 or later (64-bit)
For macOS 10.12 or later

Following are the steps on how to use Filmora:
- Click on a new project from the file menu
- If you want to import media files, click on the ‘+’ icon to browse the files from your hard drive.
- Drag and drop the video clips on your timeline.
- You can now add titles, transitions, and even music.
- Arrange the video clips in sequential order.
- Once you finish the process, you will be able to export it or share it with your friends and loved ones.
FAQs about Vegas Pro
Q1. How much does Vegas Pro cost?
Ans: The cost of Vegas Pro is affordable as you can get it for $155.88 a year, and it means that you pay only about $12.99 per month. You will also get free royalty-free stock videos and 20 GB of online storage.
Q2. Is Vegas Pro a good software?
Ans: If you check the Vegas Pro review, you will understand its popularity. It is an ideal software for professionals who want to unleash their talent and creativity, and it has some high-end editing features to enhance a professional video.
Q3. Is Vegas Pro better than Premiere Pro?
Ans: Vegas Pro is better than Premiere Pro in the user interface. When you compare Vegas Pro with other video editing software, you will find that the software is much easier. Moreover, it has some great editing tools to make a great video.
Conclusion
Vegas Pro gives you all the exciting editing features to create a professional video. It is compelling and user-friendly with simple, easy to understand user interfaces. You can use the trial version to get a feel of the video editing software. Once you are ready to take full command, you can go with the Pro version of Vegas Pro. It is one of the best software where you can learn video editing in a better way. You can check the Vegas Pro review online if you want to know about its usage.
Key Features of Vegas Pro
Vegas Pro video editing software has some of the best features to enhance your creativity. Following are some of its key features:
**OFX Plug-ins for special effects
Vegas Pro offers OFX plug-ins that help professionals create their videos with new techniques with various special effects. You can also use different filters in your videos to give them a professional look.
**Picture-in-Picture Plug-ins
With the help of Picture-in-Picture plug-ins, users will be able to edit the pictures of their own will. You will be able to control the movement of the images and even place them accordingly.
**Editing Timeline
One of the most significant advantages of using Vegas Pro video editing software is that the timeline is much simpler and faster. Various features will help you create professional videos with the help of the timeline.
You will be able to arrange the clips in the timeline quickly and smoothly with special effects like crossfades and similar other products.
**Instant Freeze time
With the help of the Freeze option of Vegas Pro, you will be able to control the playback speed of the video. Professionals use the instant freeze time to portray a dramatic scene that requires some special effects.
It is a specific feature where you need to place the cursor on a particular frame to apply the freeze and time.
**Look-up table OFX Plug-in
The look-up table is a handy feature of Vegas Pro as you can access editing software like Adobe. It helps you to edit the images accordingly. You can also modify the clips of a particular video.
There are also various other features of the look-up table like color grading, cinematic effects, camera, and similar other attributes.
**Authoring Blu-Ray Discs and DVDs
With the help of Vegas Pro, you will be able to create exciting videos and be able to create a DVD layout with a professional look. There are various sets of effects and animations that you can choose while making the final layout of your video.
Moreover, you will be able to burn the DVDs and Blu-Ray Discs to end the final process of your video creation.
How to Edit Videos with Vegas Pro?
Video editing is an art. Hence, before creating a video, you need to have a plan. The clips must be in sequential order so that it makes a story. With the help of Vegas Pro, you can turn all your video footage into an exciting account. However, you need to have some basic skills in video editing before you lay your hands on the powerful Vegas Pro video editing software.
Following is a brief guideline that will give you an idea of how to edit videos with Vegas Pro.
**Previewing
The first step in creating a video is to have a plan of action. Before you start making the video, you must decide the clips you want to import. It is because importing all the video clips and selecting them can be a waste of time.
However, do not delete the clips permanently, as you may require them at some point in time if the need arises. Vegas Pro has some exciting editing tools where you will be able to perform color correction and also stabilize the shaky videos.
**Planning
To make an excellent sensible video, you must have a plan. Your video must have a story. Hence, you must decide beforehand how to start the video with a good beginning, the middle, and the end.
It would be best if you placed the clips in sequential order so that it creates a story. It would be best also to decide how to put the text and the transitions in your video.
**A rough cut
It is advisable to place the video clips in sequential order before you start editing, and it will give you a rough idea of the outcome of the video. You can make the changes in the initial stage in the storyboard and check the outcome before you start the editing.
**Editing
Once you are happy with the final layout of the video clips, you can start with your creativity. Vegas Pro has many exciting editing tools to give your video a professional look.
You can use transitions, trimming, fades, and other editing features to make a great video. You can also add titles, music, and other elements to your video.
**Delivery
Now that you are final with the process of creating a video, it is time to show the world your creativity and talent. You will be able to either stream it online or burn a DVD to share with your friends and loved ones.
Vegas Pro Alternative to Edit Videos
If there is one video editing platform where you want to unleash your talent and creativity, then Filmora is the one. It has all the resources you need to edit your videos and exciting editing tools. Moreover, it is easy to use as it offers many tutorials on creating videos in simple steps. With the help of Filmora, you can adjust the speed of your videos and even work on multiple screens. One of the most outstanding features of Filmora is that you use various video effects like filters and titles and even change the background of your video.
For Win 7 or later (64-bit)
For macOS 10.12 or later
Following are the steps on how to use Filmora:
- Click on a new project from the file menu
- If you want to import media files, click on the ‘+’ icon to browse the files from your hard drive.
- Drag and drop the video clips on your timeline.
- You can now add titles, transitions, and even music.
- Arrange the video clips in sequential order.
- Once you finish the process, you will be able to export it or share it with your friends and loved ones.
FAQs about Vegas Pro
Q1. How much does Vegas Pro cost?
Ans: The cost of Vegas Pro is affordable as you can get it for $155.88 a year, and it means that you pay only about $12.99 per month. You will also get free royalty-free stock videos and 20 GB of online storage.
Q2. Is Vegas Pro a good software?
Ans: If you check the Vegas Pro review, you will understand its popularity. It is an ideal software for professionals who want to unleash their talent and creativity, and it has some high-end editing features to enhance a professional video.
Q3. Is Vegas Pro better than Premiere Pro?
Ans: Vegas Pro is better than Premiere Pro in the user interface. When you compare Vegas Pro with other video editing software, you will find that the software is much easier. Moreover, it has some great editing tools to make a great video.
Conclusion
Vegas Pro gives you all the exciting editing features to create a professional video. It is compelling and user-friendly with simple, easy to understand user interfaces. You can use the trial version to get a feel of the video editing software. Once you are ready to take full command, you can go with the Pro version of Vegas Pro. It is one of the best software where you can learn video editing in a better way. You can check the Vegas Pro review online if you want to know about its usage.
Add Green Screen Effects in Final Cut Pro
No matter the type of video you are shooting, the background of the video plays a major play. The background determines how eye-pleasing the frame of the entire video looks. A beautiful background enhances the video content while a distracting background can deteriorate the video outlook. You do not need to be in exotic locations or have eye-catching backgrounds in reality while shooting a video thanks to the use of the green screen effect.
Once you shoot a video with green screen background, you can replace the green screen with anything you want. You will need a video editor to replace the green screen, and Final Cut Pro is the most widely used video editor among Mac Users. We will illustrate how to add green screen in Final Cut Pro and get any background for your recorded video. We will also recommend an alternative watt to add green screen effect to your video.
Part 1. How to add green screen on Final Cut Pro
Final Cut Pro is the most popular professional video editor among Mac users. The learning curve is slightly steep, but once you get used to Final Cut Pro, you can take your recorded video to the next level with profound editing. The most important part of adding green screen effect to a video is shooting the video with a proper green screen in the background. Once you have successfully recorded your video, here are the steps on how to add background to green screen Final Cut Pro.
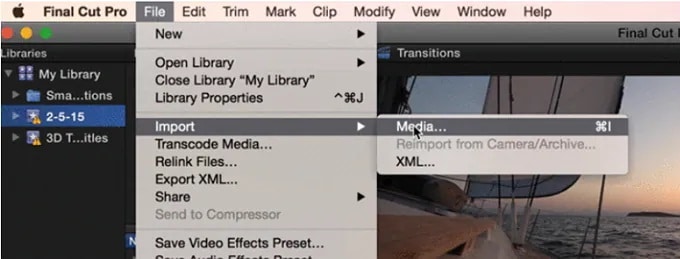
Step1 Launch Final Cut Pro and go to File> Import> Media. Select the video file with green screen background from your storage to import the file into FCP. Similarly, you should import the video or photo with which you want to replace the green screen.
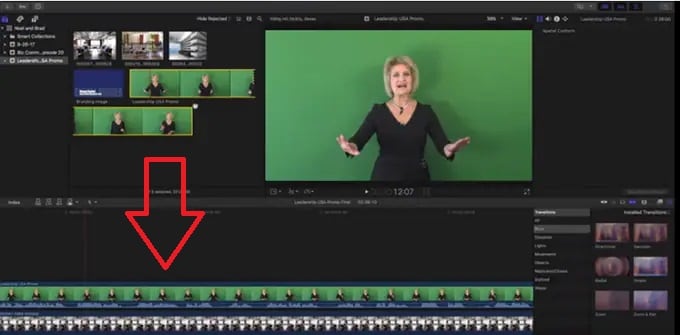
Step2 Drag the video clip with green screen background (called foreground clip) to Timeline and place it to Primary Storyline. Drag the replacement video (called background clip) below the foreground clip in Timeline.
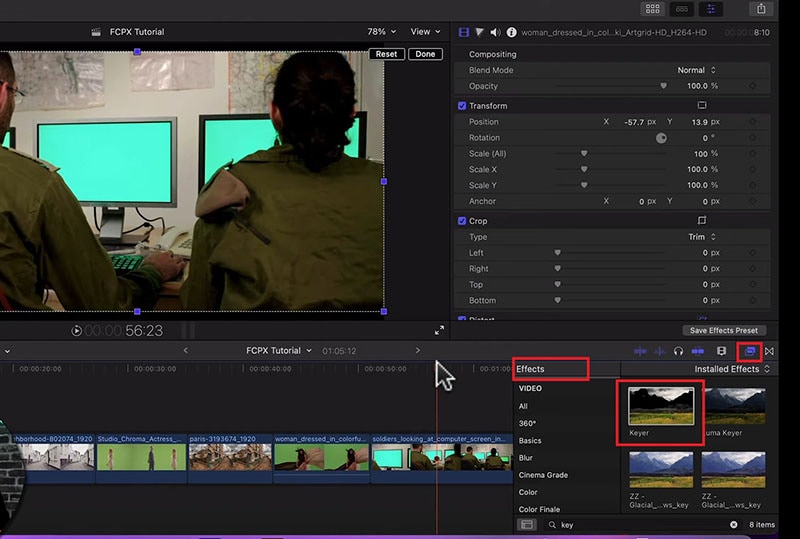
Step3 Select the foreground clip and click on Effects button present at the extreme top-right corner of the Timeline.
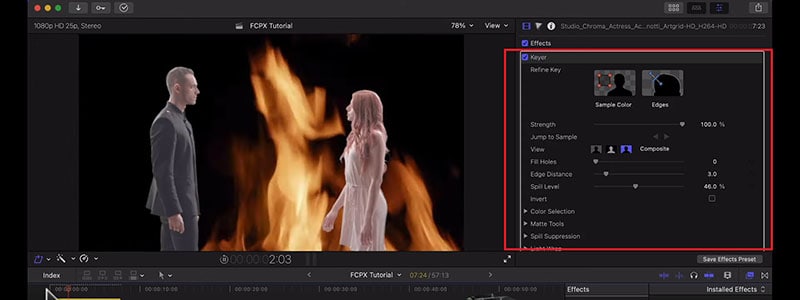
Step4 From the Effects options, select Keyer effect. If you cannot spot it immediately, you can search for it from the search field.
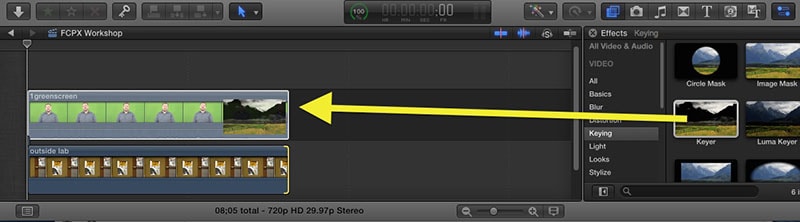
Step5 Drag and drop Keyer effect to the foreground clip. The effect detects the green screen and replaces it with the available background clip.
Step6 You might have to adjust the Keyer effect settings to get the green screen effect perfectly. Go to Inspector Window and click on Sample color and fine-tune the available settings to get it correct.
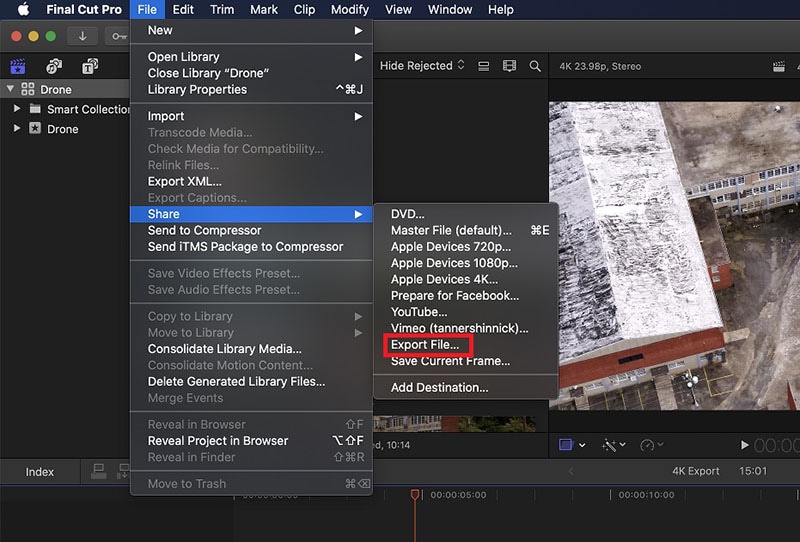
Step7 Once you are satisfied with the effect, go to File> Share> Export File and save the modified video.
Part 2. Alternative Way to Add Green Screen to Videos
Final Cut Pro is a professional but highly expensive video editor. The learning curve is not very suitable for amateur video editors. That is why if you are looking for a better alternative way to add green screen to videos, we recommend Wondershare Filmora . Filmora is a popular video editor that is available for Mac and Windows users. The user interface is extremely intuitive, and adding green screen effect is super easy. Here are the steps on how to add background to green screen effect.
Free Download For Win 7 or later(64-bit)
Free Download For macOS 10.14 or later
Step1 Download and install Filmora on your computer. Launch Filmora and click on New Projects.
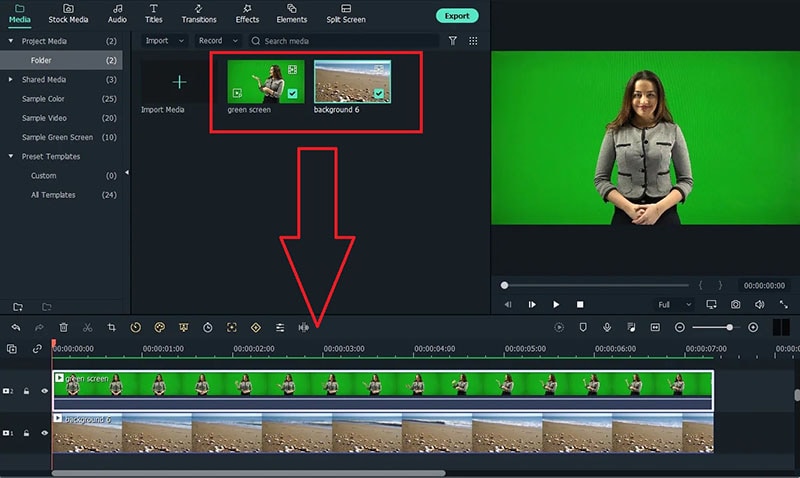
Step2 Under Project Media folder, Drag and drop the video clip with green screen background as well as the photo or video with which you want to replace the green screen.
Step3 Drag and drop the video clips on the Timeline. The video with green screen should be at the top while the replacement video or photo should be below it.
Step4 Double-click on the green screen video clip on Timeline. Go to Video>Basic and turn on Chroma key option.
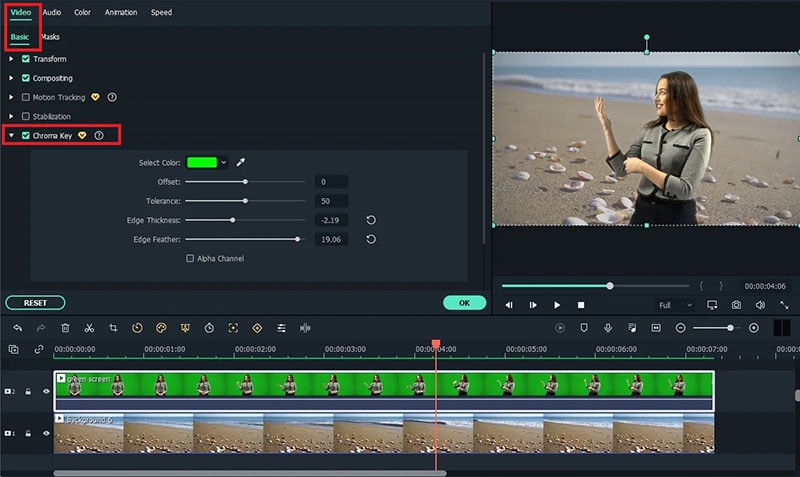
Step5 Adjust the different parameters such as offset to get the effect perfect and click on Ok button.
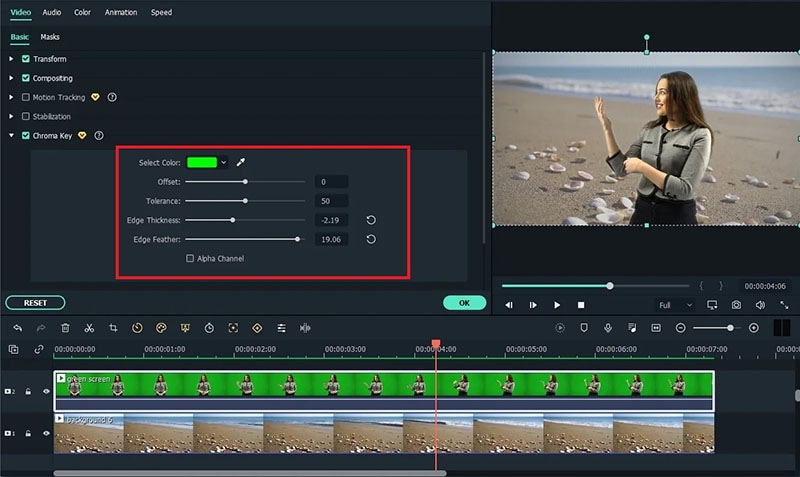
Step6 Play the video and if you are satisfied with the result, click on Export button to save the modified video file.
Part 3. Green Screen Video Tips to Use
We have already stated that replacing green screen in your video with an eye-catching background is the easiest part. On the contrary, shooting the green screen video is the most important part. If you shoot the video perfectly, replacing the background accurately in the video editor becomes super easy. Here are some important tips to use while shooting green screen video.
Distance – There should be enough distance between the subject and the green screen background so that the subject does not cast a shadow on the green screen. This distance is also important to place lights in between so that the green screen is perfectly lit for a great video shooting session.
Quality – You should opt for a high-quality green screen cloth for the background. This means the green screen should have a solid color instead of light and dark patches here and there. Besides, you should ensure that there are no wrinkles on the green screen.
Otherwise, when you will apply green screen effect through the video editor, the transformation will be uneven. You have to spend a lot of time adjusting the parameters to cover up uneven patches in the background.
Lighting – The way you set up your lights plays a major role in shooting green screen video perfectly. The light falling on the green screen will light up the screen evenly so that there are no light and dark patches. Transforming the green screen in the video editor will become that much easier.
You should focus on soft and even lighting for the entire green screen, and you should check through your camera to ensure the lighting is perfect. Sometimes, you can place lights behind the subject if the subject is staying stationary throughout the video. Otherwise, you can place the light above the subject for even distribution.
Aperture – The settings of your camera are equally important to smoothen out the green screen in the background and focus on the subject sharply. That is where aperture comes into the scene, and you need to use low aperture while shooting green screen videos. Low aperture opens up the camera lens, and the green screen turns softer in the background. The subject stands out while the background turns uniformly green.
Shutter Speed – While shooting a green screen video, you should keep a high shutter speed to prevent motion blur and uneven background. If the subject stays fixed throughout, the shutter speed should be double the frame rate. If the subject is moving throughout, the shutter speed should be around 4 times the frame rate such as 1/100.
ISO – The last thing you want in a green screen video is grainy footage. Your life will turn upside down editing the video and getting the green screen effect perfectly in any video editor. ISO determines the sensitivity and thereby, the grainy effect in your video. When the ISO is too high, the chance of getting grains in the video is high. It is better to use a native ISO for green screen effect, but you need to check with a sample recording and adjust if required.
Conclusion
We have answered how to add background to green screen Final Cut Pro. You can replace any green screen in your video with any video or photo for the background of the video. If you do not have Final Cut Pro or you find the steps slightly complicated, we recommend you to use Wondershare Filmora for instant green screen effect and quick adjustments for the best outcome.
Free Download For macOS 10.14 or later
Step1 Download and install Filmora on your computer. Launch Filmora and click on New Projects.
Step2 Under Project Media folder, Drag and drop the video clip with green screen background as well as the photo or video with which you want to replace the green screen.
Step3 Drag and drop the video clips on the Timeline. The video with green screen should be at the top while the replacement video or photo should be below it.
Step4 Double-click on the green screen video clip on Timeline. Go to Video>Basic and turn on Chroma key option.
Step5 Adjust the different parameters such as offset to get the effect perfect and click on Ok button.
Step6 Play the video and if you are satisfied with the result, click on Export button to save the modified video file.
Part 3. Green Screen Video Tips to Use
We have already stated that replacing green screen in your video with an eye-catching background is the easiest part. On the contrary, shooting the green screen video is the most important part. If you shoot the video perfectly, replacing the background accurately in the video editor becomes super easy. Here are some important tips to use while shooting green screen video.
Distance – There should be enough distance between the subject and the green screen background so that the subject does not cast a shadow on the green screen. This distance is also important to place lights in between so that the green screen is perfectly lit for a great video shooting session.
Quality – You should opt for a high-quality green screen cloth for the background. This means the green screen should have a solid color instead of light and dark patches here and there. Besides, you should ensure that there are no wrinkles on the green screen.
Otherwise, when you will apply green screen effect through the video editor, the transformation will be uneven. You have to spend a lot of time adjusting the parameters to cover up uneven patches in the background.
Lighting – The way you set up your lights plays a major role in shooting green screen video perfectly. The light falling on the green screen will light up the screen evenly so that there are no light and dark patches. Transforming the green screen in the video editor will become that much easier.
You should focus on soft and even lighting for the entire green screen, and you should check through your camera to ensure the lighting is perfect. Sometimes, you can place lights behind the subject if the subject is staying stationary throughout the video. Otherwise, you can place the light above the subject for even distribution.
Aperture – The settings of your camera are equally important to smoothen out the green screen in the background and focus on the subject sharply. That is where aperture comes into the scene, and you need to use low aperture while shooting green screen videos. Low aperture opens up the camera lens, and the green screen turns softer in the background. The subject stands out while the background turns uniformly green.
Shutter Speed – While shooting a green screen video, you should keep a high shutter speed to prevent motion blur and uneven background. If the subject stays fixed throughout, the shutter speed should be double the frame rate. If the subject is moving throughout, the shutter speed should be around 4 times the frame rate such as 1/100.
ISO – The last thing you want in a green screen video is grainy footage. Your life will turn upside down editing the video and getting the green screen effect perfectly in any video editor. ISO determines the sensitivity and thereby, the grainy effect in your video. When the ISO is too high, the chance of getting grains in the video is high. It is better to use a native ISO for green screen effect, but you need to check with a sample recording and adjust if required.
Conclusion
We have answered how to add background to green screen Final Cut Pro. You can replace any green screen in your video with any video or photo for the background of the video. If you do not have Final Cut Pro or you find the steps slightly complicated, we recommend you to use Wondershare Filmora for instant green screen effect and quick adjustments for the best outcome.
Transforming a Slow-Motion Video to Normal: Mastering the Skill
Slow-motion videos bring your videos to life by highlighting the emotions and details of a story. However, transforming a slow motion into a normal video has its benefits. For instance, you can make boomerangs or GIFs with normal videos. In addition, you can introduce limitless transitions and animations to them. Thus, are you also finding how to change slow-motion video to a normal iPhone?
This article is the perfect stop for you as it covers all your slow-motion queries from here. It will focus on how to unslow-mo a video on an iPhone and related tools. We will discuss the iPhone’s pre-built feature and some tools to achieve this. There will be a bonus tip on how to change slow-mo video to normal on iPhone.
Slow Motion Video Maker Slow your video’s speed with better control of your keyframes to create unique cinematic effects!
Make A Slow Motion Video Make A Slow Motion Video More Features

Part 1: Direct Method: Changing Slow Motion Video to Normal on iPhone
You might not be aware of this feature if you are a previous user or have just started using an iPhone. This is Apple’s built-in feature, found in iPhones and iPads. In this section, we have tailored a step-by-step guide to doing this. Here is a brief overview of how to convert a slow-motion video to a normal iPhone:
Step 1
Move to its bottom after opening the “Photos” application on your iPhone. From there, select the “Albums” option and scroll down to the “Slo-mo” option in “Media Types.”

Step 2
In the slow-mo section, find a video you want to reverse and select it to open. Navigate towards the top right corner of this video and click the “Edit” option.

Step 3
An editing panel will appear at the bottom of this video. If you’d notice, a vertical lined bar is under the video timeline. This indicates slow-mo duration, which you can change by repositioning sliders. Afterward, click the “Done” button at the right bottom of this screen to finalize.

Part 2: Top Applications That Can Be Used to Change Slow Motion Video to Normal
The iPhone’s built-in feature is equally effective for reversing a slow-mo back to normal. However, sometimes, one requires a tool for detailed editing. In such cases, we recommend you use a third party to help you achieve the desired results. We have assembled some tools on how to take slow-mo off a video on iPhone below:
- SpeedPro Slow Speed Video Edit
- Slow-Fast Motion Video Editor
- Slow Motion Video Fx Editor
- Reverse Cam – Slow Motion Video
- Slow Motion Video Editor
1. SpeedPro Slow Speed Video Edit
This is a versatile application designed explicitly to resolve the slow speed queries on iPhone. Users can effortlessly manipulate the speed of video during editing. The best part about this editor is that you can select a specific video section. It is up to you to reverse a complete slow-mo video or a part of it.

Key Features
- Facilitates both professionals and amateurs with its reachable user interface.
- After editing a video as super slow or super-fast, you can incorporate music.
- The application offers direct sharing options to vast applications like Instagram or YouTube.
2. Slow-Fast Motion Video Editor
If how to convert slow motion video to normal on an iPhone was a bet, this application would be worth your money. Many content creators have used it, and everyone has positively reviewed it. You can transform a slow-mo into a normal video using its speed option. The highest speed option is 2x, and the slowest speed option is 1/4th. There is no limitation on the video’s length or resolution for conversion.

Key Features
- You can apply different time transitions (fast or slow) to distinct video segments.
- The application doesn’t export with a Watermark addition to maintain professionalism.
- Upon converting a video or reversing it, you can adjust the audio pitch to align with it.
3. SloMo Slow Motion Video Editor
With technological advancements, the editing industry has taken up a notch. This application uses modern algorithms to create or reverse a slow with customizations. To reverse a slow-mo, you just need to upload it and increase the video’s speed. It offers three sorts of speed editing, including slow-mo, time-lapse, and stop-motion. The video speed is adjustable up to 240fps and 12x with quick processing.

Key Features
- With its independent frame manipulation, you can edit specific parts of a video.
- You can incorporate music behind your tracks out of 170+ pre-built music tracks.
- This iPhone editor retains the natural resolution of video to maintain its quality.
4. Reverse Cam – Slow Motion Video
Surfing through the internet to find how to unslow-mo a video on an iPhone? This application assists you in controlling or reversing video speed. You just need to import a previously created slow-mo into the application. In addition to reversing a video, you can also reverse audio tracks with it. There are multiple speed options like 0.25, 0.5x, and more.

Key Features
- After modifying the video speed, you can apply multiple effects to it.
- The application is compatible with iOS 9.0 or newer versions.
- It has a built-in library that users can use to save the edited videos and share them directly.
5. Slow Motion’ Video Editor
Solve all your queries related to how to change slo-mo video to normal on iPhone here. Designed to give your videos a perfect slow-motion or high-speed effect. To convert a slow-mo video into a normal one, it offers speed increase options. You can have complete control over your videos with this application.

Key Features
- It has an accessible and intuitive editing interface for user comprehension.
- It allows you to manipulate the speed of your video from 60 to 240 frames.
- It has multiple subscription options, weekly, monthly, or yearly, that you can avail accordingly.
Bonus Part: Speed Up Your iPhone Video on Desktop Using Wondershare Filmora
All these methods of transforming a slow-mo to normal are accurate and efficient. However, when it comes to perfection, one software stands tall than the others.Wondershare Filmora is a premium video editing software for precise editing. There are two methods of manipulating a slow-motion video to normal in it.
The speed ramping involves slow-mo reverse action from specific video frames. On the other hand, uniform speed modifies the complete video speed. You can add specific values for manipulating the frame rate or change the sliders. In addition, you can also add multiple effects to your video afterward. Moreover, you can also export the video in high resolution and desired format.
Free Download For Win 7 or later(64-bit)
Free Download For macOS 10.14 or later
Step-by-Step Guide to Shift Your Slow-Motion Video to Normal with Filmora
This segment involves a step-by-step guide to reverse a slow-mo. Let’s see how to change slo-mo video to normal on iPhone with Filmora below:
Step 1Import Media Files from iPhone
First, connect your iPhone to the source device you are using Filmora on. Once you have connected the devices, navigate towards the “Import” button. Expand this option, and from the dropdown menu, select “Import from a Camera or Phone.” Select the name of your iPhone in the “Import from” section and click “OK.” Once imported, place the clip in the timeline.

Step 2Access Uniform Speed Option
Then, select the clip in the timeline and navigate towards the settings panel. Afterward, go to the “Speed” tab under “Uniform Speed” set values. Drag the Speed slider towards the right to increase the video speed.

Step 3Export the Edited Video
Hit the “Play” button from the preview window to preview your video. Afterward, navigate towards the “Export” button at the top right corner. You can also set the framerate in the Export window according to preference. Further, hit the “Export” button in the Export window to save the file on the device.

Top Features to Note About Wondershare Filmora
There is more to Filmora than how to unslow-mo a video on an iPhone. The tool shows support with multiple devices like Windows, iOS, Linux, and more. Following are some of the top-notch AI features of Filmora:
1. AI Text-to-Video
Use this tool to craft creative and graphic-based videos along with voice integration. With its generative AI, it allows you to tailor videos in different contexts. It uses text-based instructions to analyze demands and follow them.
2. AI Text-Based Editing
Cutting and Trimming videos in a timeline might be difficult for some people. It requires proper skills; however, there is an alternate option. The text-based editing AI uses voice recognition to convert speech to text. Once the video has been converted, you can eliminate the parts you want.
3. AI Music Generator
If you want to generate music based on your video’s mood or context, use this AI. It asks for a few directions like theme, mood, and language to curate music. The song is efficient in what it is designed for and generates results in seconds.
4. AI Vocal Remover
Background noises always decline the quality of an audio track or overall video. With Filmora, you can separate vocals from background noise and delete the track. Both tracks are shown in the timeline and are easy to remove. Afterward, you can apply effects or introduce music before export.
Conclusion
After reaching a conclusion, one should have fully understood the merits of how to change slow-motion video to a normal iPhone. It provided insights into several useful applications for achieving this effect. Wondershare Filmora emerged as a worthy AI-driven desktop application tailored for crafting such videos. It is recommended to help you with your creative endeavors in this domain.
Make A Slow Motion Video Make A Slow Motion Video More Features
Part 1: Direct Method: Changing Slow Motion Video to Normal on iPhone
You might not be aware of this feature if you are a previous user or have just started using an iPhone. This is Apple’s built-in feature, found in iPhones and iPads. In this section, we have tailored a step-by-step guide to doing this. Here is a brief overview of how to convert a slow-motion video to a normal iPhone:
Step 1
Move to its bottom after opening the “Photos” application on your iPhone. From there, select the “Albums” option and scroll down to the “Slo-mo” option in “Media Types.”
Step 2
In the slow-mo section, find a video you want to reverse and select it to open. Navigate towards the top right corner of this video and click the “Edit” option.
Step 3
An editing panel will appear at the bottom of this video. If you’d notice, a vertical lined bar is under the video timeline. This indicates slow-mo duration, which you can change by repositioning sliders. Afterward, click the “Done” button at the right bottom of this screen to finalize.
Part 2: Top Applications That Can Be Used to Change Slow Motion Video to Normal
The iPhone’s built-in feature is equally effective for reversing a slow-mo back to normal. However, sometimes, one requires a tool for detailed editing. In such cases, we recommend you use a third party to help you achieve the desired results. We have assembled some tools on how to take slow-mo off a video on iPhone below:
- SpeedPro Slow Speed Video Edit
- Slow-Fast Motion Video Editor
- Slow Motion Video Fx Editor
- Reverse Cam – Slow Motion Video
- Slow Motion Video Editor
1. SpeedPro Slow Speed Video Edit
This is a versatile application designed explicitly to resolve the slow speed queries on iPhone. Users can effortlessly manipulate the speed of video during editing. The best part about this editor is that you can select a specific video section. It is up to you to reverse a complete slow-mo video or a part of it.
Key Features
- Facilitates both professionals and amateurs with its reachable user interface.
- After editing a video as super slow or super-fast, you can incorporate music.
- The application offers direct sharing options to vast applications like Instagram or YouTube.
2. Slow-Fast Motion Video Editor
If how to convert slow motion video to normal on an iPhone was a bet, this application would be worth your money. Many content creators have used it, and everyone has positively reviewed it. You can transform a slow-mo into a normal video using its speed option. The highest speed option is 2x, and the slowest speed option is 1/4th. There is no limitation on the video’s length or resolution for conversion.
Key Features
- You can apply different time transitions (fast or slow) to distinct video segments.
- The application doesn’t export with a Watermark addition to maintain professionalism.
- Upon converting a video or reversing it, you can adjust the audio pitch to align with it.
3. SloMo Slow Motion Video Editor
With technological advancements, the editing industry has taken up a notch. This application uses modern algorithms to create or reverse a slow with customizations. To reverse a slow-mo, you just need to upload it and increase the video’s speed. It offers three sorts of speed editing, including slow-mo, time-lapse, and stop-motion. The video speed is adjustable up to 240fps and 12x with quick processing.
Key Features
- With its independent frame manipulation, you can edit specific parts of a video.
- You can incorporate music behind your tracks out of 170+ pre-built music tracks.
- This iPhone editor retains the natural resolution of video to maintain its quality.
4. Reverse Cam – Slow Motion Video
Surfing through the internet to find how to unslow-mo a video on an iPhone? This application assists you in controlling or reversing video speed. You just need to import a previously created slow-mo into the application. In addition to reversing a video, you can also reverse audio tracks with it. There are multiple speed options like 0.25, 0.5x, and more.
Key Features
- After modifying the video speed, you can apply multiple effects to it.
- The application is compatible with iOS 9.0 or newer versions.
- It has a built-in library that users can use to save the edited videos and share them directly.
5. Slow Motion’ Video Editor
Solve all your queries related to how to change slo-mo video to normal on iPhone here. Designed to give your videos a perfect slow-motion or high-speed effect. To convert a slow-mo video into a normal one, it offers speed increase options. You can have complete control over your videos with this application.
Key Features
- It has an accessible and intuitive editing interface for user comprehension.
- It allows you to manipulate the speed of your video from 60 to 240 frames.
- It has multiple subscription options, weekly, monthly, or yearly, that you can avail accordingly.
Bonus Part: Speed Up Your iPhone Video on Desktop Using Wondershare Filmora
All these methods of transforming a slow-mo to normal are accurate and efficient. However, when it comes to perfection, one software stands tall than the others.Wondershare Filmora is a premium video editing software for precise editing. There are two methods of manipulating a slow-motion video to normal in it.
The speed ramping involves slow-mo reverse action from specific video frames. On the other hand, uniform speed modifies the complete video speed. You can add specific values for manipulating the frame rate or change the sliders. In addition, you can also add multiple effects to your video afterward. Moreover, you can also export the video in high resolution and desired format.
Free Download For Win 7 or later(64-bit)
Free Download For macOS 10.14 or later
Step-by-Step Guide to Shift Your Slow-Motion Video to Normal with Filmora
This segment involves a step-by-step guide to reverse a slow-mo. Let’s see how to change slo-mo video to normal on iPhone with Filmora below:
Step 1Import Media Files from iPhone
First, connect your iPhone to the source device you are using Filmora on. Once you have connected the devices, navigate towards the “Import” button. Expand this option, and from the dropdown menu, select “Import from a Camera or Phone.” Select the name of your iPhone in the “Import from” section and click “OK.” Once imported, place the clip in the timeline.
Step 2Access Uniform Speed Option
Then, select the clip in the timeline and navigate towards the settings panel. Afterward, go to the “Speed” tab under “Uniform Speed” set values. Drag the Speed slider towards the right to increase the video speed.
Step 3Export the Edited Video
Hit the “Play” button from the preview window to preview your video. Afterward, navigate towards the “Export” button at the top right corner. You can also set the framerate in the Export window according to preference. Further, hit the “Export” button in the Export window to save the file on the device.
Top Features to Note About Wondershare Filmora
There is more to Filmora than how to unslow-mo a video on an iPhone. The tool shows support with multiple devices like Windows, iOS, Linux, and more. Following are some of the top-notch AI features of Filmora:
1. AI Text-to-Video
Use this tool to craft creative and graphic-based videos along with voice integration. With its generative AI, it allows you to tailor videos in different contexts. It uses text-based instructions to analyze demands and follow them.
2. AI Text-Based Editing
Cutting and Trimming videos in a timeline might be difficult for some people. It requires proper skills; however, there is an alternate option. The text-based editing AI uses voice recognition to convert speech to text. Once the video has been converted, you can eliminate the parts you want.
3. AI Music Generator
If you want to generate music based on your video’s mood or context, use this AI. It asks for a few directions like theme, mood, and language to curate music. The song is efficient in what it is designed for and generates results in seconds.
4. AI Vocal Remover
Background noises always decline the quality of an audio track or overall video. With Filmora, you can separate vocals from background noise and delete the track. Both tracks are shown in the timeline and are easy to remove. Afterward, you can apply effects or introduce music before export.
Conclusion
After reaching a conclusion, one should have fully understood the merits of how to change slow-motion video to a normal iPhone. It provided insights into several useful applications for achieving this effect. Wondershare Filmora emerged as a worthy AI-driven desktop application tailored for crafting such videos. It is recommended to help you with your creative endeavors in this domain.
How to Add Subtitles to MKV Videos on All Platforms
Many people use MKV files as it’s an open-source format and does not require licenses. This file format functions as a multimedia file container that can help you in storing audio and video tracks. However, there are some key disadvantages of using MKV files, as this format is not supported by various platforms or devices. So, the most suitable video file formats that you can use are FLV and MP4. These two formats offer high-quality results and are supported by multiple platforms.
If you still want to use MKV files and want to add subtitles, this article can assist you. By reading this article, you can learn how to add subtitles to MKV with different methods.
Part 1: How to Add Subtitles to MKV on Windows?
Are you a Windows user and want to add subtitles to MKV? Read this section to find out compatible tools that can add subtitles to your MKV videos efficiently.
1. Wondershare Filmora
Free Download For Win 7 or later(64-bit)
Free Download For macOS 10.14 or later
Wondershare Filmora is a popular tool that provides you with multiple options to edit video files. If you are interested in adding subtitles to your MKV files, you can navigate to its “Speech-to-Text” feature. This feature automatically transcribes the voice used in the video into subtitles. It supports 16 different languages for creating subtitles through this feature.
This feature can also enhance your editing efficiency as you don’t have to write the subtitles on your own. Moreover, the STT feature utilizes advanced algorithms that help the tool create subtitles with high precision. Furthermore, you can also manually add the subtitles to your MKV file using this MKV subtitle editor.
Key Features
- Filmora offers various effects, such as a green screen that can help you to change your background dramatically.
- If you want to resize your videos efficiently, this tool provides the Auto Reframe feature.
- Filmora also offers various preset templates that can help you to craft captivating videos easily.
Step-by-Step Guide to Add Subtitles Using Filmora
Step1 Create a New Filmora Project
Download and install Filmora on your PC and click “Create Project.” Afterward, import the MKV video from your PC to this tool by clicking on the “Arrow” icon.

Step2 Go to Titles Tab
After importing the video, drag it to the timeline. Once done, click on the “Titles” section given on top. Afterward, click on “Subtitles” from the left section. Now you will be able to see different types of subtitles on your screen. Select your favorite style of subtitles and tap on its “Download” icon.

Step3 Choose the Preferred Subtitle Style
After that, tap on the “Plus” icon to add your selected subtitle style to the timeline. Double-click on the added subtitles, which will open the settings. You can manually add the subtitles on the “Input Text” box easily. Moreover, you can easily change the text font, color, opacity, and alignment.

Step4 Export and Save Video
Once you have created subtitles for your imported video, click the “Export” button on top. Using this option, you can save the video file to your device or share it on other platforms.

2. Cisdem Video Converter
Cisdem is an efficient tool that can be used by content creators for various purposes. Along with editing the videos, this tool can help you add subtitles to your video files in any format. It supports various formats for adding subtitles, such as MKV, MP4, AVI, etc. This tool also offers a built-in editor to modify the MKV videos flawlessly. Hence, it’s a basic tool that generates quality results instantly.
Key Features
- Cisdem can function as a video converter that supports more than 300 file formats. You can convert to and from MKV files using this platform easily.
- Through this software, you can professionally add watermarks to your MKV files. It provides various options to add a customized watermark to your desired video files.
- It offers a built-in media player that allows you to play and watch MKV files without interruption.
Steps to Add Subtitles to MKV Using Cisdem Video Converter
Step1 Launch the Cisdem tool on your system and navigate to its “Converter”. Afterward, import the MKV file instantly. Now tap on the “Pencil” icon given on top to open the editing window.

Step2 From the editing window, go to “Subtitle and Audio” and click on “No subtitles.” From the drop-down box, click on “Load Subtitles” to upload your SRT or ASS subtitle file from your system.

Step3 Now press the “Save” button to proceed. As the default output format in this tool is MP4, navigate to the “General Video” section to change it. From this option, select “MKV Video” as the output format. Afterward, hit the “Convert” button to embed the added subtitles easily.

3. VLC Media Player
The VLC Media Player is a commonly used platform that offers various functions. It can be easily accessed and shows compatibility with tons of platforms. It has a simple interface that allows you to operate it easily. Through this tool, you can also add subtitles to MKV proficiently. This MKV subtitle editor supports various caption formats such as VobSub, SubRip, SubViewer, etc.
Key Features
- While watching a video on the VLC media player, you can take instant snapshots of your favorite moments in high resolution.
- This tool offers a screen recorder through which you can capture your activities on a desktop. You can also choose the frame rate and output format for your screen recording.
- You can enhance your video files by adding effects from this tool. Along with applying attractive video effects, you can also change the brightness and hue of your video.
Step-by-Step Guide to Add Subtitles Using VLC
Step1 Open your VLC media player and click on the “Media” tab given on top. From there, tap on the “Convert/Save” option.

Step2 A new dialogue box will open regarding “Open Media.” Now you can instantly upload your MKV file on this tool. By staying on the same window, check the box saying, “Use a subtitle file.” Afterward, browse the SRT file from your computer.

Step3 Now tap on the “Convert/Save” arrowhead and choose the “Convert” option from the drop-down menu. A new window will open from where you have to tap on the “Wretch” icon. On the “Encapsulation” section, select “MKV.”

Step4 By going to the “Audio codec” and “Video codec” sections, check the box “keep original video or audio track.” Now go to the “Subtitle” section and enable the option of “Overlay subtitles on the video.” Once done, hit the “Create” button.

Part 2: How to Add Subtitles to MKV on Mac?
Are you looking for MKV subtitle editors that are compatible with Mac? In this section, you can learn how to add subtitles to MKV on your Mac devices easily.
1. HD Video Converter Deluxe
This tool is highly compatible with Mac users and provides tons of advanced features. Besides being a great video editor, this tool can help you add subtitles to your MKV video files. It supports popular subtitle formats such as ASS, SSA, and SRT. If you want to embed hardcode subtitles into your MKV files, this is the most compatible tool.
Key Features
- If you want to decrease the video file size without harming its high quality, you can use this platform. This tool offers a video compressor through which you can reduce file sizes effectively.
- To combine your various video chunks or clips, this software offers a reliable video merger.
- If you are facing audio problems in your video, this tool can permanently adjust the volume according to your preference.
Step-by-Step Guide to Add Subtitles Using HD Video Converter Deluxe
Step1 Start by launching HD Video Converter Deluxe on your MacBook. Afterward, tap on the “+Video” button to import your MKV file.

Step2 On the Output Profile window, choose “MKV” as your output format. Click on the “OK” button to proceed. Now navigate to the “Edit” tab and select “Subtitle.” From there, check “Enable Subtitle.” Also, check “Extra” and then click on the “Add” button. Now you can import the subtitle file to this tool.

Step3 Click the “Done” button and then hit the “RUN” button to embed the subtitles.

2. Wondershare UniConverter
UniConverter is one of the famous tools that many people prefer due to its high reliability. Among its various advanced features, you can use its “Subtitle Editor” to add subtitles to MKV videos. You can create subtitles manually in your preferred font. Moreover, it provides an auto generator to create subtitles by extracting audio from the video file. This feature supports more than 100 languages to offer more diversity.
Key Features
- The MKV subtitle editor of UniConverter is also capable of converting text into subtitle lines through its TXT to SRT feature.
- You can remove backgrounds from your video and add a new one with a few clicks. This can make your video more captivating.
- It offers a vocal remover that can separate instrumental sounds and vocals from an audio or video file easily.
Step-by-Step Guide to Use the Subtitle Editor of UniConverter
Step1 Run UniConverter on your PC and click on “Subtitle Editor” from its homepage. A new window will open in which you have to import the MKV video file.

Step2 You can click on the “Manual Subtitles” button to add your subtitles with respect to the time duration. Or, you can tap on ‘Import Subtitles’ to upload the subtitles file from your MacBook. Other options are also available such as Text to Subtitles and Auto Subtitles.

Step3 You can edit the added subtitles by going to the “Styles” section. Here, you can change the font, color, and style of your subtitles. Once done, click on the “Save” button.

Part 3: How to Add Subtitles to MKV Online?
If you want to use online platforms to merge subtitles with MKV, here are the top two online tools.
1. Veed
Veed is an easy-to-use online tool that allows you to edit your video clips with high accuracy. Through this online tool, you can add subtitles to your MKV files in 3 different ways. You can upload subtitle files in formats like VVT, TXT, SSA, SRT, and ASS. Otherwise, you can enter the subtitles manually by selecting their color, font, size, and time duration. Moreover, you can use its voice recognition software to auto-create subtitles instantly.
Key Features
- To make your video clips funny and engaging, this tool enables you to add various emojis and stickers to your video files.
- You can explain the content in your video by adding annotations such as text boxes using this tool.
- To remove unwanted objects from your video, you can use the crop feature of Veed.
Step-by-Step Guide to Add Subtitles Using Veed
Step1 Access the official website of Veed and click on “Add Subtitles To video” from its tools. Afterward, click the “Choose Files” button and import your MKV file.

Step2 Once done with uploading, click on “Upload Subtitle File.” You can upload any of its supported subtitle files. Also, choose the language from the given box.

Step3 After importing the subtitles, you can modify them by altering their text color, color effect, style, and alignment. Once done, hit the “Export” button.

2. Flixier
Do you want an interesting tool to create subtitles? Flixier is an efficient online tool that can edit your video and audio files. Without making a user account, you can use this tool to add subtitles to MKV video files. You can upload MKV files from different platforms, such as your device, Google Drive, Zoom, Dropbox, etc. This tool also provides different ways to flawlessly create subtitles for your video files.
Key Features
- The subtitle editor of this tool offers more than 1000 fonts. Thus, you can make your subtitles look stylish by choosing a preferred font.
- To edit your videos, this tool allows you to collaborate with your friends in real-time.
- It offers more than 50 transitions that you can apply to your videos easily.
Step-by-Step Guide to Add Subtitles Using Flixier
Step1 Visit the website of Flixier and click on “Add subtitles to your videos” from its tools. Afterward, tap on “Get Started” to proceed. The tool will ask you to upload your video file.

Step2 Once you have uploaded the MKV video, click on “Text” given on the left side. Afterward, tap “Add Subtitle” to create subtitles for your video. You can add text to the given space to create subtitles. You can also tap on the “Import Subtitle” button to upload the subtitle file. To change the properties of your subtitles, you can edit them from the provided options on your screen.

Step3 Once done with creating and adjusting subtitles, click on the “Export” button.

Conclusion
Subtitles are shown at the bottom of a video and help make the video content comprehensive. If you are dealing with MKV files and want to add subtitles in an instant way, this article has provided all the details. By reading this guide, you can learn how to add subtitles to MKV files on different platforms.
To attain the best results and utilize advanced features, we will highly recommend you use Wondershare Filmora. This tool creates a comfortable environment and gives an intuitive interface to create subtitles.
Part 1: How to Add Subtitles to MKV on Windows?
Are you a Windows user and want to add subtitles to MKV? Read this section to find out compatible tools that can add subtitles to your MKV videos efficiently.
1. Wondershare Filmora
Free Download For Win 7 or later(64-bit)
Free Download For macOS 10.14 or later
Wondershare Filmora is a popular tool that provides you with multiple options to edit video files. If you are interested in adding subtitles to your MKV files, you can navigate to its “Speech-to-Text” feature. This feature automatically transcribes the voice used in the video into subtitles. It supports 16 different languages for creating subtitles through this feature.
This feature can also enhance your editing efficiency as you don’t have to write the subtitles on your own. Moreover, the STT feature utilizes advanced algorithms that help the tool create subtitles with high precision. Furthermore, you can also manually add the subtitles to your MKV file using this MKV subtitle editor.
Key Features
- Filmora offers various effects, such as a green screen that can help you to change your background dramatically.
- If you want to resize your videos efficiently, this tool provides the Auto Reframe feature.
- Filmora also offers various preset templates that can help you to craft captivating videos easily.
Step-by-Step Guide to Add Subtitles Using Filmora
Step1 Create a New Filmora Project
Download and install Filmora on your PC and click “Create Project.” Afterward, import the MKV video from your PC to this tool by clicking on the “Arrow” icon.
Step2 Go to Titles Tab
After importing the video, drag it to the timeline. Once done, click on the “Titles” section given on top. Afterward, click on “Subtitles” from the left section. Now you will be able to see different types of subtitles on your screen. Select your favorite style of subtitles and tap on its “Download” icon.
Step3 Choose the Preferred Subtitle Style
After that, tap on the “Plus” icon to add your selected subtitle style to the timeline. Double-click on the added subtitles, which will open the settings. You can manually add the subtitles on the “Input Text” box easily. Moreover, you can easily change the text font, color, opacity, and alignment.
Step4 Export and Save Video
Once you have created subtitles for your imported video, click the “Export” button on top. Using this option, you can save the video file to your device or share it on other platforms.
2. Cisdem Video Converter
Cisdem is an efficient tool that can be used by content creators for various purposes. Along with editing the videos, this tool can help you add subtitles to your video files in any format. It supports various formats for adding subtitles, such as MKV, MP4, AVI, etc. This tool also offers a built-in editor to modify the MKV videos flawlessly. Hence, it’s a basic tool that generates quality results instantly.
Key Features
- Cisdem can function as a video converter that supports more than 300 file formats. You can convert to and from MKV files using this platform easily.
- Through this software, you can professionally add watermarks to your MKV files. It provides various options to add a customized watermark to your desired video files.
- It offers a built-in media player that allows you to play and watch MKV files without interruption.
Steps to Add Subtitles to MKV Using Cisdem Video Converter
Step1 Launch the Cisdem tool on your system and navigate to its “Converter”. Afterward, import the MKV file instantly. Now tap on the “Pencil” icon given on top to open the editing window.
Step2 From the editing window, go to “Subtitle and Audio” and click on “No subtitles.” From the drop-down box, click on “Load Subtitles” to upload your SRT or ASS subtitle file from your system.
Step3 Now press the “Save” button to proceed. As the default output format in this tool is MP4, navigate to the “General Video” section to change it. From this option, select “MKV Video” as the output format. Afterward, hit the “Convert” button to embed the added subtitles easily.
3. VLC Media Player
The VLC Media Player is a commonly used platform that offers various functions. It can be easily accessed and shows compatibility with tons of platforms. It has a simple interface that allows you to operate it easily. Through this tool, you can also add subtitles to MKV proficiently. This MKV subtitle editor supports various caption formats such as VobSub, SubRip, SubViewer, etc.
Key Features
- While watching a video on the VLC media player, you can take instant snapshots of your favorite moments in high resolution.
- This tool offers a screen recorder through which you can capture your activities on a desktop. You can also choose the frame rate and output format for your screen recording.
- You can enhance your video files by adding effects from this tool. Along with applying attractive video effects, you can also change the brightness and hue of your video.
Step-by-Step Guide to Add Subtitles Using VLC
Step1 Open your VLC media player and click on the “Media” tab given on top. From there, tap on the “Convert/Save” option.
Step2 A new dialogue box will open regarding “Open Media.” Now you can instantly upload your MKV file on this tool. By staying on the same window, check the box saying, “Use a subtitle file.” Afterward, browse the SRT file from your computer.
Step3 Now tap on the “Convert/Save” arrowhead and choose the “Convert” option from the drop-down menu. A new window will open from where you have to tap on the “Wretch” icon. On the “Encapsulation” section, select “MKV.”
Step4 By going to the “Audio codec” and “Video codec” sections, check the box “keep original video or audio track.” Now go to the “Subtitle” section and enable the option of “Overlay subtitles on the video.” Once done, hit the “Create” button.
Part 2: How to Add Subtitles to MKV on Mac?
Are you looking for MKV subtitle editors that are compatible with Mac? In this section, you can learn how to add subtitles to MKV on your Mac devices easily.
1. HD Video Converter Deluxe
This tool is highly compatible with Mac users and provides tons of advanced features. Besides being a great video editor, this tool can help you add subtitles to your MKV video files. It supports popular subtitle formats such as ASS, SSA, and SRT. If you want to embed hardcode subtitles into your MKV files, this is the most compatible tool.
Key Features
- If you want to decrease the video file size without harming its high quality, you can use this platform. This tool offers a video compressor through which you can reduce file sizes effectively.
- To combine your various video chunks or clips, this software offers a reliable video merger.
- If you are facing audio problems in your video, this tool can permanently adjust the volume according to your preference.
Step-by-Step Guide to Add Subtitles Using HD Video Converter Deluxe
Step1 Start by launching HD Video Converter Deluxe on your MacBook. Afterward, tap on the “+Video” button to import your MKV file.
Step2 On the Output Profile window, choose “MKV” as your output format. Click on the “OK” button to proceed. Now navigate to the “Edit” tab and select “Subtitle.” From there, check “Enable Subtitle.” Also, check “Extra” and then click on the “Add” button. Now you can import the subtitle file to this tool.
Step3 Click the “Done” button and then hit the “RUN” button to embed the subtitles.
2. Wondershare UniConverter
UniConverter is one of the famous tools that many people prefer due to its high reliability. Among its various advanced features, you can use its “Subtitle Editor” to add subtitles to MKV videos. You can create subtitles manually in your preferred font. Moreover, it provides an auto generator to create subtitles by extracting audio from the video file. This feature supports more than 100 languages to offer more diversity.
Key Features
- The MKV subtitle editor of UniConverter is also capable of converting text into subtitle lines through its TXT to SRT feature.
- You can remove backgrounds from your video and add a new one with a few clicks. This can make your video more captivating.
- It offers a vocal remover that can separate instrumental sounds and vocals from an audio or video file easily.
Step-by-Step Guide to Use the Subtitle Editor of UniConverter
Step1 Run UniConverter on your PC and click on “Subtitle Editor” from its homepage. A new window will open in which you have to import the MKV video file.
Step2 You can click on the “Manual Subtitles” button to add your subtitles with respect to the time duration. Or, you can tap on ‘Import Subtitles’ to upload the subtitles file from your MacBook. Other options are also available such as Text to Subtitles and Auto Subtitles.
Step3 You can edit the added subtitles by going to the “Styles” section. Here, you can change the font, color, and style of your subtitles. Once done, click on the “Save” button.
Part 3: How to Add Subtitles to MKV Online?
If you want to use online platforms to merge subtitles with MKV, here are the top two online tools.
1. Veed
Veed is an easy-to-use online tool that allows you to edit your video clips with high accuracy. Through this online tool, you can add subtitles to your MKV files in 3 different ways. You can upload subtitle files in formats like VVT, TXT, SSA, SRT, and ASS. Otherwise, you can enter the subtitles manually by selecting their color, font, size, and time duration. Moreover, you can use its voice recognition software to auto-create subtitles instantly.
Key Features
- To make your video clips funny and engaging, this tool enables you to add various emojis and stickers to your video files.
- You can explain the content in your video by adding annotations such as text boxes using this tool.
- To remove unwanted objects from your video, you can use the crop feature of Veed.
Step-by-Step Guide to Add Subtitles Using Veed
Step1 Access the official website of Veed and click on “Add Subtitles To video” from its tools. Afterward, click the “Choose Files” button and import your MKV file.
Step2 Once done with uploading, click on “Upload Subtitle File.” You can upload any of its supported subtitle files. Also, choose the language from the given box.
Step3 After importing the subtitles, you can modify them by altering their text color, color effect, style, and alignment. Once done, hit the “Export” button.
2. Flixier
Do you want an interesting tool to create subtitles? Flixier is an efficient online tool that can edit your video and audio files. Without making a user account, you can use this tool to add subtitles to MKV video files. You can upload MKV files from different platforms, such as your device, Google Drive, Zoom, Dropbox, etc. This tool also provides different ways to flawlessly create subtitles for your video files.
Key Features
- The subtitle editor of this tool offers more than 1000 fonts. Thus, you can make your subtitles look stylish by choosing a preferred font.
- To edit your videos, this tool allows you to collaborate with your friends in real-time.
- It offers more than 50 transitions that you can apply to your videos easily.
Step-by-Step Guide to Add Subtitles Using Flixier
Step1 Visit the website of Flixier and click on “Add subtitles to your videos” from its tools. Afterward, tap on “Get Started” to proceed. The tool will ask you to upload your video file.
Step2 Once you have uploaded the MKV video, click on “Text” given on the left side. Afterward, tap “Add Subtitle” to create subtitles for your video. You can add text to the given space to create subtitles. You can also tap on the “Import Subtitle” button to upload the subtitle file. To change the properties of your subtitles, you can edit them from the provided options on your screen.
Step3 Once done with creating and adjusting subtitles, click on the “Export” button.
Conclusion
Subtitles are shown at the bottom of a video and help make the video content comprehensive. If you are dealing with MKV files and want to add subtitles in an instant way, this article has provided all the details. By reading this guide, you can learn how to add subtitles to MKV files on different platforms.
To attain the best results and utilize advanced features, we will highly recommend you use Wondershare Filmora. This tool creates a comfortable environment and gives an intuitive interface to create subtitles.
Also read:
- Camtasia Vs Captivate Which Is Better
- Updated In 2024, Best 12 Best Freeze Frame Video Editing Examples
- The Glitch Effect Shows Errors and Flaws in the Image or a Video. The Write-Up Presents the Complete Procedure of Adding Premiere Pros Glitch Effect and Introduces Eight Free Glitch Effects
- 2024 Approved CapCut Lenta Template How It Benefits Slow Motion Video
- New Everything About Adding Effects In Kinemaster
- Updated Camtasia Review – Is It The Best Video Editor, In 2024
- Updated Add Green Screen Effects in Final Cut Pro for 2024
- New In 2024, Best 10 Options Slow Down Video Online with Perfection
- New 2024 Approved How to Add Expression in After Effects
- Top 10 Free WhatsApp Video Converter for 2024
- Methods on How to Speed Up Video on Splice for 2024
- New Motion Tracking Using The Best Video Editors
- 2024 Approved How to Use Color Grading in Final Cut Pro
- New Slow Down or Speed Up Videos Easily on PC, Online, and Phone for 2024
- Mastering DaVinci Resolve Scopes A Comprehensive Guide for 2024
- Updated Voice Changer for Discord | Use Voicemod on Discord for 2024
- Updated In 2024, 10 Creative AR Teaching Examples to Tell You What Is AR in Teaching
- Top 8 Sites to Download Glitch Transition for Premiere Pro for 2024
- Looking Into How Slow Mo Guys Have Changed the Dynamics of Slow-Motion
- Updated 2024 Approved Hitfilm Express Video Editor Review
- Splice Video Editor Online - Get Your Videos Splice
- Updated This Article Discusses the Splitting of the Video Clips in DaVinci Resolve Explicitly. There Is Also a Brief Description of Its Best Alternative, Wondershare Filmora. This Is Also Practically Relevant and Reasonable as Well
- New List of Whatsapp Video Format That You May Need to Know
- 2024 Approved Adobe Premiere Pro Rec 709 LUTs Finding The Best Options
- New 10 BEST TEXT TO SPEECH VIDEO MAKERS
- Updated In 2024, Finest Approach to Slow Down a Video CapCut All-in-One Video Editor
- 2024 Approved How to Create Loop Videos Using Filmora
- 2024 Approved Good Ways to Make Sure Your Video Editing Course Is Worthing to Watch
- New 2024 Approved 5 Best Video Denoisers
- Updated How to Create the Stranger Things Upside Down Effect for 2024
- New 2024 Approved How to Find a High-Quality Video Marketing Agency?
- Updated In 2024, Top Tricks for Learning Photo Slideshow
- If Youre Not Using Video yet, Now Is the Time to Start. In This Post, Well Discuss the Benefits of Using Video for Social Media Marketing and Provide Tips for Getting Started. Keep Reading to Learn More
- New Why You Should Master Slideshows In Lightroom, Fresh Insight, In 2024
- 8 Excellent Video and Photo Mergers on Desktop/Mobile/Online
- Updated Easy Way to Add Transitions to Videos
- 2024 Approved Best 8 Top Premiere Pro Slideshow Templates
- New Quickly Turn Any Video Into a Paper Rip Effect for 2024
- Updated What Is a Memoji and How to Make a Memoji? You Can Learn Top 8 Memoji Makers for PC, Android, or iOS, and the Steps to Make a Memoji
- Updated If You Are Trying to Create a Countdown Effect, but Youre Not Sure Where to Start, Then This Post Is Going to Show You some Ways to Create a Countdown Animation for Your Videos
- New How to Build A Video Editing Career for 2024
- 2024 Approved How to Create a Bokeh Effect
- Updated How to Change Video Thumbnail on Google Drive for 2024
- Powerpoint Supported Video Format and User Tips
- Updated Easily Cut Large Videos Faster on Mac 7 Solutions Included for 2024
- How to Unlock Poco X6 Pro Phone without Google Account?
- In 2024, Does find my friends work on Apple iPhone 15 Plus | Dr.fone
- FRP Hijacker by Hagard Download and Bypass your OnePlus Nord CE 3 5G FRP Locks
- This is how you can recover deleted pictures from Nokia 150 (2023).
- How To Unlock Apple iPhone 12 mini Without Passcode? 4 Easy Methods | Dr.fone
- In 2024, How to get the dragon scale and evolution-enabled pokemon On Tecno Spark 20 Pro+? | Dr.fone
- New What Wikipedia Wont Tell You About Character Rigging for 2024
- Unlocking the Power of Smart Lock A Beginners Guide for Xiaomi Redmi K70 Pro Users
- How to get the dragon scale and evolution-enabled pokemon On Samsung Galaxy F34 5G? | Dr.fone
- In 2024, Easily Unlock Your Motorola G24 Power Device SIM
- The Updated Method to Bypass Lava Yuva 3 Pro FRP
- Spoofing Life360 How to Do it on Honor X50i? | Dr.fone
- In 2024, 10 Fake GPS Location Apps on Android Of your OnePlus Nord CE 3 Lite 5G | Dr.fone
- Is GSM Flasher ADB Legit? Full Review To Bypass Your HTC Phone FRP Lock
- Wondering the Best Alternative to Hola On Realme GT Neo 5? Here Is the Answer | Dr.fone
- Reasons why Pokémon GPS does not Work On Realme 11 Pro+? | Dr.fone
- In 2024, How To Use Special Features - Virtual Location On Infinix Hot 30 5G? | Dr.fone
- In 2024, How to use Pokemon Go Joystick on Oppo Reno 10 Pro+ 5G? | Dr.fone
- How to Screen Mirroring Motorola Moto G14 to PC? | Dr.fone
- The Best 8 VPN Hardware Devices Reviewed On Poco C51 | Dr.fone
- Which is the Best Fake GPS Joystick App On Nokia C22? | Dr.fone
- In 2024, How To Bypass Lava Blaze 2 Pro FRP In 3 Different Ways
- How to Stop Google Chrome from Tracking Your Location On Xiaomi 13T? | Dr.fone
- Complete Tutorial to Use VPNa to Fake GPS Location On Samsung Galaxy A25 5G | Dr.fone
- In 2024, Unlocking Apple iPhone 12 Lock Screen 3 Foolproof Methods that Actually Work | Dr.fone
- Title: Vegas Pro - How to Download, Install and Use It, In 2024
- Author: Chloe
- Created at : 2024-05-20 03:38:22
- Updated at : 2024-05-21 03:38:22
- Link: https://ai-editing-video.techidaily.com/vegas-pro-how-to-download-install-and-use-it-in-2024/
- License: This work is licensed under CC BY-NC-SA 4.0.
