:max_bytes(150000):strip_icc():format(webp)/GettyImages-475157855-5b24021b04d1cf00369d7e11-5c66f1c04cedfd00010a2553.jpg)
Video in Text Cinematic Intro【Filmora Tutorial】

Video in Text Cinematic Intro【Filmora Tutorial】
Preparation
What you need to prepare:
- A computer (Windows or macOS)
- Your video materials.
- Filmora video editor
Step 1
Visit filmora.wondershare.com and download the Filmora video editor . Hit Install. When it’s done installing, the app will start automatically. When it does, click on New Project.
Step 2
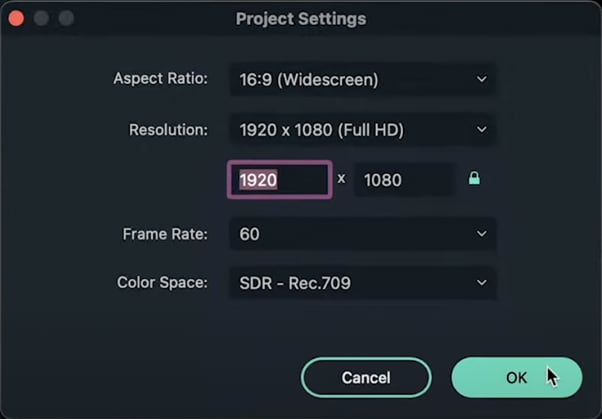
Before we start editing, go to File from the navigation panel at the top and select Project Settings. Then, set the resolution settings like in the example here.
Step 3
Now, download any background image you want. Make sure its resolution is 1920x1080. Import it and drag it to the Timeline.
Step 4
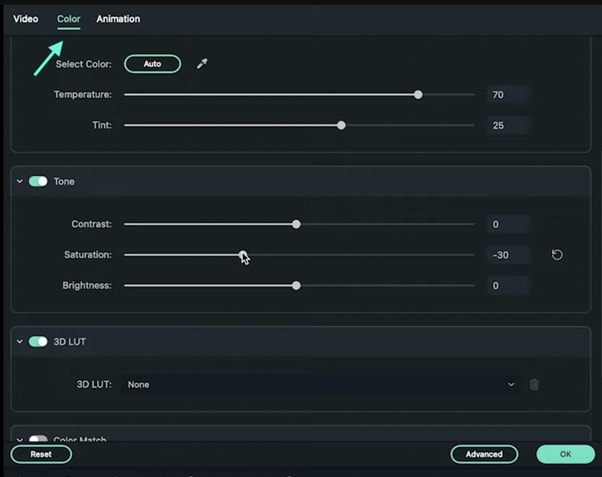
From the Timeline, double-click on the Background clip and decrease its opacity to 70%. Then, click on Color from the upper-left corner and change the settings as you wish.
Step 5
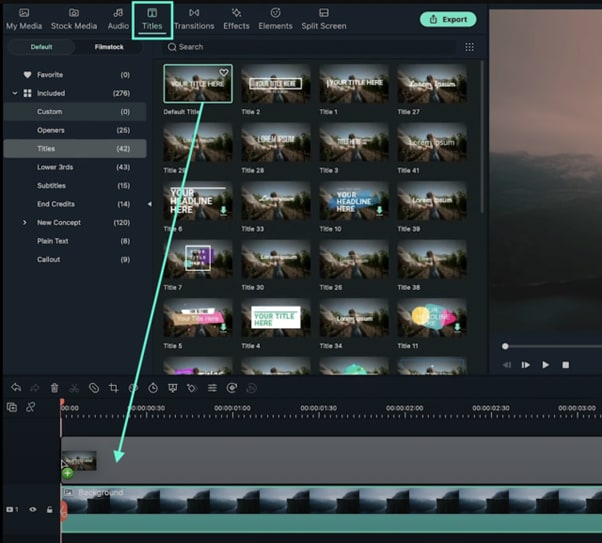
Go to the Titles tab and drag the Default Title to the Timeline. Double-click on the Default Title clip and change fonts, type in your text, etc.
Step 6
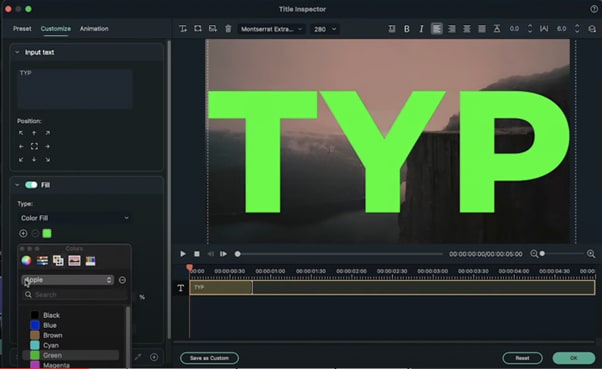
Drag the text to enlarge it so it fits the entire screen. Then, change its color to green. Press OK. Now, Export this clip and name it “1st Text”.
Step 7
Now, open a new Filmora project and edit the Project Settings like we did before. Then, go to Sample Color and drag the white color to the Timeline.
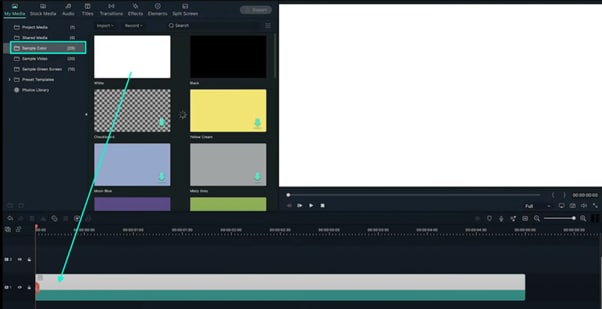
Step 8
Drag the Playhead to the 2-second marker. Drag the same Background image as before to this point. Then, double-click on the Background clip and increase the Brightness and Saturation bars to 50. Click OK.
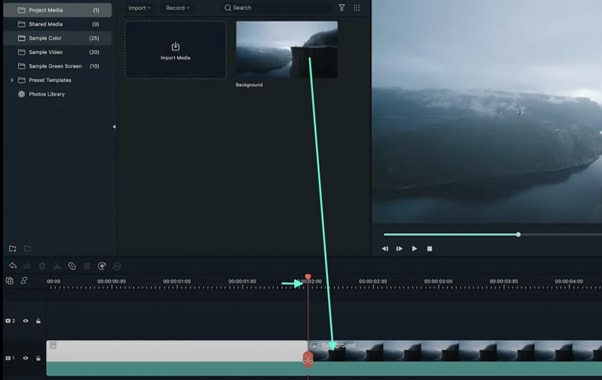
Step 9
Go to Transitions and type in “Push”. Drag the Push transition between the White layer and your Background image. Click on Export once again and name this clip “Transition”.
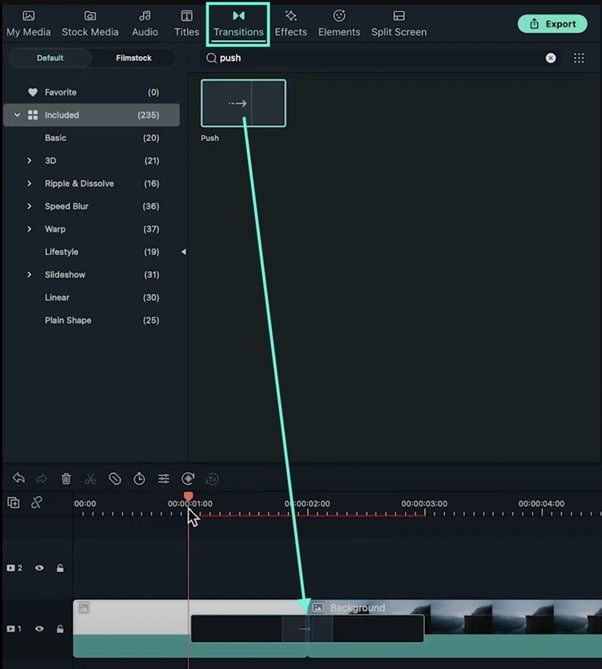
Step 10
Open a new Filmora project and adjust the Project Settings like we did the first time. Then, go to Sample Color and drag the White color to the Timeline once more.
Step 11
Go to Titles and drag the Default Title to the Timeline, above the White Sample Color clip. Now, double-click the Default Title clip and go to ADVANCED. Here, set the text color to green, choose a font you like, and increase the text size. Click OK. Export it and name it “Temporary”.

Step 12
Open a new project in Filmora. Import and Drag the same background image you used before to the Timeline. Double-click on it and drag the Saturation bar to -100. Now, drag the file you named “Temporary” into the Timeline.
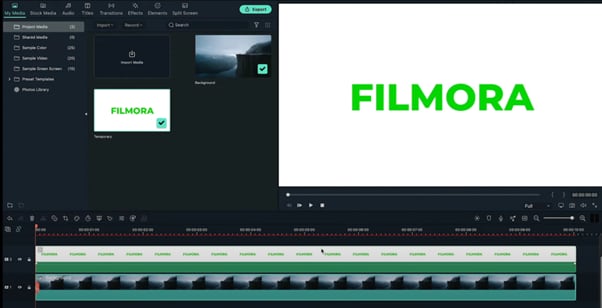
Step 13
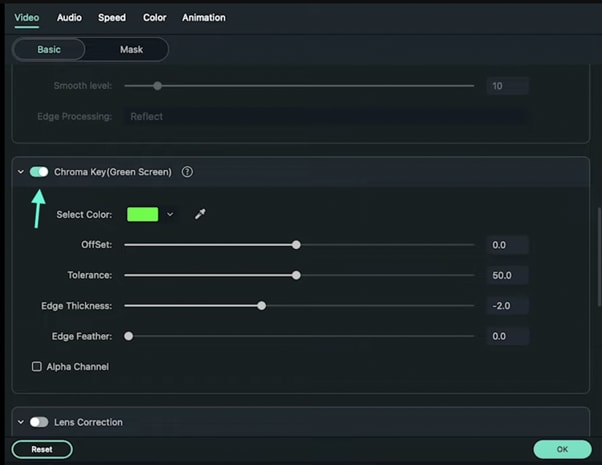
Double-click on the Temporary clip, scroll down when the new window appears, and find the Chroma key section. Enable this. Now, drag the Edge Feather bar to 0. Export this video and name it “2nd Text”.
Step 14
Open one more new project in Filmora and import the following files. There should be four, titled “Background”, “Transition”, “1st Text”, and “2nd Text”.
Step 15
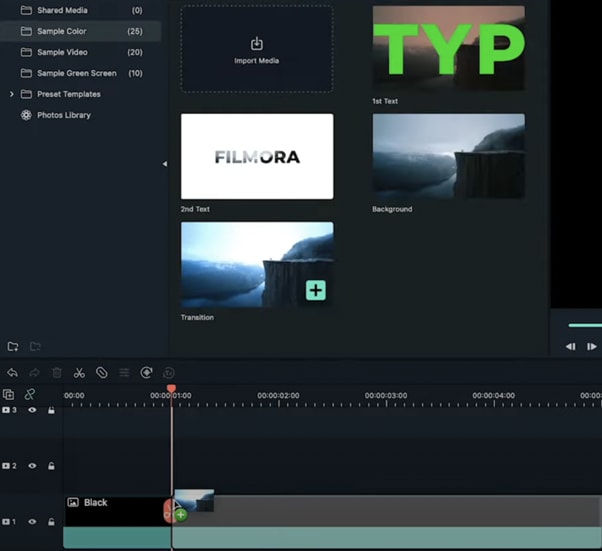
Click on Sample Color and drag the Black color to the 1st Track of the Timeline. Then, move the Playhead to the 1-second marker and drag the “Transition” clip to the same Track within the Timeline.
Step 16
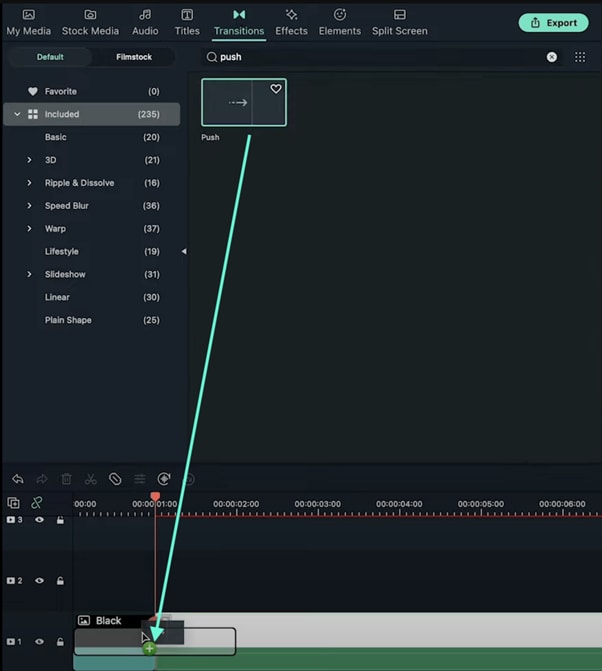
From the Transitions tab, select the Push transition and drag it to the Timeline.
Step 17
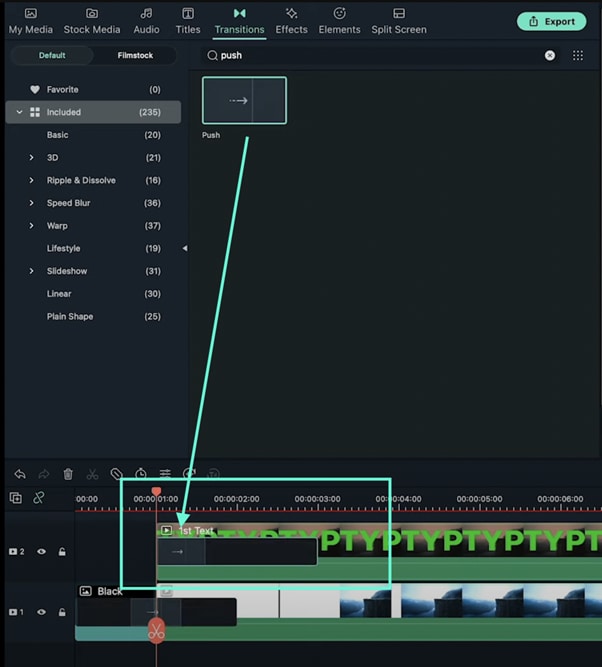
Set the Playhead at the 1-second marker once again. First, add the “1st Text” clip into Track 2 of the Timeline. Then, add another Push transition at the beginning of this clip.
Step 18
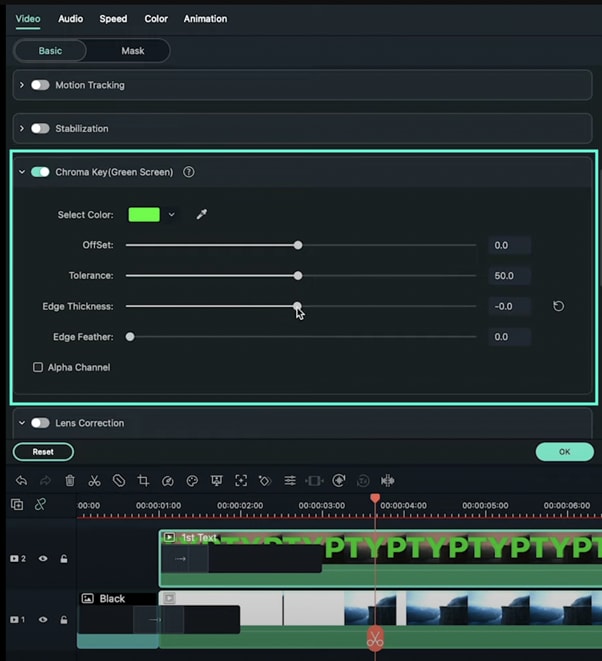
Now, double-click on the “1st Text” clip and enable the Chroma Key option. Then, set the Edge Thickness and Edge Feather bars to 0.
Step 19
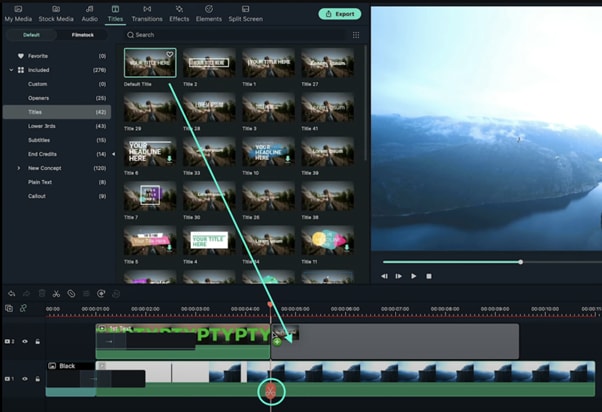
Set the Playhead at 4.5 seconds. Snip the Timeline. Then, add a new Default Title on the right side of the Playhead on Track 2.
Step 20
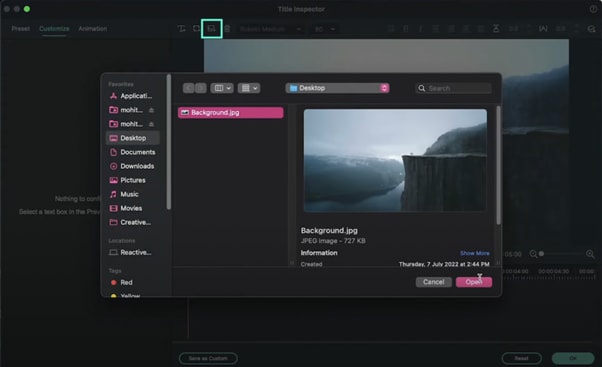
Double-click on the Default Title and go to Advanced settings. From there, delete the default text and click on the highlighted button like in the image below to add a new background to this clip. Add the same background you’ve used throughout the entire video.
Step 21
Add a new text here and customize it to match the text style in your “2nd Text” clip you exported earlier. Click OK.

Step 22
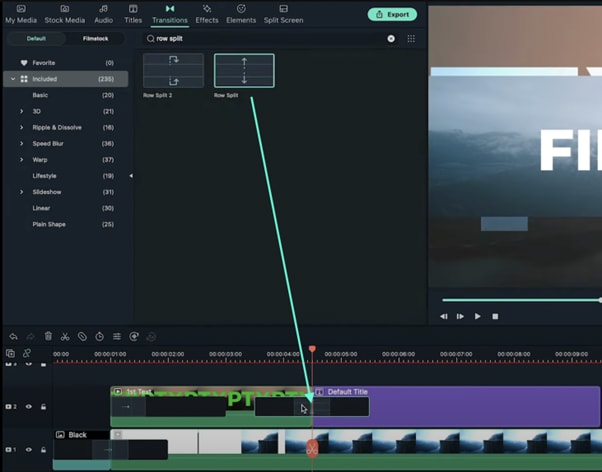
Next, go to the Transitions tab and drag the “Row Split” transition clip between Track 2 and the New Default Title you just created. Then, double-click on the transition and change its duration to 1 second.
Step 23
Set the Playhead to the 5.5 seconds marker. Drag the “2nd Text” clip you exported earlier here. Then, simply add another Row Split transition between this clip and the Default Title.
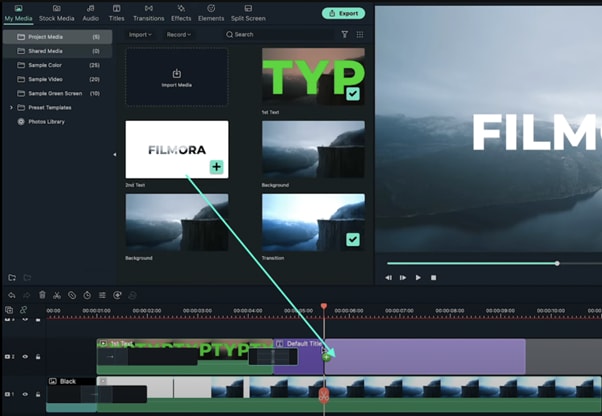
Step 24
That’s it! You’re done. All that’s left is to Render and export the video. Congratulations on creating a video in text cinematic intro in Filmora.
Summary
What you’ve learned:
- How to make advanced edits on titles in Filmora
- Basics of using green screen effects on text
- Using transitions in Filmora
- Exporting and re-using edited clips
- Creating a unique video in text cinematic intro
What you need to prepare:
- A computer (Windows or macOS)
- Your video materials.
- Filmora video editor
Step 1
Visit filmora.wondershare.com and download the Filmora video editor . Hit Install. When it’s done installing, the app will start automatically. When it does, click on New Project.
Step 2
Before we start editing, go to File from the navigation panel at the top and select Project Settings. Then, set the resolution settings like in the example here.

Step 3
Now, download any background image you want. Make sure its resolution is 1920x1080. Import it and drag it to the Timeline.
Step 4
From the Timeline, double-click on the Background clip and decrease its opacity to 70%. Then, click on Color from the upper-left corner and change the settings as you wish.

Step 5
Go to the Titles tab and drag the Default Title to the Timeline. Double-click on the Default Title clip and change fonts, type in your text, etc.

Step 6
Drag the text to enlarge it so it fits the entire screen. Then, change its color to green. Press OK. Now, Export this clip and name it “1st Text”.

Step 7
Now, open a new Filmora project and edit the Project Settings like we did before. Then, go to Sample Color and drag the white color to the Timeline.

Step 8
Drag the Playhead to the 2-second marker. Drag the same Background image as before to this point. Then, double-click on the Background clip and increase the Brightness and Saturation bars to 50. Click OK.

Step 9
Go to Transitions and type in “Push”. Drag the Push transition between the White layer and your Background image. Click on Export once again and name this clip “Transition”.

Step 10
Open a new Filmora project and adjust the Project Settings like we did the first time. Then, go to Sample Color and drag the White color to the Timeline once more.
Step 11
Go to Titles and drag the Default Title to the Timeline, above the White Sample Color clip. Now, double-click the Default Title clip and go to ADVANCED. Here, set the text color to green, choose a font you like, and increase the text size. Click OK. Export it and name it “Temporary”.

Step 12
Open a new project in Filmora. Import and Drag the same background image you used before to the Timeline. Double-click on it and drag the Saturation bar to -100. Now, drag the file you named “Temporary” into the Timeline.

Step 13
Double-click on the Temporary clip, scroll down when the new window appears, and find the Chroma key section. Enable this. Now, drag the Edge Feather bar to 0. Export this video and name it “2nd Text”.

Step 14
Open one more new project in Filmora and import the following files. There should be four, titled “Background”, “Transition”, “1st Text”, and “2nd Text”.
Step 15
Click on Sample Color and drag the Black color to the 1st Track of the Timeline. Then, move the Playhead to the 1-second marker and drag the “Transition” clip to the same Track within the Timeline.

Step 16
From the Transitions tab, select the Push transition and drag it to the Timeline.

Step 17
Set the Playhead at the 1-second marker once again. First, add the “1st Text” clip into Track 2 of the Timeline. Then, add another Push transition at the beginning of this clip.

Step 18
Now, double-click on the “1st Text” clip and enable the Chroma Key option. Then, set the Edge Thickness and Edge Feather bars to 0.

Step 19
Set the Playhead at 4.5 seconds. Snip the Timeline. Then, add a new Default Title on the right side of the Playhead on Track 2.

Step 20
Double-click on the Default Title and go to Advanced settings. From there, delete the default text and click on the highlighted button like in the image below to add a new background to this clip. Add the same background you’ve used throughout the entire video.

Step 21
Add a new text here and customize it to match the text style in your “2nd Text” clip you exported earlier. Click OK.

Step 22
Next, go to the Transitions tab and drag the “Row Split” transition clip between Track 2 and the New Default Title you just created. Then, double-click on the transition and change its duration to 1 second.

Step 23
Set the Playhead to the 5.5 seconds marker. Drag the “2nd Text” clip you exported earlier here. Then, simply add another Row Split transition between this clip and the Default Title.

Step 24
That’s it! You’re done. All that’s left is to Render and export the video. Congratulations on creating a video in text cinematic intro in Filmora.
Summary
What you’ve learned:
- How to make advanced edits on titles in Filmora
- Basics of using green screen effects on text
- Using transitions in Filmora
- Exporting and re-using edited clips
- Creating a unique video in text cinematic intro
What you need to prepare:
- A computer (Windows or macOS)
- Your video materials.
- Filmora video editor
Step 1
Visit filmora.wondershare.com and download the Filmora video editor . Hit Install. When it’s done installing, the app will start automatically. When it does, click on New Project.
Step 2
Before we start editing, go to File from the navigation panel at the top and select Project Settings. Then, set the resolution settings like in the example here.

Step 3
Now, download any background image you want. Make sure its resolution is 1920x1080. Import it and drag it to the Timeline.
Step 4
From the Timeline, double-click on the Background clip and decrease its opacity to 70%. Then, click on Color from the upper-left corner and change the settings as you wish.

Step 5
Go to the Titles tab and drag the Default Title to the Timeline. Double-click on the Default Title clip and change fonts, type in your text, etc.

Step 6
Drag the text to enlarge it so it fits the entire screen. Then, change its color to green. Press OK. Now, Export this clip and name it “1st Text”.

Step 7
Now, open a new Filmora project and edit the Project Settings like we did before. Then, go to Sample Color and drag the white color to the Timeline.

Step 8
Drag the Playhead to the 2-second marker. Drag the same Background image as before to this point. Then, double-click on the Background clip and increase the Brightness and Saturation bars to 50. Click OK.

Step 9
Go to Transitions and type in “Push”. Drag the Push transition between the White layer and your Background image. Click on Export once again and name this clip “Transition”.

Step 10
Open a new Filmora project and adjust the Project Settings like we did the first time. Then, go to Sample Color and drag the White color to the Timeline once more.
Step 11
Go to Titles and drag the Default Title to the Timeline, above the White Sample Color clip. Now, double-click the Default Title clip and go to ADVANCED. Here, set the text color to green, choose a font you like, and increase the text size. Click OK. Export it and name it “Temporary”.

Step 12
Open a new project in Filmora. Import and Drag the same background image you used before to the Timeline. Double-click on it and drag the Saturation bar to -100. Now, drag the file you named “Temporary” into the Timeline.

Step 13
Double-click on the Temporary clip, scroll down when the new window appears, and find the Chroma key section. Enable this. Now, drag the Edge Feather bar to 0. Export this video and name it “2nd Text”.

Step 14
Open one more new project in Filmora and import the following files. There should be four, titled “Background”, “Transition”, “1st Text”, and “2nd Text”.
Step 15
Click on Sample Color and drag the Black color to the 1st Track of the Timeline. Then, move the Playhead to the 1-second marker and drag the “Transition” clip to the same Track within the Timeline.

Step 16
From the Transitions tab, select the Push transition and drag it to the Timeline.

Step 17
Set the Playhead at the 1-second marker once again. First, add the “1st Text” clip into Track 2 of the Timeline. Then, add another Push transition at the beginning of this clip.

Step 18
Now, double-click on the “1st Text” clip and enable the Chroma Key option. Then, set the Edge Thickness and Edge Feather bars to 0.

Step 19
Set the Playhead at 4.5 seconds. Snip the Timeline. Then, add a new Default Title on the right side of the Playhead on Track 2.

Step 20
Double-click on the Default Title and go to Advanced settings. From there, delete the default text and click on the highlighted button like in the image below to add a new background to this clip. Add the same background you’ve used throughout the entire video.

Step 21
Add a new text here and customize it to match the text style in your “2nd Text” clip you exported earlier. Click OK.

Step 22
Next, go to the Transitions tab and drag the “Row Split” transition clip between Track 2 and the New Default Title you just created. Then, double-click on the transition and change its duration to 1 second.

Step 23
Set the Playhead to the 5.5 seconds marker. Drag the “2nd Text” clip you exported earlier here. Then, simply add another Row Split transition between this clip and the Default Title.

Step 24
That’s it! You’re done. All that’s left is to Render and export the video. Congratulations on creating a video in text cinematic intro in Filmora.
Summary
What you’ve learned:
- How to make advanced edits on titles in Filmora
- Basics of using green screen effects on text
- Using transitions in Filmora
- Exporting and re-using edited clips
- Creating a unique video in text cinematic intro
What you need to prepare:
- A computer (Windows or macOS)
- Your video materials.
- Filmora video editor
Step 1
Visit filmora.wondershare.com and download the Filmora video editor . Hit Install. When it’s done installing, the app will start automatically. When it does, click on New Project.
Step 2
Before we start editing, go to File from the navigation panel at the top and select Project Settings. Then, set the resolution settings like in the example here.

Step 3
Now, download any background image you want. Make sure its resolution is 1920x1080. Import it and drag it to the Timeline.
Step 4
From the Timeline, double-click on the Background clip and decrease its opacity to 70%. Then, click on Color from the upper-left corner and change the settings as you wish.

Step 5
Go to the Titles tab and drag the Default Title to the Timeline. Double-click on the Default Title clip and change fonts, type in your text, etc.

Step 6
Drag the text to enlarge it so it fits the entire screen. Then, change its color to green. Press OK. Now, Export this clip and name it “1st Text”.

Step 7
Now, open a new Filmora project and edit the Project Settings like we did before. Then, go to Sample Color and drag the white color to the Timeline.

Step 8
Drag the Playhead to the 2-second marker. Drag the same Background image as before to this point. Then, double-click on the Background clip and increase the Brightness and Saturation bars to 50. Click OK.

Step 9
Go to Transitions and type in “Push”. Drag the Push transition between the White layer and your Background image. Click on Export once again and name this clip “Transition”.

Step 10
Open a new Filmora project and adjust the Project Settings like we did the first time. Then, go to Sample Color and drag the White color to the Timeline once more.
Step 11
Go to Titles and drag the Default Title to the Timeline, above the White Sample Color clip. Now, double-click the Default Title clip and go to ADVANCED. Here, set the text color to green, choose a font you like, and increase the text size. Click OK. Export it and name it “Temporary”.

Step 12
Open a new project in Filmora. Import and Drag the same background image you used before to the Timeline. Double-click on it and drag the Saturation bar to -100. Now, drag the file you named “Temporary” into the Timeline.

Step 13
Double-click on the Temporary clip, scroll down when the new window appears, and find the Chroma key section. Enable this. Now, drag the Edge Feather bar to 0. Export this video and name it “2nd Text”.

Step 14
Open one more new project in Filmora and import the following files. There should be four, titled “Background”, “Transition”, “1st Text”, and “2nd Text”.
Step 15
Click on Sample Color and drag the Black color to the 1st Track of the Timeline. Then, move the Playhead to the 1-second marker and drag the “Transition” clip to the same Track within the Timeline.

Step 16
From the Transitions tab, select the Push transition and drag it to the Timeline.

Step 17
Set the Playhead at the 1-second marker once again. First, add the “1st Text” clip into Track 2 of the Timeline. Then, add another Push transition at the beginning of this clip.

Step 18
Now, double-click on the “1st Text” clip and enable the Chroma Key option. Then, set the Edge Thickness and Edge Feather bars to 0.

Step 19
Set the Playhead at 4.5 seconds. Snip the Timeline. Then, add a new Default Title on the right side of the Playhead on Track 2.

Step 20
Double-click on the Default Title and go to Advanced settings. From there, delete the default text and click on the highlighted button like in the image below to add a new background to this clip. Add the same background you’ve used throughout the entire video.

Step 21
Add a new text here and customize it to match the text style in your “2nd Text” clip you exported earlier. Click OK.

Step 22
Next, go to the Transitions tab and drag the “Row Split” transition clip between Track 2 and the New Default Title you just created. Then, double-click on the transition and change its duration to 1 second.

Step 23
Set the Playhead to the 5.5 seconds marker. Drag the “2nd Text” clip you exported earlier here. Then, simply add another Row Split transition between this clip and the Default Title.

Step 24
That’s it! You’re done. All that’s left is to Render and export the video. Congratulations on creating a video in text cinematic intro in Filmora.
Summary
What you’ve learned:
- How to make advanced edits on titles in Filmora
- Basics of using green screen effects on text
- Using transitions in Filmora
- Exporting and re-using edited clips
- Creating a unique video in text cinematic intro
FLV Editors for Windows 11/10/8.1/8/7: Easily Edit FLV Videos on PC
If you are a streamer or a content creator then you undoubtedly may have come across files having .flv format. FLV stands for “Flash Video”. It is a container file format like .mp4 and .mov. But it isn’t used quite frequently nowadays. They are mainly used for streaming videos. Because it provides compressed video while maintaining the quality and takes less space. It supports codec which is compatible with most of the devices but you may need a flash player to play these files. If you have recently started working with .flv files or need more info about it then read till the end. We have gathered all the necessary information for you in this article.
Being a content creator, you can’t just record videos and publish them directly. Sometimes it requires finishing touches or an entirely new look, for this purpose you need a good editor. And if you are working with .flv files then selecting a good editing software that supports .flv files is important. So, here we have mentioned a list of FLV video editors. You can select one depending on your needs and budget.
Best FLV Editor to Edit FlV Video on Windows and Mac:
- Wondershare – Filmora:
It is available for both Windows and Mac.
Filmora Video Editor is the most common and versatile editing software in this list that almost every content creator may have used or heard about. It has a lot of professional features used by content creators. It is one of the best video editors for .flv format, if u work with .flv files then you must get your hands on filmora.
Its UI is quite similar to premiere pro which makes it quite easy for people who are looking for premiere pro alternatives. It has hundreds of classy transitions/effects and dozens of unique and useful features but many of them are available on paid version only.
The free version also packs a punch but it is almost useless for most users as it leaves a watermark on the final product. It is good for learning video editing and once you master enough to move forward then you can purchase the pro version or you can start directly on the paid version.
For Win 7 or later (64-bit)
For macOS 10.14 or later
Features:
- Support a wide range of formats including .flv.
- Have advanced color grading options.
- Have standard Motion Tracking feature.
- Masking and Chroma key.
- Keyframing and Smooth animation. (Paid version)
- Speed ramping and Auto Synchronization. (Paid Version)
- Support industry-standard plugins (like Boris fx).
- Have a vast stock library.
Cons:
- Leaves a watermark on export. (free version)
- Have playback issues while using 4k videos.
- Lacks some standard editing features.
*Almost every software has some pros and cons. Remember these are inspected from my point of view. And it can differ from your experience.
Steps:
Import: Open filmora, a popup will appear, Select desired aspect ratio then click “New Project” to start editing or click “Open Project” to continue your old project.
On the center of the screen, you will see the import window, click it to import .flv file or any other video you want to edit.
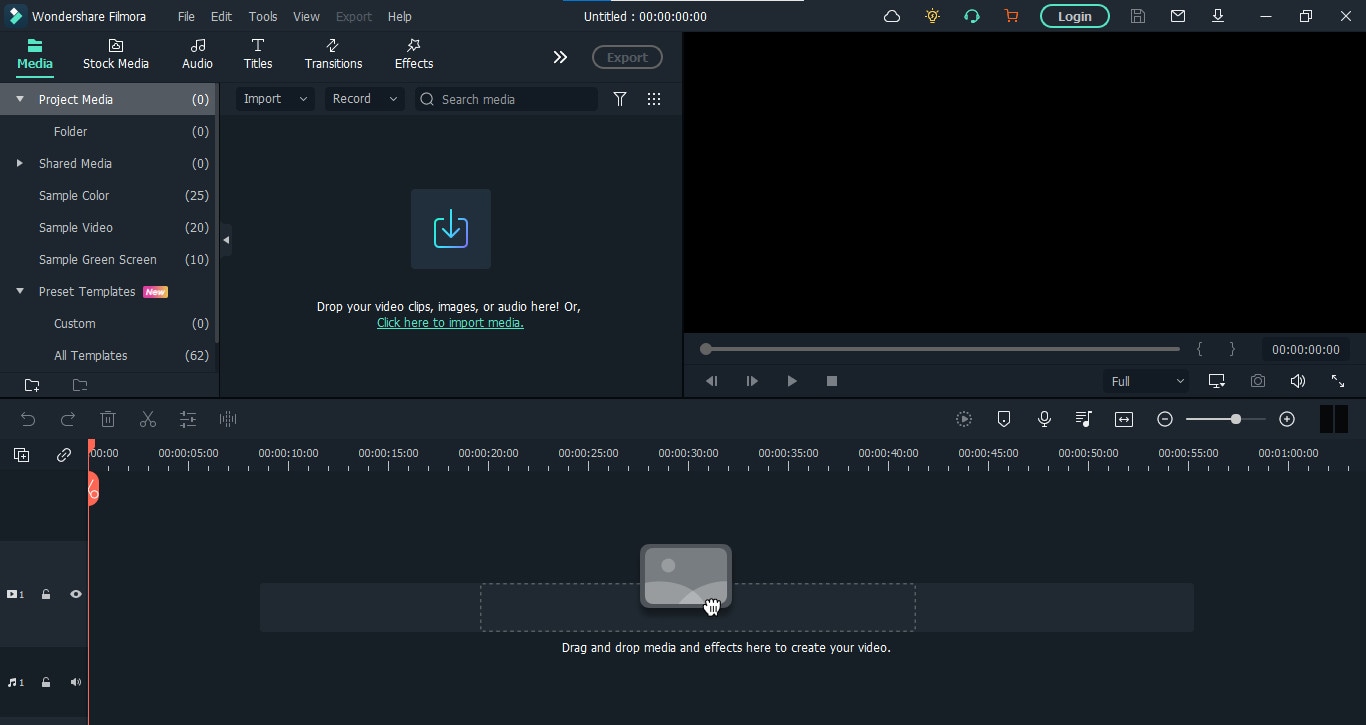
Edit: Drag the clips on the timeline to start editing. Drag the clips from the corner to trim them. Click the top left icon of the timeline (not the whole screen) to add layers. In the toolbar above the timeline, you will find a bunch of tools, like split, crop, speed ramping, animation e.t.c. Click the red scissors icon on the pointer to split the clip at the desired timestamp.
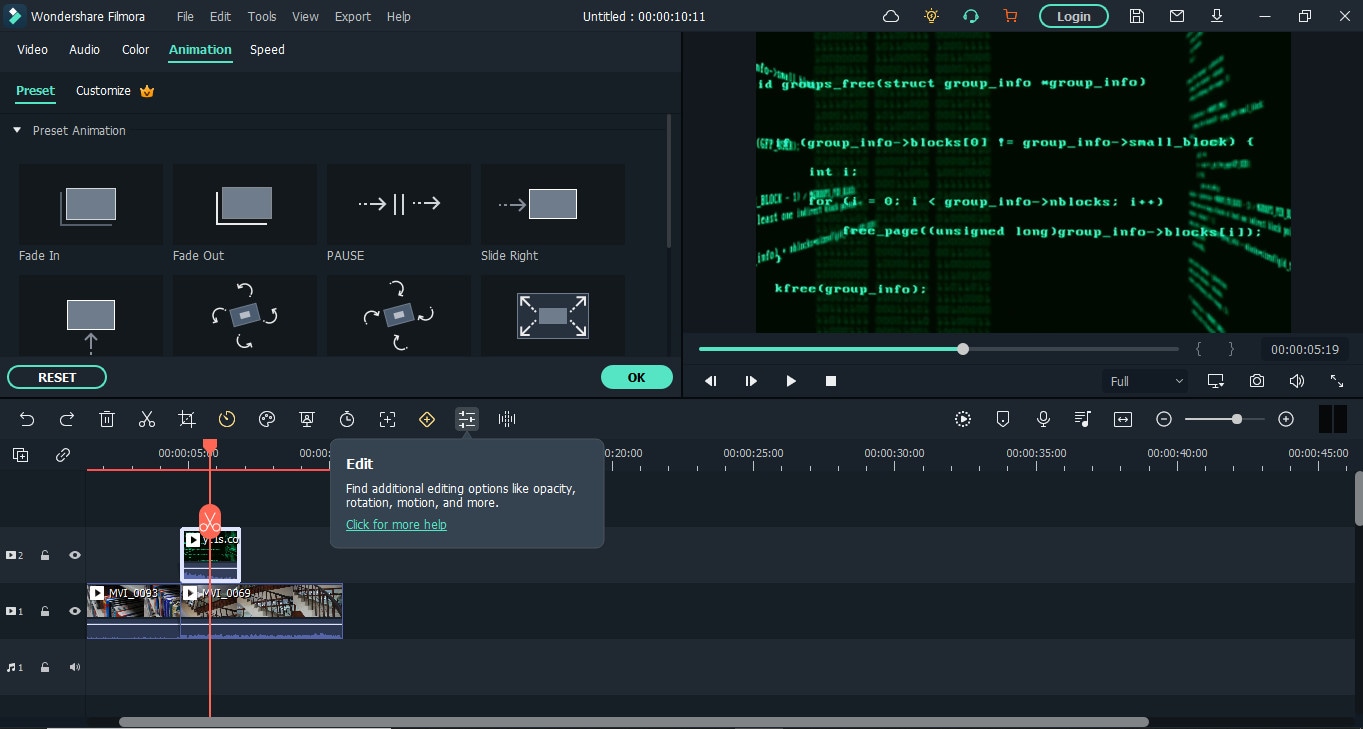
Effects: Click the “edit” icon, then you will see a bunch of icons appear on the top left corner of the screen, These are as follow.
Select the “Video” icon to transform the clip or to do motion tracking, stabilization, chroma-key, Masking, e.t.c. To do Motion tracking, on the playback screen, lock the box on the item you want to track then click “Start Tracking”.
Select the “Audio” icon to apply effects and enhance your audio.
Select the “Color” icon to do fine-tuning and color grading, Select the “3D LUT” option to import a new customized lut. You can find a number of cool luts online.
Select the “Animation” icon to add preset animations or make custom animations by using keyframes.
Select the “Speed” icon to adjust the speed of the clip or to do speed ramping.
Click the “OK” button below to go back to previous tabs.
From there you can add Audio, Titles, Transitions, Effects, Elements, and Stock Media. Simply drag and drop the effects and transition on the clip to apply it. And to use titles and stock media, click and drag them on the timeline to use them.
Export: Click the blue “Export” button. Then choose Desired format and Resolution to export your final product.
More Free FLV Editor for Windows to Edit FLV Videos:
If you are looking for a .flv video editor to perform some editing tasks without spending any money then read till the end because here we have mentioned some free FLV editors for you.
- VSDC video editors :
It is available only on Windows.
Despite being free software, it is packed with lots of features. It is a good choice for non-professionals and it can even run on low-end PCs. It supports a wide range of video/audio formats including .flv file. It has dozens of cool effects and tools that can give your videos a new look. It is a non-linear program that makes using layers much easier means you can add layers at any specific time frame and can add layers into layers for complex editing. It also supports 360 and 3D video which can easily be converted into 2D. It has a number of video and audio effects. It is an old yet powerful software which can even run in 19s Pc. Its features are mentioned below.
Features:
- Free Software with no watermark.
- Can support 4K footages on the latest versions.
- Can import/export a wide range of formats.
- Have built-in video and screen capture feature.
- Has a Non-linear interface that supports multi-layer editing.
- Have professional features like chroma key and masking.
- Can convert layers into a sprite (Grouped Sequence) for handling multiple layers easily.
Cons:
- Being a free software it has some limitations too.
- It’s hard to learn for beginners.
- It still lacks features for a professional creator.
- Doesn’t support Hardware acceleration.
Steps:
Import: Open VSDC video editor, from the “Start Project Now” tab click “Blank Project” to start a new project or click “Import Content” to browse video or image files. Then select “Project settings”.
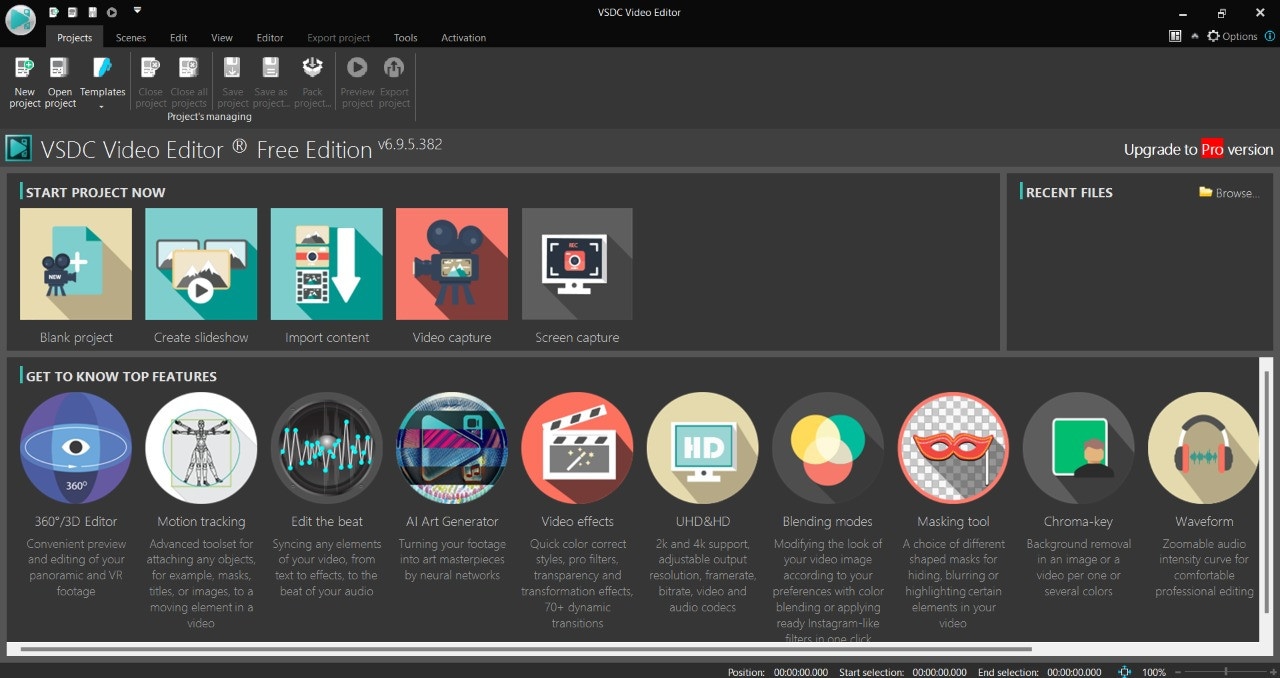
Edit: You can add more files by clicking the “Add Object” button on the top left corner. Then drag the file from Object explorer to anywhere on the timeline even on layers. On top of the “Editor Tab”, you can find the necessary tools to split, crop, and rotate the video. Click “Spacebar” to play/pause the timeline.
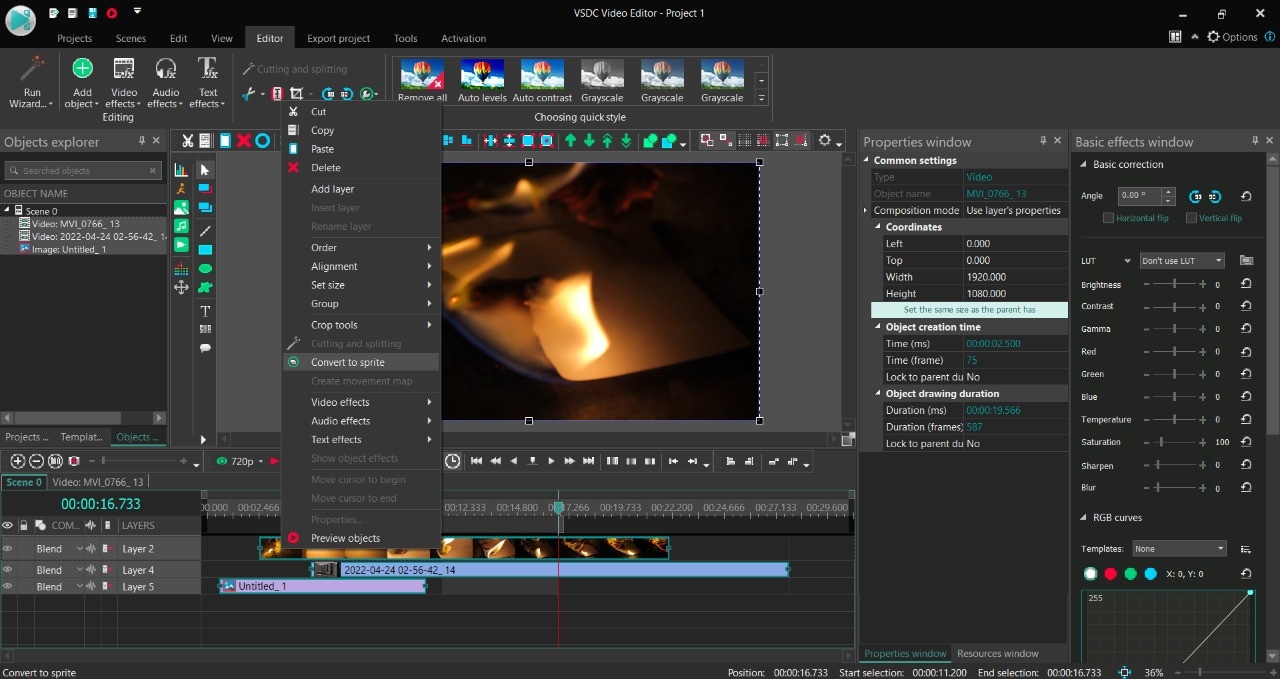
Effects: Click a video on the timeline then select the Effect buttons on top of the “Editor” tab to apply effects to your clip. Then Click the effect on “Object Explorer” to open its properties menu. On the left side of the player, you will find buttons to add text, shapes, e.t.c to the project. On the right side of the screen, you will find the “Basic effects window” where you can do color correction and grading.
Select Multiple Clips then right-click the mouse button and then the “Convert to sprite” button to make a grouped clip (clips within a clip).
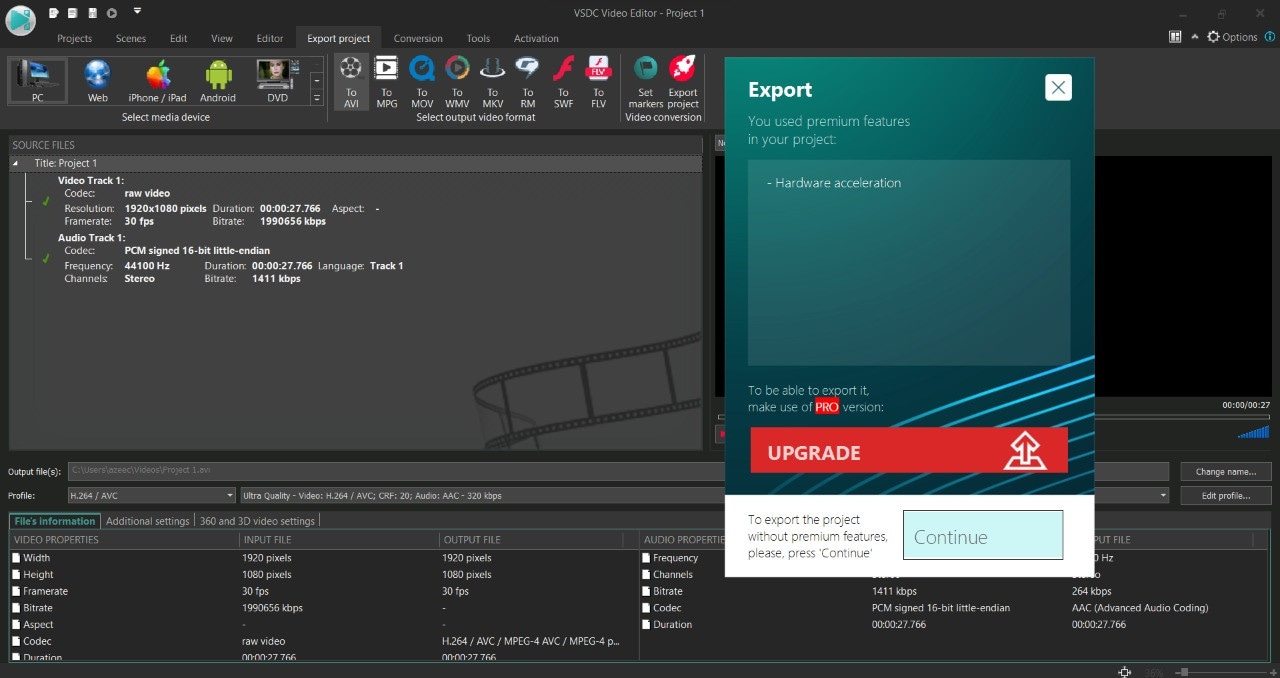
Export: Click the “Export Project” button on the top of the screen. Then choose “Media device”, “output video format” and select output destination and quality setup then click “Export Project” to export the video. If you are using the free version of the software, a popup will appear saying “export without premium features”, just click Continue. Now your file is ready to be viewed.
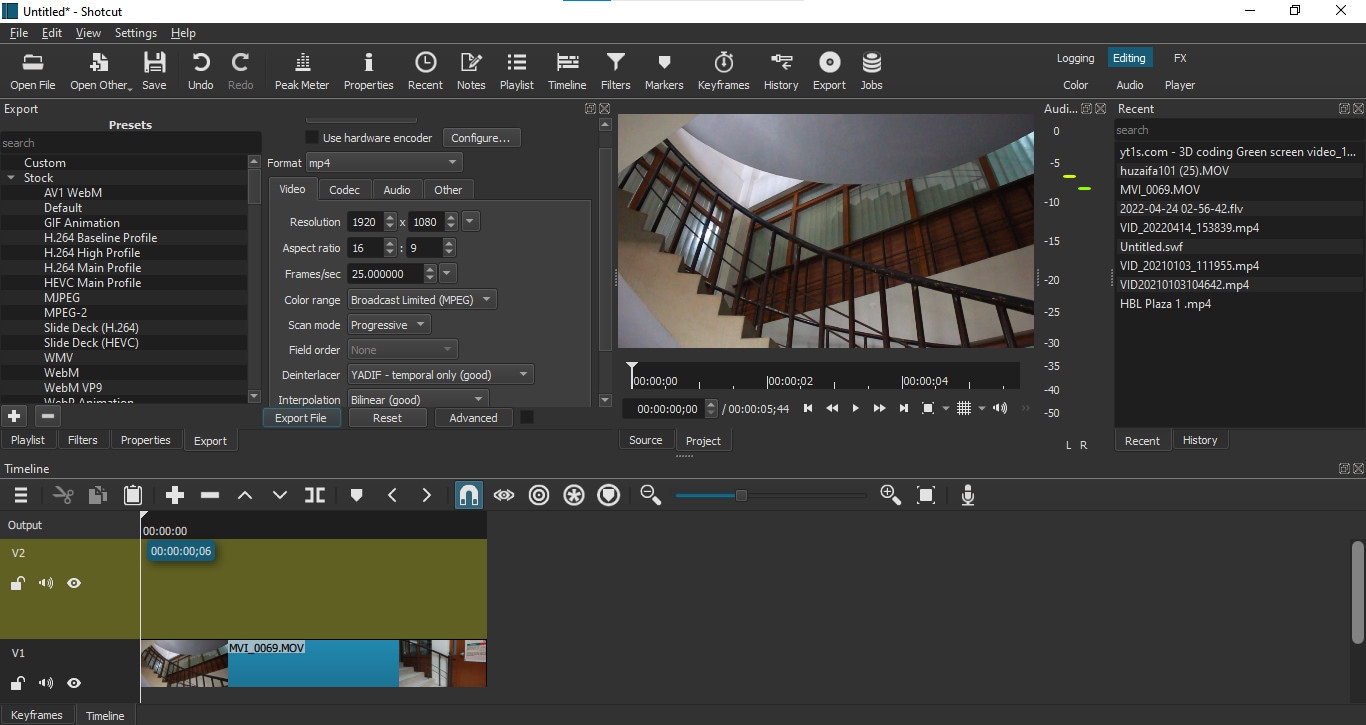
- Shotcut:
It is available on Windows, Mac, and Linux.
It is a free and open-source video editor which is simple and easy to use, which makes it ideal for beginners. It doesn’t have any pro version. It is an ideal software to deal with .flv files as it supports a large number of import/export formats. However, it takes some time to understand its UI. After that, it is quite easy to use. It has cool effects and transitions. It has a clean and simple timeline which is not versatile for professionals although it has some complex options to customize your timeline. It has some refined color grading options. Being a free software it has some 360 effects and 3D text which makes it comparatively good as compared to some other free softwares. It can support 4K videos also but lags or crashes sometimes when using 4K clips. All the effects and tools are combined in one tab “Filter” which is a plus point for some users. It also has some good quality audio effects. Some of its features are mentioned below.
Features:
- It is completely free software with no watermark.
- It has one of the largest file format compatibility.
- It can support 4K video resolution.
- It has 3 wheel grading tool and some other color filters.
- It has standard animation and keyframing features.
- It has some effects to support 360 videos.
Cons:
- It isn’t suitable for professionals as it lacks some useful features.
- Have issues with playback of 4K videos and sometimes crashes.
- Doesn’t have a separate text column and lacks some basic text and title effects.
- Its UI is different from other common video editors and is a bit hard to understand.
Steps:
Import: Click the “Open file” icon on the top left corner of the window to import files.
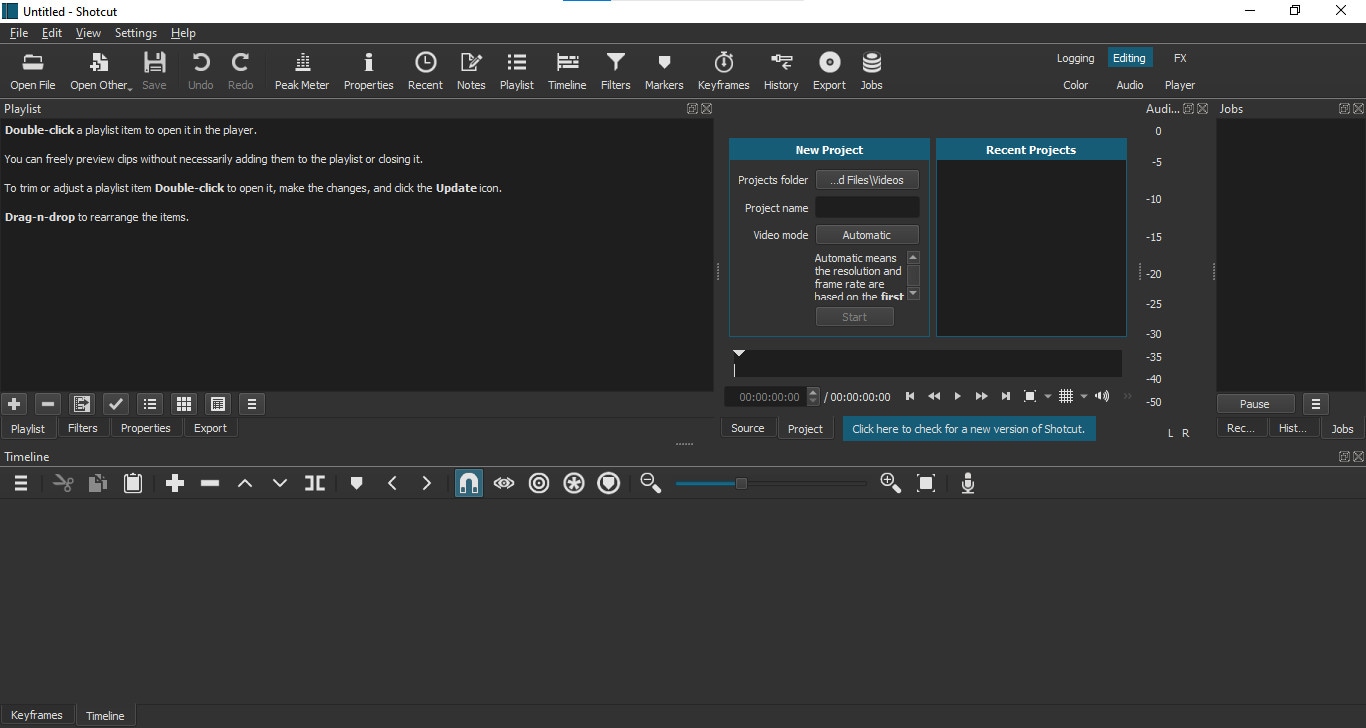
Edit: Drag and drop clips on an empty timeline panel to add tracks. Right-click on the left side of the timeline to add a video or an audio track. To trim from ends, drag the clip from corners to trim. Click the Scissors icon on the top timeline to split the clip in between.
Click the “Properties” tab above the timeline panel to change the aspect ratio and playback speed of the clip.
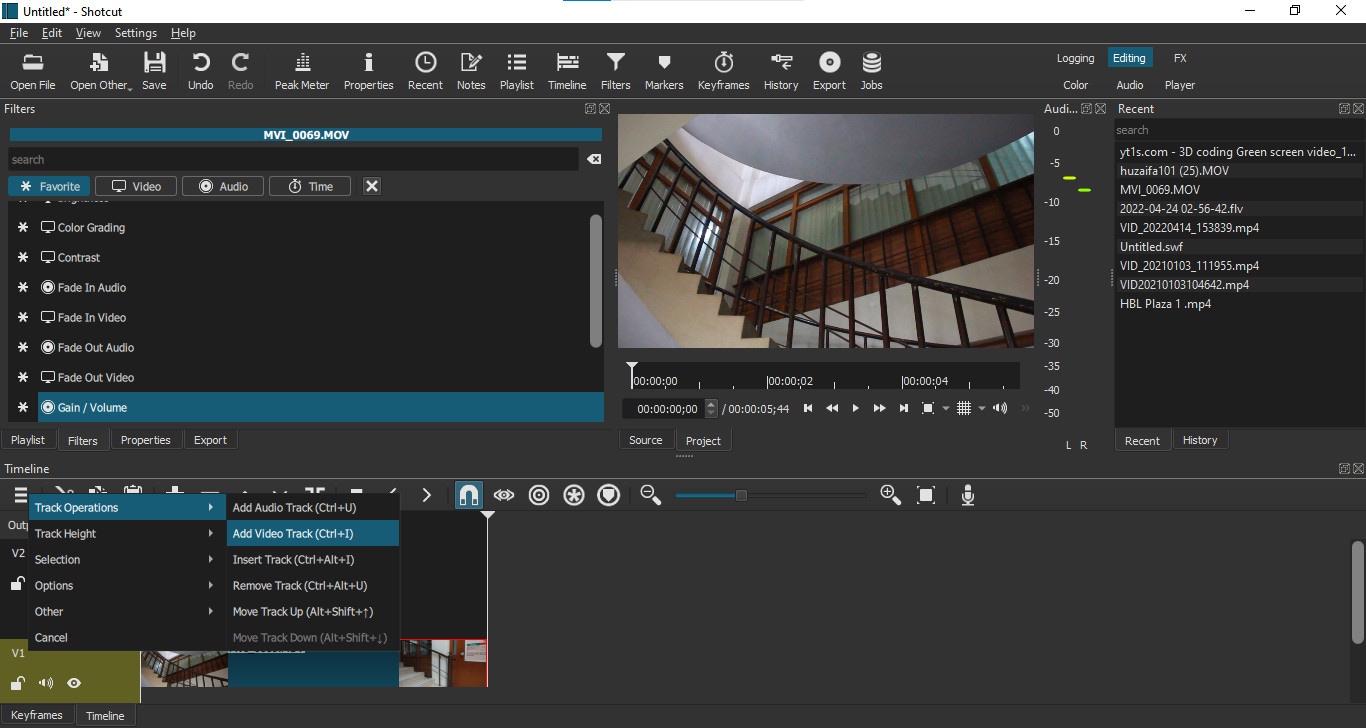
Effects: Click the “Filters” tab above the timeline panel to open the filter menu, Click “+” above it to add filters. Double click a filter to add it to the selected clip, then click the filter to change its properties.
Click the “Keyframes” icon on top of the window to open the Keyframes window. Then click the “Timeline” icon to go back to the previous window.
Export: Click the “Export” button on the top of the screen. Select a preset or click the “Advanced” button to change export settings then click “Export File”.
- OpenShot:
It is available on Windows, Mac, and Linux.
OpenShot is another choice for you if you are looking for a free FLV editor. It is simple and easy to use. Its User Interface is clean and beginner-friendly. It has hundreds of transitions and effects. It has an animated titles option also, which is powered by Blender.
Features:
- Is simple and easy to use.
- Its UI is Beginner friendly.
- Can support 4K videos.
- Support a wide range of formats.
- Have smooth keyframe animation.
- Is free and has no watermark.
Cons:
- Video Playback is a bit laggy.
- Animated titles are only supported when you have Blender (3d software) installed on your PC.
- Doesn’t have enough tools for professionals.
Steps:
Import: Start “OpenShot” then drag and drop files in the project files tab from your file system (or press CTRL + F). Drag and drop files to add them to the timeline.
Edit: To trim from ends, drag the clip from corners to trim. There are some basic tools above the tracks in the timeline window. Click “+” to add a new track. Click the scissors icon to split the clip at the desired length. Click the magnet icon to on snapping mode. Click the green marker icon to add markers at desired points during editing.
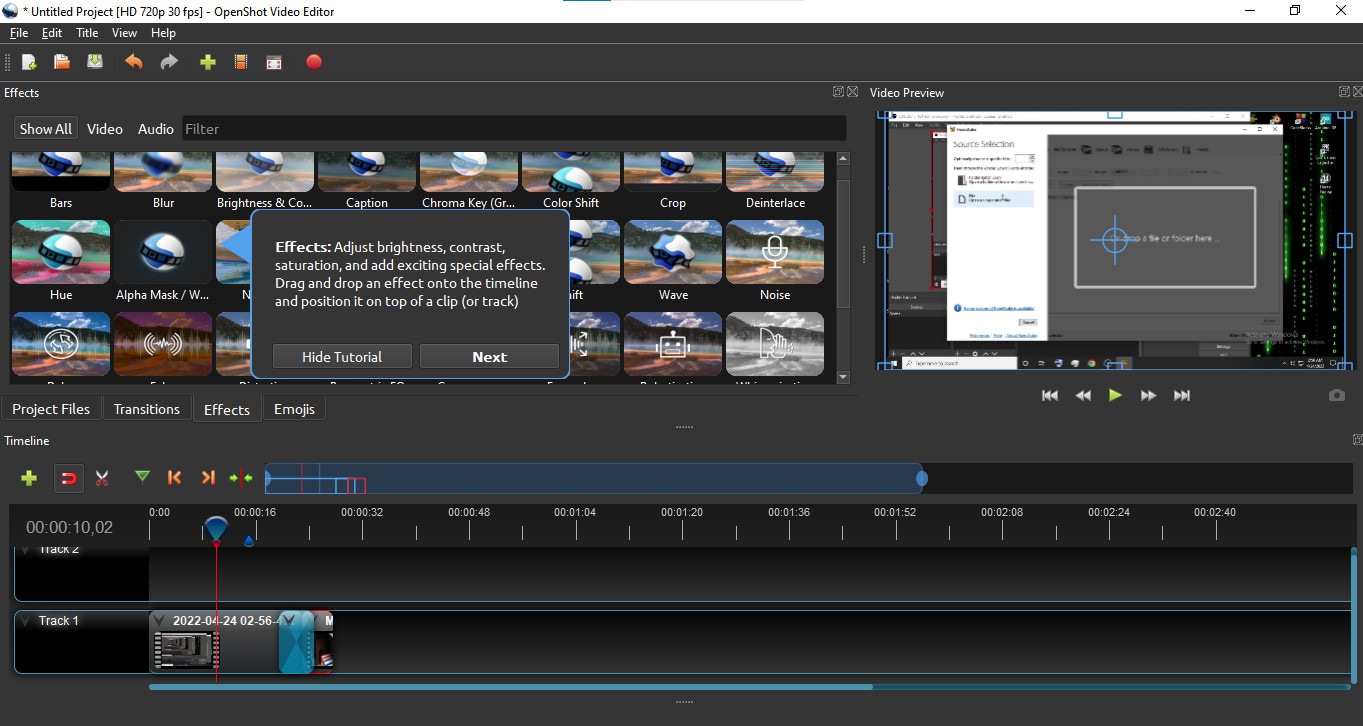
Effects: Above the timeline window you will see a bar containing 4 buttons: Project Files, Transitions, Effects, and Emojis. Drag these elements to add them to the timeline. Effects appear as a small icon on the clip. Right-click the icon then select “Remove Effect” to remove it.
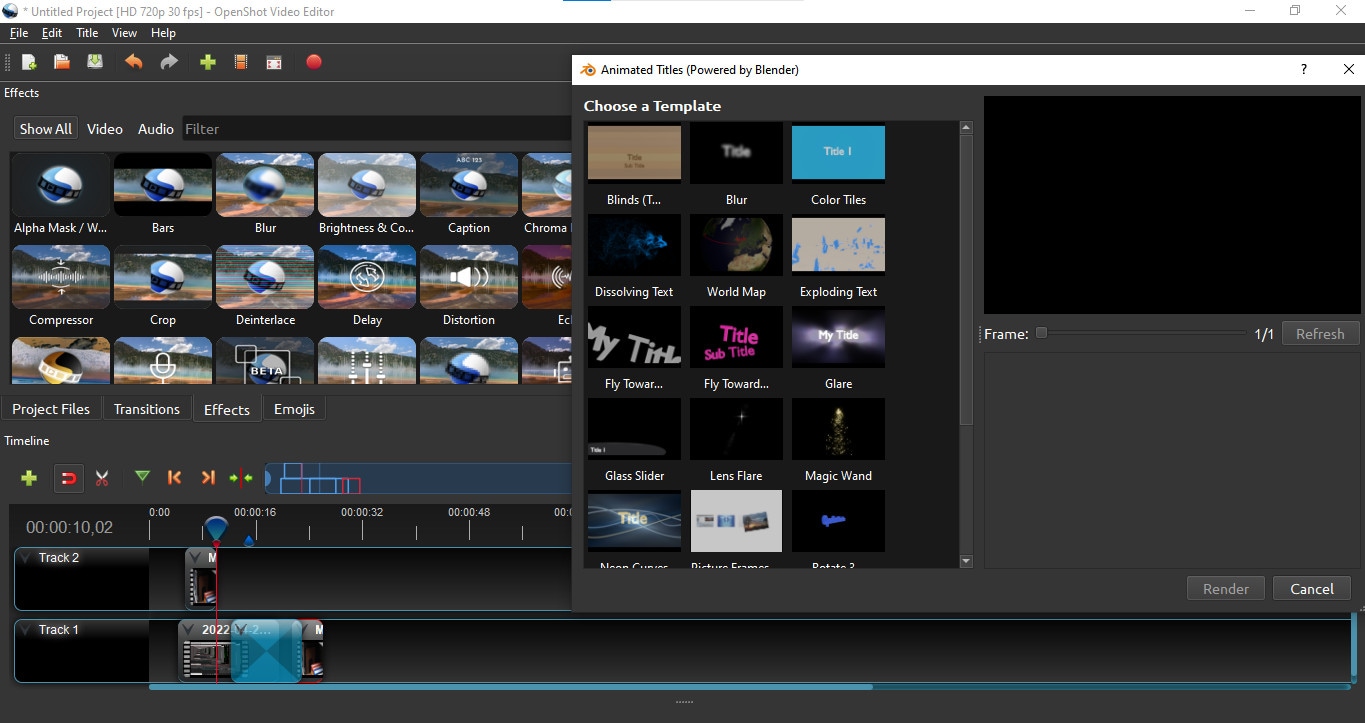
Right-click the clip to access more features like keyframe animation, playback speed, e.t.c.
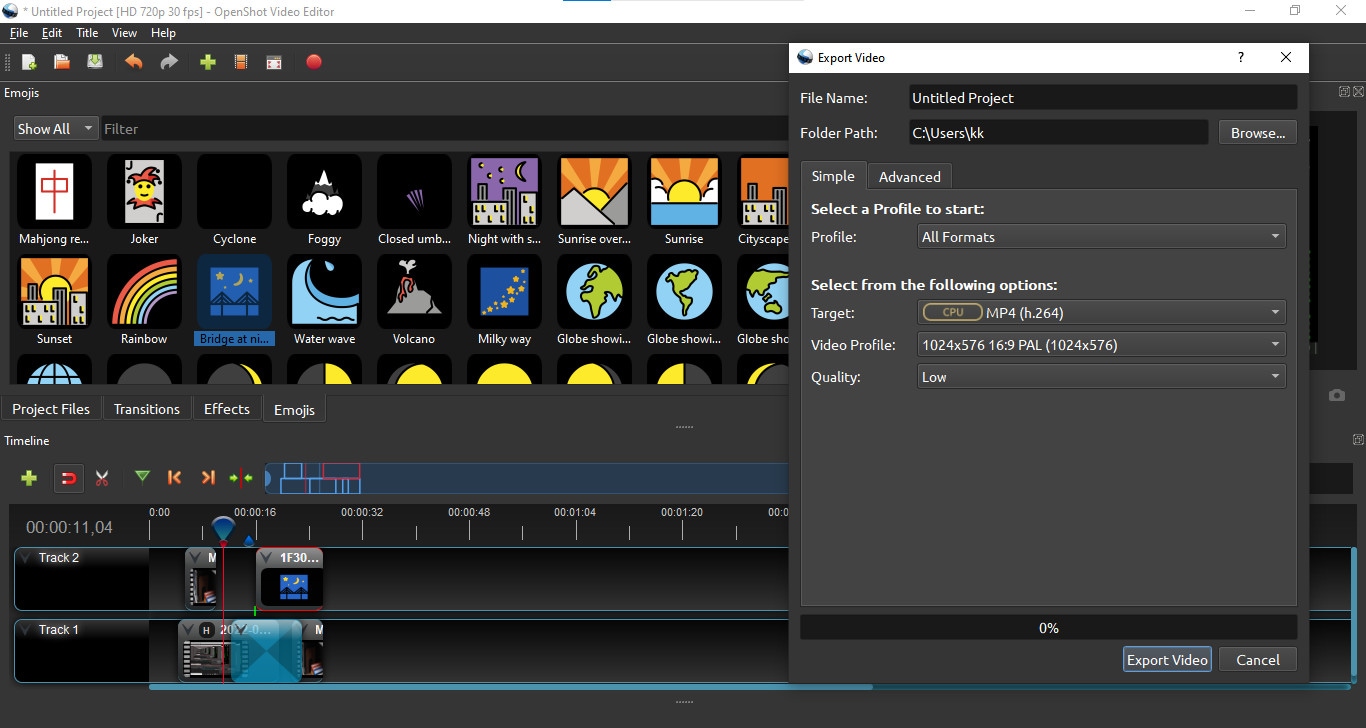
Export: Click the red dot button on the top of the screen to export your video (or press CTRL + E). Select the desired Profile, Format, Quality, and Destination folder then click “Export Video” to export your file.
More Paid FLV Editor for Windows to Edit FLV Videos:
If you are looking for a good flv editor and you are ready to spend some cash on it then we have selected some paid softwares worthy of your investment.
- Power director 365 (import only):
It is available on both, Windows and Mac.
If you are looking for software to do more than just trimming and cropping the video then Cyberlink Power Director can be the right choice for you. It is packed with dozens of features that professional content creators look for. It has some professional-level plugins also. It is suitable for both beginners and advanced users.
It allows users to import .flv file and edit it like usual but you can’t export it in the same format as it exports videos in few formats only. FLV file is then converted into any of the other supported formats.
Pricing:
Its annual subscription is 69$ which is available at 30% off at 48.99$/year. This offer is valid till 4th May 2022.
Features:
- Can support 4K videos and can import a wide range of file formats.
- Have Auto Chapter and Subtitle settings.
- Multi-cam editing.
- Have hundreds of transitions, effects, and access to thousands of stock footage.
- Can Group clips for easy editing.
- Can import presets and color LUTS.
Cons:
- It lags sometimes, this issue can be resolved to an extent if you have a powerful PC.
- Some features are complicated to use.
- Export settings have fewer file formats as compared to the import file range.
Steps:
Import: Open Power Director then select the aspect ratio and click “Full Mode” to start the program. Import media files to the media room. Click the “Import Media” icon below the files tab to add more clips.
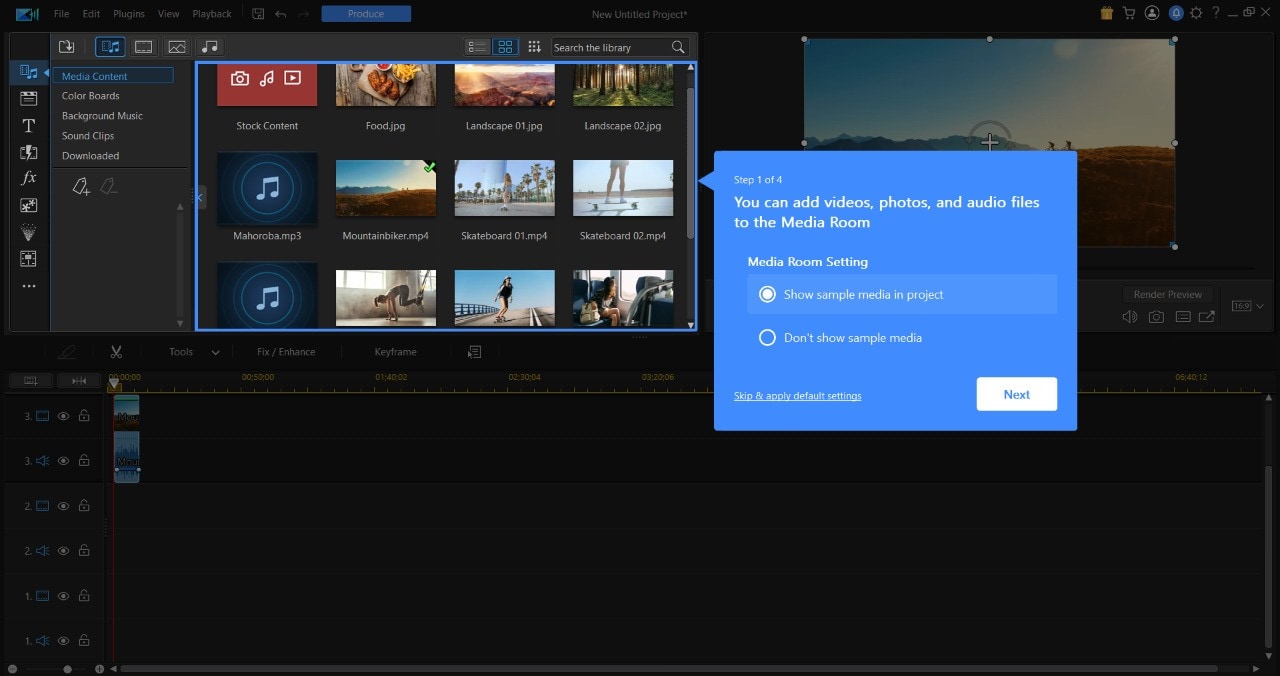
Edit: Drag and drop files to add them to the timeline. Drop files above or below to add them in layers. Click the icon on the top left corner of the timeline to add a new layer. You can find basic editing tools above the timeline.
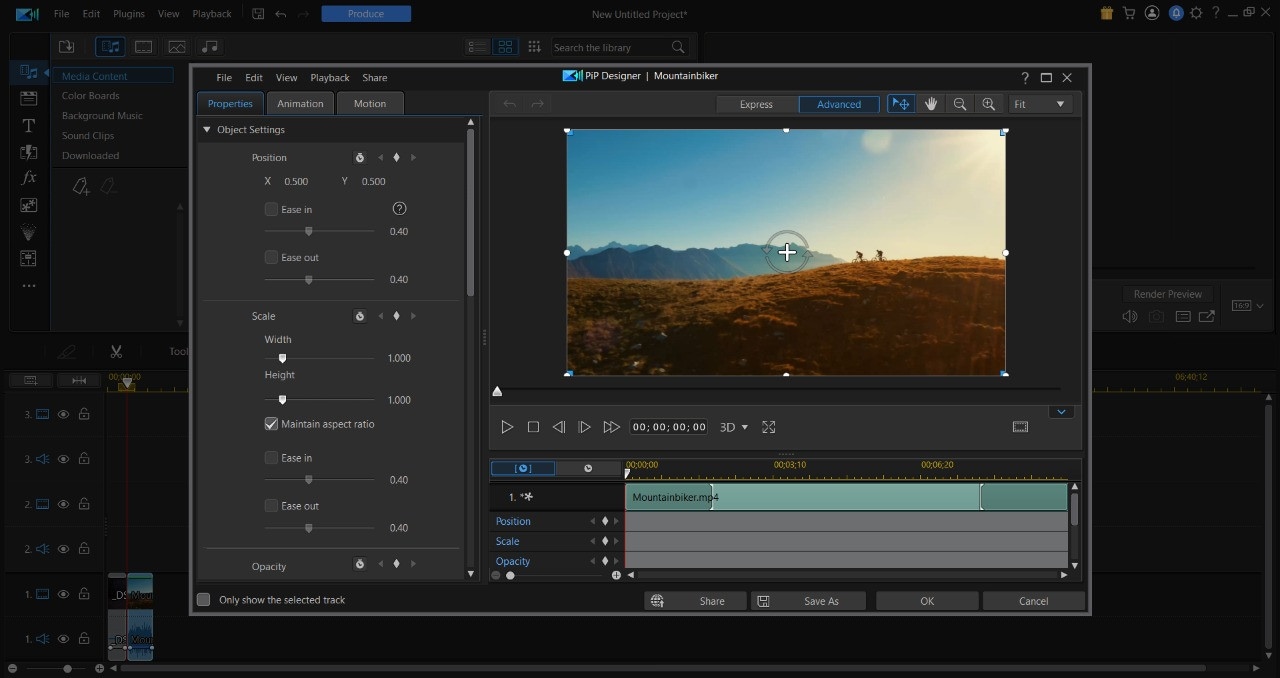
Effects: All the effects and overlay elements are situated at the top left corner of the screen in a vertical bar. Here you will find the Project library, titles, effects, transitions, overlays, e.t.c. Simply just drag and drop on the timeline to use them. Here you can also do audio mixing and add subtitles and chapters.
Double click a clip or an overlay element to open the designer window. Here you can customize the clips and overlays to enhance your project.
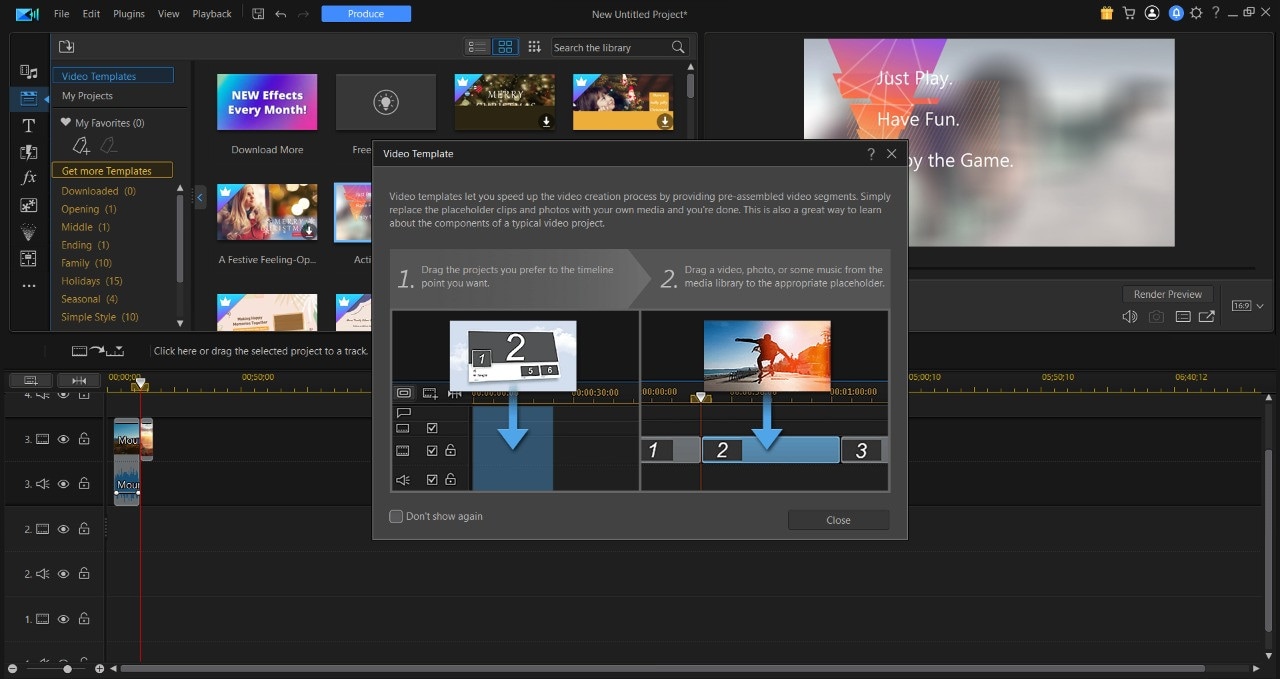
Export: Click the “Produce” button on top of the screen then select the desired mode and file format and add a destination then click “Start”.
- AVS video editor:
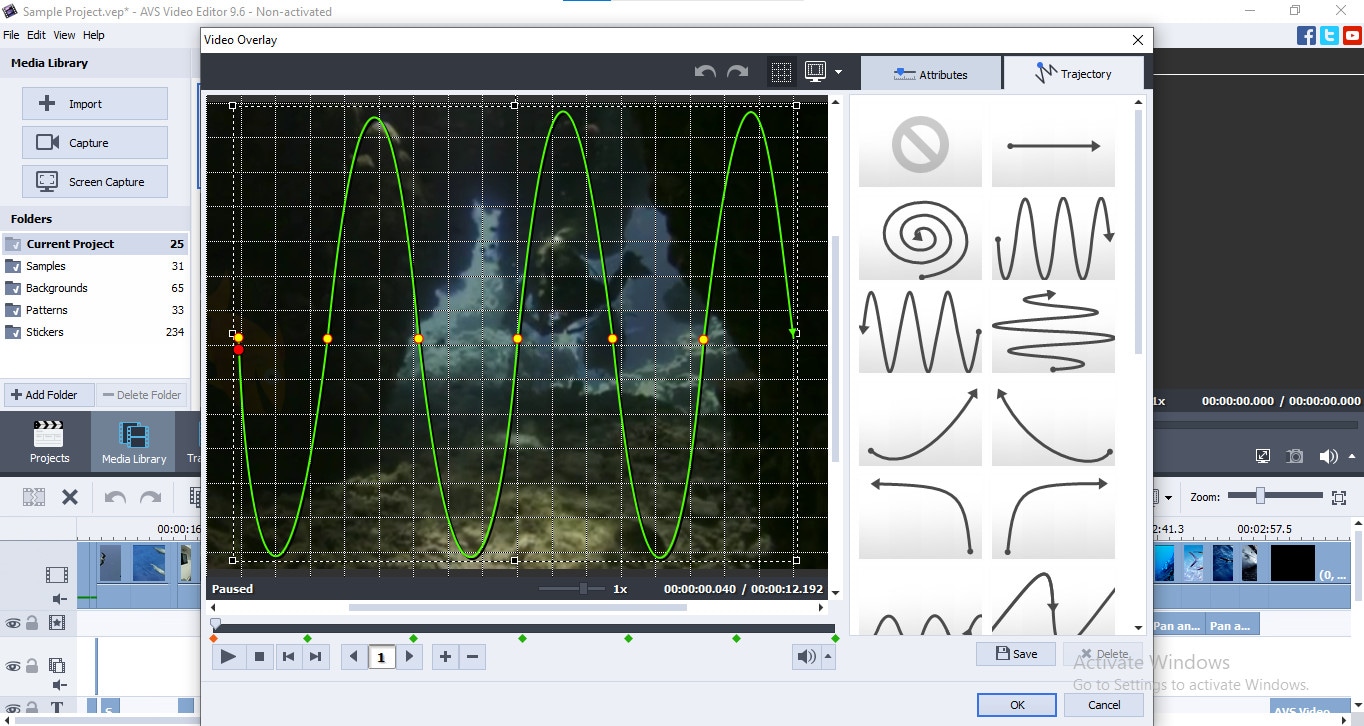
If you are looking for a good .flv video editor and are ready to spend some bucks then the AVS video editor is a good choice for you. It is a low-budget software that is simple and easy to use and has some great features. It was my first video editor which I used about 5-6 years ago when I started making videos. It is simple and easy to use. It has some fine features that can fulfill your basic video editing tasks. Has a unique animation trajectory feature, where you can create paths for overlays.
Pricing:
It has two different plans, the first is an annual one which is at 69$ per year and the second one is a lifetime offer for 199$. In a lifetime plan, you can own the software forever. Right now, the software is at a 70% discount(till 30th April 2022) which decreases the price of the annual subscription to 39$ and the purchase price is 59$ this offer makes the software valuable enough to invest in.
Features:
- Its UI is beginner-friendly and easy to learn.
- Can Support 4K videos.
- Has cool features like video stabilization and a chroma key.
- Has 300+ effects, transitions, and overlays.
- Has a storyboard-type editing style also, which is a great feature for some users.
- Has keyframing and animation trajectory option for overlays.
Cons:
- Lacks some commonly used features.
- It is a decade-old software and needs some new updates to compete with other editing softwares.
- It isn’t suitable for professionals as you can’t do many customizations.
- It has only one layer for every element like text, effects, overlays, e.t.c.
- If hard disk crashes you have to purchase the license again.
Steps:
Import: Click “Import Media Files” to import clips or click “Open Existing Project” to load previously saved projects. Drag and drop files to add them to the timeline.
Edit: To trim from ends, drag the clip from corners to trim. On top of the timeline, you will find a few basic tools like change speed, apply transitions, do color correction, or do video stabilization.
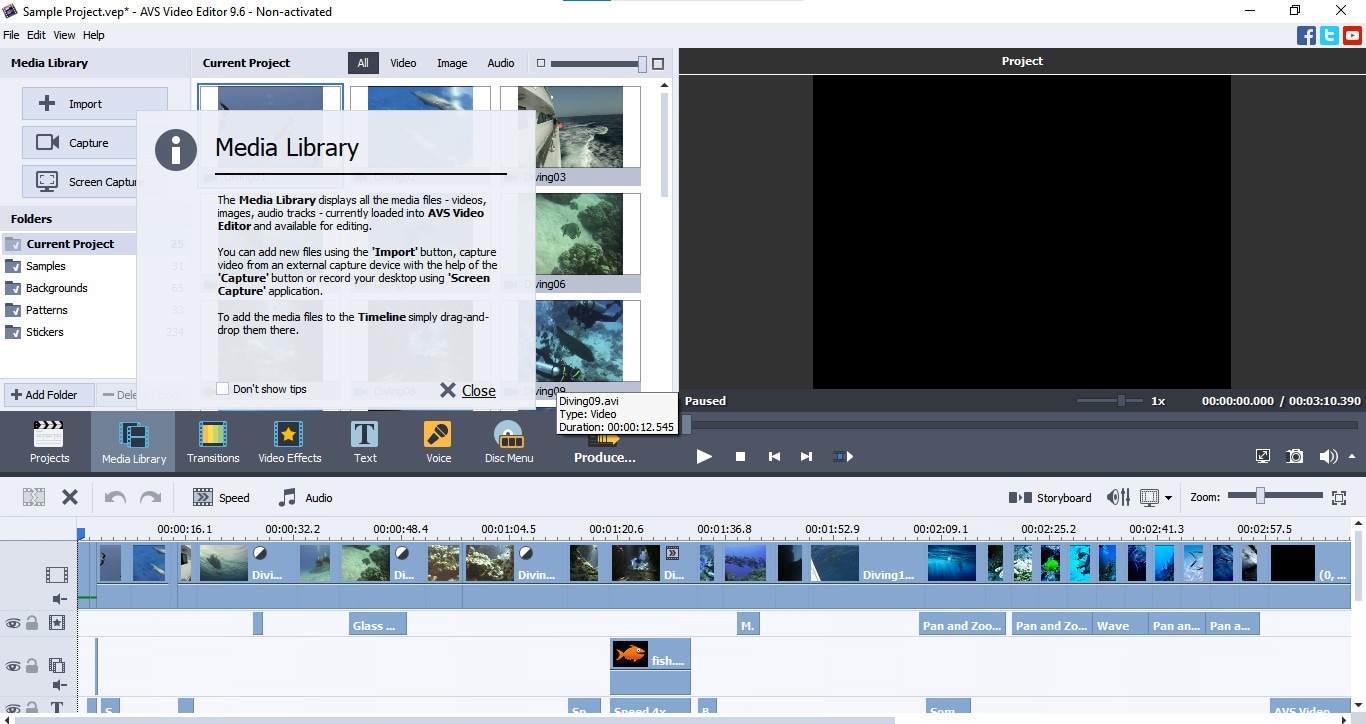
Effects: Click the “Transition” button above the timeline to apply transitions. Drag and drop transitions between two clips to apply it. Right-click on the transition to change its duration.
Click the “Video Effects” button on top of the timeline, then drag and drop the desired effect on the effects layer and trim it according to your need.
Similarly from the “Text” tab Drag and drop the desired text to the text layer in the timeline. Then select “Edit text” to change the text.
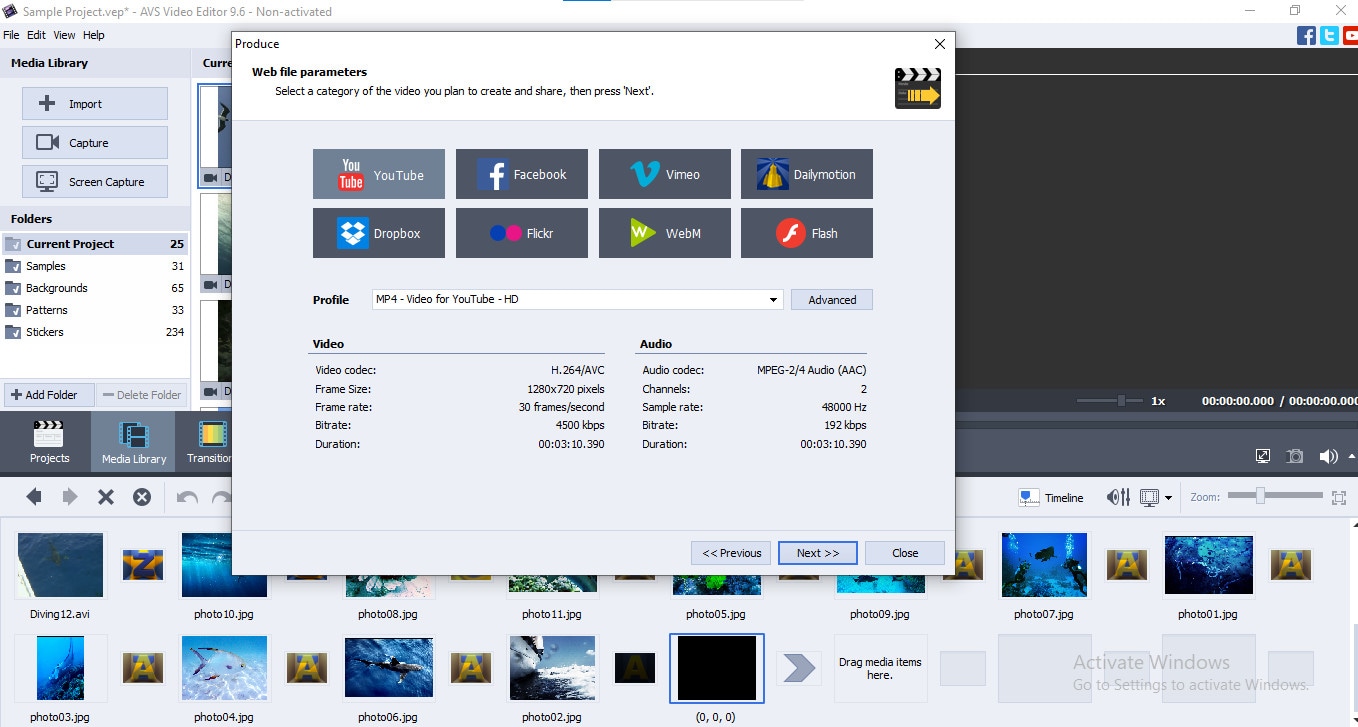
Export: Click the “Produce” button on top of the timeline to open the export window. Select the desired file format and quality then click “next” and then click the “Create” button to export your file.
Veed.io: (Online):
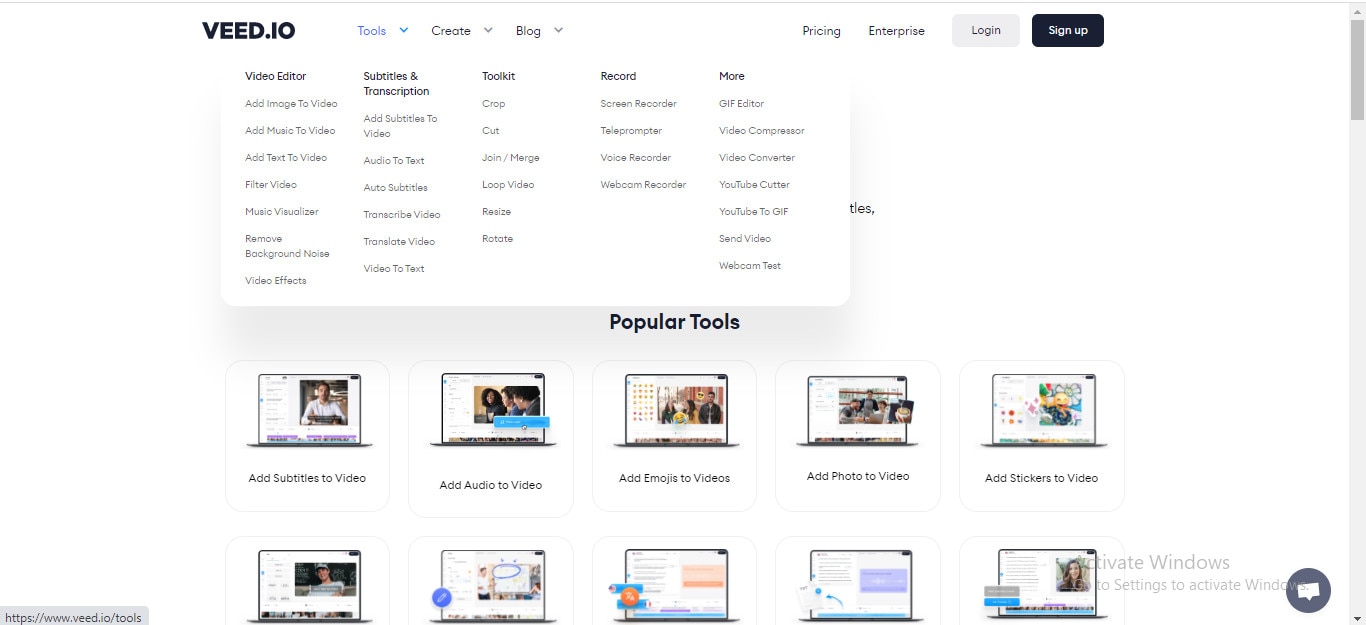
If you want to edit FLV videos quickly and don’t want to install any software then Veed.io can be a good choice for you. It is an online FLV video editor that can run on any browser and is compatible with Windows, Mac, Linux, and even mobile phones. It is a quick and simple method to fulfill your basic video editing needs. It has some amazing and uniques features as compared to other basic video editors. It is a great platform to edit videos anywhere. You can start editing video on your PC and can continue it on your phone if you have to leave your workplace. But these features come at a price as its basic plan has the majority of the features but it leaves a watermark on the final video.
Pricing:
It has 3 different plans depending on your needs. The first one is the “Free Plan” which is almost useless for most users as it creates a watermark. The second one is the “Basic Plan” at 18$/month. While third is the “Pro Plan” at 30$/month which has some more features than the basic plan. You can purchase an annual plan to save up to 33%.
Features:
- It is an online platform that makes it easily accessible from any device.
- It is multi user friendly and is a good choice for team projects.
- It has a simple and clean interface which is ideal for beginners.
- It has an Auto subtitle generator + subtitle translator and editor.
- It has audio to text and video to text features that aren’t found in many other editors.
- It is compatible with many video and audio formats.
Cons:
- It is quite slow as compared to other video editing software.
- Downloading 4K videos is only available in Pro Plan.
- It is an online platform, so its data can be breached or leaked, so avoid editing your personal videos on this platform. It can rarely happen but precaution is better than cure.
Steps:
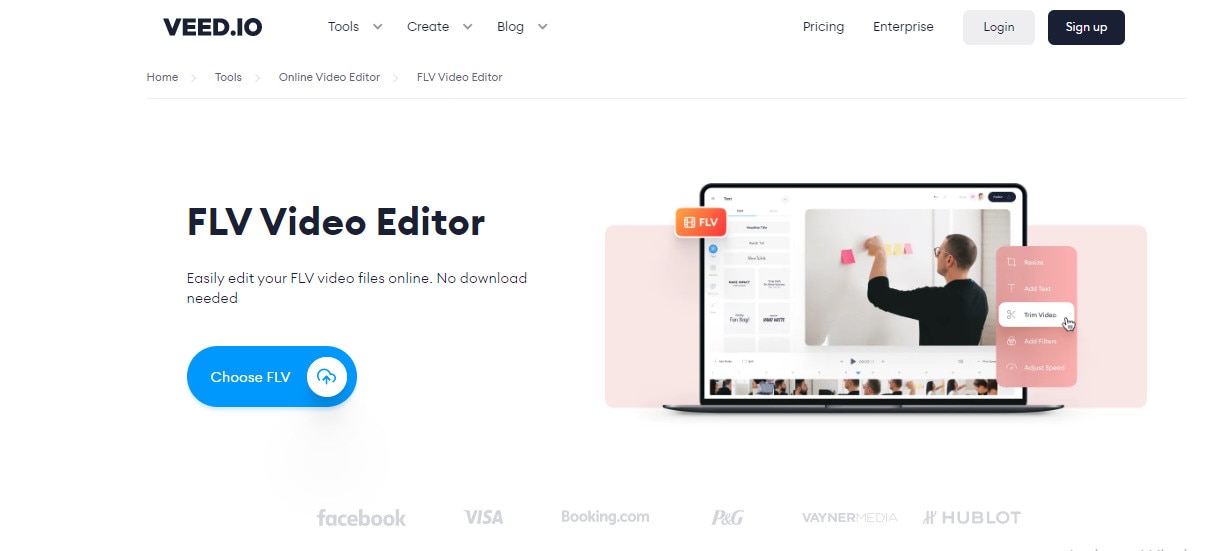
Import: Click choose FLV File on the home screen then a popup will appear, click “Browse” to upload a file or use a template.
Edit: To trim from ends, drag the clip from corners to trim. Click the “Split” button above the timeline to split the clip in between.
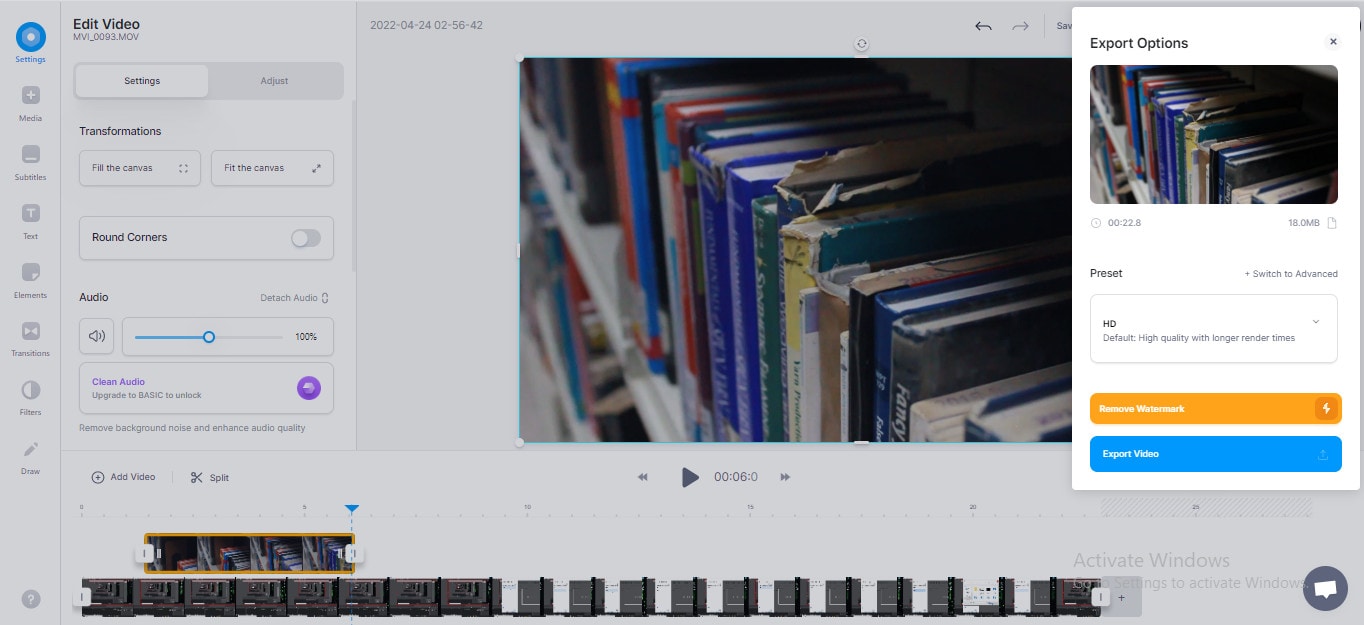
Effects: All the effects tabs like Text, Elements, Transitions lie on the left side of the screen (on windows). Click an element and it will be added to the timeline, then adjust the settings according to your will.
Export: Click the “Export” button on the top right side of the screen. Select a preset or change export settings then click “Export Video”. Soon you will get your final product.
Which Should I choose Free or Paid FLV Editor :
Are you confused to choose the FLV editor for you? Then look for the one that suits your other needs. Like if you want an editor only to crop or trim videos then save your money and go for a free video editor. But if you want some extra features to enhance your workflow or have some cash then go for paid software. For professionals, Power Director 365 or Filmora pro can be a good choice to invest your money in.
~ Some FAQs about FLV Videos:
why is .flv format used?
FLV is basically used to publish or distribute videos on the Internet. Many social platforms and web pages (such as youtube, Hulu, e.t.c.) use .flv files as it provide high-quality synchronized audio and video in compact file size. It was mostly used for embedded videos on these platforms. It is compatible with most browsers and devices even with older phones and computers.
How to play .FLV files?
To play .flv files a flash player is required. Which is pre-installed in almost most of the computers and browsers, if that’s not the case. Then you need a good video player which supports .flv format. Therefore VLC media prayer is a good choice. It is quite easy to use and has some useful features like Speed, Adding subtitles, Audio sync, e.t.c.
Is .flv file easy to edit?
FLV is just a format, It can be edited like any other format. Steps may differ from software to software. But don’t worry as I have mentioned the steps of some popular FLV video editors above.
Can the .flv file be converted?
If you don’t want to stick with the .flv format for long enough and want to switch over to a more convenient format then you can try these converters.
VLC Media Player: Yes, apart from being a video player it can convert video formats. It’s quite easy to use.
Simply Open VLC Media Player >> Click Media tab >> Click “Convert/Save” >> On pop up menu Select “Add” to add file (can add multiple files also) >> Click “Convert/Save” >> Add Destination folder and File Format (to convert in) then click “Start”.
Hand Brake: It is another popular video converter that can convert a .flv file into almost any file format.
Open HandBrake-“Drop a file” screen will appear >> Select the specific file you one to convert >> Select Destination filder >> Click “Start encoding”.
Flv vs Mp4 which is better?
FLV format was quite popular back in 2010 as it provides high-quality compressed video for the internet. It takes less space which makes it easy to download and transfer quickly. Nowadays MP4 format is used more as it is versatile and is compatible with almost all devices like Mobile, PC, TV, e.t.c. FLV uses H.263 codec while MP4 uses codec which provides better quality after compression. Still .flv file is a better choice for streaming platforms as one of the most common software used for streaming is OBS studio and it produces .flv files.
It is available for both Windows and Mac.
Filmora Video Editor is the most common and versatile editing software in this list that almost every content creator may have used or heard about. It has a lot of professional features used by content creators. It is one of the best video editors for .flv format, if u work with .flv files then you must get your hands on filmora.
Its UI is quite similar to premiere pro which makes it quite easy for people who are looking for premiere pro alternatives. It has hundreds of classy transitions/effects and dozens of unique and useful features but many of them are available on paid version only.
The free version also packs a punch but it is almost useless for most users as it leaves a watermark on the final product. It is good for learning video editing and once you master enough to move forward then you can purchase the pro version or you can start directly on the paid version.
For Win 7 or later (64-bit)
For macOS 10.14 or later
Features:
- Support a wide range of formats including .flv.
- Have advanced color grading options.
- Have standard Motion Tracking feature.
- Masking and Chroma key.
- Keyframing and Smooth animation. (Paid version)
- Speed ramping and Auto Synchronization. (Paid Version)
- Support industry-standard plugins (like Boris fx).
- Have a vast stock library.
Cons:
- Leaves a watermark on export. (free version)
- Have playback issues while using 4k videos.
- Lacks some standard editing features.
*Almost every software has some pros and cons. Remember these are inspected from my point of view. And it can differ from your experience.
Steps:
Import: Open filmora, a popup will appear, Select desired aspect ratio then click “New Project” to start editing or click “Open Project” to continue your old project.
On the center of the screen, you will see the import window, click it to import .flv file or any other video you want to edit.

Edit: Drag the clips on the timeline to start editing. Drag the clips from the corner to trim them. Click the top left icon of the timeline (not the whole screen) to add layers. In the toolbar above the timeline, you will find a bunch of tools, like split, crop, speed ramping, animation e.t.c. Click the red scissors icon on the pointer to split the clip at the desired timestamp.

Effects: Click the “edit” icon, then you will see a bunch of icons appear on the top left corner of the screen, These are as follow.
Select the “Video” icon to transform the clip or to do motion tracking, stabilization, chroma-key, Masking, e.t.c. To do Motion tracking, on the playback screen, lock the box on the item you want to track then click “Start Tracking”.
Select the “Audio” icon to apply effects and enhance your audio.
Select the “Color” icon to do fine-tuning and color grading, Select the “3D LUT” option to import a new customized lut. You can find a number of cool luts online.
Select the “Animation” icon to add preset animations or make custom animations by using keyframes.
Select the “Speed” icon to adjust the speed of the clip or to do speed ramping.
Click the “OK” button below to go back to previous tabs.
From there you can add Audio, Titles, Transitions, Effects, Elements, and Stock Media. Simply drag and drop the effects and transition on the clip to apply it. And to use titles and stock media, click and drag them on the timeline to use them.
Export: Click the blue “Export” button. Then choose Desired format and Resolution to export your final product.
More Free FLV Editor for Windows to Edit FLV Videos:
If you are looking for a .flv video editor to perform some editing tasks without spending any money then read till the end because here we have mentioned some free FLV editors for you.
- VSDC video editors :
It is available only on Windows.
Despite being free software, it is packed with lots of features. It is a good choice for non-professionals and it can even run on low-end PCs. It supports a wide range of video/audio formats including .flv file. It has dozens of cool effects and tools that can give your videos a new look. It is a non-linear program that makes using layers much easier means you can add layers at any specific time frame and can add layers into layers for complex editing. It also supports 360 and 3D video which can easily be converted into 2D. It has a number of video and audio effects. It is an old yet powerful software which can even run in 19s Pc. Its features are mentioned below.
Features:
- Free Software with no watermark.
- Can support 4K footages on the latest versions.
- Can import/export a wide range of formats.
- Have built-in video and screen capture feature.
- Has a Non-linear interface that supports multi-layer editing.
- Have professional features like chroma key and masking.
- Can convert layers into a sprite (Grouped Sequence) for handling multiple layers easily.
Cons:
- Being a free software it has some limitations too.
- It’s hard to learn for beginners.
- It still lacks features for a professional creator.
- Doesn’t support Hardware acceleration.
Steps:
Import: Open VSDC video editor, from the “Start Project Now” tab click “Blank Project” to start a new project or click “Import Content” to browse video or image files. Then select “Project settings”.

Edit: You can add more files by clicking the “Add Object” button on the top left corner. Then drag the file from Object explorer to anywhere on the timeline even on layers. On top of the “Editor Tab”, you can find the necessary tools to split, crop, and rotate the video. Click “Spacebar” to play/pause the timeline.

Effects: Click a video on the timeline then select the Effect buttons on top of the “Editor” tab to apply effects to your clip. Then Click the effect on “Object Explorer” to open its properties menu. On the left side of the player, you will find buttons to add text, shapes, e.t.c to the project. On the right side of the screen, you will find the “Basic effects window” where you can do color correction and grading.
Select Multiple Clips then right-click the mouse button and then the “Convert to sprite” button to make a grouped clip (clips within a clip).
Export: Click the “Export Project” button on the top of the screen. Then choose “Media device”, “output video format” and select output destination and quality setup then click “Export Project” to export the video. If you are using the free version of the software, a popup will appear saying “export without premium features”, just click Continue. Now your file is ready to be viewed.

- Shotcut:
It is available on Windows, Mac, and Linux.
It is a free and open-source video editor which is simple and easy to use, which makes it ideal for beginners. It doesn’t have any pro version. It is an ideal software to deal with .flv files as it supports a large number of import/export formats. However, it takes some time to understand its UI. After that, it is quite easy to use. It has cool effects and transitions. It has a clean and simple timeline which is not versatile for professionals although it has some complex options to customize your timeline. It has some refined color grading options. Being a free software it has some 360 effects and 3D text which makes it comparatively good as compared to some other free softwares. It can support 4K videos also but lags or crashes sometimes when using 4K clips. All the effects and tools are combined in one tab “Filter” which is a plus point for some users. It also has some good quality audio effects. Some of its features are mentioned below.
Features:
- It is completely free software with no watermark.
- It has one of the largest file format compatibility.
- It can support 4K video resolution.
- It has 3 wheel grading tool and some other color filters.
- It has standard animation and keyframing features.
- It has some effects to support 360 videos.
Cons:
- It isn’t suitable for professionals as it lacks some useful features.
- Have issues with playback of 4K videos and sometimes crashes.
- Doesn’t have a separate text column and lacks some basic text and title effects.
- Its UI is different from other common video editors and is a bit hard to understand.
Steps:
Import: Click the “Open file” icon on the top left corner of the window to import files.

Edit: Drag and drop clips on an empty timeline panel to add tracks. Right-click on the left side of the timeline to add a video or an audio track. To trim from ends, drag the clip from corners to trim. Click the Scissors icon on the top timeline to split the clip in between.
Click the “Properties” tab above the timeline panel to change the aspect ratio and playback speed of the clip.

Effects: Click the “Filters” tab above the timeline panel to open the filter menu, Click “+” above it to add filters. Double click a filter to add it to the selected clip, then click the filter to change its properties.
Click the “Keyframes” icon on top of the window to open the Keyframes window. Then click the “Timeline” icon to go back to the previous window.
Export: Click the “Export” button on the top of the screen. Select a preset or click the “Advanced” button to change export settings then click “Export File”.

- OpenShot:
It is available on Windows, Mac, and Linux.
OpenShot is another choice for you if you are looking for a free FLV editor. It is simple and easy to use. Its User Interface is clean and beginner-friendly. It has hundreds of transitions and effects. It has an animated titles option also, which is powered by Blender.
Features:
- Is simple and easy to use.
- Its UI is Beginner friendly.
- Can support 4K videos.
- Support a wide range of formats.
- Have smooth keyframe animation.
- Is free and has no watermark.
Cons:
- Video Playback is a bit laggy.
- Animated titles are only supported when you have Blender (3d software) installed on your PC.
- Doesn’t have enough tools for professionals.
Steps:
Import: Start “OpenShot” then drag and drop files in the project files tab from your file system (or press CTRL + F). Drag and drop files to add them to the timeline.
Edit: To trim from ends, drag the clip from corners to trim. There are some basic tools above the tracks in the timeline window. Click “+” to add a new track. Click the scissors icon to split the clip at the desired length. Click the magnet icon to on snapping mode. Click the green marker icon to add markers at desired points during editing.

Effects: Above the timeline window you will see a bar containing 4 buttons: Project Files, Transitions, Effects, and Emojis. Drag these elements to add them to the timeline. Effects appear as a small icon on the clip. Right-click the icon then select “Remove Effect” to remove it.

Right-click the clip to access more features like keyframe animation, playback speed, e.t.c.
Export: Click the red dot button on the top of the screen to export your video (or press CTRL + E). Select the desired Profile, Format, Quality, and Destination folder then click “Export Video” to export your file.

More Paid FLV Editor for Windows to Edit FLV Videos:
If you are looking for a good flv editor and you are ready to spend some cash on it then we have selected some paid softwares worthy of your investment.
- Power director 365 (import only):
It is available on both, Windows and Mac.
If you are looking for software to do more than just trimming and cropping the video then Cyberlink Power Director can be the right choice for you. It is packed with dozens of features that professional content creators look for. It has some professional-level plugins also. It is suitable for both beginners and advanced users.
It allows users to import .flv file and edit it like usual but you can’t export it in the same format as it exports videos in few formats only. FLV file is then converted into any of the other supported formats.
Pricing:
Its annual subscription is 69$ which is available at 30% off at 48.99$/year. This offer is valid till 4th May 2022.
Features:
- Can support 4K videos and can import a wide range of file formats.
- Have Auto Chapter and Subtitle settings.
- Multi-cam editing.
- Have hundreds of transitions, effects, and access to thousands of stock footage.
- Can Group clips for easy editing.
- Can import presets and color LUTS.
Cons:
- It lags sometimes, this issue can be resolved to an extent if you have a powerful PC.
- Some features are complicated to use.
- Export settings have fewer file formats as compared to the import file range.
Steps:
Import: Open Power Director then select the aspect ratio and click “Full Mode” to start the program. Import media files to the media room. Click the “Import Media” icon below the files tab to add more clips.

Edit: Drag and drop files to add them to the timeline. Drop files above or below to add them in layers. Click the icon on the top left corner of the timeline to add a new layer. You can find basic editing tools above the timeline.

Effects: All the effects and overlay elements are situated at the top left corner of the screen in a vertical bar. Here you will find the Project library, titles, effects, transitions, overlays, e.t.c. Simply just drag and drop on the timeline to use them. Here you can also do audio mixing and add subtitles and chapters.
Double click a clip or an overlay element to open the designer window. Here you can customize the clips and overlays to enhance your project.

Export: Click the “Produce” button on top of the screen then select the desired mode and file format and add a destination then click “Start”.
- AVS video editor:
If you are looking for a good .flv video editor and are ready to spend some bucks then the AVS video editor is a good choice for you. It is a low-budget software that is simple and easy to use and has some great features. It was my first video editor which I used about 5-6 years ago when I started making videos. It is simple and easy to use. It has some fine features that can fulfill your basic video editing tasks. Has a unique animation trajectory feature, where you can create paths for overlays.
Pricing:
It has two different plans, the first is an annual one which is at 69$ per year and the second one is a lifetime offer for 199$. In a lifetime plan, you can own the software forever. Right now, the software is at a 70% discount(till 30th April 2022) which decreases the price of the annual subscription to 39$ and the purchase price is 59$ this offer makes the software valuable enough to invest in.
Features:
- Its UI is beginner-friendly and easy to learn.
- Can Support 4K videos.
- Has cool features like video stabilization and a chroma key.
- Has 300+ effects, transitions, and overlays.
- Has a storyboard-type editing style also, which is a great feature for some users.
- Has keyframing and animation trajectory option for overlays.
Cons:
- Lacks some commonly used features.
- It is a decade-old software and needs some new updates to compete with other editing softwares.
- It isn’t suitable for professionals as you can’t do many customizations.
- It has only one layer for every element like text, effects, overlays, e.t.c.
- If hard disk crashes you have to purchase the license again.
Steps:
Import: Click “Import Media Files” to import clips or click “Open Existing Project” to load previously saved projects. Drag and drop files to add them to the timeline.
Edit: To trim from ends, drag the clip from corners to trim. On top of the timeline, you will find a few basic tools like change speed, apply transitions, do color correction, or do video stabilization.

Effects: Click the “Transition” button above the timeline to apply transitions. Drag and drop transitions between two clips to apply it. Right-click on the transition to change its duration.
Click the “Video Effects” button on top of the timeline, then drag and drop the desired effect on the effects layer and trim it according to your need.
Similarly from the “Text” tab Drag and drop the desired text to the text layer in the timeline. Then select “Edit text” to change the text.

Export: Click the “Produce” button on top of the timeline to open the export window. Select the desired file format and quality then click “next” and then click the “Create” button to export your file.

Veed.io: (Online):
If you want to edit FLV videos quickly and don’t want to install any software then Veed.io can be a good choice for you. It is an online FLV video editor that can run on any browser and is compatible with Windows, Mac, Linux, and even mobile phones. It is a quick and simple method to fulfill your basic video editing needs. It has some amazing and uniques features as compared to other basic video editors. It is a great platform to edit videos anywhere. You can start editing video on your PC and can continue it on your phone if you have to leave your workplace. But these features come at a price as its basic plan has the majority of the features but it leaves a watermark on the final video.
Pricing:
It has 3 different plans depending on your needs. The first one is the “Free Plan” which is almost useless for most users as it creates a watermark. The second one is the “Basic Plan” at 18$/month. While third is the “Pro Plan” at 30$/month which has some more features than the basic plan. You can purchase an annual plan to save up to 33%.

Features:
- It is an online platform that makes it easily accessible from any device.
- It is multi user friendly and is a good choice for team projects.
- It has a simple and clean interface which is ideal for beginners.
- It has an Auto subtitle generator + subtitle translator and editor.
- It has audio to text and video to text features that aren’t found in many other editors.
- It is compatible with many video and audio formats.
Cons:
- It is quite slow as compared to other video editing software.
- Downloading 4K videos is only available in Pro Plan.
- It is an online platform, so its data can be breached or leaked, so avoid editing your personal videos on this platform. It can rarely happen but precaution is better than cure.
Steps:
Import: Click choose FLV File on the home screen then a popup will appear, click “Browse” to upload a file or use a template.

Edit: To trim from ends, drag the clip from corners to trim. Click the “Split” button above the timeline to split the clip in between.

Effects: All the effects tabs like Text, Elements, Transitions lie on the left side of the screen (on windows). Click an element and it will be added to the timeline, then adjust the settings according to your will.
Export: Click the “Export” button on the top right side of the screen. Select a preset or change export settings then click “Export Video”. Soon you will get your final product.
Which Should I choose Free or Paid FLV Editor :
Are you confused to choose the FLV editor for you? Then look for the one that suits your other needs. Like if you want an editor only to crop or trim videos then save your money and go for a free video editor. But if you want some extra features to enhance your workflow or have some cash then go for paid software. For professionals, Power Director 365 or Filmora pro can be a good choice to invest your money in.
~ Some FAQs about FLV Videos:
why is .flv format used?
FLV is basically used to publish or distribute videos on the Internet. Many social platforms and web pages (such as youtube, Hulu, e.t.c.) use .flv files as it provide high-quality synchronized audio and video in compact file size. It was mostly used for embedded videos on these platforms. It is compatible with most browsers and devices even with older phones and computers.
How to play .FLV files?
To play .flv files a flash player is required. Which is pre-installed in almost most of the computers and browsers, if that’s not the case. Then you need a good video player which supports .flv format. Therefore VLC media prayer is a good choice. It is quite easy to use and has some useful features like Speed, Adding subtitles, Audio sync, e.t.c.
Is .flv file easy to edit?
FLV is just a format, It can be edited like any other format. Steps may differ from software to software. But don’t worry as I have mentioned the steps of some popular FLV video editors above.
Can the .flv file be converted?
If you don’t want to stick with the .flv format for long enough and want to switch over to a more convenient format then you can try these converters.
VLC Media Player: Yes, apart from being a video player it can convert video formats. It’s quite easy to use.
Simply Open VLC Media Player >> Click Media tab >> Click “Convert/Save” >> On pop up menu Select “Add” to add file (can add multiple files also) >> Click “Convert/Save” >> Add Destination folder and File Format (to convert in) then click “Start”.
Hand Brake: It is another popular video converter that can convert a .flv file into almost any file format.
Open HandBrake-“Drop a file” screen will appear >> Select the specific file you one to convert >> Select Destination filder >> Click “Start encoding”.
Flv vs Mp4 which is better?
FLV format was quite popular back in 2010 as it provides high-quality compressed video for the internet. It takes less space which makes it easy to download and transfer quickly. Nowadays MP4 format is used more as it is versatile and is compatible with almost all devices like Mobile, PC, TV, e.t.c. FLV uses H.263 codec while MP4 uses codec which provides better quality after compression. Still .flv file is a better choice for streaming platforms as one of the most common software used for streaming is OBS studio and it produces .flv files.
It is available for both Windows and Mac.
Filmora Video Editor is the most common and versatile editing software in this list that almost every content creator may have used or heard about. It has a lot of professional features used by content creators. It is one of the best video editors for .flv format, if u work with .flv files then you must get your hands on filmora.
Its UI is quite similar to premiere pro which makes it quite easy for people who are looking for premiere pro alternatives. It has hundreds of classy transitions/effects and dozens of unique and useful features but many of them are available on paid version only.
The free version also packs a punch but it is almost useless for most users as it leaves a watermark on the final product. It is good for learning video editing and once you master enough to move forward then you can purchase the pro version or you can start directly on the paid version.
For Win 7 or later (64-bit)
For macOS 10.14 or later
Features:
- Support a wide range of formats including .flv.
- Have advanced color grading options.
- Have standard Motion Tracking feature.
- Masking and Chroma key.
- Keyframing and Smooth animation. (Paid version)
- Speed ramping and Auto Synchronization. (Paid Version)
- Support industry-standard plugins (like Boris fx).
- Have a vast stock library.
Cons:
- Leaves a watermark on export. (free version)
- Have playback issues while using 4k videos.
- Lacks some standard editing features.
*Almost every software has some pros and cons. Remember these are inspected from my point of view. And it can differ from your experience.
Steps:
Import: Open filmora, a popup will appear, Select desired aspect ratio then click “New Project” to start editing or click “Open Project” to continue your old project.
On the center of the screen, you will see the import window, click it to import .flv file or any other video you want to edit.

Edit: Drag the clips on the timeline to start editing. Drag the clips from the corner to trim them. Click the top left icon of the timeline (not the whole screen) to add layers. In the toolbar above the timeline, you will find a bunch of tools, like split, crop, speed ramping, animation e.t.c. Click the red scissors icon on the pointer to split the clip at the desired timestamp.

Effects: Click the “edit” icon, then you will see a bunch of icons appear on the top left corner of the screen, These are as follow.
Select the “Video” icon to transform the clip or to do motion tracking, stabilization, chroma-key, Masking, e.t.c. To do Motion tracking, on the playback screen, lock the box on the item you want to track then click “Start Tracking”.
Select the “Audio” icon to apply effects and enhance your audio.
Select the “Color” icon to do fine-tuning and color grading, Select the “3D LUT” option to import a new customized lut. You can find a number of cool luts online.
Select the “Animation” icon to add preset animations or make custom animations by using keyframes.
Select the “Speed” icon to adjust the speed of the clip or to do speed ramping.
Click the “OK” button below to go back to previous tabs.
From there you can add Audio, Titles, Transitions, Effects, Elements, and Stock Media. Simply drag and drop the effects and transition on the clip to apply it. And to use titles and stock media, click and drag them on the timeline to use them.
Export: Click the blue “Export” button. Then choose Desired format and Resolution to export your final product.
More Free FLV Editor for Windows to Edit FLV Videos:
If you are looking for a .flv video editor to perform some editing tasks without spending any money then read till the end because here we have mentioned some free FLV editors for you.
- VSDC video editors :
It is available only on Windows.
Despite being free software, it is packed with lots of features. It is a good choice for non-professionals and it can even run on low-end PCs. It supports a wide range of video/audio formats including .flv file. It has dozens of cool effects and tools that can give your videos a new look. It is a non-linear program that makes using layers much easier means you can add layers at any specific time frame and can add layers into layers for complex editing. It also supports 360 and 3D video which can easily be converted into 2D. It has a number of video and audio effects. It is an old yet powerful software which can even run in 19s Pc. Its features are mentioned below.
Features:
- Free Software with no watermark.
- Can support 4K footages on the latest versions.
- Can import/export a wide range of formats.
- Have built-in video and screen capture feature.
- Has a Non-linear interface that supports multi-layer editing.
- Have professional features like chroma key and masking.
- Can convert layers into a sprite (Grouped Sequence) for handling multiple layers easily.
Cons:
- Being a free software it has some limitations too.
- It’s hard to learn for beginners.
- It still lacks features for a professional creator.
- Doesn’t support Hardware acceleration.
Steps:
Import: Open VSDC video editor, from the “Start Project Now” tab click “Blank Project” to start a new project or click “Import Content” to browse video or image files. Then select “Project settings”.

Edit: You can add more files by clicking the “Add Object” button on the top left corner. Then drag the file from Object explorer to anywhere on the timeline even on layers. On top of the “Editor Tab”, you can find the necessary tools to split, crop, and rotate the video. Click “Spacebar” to play/pause the timeline.

Effects: Click a video on the timeline then select the Effect buttons on top of the “Editor” tab to apply effects to your clip. Then Click the effect on “Object Explorer” to open its properties menu. On the left side of the player, you will find buttons to add text, shapes, e.t.c to the project. On the right side of the screen, you will find the “Basic effects window” where you can do color correction and grading.
Select Multiple Clips then right-click the mouse button and then the “Convert to sprite” button to make a grouped clip (clips within a clip).
Export: Click the “Export Project” button on the top of the screen. Then choose “Media device”, “output video format” and select output destination and quality setup then click “Export Project” to export the video. If you are using the free version of the software, a popup will appear saying “export without premium features”, just click Continue. Now your file is ready to be viewed.

- Shotcut:
It is available on Windows, Mac, and Linux.
It is a free and open-source video editor which is simple and easy to use, which makes it ideal for beginners. It doesn’t have any pro version. It is an ideal software to deal with .flv files as it supports a large number of import/export formats. However, it takes some time to understand its UI. After that, it is quite easy to use. It has cool effects and transitions. It has a clean and simple timeline which is not versatile for professionals although it has some complex options to customize your timeline. It has some refined color grading options. Being a free software it has some 360 effects and 3D text which makes it comparatively good as compared to some other free softwares. It can support 4K videos also but lags or crashes sometimes when using 4K clips. All the effects and tools are combined in one tab “Filter” which is a plus point for some users. It also has some good quality audio effects. Some of its features are mentioned below.
Features:
- It is completely free software with no watermark.
- It has one of the largest file format compatibility.
- It can support 4K video resolution.
- It has 3 wheel grading tool and some other color filters.
- It has standard animation and keyframing features.
- It has some effects to support 360 videos.
Cons:
- It isn’t suitable for professionals as it lacks some useful features.
- Have issues with playback of 4K videos and sometimes crashes.
- Doesn’t have a separate text column and lacks some basic text and title effects.
- Its UI is different from other common video editors and is a bit hard to understand.
Steps:
Import: Click the “Open file” icon on the top left corner of the window to import files.

Edit: Drag and drop clips on an empty timeline panel to add tracks. Right-click on the left side of the timeline to add a video or an audio track. To trim from ends, drag the clip from corners to trim. Click the Scissors icon on the top timeline to split the clip in between.
Click the “Properties” tab above the timeline panel to change the aspect ratio and playback speed of the clip.

Effects: Click the “Filters” tab above the timeline panel to open the filter menu, Click “+” above it to add filters. Double click a filter to add it to the selected clip, then click the filter to change its properties.
Click the “Keyframes” icon on top of the window to open the Keyframes window. Then click the “Timeline” icon to go back to the previous window.
Export: Click the “Export” button on the top of the screen. Select a preset or click the “Advanced” button to change export settings then click “Export File”.

- OpenShot:
It is available on Windows, Mac, and Linux.
OpenShot is another choice for you if you are looking for a free FLV editor. It is simple and easy to use. Its User Interface is clean and beginner-friendly. It has hundreds of transitions and effects. It has an animated titles option also, which is powered by Blender.
Features:
- Is simple and easy to use.
- Its UI is Beginner friendly.
- Can support 4K videos.
- Support a wide range of formats.
- Have smooth keyframe animation.
- Is free and has no watermark.
Cons:
- Video Playback is a bit laggy.
- Animated titles are only supported when you have Blender (3d software) installed on your PC.
- Doesn’t have enough tools for professionals.
Steps:
Import: Start “OpenShot” then drag and drop files in the project files tab from your file system (or press CTRL + F). Drag and drop files to add them to the timeline.
Edit: To trim from ends, drag the clip from corners to trim. There are some basic tools above the tracks in the timeline window. Click “+” to add a new track. Click the scissors icon to split the clip at the desired length. Click the magnet icon to on snapping mode. Click the green marker icon to add markers at desired points during editing.

Effects: Above the timeline window you will see a bar containing 4 buttons: Project Files, Transitions, Effects, and Emojis. Drag these elements to add them to the timeline. Effects appear as a small icon on the clip. Right-click the icon then select “Remove Effect” to remove it.

Right-click the clip to access more features like keyframe animation, playback speed, e.t.c.
Export: Click the red dot button on the top of the screen to export your video (or press CTRL + E). Select the desired Profile, Format, Quality, and Destination folder then click “Export Video” to export your file.

More Paid FLV Editor for Windows to Edit FLV Videos:
If you are looking for a good flv editor and you are ready to spend some cash on it then we have selected some paid softwares worthy of your investment.
- Power director 365 (import only):
It is available on both, Windows and Mac.
If you are looking for software to do more than just trimming and cropping the video then Cyberlink Power Director can be the right choice for you. It is packed with dozens of features that professional content creators look for. It has some professional-level plugins also. It is suitable for both beginners and advanced users.
It allows users to import .flv file and edit it like usual but you can’t export it in the same format as it exports videos in few formats only. FLV file is then converted into any of the other supported formats.
Pricing:
Its annual subscription is 69$ which is available at 30% off at 48.99$/year. This offer is valid till 4th May 2022.
Features:
- Can support 4K videos and can import a wide range of file formats.
- Have Auto Chapter and Subtitle settings.
- Multi-cam editing.
- Have hundreds of transitions, effects, and access to thousands of stock footage.
- Can Group clips for easy editing.
- Can import presets and color LUTS.
Cons:
- It lags sometimes, this issue can be resolved to an extent if you have a powerful PC.
- Some features are complicated to use.
- Export settings have fewer file formats as compared to the import file range.
Steps:
Import: Open Power Director then select the aspect ratio and click “Full Mode” to start the program. Import media files to the media room. Click the “Import Media” icon below the files tab to add more clips.

Edit: Drag and drop files to add them to the timeline. Drop files above or below to add them in layers. Click the icon on the top left corner of the timeline to add a new layer. You can find basic editing tools above the timeline.

Effects: All the effects and overlay elements are situated at the top left corner of the screen in a vertical bar. Here you will find the Project library, titles, effects, transitions, overlays, e.t.c. Simply just drag and drop on the timeline to use them. Here you can also do audio mixing and add subtitles and chapters.
Double click a clip or an overlay element to open the designer window. Here you can customize the clips and overlays to enhance your project.

Export: Click the “Produce” button on top of the screen then select the desired mode and file format and add a destination then click “Start”.
- AVS video editor:
If you are looking for a good .flv video editor and are ready to spend some bucks then the AVS video editor is a good choice for you. It is a low-budget software that is simple and easy to use and has some great features. It was my first video editor which I used about 5-6 years ago when I started making videos. It is simple and easy to use. It has some fine features that can fulfill your basic video editing tasks. Has a unique animation trajectory feature, where you can create paths for overlays.
Pricing:
It has two different plans, the first is an annual one which is at 69$ per year and the second one is a lifetime offer for 199$. In a lifetime plan, you can own the software forever. Right now, the software is at a 70% discount(till 30th April 2022) which decreases the price of the annual subscription to 39$ and the purchase price is 59$ this offer makes the software valuable enough to invest in.
Features:
- Its UI is beginner-friendly and easy to learn.
- Can Support 4K videos.
- Has cool features like video stabilization and a chroma key.
- Has 300+ effects, transitions, and overlays.
- Has a storyboard-type editing style also, which is a great feature for some users.
- Has keyframing and animation trajectory option for overlays.
Cons:
- Lacks some commonly used features.
- It is a decade-old software and needs some new updates to compete with other editing softwares.
- It isn’t suitable for professionals as you can’t do many customizations.
- It has only one layer for every element like text, effects, overlays, e.t.c.
- If hard disk crashes you have to purchase the license again.
Steps:
Import: Click “Import Media Files” to import clips or click “Open Existing Project” to load previously saved projects. Drag and drop files to add them to the timeline.
Edit: To trim from ends, drag the clip from corners to trim. On top of the timeline, you will find a few basic tools like change speed, apply transitions, do color correction, or do video stabilization.

Effects: Click the “Transition” button above the timeline to apply transitions. Drag and drop transitions between two clips to apply it. Right-click on the transition to change its duration.
Click the “Video Effects” button on top of the timeline, then drag and drop the desired effect on the effects layer and trim it according to your need.
Similarly from the “Text” tab Drag and drop the desired text to the text layer in the timeline. Then select “Edit text” to change the text.

Export: Click the “Produce” button on top of the timeline to open the export window. Select the desired file format and quality then click “next” and then click the “Create” button to export your file.

Veed.io: (Online):
If you want to edit FLV videos quickly and don’t want to install any software then Veed.io can be a good choice for you. It is an online FLV video editor that can run on any browser and is compatible with Windows, Mac, Linux, and even mobile phones. It is a quick and simple method to fulfill your basic video editing needs. It has some amazing and uniques features as compared to other basic video editors. It is a great platform to edit videos anywhere. You can start editing video on your PC and can continue it on your phone if you have to leave your workplace. But these features come at a price as its basic plan has the majority of the features but it leaves a watermark on the final video.
Pricing:
It has 3 different plans depending on your needs. The first one is the “Free Plan” which is almost useless for most users as it creates a watermark. The second one is the “Basic Plan” at 18$/month. While third is the “Pro Plan” at 30$/month which has some more features than the basic plan. You can purchase an annual plan to save up to 33%.

Features:
- It is an online platform that makes it easily accessible from any device.
- It is multi user friendly and is a good choice for team projects.
- It has a simple and clean interface which is ideal for beginners.
- It has an Auto subtitle generator + subtitle translator and editor.
- It has audio to text and video to text features that aren’t found in many other editors.
- It is compatible with many video and audio formats.
Cons:
- It is quite slow as compared to other video editing software.
- Downloading 4K videos is only available in Pro Plan.
- It is an online platform, so its data can be breached or leaked, so avoid editing your personal videos on this platform. It can rarely happen but precaution is better than cure.
Steps:
Import: Click choose FLV File on the home screen then a popup will appear, click “Browse” to upload a file or use a template.

Edit: To trim from ends, drag the clip from corners to trim. Click the “Split” button above the timeline to split the clip in between.

Effects: All the effects tabs like Text, Elements, Transitions lie on the left side of the screen (on windows). Click an element and it will be added to the timeline, then adjust the settings according to your will.
Export: Click the “Export” button on the top right side of the screen. Select a preset or change export settings then click “Export Video”. Soon you will get your final product.
Which Should I choose Free or Paid FLV Editor :
Are you confused to choose the FLV editor for you? Then look for the one that suits your other needs. Like if you want an editor only to crop or trim videos then save your money and go for a free video editor. But if you want some extra features to enhance your workflow or have some cash then go for paid software. For professionals, Power Director 365 or Filmora pro can be a good choice to invest your money in.
~ Some FAQs about FLV Videos:
why is .flv format used?
FLV is basically used to publish or distribute videos on the Internet. Many social platforms and web pages (such as youtube, Hulu, e.t.c.) use .flv files as it provide high-quality synchronized audio and video in compact file size. It was mostly used for embedded videos on these platforms. It is compatible with most browsers and devices even with older phones and computers.
How to play .FLV files?
To play .flv files a flash player is required. Which is pre-installed in almost most of the computers and browsers, if that’s not the case. Then you need a good video player which supports .flv format. Therefore VLC media prayer is a good choice. It is quite easy to use and has some useful features like Speed, Adding subtitles, Audio sync, e.t.c.
Is .flv file easy to edit?
FLV is just a format, It can be edited like any other format. Steps may differ from software to software. But don’t worry as I have mentioned the steps of some popular FLV video editors above.
Can the .flv file be converted?
If you don’t want to stick with the .flv format for long enough and want to switch over to a more convenient format then you can try these converters.
VLC Media Player: Yes, apart from being a video player it can convert video formats. It’s quite easy to use.
Simply Open VLC Media Player >> Click Media tab >> Click “Convert/Save” >> On pop up menu Select “Add” to add file (can add multiple files also) >> Click “Convert/Save” >> Add Destination folder and File Format (to convert in) then click “Start”.
Hand Brake: It is another popular video converter that can convert a .flv file into almost any file format.
Open HandBrake-“Drop a file” screen will appear >> Select the specific file you one to convert >> Select Destination filder >> Click “Start encoding”.
Flv vs Mp4 which is better?
FLV format was quite popular back in 2010 as it provides high-quality compressed video for the internet. It takes less space which makes it easy to download and transfer quickly. Nowadays MP4 format is used more as it is versatile and is compatible with almost all devices like Mobile, PC, TV, e.t.c. FLV uses H.263 codec while MP4 uses codec which provides better quality after compression. Still .flv file is a better choice for streaming platforms as one of the most common software used for streaming is OBS studio and it produces .flv files.
It is available for both Windows and Mac.
Filmora Video Editor is the most common and versatile editing software in this list that almost every content creator may have used or heard about. It has a lot of professional features used by content creators. It is one of the best video editors for .flv format, if u work with .flv files then you must get your hands on filmora.
Its UI is quite similar to premiere pro which makes it quite easy for people who are looking for premiere pro alternatives. It has hundreds of classy transitions/effects and dozens of unique and useful features but many of them are available on paid version only.
The free version also packs a punch but it is almost useless for most users as it leaves a watermark on the final product. It is good for learning video editing and once you master enough to move forward then you can purchase the pro version or you can start directly on the paid version.
For Win 7 or later (64-bit)
For macOS 10.14 or later
Features:
- Support a wide range of formats including .flv.
- Have advanced color grading options.
- Have standard Motion Tracking feature.
- Masking and Chroma key.
- Keyframing and Smooth animation. (Paid version)
- Speed ramping and Auto Synchronization. (Paid Version)
- Support industry-standard plugins (like Boris fx).
- Have a vast stock library.
Cons:
- Leaves a watermark on export. (free version)
- Have playback issues while using 4k videos.
- Lacks some standard editing features.
*Almost every software has some pros and cons. Remember these are inspected from my point of view. And it can differ from your experience.
Steps:
Import: Open filmora, a popup will appear, Select desired aspect ratio then click “New Project” to start editing or click “Open Project” to continue your old project.
On the center of the screen, you will see the import window, click it to import .flv file or any other video you want to edit.

Edit: Drag the clips on the timeline to start editing. Drag the clips from the corner to trim them. Click the top left icon of the timeline (not the whole screen) to add layers. In the toolbar above the timeline, you will find a bunch of tools, like split, crop, speed ramping, animation e.t.c. Click the red scissors icon on the pointer to split the clip at the desired timestamp.

Effects: Click the “edit” icon, then you will see a bunch of icons appear on the top left corner of the screen, These are as follow.
Select the “Video” icon to transform the clip or to do motion tracking, stabilization, chroma-key, Masking, e.t.c. To do Motion tracking, on the playback screen, lock the box on the item you want to track then click “Start Tracking”.
Select the “Audio” icon to apply effects and enhance your audio.
Select the “Color” icon to do fine-tuning and color grading, Select the “3D LUT” option to import a new customized lut. You can find a number of cool luts online.
Select the “Animation” icon to add preset animations or make custom animations by using keyframes.
Select the “Speed” icon to adjust the speed of the clip or to do speed ramping.
Click the “OK” button below to go back to previous tabs.
From there you can add Audio, Titles, Transitions, Effects, Elements, and Stock Media. Simply drag and drop the effects and transition on the clip to apply it. And to use titles and stock media, click and drag them on the timeline to use them.
Export: Click the blue “Export” button. Then choose Desired format and Resolution to export your final product.
More Free FLV Editor for Windows to Edit FLV Videos:
If you are looking for a .flv video editor to perform some editing tasks without spending any money then read till the end because here we have mentioned some free FLV editors for you.
- VSDC video editors :
It is available only on Windows.
Despite being free software, it is packed with lots of features. It is a good choice for non-professionals and it can even run on low-end PCs. It supports a wide range of video/audio formats including .flv file. It has dozens of cool effects and tools that can give your videos a new look. It is a non-linear program that makes using layers much easier means you can add layers at any specific time frame and can add layers into layers for complex editing. It also supports 360 and 3D video which can easily be converted into 2D. It has a number of video and audio effects. It is an old yet powerful software which can even run in 19s Pc. Its features are mentioned below.
Features:
- Free Software with no watermark.
- Can support 4K footages on the latest versions.
- Can import/export a wide range of formats.
- Have built-in video and screen capture feature.
- Has a Non-linear interface that supports multi-layer editing.
- Have professional features like chroma key and masking.
- Can convert layers into a sprite (Grouped Sequence) for handling multiple layers easily.
Cons:
- Being a free software it has some limitations too.
- It’s hard to learn for beginners.
- It still lacks features for a professional creator.
- Doesn’t support Hardware acceleration.
Steps:
Import: Open VSDC video editor, from the “Start Project Now” tab click “Blank Project” to start a new project or click “Import Content” to browse video or image files. Then select “Project settings”.

Edit: You can add more files by clicking the “Add Object” button on the top left corner. Then drag the file from Object explorer to anywhere on the timeline even on layers. On top of the “Editor Tab”, you can find the necessary tools to split, crop, and rotate the video. Click “Spacebar” to play/pause the timeline.

Effects: Click a video on the timeline then select the Effect buttons on top of the “Editor” tab to apply effects to your clip. Then Click the effect on “Object Explorer” to open its properties menu. On the left side of the player, you will find buttons to add text, shapes, e.t.c to the project. On the right side of the screen, you will find the “Basic effects window” where you can do color correction and grading.
Select Multiple Clips then right-click the mouse button and then the “Convert to sprite” button to make a grouped clip (clips within a clip).
Export: Click the “Export Project” button on the top of the screen. Then choose “Media device”, “output video format” and select output destination and quality setup then click “Export Project” to export the video. If you are using the free version of the software, a popup will appear saying “export without premium features”, just click Continue. Now your file is ready to be viewed.

- Shotcut:
It is available on Windows, Mac, and Linux.
It is a free and open-source video editor which is simple and easy to use, which makes it ideal for beginners. It doesn’t have any pro version. It is an ideal software to deal with .flv files as it supports a large number of import/export formats. However, it takes some time to understand its UI. After that, it is quite easy to use. It has cool effects and transitions. It has a clean and simple timeline which is not versatile for professionals although it has some complex options to customize your timeline. It has some refined color grading options. Being a free software it has some 360 effects and 3D text which makes it comparatively good as compared to some other free softwares. It can support 4K videos also but lags or crashes sometimes when using 4K clips. All the effects and tools are combined in one tab “Filter” which is a plus point for some users. It also has some good quality audio effects. Some of its features are mentioned below.
Features:
- It is completely free software with no watermark.
- It has one of the largest file format compatibility.
- It can support 4K video resolution.
- It has 3 wheel grading tool and some other color filters.
- It has standard animation and keyframing features.
- It has some effects to support 360 videos.
Cons:
- It isn’t suitable for professionals as it lacks some useful features.
- Have issues with playback of 4K videos and sometimes crashes.
- Doesn’t have a separate text column and lacks some basic text and title effects.
- Its UI is different from other common video editors and is a bit hard to understand.
Steps:
Import: Click the “Open file” icon on the top left corner of the window to import files.

Edit: Drag and drop clips on an empty timeline panel to add tracks. Right-click on the left side of the timeline to add a video or an audio track. To trim from ends, drag the clip from corners to trim. Click the Scissors icon on the top timeline to split the clip in between.
Click the “Properties” tab above the timeline panel to change the aspect ratio and playback speed of the clip.

Effects: Click the “Filters” tab above the timeline panel to open the filter menu, Click “+” above it to add filters. Double click a filter to add it to the selected clip, then click the filter to change its properties.
Click the “Keyframes” icon on top of the window to open the Keyframes window. Then click the “Timeline” icon to go back to the previous window.
Export: Click the “Export” button on the top of the screen. Select a preset or click the “Advanced” button to change export settings then click “Export File”.

- OpenShot:
It is available on Windows, Mac, and Linux.
OpenShot is another choice for you if you are looking for a free FLV editor. It is simple and easy to use. Its User Interface is clean and beginner-friendly. It has hundreds of transitions and effects. It has an animated titles option also, which is powered by Blender.
Features:
- Is simple and easy to use.
- Its UI is Beginner friendly.
- Can support 4K videos.
- Support a wide range of formats.
- Have smooth keyframe animation.
- Is free and has no watermark.
Cons:
- Video Playback is a bit laggy.
- Animated titles are only supported when you have Blender (3d software) installed on your PC.
- Doesn’t have enough tools for professionals.
Steps:
Import: Start “OpenShot” then drag and drop files in the project files tab from your file system (or press CTRL + F). Drag and drop files to add them to the timeline.
Edit: To trim from ends, drag the clip from corners to trim. There are some basic tools above the tracks in the timeline window. Click “+” to add a new track. Click the scissors icon to split the clip at the desired length. Click the magnet icon to on snapping mode. Click the green marker icon to add markers at desired points during editing.

Effects: Above the timeline window you will see a bar containing 4 buttons: Project Files, Transitions, Effects, and Emojis. Drag these elements to add them to the timeline. Effects appear as a small icon on the clip. Right-click the icon then select “Remove Effect” to remove it.

Right-click the clip to access more features like keyframe animation, playback speed, e.t.c.
Export: Click the red dot button on the top of the screen to export your video (or press CTRL + E). Select the desired Profile, Format, Quality, and Destination folder then click “Export Video” to export your file.

More Paid FLV Editor for Windows to Edit FLV Videos:
If you are looking for a good flv editor and you are ready to spend some cash on it then we have selected some paid softwares worthy of your investment.
- Power director 365 (import only):
It is available on both, Windows and Mac.
If you are looking for software to do more than just trimming and cropping the video then Cyberlink Power Director can be the right choice for you. It is packed with dozens of features that professional content creators look for. It has some professional-level plugins also. It is suitable for both beginners and advanced users.
It allows users to import .flv file and edit it like usual but you can’t export it in the same format as it exports videos in few formats only. FLV file is then converted into any of the other supported formats.
Pricing:
Its annual subscription is 69$ which is available at 30% off at 48.99$/year. This offer is valid till 4th May 2022.
Features:
- Can support 4K videos and can import a wide range of file formats.
- Have Auto Chapter and Subtitle settings.
- Multi-cam editing.
- Have hundreds of transitions, effects, and access to thousands of stock footage.
- Can Group clips for easy editing.
- Can import presets and color LUTS.
Cons:
- It lags sometimes, this issue can be resolved to an extent if you have a powerful PC.
- Some features are complicated to use.
- Export settings have fewer file formats as compared to the import file range.
Steps:
Import: Open Power Director then select the aspect ratio and click “Full Mode” to start the program. Import media files to the media room. Click the “Import Media” icon below the files tab to add more clips.

Edit: Drag and drop files to add them to the timeline. Drop files above or below to add them in layers. Click the icon on the top left corner of the timeline to add a new layer. You can find basic editing tools above the timeline.

Effects: All the effects and overlay elements are situated at the top left corner of the screen in a vertical bar. Here you will find the Project library, titles, effects, transitions, overlays, e.t.c. Simply just drag and drop on the timeline to use them. Here you can also do audio mixing and add subtitles and chapters.
Double click a clip or an overlay element to open the designer window. Here you can customize the clips and overlays to enhance your project.

Export: Click the “Produce” button on top of the screen then select the desired mode and file format and add a destination then click “Start”.
- AVS video editor:
If you are looking for a good .flv video editor and are ready to spend some bucks then the AVS video editor is a good choice for you. It is a low-budget software that is simple and easy to use and has some great features. It was my first video editor which I used about 5-6 years ago when I started making videos. It is simple and easy to use. It has some fine features that can fulfill your basic video editing tasks. Has a unique animation trajectory feature, where you can create paths for overlays.
Pricing:
It has two different plans, the first is an annual one which is at 69$ per year and the second one is a lifetime offer for 199$. In a lifetime plan, you can own the software forever. Right now, the software is at a 70% discount(till 30th April 2022) which decreases the price of the annual subscription to 39$ and the purchase price is 59$ this offer makes the software valuable enough to invest in.
Features:
- Its UI is beginner-friendly and easy to learn.
- Can Support 4K videos.
- Has cool features like video stabilization and a chroma key.
- Has 300+ effects, transitions, and overlays.
- Has a storyboard-type editing style also, which is a great feature for some users.
- Has keyframing and animation trajectory option for overlays.
Cons:
- Lacks some commonly used features.
- It is a decade-old software and needs some new updates to compete with other editing softwares.
- It isn’t suitable for professionals as you can’t do many customizations.
- It has only one layer for every element like text, effects, overlays, e.t.c.
- If hard disk crashes you have to purchase the license again.
Steps:
Import: Click “Import Media Files” to import clips or click “Open Existing Project” to load previously saved projects. Drag and drop files to add them to the timeline.
Edit: To trim from ends, drag the clip from corners to trim. On top of the timeline, you will find a few basic tools like change speed, apply transitions, do color correction, or do video stabilization.

Effects: Click the “Transition” button above the timeline to apply transitions. Drag and drop transitions between two clips to apply it. Right-click on the transition to change its duration.
Click the “Video Effects” button on top of the timeline, then drag and drop the desired effect on the effects layer and trim it according to your need.
Similarly from the “Text” tab Drag and drop the desired text to the text layer in the timeline. Then select “Edit text” to change the text.

Export: Click the “Produce” button on top of the timeline to open the export window. Select the desired file format and quality then click “next” and then click the “Create” button to export your file.

Veed.io: (Online):
If you want to edit FLV videos quickly and don’t want to install any software then Veed.io can be a good choice for you. It is an online FLV video editor that can run on any browser and is compatible with Windows, Mac, Linux, and even mobile phones. It is a quick and simple method to fulfill your basic video editing needs. It has some amazing and uniques features as compared to other basic video editors. It is a great platform to edit videos anywhere. You can start editing video on your PC and can continue it on your phone if you have to leave your workplace. But these features come at a price as its basic plan has the majority of the features but it leaves a watermark on the final video.
Pricing:
It has 3 different plans depending on your needs. The first one is the “Free Plan” which is almost useless for most users as it creates a watermark. The second one is the “Basic Plan” at 18$/month. While third is the “Pro Plan” at 30$/month which has some more features than the basic plan. You can purchase an annual plan to save up to 33%.

Features:
- It is an online platform that makes it easily accessible from any device.
- It is multi user friendly and is a good choice for team projects.
- It has a simple and clean interface which is ideal for beginners.
- It has an Auto subtitle generator + subtitle translator and editor.
- It has audio to text and video to text features that aren’t found in many other editors.
- It is compatible with many video and audio formats.
Cons:
- It is quite slow as compared to other video editing software.
- Downloading 4K videos is only available in Pro Plan.
- It is an online platform, so its data can be breached or leaked, so avoid editing your personal videos on this platform. It can rarely happen but precaution is better than cure.
Steps:
Import: Click choose FLV File on the home screen then a popup will appear, click “Browse” to upload a file or use a template.

Edit: To trim from ends, drag the clip from corners to trim. Click the “Split” button above the timeline to split the clip in between.

Effects: All the effects tabs like Text, Elements, Transitions lie on the left side of the screen (on windows). Click an element and it will be added to the timeline, then adjust the settings according to your will.
Export: Click the “Export” button on the top right side of the screen. Select a preset or change export settings then click “Export Video”. Soon you will get your final product.
Which Should I choose Free or Paid FLV Editor :
Are you confused to choose the FLV editor for you? Then look for the one that suits your other needs. Like if you want an editor only to crop or trim videos then save your money and go for a free video editor. But if you want some extra features to enhance your workflow or have some cash then go for paid software. For professionals, Power Director 365 or Filmora pro can be a good choice to invest your money in.
~ Some FAQs about FLV Videos:
why is .flv format used?
FLV is basically used to publish or distribute videos on the Internet. Many social platforms and web pages (such as youtube, Hulu, e.t.c.) use .flv files as it provide high-quality synchronized audio and video in compact file size. It was mostly used for embedded videos on these platforms. It is compatible with most browsers and devices even with older phones and computers.
How to play .FLV files?
To play .flv files a flash player is required. Which is pre-installed in almost most of the computers and browsers, if that’s not the case. Then you need a good video player which supports .flv format. Therefore VLC media prayer is a good choice. It is quite easy to use and has some useful features like Speed, Adding subtitles, Audio sync, e.t.c.
Is .flv file easy to edit?
FLV is just a format, It can be edited like any other format. Steps may differ from software to software. But don’t worry as I have mentioned the steps of some popular FLV video editors above.
Can the .flv file be converted?
If you don’t want to stick with the .flv format for long enough and want to switch over to a more convenient format then you can try these converters.
VLC Media Player: Yes, apart from being a video player it can convert video formats. It’s quite easy to use.
Simply Open VLC Media Player >> Click Media tab >> Click “Convert/Save” >> On pop up menu Select “Add” to add file (can add multiple files also) >> Click “Convert/Save” >> Add Destination folder and File Format (to convert in) then click “Start”.
Hand Brake: It is another popular video converter that can convert a .flv file into almost any file format.
Open HandBrake-“Drop a file” screen will appear >> Select the specific file you one to convert >> Select Destination filder >> Click “Start encoding”.
Flv vs Mp4 which is better?
FLV format was quite popular back in 2010 as it provides high-quality compressed video for the internet. It takes less space which makes it easy to download and transfer quickly. Nowadays MP4 format is used more as it is versatile and is compatible with almost all devices like Mobile, PC, TV, e.t.c. FLV uses H.263 codec while MP4 uses codec which provides better quality after compression. Still .flv file is a better choice for streaming platforms as one of the most common software used for streaming is OBS studio and it produces .flv files.
What’re the Best Alternatives to Pexels?
Sites like Pexels provide you with royalty-free images to include in your messages to further their impact. Although Pexels is a great resource for royalty-free photos and animations, it is not without its limitations. Here is a list of Pexels alternatives for you to consider when creating content. It includes reasons why the sites are suitable alternatives and brief guides on how to get started on them.
Part1: What are the best alternatives to Pexels?
There are several factors to consider when selecting a suitable image resource for your messaging. For example, you may consider a site favorable to another because of its intuitive user interface, or you may consider another because it has no pesky advertisements. Taking this into consideration, here is a list of the three best Pexels alternatives worth checking out for your next project.
No.1 Unsplash

Unsplash is a stock photo-sharing website run by Getty Images. According to recent reports, the site hosts over 265,000 photographers contributing to a library of over 3.5 million photos. Initially, all photos were under a creative commons license zero, meaning you could distribute the photos without restriction. However, following lobbying from some creators, all photos are now under the Unsplash license.
This means you can still copy, modify, share, and download images for free. However, under the new licensing terms, you cannot use unedited copies of the images for commercial purposes such as T-Shirt printing or branding and using the photos on a similar or competing service.
Most Unsplash users praise it for the following features:
- The library contains tons of high-resolution photos.
- You can access the site through your web browser or the app available on Android and iOS devices.
- There are no download limits to the photos, and everything is free.
- Unsplash is a plugin for various content editing software such as Filmora 11, Adobe XD, and Figma.
Despite all the positives, here are a few improvements to make Unsplash even better.
- The website lacks a free HD video library, which would be a great addition for aspiring content creators.
- In addition, the search algorithm is not as accurate, and you may struggle to find suitable images for your subject matter.
No.2 Shutterstock
Another Pexels alternative to consider is Shutterstock. It is an online resource where individuals and businesses can access high-quality, licensed photos, videos, illustrations, vectors, and music for their content creation.

Unlike Unsplash above, you need to create an account to access Shutterstock services. In addition, the website offers different pricing models for each user, depending on your unique requirements. For example, you can subscribe to an image-only subscription that allows you ten image downloads monthly for $29. Alternatively, you can purchase the Mix and Match subscription that offers you 25 credits monthly to download different media from the site.
Currently, the website boasts a collection of over 200 million royalty-free images and over 10 million video clips. In addition, the company also offers a percentage-based compensation model to contributors, with first-timers earning up to 15% of content sales. Furthermore, the site continues to populate its library through the acquisition of different companies in a similar space. Some of its notable acquisitions include Turbosquid, Bigstock, Rex Features, and BEImages.
No.3 Filmstock [Editor’s Choices]
Filmstock is an online library of different editing resources for filmmakers. Some of the resources you can obtain are effects, elements, titles, and audio. In addition, Filmstock is the most recent version of the formerly known Filmora Effects Store. Regardless of the close association with Filmora Video Editing Software, you can still use these resources in your creations on other programs.
Filmstock currently offers its services in three categories. They are:
- A Free package that allows you unlimited downloads of media effects and resources under a royalty-free license. However, any resource you download from the site comes with a Filmora tag.
- The Standard subscription will cost you $9.99 per month and includes free technical support as an additional feature to those available in the free package.
- Finally, the Premium subscription gives you access to the premium library that contains an exclusive selection of the contributors’ commercial work. The package will cost you $32.99 monthly and also includes all the features in the previous subscription models.
Kindly note that you must register for a Filmstock or Wondershare account to use the service. In addition, you will need to purchase a separate license to use the service with Filmora Video Editing software.
No.4 Getty Images
Getty Images is an online supplier of media resources for media, creative, and corporate clients. It boasts a resource library of over 477 million entries. Access to the site requires you to create a user account. In addition, some of the prints you will find on the site will require you to make a purchase, depending on the size and quality.
No.5 iStock

iStock is an online library of creative resources, including music, videos, illustrations, and images. In addition, the site offers access to its exclusive stock-image library through different subscription models. Some of the platforms appealing features include the following:
- An AI-powered search engine that provides more accurate results than Pexels.
- Preset templates for easier creation of videos and social media posts.
No.6 Flickr

Flickr is another alternative to Pexels worth considering. This is because it offers you free and paid access to one of the internet’s largest creative libraries. In addition, you can select from several licenses, including creative commons and U.S. Government works licenses for your assets, something other similar sites lack in their offering.
No.7 Pixabay

Pixabay gives you access to over 1 million creative assets in different categories, including videos, music, and sound effects. In addition, the site offers its content under the creative commons zero licenses, meaning you can use all stock photos without fear of backlash. Although the site’s search function requires work on its accuracy, the numerous categories make it easier to pinpoint your desired image.
No.8 Adobe Stock

Another site like Pexels is Adobe Stock, where you can access millions of creative assets for your content. Depending on your licensing options, the site offers free and paid access to its services. For example, you can increase your creativity by subscribing to the different Adobe design assets, including Adobe Stock Vector and Adobe Stock Illustrations.
No.9 Vista Create
Vista Create is an online free photo and image website like Pexels that also includes design tools to alter the images to your liking. In addition, you have plenty of templates to suit different platform requirements, including social media sites such as Facebook and Instagram. Furthermore, Vista Creare also boasts a wide collection of vectors, which you can customize in three easy steps.
No.10 LibreStock

Unlike the ones above, LIbreStock is an aggregator site that combines stock photo databases in a single platform. As such, it is arguably the largest provider of royalty-free images on the web. In addition, it automatically filters out poor-quality images, guaranteeing you excellence each time.
Most LibreStock users name the website’s search function as its best feature. This is because it also utilizes search tags when scanning through different databases. As such, you can easily find unique stock photos for your creation, regardless of how outrageous the search tag is. Finally, LibreStock provides its content under the creative commons zero licenses, meaning you can use the assets for personal and commercial work.
No.11 StockSnap

StockSnap operates similarly to Pexels, as it also offers a variety of free stock photos and images. However, a few tweaks to how you receive these creative assets make it slightly better. For example, StockSnap allows you to download ten free images from Shutterstock if what you need is unavailable in their library.
In addition, the platform also displays the most recent additions to their library in the top search results. As such, you are guaranteed to receive unique pictures without significant overuse.
Part2: FAQs
What is better than Pexels?
From the above information, Unsplash ranks as the best alternative to Pexels. This is because of its user-friendly interface, availability across web-based and smartphones, and compatibility with different video editing software such as Adobe XD and Filmora . As such, its versatility allows you to always create on the go.
Can I use Pexels on YouTube?
Yes, you can use Pexels on YouTube, provided you apply the creative assets to your material. In addition, you will need to make alterations to Pexels images and videos before using them to avoid violating your license agreement.
Free Download For Win 7 or later(64-bit)
Free Download For macOS 10.14 or later
Free Download For macOS 10.14 or later
Want to Make a Slide Show Video? Here’s How
Want Make a Slide Show Video Here’s How
An easy yet powerful editor
Numerous effects to choose from
Detailed tutorials provided by the official channel
Dear readers you don’t have to worry a bit, in this article we bring you the best slideshow video maker and easy ways using which you can custom the templates for your presentation in your way.
In this article
01 8 Best Slideshow Video Templates
02 [10 Best Video Slideshow Maker](#Part 2)
03 [5 Easy Steps to Make a Slide Show Video](#Part 3)
04 [How to Custom Templates for Google Slides Presentation](#Part 4)
Part 1 Best Slideshow Video Templates
A slideshow video could be an effective way of presenting your point to your audience. This becomes super easy when you use a good template to create your slide show video. Here are 8 best slideshow video templets which you can give a try
01Instagram Slideshow
This slide show video template is best for creating videos for Instagram and other social media platforms.
02Clean Slideshow Template
This one is suited to create video slide show for family purposes. This template could also be engaged in a clean slideshow presentation for your office.

03Parallax Scrolling Slideshow Template
This is one of the most video templates which you can use for your slide show video. This template has various after-effects which can take your presentations to a different level.
04Modern Tie Slideshow Template
If you are in a business or corporate job then give this slideshow video template a try. With a unique, tiled look and a 3D tile drop-down effect, your videos will impress everyone.

05Minimal Slideshow template
Minimal slide template is best for business presentations or product promotion. Here you can use creative text images and graphics to promote your product.

06Sweet Memories Cinematic Slideshow
If you want the best template for presenting your memories, marriages, anniversaries, emotions etc then Sweet Memories Cinematic Slideshow is the one you need.
07Motiongray Slideshow Templates
If you want to turn your adventure images and videos into an impressive slide show video then this is a must try template for you.

08Stylish Spinning Columns Slideshow Template
This template is best suited for high-end business projects. Here you will have image placeholders paired with a modern spinning column transition effect to make the slideshow video outstanding.

09Fast Slide Slideshow Video Template
If you want to create a high paced slide video show with various concepts explained in it then go for the Fast Slide Slideshow Video Template.
10Creative Slideshow Template
For the ones who want dynamic, fast-paced animation style and bold typography in their slideshow video this is the best-suited one for them.

Part 2 10 Best Video Slideshow Maker
After knowing the best templates for your slideshow video you, may be curious to know about the slideshow video maker. Here, after a lot of research, we have come up with the list of 10 best slideshow video maker which can make your professional life easy. Check the list
01PhotoStage
PhotoStage by NHC Softwares is one the best online software to create video slide shows online. This tool is specially very helpful in creating personal and commercial presentations.
Key Features - Key features of PhotoStage includes user oriented interface, animations, and music tracks (300 +). It has inbuilt Audio editing tools and a built-in music collection. If you use this software in a paid version then you can unlock its thousands of animation effects and transitions. You can also export your slide show between PC, mobile, Web etc.
Price - PhotoStage PRO $70.
Rating - 4 stars
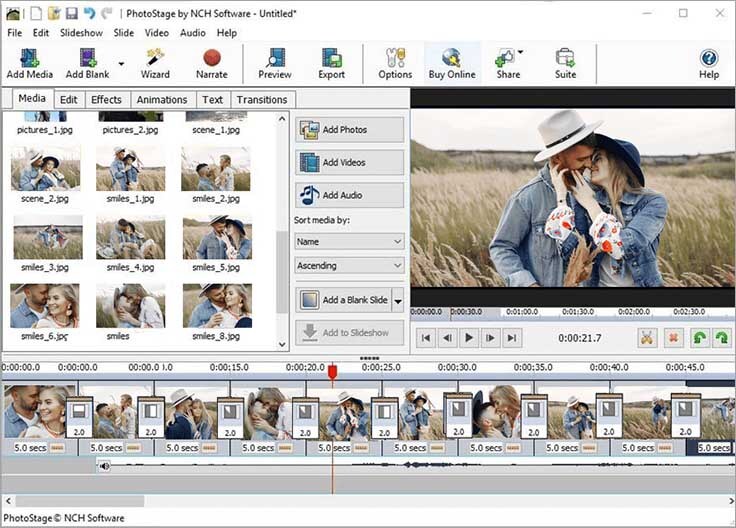
02SmartShow 3D
The next slideshow video maker to feature on our list is SmartShow 3D.
This software is known for its very easy to use interface with power-packed and loaded features.
Key Features - It has more than 200 templates for use of every kind. This software enables you to use 300+ transitions, special effects, 3D collages, and nature effects with animations and graphics. You can add music to your slideshow video from more than 200 music tracks with precise volume adjustment.
Price - Standard version cost $ 39.90 and the Deluxe version costs $ 59.50 (10 days free trial)
Rating - 5 stars
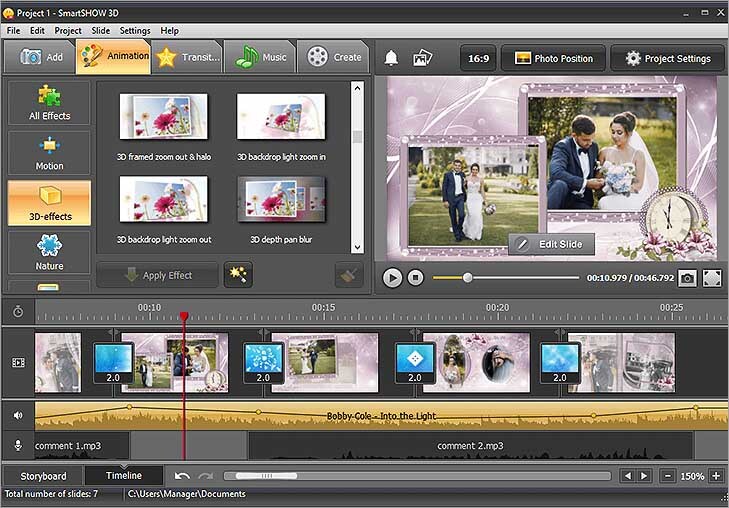
03Magix PhotoStory
If you have a bit of experience in making slideshows then you can take your slideshow making experience to another level using this software. A custom animation module and an integrated photo editing tool of Magix PhotoStory make it stand out in our list.
Key Features - 300+ library of effects coupled with a huge collection of music tracks. 100 + video templates and graphics. This software has Built-in filters for photo enhancement with the picture-in-picture option.
Price - $ 49.99 ( 30 days free trial )
Rating - 4.5 stars
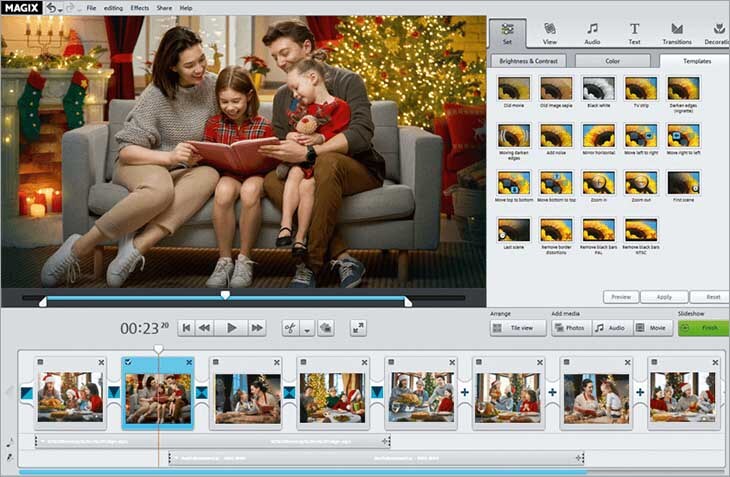
04PTE AV Studio
The best suited online tool to make a slide show video is PTE AV Studio. If you want to create smooth and fluid visual slideshows then try this software once. Here you can combine pictures, videos, and audio files into sleek slideshows and impress your boss and colleagues.
Key Features - PTE AV studio supports 100+ effects and templates. It has the best video, photo, and multitrack sound editing tools among competitors. You can create custom animations and graphics if you want. With a huge collection of masks, filters, and text styles you can create high resolution slideshow videos.
Price - Standard Version costs $ 69 while and Pro version costs $ 139 (30 days free trial)
Rating - 4 stars
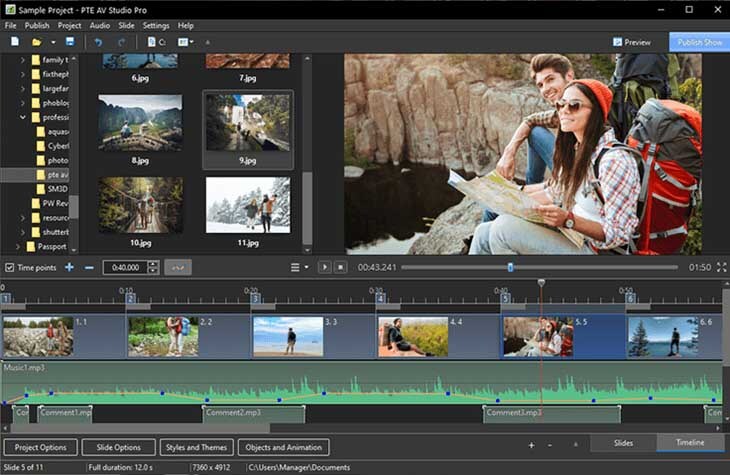
05Adobe Premiere Pro
If you are a regular slideshow user then no doubt you would know about Adobe Premiere Pro. Those who want easy to navigate the software with hundreds of features then try this one. The only draw [back of this software is that it has no inbuilt templates but don’t worry you can download thousands of templates from the internet for free.
Key Features - Animations could be added to slides using keyframes. Efficient video and audio editing and creating tool. Animations and graphics add a cherry to the cake. Advanced photo enhancement and filters to make your photos and slideshows stand out.
Price - $ 239.88 a year (30 days free trial)
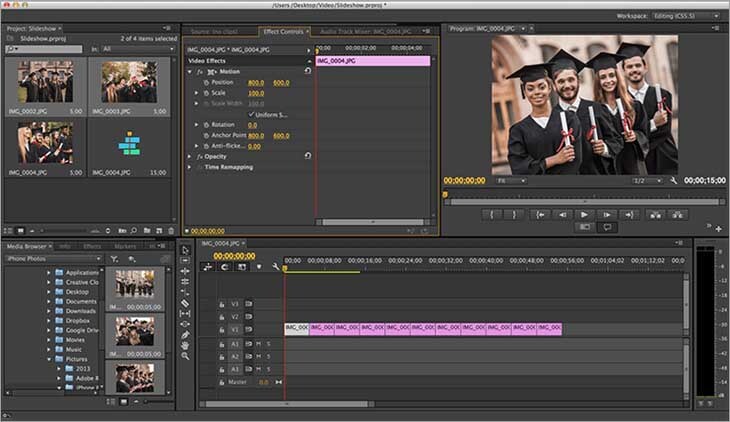
06CyberLink MediaShow
Cyberlink MediaShow is one of the earliest software that came in the field of slideshow video creation. This software enables you to create awesome slideshows, movies, and screensavers. Cyberlink MediaShow has enough features to make eye-catching videos and still it is one of the easiest ones to use. If you aim to create easily simplistic videos then go for this software.
Key Features - Descent collection of transitions with a built-in photo editing module. It is equipped with face recognition and tagging feature. You can integrate social media platforms like Facebook and share to them directly from the software.
Price - $ 49.99 ( 30 days free trial )
Rating - 3.5 stars
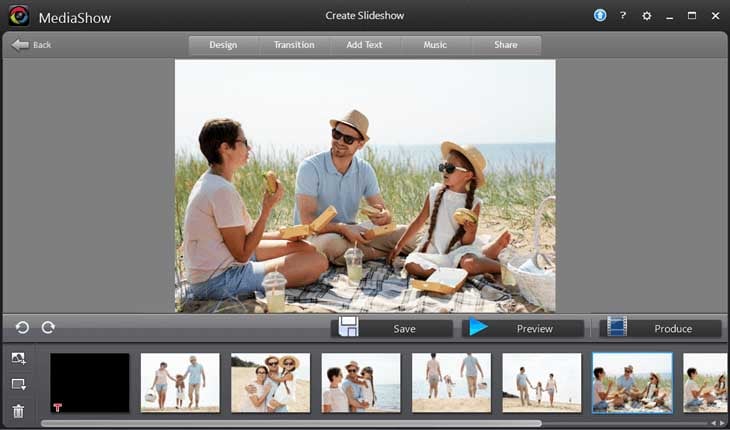
07AquaSoft Slideshow
For users who want to create colourful and dynamic family-themed slide show videos then AquaSoft Slideshow is the software to try. After a review from thousands of users, this software has made a place in our featured list. The user-friendly interface with dozens of eye-catching effects and animated text make it fun to use. It allows you to create colourful, text-filled videos and so on.
Key Features - It is powered packed with more than 200 effects and transitions and hundreds of text options. It supports almost all the formats even the older ones like CDs and DVDs. Smooth and advanced editing tools for a better experience.
Price - Premium costs $ 57.00 while Ultimate costs $ 97.00 ( 30 days free trial version)
Rating - 4 stars
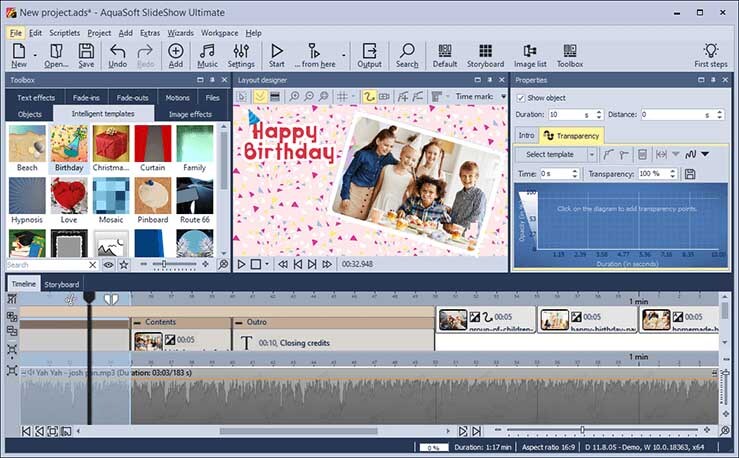
08Kizoa
This software helps you to create slide show videos which can be played on any screen. This is basically an online video creating and editing tool but it provides formats for creating slideshows too. You can use this tool on whatever platform you have like a tablet, TV, smartphone, computer screen etc.
Key Features - Intelligent cropping tool of Kizoa helps you to create and edit world-class finest images for your slideshow video. The created slideshow could be downloaded in various formats like MP4, AVI, MOV, etc. You can directly share the video to online platforms.
Price - Starter $ 29.99, Creator $ 49.99 , Professional $ 99.99, and Business $ 299.99
Rating - 4 stars
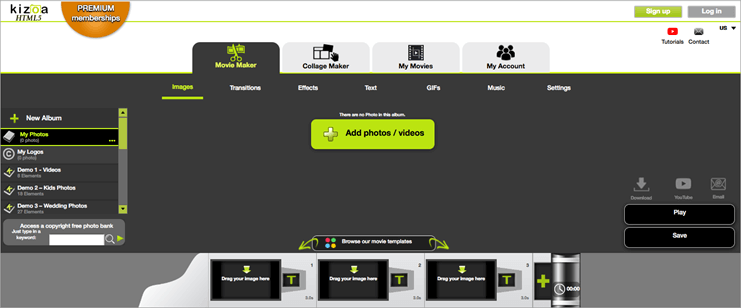
Part 3 5 Easy Steps to Make a Slide Show Video
Guys, now you know the best templates and best slideshow video makers but now the question comes “how to make a slideshow video?”. If you are confused and don’t have any clue about making a slideshow video then just get your google slides and follow the steps explained below.
Step 1: Get Free Screen Recorder
Firstly you have to start with launching Free Screen Recorder. You can use any screen recorder of your choice. Create your account on the screen recorder and get started.
Step 2. Record Your Google Slides
Noe on the screen recorder “Drag and drop” the sides of this box that appears on your screen to fit your slides into it. Select a suitable size for your video ( preferably 720 p).
Now on the left corner of the screen, you will see various controls using them you can perform various functions like start and stop recording, recording to webcam, selecting the size of the video, add audio and narration.
After performing all the functions click on “Record” to record your slides into video.
Step 3. Finishing of Recording
If you are satisfied with the video then click on the blue button to stop recording, and select “done” to save your video. However, if you don’t like it you can restart the process anytime.
Step 4. Editing of the Video
Once you have completed the recording of the video you can edit it according to your requirements. You can add or delete overlays, video sounds, narrations, graphics, green screen etc.
Step 5. Publish and Share your Slideshow video
After completing the editing and creating work click on “Publish”. You can save and publish your video directly on a YouTube channel, or Google Drive folder, or save your video as a file. And you can share it on any social media platform.
Part 4 How to Custom Templates for Google Slides Presentation
Just imagine, how easy would it have been if you could create the templates for your slide show videos. This would have made your professional life so easy. If you too are looking for such an online tool which provides you with the feature for creating custom templates for your slideshow video then you should try Wondershare’s Wondershare Filmora Video Editor Video Editor. Don’t get confused with the name it’s a video editor but has awesome features for creating custom slideshow videos. Following are some of the highlighting features of Filmora Video Editor.
Easy to use for beginners.
User-friendly interface and bunches of editing tools.
Library (royalty-free) containing hundreds of audio options.
Hundreds of templates, transitions, and filters to make your video eye-catching.
Here is a brief tutorial to use Wondershare Filmora Video Editor to create custom templates for your slideshow video.
For Win 7 or later (64-bit)
For macOS 10.12 or later
Step 1. Adding Photos and Videos
Open Filmora and click on the “Import menu”. Here select the photos and videos you want to use and click on “OK” to begin the importing.
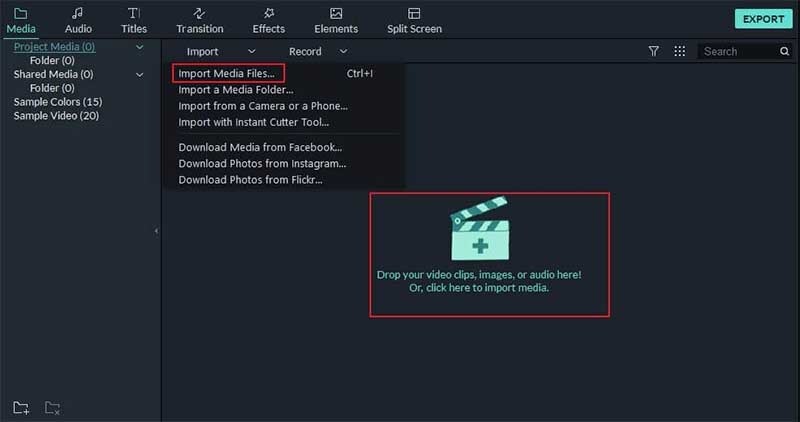
Step 2. Positioning the Media Files on Timeline
Click on “File menu” > “Preferences option” > “Editing tab” > “Photo Placement drop-down menu”. Here you can perform various functions like zooming of images, setting the duration of images, transitions and effects, crop and fitting.
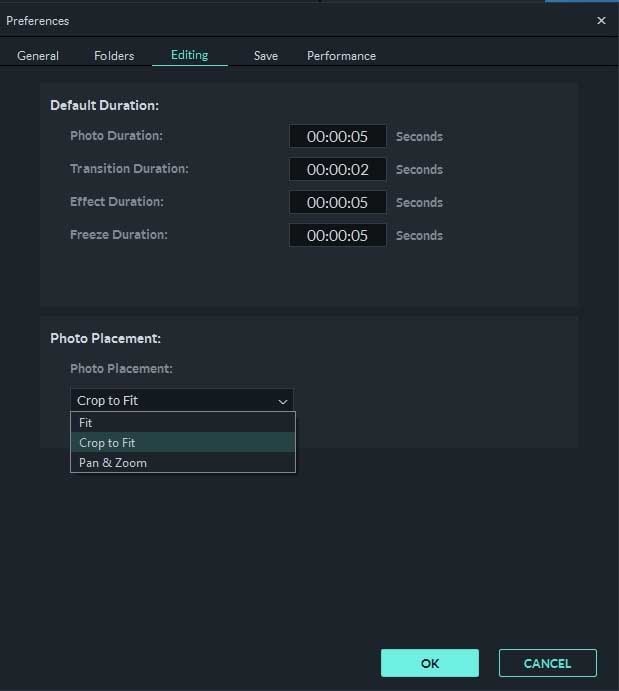
Now if you want to add more images and videos repeat steps 1 and 2.
Step 3. Use the transitions
Use transitions for smooth transitioning from one slide to another. Click on “Transition Setting Window” and set the duration for the transition.
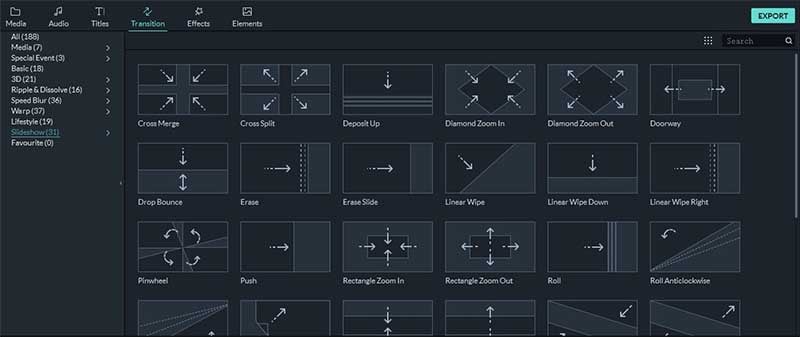
Step 4. Apply Filters and Overlays
Go to “ Effect Tab” and select suitable filters and overlays for your video.
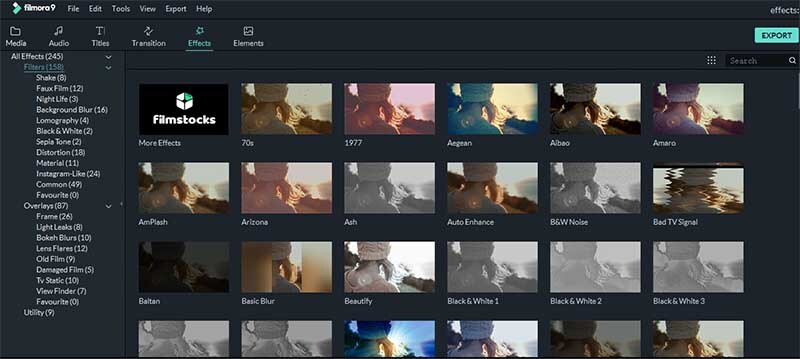
Step 5. Add Motion Graphics Element (Optional Step)
If you wish you can create motion graphics elements for your video. Click on the “ Elements tab” and select the best suited for you.
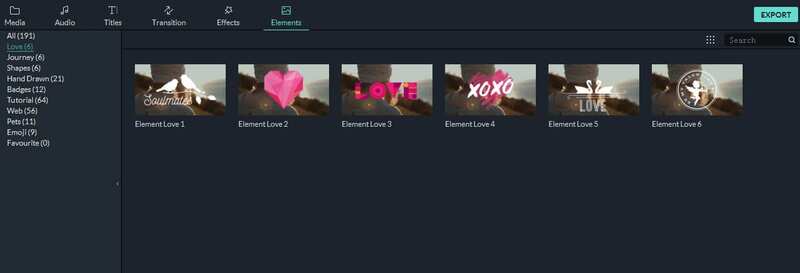
Step 6. Record Voiceover and create a Soundtrack
Go to “Media tab” > “ Record drop-down “ > “ Record Voiceover feature” to record and create soundtracks and voiceovers.
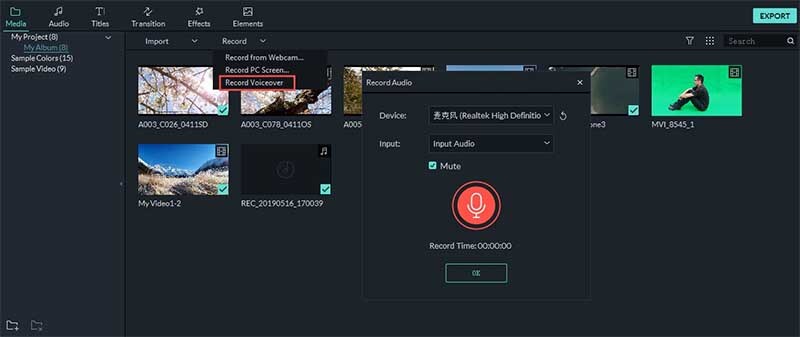
Step 7. Exporting the Slideshow Video
After making all the adjustments in the video click on the “Export” and wait for the Export window to appear on the screen. Now here you can select the output format of the file and the location for exporting your slideshow video.
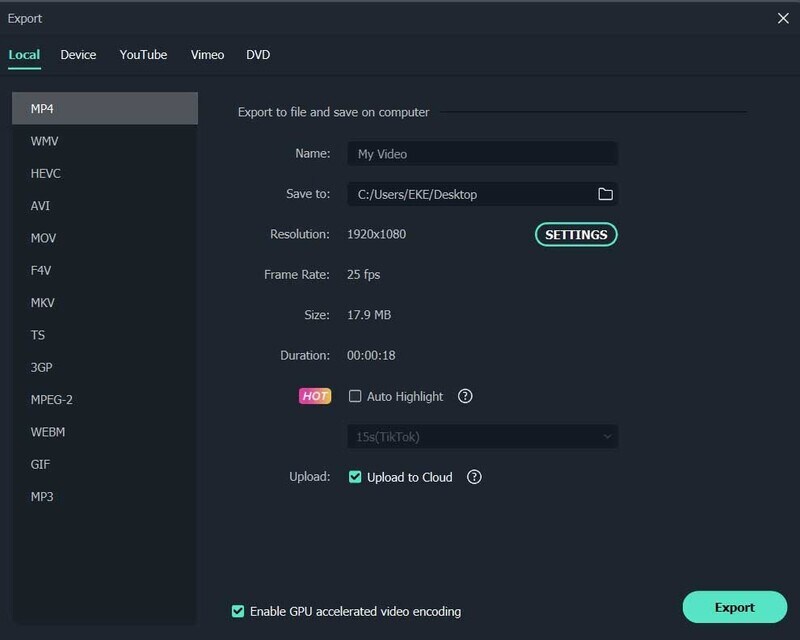
● Ending Thoughts →
● Dear readers, now it’s time, to sum up this article. We hope our efforts have made things simple for you. We have tried to bring you the best online templates available online.
● You can now read our article and learn about the best slideshow video makers available online. You can use any one of them as per your need.
● If you want to create custom templates for your slideshow video, then we recommend to try Wondershare Filmora Video Editor for easy and effective custom template creation.
Dear readers you don’t have to worry a bit, in this article we bring you the best slideshow video maker and easy ways using which you can custom the templates for your presentation in your way.
In this article
01 8 Best Slideshow Video Templates
02 [10 Best Video Slideshow Maker](#Part 2)
03 [5 Easy Steps to Make a Slide Show Video](#Part 3)
04 [How to Custom Templates for Google Slides Presentation](#Part 4)
Part 1 Best Slideshow Video Templates
A slideshow video could be an effective way of presenting your point to your audience. This becomes super easy when you use a good template to create your slide show video. Here are 8 best slideshow video templets which you can give a try
01Instagram Slideshow
This slide show video template is best for creating videos for Instagram and other social media platforms.

02Clean Slideshow Template
This one is suited to create video slide show for family purposes. This template could also be engaged in a clean slideshow presentation for your office.

03Parallax Scrolling Slideshow Template
This is one of the most video templates which you can use for your slide show video. This template has various after-effects which can take your presentations to a different level.

04Modern Tie Slideshow Template
If you are in a business or corporate job then give this slideshow video template a try. With a unique, tiled look and a 3D tile drop-down effect, your videos will impress everyone.

05Minimal Slideshow template
Minimal slide template is best for business presentations or product promotion. Here you can use creative text images and graphics to promote your product.

06Sweet Memories Cinematic Slideshow
If you want the best template for presenting your memories, marriages, anniversaries, emotions etc then Sweet Memories Cinematic Slideshow is the one you need.

07Motiongray Slideshow Templates
If you want to turn your adventure images and videos into an impressive slide show video then this is a must try template for you.

08Stylish Spinning Columns Slideshow Template
This template is best suited for high-end business projects. Here you will have image placeholders paired with a modern spinning column transition effect to make the slideshow video outstanding.

09Fast Slide Slideshow Video Template
If you want to create a high paced slide video show with various concepts explained in it then go for the Fast Slide Slideshow Video Template.

10Creative Slideshow Template
For the ones who want dynamic, fast-paced animation style and bold typography in their slideshow video this is the best-suited one for them.

Part 2 10 Best Video Slideshow Maker
After knowing the best templates for your slideshow video you, may be curious to know about the slideshow video maker. Here, after a lot of research, we have come up with the list of 10 best slideshow video maker which can make your professional life easy. Check the list
01PhotoStage
PhotoStage by NHC Softwares is one the best online software to create video slide shows online. This tool is specially very helpful in creating personal and commercial presentations.
Key Features - Key features of PhotoStage includes user oriented interface, animations, and music tracks (300 +). It has inbuilt Audio editing tools and a built-in music collection. If you use this software in a paid version then you can unlock its thousands of animation effects and transitions. You can also export your slide show between PC, mobile, Web etc.
Price - PhotoStage PRO $70.
Rating - 4 stars

02SmartShow 3D
The next slideshow video maker to feature on our list is SmartShow 3D.
This software is known for its very easy to use interface with power-packed and loaded features.
Key Features - It has more than 200 templates for use of every kind. This software enables you to use 300+ transitions, special effects, 3D collages, and nature effects with animations and graphics. You can add music to your slideshow video from more than 200 music tracks with precise volume adjustment.
Price - Standard version cost $ 39.90 and the Deluxe version costs $ 59.50 (10 days free trial)
Rating - 5 stars

03Magix PhotoStory
If you have a bit of experience in making slideshows then you can take your slideshow making experience to another level using this software. A custom animation module and an integrated photo editing tool of Magix PhotoStory make it stand out in our list.
Key Features - 300+ library of effects coupled with a huge collection of music tracks. 100 + video templates and graphics. This software has Built-in filters for photo enhancement with the picture-in-picture option.
Price - $ 49.99 ( 30 days free trial )
Rating - 4.5 stars

04PTE AV Studio
The best suited online tool to make a slide show video is PTE AV Studio. If you want to create smooth and fluid visual slideshows then try this software once. Here you can combine pictures, videos, and audio files into sleek slideshows and impress your boss and colleagues.
Key Features - PTE AV studio supports 100+ effects and templates. It has the best video, photo, and multitrack sound editing tools among competitors. You can create custom animations and graphics if you want. With a huge collection of masks, filters, and text styles you can create high resolution slideshow videos.
Price - Standard Version costs $ 69 while and Pro version costs $ 139 (30 days free trial)
Rating - 4 stars

05Adobe Premiere Pro
If you are a regular slideshow user then no doubt you would know about Adobe Premiere Pro. Those who want easy to navigate the software with hundreds of features then try this one. The only draw [back of this software is that it has no inbuilt templates but don’t worry you can download thousands of templates from the internet for free.
Key Features - Animations could be added to slides using keyframes. Efficient video and audio editing and creating tool. Animations and graphics add a cherry to the cake. Advanced photo enhancement and filters to make your photos and slideshows stand out.
Price - $ 239.88 a year (30 days free trial)

06CyberLink MediaShow
Cyberlink MediaShow is one of the earliest software that came in the field of slideshow video creation. This software enables you to create awesome slideshows, movies, and screensavers. Cyberlink MediaShow has enough features to make eye-catching videos and still it is one of the easiest ones to use. If you aim to create easily simplistic videos then go for this software.
Key Features - Descent collection of transitions with a built-in photo editing module. It is equipped with face recognition and tagging feature. You can integrate social media platforms like Facebook and share to them directly from the software.
Price - $ 49.99 ( 30 days free trial )
Rating - 3.5 stars

07AquaSoft Slideshow
For users who want to create colourful and dynamic family-themed slide show videos then AquaSoft Slideshow is the software to try. After a review from thousands of users, this software has made a place in our featured list. The user-friendly interface with dozens of eye-catching effects and animated text make it fun to use. It allows you to create colourful, text-filled videos and so on.
Key Features - It is powered packed with more than 200 effects and transitions and hundreds of text options. It supports almost all the formats even the older ones like CDs and DVDs. Smooth and advanced editing tools for a better experience.
Price - Premium costs $ 57.00 while Ultimate costs $ 97.00 ( 30 days free trial version)
Rating - 4 stars

08Kizoa
This software helps you to create slide show videos which can be played on any screen. This is basically an online video creating and editing tool but it provides formats for creating slideshows too. You can use this tool on whatever platform you have like a tablet, TV, smartphone, computer screen etc.
Key Features - Intelligent cropping tool of Kizoa helps you to create and edit world-class finest images for your slideshow video. The created slideshow could be downloaded in various formats like MP4, AVI, MOV, etc. You can directly share the video to online platforms.
Price - Starter $ 29.99, Creator $ 49.99 , Professional $ 99.99, and Business $ 299.99
Rating - 4 stars

Part 3 5 Easy Steps to Make a Slide Show Video
Guys, now you know the best templates and best slideshow video makers but now the question comes “how to make a slideshow video?”. If you are confused and don’t have any clue about making a slideshow video then just get your google slides and follow the steps explained below.
Step 1: Get Free Screen Recorder
Firstly you have to start with launching Free Screen Recorder. You can use any screen recorder of your choice. Create your account on the screen recorder and get started.
Step 2. Record Your Google Slides
Noe on the screen recorder “Drag and drop” the sides of this box that appears on your screen to fit your slides into it. Select a suitable size for your video ( preferably 720 p).
Now on the left corner of the screen, you will see various controls using them you can perform various functions like start and stop recording, recording to webcam, selecting the size of the video, add audio and narration.
After performing all the functions click on “Record” to record your slides into video.
Step 3. Finishing of Recording
If you are satisfied with the video then click on the blue button to stop recording, and select “done” to save your video. However, if you don’t like it you can restart the process anytime.
Step 4. Editing of the Video
Once you have completed the recording of the video you can edit it according to your requirements. You can add or delete overlays, video sounds, narrations, graphics, green screen etc.
Step 5. Publish and Share your Slideshow video
After completing the editing and creating work click on “Publish”. You can save and publish your video directly on a YouTube channel, or Google Drive folder, or save your video as a file. And you can share it on any social media platform.
Part 4 How to Custom Templates for Google Slides Presentation
Just imagine, how easy would it have been if you could create the templates for your slide show videos. This would have made your professional life so easy. If you too are looking for such an online tool which provides you with the feature for creating custom templates for your slideshow video then you should try Wondershare’s Wondershare Filmora Video Editor Video Editor. Don’t get confused with the name it’s a video editor but has awesome features for creating custom slideshow videos. Following are some of the highlighting features of Filmora Video Editor.
Easy to use for beginners.
User-friendly interface and bunches of editing tools.
Library (royalty-free) containing hundreds of audio options.
Hundreds of templates, transitions, and filters to make your video eye-catching.
Here is a brief tutorial to use Wondershare Filmora Video Editor to create custom templates for your slideshow video.
For Win 7 or later (64-bit)
For macOS 10.12 or later
Step 1. Adding Photos and Videos
Open Filmora and click on the “Import menu”. Here select the photos and videos you want to use and click on “OK” to begin the importing.

Step 2. Positioning the Media Files on Timeline
Click on “File menu” > “Preferences option” > “Editing tab” > “Photo Placement drop-down menu”. Here you can perform various functions like zooming of images, setting the duration of images, transitions and effects, crop and fitting.

Now if you want to add more images and videos repeat steps 1 and 2.
Step 3. Use the transitions
Use transitions for smooth transitioning from one slide to another. Click on “Transition Setting Window” and set the duration for the transition.

Step 4. Apply Filters and Overlays
Go to “ Effect Tab” and select suitable filters and overlays for your video.

Step 5. Add Motion Graphics Element (Optional Step)
If you wish you can create motion graphics elements for your video. Click on the “ Elements tab” and select the best suited for you.

Step 6. Record Voiceover and create a Soundtrack
Go to “Media tab” > “ Record drop-down “ > “ Record Voiceover feature” to record and create soundtracks and voiceovers.

Step 7. Exporting the Slideshow Video
After making all the adjustments in the video click on the “Export” and wait for the Export window to appear on the screen. Now here you can select the output format of the file and the location for exporting your slideshow video.

● Ending Thoughts →
● Dear readers, now it’s time, to sum up this article. We hope our efforts have made things simple for you. We have tried to bring you the best online templates available online.
● You can now read our article and learn about the best slideshow video makers available online. You can use any one of them as per your need.
● If you want to create custom templates for your slideshow video, then we recommend to try Wondershare Filmora Video Editor for easy and effective custom template creation.
Dear readers you don’t have to worry a bit, in this article we bring you the best slideshow video maker and easy ways using which you can custom the templates for your presentation in your way.
In this article
01 8 Best Slideshow Video Templates
02 [10 Best Video Slideshow Maker](#Part 2)
03 [5 Easy Steps to Make a Slide Show Video](#Part 3)
04 [How to Custom Templates for Google Slides Presentation](#Part 4)
Part 1 Best Slideshow Video Templates
A slideshow video could be an effective way of presenting your point to your audience. This becomes super easy when you use a good template to create your slide show video. Here are 8 best slideshow video templets which you can give a try
01Instagram Slideshow
This slide show video template is best for creating videos for Instagram and other social media platforms.

02Clean Slideshow Template
This one is suited to create video slide show for family purposes. This template could also be engaged in a clean slideshow presentation for your office.

03Parallax Scrolling Slideshow Template
This is one of the most video templates which you can use for your slide show video. This template has various after-effects which can take your presentations to a different level.

04Modern Tie Slideshow Template
If you are in a business or corporate job then give this slideshow video template a try. With a unique, tiled look and a 3D tile drop-down effect, your videos will impress everyone.

05Minimal Slideshow template
Minimal slide template is best for business presentations or product promotion. Here you can use creative text images and graphics to promote your product.

06Sweet Memories Cinematic Slideshow
If you want the best template for presenting your memories, marriages, anniversaries, emotions etc then Sweet Memories Cinematic Slideshow is the one you need.

07Motiongray Slideshow Templates
If you want to turn your adventure images and videos into an impressive slide show video then this is a must try template for you.

08Stylish Spinning Columns Slideshow Template
This template is best suited for high-end business projects. Here you will have image placeholders paired with a modern spinning column transition effect to make the slideshow video outstanding.

09Fast Slide Slideshow Video Template
If you want to create a high paced slide video show with various concepts explained in it then go for the Fast Slide Slideshow Video Template.

10Creative Slideshow Template
For the ones who want dynamic, fast-paced animation style and bold typography in their slideshow video this is the best-suited one for them.

Part 2 10 Best Video Slideshow Maker
After knowing the best templates for your slideshow video you, may be curious to know about the slideshow video maker. Here, after a lot of research, we have come up with the list of 10 best slideshow video maker which can make your professional life easy. Check the list
01PhotoStage
PhotoStage by NHC Softwares is one the best online software to create video slide shows online. This tool is specially very helpful in creating personal and commercial presentations.
Key Features - Key features of PhotoStage includes user oriented interface, animations, and music tracks (300 +). It has inbuilt Audio editing tools and a built-in music collection. If you use this software in a paid version then you can unlock its thousands of animation effects and transitions. You can also export your slide show between PC, mobile, Web etc.
Price - PhotoStage PRO $70.
Rating - 4 stars

02SmartShow 3D
The next slideshow video maker to feature on our list is SmartShow 3D.
This software is known for its very easy to use interface with power-packed and loaded features.
Key Features - It has more than 200 templates for use of every kind. This software enables you to use 300+ transitions, special effects, 3D collages, and nature effects with animations and graphics. You can add music to your slideshow video from more than 200 music tracks with precise volume adjustment.
Price - Standard version cost $ 39.90 and the Deluxe version costs $ 59.50 (10 days free trial)
Rating - 5 stars

03Magix PhotoStory
If you have a bit of experience in making slideshows then you can take your slideshow making experience to another level using this software. A custom animation module and an integrated photo editing tool of Magix PhotoStory make it stand out in our list.
Key Features - 300+ library of effects coupled with a huge collection of music tracks. 100 + video templates and graphics. This software has Built-in filters for photo enhancement with the picture-in-picture option.
Price - $ 49.99 ( 30 days free trial )
Rating - 4.5 stars

04PTE AV Studio
The best suited online tool to make a slide show video is PTE AV Studio. If you want to create smooth and fluid visual slideshows then try this software once. Here you can combine pictures, videos, and audio files into sleek slideshows and impress your boss and colleagues.
Key Features - PTE AV studio supports 100+ effects and templates. It has the best video, photo, and multitrack sound editing tools among competitors. You can create custom animations and graphics if you want. With a huge collection of masks, filters, and text styles you can create high resolution slideshow videos.
Price - Standard Version costs $ 69 while and Pro version costs $ 139 (30 days free trial)
Rating - 4 stars

05Adobe Premiere Pro
If you are a regular slideshow user then no doubt you would know about Adobe Premiere Pro. Those who want easy to navigate the software with hundreds of features then try this one. The only draw [back of this software is that it has no inbuilt templates but don’t worry you can download thousands of templates from the internet for free.
Key Features - Animations could be added to slides using keyframes. Efficient video and audio editing and creating tool. Animations and graphics add a cherry to the cake. Advanced photo enhancement and filters to make your photos and slideshows stand out.
Price - $ 239.88 a year (30 days free trial)

06CyberLink MediaShow
Cyberlink MediaShow is one of the earliest software that came in the field of slideshow video creation. This software enables you to create awesome slideshows, movies, and screensavers. Cyberlink MediaShow has enough features to make eye-catching videos and still it is one of the easiest ones to use. If you aim to create easily simplistic videos then go for this software.
Key Features - Descent collection of transitions with a built-in photo editing module. It is equipped with face recognition and tagging feature. You can integrate social media platforms like Facebook and share to them directly from the software.
Price - $ 49.99 ( 30 days free trial )
Rating - 3.5 stars

07AquaSoft Slideshow
For users who want to create colourful and dynamic family-themed slide show videos then AquaSoft Slideshow is the software to try. After a review from thousands of users, this software has made a place in our featured list. The user-friendly interface with dozens of eye-catching effects and animated text make it fun to use. It allows you to create colourful, text-filled videos and so on.
Key Features - It is powered packed with more than 200 effects and transitions and hundreds of text options. It supports almost all the formats even the older ones like CDs and DVDs. Smooth and advanced editing tools for a better experience.
Price - Premium costs $ 57.00 while Ultimate costs $ 97.00 ( 30 days free trial version)
Rating - 4 stars

08Kizoa
This software helps you to create slide show videos which can be played on any screen. This is basically an online video creating and editing tool but it provides formats for creating slideshows too. You can use this tool on whatever platform you have like a tablet, TV, smartphone, computer screen etc.
Key Features - Intelligent cropping tool of Kizoa helps you to create and edit world-class finest images for your slideshow video. The created slideshow could be downloaded in various formats like MP4, AVI, MOV, etc. You can directly share the video to online platforms.
Price - Starter $ 29.99, Creator $ 49.99 , Professional $ 99.99, and Business $ 299.99
Rating - 4 stars

Part 3 5 Easy Steps to Make a Slide Show Video
Guys, now you know the best templates and best slideshow video makers but now the question comes “how to make a slideshow video?”. If you are confused and don’t have any clue about making a slideshow video then just get your google slides and follow the steps explained below.
Step 1: Get Free Screen Recorder
Firstly you have to start with launching Free Screen Recorder. You can use any screen recorder of your choice. Create your account on the screen recorder and get started.
Step 2. Record Your Google Slides
Noe on the screen recorder “Drag and drop” the sides of this box that appears on your screen to fit your slides into it. Select a suitable size for your video ( preferably 720 p).
Now on the left corner of the screen, you will see various controls using them you can perform various functions like start and stop recording, recording to webcam, selecting the size of the video, add audio and narration.
After performing all the functions click on “Record” to record your slides into video.
Step 3. Finishing of Recording
If you are satisfied with the video then click on the blue button to stop recording, and select “done” to save your video. However, if you don’t like it you can restart the process anytime.
Step 4. Editing of the Video
Once you have completed the recording of the video you can edit it according to your requirements. You can add or delete overlays, video sounds, narrations, graphics, green screen etc.
Step 5. Publish and Share your Slideshow video
After completing the editing and creating work click on “Publish”. You can save and publish your video directly on a YouTube channel, or Google Drive folder, or save your video as a file. And you can share it on any social media platform.
Part 4 How to Custom Templates for Google Slides Presentation
Just imagine, how easy would it have been if you could create the templates for your slide show videos. This would have made your professional life so easy. If you too are looking for such an online tool which provides you with the feature for creating custom templates for your slideshow video then you should try Wondershare’s Wondershare Filmora Video Editor Video Editor. Don’t get confused with the name it’s a video editor but has awesome features for creating custom slideshow videos. Following are some of the highlighting features of Filmora Video Editor.
Easy to use for beginners.
User-friendly interface and bunches of editing tools.
Library (royalty-free) containing hundreds of audio options.
Hundreds of templates, transitions, and filters to make your video eye-catching.
Here is a brief tutorial to use Wondershare Filmora Video Editor to create custom templates for your slideshow video.
For Win 7 or later (64-bit)
For macOS 10.12 or later
Step 1. Adding Photos and Videos
Open Filmora and click on the “Import menu”. Here select the photos and videos you want to use and click on “OK” to begin the importing.

Step 2. Positioning the Media Files on Timeline
Click on “File menu” > “Preferences option” > “Editing tab” > “Photo Placement drop-down menu”. Here you can perform various functions like zooming of images, setting the duration of images, transitions and effects, crop and fitting.

Now if you want to add more images and videos repeat steps 1 and 2.
Step 3. Use the transitions
Use transitions for smooth transitioning from one slide to another. Click on “Transition Setting Window” and set the duration for the transition.

Step 4. Apply Filters and Overlays
Go to “ Effect Tab” and select suitable filters and overlays for your video.

Step 5. Add Motion Graphics Element (Optional Step)
If you wish you can create motion graphics elements for your video. Click on the “ Elements tab” and select the best suited for you.

Step 6. Record Voiceover and create a Soundtrack
Go to “Media tab” > “ Record drop-down “ > “ Record Voiceover feature” to record and create soundtracks and voiceovers.

Step 7. Exporting the Slideshow Video
After making all the adjustments in the video click on the “Export” and wait for the Export window to appear on the screen. Now here you can select the output format of the file and the location for exporting your slideshow video.

● Ending Thoughts →
● Dear readers, now it’s time, to sum up this article. We hope our efforts have made things simple for you. We have tried to bring you the best online templates available online.
● You can now read our article and learn about the best slideshow video makers available online. You can use any one of them as per your need.
● If you want to create custom templates for your slideshow video, then we recommend to try Wondershare Filmora Video Editor for easy and effective custom template creation.
Dear readers you don’t have to worry a bit, in this article we bring you the best slideshow video maker and easy ways using which you can custom the templates for your presentation in your way.
In this article
01 8 Best Slideshow Video Templates
02 [10 Best Video Slideshow Maker](#Part 2)
03 [5 Easy Steps to Make a Slide Show Video](#Part 3)
04 [How to Custom Templates for Google Slides Presentation](#Part 4)
Part 1 Best Slideshow Video Templates
A slideshow video could be an effective way of presenting your point to your audience. This becomes super easy when you use a good template to create your slide show video. Here are 8 best slideshow video templets which you can give a try
01Instagram Slideshow
This slide show video template is best for creating videos for Instagram and other social media platforms.

02Clean Slideshow Template
This one is suited to create video slide show for family purposes. This template could also be engaged in a clean slideshow presentation for your office.

03Parallax Scrolling Slideshow Template
This is one of the most video templates which you can use for your slide show video. This template has various after-effects which can take your presentations to a different level.

04Modern Tie Slideshow Template
If you are in a business or corporate job then give this slideshow video template a try. With a unique, tiled look and a 3D tile drop-down effect, your videos will impress everyone.

05Minimal Slideshow template
Minimal slide template is best for business presentations or product promotion. Here you can use creative text images and graphics to promote your product.

06Sweet Memories Cinematic Slideshow
If you want the best template for presenting your memories, marriages, anniversaries, emotions etc then Sweet Memories Cinematic Slideshow is the one you need.

07Motiongray Slideshow Templates
If you want to turn your adventure images and videos into an impressive slide show video then this is a must try template for you.

08Stylish Spinning Columns Slideshow Template
This template is best suited for high-end business projects. Here you will have image placeholders paired with a modern spinning column transition effect to make the slideshow video outstanding.

09Fast Slide Slideshow Video Template
If you want to create a high paced slide video show with various concepts explained in it then go for the Fast Slide Slideshow Video Template.

10Creative Slideshow Template
For the ones who want dynamic, fast-paced animation style and bold typography in their slideshow video this is the best-suited one for them.

Part 2 10 Best Video Slideshow Maker
After knowing the best templates for your slideshow video you, may be curious to know about the slideshow video maker. Here, after a lot of research, we have come up with the list of 10 best slideshow video maker which can make your professional life easy. Check the list
01PhotoStage
PhotoStage by NHC Softwares is one the best online software to create video slide shows online. This tool is specially very helpful in creating personal and commercial presentations.
Key Features - Key features of PhotoStage includes user oriented interface, animations, and music tracks (300 +). It has inbuilt Audio editing tools and a built-in music collection. If you use this software in a paid version then you can unlock its thousands of animation effects and transitions. You can also export your slide show between PC, mobile, Web etc.
Price - PhotoStage PRO $70.
Rating - 4 stars

02SmartShow 3D
The next slideshow video maker to feature on our list is SmartShow 3D.
This software is known for its very easy to use interface with power-packed and loaded features.
Key Features - It has more than 200 templates for use of every kind. This software enables you to use 300+ transitions, special effects, 3D collages, and nature effects with animations and graphics. You can add music to your slideshow video from more than 200 music tracks with precise volume adjustment.
Price - Standard version cost $ 39.90 and the Deluxe version costs $ 59.50 (10 days free trial)
Rating - 5 stars

03Magix PhotoStory
If you have a bit of experience in making slideshows then you can take your slideshow making experience to another level using this software. A custom animation module and an integrated photo editing tool of Magix PhotoStory make it stand out in our list.
Key Features - 300+ library of effects coupled with a huge collection of music tracks. 100 + video templates and graphics. This software has Built-in filters for photo enhancement with the picture-in-picture option.
Price - $ 49.99 ( 30 days free trial )
Rating - 4.5 stars

04PTE AV Studio
The best suited online tool to make a slide show video is PTE AV Studio. If you want to create smooth and fluid visual slideshows then try this software once. Here you can combine pictures, videos, and audio files into sleek slideshows and impress your boss and colleagues.
Key Features - PTE AV studio supports 100+ effects and templates. It has the best video, photo, and multitrack sound editing tools among competitors. You can create custom animations and graphics if you want. With a huge collection of masks, filters, and text styles you can create high resolution slideshow videos.
Price - Standard Version costs $ 69 while and Pro version costs $ 139 (30 days free trial)
Rating - 4 stars

05Adobe Premiere Pro
If you are a regular slideshow user then no doubt you would know about Adobe Premiere Pro. Those who want easy to navigate the software with hundreds of features then try this one. The only draw [back of this software is that it has no inbuilt templates but don’t worry you can download thousands of templates from the internet for free.
Key Features - Animations could be added to slides using keyframes. Efficient video and audio editing and creating tool. Animations and graphics add a cherry to the cake. Advanced photo enhancement and filters to make your photos and slideshows stand out.
Price - $ 239.88 a year (30 days free trial)

06CyberLink MediaShow
Cyberlink MediaShow is one of the earliest software that came in the field of slideshow video creation. This software enables you to create awesome slideshows, movies, and screensavers. Cyberlink MediaShow has enough features to make eye-catching videos and still it is one of the easiest ones to use. If you aim to create easily simplistic videos then go for this software.
Key Features - Descent collection of transitions with a built-in photo editing module. It is equipped with face recognition and tagging feature. You can integrate social media platforms like Facebook and share to them directly from the software.
Price - $ 49.99 ( 30 days free trial )
Rating - 3.5 stars

07AquaSoft Slideshow
For users who want to create colourful and dynamic family-themed slide show videos then AquaSoft Slideshow is the software to try. After a review from thousands of users, this software has made a place in our featured list. The user-friendly interface with dozens of eye-catching effects and animated text make it fun to use. It allows you to create colourful, text-filled videos and so on.
Key Features - It is powered packed with more than 200 effects and transitions and hundreds of text options. It supports almost all the formats even the older ones like CDs and DVDs. Smooth and advanced editing tools for a better experience.
Price - Premium costs $ 57.00 while Ultimate costs $ 97.00 ( 30 days free trial version)
Rating - 4 stars

08Kizoa
This software helps you to create slide show videos which can be played on any screen. This is basically an online video creating and editing tool but it provides formats for creating slideshows too. You can use this tool on whatever platform you have like a tablet, TV, smartphone, computer screen etc.
Key Features - Intelligent cropping tool of Kizoa helps you to create and edit world-class finest images for your slideshow video. The created slideshow could be downloaded in various formats like MP4, AVI, MOV, etc. You can directly share the video to online platforms.
Price - Starter $ 29.99, Creator $ 49.99 , Professional $ 99.99, and Business $ 299.99
Rating - 4 stars

Part 3 5 Easy Steps to Make a Slide Show Video
Guys, now you know the best templates and best slideshow video makers but now the question comes “how to make a slideshow video?”. If you are confused and don’t have any clue about making a slideshow video then just get your google slides and follow the steps explained below.
Step 1: Get Free Screen Recorder
Firstly you have to start with launching Free Screen Recorder. You can use any screen recorder of your choice. Create your account on the screen recorder and get started.
Step 2. Record Your Google Slides
Noe on the screen recorder “Drag and drop” the sides of this box that appears on your screen to fit your slides into it. Select a suitable size for your video ( preferably 720 p).
Now on the left corner of the screen, you will see various controls using them you can perform various functions like start and stop recording, recording to webcam, selecting the size of the video, add audio and narration.
After performing all the functions click on “Record” to record your slides into video.
Step 3. Finishing of Recording
If you are satisfied with the video then click on the blue button to stop recording, and select “done” to save your video. However, if you don’t like it you can restart the process anytime.
Step 4. Editing of the Video
Once you have completed the recording of the video you can edit it according to your requirements. You can add or delete overlays, video sounds, narrations, graphics, green screen etc.
Step 5. Publish and Share your Slideshow video
After completing the editing and creating work click on “Publish”. You can save and publish your video directly on a YouTube channel, or Google Drive folder, or save your video as a file. And you can share it on any social media platform.
Part 4 How to Custom Templates for Google Slides Presentation
Just imagine, how easy would it have been if you could create the templates for your slide show videos. This would have made your professional life so easy. If you too are looking for such an online tool which provides you with the feature for creating custom templates for your slideshow video then you should try Wondershare’s Wondershare Filmora Video Editor Video Editor. Don’t get confused with the name it’s a video editor but has awesome features for creating custom slideshow videos. Following are some of the highlighting features of Filmora Video Editor.
Easy to use for beginners.
User-friendly interface and bunches of editing tools.
Library (royalty-free) containing hundreds of audio options.
Hundreds of templates, transitions, and filters to make your video eye-catching.
Here is a brief tutorial to use Wondershare Filmora Video Editor to create custom templates for your slideshow video.
For Win 7 or later (64-bit)
For macOS 10.12 or later
Step 1. Adding Photos and Videos
Open Filmora and click on the “Import menu”. Here select the photos and videos you want to use and click on “OK” to begin the importing.

Step 2. Positioning the Media Files on Timeline
Click on “File menu” > “Preferences option” > “Editing tab” > “Photo Placement drop-down menu”. Here you can perform various functions like zooming of images, setting the duration of images, transitions and effects, crop and fitting.

Now if you want to add more images and videos repeat steps 1 and 2.
Step 3. Use the transitions
Use transitions for smooth transitioning from one slide to another. Click on “Transition Setting Window” and set the duration for the transition.

Step 4. Apply Filters and Overlays
Go to “ Effect Tab” and select suitable filters and overlays for your video.

Step 5. Add Motion Graphics Element (Optional Step)
If you wish you can create motion graphics elements for your video. Click on the “ Elements tab” and select the best suited for you.

Step 6. Record Voiceover and create a Soundtrack
Go to “Media tab” > “ Record drop-down “ > “ Record Voiceover feature” to record and create soundtracks and voiceovers.

Step 7. Exporting the Slideshow Video
After making all the adjustments in the video click on the “Export” and wait for the Export window to appear on the screen. Now here you can select the output format of the file and the location for exporting your slideshow video.

● Ending Thoughts →
● Dear readers, now it’s time, to sum up this article. We hope our efforts have made things simple for you. We have tried to bring you the best online templates available online.
● You can now read our article and learn about the best slideshow video makers available online. You can use any one of them as per your need.
● If you want to create custom templates for your slideshow video, then we recommend to try Wondershare Filmora Video Editor for easy and effective custom template creation.
Also read:
- Updated In 2024, 15 Best Vloggers That You Should Follow for Travel
- Updated Best Ways to Add Photos to Tik Tok Video
- Updated 2024 Approved Legend Intro Maker – Create Intro Video with Ease
- Updated Find The Best Free Canon LUTs for 2024
- Updated 2024 Approved 15 Best Free Cinematic LUTs for Your Film
- Best 10 Crazy-Cool Examples of AR Video
- In 2024, Best Guide of 8 Photo Collage Apps for PC
- Updated Are You Looking for Top AI Video Recognition Software to Choose From? Please Stay on This Article as We Look at the Current Top AI-Based Video Tools
- 2024 Approved How to Convert Images Into Video - Kapwing Tutorial
- How to Create Discord Emoji GIF for 2024
- In 2024, How to Start a Vlog
- New In 2024, How to Resize FLV Videos EfficientlyWindows, Mac, Android, iPhone & Online
- The Article Shall Offer an Overview to Create a Promising Sports Intro and Edit a YouTube Outro for a Sports Channel. There Will Also Be Three Recommended Apps to Download Background Music for Exercise for 2024
- In 2024, How to Spruce Up Your Telegram Profile
- In 2024, Now, You Can Also Apply the Stranger Things Upside Down Effect to Your Video! This Effect Combines Camera Tricks and Video Editing Within Filmora to Transition From the Normal World Into the Upside Down
- How to Put Emoji on Mac That Take Less Than 10 Mins
- 2024 Approved An Ultimate Guide on the Significance of Music in Videos and How to Choose the Right Music for Your Videos with Wondershare Filmora
- Updated Do You Know About some Efficient Slow-Motion Video Editors? Read This Article to Find Out the Best Slow-Motion Video Editing Tools that You Can Try
- In 2024, While Fiddling with Solutions to Complement the Ordinary Text Messages with Graphic Elements, People Also Ask About Ways to Add Emoji to Photo Online. Stay Here to Get the Best Answers
- Updated How to Make a Gaming Montage - Guide & Tips for 2024
- Updated In 2024, 4 Ways to Add White Border to Video on Mobile and Desktop
- Updated 2024 Approved 6 Instant Mp4 to GIF Online Tools for You
- New In 2024, HOW to Add Fade to Black on Premiere Pro
- How to Fix Android.Process.Media Has Stopped on Honor Magic 5 Pro | Dr.fone
- How to Stop Google Chrome from Tracking Your Location On Motorola Moto E13? | Dr.fone
- Ultimate Guide to Free PPTP VPN For Beginners On Realme GT 5 Pro | Dr.fone
- In 2024, How to Delete iCloud Account From Apple iPhone SE without Password?
- In 2024, How to Transfer Contacts from Vivo V29 To Phone | Dr.fone
- Quickly Remove Google FRP Lock on Meizu 21
- In 2024, How to Unlock Apple ID On your Apple iPhone 15 Pro Max without Security Questions?
- Can I Remove the Apple Watch Activation Lock By iPhone 7 Plus without the Previous Owner?
- In 2024, Will Pokémon Go Ban the Account if You Use PGSharp On Tecno Pop 8 | Dr.fone
- Android Safe Mode - How to Turn off Safe Mode on Nokia C12 Pro? | Dr.fone
- 2024 Approved DP Animation Maker Tutorial for Finding The Best Animated Profile Picture Maker
- Easy steps to recover deleted videos from Vivo S17
- Where Is the Best Place to Catch Dratini On Apple iPhone 14 | Dr.fone
- Easy steps to recover deleted data from Nokia C300
- How to Transfer Data from Samsung Galaxy M14 4G to Any iOS Devices | Dr.fone
- In 2024, Forgot Pattern Lock? Heres How You Can Unlock Xiaomi 13 Ultra Pattern Lock Screen
- What is Fake GPS Location Pro and Is It Good On Honor 100? | Dr.fone
- How to Change Credit Card on Your iPhone 12 mini Apple ID and Apple Pay
- How to Share Location in Messenger On Realme V30T? | Dr.fone
- The way to recover deleted pictures on Motorola Moto G14 without backup.
- Forgot Pattern Lock? Heres How You Can Unlock Poco X5 Pro Pattern Lock Screen
- Title: Video in Text Cinematic Intro【Filmora Tutorial】
- Author: Chloe
- Created at : 2024-05-20 03:37:31
- Updated at : 2024-05-21 03:37:31
- Link: https://ai-editing-video.techidaily.com/video-in-text-cinematic-introfilmora-tutorial/
- License: This work is licensed under CC BY-NC-SA 4.0.

