
VSCO Slow Motion

VSCO Slow Motion
While the VSCO app is most commonly used for its filters and editing capabilities. With its built-in slow-motion feature, you can create beautiful, ethereal slow-mo videos that are perfect for Instagram and other social media platforms.
Slow-motion videos have been gaining popularity on social media in recent years. They also have an aesthetic appeal that can be quite captivating. With the VSCO app, it’s easy to create stunning slow-mo videos in no time.
In this article, we’ll explore the VSCO app, its key features, and how to create VSCO smooth slow-mo videos. We’ll also discuss the best desktop alternative to help you have a clear understanding.
Part 1. What Is VSCO App?
VSCO is a photography app with a focus on beautifully edited photos as well as videos. The app offers various editing tools, filters, and presets to help you create stunning images. It is also a social platform, allowing you to share your photos and videos with the VSCO community and connect with other creative users.

Joel Flory and Greg Lutze founded the app in 2011 and first launched it in 2012 as an iOS-only app but soon expanded to Android in 2013. Today, VSCO is one of the most popular photography and videography apps, with over 20 million weekly and 40 million monthly active users.
VSCO app offers some basic image editing features for free, while advanced features are available for monthly and yearly subscriptions with seven days free trial period.
VSCO smooth slow-motion app is popular among amateur photographers because of its range of filters and slow-mo features. However, the app also offers basic image adjustments such as exposure, contrast, color saturation, highlight, and shadow adjustments. It is also designed to share photos to its corresponding social network - VSCO Space. You can add captions and hashtags and choose whether to include your location.
![]()
Note: You can download the VSCO slow motion Android app from the Google Play Storewhile the iOS version of the app is available on the App Store.
Part 2. How To Make Smooth Slow Motion Video In VSCO?
To make a smooth slow-motion video in the VSCO app, do the following steps in sequence:
Step1Download VSCO slow motion app on your device and launch it. You’ll find two options on the Home screen of the app: Take a photo and import. Click “Import” and select your video clip to edit.

Step2On the editing timeline, click “Tools” > “Volume” and drag the slider to turn off the background music.

Step3Now, click “Trim” if you want to get a specific part of a video and edit it. Afterward, click the “Speed” option.

Step4Drag the slider to the left to adjust the slow-mo speed. Make sure to click the “Smooth” option above the slider, so your video does not have any jerks or glitches.
Step5Now, to export your video, click “Next” and turn on the Save option. You can also toggle the Post to VSCO option to post your video to VSCO space and click Save to start the rendering process.

Part 3. Other Key Features Of VSCO
Here are some key features of the VSCO app:
Sharing Platform - VSCO Spaces
VSCO users and creators can collaborate by sharing their creations through Spaces. Users can post comments with joy, constructive criticism, or feedback for improvement, just like other social apps. By utilizing the same tools as others and looking at their work, you will be more inspired.

Instagram Alternative
VSCO free slow-motion app is the best alternative to Instagram. What sets it apart is that it doesn’t show like counts or allow comments. This can be appealing to users who get anxious about negative feedback. Another strength of VSCO is its simple design, which makes the app easy and enjoyable to use.
Shot And Adjust Pictures
VSCO Photo Editor is a powerful app that gives you the ability to shoot pictures and later adjust them to your liking. With VSCO, you can fine-tune your photos to get the perfect shot every time. You can also save your settings as presets so that you can apply them to future pictures.
A Wide Range Of Filters
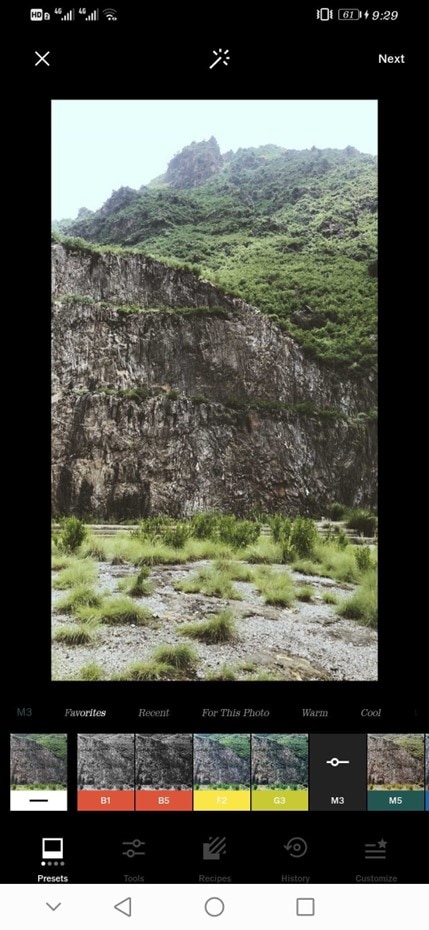
VSCO offers a wide range of basic and advanced filters, making it easy for you to find the perfect one for your photo. Moreover, you can customize your filters to create the perfect look for your photo.
A Variety Of Tools
VSCO has a variety of tools, such as exposure, contrast, and saturation, which you can use to edit your photos.

Part 4. How To Make A Slow-Motion Video On Desktop Alternative?
Desktop video editing apps are better than mobile apps when editing slow-mo or ramping features. For one, the processing power of desktop computers is generally much higher than mobile devices. This means that desktop apps can handle more complex tasks without running into performance issues.
Another advantage of desktop video editing apps is that they usually come with a more robust set of features than their mobile counterparts. This is because app developers typically have more room to add features on desktop than they do on mobile.
Below are some simple and easy steps on how to use the speed ramping tool in Filmora :
Step1To begin, open Filmora on your PC and import the video you want to edit.
Step2Drag it into the timeline once the video is imported.
Step3Next, select the “Speed” option from the Tools option in the toolbar and click “Speed Ramping.”

Step4Select the point in the video where you want the speed ramp to begin. Now, use the slider to adjust the speed of your video. You can make your video faster or slower.

Step5Finally, click “Export” to save your video on your PC.
Conclusion
In this article, we’ve explored how to create VSCO smooth slow-mo videos with simple and easy-to-follow instructions. We’ve also discussed what the app is about and its key features. In the end, we provided a brief guide on creating slow-motion videos on a desktop using Filmora software.
Hopefully, this guide helped resolve your queries, and you can now create stunning slow-motion videos without much effort.
Free Download For Win 7 or later(64-bit)
Free Download For macOS 10.14 or later
To make a smooth slow-motion video in the VSCO app, do the following steps in sequence:Step1Download VSCO slow motion app on your device and launch it. You’ll find two options on the Home screen of the app: Take a photo and import. Click “Import” and select your video clip to edit.

Step2On the editing timeline, click “Tools” > “Volume” and drag the slider to turn off the background music.

Step3Now, click “Trim” if you want to get a specific part of a video and edit it. Afterward, click the “Speed” option.

Step4Drag the slider to the left to adjust the slow-mo speed. Make sure to click the “Smooth” option above the slider, so your video does not have any jerks or glitches.
Step5Now, to export your video, click “Next” and turn on the Save option. You can also toggle the Post to VSCO option to post your video to VSCO space and click Save to start the rendering process.

Part 3. Other Key Features Of VSCO
Here are some key features of the VSCO app:
Sharing Platform - VSCO Spaces
VSCO users and creators can collaborate by sharing their creations through Spaces. Users can post comments with joy, constructive criticism, or feedback for improvement, just like other social apps. By utilizing the same tools as others and looking at their work, you will be more inspired.

Instagram Alternative
VSCO free slow-motion app is the best alternative to Instagram. What sets it apart is that it doesn’t show like counts or allow comments. This can be appealing to users who get anxious about negative feedback. Another strength of VSCO is its simple design, which makes the app easy and enjoyable to use.
Shot And Adjust Pictures
VSCO Photo Editor is a powerful app that gives you the ability to shoot pictures and later adjust them to your liking. With VSCO, you can fine-tune your photos to get the perfect shot every time. You can also save your settings as presets so that you can apply them to future pictures.
A Wide Range Of Filters
VSCO offers a wide range of basic and advanced filters, making it easy for you to find the perfect one for your photo. Moreover, you can customize your filters to create the perfect look for your photo.

A Variety Of Tools
VSCO has a variety of tools, such as exposure, contrast, and saturation, which you can use to edit your photos.

Part 4. How To Make A Slow-Motion Video On Desktop Alternative?
Desktop video editing apps are better than mobile apps when editing slow-mo or ramping features. For one, the processing power of desktop computers is generally much higher than mobile devices. This means that desktop apps can handle more complex tasks without running into performance issues.
Another advantage of desktop video editing apps is that they usually come with a more robust set of features than their mobile counterparts. This is because app developers typically have more room to add features on desktop than they do on mobile.
Below are some simple and easy steps on how to use the speed ramping tool in Filmora :
Step1To begin, open Filmora on your PC and import the video you want to edit.
Step2Drag it into the timeline once the video is imported.
Step3Next, select the “Speed” option from the Tools option in the toolbar and click “Speed Ramping.”

Step4Select the point in the video where you want the speed ramp to begin. Now, use the slider to adjust the speed of your video. You can make your video faster or slower.

Step5Finally, click “Export” to save your video on your PC.
Conclusion
In this article, we’ve explored how to create VSCO smooth slow-mo videos with simple and easy-to-follow instructions. We’ve also discussed what the app is about and its key features. In the end, we provided a brief guide on creating slow-motion videos on a desktop using Filmora software.
Hopefully, this guide helped resolve your queries, and you can now create stunning slow-motion videos without much effort.
Free Download For Win 7 or later(64-bit)
Free Download For macOS 10.14 or later
Something About Skin Care Vlog Ideas
One of the best kinds of video ideas for all the beauty gurus that they can make and upload on their YouTube Channel is the Skin Care. Reviewing products such as cosmetics, skin care and hair care products or any kind of lifestyle grooming products can be really beneficial for your viewers. Product advertisement is all over there and people are really confused and they wonder whether it is worthy enough or not if it is effective or not. That is when they take the help of internet and video to find their answer.
In this Article I’ll share to you some of the Skin Care vlog ideas for you to start doing a skin care review on your YouTube channel. But before that I’ll share with you how important is skin care?
1. How Important is Skin Care?
Good skin care is important for the following reasons: It helps your skin stay in good condition
You’re shedding skin cells throughout the day, so it’s important to keep your skin glowing and in good condition. A skin care routine is not just to help you look good, it’s essential for your skin’s health
That is why most people now a days are looking for a video or a vlog about skin care.
Here are some ideas to make for Skin Care Vlogs
- Daily Skin Care Routine Vlogs
- Skin Care Product Reviewing Vlogs
- Skin Care Unboxing Vlogs
- Empty Skin Care Vlogs
- Skin Care recommendation Vlogs
2. Daily Skin Care Routine Vlogs
This vlog can give your viewers an information on what skin care you use daily. Here you can share how you use it step by step and you can also share what products you are using for them to have an idea.
This may share to your viewers how important a daily skin care to their skin because an effective skin care may help prevent acne, treat wrinkles and help keep skin looking best.
The goal of sharing your skin care routine is to inform your viewer or subscriber the importance of taking care of your skin daily and also the good product you may use.

Daily Skin Care Routine Vlogs
3. Skin Care Product Review Vlogs
This vlog will give your viewers more knowledge about the products.
Now a days most people get all the information they want in watching YouTube videos. People often watch skin care reviews on YouTube first before they decide to buy. So, you must clearly provide a correct and honest information about the product. In reviewing a product especially skin care, you need to help the viewers understand all the information contained in the products, you must be very specific when you explaining.

Skin Care Product Review Vlogs
4. Skin Care Unboxing Vlogs
For those unfamiliar with the format, unboxing videos are when YouTubers share the unpacking of a special products. Unboxing videos are one of several formats native to YouTube that have grown up along with the YouTube generation. People wanted to share their enthusiasm for their new purchases such as beauty products or skin care products. Influencer or content creator unpacks new consumer products on camera while discussing the respective product’s features, branding, packaging, and other relevant details.
From this Vlog your viewers will have an idea what products look like or what brand of products they will buy.
5. Empty Skin Care Vlogs
I have personally watch other content creator doing this kind of vlog and for me it helps viewers to know more about beauty guru favorites skin care or their thoughts after using this kind of products.
In this vlog you will share to your audience why did you run out of products? how is the product to you, your experience while using the products, is it worth it for them to buy and if given a chance will you buy this product again? Because it is also important for them to know if the products are ok with your skin, especially sometimes the brand owner is watching the vlogs for them to have an idea about your thoughts of their products.
6. Skin Care Recommendation Vlogs
As a skin care vlogger, I often make this kind of vlog, I really enjoy doing this vlog specially when the products are effective to me, I really excited to share this information to my viewers.
Here in this vlog, you can show or recommend products that have been effective for you. Just explain in every detail how you used it and why it was effective for you. Also don’t forget your proofs of using the products, specially show them the before and after photos.

Skin Care Recommendation Vlogs
7. Choosing a Video Editing Software for You
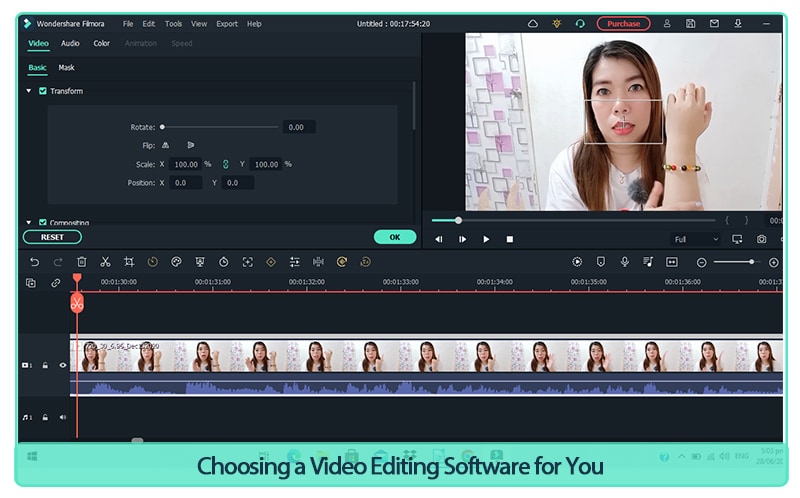
If you’re looking for editor software that can help your skin care vlogs stand out from your competition Wondershare Filmora is one the easy-to-use editing software, a beginner in video editing can easily create a stunning and creative video.
Wondershare Filmora Video Editor has action camera tools that can fix any problem with camera, share and add effects like slow motion and reverse. These tools can really help with product review vlogs especially when doing skin care reviews.
Free Download For Win 7 or later(64-bit)
Free Download For macOS 10.14 or later
Choosing a Video Editing Software for You
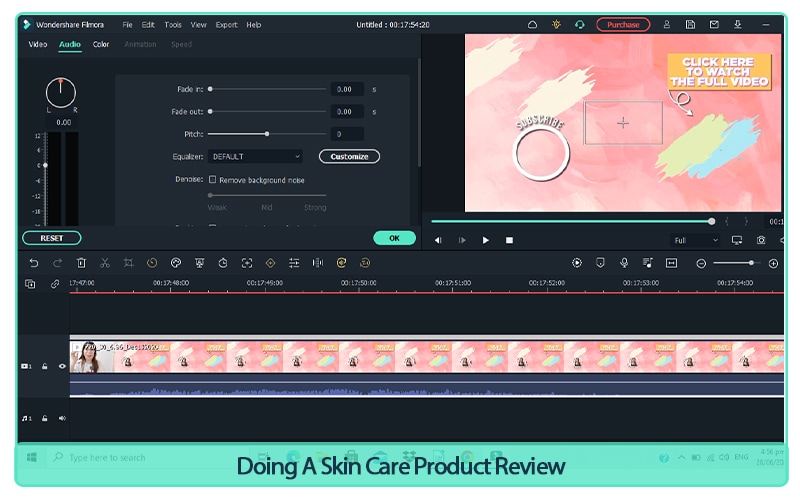
It allows noise cancellation in the background of your audio so that your viewers can better understand what you are saying about the products. Doing a skin care product review is in need a clear audio because viewers focus on what your thoughts or opinion about the product for them to have some ideas.
Doing A Skin Care Product Review
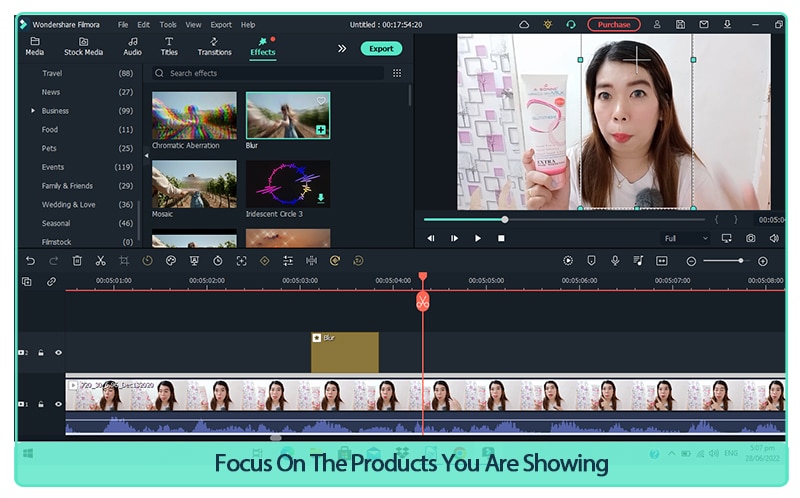
Filmora has the ability to blur video, which you can use especially when you display products in the viewer, you need to blur the background to focus on the products you are showing.
Focus On The Products You Are Showing
Filmora provide the user an extraordinary feature to edit and export videos up to a resolution of 4k.
Wrap Up
- When doing any skin care vlogs, don’t forget to advice your viewers to always do a skin test before using new products, because maybe this product is effective for me and not for you, so make it a habit to do a skin test first.
- Hope this skin care vlog ideas will help you to start your own skin care vlogs or to have an idea what content you may do to start a vlogging career.
Free Download For macOS 10.14 or later

Choosing a Video Editing Software for You
It allows noise cancellation in the background of your audio so that your viewers can better understand what you are saying about the products. Doing a skin care product review is in need a clear audio because viewers focus on what your thoughts or opinion about the product for them to have some ideas.

Doing A Skin Care Product Review
Filmora has the ability to blur video, which you can use especially when you display products in the viewer, you need to blur the background to focus on the products you are showing.

Focus On The Products You Are Showing
Filmora provide the user an extraordinary feature to edit and export videos up to a resolution of 4k.
Wrap Up
- When doing any skin care vlogs, don’t forget to advice your viewers to always do a skin test before using new products, because maybe this product is effective for me and not for you, so make it a habit to do a skin test first.
- Hope this skin care vlog ideas will help you to start your own skin care vlogs or to have an idea what content you may do to start a vlogging career.
Top 5 Free Online Video Filter Editors
In the era of digital storytelling, everyone desires to make their content stand out. Applying video filters is a surefire way to enhance your videos’ mood, style, and overall appeal.
With many video filter editors available online, choosing the right one can be daunting. Worry not, for we’ve scoured the internet to bring you the top 5 free online video filter editors to jazz up your content. Let’s dive in!
Part 1: Top 5 Free Online Video Filter Editors
Veed.io

Veed.io is more than just an online video editor. This platform is designed with the user in mind, ensuring a hassle-free experience as they navigate its diverse video editing tools. One of the standout features is, undoubtedly, its video filter capabilities.
Is the product free?
Veed.io offers a robust free version, letting creators jump in without any initial investment. However, for those seeking more advanced features and capabilities, Veed.io has premium plans available, starting at a competitive price of $12/month.
Free trial for video filter function?
One of the commendable aspects of Veed.io is its commitment to transparency. Users can fully experience the video filter function without spending a dime, ensuring they know exactly what they’re getting before opting for paid plans.
Advantages: Even those new to video editing can quickly find their way around. The platform’s design is clean and straightforward and prioritizes user experience. Videos are processed promptly, ensuring you get your polished content out quickly.
Disadvantages: The free version watermarks the videos.
Clideo

Clideo is a multifaceted online video editing solution that caters to a broad spectrum of editing needs.
Whether you’re looking to merge clips, resize videos for various platforms, or infuse creativity with video filters, Clideo offers a comprehensive toolkit.
Is the product free?
It has a free version with basic functionalities. Paid plans start at $9/month.
Free trial for video filter function?
Yes, the filter function can be tested without any charges.
Advantages : Simple to use, no software installation required.
Disadvantages : Limited filters in the free version.
Flixier

Flixier emerges as a dynamic online video editing platform, aiming to bridge the gap between advanced editing tools and user accessibility.
Catering to novice editors and seasoned professionals, it offers tools that effortlessly combine efficiency with creativity.
Is the product free?
Flixier provides a free tier. For advanced features, paid plans start at $10/month.
Free trial for video filter function?
The video filter function is available in the free tier.
Advantages: Collaborative editing features quick export times.
Disadvantages: Slightly steeper learning curve for beginners.
Flexclip

Flexclip positions itself as a holistic online video editor designed with both beginners and advanced users in mind.
Whether you’re crafting a short promotional clip, a personal vlog, or an extensive documentary, Flexclip provides the tools and templates to make the process seamless.
Is the product free?
There’s a free version available. Upgraded plans are priced from $4.99/month.
Free trial for video filter function?
Absolutely, users can enjoy filter functions for free.
Advantages: Rich video templates and intuitive design.
Disadvantages: Limited advanced editing options in the free version.
Kapwing

KAPWING has swiftly carved its niche in the world of online video editing, offering a unique blend of simplicity and versatility. Beyond just a video editor, KAPWING is a creative toolkit that empowers users to bring their video visions to life with ease.
Is the product free?
Kapwing provides a basic free version. For premium features, plans start at $20/month.
Free trial for video filter function?
The video filter function is accessible in the free version.
Advantages: No watermarks, user-friendly, wide array of tools.
Disadvantages: Some advanced filters are limited to premium users.
Part 2: Best Alternatives
When it comes to alternative video filter editors, Filmora undoubtedly stands out. Although it’s not exclusively an online tool, Filmora has firmly established its reputation in the digital video editing community, and here’s why:
- Extensive Library of Video Filters : One of Filmora’s shining points is its rich, extensive library of video filters. From adding a touch of nostalgia with sepia tones to creating blockbuster cinematic vibes with dramatic contrasts, Filmora ensures every creative vision can be realized.
Video Filter Editor
Create AI Filter For Win 7 or later(64-bit)
Create AI Filter For macOS 10.14 or later
- User-friendly Interface : While its feature set is extensive, beginners need not be intimidated. Filmora offers an intuitive drag-and-drop interface, making the application of filters a seamless process. This ease of use ensures that even the most novice of editors can achieve professional-looking results in no time.
- Customizable Filters : Filmora allows users to tweak and customize effects to their liking beyond the preset filters. This feature gives creators the flexibility to craft unique visuals that align with their brand or story’s essence.
- Regular Updates : Filmora continuously updates its software, adding new filters and features. This means users can always stay ahead of the curve and incorporate the latest trends into their videos.
- Pricing and Value : While Filmora isn’t free, the value it offers makes the investment worthwhile. The tool offers various pricing plans designed for both individuals and businesses. Given the quality and diversity of its video filters, many content creators view it as a justifiable expense.
- Community and Tutorials : Filmora boasts a vibrant community of users. Their official website and channels regularly release tutorials, guiding users on the various functionalities, ensuring you make the most out of the software.
Part 3: Summary
The digital space is flooded with content, making it crucial for creators to ensure their videos capture attention and engage viewers. Utilizing video filters can significantly boost the visual appeal of your content.
With platforms like Veed.io, Clideo, Flixier, Flexclip, and KAPWING, filtering videos is now more accessible than ever.
And for those willing to invest a little, Filmora stands as a robust alternative. So, explore these platforms, harness the power of video filters, and watch your content shine like never before!
Part 1: Top 5 Free Online Video Filter Editors
Veed.io

Veed.io is more than just an online video editor. This platform is designed with the user in mind, ensuring a hassle-free experience as they navigate its diverse video editing tools. One of the standout features is, undoubtedly, its video filter capabilities.
Is the product free?
Veed.io offers a robust free version, letting creators jump in without any initial investment. However, for those seeking more advanced features and capabilities, Veed.io has premium plans available, starting at a competitive price of $12/month.
Free trial for video filter function?
One of the commendable aspects of Veed.io is its commitment to transparency. Users can fully experience the video filter function without spending a dime, ensuring they know exactly what they’re getting before opting for paid plans.
Advantages: Even those new to video editing can quickly find their way around. The platform’s design is clean and straightforward and prioritizes user experience. Videos are processed promptly, ensuring you get your polished content out quickly.
Disadvantages: The free version watermarks the videos.
Clideo

Clideo is a multifaceted online video editing solution that caters to a broad spectrum of editing needs.
Whether you’re looking to merge clips, resize videos for various platforms, or infuse creativity with video filters, Clideo offers a comprehensive toolkit.
Is the product free?
It has a free version with basic functionalities. Paid plans start at $9/month.
Free trial for video filter function?
Yes, the filter function can be tested without any charges.
Advantages : Simple to use, no software installation required.
Disadvantages : Limited filters in the free version.
Flixier

Flixier emerges as a dynamic online video editing platform, aiming to bridge the gap between advanced editing tools and user accessibility.
Catering to novice editors and seasoned professionals, it offers tools that effortlessly combine efficiency with creativity.
Is the product free?
Flixier provides a free tier. For advanced features, paid plans start at $10/month.
Free trial for video filter function?
The video filter function is available in the free tier.
Advantages: Collaborative editing features quick export times.
Disadvantages: Slightly steeper learning curve for beginners.
Flexclip

Flexclip positions itself as a holistic online video editor designed with both beginners and advanced users in mind.
Whether you’re crafting a short promotional clip, a personal vlog, or an extensive documentary, Flexclip provides the tools and templates to make the process seamless.
Is the product free?
There’s a free version available. Upgraded plans are priced from $4.99/month.
Free trial for video filter function?
Absolutely, users can enjoy filter functions for free.
Advantages: Rich video templates and intuitive design.
Disadvantages: Limited advanced editing options in the free version.
Kapwing

KAPWING has swiftly carved its niche in the world of online video editing, offering a unique blend of simplicity and versatility. Beyond just a video editor, KAPWING is a creative toolkit that empowers users to bring their video visions to life with ease.
Is the product free?
Kapwing provides a basic free version. For premium features, plans start at $20/month.
Free trial for video filter function?
The video filter function is accessible in the free version.
Advantages: No watermarks, user-friendly, wide array of tools.
Disadvantages: Some advanced filters are limited to premium users.
Part 2: Best Alternatives
When it comes to alternative video filter editors, Filmora undoubtedly stands out. Although it’s not exclusively an online tool, Filmora has firmly established its reputation in the digital video editing community, and here’s why:
- Extensive Library of Video Filters : One of Filmora’s shining points is its rich, extensive library of video filters. From adding a touch of nostalgia with sepia tones to creating blockbuster cinematic vibes with dramatic contrasts, Filmora ensures every creative vision can be realized.
Video Filter Editor
Create AI Filter For Win 7 or later(64-bit)
Create AI Filter For macOS 10.14 or later
- User-friendly Interface : While its feature set is extensive, beginners need not be intimidated. Filmora offers an intuitive drag-and-drop interface, making the application of filters a seamless process. This ease of use ensures that even the most novice of editors can achieve professional-looking results in no time.
- Customizable Filters : Filmora allows users to tweak and customize effects to their liking beyond the preset filters. This feature gives creators the flexibility to craft unique visuals that align with their brand or story’s essence.
- Regular Updates : Filmora continuously updates its software, adding new filters and features. This means users can always stay ahead of the curve and incorporate the latest trends into their videos.
- Pricing and Value : While Filmora isn’t free, the value it offers makes the investment worthwhile. The tool offers various pricing plans designed for both individuals and businesses. Given the quality and diversity of its video filters, many content creators view it as a justifiable expense.
- Community and Tutorials : Filmora boasts a vibrant community of users. Their official website and channels regularly release tutorials, guiding users on the various functionalities, ensuring you make the most out of the software.
Part 3: Summary
The digital space is flooded with content, making it crucial for creators to ensure their videos capture attention and engage viewers. Utilizing video filters can significantly boost the visual appeal of your content.
With platforms like Veed.io, Clideo, Flixier, Flexclip, and KAPWING, filtering videos is now more accessible than ever.
And for those willing to invest a little, Filmora stands as a robust alternative. So, explore these platforms, harness the power of video filters, and watch your content shine like never before!
Freeze Frame Clone Effect Is a Creative Effect to Use for Many Video Creators. This Article Will Show You How to Use Filmora to Make a Frozen Frame Clone Video Effect
Preparation
What you need to prepare:
- A computer (Windows or macOS)
- Your video materials.
- Filmora video editor
Step 1
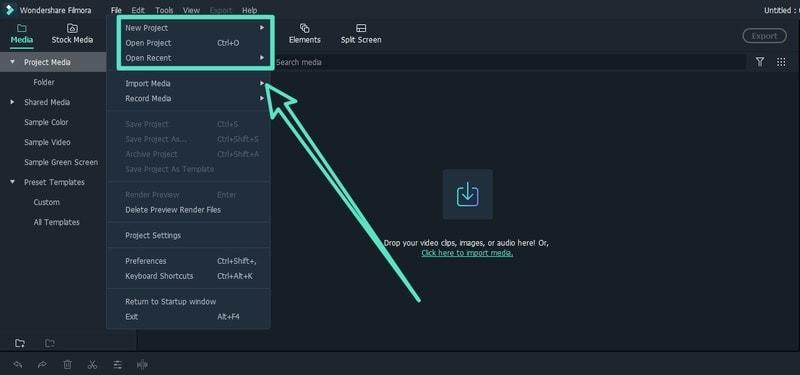
Download and install Wondershare Filmora on your computer. Launch Filmora and click on New Project on the welcome screen. Alternatively, go to File menu and select New Project option.
Step 2
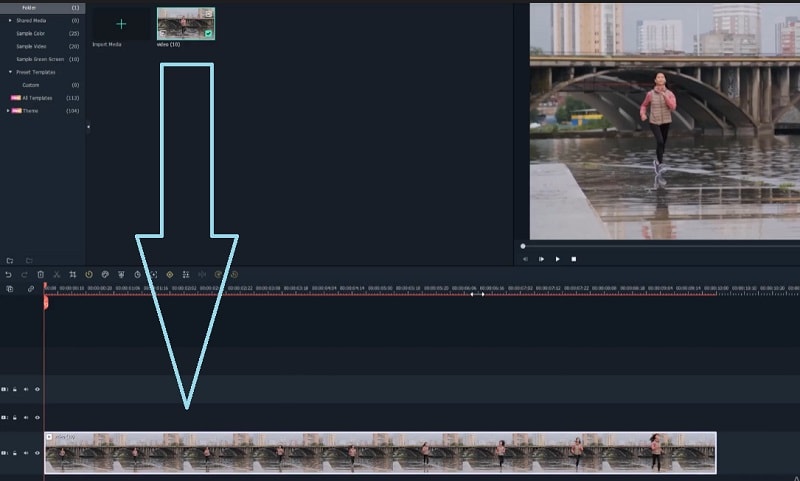
Import your video clip to Project Media folder. Go to File> Import Media and click on Import Media Files option. Select the video clip from your hard drive. Otherwise, you can drag and drop the video clip directly into the Project Media folder. Finally, drop the video clip from Project Media folder onto the timeline.
Step 3
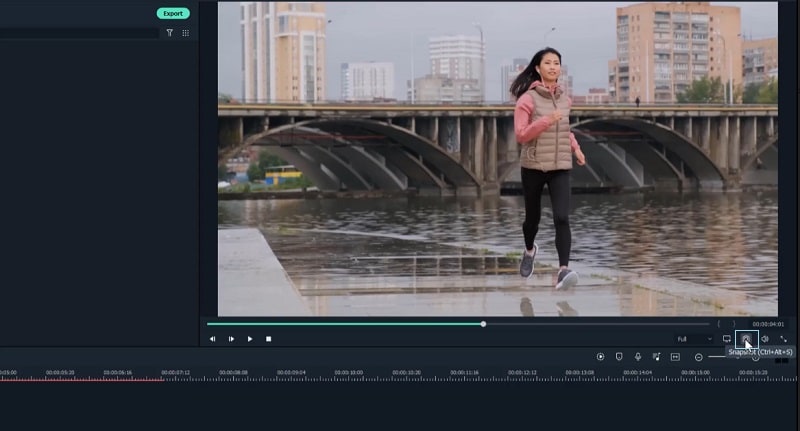
Place the marker where you want the frame to freeze. Click on Camera icon under Program window. This will take a snapshot of the current frame and place it under Project Media folder. Drag and drop the snapshot onto the timeline.
Step 4
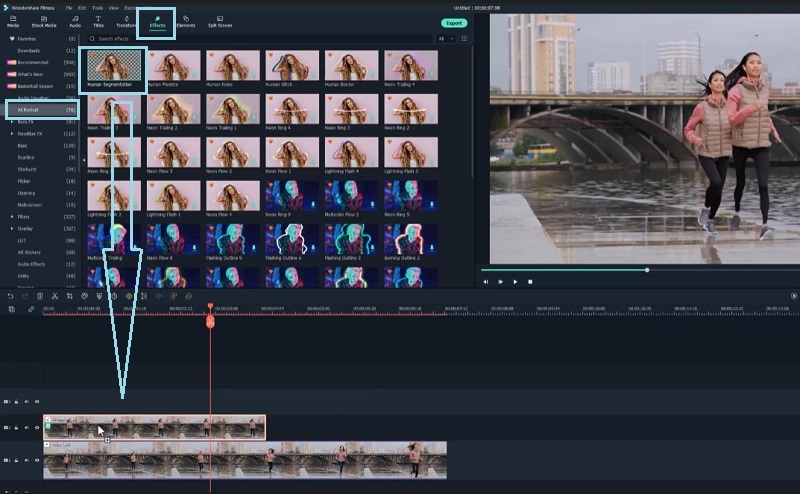
Match the duration of the snapshot with the point where you want the frame to freeze. Go to Effects> AI Portrait> Human Segmentation and drop the effect on the snapshot layer to make the background disappear.
Step 5
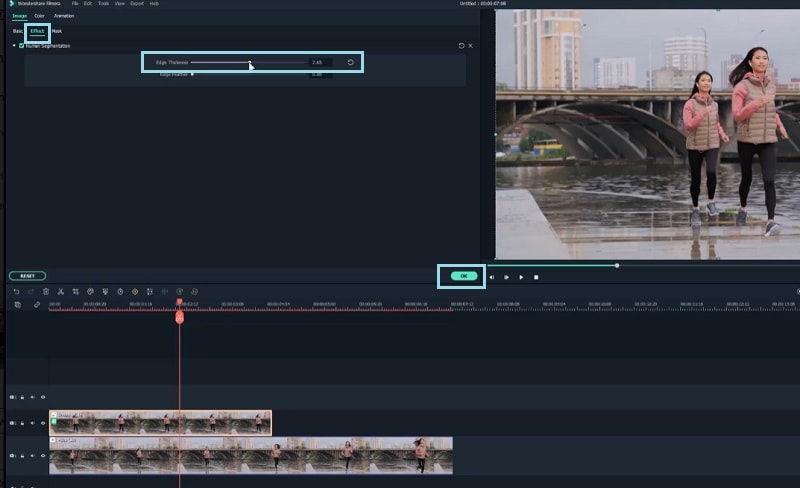
Double-click on the snapshot layer. Go to Effect and adjust the Edge thickness so that it looks perfect. Click on OK button and play the video to check out the effect.
Step 6
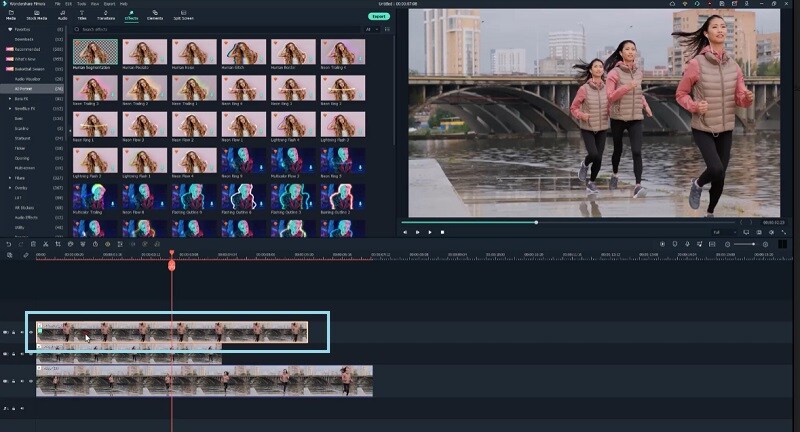
Perform Step 3 to Step 5 again where you need to select a frame to freeze, take snapshot, drop onto timeline and remove background. Finally, play the video to check out the freeze frame clone effect. Save the video on your hard drive by click on Export button.
Summary
What you’ve learned:
- How to take snapshot from a video for freeze frame
- How to remove background from snapshot
- How to mix snapshots and video for cloning effect
What you need to prepare:
- A computer (Windows or macOS)
- Your video materials.
- Filmora video editor
Step 1
Download and install Wondershare Filmora on your computer. Launch Filmora and click on New Project on the welcome screen. Alternatively, go to File menu and select New Project option.

Step 2
Import your video clip to Project Media folder. Go to File> Import Media and click on Import Media Files option. Select the video clip from your hard drive. Otherwise, you can drag and drop the video clip directly into the Project Media folder. Finally, drop the video clip from Project Media folder onto the timeline.

Step 3
Place the marker where you want the frame to freeze. Click on Camera icon under Program window. This will take a snapshot of the current frame and place it under Project Media folder. Drag and drop the snapshot onto the timeline.

Step 4
Match the duration of the snapshot with the point where you want the frame to freeze. Go to Effects> AI Portrait> Human Segmentation and drop the effect on the snapshot layer to make the background disappear.

Step 5
Double-click on the snapshot layer. Go to Effect and adjust the Edge thickness so that it looks perfect. Click on OK button and play the video to check out the effect.

Step 6
Perform Step 3 to Step 5 again where you need to select a frame to freeze, take snapshot, drop onto timeline and remove background. Finally, play the video to check out the freeze frame clone effect. Save the video on your hard drive by click on Export button.

Summary
What you’ve learned:
- How to take snapshot from a video for freeze frame
- How to remove background from snapshot
- How to mix snapshots and video for cloning effect
What you need to prepare:
- A computer (Windows or macOS)
- Your video materials.
- Filmora video editor
Step 1
Download and install Wondershare Filmora on your computer. Launch Filmora and click on New Project on the welcome screen. Alternatively, go to File menu and select New Project option.

Step 2
Import your video clip to Project Media folder. Go to File> Import Media and click on Import Media Files option. Select the video clip from your hard drive. Otherwise, you can drag and drop the video clip directly into the Project Media folder. Finally, drop the video clip from Project Media folder onto the timeline.

Step 3
Place the marker where you want the frame to freeze. Click on Camera icon under Program window. This will take a snapshot of the current frame and place it under Project Media folder. Drag and drop the snapshot onto the timeline.

Step 4
Match the duration of the snapshot with the point where you want the frame to freeze. Go to Effects> AI Portrait> Human Segmentation and drop the effect on the snapshot layer to make the background disappear.

Step 5
Double-click on the snapshot layer. Go to Effect and adjust the Edge thickness so that it looks perfect. Click on OK button and play the video to check out the effect.

Step 6
Perform Step 3 to Step 5 again where you need to select a frame to freeze, take snapshot, drop onto timeline and remove background. Finally, play the video to check out the freeze frame clone effect. Save the video on your hard drive by click on Export button.

Summary
What you’ve learned:
- How to take snapshot from a video for freeze frame
- How to remove background from snapshot
- How to mix snapshots and video for cloning effect
What you need to prepare:
- A computer (Windows or macOS)
- Your video materials.
- Filmora video editor
Step 1
Download and install Wondershare Filmora on your computer. Launch Filmora and click on New Project on the welcome screen. Alternatively, go to File menu and select New Project option.

Step 2
Import your video clip to Project Media folder. Go to File> Import Media and click on Import Media Files option. Select the video clip from your hard drive. Otherwise, you can drag and drop the video clip directly into the Project Media folder. Finally, drop the video clip from Project Media folder onto the timeline.

Step 3
Place the marker where you want the frame to freeze. Click on Camera icon under Program window. This will take a snapshot of the current frame and place it under Project Media folder. Drag and drop the snapshot onto the timeline.

Step 4
Match the duration of the snapshot with the point where you want the frame to freeze. Go to Effects> AI Portrait> Human Segmentation and drop the effect on the snapshot layer to make the background disappear.

Step 5
Double-click on the snapshot layer. Go to Effect and adjust the Edge thickness so that it looks perfect. Click on OK button and play the video to check out the effect.

Step 6
Perform Step 3 to Step 5 again where you need to select a frame to freeze, take snapshot, drop onto timeline and remove background. Finally, play the video to check out the freeze frame clone effect. Save the video on your hard drive by click on Export button.

Summary
What you’ve learned:
- How to take snapshot from a video for freeze frame
- How to remove background from snapshot
- How to mix snapshots and video for cloning effect
Also read:
- [Updated] Expert-Endorsed 8 Tripods for Flawless 4K Footage
- [Updated] The Top Ten Video Call Programs for Phones & PC Users
- 2024 Approved Insightful Exploration Discovering the Finest Zero-Price Free Audio Design Platforms on Windows
- AMD Radeon HD Driver Download: Optimize Your Windows Experience
- How To Make a Video by Mouse in Filmora?
- In 2024, How to Stop Google Chrome from Tracking Your Location On Oppo Reno 11 Pro 5G? | Dr.fone
- Mastering iPhone Photography Focus on Shadows
- Navigating Tech Gear: Tom's Expert Hardware Analysis
- New Best Practical Tips to Improve Your Lighting in the Sun for 2024
- New Everything That You Need to Know About Video Montages- Ideas, Techniques, and Software
- New In 2024, How to Add Filter to Video Online
- New In 2024, Top 8 Sites to Download Glitch Transition for Premiere Pro
- New Step by Step to Split Clips in VLC for 2024
- New Whats The Best Laptops For Video Editing for 2024
- Rapid Charger's Guide: Overcoming Non-Charging Laptop Batteries
- Top-Rated Storm Tracking Applications
- Unlocking Better Well-Being: AI's Promise in Therapy
- Updated 2024 Approved Best Ideas on Using Green Screen with Filmora
- Updated How to Create Loop Videos with Filmora for 2024
- Title: VSCO Slow Motion
- Author: Chloe
- Created at : 2024-09-26 21:07:49
- Updated at : 2024-10-02 21:23:32
- Link: https://ai-editing-video.techidaily.com/vsco-slow-motion/
- License: This work is licensed under CC BY-NC-SA 4.0.