:max_bytes(150000):strip_icc():format(webp)/GettyImages-664800650-4349941504c24712b81975694798236b.jpg)
Want to Add a Motion Blur Effect to Your Photos? This Step-by-Step Tutorial Will Show You How to Use GIMP Software to Get the Effect You Want

Want to Add a Motion Blur Effect to Your Photos? This Step-by-Step Tutorial Will Show You How to Use GIMP Software to Get the Effect You Want
GIMP is a cross-platform image editing software that you can use to edit photos and create graphics. The software is available for Linux, Windows, and macOS and can add a motion blur effect (A sense of movement in the photo), making your pictures look more realistic and professional.
So to help you tone your skills, we’ve written a comprehensive guide on how to apply the GIMP motion blur effect to your photos!
Part I. What Is GIMP?
GIMP software, a GNU Image Manipulation Program, is an open-source raster graphics editor used for image editing and retouching, converting between different image formats, free-form drawing, and more.
GIMP is frequently used as a Photoshop alternative. The software boasts a wide range of features, including support for layers, masks, color management, and third-party plugins.
Key Features
Here are some key features of the GIMP software:
- Quickly hide panels and menus to let you switch to a full-screen mode to preview pictures
- Fixes distorted images
- Available for Windows, Linux, Mac OS, and other operating systems
- Automatic image enhancement tool
- Lets you remove all the panels and tools from the workflow except the one you are working with.
- Released under a license called GNU General Public License v3 and later, which makes it free to use and distribute
- Add overlays and crop or resize an image
- Wide range of file formats that it can read and write, making it a versatile tool for working with images
Part II. How To Add The Motion Blur Effect To Your Photos in GIMP?
Below we’ve provided the step-by-step tutorial to add a motion blur effect to your photos in GIMP:
Step1 In the first step, launch a browser on your device, head to the GIMP website , and download the installation file according to your operating system. Now, click the downloaded installer, install the software on your system and launch it.

Step2 In the next step, click “File” on the GIMP dashboard, and select “Open” to access the Open Image window. Select your image file from your system and click “Open” to import the file.
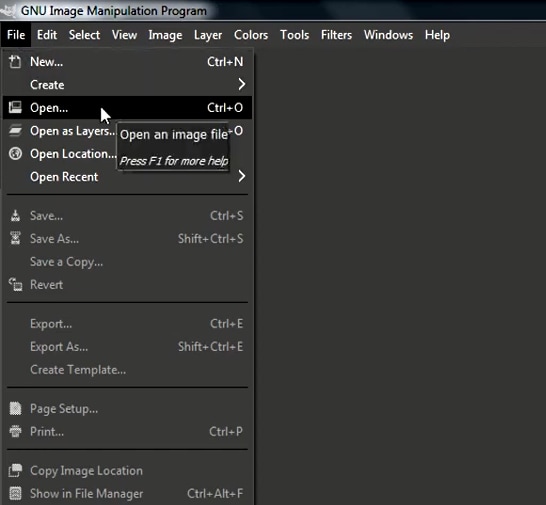
Step3 Next, click the “Filters” option from the top toolbar, select “Blur,” and choose “Motion Blur” from the drop-down menu. A dialogue box will now open where you can preview the effect and adjust the settings, including Blur Type, Blur Center, and Blur Parameters.
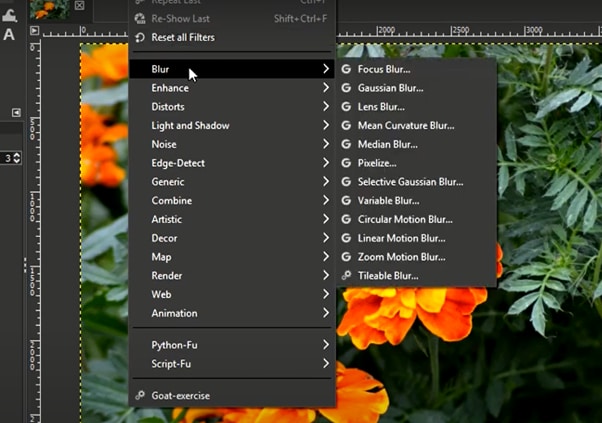
Step4 Once you are satisfied with your changes, click “OK” to apply the effect to the image, and make some other edits if needed. Finally, click “File” from the top toolbar, choose “Export As,” click “File Type” to select the format, and select the “Export” option to save your file.
Bonus Tips – The Alternative To GIMP To Create Motion Blur Effect
GIMP is a popular image editor that you can use to create motion blur effects. However, some users find it difficult to use the software for this purpose.
To simplify the process, we recommend usingWondershare Filmora an all-in-one editing software that offers multiple advanced features to help you quickly enhance your project.
Free Download For Win 7 or later(64-bit)
Free Download For macOS 10.14 or later
Here’s why Filmora is the best alternative to GIMP for creating motion blur effects:
- A user-friendly interface where you can quickly create the motion blur effect without spending hours learning the process
- Advanced video editing tools, such as keyframing, speed ramping, green screen, title editing, motion tracking, screen recorder, and preset templates
- Royalty-free music library where you can access millions of music and soundtracks
- Adds the motion blur effect to your videos as well as images
- Comes with multiple parameters to adjust the effect on your clip or image
To add the radial blur effect to images using Filmora, here are the quick and easy-to-follow steps:
Step1 Download the Filmora software on your PC, launch it, and click “Create New Project” on the main panel. Use the “Click Here to Import your Media File” option to import your photo and drag and drop it into the timeline.

Step2 Now, head to the “Effects” tab from the taskbar. Use the search option to find the Blur effect. Afterward, drag & drop it in the timeline and adjust it on your selected clip.
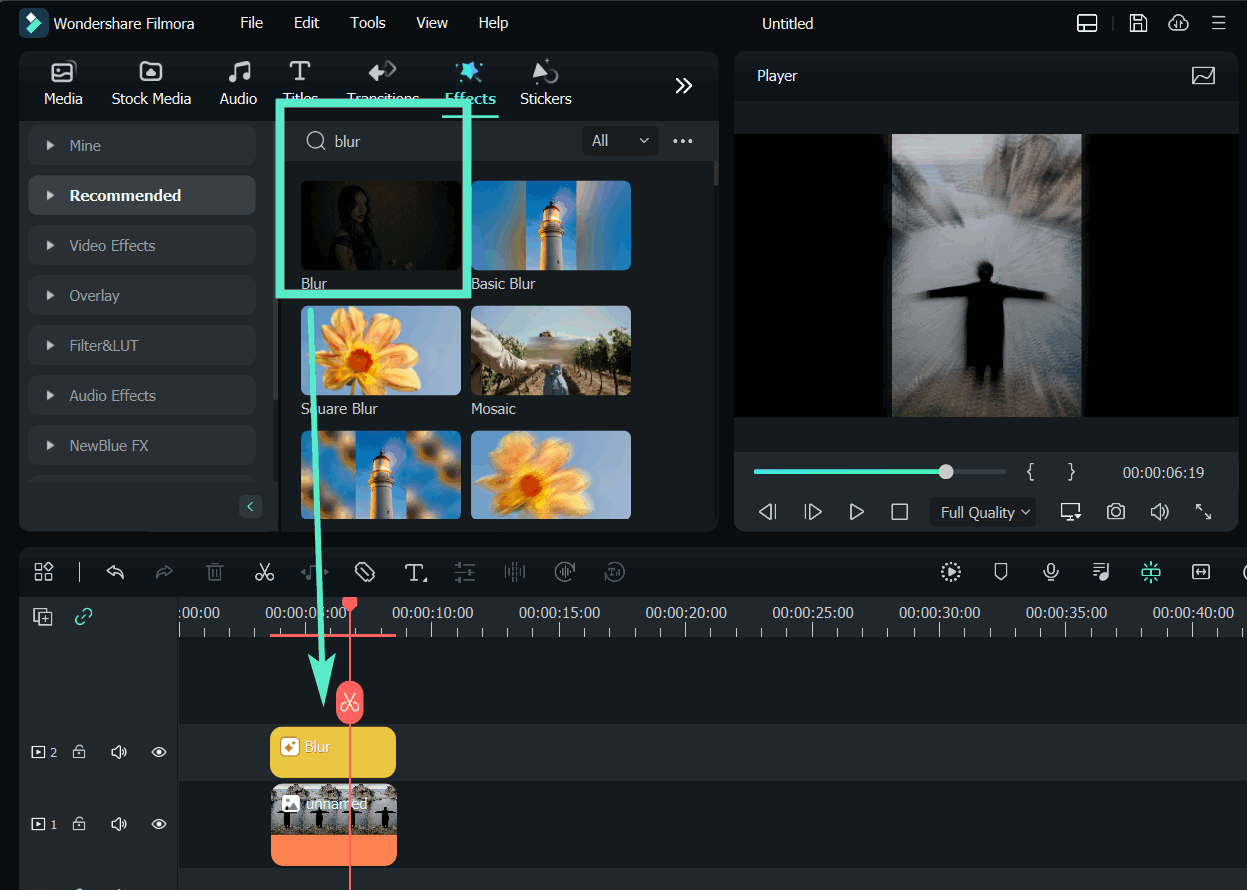
Step3 Please note that motion blur is now a dynamic effect on the image. That means you can add multiple photos and make them into a slideshow with a blur effect transition. Or, press the “Play” icon to preview your photo and pause the clip where you think motion blur works best.
Step4 Click the effect in the timeline to open its settings. Now, play your clip to preview and adjust the parameters as you want to smooth down the motion effect.
Step5 Once satisfied with the outcome, click the “Export” option, go to the “Local” tab, select a file format to save the images, and click “Export” again to save your project.
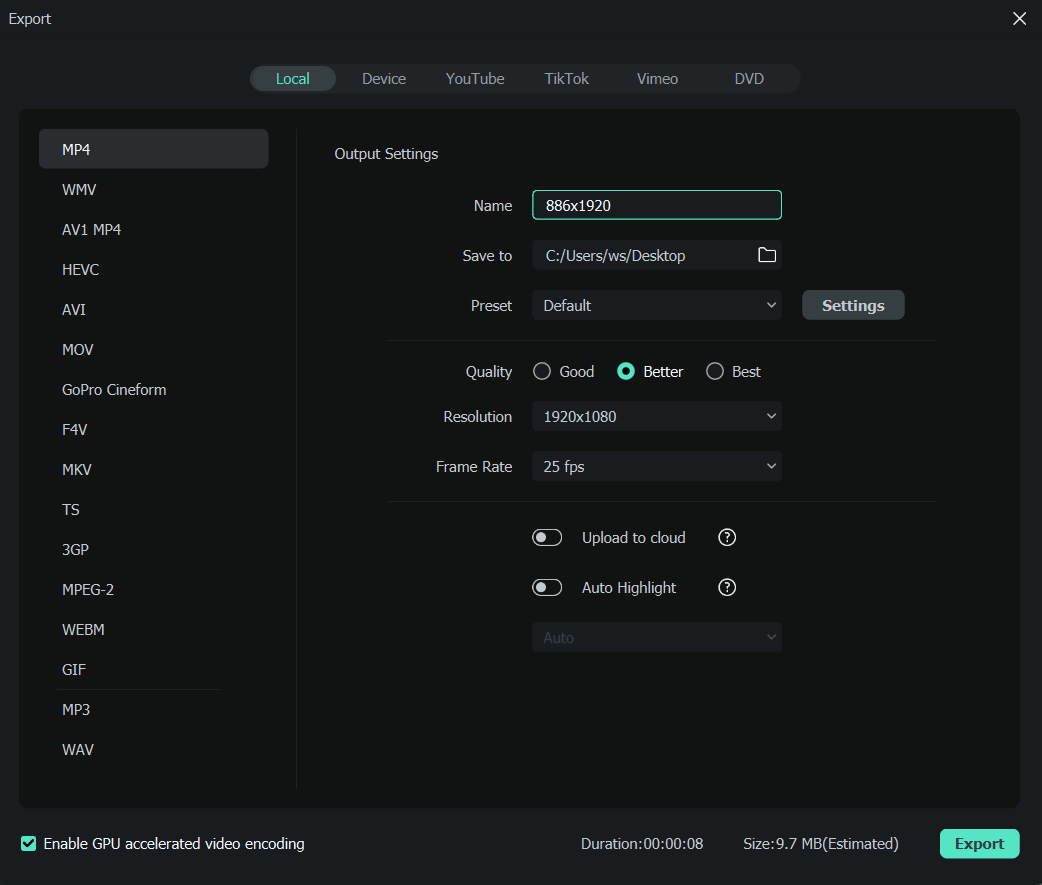
Filmora offers many export options, such as your device, YouTube, Vimeo, and DVD, with just a few clicks.
Last Words
In this detailed tutorial, we’ve discussed what GIMP is and its key features. We’ve provided a step-by-step guide to walk you through the process of creating the motion blur effect using the GIMP software.
In addition, we’ve provided a bonus tip to recommend Filmora as the best alternative to GIMP for creating the motion blur effect.
Hopefully, you found this article helpful in resolving your queries, and you can now add a smooth motion blur effect to your images.
Free Download For macOS 10.14 or later
Here’s why Filmora is the best alternative to GIMP for creating motion blur effects:
- A user-friendly interface where you can quickly create the motion blur effect without spending hours learning the process
- Advanced video editing tools, such as keyframing, speed ramping, green screen, title editing, motion tracking, screen recorder, and preset templates
- Royalty-free music library where you can access millions of music and soundtracks
- Adds the motion blur effect to your videos as well as images
- Comes with multiple parameters to adjust the effect on your clip or image
To add the radial blur effect to images using Filmora, here are the quick and easy-to-follow steps:
Step1 Download the Filmora software on your PC, launch it, and click “Create New Project” on the main panel. Use the “Click Here to Import your Media File” option to import your photo and drag and drop it into the timeline.

Step2 Now, head to the “Effects” tab from the taskbar. Use the search option to find the Blur effect. Afterward, drag & drop it in the timeline and adjust it on your selected clip.

Step3 Please note that motion blur is now a dynamic effect on the image. That means you can add multiple photos and make them into a slideshow with a blur effect transition. Or, press the “Play” icon to preview your photo and pause the clip where you think motion blur works best.
Step4 Click the effect in the timeline to open its settings. Now, play your clip to preview and adjust the parameters as you want to smooth down the motion effect.
Step5 Once satisfied with the outcome, click the “Export” option, go to the “Local” tab, select a file format to save the images, and click “Export” again to save your project.

Filmora offers many export options, such as your device, YouTube, Vimeo, and DVD, with just a few clicks.
Last Words
In this detailed tutorial, we’ve discussed what GIMP is and its key features. We’ve provided a step-by-step guide to walk you through the process of creating the motion blur effect using the GIMP software.
In addition, we’ve provided a bonus tip to recommend Filmora as the best alternative to GIMP for creating the motion blur effect.
Hopefully, you found this article helpful in resolving your queries, and you can now add a smooth motion blur effect to your images.
How Important It Is to Perform Color Correction to Your Video? Here Is a Solution with After Effects Color Correction with Illustrative Videos
Create High-Quality Video - Wondershare Filmora
An easy and powerful YouTube video editor
Numerous video and audio effects to choose from
Detailed tutorials provided by the official channel
When it comes to understanding and mastery of information, videos are always the best. Research carried out by Wyzwol, a marketing research institute, states that 68% of people like to learn about services through videos.
Color correction in After Effects involves a wide range of tools, including Lumetri color, Hue saturation, and RGB curves. It involves extensive reading and interpretation of graphs and histograms – A thing not for the faint-hearted. To better your understanding of color correction in After Effects, you not only need to rely on blogs but also videos. Therefore from this article, you will learn about color correction in After Effects with videos.
Let’s dive in!
In this article
01 What is Color Correction in After Effects
02 Learn Color Correction in After Effects with These Videos
What is Color Correction in After Effects
Color correction is a functionality feature in Adobe After effects that fixes all the color complications in an image or a video. This functionality feature alters a clip of footage to match a constant appearance.
Most colorists and editors use After Effects to adjust color, saturation, and contrast in clips that look unreal and make them appear natural and unprocessed.
When you want to color correct your footage, you first need to establish your video clip and then determine the colors needs for your clip. With this, color grading will become an absolute breeze for you.
Learn Color Correction in After Effects with These Videos
1. Pro Tip - Cinematic Color Grade in After Effects - After Effects Tutorial by Dope Motions
One of the top-notch videos we will use to learn color correcting is one produced by Dope Motions. Dope Motions is a YouTube channel that is managed by Nick Pawar. Nick creates high-quality graphics and VFX tutorials where he shares insightful ideas on how to carry out various cinematic edits to videos – This includes color correction.
In this video, Nick gives his voice on color grid videos giving it that cinematic look with much ease. His method is relatively simpler since one need not use plugins to do color correction. Though it is much easier to carry out color correction with plugins, Nick emphasizes more on color correction without plugins since you will be able to extensively customize your video based on your preference.
In this video, Nick spotlights various topics, including how to use lumetri color, color correction, cinematic color grading, how to make presets, color effects, among many more. All in After Effects.
Besides, with these techniques, you cannot not only use color correction in After Effects but also in premiere pro. Beginners, as well as intermediate video editors, will significantly benefit from this exemplary video. Learn from Nick and create splendid videos that will leave your clients and viewers all rooted to the ground.
2. Create a Cinematic Look with After Effects Tricks! by Kriscoart
Another enlightening video that talks about color correction in After Effect are this one from Kriscoart. Kriscoart is a fast-growing YouTube channel developed by managed by Kris Truini. Some of the core values of this channel are to learn, create and share content. From his channel, Truini does not centralize his focus to only video editing; he goes to the extremes of edifying on VFX tutorials, lighting workshops, and short film breakdowns.
In this video, Truini shares some simple tricks with his subscribers as well as new visitors on how to carry out a color correction in After Effects. He elaborates on manipulating lights and adding dramatic atmospheres and cinematic looks to your video shots by using some simple masks, solids, and adjustment layers.
Truini uses the project he is working on to flesh out various color correction tools and how to put them into use authentically. He targets not only beginner video editors but also intermediate ones who are looking forward to increasing their skill set.
Through his YouTube channels, Truini aims at educating the masses so that they can be well conversant with most of the video editing tools. He wants the voice of every filmmaker and prospective to be heard by their prospective audiences.
3. Advanced Color Grading in After Effects - NO PLUGINS by the VFX Show
Color correcting and Color grading without plugins is something that is a back-breaking activity to beginner video editors. Here, Collin Black of @ The VFX Show tends to break that misconception. Collin Black, the manager of The VFX Show, teaches his subscribers and new visitors to his channel how to carry out color correction without necessarily using plugins.
Collin Black states that even though plugins are very easy to use in color correction, you cannot carry out a wide range of customizable activities. It makes color correction without plugins be something to use to create neck-breaking video clips.
In this video, Collin uses a photo that he took while driving. The image appears to be faulty with lousy lighting. He uses a wide range of tools while elaborating every single step. When compared to the start, the final result of his work can be said to be “something out of this world.”
The target audience is beginner video editors with the zeal and zest of learning and wanting to get to know more about color correction without plugins.
4. Easy Colour Correction - After Effects Tutorial by DM Design
Are there scenarios where you come across a simple-looking video clip that is perfectly edited with ideal visual colors and has a sensational cinematic appearance? Debra Mayer, the founder, and owner of DM Designs, a renowned YouTube channel, simplify the processes required to get stunning videos.
Debra Mayer, in her YouTube channel, does all in her powers to teach all the Adobe techniques. She simplifies it and makes every single step to be somewhat relatable. In her channel, she does say much but expounds on tons of tools and activities.
Debra uses footage of a deserted land occupied by trees and grassland in this video. Everything in the picture looks dull and dusty. Debra expounds on how to create some cinematic appearance on clips with straightforward steps. Her after video appears to be something unreal due to extensive editing.
Her target audience for this video is beginner video editors. She can explain color correction in the easiest way possible from her immerse skillset. With that, beginner editors will significantly benefit from it.
5. Make Cinematic Looks with After Effects Color Correction Tricks! by Black Mixture
Paying for the After Effects subscription and again paying for color correction is something most people cannot wish to do. Even though you are not good at color correction, you need to stress yourself since Nate and Chriselle of Black Mixture will make things easy for you. Black Mixture is a YouTube account managed by Nate and Chriselle, a couple. In their channel, they expound on topics surrounding filmmaking, graphic design, motion design, and photography.
In this video, Nate elaborates on various steps on how to carry out a color correction in Adobe After Effects without plugins. He even goes to the extent of showing how to add music video effects as well as cinematic effects.
Nate uniquely uses only three color correction effects to carry out all the color correction needed to his footage – A super-fast driving car on a highway – And comes up with stunning results. He uses various customizable Adobe Effects settings such as hue, contrast, saturation.
Furthermore, Nate explains how to interpret and use histograms and graphs in adjusting various customizable settings. He also emphasizes the glow, a unique functionality feature that alters the lighting of clips to make his background appear super cool. Most editors do not commonly use glow, but it creates outstanding videos when used.
Nate does not only target beginner video editors but also intermediate ones. There is something new that intermediate editors will also learn.
6. Color Correction in After Effects - Tutorial by Kenneth Moore
This is the last YouTube video that we are going to learn about color correcting from. It is a video produced by Kenneth Moore, A prime owner of Kenneth Moore’s YouTube Channel. Even though his channel, Kenneth Moore channel, is still on the grow, he straightforwardly brought out every step to carry out when doing color correction in After Effects.
In this video, Moore uses a shot of a drown to elaborate color correction. The initial footage appears to be dull with indistinct features. With the color corrections tools, Moore is able to liven the footage giving it that outstanding look.
Moore unfolds on how to use various functionality tools in After Effects. In his video, he incorporates contrast, curves, RGB Parade, color balancing, color wheels, Vectorscope, and HSL Secondary functionalities. He used another footage, a car, to elaborate on HSL secondary.
In the video, Moore targets beginner and intermediate video editors to throw light on other color correction functionalities that video editors need to learn.
Conclusion
● Supplement your reading about color correction in After Effects with these videos. The above six videos evidently explain how to carry out a color correction in Adobe After Effects with ease. The videos are created with established producers and video editors; therefore they give professional insights and teachings.
● Color correction in After Effects should no longer stress you out. All you have to do is watch any of the above videos, or you can watch all of them and have a better grip of color correction. You will be able to create exceptional footage.
When it comes to understanding and mastery of information, videos are always the best. Research carried out by Wyzwol, a marketing research institute, states that 68% of people like to learn about services through videos.
Color correction in After Effects involves a wide range of tools, including Lumetri color, Hue saturation, and RGB curves. It involves extensive reading and interpretation of graphs and histograms – A thing not for the faint-hearted. To better your understanding of color correction in After Effects, you not only need to rely on blogs but also videos. Therefore from this article, you will learn about color correction in After Effects with videos.
Let’s dive in!

In this article
01 What is Color Correction in After Effects
02 Learn Color Correction in After Effects with These Videos
What is Color Correction in After Effects
Color correction is a functionality feature in Adobe After effects that fixes all the color complications in an image or a video. This functionality feature alters a clip of footage to match a constant appearance.
Most colorists and editors use After Effects to adjust color, saturation, and contrast in clips that look unreal and make them appear natural and unprocessed.
When you want to color correct your footage, you first need to establish your video clip and then determine the colors needs for your clip. With this, color grading will become an absolute breeze for you.
Learn Color Correction in After Effects with These Videos
1. Pro Tip - Cinematic Color Grade in After Effects - After Effects Tutorial by Dope Motions
One of the top-notch videos we will use to learn color correcting is one produced by Dope Motions. Dope Motions is a YouTube channel that is managed by Nick Pawar. Nick creates high-quality graphics and VFX tutorials where he shares insightful ideas on how to carry out various cinematic edits to videos – This includes color correction.
In this video, Nick gives his voice on color grid videos giving it that cinematic look with much ease. His method is relatively simpler since one need not use plugins to do color correction. Though it is much easier to carry out color correction with plugins, Nick emphasizes more on color correction without plugins since you will be able to extensively customize your video based on your preference.
In this video, Nick spotlights various topics, including how to use lumetri color, color correction, cinematic color grading, how to make presets, color effects, among many more. All in After Effects.
Besides, with these techniques, you cannot not only use color correction in After Effects but also in premiere pro. Beginners, as well as intermediate video editors, will significantly benefit from this exemplary video. Learn from Nick and create splendid videos that will leave your clients and viewers all rooted to the ground.
2. Create a Cinematic Look with After Effects Tricks! by Kriscoart
Another enlightening video that talks about color correction in After Effect are this one from Kriscoart. Kriscoart is a fast-growing YouTube channel developed by managed by Kris Truini. Some of the core values of this channel are to learn, create and share content. From his channel, Truini does not centralize his focus to only video editing; he goes to the extremes of edifying on VFX tutorials, lighting workshops, and short film breakdowns.
In this video, Truini shares some simple tricks with his subscribers as well as new visitors on how to carry out a color correction in After Effects. He elaborates on manipulating lights and adding dramatic atmospheres and cinematic looks to your video shots by using some simple masks, solids, and adjustment layers.
Truini uses the project he is working on to flesh out various color correction tools and how to put them into use authentically. He targets not only beginner video editors but also intermediate ones who are looking forward to increasing their skill set.
Through his YouTube channels, Truini aims at educating the masses so that they can be well conversant with most of the video editing tools. He wants the voice of every filmmaker and prospective to be heard by their prospective audiences.
3. Advanced Color Grading in After Effects - NO PLUGINS by the VFX Show
Color correcting and Color grading without plugins is something that is a back-breaking activity to beginner video editors. Here, Collin Black of @ The VFX Show tends to break that misconception. Collin Black, the manager of The VFX Show, teaches his subscribers and new visitors to his channel how to carry out color correction without necessarily using plugins.
Collin Black states that even though plugins are very easy to use in color correction, you cannot carry out a wide range of customizable activities. It makes color correction without plugins be something to use to create neck-breaking video clips.
In this video, Collin uses a photo that he took while driving. The image appears to be faulty with lousy lighting. He uses a wide range of tools while elaborating every single step. When compared to the start, the final result of his work can be said to be “something out of this world.”
The target audience is beginner video editors with the zeal and zest of learning and wanting to get to know more about color correction without plugins.
4. Easy Colour Correction - After Effects Tutorial by DM Design
Are there scenarios where you come across a simple-looking video clip that is perfectly edited with ideal visual colors and has a sensational cinematic appearance? Debra Mayer, the founder, and owner of DM Designs, a renowned YouTube channel, simplify the processes required to get stunning videos.
Debra Mayer, in her YouTube channel, does all in her powers to teach all the Adobe techniques. She simplifies it and makes every single step to be somewhat relatable. In her channel, she does say much but expounds on tons of tools and activities.
Debra uses footage of a deserted land occupied by trees and grassland in this video. Everything in the picture looks dull and dusty. Debra expounds on how to create some cinematic appearance on clips with straightforward steps. Her after video appears to be something unreal due to extensive editing.
Her target audience for this video is beginner video editors. She can explain color correction in the easiest way possible from her immerse skillset. With that, beginner editors will significantly benefit from it.
5. Make Cinematic Looks with After Effects Color Correction Tricks! by Black Mixture
Paying for the After Effects subscription and again paying for color correction is something most people cannot wish to do. Even though you are not good at color correction, you need to stress yourself since Nate and Chriselle of Black Mixture will make things easy for you. Black Mixture is a YouTube account managed by Nate and Chriselle, a couple. In their channel, they expound on topics surrounding filmmaking, graphic design, motion design, and photography.
In this video, Nate elaborates on various steps on how to carry out a color correction in Adobe After Effects without plugins. He even goes to the extent of showing how to add music video effects as well as cinematic effects.
Nate uniquely uses only three color correction effects to carry out all the color correction needed to his footage – A super-fast driving car on a highway – And comes up with stunning results. He uses various customizable Adobe Effects settings such as hue, contrast, saturation.
Furthermore, Nate explains how to interpret and use histograms and graphs in adjusting various customizable settings. He also emphasizes the glow, a unique functionality feature that alters the lighting of clips to make his background appear super cool. Most editors do not commonly use glow, but it creates outstanding videos when used.
Nate does not only target beginner video editors but also intermediate ones. There is something new that intermediate editors will also learn.
6. Color Correction in After Effects - Tutorial by Kenneth Moore
This is the last YouTube video that we are going to learn about color correcting from. It is a video produced by Kenneth Moore, A prime owner of Kenneth Moore’s YouTube Channel. Even though his channel, Kenneth Moore channel, is still on the grow, he straightforwardly brought out every step to carry out when doing color correction in After Effects.
In this video, Moore uses a shot of a drown to elaborate color correction. The initial footage appears to be dull with indistinct features. With the color corrections tools, Moore is able to liven the footage giving it that outstanding look.
Moore unfolds on how to use various functionality tools in After Effects. In his video, he incorporates contrast, curves, RGB Parade, color balancing, color wheels, Vectorscope, and HSL Secondary functionalities. He used another footage, a car, to elaborate on HSL secondary.
In the video, Moore targets beginner and intermediate video editors to throw light on other color correction functionalities that video editors need to learn.
Conclusion
● Supplement your reading about color correction in After Effects with these videos. The above six videos evidently explain how to carry out a color correction in Adobe After Effects with ease. The videos are created with established producers and video editors; therefore they give professional insights and teachings.
● Color correction in After Effects should no longer stress you out. All you have to do is watch any of the above videos, or you can watch all of them and have a better grip of color correction. You will be able to create exceptional footage.
When it comes to understanding and mastery of information, videos are always the best. Research carried out by Wyzwol, a marketing research institute, states that 68% of people like to learn about services through videos.
Color correction in After Effects involves a wide range of tools, including Lumetri color, Hue saturation, and RGB curves. It involves extensive reading and interpretation of graphs and histograms – A thing not for the faint-hearted. To better your understanding of color correction in After Effects, you not only need to rely on blogs but also videos. Therefore from this article, you will learn about color correction in After Effects with videos.
Let’s dive in!

In this article
01 What is Color Correction in After Effects
02 Learn Color Correction in After Effects with These Videos
What is Color Correction in After Effects
Color correction is a functionality feature in Adobe After effects that fixes all the color complications in an image or a video. This functionality feature alters a clip of footage to match a constant appearance.
Most colorists and editors use After Effects to adjust color, saturation, and contrast in clips that look unreal and make them appear natural and unprocessed.
When you want to color correct your footage, you first need to establish your video clip and then determine the colors needs for your clip. With this, color grading will become an absolute breeze for you.
Learn Color Correction in After Effects with These Videos
1. Pro Tip - Cinematic Color Grade in After Effects - After Effects Tutorial by Dope Motions
One of the top-notch videos we will use to learn color correcting is one produced by Dope Motions. Dope Motions is a YouTube channel that is managed by Nick Pawar. Nick creates high-quality graphics and VFX tutorials where he shares insightful ideas on how to carry out various cinematic edits to videos – This includes color correction.
In this video, Nick gives his voice on color grid videos giving it that cinematic look with much ease. His method is relatively simpler since one need not use plugins to do color correction. Though it is much easier to carry out color correction with plugins, Nick emphasizes more on color correction without plugins since you will be able to extensively customize your video based on your preference.
In this video, Nick spotlights various topics, including how to use lumetri color, color correction, cinematic color grading, how to make presets, color effects, among many more. All in After Effects.
Besides, with these techniques, you cannot not only use color correction in After Effects but also in premiere pro. Beginners, as well as intermediate video editors, will significantly benefit from this exemplary video. Learn from Nick and create splendid videos that will leave your clients and viewers all rooted to the ground.
2. Create a Cinematic Look with After Effects Tricks! by Kriscoart
Another enlightening video that talks about color correction in After Effect are this one from Kriscoart. Kriscoart is a fast-growing YouTube channel developed by managed by Kris Truini. Some of the core values of this channel are to learn, create and share content. From his channel, Truini does not centralize his focus to only video editing; he goes to the extremes of edifying on VFX tutorials, lighting workshops, and short film breakdowns.
In this video, Truini shares some simple tricks with his subscribers as well as new visitors on how to carry out a color correction in After Effects. He elaborates on manipulating lights and adding dramatic atmospheres and cinematic looks to your video shots by using some simple masks, solids, and adjustment layers.
Truini uses the project he is working on to flesh out various color correction tools and how to put them into use authentically. He targets not only beginner video editors but also intermediate ones who are looking forward to increasing their skill set.
Through his YouTube channels, Truini aims at educating the masses so that they can be well conversant with most of the video editing tools. He wants the voice of every filmmaker and prospective to be heard by their prospective audiences.
3. Advanced Color Grading in After Effects - NO PLUGINS by the VFX Show
Color correcting and Color grading without plugins is something that is a back-breaking activity to beginner video editors. Here, Collin Black of @ The VFX Show tends to break that misconception. Collin Black, the manager of The VFX Show, teaches his subscribers and new visitors to his channel how to carry out color correction without necessarily using plugins.
Collin Black states that even though plugins are very easy to use in color correction, you cannot carry out a wide range of customizable activities. It makes color correction without plugins be something to use to create neck-breaking video clips.
In this video, Collin uses a photo that he took while driving. The image appears to be faulty with lousy lighting. He uses a wide range of tools while elaborating every single step. When compared to the start, the final result of his work can be said to be “something out of this world.”
The target audience is beginner video editors with the zeal and zest of learning and wanting to get to know more about color correction without plugins.
4. Easy Colour Correction - After Effects Tutorial by DM Design
Are there scenarios where you come across a simple-looking video clip that is perfectly edited with ideal visual colors and has a sensational cinematic appearance? Debra Mayer, the founder, and owner of DM Designs, a renowned YouTube channel, simplify the processes required to get stunning videos.
Debra Mayer, in her YouTube channel, does all in her powers to teach all the Adobe techniques. She simplifies it and makes every single step to be somewhat relatable. In her channel, she does say much but expounds on tons of tools and activities.
Debra uses footage of a deserted land occupied by trees and grassland in this video. Everything in the picture looks dull and dusty. Debra expounds on how to create some cinematic appearance on clips with straightforward steps. Her after video appears to be something unreal due to extensive editing.
Her target audience for this video is beginner video editors. She can explain color correction in the easiest way possible from her immerse skillset. With that, beginner editors will significantly benefit from it.
5. Make Cinematic Looks with After Effects Color Correction Tricks! by Black Mixture
Paying for the After Effects subscription and again paying for color correction is something most people cannot wish to do. Even though you are not good at color correction, you need to stress yourself since Nate and Chriselle of Black Mixture will make things easy for you. Black Mixture is a YouTube account managed by Nate and Chriselle, a couple. In their channel, they expound on topics surrounding filmmaking, graphic design, motion design, and photography.
In this video, Nate elaborates on various steps on how to carry out a color correction in Adobe After Effects without plugins. He even goes to the extent of showing how to add music video effects as well as cinematic effects.
Nate uniquely uses only three color correction effects to carry out all the color correction needed to his footage – A super-fast driving car on a highway – And comes up with stunning results. He uses various customizable Adobe Effects settings such as hue, contrast, saturation.
Furthermore, Nate explains how to interpret and use histograms and graphs in adjusting various customizable settings. He also emphasizes the glow, a unique functionality feature that alters the lighting of clips to make his background appear super cool. Most editors do not commonly use glow, but it creates outstanding videos when used.
Nate does not only target beginner video editors but also intermediate ones. There is something new that intermediate editors will also learn.
6. Color Correction in After Effects - Tutorial by Kenneth Moore
This is the last YouTube video that we are going to learn about color correcting from. It is a video produced by Kenneth Moore, A prime owner of Kenneth Moore’s YouTube Channel. Even though his channel, Kenneth Moore channel, is still on the grow, he straightforwardly brought out every step to carry out when doing color correction in After Effects.
In this video, Moore uses a shot of a drown to elaborate color correction. The initial footage appears to be dull with indistinct features. With the color corrections tools, Moore is able to liven the footage giving it that outstanding look.
Moore unfolds on how to use various functionality tools in After Effects. In his video, he incorporates contrast, curves, RGB Parade, color balancing, color wheels, Vectorscope, and HSL Secondary functionalities. He used another footage, a car, to elaborate on HSL secondary.
In the video, Moore targets beginner and intermediate video editors to throw light on other color correction functionalities that video editors need to learn.
Conclusion
● Supplement your reading about color correction in After Effects with these videos. The above six videos evidently explain how to carry out a color correction in Adobe After Effects with ease. The videos are created with established producers and video editors; therefore they give professional insights and teachings.
● Color correction in After Effects should no longer stress you out. All you have to do is watch any of the above videos, or you can watch all of them and have a better grip of color correction. You will be able to create exceptional footage.
When it comes to understanding and mastery of information, videos are always the best. Research carried out by Wyzwol, a marketing research institute, states that 68% of people like to learn about services through videos.
Color correction in After Effects involves a wide range of tools, including Lumetri color, Hue saturation, and RGB curves. It involves extensive reading and interpretation of graphs and histograms – A thing not for the faint-hearted. To better your understanding of color correction in After Effects, you not only need to rely on blogs but also videos. Therefore from this article, you will learn about color correction in After Effects with videos.
Let’s dive in!

In this article
01 What is Color Correction in After Effects
02 Learn Color Correction in After Effects with These Videos
What is Color Correction in After Effects
Color correction is a functionality feature in Adobe After effects that fixes all the color complications in an image or a video. This functionality feature alters a clip of footage to match a constant appearance.
Most colorists and editors use After Effects to adjust color, saturation, and contrast in clips that look unreal and make them appear natural and unprocessed.
When you want to color correct your footage, you first need to establish your video clip and then determine the colors needs for your clip. With this, color grading will become an absolute breeze for you.
Learn Color Correction in After Effects with These Videos
1. Pro Tip - Cinematic Color Grade in After Effects - After Effects Tutorial by Dope Motions
One of the top-notch videos we will use to learn color correcting is one produced by Dope Motions. Dope Motions is a YouTube channel that is managed by Nick Pawar. Nick creates high-quality graphics and VFX tutorials where he shares insightful ideas on how to carry out various cinematic edits to videos – This includes color correction.
In this video, Nick gives his voice on color grid videos giving it that cinematic look with much ease. His method is relatively simpler since one need not use plugins to do color correction. Though it is much easier to carry out color correction with plugins, Nick emphasizes more on color correction without plugins since you will be able to extensively customize your video based on your preference.
In this video, Nick spotlights various topics, including how to use lumetri color, color correction, cinematic color grading, how to make presets, color effects, among many more. All in After Effects.
Besides, with these techniques, you cannot not only use color correction in After Effects but also in premiere pro. Beginners, as well as intermediate video editors, will significantly benefit from this exemplary video. Learn from Nick and create splendid videos that will leave your clients and viewers all rooted to the ground.
2. Create a Cinematic Look with After Effects Tricks! by Kriscoart
Another enlightening video that talks about color correction in After Effect are this one from Kriscoart. Kriscoart is a fast-growing YouTube channel developed by managed by Kris Truini. Some of the core values of this channel are to learn, create and share content. From his channel, Truini does not centralize his focus to only video editing; he goes to the extremes of edifying on VFX tutorials, lighting workshops, and short film breakdowns.
In this video, Truini shares some simple tricks with his subscribers as well as new visitors on how to carry out a color correction in After Effects. He elaborates on manipulating lights and adding dramatic atmospheres and cinematic looks to your video shots by using some simple masks, solids, and adjustment layers.
Truini uses the project he is working on to flesh out various color correction tools and how to put them into use authentically. He targets not only beginner video editors but also intermediate ones who are looking forward to increasing their skill set.
Through his YouTube channels, Truini aims at educating the masses so that they can be well conversant with most of the video editing tools. He wants the voice of every filmmaker and prospective to be heard by their prospective audiences.
3. Advanced Color Grading in After Effects - NO PLUGINS by the VFX Show
Color correcting and Color grading without plugins is something that is a back-breaking activity to beginner video editors. Here, Collin Black of @ The VFX Show tends to break that misconception. Collin Black, the manager of The VFX Show, teaches his subscribers and new visitors to his channel how to carry out color correction without necessarily using plugins.
Collin Black states that even though plugins are very easy to use in color correction, you cannot carry out a wide range of customizable activities. It makes color correction without plugins be something to use to create neck-breaking video clips.
In this video, Collin uses a photo that he took while driving. The image appears to be faulty with lousy lighting. He uses a wide range of tools while elaborating every single step. When compared to the start, the final result of his work can be said to be “something out of this world.”
The target audience is beginner video editors with the zeal and zest of learning and wanting to get to know more about color correction without plugins.
4. Easy Colour Correction - After Effects Tutorial by DM Design
Are there scenarios where you come across a simple-looking video clip that is perfectly edited with ideal visual colors and has a sensational cinematic appearance? Debra Mayer, the founder, and owner of DM Designs, a renowned YouTube channel, simplify the processes required to get stunning videos.
Debra Mayer, in her YouTube channel, does all in her powers to teach all the Adobe techniques. She simplifies it and makes every single step to be somewhat relatable. In her channel, she does say much but expounds on tons of tools and activities.
Debra uses footage of a deserted land occupied by trees and grassland in this video. Everything in the picture looks dull and dusty. Debra expounds on how to create some cinematic appearance on clips with straightforward steps. Her after video appears to be something unreal due to extensive editing.
Her target audience for this video is beginner video editors. She can explain color correction in the easiest way possible from her immerse skillset. With that, beginner editors will significantly benefit from it.
5. Make Cinematic Looks with After Effects Color Correction Tricks! by Black Mixture
Paying for the After Effects subscription and again paying for color correction is something most people cannot wish to do. Even though you are not good at color correction, you need to stress yourself since Nate and Chriselle of Black Mixture will make things easy for you. Black Mixture is a YouTube account managed by Nate and Chriselle, a couple. In their channel, they expound on topics surrounding filmmaking, graphic design, motion design, and photography.
In this video, Nate elaborates on various steps on how to carry out a color correction in Adobe After Effects without plugins. He even goes to the extent of showing how to add music video effects as well as cinematic effects.
Nate uniquely uses only three color correction effects to carry out all the color correction needed to his footage – A super-fast driving car on a highway – And comes up with stunning results. He uses various customizable Adobe Effects settings such as hue, contrast, saturation.
Furthermore, Nate explains how to interpret and use histograms and graphs in adjusting various customizable settings. He also emphasizes the glow, a unique functionality feature that alters the lighting of clips to make his background appear super cool. Most editors do not commonly use glow, but it creates outstanding videos when used.
Nate does not only target beginner video editors but also intermediate ones. There is something new that intermediate editors will also learn.
6. Color Correction in After Effects - Tutorial by Kenneth Moore
This is the last YouTube video that we are going to learn about color correcting from. It is a video produced by Kenneth Moore, A prime owner of Kenneth Moore’s YouTube Channel. Even though his channel, Kenneth Moore channel, is still on the grow, he straightforwardly brought out every step to carry out when doing color correction in After Effects.
In this video, Moore uses a shot of a drown to elaborate color correction. The initial footage appears to be dull with indistinct features. With the color corrections tools, Moore is able to liven the footage giving it that outstanding look.
Moore unfolds on how to use various functionality tools in After Effects. In his video, he incorporates contrast, curves, RGB Parade, color balancing, color wheels, Vectorscope, and HSL Secondary functionalities. He used another footage, a car, to elaborate on HSL secondary.
In the video, Moore targets beginner and intermediate video editors to throw light on other color correction functionalities that video editors need to learn.
Conclusion
● Supplement your reading about color correction in After Effects with these videos. The above six videos evidently explain how to carry out a color correction in Adobe After Effects with ease. The videos are created with established producers and video editors; therefore they give professional insights and teachings.
● Color correction in After Effects should no longer stress you out. All you have to do is watch any of the above videos, or you can watch all of them and have a better grip of color correction. You will be able to create exceptional footage.
How to Resize FLV Video Efficiently [Windows, Mac,Android, iPhone & O
FLV Videos are Flash Video files with a .flv file extension. FLV video files were once one of the most popular video file types and the standard video format used for embedding videos on the internet and streaming. Even though video files like mp4 and mkv have gained more popularity today, you can still come across many Flv videos on the internet.
In this article, you’ll be learning How to Resize FLV Videos Efficiently on all the platforms. But wait, what exactly does the resizing mean? When you are working with videos, resizing can mean two things: one is changing the aspect ratio or resolution of the video and another is changing the file size of the video. So let’s see how we can resize the flv videos efficiently on different platforms:
Best FLV Editor to Resize FLV Videos on Windows and Mac – Filmora Video Editor [with steps]
Among many different video editors available today, Filmora Video Editor is the one that climbs up the rank to the top. It is the best FLV editor on Windows and Mac for resizing and editing flv videos. Different social media platforms require videos of different sizes, resolutions, and aspect ratios. For eg: YouTube requires horizontal video, TikTok requires vertical, Emails have a size limit for every file, etc. That’s when the Filmora Video Editor comes into play for fast and easy resizing of any video for different platforms.
For Win 7 or later (64-bit)
For macOS 10.14 or later
Why choose Filmora Video Editor for resizing FLV videos, you say?
- Simple UI and easy interface
- Easily crop or change the aspect ratio of the video
- Not all video editors support FLV video format, but the Filmora does
- Advanced export options to compress or change the file size of video
- Suitable for beginners as well as professionals
- Regular software updates and improvements
Plus, Filmora Video Editor has a free version, so you can instantly download the program, install it, and get started on resizing FLV Videos. Below is a step-by-step guide to resize FLV Videos on Windows and Mac with Wondershare Filmora Video Editor, so you can follow along!
Steps to resize FLV videos with Filmora Video Editor:
- Launch Filmora and open a new project
Run the Wondershare Filmora application on Windows or Mac after installing it. Then you should automatically be inside a new project. If not, you can manually open a new project by going to File on the top left corner and then clicking on ‘**New Project**’.

- Import the FLV video and add it to timeline
Click on ‘**Import Media Files**’ and import the flv video into project media from your computer’s file explorer. Then add the video to the timeline by dragging it inside the timeline.

- Edit and perform desired modifications (Optional)
If you are just looking to resize the FLV video file, then you can skip this step and move to step no. 4. Otherwise, you can do various editings on the video like cropping, muting, trimming, animating, etc. before resizing the video. Filmora provides a wide range of features for editing and adding effects to the video.

- Resize the video by changing the aspect ratio
Aspect ratio defines the shape of your video like if you want the video to be horizontal, vertical, square, or custom. Generally, the term ‘resizing video’ refers to changing the aspect ratio of the video. For that, go to the File and then to the Project Settings. Then on the Aspect Ratio box, select the one that you prefer or you can try custom scaling. You can choose your preferred resolution of the project too while you’re at it.

- Resize the video by cropping
When you change the aspect ratio of the project, some parts of your flv video might not fit or it might be shrunk small to fit. So you need to resize the flv video by cropping so that you can crop and focus on the part of the video you like. To crop the video, select the flv video clip in the timeline and click on the crop icon in the timeline toolbar. Now choose the ratio you want to crop and select the part you’d like to keep. Then click OK and your flv video will be resized.

- Adjust the file size of the video through export settings
After you’ve cropped and resized the Flv video, you need to export it by clicking the Export button on the top center part. There are different settings available for exporting the video. Click on the Settings button near the resolution and you’ll be shown some detailed preferences for exporting. Every setting here like frame rate, resolution, bitrate, etc. can affect the size of the output video.

Filmora Video Editor really makes the task of editing and resizing FLV videos easier, simpler, and faster. Since you now know the steps, it’s time you try it and resize your own FLV videos with this best FLV Editor for Windows and Mac.
Alternative Way to Resize FLV Videos on Windows
In case you want to try something different than Filmora, here are two alternative software (one paid and another free) that you can use to resize your FLV Videos on Windows:
- Movavi Video Editor Plus

Movavi Video Editor Plus is one of the best easy-to-use video editors that can help you to resize FLV videos as well as edit them on Windows. Its interface and functionalities are somewhat similar to that of the Filmora Video Editor. This is a paid software available for download on both Windows and Mac but you can try it for free with their 7 days trial version.
Steps to resize FLV videos on Windows with Movavi Video Editor:
- Install Movavi Video Editor and run the software on your PC. Then you should automatically be inside a new project in it.

- Import the FLV video file you want to resize through the ‘File Import’ tab on the left and drag it to the timeline.

- To resize the aspect ratio, expand the resolution options near the preview screen above the export button and select the preferred ratio.

- To crop or resize the video, select the clip in the timeline and use the crop tool to make adjustments as you wish. Then hit Apply to save changes.

- After the video is ready, export it with the Export button on the right side of the screen. Then choose your preferred settings for output and click on Start after which your video will be rendered and saved to your PC.

- VSDC Free Video Editor

VSDC Free Video Editor is another alternative to Filmora for resizing FLV videos on Windows. It is a free video editor that packs a wide range of editing features without any restrictions. However, it does have a paid version with some advanced features and hardware acceleration.
Steps to resize FLV videos on Windows with VSDC Free Video Editor:
- Install and open VSDC video editor on your PC. Then create a new project with preferred settings through the ‘Projects’ tab on the top left corner.

- Import the video file into the project by dragging and dropping it directly into the timeline.

- To resize the aspect ratio, click on the Projects Explorer and click on your project name. Then in the Properties windows on the right, manually adjust width, height, resolution, etc. according to your preferences.

- To crop and reposition your video, select the clip in the timeline and go to the Editor tab on the top. Then use the crop tool and adjust your video accordingly.

- Finally export your design through the Export project tab at the top with preferred settings.

Alternative Way to Resize FLV Videos on Mac
Wondershare Filmora Video Editor is also available for Mac operating system which is recommended to resize FLV videos but if you want to try out some other alternatives, then below are the two ways to resize FLV videos on Mac:
- VideoProc Converter

VideoProc is a powerful video editor/ converter that helps you edit, convert, and resize any kind of video. It also supports a wide range of codecs and video formats including flv. It is a paid software but you can also try their free trial version with some limitations.
Steps to resize FLV videos on Mac with VideoProc:
- Launch VideoProc on a Mac device and go inside the Video

- Add files in VideoProc by drag and drop method or directly through the ‘Add Video’ option.

- Then click on the Options (codec) on the right side of the video and change the resolutions and aspect ratio of the video as you want. You can also manage export settings like quality, codec, fps, bitrate, etc. from this tab.

- Then go to the Crop section inside the Edit Video tab and crop the video as you like with preview and different other options.

- Finally click Done to go back and hit the Run This’ll start rendering the video and will save it to your Mac device.

- Shotcut

Shotcut is another alternative to Filmora Video Editor for resizing FLV videos on Mac. It is a free, open-source, and cross-platform video editor that has a sleek and intuitive interface with many useful editing features which really makes it suitable for both beginners as well as advanced editors.
Steps to resize FLV videos on Mac with Shotcut:
- Run the Shotcut program on your Mac after installing it and create a new project.

- Import the Flv video file to the project by drag and drop method into the timeline.

- To change the resolution and aspect ratio of the video, go to the Settings tab, then Video mode, and choose the format you want.

- To crop the video, select the clip in the timeline and go to the Filters Now click on the ‘**+**’ icon and select Size, Position & Rotate under the Favorite section. Then adjust crop settings as you like.

- Finally, go to the Export section at the top and click on Advanced. Then configure the output settings as you like and click on Export File.

2 Ways to Resize FLV Videos on Android
Wouldn’t it be great if you could resize FLV videos on your android device rather than having to open your computer for every small task? Previously, this was a major issue due to a lack of good video editors for android with flv support but that’s no longer the case. Below are two ways to resize FLV videos on android:
- Inshot

InShot is a powerful all-in-one video editor for android which acts both as a basic video editor as well as an advanced video editor with its simple design yet powerful features. There aren’t many video editors in Android that supports Flv or some older codecs, but InShot is one of the very few editors that support these video formats. It is a paid app but also has a limited free version to try.
Steps to resize FLV videos on Android with InShot:
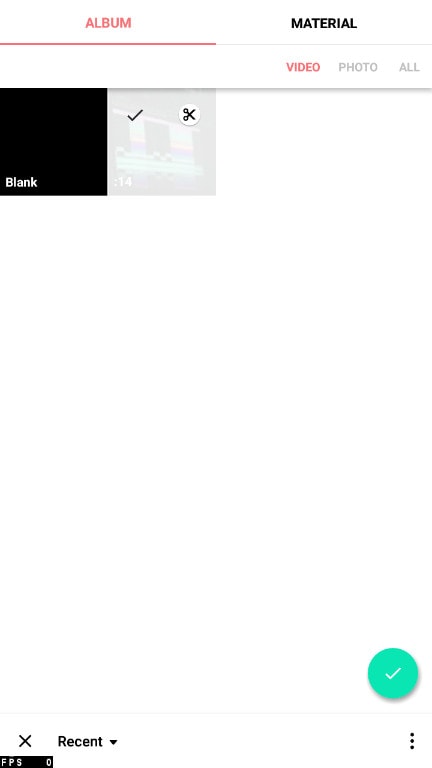
- Open the Inshot app on your android device and click on Video.

- Now select the FLV video file and click on the tick icon near the bottom right.
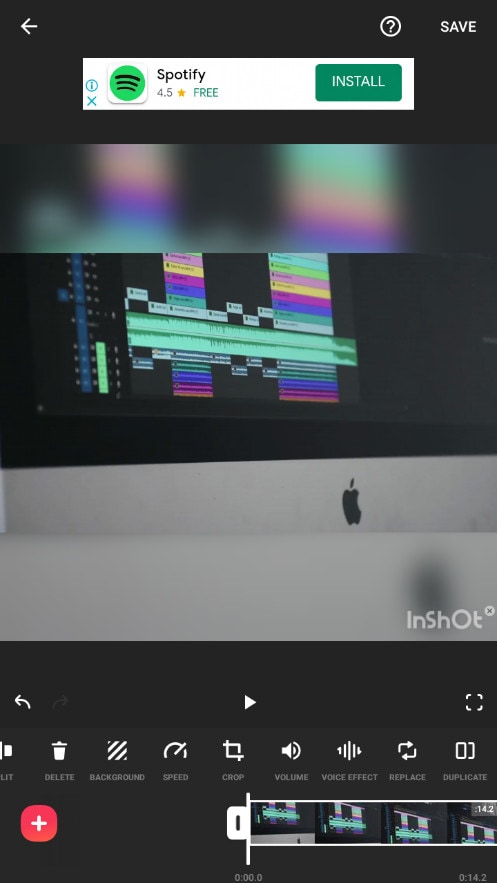
- Then tap on the Crop option from the tools at the bottom.
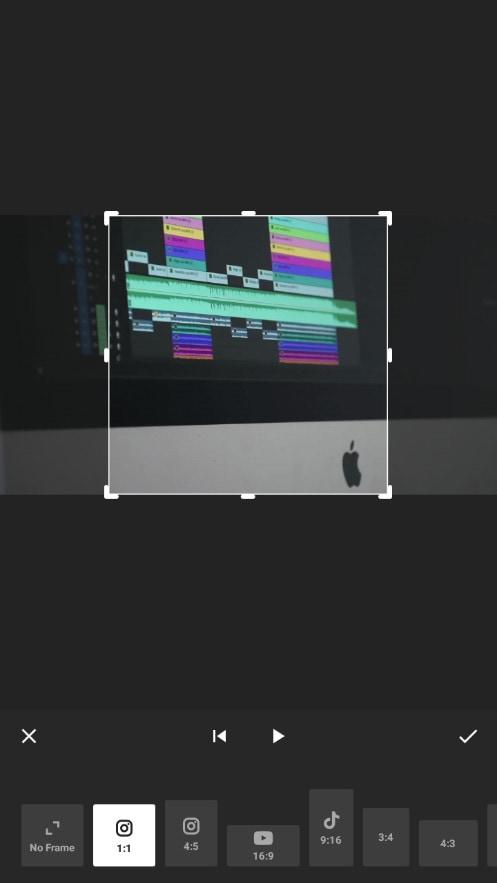
- Now select the aspect ratio you like and crop accordingly.
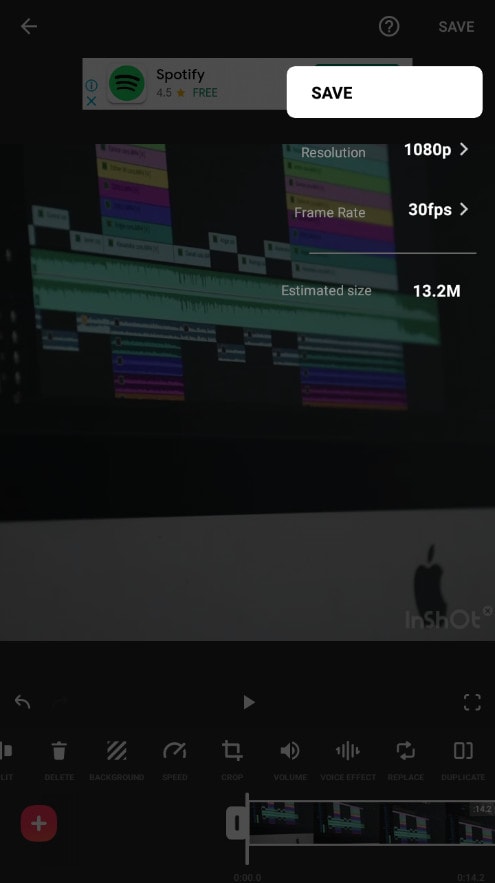
- To save the video, tap on the Save button at the top right. Then choose the resolution and finally save the video to your device.
- AndroVid – Video Editor, Video Maker

AndroVid is an easy-to-use, full-featured video editor especially developed to edit videos for social media like YouTube, TikTok, Facebook, Instagram, etc. It is not a very popular application with just over 300k+ downloads in Google Play Store, but after testing it out, we thought it deserves to be in this article. It is available for free to download from Google Play Store.
Steps to resize FLV videos on Android with AndroVid Video Editor:
- Open AndroVid Video Editor on an android phone and go inside the Videos

- Now select the FLV video file that you want to resize.

- Inside editor, tap on the Crop tool in the toolbar at the top.

- Then select the preferred Aspect ratio from the top right, reposition the video area and tap on the tick icon to save the video.

- If you need to change the resolution too, click on the three dots at the top right after the video is saved successfully. Then choose the preferred resolution, quality, and format and click on the tick icon to export.

2 Ways to Resize FLV Videos on iPhone
Like Android, you can also resize FLV videos on your iPhone on the go without needing to use your computer. Doing such editing on mobile phones can really save your time and effort, so here are 2 ways for you to resize FLV videos on iPhone:
- Cyberlink Powerdirector

Cyberlink Powerdirector is one of the most popular as well as powerful video editors for Android and iOS. It is a full-featured mobile video editor with over 130M+ downloads on the App Store which allows you to do an advanced level of editing. It is a paid software but also has a free version available for download.
Steps to resize FLV videos on iPhone with PowerDirector:
- Launch the PowerDirector app on your iPhone and create a new project. Unlike other apps, you cannot change the aspect ratio later, so you need to set the aspect ratio you want while creating a new project.

- Now add the FLV video file into the timeline by tapping on the ‘**+**’ icon on the video. Then tap on the play button at the top right to enter the editor.

- To resize the video, select the video clip in the timeline and tap on the pencil icon at the bottom left. Then use different crop tools available to resize your video as you want.

- After you resize the video, tap on the export button on the top right to export it. Then tap on Produce and Share, and produce resized video with preferred settings.

- Splice – Video Editor & Maker

Splice – Video Editor & Maker is a simple yet powerful application that makes it easy to create fully customized and professional-looking videos on iPhone. It is another great app for resizing FLV videos on iPhone with over 70M+ downloads on App Store and it is available for free.
Steps to resize FLV videos on iPhone with Splice:
- Open the Splice app on the iPhone and tap on the ‘**+**’ icon to create a new project.

- Now select the flv video file to add and start the project.

- To resize the video, tap on the gear icon at the top right corner which opens up Project settings from where you can change the aspect ratio.

- To crop the video, select the clip in the timeline and tap on the Crop option in the toolbar. You can crop and reposition the video from there.

- Then click on the Export icon at the top right corner to export the video with preferred configurations.

2 Ways to Resize FLV Videos Online
Resizing is not that big of a task and you might just want to quickly resize your Flv video and share it. So why bother installing and running large video editing programs on your computer or even mobile phones when you can easily resize your videos in the web browser? Yes, you read that right, and below are the 2 ways for you to resize FLV videos online:
- io

Veed is a simple online video editing tool that you can access from any device with the help of a web browser. It can help you resize your Flv videos easily within just a few clicks. It has a clean and beautiful interface with a responsive design which provides you with a good editing experience while using it. It is a paid tool but you can also try it for free before purchasing it.
Steps to resize FLV videos online with Veed.io:
- Go to veed.io on your web browser and click on ‘Upload Your Video’ to get started without any account.

- Now upload the FLV video or you can directly drag and drop the video there.

- After you upload the video, you’ll be taken inside the Veed editor. To change the aspect ratio, go to the Size section inside Project Settings and choose the size you want to resize to.

- To crop the video, select the clip in the timeline and directly resize the video from the preview area. And you can also use settings like ‘Fill the canvas’ and ‘Fit the canvas’ at the left side for ease.

- Then click on the Export button at the top right corner to open Export settings. Configure the settings as you like and click on ‘Export Video’ to render and download the video.

- Clideo

When it comes to resizing or editing videos online, Clideo is one of the best tools you can rely on. Like Veed.io, it has a clean and responsive interface and supports many video formats including flv. Clideo is free to use but also comes with various subscription plans for extra functionalities.
Steps to resize FLV videos online with Clideo:
- Go to clideo.com/resize-video and upload your video through ‘Choose file’ button.

- To resize the aspect ratio, choose your desired formats in the ‘Resize for’ section. You can also manually set the aspect ratio.

- Then just below that, you’ll find various cropping options. Use them to crop or resize the video as you like.

- Finally, click on the Export button at the bottom right corner to export the video. You can download the video or can directly save to cloud storage like Drive, Dropbox, etc.

FAQs about Resizing FLV Video
Here are some of the Frequently Asked Questions (FAQs) related to resizing FLV videos that you might be interested in:
- How do I make FLV files smaller?
You can make FLV files smaller with the help of any video editor that supports Flv video format by cutting and cropping out unnecessary parts, decreasing the resolution, and bitrate, and converting flv into another lighter file format.
- Which video editors support FLV file format?
There are few video editors like Filmora, Movavi, VSDC, etc. that support the FLV file format. But when it comes to editing FLV videos, Filmora Video Editor is the best choice.
- How do I view an FLV file?
FLV is one of the oldest video formats due to which most new and modern video players don’t recognize it or can’t play it. However, there are few programs like VLC media players which can help you view an FLV file. Or you can also convert the FLV file into other supported video formats with the help of a video converter.
- Can I convert a horizontal FLV video into a vertical one?
Yes, and that’s a piece of cake when you use Filmora Video Editor or other similar video editors. You just need to change the aspect ratio of the video or the project from horizontal (generally 16:9) to vertical (generally 9:16).
- Can I resize FLV video files on my mobile?
Though video editors on mobile are not as powerful as those on PC, there are some that are still capable enough to let you easily resize FLV video files on mobile devices. Some examples are InShot, Splice, Powerdirector, etc.
For macOS 10.14 or later
Why choose Filmora Video Editor for resizing FLV videos, you say?
- Simple UI and easy interface
- Easily crop or change the aspect ratio of the video
- Not all video editors support FLV video format, but the Filmora does
- Advanced export options to compress or change the file size of video
- Suitable for beginners as well as professionals
- Regular software updates and improvements
Plus, Filmora Video Editor has a free version, so you can instantly download the program, install it, and get started on resizing FLV Videos. Below is a step-by-step guide to resize FLV Videos on Windows and Mac with Wondershare Filmora Video Editor, so you can follow along!
Steps to resize FLV videos with Filmora Video Editor:
- Launch Filmora and open a new project
Run the Wondershare Filmora application on Windows or Mac after installing it. Then you should automatically be inside a new project. If not, you can manually open a new project by going to File on the top left corner and then clicking on ‘**New Project**’.

- Import the FLV video and add it to timeline
Click on ‘**Import Media Files**’ and import the flv video into project media from your computer’s file explorer. Then add the video to the timeline by dragging it inside the timeline.

- Edit and perform desired modifications (Optional)
If you are just looking to resize the FLV video file, then you can skip this step and move to step no. 4. Otherwise, you can do various editings on the video like cropping, muting, trimming, animating, etc. before resizing the video. Filmora provides a wide range of features for editing and adding effects to the video.

- Resize the video by changing the aspect ratio
Aspect ratio defines the shape of your video like if you want the video to be horizontal, vertical, square, or custom. Generally, the term ‘resizing video’ refers to changing the aspect ratio of the video. For that, go to the File and then to the Project Settings. Then on the Aspect Ratio box, select the one that you prefer or you can try custom scaling. You can choose your preferred resolution of the project too while you’re at it.

- Resize the video by cropping
When you change the aspect ratio of the project, some parts of your flv video might not fit or it might be shrunk small to fit. So you need to resize the flv video by cropping so that you can crop and focus on the part of the video you like. To crop the video, select the flv video clip in the timeline and click on the crop icon in the timeline toolbar. Now choose the ratio you want to crop and select the part you’d like to keep. Then click OK and your flv video will be resized.

- Adjust the file size of the video through export settings
After you’ve cropped and resized the Flv video, you need to export it by clicking the Export button on the top center part. There are different settings available for exporting the video. Click on the Settings button near the resolution and you’ll be shown some detailed preferences for exporting. Every setting here like frame rate, resolution, bitrate, etc. can affect the size of the output video.

Filmora Video Editor really makes the task of editing and resizing FLV videos easier, simpler, and faster. Since you now know the steps, it’s time you try it and resize your own FLV videos with this best FLV Editor for Windows and Mac.
Alternative Way to Resize FLV Videos on Windows
In case you want to try something different than Filmora, here are two alternative software (one paid and another free) that you can use to resize your FLV Videos on Windows:
- Movavi Video Editor Plus

Movavi Video Editor Plus is one of the best easy-to-use video editors that can help you to resize FLV videos as well as edit them on Windows. Its interface and functionalities are somewhat similar to that of the Filmora Video Editor. This is a paid software available for download on both Windows and Mac but you can try it for free with their 7 days trial version.
Steps to resize FLV videos on Windows with Movavi Video Editor:
- Install Movavi Video Editor and run the software on your PC. Then you should automatically be inside a new project in it.

- Import the FLV video file you want to resize through the ‘File Import’ tab on the left and drag it to the timeline.

- To resize the aspect ratio, expand the resolution options near the preview screen above the export button and select the preferred ratio.

- To crop or resize the video, select the clip in the timeline and use the crop tool to make adjustments as you wish. Then hit Apply to save changes.

- After the video is ready, export it with the Export button on the right side of the screen. Then choose your preferred settings for output and click on Start after which your video will be rendered and saved to your PC.

- VSDC Free Video Editor

VSDC Free Video Editor is another alternative to Filmora for resizing FLV videos on Windows. It is a free video editor that packs a wide range of editing features without any restrictions. However, it does have a paid version with some advanced features and hardware acceleration.
Steps to resize FLV videos on Windows with VSDC Free Video Editor:
- Install and open VSDC video editor on your PC. Then create a new project with preferred settings through the ‘Projects’ tab on the top left corner.

- Import the video file into the project by dragging and dropping it directly into the timeline.

- To resize the aspect ratio, click on the Projects Explorer and click on your project name. Then in the Properties windows on the right, manually adjust width, height, resolution, etc. according to your preferences.

- To crop and reposition your video, select the clip in the timeline and go to the Editor tab on the top. Then use the crop tool and adjust your video accordingly.

- Finally export your design through the Export project tab at the top with preferred settings.

Alternative Way to Resize FLV Videos on Mac
Wondershare Filmora Video Editor is also available for Mac operating system which is recommended to resize FLV videos but if you want to try out some other alternatives, then below are the two ways to resize FLV videos on Mac:
- VideoProc Converter

VideoProc is a powerful video editor/ converter that helps you edit, convert, and resize any kind of video. It also supports a wide range of codecs and video formats including flv. It is a paid software but you can also try their free trial version with some limitations.
Steps to resize FLV videos on Mac with VideoProc:
- Launch VideoProc on a Mac device and go inside the Video

- Add files in VideoProc by drag and drop method or directly through the ‘Add Video’ option.

- Then click on the Options (codec) on the right side of the video and change the resolutions and aspect ratio of the video as you want. You can also manage export settings like quality, codec, fps, bitrate, etc. from this tab.

- Then go to the Crop section inside the Edit Video tab and crop the video as you like with preview and different other options.

- Finally click Done to go back and hit the Run This’ll start rendering the video and will save it to your Mac device.

- Shotcut

Shotcut is another alternative to Filmora Video Editor for resizing FLV videos on Mac. It is a free, open-source, and cross-platform video editor that has a sleek and intuitive interface with many useful editing features which really makes it suitable for both beginners as well as advanced editors.
Steps to resize FLV videos on Mac with Shotcut:
- Run the Shotcut program on your Mac after installing it and create a new project.

- Import the Flv video file to the project by drag and drop method into the timeline.

- To change the resolution and aspect ratio of the video, go to the Settings tab, then Video mode, and choose the format you want.

- To crop the video, select the clip in the timeline and go to the Filters Now click on the ‘**+**’ icon and select Size, Position & Rotate under the Favorite section. Then adjust crop settings as you like.

- Finally, go to the Export section at the top and click on Advanced. Then configure the output settings as you like and click on Export File.

2 Ways to Resize FLV Videos on Android
Wouldn’t it be great if you could resize FLV videos on your android device rather than having to open your computer for every small task? Previously, this was a major issue due to a lack of good video editors for android with flv support but that’s no longer the case. Below are two ways to resize FLV videos on android:
- Inshot

InShot is a powerful all-in-one video editor for android which acts both as a basic video editor as well as an advanced video editor with its simple design yet powerful features. There aren’t many video editors in Android that supports Flv or some older codecs, but InShot is one of the very few editors that support these video formats. It is a paid app but also has a limited free version to try.
Steps to resize FLV videos on Android with InShot:
- Open the Inshot app on your android device and click on Video.

- Now select the FLV video file and click on the tick icon near the bottom right.

- Then tap on the Crop option from the tools at the bottom.

- Now select the aspect ratio you like and crop accordingly.

- To save the video, tap on the Save button at the top right. Then choose the resolution and finally save the video to your device.

- AndroVid – Video Editor, Video Maker

AndroVid is an easy-to-use, full-featured video editor especially developed to edit videos for social media like YouTube, TikTok, Facebook, Instagram, etc. It is not a very popular application with just over 300k+ downloads in Google Play Store, but after testing it out, we thought it deserves to be in this article. It is available for free to download from Google Play Store.
Steps to resize FLV videos on Android with AndroVid Video Editor:
- Open AndroVid Video Editor on an android phone and go inside the Videos

- Now select the FLV video file that you want to resize.

- Inside editor, tap on the Crop tool in the toolbar at the top.

- Then select the preferred Aspect ratio from the top right, reposition the video area and tap on the tick icon to save the video.

- If you need to change the resolution too, click on the three dots at the top right after the video is saved successfully. Then choose the preferred resolution, quality, and format and click on the tick icon to export.

2 Ways to Resize FLV Videos on iPhone
Like Android, you can also resize FLV videos on your iPhone on the go without needing to use your computer. Doing such editing on mobile phones can really save your time and effort, so here are 2 ways for you to resize FLV videos on iPhone:
- Cyberlink Powerdirector

Cyberlink Powerdirector is one of the most popular as well as powerful video editors for Android and iOS. It is a full-featured mobile video editor with over 130M+ downloads on the App Store which allows you to do an advanced level of editing. It is a paid software but also has a free version available for download.
Steps to resize FLV videos on iPhone with PowerDirector:
- Launch the PowerDirector app on your iPhone and create a new project. Unlike other apps, you cannot change the aspect ratio later, so you need to set the aspect ratio you want while creating a new project.

- Now add the FLV video file into the timeline by tapping on the ‘**+**’ icon on the video. Then tap on the play button at the top right to enter the editor.

- To resize the video, select the video clip in the timeline and tap on the pencil icon at the bottom left. Then use different crop tools available to resize your video as you want.

- After you resize the video, tap on the export button on the top right to export it. Then tap on Produce and Share, and produce resized video with preferred settings.

- Splice – Video Editor & Maker

Splice – Video Editor & Maker is a simple yet powerful application that makes it easy to create fully customized and professional-looking videos on iPhone. It is another great app for resizing FLV videos on iPhone with over 70M+ downloads on App Store and it is available for free.
Steps to resize FLV videos on iPhone with Splice:
- Open the Splice app on the iPhone and tap on the ‘**+**’ icon to create a new project.

- Now select the flv video file to add and start the project.

- To resize the video, tap on the gear icon at the top right corner which opens up Project settings from where you can change the aspect ratio.

- To crop the video, select the clip in the timeline and tap on the Crop option in the toolbar. You can crop and reposition the video from there.

- Then click on the Export icon at the top right corner to export the video with preferred configurations.

2 Ways to Resize FLV Videos Online
Resizing is not that big of a task and you might just want to quickly resize your Flv video and share it. So why bother installing and running large video editing programs on your computer or even mobile phones when you can easily resize your videos in the web browser? Yes, you read that right, and below are the 2 ways for you to resize FLV videos online:
- io

Veed is a simple online video editing tool that you can access from any device with the help of a web browser. It can help you resize your Flv videos easily within just a few clicks. It has a clean and beautiful interface with a responsive design which provides you with a good editing experience while using it. It is a paid tool but you can also try it for free before purchasing it.
Steps to resize FLV videos online with Veed.io:
- Go to veed.io on your web browser and click on ‘Upload Your Video’ to get started without any account.

- Now upload the FLV video or you can directly drag and drop the video there.

- After you upload the video, you’ll be taken inside the Veed editor. To change the aspect ratio, go to the Size section inside Project Settings and choose the size you want to resize to.

- To crop the video, select the clip in the timeline and directly resize the video from the preview area. And you can also use settings like ‘Fill the canvas’ and ‘Fit the canvas’ at the left side for ease.

- Then click on the Export button at the top right corner to open Export settings. Configure the settings as you like and click on ‘Export Video’ to render and download the video.

- Clideo

When it comes to resizing or editing videos online, Clideo is one of the best tools you can rely on. Like Veed.io, it has a clean and responsive interface and supports many video formats including flv. Clideo is free to use but also comes with various subscription plans for extra functionalities.
Steps to resize FLV videos online with Clideo:
- Go to clideo.com/resize-video and upload your video through ‘Choose file’ button.

- To resize the aspect ratio, choose your desired formats in the ‘Resize for’ section. You can also manually set the aspect ratio.

- Then just below that, you’ll find various cropping options. Use them to crop or resize the video as you like.

- Finally, click on the Export button at the bottom right corner to export the video. You can download the video or can directly save to cloud storage like Drive, Dropbox, etc.

FAQs about Resizing FLV Video
Here are some of the Frequently Asked Questions (FAQs) related to resizing FLV videos that you might be interested in:
- How do I make FLV files smaller?
You can make FLV files smaller with the help of any video editor that supports Flv video format by cutting and cropping out unnecessary parts, decreasing the resolution, and bitrate, and converting flv into another lighter file format.
- Which video editors support FLV file format?
There are few video editors like Filmora, Movavi, VSDC, etc. that support the FLV file format. But when it comes to editing FLV videos, Filmora Video Editor is the best choice.
- How do I view an FLV file?
FLV is one of the oldest video formats due to which most new and modern video players don’t recognize it or can’t play it. However, there are few programs like VLC media players which can help you view an FLV file. Or you can also convert the FLV file into other supported video formats with the help of a video converter.
- Can I convert a horizontal FLV video into a vertical one?
Yes, and that’s a piece of cake when you use Filmora Video Editor or other similar video editors. You just need to change the aspect ratio of the video or the project from horizontal (generally 16:9) to vertical (generally 9:16).
- Can I resize FLV video files on my mobile?
Though video editors on mobile are not as powerful as those on PC, there are some that are still capable enough to let you easily resize FLV video files on mobile devices. Some examples are InShot, Splice, Powerdirector, etc.
For macOS 10.14 or later
Why choose Filmora Video Editor for resizing FLV videos, you say?
- Simple UI and easy interface
- Easily crop or change the aspect ratio of the video
- Not all video editors support FLV video format, but the Filmora does
- Advanced export options to compress or change the file size of video
- Suitable for beginners as well as professionals
- Regular software updates and improvements
Plus, Filmora Video Editor has a free version, so you can instantly download the program, install it, and get started on resizing FLV Videos. Below is a step-by-step guide to resize FLV Videos on Windows and Mac with Wondershare Filmora Video Editor, so you can follow along!
Steps to resize FLV videos with Filmora Video Editor:
- Launch Filmora and open a new project
Run the Wondershare Filmora application on Windows or Mac after installing it. Then you should automatically be inside a new project. If not, you can manually open a new project by going to File on the top left corner and then clicking on ‘**New Project**’.

- Import the FLV video and add it to timeline
Click on ‘**Import Media Files**’ and import the flv video into project media from your computer’s file explorer. Then add the video to the timeline by dragging it inside the timeline.

- Edit and perform desired modifications (Optional)
If you are just looking to resize the FLV video file, then you can skip this step and move to step no. 4. Otherwise, you can do various editings on the video like cropping, muting, trimming, animating, etc. before resizing the video. Filmora provides a wide range of features for editing and adding effects to the video.

- Resize the video by changing the aspect ratio
Aspect ratio defines the shape of your video like if you want the video to be horizontal, vertical, square, or custom. Generally, the term ‘resizing video’ refers to changing the aspect ratio of the video. For that, go to the File and then to the Project Settings. Then on the Aspect Ratio box, select the one that you prefer or you can try custom scaling. You can choose your preferred resolution of the project too while you’re at it.

- Resize the video by cropping
When you change the aspect ratio of the project, some parts of your flv video might not fit or it might be shrunk small to fit. So you need to resize the flv video by cropping so that you can crop and focus on the part of the video you like. To crop the video, select the flv video clip in the timeline and click on the crop icon in the timeline toolbar. Now choose the ratio you want to crop and select the part you’d like to keep. Then click OK and your flv video will be resized.

- Adjust the file size of the video through export settings
After you’ve cropped and resized the Flv video, you need to export it by clicking the Export button on the top center part. There are different settings available for exporting the video. Click on the Settings button near the resolution and you’ll be shown some detailed preferences for exporting. Every setting here like frame rate, resolution, bitrate, etc. can affect the size of the output video.

Filmora Video Editor really makes the task of editing and resizing FLV videos easier, simpler, and faster. Since you now know the steps, it’s time you try it and resize your own FLV videos with this best FLV Editor for Windows and Mac.
Alternative Way to Resize FLV Videos on Windows
In case you want to try something different than Filmora, here are two alternative software (one paid and another free) that you can use to resize your FLV Videos on Windows:
- Movavi Video Editor Plus

Movavi Video Editor Plus is one of the best easy-to-use video editors that can help you to resize FLV videos as well as edit them on Windows. Its interface and functionalities are somewhat similar to that of the Filmora Video Editor. This is a paid software available for download on both Windows and Mac but you can try it for free with their 7 days trial version.
Steps to resize FLV videos on Windows with Movavi Video Editor:
- Install Movavi Video Editor and run the software on your PC. Then you should automatically be inside a new project in it.

- Import the FLV video file you want to resize through the ‘File Import’ tab on the left and drag it to the timeline.

- To resize the aspect ratio, expand the resolution options near the preview screen above the export button and select the preferred ratio.

- To crop or resize the video, select the clip in the timeline and use the crop tool to make adjustments as you wish. Then hit Apply to save changes.

- After the video is ready, export it with the Export button on the right side of the screen. Then choose your preferred settings for output and click on Start after which your video will be rendered and saved to your PC.

- VSDC Free Video Editor

VSDC Free Video Editor is another alternative to Filmora for resizing FLV videos on Windows. It is a free video editor that packs a wide range of editing features without any restrictions. However, it does have a paid version with some advanced features and hardware acceleration.
Steps to resize FLV videos on Windows with VSDC Free Video Editor:
- Install and open VSDC video editor on your PC. Then create a new project with preferred settings through the ‘Projects’ tab on the top left corner.

- Import the video file into the project by dragging and dropping it directly into the timeline.

- To resize the aspect ratio, click on the Projects Explorer and click on your project name. Then in the Properties windows on the right, manually adjust width, height, resolution, etc. according to your preferences.

- To crop and reposition your video, select the clip in the timeline and go to the Editor tab on the top. Then use the crop tool and adjust your video accordingly.

- Finally export your design through the Export project tab at the top with preferred settings.

Alternative Way to Resize FLV Videos on Mac
Wondershare Filmora Video Editor is also available for Mac operating system which is recommended to resize FLV videos but if you want to try out some other alternatives, then below are the two ways to resize FLV videos on Mac:
- VideoProc Converter

VideoProc is a powerful video editor/ converter that helps you edit, convert, and resize any kind of video. It also supports a wide range of codecs and video formats including flv. It is a paid software but you can also try their free trial version with some limitations.
Steps to resize FLV videos on Mac with VideoProc:
- Launch VideoProc on a Mac device and go inside the Video

- Add files in VideoProc by drag and drop method or directly through the ‘Add Video’ option.

- Then click on the Options (codec) on the right side of the video and change the resolutions and aspect ratio of the video as you want. You can also manage export settings like quality, codec, fps, bitrate, etc. from this tab.

- Then go to the Crop section inside the Edit Video tab and crop the video as you like with preview and different other options.

- Finally click Done to go back and hit the Run This’ll start rendering the video and will save it to your Mac device.

- Shotcut

Shotcut is another alternative to Filmora Video Editor for resizing FLV videos on Mac. It is a free, open-source, and cross-platform video editor that has a sleek and intuitive interface with many useful editing features which really makes it suitable for both beginners as well as advanced editors.
Steps to resize FLV videos on Mac with Shotcut:
- Run the Shotcut program on your Mac after installing it and create a new project.

- Import the Flv video file to the project by drag and drop method into the timeline.

- To change the resolution and aspect ratio of the video, go to the Settings tab, then Video mode, and choose the format you want.

- To crop the video, select the clip in the timeline and go to the Filters Now click on the ‘**+**’ icon and select Size, Position & Rotate under the Favorite section. Then adjust crop settings as you like.

- Finally, go to the Export section at the top and click on Advanced. Then configure the output settings as you like and click on Export File.

2 Ways to Resize FLV Videos on Android
Wouldn’t it be great if you could resize FLV videos on your android device rather than having to open your computer for every small task? Previously, this was a major issue due to a lack of good video editors for android with flv support but that’s no longer the case. Below are two ways to resize FLV videos on android:
- Inshot

InShot is a powerful all-in-one video editor for android which acts both as a basic video editor as well as an advanced video editor with its simple design yet powerful features. There aren’t many video editors in Android that supports Flv or some older codecs, but InShot is one of the very few editors that support these video formats. It is a paid app but also has a limited free version to try.
Steps to resize FLV videos on Android with InShot:
- Open the Inshot app on your android device and click on Video.

- Now select the FLV video file and click on the tick icon near the bottom right.

- Then tap on the Crop option from the tools at the bottom.

- Now select the aspect ratio you like and crop accordingly.

- To save the video, tap on the Save button at the top right. Then choose the resolution and finally save the video to your device.

- AndroVid – Video Editor, Video Maker

AndroVid is an easy-to-use, full-featured video editor especially developed to edit videos for social media like YouTube, TikTok, Facebook, Instagram, etc. It is not a very popular application with just over 300k+ downloads in Google Play Store, but after testing it out, we thought it deserves to be in this article. It is available for free to download from Google Play Store.
Steps to resize FLV videos on Android with AndroVid Video Editor:
- Open AndroVid Video Editor on an android phone and go inside the Videos

- Now select the FLV video file that you want to resize.

- Inside editor, tap on the Crop tool in the toolbar at the top.

- Then select the preferred Aspect ratio from the top right, reposition the video area and tap on the tick icon to save the video.

- If you need to change the resolution too, click on the three dots at the top right after the video is saved successfully. Then choose the preferred resolution, quality, and format and click on the tick icon to export.

2 Ways to Resize FLV Videos on iPhone
Like Android, you can also resize FLV videos on your iPhone on the go without needing to use your computer. Doing such editing on mobile phones can really save your time and effort, so here are 2 ways for you to resize FLV videos on iPhone:
- Cyberlink Powerdirector

Cyberlink Powerdirector is one of the most popular as well as powerful video editors for Android and iOS. It is a full-featured mobile video editor with over 130M+ downloads on the App Store which allows you to do an advanced level of editing. It is a paid software but also has a free version available for download.
Steps to resize FLV videos on iPhone with PowerDirector:
- Launch the PowerDirector app on your iPhone and create a new project. Unlike other apps, you cannot change the aspect ratio later, so you need to set the aspect ratio you want while creating a new project.

- Now add the FLV video file into the timeline by tapping on the ‘**+**’ icon on the video. Then tap on the play button at the top right to enter the editor.

- To resize the video, select the video clip in the timeline and tap on the pencil icon at the bottom left. Then use different crop tools available to resize your video as you want.

- After you resize the video, tap on the export button on the top right to export it. Then tap on Produce and Share, and produce resized video with preferred settings.

- Splice – Video Editor & Maker

Splice – Video Editor & Maker is a simple yet powerful application that makes it easy to create fully customized and professional-looking videos on iPhone. It is another great app for resizing FLV videos on iPhone with over 70M+ downloads on App Store and it is available for free.
Steps to resize FLV videos on iPhone with Splice:
- Open the Splice app on the iPhone and tap on the ‘**+**’ icon to create a new project.

- Now select the flv video file to add and start the project.

- To resize the video, tap on the gear icon at the top right corner which opens up Project settings from where you can change the aspect ratio.

- To crop the video, select the clip in the timeline and tap on the Crop option in the toolbar. You can crop and reposition the video from there.

- Then click on the Export icon at the top right corner to export the video with preferred configurations.

2 Ways to Resize FLV Videos Online
Resizing is not that big of a task and you might just want to quickly resize your Flv video and share it. So why bother installing and running large video editing programs on your computer or even mobile phones when you can easily resize your videos in the web browser? Yes, you read that right, and below are the 2 ways for you to resize FLV videos online:
- io

Veed is a simple online video editing tool that you can access from any device with the help of a web browser. It can help you resize your Flv videos easily within just a few clicks. It has a clean and beautiful interface with a responsive design which provides you with a good editing experience while using it. It is a paid tool but you can also try it for free before purchasing it.
Steps to resize FLV videos online with Veed.io:
- Go to veed.io on your web browser and click on ‘Upload Your Video’ to get started without any account.

- Now upload the FLV video or you can directly drag and drop the video there.

- After you upload the video, you’ll be taken inside the Veed editor. To change the aspect ratio, go to the Size section inside Project Settings and choose the size you want to resize to.

- To crop the video, select the clip in the timeline and directly resize the video from the preview area. And you can also use settings like ‘Fill the canvas’ and ‘Fit the canvas’ at the left side for ease.

- Then click on the Export button at the top right corner to open Export settings. Configure the settings as you like and click on ‘Export Video’ to render and download the video.

- Clideo

When it comes to resizing or editing videos online, Clideo is one of the best tools you can rely on. Like Veed.io, it has a clean and responsive interface and supports many video formats including flv. Clideo is free to use but also comes with various subscription plans for extra functionalities.
Steps to resize FLV videos online with Clideo:
- Go to clideo.com/resize-video and upload your video through ‘Choose file’ button.

- To resize the aspect ratio, choose your desired formats in the ‘Resize for’ section. You can also manually set the aspect ratio.

- Then just below that, you’ll find various cropping options. Use them to crop or resize the video as you like.

- Finally, click on the Export button at the bottom right corner to export the video. You can download the video or can directly save to cloud storage like Drive, Dropbox, etc.

FAQs about Resizing FLV Video
Here are some of the Frequently Asked Questions (FAQs) related to resizing FLV videos that you might be interested in:
- How do I make FLV files smaller?
You can make FLV files smaller with the help of any video editor that supports Flv video format by cutting and cropping out unnecessary parts, decreasing the resolution, and bitrate, and converting flv into another lighter file format.
- Which video editors support FLV file format?
There are few video editors like Filmora, Movavi, VSDC, etc. that support the FLV file format. But when it comes to editing FLV videos, Filmora Video Editor is the best choice.
- How do I view an FLV file?
FLV is one of the oldest video formats due to which most new and modern video players don’t recognize it or can’t play it. However, there are few programs like VLC media players which can help you view an FLV file. Or you can also convert the FLV file into other supported video formats with the help of a video converter.
- Can I convert a horizontal FLV video into a vertical one?
Yes, and that’s a piece of cake when you use Filmora Video Editor or other similar video editors. You just need to change the aspect ratio of the video or the project from horizontal (generally 16:9) to vertical (generally 9:16).
- Can I resize FLV video files on my mobile?
Though video editors on mobile are not as powerful as those on PC, there are some that are still capable enough to let you easily resize FLV video files on mobile devices. Some examples are InShot, Splice, Powerdirector, etc.
For macOS 10.14 or later
Why choose Filmora Video Editor for resizing FLV videos, you say?
- Simple UI and easy interface
- Easily crop or change the aspect ratio of the video
- Not all video editors support FLV video format, but the Filmora does
- Advanced export options to compress or change the file size of video
- Suitable for beginners as well as professionals
- Regular software updates and improvements
Plus, Filmora Video Editor has a free version, so you can instantly download the program, install it, and get started on resizing FLV Videos. Below is a step-by-step guide to resize FLV Videos on Windows and Mac with Wondershare Filmora Video Editor, so you can follow along!
Steps to resize FLV videos with Filmora Video Editor:
- Launch Filmora and open a new project
Run the Wondershare Filmora application on Windows or Mac after installing it. Then you should automatically be inside a new project. If not, you can manually open a new project by going to File on the top left corner and then clicking on ‘**New Project**’.

- Import the FLV video and add it to timeline
Click on ‘**Import Media Files**’ and import the flv video into project media from your computer’s file explorer. Then add the video to the timeline by dragging it inside the timeline.

- Edit and perform desired modifications (Optional)
If you are just looking to resize the FLV video file, then you can skip this step and move to step no. 4. Otherwise, you can do various editings on the video like cropping, muting, trimming, animating, etc. before resizing the video. Filmora provides a wide range of features for editing and adding effects to the video.

- Resize the video by changing the aspect ratio
Aspect ratio defines the shape of your video like if you want the video to be horizontal, vertical, square, or custom. Generally, the term ‘resizing video’ refers to changing the aspect ratio of the video. For that, go to the File and then to the Project Settings. Then on the Aspect Ratio box, select the one that you prefer or you can try custom scaling. You can choose your preferred resolution of the project too while you’re at it.

- Resize the video by cropping
When you change the aspect ratio of the project, some parts of your flv video might not fit or it might be shrunk small to fit. So you need to resize the flv video by cropping so that you can crop and focus on the part of the video you like. To crop the video, select the flv video clip in the timeline and click on the crop icon in the timeline toolbar. Now choose the ratio you want to crop and select the part you’d like to keep. Then click OK and your flv video will be resized.

- Adjust the file size of the video through export settings
After you’ve cropped and resized the Flv video, you need to export it by clicking the Export button on the top center part. There are different settings available for exporting the video. Click on the Settings button near the resolution and you’ll be shown some detailed preferences for exporting. Every setting here like frame rate, resolution, bitrate, etc. can affect the size of the output video.

Filmora Video Editor really makes the task of editing and resizing FLV videos easier, simpler, and faster. Since you now know the steps, it’s time you try it and resize your own FLV videos with this best FLV Editor for Windows and Mac.
Alternative Way to Resize FLV Videos on Windows
In case you want to try something different than Filmora, here are two alternative software (one paid and another free) that you can use to resize your FLV Videos on Windows:
- Movavi Video Editor Plus

Movavi Video Editor Plus is one of the best easy-to-use video editors that can help you to resize FLV videos as well as edit them on Windows. Its interface and functionalities are somewhat similar to that of the Filmora Video Editor. This is a paid software available for download on both Windows and Mac but you can try it for free with their 7 days trial version.
Steps to resize FLV videos on Windows with Movavi Video Editor:
- Install Movavi Video Editor and run the software on your PC. Then you should automatically be inside a new project in it.

- Import the FLV video file you want to resize through the ‘File Import’ tab on the left and drag it to the timeline.

- To resize the aspect ratio, expand the resolution options near the preview screen above the export button and select the preferred ratio.

- To crop or resize the video, select the clip in the timeline and use the crop tool to make adjustments as you wish. Then hit Apply to save changes.

- After the video is ready, export it with the Export button on the right side of the screen. Then choose your preferred settings for output and click on Start after which your video will be rendered and saved to your PC.

- VSDC Free Video Editor

VSDC Free Video Editor is another alternative to Filmora for resizing FLV videos on Windows. It is a free video editor that packs a wide range of editing features without any restrictions. However, it does have a paid version with some advanced features and hardware acceleration.
Steps to resize FLV videos on Windows with VSDC Free Video Editor:
- Install and open VSDC video editor on your PC. Then create a new project with preferred settings through the ‘Projects’ tab on the top left corner.

- Import the video file into the project by dragging and dropping it directly into the timeline.

- To resize the aspect ratio, click on the Projects Explorer and click on your project name. Then in the Properties windows on the right, manually adjust width, height, resolution, etc. according to your preferences.

- To crop and reposition your video, select the clip in the timeline and go to the Editor tab on the top. Then use the crop tool and adjust your video accordingly.

- Finally export your design through the Export project tab at the top with preferred settings.

Alternative Way to Resize FLV Videos on Mac
Wondershare Filmora Video Editor is also available for Mac operating system which is recommended to resize FLV videos but if you want to try out some other alternatives, then below are the two ways to resize FLV videos on Mac:
- VideoProc Converter

VideoProc is a powerful video editor/ converter that helps you edit, convert, and resize any kind of video. It also supports a wide range of codecs and video formats including flv. It is a paid software but you can also try their free trial version with some limitations.
Steps to resize FLV videos on Mac with VideoProc:
- Launch VideoProc on a Mac device and go inside the Video

- Add files in VideoProc by drag and drop method or directly through the ‘Add Video’ option.

- Then click on the Options (codec) on the right side of the video and change the resolutions and aspect ratio of the video as you want. You can also manage export settings like quality, codec, fps, bitrate, etc. from this tab.

- Then go to the Crop section inside the Edit Video tab and crop the video as you like with preview and different other options.

- Finally click Done to go back and hit the Run This’ll start rendering the video and will save it to your Mac device.

- Shotcut

Shotcut is another alternative to Filmora Video Editor for resizing FLV videos on Mac. It is a free, open-source, and cross-platform video editor that has a sleek and intuitive interface with many useful editing features which really makes it suitable for both beginners as well as advanced editors.
Steps to resize FLV videos on Mac with Shotcut:
- Run the Shotcut program on your Mac after installing it and create a new project.

- Import the Flv video file to the project by drag and drop method into the timeline.

- To change the resolution and aspect ratio of the video, go to the Settings tab, then Video mode, and choose the format you want.

- To crop the video, select the clip in the timeline and go to the Filters Now click on the ‘**+**’ icon and select Size, Position & Rotate under the Favorite section. Then adjust crop settings as you like.

- Finally, go to the Export section at the top and click on Advanced. Then configure the output settings as you like and click on Export File.

2 Ways to Resize FLV Videos on Android
Wouldn’t it be great if you could resize FLV videos on your android device rather than having to open your computer for every small task? Previously, this was a major issue due to a lack of good video editors for android with flv support but that’s no longer the case. Below are two ways to resize FLV videos on android:
- Inshot

InShot is a powerful all-in-one video editor for android which acts both as a basic video editor as well as an advanced video editor with its simple design yet powerful features. There aren’t many video editors in Android that supports Flv or some older codecs, but InShot is one of the very few editors that support these video formats. It is a paid app but also has a limited free version to try.
Steps to resize FLV videos on Android with InShot:
- Open the Inshot app on your android device and click on Video.

- Now select the FLV video file and click on the tick icon near the bottom right.

- Then tap on the Crop option from the tools at the bottom.

- Now select the aspect ratio you like and crop accordingly.

- To save the video, tap on the Save button at the top right. Then choose the resolution and finally save the video to your device.

- AndroVid – Video Editor, Video Maker

AndroVid is an easy-to-use, full-featured video editor especially developed to edit videos for social media like YouTube, TikTok, Facebook, Instagram, etc. It is not a very popular application with just over 300k+ downloads in Google Play Store, but after testing it out, we thought it deserves to be in this article. It is available for free to download from Google Play Store.
Steps to resize FLV videos on Android with AndroVid Video Editor:
- Open AndroVid Video Editor on an android phone and go inside the Videos

- Now select the FLV video file that you want to resize.

- Inside editor, tap on the Crop tool in the toolbar at the top.

- Then select the preferred Aspect ratio from the top right, reposition the video area and tap on the tick icon to save the video.

- If you need to change the resolution too, click on the three dots at the top right after the video is saved successfully. Then choose the preferred resolution, quality, and format and click on the tick icon to export.

2 Ways to Resize FLV Videos on iPhone
Like Android, you can also resize FLV videos on your iPhone on the go without needing to use your computer. Doing such editing on mobile phones can really save your time and effort, so here are 2 ways for you to resize FLV videos on iPhone:
- Cyberlink Powerdirector

Cyberlink Powerdirector is one of the most popular as well as powerful video editors for Android and iOS. It is a full-featured mobile video editor with over 130M+ downloads on the App Store which allows you to do an advanced level of editing. It is a paid software but also has a free version available for download.
Steps to resize FLV videos on iPhone with PowerDirector:
- Launch the PowerDirector app on your iPhone and create a new project. Unlike other apps, you cannot change the aspect ratio later, so you need to set the aspect ratio you want while creating a new project.

- Now add the FLV video file into the timeline by tapping on the ‘**+**’ icon on the video. Then tap on the play button at the top right to enter the editor.

- To resize the video, select the video clip in the timeline and tap on the pencil icon at the bottom left. Then use different crop tools available to resize your video as you want.

- After you resize the video, tap on the export button on the top right to export it. Then tap on Produce and Share, and produce resized video with preferred settings.

- Splice – Video Editor & Maker

Splice – Video Editor & Maker is a simple yet powerful application that makes it easy to create fully customized and professional-looking videos on iPhone. It is another great app for resizing FLV videos on iPhone with over 70M+ downloads on App Store and it is available for free.
Steps to resize FLV videos on iPhone with Splice:
- Open the Splice app on the iPhone and tap on the ‘**+**’ icon to create a new project.

- Now select the flv video file to add and start the project.

- To resize the video, tap on the gear icon at the top right corner which opens up Project settings from where you can change the aspect ratio.

- To crop the video, select the clip in the timeline and tap on the Crop option in the toolbar. You can crop and reposition the video from there.

- Then click on the Export icon at the top right corner to export the video with preferred configurations.

2 Ways to Resize FLV Videos Online
Resizing is not that big of a task and you might just want to quickly resize your Flv video and share it. So why bother installing and running large video editing programs on your computer or even mobile phones when you can easily resize your videos in the web browser? Yes, you read that right, and below are the 2 ways for you to resize FLV videos online:
- io

Veed is a simple online video editing tool that you can access from any device with the help of a web browser. It can help you resize your Flv videos easily within just a few clicks. It has a clean and beautiful interface with a responsive design which provides you with a good editing experience while using it. It is a paid tool but you can also try it for free before purchasing it.
Steps to resize FLV videos online with Veed.io:
- Go to veed.io on your web browser and click on ‘Upload Your Video’ to get started without any account.

- Now upload the FLV video or you can directly drag and drop the video there.

- After you upload the video, you’ll be taken inside the Veed editor. To change the aspect ratio, go to the Size section inside Project Settings and choose the size you want to resize to.

- To crop the video, select the clip in the timeline and directly resize the video from the preview area. And you can also use settings like ‘Fill the canvas’ and ‘Fit the canvas’ at the left side for ease.

- Then click on the Export button at the top right corner to open Export settings. Configure the settings as you like and click on ‘Export Video’ to render and download the video.

- Clideo

When it comes to resizing or editing videos online, Clideo is one of the best tools you can rely on. Like Veed.io, it has a clean and responsive interface and supports many video formats including flv. Clideo is free to use but also comes with various subscription plans for extra functionalities.
Steps to resize FLV videos online with Clideo:
- Go to clideo.com/resize-video and upload your video through ‘Choose file’ button.

- To resize the aspect ratio, choose your desired formats in the ‘Resize for’ section. You can also manually set the aspect ratio.

- Then just below that, you’ll find various cropping options. Use them to crop or resize the video as you like.

- Finally, click on the Export button at the bottom right corner to export the video. You can download the video or can directly save to cloud storage like Drive, Dropbox, etc.

FAQs about Resizing FLV Video
Here are some of the Frequently Asked Questions (FAQs) related to resizing FLV videos that you might be interested in:
- How do I make FLV files smaller?
You can make FLV files smaller with the help of any video editor that supports Flv video format by cutting and cropping out unnecessary parts, decreasing the resolution, and bitrate, and converting flv into another lighter file format.
- Which video editors support FLV file format?
There are few video editors like Filmora, Movavi, VSDC, etc. that support the FLV file format. But when it comes to editing FLV videos, Filmora Video Editor is the best choice.
- How do I view an FLV file?
FLV is one of the oldest video formats due to which most new and modern video players don’t recognize it or can’t play it. However, there are few programs like VLC media players which can help you view an FLV file. Or you can also convert the FLV file into other supported video formats with the help of a video converter.
- Can I convert a horizontal FLV video into a vertical one?
Yes, and that’s a piece of cake when you use Filmora Video Editor or other similar video editors. You just need to change the aspect ratio of the video or the project from horizontal (generally 16:9) to vertical (generally 9:16).
- Can I resize FLV video files on my mobile?
Though video editors on mobile are not as powerful as those on PC, there are some that are still capable enough to let you easily resize FLV video files on mobile devices. Some examples are InShot, Splice, Powerdirector, etc.
Splitting a Video in VSDC [Step by Step]
VSDC is a proper editor for freely available videos and has various controls. It is such a tool that anyone can easily use without appropriate training. It provides accessibility to the huge library of audio and video effects. VSDC is highly supportive of the famous video and file formats. That’s why it also helps convert the video and audio files from one format to another instantly.
There is also a feature for burning the built-in disk in this editor. Most people enjoy the benefits of this free editor, particularly for educational reasons. There is also a possibility of creating videos to advertise the specific product. Easy to share on Facebook, Twitter, YouTube and others. VDSC can extend the content format and present it to the target audience.
The actual discussion is regarding the splitting of the video by using the VSDC. Also, recommendation of using Wondershare Filmora as the better substitute in place of VSDC.
How is it possible to split the videos in VSDC?
VSDC is a complete open-source program for all users. But the whole interface is not as simple as the Wondershare Filmora. After setting the preview of your video file, this video player starts working independently just for you. Let’s look at different methods for splitting the clips in VSDC.
Part1 - Splitting of the clip into 2 parts just by a single click:
Step 1:
Click multiple times on the icon of the VSCD present on the desktop screen. Later, click on the “Import Content”, then you are able to search a specific video file from the folder of your computer. While determining the videos, the project’s settings are visible, so it is easy to customize the parameters according to your wish.

Step 2:
The video file you select is in the centre position. Even you can preview first and keep moving the play head and handle in such a way that you select the part that is not in need. When you are prepared, hit the button of “Cut out fragment” in the menu of “Tools” in the tab of “Editor”.

Step 3:
Right-click on the video clip to get the option of “Cutting and Splitting” in the object menu. Or you can even press on the right side of the “Properties window”. Then the pop-up window appears that helps you editing your video in VSDC video editor. Select the particular area you don’t want by clicking on the “Cut Area” icon. Also, the restoration is possible when you click on the “Remove Area of Deleting” button.

Step 4:
At this moment, you can export the video that you have edited. Save it on your PC directly with some format. It is easy to transfer the videos to the smartphone or even uploading on the web.
Part2 - Splitting of the clip from markers while exporting the video file:
A splitting tool is also available in VSDC when you want to use different video parts after applying the effects. After adding the video file from the “Export project” tab, and then click on the “Set markers”. Click “Apply Changes” when all the markers are ready for splitting the clips. Option for exporting the video is present so you can save it in the format of your choice. It is simple to save the video’s parts that are created from the markers.

Part3 - Splitting of one clip into more than one scene and applying the effect on them:
For applying different effects on various parts of your video, split it. In this method, add the video file in the timeline and right-click. From the drop-down menu, select “Properties”, and then a window appears. Keep scrolling downward, click on the button of light-green colour “Cutting and Splitting” button.

When the window pops up, click on the “Apply changes” button, and the video automatically gets split. Every part of the video is present on the timeline after one another.

An easier way to split the video
No doubt, VSDC is a good option for editing the videos, but Filmora Video Editor has more features and better software for splitting the video. It fulfils the requirements of various users, whether it is for personal or business purposes. Also, the stylizing of the video is possible, including the quality, resolution, speed and other parameters.
For Win 7 or later (64-bit)
For macOS 10.14 or later
Features
- Removing the noise
- Colour tunning
- Detecting of the scenes
- Video stabilization
- Audio equalizer
- Splitting, rotating and trimming of the video clips
Wondershare Filmora is always helpful in splitting, trimming and different options available for editing the videos. Following are the steps for using these features:
Step 1. Click on “Import” to bring the source file to the timeline.
Step 2. It is essential to select the clip in the timeline and move the play head on the right side. Click on the “Split” scissor icon visible on the toolbar. It helps in separating the videos into different parts.

Step 3. Save the video clip according to the format of your own choice. Simply click on “Export” and select the format from the tab “Format”. It is leftwards of the window. There is a whole list of the formats.

It would help if you used the Wondershare Filmora for splitting the video clips into parts without losing their quality. There is a number of effects and features that will definitely attract you. It is definitely suitable for making outstanding videos and images.
Wondershare Filmora has undoubtedly received many positive reviews compared to other editing software. You use the latest version of Wondershare Filmora to avail of its maximum features as it includes more than 25 sound and transitional effects. Keyframing is also possible. Go for it and start editing on it today.
Step 2:
The video file you select is in the centre position. Even you can preview first and keep moving the play head and handle in such a way that you select the part that is not in need. When you are prepared, hit the button of “Cut out fragment” in the menu of “Tools” in the tab of “Editor”.

Step 3:
Right-click on the video clip to get the option of “Cutting and Splitting” in the object menu. Or you can even press on the right side of the “Properties window”. Then the pop-up window appears that helps you editing your video in VSDC video editor. Select the particular area you don’t want by clicking on the “Cut Area” icon. Also, the restoration is possible when you click on the “Remove Area of Deleting” button.

Step 4:
At this moment, you can export the video that you have edited. Save it on your PC directly with some format. It is easy to transfer the videos to the smartphone or even uploading on the web.
Part2 - Splitting of the clip from markers while exporting the video file:
A splitting tool is also available in VSDC when you want to use different video parts after applying the effects. After adding the video file from the “Export project” tab, and then click on the “Set markers”. Click “Apply Changes” when all the markers are ready for splitting the clips. Option for exporting the video is present so you can save it in the format of your choice. It is simple to save the video’s parts that are created from the markers.

Part3 - Splitting of one clip into more than one scene and applying the effect on them:
For applying different effects on various parts of your video, split it. In this method, add the video file in the timeline and right-click. From the drop-down menu, select “Properties”, and then a window appears. Keep scrolling downward, click on the button of light-green colour “Cutting and Splitting” button.

When the window pops up, click on the “Apply changes” button, and the video automatically gets split. Every part of the video is present on the timeline after one another.

An easier way to split the video
No doubt, VSDC is a good option for editing the videos, but Filmora Video Editor has more features and better software for splitting the video. It fulfils the requirements of various users, whether it is for personal or business purposes. Also, the stylizing of the video is possible, including the quality, resolution, speed and other parameters.
For Win 7 or later (64-bit)
For macOS 10.14 or later
Features
- Removing the noise
- Colour tunning
- Detecting of the scenes
- Video stabilization
- Audio equalizer
- Splitting, rotating and trimming of the video clips
Wondershare Filmora is always helpful in splitting, trimming and different options available for editing the videos. Following are the steps for using these features:
Step 1. Click on “Import” to bring the source file to the timeline.
Step 2. It is essential to select the clip in the timeline and move the play head on the right side. Click on the “Split” scissor icon visible on the toolbar. It helps in separating the videos into different parts.

Step 3. Save the video clip according to the format of your own choice. Simply click on “Export” and select the format from the tab “Format”. It is leftwards of the window. There is a whole list of the formats.

It would help if you used the Wondershare Filmora for splitting the video clips into parts without losing their quality. There is a number of effects and features that will definitely attract you. It is definitely suitable for making outstanding videos and images.
Wondershare Filmora has undoubtedly received many positive reviews compared to other editing software. You use the latest version of Wondershare Filmora to avail of its maximum features as it includes more than 25 sound and transitional effects. Keyframing is also possible. Go for it and start editing on it today.
Step 2:
The video file you select is in the centre position. Even you can preview first and keep moving the play head and handle in such a way that you select the part that is not in need. When you are prepared, hit the button of “Cut out fragment” in the menu of “Tools” in the tab of “Editor”.

Step 3:
Right-click on the video clip to get the option of “Cutting and Splitting” in the object menu. Or you can even press on the right side of the “Properties window”. Then the pop-up window appears that helps you editing your video in VSDC video editor. Select the particular area you don’t want by clicking on the “Cut Area” icon. Also, the restoration is possible when you click on the “Remove Area of Deleting” button.

Step 4:
At this moment, you can export the video that you have edited. Save it on your PC directly with some format. It is easy to transfer the videos to the smartphone or even uploading on the web.
Part2 - Splitting of the clip from markers while exporting the video file:
A splitting tool is also available in VSDC when you want to use different video parts after applying the effects. After adding the video file from the “Export project” tab, and then click on the “Set markers”. Click “Apply Changes” when all the markers are ready for splitting the clips. Option for exporting the video is present so you can save it in the format of your choice. It is simple to save the video’s parts that are created from the markers.

Part3 - Splitting of one clip into more than one scene and applying the effect on them:
For applying different effects on various parts of your video, split it. In this method, add the video file in the timeline and right-click. From the drop-down menu, select “Properties”, and then a window appears. Keep scrolling downward, click on the button of light-green colour “Cutting and Splitting” button.

When the window pops up, click on the “Apply changes” button, and the video automatically gets split. Every part of the video is present on the timeline after one another.

An easier way to split the video
No doubt, VSDC is a good option for editing the videos, but Filmora Video Editor has more features and better software for splitting the video. It fulfils the requirements of various users, whether it is for personal or business purposes. Also, the stylizing of the video is possible, including the quality, resolution, speed and other parameters.
For Win 7 or later (64-bit)
For macOS 10.14 or later
Features
- Removing the noise
- Colour tunning
- Detecting of the scenes
- Video stabilization
- Audio equalizer
- Splitting, rotating and trimming of the video clips
Wondershare Filmora is always helpful in splitting, trimming and different options available for editing the videos. Following are the steps for using these features:
Step 1. Click on “Import” to bring the source file to the timeline.
Step 2. It is essential to select the clip in the timeline and move the play head on the right side. Click on the “Split” scissor icon visible on the toolbar. It helps in separating the videos into different parts.

Step 3. Save the video clip according to the format of your own choice. Simply click on “Export” and select the format from the tab “Format”. It is leftwards of the window. There is a whole list of the formats.

It would help if you used the Wondershare Filmora for splitting the video clips into parts without losing their quality. There is a number of effects and features that will definitely attract you. It is definitely suitable for making outstanding videos and images.
Wondershare Filmora has undoubtedly received many positive reviews compared to other editing software. You use the latest version of Wondershare Filmora to avail of its maximum features as it includes more than 25 sound and transitional effects. Keyframing is also possible. Go for it and start editing on it today.
Step 2:
The video file you select is in the centre position. Even you can preview first and keep moving the play head and handle in such a way that you select the part that is not in need. When you are prepared, hit the button of “Cut out fragment” in the menu of “Tools” in the tab of “Editor”.

Step 3:
Right-click on the video clip to get the option of “Cutting and Splitting” in the object menu. Or you can even press on the right side of the “Properties window”. Then the pop-up window appears that helps you editing your video in VSDC video editor. Select the particular area you don’t want by clicking on the “Cut Area” icon. Also, the restoration is possible when you click on the “Remove Area of Deleting” button.

Step 4:
At this moment, you can export the video that you have edited. Save it on your PC directly with some format. It is easy to transfer the videos to the smartphone or even uploading on the web.
Part2 - Splitting of the clip from markers while exporting the video file:
A splitting tool is also available in VSDC when you want to use different video parts after applying the effects. After adding the video file from the “Export project” tab, and then click on the “Set markers”. Click “Apply Changes” when all the markers are ready for splitting the clips. Option for exporting the video is present so you can save it in the format of your choice. It is simple to save the video’s parts that are created from the markers.

Part3 - Splitting of one clip into more than one scene and applying the effect on them:
For applying different effects on various parts of your video, split it. In this method, add the video file in the timeline and right-click. From the drop-down menu, select “Properties”, and then a window appears. Keep scrolling downward, click on the button of light-green colour “Cutting and Splitting” button.

When the window pops up, click on the “Apply changes” button, and the video automatically gets split. Every part of the video is present on the timeline after one another.

An easier way to split the video
No doubt, VSDC is a good option for editing the videos, but Filmora Video Editor has more features and better software for splitting the video. It fulfils the requirements of various users, whether it is for personal or business purposes. Also, the stylizing of the video is possible, including the quality, resolution, speed and other parameters.
For Win 7 or later (64-bit)
For macOS 10.14 or later
Features
- Removing the noise
- Colour tunning
- Detecting of the scenes
- Video stabilization
- Audio equalizer
- Splitting, rotating and trimming of the video clips
Wondershare Filmora is always helpful in splitting, trimming and different options available for editing the videos. Following are the steps for using these features:
Step 1. Click on “Import” to bring the source file to the timeline.
Step 2. It is essential to select the clip in the timeline and move the play head on the right side. Click on the “Split” scissor icon visible on the toolbar. It helps in separating the videos into different parts.

Step 3. Save the video clip according to the format of your own choice. Simply click on “Export” and select the format from the tab “Format”. It is leftwards of the window. There is a whole list of the formats.

It would help if you used the Wondershare Filmora for splitting the video clips into parts without losing their quality. There is a number of effects and features that will definitely attract you. It is definitely suitable for making outstanding videos and images.
Wondershare Filmora has undoubtedly received many positive reviews compared to other editing software. You use the latest version of Wondershare Filmora to avail of its maximum features as it includes more than 25 sound and transitional effects. Keyframing is also possible. Go for it and start editing on it today.
Also read:
- For Converting GIF to MOV Format, You Dont Need to Search From A-Z. Here Is an Amazing Guide, that Gives You Complete Details About Both Offline and Online Gif-to-MOV Converters. Catch Them Below and Experience a Pro Editing Time
- New In 2024, Little Known Ways of Adding Emojis to Photos on iPhone & Android 2023
- How to Make a Transparent Background in Paint. How 3D Paint Transparent Background Can Be Made. How to Save an Image with Transparent Background for 2024
- 2024 Approved In This Article, We Will Review Movavi Video Editor and List Out Movavi Video Suites Features
- New In 2024, How to Create a Makeup Video
- New 2024 Approved Easiest Fix Included! Top 5 Ways to Convert HDR to SDR Videos
- New How to Overlay Video in Premiere Pro
- New Best 10 Options Slow Down Video Online with Perfection
- How to Create a Vacation Slideshow in 5 Minutes
- How to Get Zoom on TV Easy Solutions
- Updated Best 8 Animated Video Makers for 2024
- New 2024 Approved Finding the Best Voice Changers for WhatsApp Free and Paid
- Updated 2024 Approved How to Make an Aesthetic Slideshow
- Updated How To Add Motion Blur Effect To Photos in GIMP
- New 2024 Approved A Guide to Speed up a Video on Splice
- Ultimate Guidelines to Help You Better Use VLC Media Player
- Updated Templates Take Your Music Video From Drab to Fab and Add some Spice to the Catchy Song. Here Are some Templates You Could Use to Make Your Music Video Popular
- Updated Gifs Can Convey Your Emotions in a Way that Words Cannot, so They Are Becoming a Popular Way to Express Yourself, and You Must Know How to Make a Gif and You Wont Believe that Its Not Difficult to Do
- Updated 2024 Approved 7 Ways Add Subtitles to MKV Videos on All Platforms
- How to Fix Unfortunately, Contacts Has Stopped Error on Infinix Hot 30i | Dr.fone
- Top Apps and Online Tools To Track Samsung Galaxy F15 5G Phone With/Without IMEI Number
- How to Reset your Samsung Galaxy S23 Lock Screen Password
- How To Leave a Life360 Group On Sony Xperia 5 V Without Anyone Knowing? | Dr.fone
- In 2024, How to Change/Add Location Filters on Snapchat For your Motorola G24 Power | Dr.fone
- Can I use iTools gpx file to catch the rare Pokemon On Samsung Galaxy A23 5G | Dr.fone
- Unlocking Apple iPhone SE (2020) Lock Screen 3 Foolproof Methods that Actually Work | Dr.fone
- New Your Selling Strategy With LazLive Live Selling for 2024
- In 2024, How to Unlock Itel P55 5G Bootloader Easily
- Pokemon Go No GPS Signal? Heres Every Possible Solution On Motorola Edge 2023 | Dr.fone
- In 2024, How to Send and Fake Live Location on Facebook Messenger Of your Poco C55 | Dr.fone
- Title: Want to Add a Motion Blur Effect to Your Photos? This Step-by-Step Tutorial Will Show You How to Use GIMP Software to Get the Effect You Want
- Author: Chloe
- Created at : 2024-05-20 03:37:37
- Updated at : 2024-05-21 03:37:37
- Link: https://ai-editing-video.techidaily.com/want-to-add-a-motion-blur-effect-to-your-photos-this-step-by-step-tutorial-will-show-you-how-to-use-gimp-software-to-get-the-effect-you-want/
- License: This work is licensed under CC BY-NC-SA 4.0.

