
:max_bytes(150000):strip_icc():format(webp)/GettyImages-597071115-37c5865742de421eafc8b7da4cc5a618.jpg)
Want to Make a Funny Vlog on TikTok? Trying to Find the Right Topic for It? This Article Presents some Impressive Options for Making a Funny Vlog for TikTok for 2024
Want to Make a Funny Vlog on TikTok? Trying to Find the Right Topic for It? This Article Presents some Impressive Options for Making a Funny Vlog for TikTok
TikTok has been among the few social media platforms that have gained an exponential following in a truly short time. Regardless of this stunted digital environment, the platform made its statement of becoming part of the all-time greats.
TikTok became known as a short-video platform that influenced the making of funny vlogs. If you are interested in making a funny vlog, you are at the right place.
In this article
01 Ideas for Creating A Funny Vlog for TikTok
02 5 Popular Funny Vloggers on TikTok
Part 1: Ideas for Creating A Funny Vlog for TikTok
When creating a funny vlog across TikTok, there are numerous ideas that one can think of. However, since TikTok videos are of small lengths, achieving diversity is difficult yet possible. You’ll surely get your break if you understand the following ideas for creating a funny vlog.

React to Other Videos
While it may seem the most mainstream style of creating funny content across TikTok, it is also the most effective way of making people laugh while watching your video. This will also bring recurring viewers across your channel.
Display Failure Videos
It is always great to see people trying and doing something funny across the video. Failure videos are believed to be the other way of creating content for a funny vlog on your TikTok, which shall make people laugh hard.
Use Goofy and Peculiar Voices
Unrealistic and weird voices can make your short video seem funny. If you consider talking about something in a silly voice, it will make people burst out of laughter.
Trolling Family Members
One of the best ways to make something good out of TikTok is creating candid moments. This can always be done if you troll or prank your family members out of nowhere. Just keep reminding that you have to ensure no one gets injured due to it.
Impersonations
Making impersonated videos of major celebrities is another way of showing funny content to the viewers on TikTok. If you consider some funny examples for this, it will surely bring you effective results.
Make Puns and Funny Statements
Another great way to create a funny vlog for your TikTok is to be good at making puns. This is purely hilarious content and needs someone to be highly great in it.
Physical Challenges
This can be a bit risky, but it can become quite fun to make and show to the world if executed with care. However, this can be conducted individually or in a group of people, as you find it appropriate.
Use Effects of TikTok
TikTok makes sure to provide something funny in effects to its users. The use of effects for TikTok is an excellent technique to make funny vlogs; however, it can get funny if the elements used across it have a dubious meaning.
Run Everything in Reverse
One of the most straightforward techniques to make a funny vlog is to run everything in reverse order. The simplest thing of a video becomes the funniest to watch.
Part 2: 5 Popular Funny Vloggers on TikTok
This part will provide some popular examples of TikTokers who have made a considerate performance in providing funny content to people across the platform.
Khaby Lame
This is, without a doubt, the first-choice in TikTok accounts that would always come while relating to funny content. Khaby started his journey as a TikToker with a remarkably simple motive of pointing out the simplicity in different tasks, which were displayed to be difficult. Although it sounds pretty basic, the technique taken by Khaby has been so considerate it brought him millions of followers for creating funny content.

Sarah Cooper
Want to see a great impersonation of Donald Trump? It is undoubtedly great to see every time. With Sarah Cooper, it just becomes an entirely different story. Her impersonation has been so perfect that she has been referred to as one of the best funny vloggers on TikTok. Her likes across the platform may not be that great, but she has shown some stature in presenting funny content in a great way.

Dobre Twins
This twin duo is known across many social media platforms for its funny content. As the twins started using TikTok, they started creating good funny vlogs, which gained quite the traction for them. Their unique ideas to present different things have presented the following worth 23 million likes across TikTok, which is quite commendable. However, Lucas and Marcus are only known to operate this TikTok account.

Image alt: dobre twins funny tiktoker
Brittany Broski
Quite a few TikTokers actually make funny videos with impressive comedy. Brittany Broski is a celebrity in this genre, where she has taken great use of her comedy skills to present great vlogs with different and unique topics. Her take on comedy is entirely different, which makes her funny vlog unique and better than others.

Cole LeBrant
This TikToker makes a good collection of funny vlogs across his account with his family. The variety and variability in his videos make him a different version of fun compared to other TikTokers. He has built a great reach across the account, which makes him an impressive choice.

Part 3: How to Make a Funny Vlog?
Funny vlogs are a fabulous way to interact with people of different tastes. It can be something that cherishes the moods of the viewers, regardless of their current emotions. To make this happen, you need a good platform that helps you create a video for your viewers to watch. Wondershare Filmora fulfills the needs of a video editor by providing you with the perfect options while editing the video for TikTok.
For Win 7 or later (64-bit)
For macOS 10.12 or later
If you are looking forward to understanding how to create a funny vlog for your TikTok using Filmora, you need to follow a set of simple steps. These are shown as follows:
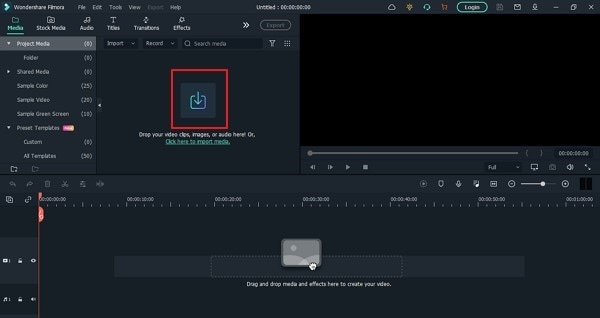
Step 1: Launch and Import Video
To start, you need to have Wondershare Filmora installed across your device. Launch the tool and click on “New Project” to start from scratch. Once the screen opens up, you need to click on the “Arrow Head” icon across the ‘Media’ Tab to import the audio you wish to amend for TikTok.
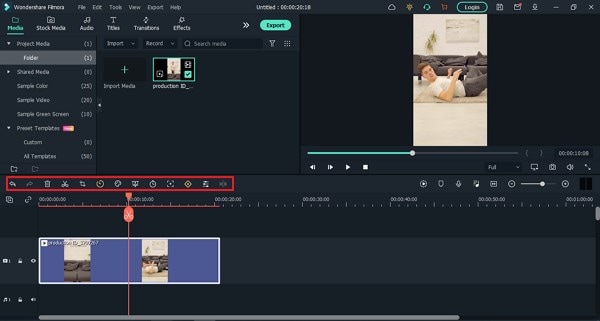
Step 2: Perform Basic Editing
Wondershare Filmora provides users with multiple options for editing their files. At first, drag the file onto the timeline. Following this, you can merge different videos or enhance the video by trimming it. Along with that, you can also consider splitting the image or changing its playback speed for different results.
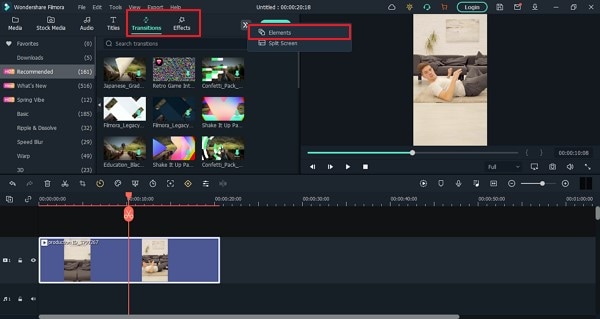
Step 3: Add Effects and Transitions
After you are done with some basic editing, you can add different effects from the “Effects” section. To make the video look exclusive, you can also include “Transitions” across it. Use the “Elements” tab to include stickers and emojis to enhance your TikTok video.
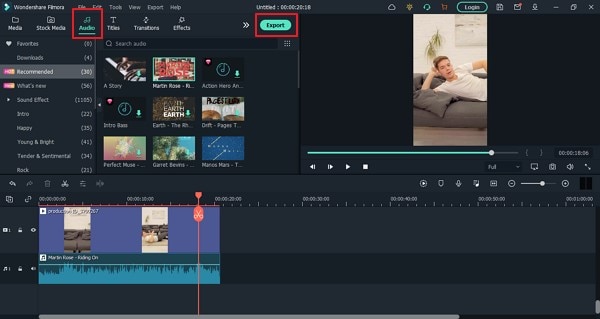
Step 4: Manage the Audio
For managing the audio of your video, you can make several changes across it. You can detach audio and change the audio with another soundtrack. Filmora also allows you to add audio from the “Audio” section, which contains royalty-free music to add. Once you are done, click on the “Export” button to set the settings of the video before exporting it back onto the device.
Closing Words
This article has presented some of the finest tips that can be utilized for creating funny vlogs on your TikTok. If you coherently use these tips, you can get significant results across your account in the name of the followers. Along with that, you can also use Filmora for making the best funny vlog with different editing tools.
Wondershare Filmora
Get started easily with Filmora’s powerful performance, intuitive interface, and countless effects!
Try It Free Try It Free Try It Free Learn More >

02 5 Popular Funny Vloggers on TikTok
Part 1: Ideas for Creating A Funny Vlog for TikTok
When creating a funny vlog across TikTok, there are numerous ideas that one can think of. However, since TikTok videos are of small lengths, achieving diversity is difficult yet possible. You’ll surely get your break if you understand the following ideas for creating a funny vlog.
React to Other Videos
While it may seem the most mainstream style of creating funny content across TikTok, it is also the most effective way of making people laugh while watching your video. This will also bring recurring viewers across your channel.
Display Failure Videos
It is always great to see people trying and doing something funny across the video. Failure videos are believed to be the other way of creating content for a funny vlog on your TikTok, which shall make people laugh hard.
Use Goofy and Peculiar Voices
Unrealistic and weird voices can make your short video seem funny. If you consider talking about something in a silly voice, it will make people burst out of laughter.
Trolling Family Members
One of the best ways to make something good out of TikTok is creating candid moments. This can always be done if you troll or prank your family members out of nowhere. Just keep reminding that you have to ensure no one gets injured due to it.
Impersonations
Making impersonated videos of major celebrities is another way of showing funny content to the viewers on TikTok. If you consider some funny examples for this, it will surely bring you effective results.
Make Puns and Funny Statements
Another great way to create a funny vlog for your TikTok is to be good at making puns. This is purely hilarious content and needs someone to be highly great in it.
Physical Challenges
This can be a bit risky, but it can become quite fun to make and show to the world if executed with care. However, this can be conducted individually or in a group of people, as you find it appropriate.
Use Effects of TikTok
TikTok makes sure to provide something funny in effects to its users. The use of effects for TikTok is an excellent technique to make funny vlogs; however, it can get funny if the elements used across it have a dubious meaning.
Run Everything in Reverse
One of the most straightforward techniques to make a funny vlog is to run everything in reverse order. The simplest thing of a video becomes the funniest to watch.
Part 2: 5 Popular Funny Vloggers on TikTok
This part will provide some popular examples of TikTokers who have made a considerate performance in providing funny content to people across the platform.
Khaby Lame
This is, without a doubt, the first-choice in TikTok accounts that would always come while relating to funny content. Khaby started his journey as a TikToker with a remarkably simple motive of pointing out the simplicity in different tasks, which were displayed to be difficult. Although it sounds pretty basic, the technique taken by Khaby has been so considerate it brought him millions of followers for creating funny content.
Sarah Cooper
Want to see a great impersonation of Donald Trump? It is undoubtedly great to see every time. With Sarah Cooper, it just becomes an entirely different story. Her impersonation has been so perfect that she has been referred to as one of the best funny vloggers on TikTok. Her likes across the platform may not be that great, but she has shown some stature in presenting funny content in a great way.
Dobre Twins
This twin duo is known across many social media platforms for its funny content. As the twins started using TikTok, they started creating good funny vlogs, which gained quite the traction for them. Their unique ideas to present different things have presented the following worth 23 million likes across TikTok, which is quite commendable. However, Lucas and Marcus are only known to operate this TikTok account.
Image alt: dobre twins funny tiktoker
Brittany Broski
Quite a few TikTokers actually make funny videos with impressive comedy. Brittany Broski is a celebrity in this genre, where she has taken great use of her comedy skills to present great vlogs with different and unique topics. Her take on comedy is entirely different, which makes her funny vlog unique and better than others.
Cole LeBrant
This TikToker makes a good collection of funny vlogs across his account with his family. The variety and variability in his videos make him a different version of fun compared to other TikTokers. He has built a great reach across the account, which makes him an impressive choice.
Part 3: How to Make a Funny Vlog?
Funny vlogs are a fabulous way to interact with people of different tastes. It can be something that cherishes the moods of the viewers, regardless of their current emotions. To make this happen, you need a good platform that helps you create a video for your viewers to watch. Wondershare Filmora fulfills the needs of a video editor by providing you with the perfect options while editing the video for TikTok.
For Win 7 or later (64-bit)
For macOS 10.12 or later
If you are looking forward to understanding how to create a funny vlog for your TikTok using Filmora, you need to follow a set of simple steps. These are shown as follows:
Step 1: Launch and Import Video
To start, you need to have Wondershare Filmora installed across your device. Launch the tool and click on “New Project” to start from scratch. Once the screen opens up, you need to click on the “Arrow Head” icon across the ‘Media’ Tab to import the audio you wish to amend for TikTok.
Step 2: Perform Basic Editing
Wondershare Filmora provides users with multiple options for editing their files. At first, drag the file onto the timeline. Following this, you can merge different videos or enhance the video by trimming it. Along with that, you can also consider splitting the image or changing its playback speed for different results.
Step 3: Add Effects and Transitions
After you are done with some basic editing, you can add different effects from the “Effects” section. To make the video look exclusive, you can also include “Transitions” across it. Use the “Elements” tab to include stickers and emojis to enhance your TikTok video.
Step 4: Manage the Audio
For managing the audio of your video, you can make several changes across it. You can detach audio and change the audio with another soundtrack. Filmora also allows you to add audio from the “Audio” section, which contains royalty-free music to add. Once you are done, click on the “Export” button to set the settings of the video before exporting it back onto the device.
Closing Words
This article has presented some of the finest tips that can be utilized for creating funny vlogs on your TikTok. If you coherently use these tips, you can get significant results across your account in the name of the followers. Along with that, you can also use Filmora for making the best funny vlog with different editing tools.
Wondershare Filmora
Get started easily with Filmora’s powerful performance, intuitive interface, and countless effects!
Try It Free Try It Free Try It Free Learn More >
Use Path Blur In Photoshop To Create Motion Effect
There are different kinds of blur effects that redefine the movement and intensity of an image. By applying a suitable blur effect, you can increase the visual appeal of your still photo by emphasizing a certain motion. Path blur is one of the trending motion blur effects that people use to enhance their photos instantly. Through this article, you can learn how to use path blur in Photoshop conveniently.
Part 1: What is Path Blur and How Does It Work?
Path blur is a kind of motion blur that highlights a motion and speed in a certain direction. It helps to create a sense of movement by adjusting the blur intensity and central point. If you want to display a stimulating motion in an image, path blur can assist you in this regard.
Path blur works by adjusting two variables: Speed and Taper. By adjusting the speed slider, you can specify the amount of path blur. In addition to speed, you can adjust the taper value accordingly to determine the blur trail.

This effect can instantly add new dimensions to your captured photo. For instance, if you have captured a photo of a racing car, you can add a path blur effect to give a sense of speed to it. You can easily find this special effect in Adobe Photoshop. By using the selection tools, you can effectively add a path blur effect to your image in the selected area. To know more about path blur in Photoshop, continue reading this article.
Part 2: How to Use Path Blur in Photoshop?
Photoshop is undoubtedly the most commonly used tool to edit pictures with great configuration options. After uploading the image, you can quickly transform it by adding new effects, filters, and layers. You can retouch your photography efficiently through this tool by increasing the quality of pictures. Moreover, the clean user interface of Photoshop allows you to utilize the advanced functions without any interruptions.
Are you ready to use Photoshop path blur? Read this part of the article to find out two interesting ways to create a path blur effect in the images.
Add Dynamic Effect to Your Static Images
Step1 Open Photoshop and import the desired picture. Once done, go to the “Layers” section and copy the background layer. For this, press “Ctrl + J” in Windows and “Command + J” for MacBook.

Step2 Now proceed to the “Filter” section and locate the option “Blur Gallery”. From there, choose the “Path Blur” option. Now you would be able to see an arrow on your screen. Using this arrow, you can specify the path blur motion. Drag and close the arrow where you want to show the speed. Also, set a higher value for the speed given on the right side. Once done, hit the “OK” button.

Create a Long Exposure Picture
Step1 Navigate to the Adobe Photoshop tool and begin by uploading a picture. Afterward, go to the “Filter” tab and select “Convert for Small Filters.”

Step2 Now go to the “Filter” tab again and choose the “Blur Gallery” option. From there, select the “Path Blur” option. Now adjust the displayed arrow in a particular direction to decide the starting and endpoint of the path blur. Moreover, modify the “Speed” slider according to your choice.

Step3 After dragging the arrow in a particular direction, a blue dot will appear at the center. Press the “Delete” button to eliminate that point. Now select the endpoint of the arrow and change its blur shape.

Step4 Utilize the noise section to add a grainy effect in the blurred area. Once done, click on the “OK” button. Now select the masking tool to select the area in your picture. Afterward, choose the “Smart Mask” filter and then navigate to the “Fill” option given in the “Edit” section.

Step5 In the fill menu, choose the color “Black.” Now go to the “Select” section and click “Deselect.” To soften the whole look, you can go to the “Properties” panel and adjust the “Feather” properties.

Step6 Now add the first layer and choose the option “Convert for Smart Filters.” Again, go to the “Filter” section, select “Blur Gallery,” and uncheck the option called “Edit Blur Screen.”

Step7 Now increase the length of the arrow and press “Ctrl + Click” for Windows or “Command + Click” for Mac to reposition the path. You can also add a curve to the arrow. Enhance the speed from the right panel and uncheck the option of “Center Blur.” You can increase the taper value to make the blur gradually trail off. Add a grainy filter for more enhancements.

Bonus Tips – The Alternative to Photoshop to Create Motion Blur Effect
Many users find the interface of Adobe Photoshop intimidating or challenging to operate. If you want an alternative to Photoshop, the best choice you can make is to use Wondershare Filmora . For beginners, this tool adds built-in presets that are professionally made.
Free Download For Win 7 or later(64-bit)
Free Download For macOS 10.14 or later
It offers more than 900 effects that you can use to add new dimensions to your photos and videos. Moreover, it provides fast processing speed for photo and video editing to help you achieve your goals conveniently.
Steps to Produce Motion Blur Effect in Filmora
If you are a beginner and want to create a motion blur effect, then use the steps mentioned below:
Step1 Add the Image to Timeline
After launching Filmora, select “Create New Project” and import the desired picture. After dragging it to the timeline, you have to split it to proceed.

Step2 Choose the Background Blur
To split, choose the starting and ending point in the clip where you want to add the motion blur effect. Once done, go to the “Effects” tab and search for the “Background Blur” effect section. Pick and apply the desired blur filter to the split section of the video.

Step3 Apply the Transition
Once you have added the motion blur effect, you can check the results from the preview window. You can also apply the “Dissolve” transition from the “Transitions” tab to generate a smooth result.

Conclusion
If you want to display a sense of speed and movement in the picture, you can add a path blur effect. It’s one of the types of motion blur effects that many people use in their pictures to add a dynamic element. By reading this article, you have learned how to add path blur in Photoshop through simple means. Moreover, you can also explore the tool Filmora to create a motion blur effect in the photos effortlessly.
Free Download For macOS 10.14 or later
It offers more than 900 effects that you can use to add new dimensions to your photos and videos. Moreover, it provides fast processing speed for photo and video editing to help you achieve your goals conveniently.
Steps to Produce Motion Blur Effect in Filmora
If you are a beginner and want to create a motion blur effect, then use the steps mentioned below:
Step1 Add the Image to Timeline
After launching Filmora, select “Create New Project” and import the desired picture. After dragging it to the timeline, you have to split it to proceed.
Step2 Choose the Background Blur
To split, choose the starting and ending point in the clip where you want to add the motion blur effect. Once done, go to the “Effects” tab and search for the “Background Blur” effect section. Pick and apply the desired blur filter to the split section of the video.
Step3 Apply the Transition
Once you have added the motion blur effect, you can check the results from the preview window. You can also apply the “Dissolve” transition from the “Transitions” tab to generate a smooth result.
Conclusion
If you want to display a sense of speed and movement in the picture, you can add a path blur effect. It’s one of the types of motion blur effects that many people use in their pictures to add a dynamic element. By reading this article, you have learned how to add path blur in Photoshop through simple means. Moreover, you can also explore the tool Filmora to create a motion blur effect in the photos effortlessly.
Detailed Guide to Resize Your Video in VLC
Videos are one of the most popular types of content on the internet. There are millions of videos uploaded to YouTube, Facebook, and other video-sharing sites each day. Sharing your videos with others is possible when you know how to resize them in VLC. VLC is a free media player that allows you to convert or compress your videos in order to make them smaller for uploading or downloading.
Videos are a great way to showcase your business, company, or product on social media sites like Facebook and Twitter. But what happens when you use the wrong size for your video? The whole thing looks distorted and low quality. It’s not very appealing.
Luckily, resizing videos in VLC is simple. All you need is the right software and the right steps.
This blog post will walk you through how to resize videos using VLC. We’ll cover what the default settings are for video resolutions, how to change them, and why it’s important to know what size of video you’re uploading before uploading it.
So without further ado, let’s get started!
Step by step to resize your video in VLC
Anyone who has a lot of videos on their computer knows how frustrating it can be to find the video you want among the hundreds of ones you have. Well, VLC makes it possible to resize your videos so they’ll fit onto your desktop. Here’s how:
Resizing by converting to a smaller file size
Because some video formats, such as MKV and AVI, take up too much space, it’s a good idea to convert videos to smaller formats, such as FLV, WMV, and so on. To lower the video size, you’ll be pleased to learn that VLC allows you to convert video/audio files without the need to install any other software. The video conversion guide for VLC can be found below.
Step 1: Launch the VLC Media Player.

Step 2: Go to the menu and pick Media > Convert/Save from the drop-down menu, then Add > Convert/Save from the drop-down menu.

Step 3: Choose a profile for the video you wish to convert.

Step 4: Select the Start button to start VLC video compression.
Resizing by cutting unnecessary video segment
Step 1: Launch the VLC Media Player

Step 2: Go to Menu > View Menu > Advanced Controls in VLC Media Player and select it from the menu.

Step 3: Play the video you want to crop and then click the Record button on the scene you want to crop and then the same button to pause the video where you want to crop it.

Step 4: In Windows 7, 8, and XP, the film will automatically save in Library > Videos, and in My Documents > My Videos in Windows 7.
VLC Media Player is unquestionably one of the greatest video players available for free. Nonetheless, it isn’t the finest video reduction because it just reduces the size of videos by using certain simple parameters rather than complex ones. As a result, we offer Fimora, an all-in-one video toolbox that can convert, compress, download, record, edit, burn, and more, as a better video compressor. You can change the video resolution, bit rate, encoder, format, and other settings to compress video and audio files in a variety of formats. Follow the simple steps below to get this VLC compressor replacement on your Windows/Mac for free.
An easier way to resize videos using Filmora
Filmora Video Editor is a powerful, yet easy to use video editor for PC and Mac. With the most intuitive and streamlined editing process out there, Filmora lets you cut and resize videos with just a few clicks of your mouse.
Through this part, we’ll show you how to resize videos using Filmora’s three-step process: import video files, select video clips, and edit them. We’ll also teach you some shortcuts for making the editing process as quick as possible!
A common challenge for beginner video editors is knowing where to start. With Filmora, you begin by importing your video files, selecting the clip you want to cut, and then editing it. It’s a three-step process that takes less than five minutes!
Once you have finished editing your video clip, Filmora will give you the option to share it on social media or export it in MP4 or AVI format.
Keep reading to learn more about how to cut and resize videos using Filmora’s three-step process!
For Win 7 or later (64-bit)
For macOS 10.14 or later
Step by Step on How to Resize Videos using Filmora
Resizing videos in Filmora is a quick and easy process. To resize videos, first make sure you have imported your video file into the editor.
Resizing by changing the dimensions
Step 1: To import a video file, either drag and drop the file on the screen or click on “Import Files” in the toolbar.

Step 2: Once you’ve imported your video, select the video clips that you want to resize by clicking on them; then, resizing them is as simple as dragging their borders!

Step 3: You can also use the size fields at the bottom of the frame to change their dimensions.
Step 4: Keep in mind that changing one dimension of a video clip will affect both its width and height proportionally. For example, if you enlarge a 16:9 widescreen clip to 720p (from 480p), it will be double its original proportions (720x480).
Resizing by shrinking video file size.
Step 1: To import a video file, either drag and drop it onto the screen or use the toolbar’s “Import Files” option.

Step 2: Open the video shrinker’s output window by clicking the “Export” button.

Step 3: Select the Format tab and keep the video in its original format as a result. Then, in the “Settings” panel, click the triangle button below to downsize the video by choosing a lower video resolution, frame rate, or bit rate. When it comes to video formats, you can choose among FLV, MP4, and other similar formats, which normally result in smaller files.

Step 4: The shrunk file should be exported.
Conclusion
So you’ve got this beautiful video you want to post on your social media page or website, but the dimensions are all wrong. No worries! There’s an easy solution to your problem. Filmora is a video editing software that is easy to use and versatile and powerful at the same time. Whether you’re just starting out or are a pro, Filmora is the perfect tool for the job. You don’t need to be an expert to edit videos in Filmora; it’s easy enough for beginners. With Filmora, you can resize your videos in seconds by following these simple steps above.
Step 2: Go to the menu and pick Media > Convert/Save from the drop-down menu, then Add > Convert/Save from the drop-down menu.
Step 3: Choose a profile for the video you wish to convert.
Step 4: Select the Start button to start VLC video compression.
Resizing by cutting unnecessary video segment
Step 1: Launch the VLC Media Player
Step 2: Go to Menu > View Menu > Advanced Controls in VLC Media Player and select it from the menu.
Step 3: Play the video you want to crop and then click the Record button on the scene you want to crop and then the same button to pause the video where you want to crop it.
Step 4: In Windows 7, 8, and XP, the film will automatically save in Library > Videos, and in My Documents > My Videos in Windows 7.
VLC Media Player is unquestionably one of the greatest video players available for free. Nonetheless, it isn’t the finest video reduction because it just reduces the size of videos by using certain simple parameters rather than complex ones. As a result, we offer Fimora, an all-in-one video toolbox that can convert, compress, download, record, edit, burn, and more, as a better video compressor. You can change the video resolution, bit rate, encoder, format, and other settings to compress video and audio files in a variety of formats. Follow the simple steps below to get this VLC compressor replacement on your Windows/Mac for free.
An easier way to resize videos using Filmora
Filmora Video Editor is a powerful, yet easy to use video editor for PC and Mac. With the most intuitive and streamlined editing process out there, Filmora lets you cut and resize videos with just a few clicks of your mouse.
Through this part, we’ll show you how to resize videos using Filmora’s three-step process: import video files, select video clips, and edit them. We’ll also teach you some shortcuts for making the editing process as quick as possible!
A common challenge for beginner video editors is knowing where to start. With Filmora, you begin by importing your video files, selecting the clip you want to cut, and then editing it. It’s a three-step process that takes less than five minutes!
Once you have finished editing your video clip, Filmora will give you the option to share it on social media or export it in MP4 or AVI format.
Keep reading to learn more about how to cut and resize videos using Filmora’s three-step process!
For Win 7 or later (64-bit)
For macOS 10.14 or later
Step by Step on How to Resize Videos using Filmora
Resizing videos in Filmora is a quick and easy process. To resize videos, first make sure you have imported your video file into the editor.
Resizing by changing the dimensions
Step 1: To import a video file, either drag and drop the file on the screen or click on “Import Files” in the toolbar.
Step 2: Once you’ve imported your video, select the video clips that you want to resize by clicking on them; then, resizing them is as simple as dragging their borders!
Step 3: You can also use the size fields at the bottom of the frame to change their dimensions.
Step 4: Keep in mind that changing one dimension of a video clip will affect both its width and height proportionally. For example, if you enlarge a 16:9 widescreen clip to 720p (from 480p), it will be double its original proportions (720x480).
Resizing by shrinking video file size.
Step 1: To import a video file, either drag and drop it onto the screen or use the toolbar’s “Import Files” option.
Step 2: Open the video shrinker’s output window by clicking the “Export” button.
Step 3: Select the Format tab and keep the video in its original format as a result. Then, in the “Settings” panel, click the triangle button below to downsize the video by choosing a lower video resolution, frame rate, or bit rate. When it comes to video formats, you can choose among FLV, MP4, and other similar formats, which normally result in smaller files.
Step 4: The shrunk file should be exported.
Conclusion
So you’ve got this beautiful video you want to post on your social media page or website, but the dimensions are all wrong. No worries! There’s an easy solution to your problem. Filmora is a video editing software that is easy to use and versatile and powerful at the same time. Whether you’re just starting out or are a pro, Filmora is the perfect tool for the job. You don’t need to be an expert to edit videos in Filmora; it’s easy enough for beginners. With Filmora, you can resize your videos in seconds by following these simple steps above.
How to Create a Clideo Slideshow
How to Create a Clideo Slideshow
An easy yet powerful editor
Numerous effects to choose from
Detailed tutorials provided by the official channel
A clideo slideshow is an interesting trend of precise content delivery. Stay here to understand the working essentials of creating Clideo presentations with utmost ease!
In this article
01 [How Do You Make a Slideshow on Clideo?](#Part 1)
02 [Best 5 Tip to Make a Slideshow with Music](#Part 2)
03 [How to Make a Photo Slideshow on Mac?](#Part 3)
Part 1 How Do You Make a Slideshow on Clideo?
Deciding to create slideshow presentations for a graphic design oriented personal or professional concern lands you across a plethora of choices in the IT market in the shape of high end application software program and tools. No doubt, these are leaders in their task; however, the online slideshow makers available across the web are no less.
Paying attention to the same, let us focus our discussion on how does the Clideo slideshow maker tool work to adhere the aforesaid concern. Talking a bit about the credibility of the online program, the tool grants you the flexibility of creating amazing slideshow movies and presentations from images, video clips and recordings, while allowing you to complement the same with the most upbeat and suitable background music.
Additional appeals of the online include the latter’s free availability and extensive device compatibility to work affordably well with all your Windows and MacOS supported desktops, laptops and PCs, along with Android and iOS compatible smartphones and tablets. All you need is an internet connection to launch the tool in your favorite web browser and that’s how you can step into the creation process right away.
Let us now look through the process of creating slideshows in the Clideo tool using a set of still images in the following section:
Step 1: Launch the Tool
Start with navigating to the official Clideo website in any of your preferred web browsers and launch the online slideshow maker tool in your device.

Step 2: Upload Image Files
The tool’s launch screen displays the ‘Choose Files’ tab in blue, which you can click on to upload the desired image files to the Clideo timeline while selecting them from your device gallery. To select and upload images from your Dropbox or Google Drive accounts, click on the ‘Upside Arrow’ in the ‘Choose Files’ tab.

The tool supports a decent variety of image formats to work with, like, JPG, JPEG, PNG, GIF, TIFF, etc., thus letting you escape the notch of sticking to a specific file format. You can also choose to either upload the image files all at once, or add them at a later stage, as per your requirement.
Step 3: Let’s Get Creating!
Once the selected images get uploaded on the editor timeline of the tool, you can preview them in the editor workspace. You can change the sequence of appearance of the images by dragging and dropping their thumbnails at respective places within the editor timeline or delete them by selecting the image and clicking the ‘X’ symbol.
You can additionally, choose to add extra clips by tapping the ‘Add More Videos’ option in the timeline. As an alternative, navigate to the panel at the right and hit the ‘Add More Files’ button at the top.

Step 4: Crop the Media Files
Below the ‘Add More Files’ option in the right panel, you can see the ‘Crop Options’ tab. You can work with the crop tool to adjust the size of the added videos and images so that they fit in the borders of the media frames. You are further allowed to select a suitable aspect ratio and zoom the media files in and out to obtain the affordable screen size. This would come handy when you proceed to share your slideshow across various media platforms, like, Instagram, Facebook, YouTube, etc., each of which has a different screen resolution and size.

Step 5: Time Your Slides
You can decide play duration for your media files by navigating to the same right panel and hitting the ‘Image Duration’ tab and setting the required parameters in the dropdown list that appears next. Here, you can adjust the time settings of the images in your slideshow presentations, however, the video play durations are preset and you are not allowed to change them. If you wish to have a smooth play of the presentation slides, do not forget to tick the ‘Crossfade’ checkbox.

Step 6: Add a Suitable Background Music
The last one in the right panel is the ‘Add Audio’ option which you can use to supplement your presentation with the coolest and the most suitable background music. All you need to do is, hit the aforesaid tab and browse through your device’s media gallery to select an audio file of your choice. To add a music file that’s belongs to your online storage, click on the ‘Upside Arrow’ in the tab and proceed to make a selection or add a link of the desired audio file.

Once you have added the track, you are permitted to trim, adjust volume settings and loop the track if required under the ‘Audio Options’ tab.

Step 7: Duration, Size and Format Adjustments
Navigate to the left side ‘Options Panel’ at the bottom of the editor workspace, where you can set the different parameters of your slideshow size and run time. You can also choose to generate the output presentation in a specific file format if required, using the ‘Format Picker’ tool. When you are satisfied with everything, reach to and hit the ‘Export’ button at the extreme right.

Step 8: Save Your Creation
Completion of Step 7 will take you to the ‘Slideshow Save’ interface of the video editor tool. Here, you can preview your slideshow and save it to your device if everything seems fine. To save your output file, click on the ‘Download’ tab. If however, you need to make any further changes to the presentation, hit the ‘Edit’ tab to get directed back to the editor workspace.

Part 2 Best 5 Tip to Make a Slideshow with Music
While the visual elements count to be the major attractions of a slideshow presentation, subtle background music can work to bind the audience with the rhythm and flow of the presentation. Having learnt about the fundamentals of creating over the top slideshows with Clideo, let us move ahead with working on some of the best tips to complement your already awesome graphic slideshow artwork with the most appealing audio in the following section:
01Select a Royalty Free Music Plan
Adding suitable background music can uplift the appeal of your slideshow presentation to greater extents. While most of the slideshow creator programs available today are equipped with extensive varieties of inbuilt audio for visibly any presentation setting, you can also opt to choose your own music plan in case you don’t get anything specific.
However, you do need to take care of certain factors when deciding on your music plan, most importantly, the pricing concerns. Go for selecting a royalty free, unlimited audio license via an affordable paid subscription from recognized and leading music hubs and online audio websites.
02Browse the Recommended Audio Choices
When looking through the diversity of music options available on any audio website, do not forget to pay attention to the user and website recommended playlists and music categories. These tend to have a collection of the most preferred audio choices and there are high chances of you getting your exact music piece from within these playlists.
You can further, refine your search within these categories by setting filters of genre and style, in case you have a clear idea of what you exactly need, thus rescuing you from the hustle of browsing through a never ending list of audio files.

03Synchronize the Slideshow Music and the Contents
The credibility of your background audio lies in adding additional spark and integrity to the stills and videos of the presentation. When selecting the music elements for your slideshow, make sure that your choices are well in accordance with the content and mood of your creation. The most important aspect here is that the music you choose to add should complement the story being depicted, while captivating the viewer’s attention.
Avoid choosing a random audio just because you have heard a buzz of the same on popular platforms or a peer recommendation, lest the contents and background score of your presentation may take opposite paths and disrupt the information flow, while resulting in a distracted audience. To escape the hustle, you may seek help from the diversity of stock audio websites for a keyword and category oriented music search.
If you are interested in adding depth to your background audio, consider using the stem files of a selected song to obtain the latter’s instrumental note recordings. This will help to add a unique layer to the song, while uplifting its mood to a different level.

04Curate and Test
When you are done with creating the perfect soundtrack for your presentation with the choicest of music, proceed to narrow down your list to a finer selection via curating the elements of the soundtrack. All you need to do is, add each track to the presentation elements, while taking care that every inclusion matches with the content it is supposed to complement.
Take care to restrict your choices in line with the length of the slideshow; else you may end up stuffing the footage with too many music pieces, leading to a miscoordinated arrangement. Check if you need just a single song or a complete soundtrack.

● Sound Proof the Final Selection
When you are happy with your work, move ahead with running a mock slideshow to have an assurance of everything being at its respective place. Take note of the music flow to be in cohesion with the other elements of the presentation, check the audio quality, resolution, etc., properties and make changes where necessary. When all seems well, you are ready to share your Clideo slideshow with friends and family on social media handles and communities.
Part 3 How to Make a Photo Slideshow on Mac?
Creating a slideshow is among the most recent trends of infotainment and content sharing. Talking of the creation tools, while most of them turn to be platform specific, others tend to have limitless device compatibility. The Clideo Slideshow maker online tool is one such utility that allows you to design slideshow presentations on any device of your exclusive preference.
Having said that, let us try hands at understanding the slideshow creation process of the aforesaid tool on a MacOs supported device in the following section:
Step 1: Launch the Clideo Online Tool
In any of your preferred Mac supported device, navigate to the home site of the Clideo slideshow maker tool using your desired web browser and move ahead with launching the same in your system.

Step 2: Upload Your Media
In the aforesaid slideshow maker’s opening interface, click on the ‘Choose Files’ tab to select and add the required media files from your Mac device’s local gallery. You can also opt for a ‘Drag and Drop’ of the desired files from your system to the tool’s editor workspace. However, if you wish to make an upload from your online storage accounts like that of Google Drive or Dropbox, hover to the ‘Upside Arrow within the ‘Choose Files’ tab.

Step 3: Adding Extra Files
If you want to add some more media files to the slideshow, navigate to the ‘Options Panel’ to the right of the editing workspace and click on ‘Add More Files’ at the top. Repeat Step 1 here to upload the image and video files in a similar way. Once finished, you can proceed to change the file sequence, delete any unwanted selection or click on ‘Add More Videos’ in the timeline to directly add more video files to your presentation.

Step 4: Crop Your Selections
The left side ‘Options Panel’ further consists of ‘Crop Options’ from where you can adjust the size of your images and videos to a particular aspect ratio, or fit them to a custom screen size using the ‘Crop and Zoom’ option. To add borders to the sides of your slideshow images, click on the ‘Fit With Border’ option.

Step 5: Play Duration Adjustments
Below the ‘Crop Options’, lies the ‘Image Duration’ tab, which you can click on to set the time frames of at will be applicable to all the media files. Also, click within the ‘Crossfade’ checkbox to ensure a seamless transition between successive slides.

Step 6: Add a Background Audio
Once again, navigate to the left side ‘Options Panel’ and tap the ‘Add Audio’ tab at the bottom to upload the desired audio files from your system to the editor timeline. You can also add music files from your online storage accounts, such as, Dropbox, Google Drive, etc.

To extract a piece of the audio for slideshow inclusion, click on the ‘Trim Audio’ tab under ‘Audio Options’. You can now select the desired audio fragment either by adjusting the yellow markers at the ends of the music clip, or specify the time stamps of the required fragment in the respective fields. The volume adjustments for both audio as well as video tracks can be made using the ‘Volume Bars’ icon.

Step 7: Output Format Selection and Export
Navigate to the format options beneath the editor timeline to select a desired output format for your slideshow. You can choose from MOV, API, MKV, MP4, WMV, and a number of other file formats. When you are happy with your work, navigate to and tap the ‘Export’ button at the extreme right corner of the editor workspace.

Step 8: Preview and Download Your Presentation
When you are done with everything, move ahead to watch a preview of your work to ascertain that all the aspects of the slideshow are just perfect. If you need to add further changes, hit the ‘Edit’ tab to head back to the editing workspace. In an otherwsise case, proceed to tap the ‘Download’ button for saving the slideshow either to your device gallery or an online storage account.

Designing Stunning Slideshow Presentataions in Filmora
When browsing through reliable software alternatiaves ez start your slideshow creation streak, picking any member of the Wondershare Filmora Video Editor franchise would indeed be a smart choice, owing tso the fact that, the aforesaid program promises to adhere to the most specificuser needs and the large scale disverity in creator preferences.
For Win 7 or later (64-bit)
For macOS 10.12 or later
Diving into the feature rich library of the software, you get to access a plethora of preset and custsomizable audio-visual effects, transitions, filters, background themes and templates; and a huge storehouse of additional elements, that are all set to add the jaw dropping spark to your otherwise customary slideshows.
The later versions of the editor program are upgraged to include a divserity of high end editing effects, like the Green Screen and AI based transitions that wosrk towards delivering a high quality professional slideshow output to enure an auadience appraisal that is simply wow!
● Ending Thoughts →
● The Clideo slideshow maker tool is anexcellent choice to design over the top slideshow presentations on an online platform.
●> Using Clideo, you can choose to create slideshows on any of your preferred devices, like, Mac, Windows, etc.
● If you are interested in looking for additional alternatives of slideshow creator software, the Wondershare Filmora franchise is something to count upon.
A clideo slideshow is an interesting trend of precise content delivery. Stay here to understand the working essentials of creating Clideo presentations with utmost ease!
In this article
01 [How Do You Make a Slideshow on Clideo?](#Part 1)
02 [Best 5 Tip to Make a Slideshow with Music](#Part 2)
03 [How to Make a Photo Slideshow on Mac?](#Part 3)
Part 1 How Do You Make a Slideshow on Clideo?
Deciding to create slideshow presentations for a graphic design oriented personal or professional concern lands you across a plethora of choices in the IT market in the shape of high end application software program and tools. No doubt, these are leaders in their task; however, the online slideshow makers available across the web are no less.
Paying attention to the same, let us focus our discussion on how does the Clideo slideshow maker tool work to adhere the aforesaid concern. Talking a bit about the credibility of the online program, the tool grants you the flexibility of creating amazing slideshow movies and presentations from images, video clips and recordings, while allowing you to complement the same with the most upbeat and suitable background music.
Additional appeals of the online include the latter’s free availability and extensive device compatibility to work affordably well with all your Windows and MacOS supported desktops, laptops and PCs, along with Android and iOS compatible smartphones and tablets. All you need is an internet connection to launch the tool in your favorite web browser and that’s how you can step into the creation process right away.
Let us now look through the process of creating slideshows in the Clideo tool using a set of still images in the following section:
Step 1: Launch the Tool
Start with navigating to the official Clideo website in any of your preferred web browsers and launch the online slideshow maker tool in your device.
Step 2: Upload Image Files
The tool’s launch screen displays the ‘Choose Files’ tab in blue, which you can click on to upload the desired image files to the Clideo timeline while selecting them from your device gallery. To select and upload images from your Dropbox or Google Drive accounts, click on the ‘Upside Arrow’ in the ‘Choose Files’ tab.
The tool supports a decent variety of image formats to work with, like, JPG, JPEG, PNG, GIF, TIFF, etc., thus letting you escape the notch of sticking to a specific file format. You can also choose to either upload the image files all at once, or add them at a later stage, as per your requirement.
Step 3: Let’s Get Creating!
Once the selected images get uploaded on the editor timeline of the tool, you can preview them in the editor workspace. You can change the sequence of appearance of the images by dragging and dropping their thumbnails at respective places within the editor timeline or delete them by selecting the image and clicking the ‘X’ symbol.
You can additionally, choose to add extra clips by tapping the ‘Add More Videos’ option in the timeline. As an alternative, navigate to the panel at the right and hit the ‘Add More Files’ button at the top.
Step 4: Crop the Media Files
Below the ‘Add More Files’ option in the right panel, you can see the ‘Crop Options’ tab. You can work with the crop tool to adjust the size of the added videos and images so that they fit in the borders of the media frames. You are further allowed to select a suitable aspect ratio and zoom the media files in and out to obtain the affordable screen size. This would come handy when you proceed to share your slideshow across various media platforms, like, Instagram, Facebook, YouTube, etc., each of which has a different screen resolution and size.
Step 5: Time Your Slides
You can decide play duration for your media files by navigating to the same right panel and hitting the ‘Image Duration’ tab and setting the required parameters in the dropdown list that appears next. Here, you can adjust the time settings of the images in your slideshow presentations, however, the video play durations are preset and you are not allowed to change them. If you wish to have a smooth play of the presentation slides, do not forget to tick the ‘Crossfade’ checkbox.
Step 6: Add a Suitable Background Music
The last one in the right panel is the ‘Add Audio’ option which you can use to supplement your presentation with the coolest and the most suitable background music. All you need to do is, hit the aforesaid tab and browse through your device’s media gallery to select an audio file of your choice. To add a music file that’s belongs to your online storage, click on the ‘Upside Arrow’ in the tab and proceed to make a selection or add a link of the desired audio file.
Once you have added the track, you are permitted to trim, adjust volume settings and loop the track if required under the ‘Audio Options’ tab.
Step 7: Duration, Size and Format Adjustments
Navigate to the left side ‘Options Panel’ at the bottom of the editor workspace, where you can set the different parameters of your slideshow size and run time. You can also choose to generate the output presentation in a specific file format if required, using the ‘Format Picker’ tool. When you are satisfied with everything, reach to and hit the ‘Export’ button at the extreme right.
Step 8: Save Your Creation
Completion of Step 7 will take you to the ‘Slideshow Save’ interface of the video editor tool. Here, you can preview your slideshow and save it to your device if everything seems fine. To save your output file, click on the ‘Download’ tab. If however, you need to make any further changes to the presentation, hit the ‘Edit’ tab to get directed back to the editor workspace.
Part 2 Best 5 Tip to Make a Slideshow with Music
While the visual elements count to be the major attractions of a slideshow presentation, subtle background music can work to bind the audience with the rhythm and flow of the presentation. Having learnt about the fundamentals of creating over the top slideshows with Clideo, let us move ahead with working on some of the best tips to complement your already awesome graphic slideshow artwork with the most appealing audio in the following section:
01Select a Royalty Free Music Plan
Adding suitable background music can uplift the appeal of your slideshow presentation to greater extents. While most of the slideshow creator programs available today are equipped with extensive varieties of inbuilt audio for visibly any presentation setting, you can also opt to choose your own music plan in case you don’t get anything specific.
However, you do need to take care of certain factors when deciding on your music plan, most importantly, the pricing concerns. Go for selecting a royalty free, unlimited audio license via an affordable paid subscription from recognized and leading music hubs and online audio websites.
02Browse the Recommended Audio Choices
When looking through the diversity of music options available on any audio website, do not forget to pay attention to the user and website recommended playlists and music categories. These tend to have a collection of the most preferred audio choices and there are high chances of you getting your exact music piece from within these playlists.
You can further, refine your search within these categories by setting filters of genre and style, in case you have a clear idea of what you exactly need, thus rescuing you from the hustle of browsing through a never ending list of audio files.
03Synchronize the Slideshow Music and the Contents
The credibility of your background audio lies in adding additional spark and integrity to the stills and videos of the presentation. When selecting the music elements for your slideshow, make sure that your choices are well in accordance with the content and mood of your creation. The most important aspect here is that the music you choose to add should complement the story being depicted, while captivating the viewer’s attention.
Avoid choosing a random audio just because you have heard a buzz of the same on popular platforms or a peer recommendation, lest the contents and background score of your presentation may take opposite paths and disrupt the information flow, while resulting in a distracted audience. To escape the hustle, you may seek help from the diversity of stock audio websites for a keyword and category oriented music search.
If you are interested in adding depth to your background audio, consider using the stem files of a selected song to obtain the latter’s instrumental note recordings. This will help to add a unique layer to the song, while uplifting its mood to a different level.
04Curate and Test
When you are done with creating the perfect soundtrack for your presentation with the choicest of music, proceed to narrow down your list to a finer selection via curating the elements of the soundtrack. All you need to do is, add each track to the presentation elements, while taking care that every inclusion matches with the content it is supposed to complement.
Take care to restrict your choices in line with the length of the slideshow; else you may end up stuffing the footage with too many music pieces, leading to a miscoordinated arrangement. Check if you need just a single song or a complete soundtrack.
● Sound Proof the Final Selection
When you are happy with your work, move ahead with running a mock slideshow to have an assurance of everything being at its respective place. Take note of the music flow to be in cohesion with the other elements of the presentation, check the audio quality, resolution, etc., properties and make changes where necessary. When all seems well, you are ready to share your Clideo slideshow with friends and family on social media handles and communities.
Part 3 How to Make a Photo Slideshow on Mac?
Creating a slideshow is among the most recent trends of infotainment and content sharing. Talking of the creation tools, while most of them turn to be platform specific, others tend to have limitless device compatibility. The Clideo Slideshow maker online tool is one such utility that allows you to design slideshow presentations on any device of your exclusive preference.
Having said that, let us try hands at understanding the slideshow creation process of the aforesaid tool on a MacOs supported device in the following section:
Step 1: Launch the Clideo Online Tool
In any of your preferred Mac supported device, navigate to the home site of the Clideo slideshow maker tool using your desired web browser and move ahead with launching the same in your system.
Step 2: Upload Your Media
In the aforesaid slideshow maker’s opening interface, click on the ‘Choose Files’ tab to select and add the required media files from your Mac device’s local gallery. You can also opt for a ‘Drag and Drop’ of the desired files from your system to the tool’s editor workspace. However, if you wish to make an upload from your online storage accounts like that of Google Drive or Dropbox, hover to the ‘Upside Arrow within the ‘Choose Files’ tab.
Step 3: Adding Extra Files
If you want to add some more media files to the slideshow, navigate to the ‘Options Panel’ to the right of the editing workspace and click on ‘Add More Files’ at the top. Repeat Step 1 here to upload the image and video files in a similar way. Once finished, you can proceed to change the file sequence, delete any unwanted selection or click on ‘Add More Videos’ in the timeline to directly add more video files to your presentation.
Step 4: Crop Your Selections
The left side ‘Options Panel’ further consists of ‘Crop Options’ from where you can adjust the size of your images and videos to a particular aspect ratio, or fit them to a custom screen size using the ‘Crop and Zoom’ option. To add borders to the sides of your slideshow images, click on the ‘Fit With Border’ option.
Step 5: Play Duration Adjustments
Below the ‘Crop Options’, lies the ‘Image Duration’ tab, which you can click on to set the time frames of at will be applicable to all the media files. Also, click within the ‘Crossfade’ checkbox to ensure a seamless transition between successive slides.
Step 6: Add a Background Audio
Once again, navigate to the left side ‘Options Panel’ and tap the ‘Add Audio’ tab at the bottom to upload the desired audio files from your system to the editor timeline. You can also add music files from your online storage accounts, such as, Dropbox, Google Drive, etc.
To extract a piece of the audio for slideshow inclusion, click on the ‘Trim Audio’ tab under ‘Audio Options’. You can now select the desired audio fragment either by adjusting the yellow markers at the ends of the music clip, or specify the time stamps of the required fragment in the respective fields. The volume adjustments for both audio as well as video tracks can be made using the ‘Volume Bars’ icon.
Step 7: Output Format Selection and Export
Navigate to the format options beneath the editor timeline to select a desired output format for your slideshow. You can choose from MOV, API, MKV, MP4, WMV, and a number of other file formats. When you are happy with your work, navigate to and tap the ‘Export’ button at the extreme right corner of the editor workspace.
Step 8: Preview and Download Your Presentation
When you are done with everything, move ahead to watch a preview of your work to ascertain that all the aspects of the slideshow are just perfect. If you need to add further changes, hit the ‘Edit’ tab to head back to the editing workspace. In an otherwsise case, proceed to tap the ‘Download’ button for saving the slideshow either to your device gallery or an online storage account.
Designing Stunning Slideshow Presentataions in Filmora
When browsing through reliable software alternatiaves ez start your slideshow creation streak, picking any member of the Wondershare Filmora Video Editor franchise would indeed be a smart choice, owing tso the fact that, the aforesaid program promises to adhere to the most specificuser needs and the large scale disverity in creator preferences.
For Win 7 or later (64-bit)
For macOS 10.12 or later
Diving into the feature rich library of the software, you get to access a plethora of preset and custsomizable audio-visual effects, transitions, filters, background themes and templates; and a huge storehouse of additional elements, that are all set to add the jaw dropping spark to your otherwise customary slideshows.
The later versions of the editor program are upgraged to include a divserity of high end editing effects, like the Green Screen and AI based transitions that wosrk towards delivering a high quality professional slideshow output to enure an auadience appraisal that is simply wow!
● Ending Thoughts →
● The Clideo slideshow maker tool is anexcellent choice to design over the top slideshow presentations on an online platform.
●> Using Clideo, you can choose to create slideshows on any of your preferred devices, like, Mac, Windows, etc.
● If you are interested in looking for additional alternatives of slideshow creator software, the Wondershare Filmora franchise is something to count upon.
Also read:
- New 2024 Approved Learning Some Perfect Ways to Convert a Slow-Motion Video to Normal
- In 2024, Spooky Halloween with the Best 15+ Halloween Countdown Video Clips
- Updated How to Make Split Screen Videos in Filmora for 2024
- Updated Do You Want to Know How to Add a VHS Effect Premiere Look? You Can Easily Apply the VHS Effect to Your Videos Using Adobe Premiere Pro
- Updated Little Known Ways of Adding Emojis to Photos on iPhone & Android 2023
- 2024 Approved Best Tips on How to Design Travel Slideshow
- 2024 Approved How to Add Adjustment Layer in Premiere Pro
- New Change Speed of a Video on iPhone
- 2024 Approved Best Way To Color Grading & Color Correction in Filmora
- To Get Cinematographs of a Music Video, You Need to Understand the Basics of Camera Movement. As Well Framing and Lighting of the Setup Are Illustrated in This Article
- 2024 Approved What Is the Best MP4 Cutters for YouTubers on Mac?
- New In 2024, How to Add Text Effects in Adobe Premiere Pro?
- Updated MP3 Cutter Download for 2024
- Updated 2024 Approved How to Add Font Effects to Videos
- New Top 5 Tools to Help You Know More Freeze-Frame Video Editing Skills
- Updated 2024 Approved An Ultimate Guide To Edit a Music Video Aspect Ratio and First Cut
- New 8 Top Premiere Pro Slideshow Templates for 2024
- Best Youtube Video Meme Maker for 2024
- New Enhance Your Film Production with These 5 Silence Detection Tools
- Updated A Comprehensive Guide on Converting Slo-Mo Videos to Normal Speed Videos On iPhone for 2024
- New Merge MP4 Online? Its Easy With These 5 Tools for 2024
- 2024 Approved S-Log Is a Gamma Curve Optimized for Digital Cameras to Maximize the Image Sensors Performance. Although These Videos May Look Flat and Washed Out, They Contain Lots of Color Information
- In 2024, How to Slow Down Time-Lapse Videos on iPhone
- Updated In 2024, Featuring The Use of Camera Shake in Creating the Best Videos
- Working Out All Important Details of Slowing Down Video in After Effects
- Updated A Complete Overview of VSCO Video Editor
- 2024 Approved Top 10 Sony LUT for Different Purposes
- New 4 Ways to Add White Border to Video on Mobile and Desktop for 2024
- 2024 Approved Steps to Remove Background Noise From Video Sony Vegas
- There Are Several Video Players that You Can Use to Watch Videos on Your PC. To Have a Better Experience Viewing Videos and Enhancing Them Across a Similar Platform, You Can Try Out VLC Media Player for PC
- New Elevate Your TikTok Game with Catchy Captions! Explore the Trendiest 2024 TikTok Captions for Every Occasion and Style. Up Your TikTok Content with Style
- 2024 Approved Are You Stuck with How to Use Discord GIF Ideally? Check that Out in This Article, as We Will Guide You on All You Need to Know About GIFs for Discord
- 2024 Approved Hitfilm Express - A Guide to Download, Install, Key Features
- New VSDC Free Video Editor Review
- How to Reset Xiaomi Redmi Note 12R without Losing Data | Dr.fone
- In 2024, 3 Effective Methods to Fake GPS location on Android For your Samsung Galaxy Z Fold 5 | Dr.fone
- 2024 Approved Authors Recommended The Best Text Voice Generators for All Platforms
- In 2024, How to Detect and Stop mSpy from Spying on Your Realme 12+ 5G | Dr.fone
- How to Fix My Realme GT Neo 5 SE Location Is Wrong | Dr.fone
- In 2024, A Working Guide For Pachirisu Pokemon Go Map On Vivo V29 | Dr.fone
- In 2024, Ultimate guide to get the meltan box pokemon go For Samsung Galaxy A25 5G | Dr.fone
- Updated Whats Your No. 1 Maker to Animate Your Logo Online Free for 2024
- Fake Android Location without Rooting For Your Oppo Reno 10 Pro+ 5G | Dr.fone
- How to Perform Hard Reset on Vivo X Flip? | Dr.fone
- Recommended Best Applications for Mirroring Your Realme Narzo N53 Screen | Dr.fone
- Reasons why Pokémon GPS does not Work On Apple iPhone 7? | Dr.fone
- In 2024, How to Send and Fake Live Location on Facebook Messenger Of your Huawei P60 | Dr.fone
- In 2024, How to Bypass FRP on Nokia C12?
- How To Unlock Infinix Hot 30 5G Phone Without Password?
- Full Tutorial to Bypass Your Vivo Y100i Face Lock?
- 5 Ways to Track Honor Play 40C without App | Dr.fone
- How to Remove Forgotten PIN Of Your Xiaomi 14
- Updated In 2024, Best Text-to-Audio Converters of All Times
- Top 5 Tools to Convert Text to Audio Online for Free for 2024
- 15 Best Strongest Pokémon To Use in Pokémon GO PvP Leagues For Samsung Galaxy F14 5G | Dr.fone
- In 2024, 3 Ways to Unlock iPhone 13 mini without Passcode or Face ID
- Ultimate guide to get the meltan box pokemon go For Oppo Reno 11 Pro 5G | Dr.fone
- In 2024, The Ultimate Guide to Bypassing iCloud Activation Lock on Apple iPhone 15
- How to get the dragon scale and evolution-enabled pokemon On Tecno Spark 20 Pro? | Dr.fone
- How to Bypass Apple iPhone SE (2022) Passcode Easily Video Inside | Dr.fone
- Updated How to Make an Animated Travel Map Video, In 2024
- In 2024, Sim Unlock Motorola Phones without Code 2 Ways to Remove Android Sim Lock
- In 2024, How to Unlock SIM Card on Apple iPhone 15 Plus online without jailbreak
- New In 2024, What Is ChatGPT? | Wondershare Virbo Glossary
- Stuck at Android System Recovery Of Xiaomi Redmi K70 ? Fix It Easily | Dr.fone
- Title: Want to Make a Funny Vlog on TikTok? Trying to Find the Right Topic for It? This Article Presents some Impressive Options for Making a Funny Vlog for TikTok for 2024
- Author: Chloe
- Created at : 2024-04-24 07:08:24
- Updated at : 2024-04-25 07:08:24
- Link: https://ai-editing-video.techidaily.com/want-to-make-a-funny-vlog-on-tiktok-trying-to-find-the-right-topic-for-it-this-article-presents-some-impressive-options-for-making-a-funny-vlog-for-tiktok-f/
- License: This work is licensed under CC BY-NC-SA 4.0.
