:max_bytes(150000):strip_icc():format(webp)/GettyImages-1065028028-8e770c58918e4cf8b0852e81cff60ed6.jpg)
Want to Play a Video on Loop on Vimeo so that It Plays Again and Again? Here Are All the Different Ways to Loop a Video on Vimeo in Simple Steps

Want to Play a Video on Loop on Vimeo so that It Plays Again and Again? Here Are All the Different Ways to Loop a Video on Vimeo in Simple Steps
Vimeo is a popular video streaming platform where you can watch videos all day. Vimeo is a close competitor of YouTube. If you are a regular viewer on Vimeo, you may want to watch a video in a loop. Instead of manually playing the video again and again, you can automatically loop the video on Vimeo.
If you are embedding a Vimeo video on your website, you will want to play it on a loop. This will ensure maximum watch time from the audience. Besides, if you are a video creator, you may want to loop Vimeo videos for your video project. We will illustrate how to loop video on Vimeo for all scenarios.
Way 1. Loop A Video on Vimeo Directly
Most online users watch videos on Vimeo directly through the web browser. This is specifically applicable to computer users. If you want Vimeo loop video for any desired video, the steps are simple. You have to make some adjustments and additions to the video URL on the address bar. You should change the URL accurately for looping a video. Here are the steps on how to loop a video on Vimeo directly.
Step 1: On your device, launch the web browser. Open the official website of Vimeo Watch. Play any video of your liking.

Step 2: Now, you need to change the URL of the video you are playing. Here are the changes to make in the address bar.
- Remove everything at the beginning of “vimeo.com”. Add “.player” at the beginning of the URL.
- Add “/video/“ after “vimeo.com”.
- Add “?amp;loop=1:” at the end of the URL.
Therefore, the initial URL of the video was “https://vimeo.com/754255543 “. You have to change it to “player.vimeo.com/video/754255543?amp;loop=1”.
Step 3: After making the changes, press Enter key. The same video will play in a loop until you pause the video or close the web browser’s tab.
Way 2. Loop a Vimeo Video When Embedded on Your Site
You can embed a Vimeo video on your website so that the audience can watch it. The video will play only once when someone lands on your website. After the video ends playing, the embedding will show suggested videos. If you want the same video to play again and again, you have to put it in a loop. Here are the steps on how to loop Vimeo video when embedded on your website.
Step 1: Open the Vimeo video on your web browser. Click on Share icon present inside the player in the top-right corner.
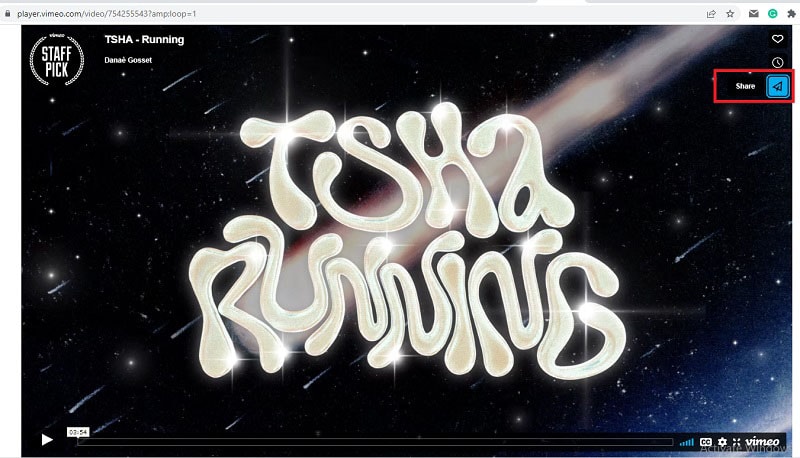
Step 2: You will get to see several options, and you need to click on “Get Embed Code” option.
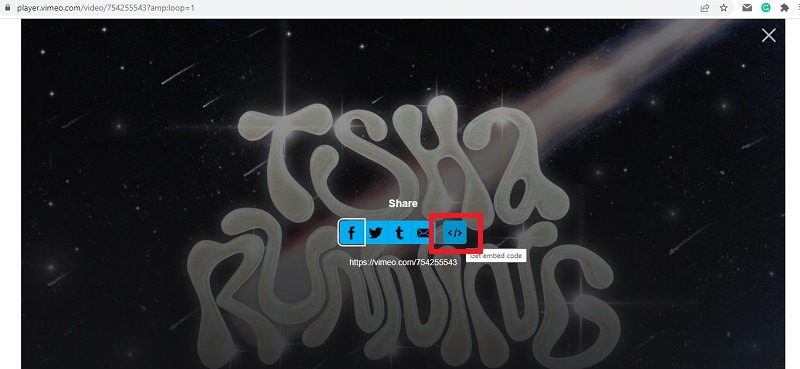
Step 3: On the next screen, you will get the embed code in a pop-up box. Click on Show options.

Step 4: From the expanded section, go to Special Stuff section. Turn on “Loop this video” option.

Step 5: Thereafter, copy the code and paste it into your website to play the video in a loop.
Way 3. How to Loop a Vimeo Video on Mobile
If you are a mobile user, you can use the Vimeo app. But you cannot loop a video on the Vimeo app, quite surprisingly. If you are using the Vimeo app, you can copy the link to the video. Thereafter, you can open the video on your web browser app. You can follow the steps we have mentioned for looping a video on Vimeo directly. Here are the steps for Vimeo loop video on mobile devices.
Step 1: Open the Vimeo app on your mobile device. Play the video that you want in the loop.
Step 2: Tap on the Share icon and tap on Copy URL option.
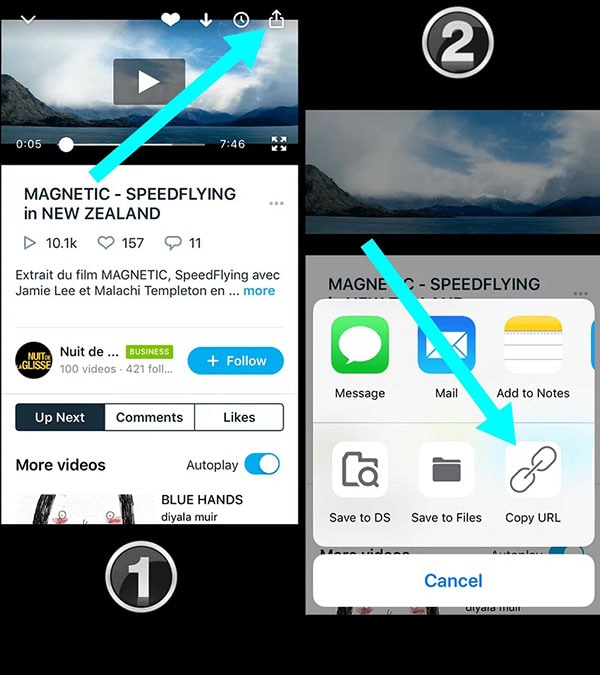
Step 3: Open your web browser and paste the copied URL.
Step 4: Modify the URL in the address bar following the steps we have mentioned in Way 1.
After the modification, the URL of the video should change from “https://vimeo.com/754255543 “ to “player.vimeo.com/video/754255543?amp;loop=1”.
Way 4. How to Loop Vimeo Videos on Computer
If you want to use Vimeo loop video in your video project on your computer, you can use Wondershare Filmora. Filmora is a professional video editor where you can loop any downloaded Vimeo video as long as you want. There are several online Vimeo downloaders available to download any designed Vimeo video.
Thereafter, you can import the downloaded video into Filmora. Then you can extend the duration by looping the video. Filmora is available for Windows and macOS. Apart from looping, you can edit your video like a professional. Here are the steps on how to loop a video on Vimeo.
Free Download For Win 7 or later(64-bit)
Free Download For macOS 10.14 or later
Step 1: Download and install Wondershare Filmora. Download the desired Vimeo video on your computer. Launch Filmora and click on New Project.

Step 2: Drag and drop the downloaded video file into the Project Media folder on Filmora. Thereafter, bring the video file from Project Media folder into the timeline.

Step 3: Drag and drop the video clip into the timeline again. Make sure that there is no gap between the clips and they are on the same channel for looping. Alternative, you can copy and paste the video clip multiple times for looping.

Step 4: You can play the video and watch it in loop. Finally, click on the Export button to save the video in the desired file format.

Wondershare Filmora Best Video Looper Software for Social Media Video Creation.
Free Download Free Download Learn More

Conclusion
There are several ways to loop a video on Vimeo. The best way out is to go for Vimeo loop video directly from the web browser. We have also illustrated how to embed a Vimeo video in a loop into your website. If you want to have a looped Vimeo video in your video project, you can use Filmora on your computer.
Free Download For macOS 10.14 or later
Step 1: Download and install Wondershare Filmora. Download the desired Vimeo video on your computer. Launch Filmora and click on New Project.

Step 2: Drag and drop the downloaded video file into the Project Media folder on Filmora. Thereafter, bring the video file from Project Media folder into the timeline.

Step 3: Drag and drop the video clip into the timeline again. Make sure that there is no gap between the clips and they are on the same channel for looping. Alternative, you can copy and paste the video clip multiple times for looping.

Step 4: You can play the video and watch it in loop. Finally, click on the Export button to save the video in the desired file format.

Wondershare Filmora Best Video Looper Software for Social Media Video Creation.
Free Download Free Download Learn More

Conclusion
There are several ways to loop a video on Vimeo. The best way out is to go for Vimeo loop video directly from the web browser. We have also illustrated how to embed a Vimeo video in a loop into your website. If you want to have a looped Vimeo video in your video project, you can use Filmora on your computer.
Polish and Enshrine Your Music Videos with the Best Editing Software, Filmora. Add Cuts to Your Beat, Light Leaks, and Much More
A common understanding in cinematography circles is that editing makes the seventy percent of the total job. It is editing that makes a significant difference, and Filmora, a professional video editor, comes in handy when you want to edit your photos.
Filmora has multiple features that allow you to shine your videos in countless ways. This article will clarify everything you need to improve your music video. Also, it is just the tip of the iceberg. The more you try to be creative, the more options Filmora will provide you. The following points highlight how you can polish your music video editing skills.
Part 1. Duplicate your project before editing
Before you begin unleashing your inner creativity, you must make a duplicate copy of your project file. Of course, it would help if you did so to keep a backup file.
It will help you get back to the pre-edit file if you want to start from the beginning or if you want to save the file for use in the future. You can make a duplicate file of your project by following the subsequent steps.
Step1Download and install Filmora
You can download Filmora from its official website.
Free Download For Win 7 or later(64-bit)
Free Download For macOS 10.14 or later
Step2Create or import your project
- Create a project if you are using Filmora for the first time.
- Import the project from your computer directory. Then, go to file in the menu bar, and click on the open project.
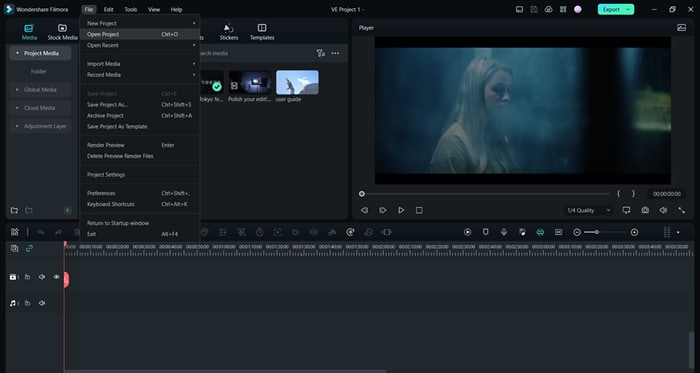
- Select the project you want to open.
Step3Duplicate the project file and rename it
- When you open Filmora, a start-up window will appear.
- Right-click on the project you want to duplicate.

Step4Rename the duplicate file
- Rename the file to keep a record of new editions.
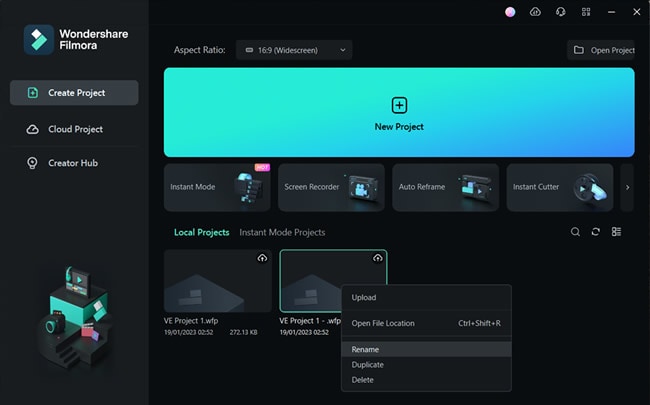
The file is renamed. It will help you remember which file is original. If your files become corrupted, you can easily access the original ones. Once you are done duplicating your project file, it is time to do our primary job: Polishing our video edits with Filmora .
Free Download For Win 7 or later(64-bit)
Free Download For macOS 10.14 or later
Part 2. Polishing Your Music Video
Just like ladies apply polish to their nails to make them more attractive, you can use editing to your music video to get the same result. Ladies can go to the beautician if they want. You can go to a professional editor if you like it.
However, these options are pretty expensive. The best way is to do it yourself. It is fun. Also, you can let loose your hidden artist for a while. Stick to the following points to understand how to begin polishing your music video.
How to put cuts on beats?
Adding beat cuts to a music video is imperative. Randomly placing beats yield an inferior-quality video. It also gives the impression that video editing is not done by a professional. The beats must be adjusted to synchronize with the storyline of the video.
Moreover, the video will lose its charm if you put cuts on every beat. People will not be able to enjoy, let alone understand, what is happening in the film.
What are the beats?
Beats are pieces of music that recur in a pattern. They are essential for music videos. It adds attraction for the viewers. Also, without beats, no music video can go viral. In the digital age, beats boost your music video.
![]()
Note: Cuts are recommended on every 2nd and 4th beat. In that way, a smooth transition of music beats takes place, making it more ear-pleasing. It also gives a professional outlook to the whole music.
Let’s learn how you can put cuts on your beats.
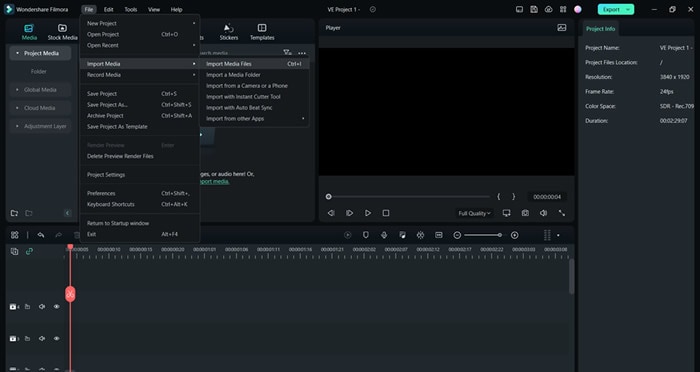
Step1Import the music video
- Import the Music video to which you would like to add any beat.
- You can also use the one given in Filmora.
- Drag and Drop the music video in the timeline panel.
Step2Detach its audio
- Right-click on the video.
- Select the option “Detach Audio.” It will separate the attached audio from the music. You will be able to add cuts where you deem necessary.
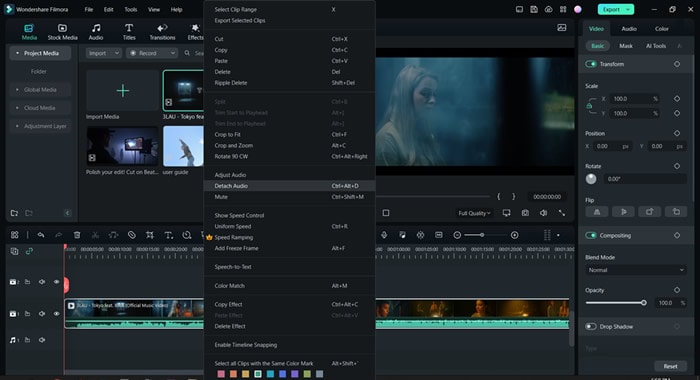
You can also import audio from your drive. After that, drag and drop the imported file into the timeline panel.
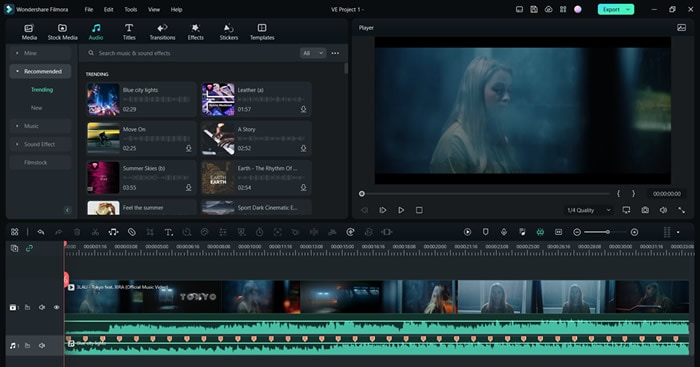
- Right, Click on the audio file in the audio panel.
- Select the option “Beat Detection.” It will show beats (with red markers) on the audio timeline, making adding cuts to the beat easy.
Step3Cut the beats where you find necessary
- Listen carefully to the audio file and plan where you want to add a cut to your beat.
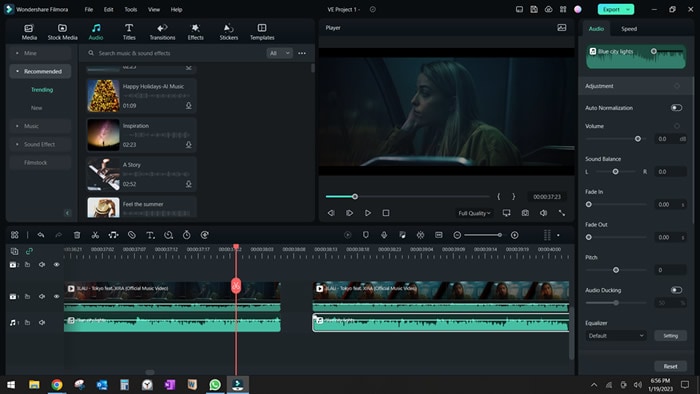
- Adjust the beat according to your music video.
- Join the trimmed video segments to maintain continuity. The final product should look like the one given below.
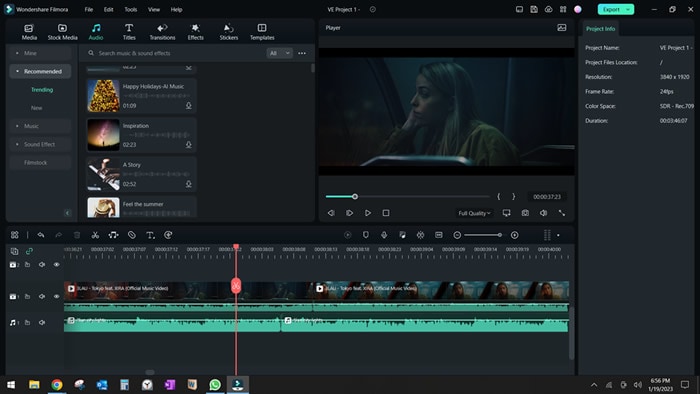
Resultantly, it will readjust the beat to a different spot on the video. You can make multiple cuts in the beats. However, it is not recommended. It makes the whole experience of listening quite jarring.
Once you’ve added cuts to the beats, it is time to make them smooth. For that, keep reading the instructions given below.
Free Download For Win 7 or later(64-bit)
Free Download For macOS 10.14 or later
How to smooth out cuts
Adding cuts in the beats is one part of the job, not the whole job. After adding these cuts, you have to smoothen them. With it, the point of interest for the audience becomes clear.
To maintain the audience’s attention on our video, we have to smoothen the cuts so that our audience quickly understands the ongoing story in our video. If sudden changes occur on the screen, watching it gets disconcerting.
Indeed, you would not want your audience to have this experience. Head to the following techniques to understand how to smooth out video cuts
Technique 1: Showing multiple perspectives
The focal person in the video must occupy the same spot in the previous shot as it maintains in the current shot.
Let us understand from the example given below.
- Shot 1: The actress in the music video is occupying the left seat on the bus while looking outside.
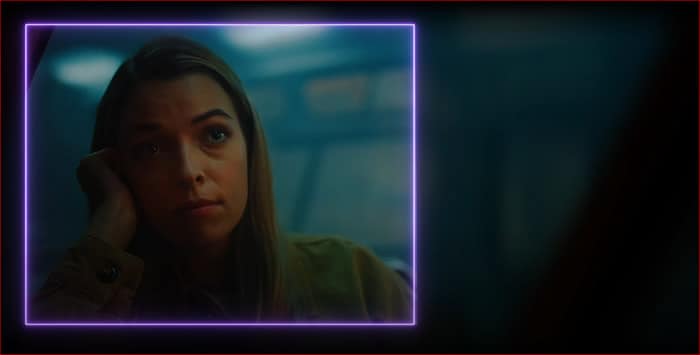
- Shot 2: The actress occupies the same spot in the subsequent shot.
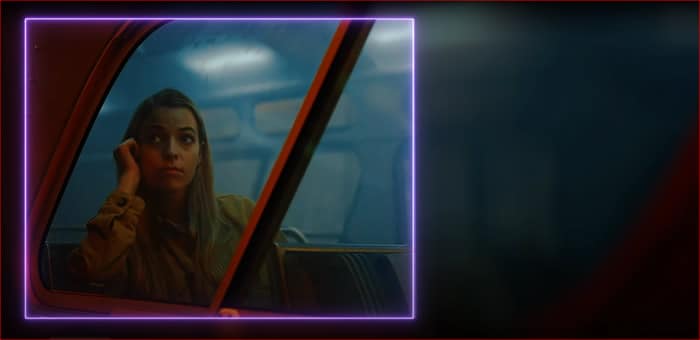
- Third Shot: The shot shows the wide angle of the bus from the inside. The actress is still sitting in the same position and the same place.
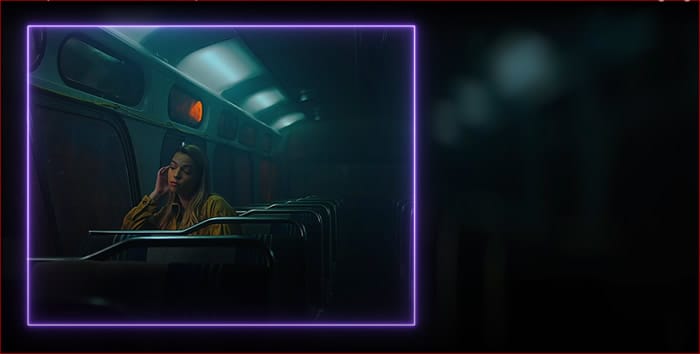
This technique keeps the audience focused on the point of interest while giving them a different perspective of the scene.
Technique 2: Using light leaks
The technique is quite helpful for the transition between two cuts. It uses different levels of colors to shine between cuts, adding smoothness and providing coherence.
What are light leaks?
Light leaks are great effects in Filmora. These effects fill the screen with light. It seems that light is leaking in a disorderly fashion. For the time being, the whole screen is filled with that effect. Thus, it explains the name of this effect as a light leak.
Filmora provides a plethora of features for adding Light Leak for transitioning cuts. With the use of Filmora, one can quickly bring a level of flow to the music video. Keep reading to understand how to use this remarkable feature of Filmora.
Free Download For Win 7 or later(64-bit)
Free Download For macOS 10.14 or later
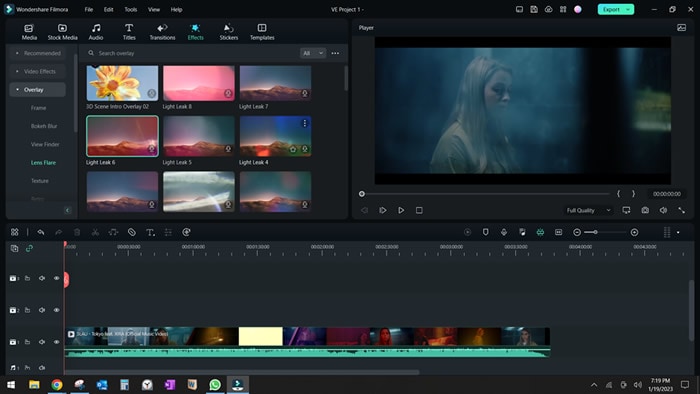
Step1Access the light leak effects on Filmora
- Go to Effects on the Interface.
- Go to Overlay and choose the light Leak feature.
- You can also use any other light Leak stock in your capacity.
Step2Drag and drop the effects in the video editing
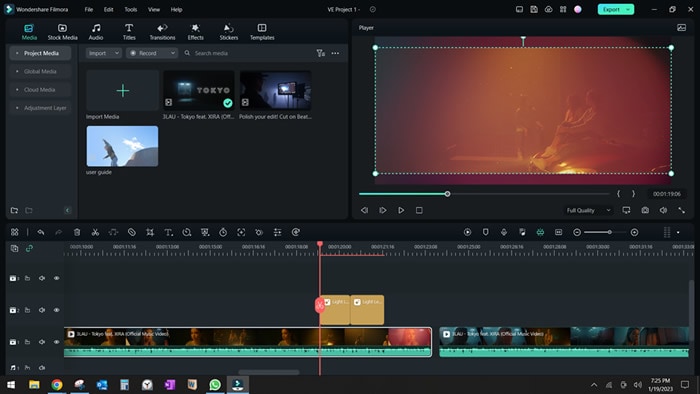
- Drag and drop the effect between any two cuts where you want to add this feature for a smooth transition.
- The effects should be placed above the video, in the timeline over the clip.
Step3Setting the color and blend of the light leak effect
- Right-click on the clip, and go to “Edit Properties.”
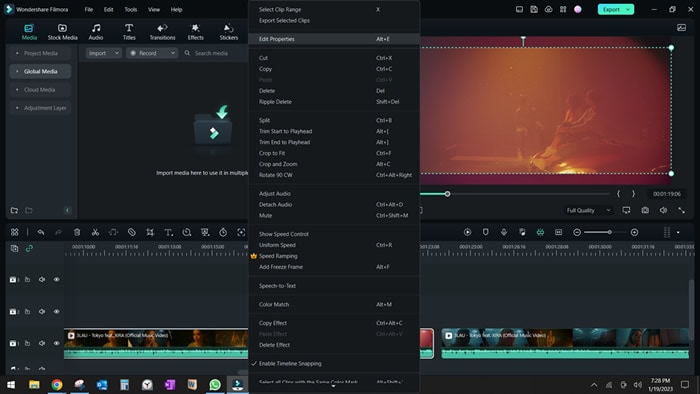
- Go to the Composing menu. Then, go to “Blend Mode” and choose “Screen.”
- It will adjust the light Leak feature to your entire screen.
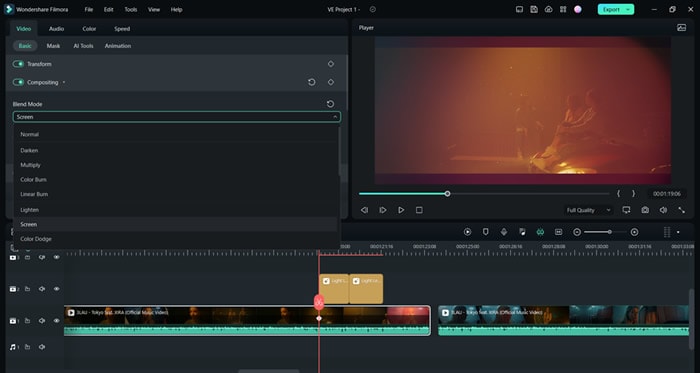
Step4Fit the effect to the width of the screen
- Go to the Transform option in the clip properties.
- Click on both circles in front of the Scale option. It will adjust the effect to the entire frame width, giving it a pleasing outlook.
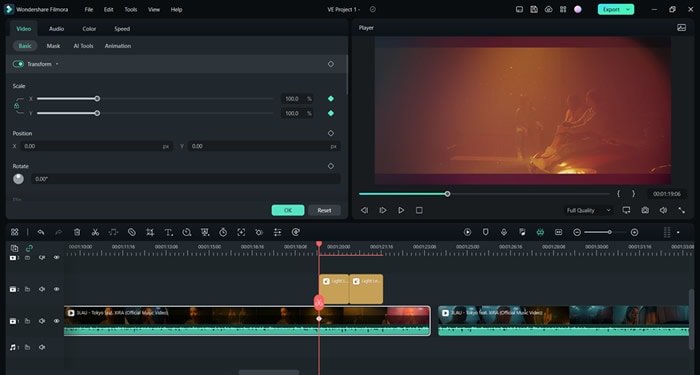
There you go! Your light Leak filter is ready. Give attention to how the light floods the screen and the scene transitions from one part to the next.
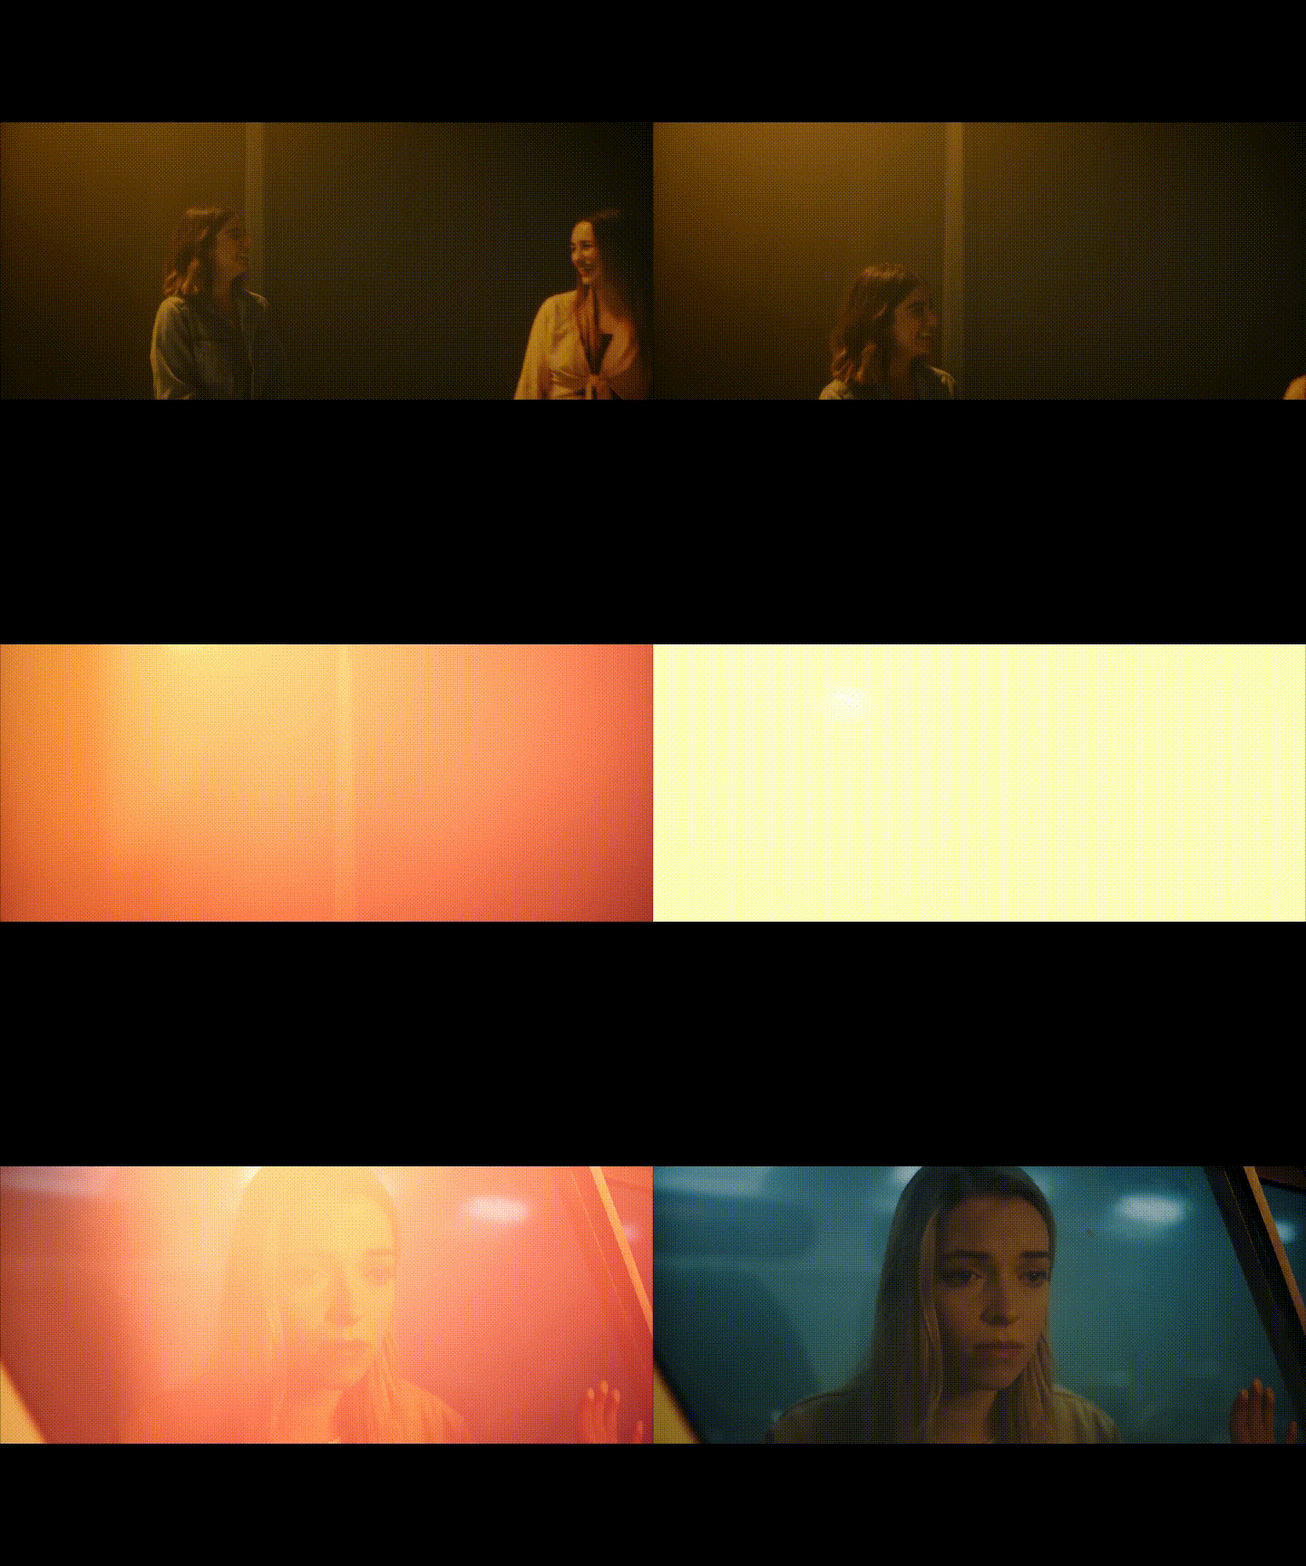
Now, you are done with adding some additional color and light to your cuts. Your cuts are now smooth and trouble-free. Moving onto our next tip that will further polish your music video. It is called Reframing and Zooming.
Reframe and zoom to polish your video
Another significant feature of Filmora is that it allows you to readjust the frame and zoom of the video. Any zooming option left undone in the shooting phase can be addressed in the editing phase.
For example, a director did an excellent job shooting a video. He considered every angle and yielded the best video shoot he could achieve. However, he missed a few zooming-out techniques while shooting. Now, what should one do? Use Filmora.
It is where the reframing and zooming feature of Filmora comes into play and saves the day.
Free Download For Win 7 or later(64-bit)
Free Download For macOS 10.14 or later
What are the reframing and zooming features?
This feature allows you to adjust the zoom on the point of interest in the music video. If you want to add extra focus on a certain point, the feature in Filmora can do that for you. You can run zoom in or zoom out on any particular object or actor. Follow the given steps to understand how you can do that.
Step1Plan your video
- Where you want to reframe and zoom. Trim that part of the video.
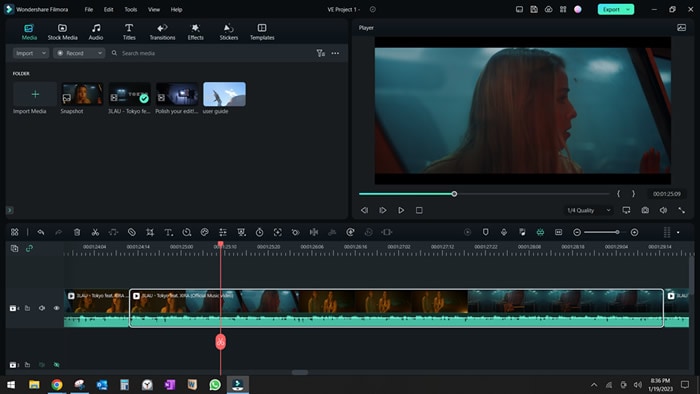
Step2Choose any two points on the clip for reframing
- Choose any two points on the clip. These points are reference points. When the clip moves from one point to the next point, the reframing takes place.
Step3Adjust the scale and position of the clip
- Go to the Transform option in Clip properties.
- Go to the clip’s end (2nd point), and turn on the Scale and Position circles.
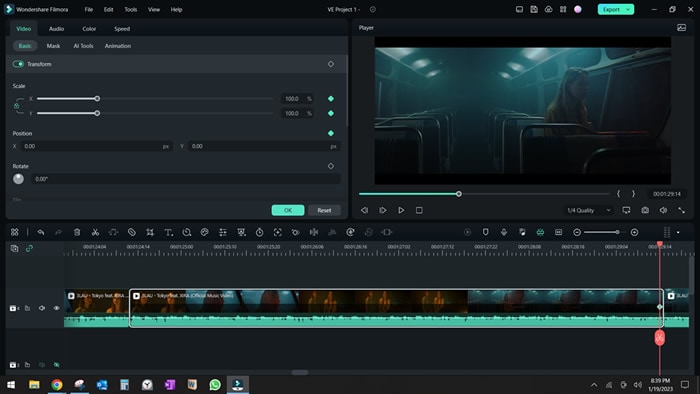
- Go to the start of the clip
- And adjust the value of scale and position.
Atl Text: Setting new value to Scale and Position.
Step4Replay the clip
- Once the scale readings and position in the initial point are set, replay the clip to observe the reframing.
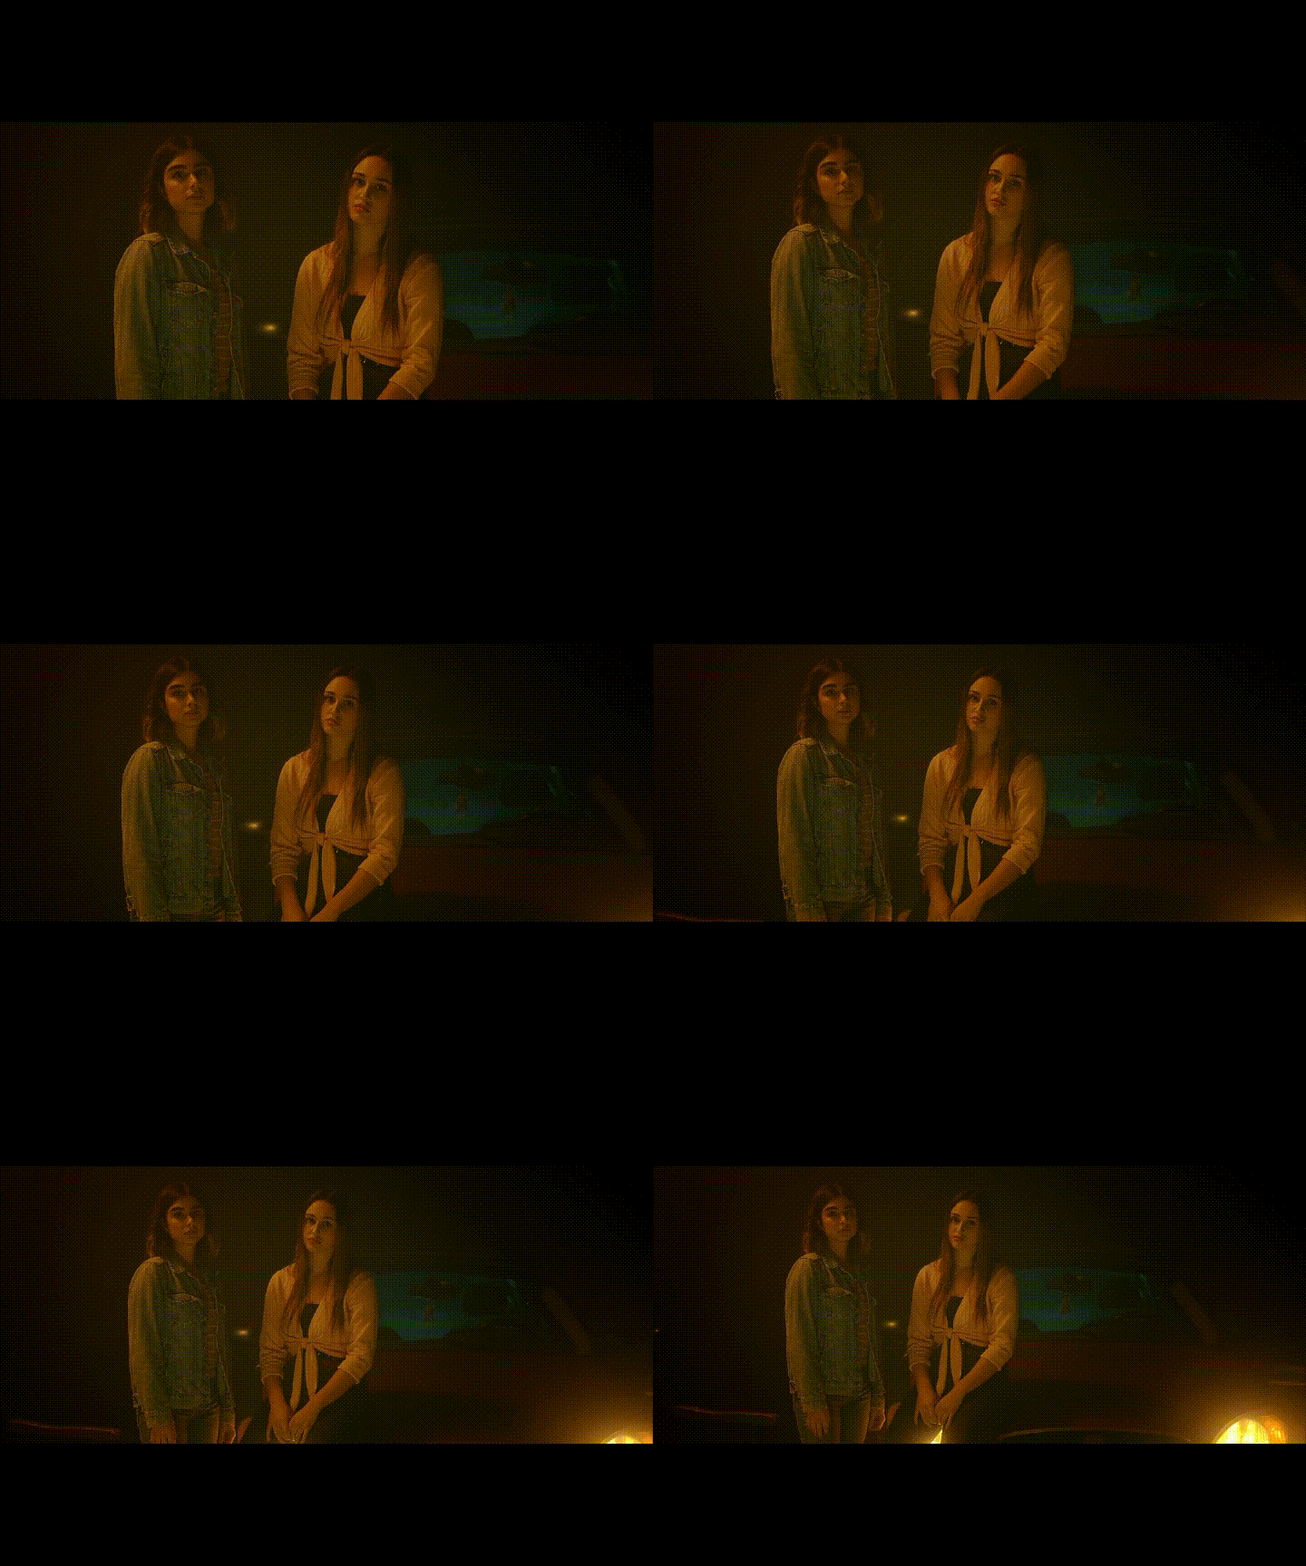
You can use it on the static shots if you want. The procedure is the same. You have to adjust the scale and position of the screen to adjust reframing. Thus, Filmora fills gaps in your music video without the need to reshoot.
Final words
Video editing requires patience, creativity, and efficient tools. Filmora provides the most effective means to run various effects on your video. You can add cuts to your, smoothen your cuts, and readjust the frame of your video. These are merely a few features to mention.
In a nutshell, Filmora assists you in polishing your music video. You will not need a professional editor. You will become one in no time.
Free Download For Win 7 or later(64-bit)
Free Download For macOS 10.14 or later
Free Download For macOS 10.14 or later
Step2Create or import your project
- Create a project if you are using Filmora for the first time.
- Import the project from your computer directory. Then, go to file in the menu bar, and click on the open project.

- Select the project you want to open.
Step3Duplicate the project file and rename it
- When you open Filmora, a start-up window will appear.
- Right-click on the project you want to duplicate.

Step4Rename the duplicate file
- Rename the file to keep a record of new editions.

The file is renamed. It will help you remember which file is original. If your files become corrupted, you can easily access the original ones. Once you are done duplicating your project file, it is time to do our primary job: Polishing our video edits with Filmora .
Free Download For Win 7 or later(64-bit)
Free Download For macOS 10.14 or later
Part 2. Polishing Your Music Video
Just like ladies apply polish to their nails to make them more attractive, you can use editing to your music video to get the same result. Ladies can go to the beautician if they want. You can go to a professional editor if you like it.
However, these options are pretty expensive. The best way is to do it yourself. It is fun. Also, you can let loose your hidden artist for a while. Stick to the following points to understand how to begin polishing your music video.
How to put cuts on beats?
Adding beat cuts to a music video is imperative. Randomly placing beats yield an inferior-quality video. It also gives the impression that video editing is not done by a professional. The beats must be adjusted to synchronize with the storyline of the video.
Moreover, the video will lose its charm if you put cuts on every beat. People will not be able to enjoy, let alone understand, what is happening in the film.
What are the beats?
Beats are pieces of music that recur in a pattern. They are essential for music videos. It adds attraction for the viewers. Also, without beats, no music video can go viral. In the digital age, beats boost your music video.
![]()
Note: Cuts are recommended on every 2nd and 4th beat. In that way, a smooth transition of music beats takes place, making it more ear-pleasing. It also gives a professional outlook to the whole music.
Let’s learn how you can put cuts on your beats.
Step1Import the music video
- Import the Music video to which you would like to add any beat.
- You can also use the one given in Filmora.
- Drag and Drop the music video in the timeline panel.

Step2Detach its audio
- Right-click on the video.
- Select the option “Detach Audio.” It will separate the attached audio from the music. You will be able to add cuts where you deem necessary.

You can also import audio from your drive. After that, drag and drop the imported file into the timeline panel.
- Right, Click on the audio file in the audio panel.
- Select the option “Beat Detection.” It will show beats (with red markers) on the audio timeline, making adding cuts to the beat easy.

Step3Cut the beats where you find necessary
- Listen carefully to the audio file and plan where you want to add a cut to your beat.

- Adjust the beat according to your music video.
- Join the trimmed video segments to maintain continuity. The final product should look like the one given below.

Resultantly, it will readjust the beat to a different spot on the video. You can make multiple cuts in the beats. However, it is not recommended. It makes the whole experience of listening quite jarring.
Once you’ve added cuts to the beats, it is time to make them smooth. For that, keep reading the instructions given below.
Free Download For Win 7 or later(64-bit)
Free Download For macOS 10.14 or later
How to smooth out cuts
Adding cuts in the beats is one part of the job, not the whole job. After adding these cuts, you have to smoothen them. With it, the point of interest for the audience becomes clear.
To maintain the audience’s attention on our video, we have to smoothen the cuts so that our audience quickly understands the ongoing story in our video. If sudden changes occur on the screen, watching it gets disconcerting.
Indeed, you would not want your audience to have this experience. Head to the following techniques to understand how to smooth out video cuts
Technique 1: Showing multiple perspectives
The focal person in the video must occupy the same spot in the previous shot as it maintains in the current shot.
Let us understand from the example given below.
- Shot 1: The actress in the music video is occupying the left seat on the bus while looking outside.

- Shot 2: The actress occupies the same spot in the subsequent shot.

- Third Shot: The shot shows the wide angle of the bus from the inside. The actress is still sitting in the same position and the same place.

This technique keeps the audience focused on the point of interest while giving them a different perspective of the scene.
Technique 2: Using light leaks
The technique is quite helpful for the transition between two cuts. It uses different levels of colors to shine between cuts, adding smoothness and providing coherence.
What are light leaks?
Light leaks are great effects in Filmora. These effects fill the screen with light. It seems that light is leaking in a disorderly fashion. For the time being, the whole screen is filled with that effect. Thus, it explains the name of this effect as a light leak.
Filmora provides a plethora of features for adding Light Leak for transitioning cuts. With the use of Filmora, one can quickly bring a level of flow to the music video. Keep reading to understand how to use this remarkable feature of Filmora.
Free Download For Win 7 or later(64-bit)
Free Download For macOS 10.14 or later
Step1Access the light leak effects on Filmora
- Go to Effects on the Interface.
- Go to Overlay and choose the light Leak feature.
- You can also use any other light Leak stock in your capacity.

Step2Drag and drop the effects in the video editing
- Drag and drop the effect between any two cuts where you want to add this feature for a smooth transition.
- The effects should be placed above the video, in the timeline over the clip.

Step3Setting the color and blend of the light leak effect
- Right-click on the clip, and go to “Edit Properties.”

- Go to the Composing menu. Then, go to “Blend Mode” and choose “Screen.”
- It will adjust the light Leak feature to your entire screen.

Step4Fit the effect to the width of the screen
- Go to the Transform option in the clip properties.
- Click on both circles in front of the Scale option. It will adjust the effect to the entire frame width, giving it a pleasing outlook.

There you go! Your light Leak filter is ready. Give attention to how the light floods the screen and the scene transitions from one part to the next.

Now, you are done with adding some additional color and light to your cuts. Your cuts are now smooth and trouble-free. Moving onto our next tip that will further polish your music video. It is called Reframing and Zooming.
Reframe and zoom to polish your video
Another significant feature of Filmora is that it allows you to readjust the frame and zoom of the video. Any zooming option left undone in the shooting phase can be addressed in the editing phase.
For example, a director did an excellent job shooting a video. He considered every angle and yielded the best video shoot he could achieve. However, he missed a few zooming-out techniques while shooting. Now, what should one do? Use Filmora.
It is where the reframing and zooming feature of Filmora comes into play and saves the day.
Free Download For Win 7 or later(64-bit)
Free Download For macOS 10.14 or later
What are the reframing and zooming features?
This feature allows you to adjust the zoom on the point of interest in the music video. If you want to add extra focus on a certain point, the feature in Filmora can do that for you. You can run zoom in or zoom out on any particular object or actor. Follow the given steps to understand how you can do that.
Step1Plan your video
- Where you want to reframe and zoom. Trim that part of the video.

Step2Choose any two points on the clip for reframing
- Choose any two points on the clip. These points are reference points. When the clip moves from one point to the next point, the reframing takes place.
Step3Adjust the scale and position of the clip
- Go to the Transform option in Clip properties.
- Go to the clip’s end (2nd point), and turn on the Scale and Position circles.

- Go to the start of the clip
- And adjust the value of scale and position.
Atl Text: Setting new value to Scale and Position.
Step4Replay the clip
- Once the scale readings and position in the initial point are set, replay the clip to observe the reframing.

You can use it on the static shots if you want. The procedure is the same. You have to adjust the scale and position of the screen to adjust reframing. Thus, Filmora fills gaps in your music video without the need to reshoot.
Final words
Video editing requires patience, creativity, and efficient tools. Filmora provides the most effective means to run various effects on your video. You can add cuts to your, smoothen your cuts, and readjust the frame of your video. These are merely a few features to mention.
In a nutshell, Filmora assists you in polishing your music video. You will not need a professional editor. You will become one in no time.
Free Download For Win 7 or later(64-bit)
Free Download For macOS 10.14 or later
Stunning Glitch Effect and Its Creation Steps for Premiere Pro
Glitch means errors and malfunction in the footage in software, games, videos, images, and audio. Presently, creative professionals are intentionally adding the glitch effect to their work to give a unique vibe to it. The effect appears as the pixels glitch organically, appearing to melt or duplicate onto the next scene.
The article takes Adobe Premiere Pro under consideration. First, glitch effect Premiere templates and then the step-by-step guide to add glitch transition Premiere Pro would be discussed. Time to begin!
In this article
01 Part 1: 8 Amazing Glitch Effect for Premiere Pro
02 Part 2: How Do You Do the Glitch Effect in Premiere Pro?
Part 1: 8 Amazing Glitch Effect for Premiere Pro
There are extensive websites in business that offer amazing templates to add glitch effects to your video. The subsection of this article shall come up with eight workable VHS effect Premiere, which would be perfectly compatible with Premiere Pro. These VHS effect Premiere Pro are HD quality, which means you do not have to worry about the output. So, let us start! Shall we?
The first VHS overlay Premiere is Digital Glitch Transitions. Envato Elements offers 20 glitch transitions that can be used in different video themes. The HD resolution of this distortion effect Premiere Pro is 1920x1080. There are noise effects as well.

Glitch Slideshow is another amazing glitch effect Premiere Pro free introduced by Envato Elements. If you are a photographer or a film director, this glitch transition Premiere gives you what you need. The HD resolution is offered, and no plugins are required.

3. Venus
Venus is the perfect choice to add an Adobe Premiere VHS effect by offering an adjustable duration of the video with effortless customization. The template is highly famous among YouTubers and content creators to leave a long-lasting impact on the audience via glitchy titles and effects.

Presenting another Premiere Pro template, Fast Glitch Transitions is a ready-to-use template. It offers ten fast-tracked transitions that add value to the project. Moreover, it brings versatile colors to the video with the glitches. This Premiere VHS effect is perfect for intros and travel videos.

Allow me to introduce you to another new and stylish static effect Premiere Pro known as Glitch Multiframe Opener. It is a dynamic template that needs no plugins. Be free to use the template for commercials, Facebook video openers, and teasers. Moreover, photos and videos can be added to make the glitch workable.

Glitch Urban Opener is an impeccable glitch effect for Premiere Pro, presenting trendy and creative designs. It brings smooth transitions to the video with 17 editable layers, 11 media holders, and one logo placeholder. All of these options make this VHS filter Premiereeasily customizable and operatable.

Another retro effect Premiere Pro from Motion Elements is 30 Glitch Transitions. The media industry uses this template to insert different glitch effects into the video and make it eye-catching for everyone. The effects are styled with interference, bad TV, distortions, VHS noise, and other fatal errors.

Last but not the least, Glitch Transitions can be counted upon to act as the best Adobe Premiere glitch effect. There are three transitions for different themes. The color controls help manage the video editing more effectively. Moreover, the templates offer horizontal and vertical directions to work better.

Part 2: How Do You Do the Glitch Effect in Premiere Pro?
Are you a Premiere Pro user? Do you need to add the Premiere glitch transition to the video? Worry no more! Follow this subsection vividly. Would you?
Adobe Premiere Pro is a video editing software that has got you covered. You can enhance the speed of the video to tell your story better and share the vision. With Premiere Pro in the frame, you can shift the colors, insert graphics and titles, and give a unique music effect to the video. All in one platform, a dream come true, don’t you agree?
If you want to perform a Premiere Pro VHS effect, allow us to walk you through the process. It is highly recommended that you follow the guide carefully to have desirable results. So, what are we waiting for? Time to start, right?
Step 1: Importing the Targeted Video
To begin the process, open Adobe Premiere Pro on your system. Import the targeted footage and drag it to the timeline. After the video is added, head to the “Effects” panel on the left side of the interface.

Step 2: Launching the VR Digital Glitch
Type away glitch in the search bar. The user will find VR Digital Glitch in the results. Drag the effect to the clip on the timeline. Now, it is time to navigate to the “Effect Controls.”
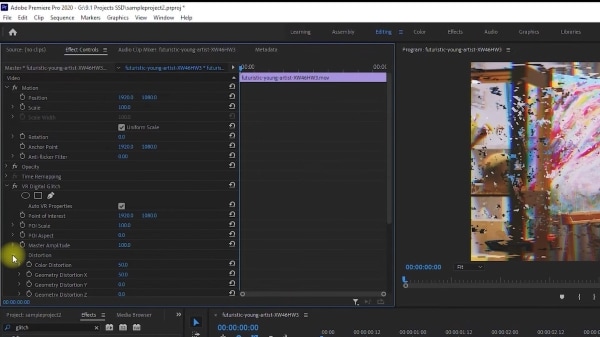
Step 3: Changing the Distortion Control
Scroll down to find “Distortion” in the controls and expand it. The user is suggested to increase the color distortion to give an RGB effect to the footage. After that, you should reduce the distortion rate to 0 so that different artifacts can be eliminated effortlessly.

Step 4: Changing the Noise Strength
Moving on, expand the “Noise” control section and increase the noise strength. It will give the footage a significant level of graininess.

Step 5: Animating the Glitch Effect
To animate the glitch, use the playhead on the top and drag it to the first position where the effect should start from. Hit the stopwatch located on the left of “Master Amplitude.” It will create a keyframe. Alter the “Master Amplitude” to 0 as we do not want the clip to begin with a glitch.

Step 6: Playing with the Playhead
Now, use your keyboard’s right arrow to move the playhead three frames forward. After that, set the “Master Amplitude” to 100. Again, move the playhead three frames forward and set the “Master Amplitude” to 0. The animation is produced on the RGB color distortion.

Step 7: Positioning the Video
Move back to the first keyframe and head to the top that shows “Scale” settings. Enhance the scale value so that the video position can be leveled. Click on the stopwatch next to “Position” to create a keyframe. Move the playhead one frame forward and adjust the position of the frame.

Step 8: Final Process
Again, move the playhead to the next frame and click on the “Reset” shaped icon to reset the position of the video. Move another frame forward and reposition the video. You can do this multiple times to give a glitchy effect to the clip. There you go! It is all done.

Conclusion
A raw video doesn’t send the message as the user wants. For this, creative professionals need to give some effects to the video, such as glitch effect Premiere. The article highlighted some famous glitch effects which were perfectly compatible with Adobe Premiere Pro. The whole procedure to add the Adobe Premiere glitch effect was also the crux of this write-up.
02 Part 2: How Do You Do the Glitch Effect in Premiere Pro?
Part 1: 8 Amazing Glitch Effect for Premiere Pro
There are extensive websites in business that offer amazing templates to add glitch effects to your video. The subsection of this article shall come up with eight workable VHS effect Premiere, which would be perfectly compatible with Premiere Pro. These VHS effect Premiere Pro are HD quality, which means you do not have to worry about the output. So, let us start! Shall we?
The first VHS overlay Premiere is Digital Glitch Transitions. Envato Elements offers 20 glitch transitions that can be used in different video themes. The HD resolution of this distortion effect Premiere Pro is 1920x1080. There are noise effects as well.

Glitch Slideshow is another amazing glitch effect Premiere Pro free introduced by Envato Elements. If you are a photographer or a film director, this glitch transition Premiere gives you what you need. The HD resolution is offered, and no plugins are required.

3. Venus
Venus is the perfect choice to add an Adobe Premiere VHS effect by offering an adjustable duration of the video with effortless customization. The template is highly famous among YouTubers and content creators to leave a long-lasting impact on the audience via glitchy titles and effects.

Presenting another Premiere Pro template, Fast Glitch Transitions is a ready-to-use template. It offers ten fast-tracked transitions that add value to the project. Moreover, it brings versatile colors to the video with the glitches. This Premiere VHS effect is perfect for intros and travel videos.

Allow me to introduce you to another new and stylish static effect Premiere Pro known as Glitch Multiframe Opener. It is a dynamic template that needs no plugins. Be free to use the template for commercials, Facebook video openers, and teasers. Moreover, photos and videos can be added to make the glitch workable.

Glitch Urban Opener is an impeccable glitch effect for Premiere Pro, presenting trendy and creative designs. It brings smooth transitions to the video with 17 editable layers, 11 media holders, and one logo placeholder. All of these options make this VHS filter Premiereeasily customizable and operatable.

Another retro effect Premiere Pro from Motion Elements is 30 Glitch Transitions. The media industry uses this template to insert different glitch effects into the video and make it eye-catching for everyone. The effects are styled with interference, bad TV, distortions, VHS noise, and other fatal errors.

Last but not the least, Glitch Transitions can be counted upon to act as the best Adobe Premiere glitch effect. There are three transitions for different themes. The color controls help manage the video editing more effectively. Moreover, the templates offer horizontal and vertical directions to work better.

Part 2: How Do You Do the Glitch Effect in Premiere Pro?
Are you a Premiere Pro user? Do you need to add the Premiere glitch transition to the video? Worry no more! Follow this subsection vividly. Would you?
Adobe Premiere Pro is a video editing software that has got you covered. You can enhance the speed of the video to tell your story better and share the vision. With Premiere Pro in the frame, you can shift the colors, insert graphics and titles, and give a unique music effect to the video. All in one platform, a dream come true, don’t you agree?
If you want to perform a Premiere Pro VHS effect, allow us to walk you through the process. It is highly recommended that you follow the guide carefully to have desirable results. So, what are we waiting for? Time to start, right?
Step 1: Importing the Targeted Video
To begin the process, open Adobe Premiere Pro on your system. Import the targeted footage and drag it to the timeline. After the video is added, head to the “Effects” panel on the left side of the interface.

Step 2: Launching the VR Digital Glitch
Type away glitch in the search bar. The user will find VR Digital Glitch in the results. Drag the effect to the clip on the timeline. Now, it is time to navigate to the “Effect Controls.”

Step 3: Changing the Distortion Control
Scroll down to find “Distortion” in the controls and expand it. The user is suggested to increase the color distortion to give an RGB effect to the footage. After that, you should reduce the distortion rate to 0 so that different artifacts can be eliminated effortlessly.

Step 4: Changing the Noise Strength
Moving on, expand the “Noise” control section and increase the noise strength. It will give the footage a significant level of graininess.

Step 5: Animating the Glitch Effect
To animate the glitch, use the playhead on the top and drag it to the first position where the effect should start from. Hit the stopwatch located on the left of “Master Amplitude.” It will create a keyframe. Alter the “Master Amplitude” to 0 as we do not want the clip to begin with a glitch.

Step 6: Playing with the Playhead
Now, use your keyboard’s right arrow to move the playhead three frames forward. After that, set the “Master Amplitude” to 100. Again, move the playhead three frames forward and set the “Master Amplitude” to 0. The animation is produced on the RGB color distortion.

Step 7: Positioning the Video
Move back to the first keyframe and head to the top that shows “Scale” settings. Enhance the scale value so that the video position can be leveled. Click on the stopwatch next to “Position” to create a keyframe. Move the playhead one frame forward and adjust the position of the frame.

Step 8: Final Process
Again, move the playhead to the next frame and click on the “Reset” shaped icon to reset the position of the video. Move another frame forward and reposition the video. You can do this multiple times to give a glitchy effect to the clip. There you go! It is all done.

Conclusion
A raw video doesn’t send the message as the user wants. For this, creative professionals need to give some effects to the video, such as glitch effect Premiere. The article highlighted some famous glitch effects which were perfectly compatible with Adobe Premiere Pro. The whole procedure to add the Adobe Premiere glitch effect was also the crux of this write-up.
02 Part 2: How Do You Do the Glitch Effect in Premiere Pro?
Part 1: 8 Amazing Glitch Effect for Premiere Pro
There are extensive websites in business that offer amazing templates to add glitch effects to your video. The subsection of this article shall come up with eight workable VHS effect Premiere, which would be perfectly compatible with Premiere Pro. These VHS effect Premiere Pro are HD quality, which means you do not have to worry about the output. So, let us start! Shall we?
The first VHS overlay Premiere is Digital Glitch Transitions. Envato Elements offers 20 glitch transitions that can be used in different video themes. The HD resolution of this distortion effect Premiere Pro is 1920x1080. There are noise effects as well.

Glitch Slideshow is another amazing glitch effect Premiere Pro free introduced by Envato Elements. If you are a photographer or a film director, this glitch transition Premiere gives you what you need. The HD resolution is offered, and no plugins are required.

3. Venus
Venus is the perfect choice to add an Adobe Premiere VHS effect by offering an adjustable duration of the video with effortless customization. The template is highly famous among YouTubers and content creators to leave a long-lasting impact on the audience via glitchy titles and effects.

Presenting another Premiere Pro template, Fast Glitch Transitions is a ready-to-use template. It offers ten fast-tracked transitions that add value to the project. Moreover, it brings versatile colors to the video with the glitches. This Premiere VHS effect is perfect for intros and travel videos.

Allow me to introduce you to another new and stylish static effect Premiere Pro known as Glitch Multiframe Opener. It is a dynamic template that needs no plugins. Be free to use the template for commercials, Facebook video openers, and teasers. Moreover, photos and videos can be added to make the glitch workable.

Glitch Urban Opener is an impeccable glitch effect for Premiere Pro, presenting trendy and creative designs. It brings smooth transitions to the video with 17 editable layers, 11 media holders, and one logo placeholder. All of these options make this VHS filter Premiereeasily customizable and operatable.

Another retro effect Premiere Pro from Motion Elements is 30 Glitch Transitions. The media industry uses this template to insert different glitch effects into the video and make it eye-catching for everyone. The effects are styled with interference, bad TV, distortions, VHS noise, and other fatal errors.

Last but not the least, Glitch Transitions can be counted upon to act as the best Adobe Premiere glitch effect. There are three transitions for different themes. The color controls help manage the video editing more effectively. Moreover, the templates offer horizontal and vertical directions to work better.

Part 2: How Do You Do the Glitch Effect in Premiere Pro?
Are you a Premiere Pro user? Do you need to add the Premiere glitch transition to the video? Worry no more! Follow this subsection vividly. Would you?
Adobe Premiere Pro is a video editing software that has got you covered. You can enhance the speed of the video to tell your story better and share the vision. With Premiere Pro in the frame, you can shift the colors, insert graphics and titles, and give a unique music effect to the video. All in one platform, a dream come true, don’t you agree?
If you want to perform a Premiere Pro VHS effect, allow us to walk you through the process. It is highly recommended that you follow the guide carefully to have desirable results. So, what are we waiting for? Time to start, right?
Step 1: Importing the Targeted Video
To begin the process, open Adobe Premiere Pro on your system. Import the targeted footage and drag it to the timeline. After the video is added, head to the “Effects” panel on the left side of the interface.

Step 2: Launching the VR Digital Glitch
Type away glitch in the search bar. The user will find VR Digital Glitch in the results. Drag the effect to the clip on the timeline. Now, it is time to navigate to the “Effect Controls.”

Step 3: Changing the Distortion Control
Scroll down to find “Distortion” in the controls and expand it. The user is suggested to increase the color distortion to give an RGB effect to the footage. After that, you should reduce the distortion rate to 0 so that different artifacts can be eliminated effortlessly.

Step 4: Changing the Noise Strength
Moving on, expand the “Noise” control section and increase the noise strength. It will give the footage a significant level of graininess.

Step 5: Animating the Glitch Effect
To animate the glitch, use the playhead on the top and drag it to the first position where the effect should start from. Hit the stopwatch located on the left of “Master Amplitude.” It will create a keyframe. Alter the “Master Amplitude” to 0 as we do not want the clip to begin with a glitch.

Step 6: Playing with the Playhead
Now, use your keyboard’s right arrow to move the playhead three frames forward. After that, set the “Master Amplitude” to 100. Again, move the playhead three frames forward and set the “Master Amplitude” to 0. The animation is produced on the RGB color distortion.

Step 7: Positioning the Video
Move back to the first keyframe and head to the top that shows “Scale” settings. Enhance the scale value so that the video position can be leveled. Click on the stopwatch next to “Position” to create a keyframe. Move the playhead one frame forward and adjust the position of the frame.

Step 8: Final Process
Again, move the playhead to the next frame and click on the “Reset” shaped icon to reset the position of the video. Move another frame forward and reposition the video. You can do this multiple times to give a glitchy effect to the clip. There you go! It is all done.

Conclusion
A raw video doesn’t send the message as the user wants. For this, creative professionals need to give some effects to the video, such as glitch effect Premiere. The article highlighted some famous glitch effects which were perfectly compatible with Adobe Premiere Pro. The whole procedure to add the Adobe Premiere glitch effect was also the crux of this write-up.
02 Part 2: How Do You Do the Glitch Effect in Premiere Pro?
Part 1: 8 Amazing Glitch Effect for Premiere Pro
There are extensive websites in business that offer amazing templates to add glitch effects to your video. The subsection of this article shall come up with eight workable VHS effect Premiere, which would be perfectly compatible with Premiere Pro. These VHS effect Premiere Pro are HD quality, which means you do not have to worry about the output. So, let us start! Shall we?
The first VHS overlay Premiere is Digital Glitch Transitions. Envato Elements offers 20 glitch transitions that can be used in different video themes. The HD resolution of this distortion effect Premiere Pro is 1920x1080. There are noise effects as well.

Glitch Slideshow is another amazing glitch effect Premiere Pro free introduced by Envato Elements. If you are a photographer or a film director, this glitch transition Premiere gives you what you need. The HD resolution is offered, and no plugins are required.

3. Venus
Venus is the perfect choice to add an Adobe Premiere VHS effect by offering an adjustable duration of the video with effortless customization. The template is highly famous among YouTubers and content creators to leave a long-lasting impact on the audience via glitchy titles and effects.

Presenting another Premiere Pro template, Fast Glitch Transitions is a ready-to-use template. It offers ten fast-tracked transitions that add value to the project. Moreover, it brings versatile colors to the video with the glitches. This Premiere VHS effect is perfect for intros and travel videos.

Allow me to introduce you to another new and stylish static effect Premiere Pro known as Glitch Multiframe Opener. It is a dynamic template that needs no plugins. Be free to use the template for commercials, Facebook video openers, and teasers. Moreover, photos and videos can be added to make the glitch workable.

Glitch Urban Opener is an impeccable glitch effect for Premiere Pro, presenting trendy and creative designs. It brings smooth transitions to the video with 17 editable layers, 11 media holders, and one logo placeholder. All of these options make this VHS filter Premiereeasily customizable and operatable.

Another retro effect Premiere Pro from Motion Elements is 30 Glitch Transitions. The media industry uses this template to insert different glitch effects into the video and make it eye-catching for everyone. The effects are styled with interference, bad TV, distortions, VHS noise, and other fatal errors.

Last but not the least, Glitch Transitions can be counted upon to act as the best Adobe Premiere glitch effect. There are three transitions for different themes. The color controls help manage the video editing more effectively. Moreover, the templates offer horizontal and vertical directions to work better.

Part 2: How Do You Do the Glitch Effect in Premiere Pro?
Are you a Premiere Pro user? Do you need to add the Premiere glitch transition to the video? Worry no more! Follow this subsection vividly. Would you?
Adobe Premiere Pro is a video editing software that has got you covered. You can enhance the speed of the video to tell your story better and share the vision. With Premiere Pro in the frame, you can shift the colors, insert graphics and titles, and give a unique music effect to the video. All in one platform, a dream come true, don’t you agree?
If you want to perform a Premiere Pro VHS effect, allow us to walk you through the process. It is highly recommended that you follow the guide carefully to have desirable results. So, what are we waiting for? Time to start, right?
Step 1: Importing the Targeted Video
To begin the process, open Adobe Premiere Pro on your system. Import the targeted footage and drag it to the timeline. After the video is added, head to the “Effects” panel on the left side of the interface.

Step 2: Launching the VR Digital Glitch
Type away glitch in the search bar. The user will find VR Digital Glitch in the results. Drag the effect to the clip on the timeline. Now, it is time to navigate to the “Effect Controls.”

Step 3: Changing the Distortion Control
Scroll down to find “Distortion” in the controls and expand it. The user is suggested to increase the color distortion to give an RGB effect to the footage. After that, you should reduce the distortion rate to 0 so that different artifacts can be eliminated effortlessly.

Step 4: Changing the Noise Strength
Moving on, expand the “Noise” control section and increase the noise strength. It will give the footage a significant level of graininess.

Step 5: Animating the Glitch Effect
To animate the glitch, use the playhead on the top and drag it to the first position where the effect should start from. Hit the stopwatch located on the left of “Master Amplitude.” It will create a keyframe. Alter the “Master Amplitude” to 0 as we do not want the clip to begin with a glitch.

Step 6: Playing with the Playhead
Now, use your keyboard’s right arrow to move the playhead three frames forward. After that, set the “Master Amplitude” to 100. Again, move the playhead three frames forward and set the “Master Amplitude” to 0. The animation is produced on the RGB color distortion.

Step 7: Positioning the Video
Move back to the first keyframe and head to the top that shows “Scale” settings. Enhance the scale value so that the video position can be leveled. Click on the stopwatch next to “Position” to create a keyframe. Move the playhead one frame forward and adjust the position of the frame.

Step 8: Final Process
Again, move the playhead to the next frame and click on the “Reset” shaped icon to reset the position of the video. Move another frame forward and reposition the video. You can do this multiple times to give a glitchy effect to the clip. There you go! It is all done.

Conclusion
A raw video doesn’t send the message as the user wants. For this, creative professionals need to give some effects to the video, such as glitch effect Premiere. The article highlighted some famous glitch effects which were perfectly compatible with Adobe Premiere Pro. The whole procedure to add the Adobe Premiere glitch effect was also the crux of this write-up.
[Top List] Best VHS Sound Effect That You Can Use in Video Making
Do you know why some videos grab your attention more than others? It’s about the visuals and the effects used in those videos. Effects are important in improving the overall experience and making a video more engaging. But it’s not just limited to video effects; audio effects can make a significant difference too. You can create specific themed content by adding effects to your videos.
When it comes to quality content, audio effects can add an extra layer of depth to it. They can transport you to a different time, place, or mood. However, you can create an old vintage-style video and make your audience go “WOW.” You can add an old retro-themed filter to your video, but adding a VHS sound effect is more important. This audio effect will make your video look more authentic and professional.
Part 1: How Are VHS Sound Effects Helpful in Video Creation?
Do you know how much VHS noise sound effects can be helpful? No problem if you don’t know how because this portion is going to answer you anyway.
1. Creates a Nostalgic Ambiance
VHS sound effects can bring back the feeling of nostalgia, just like the visual effects. The distinct sounds associated with VHS, like the gentle hum and hiss, create a vintage ambiance. It can make your video feel more authentic and take viewers back to the time of VHS tapes.
2. Adds Authenticity
Adding VHS audio effects can make your video feel more authentic. Similarly, if you want to recreate the experience of watching content on VHS tapes, this effect can help. Simulating audio imperfections like dropouts and tracking errors can make the video seem more genuine.
3. Sets Time Period
These audio effects help set the period and setting of your video. You can match the sound with the visuals using VHS tape sound effects. Moreover, it creates a consistent audio-visual experience that accurately represents a particular era.
4. Improves Genre and Atmosphere
Such sound effects are particularly effective in genres like horror or suspense. The gritty or distorted audio aesthetic associated with VHS can add depth and intensity to a video. It further improves the experience of your content and engages your audiences.
5. Experimenting Unconventional Techniques
Audio filters like VHS allow filmmakers and video creators to express their artistic style and vision. Using VHS-inspired audio elements, you can experiment with unconventional techniques. It also creates unique and original compositions that stand out from traditional sound designs.
Add VHS Sound Effect to Video
Simply add sound effects on video with Filmora Video Effect Editor ! Experience the magic of cool yet outstanding video effects, where your videos come to life in beautiful visuals.
Apply VHS Sound Effect Apply VHS Sound Effect Learn More >

Part 2: Best VHS Sound Effects To Use in 2024
A video is incomplete without good-quality audio and sound effects. So, if you want to create a VHS-style video, make sure to use VHS audio filters as well. Here are some classic VHS sounds you can use for your content.
1. Video Cass. Recorder 06
This audio effect gives your video the nostalgic feel of an old video reel playing. Its VHS-inspired audio effects last for 30 seconds. You can use this effect to create a vintage atmosphere in your videos. This effect can also transport your viewers back to the era of classic video recordings.
2. Creepy Distortion
You can create a haunting and unsettling atmosphere with this sound effect. It adds a creepy VHS sound distortion effect to your content. This effect is perfect for horror or suspenseful scenes. Moreover, this audio filter has a duration of 30 seconds.
3. VCR Deck Insert VHS Ta PE416803
With this audio effect, you can simulate the experience of inserting a tape into a VCR. You can add this effect to your video to enhance the authenticity and realism of a scene. It will help you in a situation where a tape is being loaded into a VCR. The duration of this audio is 20 seconds.
4. VCR Deck Insert VHS Ta PE416801
In this effect, you can hear the sound of someone inserting a tape into a VCR and pressing the play button. You can use this effect when showing scenes of tapes being loaded and played on a VCR. This 10-second audio effect will add an extra layer of realism and nostalgia.
5. VHS Player
Experience the entire process of using a VHS tape with this audio effect. You’ll hear the opening of the VHS box, inserting it into the VCR, followed by the playback sound. Then, there’s the fast-forward effect; additionally, you can enjoy the sound of the fast reverse. Finally, you’ll hear the stop, ejection of the VHS, and the storage of it back into its original box. This effect lasts for 3 minutes and 5 seconds.
6. VCR: Forward
Get the feeling of fast-forwarding through a VHS tape with this sound effect. It lasts 1 minute and 4 seconds and adds the authentic sound of a fast-forwarding VHS tape. You can use this audio effect when you want to add a similar effect to your content.
7. VCR VHS Tape Rewind M PE1046902
You can use this effect in your VHS-styled videos. It produces the sound of a VHS tape rewinding, followed by the VHS pause sound effect. This effect adds a distinct audio cue for rewinding and pausing scenes involving a VHS. The duration of this VHS effect is 4 seconds.
8. VCR: Rewind
Take a trip back in time with the sound of a VHS tape being rewound. This audio file adds a VHS rewind sound effect to your video. The duration of this file is 1 minute and 9 seconds. It will provide the nostalgic sound of a quick rewinding of a VHS tape.
9. Video Cass. Recorder 07
Using this audio effect, you can create the sensation of a video reel playing in a video cassette recorder. This VHS audio filter lasts for 30 seconds. You can use this effect to emphasize the vintage vibe of your video further. It also adds an old-fashioned charm to your video content.
10. VHS Player Rewind
This sound effect, provided by Pixabay, lasts 1 minute and 13 seconds. It starts with a glitchy and nostalgic VHS rewind sound to your video. The audio file brings back memories of vintage technology by adding the VHS rewind effect. You can recreate the experience of the 90s using this audio filter.
Bonus Part: Creating The Best VHS-Themed Videos With Wondershare Filmora
Filmora Video Editor is the ultimate tool and an incredible software for video editing. From audio effects to professional video edits, this tool can do a lot of stuff. This tool is now powered with AI technology which means more features are added in its latest version. You can edit your video and add sound effects that sync with your content feel.
Add VHS Sound Effect For Win 7 or later(64-bit)
Add VHS Sound Effect For macOS 10.14 or later
To make such videos having VHS effects, first, you need to learn how to use Wondershare Filmora. If you follow the following steps, you can easily edit your videos.
Step 1Starting Your Project
Open Wondershare Filmora and click on “New Project” to begin. This will bring up a new window where you can get started on your video. Import your video file by selecting the “Import Media” option and choosing the file from your system. Then, drag and drop the video into the timeline area to organize and prepare it for editing.

Step 2Apply VHS Effect to the Video
It’s time to add the VHS effects to your video. Look for the “Effects” option in the top bar and click on it. Next, search for “VHS” to find a variety of VHS overlays. Choose the one that suits your style and drag it onto the timeline, placing it over your video.
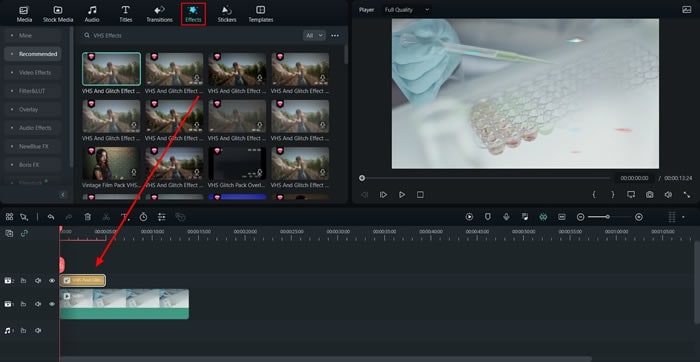
Step 3Apply VHS Sound Effects
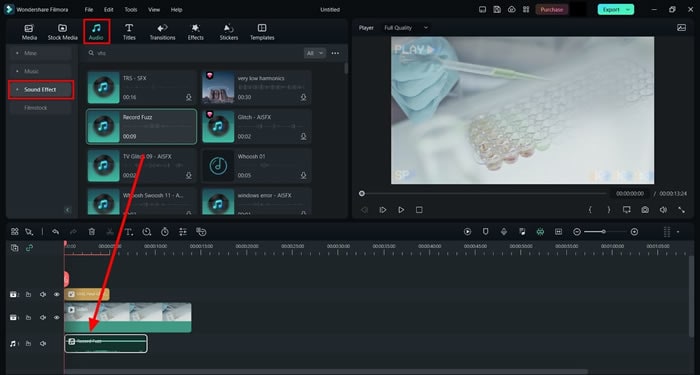
For the VHS audio filter, go to the “Audio” tab, select “Sound Effect,” and search for “VHS.” Proceed further by selecting a suitable sound effect and dragging it onto the timeline beneath your video.
Step 4Export Your File
Once satisfied with the result, click the “Export” tab at the top left of the screen to save your video with the applied VHS effects.

Conclusion
In conclusion, a good video depends not only on your camera. There is so much post-production work behind good-quality content. You have to create a feel and ambiance in a video using effects and other overlays. You can create an old-themed video using the right filter and adding a VHS audio effect. Wondershare Filmora provides you with a platform where you can create such content with ease.
Apply VHS Sound Effect Apply VHS Sound Effect Learn More >

Part 2: Best VHS Sound Effects To Use in 2024
A video is incomplete without good-quality audio and sound effects. So, if you want to create a VHS-style video, make sure to use VHS audio filters as well. Here are some classic VHS sounds you can use for your content.
1. Video Cass. Recorder 06
This audio effect gives your video the nostalgic feel of an old video reel playing. Its VHS-inspired audio effects last for 30 seconds. You can use this effect to create a vintage atmosphere in your videos. This effect can also transport your viewers back to the era of classic video recordings.
2. Creepy Distortion
You can create a haunting and unsettling atmosphere with this sound effect. It adds a creepy VHS sound distortion effect to your content. This effect is perfect for horror or suspenseful scenes. Moreover, this audio filter has a duration of 30 seconds.
3. VCR Deck Insert VHS Ta PE416803
With this audio effect, you can simulate the experience of inserting a tape into a VCR. You can add this effect to your video to enhance the authenticity and realism of a scene. It will help you in a situation where a tape is being loaded into a VCR. The duration of this audio is 20 seconds.
4. VCR Deck Insert VHS Ta PE416801
In this effect, you can hear the sound of someone inserting a tape into a VCR and pressing the play button. You can use this effect when showing scenes of tapes being loaded and played on a VCR. This 10-second audio effect will add an extra layer of realism and nostalgia.
5. VHS Player
Experience the entire process of using a VHS tape with this audio effect. You’ll hear the opening of the VHS box, inserting it into the VCR, followed by the playback sound. Then, there’s the fast-forward effect; additionally, you can enjoy the sound of the fast reverse. Finally, you’ll hear the stop, ejection of the VHS, and the storage of it back into its original box. This effect lasts for 3 minutes and 5 seconds.
6. VCR: Forward
Get the feeling of fast-forwarding through a VHS tape with this sound effect. It lasts 1 minute and 4 seconds and adds the authentic sound of a fast-forwarding VHS tape. You can use this audio effect when you want to add a similar effect to your content.
7. VCR VHS Tape Rewind M PE1046902
You can use this effect in your VHS-styled videos. It produces the sound of a VHS tape rewinding, followed by the VHS pause sound effect. This effect adds a distinct audio cue for rewinding and pausing scenes involving a VHS. The duration of this VHS effect is 4 seconds.
8. VCR: Rewind
Take a trip back in time with the sound of a VHS tape being rewound. This audio file adds a VHS rewind sound effect to your video. The duration of this file is 1 minute and 9 seconds. It will provide the nostalgic sound of a quick rewinding of a VHS tape.
9. Video Cass. Recorder 07
Using this audio effect, you can create the sensation of a video reel playing in a video cassette recorder. This VHS audio filter lasts for 30 seconds. You can use this effect to emphasize the vintage vibe of your video further. It also adds an old-fashioned charm to your video content.
10. VHS Player Rewind
This sound effect, provided by Pixabay, lasts 1 minute and 13 seconds. It starts with a glitchy and nostalgic VHS rewind sound to your video. The audio file brings back memories of vintage technology by adding the VHS rewind effect. You can recreate the experience of the 90s using this audio filter.
Bonus Part: Creating The Best VHS-Themed Videos With Wondershare Filmora
Filmora Video Editor is the ultimate tool and an incredible software for video editing. From audio effects to professional video edits, this tool can do a lot of stuff. This tool is now powered with AI technology which means more features are added in its latest version. You can edit your video and add sound effects that sync with your content feel.
Add VHS Sound Effect For Win 7 or later(64-bit)
Add VHS Sound Effect For macOS 10.14 or later
To make such videos having VHS effects, first, you need to learn how to use Wondershare Filmora. If you follow the following steps, you can easily edit your videos.
Step 1Starting Your Project
Open Wondershare Filmora and click on “New Project” to begin. This will bring up a new window where you can get started on your video. Import your video file by selecting the “Import Media” option and choosing the file from your system. Then, drag and drop the video into the timeline area to organize and prepare it for editing.

Step 2Apply VHS Effect to the Video
It’s time to add the VHS effects to your video. Look for the “Effects” option in the top bar and click on it. Next, search for “VHS” to find a variety of VHS overlays. Choose the one that suits your style and drag it onto the timeline, placing it over your video.

Step 3Apply VHS Sound Effects
For the VHS audio filter, go to the “Audio” tab, select “Sound Effect,” and search for “VHS.” Proceed further by selecting a suitable sound effect and dragging it onto the timeline beneath your video.

Step 4Export Your File
Once satisfied with the result, click the “Export” tab at the top left of the screen to save your video with the applied VHS effects.

Conclusion
In conclusion, a good video depends not only on your camera. There is so much post-production work behind good-quality content. You have to create a feel and ambiance in a video using effects and other overlays. You can create an old-themed video using the right filter and adding a VHS audio effect. Wondershare Filmora provides you with a platform where you can create such content with ease.
Also read:
- Updated How to Make a Slideshow on iPhone
- New 10 BEST TEXT TO SPEECH VIDEO MAKERS
- Updated Find The Best LUTs for Lightroom for 2024
- New In 2024, Step by Step to Cut Video in Adobe Premiere Pro
- New A Normal Video Brings More Editing Opportunities than a Slow-Motion One. This Text Explores How to Convert Slow Motion Video to Normal on iPhone for 2024
- How to Combine Several Xvid Files Into One Windows, Mac,Android, iPhone & Online for 2024
- Find a Solution for Effortless Sky Replacement Photoshop in This Comprehensive Guide. Also, Use the Easiest Video Editing Tool to Make Your Media Stunning
- New 2 Methods to Crop a Video Using After Effects for 2024
- New Top 20 Best Text To Speech Software Windows, Mac, Android, iPhone & Online for 2024
- Updated Learn How to Make Interactive and Fun Video Collages Using Kapwing Collage Maker, an Easy-to-Use Tool for All Your Collage-Making Needs
- This Article Will Help You Understand How to Create Video Contents that Convert Sales for 2024
- In 2024, In This Article, We Are Going to Learn the Simplest Procedure on How to Cut And/Or Trim Videos Using VLC Media Player. Each Step Is Carefully Explained, with Screenshots Attached
- New How to Google Meet Green Screen
- Updated When the Talk Is About an Effective Slideshow Design, People Also Ask of Creating a Quick Windows 10 Slideshow. Keep Reading to Know About the Quickest Ways of Setting the Issue Straight
- New Top 6 Text to Speech Generators for YouTube Videos Windows, Mac, And
- 2024 Approved So, in This Short Tutorial, Well Learn How to Create a Vintage 1980-Style Video with a Retro Effect that Will Leave Your Audience Yearning for More
- In 2024, Discover How to Create Professional Foggy Text Reflection Effects in the Filmora Video Editor
- New Introduction to The Best Cinematic LUTs in The Market for 2024
- New 2024 Approved Best iPhone LUTs App to Use
- New Speed up Video on Splice
- Updated 2024 Approved How to Create a Slideshow with Movavi Slideshow Maker
- Updated How To Blur Background in Adobe Premiere Pro Detailed Guide for 2024
- How Windows Movie Maker Save MP4 File for 2024
- In 2024, Latest Guide How To Bypass Honor 90 Lite FRP Without Computer
- How to Lock Apps on Nokia C02 to Protect Your Individual Information
- How to Unlock Apple iPhone SE Without Passcode? | Dr.fone
- In 2024, The Best Android Unlock Software For Vivo Y100A Device Top 5 Picks to Remove Android Locks
- Want to Uninstall Google Play Service from Samsung Galaxy S23? Here is How | Dr.fone
- 10 Best Fake GPS Location Spoofers for Xiaomi Redmi Note 12R | Dr.fone
- How to Transfer Data from Honor Magic 6 to Samsung Phone | Dr.fone
- How to Downgrade Apple iPhone 7 Plus to an Older iOS System Version? | Dr.fone
- Video File Repair - How to Fix Corrupted video files of Xiaomi Redmi K70 Pro?
- How to Change/Add Location Filters on Snapchat For your Oppo A79 5G | Dr.fone
- In 2024, 8 Ways to Transfer Photos from Honor Magic Vs 2 to iPhone Easily | Dr.fone
- In 2024, How to Unlock Apple iPhone 15 Pro Passcode Screen?
- In 2024, 6 Proven Ways to Unlock Vivo Y100i Power 5G Phone When You Forget the Password
- A Detailed Guide on Faking Your Location in Mozilla Firefox On Poco F5 5G | Dr.fone
- In 2024, How to Make the Most of Your iPhone 15 Plus Lock Screen with Notifications? | Dr.fone
- Undelete lost photos from Honor 90 GT.
- Pokemon Go Error 12 Failed to Detect Location On Vivo S17t? | Dr.fone
- Top 5 Tracking Apps to Track Motorola Moto E13 without Them Knowing | Dr.fone
- In 2024, Full Guide to Catch 100 IV Pokémon Using a Map On Samsung Galaxy M34 5G | Dr.fone
- How to Change/Add Location Filters on Snapchat For your Oppo Reno 11 Pro 5G | Dr.fone
- Full Solutions to Fix Error Code 920 In Google Play on Xiaomi 14 Ultra | Dr.fone
- How to Rescue Lost Photos from Vivo Y27 5G?
- Title: Want to Play a Video on Loop on Vimeo so that It Plays Again and Again? Here Are All the Different Ways to Loop a Video on Vimeo in Simple Steps
- Author: Chloe
- Created at : 2024-05-20 03:37:37
- Updated at : 2024-05-21 03:37:37
- Link: https://ai-editing-video.techidaily.com/want-to-play-a-video-on-loop-on-vimeo-so-that-it-plays-again-and-again-here-are-all-the-different-ways-to-loop-a-video-on-vimeo-in-simple-steps/
- License: This work is licensed under CC BY-NC-SA 4.0.


