
Want to Play a Video on Loop on Vimeo so that It Plays Again and Again? Here Are All the Different Ways to Loop a Video on Vimeo in Simple Steps for 2024
Want to Play a Video on Loop on Vimeo so that It Plays Again and Again? Here Are All the Different Ways to Loop a Video on Vimeo in Simple Steps
Vimeo is a popular video streaming platform where you can watch videos all day. Vimeo is a close competitor of YouTube. If you are a regular viewer on Vimeo, you may want to watch a video in a loop. Instead of manually playing the video again and again, you can automatically loop the video on Vimeo.
If you are embedding a Vimeo video on your website, you will want to play it on a loop. This will ensure maximum watch time from the audience. Besides, if you are a video creator, you may want to loop Vimeo videos for your video project. We will illustrate how to loop video on Vimeo for all scenarios.
Way 1. Loop A Video on Vimeo Directly
Most online users watch videos on Vimeo directly through the web browser. This is specifically applicable to computer users. If you want Vimeo loop video for any desired video, the steps are simple. You have to make some adjustments and additions to the video URL on the address bar. You should change the URL accurately for looping a video. Here are the steps on how to loop a video on Vimeo directly.
Step 1: On your device, launch the web browser. Open the official website of Vimeo Watch. Play any video of your liking.

Step 2: Now, you need to change the URL of the video you are playing. Here are the changes to make in the address bar.
- Remove everything at the beginning of “vimeo.com”. Add “.player” at the beginning of the URL.
- Add “/video/“ after “vimeo.com”.
- Add “?amp;loop=1:” at the end of the URL.
Therefore, the initial URL of the video was “https://vimeo.com/754255543 “. You have to change it to “player.vimeo.com/video/754255543?amp;loop=1”.
Step 3: After making the changes, press Enter key. The same video will play in a loop until you pause the video or close the web browser’s tab.
Way 2. Loop a Vimeo Video When Embedded on Your Site
You can embed a Vimeo video on your website so that the audience can watch it. The video will play only once when someone lands on your website. After the video ends playing, the embedding will show suggested videos. If you want the same video to play again and again, you have to put it in a loop. Here are the steps on how to loop Vimeo video when embedded on your website.
Step 1: Open the Vimeo video on your web browser. Click on Share icon present inside the player in the top-right corner.

Step 2: You will get to see several options, and you need to click on “Get Embed Code” option.

Step 3: On the next screen, you will get the embed code in a pop-up box. Click on Show options.

Step 4: From the expanded section, go to Special Stuff section. Turn on “Loop this video” option.

Step 5: Thereafter, copy the code and paste it into your website to play the video in a loop.
Way 3. How to Loop a Vimeo Video on Mobile
If you are a mobile user, you can use the Vimeo app. But you cannot loop a video on the Vimeo app, quite surprisingly. If you are using the Vimeo app, you can copy the link to the video. Thereafter, you can open the video on your web browser app. You can follow the steps we have mentioned for looping a video on Vimeo directly. Here are the steps for Vimeo loop video on mobile devices.
Step 1: Open the Vimeo app on your mobile device. Play the video that you want in the loop.
Step 2: Tap on the Share icon and tap on Copy URL option.

Step 3: Open your web browser and paste the copied URL.
Step 4: Modify the URL in the address bar following the steps we have mentioned in Way 1.
After the modification, the URL of the video should change from “https://vimeo.com/754255543 “ to “player.vimeo.com/video/754255543?amp;loop=1”.
Way 4. How to Loop Vimeo Videos on Computer
If you want to use Vimeo loop video in your video project on your computer, you can use Wondershare Filmora. Filmora is a professional video editor where you can loop any downloaded Vimeo video as long as you want. There are several online Vimeo downloaders available to download any designed Vimeo video.
Thereafter, you can import the downloaded video into Filmora. Then you can extend the duration by looping the video. Filmora is available for Windows and macOS. Apart from looping, you can edit your video like a professional. Here are the steps on how to loop a video on Vimeo.
Free Download For Win 7 or later(64-bit)
Free Download For macOS 10.14 or later
Step 1: Download and install Wondershare Filmora. Download the desired Vimeo video on your computer. Launch Filmora and click on New Project.

Step 2: Drag and drop the downloaded video file into the Project Media folder on Filmora. Thereafter, bring the video file from Project Media folder into the timeline.

Step 3: Drag and drop the video clip into the timeline again. Make sure that there is no gap between the clips and they are on the same channel for looping. Alternative, you can copy and paste the video clip multiple times for looping.

Step 4: You can play the video and watch it in loop. Finally, click on the Export button to save the video in the desired file format.

Wondershare Filmora Best Video Looper Software for Social Media Video Creation.
Free Download Free Download Learn More

![]()
Conclusion
There are several ways to loop a video on Vimeo. The best way out is to go for Vimeo loop video directly from the web browser. We have also illustrated how to embed a Vimeo video in a loop into your website. If you want to have a looped Vimeo video in your video project, you can use Filmora on your computer.
Free Download For macOS 10.14 or later
Step 1: Download and install Wondershare Filmora. Download the desired Vimeo video on your computer. Launch Filmora and click on New Project.
Step 2: Drag and drop the downloaded video file into the Project Media folder on Filmora. Thereafter, bring the video file from Project Media folder into the timeline.
Step 3: Drag and drop the video clip into the timeline again. Make sure that there is no gap between the clips and they are on the same channel for looping. Alternative, you can copy and paste the video clip multiple times for looping.
Step 4: You can play the video and watch it in loop. Finally, click on the Export button to save the video in the desired file format.
Wondershare Filmora Best Video Looper Software for Social Media Video Creation.
Free Download Free Download Learn More
![]()
Conclusion
There are several ways to loop a video on Vimeo. The best way out is to go for Vimeo loop video directly from the web browser. We have also illustrated how to embed a Vimeo video in a loop into your website. If you want to have a looped Vimeo video in your video project, you can use Filmora on your computer.
3 Ways To Stream And Record At The Same Time
The popularity of live streaming has exploded recently. A live stream is simply a video broadcast in real-time over the internet. It’s a great way to connect with people directly, whether for a gaming session, a cooking show, or a Q&A.
Many reasons are there for which why you might want to live stream and record at the same time. For instance, keep a record of your gameplay or stream highlights for future editing or use your live stream to generate content for your YouTube channel.
Whatever your reasons, this article will show you how to do live streaming and recording at the same time using three different methods.
Way 1. Use OBS To Stream And Record Video At The Same Time
OBS, or Open Broadcaster Software, is a free and open-source tool that allows you to stream and record video at the same time, which can be useful if you want to live-stream your gameplay on Twitch or record a tutorial for YouTube.
Key Features of OBS
- Compatible with Mac OS X, Linux, and Windows operating systems.
- Requires at least 4 GB of storage space and an Intel i5 2000-series processor or higher DirectX 10 capable graphics card.
- High-performance video capturing and mixing in real-time.
- With Custom Transitions, you can set up an unlimited number of scenes you can switch between seamlessly.
- Intuitive audio mixer.
- Easy-to-use and simple configuration options.
Steps
Here’s an easy and quick guide on how to use OBS Studio to stream and record videos simultaneously:
Step1 Download OBS Studio from the official website and install it on your computer or laptop.
Step2 Launch OBS Studio and go to the Settings menu. Find the Recording section under the Output tab.
Step3 Click “Start Recording” to manually start the recording or head to the General Tab and checkmark the box before “Automatically Record When Streaming.”
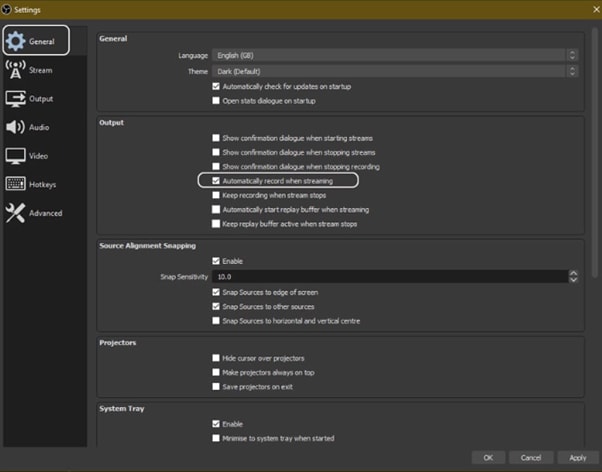
Step4 Finally, click “Apply” to save your settings. Now when you start your stream, the recording will also begin simultaneously.
Way 2. Use Twitch To Save Your Streams
Twitch is the most popular and best live streaming platform that allows gamers to broadcast their gameplay to a live audience and also gives them the ability to save their past broadcasts, or “streams.”
This feature can be useful to save your live stream for later viewing or share your stream with someone who missed it.
Features
Twitch offers a variety of features that make it a unique and powerful game streaming platform. Some of the most notable ones are:
- Live streaming: Twitch allows gamers to share their gameplay in real-time with other gamers around the world. This live aspect of the platform makes it unique and engaging.
- Social interaction: Twitch offers a variety of features that allow gamers to connect with each other, including chat rooms, forums, and user-generated content.
You can save your stream on Twitch in two ways:
- Use the “Highlights” feature, which allows you to save specific moments from your live stream.
- Download your stream’s entire VOD (video on demand) after it has ended.
Steps
Here are the quick steps to saving a stream on your PC from Twitch. But first, you need to enable Twitch VODs before starting your broadcast in the following way:
Step1 Visit Twitch and sign in to your account. Now, click the “Profile” icons and go to “Creator Dashboard.”
Step2 Head to Setting from the left-sidebar and click the “Stream” option. Scroll down and find the VOD Settings. Toggle the buttons next to “Store Past Broadcasts.”
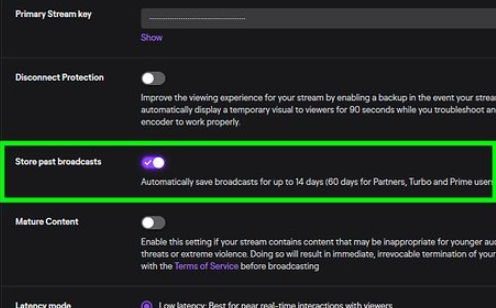
Step3 To publish your VODs instantly after broadcasting, toggle the button next to “Always Publish VODs.”
Now, to download the recordings of your broadcasts to your PC, do the following steps in sequence:
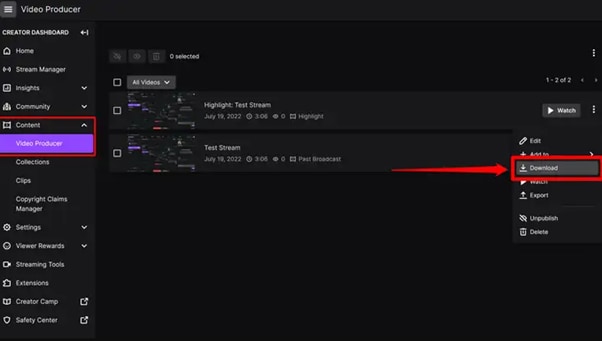
Step1 Head to the Creator Dashboard, find the “Content” section in the left sidebar, and click “Video Producer.”
Step2 Find the stream (VOD or Highlights) you want to download and on the right side, click the three dots.
Step3 Finally, click the “Download” option and let Twitch prepare your video. You will then get the stream’s recording in MP4 format.
Way 3. Use Screen Recorder To Record Your Streams
Using a screen recorder is a great way to record your live stream because it lets you capture the full screen of your PC. Although there are many different screen recorders to choose from, we recommend using Filmora.
Wondershare Filmora is a powerful editor with easy-to-use screen recording capabilities, giving you everything you need to record and stream your video at the same time. The software is free to use and has an intuitive interface.
Features of Filmora
- Support for both Mac OS X and Windows operating systems.
- Ability to record your PC screen, audio, and webcam all at once
- A variety of video editing features
- An easy-to-use interface
Steps
Here’s how to use Filmora for recording while streaming:
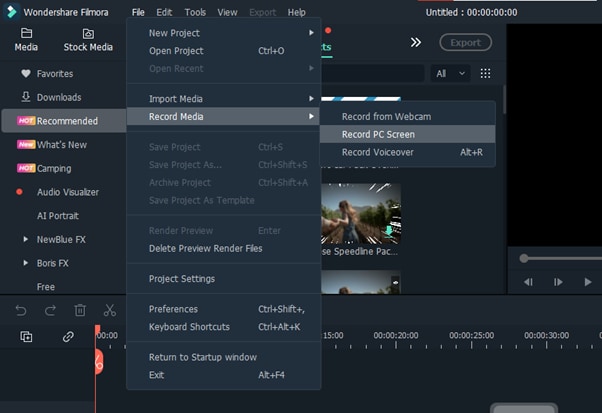
Step1 Head to the official Filmora website, download the software and install it on your PC.
Step2 Launch Filmora 11 and click “New project” in the main interface. Click “File” from the top toolbar and scroll down to “Record media.” From the drop-down menu, select “Record PC Screen.”
Step3 A new “Wondershare Screen Recorder” window will pop up. You can set up a full screen, custom or target screen recording, speaker, and microphone settings. If you want more Settings, click the drop-down icon.
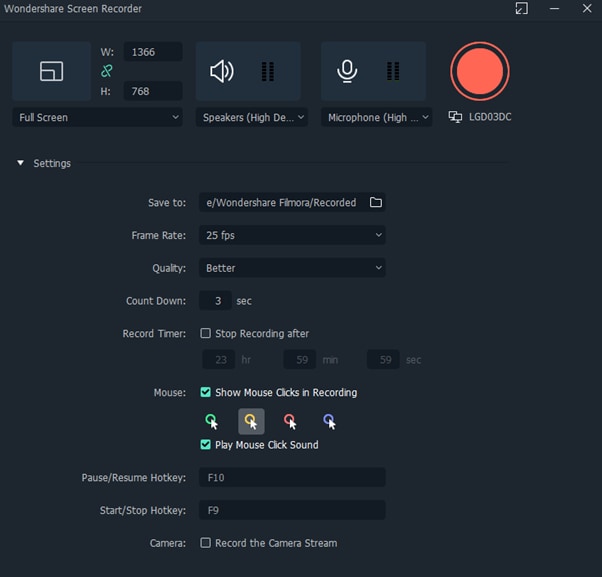
Step4 Click the Start icon to begin your recording. Afterward, click the Stop icon to stop the recording, and your stream will be saved in the selected destination.
Conclusion
In this article, we’ve discussed three step-by-step methods to help you do live streaming and recording at the same time. With these solutions at your disposal, you’ll be able to save your VODs with ease.
It is best to choose only one software to start with to avoid the time-consuming trial-and-error process. If you want to add another tool, do so later; otherwise, you will waste your precious time and resources.
Give these methods a shot, and eventually, you will find your groove—and become accustomed to just how easy it is to record and stream a video simultaneously.
Free Download For Win 7 or later(64-bit)
Free Download For macOS 10.14 or later
Free Download For macOS 10.14 or later
Adjust Background to Black for Your Product Review Video
Are you planning to make a product review video but wondering how to set up your background? If so, then you’re in the right place. This post will show you how to adjust the background to black for your product review video.
It’s essential to have a smooth black background without texture for your product review videos. Having a clean background is visually appealing and enhances the video. It will make sure that your viewers can see the product clearly without any distractions.
Do the following steps to change the background to black for your product review video:

Part 1. How to change the parameters in Filmora
For this tutorial, we will do it using Wondershare Filmora . So, if you haven’t installed it yet, you can download it here:
Free Download For Win 7 or later(64-bit)
Free Download For macOS 10.14 or later
Step1 Right-click the clip in the editing timeline > Edit Properties.

Step2 Select the Color menu > Advanced.

Step3 Setting the color parameters.
Click the adjust button in the upper left, scroll down to the vignette, and then decrease the amount and size value until the oval surrounds the subject.

Scroll up to the color options and increase the contrast to 100.

Go to the light menu, then decrease the shadows to cover any remaining light spots.

Part 2. Tips: How to improve product review video
Following these tips will help you improve the quality of your product review videos and make them more enjoyable for your audience.
1) Make sure your video has the correct resolution and scale
Having the correct resolution and scale for your video will make sure that it has a high-definition (HD) or high-quality resolution. Also, it will ensure that your video is the correct size when exporting.
If the scale is different from the resolution, then the empty space will be filled with black, and you will get black bars border that makes your video smaller.
2) Use proper lighting to ensure your video looks clear and bright
To get proper lighting, you should use natural lighting whenever possible, such as sunlight. However, if you can’t shoot during the day or it’s difficult to get natural light, you will need to use artificial lighting.
Next, adjust the white balance on your camera. You can also edit the color grading to finalize the look and improve the overall color of your video.
3) Make sure the audio quality of your video is good
Poor audio can make your video harder to listen to and turn off viewers.
Summary
It is essential to know how to adjust the background to black in your product review video. This is because it can help to make your video content more professional and stand out. By the end of this tutorial, you can now try and create a professional-looking video with a black background to improve your product review video.
Free Download For macOS 10.14 or later
Step1 Right-click the clip in the editing timeline > Edit Properties.
Step2 Select the Color menu > Advanced.
Step3 Setting the color parameters.
Click the adjust button in the upper left, scroll down to the vignette, and then decrease the amount and size value until the oval surrounds the subject.
Scroll up to the color options and increase the contrast to 100.
Go to the light menu, then decrease the shadows to cover any remaining light spots.
Part 2. Tips: How to improve product review video
Following these tips will help you improve the quality of your product review videos and make them more enjoyable for your audience.
1) Make sure your video has the correct resolution and scale
Having the correct resolution and scale for your video will make sure that it has a high-definition (HD) or high-quality resolution. Also, it will ensure that your video is the correct size when exporting.
If the scale is different from the resolution, then the empty space will be filled with black, and you will get black bars border that makes your video smaller.
2) Use proper lighting to ensure your video looks clear and bright
To get proper lighting, you should use natural lighting whenever possible, such as sunlight. However, if you can’t shoot during the day or it’s difficult to get natural light, you will need to use artificial lighting.
Next, adjust the white balance on your camera. You can also edit the color grading to finalize the look and improve the overall color of your video.
3) Make sure the audio quality of your video is good
Poor audio can make your video harder to listen to and turn off viewers.
Summary
It is essential to know how to adjust the background to black in your product review video. This is because it can help to make your video content more professional and stand out. By the end of this tutorial, you can now try and create a professional-looking video with a black background to improve your product review video.
In This Guidepost, You’ll Learn What an HDRI Photo Is and How to Use the Best Free HDRI Program to Edit Photos. You’ll Also Know the Difference Between HDR and HDRI
Photography is like art itself. Photographers must carefully select the setting and use the right camera to capture images with lossless quality. However, you’ll realize that some photos appear darker or brighter than in actual life.
In that case, use free HDRI software to change that straightway. But HDRI being a relatively new technique, beginners might struggle to edit the photos, let alone find the perfect HDRI software.
So, in this simple guidepost, we’ll learn how to create an HDRI 3D picture using HDRI for Blender. But first, let’s understand what an HDRI file is and the difference between HDRI and HDR.
Part 1: What is HDRI?
HDRI (High Dynamic Range Image) is simply an image created using multiple image overlays of the same background but with varying exposures. The exposures can range from the brightest highlights to the darkest shadows. So, in short, HDRI expands an image’s dynamic range to brighten or darken it and make it look more natural.
Having said that, HDRI is a raster image created using color pixels. HDRI photos are generally significant in size, so they won’t quickly lose quality like other raster photos such as PNG and JPG. Many formats can store HDRI images, although the most common are OpenEXR (.exr) and Radiance RGBE (.hdr).
Pros
- You can easily create one using HDRI for Blender, Photoshop, EasyHDRI, etc.
- HDRI photos are compatible with many image editing programs.
- Produces crisp images with excellent detail and lighting control.
Cons
- 32-bit HDRI files have significant sizes.
- HDRI can quickly be poorly done without prior experience.
Part 2: What’s the difference between HDR and HDRI
According to Wikipedia, HDR and HDRI are the same things. But is it true? For starters, HDRI is basically a photo with High Dynamic Range qualities. So, yes, HDR and HDRI can mean the same thing in digital image editing.
However, some photo editors argue that there is a difference between these two regarding basic workflow. First, HDR technology increases brightness to show more image details. On the other hand, HDRI performs unique optimization of content and lighting to deliver crisp images. In other words, HDRI brightens the dark shadows without necessarily overexposing the bright image areas.
Some photographers can also consider HDR as images with pixel values higher than 1 or 255. That means that the pixels can be much higher than pure white. But technically speaking, HDR and HDRI can be used interchangeably.
Part 3: When to use HDRI
Now that you have all the information about HDRI, let’s learn about some industries where HDRI is applicable.
1. HDRI for 3D visualization and 3D animation
HDRI 3D is commonplace these days. 3D animation creators can use programs like HDRI Blender to add HDR environments and make the content look detailed and more realistic in high lighting reflections. To put it simply, HDRI makes 3D scenes look lighter, less cartoonish, and more professional. This technology can also be used in interior visualizations in animations.
2. HDRI for architect rendering
Creating HDRI environments is a common practice in 3D architectural designs. For example, designers can create panoramic house designs with varying light tones and interior moods. HDRI helps them give a natural 3D lighting effect on scenes and objects.
3. HDRI monitors and TVs
You’ve probably heard of HDRI 4K when shopping for a smart TV or computer monitor. These TVs offer a lot more than just a wide color gamut, high brightness, and advanced contrast ratio. In addition, HDR TVs and monitors can recognize HDR signals, allowing viewers to watch the content with all studio quality. In short, viewers can see more color details in shadowy and lighter scenes, making them perfect for avid gamers.
Part 4: How do you open an HDRI?
Because HDRIs use low dynamic range rendering, a standard display panel won’t open HDR images. So, to open an HDRI file on a non-HDR display, you’ll need to convert it to a different low dynamic range format using tone mapping technology. For example, you convert HDRI to JPEG or PNG and enjoy regular bitmaps while maintaining the HDRI properties. You can also open and edit HDRI using desktop programs like EasyHDR, Photoshop, and Blender.
Part 5: How to set up an HDR environment background?
Before wrapping up this blog post, let’s discuss how to use HDRI for Blender to apply HDR effects to an image’s background. Blender is a 100% free program for creating jaw-dropping 3D rendering and animations on Mac and Windows computers. With Blender, you’ll get an advanced modeling toolset like retopology, curves, sculpting, and more. But in this post, we’ll learn how to create an HDR environment or add lighting to your image project. Let’s get started!
Step1Install and run Blender and then tap the World Properties tab. Then, click the Color icon and add Environment Texture.

Step2Next, split the window into two and launch the Shader Editor tool. Then, open the Object drop-down menu at the top-left corner and choose World. You’ll see the Environment Texture hooked into the background.

Step3On the Environment Texture, tap Open Image before opening the 3.2 folder inside the Blender Foundation folder. Then, click Data files > Studiolights > Word. Now open a .exr file. For example, open the Interior.exr image.

Step4Click the Viewport Shading icon and tap the drop-down button to choose Interior. You’ll see all the lighting reflections inside the room and customize it as you wish. That’s it!

Conclusion
Using the environment maps is the simplest and most effective way to lighten up your 3D scenes in Blender. This program lets you achieve realistic 3D scenes, mimicking natural world lighting. But note that Blender can be a little confusing for beginners. So, play around with this HDRI tool, and you’ll be a pro in no time.
Free Download For Win 7 or later(64-bit)
Free Download For macOS 10.14 or later
Part 2: What’s the difference between HDR and HDRI
According to Wikipedia, HDR and HDRI are the same things. But is it true? For starters, HDRI is basically a photo with High Dynamic Range qualities. So, yes, HDR and HDRI can mean the same thing in digital image editing.
However, some photo editors argue that there is a difference between these two regarding basic workflow. First, HDR technology increases brightness to show more image details. On the other hand, HDRI performs unique optimization of content and lighting to deliver crisp images. In other words, HDRI brightens the dark shadows without necessarily overexposing the bright image areas.
Some photographers can also consider HDR as images with pixel values higher than 1 or 255. That means that the pixels can be much higher than pure white. But technically speaking, HDR and HDRI can be used interchangeably.
Part 3: When to use HDRI
Now that you have all the information about HDRI, let’s learn about some industries where HDRI is applicable.
1. HDRI for 3D visualization and 3D animation
HDRI 3D is commonplace these days. 3D animation creators can use programs like HDRI Blender to add HDR environments and make the content look detailed and more realistic in high lighting reflections. To put it simply, HDRI makes 3D scenes look lighter, less cartoonish, and more professional. This technology can also be used in interior visualizations in animations.
2. HDRI for architect rendering
Creating HDRI environments is a common practice in 3D architectural designs. For example, designers can create panoramic house designs with varying light tones and interior moods. HDRI helps them give a natural 3D lighting effect on scenes and objects.
3. HDRI monitors and TVs
You’ve probably heard of HDRI 4K when shopping for a smart TV or computer monitor. These TVs offer a lot more than just a wide color gamut, high brightness, and advanced contrast ratio. In addition, HDR TVs and monitors can recognize HDR signals, allowing viewers to watch the content with all studio quality. In short, viewers can see more color details in shadowy and lighter scenes, making them perfect for avid gamers.
Part 4: How do you open an HDRI?
Because HDRIs use low dynamic range rendering, a standard display panel won’t open HDR images. So, to open an HDRI file on a non-HDR display, you’ll need to convert it to a different low dynamic range format using tone mapping technology. For example, you convert HDRI to JPEG or PNG and enjoy regular bitmaps while maintaining the HDRI properties. You can also open and edit HDRI using desktop programs like EasyHDR, Photoshop, and Blender.
Part 5: How to set up an HDR environment background?
Before wrapping up this blog post, let’s discuss how to use HDRI for Blender to apply HDR effects to an image’s background. Blender is a 100% free program for creating jaw-dropping 3D rendering and animations on Mac and Windows computers. With Blender, you’ll get an advanced modeling toolset like retopology, curves, sculpting, and more. But in this post, we’ll learn how to create an HDR environment or add lighting to your image project. Let’s get started!
Step1Install and run Blender and then tap the World Properties tab. Then, click the Color icon and add Environment Texture.
Step2Next, split the window into two and launch the Shader Editor tool. Then, open the Object drop-down menu at the top-left corner and choose World. You’ll see the Environment Texture hooked into the background.
Step3On the Environment Texture, tap Open Image before opening the 3.2 folder inside the Blender Foundation folder. Then, click Data files > Studiolights > Word. Now open a .exr file. For example, open the Interior.exr image.
Step4Click the Viewport Shading icon and tap the drop-down button to choose Interior. You’ll see all the lighting reflections inside the room and customize it as you wish. That’s it!
Conclusion
Using the environment maps is the simplest and most effective way to lighten up your 3D scenes in Blender. This program lets you achieve realistic 3D scenes, mimicking natural world lighting. But note that Blender can be a little confusing for beginners. So, play around with this HDRI tool, and you’ll be a pro in no time.
Free Download For Win 7 or later(64-bit)
Free Download For macOS 10.14 or later
Also read:
- [Updated] 2024 Approved CamClip Collector, Social Edition
- [Updated] Amazon Prime Video's Social Stardom on Twitter for 2024
- [Updated] Step by Step Creating Your Channel's Simple Subscribe Button
- ChuckleChain Master the Art of Memes at Home
- Decoding the History of AI: How Old Is This Revolutionary Tech?
- Ensure the Document Remains Informative and Comprehensive After Simplification, Using No More than Two Sentences for Analogies
- Heroic Measures Against a Corrupted Disk in Steam Games: A Simple Fix Guide
- How To Acquire Standardized Thumbnails From Youtube Online & Desktop Options for 2024
- In 2024, How to Change/Add Location Filters on Snapchat For your Tecno Camon 20 | Dr.fone
- Local vs Global: Is a Local Large Language Model Right for Your Needs?
- Maintaining Confidentiality in Work ChatAI Usage
- Resolve Call of Duty: WWII Display Problems - Fixes for PC Users
- Resolved: Troubleshooting Guide - Overcoming 'World of Warcraft Won't Start' On PC
- Solved! Troubleshooting Resident Evil Village PC Instability Issues
- The Easy Way to Snap Spectacular Slow Mo on Android for 2024
- The Enhanced Performance & Value of the Latest Apple iPad Air
- Title: Want to Play a Video on Loop on Vimeo so that It Plays Again and Again? Here Are All the Different Ways to Loop a Video on Vimeo in Simple Steps for 2024
- Author: Chloe
- Created at : 2025-02-25 04:29:05
- Updated at : 2025-03-03 18:45:36
- Link: https://ai-editing-video.techidaily.com/want-to-play-a-video-on-loop-on-vimeo-so-that-it-plays-again-and-again-here-are-all-the-different-ways-to-loop-a-video-on-vimeo-in-simple-steps-for-2024/
- License: This work is licensed under CC BY-NC-SA 4.0.