:max_bytes(150000):strip_icc():format(webp)/GettyImages-917461864-7141ebd3ec944ce6a431b8d485cc9cdb.jpg)
What Is the Best FPS for YouTube Videos?

What Is the Best FPS for YouTube Videos?
YouTube has become one of the to go to social media platforms for internet use because it provides entertainment for people who want to get entertained, learn or catch up with their favorite personalities. This platform has also given content creators a space to showcase their talents, educate the masses or simply have a good time when playing their games.
However, being a content creator on YouTube entails more than just posting a video weekly. You ought to ensure you get the frame rate in the video right. Failure to choose the correct frame rate will affect how your audience enjoys the video, increasing the chances that you lose subscribers.
Without further ado, let’s discuss the best fps for YouTube.
How Does FPS Affect Viewing YouTube Videos?
Before we dive into how FPS affects your viewing experience on YouTube and determine the best frame rate for YouTube, let’s define what it is. FPS is short for frames per second and is the number of still images appearing on display in one second. The more frames per second you have in your video, the clearer your video will become. The vice versa is also true.
To further simplify this definition, we will use the example of a flipbook. An animator usually draws an image on each page of the book. When they flip the pages in rapid succession, the images appear to be in motion. Suppose the animator used fewer pages to make their flipbook.
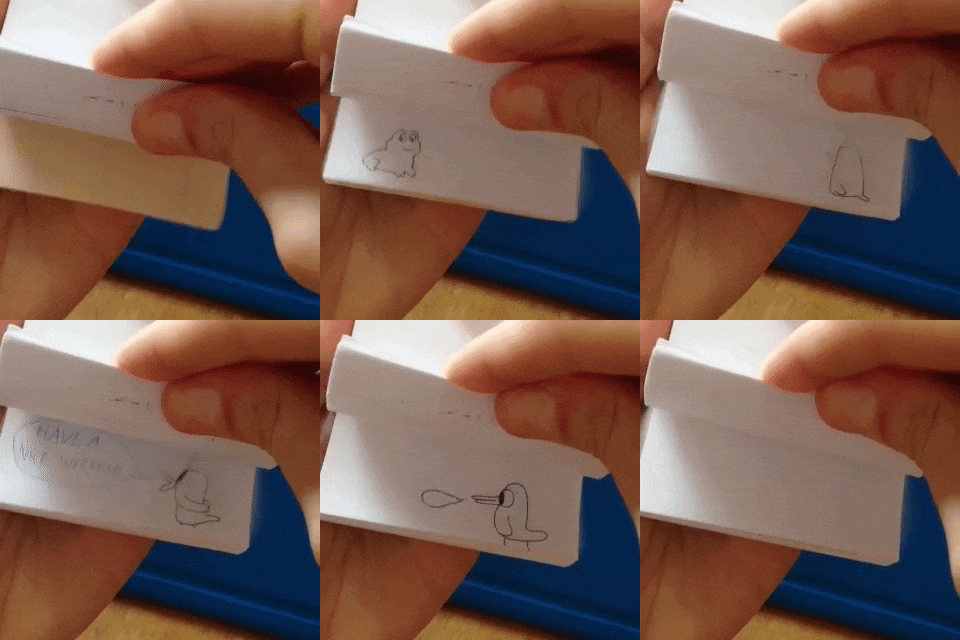
The animation would not be as smooth and crisp as if they had used more pages, each with a different still image contributing to the final motion.
The human brain can easily differentiate between 12 distinct images. However, when the photos exceed 18 and move rapidly, the brain is tricked into believing that the pictures are in motion. A frame rate lower than 24FPS will make your YouTube video look choppy and unnatural, as if it lags in real time.
Ideally, 24fps is the best fps for YouTube videos featuring mundane activities that we see in daily life. However, if you want to pack more information into your video and make the motion a bit smoother, then 30fps is the best video frame rate for YouTube.
Perhaps you post fast-paced content about gaming and other live-action videos. You are better off choosing 60FPS, which makes high-speed scenes look more fluid and helps you capture double the information.
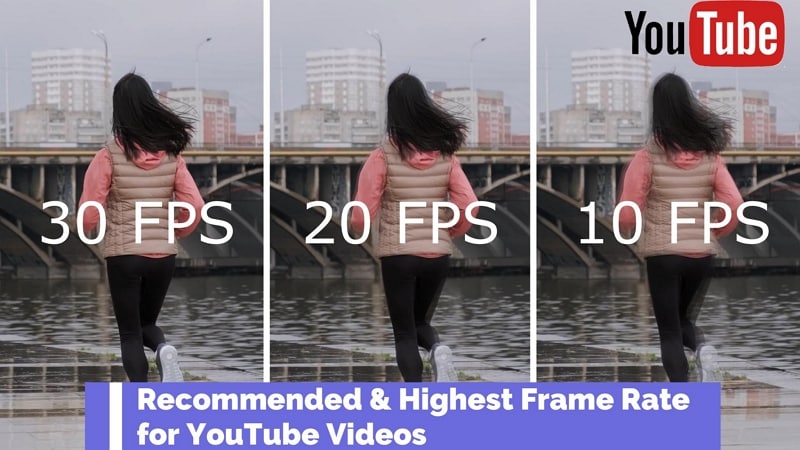
What Is the Recommended & Highest Frame Rate for YouTube Videos?
Unfortunately, there is no correct answer when it comes to the best video frame rate for YouTube videos. The controversy still continues, and everyone seems to have their own opinion.
According to Thomas Edison , anything less than 46FPS for motion pictures will strain the eyes and give an unpleasant viewing experience. At the time, filmmakers and videographers were adamant about sticking to between 22-26PFS for their videos, provided the audio adaptability remained at 35mm.
Different frame rates are used for various displays, genres, and mediums. For instance, 1-16FPS was common in silent-era movies and stop-motion movies. However, this frame rate is neither universally accepted nor widespread in the world today.
An excellent example of a frame rate that produces larger-than-life videos with exceptional detail is 24fps. However, the NTSC confirms that it is, in fact, 23.97 frames per second when you consider issues to do with color and hue.
Another universally acceptable frame rate is 30fps, which is widespread in television. Videographers also use it to make slow-motion segments in sports videos or other fast-paced content. The sweet 60fps makes any motion look smooth as butter and significantly reduces any blur in your videos. This frame rate is also characterized by super fine details you can easily miss with 24 and 30fps. It is also the highest fps video on YouTube.
120fps is synonymous with grandeur, with its monumental footage suitable for slow-motion scenes. Lastly, anything above 120fps works great with ultra-slow-motion videos. Of course, we are talking 240fps, which is rare but not uncommon. However, you would need a high-speed capture camera, which we believe doesn’t come cheap.
To sum it all up, 24fps is the recommended frame rate for YouTube. You can go higher than the baseline and use 30fps or higher if you make videos with lots of motion, like gaming videos. Most of the time, a higher frame rate is a personal choice rather than a necessity. However, we understand you want to give your viewers a pleasant experience while watching your content.
What Is the Best Frame Rate for YouTube Videos?
If you want to record a video for your YouTube channel, you might wonder what is the best fps for YouTube videos. You are better off sticking between 24fps and 60fps. The platform has only recently added 8K support for videos, which is a plus for many content creators. Below is a list of frame rates for the most popular genres on YouTube.
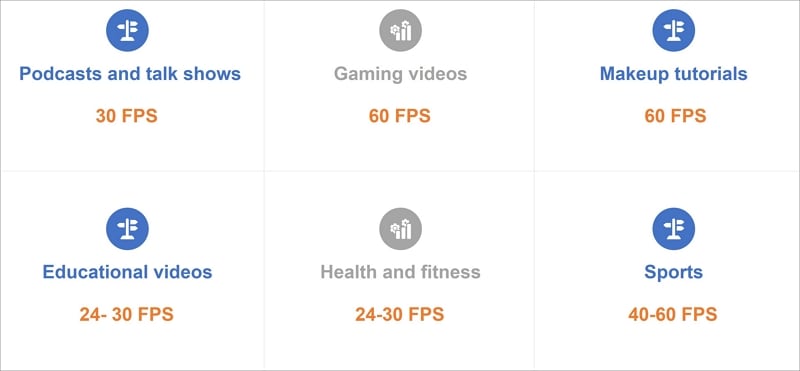
- Podcasts and talk shows - 30 FPS
- Gaming videos - 60 FPS
- Makeup tutorials - 60 FPS
- Educational videos - 24- 30 FPS
- Health and fitness - 24-30 FPS
- Sports - 40-60 FPS
Remember that the list above is not exhaustive and doesn’t cover all types of content on the platform. We can’t also guarantee that there is a “best” frame rate for your YouTube video. We suggest you heed our suggestion and practice to determine the best frame rate for YouTube videos.
We couldn’t fail to mention that your frame rate should match the content uploading and decoding. Since the interlaced content may experience performance issues on YouTube, it would help if you deinterlaced it.
How To Check FPS on YouTube Video?
Below is a simple guide on how to check fps on YouTube videos.
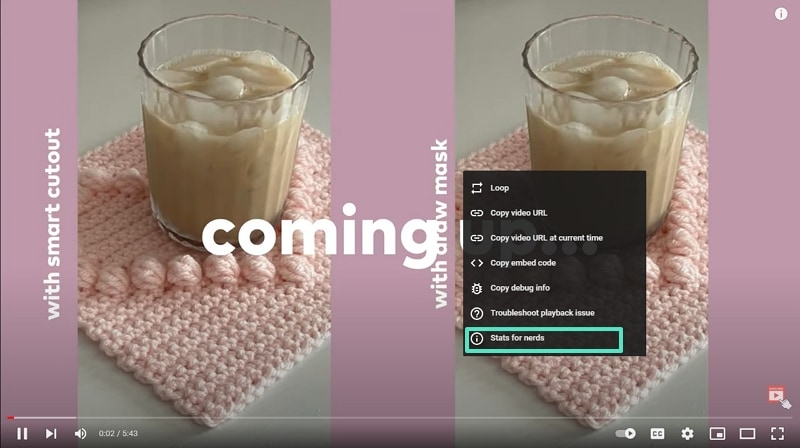
Step1 Open any video on YouTube and right-click on it. A pop-up window will appear. Select “Stats for nerds.”
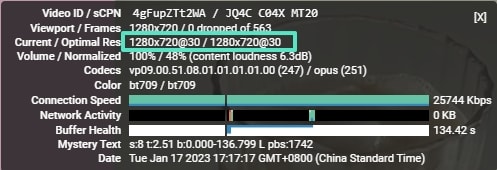
Step2 Narrow down on the “Current/Optimal Res” tab. The first set of figures before the forward slash represents the current resolution, while the figures after the forward slash represent the optimal resolution for the video. For instance, the figure in the picture below indicates that the resolution is 1280*720, and the frame rate is 30FPS. The figures repeat themselves, meaning that the video is at the optimal resolution.
How To Adjust FPS When Editing a YouTube Video?
An efficient video editing tool is all you need to adjust the frame rate for a video you want to upload to YouTube. Since there are so many options in the market, it is easy to get swept away by the prospects and wonder which one to choose.
Based on our research, Wondershare Filmora is one of the most efficient editing tools to change the FPS in your video and make it more enjoyable to watch.
Free Download For Win 7 or later(64-bit)
Free Download For macOS 10.14 or later
Wondershare Filmora is highly feature-rich, making it an editor’s dream. We guarantee you don’t need to be a pro to use this platform. The user-friendly interface is the ideal choice for even the most clueless novice.
However, a little knowledge goes a long way in ensuring you don’t get stuck using it. In addition, customer support is impeccable, meaning you will always find someone to help you whenever you encounter a problem using the platform.
The split-screen icon allows you to play and edit different clips simultaneously without clicking out of the app or finishing one task before starting the next. You can also select the number of split screens you want, depending on the videos you want to edit in one go. The newer version, Filomra 12, has everything you need to edit your video and make anyone who watches it glued to the screen because of how crisp it is.
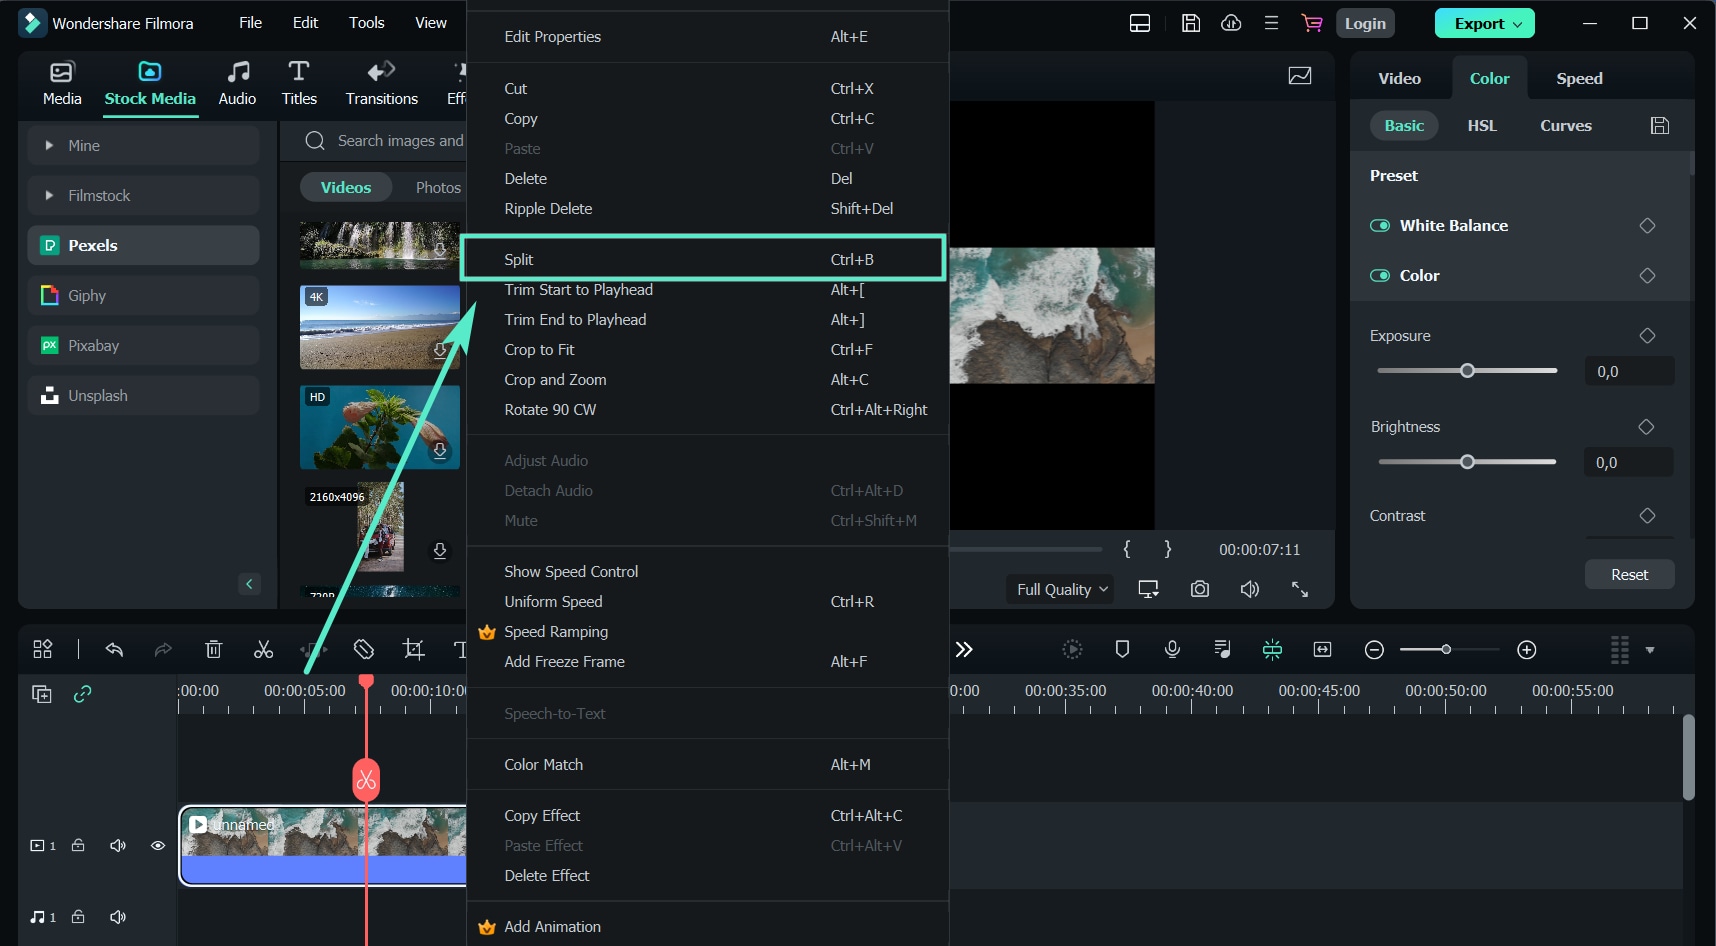
Below are some examples of key features you might find interesting.
- GIF support
- Audio equalizer
- 4K editing
- Advanced text editing
- Noise removal
- Scene detection
- Audio mixer
- Colour tuning
Here is a detailed guide on how to use Wondershare Filmora to adjust the frame rate for YouTube videos.
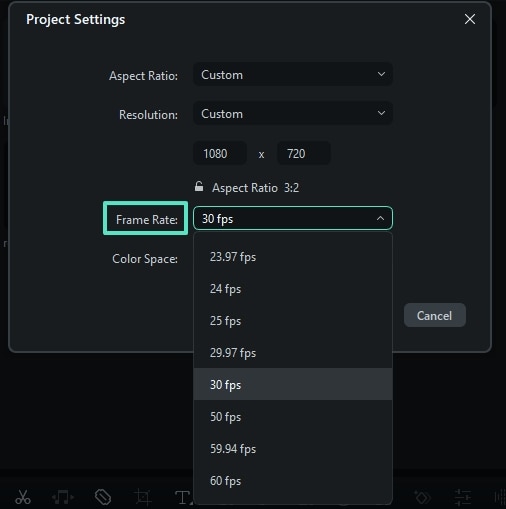
Step1 Launch the platform on your PC or laptop and click on the “File” tab at the top of the page. A drop-down menu will appear. Select “Project Settings.”

Step2 After a dialogue box appears, click “Frame Rate” and choose the best option.
Step3 Continue customizing your video using the other editing tools in the platform, and click “Export” to save a copy to your device.
Conclusion
Making crisp, polished-looking YouTube videos takes a lot of time and dedication. Fortunately, you knew that by the time you decided to start creating content for the platform. With all the knowledge at your fingertips, you have no reason not to broaden your knowledge base and gather enough information to help you create the best videos.
There are plenty of video editing tools to get your video to the correct resolution, so your content is above par. If you don’t know how to use a specific app or platform, you must search for a tutorial and start practicing. You could also consult other creators in your niche and ask them how they make their videos look so good.
Free Download For macOS 10.14 or later
Wondershare Filmora is highly feature-rich, making it an editor’s dream. We guarantee you don’t need to be a pro to use this platform. The user-friendly interface is the ideal choice for even the most clueless novice.
However, a little knowledge goes a long way in ensuring you don’t get stuck using it. In addition, customer support is impeccable, meaning you will always find someone to help you whenever you encounter a problem using the platform.
The split-screen icon allows you to play and edit different clips simultaneously without clicking out of the app or finishing one task before starting the next. You can also select the number of split screens you want, depending on the videos you want to edit in one go. The newer version, Filomra 12, has everything you need to edit your video and make anyone who watches it glued to the screen because of how crisp it is.

Below are some examples of key features you might find interesting.
- GIF support
- Audio equalizer
- 4K editing
- Advanced text editing
- Noise removal
- Scene detection
- Audio mixer
- Colour tuning
Here is a detailed guide on how to use Wondershare Filmora to adjust the frame rate for YouTube videos.
Step1 Launch the platform on your PC or laptop and click on the “File” tab at the top of the page. A drop-down menu will appear. Select “Project Settings.”

Step2 After a dialogue box appears, click “Frame Rate” and choose the best option.

Step3 Continue customizing your video using the other editing tools in the platform, and click “Export” to save a copy to your device.
Conclusion
Making crisp, polished-looking YouTube videos takes a lot of time and dedication. Fortunately, you knew that by the time you decided to start creating content for the platform. With all the knowledge at your fingertips, you have no reason not to broaden your knowledge base and gather enough information to help you create the best videos.
There are plenty of video editing tools to get your video to the correct resolution, so your content is above par. If you don’t know how to use a specific app or platform, you must search for a tutorial and start practicing. You could also consult other creators in your niche and ask them how they make their videos look so good.
How to Make GIFs From Videos on Mac
GIFs are being used more than ever today. Thanks to their prevalence on social media. You’ll see everything from cute kittens to cheeky celebrities, most of which will put a big smile on your face.
In addition to GIFs used for recreational purposes, there are those used for commercial ones. For example, they are good for demonstrating the steps of a process. You can even use them in articles to give you a visual aid that goes with the written word.
Whether you want to create a GIF for business or pleasure, it doesn’t have to take more than a few minutes of your time. So, here are the best GIF makers for Mac to try.
BEST FREE GIF MAKER ON MAC - FILMORA VIDEO EDITOR
Supported OS: Windows and Mac
Filmora Video Editor is used by the vast majority of inexperienced creators. Drag-and-drop allows you to add video clips and images. It contains over 130 various types of pre-set titles and text. You can also easily integrate your company’s logo into your videos.
Editing GIF files with Wondershare Filmora is quick and easy: first, import your GIF or video into the media library. Second, drag your GIFs/videos/images to the timeline after that. After you’ve placed your video to the timeline, you can edit it with a variety of tools.
For Win 7 or later (64-bit)
For macOS 10.14 or later
Features:
3D Video Editing
Media Library
Video Capture
Video Stabilization
Pros:
Expansive video editing features
Professional appearance for an affordable price
User-friendly interface
Cons:
The video saving process may lag
Bug fixes may take time to resolve
Watermarks on the free version
Premade templates lack a professional feel
Steps On How To Make GIF In Filmora
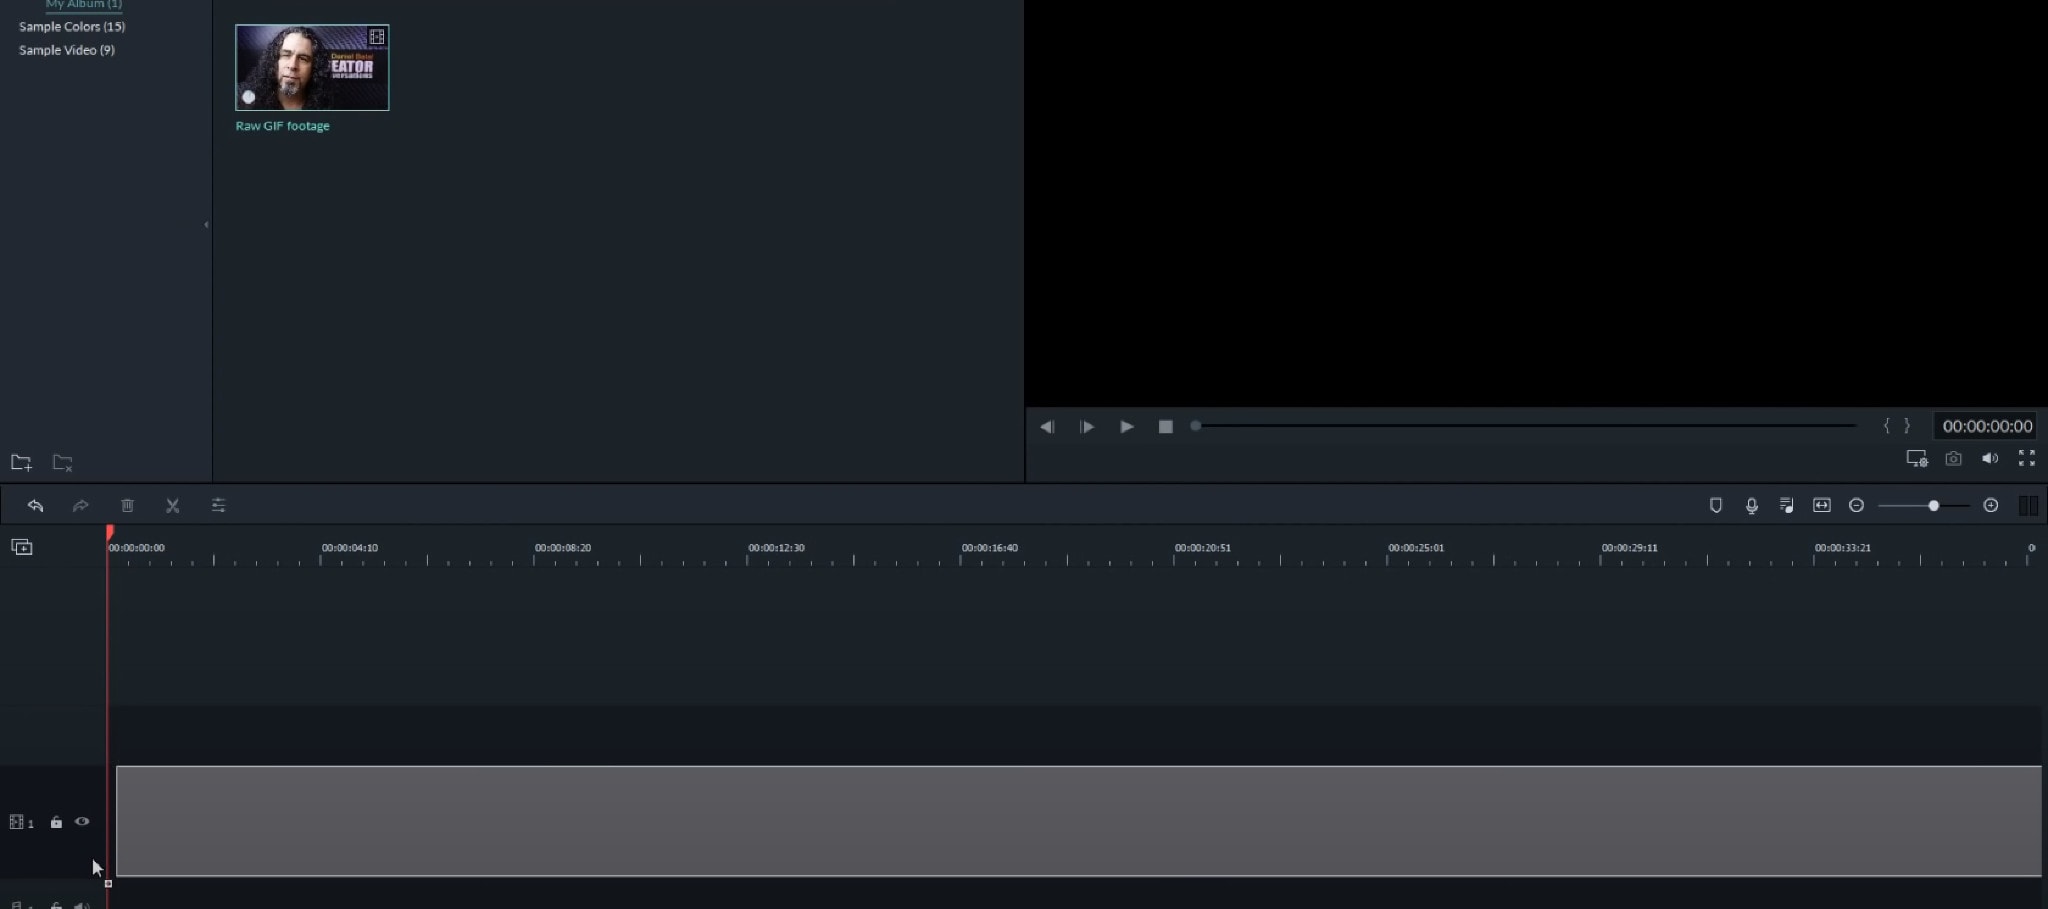
- Import Media Files
The very first task for users is to import some editable video files or collections of photos to the timeline of Wondershare Filmora.
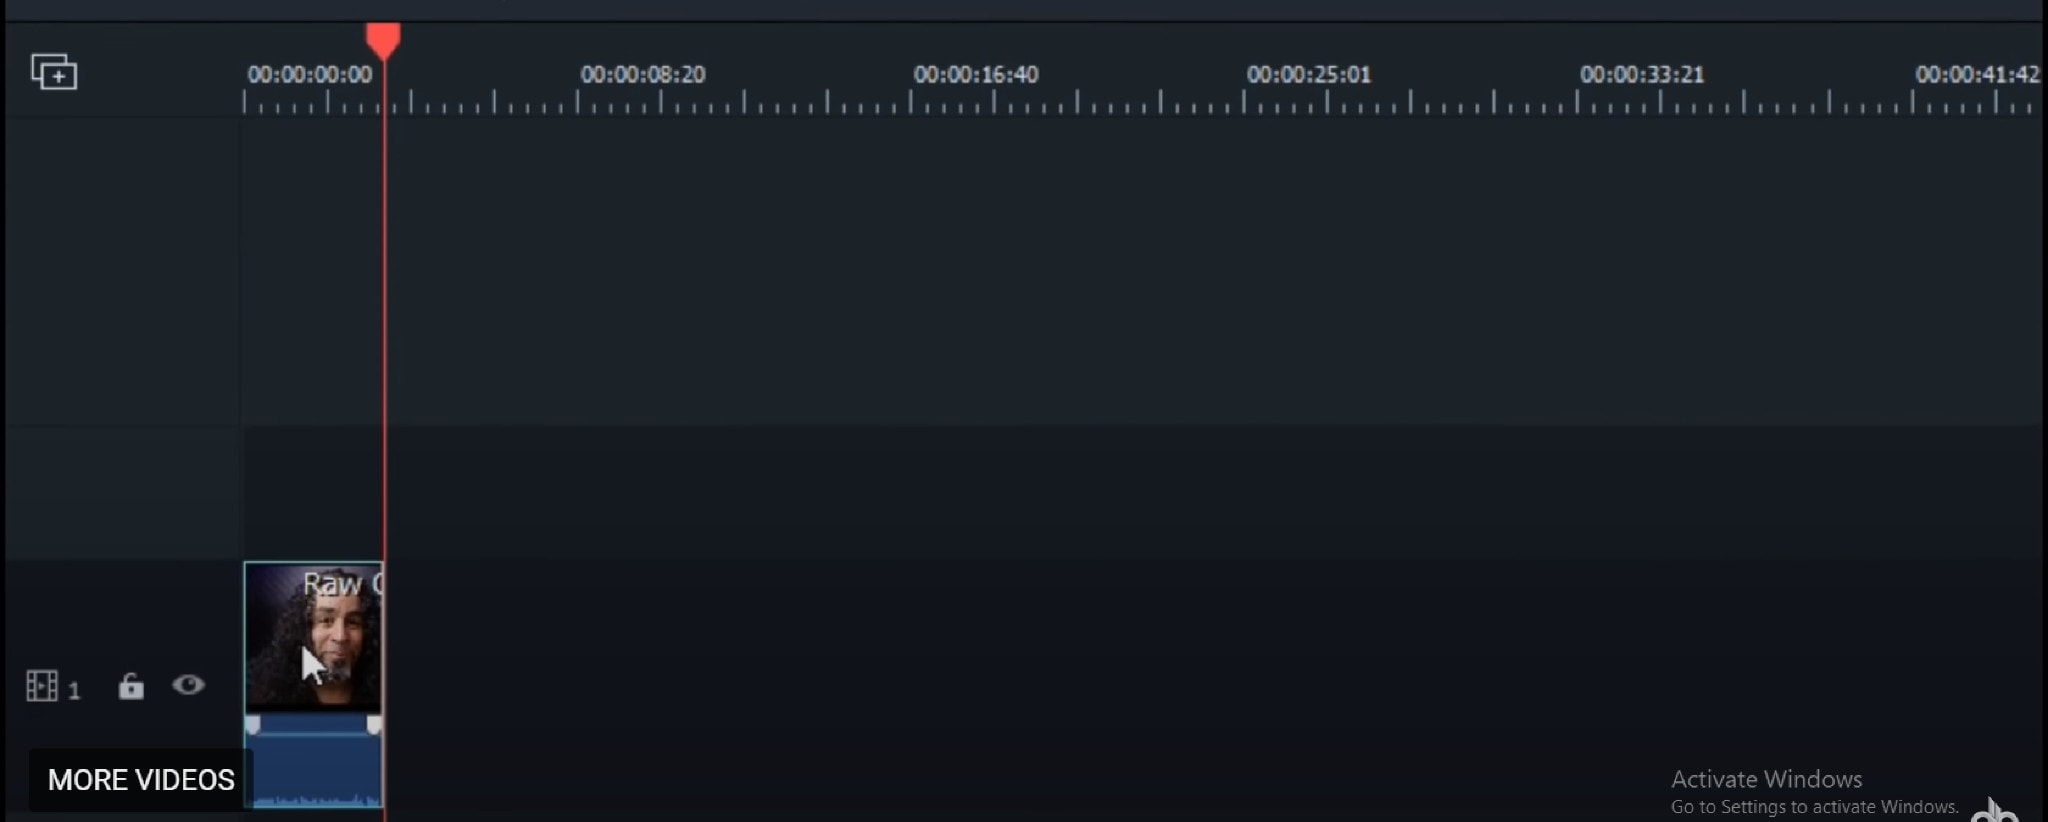
- Drag To Timeline

- Edit Media Files
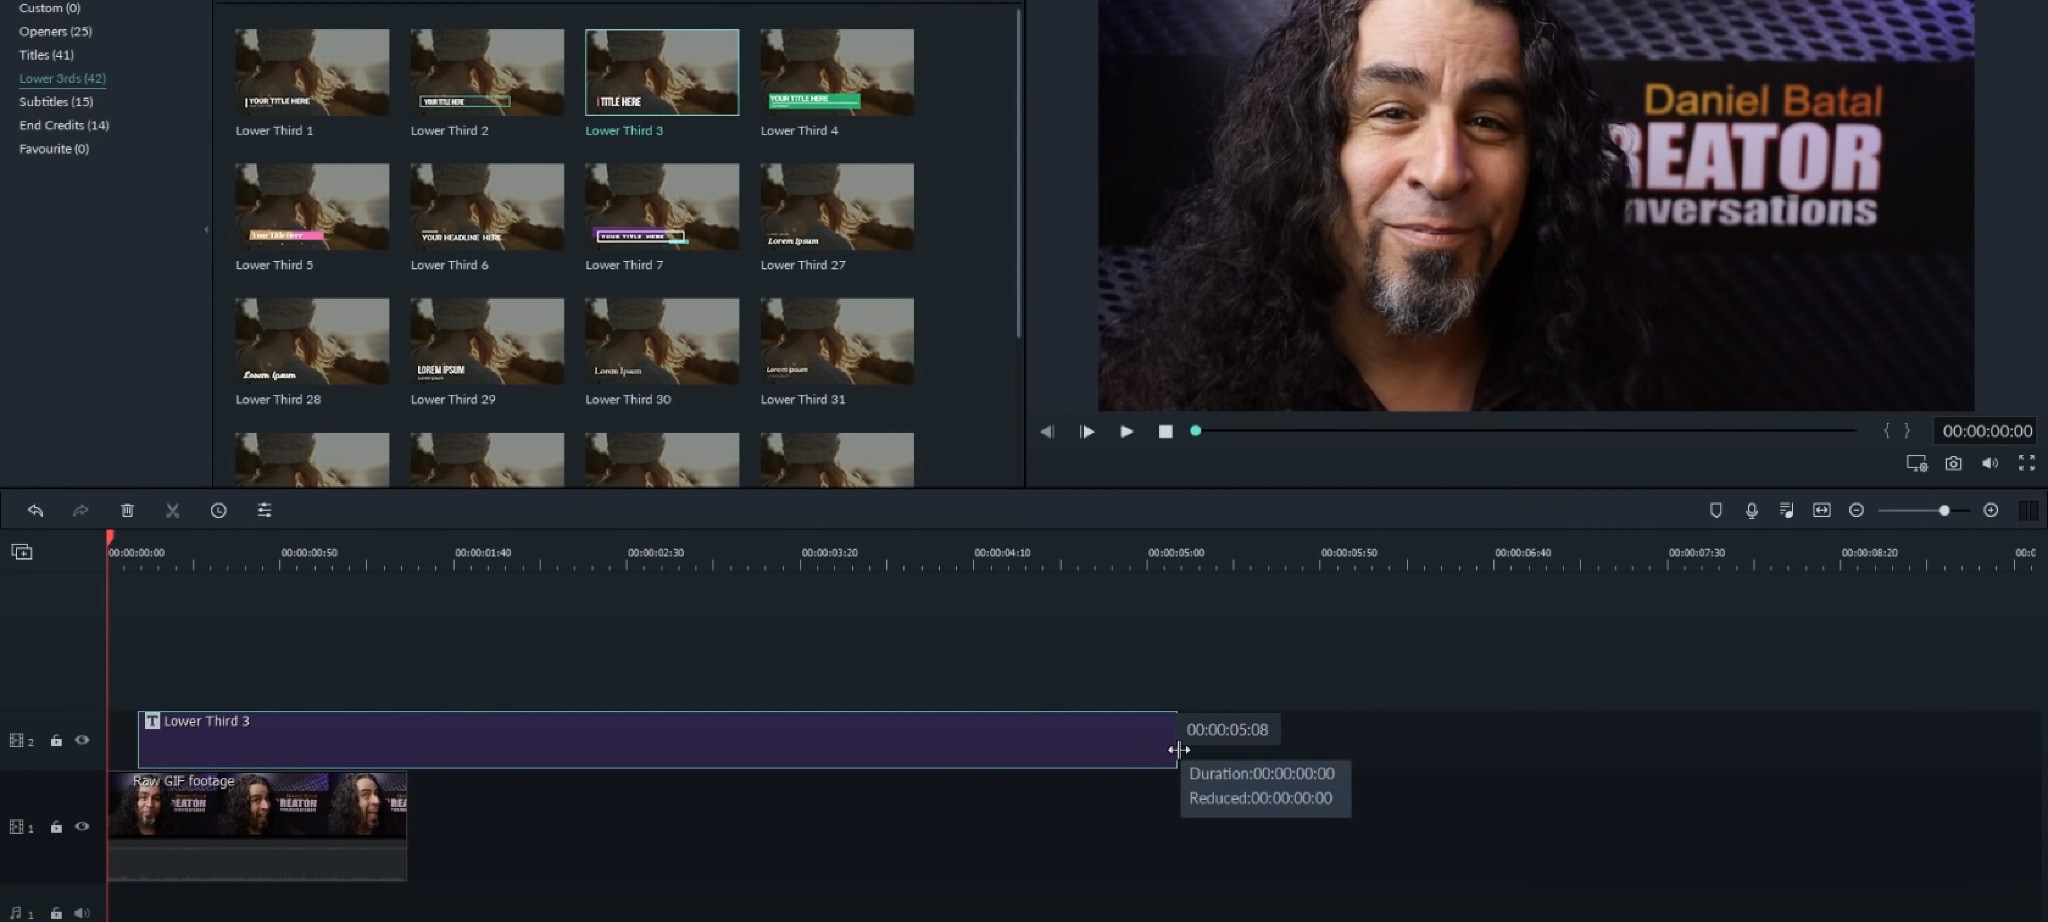
- Add Text Effect To Gif Files
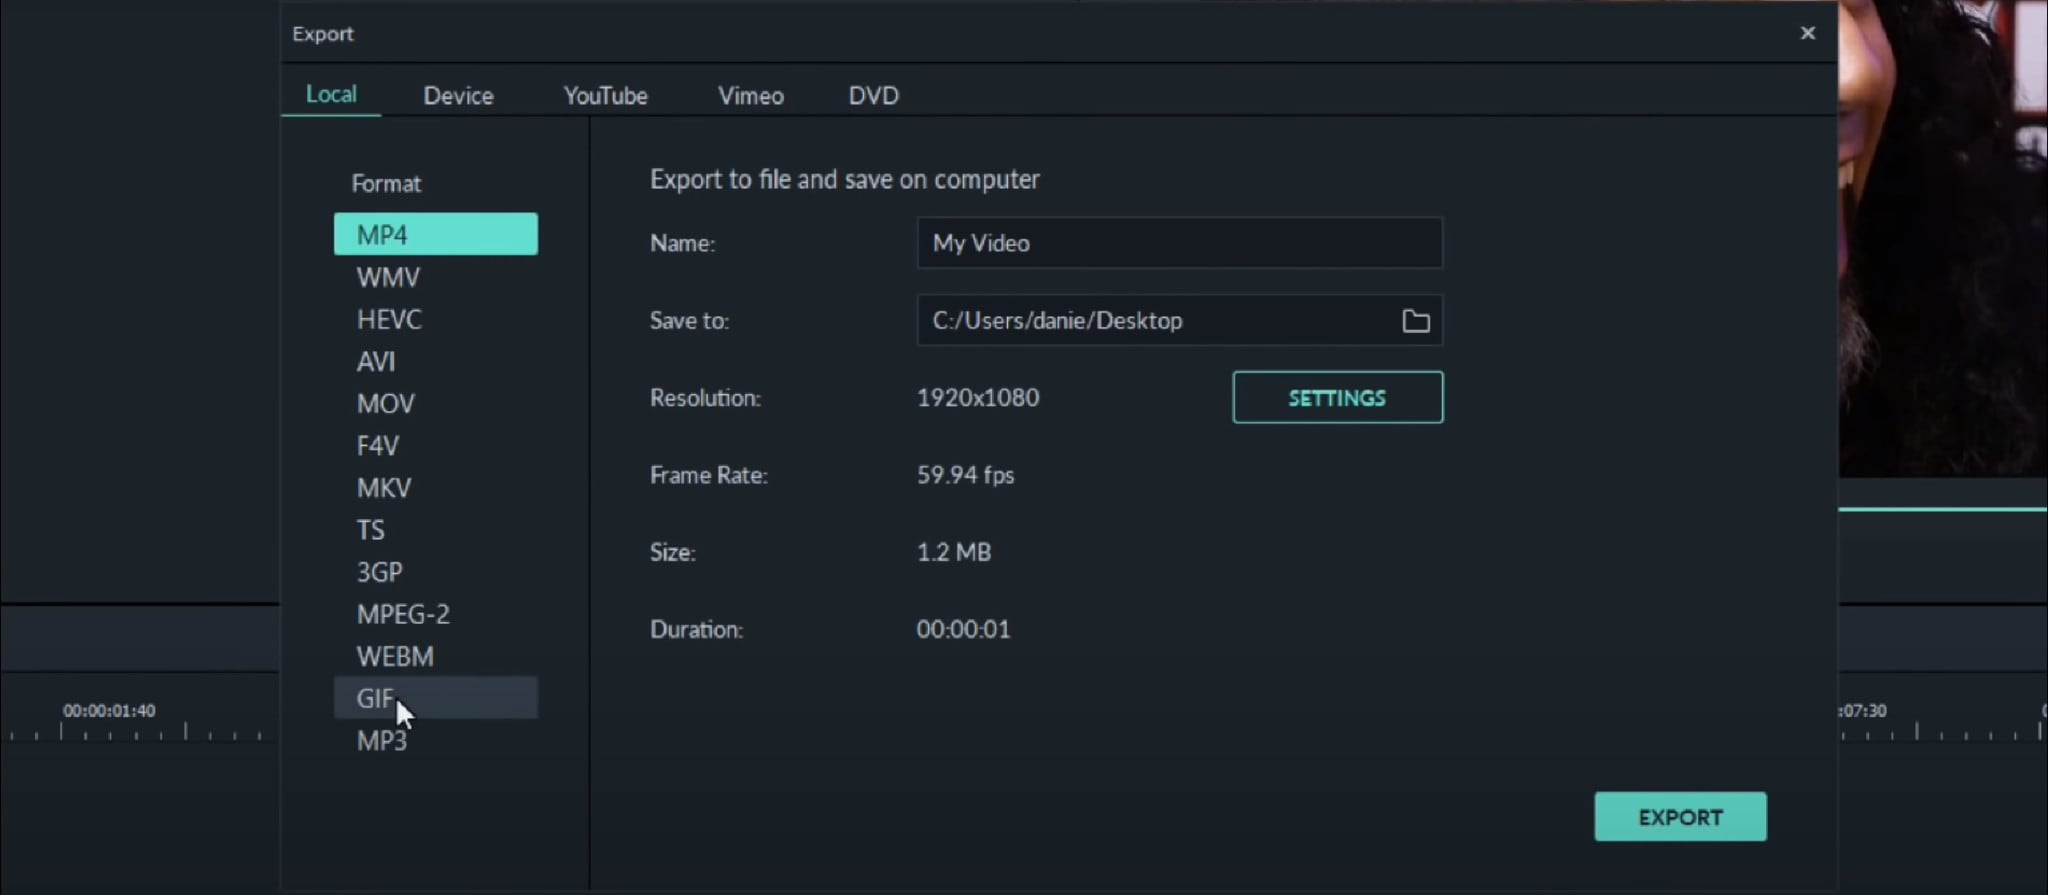
- Save And Export
SMART GIF MAKER
Supported OS: Windows and Mac
Smart GIF Maker is some other loose however extraordinarily beneficial app for Mac users. To make the procedure feasible, the creators used an incredibly simple user interface which is easy like any other popular app. With this app, users can without difficulty create new GIFs even as additionally enhancing current GIFs. Smart GIF Maker makes it easy to feature or dispose of frames from a GIF or maybe a photo.
Users may even customize the loop counts and body periods for every GIF they create. Simply drag and drop the photographs right into a body even as converting the order of the frames to your liking, and you may have a GIF prepared in no time.
Users can set the duration of each frame in the app at the same time. It even handles previews much better than it used to. In order to make things easier for users, the app asks whether or not to import the created file.
Features:
Simple UI
- Easily create new, or modify existing gifs.
- Easily add and remove frames to a gif.
- Click frames to modify images, or drag images to the frames.
- Preview gifs before exporting them.
Drag and drop
- Drag images from Finder to add to the gif.
- Drag frames inside the app to change the order.
Import and export
- Import gifs or movies, or create gifs entirely from individual images.
- Imports .gif, .mov and .mp4.
- Add .png, .jpg, .bmp, .tiff or .gif images to the gif.
- Export workspace as .gif.
Settings
- Set the frame duration of an individual or all frames.
- Set the loop counter of the gif.
Editor
- Edit frames in the gif using Paint-like features.
- Draw directly on frames, with varying colors and brush sizes.
- Use eraser and eyedropper tools to make editing easier!
Extras
- Reverse gifs,
- Set all frame durations at once.
Cons:
- Restricted features for free accounts
- Slow conversion process
Steps On How To Make GIF In Smart GIF Maker
- Import Your Video
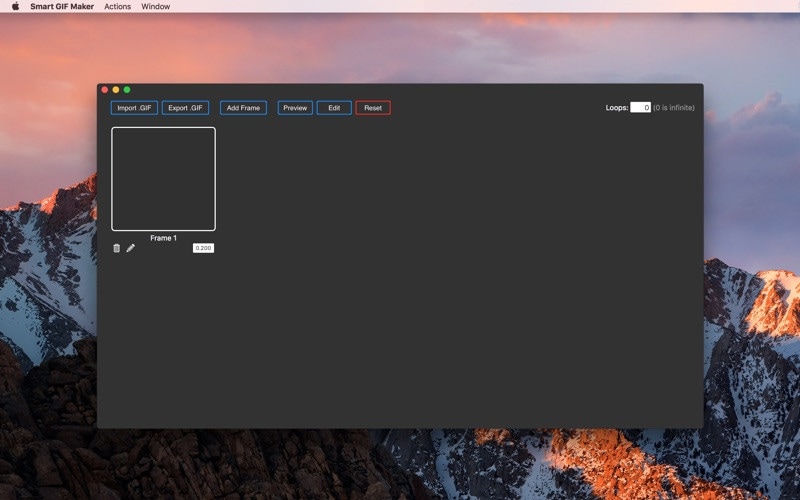
When you import your video, the app breaks it down into frames you can then work with, remove, or edit. You can also use images with the app and import them with the same type of editing options.
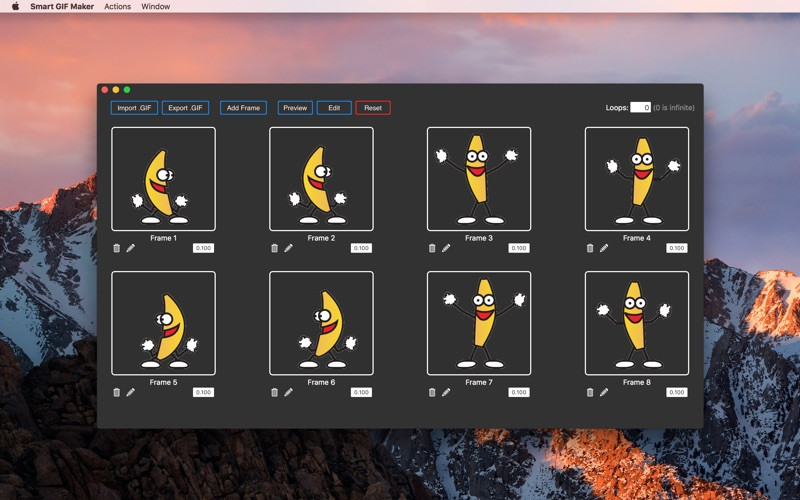
- With each frame, you can change the drawing size, use an eraser tool, adjust the background color, and use the eyedropper for matching colors.
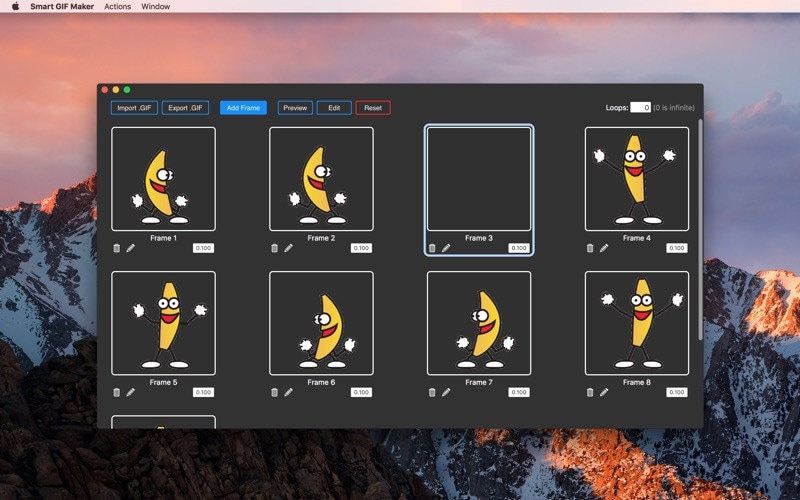
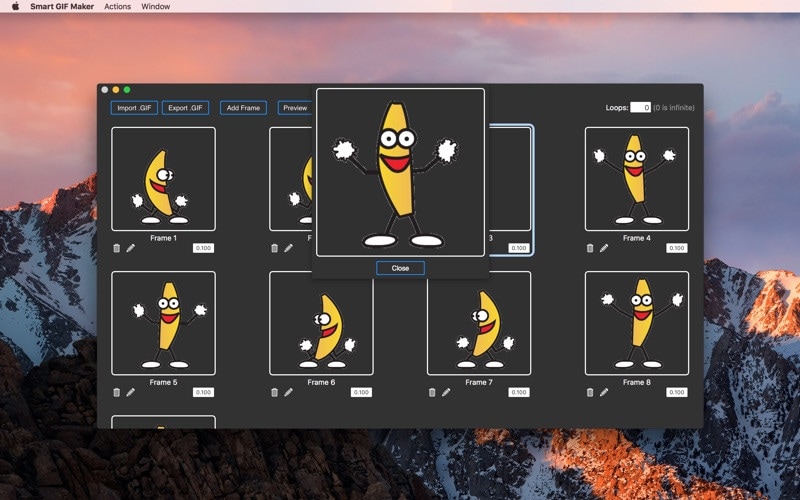
- After you edit your frames, you can set the time delay for each and the number of loops on the main screen. When you finish creating your GIF, hit the Preview button at the top and then export it to your computer if you’re happy with it.
GIPHY CAPTURE
Supported OS: Mac and Windows
Because of its simplicity and ease of use, GIPHY Capture is one of the most popular and well-liked apps for creating GIFs. The app is free and allows users to capture anything on their screen and convert it into a GIF lasting up to 30 seconds. A couple of clicks are all that is required to complete the task; one click initiates the process, while another click terminates it. All that remains is to add the appropriate captions and adjust the GIF’s export size, and you’re done. If you are a professional, the app even allows you to make more precise edits and trim a clip at specific time frames.
Once you’ve completed all of this and are satisfied with the end result, the next step is simple. Users can choose to save the GIF to their GIPHY account or share it directly with their friends and family.
Features:
Capture Instantly
- Create your GIF with just a couple of clicks
- Click to start, click to stop
- Capture GIFs up to 30 seconds long
Edit Precisely
- Super simple editing lets you get creative, fast
- Pick which kind of loop you like best
- Adjust the frame rate to your liking
- Animated captions: add them, style them, animate them
- Preview the file size of your GIF before saving
Quickly Save and Share
- Email your friends your favorite videos as GIFs
Simple Upload To Giphy
- Hold onto your favorite GIF creations forever
- Easily access them whenever you want
- Share your GIFs on Facebook, Tweet them to Twitter, or send them on Facebook Messenger
Cons:
● App Notifications are not working properly
● Audio / video loading problem
● App installation issues
● Login issues or account related issues
Steps On How To Make Gif In Giphy Capture
1. Once you’ve opened GIPHY Capture - open up your browser, video, or whatever you want to record. Adjust the size of your GIPHY capture frame by grabbing any of the sides or corners and stretching to your desired frame size
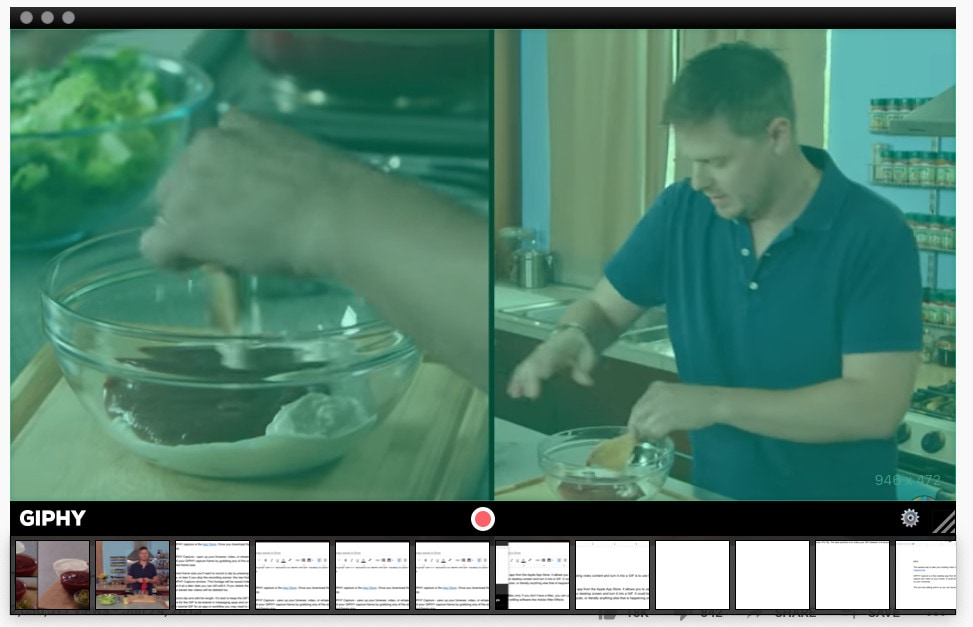
After your frame is set up, you’ll want to record a clip by pressing the red circle button. After 30-seconds (or less if you stop the recording sooner) the raw footage will be saved on the bottom of your GIPHY Capture window. This footage will be saved indefinitely, so if you close the app and reopen it at a later date you can pick up where you left off. However, if you delete the GIPHY Capture app from your computer, your videos will be deleted too.
You can take this 30-second clip and edit the length. It’s best to keep the GIF between 2-6 seconds if the intention is for the GIF to be shared in messaging apps and on the web. If you are making a “how-to” or tutorial GIF for an app or workflow you may need to make the length longer than 6 seconds.
You can choose to edit the loop type, pixel size, and frame rate. Changing these can affect the quality and file size of your GIF. In most cases leaving the standard preset options works best.
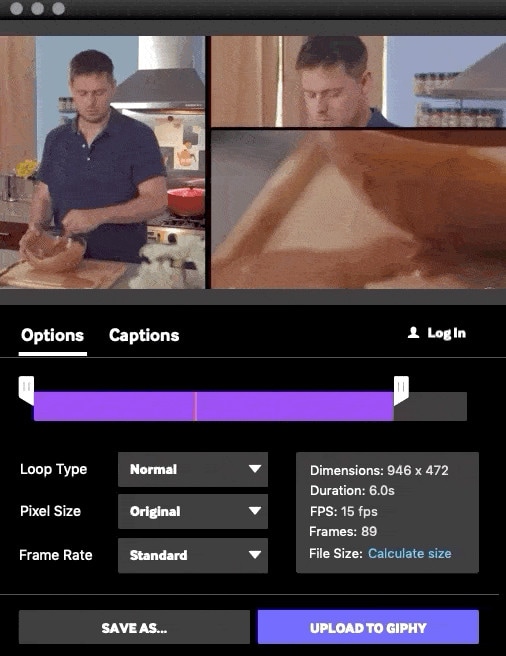
Under the Captions tab, you can easily add captions to your GIFs. Your captions can either have the regular or italicized text and come with a few preset options for changing the text color. You can edit the animation of the caption, just in case you want it to fade or drop into the frame. You can even edit the duration of the caption in your GIF. If you have a 6-second GIF but only want the caption to be in the frame for the final 2 seconds you can do so by editing the start and end time of the caption.
Now that you’ve created your GIF you can upload it directly to your GIPHY account and allow people to share it, provided you have a branded GIPHY channel.
If you don’t want to upload your new creation directly to GIPHY, you can download it as a .gif or .mp4 file locally to your computer.
GIFROCKET
Supported OS: Mac
GifRocket is the only downloadable record converter for developing GIFs. The only disadvantage is that it is only available to Mac users. This program is used to convert a video file to GIF format. That means you must already have the video file created. You can use a small clip from a previous video that you made or a clip that you downloaded. After you’ve downloaded and installed GifRocket on your computer, simply drag and drop your video file over the GifRocket tool window. The converter will begin working, and you will have a perfect GIF in a matter of seconds.
The production value must be the same as a full-length marketing video but the file size must be smaller, this tool is ideal for creating banner videos for site pages.
Features:
- Intuitive interface
- Change quality and file size of the outputted file
Cons:
- Lack of features like crop and frame rate, only available for Mac.
Steps On How To Make Gif In GIF Rocket
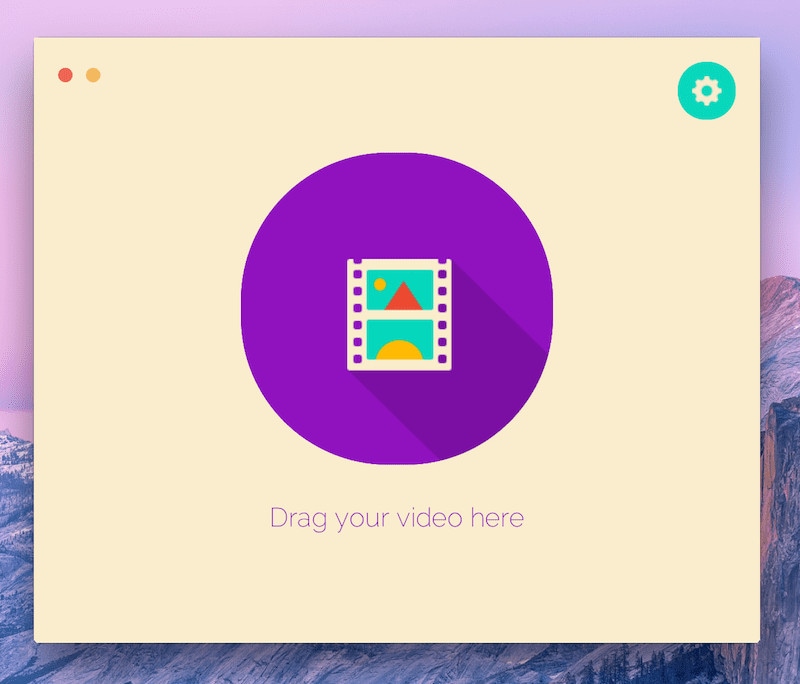
- After you download the app, open it, and there you will see a blank canvas. You’re supposed to drag the file here to start the conversion to GIF. But not so fast. First, click the Settings button. Here you’ll get three fields.
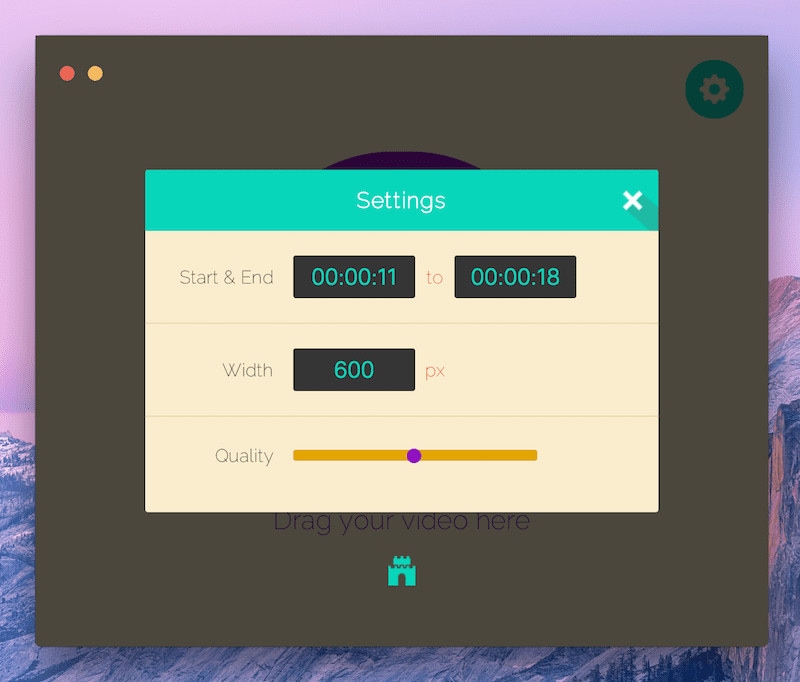
Enter the start and endpoint. Remember this is in the Hours: Minutes: Seconds layout so if your video is short, don’t forget to add zeros for the hours or minutes mark, or else the GIF won’t work.
Second, select the width of the GIF you want to create. The default is 320px. You can take it up to 500 or 600 if you’re dealing with a widescreen video but if you make the GIF too wide the size of the resulting file is also going to go up.
The last setting is quality. There is a slider and frankly, it’s not that helpful. There are only three points on it. I found the middle point, 50% to work the best. Once you’ve got the settings the way you want, click X, drag in the file and wait for Gifrocket to do its thing.
BEST PAID GIF MAKER ON MAC
PICGIF
Supported OS: Mac
PicGIF is yet another app for Mac users to express their contemporary entertainment in the form of a GIF. When it comes to gif creation, the app is quite versatile, and the quality of a created gif is truly astounding. PicGIF generates exceptionally eye-catching gifs with advanced high-satisfaction and stability, as opposed to other apps’ commonly crappy and blurry gifs.
You can make GIFs from movies or from a collection of photographs. All you have to do is select all of the photographs, adjust the fullness, and then select the rate at which the frames will flip. It’s a simple, easy-to-use, and brief app, but the lack of right cropping functionality can be a deterrent for users looking for it.
Features:
- Support a vast number of file formats
- Support hundreds of image formats like JPEG, TIFF, BMP, PNG, TGA, RAW, PIC, etc., and any image size.
- Support almost all common video formats: MOV, MPEG, MP4, M4V, 3GP, AVI, and more.
- Support combining multiple formats – images, GIFs, and videos into a new single GIF.
Pros:
- The PicGIF software is safe to use
- The support of PicGIF is good
Cons:
- Requires OS X 10.7 Lion or later
Steps On How To Make Gif In Pic GIF
- Importing
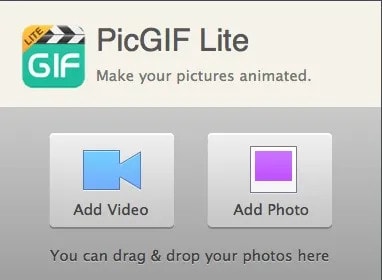
The picGIF app accepts many different image formats and all common video formats. The app says you can drag and drop onto the pop-up screen on opening the app, but it wouldn’t allow me to do this. However, I was able to work around it by just choosing “Add Photo” or “Add Video” in the File menu, or by doing “Command + O” or “Command + D”, respectively. Even though it says “Add Photo,” you can add multiple files at once.
2. Customization of Pictures
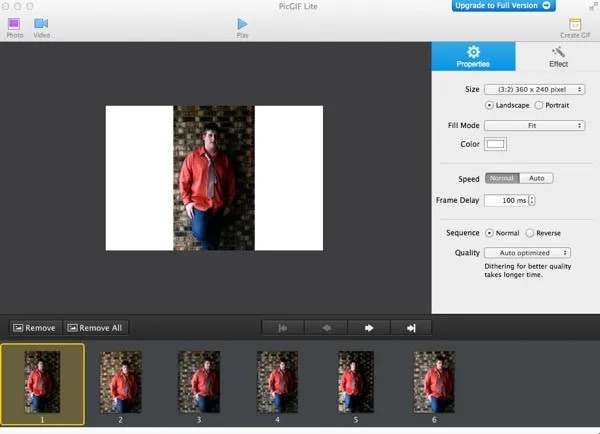
Once you have added the photos, you have several options to customize the gif. Under the “Properties” menu in PicGIF, you can change the size of the output or keep with the default of 360 x 240 pixels and can also choose whether they will be presented as portrait or landscape. At the bottom, you can also choose whether you want it auto optimized for quality or whether you want better quality, which will of course take longer.
Next is deciding how it will handle the photos if they don’t match the exact size of the output, whether you want them sized to fit, stretched, etc., and to choose a background color for when they don’t fit. Speed is the next option to be determined, either leave it on Auto or set the speed yourself. The photos will either be in the sequence you added them in or you can choose to have it go in reverse.
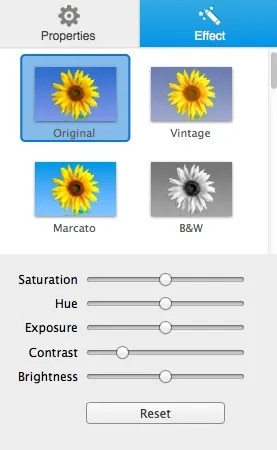
In the “Effects” menu, you can choose among popular options – Original, Vintage, Marcato, and B&W. After you make your choice, you can set the bars for Saturation, Hue, Exposure, Contrast, and Brightness. These are much like you would find in your standard photo apps
Hit the play button to test your GIF, and if it’s to your liking, click “Create GIF”. It only took seconds to create my GIF, but I only had six pictures and left it at the default size.
- Customization of Videos
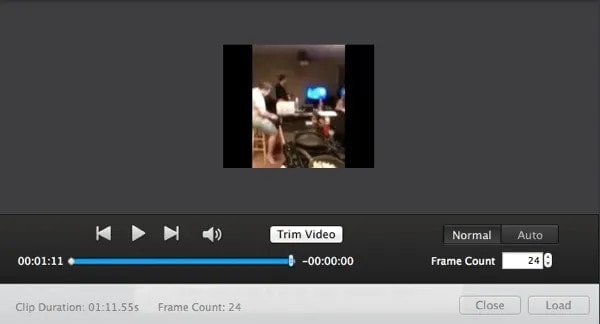
There aren’t that many options for creating video GIFs. There are, but you need to buy the full version app for $4.99. For this price, you will be able to trim the video as you wish, add text, and add stickers. By sticking with the free version you are limited to either having it autoplay or changing the frames per second. You can also import existing GIFs and edit them. Saving this gif took longer than with the photos, but I was using a longer video.
GIFABLE
Supported OS: Mac
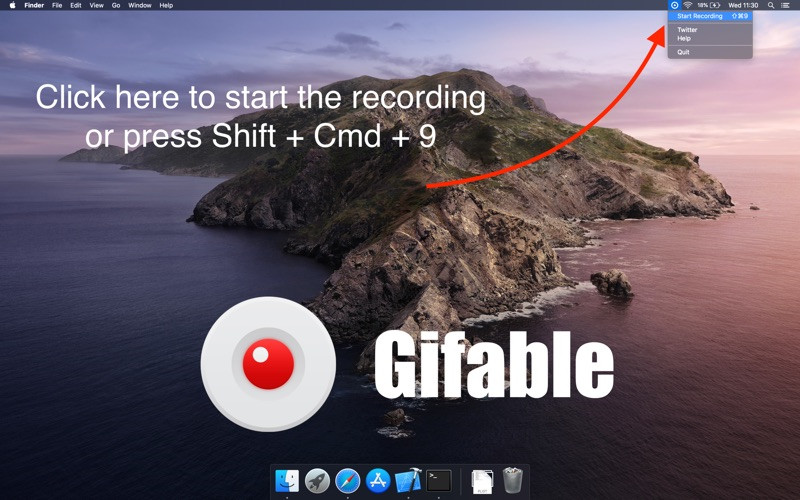
Gifable is another macOS application that enables user to create GIFs as well as save the display screen. This software is simple to use. It first takes a screenshot of the display and converts it to GIF format. This tool currently transmits data at a rate of 12 frames per second. Gifable advanced feature is that it can copy the GIF to the clipboard for clean copy and paste operations. However, there is a help menu that instructs newcomers on how to use the software. This device is ideal for blogging, tutorials, sharing with colleagues, and social media
Features:
- Currently records at 12 fps
- Shows a preview of the gif when the recording is finished
- Ability to copy the gif to your clipboard for easy copy and paste
- Quickly locate the file you created with a find in finder button
- Help menu to show you how to use Gifable
Pros:
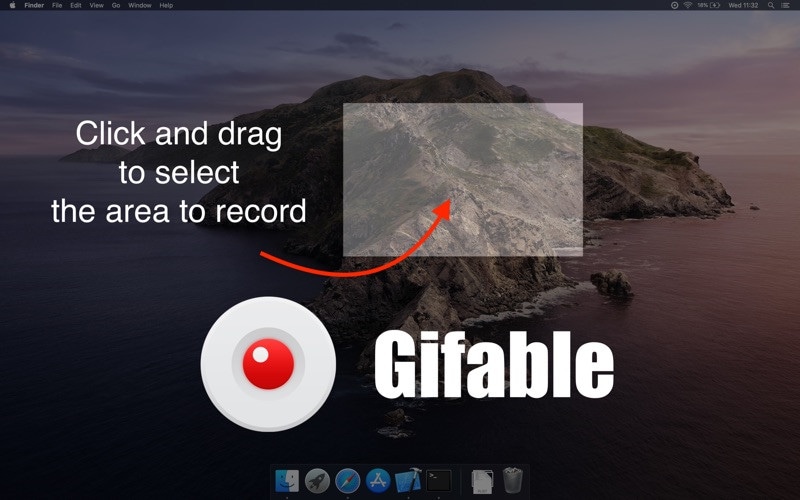
- Click and drag to record
- Records automatically
Cons:
- Not compatible with all operating systems
- Low fps recording
Steps On How To Make Gif In Gifable
- Click the Gifable icon in your menu bar, and select record.
- Click and drag your mouse over the area you would like to record.
- Recording starts automatically!
- Click the Gifable icon, then stop recording, to stop the recording.
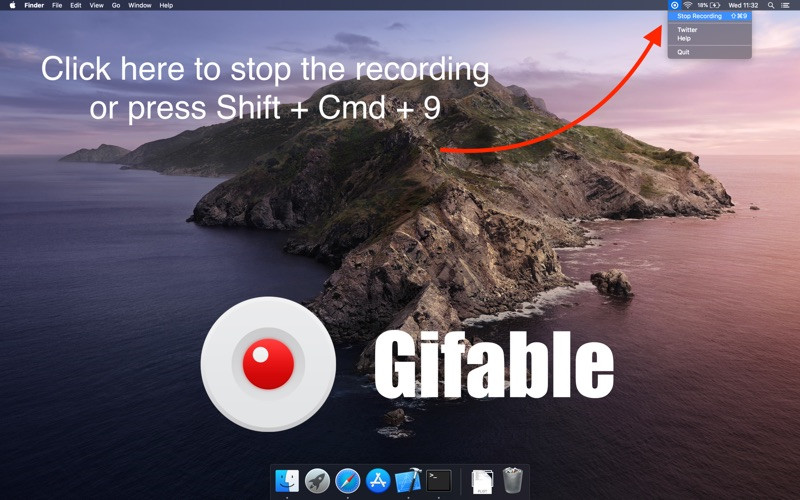
GIFOX
Supported OS: Mac
Gifox is yet another cutting-edge GIF generator with an appealing user interface. It is extremely simple to use and has a plethora of wonderful features. The app allows you to record your screen and then convert it to GIFs. It includes a sophisticated compression option that allows customers to tailor the output high-satisfactory and size. Gifox additionally permits you to pick the FPS for its animations.
Gifox is a cleverly specified and expertly crafted app that captures your display screen and converts it into lively gifs – a wonderful opportunity to static pix and huge videos. It’s the ideal companion for:
- Product demonstrations and micro-screencasts
- Reporting bugs and providing entertaining instructions
- Capturing precise video on the display screen
Features:
- Gifox allows us not to convert video clips, but we can also capture what is displayed on the screen, either full screen or a part of it.
- We can set the number of fps in each screen recording.
- We can also adjust the number of fps of playback when we convert the video.
- When performing video compression, we can adjust the number of colors we want to use in the conversion
- When recording the screen of our Mac to make a GIF, we can make use of keyboard shortcuts to start and stop recording.
- Once we have created the GIF, we can share it by dragging it to other apps, uploading it directly to our storage service, or even from Imgur.
Pros:
- It is vastly easy to use compared to many other apps in the market.
- It comes with the most dynamic interface.
Cons:
- File sizes of the produced GIFs are big in some cases, which leads to a slow upload on websites with huge traffic.
Steps On How To Make Gif In Gifox
1. Record Your Screen
After clicking the fox icon in the menu bar, you can find the buttons to record the screen on the left side of the interface.
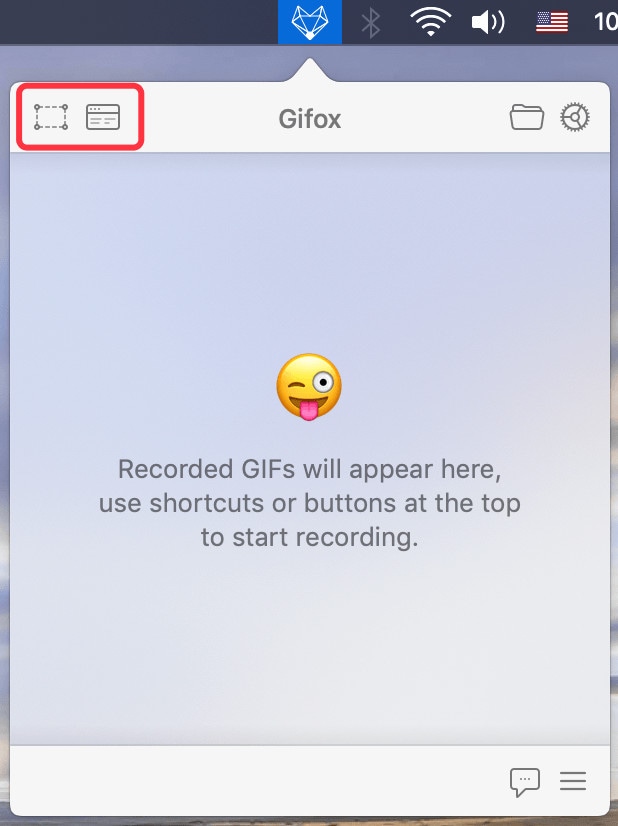
Gifox provides two modes for recording the screen – area and window. This means you can record part of the window or choose to record the full window.
For an area recording, Gifox allows you the freedom to select the area. You can select any area by dragging your mouse from corner to corner.

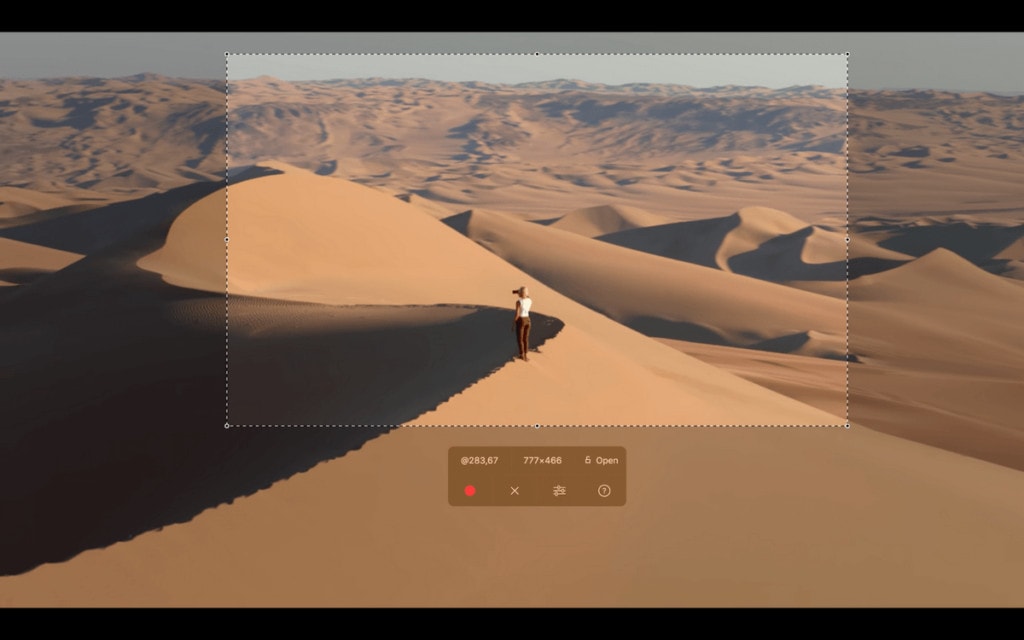
When using the window recording mode, one great feature is that it doesn’t matter if several windows are overlapping. You can just select the one you want to record, and Gifox will ignore the other window.
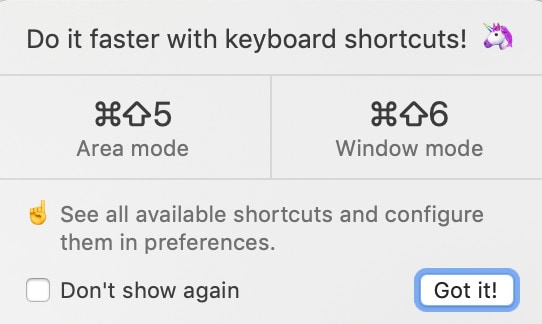
Gifox also offers shortcuts so that you don’t have to always open the icon from the menu bar. This makes it even easier to use as a daily utility.
2. Flexible Setting
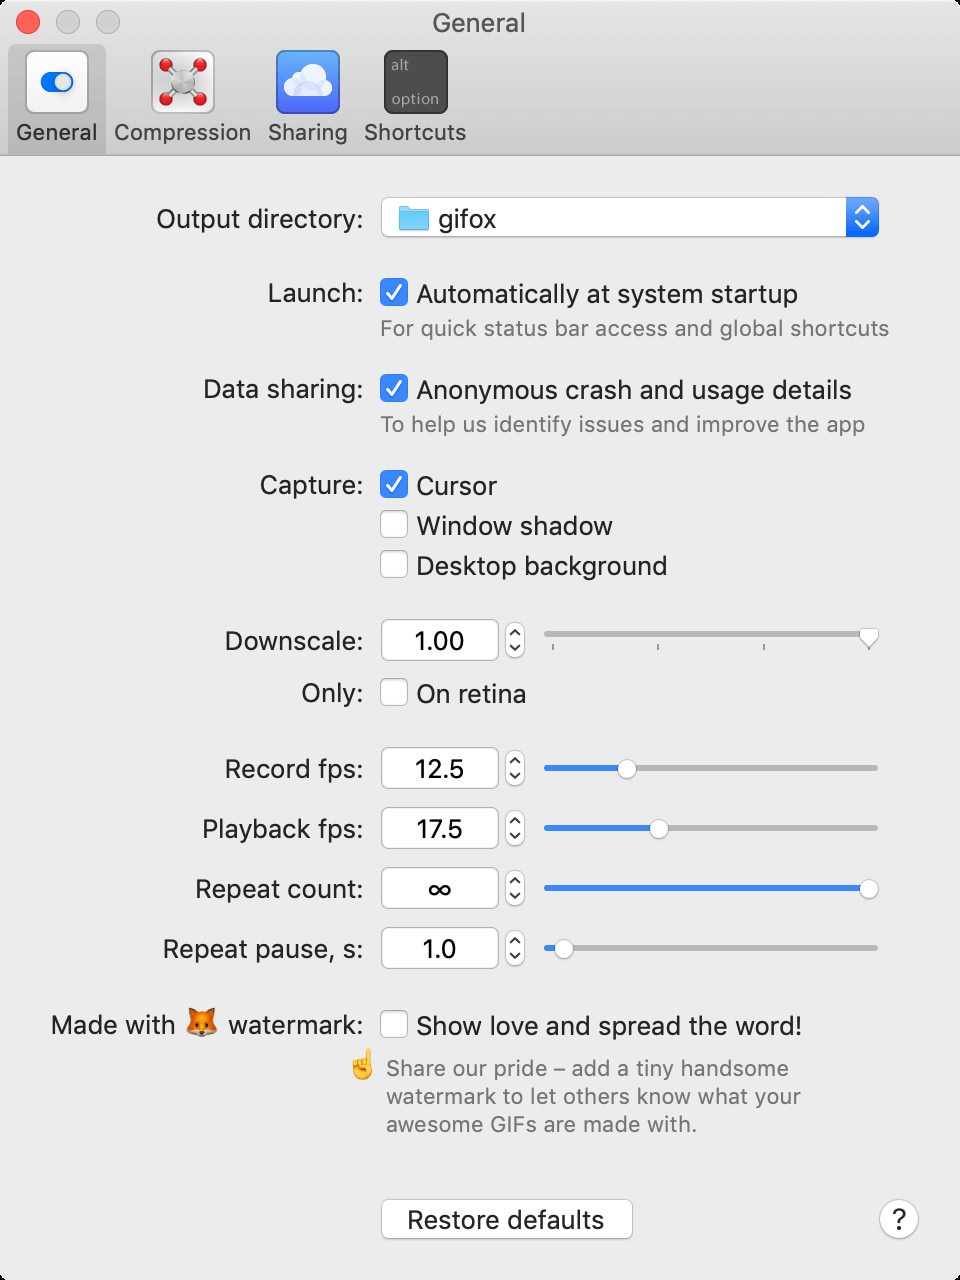
Gifox is not only easy to use but also a very flexible application. Here are just some of the options that you can customize:
- Mouse cursor appearance
- Window shadow
- Desktop background recording fps
- Playback fps
- Repeat count and pause
- Max colors
- Bayer scale
All of these are available in the Gifox settings window.
3. Compress
If you’re sharing a GIF on the internet, you’re going to like it to be of good quality but with the smallest file size possible. Gifox makes this possible. Available in preferences, the compress settings allow you to have full control over the quality of the GIF. You can change the color count, the palette, the dither, and the bayer scale. This eliminates the need to install a second program just for compressing your file.
WHICH SHOULD I CHOOSE: FREE OR PAID GIF MAKER ON MAC?
If the main reason you want this powerful and advanced GIF software is to create GIFs from videos, you should invest in the advanced version. Since there is not much you can do with videos and the free version.
However, if you want to make GIFs from photos, this free or open-source version will suffice.
FAQS ABOUT MAKING GIFS FROM VIDEO
- What tip can I have in editing GIFs?
You don’t need to make your GIF colorful. You need to use fewer colors. The fewer colors your GIF has, the more fun it is. Because if your GIF has a lot of colors, you will have a problem exporting it.
- Is it possible to export GIFs without watermarks?
Yes, some GIF editors have a feature to remove the watermarks using a free account. However, there are also GIF editors where you need to pay a flat amount first before exporting GIF without watermarks.
- Can I use Video Converter Ultimate offline to edit a GIF?
Absolutely, yes. Even without internet access, you can modify and quickly convert your GIF in no time.
Conclusion:
If the proper GIF editor is used, animated GIFs can be edited with little effort. There are GIF software programs that are highly recommended by users due to their ease of use and simple interface. It’s time to give them a shot!
For macOS 10.14 or later
Features:
3D Video Editing
Media Library
Video Capture
Video Stabilization
Pros:
Expansive video editing features
Professional appearance for an affordable price
User-friendly interface
Cons:
The video saving process may lag
Bug fixes may take time to resolve
Watermarks on the free version
Premade templates lack a professional feel
Steps On How To Make GIF In Filmora
- Import Media Files
The very first task for users is to import some editable video files or collections of photos to the timeline of Wondershare Filmora.

- Drag To Timeline

- Edit Media Files

- Add Text Effect To Gif Files

- Save And Export

SMART GIF MAKER
Supported OS: Windows and Mac
Smart GIF Maker is some other loose however extraordinarily beneficial app for Mac users. To make the procedure feasible, the creators used an incredibly simple user interface which is easy like any other popular app. With this app, users can without difficulty create new GIFs even as additionally enhancing current GIFs. Smart GIF Maker makes it easy to feature or dispose of frames from a GIF or maybe a photo.
Users may even customize the loop counts and body periods for every GIF they create. Simply drag and drop the photographs right into a body even as converting the order of the frames to your liking, and you may have a GIF prepared in no time.
Users can set the duration of each frame in the app at the same time. It even handles previews much better than it used to. In order to make things easier for users, the app asks whether or not to import the created file.
Features:
Simple UI
- Easily create new, or modify existing gifs.
- Easily add and remove frames to a gif.
- Click frames to modify images, or drag images to the frames.
- Preview gifs before exporting them.
Drag and drop
- Drag images from Finder to add to the gif.
- Drag frames inside the app to change the order.
Import and export
- Import gifs or movies, or create gifs entirely from individual images.
- Imports .gif, .mov and .mp4.
- Add .png, .jpg, .bmp, .tiff or .gif images to the gif.
- Export workspace as .gif.
Settings
- Set the frame duration of an individual or all frames.
- Set the loop counter of the gif.
Editor
- Edit frames in the gif using Paint-like features.
- Draw directly on frames, with varying colors and brush sizes.
- Use eraser and eyedropper tools to make editing easier!
Extras
- Reverse gifs,
- Set all frame durations at once.
Cons:
- Restricted features for free accounts
- Slow conversion process
Steps On How To Make GIF In Smart GIF Maker
- Import Your Video

When you import your video, the app breaks it down into frames you can then work with, remove, or edit. You can also use images with the app and import them with the same type of editing options.

- With each frame, you can change the drawing size, use an eraser tool, adjust the background color, and use the eyedropper for matching colors.


- After you edit your frames, you can set the time delay for each and the number of loops on the main screen. When you finish creating your GIF, hit the Preview button at the top and then export it to your computer if you’re happy with it.
GIPHY CAPTURE
Supported OS: Mac and Windows
Because of its simplicity and ease of use, GIPHY Capture is one of the most popular and well-liked apps for creating GIFs. The app is free and allows users to capture anything on their screen and convert it into a GIF lasting up to 30 seconds. A couple of clicks are all that is required to complete the task; one click initiates the process, while another click terminates it. All that remains is to add the appropriate captions and adjust the GIF’s export size, and you’re done. If you are a professional, the app even allows you to make more precise edits and trim a clip at specific time frames.
Once you’ve completed all of this and are satisfied with the end result, the next step is simple. Users can choose to save the GIF to their GIPHY account or share it directly with their friends and family.
Features:
Capture Instantly
- Create your GIF with just a couple of clicks
- Click to start, click to stop
- Capture GIFs up to 30 seconds long
Edit Precisely
- Super simple editing lets you get creative, fast
- Pick which kind of loop you like best
- Adjust the frame rate to your liking
- Animated captions: add them, style them, animate them
- Preview the file size of your GIF before saving
Quickly Save and Share
- Email your friends your favorite videos as GIFs
Simple Upload To Giphy
- Hold onto your favorite GIF creations forever
- Easily access them whenever you want
- Share your GIFs on Facebook, Tweet them to Twitter, or send them on Facebook Messenger
Cons:
● App Notifications are not working properly
● Audio / video loading problem
● App installation issues
● Login issues or account related issues
Steps On How To Make Gif In Giphy Capture
1. Once you’ve opened GIPHY Capture - open up your browser, video, or whatever you want to record. Adjust the size of your GIPHY capture frame by grabbing any of the sides or corners and stretching to your desired frame size

After your frame is set up, you’ll want to record a clip by pressing the red circle button. After 30-seconds (or less if you stop the recording sooner) the raw footage will be saved on the bottom of your GIPHY Capture window. This footage will be saved indefinitely, so if you close the app and reopen it at a later date you can pick up where you left off. However, if you delete the GIPHY Capture app from your computer, your videos will be deleted too.
You can take this 30-second clip and edit the length. It’s best to keep the GIF between 2-6 seconds if the intention is for the GIF to be shared in messaging apps and on the web. If you are making a “how-to” or tutorial GIF for an app or workflow you may need to make the length longer than 6 seconds.
You can choose to edit the loop type, pixel size, and frame rate. Changing these can affect the quality and file size of your GIF. In most cases leaving the standard preset options works best.

Under the Captions tab, you can easily add captions to your GIFs. Your captions can either have the regular or italicized text and come with a few preset options for changing the text color. You can edit the animation of the caption, just in case you want it to fade or drop into the frame. You can even edit the duration of the caption in your GIF. If you have a 6-second GIF but only want the caption to be in the frame for the final 2 seconds you can do so by editing the start and end time of the caption.
Now that you’ve created your GIF you can upload it directly to your GIPHY account and allow people to share it, provided you have a branded GIPHY channel.
If you don’t want to upload your new creation directly to GIPHY, you can download it as a .gif or .mp4 file locally to your computer.
GIFROCKET
Supported OS: Mac
GifRocket is the only downloadable record converter for developing GIFs. The only disadvantage is that it is only available to Mac users. This program is used to convert a video file to GIF format. That means you must already have the video file created. You can use a small clip from a previous video that you made or a clip that you downloaded. After you’ve downloaded and installed GifRocket on your computer, simply drag and drop your video file over the GifRocket tool window. The converter will begin working, and you will have a perfect GIF in a matter of seconds.
The production value must be the same as a full-length marketing video but the file size must be smaller, this tool is ideal for creating banner videos for site pages.
Features:
- Intuitive interface
- Change quality and file size of the outputted file
Cons:
- Lack of features like crop and frame rate, only available for Mac.
Steps On How To Make Gif In GIF Rocket
- After you download the app, open it, and there you will see a blank canvas. You’re supposed to drag the file here to start the conversion to GIF. But not so fast. First, click the Settings button. Here you’ll get three fields.

Enter the start and endpoint. Remember this is in the Hours: Minutes: Seconds layout so if your video is short, don’t forget to add zeros for the hours or minutes mark, or else the GIF won’t work.
Second, select the width of the GIF you want to create. The default is 320px. You can take it up to 500 or 600 if you’re dealing with a widescreen video but if you make the GIF too wide the size of the resulting file is also going to go up.
The last setting is quality. There is a slider and frankly, it’s not that helpful. There are only three points on it. I found the middle point, 50% to work the best. Once you’ve got the settings the way you want, click X, drag in the file and wait for Gifrocket to do its thing.

BEST PAID GIF MAKER ON MAC
PICGIF
Supported OS: Mac
PicGIF is yet another app for Mac users to express their contemporary entertainment in the form of a GIF. When it comes to gif creation, the app is quite versatile, and the quality of a created gif is truly astounding. PicGIF generates exceptionally eye-catching gifs with advanced high-satisfaction and stability, as opposed to other apps’ commonly crappy and blurry gifs.
You can make GIFs from movies or from a collection of photographs. All you have to do is select all of the photographs, adjust the fullness, and then select the rate at which the frames will flip. It’s a simple, easy-to-use, and brief app, but the lack of right cropping functionality can be a deterrent for users looking for it.
Features:
- Support a vast number of file formats
- Support hundreds of image formats like JPEG, TIFF, BMP, PNG, TGA, RAW, PIC, etc., and any image size.
- Support almost all common video formats: MOV, MPEG, MP4, M4V, 3GP, AVI, and more.
- Support combining multiple formats – images, GIFs, and videos into a new single GIF.
Pros:
- The PicGIF software is safe to use
- The support of PicGIF is good
Cons:
- Requires OS X 10.7 Lion or later
Steps On How To Make Gif In Pic GIF
- Importing
The picGIF app accepts many different image formats and all common video formats. The app says you can drag and drop onto the pop-up screen on opening the app, but it wouldn’t allow me to do this. However, I was able to work around it by just choosing “Add Photo” or “Add Video” in the File menu, or by doing “Command + O” or “Command + D”, respectively. Even though it says “Add Photo,” you can add multiple files at once.

2. Customization of Pictures
Once you have added the photos, you have several options to customize the gif. Under the “Properties” menu in PicGIF, you can change the size of the output or keep with the default of 360 x 240 pixels and can also choose whether they will be presented as portrait or landscape. At the bottom, you can also choose whether you want it auto optimized for quality or whether you want better quality, which will of course take longer.
Next is deciding how it will handle the photos if they don’t match the exact size of the output, whether you want them sized to fit, stretched, etc., and to choose a background color for when they don’t fit. Speed is the next option to be determined, either leave it on Auto or set the speed yourself. The photos will either be in the sequence you added them in or you can choose to have it go in reverse.


In the “Effects” menu, you can choose among popular options – Original, Vintage, Marcato, and B&W. After you make your choice, you can set the bars for Saturation, Hue, Exposure, Contrast, and Brightness. These are much like you would find in your standard photo apps
Hit the play button to test your GIF, and if it’s to your liking, click “Create GIF”. It only took seconds to create my GIF, but I only had six pictures and left it at the default size.
- Customization of Videos
There aren’t that many options for creating video GIFs. There are, but you need to buy the full version app for $4.99. For this price, you will be able to trim the video as you wish, add text, and add stickers. By sticking with the free version you are limited to either having it autoplay or changing the frames per second. You can also import existing GIFs and edit them. Saving this gif took longer than with the photos, but I was using a longer video.

GIFABLE
Supported OS: Mac
Gifable is another macOS application that enables user to create GIFs as well as save the display screen. This software is simple to use. It first takes a screenshot of the display and converts it to GIF format. This tool currently transmits data at a rate of 12 frames per second. Gifable advanced feature is that it can copy the GIF to the clipboard for clean copy and paste operations. However, there is a help menu that instructs newcomers on how to use the software. This device is ideal for blogging, tutorials, sharing with colleagues, and social media
Features:
- Currently records at 12 fps
- Shows a preview of the gif when the recording is finished
- Ability to copy the gif to your clipboard for easy copy and paste
- Quickly locate the file you created with a find in finder button
- Help menu to show you how to use Gifable
Pros:
- Click and drag to record
- Records automatically
Cons:
- Not compatible with all operating systems
- Low fps recording
Steps On How To Make Gif In Gifable
- Click the Gifable icon in your menu bar, and select record.

- Click and drag your mouse over the area you would like to record.

- Recording starts automatically!
- Click the Gifable icon, then stop recording, to stop the recording.

GIFOX
Supported OS: Mac
Gifox is yet another cutting-edge GIF generator with an appealing user interface. It is extremely simple to use and has a plethora of wonderful features. The app allows you to record your screen and then convert it to GIFs. It includes a sophisticated compression option that allows customers to tailor the output high-satisfactory and size. Gifox additionally permits you to pick the FPS for its animations.
Gifox is a cleverly specified and expertly crafted app that captures your display screen and converts it into lively gifs – a wonderful opportunity to static pix and huge videos. It’s the ideal companion for:
- Product demonstrations and micro-screencasts
- Reporting bugs and providing entertaining instructions
- Capturing precise video on the display screen
Features:
- Gifox allows us not to convert video clips, but we can also capture what is displayed on the screen, either full screen or a part of it.
- We can set the number of fps in each screen recording.
- We can also adjust the number of fps of playback when we convert the video.
- When performing video compression, we can adjust the number of colors we want to use in the conversion
- When recording the screen of our Mac to make a GIF, we can make use of keyboard shortcuts to start and stop recording.
- Once we have created the GIF, we can share it by dragging it to other apps, uploading it directly to our storage service, or even from Imgur.
Pros:
- It is vastly easy to use compared to many other apps in the market.
- It comes with the most dynamic interface.
Cons:
- File sizes of the produced GIFs are big in some cases, which leads to a slow upload on websites with huge traffic.
Steps On How To Make Gif In Gifox
1. Record Your Screen
After clicking the fox icon in the menu bar, you can find the buttons to record the screen on the left side of the interface.

Gifox provides two modes for recording the screen – area and window. This means you can record part of the window or choose to record the full window.
For an area recording, Gifox allows you the freedom to select the area. You can select any area by dragging your mouse from corner to corner.


When using the window recording mode, one great feature is that it doesn’t matter if several windows are overlapping. You can just select the one you want to record, and Gifox will ignore the other window.
Gifox also offers shortcuts so that you don’t have to always open the icon from the menu bar. This makes it even easier to use as a daily utility.

2. Flexible Setting
Gifox is not only easy to use but also a very flexible application. Here are just some of the options that you can customize:
- Mouse cursor appearance
- Window shadow
- Desktop background recording fps
- Playback fps
- Repeat count and pause
- Max colors
- Bayer scale
All of these are available in the Gifox settings window.

3. Compress
If you’re sharing a GIF on the internet, you’re going to like it to be of good quality but with the smallest file size possible. Gifox makes this possible. Available in preferences, the compress settings allow you to have full control over the quality of the GIF. You can change the color count, the palette, the dither, and the bayer scale. This eliminates the need to install a second program just for compressing your file.
WHICH SHOULD I CHOOSE: FREE OR PAID GIF MAKER ON MAC?
If the main reason you want this powerful and advanced GIF software is to create GIFs from videos, you should invest in the advanced version. Since there is not much you can do with videos and the free version.
However, if you want to make GIFs from photos, this free or open-source version will suffice.
FAQS ABOUT MAKING GIFS FROM VIDEO
- What tip can I have in editing GIFs?
You don’t need to make your GIF colorful. You need to use fewer colors. The fewer colors your GIF has, the more fun it is. Because if your GIF has a lot of colors, you will have a problem exporting it.
- Is it possible to export GIFs without watermarks?
Yes, some GIF editors have a feature to remove the watermarks using a free account. However, there are also GIF editors where you need to pay a flat amount first before exporting GIF without watermarks.
- Can I use Video Converter Ultimate offline to edit a GIF?
Absolutely, yes. Even without internet access, you can modify and quickly convert your GIF in no time.
Conclusion:
If the proper GIF editor is used, animated GIFs can be edited with little effort. There are GIF software programs that are highly recommended by users due to their ease of use and simple interface. It’s time to give them a shot!
For macOS 10.14 or later
Features:
3D Video Editing
Media Library
Video Capture
Video Stabilization
Pros:
Expansive video editing features
Professional appearance for an affordable price
User-friendly interface
Cons:
The video saving process may lag
Bug fixes may take time to resolve
Watermarks on the free version
Premade templates lack a professional feel
Steps On How To Make GIF In Filmora
- Import Media Files
The very first task for users is to import some editable video files or collections of photos to the timeline of Wondershare Filmora.

- Drag To Timeline

- Edit Media Files

- Add Text Effect To Gif Files

- Save And Export

SMART GIF MAKER
Supported OS: Windows and Mac
Smart GIF Maker is some other loose however extraordinarily beneficial app for Mac users. To make the procedure feasible, the creators used an incredibly simple user interface which is easy like any other popular app. With this app, users can without difficulty create new GIFs even as additionally enhancing current GIFs. Smart GIF Maker makes it easy to feature or dispose of frames from a GIF or maybe a photo.
Users may even customize the loop counts and body periods for every GIF they create. Simply drag and drop the photographs right into a body even as converting the order of the frames to your liking, and you may have a GIF prepared in no time.
Users can set the duration of each frame in the app at the same time. It even handles previews much better than it used to. In order to make things easier for users, the app asks whether or not to import the created file.
Features:
Simple UI
- Easily create new, or modify existing gifs.
- Easily add and remove frames to a gif.
- Click frames to modify images, or drag images to the frames.
- Preview gifs before exporting them.
Drag and drop
- Drag images from Finder to add to the gif.
- Drag frames inside the app to change the order.
Import and export
- Import gifs or movies, or create gifs entirely from individual images.
- Imports .gif, .mov and .mp4.
- Add .png, .jpg, .bmp, .tiff or .gif images to the gif.
- Export workspace as .gif.
Settings
- Set the frame duration of an individual or all frames.
- Set the loop counter of the gif.
Editor
- Edit frames in the gif using Paint-like features.
- Draw directly on frames, with varying colors and brush sizes.
- Use eraser and eyedropper tools to make editing easier!
Extras
- Reverse gifs,
- Set all frame durations at once.
Cons:
- Restricted features for free accounts
- Slow conversion process
Steps On How To Make GIF In Smart GIF Maker
- Import Your Video

When you import your video, the app breaks it down into frames you can then work with, remove, or edit. You can also use images with the app and import them with the same type of editing options.

- With each frame, you can change the drawing size, use an eraser tool, adjust the background color, and use the eyedropper for matching colors.


- After you edit your frames, you can set the time delay for each and the number of loops on the main screen. When you finish creating your GIF, hit the Preview button at the top and then export it to your computer if you’re happy with it.
GIPHY CAPTURE
Supported OS: Mac and Windows
Because of its simplicity and ease of use, GIPHY Capture is one of the most popular and well-liked apps for creating GIFs. The app is free and allows users to capture anything on their screen and convert it into a GIF lasting up to 30 seconds. A couple of clicks are all that is required to complete the task; one click initiates the process, while another click terminates it. All that remains is to add the appropriate captions and adjust the GIF’s export size, and you’re done. If you are a professional, the app even allows you to make more precise edits and trim a clip at specific time frames.
Once you’ve completed all of this and are satisfied with the end result, the next step is simple. Users can choose to save the GIF to their GIPHY account or share it directly with their friends and family.
Features:
Capture Instantly
- Create your GIF with just a couple of clicks
- Click to start, click to stop
- Capture GIFs up to 30 seconds long
Edit Precisely
- Super simple editing lets you get creative, fast
- Pick which kind of loop you like best
- Adjust the frame rate to your liking
- Animated captions: add them, style them, animate them
- Preview the file size of your GIF before saving
Quickly Save and Share
- Email your friends your favorite videos as GIFs
Simple Upload To Giphy
- Hold onto your favorite GIF creations forever
- Easily access them whenever you want
- Share your GIFs on Facebook, Tweet them to Twitter, or send them on Facebook Messenger
Cons:
● App Notifications are not working properly
● Audio / video loading problem
● App installation issues
● Login issues or account related issues
Steps On How To Make Gif In Giphy Capture
1. Once you’ve opened GIPHY Capture - open up your browser, video, or whatever you want to record. Adjust the size of your GIPHY capture frame by grabbing any of the sides or corners and stretching to your desired frame size

After your frame is set up, you’ll want to record a clip by pressing the red circle button. After 30-seconds (or less if you stop the recording sooner) the raw footage will be saved on the bottom of your GIPHY Capture window. This footage will be saved indefinitely, so if you close the app and reopen it at a later date you can pick up where you left off. However, if you delete the GIPHY Capture app from your computer, your videos will be deleted too.
You can take this 30-second clip and edit the length. It’s best to keep the GIF between 2-6 seconds if the intention is for the GIF to be shared in messaging apps and on the web. If you are making a “how-to” or tutorial GIF for an app or workflow you may need to make the length longer than 6 seconds.
You can choose to edit the loop type, pixel size, and frame rate. Changing these can affect the quality and file size of your GIF. In most cases leaving the standard preset options works best.

Under the Captions tab, you can easily add captions to your GIFs. Your captions can either have the regular or italicized text and come with a few preset options for changing the text color. You can edit the animation of the caption, just in case you want it to fade or drop into the frame. You can even edit the duration of the caption in your GIF. If you have a 6-second GIF but only want the caption to be in the frame for the final 2 seconds you can do so by editing the start and end time of the caption.
Now that you’ve created your GIF you can upload it directly to your GIPHY account and allow people to share it, provided you have a branded GIPHY channel.
If you don’t want to upload your new creation directly to GIPHY, you can download it as a .gif or .mp4 file locally to your computer.
GIFROCKET
Supported OS: Mac
GifRocket is the only downloadable record converter for developing GIFs. The only disadvantage is that it is only available to Mac users. This program is used to convert a video file to GIF format. That means you must already have the video file created. You can use a small clip from a previous video that you made or a clip that you downloaded. After you’ve downloaded and installed GifRocket on your computer, simply drag and drop your video file over the GifRocket tool window. The converter will begin working, and you will have a perfect GIF in a matter of seconds.
The production value must be the same as a full-length marketing video but the file size must be smaller, this tool is ideal for creating banner videos for site pages.
Features:
- Intuitive interface
- Change quality and file size of the outputted file
Cons:
- Lack of features like crop and frame rate, only available for Mac.
Steps On How To Make Gif In GIF Rocket
- After you download the app, open it, and there you will see a blank canvas. You’re supposed to drag the file here to start the conversion to GIF. But not so fast. First, click the Settings button. Here you’ll get three fields.

Enter the start and endpoint. Remember this is in the Hours: Minutes: Seconds layout so if your video is short, don’t forget to add zeros for the hours or minutes mark, or else the GIF won’t work.
Second, select the width of the GIF you want to create. The default is 320px. You can take it up to 500 or 600 if you’re dealing with a widescreen video but if you make the GIF too wide the size of the resulting file is also going to go up.
The last setting is quality. There is a slider and frankly, it’s not that helpful. There are only three points on it. I found the middle point, 50% to work the best. Once you’ve got the settings the way you want, click X, drag in the file and wait for Gifrocket to do its thing.

BEST PAID GIF MAKER ON MAC
PICGIF
Supported OS: Mac
PicGIF is yet another app for Mac users to express their contemporary entertainment in the form of a GIF. When it comes to gif creation, the app is quite versatile, and the quality of a created gif is truly astounding. PicGIF generates exceptionally eye-catching gifs with advanced high-satisfaction and stability, as opposed to other apps’ commonly crappy and blurry gifs.
You can make GIFs from movies or from a collection of photographs. All you have to do is select all of the photographs, adjust the fullness, and then select the rate at which the frames will flip. It’s a simple, easy-to-use, and brief app, but the lack of right cropping functionality can be a deterrent for users looking for it.
Features:
- Support a vast number of file formats
- Support hundreds of image formats like JPEG, TIFF, BMP, PNG, TGA, RAW, PIC, etc., and any image size.
- Support almost all common video formats: MOV, MPEG, MP4, M4V, 3GP, AVI, and more.
- Support combining multiple formats – images, GIFs, and videos into a new single GIF.
Pros:
- The PicGIF software is safe to use
- The support of PicGIF is good
Cons:
- Requires OS X 10.7 Lion or later
Steps On How To Make Gif In Pic GIF
- Importing
The picGIF app accepts many different image formats and all common video formats. The app says you can drag and drop onto the pop-up screen on opening the app, but it wouldn’t allow me to do this. However, I was able to work around it by just choosing “Add Photo” or “Add Video” in the File menu, or by doing “Command + O” or “Command + D”, respectively. Even though it says “Add Photo,” you can add multiple files at once.

2. Customization of Pictures
Once you have added the photos, you have several options to customize the gif. Under the “Properties” menu in PicGIF, you can change the size of the output or keep with the default of 360 x 240 pixels and can also choose whether they will be presented as portrait or landscape. At the bottom, you can also choose whether you want it auto optimized for quality or whether you want better quality, which will of course take longer.
Next is deciding how it will handle the photos if they don’t match the exact size of the output, whether you want them sized to fit, stretched, etc., and to choose a background color for when they don’t fit. Speed is the next option to be determined, either leave it on Auto or set the speed yourself. The photos will either be in the sequence you added them in or you can choose to have it go in reverse.


In the “Effects” menu, you can choose among popular options – Original, Vintage, Marcato, and B&W. After you make your choice, you can set the bars for Saturation, Hue, Exposure, Contrast, and Brightness. These are much like you would find in your standard photo apps
Hit the play button to test your GIF, and if it’s to your liking, click “Create GIF”. It only took seconds to create my GIF, but I only had six pictures and left it at the default size.
- Customization of Videos
There aren’t that many options for creating video GIFs. There are, but you need to buy the full version app for $4.99. For this price, you will be able to trim the video as you wish, add text, and add stickers. By sticking with the free version you are limited to either having it autoplay or changing the frames per second. You can also import existing GIFs and edit them. Saving this gif took longer than with the photos, but I was using a longer video.

GIFABLE
Supported OS: Mac
Gifable is another macOS application that enables user to create GIFs as well as save the display screen. This software is simple to use. It first takes a screenshot of the display and converts it to GIF format. This tool currently transmits data at a rate of 12 frames per second. Gifable advanced feature is that it can copy the GIF to the clipboard for clean copy and paste operations. However, there is a help menu that instructs newcomers on how to use the software. This device is ideal for blogging, tutorials, sharing with colleagues, and social media
Features:
- Currently records at 12 fps
- Shows a preview of the gif when the recording is finished
- Ability to copy the gif to your clipboard for easy copy and paste
- Quickly locate the file you created with a find in finder button
- Help menu to show you how to use Gifable
Pros:
- Click and drag to record
- Records automatically
Cons:
- Not compatible with all operating systems
- Low fps recording
Steps On How To Make Gif In Gifable
- Click the Gifable icon in your menu bar, and select record.

- Click and drag your mouse over the area you would like to record.

- Recording starts automatically!
- Click the Gifable icon, then stop recording, to stop the recording.

GIFOX
Supported OS: Mac
Gifox is yet another cutting-edge GIF generator with an appealing user interface. It is extremely simple to use and has a plethora of wonderful features. The app allows you to record your screen and then convert it to GIFs. It includes a sophisticated compression option that allows customers to tailor the output high-satisfactory and size. Gifox additionally permits you to pick the FPS for its animations.
Gifox is a cleverly specified and expertly crafted app that captures your display screen and converts it into lively gifs – a wonderful opportunity to static pix and huge videos. It’s the ideal companion for:
- Product demonstrations and micro-screencasts
- Reporting bugs and providing entertaining instructions
- Capturing precise video on the display screen
Features:
- Gifox allows us not to convert video clips, but we can also capture what is displayed on the screen, either full screen or a part of it.
- We can set the number of fps in each screen recording.
- We can also adjust the number of fps of playback when we convert the video.
- When performing video compression, we can adjust the number of colors we want to use in the conversion
- When recording the screen of our Mac to make a GIF, we can make use of keyboard shortcuts to start and stop recording.
- Once we have created the GIF, we can share it by dragging it to other apps, uploading it directly to our storage service, or even from Imgur.
Pros:
- It is vastly easy to use compared to many other apps in the market.
- It comes with the most dynamic interface.
Cons:
- File sizes of the produced GIFs are big in some cases, which leads to a slow upload on websites with huge traffic.
Steps On How To Make Gif In Gifox
1. Record Your Screen
After clicking the fox icon in the menu bar, you can find the buttons to record the screen on the left side of the interface.

Gifox provides two modes for recording the screen – area and window. This means you can record part of the window or choose to record the full window.
For an area recording, Gifox allows you the freedom to select the area. You can select any area by dragging your mouse from corner to corner.


When using the window recording mode, one great feature is that it doesn’t matter if several windows are overlapping. You can just select the one you want to record, and Gifox will ignore the other window.
Gifox also offers shortcuts so that you don’t have to always open the icon from the menu bar. This makes it even easier to use as a daily utility.

2. Flexible Setting
Gifox is not only easy to use but also a very flexible application. Here are just some of the options that you can customize:
- Mouse cursor appearance
- Window shadow
- Desktop background recording fps
- Playback fps
- Repeat count and pause
- Max colors
- Bayer scale
All of these are available in the Gifox settings window.

3. Compress
If you’re sharing a GIF on the internet, you’re going to like it to be of good quality but with the smallest file size possible. Gifox makes this possible. Available in preferences, the compress settings allow you to have full control over the quality of the GIF. You can change the color count, the palette, the dither, and the bayer scale. This eliminates the need to install a second program just for compressing your file.
WHICH SHOULD I CHOOSE: FREE OR PAID GIF MAKER ON MAC?
If the main reason you want this powerful and advanced GIF software is to create GIFs from videos, you should invest in the advanced version. Since there is not much you can do with videos and the free version.
However, if you want to make GIFs from photos, this free or open-source version will suffice.
FAQS ABOUT MAKING GIFS FROM VIDEO
- What tip can I have in editing GIFs?
You don’t need to make your GIF colorful. You need to use fewer colors. The fewer colors your GIF has, the more fun it is. Because if your GIF has a lot of colors, you will have a problem exporting it.
- Is it possible to export GIFs without watermarks?
Yes, some GIF editors have a feature to remove the watermarks using a free account. However, there are also GIF editors where you need to pay a flat amount first before exporting GIF without watermarks.
- Can I use Video Converter Ultimate offline to edit a GIF?
Absolutely, yes. Even without internet access, you can modify and quickly convert your GIF in no time.
Conclusion:
If the proper GIF editor is used, animated GIFs can be edited with little effort. There are GIF software programs that are highly recommended by users due to their ease of use and simple interface. It’s time to give them a shot!
For macOS 10.14 or later
Features:
3D Video Editing
Media Library
Video Capture
Video Stabilization
Pros:
Expansive video editing features
Professional appearance for an affordable price
User-friendly interface
Cons:
The video saving process may lag
Bug fixes may take time to resolve
Watermarks on the free version
Premade templates lack a professional feel
Steps On How To Make GIF In Filmora
- Import Media Files
The very first task for users is to import some editable video files or collections of photos to the timeline of Wondershare Filmora.

- Drag To Timeline

- Edit Media Files

- Add Text Effect To Gif Files

- Save And Export

SMART GIF MAKER
Supported OS: Windows and Mac
Smart GIF Maker is some other loose however extraordinarily beneficial app for Mac users. To make the procedure feasible, the creators used an incredibly simple user interface which is easy like any other popular app. With this app, users can without difficulty create new GIFs even as additionally enhancing current GIFs. Smart GIF Maker makes it easy to feature or dispose of frames from a GIF or maybe a photo.
Users may even customize the loop counts and body periods for every GIF they create. Simply drag and drop the photographs right into a body even as converting the order of the frames to your liking, and you may have a GIF prepared in no time.
Users can set the duration of each frame in the app at the same time. It even handles previews much better than it used to. In order to make things easier for users, the app asks whether or not to import the created file.
Features:
Simple UI
- Easily create new, or modify existing gifs.
- Easily add and remove frames to a gif.
- Click frames to modify images, or drag images to the frames.
- Preview gifs before exporting them.
Drag and drop
- Drag images from Finder to add to the gif.
- Drag frames inside the app to change the order.
Import and export
- Import gifs or movies, or create gifs entirely from individual images.
- Imports .gif, .mov and .mp4.
- Add .png, .jpg, .bmp, .tiff or .gif images to the gif.
- Export workspace as .gif.
Settings
- Set the frame duration of an individual or all frames.
- Set the loop counter of the gif.
Editor
- Edit frames in the gif using Paint-like features.
- Draw directly on frames, with varying colors and brush sizes.
- Use eraser and eyedropper tools to make editing easier!
Extras
- Reverse gifs,
- Set all frame durations at once.
Cons:
- Restricted features for free accounts
- Slow conversion process
Steps On How To Make GIF In Smart GIF Maker
- Import Your Video

When you import your video, the app breaks it down into frames you can then work with, remove, or edit. You can also use images with the app and import them with the same type of editing options.

- With each frame, you can change the drawing size, use an eraser tool, adjust the background color, and use the eyedropper for matching colors.


- After you edit your frames, you can set the time delay for each and the number of loops on the main screen. When you finish creating your GIF, hit the Preview button at the top and then export it to your computer if you’re happy with it.
GIPHY CAPTURE
Supported OS: Mac and Windows
Because of its simplicity and ease of use, GIPHY Capture is one of the most popular and well-liked apps for creating GIFs. The app is free and allows users to capture anything on their screen and convert it into a GIF lasting up to 30 seconds. A couple of clicks are all that is required to complete the task; one click initiates the process, while another click terminates it. All that remains is to add the appropriate captions and adjust the GIF’s export size, and you’re done. If you are a professional, the app even allows you to make more precise edits and trim a clip at specific time frames.
Once you’ve completed all of this and are satisfied with the end result, the next step is simple. Users can choose to save the GIF to their GIPHY account or share it directly with their friends and family.
Features:
Capture Instantly
- Create your GIF with just a couple of clicks
- Click to start, click to stop
- Capture GIFs up to 30 seconds long
Edit Precisely
- Super simple editing lets you get creative, fast
- Pick which kind of loop you like best
- Adjust the frame rate to your liking
- Animated captions: add them, style them, animate them
- Preview the file size of your GIF before saving
Quickly Save and Share
- Email your friends your favorite videos as GIFs
Simple Upload To Giphy
- Hold onto your favorite GIF creations forever
- Easily access them whenever you want
- Share your GIFs on Facebook, Tweet them to Twitter, or send them on Facebook Messenger
Cons:
● App Notifications are not working properly
● Audio / video loading problem
● App installation issues
● Login issues or account related issues
Steps On How To Make Gif In Giphy Capture
1. Once you’ve opened GIPHY Capture - open up your browser, video, or whatever you want to record. Adjust the size of your GIPHY capture frame by grabbing any of the sides or corners and stretching to your desired frame size

After your frame is set up, you’ll want to record a clip by pressing the red circle button. After 30-seconds (or less if you stop the recording sooner) the raw footage will be saved on the bottom of your GIPHY Capture window. This footage will be saved indefinitely, so if you close the app and reopen it at a later date you can pick up where you left off. However, if you delete the GIPHY Capture app from your computer, your videos will be deleted too.
You can take this 30-second clip and edit the length. It’s best to keep the GIF between 2-6 seconds if the intention is for the GIF to be shared in messaging apps and on the web. If you are making a “how-to” or tutorial GIF for an app or workflow you may need to make the length longer than 6 seconds.
You can choose to edit the loop type, pixel size, and frame rate. Changing these can affect the quality and file size of your GIF. In most cases leaving the standard preset options works best.

Under the Captions tab, you can easily add captions to your GIFs. Your captions can either have the regular or italicized text and come with a few preset options for changing the text color. You can edit the animation of the caption, just in case you want it to fade or drop into the frame. You can even edit the duration of the caption in your GIF. If you have a 6-second GIF but only want the caption to be in the frame for the final 2 seconds you can do so by editing the start and end time of the caption.
Now that you’ve created your GIF you can upload it directly to your GIPHY account and allow people to share it, provided you have a branded GIPHY channel.
If you don’t want to upload your new creation directly to GIPHY, you can download it as a .gif or .mp4 file locally to your computer.
GIFROCKET
Supported OS: Mac
GifRocket is the only downloadable record converter for developing GIFs. The only disadvantage is that it is only available to Mac users. This program is used to convert a video file to GIF format. That means you must already have the video file created. You can use a small clip from a previous video that you made or a clip that you downloaded. After you’ve downloaded and installed GifRocket on your computer, simply drag and drop your video file over the GifRocket tool window. The converter will begin working, and you will have a perfect GIF in a matter of seconds.
The production value must be the same as a full-length marketing video but the file size must be smaller, this tool is ideal for creating banner videos for site pages.
Features:
- Intuitive interface
- Change quality and file size of the outputted file
Cons:
- Lack of features like crop and frame rate, only available for Mac.
Steps On How To Make Gif In GIF Rocket
- After you download the app, open it, and there you will see a blank canvas. You’re supposed to drag the file here to start the conversion to GIF. But not so fast. First, click the Settings button. Here you’ll get three fields.

Enter the start and endpoint. Remember this is in the Hours: Minutes: Seconds layout so if your video is short, don’t forget to add zeros for the hours or minutes mark, or else the GIF won’t work.
Second, select the width of the GIF you want to create. The default is 320px. You can take it up to 500 or 600 if you’re dealing with a widescreen video but if you make the GIF too wide the size of the resulting file is also going to go up.
The last setting is quality. There is a slider and frankly, it’s not that helpful. There are only three points on it. I found the middle point, 50% to work the best. Once you’ve got the settings the way you want, click X, drag in the file and wait for Gifrocket to do its thing.

BEST PAID GIF MAKER ON MAC
PICGIF
Supported OS: Mac
PicGIF is yet another app for Mac users to express their contemporary entertainment in the form of a GIF. When it comes to gif creation, the app is quite versatile, and the quality of a created gif is truly astounding. PicGIF generates exceptionally eye-catching gifs with advanced high-satisfaction and stability, as opposed to other apps’ commonly crappy and blurry gifs.
You can make GIFs from movies or from a collection of photographs. All you have to do is select all of the photographs, adjust the fullness, and then select the rate at which the frames will flip. It’s a simple, easy-to-use, and brief app, but the lack of right cropping functionality can be a deterrent for users looking for it.
Features:
- Support a vast number of file formats
- Support hundreds of image formats like JPEG, TIFF, BMP, PNG, TGA, RAW, PIC, etc., and any image size.
- Support almost all common video formats: MOV, MPEG, MP4, M4V, 3GP, AVI, and more.
- Support combining multiple formats – images, GIFs, and videos into a new single GIF.
Pros:
- The PicGIF software is safe to use
- The support of PicGIF is good
Cons:
- Requires OS X 10.7 Lion or later
Steps On How To Make Gif In Pic GIF
- Importing
The picGIF app accepts many different image formats and all common video formats. The app says you can drag and drop onto the pop-up screen on opening the app, but it wouldn’t allow me to do this. However, I was able to work around it by just choosing “Add Photo” or “Add Video” in the File menu, or by doing “Command + O” or “Command + D”, respectively. Even though it says “Add Photo,” you can add multiple files at once.

2. Customization of Pictures
Once you have added the photos, you have several options to customize the gif. Under the “Properties” menu in PicGIF, you can change the size of the output or keep with the default of 360 x 240 pixels and can also choose whether they will be presented as portrait or landscape. At the bottom, you can also choose whether you want it auto optimized for quality or whether you want better quality, which will of course take longer.
Next is deciding how it will handle the photos if they don’t match the exact size of the output, whether you want them sized to fit, stretched, etc., and to choose a background color for when they don’t fit. Speed is the next option to be determined, either leave it on Auto or set the speed yourself. The photos will either be in the sequence you added them in or you can choose to have it go in reverse.


In the “Effects” menu, you can choose among popular options – Original, Vintage, Marcato, and B&W. After you make your choice, you can set the bars for Saturation, Hue, Exposure, Contrast, and Brightness. These are much like you would find in your standard photo apps
Hit the play button to test your GIF, and if it’s to your liking, click “Create GIF”. It only took seconds to create my GIF, but I only had six pictures and left it at the default size.
- Customization of Videos
There aren’t that many options for creating video GIFs. There are, but you need to buy the full version app for $4.99. For this price, you will be able to trim the video as you wish, add text, and add stickers. By sticking with the free version you are limited to either having it autoplay or changing the frames per second. You can also import existing GIFs and edit them. Saving this gif took longer than with the photos, but I was using a longer video.

GIFABLE
Supported OS: Mac
Gifable is another macOS application that enables user to create GIFs as well as save the display screen. This software is simple to use. It first takes a screenshot of the display and converts it to GIF format. This tool currently transmits data at a rate of 12 frames per second. Gifable advanced feature is that it can copy the GIF to the clipboard for clean copy and paste operations. However, there is a help menu that instructs newcomers on how to use the software. This device is ideal for blogging, tutorials, sharing with colleagues, and social media
Features:
- Currently records at 12 fps
- Shows a preview of the gif when the recording is finished
- Ability to copy the gif to your clipboard for easy copy and paste
- Quickly locate the file you created with a find in finder button
- Help menu to show you how to use Gifable
Pros:
- Click and drag to record
- Records automatically
Cons:
- Not compatible with all operating systems
- Low fps recording
Steps On How To Make Gif In Gifable
- Click the Gifable icon in your menu bar, and select record.

- Click and drag your mouse over the area you would like to record.

- Recording starts automatically!
- Click the Gifable icon, then stop recording, to stop the recording.

GIFOX
Supported OS: Mac
Gifox is yet another cutting-edge GIF generator with an appealing user interface. It is extremely simple to use and has a plethora of wonderful features. The app allows you to record your screen and then convert it to GIFs. It includes a sophisticated compression option that allows customers to tailor the output high-satisfactory and size. Gifox additionally permits you to pick the FPS for its animations.
Gifox is a cleverly specified and expertly crafted app that captures your display screen and converts it into lively gifs – a wonderful opportunity to static pix and huge videos. It’s the ideal companion for:
- Product demonstrations and micro-screencasts
- Reporting bugs and providing entertaining instructions
- Capturing precise video on the display screen
Features:
- Gifox allows us not to convert video clips, but we can also capture what is displayed on the screen, either full screen or a part of it.
- We can set the number of fps in each screen recording.
- We can also adjust the number of fps of playback when we convert the video.
- When performing video compression, we can adjust the number of colors we want to use in the conversion
- When recording the screen of our Mac to make a GIF, we can make use of keyboard shortcuts to start and stop recording.
- Once we have created the GIF, we can share it by dragging it to other apps, uploading it directly to our storage service, or even from Imgur.
Pros:
- It is vastly easy to use compared to many other apps in the market.
- It comes with the most dynamic interface.
Cons:
- File sizes of the produced GIFs are big in some cases, which leads to a slow upload on websites with huge traffic.
Steps On How To Make Gif In Gifox
1. Record Your Screen
After clicking the fox icon in the menu bar, you can find the buttons to record the screen on the left side of the interface.

Gifox provides two modes for recording the screen – area and window. This means you can record part of the window or choose to record the full window.
For an area recording, Gifox allows you the freedom to select the area. You can select any area by dragging your mouse from corner to corner.


When using the window recording mode, one great feature is that it doesn’t matter if several windows are overlapping. You can just select the one you want to record, and Gifox will ignore the other window.
Gifox also offers shortcuts so that you don’t have to always open the icon from the menu bar. This makes it even easier to use as a daily utility.

2. Flexible Setting
Gifox is not only easy to use but also a very flexible application. Here are just some of the options that you can customize:
- Mouse cursor appearance
- Window shadow
- Desktop background recording fps
- Playback fps
- Repeat count and pause
- Max colors
- Bayer scale
All of these are available in the Gifox settings window.

3. Compress
If you’re sharing a GIF on the internet, you’re going to like it to be of good quality but with the smallest file size possible. Gifox makes this possible. Available in preferences, the compress settings allow you to have full control over the quality of the GIF. You can change the color count, the palette, the dither, and the bayer scale. This eliminates the need to install a second program just for compressing your file.
WHICH SHOULD I CHOOSE: FREE OR PAID GIF MAKER ON MAC?
If the main reason you want this powerful and advanced GIF software is to create GIFs from videos, you should invest in the advanced version. Since there is not much you can do with videos and the free version.
However, if you want to make GIFs from photos, this free or open-source version will suffice.
FAQS ABOUT MAKING GIFS FROM VIDEO
- What tip can I have in editing GIFs?
You don’t need to make your GIF colorful. You need to use fewer colors. The fewer colors your GIF has, the more fun it is. Because if your GIF has a lot of colors, you will have a problem exporting it.
- Is it possible to export GIFs without watermarks?
Yes, some GIF editors have a feature to remove the watermarks using a free account. However, there are also GIF editors where you need to pay a flat amount first before exporting GIF without watermarks.
- Can I use Video Converter Ultimate offline to edit a GIF?
Absolutely, yes. Even without internet access, you can modify and quickly convert your GIF in no time.
Conclusion:
If the proper GIF editor is used, animated GIFs can be edited with little effort. There are GIF software programs that are highly recommended by users due to their ease of use and simple interface. It’s time to give them a shot!
Complete Guide to Change Video Resolution in Filmora
With the vast number of devices available in the market today, storing data and video files has become difficult. Frequently in cases where the devices share different forms of resolution, it makes sharing videos a hassle.
In those situations, changing the resolution of your video can be a great idea. It will also allow you to save storage. In this article, you’ll adjust the resolution in just a few clicks by Wondershare Filmora. But before we learn how to change a video’s resolution, let’s look into what a video resolution is!
Part 1. What Is a Video Resolution?
A video resolution, in short, is the quality of the video visible. A video is rendered at a specific rate whenever you watch a movie or go to a cinema. A screen is made up of tiny pixels and arranged in an order that determines the resolution of a screen.
Video resolution is rendered in a vertical and horizontal orientation. Therefore, whenever you play a video on YouTube, the resolution scale is available for you to choose from, i.e., 480p, 720p, 1080p, etc.
In most cases, a resolution is dictated by the full abbreviation. So, for example, a 720p video is 1280 x 720, and a 1080p video is a 1920 x 1080 resolution.

![]()
Note: The number written before is the number of horizontal pixels in a video. And the number written after is the vertical pixels in a video.
Before we adjust the resolution of a video, let’s look at a comparison between different types of video resolution.
Part 2. 7 Different Types of Video Resolution
It has been established that a video resolution is not a constant number and changes according to the screen. Scroll below to look at the different forms of video resolutions available!
360p
The full resolution is 480 x 360. This resolution is a minimal video resolution. On a big screen, 360p will look blurry. That is why a 360p resolution is the best for smaller devices such as Mobile phones.
480p
The full resolution is 853 x 480. Although an upgrade from the latter, this resolution is available on many devices. It’s mainly used in devices such as smaller TVs, laptops, and Desktop computers. It is also available for Burn-in DVDs.
720p
The full version of the resolution is 1280 x 720. This resolution is called HD, short for High Definition. 720p quality looks good almost on every device and is also reasonably available.
Most modern devices, such as Mobile phones, Touch Tablets, Laptops, and PCs, are calibrated in 720p Resolution.

1080p
The resolution in its complete form is 1920 x 1080. This resolution is also known as FHD, short for Full High Definition. 1080p resolution is the quality in which many high-quality devices are constructed. As a result, the screens of these devices have a clear and clean display.

![]()
Note: It is usually recommended to share videos on social media in 1080p resolution.
1440p
This resolution is also called QHD (Quad HD). The length and width of this resolution are 2560 x 1440. As the name suggests, its quality is quad (four times) than that of a standard 720p resolution.
The screens of devices constructed in this resolution usually have a high-end purpose. For example, this resolution is commonly used in Gaming monitors and High-end smartphones.

2160p
The screens constructed in this resolution are considered among the best available in the market. 2160p (3840 x 2160) is also known as UHD, which is short for Ultra High Definition. It is also known as 4K because it offers four times the power of 1080p or FHD (Full High Definition.)
These screens are usually available for high-end competitive gaming monitors or big screen LCD and LED Television. In addition, some of the flagship smartphones are also built with 4K resolution.

4320p
This resolution is also known as 8K. The length and width of the pixel arrangement are 7680 x 4320. The pixels are arranged in these screens to offer sixteen times the average power of a 1080p (FHD) monitor.
This resolution is only available on several devices, such as commercial TVs and monitors. However, this is the most significant resolution available in the modern market. Therefore, even if your monitor cannot support a larger resolution, you can test whether your PC can render an 8K resolution.

Part 3. Why Do You Need to Change a Video Resolution?
There are numerous cases where you will want to change the resolution of a video. Some of them are described below.
Decreasing a Video Resolution
Sometimes, you are trying to upload a video from a smartphone. Or, in general, you want to transfer videos to a smartphone. The resolution of your video can play a significant role in the transfer process.
If your video file has a higher resolution, it will take up more space on your phone. As well as, if your PC has a higher resolution, say a 4K resolution, and your phone is of 1080p resolution. You might not be able to play it.
To counter situations like these, you need to change the resolution of your video.
Increasing a Video Resolution
Similarly, there are instances where you would need to change the resolution of your video to increase it.
A good example would be to burn a low-quality DVD. To maintain good quality on a DVD, you need to increase its resolution before transfer.
Changing the exact resolution of a video is only possible in some cases because you cannot change the precise pixel of the video it is recorded in. But software like Wondershare Filmora allows you to change the resolution of your video easily.
Now let’s move to understanding the steps involved in changing the resolution of a video!
Part 4. Steps to Change Video Resolution in Filmora
To change the resolution of a video, you would need a basic video editor. This video editor needs to support the features that enable you to adjust a video resolution. In this case, Filmora is the best option.
Wondershare Filmora
Free Download For Win 7 or later(64-bit)
Free Download For macOS 10.14 or later
It has an attractive system UI that allows inexperienced users to learn how to use it quickly. It also has a diverse stock media collection. Not only that, but It gives you access to dependable features for changing the speed of a video.

Scroll below to learn how to download the latest version!
Step1 Download Filmora
Begin by installing the latest version of Wondershare Filmora if you don’t do already. Then, run the installer of this app on your PC or Mac.
Now that you have downloaded the app let’s change the resolution!
Step2 Import Video Clips
Your next step after launching Filmora is to import video clips you want to resize. To accomplish this, follow the steps outlined below:
- Locate and select the Import icon on the top left side of the Filmora Home Interface.
- It will take you to your computer’s library.
- Select the videos to be edited and then click OK.

If you need clarification about the resolution of the video that you imported, you can also check them before adding it to the timeline.
- Right-Click on the video in the import window.
- In the pop-up column, go to Properties.
It opens a window that will tell you the basic info about your video clips. Here you can also preview the resolution.

Now that we have our clips imported, it is time to add them to the timeline below!
Step3 Add The Video Clips to Timeline
To add Video clips to the timeline, go through the steps as guided:
- Hold Right click to drag and select the video clips in the import window.
- Release Right-click when in the timeline.

Doing so would have added the video clips to the timeline. Instead, it has created a workplace to edit our videos.
You can trim, add effects, and join multiple clips in this process. After finishing the editing process, it’s time to select an export format.
Step4 Export Your Video
You can export into video formats in two ways with Filmora. It can be either selecting a format for your video. Or you can also choose to export your video to a particular device.
Video Format Resolution
Wondershare Filmora is a fantastic software that allows you to access a variety of formats for your videos. These export formats include MP4, WMV, F4V, MOV, TS, 3GP, and more. To select a format for your video, follow the steps as guided:
- Click on Export.
- In the left column, click on the video format you need.
- Click Export on the bottom right corner of the window.

Exporting a video in a specific format not only allows you to change the format of a video but also allows you to change the resolution simultaneously.
Default Resolution Settings
Some formats have a built-in resolution. Whenever you choose a specific format for a video, the resolution of the video will be shifted to the resolution of that format, i.e., TS has a default 1080p resolution.
![]()
Note: Another thing to remember is that most video formats have defaulted to 1080p. But there are some formats whose resolutions vary according to their style. A good example is a 3GP format, which is set to 352 x 488 by default.
Customize the Resolution
But if you don’t find the resolution stable for your device, you can also change this default resolution in simple steps. In the export window, follow the steps mentioned ahead:
- In the preset tab, go to > settings.
- In the video tab, click on the resolution.
- In the drop-down menu, select the resolution that you desire.
You can also select a custom resolution by these steps:
- In the drop-down menu, click on Custom.
- Here, you can change the height and width according to your wish.

Exporting a Video to a Specific Device
Selecting a format for your video can help if you want to change the resolution. But in cases where you want to export a video to a particular mobile device. Such as an iPhone or an iPad, you can select the device export option.
In the device export option, you can select a custom device. Filmora allows you to choose from a wide variety of machines available when you choose a custom device; the resolution will be set to optimal for that particular device.
Select a Folder to Export Your Video
After you are done calibrating the resolution settings, you can move on to select the export location for your video. You can do so by the steps mentioned:
- In the main Export window, navigate to the Save
- Click on the Folder
- It will direct you to your PC library.
- Select the directory you want to export your video to.
- Click Select Folder.

Final Step
The last step to export your video is clicking on the Export icon in the bottom right corner of the window. It opens up a render window. Wait for a few minutes until the video finishes exporting.
When the export is finished, a window will pop up as a reminder. You can also find the target folder by clicking on Find Target.

Congratulations! You have successfully learned how to change the resolution of a video using Wondershare Filmora.
Conclusion
Rapid video technology advancement is leading to the development of higher-resolution devices. The greatest resolution in the modern day is the 8K; soon, everyone will be using 8K devices. So, it is beneficial to learn how to change a video’s resolution.
By following the steps mentioned in this article, you can now change the resolution of your video using Filmora.
Before we adjust the resolution of a video, let’s look at a comparison between different types of video resolution.
Part 2. 7 Different Types of Video Resolution
It has been established that a video resolution is not a constant number and changes according to the screen. Scroll below to look at the different forms of video resolutions available!
360p
The full resolution is 480 x 360. This resolution is a minimal video resolution. On a big screen, 360p will look blurry. That is why a 360p resolution is the best for smaller devices such as Mobile phones.
480p
The full resolution is 853 x 480. Although an upgrade from the latter, this resolution is available on many devices. It’s mainly used in devices such as smaller TVs, laptops, and Desktop computers. It is also available for Burn-in DVDs.
720p
The full version of the resolution is 1280 x 720. This resolution is called HD, short for High Definition. 720p quality looks good almost on every device and is also reasonably available.
Most modern devices, such as Mobile phones, Touch Tablets, Laptops, and PCs, are calibrated in 720p Resolution.

1080p
The resolution in its complete form is 1920 x 1080. This resolution is also known as FHD, short for Full High Definition. 1080p resolution is the quality in which many high-quality devices are constructed. As a result, the screens of these devices have a clear and clean display.

![]()
Note: It is usually recommended to share videos on social media in 1080p resolution.
1440p
This resolution is also called QHD (Quad HD). The length and width of this resolution are 2560 x 1440. As the name suggests, its quality is quad (four times) than that of a standard 720p resolution.
The screens of devices constructed in this resolution usually have a high-end purpose. For example, this resolution is commonly used in Gaming monitors and High-end smartphones.

2160p
The screens constructed in this resolution are considered among the best available in the market. 2160p (3840 x 2160) is also known as UHD, which is short for Ultra High Definition. It is also known as 4K because it offers four times the power of 1080p or FHD (Full High Definition.)
These screens are usually available for high-end competitive gaming monitors or big screen LCD and LED Television. In addition, some of the flagship smartphones are also built with 4K resolution.

4320p
This resolution is also known as 8K. The length and width of the pixel arrangement are 7680 x 4320. The pixels are arranged in these screens to offer sixteen times the average power of a 1080p (FHD) monitor.
This resolution is only available on several devices, such as commercial TVs and monitors. However, this is the most significant resolution available in the modern market. Therefore, even if your monitor cannot support a larger resolution, you can test whether your PC can render an 8K resolution.

Part 3. Why Do You Need to Change a Video Resolution?
There are numerous cases where you will want to change the resolution of a video. Some of them are described below.
Decreasing a Video Resolution
Sometimes, you are trying to upload a video from a smartphone. Or, in general, you want to transfer videos to a smartphone. The resolution of your video can play a significant role in the transfer process.
If your video file has a higher resolution, it will take up more space on your phone. As well as, if your PC has a higher resolution, say a 4K resolution, and your phone is of 1080p resolution. You might not be able to play it.
To counter situations like these, you need to change the resolution of your video.
Increasing a Video Resolution
Similarly, there are instances where you would need to change the resolution of your video to increase it.
A good example would be to burn a low-quality DVD. To maintain good quality on a DVD, you need to increase its resolution before transfer.
Changing the exact resolution of a video is only possible in some cases because you cannot change the precise pixel of the video it is recorded in. But software like Wondershare Filmora allows you to change the resolution of your video easily.
Now let’s move to understanding the steps involved in changing the resolution of a video!
Part 4. Steps to Change Video Resolution in Filmora
To change the resolution of a video, you would need a basic video editor. This video editor needs to support the features that enable you to adjust a video resolution. In this case, Filmora is the best option.
Wondershare Filmora
Free Download For Win 7 or later(64-bit)
Free Download For macOS 10.14 or later
It has an attractive system UI that allows inexperienced users to learn how to use it quickly. It also has a diverse stock media collection. Not only that, but It gives you access to dependable features for changing the speed of a video.

Scroll below to learn how to download the latest version!
Step1 Download Filmora
Begin by installing the latest version of Wondershare Filmora if you don’t do already. Then, run the installer of this app on your PC or Mac.
Now that you have downloaded the app let’s change the resolution!
Step2 Import Video Clips
Your next step after launching Filmora is to import video clips you want to resize. To accomplish this, follow the steps outlined below:
- Locate and select the Import icon on the top left side of the Filmora Home Interface.
- It will take you to your computer’s library.
- Select the videos to be edited and then click OK.

If you need clarification about the resolution of the video that you imported, you can also check them before adding it to the timeline.
- Right-Click on the video in the import window.
- In the pop-up column, go to Properties.
It opens a window that will tell you the basic info about your video clips. Here you can also preview the resolution.

Now that we have our clips imported, it is time to add them to the timeline below!
Step3 Add The Video Clips to Timeline
To add Video clips to the timeline, go through the steps as guided:
- Hold Right click to drag and select the video clips in the import window.
- Release Right-click when in the timeline.

Doing so would have added the video clips to the timeline. Instead, it has created a workplace to edit our videos.
You can trim, add effects, and join multiple clips in this process. After finishing the editing process, it’s time to select an export format.
Step4 Export Your Video
You can export into video formats in two ways with Filmora. It can be either selecting a format for your video. Or you can also choose to export your video to a particular device.
Video Format Resolution
Wondershare Filmora is a fantastic software that allows you to access a variety of formats for your videos. These export formats include MP4, WMV, F4V, MOV, TS, 3GP, and more. To select a format for your video, follow the steps as guided:
- Click on Export.
- In the left column, click on the video format you need.
- Click Export on the bottom right corner of the window.

Exporting a video in a specific format not only allows you to change the format of a video but also allows you to change the resolution simultaneously.
Default Resolution Settings
Some formats have a built-in resolution. Whenever you choose a specific format for a video, the resolution of the video will be shifted to the resolution of that format, i.e., TS has a default 1080p resolution.
![]()
Note: Another thing to remember is that most video formats have defaulted to 1080p. But there are some formats whose resolutions vary according to their style. A good example is a 3GP format, which is set to 352 x 488 by default.
Customize the Resolution
But if you don’t find the resolution stable for your device, you can also change this default resolution in simple steps. In the export window, follow the steps mentioned ahead:
- In the preset tab, go to > settings.
- In the video tab, click on the resolution.
- In the drop-down menu, select the resolution that you desire.
You can also select a custom resolution by these steps:
- In the drop-down menu, click on Custom.
- Here, you can change the height and width according to your wish.

Exporting a Video to a Specific Device
Selecting a format for your video can help if you want to change the resolution. But in cases where you want to export a video to a particular mobile device. Such as an iPhone or an iPad, you can select the device export option.
In the device export option, you can select a custom device. Filmora allows you to choose from a wide variety of machines available when you choose a custom device; the resolution will be set to optimal for that particular device.
Select a Folder to Export Your Video
After you are done calibrating the resolution settings, you can move on to select the export location for your video. You can do so by the steps mentioned:
- In the main Export window, navigate to the Save
- Click on the Folder
- It will direct you to your PC library.
- Select the directory you want to export your video to.
- Click Select Folder.

Final Step
The last step to export your video is clicking on the Export icon in the bottom right corner of the window. It opens up a render window. Wait for a few minutes until the video finishes exporting.
When the export is finished, a window will pop up as a reminder. You can also find the target folder by clicking on Find Target.

Congratulations! You have successfully learned how to change the resolution of a video using Wondershare Filmora.
Conclusion
Rapid video technology advancement is leading to the development of higher-resolution devices. The greatest resolution in the modern day is the 8K; soon, everyone will be using 8K devices. So, it is beneficial to learn how to change a video’s resolution.
By following the steps mentioned in this article, you can now change the resolution of your video using Filmora.
3D Ray Traced Settings In After Effects
3D Ray Traced is a hot topic in the world of graphic design and video editing that allows you to create three-dimensional images from scratch or add realistic effects to existing 2D footage.
In After Effects, it is a lightning technique for generating a photorealistic image by tracing the light’s path through a scene in three dimensions. Raytracing lets you have proper reflections, internal refraction, and transparency.
In this comprehensive guide, we’ll explore the basics of Ray Tracing and everything you need to know about 3D Ray Traced in After Effects.
Part 1. What Is Ray Tracing?
Ray Tracing is a powerful rendering technique that can create incredibly realistic lighting and shadows. By tracing the path of light, algorithms can simulate the way that light interacts with virtual objects in a computer-generated world.
This results in more lifelike shadows, reflections, and translucence. Ray Tracing has been responsible for the dramatic increase in realism we’ve seen in video games over the years, and its benefits are only becoming more apparent as technology improves.
In simple words, Ray Tracing is a computer graphics technique for generating realistic images and works by tracing the light’s path from the camera through the scene. This allows for accurate simulations of light interactions, such as reflection, refraction, and shadows.

Part 2. Overview Of Ray Tracing
In this part, we will explain what Ray Tracing is from the following sides and for your better understanding.
History
Albrecht Dürer first gave the idea of Ray Tracing in the 16th century through his invention, the Dürer’s door. However, it was not until 1968 that Arthur Appel used a computer for the first time to create a shaded picture through Ray Tracing.
First conceptualized in 1969, Ray Tracing is a common technique used to create computer-generated graphics for movies and TV shows today. This is because studios can use the processing power of multiple computers to get the job done quickly and efficiently. However, even with this extra processing power, Ray Tracing can be a long and difficult process.
Despite the challenges, Ray Tracing is becoming increasingly popular due to computer hardware and software advances. And as technology continues to improve, we can expect to see even more realistic images in the future.
Advantages
Here’re some advantages of Ray Tracing:
- Realistic Rendering: Ray Tracing can create more realistic images than those created with traditional rendering techniques. This is because it calculates the light path more accurately, resulting in more realistic shadows, refraction, and reflections.
- Anti-aliasing And Depth Of Field: Ray Tracing can help you quickly get the anti-aliasing and depth of field effects.
Disadvantages
The downside of Ray Tracing technology is that it requires a lot of computing power to run, and it can be difficult to create more complex lighting effects like caustics.
Part 3. How Does Ray Tracing Work?
Ray Tracking uses the process of denoising. The algorithm starts with the camera and traces the shades of shadows and lights.
Ray Tracing uses machine learning to fill in the gaps to form a realistic image. The brighter the scene, the higher the graphics quality; the higher the quality, the more expensive it is. This is why Ray Tracing didn’t become popular in the video game industry until recently.
Part 4. Ray Tracing In Adobe After Effects
After the introduction of Ray Tracing, we will combine it with a popular video editor - Adobe After Effects to see how it works. Adobe After Effects is a useful and powerful tool for creating visual effects and animated graphics. Adobe introduced Ray Tracing or Ray-Traced 3D feature in After Effect to help graphic designers create photorealistic 3D images and render light and shadow. This feature was added in 2012 with the release of After Effects CS 6.

However, the Ray Tracing feature was later removed from After Effects in 2020 due to multiple reasons:
- The Ray Tracing tool always faced bugs and glitches.
- This feature did not work correctly if you were not using Adobe Media Encoder.
- NVIDIA would change the standards from time to time.
Functions
Though as mentioned above, the Ray Tracing feature was removed in 2020, its advanced 3D features are still worth of introducing. Here’re some functions of Ray Traced 3D After Effects:
- Ray Traced allows you to generate and place multiple lights.
- You can set a material option for 3D layers.
- Moreover, you can control how shadows are cast.
How Does It Work
3D Ray Tracing in After Effects works by giving your text and paths more depth. Extruded layers have a z-axis depth, making them three-dimensional. This extra dimension is viewable from all angles, even when the layer is rotated. In contrast, non-extruded layers have zero depth on the z-axis. So, they will disappear if you try to rotate them 90 degrees on the x or y-axis.
Part 5. Ray-Traced 3D Settings In Adobe After Effects
The release of the Ray-Traced 3D setting in After Effects CS6 made it easier than ever to create stunning 3D images and animations. Let’s focus on how to use it in After Effects appropriately.
How To Set It
Adobe After Effects has a three-dimensional space animation setting, but this doesn’t include Ray Tracing. You need to change the default settings if you want to use it in your animation. To do so:
Step1 Go to the Composition Settings panel to set up the Ray-Traced 3D composition.
Step2 Open the Advanced tab, and from the “Renderer” option, select “Ray-Traced 3D” from the drop-down menu.

A layer becomes a 3D layer when the 3D checkbox is checked in the timeline and has more options than a normal layer regarding composition. When you open the layer properties timeline, you can access two options: Geometry Options and Material Options.
The former deals with the layer’s depth and edges shape, while the latter deals with the interaction of layers with depth and includes shadow, reflection, refraction, and transparency option.

When To Use It
Here’re some instances of when to use Ray-Traced 3D compositions in After Effects:
- When you want to create true 3D types and animate them.
- If you want to get a logo extruded and present it as if it was a real object.
- When you want to create realistic shadows or reflections to create stunning motion graphics.
- You can also use it to create realistic images or simulate lighting effects.
Ray Traced 3D After Effects Plugin Download
Zaxwerks ProAnimator AE is a 3D animation plugin for After Effects that makes it easier to animate objects in three dimensions. With ProAnimator AE, you don’t have to use keyframes to animate objects.
Instead, you’re given an interface that makes it simpler to learn than traditional 3D animation programs. Moreover, ProAnimator AE is capable of near real-time Ray Tracing so that you can create realistic reflections in very little time.
Video - What is Ray Tracing?
Conclusion
In this article, we’ve discussed Ray Tracing, how it works, and its function in Adobe After Effect. We also shed light on Ray Traced 3D settings in After Effect, how to set it, and when to use it. Moreover, we discussed a plugin to help you create photorealistic reflections and shadows.
Hopefully, your queries have been resolved, and you now fully understand the Ray Tracing technology.
Free Download For Win 7 or later(64-bit)
Free Download For macOS 10.14 or later
Part 1. What Is Ray Tracing?
Ray Tracing is a powerful rendering technique that can create incredibly realistic lighting and shadows. By tracing the path of light, algorithms can simulate the way that light interacts with virtual objects in a computer-generated world.
This results in more lifelike shadows, reflections, and translucence. Ray Tracing has been responsible for the dramatic increase in realism we’ve seen in video games over the years, and its benefits are only becoming more apparent as technology improves.
In simple words, Ray Tracing is a computer graphics technique for generating realistic images and works by tracing the light’s path from the camera through the scene. This allows for accurate simulations of light interactions, such as reflection, refraction, and shadows.

Part 2. Overview Of Ray Tracing
In this part, we will explain what Ray Tracing is from the following sides and for your better understanding.
History
Albrecht Dürer first gave the idea of Ray Tracing in the 16th century through his invention, the Dürer’s door. However, it was not until 1968 that Arthur Appel used a computer for the first time to create a shaded picture through Ray Tracing.
First conceptualized in 1969, Ray Tracing is a common technique used to create computer-generated graphics for movies and TV shows today. This is because studios can use the processing power of multiple computers to get the job done quickly and efficiently. However, even with this extra processing power, Ray Tracing can be a long and difficult process.
Despite the challenges, Ray Tracing is becoming increasingly popular due to computer hardware and software advances. And as technology continues to improve, we can expect to see even more realistic images in the future.
Advantages
Here’re some advantages of Ray Tracing:
- Realistic Rendering: Ray Tracing can create more realistic images than those created with traditional rendering techniques. This is because it calculates the light path more accurately, resulting in more realistic shadows, refraction, and reflections.
- Anti-aliasing And Depth Of Field: Ray Tracing can help you quickly get the anti-aliasing and depth of field effects.
Disadvantages
The downside of Ray Tracing technology is that it requires a lot of computing power to run, and it can be difficult to create more complex lighting effects like caustics.
Part 3. How Does Ray Tracing Work?
Ray Tracking uses the process of denoising. The algorithm starts with the camera and traces the shades of shadows and lights.
Ray Tracing uses machine learning to fill in the gaps to form a realistic image. The brighter the scene, the higher the graphics quality; the higher the quality, the more expensive it is. This is why Ray Tracing didn’t become popular in the video game industry until recently.
Part 4. Ray Tracing In Adobe After Effects
After the introduction of Ray Tracing, we will combine it with a popular video editor - Adobe After Effects to see how it works. Adobe After Effects is a useful and powerful tool for creating visual effects and animated graphics. Adobe introduced Ray Tracing or Ray-Traced 3D feature in After Effect to help graphic designers create photorealistic 3D images and render light and shadow. This feature was added in 2012 with the release of After Effects CS 6.

However, the Ray Tracing feature was later removed from After Effects in 2020 due to multiple reasons:
- The Ray Tracing tool always faced bugs and glitches.
- This feature did not work correctly if you were not using Adobe Media Encoder.
- NVIDIA would change the standards from time to time.
Functions
Though as mentioned above, the Ray Tracing feature was removed in 2020, its advanced 3D features are still worth of introducing. Here’re some functions of Ray Traced 3D After Effects:
- Ray Traced allows you to generate and place multiple lights.
- You can set a material option for 3D layers.
- Moreover, you can control how shadows are cast.
How Does It Work
3D Ray Tracing in After Effects works by giving your text and paths more depth. Extruded layers have a z-axis depth, making them three-dimensional. This extra dimension is viewable from all angles, even when the layer is rotated. In contrast, non-extruded layers have zero depth on the z-axis. So, they will disappear if you try to rotate them 90 degrees on the x or y-axis.
Part 5. Ray-Traced 3D Settings In Adobe After Effects
The release of the Ray-Traced 3D setting in After Effects CS6 made it easier than ever to create stunning 3D images and animations. Let’s focus on how to use it in After Effects appropriately.
How To Set It
Adobe After Effects has a three-dimensional space animation setting, but this doesn’t include Ray Tracing. You need to change the default settings if you want to use it in your animation. To do so:
Step1 Go to the Composition Settings panel to set up the Ray-Traced 3D composition.
Step2 Open the Advanced tab, and from the “Renderer” option, select “Ray-Traced 3D” from the drop-down menu.

A layer becomes a 3D layer when the 3D checkbox is checked in the timeline and has more options than a normal layer regarding composition. When you open the layer properties timeline, you can access two options: Geometry Options and Material Options.
The former deals with the layer’s depth and edges shape, while the latter deals with the interaction of layers with depth and includes shadow, reflection, refraction, and transparency option.

When To Use It
Here’re some instances of when to use Ray-Traced 3D compositions in After Effects:
- When you want to create true 3D types and animate them.
- If you want to get a logo extruded and present it as if it was a real object.
- When you want to create realistic shadows or reflections to create stunning motion graphics.
- You can also use it to create realistic images or simulate lighting effects.
Ray Traced 3D After Effects Plugin Download
Zaxwerks ProAnimator AE is a 3D animation plugin for After Effects that makes it easier to animate objects in three dimensions. With ProAnimator AE, you don’t have to use keyframes to animate objects.
Instead, you’re given an interface that makes it simpler to learn than traditional 3D animation programs. Moreover, ProAnimator AE is capable of near real-time Ray Tracing so that you can create realistic reflections in very little time.
Video - What is Ray Tracing?
Conclusion
In this article, we’ve discussed Ray Tracing, how it works, and its function in Adobe After Effect. We also shed light on Ray Traced 3D settings in After Effect, how to set it, and when to use it. Moreover, we discussed a plugin to help you create photorealistic reflections and shadows.
Hopefully, your queries have been resolved, and you now fully understand the Ray Tracing technology.
Free Download For Win 7 or later(64-bit)
Free Download For macOS 10.14 or later
Also read:
- Updated In 2024, Adding Text to Your Collage Not only Makes It Look Sophisticated but Also Versatile. So, if You Too Are Looking for Ways to Create a Collage Text, Check Out Our Article
- New How Much Information Do You Have About MP4 Digital File Storage? Let Us Tell You More About the MP4 File Format; Get Ready to Increase Your Knowledge
- Montage Makes It Easy to Create and Share Videos. This Article Will Explain What It Can Do and Show You Examples of Movies that Use Montage
- In 2024, Learn Top Best Free LUTs For Premiere Pro
- In 2024, How to Loop a Video in PowerPoint
- New Something About Skin Care Vlog Ideas
- In 2024, Stunning Glitch Effect and Its Creation Guideline for Premiere Pro
- New Whatre the Best Alternatives to Pexels for 2024
- Best 10 Crazy-Cool Examples of AR Video for 2024
- In 2024, Best 10 Options Slow Down Video Online with Perfection
- Updated In 2024, How to Create Cinematic Style Videos? Easy Guide for Beginners
- 2024 Approved Want to Apply a Filter on Your Video Using Your iPhone or Mac? Here Are the Simple Steps to Put Add Filters on iMovie. Find Out a Better iMovie Alternative with More Filters
- New In 2024, Guide To Creating The Perfect VHS Effect Look in Premiere Pro
- New How to Brighten a Video in Windows 10 Easily for 2024
- Updated 2024 Approved 5 Tried-And-True Ways to GIF Making
- In 2024, Why Your WhatsApp Live Location is Not Updating and How to Fix on your Oppo A18 | Dr.fone
- Updated How To Learn Cartoon Sketch Drawing
- In 2024, How to Remove an AirTag from Your Apple ID Account On iPhone 13 Pro Max?
- In 2024, How to Transfer Contacts from Honor Magic 6 to iPhone XS/11 | Dr.fone
- In 2024, 3 Ways to Track Vivo X100 Pro without Them Knowing | Dr.fone
- In 2024, How to Use Google Assistant on Your Lock Screen Of Infinix Hot 30 5G Phone
- In 2024, How to Unlock Infinix Note 30i Phone Password Without Factory Reset?
- iPhone Is Disabled? Here Is The Way To Unlock Disabled iPhone 13 | Dr.fone
- How to Delete iCloud Account From iPhone SE without Password?
- In 2024, Hassle-Free Ways to Remove FRP Lock on Itel Phones with/without a PC
- In 2024, How Can Nokia C02Mirror Share to PC? | Dr.fone
- This is how you can recover deleted pictures from Realme C67 4G.
- Title: What Is the Best FPS for YouTube Videos?
- Author: Chloe
- Created at : 2024-05-20 03:37:25
- Updated at : 2024-05-21 03:37:25
- Link: https://ai-editing-video.techidaily.com/what-is-the-best-fps-for-youtube-videos/
- License: This work is licensed under CC BY-NC-SA 4.0.

