
What Is the Best Frame Rate for 4K Videos, In 2024

What Is the Best Frame Rate for 4K Videos?
People in the videography ad filmmaking world use complicated terminology like Ultra High Def to describe 4K videos. Even though you are not a complete stranger to the term 4K, you might still be unaware of what it means.
In a nutshell, 4K is the highest resolution you can watch your movies and videos. The details are incredibly crisp, meaning you can see pimples or the pores on an actor’s face through the screen. However, the frame rate will significantly affect how you enjoy a 4K video. Therefore, it would be wise to learn how to choose the ideal frame rate to suit your needs.
Keep reading this article to learn more about frame rates and which is suitable for a 4K video.

How Do Frame Rates Affect Video Viewing?
The motion will appear smoother if your video contains more frames per second. Even though your viewers are not tech-savvy, they will definitely notice the difference.
Consider a video of a duck drinking water from a pond. If you film and playback the same video in 24, 30, and 60fps, you will see a noticeable difference, assuming your shutter speed is set according to the 180-degree shutter rule.
If you are filming quicker motions of wildlife and birds, you are better off sticking to higher resolutions to give the viewer a pleasant experience and ensure the motion is fluid.
On the other hand, lower frame rates like 24fps are ideal for human movements, which are not as smooth as wildlife. Suppose you used 60fps for a cinematic film or a TV show. The video would look a bit odd because that is not how we see things in the natural world. In addition, your viewers aren’t used to such smoothness.
Viewing Requirements of 4K Videos
You may have heard about 4K videos and wondered what people mean by that term. In simple terms, a 4K video is a high-resolution video that is four times the usual 1080p HD video. When it comes to 4K videos, there are two standard resolutions. One of them is the standard for Digital Cinema which is 4096*2160 pixels. The other is for television and is 3840*2160 pixels.
To stream 4K content, you need a bandwidth between 10 and 20 Mbps. On the other hand, streaming platforms like Netflix require higher bandwidths of not less than 15 Mbps. In addition to the bandwidth we mentioned earlier, you need a 4KTV or 4K monitor.
This specification was brought up at the UHD Alliance, a union of more than 50 tech companies working together to support 4K content. Tech companies ought to ensure the devices they produce are compatible with 4K videos, which are becoming increasingly popular.
Below is a list of requirements any electronic device should fulfill before being termed a 4KTV or 4K monitor.
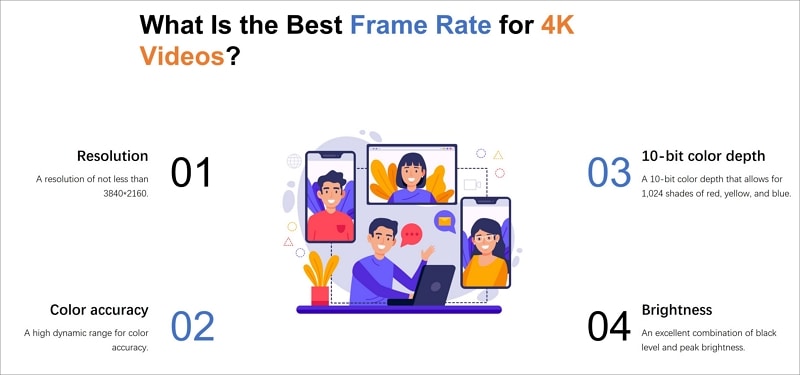
- A resolution of not less than 3840*2160.
- A 10-bit color depth that allows for 1,024 shades of red, yellow, and blue.
- A high dynamic range for color accuracy.
- An excellent combination of black level and peak brightness. The peak brightness should not exceed 1,000 nits, and the black level shouldn’t go below 0.5 nits. Alternatively, the peak brightness shouldn’t exceed 540 nits; neither should the black level plummet below 0.0005 nits.
Best Frame Rate for 4K Video
We all know that the frame rate you choose for your video will significantly impact the viewer’s experience and the overall style of your video. The frame rate will also affect how the video looks. For instance, a frame rate lower than 24fps will make your video look unprofessional and of poor quality. The content will also flicker because there aren’t many still images per second.
On the other hand, a lower FPS causes the file size to be smaller, causing it to consume a lower bandwidth. The vice versa is also true. Now that you understand these facts, you might wonder which frame rate would be best for your 4K videos.
Research reveals that the most acceptable frame rate is 30fps and 60fps. This is because the motion will appear natural to the human eye without being too fast or unrealistic.
If you are wondering what is the best frame rate for 4k videos, we urge you to select 60fps because it contains more detail. The higher frame rate also makes the motion look very smooth and crisp. Perhaps you want to shoot a slow-motion video. In that case, an even higher frame rate of 120fps would be ideal.
How To Choose The Base Frame Rates for Your Next Video
Choosing a frame rate for your videos is not complicated. However, it is not a straightforward process either. There are numerous moving parts that ought to work harmoniously for your video to turn out perfect and guarantee your audience will have a pleasant viewing experience. Before we dive into choosing the best frame rate for your 4K videos, let’s help you understand the filmmaking process.
Most filmmakers and videographers see it fit to shoot videos in 120p or 4K. This step makes their work easier during the editing process. If the raw footage is in 4K, they can de-emphasize or retain specific plot points that would look great in the final video. However, not everyone is shooting a video for Hollywood. Therefore, shooting in 4K on your laptop for your YouTube channel might be difficult.
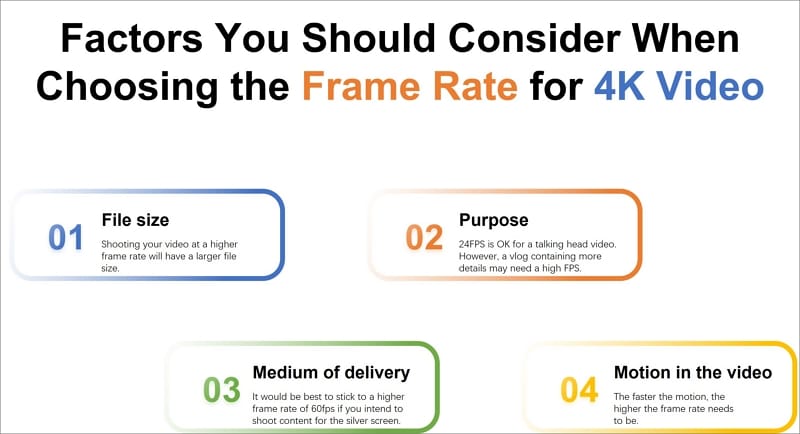
Below are some factors you should consider when choosing the best frame rate for a 4k video.
File size
Shooting your video at a higher frame rate means more still images are packed into a single second of the video. Therefore, you will end up with a larger file size. If you want to shoot a video for your YouTube channel, it would be wise to stick to a smaller frame rate.
Purpose
It wouldn’t make sense to shoot a talking head video at more than 24fps. However, a higher frame rate would be ideal for a travel vlog, where the details need to be crisp.
Medium of delivery
The standard frame rate for television is 24fps. On the other hand, it would be best to stick to a higher frame rate of 60fps if you intend to shoot content for the silver screen.
Motion in the video
Lastly, the movement within the video will play a massive role in the frame rate you choose. The faster the motion, the higher the frame rate needs to be. For instance, action movies don’t do well in frame rates of less than 60 fps.
How To Set the Frame Rate of Your Editing Tools
Even though you didn’t use the ideal frame rate for 4k video during filming, you could use an editing tool to tweak the frame rate to where you need it to be. In our opinion, Wondershare Filmora is an excellent editing tool to set the ideal frame rate and take your videos to the next level.
Wondershare Filmora is a feature-rich platform that takes the tedium out of editing your videos and makes the outcome look spectacular. People won’t believe you when you say you edited the video yourself!
The platform is user-friendly, eliminating the need for a learning curve. You also don’t need to be an experienced editor or graphic designer to use this platform. Here is a list of nifty features you might find helpful on this platform.
- GIF support
- Audio equalizer
- Advanced text editing
- Noise removal
- Scene detection
- Audio mixer
- Color tuning
Out of all the wonderful features mentioned above, we will zero in on 4K editing support for now. You can use this feature to edit and export videos up to 4K without breaking a sweat.
Free Download For Win 7 or later(64-bit)
Free Download For macOS 10.14 or later
Wondershare Filmora allows you to customize your 4K videos by zooming in on a particular scene, tilting the video, or incorporating panning to give it a serene effect. We guarantee you will have fun using this platform and will get better at creating exquisite 4K content for your channel.
Below is a simple guide on using Wondershare Filmora to set the 4k video frame rate.
Step1 Launch the platform on your device and select the “File” tab. After a drop-down menu appears, select “Project Settings.”

Step2 In the dialogue box, select “Frame Rate” and choose the frame rate you think is ideal for your video.

Step3 Click “OK” and edit the videos as you like.
Conclusion
4K is the trend of the era, and it would be a shame if you got left behind. The viewer’s expectations are rising steadily, and they would rather skip your video to watch another if the quality is not up to par. In addition to giving you a competitive edge, 4K videos are very crisp and allow you to enjoy deep, vibrant colors.
You can also capture still photos from the video without compromising on quality. We can go on and on about the benefits of adopting 4K resolution in your videos. Therefore, it would be wise to increase your knowledge base and learn everything there is to know about 4K videos and how to set the best frame rates.
Free Download For macOS 10.14 or later
Wondershare Filmora allows you to customize your 4K videos by zooming in on a particular scene, tilting the video, or incorporating panning to give it a serene effect. We guarantee you will have fun using this platform and will get better at creating exquisite 4K content for your channel.
Below is a simple guide on using Wondershare Filmora to set the 4k video frame rate.
Step1 Launch the platform on your device and select the “File” tab. After a drop-down menu appears, select “Project Settings.”

Step2 In the dialogue box, select “Frame Rate” and choose the frame rate you think is ideal for your video.

Step3 Click “OK” and edit the videos as you like.
Conclusion
4K is the trend of the era, and it would be a shame if you got left behind. The viewer’s expectations are rising steadily, and they would rather skip your video to watch another if the quality is not up to par. In addition to giving you a competitive edge, 4K videos are very crisp and allow you to enjoy deep, vibrant colors.
You can also capture still photos from the video without compromising on quality. We can go on and on about the benefits of adopting 4K resolution in your videos. Therefore, it would be wise to increase your knowledge base and learn everything there is to know about 4K videos and how to set the best frame rates.
What’s an AV1 Format and How Does It Impact Your Life?
Have you heard about the AV1 format video? This format is a new compression standard that promises to improve video quality while reducing file size. If you frequently stream video, the AV1 files could make an impact on your life, and we are just beginning to see its potential. Let’s take a further look at what AV1 is and what you need to know about this new video codec.
Part 1: Where does it come from?
AV1 (AOMedia Video 1) is a new video compression format that is being developed by the Alliance for Open Media (AOMedia). AOMedia is a consortium of major tech companies including Google, Microsoft, Netflix, and Amazon. The AV1 codec is an improvement on VP9 in several ways, most notably in its ability to compress video more efficiently.
Although the AV1 codec is still in the early stages of development, it is already being adopted by some major tech companies. Netflix has announced that it will start using AV1 for its streaming service, and Google has said that AV1 will be the default codec for YouTube.
How can streaming platforms and users benefit from a new codec?

The importance of codecs
A codec is a device that encodes and decodes digital audio signals. Without a codec, your audio would sound garbled and distorted. There are two metrics to take into account to judge the performance of video codecs: quality and bitrate.
The benefits of the new codec
Two of the most popular video formats, provide high-quality video at a relatively low bit rate.
The new AV1 codec offers several benefits for streaming platforms and their users. Take a look at a few of them:
- Lower bitrate
- Reduced costs for encoding
For streaming platforms, AV1 could lead to reducing costs for encoding as well as increasing quality and compatibility. For users, AV1 could improve streaming quality, especially on mobile devices.
- Smaller size with better quality
AV1 files will take up less space on your hard drive or be smaller in file size when streamed online. Since AV1 can compress video files to a much smaller size without sacrificing quality, users will be able to save data when streaming video on their devices!
- More efficient
AV1 will use less processing power to decode a video compared to other video codecs. As a result, the streaming platforms can save on bandwidth costs, which can be passed on to users in the form of lower subscription prices eventually.
- Royalty-free
The ultimate goal of AOMedia is to develop an open and royalty-free video codec that can be used by anyone. So, you will have better video quality, lower bandwidth costs, and faster loading times.
AV1 is just one of the many new technologies that are revolutionizing online media delivery. With its superior quality and efficiency, AV1 is poised to become the standard codec for online video in the years to come where everyone can access more affordable and high-quality videos.
Part 2: What are the Trends of Codec War AV1?
As we have already discussed, AV1 is a newer codec that promises better compression. This video format has already been widely used and gaining traction in the streaming industry. It is being used more for live broadcasts and other time-sensitive applications.
Who will prevail?
Since both codecs have their pros and cons, it’s unclear which one will ultimately prevail. However, as the world moves towards more open standards for video codecs, there is growing concern that AV1 codec will be used to monopolize the market. While AV1 is free to use, it is encumbered by patents held by members of the Alliance for Open Media (AOMedia), which includes companies like Google, Microsoft, and Apple.
How would AV1 monopolize the market?

The EU Commissions’ questionnaire, as reported by Reuters , unveiled that the alliance and its members had been requiring companies to cross-license their patents for no charge to receive the AV1 format. These companies had no affiliation with AOM when AV1 was originally devised. This was a non-negotiable requisite for companies who owned patents that were necessary to contribute to the AV1 standard’s technical specifications.
As a result, this action is concerned to hinder innovation and thus prevents the new entities feasible to flourish. Therefore, there is a growing movement to antitrust AV1 which has been investigated by the European Commission.
What happened after the AV1 Antitrust Investigation

The European Commission is looking into whether this licensing scheme violates antitrust law and whether the companies involved are colluding to keep AV1 closed off to competitors. The investigation is in its early stages, and no formal charges have been filed against Google at this time.
However, if the Commission finds that Google has indeed abused its market position, it could order Google to make changes to AV1 or face steep fines. Although the fines have yet to be determined, each company involved could ultimately pay up to 10% of their global turnover.
Nonetheless, this issue has shed light on the competitive landscape of the codec market. Well, although the outcome of the antitrust investigation is still uncertain, it is clear that it has the potential to shake up the codec market.
Part 3: What Should You Expect in the Future?
H.266 codec

H.266 is the next-generation video codec that is being developed to improve upon the current standard and the latest advances in video technology. We can expect H.266 to continue to evolve and be improved upon as time goes on. Some of their transcendence that you can look forward to:
- Improve compression efficiency
H.266/VVC is designed to improve compression efficiency by 20-50% over previous versions. You can have a video of the same file size and bit rate but make it look significantly better.
- Inter-Layer Prediction (ILP) usage
The H.266 codec uses a new type of inter-frame prediction called Inter-Layer Prediction (ILP). ILP allows the codec to exploit the correlations between different layers of a video signal. Therefore, it gives better results on image quality and file size when you encode a video with the H.266 codec.
- Higher-quality video
We can expect higher-quality video content to become more widespread. This new codec will also enable new types of content, such as virtual reality and 360-degree video, to be streamed and enjoyed by a wider audience.
AV2 codec
The AV2 codec is an improvement on the current AV1. The AV2 codec is said to be more efficient and have better quality than the AV1 codec. It is still in development and is not yet available for use.
Since this codec is expected to provide better quality video at lower bit rates than other codecs, it would be ideal for use in video applications such as streaming and video conferencing. So, what can we expect from the AV2 codec in the future? Here are a few things to look out for:
- Improved quality at lower bitrates
- Wider adoption in streaming and conferencing applications
- Continued development and improvement
FAQs: To cater to people also ask
1. How do I open an AV1 file?
AV1 is a relatively new file format. If you have an AV1 file that you need to open, you can use one of the following methods:
- Use a media player that supports AV1, such as VLC Media Player or MPV
- Use conversion software to convert the AV1 file into a more widely-supported file format
2. Can MP4 contain AV1?
Yes. While AV1 is a relatively new codec, it is already supported by many popular media players and devices. MP4 is a container format, which means it can hold multiple types of data. The data can be encoded using any codec, including AV1. Therefore, you can encode your content in AV1 and store it in an MP4 container for playback on the devices.
Free Download For Win 7 or later(64-bit)
Free Download For macOS 10.14 or later
Free Download For macOS 10.14 or later
How to Add Font Effect
Adding titles and texts to a video clip during the post-production phase is a common thing. You may need to add texts in the intro and outro of the video as well as to highlight important parts in the middle of the video. Showing regular and static texts and titles is very unappealing, and that is why everyone includes font effects to animate the texts.
There are different types of font effects available to apply to the texts and titles in your video. There are premium video editors available with a wide range of effects such as After Effect font effects. If you are an occasional video creator, you can use online font effects while you edit your videos on the go. We will illustrate how to add font effects to videos on any device.
Part 1. Add Font Effects to Video on Windows PC
If you have the video where you want to edit and add font effect on your Windows PC, you will need a video editor where the font effects are available. If you are a regular video creator, you should opt for a premium video editor, and we recommend Wondershare Filmora. Filmora is a professional video editor with a super intuitive user interface. You can add texts and titles and add animation to the text conveniently without any prior knowledge or experience.
Filmora has a wide range of effects and animations that you can add to the text of the video. In fact, there are categorized so that you can choose from them as per your requirements. All you have to do is go for font effect download and apply them to any text on your video. Here are the steps to add font effects to video on your Windows computer.
Step1Download and install Wondershare Filmora for Windows PC. Launch the application to edit your video.
Step2To start a new project, click on New Project option on the welcome screen. Alternatively, you can go to File> New Project from the menu bar.

Step3Import your video file from your hard drive by going to File> Import Media> Import Media Files from the menu bar. Alternatively, you can drag and drop the video file into Project Media folder.

Step4Drag and drop the video file into the Timeline. You can add multiple video clips. Thereafter, you can arrange them in proper order on the Timeline.

Step5Go to Titles located at the top bar. From the left panel, select any category of text effect and drop into the Timeline on top of the video clip. You should place the text effect on the Timeline wherever you want it to appear in the video. You can also stretch the duration of the text effect as per your preference.

Step6Customize the text effect by double clicking on the text effect located on Timeline. Under Preset tab, you will find different font effects and styles. Change the text, font, size, color, and every other parameter as required. For more customization, you can click on Advanced button. Finally, click on OK button.

Step7Play the video and click on Export button. Select your desired file format and save the edited video on your hard drive.
Part 2. Add Video Font Effects on Mac
If you are using a Mac where you want to edit your video and add font effects, you do not have to install any external video editor. This is because Mac comes with a built-in video editor called iMovie by Apple where you can easily add font effects. There are different types of video font effects available on iMovie starting from animated titles to credits and callouts. You can get similar font for After Effect on iMovie. Here are the steps to add video font effects on Mac.
Step1Open iMovie on your Mac from Applications folder. Go to File> Import Media option to import your video under Project Media.

Step2Drag and drop the selected video into Timeline for your iMovie project. Click on Titles tab located at the top.

Step3Place the mouse point over the different text styles to check them. Drag and drop the desired text style into the Timeline and place it where you want the text to appear. You can stretch the duration of the text effect.

Step4From Viewer interface, double click on the text part of the video to customize the text. You will see options to change the font, font size, color and much more.

Step5Play the video and once you are satisfied, go to File> Share> File and save the edited video on your storage device.
Part 3. How to Add Font Effects Online
If you edit videos occasionally and you want to add font effects to your video without downloading any video editor, you can use an online video editor. There are several online video editors you will come across, but for adding free font effects, we recommend FlexClip video editor. It is a completely free online video editor where you can edit and export video without any watermark. There are several elegant font effects available, and you can make easy adjustments instantly. Here are the steps to add font effects to your video.
Step1Open your web browser and visit on “flexclip.com/tools/add-text-to-video”. Click on Browser Video button. Select the video from your storage device.

Step2Once the video is uploaded, you will see Text tab already selected. Go through the list of font effects available. Drag and drop the desired font effect into the video on the Viewer.

Step3Double-click on the font effect on the Viewer and customize all the parameters such as text, size, and style.

Step4Once you are satisfied, click on Export button in the top-right corner.

Conclusion
Adding font effects on video is a common practice especially when you have intro and outro in your video clip. Instead of the regular titles and texts, you should opt for creative font effects so that the text parts on your video look attractive. If it is a one-time thing, you can opt for an online video editor. If you use a Mac, you can use iMovie, and for Windows PC, we recommend Wondershare Filmora .
Free Download For Win 7 or later(64-bit)
Free Download For macOS 10.14 or later
Free Download For macOS 10.14 or later
The Power of Music in Videos
No video is complete without suitable audio. Adding audio to a video is not that difficult, but choosing the right audio can be a hassle. You want something that captures the ears of the audience but, at the same time, compliments your video. The best way to do this is by adding music to your videos with Wondershare Filmora .
Free Download For Win 7 or later(64-bit)
Free Download For macOS 10.14 or later
The following passage will guide you through everything you must consider while choosing music for your videos. But first, we’ll show you how easy it is to alter your video with music using Wondershare Filmora.
How different types of music affect your videos
You can easily change the viewer’s perception using different music, even with the same visuals. The right song will elevate your video to another level and assist in relaying your feelings and emotions to the viewers. The following examples will illustrate how changing the audio changes the impression of the video.
Example #1
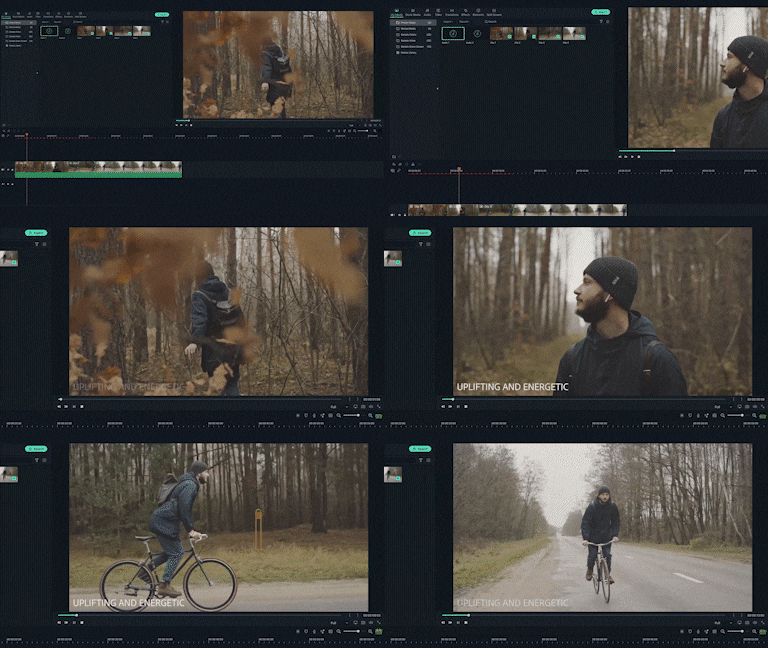
Let’s say you have a video of someone walking through the woods. Now without music audio, your video will be boring. You can quickly fix this by adding an upbeat song to make your video more energetic.
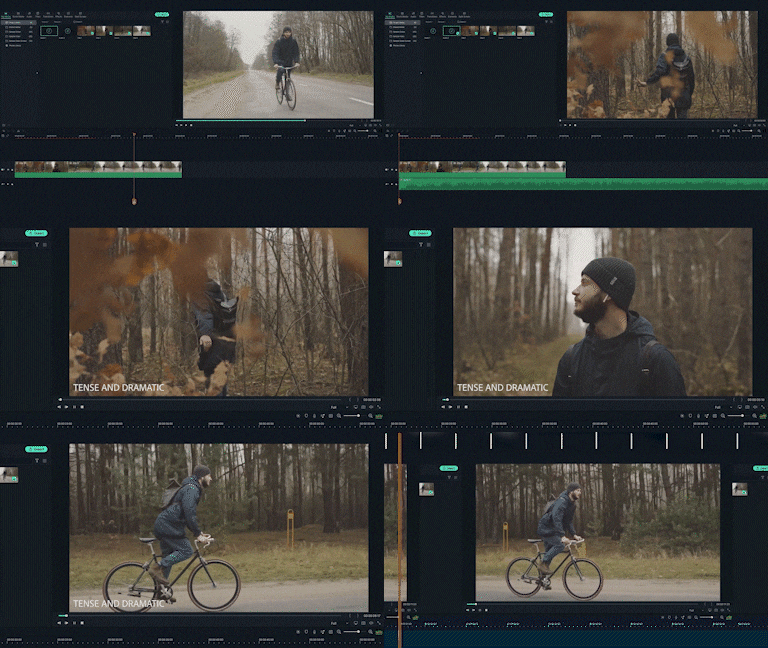
Using the same visuals, you can add a more tense and dramatic song, like from a horror movie. You have successfully changed the entire vibe of the same video from “inspiring” to “sinister.” It proves the importance of the balance between audio and visuals.
Example #2
For a better understanding, let’s look at a movie scene we all know and love. Take the entrance scene from Avengers: Endgame. The music used by the producer aims to excite the audience while building up the hype for the upcoming battle. However, if we change the audio of this scene, we end up with a completely different set of emotions that might not go too well with the shot.

Now that we’ve seen how crucial audio can be in a video, let’s see how to choose the best music audio for your video.
Tip #1: Identify the mood
As we’ve demonstrated before, the audio can change the entire mood of the video. The right music for any video will be the one that compliments the spirit of the visuals and relays the emotions the producer intended.

Rewatch your recorded clips until you know the mood portrayed by the visuals. Select music that matches the spirit of your visuals. For example, you would use different music for a sunny day compared to a cloudy day. Once you’ve figured out the mood and understand the emotions you want to elicit, search for audio that achieves this and balances out your visuals.
Tip #2: Video and music style
We’ve already established that different styles of music complement other types of videos. So, keep the type of your video in consideration. For example, is your video fast-paced and full of action, or is it more serious in nature, like an interview or documentary?

Once you have music that matches your video style, check the audio wave. The four most common patterns are steady, ascending, descending, or furious. The audio wave will help you select the visuals that best match that audio.
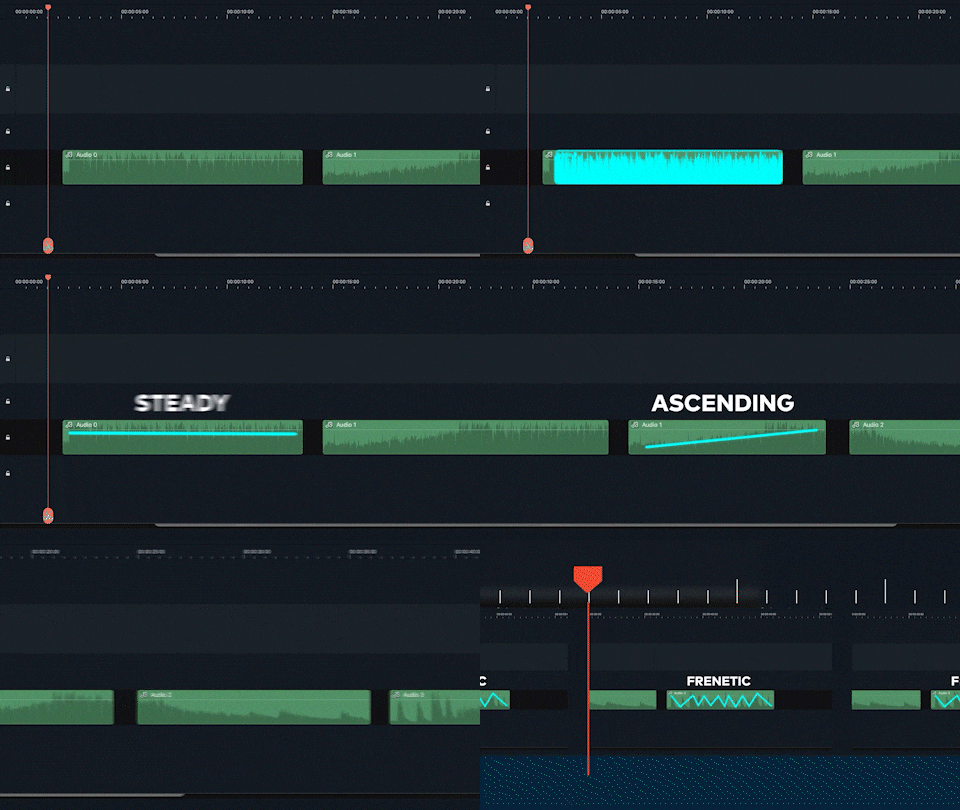
For example, if you’re using audio with an ascending audio wave, you would use visuals that build up with the audio. The beat drop will signal the transition to reveal a powerful shot.
Tip #3: Don’t force the music
As emphasized before, your music should match your video. We all have a favorite music genre, but sometimes that may not go well with our visuals. For example, you love country music but have a video about the nightlife in the city. Using country music in a video about the town does not match well and will confuse your audience.
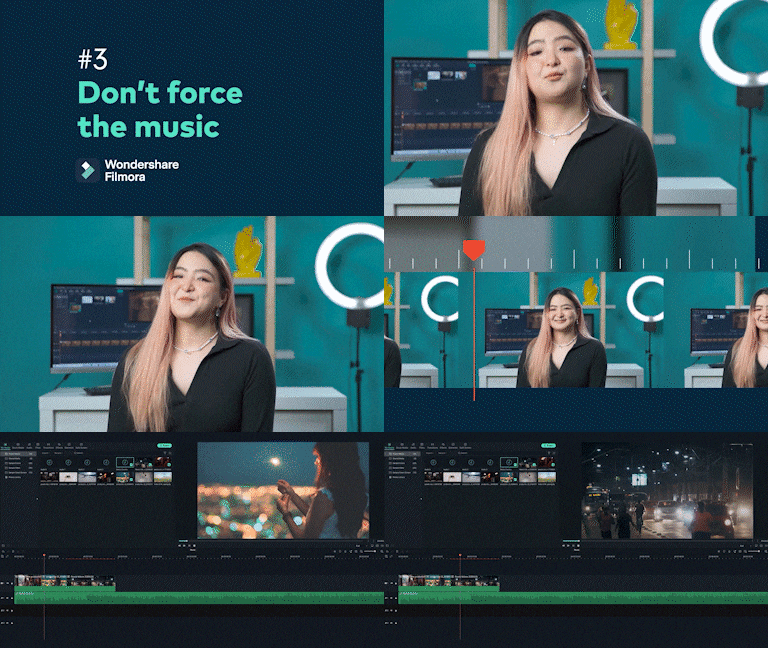
To get music that best suits our video, we must be open and explore all music genres. You’ll see how easy it is to scout a song that fits perfectly with your visuals. The easiest way is to choose a song that gives out the same emotions as intended by the visuals.
Final Words
Now, you clearly understand the importance of music in videos. The right music can uplift your video into a viral sensation, while the wrong music track will turn your video into a catastrophe. Remember to review the legalities of copyright and infringement before using any music in your videos to avoid legal issues. Make sure you have permission to use the music or use royalty-free music.
Share this article with your friends and family interested in making stunning videos with perfect music audio. Comment below on your favorite scene from a movie or show where the music perfectly matched the visuals and left you with goosebumps.
Free Download For macOS 10.14 or later
The following passage will guide you through everything you must consider while choosing music for your videos. But first, we’ll show you how easy it is to alter your video with music using Wondershare Filmora.
How different types of music affect your videos
You can easily change the viewer’s perception using different music, even with the same visuals. The right song will elevate your video to another level and assist in relaying your feelings and emotions to the viewers. The following examples will illustrate how changing the audio changes the impression of the video.
Example #1
Let’s say you have a video of someone walking through the woods. Now without music audio, your video will be boring. You can quickly fix this by adding an upbeat song to make your video more energetic.

Using the same visuals, you can add a more tense and dramatic song, like from a horror movie. You have successfully changed the entire vibe of the same video from “inspiring” to “sinister.” It proves the importance of the balance between audio and visuals.

Example #2
For a better understanding, let’s look at a movie scene we all know and love. Take the entrance scene from Avengers: Endgame. The music used by the producer aims to excite the audience while building up the hype for the upcoming battle. However, if we change the audio of this scene, we end up with a completely different set of emotions that might not go too well with the shot.

Now that we’ve seen how crucial audio can be in a video, let’s see how to choose the best music audio for your video.
Tip #1: Identify the mood
As we’ve demonstrated before, the audio can change the entire mood of the video. The right music for any video will be the one that compliments the spirit of the visuals and relays the emotions the producer intended.

Rewatch your recorded clips until you know the mood portrayed by the visuals. Select music that matches the spirit of your visuals. For example, you would use different music for a sunny day compared to a cloudy day. Once you’ve figured out the mood and understand the emotions you want to elicit, search for audio that achieves this and balances out your visuals.
Tip #2: Video and music style
We’ve already established that different styles of music complement other types of videos. So, keep the type of your video in consideration. For example, is your video fast-paced and full of action, or is it more serious in nature, like an interview or documentary?

Once you have music that matches your video style, check the audio wave. The four most common patterns are steady, ascending, descending, or furious. The audio wave will help you select the visuals that best match that audio.

For example, if you’re using audio with an ascending audio wave, you would use visuals that build up with the audio. The beat drop will signal the transition to reveal a powerful shot.
Tip #3: Don’t force the music
As emphasized before, your music should match your video. We all have a favorite music genre, but sometimes that may not go well with our visuals. For example, you love country music but have a video about the nightlife in the city. Using country music in a video about the town does not match well and will confuse your audience.

To get music that best suits our video, we must be open and explore all music genres. You’ll see how easy it is to scout a song that fits perfectly with your visuals. The easiest way is to choose a song that gives out the same emotions as intended by the visuals.
Final Words
Now, you clearly understand the importance of music in videos. The right music can uplift your video into a viral sensation, while the wrong music track will turn your video into a catastrophe. Remember to review the legalities of copyright and infringement before using any music in your videos to avoid legal issues. Make sure you have permission to use the music or use royalty-free music.
Share this article with your friends and family interested in making stunning videos with perfect music audio. Comment below on your favorite scene from a movie or show where the music perfectly matched the visuals and left you with goosebumps.
Also read:
- [New] 2024 Approved Top 5 Pro Snipers on macOS
- [Updated] The Crème De La Créativité YouTube Subscriber List
- Complete Guide to Hard Reset Your Samsung Galaxy M34 5G | Dr.fone
- Diagnosing & Repairing the Silent Microphone in Your SteelSeries Arctis 9, 9X - Step-by-Step Solutions
- Get Your Microsoft Ergonomic Keyboard 4000 Up and Running with These Simple Steps!
- How to Fix 'Launch Error' Problems in Video Games - A Comprehensive Guide
- How To Make a Video by Mouse in Filmora?
- New Best Practical Tips to Improve Your Lighting in the Sun for 2024
- New In 2024, Top 8 Sites to Download Glitch Transition for Premiere Pro
- New Step by Step to Split Clips in VLC for 2024
- Say Goodbye to Kodi Pause: A Guide on Correcting Stream Stutter
- TikTok to Tokens Financial Figures of PewDiePie
- Unraveling the Fabric of Friendships in Social Media
- Updated How to Create Loop Videos with Filmora for 2024
- Title: What Is the Best Frame Rate for 4K Videos, In 2024
- Author: Chloe
- Created at : 2025-02-12 16:26:13
- Updated at : 2025-02-14 20:42:38
- Link: https://ai-editing-video.techidaily.com/what-is-the-best-frame-rate-for-4k-videos-in-2024/
- License: This work is licensed under CC BY-NC-SA 4.0.