
:max_bytes(150000):strip_icc():format(webp)/streamfreesportsonline-5b1994178023b900364a81e5.jpg)
Windows Movie Maker Review for 2024
Windows Movie Maker Review
Are you considering creating impressive movies from your video clips? Then you need to install this famous Windows movie maker tool to fulfill your job. This is expert video editing Microsoft software that you may use for free. This video editing tool by Windows has received massive recognition due to its simplicity. Also, it makes every task easy and quick, like combining video clips to form digital movies, including various effects, background music, transitions, and titles.
So, Windows Movie Maker is undoubtedly the ideal software for this job. Moreover, video editors using this app experience several attributes in their organization to finally emerge with the perfect videos, like audio options, animations, transitions overlays, and timeline narration. It has user-friendly features, which you’ll enjoy experimenting with. This software also has XML code allowing its end users to modify live effects and transitions or even prepare very new ones.
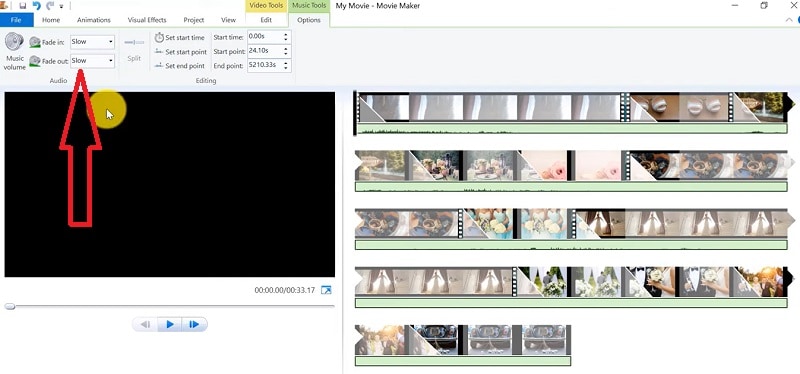
This brilliant tool can even do primary track editing, including fade-out and fade-in effects in your final audio tracks. Windows movie maker even allows you to post your final project effortlessly on various video sites and social media platforms. Here’s a complete guide:
1. Download and Install Windows Movie Maker
Windows movie maker was previously recognized in Windows 7 as Windows Live Movie Maker. So to experience the features of this software, first, you need to download and install this app which is available free of charge. The steps are as follows.
- Firstly, download the setup file of Windows Live Essentials.
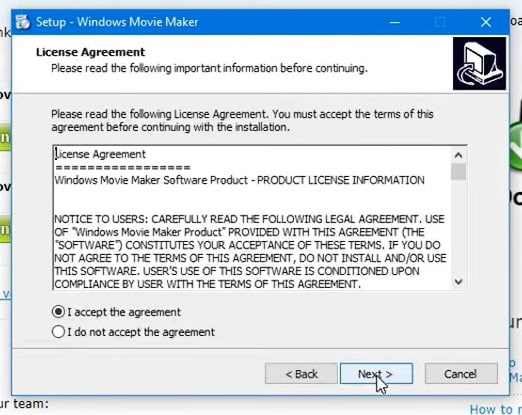
- You’ve to double-click on this setup file called windows-movie-maker.exe. Then tap on ‘Yes’ to permit the setup package to function.
- You’ll now be redirected to the installation window of Windows Essential. Next, you’ll see two options towards the web page’s top, and you’ll have to select the option ‘Install all of Windows Essentials (recommended)’ to continue with the installation process.
Windows Essentials comprise Microsoft OneDrive, Outlook Connector Pack, Movie Maker, Writer, Mail, Photo Gallery, and Messenger.
- Locate ‘View Details’ towards the left end of the page and tap on it. A progress and percentage bar will pop out along with the details regarding the program you’re installing.
- You need to wait a while to install Windows Movie Maker Software. Pause until the program completes its installation. After you find that the program title changes to another program such as Mail, you may proceed again.
- Now click on the Windows icon and then the ‘Start’ menu on the bottom left of your computer screen.
- Type and Search for ‘Windows Movie Maker, and you’ll find the newly downloaded app on the screen.
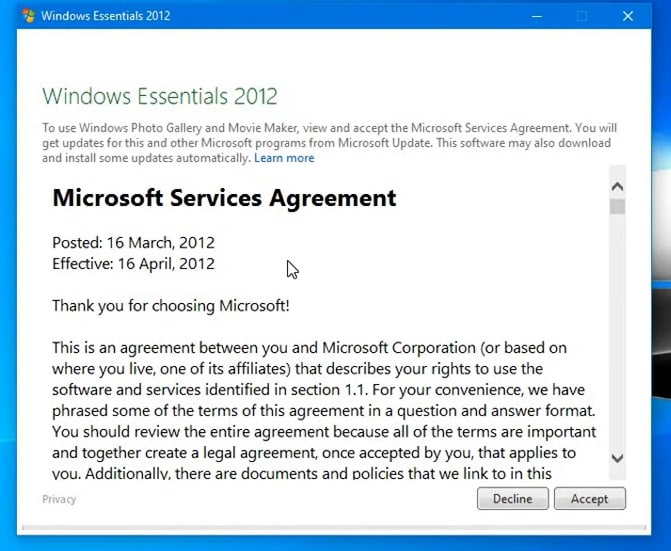
- Click on the icon with film reel, which is the Movie Maker app, and you’ll locate it above the Start menu. Next, you’ll be redirected to the terms of use of Windows Essentials for this Window to begin.
- Find the ‘Accept ‘ button towards the screen’s right-end corner and tap on it. Windows Movie Maker will now open.
- Next, tap on ‘Close’ when prompted with an error message from the installation windows.
You may now Enjoy Windows Movie Maker Live and begin making movies and videos using this software.
2. Interface
The user interface of Winona Movie Maker has three essential areas: the timeline and the storyboard, the panes and the toolbar, and the menu bar. This area covers…
- Timeline and storyboard: It offers a timeline and storyboard usage details for working with the current project clips.
- Panes: It offers details regarding Collections pane usage for viewing all your collections. Furthermore, it offers information regarding the Movie Task pane for all general tasks during movie making or project editing.
- Toolbar and Menubar: Here, you’ll get details regarding toolbar and menu commands usage for different tasks in this software.
3. Basic Editing
Adding clips to your timeline is the most straightforward method for creating digital movies using Movie Maker. Thereby, picking any one AutoMovie Themes out of those seven choices from default, sepia, black and white, pan and zoom, fade, cinematic, and contemporary.
You can enjoy the following choices for editing all your video clips:
- Creating clips: You may create new clips from different video clips after you’re done with capturing and importing in the Windows Movie Maker. You may create clips in the software anytime, according to your convenience.
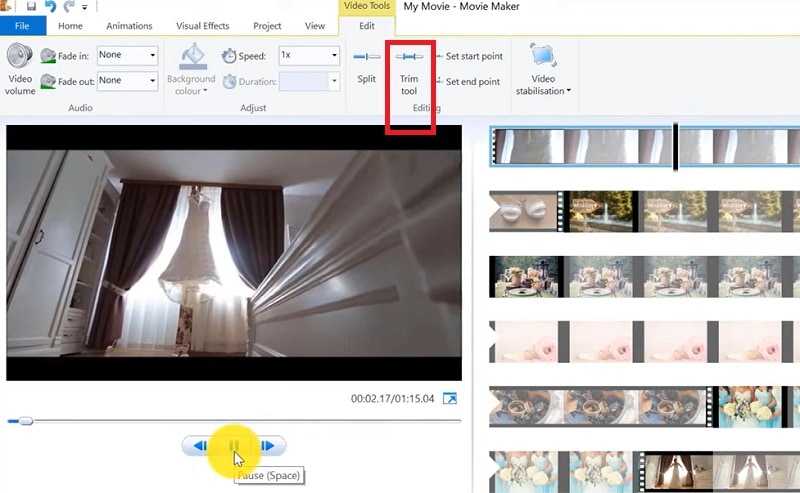
- Trimming any clip: You may hide any clip part you don’t wish to keep in the project. For instance, you may trim the clip’s end or beginning. Also, trimming doesn’t erase the details provided in their source material.
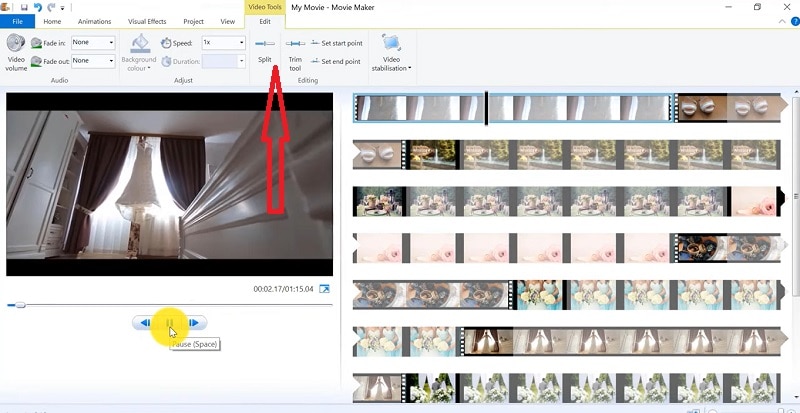
- Splitting Clips: Movie Maker allows you to split any video into two parts which can be helpful when you wish to add a video transition picture between the clips.
- Combining clips: Movie Maker allows you to merge two or multiple contiguous clips. Contiguous indicates that you need to record these clips together so that the beginning and end times are the same as the following video clip.
4. Add Video Effects
Video effects’ ascertain how any title, picture, or video clip displays in the final movie or project. Video effects permit you to include various effects in the movie and are added for the total time that the title, picture, or video clip displays.
Furthermore, you may add various other effects, which you’ll find in the folder of video effects in their Collections pane. You may maintain video effects when moving, copying, cutting, or splitting a picture or video clip.
5. Audio Editing
Windows Movie Maker permits you to operate various audios in several ways. A few specific audio-related jobs you may execute in Windows Movie Live Maker comprise the following:
- Audio levels adjustment: You can adjust your audio level so that you can easily control the audio playback and balance after you have the audio that comes up on Music/ Audio and Audio tracks in your timeline.
- Timeline narration: You may include a voice narration for the picture or video clips, which will appear on the timeline’s video track. There’ll be an automated synchronization of the audio narration with your video, where the narration shall elaborate on the movie event or action when you play it.
- Audio Clips Volume adjustment: You may adjust the audio volume for the video clip’s audio portion or the clips containing only audio. This permits you to control the audio clip’s volume such that you can hear it based on the sound level you’ve set for your audio clip.
- Adding audio effects: You may add various audio effects like mute, fade out and fade in.
6. Share Files
Are you done with video project editing, and now you wish to share it? Windows Movie Maker offers you various choices for sharing straight away from their app, comprising:
- YouTube
- Vimeo
So with this power, you may guarantee to share the video’s correct aspect ratio and size version to any planned platform. Nevertheless, you don’t require signing in to your Microsoft account for sharing to the preferred platform, which may act as a hurdle for all its users who do not have Microsoft Office accounts.
7. Pros and Cons
The software’s advantages are its automated preview, simple controls, and user-friendliness. Additionally, the following are some clear advantages and disadvantages of using Windows Movie Maker:
Pros
- This app is perfect for all novices and is an ideal introduction as it utilizes several pro editing systems’ general workflow components like assembling timelines and importing. Its interface has easy navigation and is exceptionally intuitive for most new beginners as well.
- Windows Live MovieMaker is a video editing Microsoft application that arrives standard with all Windows computers. It is amongst the most favorite editing apps obtainable and exact, as other programs are user-friendly and fun. This software comes free with Vista, XP, and Windows Me and has effortless usage. Moreover, you may download additional video plugins, plus it won’t give you any chance to complain regarding its free software.
- This app is straightforward to learn, and you won’t require any experience in film editing for using Windows Media Player. You’ll explore more than 130 effects with accessible Fantastic credits, titles, and transitions. Next to this, you may drag and then drop the clip at any place in the timeline.
- Windows Movie Maker is an ideal app for image slide shows and was developed to create photo and home movie slide shows. It presents excellent fun transitions and themes; you may add music easily. This app provides excellent variety, being a free editing application. Furthermore, it offers transitions and striking effects to function with.
- Windows Live Movie Maker is free of cost for all Microsoft Windows users and is basically for clients having zero to minimum experience editing audio and videos. Moreover, it has many special effects you may use while creating videos. Also, you may frag and then place any picture or video anywhere you wish to see it.
- You can choose from several themes, enhancing your film with tools like contemporary themes, fade effects, and sepia toning choices. You have to click once, and then the users can choose and apply from the multiple effects collection.
Cons
- Windows Movie Maker contains unlimited audio and video tracks, yet it provides just one accessible one at a time. Hence, if you wish to include some other audio or music track, you may prepare the video, thereby sending it to the ultimate file.
- It isn’t uninstallable using any remove or add control panel. Also, it is impossible to do video overlaying.
- This app requires much patience because it is prone to crashes. Moreover, you’ll require enough time and effort to do video reversing. It often becomes frustrating for all advanced editors to cut clips into small parts and then add them back. Hence, Windows Movie maker isn’t good for professional video editors.
- Windows Live MovieMaker can crash and freeze and is known to suffer frequent crashes. Hence, ensure saving often and avoid creating complex videos. Also, you cannot perform complex editing and can now prepare single audio and video track.
8. Windows Movie Maker Alternative Software
Wondershare Filmora Video Editor is the best alternative for Windows Movie Live Maker and is a highly favored and most effective software program. You can download it for free, and it is adaptable with Windows 7 OS or above. This app is user-friendly but powerful and allows you to split, merge, crop, and trip various video clips with essential built-in video editing attributes.
Free Download For Win 7 or later(64-bit)
Free Download For macOS 10.14 or later
Additionally, you may get a few advanced properties like video stabilization, color correction, and green screen in Filmora effortlessly. You may even explore several fashionable and modern video effects such as music, text, and intros for topics like games, Education, Travel, Vlogger, Beauty, etc. Here is the comparison between the two software:
Filmora and Windows Movie Maker comparison
| Basis | Windows Movie Maker | Wondershare Filmora |
|---|---|---|
| Pricing | Free/ inexpensive | Quote basedAnnual SubscriptionOne-time paymentMonthly Payment |
| Interface | Pleasing interface | Auto movie options |
| Effects | Several overlays and effects | Special effects choices and transition overlays |
| Integration | YouTubeFacebookVimeoEmail | TwitterInstagramFacebookVimeoYouTube |
Conclusion
You may use Windows Movie Maker Live for capturing videos and audio to the computer using various video sources, including Web Cameras and Video Cameras, thereby using the recorded data in your new movies. You may import still pictures, video, and audio into this application to use in the movies you’re making. Moreover, after you’ve finished with video and audio content editing in this app, which may involve adding effects, video transitions, and titles, you may finally save the ultimate movie and then share and watch it with your family and friends.
What Are AR Emoji Stickers & How to Add Them to Your Video
AR emoji stickers are a fun and creative way to add personality to your videos. With just a few clicks, you can turn yourself into a cartoon character, animal, or any other emoji representing your mood or personality. These stickers use augmented reality technology to superimpose the emoji onto your face in real time, giving your videos a dynamic and interactive element.
In this article, we’ll show you how to add AR emoji stickers to your videos and share some tips and tricks for using them like a pro. Whether creating content for social media, messaging apps, or projects, AR emoji stickers can help you add whimsy and personality to your videos.

- Filmora for Mobile AR Camera
- Samsung AR Emoji Stickers
- iPhone Memoji AR Stickers
- Mirror: Emoji Maker & Stickers for Android
- Yoji: AR Emoji Camera Recorder
What Are AR Emoji Stickers?
AR emoji stickers are a feature that allows users to create custom emoji stickers of themselves or others using augmented reality technology. These stickers can be used in videos or photos to add an extra layer of personalization and fun.

To create an AR emoji sticker, users typically need a smartphone or device with a front-facing camera. The camera scans the user’s face and generates a 3D model, which can then be customized with different facial expressions, hairstyles, and other features. Once the AR emoji sticker is created, it can be added to videos or photos in real-time using the device’s camera or a video editing app.
AR emoji stickers are a popular feature on messaging apps, social media platforms, and video editing software. They can be used to add a playful and personal touch to videos and photos and are especially popular with younger audiences.
Best 5 AR Emoji Stickers App
Many apps and platforms offer a variety of AR emoji stickers for users to choose from. These stickers can be added to videos or photos to add a personal and playful touch. Here are the five best apps and platforms for finding and using AR emoji stickers. Whether you’re looking for animated characters, animal faces, or something else, these apps have you covered.
1. Filmora for Mobile AR Camera

Filmora for Mobile is a video editing app that offers an AR camera feature for adding AR emoji stickers to videos. The AR camera allows users to select from various pre-made AR emoji stickers and add them to their videos in real-time. The stickers can be resized, rotated, and positioned to fit the user’s desired look.
In addition to AR emoji stickers, the Filmora for Mobile AR camera offers fun and creative effects, such as filters, overlays, and text.
Free Download For Win 7 or later(64-bit)
Free Download For macOS 10.14 or later
Editor’s Verdict: Filmora for Mobile’s AR camera is a fun and easy-to-use tool for adding AR emoji stickers and other creative effects to your videos. Its wide selection of stickers and intuitive interface makes it great for adding personality and emotion to videos.
Ratings in App Store: 4.7 out of 5
Ratings in Google Play Store: 4.7 out of 5
Operating System: Android and iOS
Pricing: Free for Download; Paid version starts from $5.99/month.
One of the standout features of Filmora for Mobile’s AR camera is the ability to customize the stickers with different facial expressions and mouth shapes. This allows users to create more dynamic and lifelike AR emoji stickers that can convey various emotions and moods. The app also allows users to record videos with the AR camera and share them directly to social media platforms or save them to their devices.
2. Samsung AR Emoji Stickers

Samsung’s AR Emoji stickers are a popular feature on the company’s messaging app, Samsung Messages. Users can create a 3D avatar of themselves or others using the app’s camera to use the stickers. The avatar can be customized with different hairstyles, facial expressions, and other features.
Once the avatar is created, it can be used as an AR emoji sticker in videos and photos. The stickers can be resized, rotated, and positioned to fit the user’s desired look. In addition to the customizable avatars, Samsung’s AR Emoji stickers also include a variety of pre-made stickers of popular characters and animals.
Editor’s Verdict: Samsung’s AR Emoji stickers are a fun and easy-to-use tool for adding personality and flair to your videos and photos. It is convenient for those looking to add fun to their video projects.
Ratings in Galaxy Store: 4.5 out of 5
Operating Systems: Android
Pricing: Free
One of the standout features of Samsung’s AR Emoji stickers is the ability to record videos with the stickers in real time. This allows users to create dynamic and interactive content that showcases their avatar in action. The app also allows users to save AR Emoji stickers and use them in other apps or share them on social media.
3. iPhone Memoji AR Stickers

iPhone’s Memoji AR stickers allow users to create custom avatars of themselves or others using the app’s camera. These avatars can be customized with different hairstyles, facial expressions, and other features and used as AR emoji stickers in videos and photos. In addition to the customizable avatars, the app also includes a variety of pre-made stickers of popular characters and animals.
Editor’s Verdict: Add personality and flair to your videos and photos with iPhone’s easy-to-use Memoji AR stickers. Customize your avatars or choose from a wide selection of pre-made stickers to convey emotions and moods. Create dynamic and interactive content with the real-time recording feature, and save or share your stickers for added convenience.
Ratings in App Store: 3.4 out of 5
Operating System: iOS
Pricing: Free
iPhone’s Memoji AR stickers create dynamic and interactive content that can be saved and shared on social media or other apps. The app offers customization options for creating personalized avatars and pre-made stickers. These features make iPhone’s Memoji AR stickers a great tool for adding personality and emotion to your videos.
4. Mirror: Emoji Maker & Stickers for Android

Mirror: Emoji Maker & Stickers is an app for Android devices that allows users to create custom AR emoji stickers of themselves or others. The app uses the device’s camera to scan the user’s face and generate a 3D model, which can then be customized with different hairstyles, facial expressions, and other features.
Editor’s Verdict: Personalize your videos and photos with custom AR emoji stickers using Android’s Mirror: Emoji Maker & Stickers app. Customize your avatar and add the sticker in real time, or choose from various pre-made stickers. Create dynamic and interactive content with the app’s real-time recording feature, and save or share your stickers for future use.
Ratings in App Store: 4.8 out of 5
Ratings in Google Play Store: 4.4 out of 5
Operating Systems: Android and iOS
Pricing: Free for Download; 23,99 € for 6-month premium access.
Once the AR emoji sticker is created, it can be added to videos or photos in real-time using the app’s camera or a video editing app. The stickers can be resized, rotated, and positioned to fit the user’s desired look. In addition to the customizable avatars, Mirror: Emoji Maker & Stickers also includes a variety of pre-made stickers of popular characters and animals.
5. Yoji: AR Emoji Camera Recorder

AR Emoji Camera Recorder is a camera app that allows users to create personalized, animated emojis using augmented reality (AR) technology. With this app, users can create emojis that look like them by taking a selfie and customizing the appearance of the emoji with a variety of different features and options.
Editor’s Verdict: The app is easy to use, and the AR technology used to create the personalized emojis is top-notch. The ability to record videos and take photos with the emoji superimposed over the user’s face in real-time adds a fun and personal touch to the content.
Ratings in App Store: 4.5 out of 5
Operating Systems: iOS
Pricing: Free for Download; Paid version starts from $1.99/week.
Once the emoji is created, users can record videos or take photos superimposed over their faces in real time, adding a fun and personal touch to their content. The app also includes a range of stickers and filters to further enhance the user’s videos and photos.
Add AR Emoji Stickers to Your Video
Ready to add some personality and flair to your videos? This section will introduce how to use Filmora for Mobile’s AR camera to add AR emoji stickers to your videos. Filmora for Mobile is a video editing app that offers a variety of creative features, including an AR camera for adding AR emoji stickers to videos in real time.
Whether you want to create your custom stickers or use pre-made ones, Filmora for Mobile has you covered. Follow along as we walk you through the steps for adding AR emoji stickers to your videos.
Recording The AR Video
Here’s how to record your AR video on your iOS device:
Step1 Download and install Filmora for Mobile from the app store.
Step2 Tap on the camera button in the top right corner.

Step3 Adjust the video ratio or switch between the front and rear cameras using the “frame“ icon.

Step4 Preview and select animoji or memoji features using the “Props“ button.

Step5 Tap the purple record button to capture your AR video.

Step6 Your video will be saved automatically and can be edited by tapping “Edit“ below the screen.

Step7 Preview and export your completed video.

Editing The AR Video
After recording the AR video, it’s time to edit it. Follow these steps to do so:
Step1 On the editing timeline, use the various tools and features located below the timeline to edit your video.

Step2 Use the “canvas“ button to adjust the video ratio for TikTok or Instagram.

Step3 Enhance your video with filters by tapping the “Filters“ button.

Step4 Preview and choose transition effects by tapping in between video junctions.

Step5 Preview your edited video and export it to save and share.

Conclusion
AR emoji stickers are a great way to bring personality and emotion to your videos. Filmora for Mobile is a particularly useful app for adding AR emoji stickers to your videos, with its easy-to-use AR camera and a wide variety of customization options. Whether you create your custom avatars or use pre-made stickers, Filmora for Mobile offers much flexibility for adding fun and flair to your video projects.
So, give Filmora for Mobile’s AR emoji stickers a try next time you want to spice up your video content.
What Are AR Emoji Stickers?
AR emoji stickers are a feature that allows users to create custom emoji stickers of themselves or others using augmented reality technology. These stickers can be used in videos or photos to add an extra layer of personalization and fun.
To create an AR emoji sticker, users typically need a smartphone or device with a front-facing camera. The camera scans the user’s face and generates a 3D model, which can then be customized with different facial expressions, hairstyles, and other features. Once the AR emoji sticker is created, it can be added to videos or photos in real-time using the device’s camera or a video editing app.
AR emoji stickers are a popular feature on messaging apps, social media platforms, and video editing software. They can be used to add a playful and personal touch to videos and photos and are especially popular with younger audiences.
Best 5 AR Emoji Stickers App
Many apps and platforms offer a variety of AR emoji stickers for users to choose from. These stickers can be added to videos or photos to add a personal and playful touch. Here are the five best apps and platforms for finding and using AR emoji stickers. Whether you’re looking for animated characters, animal faces, or something else, these apps have you covered.
1. Filmora for Mobile AR Camera
Filmora for Mobile is a video editing app that offers an AR camera feature for adding AR emoji stickers to videos. The AR camera allows users to select from various pre-made AR emoji stickers and add them to their videos in real-time. The stickers can be resized, rotated, and positioned to fit the user’s desired look.
In addition to AR emoji stickers, the Filmora for Mobile AR camera offers fun and creative effects, such as filters, overlays, and text.
Free Download For Win 7 or later(64-bit)
Free Download For macOS 10.14 or later
Editor’s Verdict: Filmora for Mobile’s AR camera is a fun and easy-to-use tool for adding AR emoji stickers and other creative effects to your videos. Its wide selection of stickers and intuitive interface makes it great for adding personality and emotion to videos.
Ratings in App Store: 4.7 out of 5
Ratings in Google Play Store: 4.7 out of 5
Operating System: Android and iOS
Pricing: Free for Download; Paid version starts from $5.99/month.
One of the standout features of Filmora for Mobile’s AR camera is the ability to customize the stickers with different facial expressions and mouth shapes. This allows users to create more dynamic and lifelike AR emoji stickers that can convey various emotions and moods. The app also allows users to record videos with the AR camera and share them directly to social media platforms or save them to their devices.
2. Samsung AR Emoji Stickers
Samsung’s AR Emoji stickers are a popular feature on the company’s messaging app, Samsung Messages. Users can create a 3D avatar of themselves or others using the app’s camera to use the stickers. The avatar can be customized with different hairstyles, facial expressions, and other features.
Once the avatar is created, it can be used as an AR emoji sticker in videos and photos. The stickers can be resized, rotated, and positioned to fit the user’s desired look. In addition to the customizable avatars, Samsung’s AR Emoji stickers also include a variety of pre-made stickers of popular characters and animals.
Editor’s Verdict: Samsung’s AR Emoji stickers are a fun and easy-to-use tool for adding personality and flair to your videos and photos. It is convenient for those looking to add fun to their video projects.
Ratings in Galaxy Store: 4.5 out of 5
Operating Systems: Android
Pricing: Free
One of the standout features of Samsung’s AR Emoji stickers is the ability to record videos with the stickers in real time. This allows users to create dynamic and interactive content that showcases their avatar in action. The app also allows users to save AR Emoji stickers and use them in other apps or share them on social media.
3. iPhone Memoji AR Stickers
iPhone’s Memoji AR stickers allow users to create custom avatars of themselves or others using the app’s camera. These avatars can be customized with different hairstyles, facial expressions, and other features and used as AR emoji stickers in videos and photos. In addition to the customizable avatars, the app also includes a variety of pre-made stickers of popular characters and animals.
Editor’s Verdict: Add personality and flair to your videos and photos with iPhone’s easy-to-use Memoji AR stickers. Customize your avatars or choose from a wide selection of pre-made stickers to convey emotions and moods. Create dynamic and interactive content with the real-time recording feature, and save or share your stickers for added convenience.
Ratings in App Store: 3.4 out of 5
Operating System: iOS
Pricing: Free
iPhone’s Memoji AR stickers create dynamic and interactive content that can be saved and shared on social media or other apps. The app offers customization options for creating personalized avatars and pre-made stickers. These features make iPhone’s Memoji AR stickers a great tool for adding personality and emotion to your videos.
4. Mirror: Emoji Maker & Stickers for Android
Mirror: Emoji Maker & Stickers is an app for Android devices that allows users to create custom AR emoji stickers of themselves or others. The app uses the device’s camera to scan the user’s face and generate a 3D model, which can then be customized with different hairstyles, facial expressions, and other features.
Editor’s Verdict: Personalize your videos and photos with custom AR emoji stickers using Android’s Mirror: Emoji Maker & Stickers app. Customize your avatar and add the sticker in real time, or choose from various pre-made stickers. Create dynamic and interactive content with the app’s real-time recording feature, and save or share your stickers for future use.
Ratings in App Store: 4.8 out of 5
Ratings in Google Play Store: 4.4 out of 5
Operating Systems: Android and iOS
Pricing: Free for Download; 23,99 € for 6-month premium access.
Once the AR emoji sticker is created, it can be added to videos or photos in real-time using the app’s camera or a video editing app. The stickers can be resized, rotated, and positioned to fit the user’s desired look. In addition to the customizable avatars, Mirror: Emoji Maker & Stickers also includes a variety of pre-made stickers of popular characters and animals.
5. Yoji: AR Emoji Camera Recorder
AR Emoji Camera Recorder is a camera app that allows users to create personalized, animated emojis using augmented reality (AR) technology. With this app, users can create emojis that look like them by taking a selfie and customizing the appearance of the emoji with a variety of different features and options.
Editor’s Verdict: The app is easy to use, and the AR technology used to create the personalized emojis is top-notch. The ability to record videos and take photos with the emoji superimposed over the user’s face in real-time adds a fun and personal touch to the content.
Ratings in App Store: 4.5 out of 5
Operating Systems: iOS
Pricing: Free for Download; Paid version starts from $1.99/week.
Once the emoji is created, users can record videos or take photos superimposed over their faces in real time, adding a fun and personal touch to their content. The app also includes a range of stickers and filters to further enhance the user’s videos and photos.
Add AR Emoji Stickers to Your Video
Ready to add some personality and flair to your videos? This section will introduce how to use Filmora for Mobile’s AR camera to add AR emoji stickers to your videos. Filmora for Mobile is a video editing app that offers a variety of creative features, including an AR camera for adding AR emoji stickers to videos in real time.
Whether you want to create your custom stickers or use pre-made ones, Filmora for Mobile has you covered. Follow along as we walk you through the steps for adding AR emoji stickers to your videos.
Recording The AR Video
Here’s how to record your AR video on your iOS device:
Step1 Download and install Filmora for Mobile from the app store.
Step2 Tap on the camera button in the top right corner.
Step3 Adjust the video ratio or switch between the front and rear cameras using the “frame“ icon.
Step4 Preview and select animoji or memoji features using the “Props“ button.
Step5 Tap the purple record button to capture your AR video.
Step6 Your video will be saved automatically and can be edited by tapping “Edit“ below the screen.
Step7 Preview and export your completed video.
Editing The AR Video
After recording the AR video, it’s time to edit it. Follow these steps to do so:
Step1 On the editing timeline, use the various tools and features located below the timeline to edit your video.
Step2 Use the “canvas“ button to adjust the video ratio for TikTok or Instagram.
Step3 Enhance your video with filters by tapping the “Filters“ button.
Step4 Preview and choose transition effects by tapping in between video junctions.
Step5 Preview your edited video and export it to save and share.
Conclusion
AR emoji stickers are a great way to bring personality and emotion to your videos. Filmora for Mobile is a particularly useful app for adding AR emoji stickers to your videos, with its easy-to-use AR camera and a wide variety of customization options. Whether you create your custom avatars or use pre-made stickers, Filmora for Mobile offers much flexibility for adding fun and flair to your video projects.
So, give Filmora for Mobile’s AR emoji stickers a try next time you want to spice up your video content.
Methods to Make Sure Your Recording Slideshow in Powerpoint Is Not Wro
Ways to Make Sure Your Recording Slideshow in Powerpoint is Not Wrong
An easy yet powerful editor
Numerous effects to choose from
Detailed tutorials provided by the official channel
Creating a presentation is a daunting task, and not everybody has enough expertise to create it. But those who know they can create the presentation are well aware of the steps they need to follow to record a slide show PowerPoint.
If you are new to it or feel confused about how you will be able to do it, keep reading till the last. Here in this read, we will help you to know whether the way you have adapted to record the presentation is favorable or not. Additionally, in the end you will have an idea about the right steps that you need to follow in order to get it done. Let’s get started!
In this article
01 [How to Record Slide Show Powerpoint](#Part 1)
02 [The 6 Best Slide Show PowerPoint Recording Tools](#Part 2)
03 [Recording Slide Show Powerpoint Q&A](#Part 3)
Part 1 How to Record Slide Show Powerpoint
Before understanding the use of tools to record slide show, one must be aware of how will they be able to do it. For the same, there are simple steps that you need to follow, these are:
Step 1: Firstly, open the slide from which you wish to start the recording.
Step 2: “Record” button is right there at the upper right corner of the PowerPoint window. Click on it.
Step 3: When you are done with making the changes or say customizations, select “Record button”. This one is round and red in appearance.
Step 4: Wait until the countdown.
Step 5: Start speaking as per the slides you have created.
Step 6: when you are done with it, you can save it and share it with others too.
Note: this one turns out to be the simplest method for recording slide shows in PowerPoint. But some users are not happy with the same because they are not in the state to make the additional editing if they need to do any. Thus, at that point, they look out for other tools available.
Part 2 The 6 Best Slide Show PowerPoint Recording Tools
In this section, you will come to know about the best slide show PowerPoint recording tools that you can consider and get the best results in return: -
01Vmaker
Vmaker is a tool that allows you to create and share your PowerPoint presentations. It records your presentation in high-quality video, audio, and text. It has many features that help you to make a great presentation. For instance, it can record your screen in real-time and automatically saves the recorded file as a video file. You can also use it to record the audio from your microphone or an external source like YouTube or SoundCloud. It also has features for editing videos and adding subtitles, watermarks, etc. It is one of the best slide show PowerPoint recording tools available on the market today.

Additionally, the tool also has an inbuilt screen recorder that lets you record your presentation in full HD resolution. It records your screen with sound as well, so you can share it on social media or embed it on websites.
02Panapto
Panapto lets users create professional-looking presentations with just a few clicks. It also supports animations, transitions, and other features for creating engaging slideshows. It is a professional tool that allows you to create a slide show of your PowerPoint presentation in just one click and share it with other people. Furthermore, It also allows you to record your presentation as a video file and publish it online for others to view. If you are looking for the best Slide Show Powerpoint Recording Tools, Panapto is the right choice for you. It works on Windows, Linux, and Mac OS X.

03Camtasia
Camtasia is software that can be used as a video recording tool for presentations. It allows you to record, edit, and share videos with ease. In general, it is an easy-to-use screen recording tool that lets you create high-quality recordings of presentations, webinars, and meetings in seconds. It also includes a number of features like color correction tools and motion tracking that make it easy to create professional-looking videos without any extra effort.

With it, you can easily create a presentation from your computer or tablet. You can also use it to record training sessions or meetings so that you can review them later.
04Ispring
Ispring is presentation software that records your presentations in real-time and allows you to review them later on. You can also share your recordings with others or embed them into websites or blogs. It saves you time, effort, and money. It allows the option of recording your screen using your webcam or microphone (with or without sound).

Furthermore, it is helpful in capturing the screen from any device on the desktop, including computers, laptops, tablets, and even smartphones. Along with that, if you are looking to edit audio files in real-time then no more waiting for hours to edit the sound.
Lastly, after creating the content, if you wish to publish it over any social media portal, the direct option is there to help you with it.
05Bandicam
Bandicam is a powerful software that allows users to record their screens in high quality with ease. It is not limited by frames per second but rather the number of frames per second it can record at different resolutions. It has the ability to take screenshots that are saved as PNG files or even take screencasts that are saved as MP4 files.n Furthermore, it is the best slide show PowerPoint recording tool. It can be used for recording gameplay, tutorials, presentations, or anything else you would like to show on a screen.

The Bandicam website also offers an online tutorial for those who are new to using the software, as well as a help center with video tutorials for those who have never used it before.
06Screenflow
Screenflow is a free and open-source screen recording tool that works on Mac. It allows you to record your computer screen, audio, and webcam. It is a really useful tool for those who want to create videos for presentations but don’t have the time or budget to hire an expensive video producer. It can be used as a screen recorder or a presentation tool. You can easily edit recorded videos with Screenflow’s inbuilt video editor.

In general, Screenflow is a tool that records your screen and lets you share it with others. It’s a great tool for both beginners and professionals to record their work, presentations, or tutorials.
Part 3 Recording Slide Show Powerpoint Q&A
01What are the advantages of recording a slide show PowerPoint?
Recording a slide show PowerPoint is an easy way to capture the information from your slides into an editable video that you can share with your audience. It’s also easy for people who missed the presentation or need to review it later, as well as for those who want to use it for other purposes like marketing collateral or educational content. By recording a slide show PowerPoint, you’re able to retain the benefits of giving a live presentation without all the hassle of actually delivering it in person.
02How can I record a slide show PowerPoint?
There are a few ways to record a slide show PowerPoint, including using the PowerPoint recording option. If you are using PowerPoint, you should be able to find the option in your presentation settings. But if you are not fond of trying it out, you can use Filmora. This is one of the best video editing tools available, with some exclusive features. This has the simplest interface, and users can get their presentation recorded needs catered for sure.
03How can I use my recorded slideshows in different presentations?
There are many ways to do this. You could export the slideshow as a .mp4 file and then import it into another presentation for reuse. You could also just load the slideshow on your laptop’s screen and use it that way instead of having a projector or screen. If you wish to integrate some effects into it, you can try out Wondershare Filmora Video Editor , the ultimate video editing tool available for people around.
For Win 7 or later (64-bit)
For macOS 10.12 or later
04How long does it take to create a single recording slide show PowerPoint?
It takes a lot of time and effort to create a single recording slide show PowerPoint. This is because of the time it takes to go through all the slides and find the right images.
It is best if you start by finding out what you want to say with your presentation. Then, select images that support your message, and finally, create slides that tell your story.
This process will save a lot of time and effort when it comes to creating slide shows for presentations.
05How long can a recording slide show PowerPoint be recorded?
The length of a PowerPoint recording is determined by the length of the slide show. The default setting for the length of the slide show is 60 minutes, but it can be changed to any duration.
● Ending Thoughts →
● Recorded slide show presentations are best to consider when one wishes to save the efforts of creating the same presentation again and again.
● Filmora is one of the best video editing tools available to users for doing the editing in the recorded slideshow presentation if needed.
● Recording a slideshow is relatively an easy task if one is aware of the right steps. But if there is a lack of knowledge, they will not be able to do it.
Creating a presentation is a daunting task, and not everybody has enough expertise to create it. But those who know they can create the presentation are well aware of the steps they need to follow to record a slide show PowerPoint.
If you are new to it or feel confused about how you will be able to do it, keep reading till the last. Here in this read, we will help you to know whether the way you have adapted to record the presentation is favorable or not. Additionally, in the end you will have an idea about the right steps that you need to follow in order to get it done. Let’s get started!
In this article
01 [How to Record Slide Show Powerpoint](#Part 1)
02 [The 6 Best Slide Show PowerPoint Recording Tools](#Part 2)
03 [Recording Slide Show Powerpoint Q&A](#Part 3)
Part 1 How to Record Slide Show Powerpoint
Before understanding the use of tools to record slide show, one must be aware of how will they be able to do it. For the same, there are simple steps that you need to follow, these are:
Step 1: Firstly, open the slide from which you wish to start the recording.
Step 2: “Record” button is right there at the upper right corner of the PowerPoint window. Click on it.
Step 3: When you are done with making the changes or say customizations, select “Record button”. This one is round and red in appearance.
Step 4: Wait until the countdown.
Step 5: Start speaking as per the slides you have created.
Step 6: when you are done with it, you can save it and share it with others too.
Note: this one turns out to be the simplest method for recording slide shows in PowerPoint. But some users are not happy with the same because they are not in the state to make the additional editing if they need to do any. Thus, at that point, they look out for other tools available.
Part 2 The 6 Best Slide Show PowerPoint Recording Tools
In this section, you will come to know about the best slide show PowerPoint recording tools that you can consider and get the best results in return: -
01Vmaker
Vmaker is a tool that allows you to create and share your PowerPoint presentations. It records your presentation in high-quality video, audio, and text. It has many features that help you to make a great presentation. For instance, it can record your screen in real-time and automatically saves the recorded file as a video file. You can also use it to record the audio from your microphone or an external source like YouTube or SoundCloud. It also has features for editing videos and adding subtitles, watermarks, etc. It is one of the best slide show PowerPoint recording tools available on the market today.
Additionally, the tool also has an inbuilt screen recorder that lets you record your presentation in full HD resolution. It records your screen with sound as well, so you can share it on social media or embed it on websites.
02Panapto
Panapto lets users create professional-looking presentations with just a few clicks. It also supports animations, transitions, and other features for creating engaging slideshows. It is a professional tool that allows you to create a slide show of your PowerPoint presentation in just one click and share it with other people. Furthermore, It also allows you to record your presentation as a video file and publish it online for others to view. If you are looking for the best Slide Show Powerpoint Recording Tools, Panapto is the right choice for you. It works on Windows, Linux, and Mac OS X.
03Camtasia
Camtasia is software that can be used as a video recording tool for presentations. It allows you to record, edit, and share videos with ease. In general, it is an easy-to-use screen recording tool that lets you create high-quality recordings of presentations, webinars, and meetings in seconds. It also includes a number of features like color correction tools and motion tracking that make it easy to create professional-looking videos without any extra effort.
With it, you can easily create a presentation from your computer or tablet. You can also use it to record training sessions or meetings so that you can review them later.
04Ispring
Ispring is presentation software that records your presentations in real-time and allows you to review them later on. You can also share your recordings with others or embed them into websites or blogs. It saves you time, effort, and money. It allows the option of recording your screen using your webcam or microphone (with or without sound).
Furthermore, it is helpful in capturing the screen from any device on the desktop, including computers, laptops, tablets, and even smartphones. Along with that, if you are looking to edit audio files in real-time then no more waiting for hours to edit the sound.
Lastly, after creating the content, if you wish to publish it over any social media portal, the direct option is there to help you with it.
05Bandicam
Bandicam is a powerful software that allows users to record their screens in high quality with ease. It is not limited by frames per second but rather the number of frames per second it can record at different resolutions. It has the ability to take screenshots that are saved as PNG files or even take screencasts that are saved as MP4 files.n Furthermore, it is the best slide show PowerPoint recording tool. It can be used for recording gameplay, tutorials, presentations, or anything else you would like to show on a screen.
The Bandicam website also offers an online tutorial for those who are new to using the software, as well as a help center with video tutorials for those who have never used it before.
06Screenflow
Screenflow is a free and open-source screen recording tool that works on Mac. It allows you to record your computer screen, audio, and webcam. It is a really useful tool for those who want to create videos for presentations but don’t have the time or budget to hire an expensive video producer. It can be used as a screen recorder or a presentation tool. You can easily edit recorded videos with Screenflow’s inbuilt video editor.
In general, Screenflow is a tool that records your screen and lets you share it with others. It’s a great tool for both beginners and professionals to record their work, presentations, or tutorials.
Part 3 Recording Slide Show Powerpoint Q&A
01What are the advantages of recording a slide show PowerPoint?
Recording a slide show PowerPoint is an easy way to capture the information from your slides into an editable video that you can share with your audience. It’s also easy for people who missed the presentation or need to review it later, as well as for those who want to use it for other purposes like marketing collateral or educational content. By recording a slide show PowerPoint, you’re able to retain the benefits of giving a live presentation without all the hassle of actually delivering it in person.
02How can I record a slide show PowerPoint?
There are a few ways to record a slide show PowerPoint, including using the PowerPoint recording option. If you are using PowerPoint, you should be able to find the option in your presentation settings. But if you are not fond of trying it out, you can use Filmora. This is one of the best video editing tools available, with some exclusive features. This has the simplest interface, and users can get their presentation recorded needs catered for sure.
03How can I use my recorded slideshows in different presentations?
There are many ways to do this. You could export the slideshow as a .mp4 file and then import it into another presentation for reuse. You could also just load the slideshow on your laptop’s screen and use it that way instead of having a projector or screen. If you wish to integrate some effects into it, you can try out Wondershare Filmora Video Editor , the ultimate video editing tool available for people around.
For Win 7 or later (64-bit)
For macOS 10.12 or later
04How long does it take to create a single recording slide show PowerPoint?
It takes a lot of time and effort to create a single recording slide show PowerPoint. This is because of the time it takes to go through all the slides and find the right images.
It is best if you start by finding out what you want to say with your presentation. Then, select images that support your message, and finally, create slides that tell your story.
This process will save a lot of time and effort when it comes to creating slide shows for presentations.
05How long can a recording slide show PowerPoint be recorded?
The length of a PowerPoint recording is determined by the length of the slide show. The default setting for the length of the slide show is 60 minutes, but it can be changed to any duration.
● Ending Thoughts →
● Recorded slide show presentations are best to consider when one wishes to save the efforts of creating the same presentation again and again.
● Filmora is one of the best video editing tools available to users for doing the editing in the recorded slideshow presentation if needed.
● Recording a slideshow is relatively an easy task if one is aware of the right steps. But if there is a lack of knowledge, they will not be able to do it.
How to Loop a Video in PowerPoint
Loop videos are a great way to showcase your content. They’re easy to make, and they’re also easy to edit. You can have a loop video where the slides keep repeating in the same order, or you can change it up by putting different images on each slide.
You’re probably already familiar with the concept of looping video in PowerPoint. However, there are some instances where looping videos can be a real-time saver. To do this, you need to make sure that your visuals are engaging and unique. You can achieve this by using video loops in PowerPoint presentations.
You can use it if you want to demonstrate an idea or concept by showing several parts of the same thing at once. Or you can use PowerPoint if you have a very long video that you want to show in one go. You can also use it for suggesting different angles for your audience and making their eyes move from one point to another without making them bored.
Part 1: How to Make a Slideshow Loop in PowerPoint
A power-point loop video is the most efficient way to create a slideshow for your presentation. This easy-to-use software utility provides a simple and intuitive interface that lets you add slideshows to your presentations.
This is ideal for creating multi-streaming PowerPoint presentations that can be repeatedly viewed in the same or a different sequence. Create multimedia presentations with an animated slide show, including videos, and music with just a few clicks of the mouse.
The creation of the Slideshow loop in Microsoft PowerPoint is quite easy and simple. To make a looping slideshow, you’ll first need a PowerPoint. A PowerPoint is a set of instructions that allows you to display a series of images and text in the same sequence. This gives your audience the ability to explore the information on the slides in more depth and engage with the content on a more personal level.
If you want to create a looping slideshow in PowerPoint, you can use the following steps.
Step 1: Open Microsoft PowerPoint and select Slide show from Toolbar
The first step is to open Microsoft PowerPoint. To create a looping slideshow in PowerPoint, click on the Slide show feature on the top of the toolbar. Then different features will appear after clicking on it.

Step 2: Set up the Slide show manually
When you open the Slideshow, click on the Set Up Show from the toolbar. Some options will be shown in the drop-down (Manual, Auto, and Set Up Show). Select the option Set Up Show. A dialogue box will appear to select the following check boxes that are shown in the below picture:

Step 3: Select the slides and click on Transition
Select overall slides and click on the Transitions tab. You can see an option of Auto, interval. Uncheck the box of Auto, interval, and choose the time according to your requirements. Adding transitions can help to make your PowerPoint presentation more engaging and visually appealing. When you are adding transitions, make sure to think about how they can help to improve your overall presentation.

PowerPoint has the technology to create an endless loop slideshow that keeps playing without your finger. Loop slideshows are best used with information that is short, repeated, and not too repetitious. For example, if you want to play something on a loop it is better to create a looping slideshow than an extended presentation that repeats itself endlessly.
The power of loop slides is in their ability to engage users. You can have a slideshow that plays automatically or you can have it play when the user enters a specific panel. Slideshow Loops on PowerPoint allow you to play one or more slides over and over again by pressing the Play button. You can also create a time-lapse, which pauses the slideshow at a specific point.
Benefits of making a slideshow in PowerPoint
There are many benefits of using a looping slideshow in PowerPoint. There are many benefits of using loop video in PowerPoint presentations. Loop slideshow gives your audience a sense of continuity and connection, which can help them follow the story and understand the information more easily. It also helps to keep people engaged and interested in your presentation. They can be used to promote a product or service, commemorate a special event, or entertain and inform your audience.
- Slides can be played in a continuous loop, allowing the audience to stay engaged with the presentation from beginning to end.
- The looping feature makes it easy to create a presentation that is tailored to the specific needs of your audience. You can choose to have the slides repeat automatically, or you can control when each slide appears.
- It can help to save time. By using loop video, you can avoid having to constantly start and stop your presentation to show different parts of it. This can save you a lot of time and energy, which can be put into more important things.
- They can be used to commemorate a special event.
- They can be used to entertain and inform your audience.
Part 2: Alternative Way to Create Loop Slideshow Video
If you have been searching for the perfect way to create a loop slideshow video, Filmora video editor might be what you need. It is one of the most popular loop slideshow makers on the market and there is an app for all devices, including PCs and Macs to android phones and tablets. Filmora is a slideshow loop maker that allows you to produce video files quickly and easily with simple drag and drop.
Filmora provides you with seamless loop video for your website, youtube, and other channels, You can create content in various formats and image resolution to any social media like Facebook, Twitter, Instagram, and others with the help of our unique features. Filmora is a professional video editor for Windows. It’s an ideal tool for everyone, from beginners to professionals, as well as a great help for students, researchers, and teachers.
In this article, we’ll show you how to make a looping slideshow in PowerPoint. First, you’ll need to download Filmora. This software is used to create professional-looking videos that can be made at any length.
Step 1: Download Filmora and Import images and videos
Free Download For Win 7 or later(64-bit)
Free Download For macOS 10.14 or later
So first off, we need to create a new project. On the left-hand side, you’ll see your media library and on the right-hand side, there’s a green button that says “create new project”. You’ll notice there are three sections: video, audio, and images. These play a key role in creating your final video so let’s talk about each one individually.

Step 2: Add Title and background to your Slideshow video
This step is totally up to you in which you can add some titles the starting your slideshow. It is not very necessary but gives your slide show a perfect look. It also allows you to select any plain background of any color. You can use multiple transitions, music, and effects to tell your story in exactly the way you want!

Step 3: Make copies of the Slideshow and add transitions
Lastly, make copies of your media or pictures you want to add to your slideshow. Filmora allows you to set the duration of your slideshow. After copying the pictures paste them where the video ends. Then continue pasting according to your requirements. Add a transition “Dissolve” from the Transitions Tab. When you complete your editing export your video to your desktop or where you want to store it.

Benefits of looping Slideshare video in Filmora
There are many benefits of using a loop slideshow video in Filmora. First and foremost, a looping slideshow is a great way to create a presentation or video that is both engaging and professional. Additionally, looping a video makes it easy to keep audiences engaged and on foot, which is especially important for long videos or presentations.
Plus, looping can help to save on file size and memory usage, making it a great option for videos that will be shared online. Finally, looping can add an element of excitement and anticipation to a video, which can help to keep viewers engaged and coming back for more. You could also add animations between the slides that move differently than they would normally do.
Loop Slideshow Video in Filmora is a great option for you. It’s easy to use, and it has a wide range of options that allow you to customize your video output. You can even add music and sound effects to your videos! If you’re looking to make a loop slideshow video, this is the best software for it.
The Bottom Line
Slideshows are very popular, but they can sometimes seem a little boring. If you want to add something new, looping your slideshow will make all the difference. Adding music is easy in PowerPoint. A slideshow loop can be an effective way to keep viewers’ attention, making it an effective tool for presentation. You can renovate your outdated slideshows video with Filmora.
With its loop function, Filmora enables you to incorporate interesting dynamic effects into your videos. So what does it take to set up a PowerPoint loop video? You don’t need a lot of special programs or plugins to make your videos get looped on your presentations. Follow the above simple steps and you’ll have your videos getting looped in no time.
Free Download For macOS 10.14 or later
So first off, we need to create a new project. On the left-hand side, you’ll see your media library and on the right-hand side, there’s a green button that says “create new project”. You’ll notice there are three sections: video, audio, and images. These play a key role in creating your final video so let’s talk about each one individually.
Step 2: Add Title and background to your Slideshow video
This step is totally up to you in which you can add some titles the starting your slideshow. It is not very necessary but gives your slide show a perfect look. It also allows you to select any plain background of any color. You can use multiple transitions, music, and effects to tell your story in exactly the way you want!
Step 3: Make copies of the Slideshow and add transitions
Lastly, make copies of your media or pictures you want to add to your slideshow. Filmora allows you to set the duration of your slideshow. After copying the pictures paste them where the video ends. Then continue pasting according to your requirements. Add a transition “Dissolve” from the Transitions Tab. When you complete your editing export your video to your desktop or where you want to store it.
Benefits of looping Slideshare video in Filmora
There are many benefits of using a loop slideshow video in Filmora. First and foremost, a looping slideshow is a great way to create a presentation or video that is both engaging and professional. Additionally, looping a video makes it easy to keep audiences engaged and on foot, which is especially important for long videos or presentations.
Plus, looping can help to save on file size and memory usage, making it a great option for videos that will be shared online. Finally, looping can add an element of excitement and anticipation to a video, which can help to keep viewers engaged and coming back for more. You could also add animations between the slides that move differently than they would normally do.
Loop Slideshow Video in Filmora is a great option for you. It’s easy to use, and it has a wide range of options that allow you to customize your video output. You can even add music and sound effects to your videos! If you’re looking to make a loop slideshow video, this is the best software for it.
The Bottom Line
Slideshows are very popular, but they can sometimes seem a little boring. If you want to add something new, looping your slideshow will make all the difference. Adding music is easy in PowerPoint. A slideshow loop can be an effective way to keep viewers’ attention, making it an effective tool for presentation. You can renovate your outdated slideshows video with Filmora.
With its loop function, Filmora enables you to incorporate interesting dynamic effects into your videos. So what does it take to set up a PowerPoint loop video? You don’t need a lot of special programs or plugins to make your videos get looped on your presentations. Follow the above simple steps and you’ll have your videos getting looped in no time.
Also read:
- Guide To Creating The Perfect VHS Effect Look in Premiere Pro for 2024
- Updated Easy Ways to Change Aspect Ratio in iMovie?
- How to Make Sony Vegas Freeze Frame for 2024
- Updated Working Through the Details of iMovie Slow Motion Video Making 100 Effective for 2024
- You Might Have Difficulty Rotating a Video without an Efficient Media Player or Editing Tool. Below Is a Detailed Guide on Rotating a Video on Any Axes for 2024
- Camtasia Vs. Final Cut Pro for 2024
- New 2024 Approved How to Edit Facebook Video Ads for E-Commerce Business
- Blender Is a 3D Animation Software that Can Be Used to Create Stunning 3D Models and Videos
- In 2024, How to Make an Adobe Slideshow the Easy Way
- New In 2024, Detailed Tutorial to Rotate Videos in Cyberlink PowerDirector
- New If Youre Not Using Video yet, Now Is the Time to Start. In This Post, Well Discuss the Benefits of Using Video for Social Media Marketing and Provide Tips for Getting Started. Keep Reading to Learn More
- Reviewing Efectum App and The Best Alternatives for Smartphone Users for 2024
- Updated Learn Topaz Video Enhance AI Review and Achieve Powerful Video Conversion
- Updated 2024 Approved A Guide To Motion Tracking Using The Best Video Editors
- In This Article, We Will Introduce You Our Top 5 Picks of Websites and Software Converter Online to Convert Powerpoint to Mp4 for 2024
- New 2024 Approved How To Make A Political Video
- Updated Detailed Tutorial to Resize Your Video in VLC
- Updated You Can Create Interaction Videos with Friends and Family by Sitting Far Away, Which Seems Innovative. In This Article, Youll Get a Guide to Edit a Split-Screen Video on Filmora
- In 2024, How to Color Correct in OBS
- New Every Compositor Should Know The Tips of Color Match in After Effects
- How to Make a PowerPoint Looping Slideshow for 2024
- 2024 Approved How Can I Control Speed of a Video
- New How to Color Correct in OBS for 2024
- New In 2024, Vintage Film Effect 1990S - How to Make
- Updated Want to Make Professional-Looking Videos? Keep Reading to Give Your Videos a Cinematic Feel with the Audio Mixer of Filmora
- 2024 Approved This Article Is Regarding the Guidance About the Split of the Audio From the Video in Premiere Pro. And Also, the Discussion of the Wondershare Fllmora as the Replacement and How to Perform a Similar Task in It
- Brighten a Video in Windows 10 Easily When Video Clips You Recorded on Your Windows 10 Computer or Those Downloaded From YouTube Are Too Dark or Too Bright, You Can Easily Adjust the Color Levels in a Few Clicks
- Updated 2024 Approved How to Crop Videos in Windows Media Player
- 2024 Approved If You Want to Know More About the Basics of Final Cut Pro, It Would Be Helpful to Watch a Beginner Tutorial, with the Length of only 20 Minutes, an Introduction of the Whole Program
- New 5 Tried-And-True Methods to GIF Making
- Updated In 2024, What Is TS Format and How To Play TS Files?
- Updated In 2024, Frame Rates, Speed, and Wondershare Filmora
- Top 5 Tracking Apps to Track HTC U23 without Them Knowing | Dr.fone
- YouTube Live Selling Boost Your Sales With These Tips for 2024
- In 2024, Full Guide to Catch 100 IV Pokémon Using a Map On Tecno Spark 20C | Dr.fone
- In 2024, How To Do Nubia Red Magic 8S Pro Screen Sharing | Dr.fone
- Prank Your Friends! Easy Ways to Fake and Share Google Maps Location On Infinix Hot 40i | Dr.fone
- How To Change Your SIM PIN Code on Your Honor Magic 6 Pro Phone
- In 2024, Lava Yuva 3 ADB Format Tool for PC vs. Other Unlocking Tools Which One is the Best?
- Easy Tutorial for Activating iCloud on Apple iPhone X Safe and Legal
- In 2024, How to Use Life360 on Windows PC For Realme C33 2023? | Dr.fone
- In 2024, How to Change Google Play Location On Samsung Galaxy A15 4G | Dr.fone
- Different Methods for Resetting Xiaomi Redmi 12 Phones with Screen Locked and Not | Dr.fone
- Recover your music after Nokia 150 (2023) has been deleted
- 2 Ways to Transfer Text Messages from Xiaomi 13T Pro to iPhone 15/14/13/12/11/X/8/ | Dr.fone
- Title: Windows Movie Maker Review for 2024
- Author: Chloe
- Created at : 2024-04-24 07:08:16
- Updated at : 2024-04-25 07:08:16
- Link: https://ai-editing-video.techidaily.com/windows-movie-maker-review-for-2024/
- License: This work is licensed under CC BY-NC-SA 4.0.
