:max_bytes(150000):strip_icc():format(webp)/iOS-wwdc-7d655ca37a3b43b99fd9dac09bec13c4.jpg)
You Might Have Difficulty Rotating a Video without an Efficient Media Player or Editing Tool. Below Is a Detailed Guide on Rotating a Video on Any Axes

You Might Have Difficulty Rotating a Video without an Efficient Media Player or Editing Tool. Below Is a Detailed Guide on Rotating a Video on Any Axes
The Internet and social media have become a staple in our daily lives. Internet users post thousands of videos every day that you can watch online or download and rewatch in your free time. Suppose you encounter a video that is upside down or shot at an angle that makes it difficult for you to enjoy it fully.
It would be nice to find a way to rotate the video to portrait mode so you can watch it without any distractions. Fortunately, this article will discuss using Media Player Classic to rotate any video. We also discuss an excellent alternative to the aforementioned media player.
What Is Media Player Classic?
In a nutshell, Media Player Classic is an open-source media player suitable for 32-bit and 64-bit Microsoft Windows. If you have used the original interface, you might notice that it resembles Windows Media Player 6.4. The only key difference is that the former is more feature-rich and provides more options. In addition, Media Player Classic is very compact and lightweight.
A programmer named “Gabest’’ created and designed this platform as a closed-source application. Things changed, and he later relicensed the media player as free under the terms of the GLP-2.0 license. He released the final version, MPC 6.4.9.0, on 20th March 2006.
Unfortunately, development stalled in 2006, much to the disappointment of many users who had grown to love it. Gabest made a public statement in 2007 saying that Media Player Classic was not dead, just that he couldn’t work on it anymore.
How To Rotate Video in Media Player Classic?
Media Player Classic allows you to rotate your video around three axes, X, Y, and Z. Once you are done, you can fix a video that was initially upside down or in landscape mode for a better viewing experience. Another perk of using Media Player Classic to rotate a video is that you can use shortcuts to make your work easier.
Before we teach you how to rotate video in windows Media Player Classic, there are a few things you should know. Unfortunately, this platform doesn’t allow you to rotate a video in its graphical user interface. You can’t also use it to edit a video. Suppose you want to add text or overwrite the original video clip. Media Player Classic can only allow you to playback a video or rotate it.
Here is a simple guide on how to rotate videos in Media Player Classic.
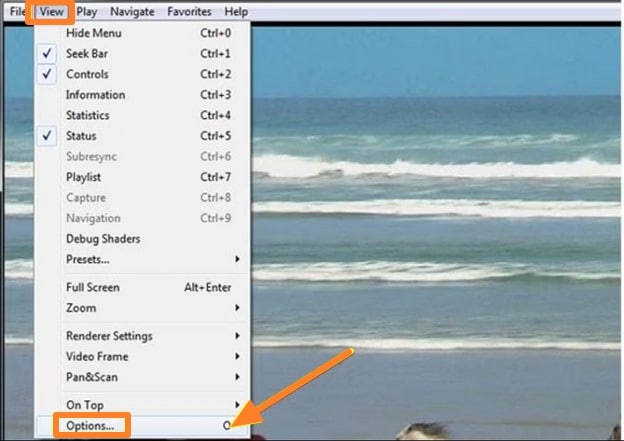
Step1 Launch Media Player Classic and click on the “View” tab. Select “Options” or click “O” to display the “Options” window.
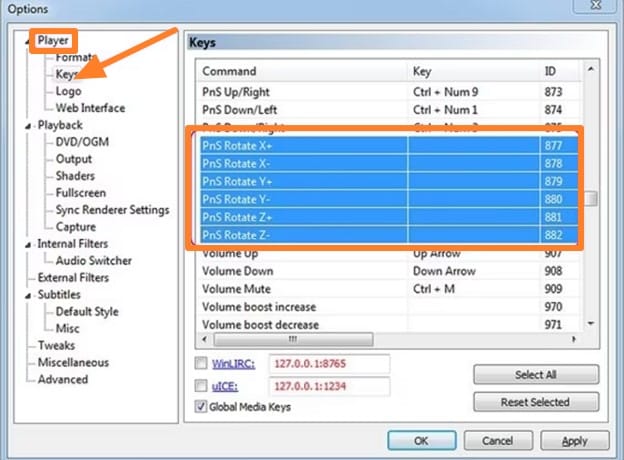
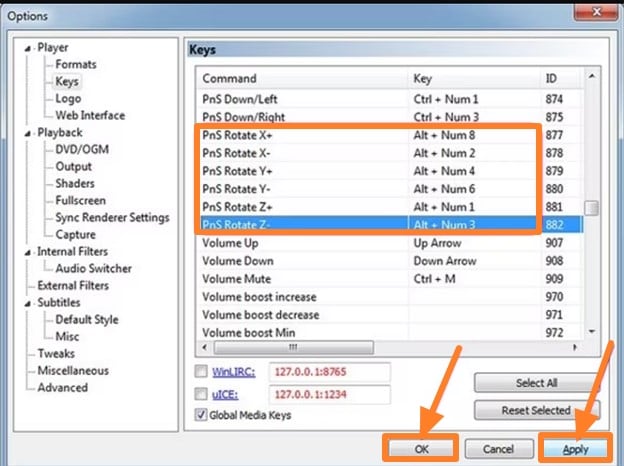
Step2 Navigate to the left pane to the Player Group and click on “Keys.” If the Player Group is not expanded by the time, you launch the platform, double-click it and wait a few seconds. You can then navigate to the “PnS Rotate” command on the Keys list.
Step3 Go to the “PnS Rotate+” command and double-click the “Key” field. You can then click on any key to rotate your video around the x-axis. Once you are satisfied with the results, click “…” to apply the changes you have made.
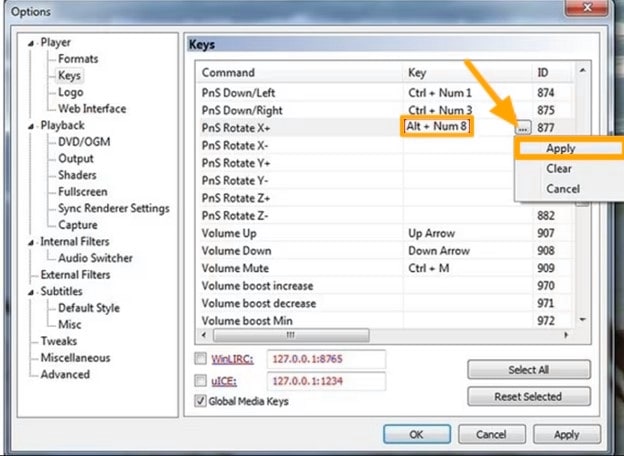
Step4 You can now assign shortcuts to “PnS Rotate” commands. For instance, you could assign PnS Rotate Y for rotation along the Y axis and PnS Z for rotation along the Z axis. After each axis has a shortcut, select “Apply” then “OK” to save your changes and close the Options window respectively.
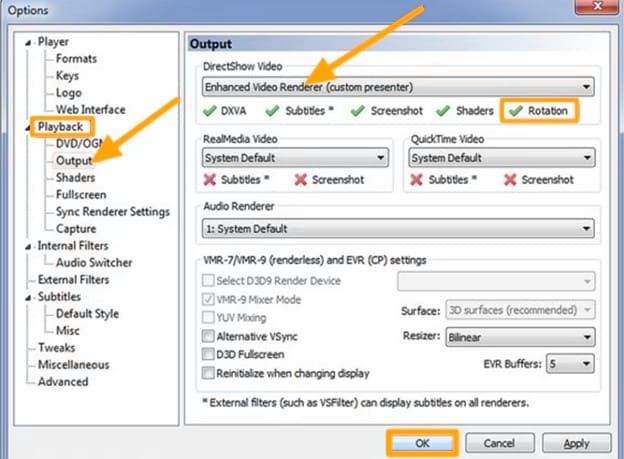
Step5 Select “Output” on the Options window and navigate to the DirectShow Video section to confirm whether the Media Classic Player supports rotation for the rendered video. Ascertain the Rotation feature has a green check mark, which indicates that the platform promotes rotation for the video. If the video has a red X, select “Apply” and click “OK.”
Step6 Use the shortcuts you assigned to the keys in Step 4 to rotate your video as you see fit. Since the rotation occurs gradually, you might need to press the keys numerous times or press and hold to see a visible change.
For instance, you can rotate your video from landscape to portrait by clicking “Alt-Num 1” and “Alt-Num 3,” respectively. To revert your video to its original state, press “Alt-Num 5.”
Need an alternative to Media Player Classic? Try Wondershare Filmora To Rotate a Video
Free Download For Win 7 or later(64-bit)
Free Download For macOS 10.14 or later
You might need a better alternative to Media Classic Player to help rotate your videos. As we mentioned, Media Classic Player doesn’t allow you to change the video. The scope of this platform only extends to playing and rotating videos along three axes. In our opinion, Wondershare Filmora is an excellent alternative.

This feature-rich platform is your one-stop solution for any creator who wants to make a mark with their videos. You can download it free on your desktop, laptop, or smartphone and use it anytime. The cloud storage allows you to snap a photo and upload it for editing at a later time.
In addition, the platform has a co-creation space where you can share your work with other users and compare notes. Here is a list of other nifty features we guarantee you will enjoy.
- Motion tracking
- Auto beat sync
- Split screen
- Title Editing
- Preset templates
- AI Portrait
- Mask and blend
- Text to speech
- Silence detection
- Audio visualizer
How To Rotate a Video 90 Degrees With Wondershare Filmora?
Now that you have seen how different this platform is from Media Classic Player, you might be curious about how effectively it rotates your videos. Perhaps our detailed guide will help you decide whether you want to give Wondershare Filmora a shot.
Stick around to learn how to rotate a video 90 degrees with Wondershare Filmora.
Step1 Import the video you want to rotate to Wondershare Filmora and drag and drop it to the timeline as shown below.
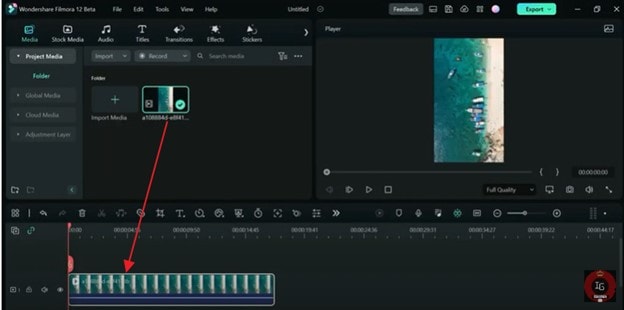
Step2 Click on the monitor icon and select “Change Project Aspect Ratio” in the drop-down menu.

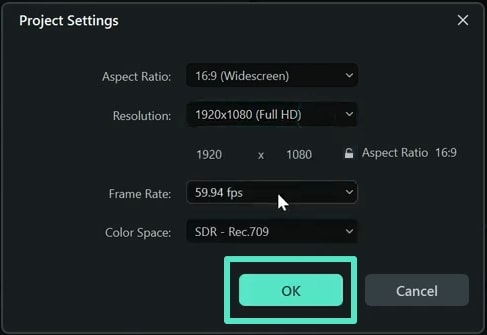
Step3 In the “Project Settings” window, you can change your video’s Aspect Ratio, Resolution, Frame Rate, and Color space.
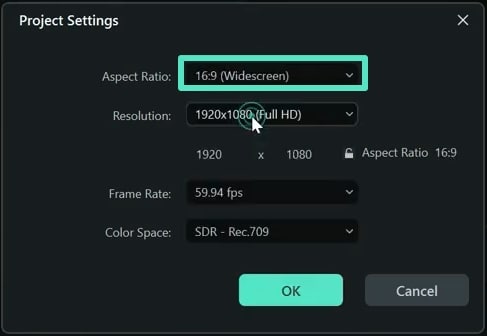
Step4 Once you are happy with your changes, click “OK” and close the window.
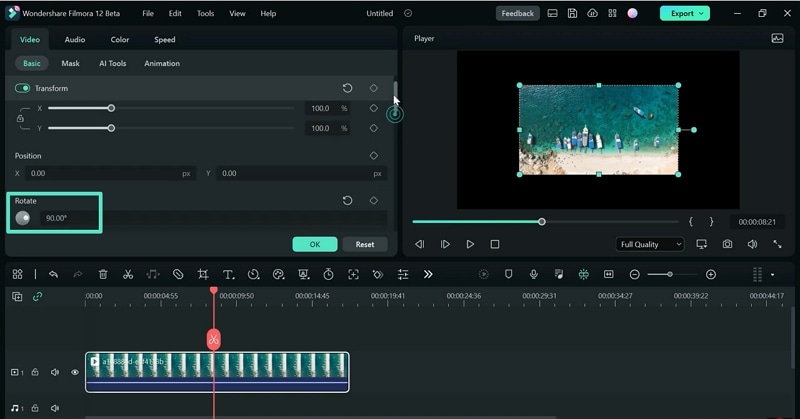
Step5 Double-click the video track and navigate to the Rotate option in the window. Hover your mouse over the dot in the Rotate tab until you get to 90 degrees. You could also adjust the rotation of the video by clicking on the pivot in the media player till the video is at 90 degrees.
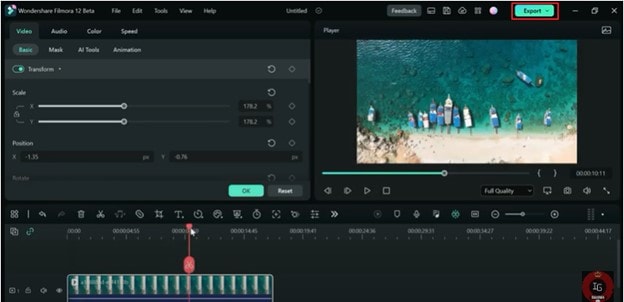
Step6 Click “Export” to save a copy of the rotated video to your device.
Which Is Better To Rotate a Video? Media Player Classic or Wondershare Filmora?
Having seen both sides of the coin, you might wonder which option is better to help you rotate a video. In this section of the article, we pit Wondershare Filmora against Media Player Classic to help you determine which option will work best for you.
Take a look at the table below.
| Media Player Classic | Wondershare Filmora | |
|---|---|---|
| Operating System | Microsoft Windows | Windows & Mac |
| Ratings from G2 | N/A | 4.4/5 stars |
| Pricing | Free | Annual Plan – US$49.99/yearCross Platform Plan - US$59.99/YearPerpetual Plan - US$79.99 |
| Features | ● Enhanced video rendering● Removal of tearing● Supports SVCD, VCD, and DVD playback● AVI subtitles● Customizable toolbar | ● AI Portrait● Mask and blend● Text to speech● Silence detection● Audio visualizer● Motion tracking● Auto beat sync● Split screen● Title Editing● Preset templates |
As you have seen, Media player Classic doesn’t have the Rotate feature per se. However, you can assign shortcuts to the keys to rotate a video along three axes as you see fit. You can also use a combination of keys like Alt and Num to change how your video sits so you can enjoy it as you like.
On the other hand, Wondershare Filmora has a more comprehensive Rotate feature that allows you to drag your pointer along a bar till the video sits at the correct number of degrees.
This platform also provides additional features, like allowing you to scale the video to fit the screen and adjusting project settings like the resolution and frame rate. If you don’t want to use the sliding bar, you can use your pointer to manually adjust the rotation by clicking on the pivot with your pointer.
In a nutshell, Windows Media Player is the ideal choice if you want to rotate your video and leave it at that. However, if you are looking for more advanced features, you are better off choosing Wondershare Filmora. The latter option also makes your videos look more polished like they were edited by a professional.
Conclusion
Videos might be trickier to edit than photos, especially when you want to rotate them. Fortunately, developers have been working tirelessly to ensure you have many tools at your disposal to edit your videos from any device at any time.
If you don’t fancy editing videos on your laptop, you could download the software to your smartphone and rotate videos on the move. Technology is truly a blessing that has come to make our work easier. Hopefully, after reading this article, you can effortlessly rotate any video you encounter.
Free Download For macOS 10.14 or later
You might need a better alternative to Media Classic Player to help rotate your videos. As we mentioned, Media Classic Player doesn’t allow you to change the video. The scope of this platform only extends to playing and rotating videos along three axes. In our opinion, Wondershare Filmora is an excellent alternative.

This feature-rich platform is your one-stop solution for any creator who wants to make a mark with their videos. You can download it free on your desktop, laptop, or smartphone and use it anytime. The cloud storage allows you to snap a photo and upload it for editing at a later time.
In addition, the platform has a co-creation space where you can share your work with other users and compare notes. Here is a list of other nifty features we guarantee you will enjoy.
- Motion tracking
- Auto beat sync
- Split screen
- Title Editing
- Preset templates
- AI Portrait
- Mask and blend
- Text to speech
- Silence detection
- Audio visualizer
How To Rotate a Video 90 Degrees With Wondershare Filmora?
Now that you have seen how different this platform is from Media Classic Player, you might be curious about how effectively it rotates your videos. Perhaps our detailed guide will help you decide whether you want to give Wondershare Filmora a shot.
Stick around to learn how to rotate a video 90 degrees with Wondershare Filmora.
Step1 Import the video you want to rotate to Wondershare Filmora and drag and drop it to the timeline as shown below.

Step2 Click on the monitor icon and select “Change Project Aspect Ratio” in the drop-down menu.

Step3 In the “Project Settings” window, you can change your video’s Aspect Ratio, Resolution, Frame Rate, and Color space.

Step4 Once you are happy with your changes, click “OK” and close the window.

Step5 Double-click the video track and navigate to the Rotate option in the window. Hover your mouse over the dot in the Rotate tab until you get to 90 degrees. You could also adjust the rotation of the video by clicking on the pivot in the media player till the video is at 90 degrees.

Step6 Click “Export” to save a copy of the rotated video to your device.

Which Is Better To Rotate a Video? Media Player Classic or Wondershare Filmora?
Having seen both sides of the coin, you might wonder which option is better to help you rotate a video. In this section of the article, we pit Wondershare Filmora against Media Player Classic to help you determine which option will work best for you.
Take a look at the table below.
| Media Player Classic | Wondershare Filmora | |
|---|---|---|
| Operating System | Microsoft Windows | Windows & Mac |
| Ratings from G2 | N/A | 4.4/5 stars |
| Pricing | Free | Annual Plan – US$49.99/yearCross Platform Plan - US$59.99/YearPerpetual Plan - US$79.99 |
| Features | ● Enhanced video rendering● Removal of tearing● Supports SVCD, VCD, and DVD playback● AVI subtitles● Customizable toolbar | ● AI Portrait● Mask and blend● Text to speech● Silence detection● Audio visualizer● Motion tracking● Auto beat sync● Split screen● Title Editing● Preset templates |
As you have seen, Media player Classic doesn’t have the Rotate feature per se. However, you can assign shortcuts to the keys to rotate a video along three axes as you see fit. You can also use a combination of keys like Alt and Num to change how your video sits so you can enjoy it as you like.
On the other hand, Wondershare Filmora has a more comprehensive Rotate feature that allows you to drag your pointer along a bar till the video sits at the correct number of degrees.
This platform also provides additional features, like allowing you to scale the video to fit the screen and adjusting project settings like the resolution and frame rate. If you don’t want to use the sliding bar, you can use your pointer to manually adjust the rotation by clicking on the pivot with your pointer.
In a nutshell, Windows Media Player is the ideal choice if you want to rotate your video and leave it at that. However, if you are looking for more advanced features, you are better off choosing Wondershare Filmora. The latter option also makes your videos look more polished like they were edited by a professional.
Conclusion
Videos might be trickier to edit than photos, especially when you want to rotate them. Fortunately, developers have been working tirelessly to ensure you have many tools at your disposal to edit your videos from any device at any time.
If you don’t fancy editing videos on your laptop, you could download the software to your smartphone and rotate videos on the move. Technology is truly a blessing that has come to make our work easier. Hopefully, after reading this article, you can effortlessly rotate any video you encounter.
Unlink Audio and Video in DaVinci Resolve [Detailed Steps]
There are various reasons why someone might want to remove audio from a video. Some of the film shots will have a lot of background noise, which might be distracting while watching the video. Some people like to include alternative audio or a soundtrack to make their films more presentable and attract people. So, whether you want to watch a silent video or one with a separate audio file, you’ll have to erase the original audio.
How To Detach Audio and Video in Da Vinci Resolve
DaVinci Resolve is a sound and video editing program for all types of files. It has numerous applications. Let’s begin with audio extraction from a video clip below:
- Launch the DaVinci Resolve and open the file from File>Open>Select video clip.
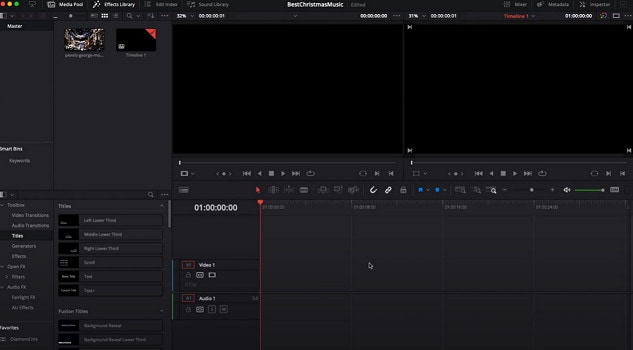
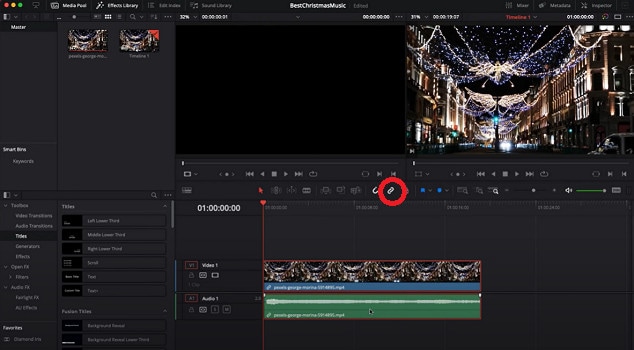
- All you have to do with DaVinci Resolve is tap on the chain link in the toolbar above to delete audio from any clip. Alternatively, you may just press down the “ctrl + shift + I” keys to connect and unlink the audio from your clip. Inspect the equalizer after that, and you’re done.
- You can now export the footage on your computer once you’ve finished editing and are pleased with the progress.
Other Alternatives
Suppose you find Da Vinci Resolve very complicated, and you get confused a lot while using it. I prepared a list of a few alternatives that you may use to detach the audio to your videos.
Besides extracting sound from video, the software listed below also has functionality for editing the audio file. Here are some of the most excellent and most popular audio separation and replacement tools:
#1: Wondershare Filmora – Overall Best
It is available on Windows and Mac.
Wondershare Filmora is a popular video editing program used all over the world. Filmora includes all the capabilities that will give you the most outstanding results, whether you’re doing easy video editing, advanced video editing, or even making movies. It also has specific editing features for social media videos.
Follow these steps below, and let’s look at how to detach audio from a video file with Filmora:
- Launch Filmora, then click on File-Import Media and load the video clip to the Media Library, wherein the sound needs to be deleted.
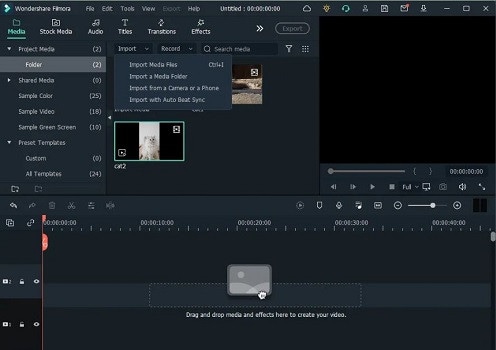
- Drag and drop using the mouse the video clips from the Media Library to the Timeline when it has been imported.
- Click Detach Audio from the context menu of the video file on the timeline.

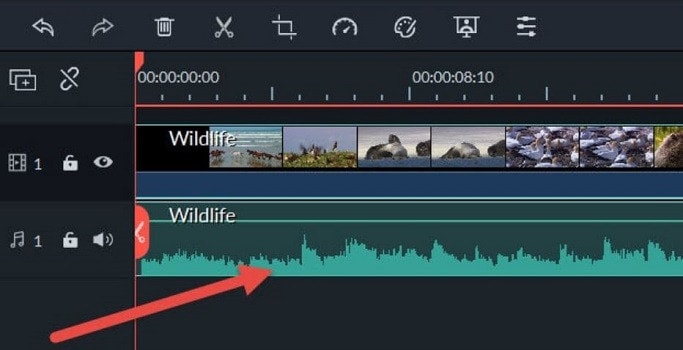
- The audio will now show on the audio track below in a different format.
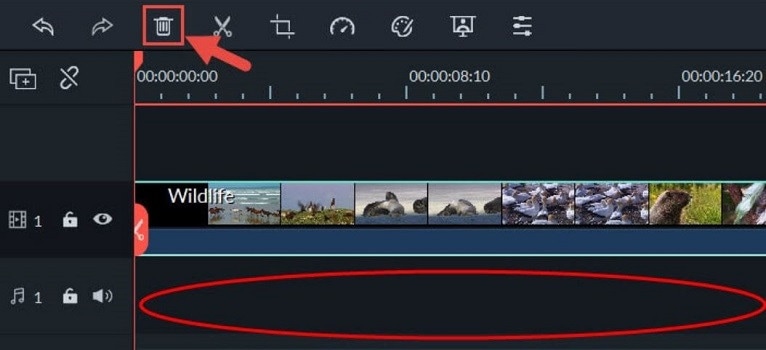
- To completely remove the audio file, press on it and simply tap the Delete icon.
You may add a new sound to your video clip in the same manner, you did with the video (import, drag, and drop). Filmora also offers options that enable you to edit and add effects to an audio track.
#2: VSDC Video Editor
It is available on Windows and Mac.
VSDC is a popular video editing program that can handle high-resolution videos such as VR 360-degree, 4K UHD, and 3D films. It also allows users to capture speech and film from the screen and save the material in any format they want. Let’s look at how VSDC can be used to eliminate audio from video:
- Upload the clips you want to edit into VSDC.
- Pick the Properties option from the toolbar by right-clicking on the file with the cursor. A small window will drop down from the right side of the screen.

- You will find a Split to Audio and Video tab at the very bottom of the window; select it.
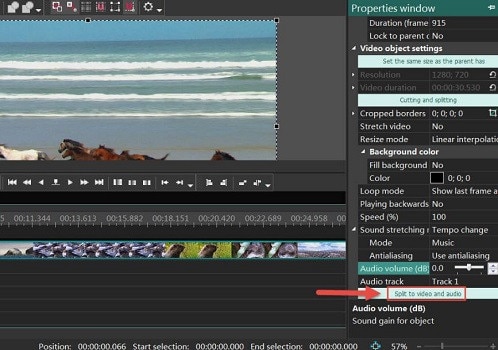
- On the timeline, the sound will now be divided from the video.
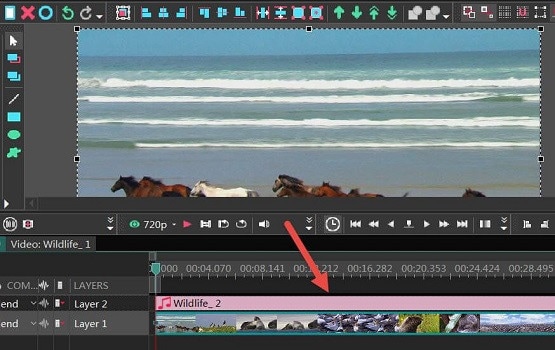
- Erase the audio file by clicking on it. Then, the video is now playable without audio.
VSDC also gives you the option of muting the audio rather than deleting it; however, deleting the audio is preferred.
#3: AudioRemover Tool
It is available on Windows, Mac, and Online.
The AudioRemover Tool is a program that allows you to eliminate audio from any video without having to re-encode it. It is an online service that can be accessed using a browser on Windows and Mac computers. The AudioRemover program can be used by those who do not want to download and install video editing software or just wish to remove audio from video files without additional editing. It can handle any video format, including MP4, MOV, and AVI.
Let’s look at how you can use this application to delete audio:
- Open the online AudioRemover.
- Choose the source video using the Browse tab, then press the Upload Video icon.

- You can save the media files (without audio) once the uploading is finished by clicking the Download File button next to the Completed indication.
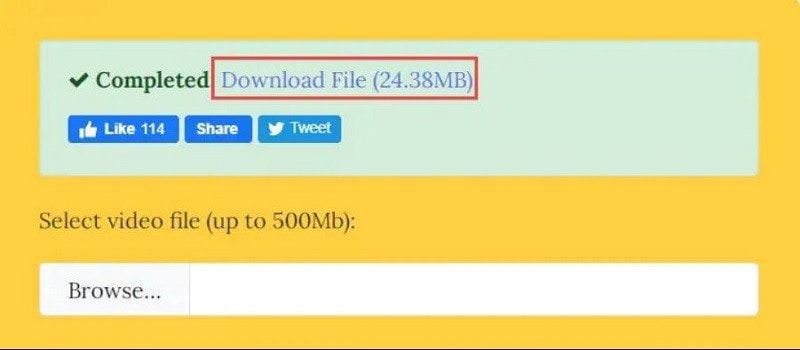
This program requires an active connection to the internet, and you cannot upload files larger than 500 MB.
#4: Windows Movie Maker
It is available on Windows.
Because it used to be included in the Windows Essentials software set, Windows Movie Maker is among the most popular accessible editing programs. Let’s have a look at how Movie Maker handles audio extraction.
- Upload the video you want to modify into Windows Movie Maker.
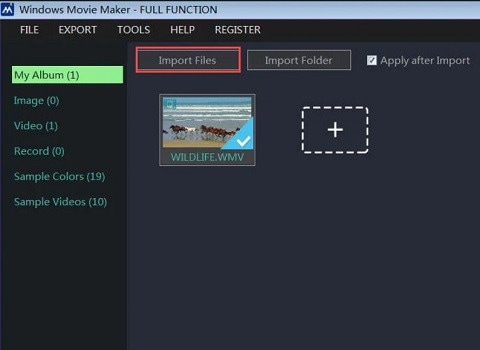
- Create a timeline for the video. Remove audio by right-clicking it (You may also click Detach Audio, and then it will detach the sound from the audio track)
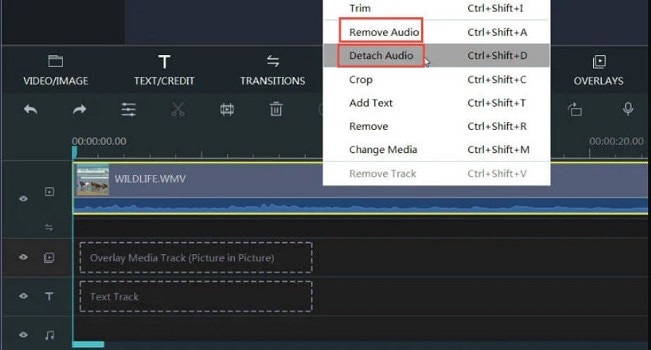
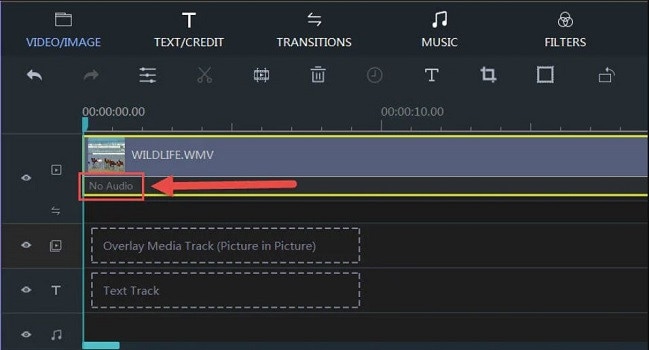
- It will immediately erase the sound, and it will not show any Audio input anymore.
Wrapping Things Up
People’s viewing experiences are greatly influenced by the audio accompanying a video. No matter how wonderful or perfect a video clip is, if the audio playing while watching it is terrible, it may be a very frustrating experience. So, we’ve gone over a few different software options for removing audio from a video file and replacing it with another audio in a couple of moments.
Frequently Asked Questions
How to Insert Audio to Video Clip in Da Vinci Resolve?
There may be times that your video may require the addition of music, background audio, or wooshing sounds.
To begin, open Resolve and import your audio clip:
- Navigate to the “Edit” page.
- Select the tab “Media Pool.”
- Right-click and choose “Import Media” or push “Ctrl + i.”
- Pick your audio clip and browse to your location.
- Select “Open.”
The audio clip is now imported into the “Media Pool.” After that, you’ll need to figure out which part of the audio track you’ll use.
Double-click the audio clip to play it. In the “Source Viewer,” it will appear.
Set the needed audio parts in (press I) and out (press O). Alternatively, if you need the entire soundtrack, there’s no need to set in and out.
Drag & drop the audio track (from the media pool) underneath the video you want to use. It will then add the sound file with the selected portion of the audio. You can now modify the audio to match the visual.
How to Link Your Audio and Video in DaVinci Resolve?
It’s best to link the soundtrack (music, sound effect, or background music) to the relevant video once you’ve adjusted the audio file.
Here’s how to connect audio and video in a timeline:
- Press “Ctrl” or “Cmd” to toggle both the video and audio.
- Right-click and choose “Link Clips.” You may also use the shortcuts “Ctrl + Alt + L” or “Option + Command + L.”
- The sound and visual are now both connected.
Thus, you can rest guaranteed that the audio will follow your movie wherever it goes. There will be no issues with out-of-sync!
How Do You Link Many Audio and Video Files Together in DaVinci Resolve?
Several video and audio segments can be linked together to form a single one. You can rearrange them anywhere in the timeline, and they will not be out of sync.
This is how you connect many clips:
- By holding down the “Ctrl” or “Cmd” key, you can choose all the video and audio clips you want.
- Right-click and choose “Link Clips.” You may also use the shortcut keys “Ctrl + Alt + L” or “Option + Command + L”.
- Now, all your video or audio files are linked together.
Is Any Music Available to Use for Editing?
Understanding copyright law can be complicated. It’s best to use free music for video editing if you don’t want to be accused of copyright violation.
Additionally, you can purchase two licenses to avoid copyright concerns. The producer controls the synchronization license, and the master license to use the song recording is managed by the publishing company.
If you don’t want to go into legal trouble, the only thing you need to remember is never to utilize any illegal video.
Is There Any Free Music in DaVinci Resolve?
DaVinci Resolve does not include any free music; however, it does include royalty-free sound effects noise. To get started, you can download and install the available sound package.
What Software Provides Free Music?
The Audio Collection in Wondershare Filmora has over 50 royalty-free audio tracks for videos, with more to come.
For video production, you can acquire free background music.
In addition, Filmora has 25 sound effects, including animal sounds, video game sounds, and beeps. With Filmora, you may use more advanced editing features like keyframing, background noise elimination, cut, trim, crop, PIP effects, green-screen effects, and more to add free-choice music to your film.
Filmora will enhance the appeal of your video by giving free background music. You may also tweak the background sound, such as speeding up and slowing down, fade-in and fade-out.

- All you have to do with DaVinci Resolve is tap on the chain link in the toolbar above to delete audio from any clip. Alternatively, you may just press down the “ctrl + shift + I” keys to connect and unlink the audio from your clip. Inspect the equalizer after that, and you’re done.

- You can now export the footage on your computer once you’ve finished editing and are pleased with the progress.
Other Alternatives
Suppose you find Da Vinci Resolve very complicated, and you get confused a lot while using it. I prepared a list of a few alternatives that you may use to detach the audio to your videos.
Besides extracting sound from video, the software listed below also has functionality for editing the audio file. Here are some of the most excellent and most popular audio separation and replacement tools:
#1: Wondershare Filmora – Overall Best
It is available on Windows and Mac.
Wondershare Filmora is a popular video editing program used all over the world. Filmora includes all the capabilities that will give you the most outstanding results, whether you’re doing easy video editing, advanced video editing, or even making movies. It also has specific editing features for social media videos.
Follow these steps below, and let’s look at how to detach audio from a video file with Filmora:
- Launch Filmora, then click on File-Import Media and load the video clip to the Media Library, wherein the sound needs to be deleted.

- Drag and drop using the mouse the video clips from the Media Library to the Timeline when it has been imported.
- Click Detach Audio from the context menu of the video file on the timeline.

- The audio will now show on the audio track below in a different format.

- To completely remove the audio file, press on it and simply tap the Delete icon.

You may add a new sound to your video clip in the same manner, you did with the video (import, drag, and drop). Filmora also offers options that enable you to edit and add effects to an audio track.
#2: VSDC Video Editor
It is available on Windows and Mac.
VSDC is a popular video editing program that can handle high-resolution videos such as VR 360-degree, 4K UHD, and 3D films. It also allows users to capture speech and film from the screen and save the material in any format they want. Let’s look at how VSDC can be used to eliminate audio from video:
- Upload the clips you want to edit into VSDC.
- Pick the Properties option from the toolbar by right-clicking on the file with the cursor. A small window will drop down from the right side of the screen.

- You will find a Split to Audio and Video tab at the very bottom of the window; select it.

- On the timeline, the sound will now be divided from the video.

- Erase the audio file by clicking on it. Then, the video is now playable without audio.
VSDC also gives you the option of muting the audio rather than deleting it; however, deleting the audio is preferred.
#3: AudioRemover Tool
It is available on Windows, Mac, and Online.
The AudioRemover Tool is a program that allows you to eliminate audio from any video without having to re-encode it. It is an online service that can be accessed using a browser on Windows and Mac computers. The AudioRemover program can be used by those who do not want to download and install video editing software or just wish to remove audio from video files without additional editing. It can handle any video format, including MP4, MOV, and AVI.
Let’s look at how you can use this application to delete audio:
- Open the online AudioRemover.
- Choose the source video using the Browse tab, then press the Upload Video icon.

- You can save the media files (without audio) once the uploading is finished by clicking the Download File button next to the Completed indication.

This program requires an active connection to the internet, and you cannot upload files larger than 500 MB.
#4: Windows Movie Maker
It is available on Windows.
Because it used to be included in the Windows Essentials software set, Windows Movie Maker is among the most popular accessible editing programs. Let’s have a look at how Movie Maker handles audio extraction.
- Upload the video you want to modify into Windows Movie Maker.

- Create a timeline for the video. Remove audio by right-clicking it (You may also click Detach Audio, and then it will detach the sound from the audio track)

- It will immediately erase the sound, and it will not show any Audio input anymore.

Wrapping Things Up
People’s viewing experiences are greatly influenced by the audio accompanying a video. No matter how wonderful or perfect a video clip is, if the audio playing while watching it is terrible, it may be a very frustrating experience. So, we’ve gone over a few different software options for removing audio from a video file and replacing it with another audio in a couple of moments.
Frequently Asked Questions
How to Insert Audio to Video Clip in Da Vinci Resolve?
There may be times that your video may require the addition of music, background audio, or wooshing sounds.
To begin, open Resolve and import your audio clip:
- Navigate to the “Edit” page.
- Select the tab “Media Pool.”
- Right-click and choose “Import Media” or push “Ctrl + i.”
- Pick your audio clip and browse to your location.
- Select “Open.”
The audio clip is now imported into the “Media Pool.” After that, you’ll need to figure out which part of the audio track you’ll use.
Double-click the audio clip to play it. In the “Source Viewer,” it will appear.
Set the needed audio parts in (press I) and out (press O). Alternatively, if you need the entire soundtrack, there’s no need to set in and out.
Drag & drop the audio track (from the media pool) underneath the video you want to use. It will then add the sound file with the selected portion of the audio. You can now modify the audio to match the visual.
How to Link Your Audio and Video in DaVinci Resolve?
It’s best to link the soundtrack (music, sound effect, or background music) to the relevant video once you’ve adjusted the audio file.
Here’s how to connect audio and video in a timeline:
- Press “Ctrl” or “Cmd” to toggle both the video and audio.
- Right-click and choose “Link Clips.” You may also use the shortcuts “Ctrl + Alt + L” or “Option + Command + L.”
- The sound and visual are now both connected.
Thus, you can rest guaranteed that the audio will follow your movie wherever it goes. There will be no issues with out-of-sync!
How Do You Link Many Audio and Video Files Together in DaVinci Resolve?
Several video and audio segments can be linked together to form a single one. You can rearrange them anywhere in the timeline, and they will not be out of sync.
This is how you connect many clips:
- By holding down the “Ctrl” or “Cmd” key, you can choose all the video and audio clips you want.
- Right-click and choose “Link Clips.” You may also use the shortcut keys “Ctrl + Alt + L” or “Option + Command + L”.
- Now, all your video or audio files are linked together.
Is Any Music Available to Use for Editing?
Understanding copyright law can be complicated. It’s best to use free music for video editing if you don’t want to be accused of copyright violation.
Additionally, you can purchase two licenses to avoid copyright concerns. The producer controls the synchronization license, and the master license to use the song recording is managed by the publishing company.
If you don’t want to go into legal trouble, the only thing you need to remember is never to utilize any illegal video.
Is There Any Free Music in DaVinci Resolve?
DaVinci Resolve does not include any free music; however, it does include royalty-free sound effects noise. To get started, you can download and install the available sound package.
What Software Provides Free Music?
The Audio Collection in Wondershare Filmora has over 50 royalty-free audio tracks for videos, with more to come.
For video production, you can acquire free background music.
In addition, Filmora has 25 sound effects, including animal sounds, video game sounds, and beeps. With Filmora, you may use more advanced editing features like keyframing, background noise elimination, cut, trim, crop, PIP effects, green-screen effects, and more to add free-choice music to your film.
Filmora will enhance the appeal of your video by giving free background music. You may also tweak the background sound, such as speeding up and slowing down, fade-in and fade-out.

- All you have to do with DaVinci Resolve is tap on the chain link in the toolbar above to delete audio from any clip. Alternatively, you may just press down the “ctrl + shift + I” keys to connect and unlink the audio from your clip. Inspect the equalizer after that, and you’re done.

- You can now export the footage on your computer once you’ve finished editing and are pleased with the progress.
Other Alternatives
Suppose you find Da Vinci Resolve very complicated, and you get confused a lot while using it. I prepared a list of a few alternatives that you may use to detach the audio to your videos.
Besides extracting sound from video, the software listed below also has functionality for editing the audio file. Here are some of the most excellent and most popular audio separation and replacement tools:
#1: Wondershare Filmora – Overall Best
It is available on Windows and Mac.
Wondershare Filmora is a popular video editing program used all over the world. Filmora includes all the capabilities that will give you the most outstanding results, whether you’re doing easy video editing, advanced video editing, or even making movies. It also has specific editing features for social media videos.
Follow these steps below, and let’s look at how to detach audio from a video file with Filmora:
- Launch Filmora, then click on File-Import Media and load the video clip to the Media Library, wherein the sound needs to be deleted.

- Drag and drop using the mouse the video clips from the Media Library to the Timeline when it has been imported.
- Click Detach Audio from the context menu of the video file on the timeline.

- The audio will now show on the audio track below in a different format.

- To completely remove the audio file, press on it and simply tap the Delete icon.

You may add a new sound to your video clip in the same manner, you did with the video (import, drag, and drop). Filmora also offers options that enable you to edit and add effects to an audio track.
#2: VSDC Video Editor
It is available on Windows and Mac.
VSDC is a popular video editing program that can handle high-resolution videos such as VR 360-degree, 4K UHD, and 3D films. It also allows users to capture speech and film from the screen and save the material in any format they want. Let’s look at how VSDC can be used to eliminate audio from video:
- Upload the clips you want to edit into VSDC.
- Pick the Properties option from the toolbar by right-clicking on the file with the cursor. A small window will drop down from the right side of the screen.

- You will find a Split to Audio and Video tab at the very bottom of the window; select it.

- On the timeline, the sound will now be divided from the video.

- Erase the audio file by clicking on it. Then, the video is now playable without audio.
VSDC also gives you the option of muting the audio rather than deleting it; however, deleting the audio is preferred.
#3: AudioRemover Tool
It is available on Windows, Mac, and Online.
The AudioRemover Tool is a program that allows you to eliminate audio from any video without having to re-encode it. It is an online service that can be accessed using a browser on Windows and Mac computers. The AudioRemover program can be used by those who do not want to download and install video editing software or just wish to remove audio from video files without additional editing. It can handle any video format, including MP4, MOV, and AVI.
Let’s look at how you can use this application to delete audio:
- Open the online AudioRemover.
- Choose the source video using the Browse tab, then press the Upload Video icon.

- You can save the media files (without audio) once the uploading is finished by clicking the Download File button next to the Completed indication.

This program requires an active connection to the internet, and you cannot upload files larger than 500 MB.
#4: Windows Movie Maker
It is available on Windows.
Because it used to be included in the Windows Essentials software set, Windows Movie Maker is among the most popular accessible editing programs. Let’s have a look at how Movie Maker handles audio extraction.
- Upload the video you want to modify into Windows Movie Maker.

- Create a timeline for the video. Remove audio by right-clicking it (You may also click Detach Audio, and then it will detach the sound from the audio track)

- It will immediately erase the sound, and it will not show any Audio input anymore.

Wrapping Things Up
People’s viewing experiences are greatly influenced by the audio accompanying a video. No matter how wonderful or perfect a video clip is, if the audio playing while watching it is terrible, it may be a very frustrating experience. So, we’ve gone over a few different software options for removing audio from a video file and replacing it with another audio in a couple of moments.
Frequently Asked Questions
How to Insert Audio to Video Clip in Da Vinci Resolve?
There may be times that your video may require the addition of music, background audio, or wooshing sounds.
To begin, open Resolve and import your audio clip:
- Navigate to the “Edit” page.
- Select the tab “Media Pool.”
- Right-click and choose “Import Media” or push “Ctrl + i.”
- Pick your audio clip and browse to your location.
- Select “Open.”
The audio clip is now imported into the “Media Pool.” After that, you’ll need to figure out which part of the audio track you’ll use.
Double-click the audio clip to play it. In the “Source Viewer,” it will appear.
Set the needed audio parts in (press I) and out (press O). Alternatively, if you need the entire soundtrack, there’s no need to set in and out.
Drag & drop the audio track (from the media pool) underneath the video you want to use. It will then add the sound file with the selected portion of the audio. You can now modify the audio to match the visual.
How to Link Your Audio and Video in DaVinci Resolve?
It’s best to link the soundtrack (music, sound effect, or background music) to the relevant video once you’ve adjusted the audio file.
Here’s how to connect audio and video in a timeline:
- Press “Ctrl” or “Cmd” to toggle both the video and audio.
- Right-click and choose “Link Clips.” You may also use the shortcuts “Ctrl + Alt + L” or “Option + Command + L.”
- The sound and visual are now both connected.
Thus, you can rest guaranteed that the audio will follow your movie wherever it goes. There will be no issues with out-of-sync!
How Do You Link Many Audio and Video Files Together in DaVinci Resolve?
Several video and audio segments can be linked together to form a single one. You can rearrange them anywhere in the timeline, and they will not be out of sync.
This is how you connect many clips:
- By holding down the “Ctrl” or “Cmd” key, you can choose all the video and audio clips you want.
- Right-click and choose “Link Clips.” You may also use the shortcut keys “Ctrl + Alt + L” or “Option + Command + L”.
- Now, all your video or audio files are linked together.
Is Any Music Available to Use for Editing?
Understanding copyright law can be complicated. It’s best to use free music for video editing if you don’t want to be accused of copyright violation.
Additionally, you can purchase two licenses to avoid copyright concerns. The producer controls the synchronization license, and the master license to use the song recording is managed by the publishing company.
If you don’t want to go into legal trouble, the only thing you need to remember is never to utilize any illegal video.
Is There Any Free Music in DaVinci Resolve?
DaVinci Resolve does not include any free music; however, it does include royalty-free sound effects noise. To get started, you can download and install the available sound package.
What Software Provides Free Music?
The Audio Collection in Wondershare Filmora has over 50 royalty-free audio tracks for videos, with more to come.
For video production, you can acquire free background music.
In addition, Filmora has 25 sound effects, including animal sounds, video game sounds, and beeps. With Filmora, you may use more advanced editing features like keyframing, background noise elimination, cut, trim, crop, PIP effects, green-screen effects, and more to add free-choice music to your film.
Filmora will enhance the appeal of your video by giving free background music. You may also tweak the background sound, such as speeding up and slowing down, fade-in and fade-out.

- All you have to do with DaVinci Resolve is tap on the chain link in the toolbar above to delete audio from any clip. Alternatively, you may just press down the “ctrl + shift + I” keys to connect and unlink the audio from your clip. Inspect the equalizer after that, and you’re done.

- You can now export the footage on your computer once you’ve finished editing and are pleased with the progress.
Other Alternatives
Suppose you find Da Vinci Resolve very complicated, and you get confused a lot while using it. I prepared a list of a few alternatives that you may use to detach the audio to your videos.
Besides extracting sound from video, the software listed below also has functionality for editing the audio file. Here are some of the most excellent and most popular audio separation and replacement tools:
#1: Wondershare Filmora – Overall Best
It is available on Windows and Mac.
Wondershare Filmora is a popular video editing program used all over the world. Filmora includes all the capabilities that will give you the most outstanding results, whether you’re doing easy video editing, advanced video editing, or even making movies. It also has specific editing features for social media videos.
Follow these steps below, and let’s look at how to detach audio from a video file with Filmora:
- Launch Filmora, then click on File-Import Media and load the video clip to the Media Library, wherein the sound needs to be deleted.

- Drag and drop using the mouse the video clips from the Media Library to the Timeline when it has been imported.
- Click Detach Audio from the context menu of the video file on the timeline.

- The audio will now show on the audio track below in a different format.

- To completely remove the audio file, press on it and simply tap the Delete icon.

You may add a new sound to your video clip in the same manner, you did with the video (import, drag, and drop). Filmora also offers options that enable you to edit and add effects to an audio track.
#2: VSDC Video Editor
It is available on Windows and Mac.
VSDC is a popular video editing program that can handle high-resolution videos such as VR 360-degree, 4K UHD, and 3D films. It also allows users to capture speech and film from the screen and save the material in any format they want. Let’s look at how VSDC can be used to eliminate audio from video:
- Upload the clips you want to edit into VSDC.
- Pick the Properties option from the toolbar by right-clicking on the file with the cursor. A small window will drop down from the right side of the screen.

- You will find a Split to Audio and Video tab at the very bottom of the window; select it.

- On the timeline, the sound will now be divided from the video.

- Erase the audio file by clicking on it. Then, the video is now playable without audio.
VSDC also gives you the option of muting the audio rather than deleting it; however, deleting the audio is preferred.
#3: AudioRemover Tool
It is available on Windows, Mac, and Online.
The AudioRemover Tool is a program that allows you to eliminate audio from any video without having to re-encode it. It is an online service that can be accessed using a browser on Windows and Mac computers. The AudioRemover program can be used by those who do not want to download and install video editing software or just wish to remove audio from video files without additional editing. It can handle any video format, including MP4, MOV, and AVI.
Let’s look at how you can use this application to delete audio:
- Open the online AudioRemover.
- Choose the source video using the Browse tab, then press the Upload Video icon.

- You can save the media files (without audio) once the uploading is finished by clicking the Download File button next to the Completed indication.

This program requires an active connection to the internet, and you cannot upload files larger than 500 MB.
#4: Windows Movie Maker
It is available on Windows.
Because it used to be included in the Windows Essentials software set, Windows Movie Maker is among the most popular accessible editing programs. Let’s have a look at how Movie Maker handles audio extraction.
- Upload the video you want to modify into Windows Movie Maker.

- Create a timeline for the video. Remove audio by right-clicking it (You may also click Detach Audio, and then it will detach the sound from the audio track)

- It will immediately erase the sound, and it will not show any Audio input anymore.

Wrapping Things Up
People’s viewing experiences are greatly influenced by the audio accompanying a video. No matter how wonderful or perfect a video clip is, if the audio playing while watching it is terrible, it may be a very frustrating experience. So, we’ve gone over a few different software options for removing audio from a video file and replacing it with another audio in a couple of moments.
Frequently Asked Questions
How to Insert Audio to Video Clip in Da Vinci Resolve?
There may be times that your video may require the addition of music, background audio, or wooshing sounds.
To begin, open Resolve and import your audio clip:
- Navigate to the “Edit” page.
- Select the tab “Media Pool.”
- Right-click and choose “Import Media” or push “Ctrl + i.”
- Pick your audio clip and browse to your location.
- Select “Open.”
The audio clip is now imported into the “Media Pool.” After that, you’ll need to figure out which part of the audio track you’ll use.
Double-click the audio clip to play it. In the “Source Viewer,” it will appear.
Set the needed audio parts in (press I) and out (press O). Alternatively, if you need the entire soundtrack, there’s no need to set in and out.
Drag & drop the audio track (from the media pool) underneath the video you want to use. It will then add the sound file with the selected portion of the audio. You can now modify the audio to match the visual.
How to Link Your Audio and Video in DaVinci Resolve?
It’s best to link the soundtrack (music, sound effect, or background music) to the relevant video once you’ve adjusted the audio file.
Here’s how to connect audio and video in a timeline:
- Press “Ctrl” or “Cmd” to toggle both the video and audio.
- Right-click and choose “Link Clips.” You may also use the shortcuts “Ctrl + Alt + L” or “Option + Command + L.”
- The sound and visual are now both connected.
Thus, you can rest guaranteed that the audio will follow your movie wherever it goes. There will be no issues with out-of-sync!
How Do You Link Many Audio and Video Files Together in DaVinci Resolve?
Several video and audio segments can be linked together to form a single one. You can rearrange them anywhere in the timeline, and they will not be out of sync.
This is how you connect many clips:
- By holding down the “Ctrl” or “Cmd” key, you can choose all the video and audio clips you want.
- Right-click and choose “Link Clips.” You may also use the shortcut keys “Ctrl + Alt + L” or “Option + Command + L”.
- Now, all your video or audio files are linked together.
Is Any Music Available to Use for Editing?
Understanding copyright law can be complicated. It’s best to use free music for video editing if you don’t want to be accused of copyright violation.
Additionally, you can purchase two licenses to avoid copyright concerns. The producer controls the synchronization license, and the master license to use the song recording is managed by the publishing company.
If you don’t want to go into legal trouble, the only thing you need to remember is never to utilize any illegal video.
Is There Any Free Music in DaVinci Resolve?
DaVinci Resolve does not include any free music; however, it does include royalty-free sound effects noise. To get started, you can download and install the available sound package.
What Software Provides Free Music?
The Audio Collection in Wondershare Filmora has over 50 royalty-free audio tracks for videos, with more to come.
For video production, you can acquire free background music.
In addition, Filmora has 25 sound effects, including animal sounds, video game sounds, and beeps. With Filmora, you may use more advanced editing features like keyframing, background noise elimination, cut, trim, crop, PIP effects, green-screen effects, and more to add free-choice music to your film.
Filmora will enhance the appeal of your video by giving free background music. You may also tweak the background sound, such as speeding up and slowing down, fade-in and fade-out.
Easy Guide to Use a Stabilization Tool in Filmora
Does your video shake so much? Shaking movement on your camera is often inevitable, especially if you don’t use a camera stabilizer or a camera with no built-in image stabilization. As a result, it can make your video look distracting and difficult to watch.
But you don’t need to worry. You can use a stabilization tool in Filmora . A stabilization tool is a feature that can help to correct for camera shake and other types of movement. If you are a handheld shooter, you will find this tool extremely helpful.
Part 1: When do you need to stabilize your video?
Now, let’s talk about when you should stabilize your video. If you’re shooting something that is moving, like people or animals, you will definitely want to stabilize your video. This will help ensure that the video is smooth and steady.
Another time you may want to stabilize your video is if you’re shooting in a low-light situation. It will help to ensure that your video is not too shaky.
Finally, if you’re shooting a video that’s going to be displayed on a large screen, you may want to stabilize your video. Stabilizing your video will help ensure the output is crisp and clear.
Part 2: How to stabilize your video with Filmora
Filmora has a stabilization feature that can help to smooth your video and make it look more professional. If you haven’t installed Filmora yet, you can download it for free.
Free Download For Win 7 or later(64-bit)
Free Download For macOS 10.14 or later
So, should you have a wobble movement in your video, follow these steps to make it smoother in no time:
Step1 Launch Filmora 11 and create a new project.
Step2 Import your video to Filmora.
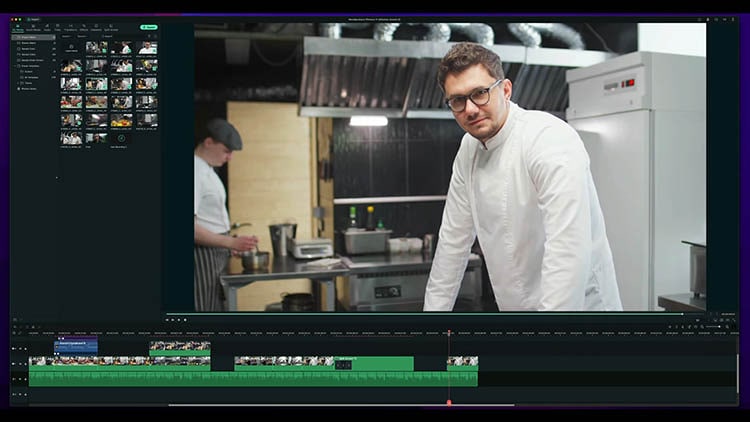
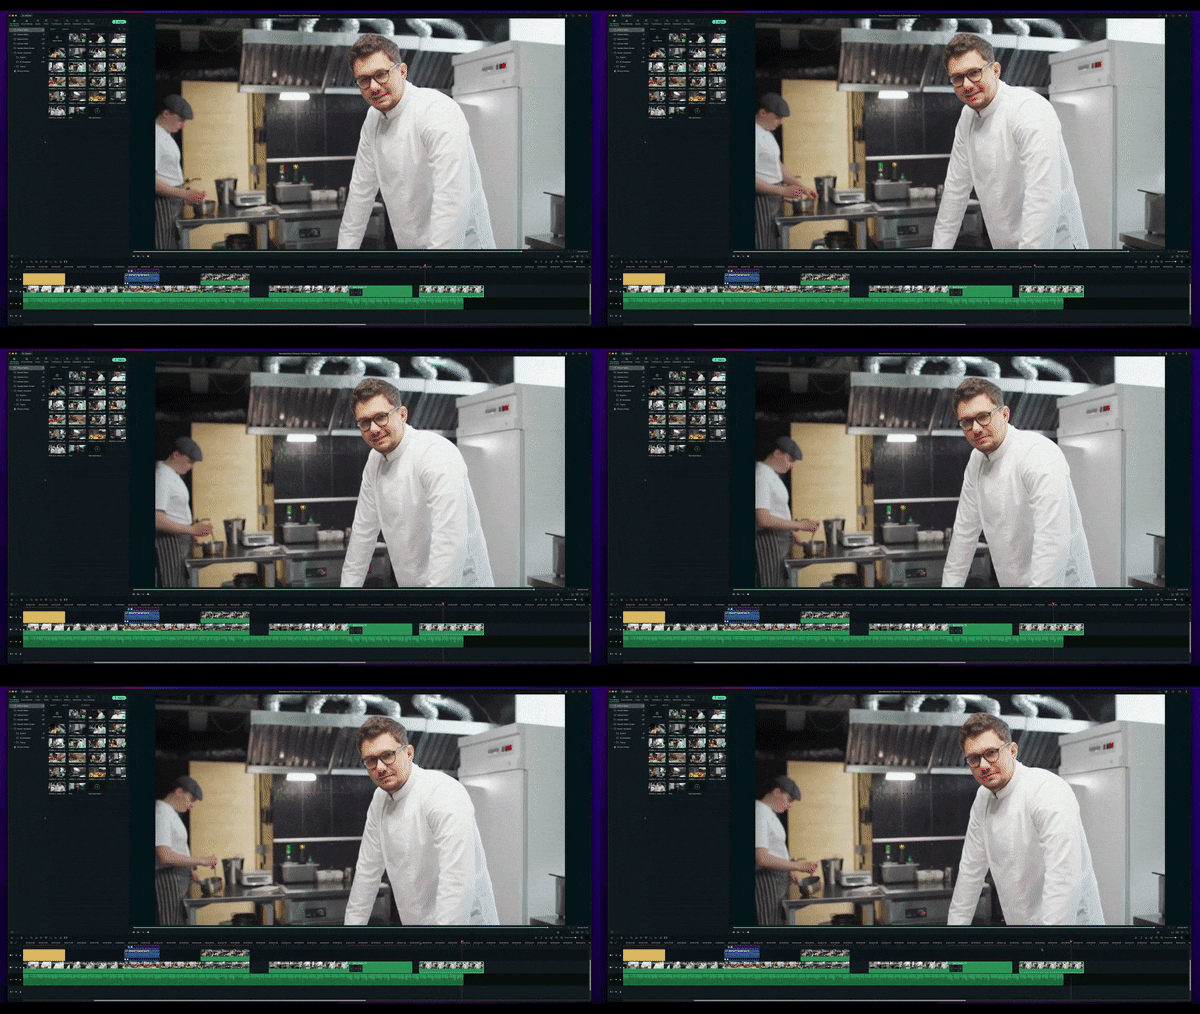
Step3 After you import your video to Filmora, the Stabilization must have been off. So, switch the Stabilization toggle on, then a loading bar will start going up to analyze the clip.
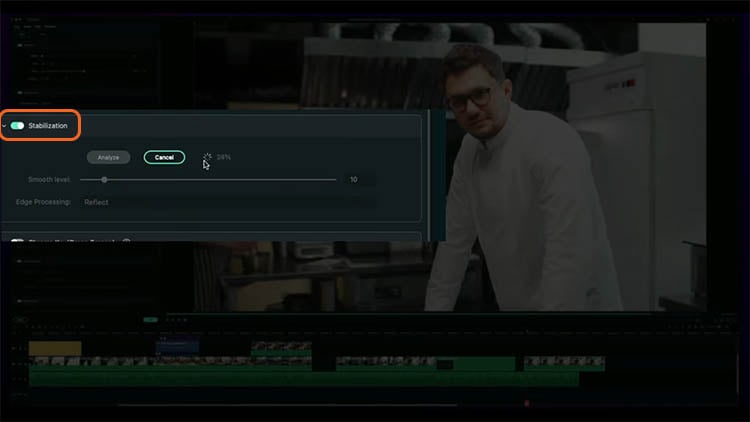
Step4 Once it finishes analyzing, the smooth level will default to 10. See the preview whether you like how it turns out.
Before
After
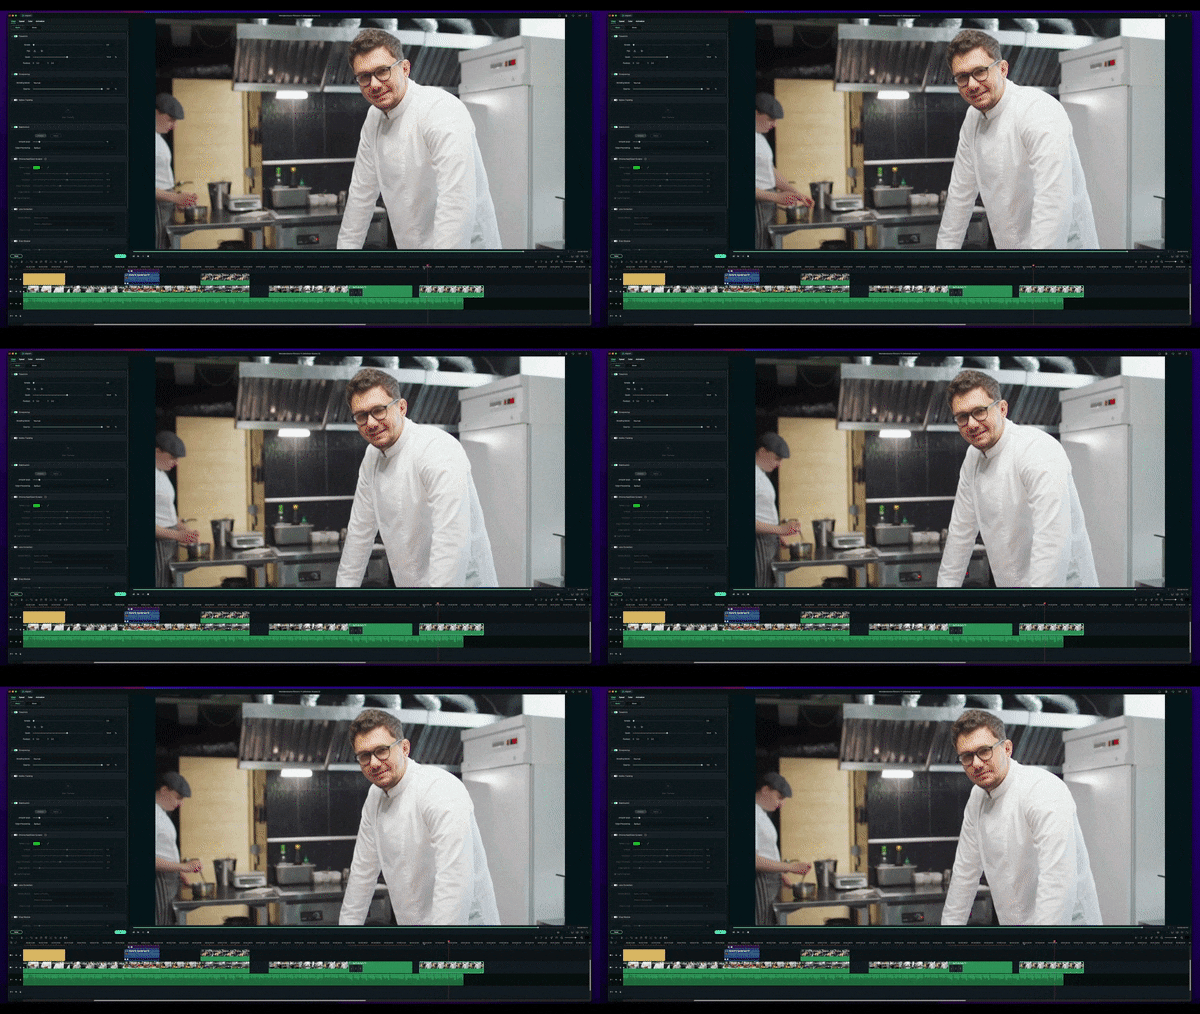
Please note that the center point of your image will always be the most stable. The more shaky a clip is, the more it will crop into that image.
If you are unsatisfied with the default setting, increasing the Smoothness Level will result in more cropping to the image. On the contrary, if you put the Smoothness Level down to zero, you are no longer cropping into the image, but the result won’t be as smooth.
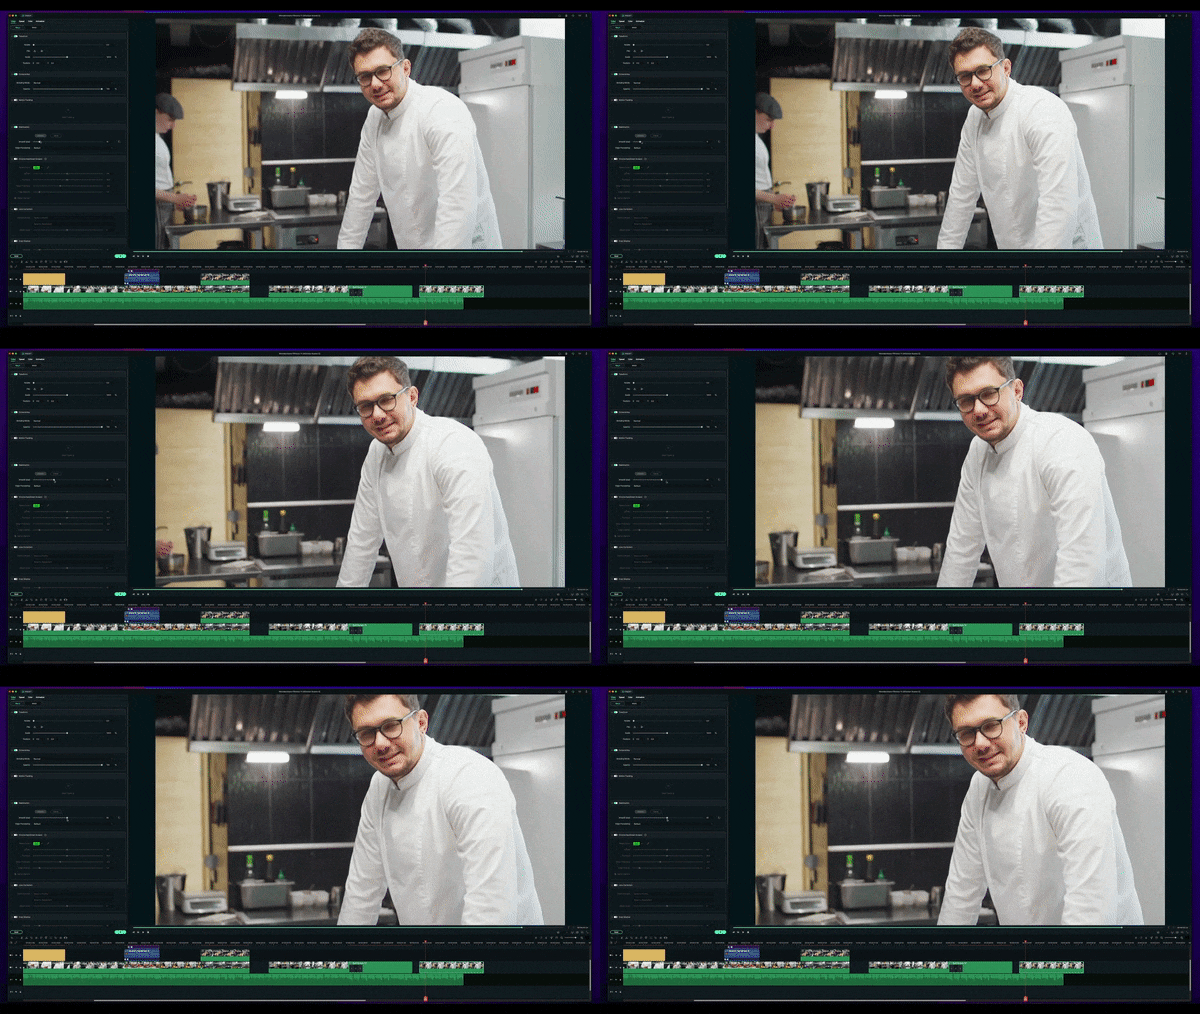
Should the cropping bother you, such as it crops the subject’s hair out of the frame, you can adjust it with Edge Processing.
If you change it to None, you will see the black bars that simulate how it stabilizes the clip. Try to hit play on the preview screen, and then you can see more clearly how the tool keeps the center of the frame to make it stable and less shaky.
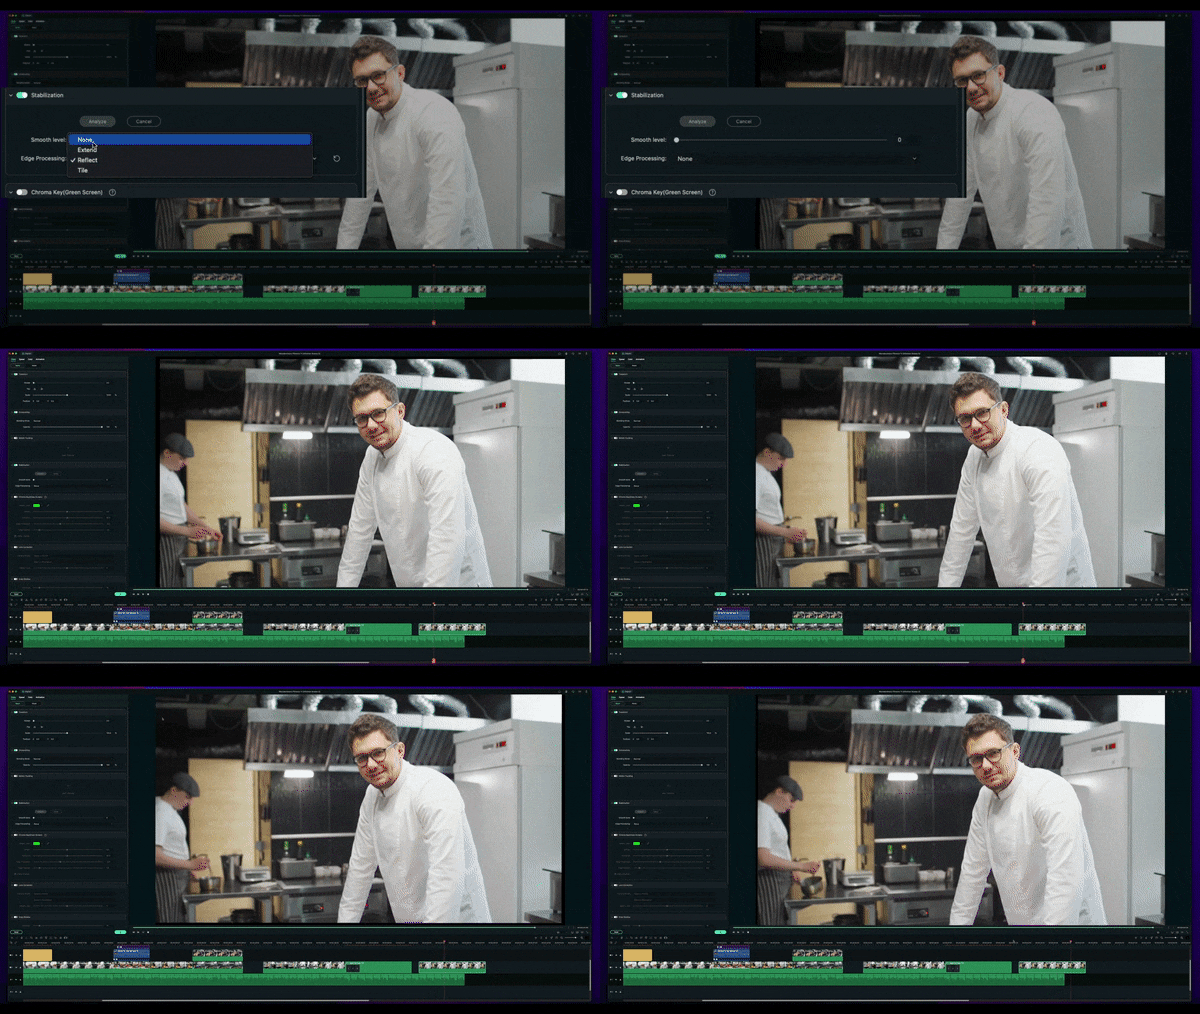
As Reflect is the default, the Extend uses artificial intelligence to extend the pixels, as you are often aware in Photoshop.
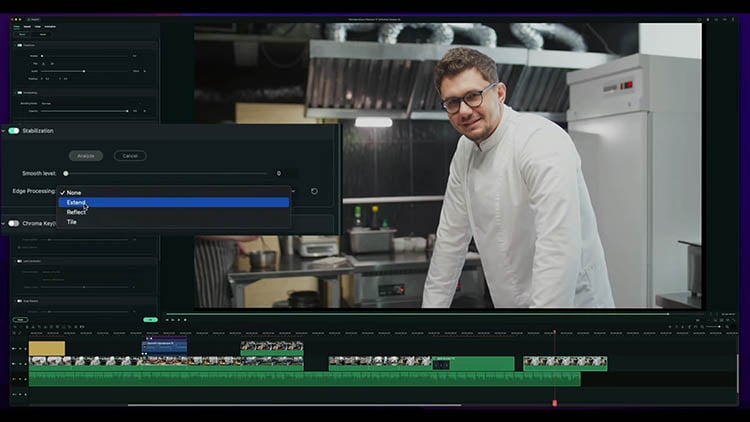
Besides the three, there is also the Tile option. Each of them would give a different result. You can try and use the one that works best for you.
Summary
When you’re shooting a video, you must have wanted it to be as smooth and stable as possible. By stabilizing your video, you can help ensure it’s smooth and easy to watch.
Filmora offers a Stabilization feature that allows you to easily improve your video’s quality. Simply select the video clip you want to stabilize and click the stabilization button. Filmora will do the rest, giving you a smooth and stable video.
Free Download For macOS 10.14 or later
So, should you have a wobble movement in your video, follow these steps to make it smoother in no time:
Step1 Launch Filmora 11 and create a new project.
Step2 Import your video to Filmora.

Step3 After you import your video to Filmora, the Stabilization must have been off. So, switch the Stabilization toggle on, then a loading bar will start going up to analyze the clip.

Step4 Once it finishes analyzing, the smooth level will default to 10. See the preview whether you like how it turns out.
Before

After

Please note that the center point of your image will always be the most stable. The more shaky a clip is, the more it will crop into that image.
If you are unsatisfied with the default setting, increasing the Smoothness Level will result in more cropping to the image. On the contrary, if you put the Smoothness Level down to zero, you are no longer cropping into the image, but the result won’t be as smooth.

Should the cropping bother you, such as it crops the subject’s hair out of the frame, you can adjust it with Edge Processing.
If you change it to None, you will see the black bars that simulate how it stabilizes the clip. Try to hit play on the preview screen, and then you can see more clearly how the tool keeps the center of the frame to make it stable and less shaky.

As Reflect is the default, the Extend uses artificial intelligence to extend the pixels, as you are often aware in Photoshop.

Besides the three, there is also the Tile option. Each of them would give a different result. You can try and use the one that works best for you.
Summary
When you’re shooting a video, you must have wanted it to be as smooth and stable as possible. By stabilizing your video, you can help ensure it’s smooth and easy to watch.
Filmora offers a Stabilization feature that allows you to easily improve your video’s quality. Simply select the video clip you want to stabilize and click the stabilization button. Filmora will do the rest, giving you a smooth and stable video.
Top Shortcut Towards Timeline Template
Best Shortcut Towards Timeline Template
An easy yet powerful editor
Numerous effects to choose from
Detailed tutorials provided by the official channel
In this article
01 [Best Tips To Become A Timeline Designer Now?](#Part 1)
02 [12 Editable Timeline Templates](#Part 2)
03 [How to Create a Timeline?](#Part 3)
04 [Time Template Q&A](#Part 4)
Part 1 Best Tips To Become A Timeline Designer Now?
If you desire to become an expert timeline designer, it is essential to hone your skills. Here are some tips that will help you in boosting your skills and become an expert.
01Keep it Simple
Keeping it simple looks beautiful, helps in communicating messages more clearly. Using required elements without making it look cluttered, will help to understand the messages more quickly. Adding space where it is necessary will make it look clean and you can fully focus on the content. Focus on the fonts as it will represent your content.
If you want to create some serious look, you can use black and white colors. This will make it look simpler. If you want to highlight specific content you can add your desired colors to it. This will make the specific content to stand out.
02Enlarge the images to wider dimension
Adding high quality images is not a big deal now. Images play an important role in design as they add context, and emotion and then you can communicate a message more easily. Try to display the images in full size so that it looks more impactful. Display the images as much as you can and take advantage from it, displaying them on full size gives a luxurious look.
If you want to make your images look more professional, add layers. Add an overlay to your images to change them in unicolor.
03Use simple shapes
Using simple shapes will enhance the look of the design. There are a lot of shapes from which you can choose like geometric, organic shapes etc. Geometric shapes include basic shapes like square, circle, rectangle and triangle. Circles are the best shapes as they don’t have any sharp corners or edges. Circles help to keep the content separate and look neat.
04Using dark color
Using dark color can be challenging to work on but it looks sophisticated. Using dark color with dark color text can be difficult to read and thus it should be avoided. Try to add a contrast color with a dark color background. Use dark color as your background and light color like grey, orange or yellow to highlight the specific content.
05Add borders
Borders are a set of designs shapes, boundaries of text boxes, lines, etc. that can make your document look more beautiful and attractive. Adding a border can enhance the look of the content and theme of the menu. You can customize the design and thickness of the page. It totally depends on you that if you want add colorful border, text border, picture border, text border and custom border then you can add them. Adding a border will make it look more clean and simple.
Part 2 Editable Timeline Templates
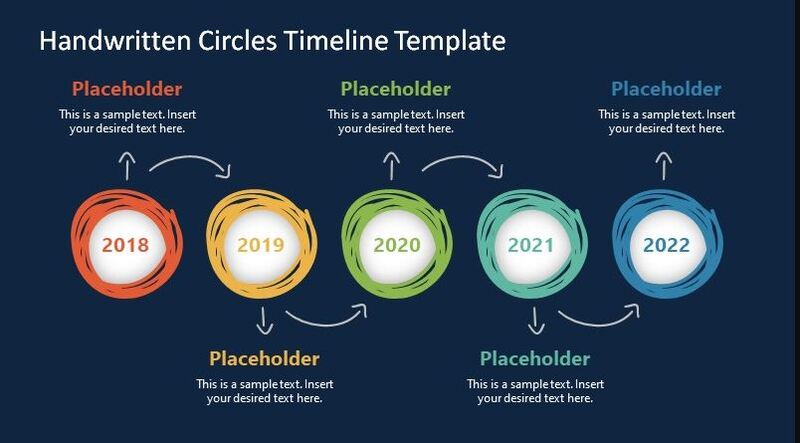
06Handwritten Circles Timeline PowerPoint Template
The handwritten circles timeline PowerPoint template is suitable for envisioning projects, goals, events etc. Business companies use this handwritten timeline template to represent business growth in their presentation. The companies use this timeline template for making their high level projects according to the schedule. Timeline template presentations are used in business, schools, organizations etc.
The timeline template of hand writing circles is editable. You can customize its colors in background, and can also change its hand drawn shapes. Inside the circle the text boxes can be switchable from the clipart icons.
07One Pager Vertical Timeline Slide Timeline
This vertical timeline template displays the connected curves as a path in vertical timeline. It is used for presenting the events, goals etc. in a sequence. A person from any field can use this curved timeline in vertical order. This one page vertical timeline slide can be used for teaching process or explaining historic events in which you can display year, decay or anything related to that event.
This is an editable PowerPoint vertical timeline and you can customize it as you want. The sky blue and white combination looks professional but if you don’t like it you can change its color according to the business presentation. Business can use this timeline template to represent their business strategy, goals or projects.
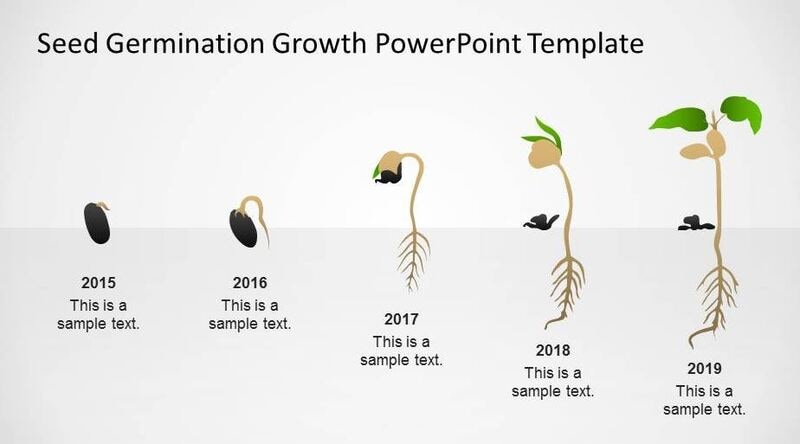
08Seed Germination Growth PowerPoint Template
Seed germination growth PowerPoint template is very innovative template which shows the growth metaphor of the seed and by using it you can make a beautiful presentation. Each and every object is created from the PowerPoint shapes so that the user can customize it according to him. You can present it to your audience in a very professional way.
09Creative Timeline Template for PowerPoint
The Creative Timeline Template for PowerPoint is a selection of milestone shapes arranged in a sequence to give you a professional timeline. You can track the growth and progress of any company by using this template. They are used to give you directions. In the other way, they can be represented in the form of events. These events are in running order, which means it can happen one after the other. Between the two milestones, a gap is been displayed. Milestone can involve the dates, people etc. The template can be customized using PowerPoint shapes. The user can change its color and texts as well using its editable features.
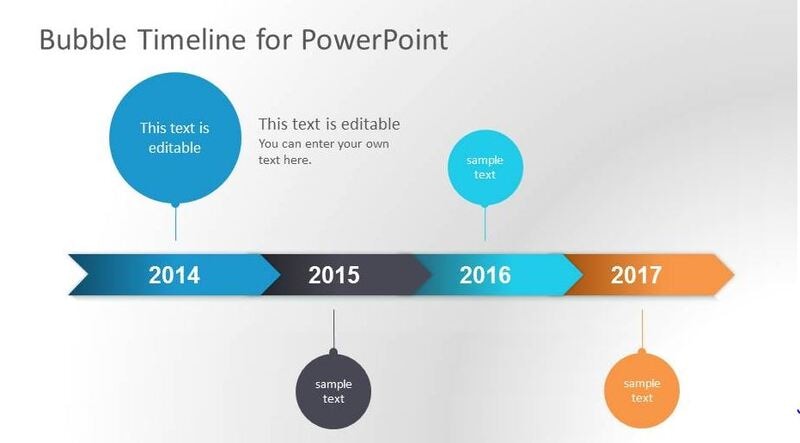
10Bubble Timeline PowerPoint Template
This timeline PowerPoint template has a bubble style and comes with a clean design. This timeline template for PowerPoint has different slides with timeline graphics. You can make changes or edit this timeline as you want. Some slides designs include a series of bars to represent the important milestones in the form of bubble.
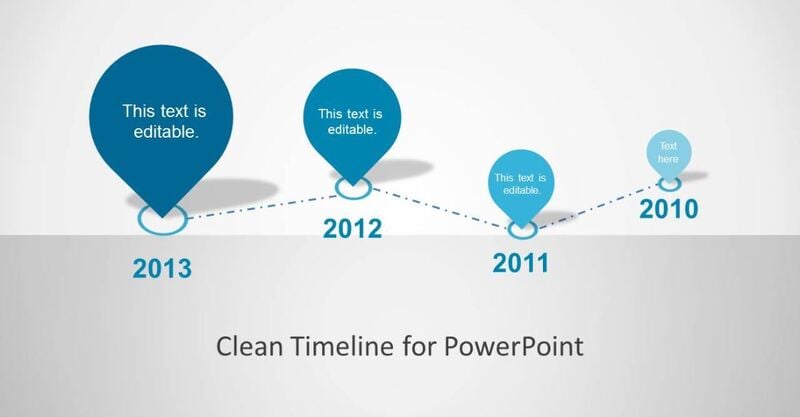
11Clean Timeline Template for PowerPoint
Clean timeline template for PowerPoint is a beautiful template with simple design. In this PowerPoint presentation template, you will get 6 slide designs with amazing layouts which have been created from the PowerPoint shapes.
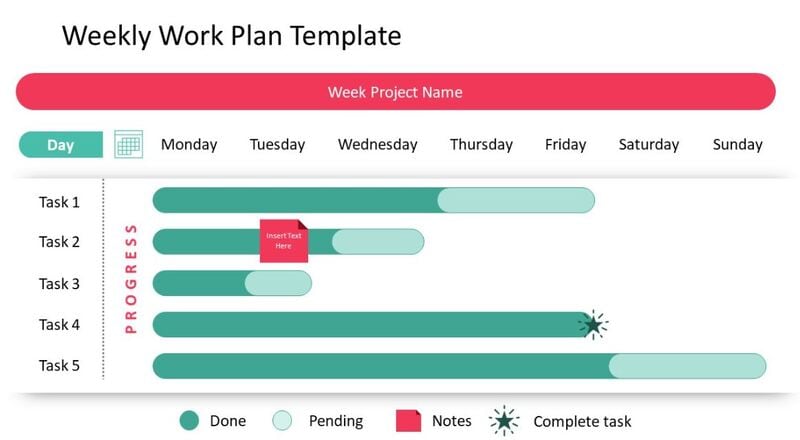
12Weekly Work Plan Template
The Weekly Work Plan Template is designed to present the progress of weekly tasks. It helps you in planning your week efficiently and also not to miss out on important tasks. The design of this template has a horizontal bar graph, with different horizontal shapes showing the progress of the particular event or task. Users can also change the colors or the objects if they wish their plan a personalized touch. It can also be used by professionals or by teachers to present their weekly goals or progress.
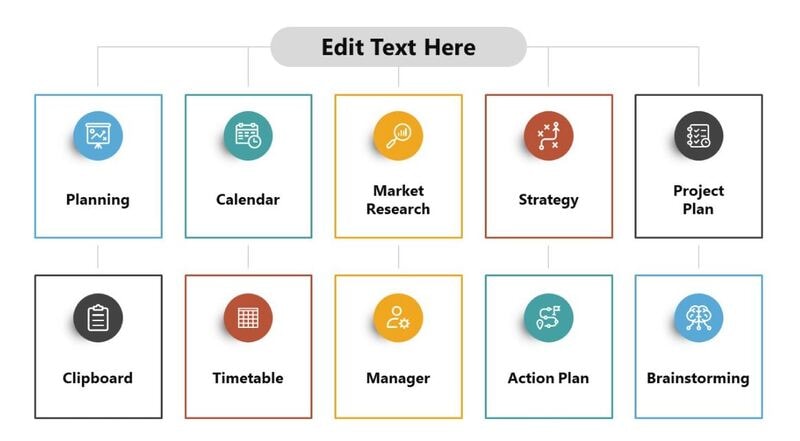
13Work Plan Slides PowerPoint Templates
The Work Plan Slides PowerPoint Templates come in four designs which can be used by professionals to present their work plans. Professionals can customize this Work Plan Slides PowerPoint Templates according to how they want to present their work plan. Teachers and organizations can also edit this template to design this. This There are several elements that can also be changed. Users can modify background, text font, shapes and colors as they wish.
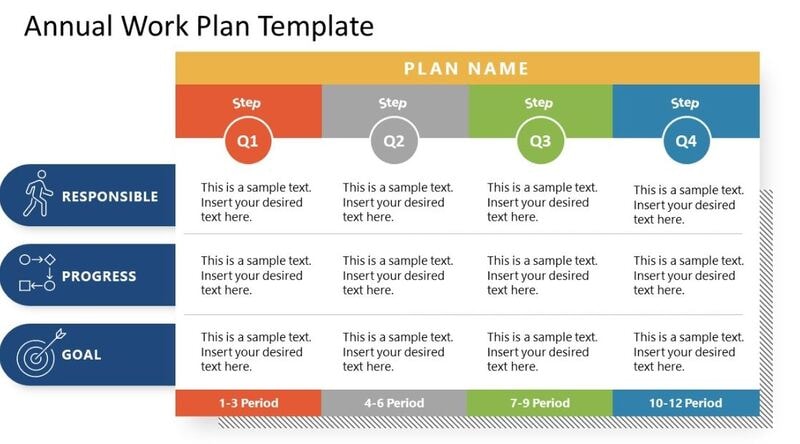
14Annual Work Plan Template for PowerPoint
You can represent the annual strategy plan by customizing the Annual Work Plan Template. The annual work plan template represents the most important achievement predicted throughout the year. It is an organization plan for 12 months which includes the budget details, responsibilities, and progress expectations.
Any changes like color, font style, design or background changes are customizable. Use this template for preparing an annual work plan for your organization.
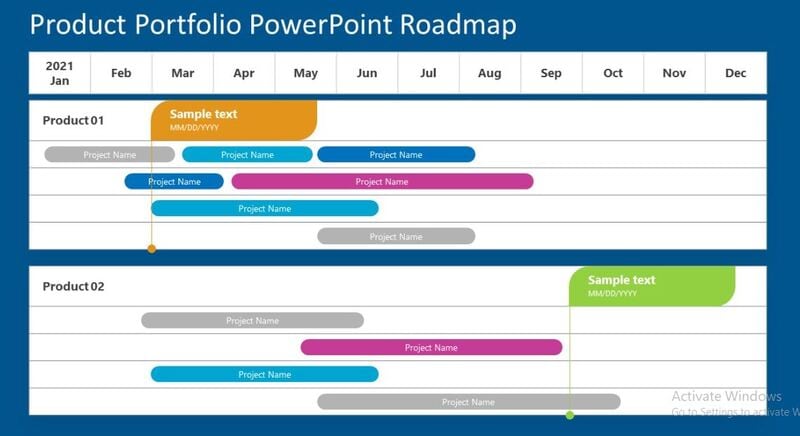
15 10. Product Portfolio Timeline Template
The Product Portfolio Timeline Template is a Gantt chart presentation for any product portfolio. The product portfolio timeline envisions the development strategy and processes to deliver a product. It gives you an overview of the product stages regarding its progress over time. This is an editable template with white and blue PowerPoint backgrounds. Users can customize the timeline according to their presentation theme.
16Arrows Milestone Timeline Template
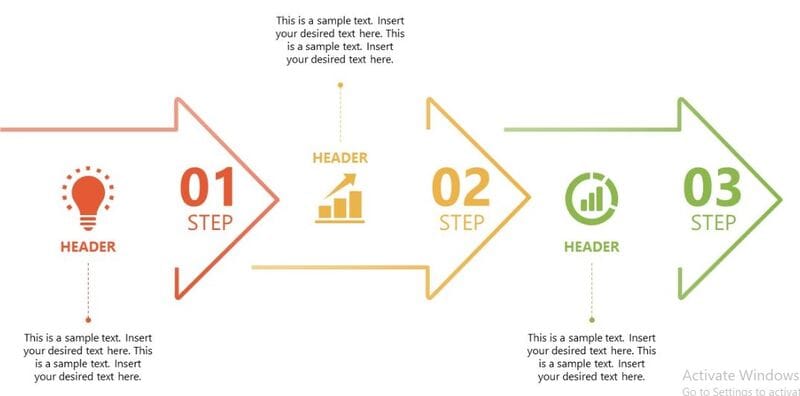
The Arrow Milestone Timeline Template is a set of arrows PowerPoint diagram. These timeline templates are very helpful in highlighting the workflow. The timeline template is convenient for providing information in order to understand the growth, change, or recurring events. Ready to use timeline templates will help you save your time and energy and by simply changing its textual content. Users can also edit the timeline by changing its color, font style, and background and shape effects.
17Scheduled Day View Calendar PowerPoint Template
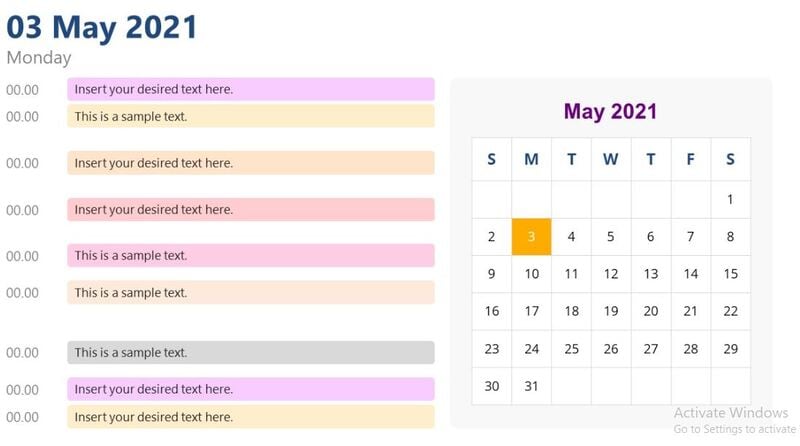
Scheduled Day View Calendar PowerPoint Template is available in three designs. These are the templates which help the individuals and corporate in time management. These templates make it easy for the busy individuals to manage their activities. It will keep you updated with all the events which are happening around you. A daily calendar PowerPoint template will help you ti make and present to- do- list. The template of day schedule will represent the day chores, activities and work which is happened throughout the day. The Schedule Day View Calendar PowerPoint Template is customizable making it easy for you to manage the tasks in a creative manner.
Part 3 How To Create A Timeline?
Creating a timeline can be easy of you use a software like Wondershare Filmora Video Editor . This software comes loaded with a lot of features that will allow you to design a creative timeline to manage your tasks. All you need to do is to go to the editor panel in which you can access different tools.
For Win 7 or later (64-bit)
For macOS 10.12 or later
Below listed are the tools and how you can use them for creating a timeline.
Working with the Time Ruler
You can check the duration of the project on the Time Ruler, which is located on the top side of the timeline. Play head’s present position will be changed when you will click on the time ruler. It allows you to select video clip which you want to be displayed on the Viewer Panel. On the Time Ruler, dragging a playhead to any particular location will let you traverse through your project and preview your clips before you make any other changes at that particular location.
Working with Scaling and Panning on Timeline
The Zoom bar is used to scale the timeline. You can zoom in or out depending on your comfortability and preview your project how it will look on the Timeline. There is no need to put the video clips onto the timeline before you scale it. Adding a video clip to a video track on a timeline will let you know how much you have to zoom in or out. You can pan the video and audio when you zoom in on a certain segment on the Timeline by using Hand Tool and Scroll Bars. Scaling and panning options in the Editor’s panel can help you in editing the video.
Choosing the Work Area
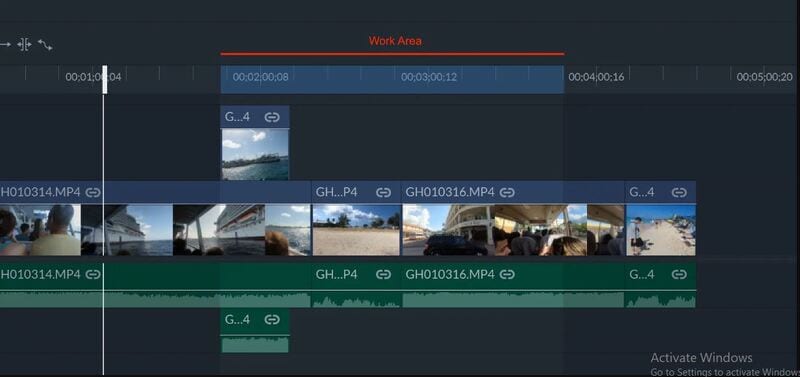
On the Time Ruler, you will see the light gray area which shows the selected work area. You can export only that part of the timeline, once you have selected the work area. In the viewer panel, you can also loop your selected area; it is another way to analyze your work. If you want to loop a work area, from the viewer select the loop playback icon.
Export your Video
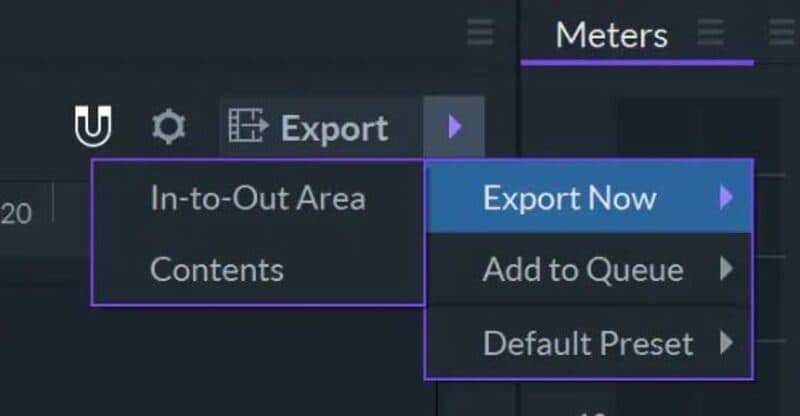
At the upper right corner of the Editor Panel, there is an Export Button which has two options which will let you choose the portion of timeline you want to add to export line.
You have to select the work area on the timeline to make use of the Export option. You can select the area by simply pressing I button then drag the slider on the point on the timeline where you want the work area to end by pressing the O button. When you are done with this, click on the Export button and select the In-Out option. From the Export Option, it will only export the section on the Timeline which is selected by the work area.
Part 4 Time template Q&A
What are the different things that should be involved in a timeline?
A. A timeline template should include the events or activities that you want represent in your presentation along with their date and time, so that audience will get the idea of when and at what time it is going to happen.
What are the most important elements of a timeline?
A. The most important elements of a timeline are:
● The task lists should be completely mentioned with all the required details.
● Mention the date and time so that audience can get an idea of when will this task take place.
● Mention the length of each task and the person who will be responsible for this task.
What is the aim of using a timeline?
A. A time is an important tool as it represents the events and activities. We use timeline for any kind of research, study, business projects or event planning. Timelines make things easier to explain it to anyone in an orderly manner.
What are the various types of timeline?
A. There are different types of timelines:
● Gantt Chart Timeline
● Chronology Chart
● Static Timeline
● Interactive timeline
● Vertical Bar Chart Timeline
In what way a timeline will help a team to achieve its goals?
A. Team members will get an idea of the events that whether they are on track or not. Setting deadlines of a project to complete it on time. Timeline will help them in making strategies for the company project if it is required.
● Ending Thoughts →
● Timeline Templates are very helpful in telling stories, any sort of development or growth which is very helpful in understanding the previous and present things.
● There are a lot of editable Timeline Templates which you can customize it according to your needs.
● Most important things of the Timeline Templates are dates and time of the tasks, and the duration of the tasks which helps you in better time management.
Also read:
- In 2024, Wondering How to Replace Sky in After Effects? Learn How
- Updated How To Mirror a Video Clip in Premiere Pro
- Updated Are You Excited to Learn About a File Format that Helps in Easy Transfer? We Are Talking About the 3GP Format. Stay with Us and Get to Know More About It
- New Easy Ways to Remove Motion Blur In Photoshop
- 2024 Approved Perfecting the Art of Slowing Down Video on Instagram
- New Camtasia Vs. Final Cut Pro for 2024
- New 2024 Approved A Detailed Guide to Do Color Correction in OBS
- In 2024, How to Make First Impression Review Video
- Some Facts About GIF Background You Didnt Know for 2024
- 2024 Approved The Only Guide Youll Ever Need to Learn GIF Design That Get Shared Like Crazy
- New 10 Best Websites to Discover Free Premiere Pro Video Templates for 2024
- New Stunning Glitch Effect and Its Creation Guideline for Premiere Pro
- New In 2024, Every Compositor Should Know The Tips of Color Match in After Effects
- Splitting Audio From Video in Sony Vegas Step by Step
- Updated Final Cut Pro - How to Download and Install It?
- In 2024, Having Trouble with Black Backgrounds in After Effects? Land in Here to Know How You Can Quickly Escape This Glitch in the Simplest Ever Way Possible
- New How to Download Windows Movie Maker 2012 Version
- 6 Websites to Free Download Motivational Video Footage
- How Much Information Do You Have About MP4 Digital File Storage? Let Us Tell You More About the MP4 File Format; Get Ready to Increase Your Knowledge for 2024
- Updated How to Zoom in on PowerPoint Easy Ways
- Updated 2024 Approved 100 Working Methods to Learn How to Rotate TikTok Video
- Updated Top 16 Motion Blur Apps for Videos & Photos
- Updated 2024 Approved Top List Best VHS Sound Effect That You Can Use in Video Making
- In 2024, So, You Are a Gamer and Have Been on the Cool App Discord for a While, and You Keep Hearing People Talk About Game Bots in Discord, Like, Robot Gamers? This Article Will Discuss All Discord Game Bots and Much More
- In 2024, Rootjunky APK To Bypass Google FRP Lock For Samsung Galaxy M34
- List of Pokémon Go Joysticks On Vivo S17e | Dr.fone
- In 2024, How to Successfully Bypass iCloud Activation Lock on Apple iPhone 14 Plus
- How Do You Unlock your iPhone 6s? Learn All 4 Methods | Dr.fone
- How to add a digital signature block to .xlsx
- How to Reset Gmail Password on Vivo Devices
- In 2024, How to use iSpoofer on Nokia C02? | Dr.fone
- In 2024, Bypass iCloud Activation Lock with IMEI Code On your Apple iPhone 14 Plus
- How to Rescue Lost Videos from Honor Magic 6 Lite
- In 2024, Bypass iCloud Activation Lock with IMEI Code On Apple iPhone X
- Recover your contacts after Motorola Moto G34 5G has been deleted.
- Complete guide for recovering music files on Samsung Galaxy A14 5G
- Unlock Apple iPhone 6s With Forgotten Passcode Different Methods You Can Try
- In 2024, Top 10 Password Cracking Tools For Vivo Y27 4G
- Best Methods for Honor Play 8T Wont Turn On | Dr.fone
- Why Your WhatsApp Live Location is Not Updating and How to Fix on your Apple iPhone XS Max | Dr.fone
- Fake Android Location without Rooting For Your Google Pixel 7a | Dr.fone
- How To Transfer WhatsApp From iPhone 13 Pro to other iPhone 11 devices? | Dr.fone
- In 2024, Process of Screen Sharing Samsung Galaxy A15 5G to PC- Detailed Steps | Dr.fone
- How to get back lost photos from Oppo Reno 10 Pro+ 5G.
- Bypass/Reset Magic 6 Phone Screen Passcode/Pattern/Pin
- Title: You Might Have Difficulty Rotating a Video without an Efficient Media Player or Editing Tool. Below Is a Detailed Guide on Rotating a Video on Any Axes
- Author: Chloe
- Created at : 2024-05-20 03:37:38
- Updated at : 2024-05-21 03:37:38
- Link: https://ai-editing-video.techidaily.com/you-might-have-difficulty-rotating-a-video-without-an-efficient-media-player-or-editing-tool-below-is-a-detailed-guide-on-rotating-a-video-on-any-axes/
- License: This work is licensed under CC BY-NC-SA 4.0.


