
Camtasia Video Editor Review

Camtasia Video Editor Review
If you are planning to record your screen and create a tutorial video, you will need a screen recording application. After capturing your video, you need to edit your videos so that you can remove unnecessary parts and add texts and titles wherever necessary. You will need a video editor with screen recorder, and Camtasia video editor is a suitable choice.
Camtasia lets you capture your gameplay as well as create software demo videos. You can choose from video templates and themes to create professional-quality videos as per your requirements. You can add transitions, effects, and annotations to make the videos attractive and engaging. But is Camtasia editor really the best one or is there a better alternative available? Find out from our Camtasia review.
Part 1. How to Download and Install Camtasia?
TechSmith Camtasia is compatible with both Windows 10 or above and Mac 10.14 or above. Camtasia is not a lightweight video editor as it demands 8GB of RAM. As far as the processor goes, it requires at least a 6th Gen Core i3 processor or M1 Apple processor. Therefore, if you have a low-end computer, you may experience lag and crash.
Camtasia is a premium video editor, and you can download its free trial version before opting for its premium version. The price plans differ for individuals, businesses, education, and government organizations. Here are the steps to download and install Camtasia free trial version.
Step 1: Open the web browser on your computer and visit “www.techsmith.com/download/camtasia” .
Step 2: Click on Windows Download or Mac Download as per your operating system.
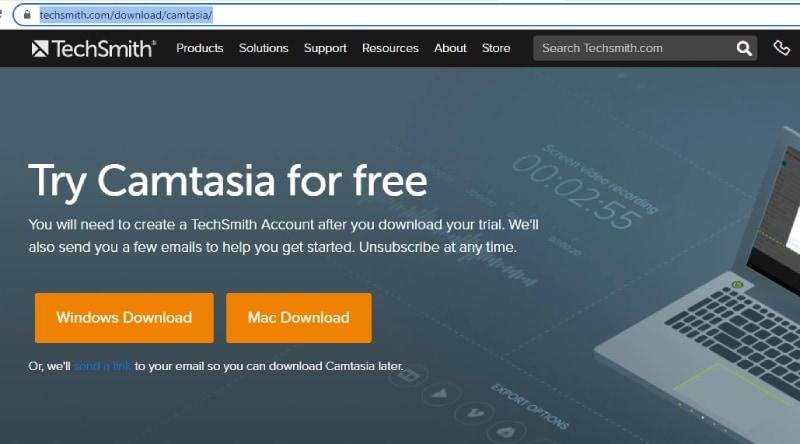
Step 3: Wait for some time for the installer software to get downloaded. Thereafter, click on the installer file to install Camtasia following the on-screen instructions.
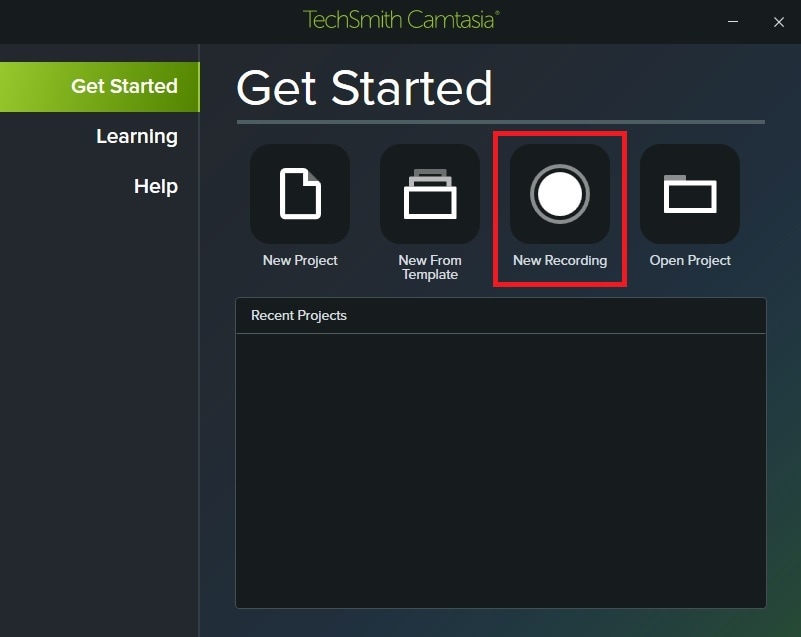
Step 4: After installation, launch Camtasia and click on New Recording option to capture your screen. If you want to edit an existing video, you need to click on New Project option.
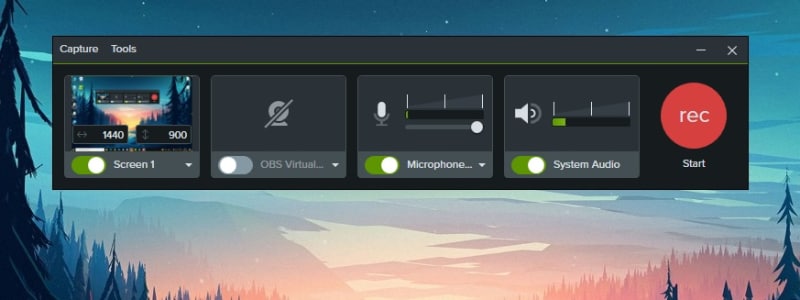
Step 5: If you have clicked on New Recording option, you will get a widget where you need to select your screen to start capturing. You can also select external webcam and microphone. Once you are ready to recording, Click on Rec red button.
Part 2. Key Features of Camtasia
Camtasia is a versatile video editor that competes with all the premium video editors in the market. Hence, there is no dearth of features and functionalities in Camtasia editor, and we are going to highlight the key features that you should be aware of.
Recording – Camtasia lets you capture your screen as well as webcam video easily. You can also record system audio as well as external mic audio. This is useful in recording gameplay with live reaction, tutorial, and training videos as well as presentation videos. You can capture any specific region of the screen as well as use greenscreen effect for webcam videos.
Templates – Camtasia is tailor-made for creating video tutorials, how-to videos, software demo videos, presentation and instructional videos, and training videos. This is why it comes with video templates that users can use immediately to create any specific type of video instantly. In fact, you can customize these templates and create your own theme so that the videos get personalized branding.
Presets and Transitions – There are loads of presents and transitions that you can include in your video to uplift the video content and quality. You can also create custom styles and configure them for regular use in your videos. Transitions are extremely useful to avoid pauses and put them in between slides.
PowerPoint Integration – You can turn your slides on PowerPoint into video instantly with Camtasia. Camtasia comes with PowerPoint integration through which you can import slides in Camtasia and create a video out of it with transitions and other effects. Alternatively, you can record your presentation in PowerPoint in video format.
Annotations and Interactivity – Camtasia lets you create videos where the viewers can interact and take actions. There are options for callouts, quizzes, textboxes, and much more so that the viewers can engage themselves in the video. Besides, you can use arrows, shapes, and other objects to highlight parts in your video for better explanation.
Audio and Cursor Effects – Camtasia has a wide range of audio effects that you apply to your audio recordings or import audio files. Besides, there are options for background noise removal, adjusting gain and pitch, compression, and emphasize. Similarly, you can highlight your cursor movement, spotlight the area as well as magnify when required.
Part 3. How to Edit Videos with Camtasia?
Camtasia is essentially a video editor where you can all types of videos as per your requirements. Camtasia has a robust timeline where you can import different types of video and audio files and arrange them sequentially. You can have multiple layers on top of another such as texts, shapes, photos, voiceover, and other media files as required. Camtasia has a powerful canvas where you can preview your edited video as well as resize and rotate the edited video. Here are the steps to edit videos with Camtasia.
Step 1: Open Camtasia and click on New Project. Sign into your Camtasia account to start editing your recorded video.

Step 2: Go to Media and click on Import Media. Import all the media files starting from video clips to audio clips and even photos.

Step 3: From Media Bin, drag and drop the media files to the timeline. Keep the video files in one track, audio files in another track, and likewise. Arrange them properly so that they are placed sequentially. You can trim them directly from the timeline and stretch the music file to cover the entire video as required.
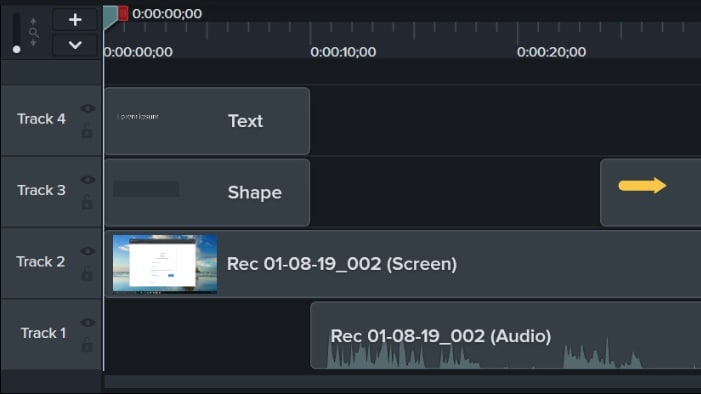
Step 4: Go to Annotation to add shapes, texts, arrows, and callouts. Go to Transitions and drag and drop transitions of your choice in between video clips on the timeline as you think perfect.
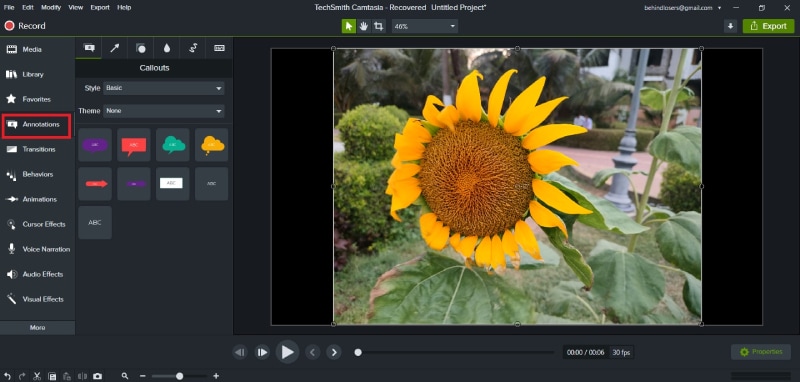
Step 5: Go to Audio Effects to enhance the audio of the video. Moreover, you can check and apply animations, behaviors(text effects), cursor effects, visual effects as well as interactivity as you think relevant.
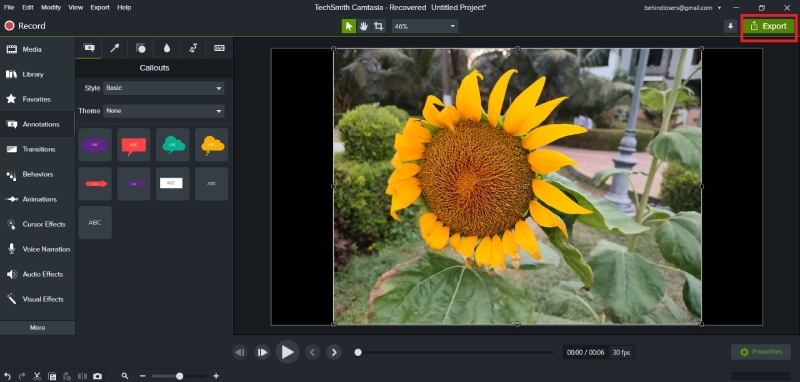
Step 6: On the canvas, check out how your edited video looks like. Once you are satisfied, click on Export button to save the video on your hard drive.
Part 4. Camtasia Alternative to Edit Videos
There are various reasons why people look for a better alternative to Camtasia after trying out its free trial. First of all, you need a high-end computer for Camtasia to run smoothly. Second, there are limited effects and animations available for a premium video editor. Users have also reported crashes and bugs while editing high-resolution videos. We recommend Wondershare Filmora as the best alternative to Camtasia edit video.
Filmora is a premium video editor with video capturing option just like Camtasia. Filmora scores over Camtasia as it has minimum system requirements, and there are loads of visual and audio effects including the trending ones. Besides, there are stock media files that you can include in your video. Moreover, Filmora supports more file formats for importing and exporting. Here are the steps to edit videos on Filmora.
For Win 7 or later (64-bit)
For macOS 10.12 or later
Step 1: Download and install Filmora on your computer. Filmora is available for Windows and Mac.
Step 2: Launch Filmora and click on New Project. Drag and drop all your media files into Project Media folder.
Step 3: Drag and place the video files one by one on the timeline as per your requirements. Place audio files in the same way on a different track.

Step 4: Go to Transitions located at the top bar and drag and drop any transition in between video clips and photos wherever required. You can also insert Titles, Effects, and Elements from the top bar.

Step 5: Go to Audio located at the top bar, and drag and drop audio effects on the audio files on the timeline. You can also check the Stock Media and use them in your video as required.
Step 6: Play the video once everything is done, and click on Export button to save the video file on your hard drive.

Part 5. FAQs about Camtasia
1. Can I use Camtasia for free?
You can download the free trial version of Camtasia and use it for a limited number of days. The free version has all the features unlocked, but the output video will have Camtasia watermark.
2. Is Camtasia good for video editing?
Camtasia is good for video editing if your video belongs to training and tutorial videos. There are templates and annotations available that are tailor-made to edit how-to videos and add interactivity for the viewers. However, for an all-rounder video editor, we recommend Filmora over Camtasia.
3. How do I trim a video in Camtasia?
Once your import the video and place it on the timeline, use green and red to select the part that you want to trim. Once the selection is done, click on Cut(scissor) icon. The portion will be cut, and you can paste it anywhere if required. Lastly, join the parts of the video on the timeline after trimming any part out.
4. Can I record my screen with Camtasia?
Yes, Camtasia allows you to record your screen, webcam, or both simultaneously. You can also capture system audio or record your own voiceover. This feature is useful for creating tutorials, demos, or presentations.
5. How do I export my videos from Camtasia?
Once you have finished editing your videos, you can export them in various formats, such as MP4, WMV, MOV, and AVI. Camtasia also allows you to customize the video settings, such as resolution, frame rate, and bitrate. You can also upload your videos directly to YouTube, Vimeo, or Screencast.com from Camtasia.
For macOS 10.12 or later
Step 1: Download and install Filmora on your computer. Filmora is available for Windows and Mac.
Step 2: Launch Filmora and click on New Project. Drag and drop all your media files into Project Media folder.
Step 3: Drag and place the video files one by one on the timeline as per your requirements. Place audio files in the same way on a different track.

Step 4: Go to Transitions located at the top bar and drag and drop any transition in between video clips and photos wherever required. You can also insert Titles, Effects, and Elements from the top bar.

Step 5: Go to Audio located at the top bar, and drag and drop audio effects on the audio files on the timeline. You can also check the Stock Media and use them in your video as required.
Step 6: Play the video once everything is done, and click on Export button to save the video file on your hard drive.

Part 5. FAQs about Camtasia
1. Can I use Camtasia for free?
You can download the free trial version of Camtasia and use it for a limited number of days. The free version has all the features unlocked, but the output video will have Camtasia watermark.
2. Is Camtasia good for video editing?
Camtasia is good for video editing if your video belongs to training and tutorial videos. There are templates and annotations available that are tailor-made to edit how-to videos and add interactivity for the viewers. However, for an all-rounder video editor, we recommend Filmora over Camtasia.
3. How do I trim a video in Camtasia?
Once your import the video and place it on the timeline, use green and red to select the part that you want to trim. Once the selection is done, click on Cut(scissor) icon. The portion will be cut, and you can paste it anywhere if required. Lastly, join the parts of the video on the timeline after trimming any part out.
4. Can I record my screen with Camtasia?
Yes, Camtasia allows you to record your screen, webcam, or both simultaneously. You can also capture system audio or record your own voiceover. This feature is useful for creating tutorials, demos, or presentations.
5. How do I export my videos from Camtasia?
Once you have finished editing your videos, you can export them in various formats, such as MP4, WMV, MOV, and AVI. Camtasia also allows you to customize the video settings, such as resolution, frame rate, and bitrate. You can also upload your videos directly to YouTube, Vimeo, or Screencast.com from Camtasia.
For macOS 10.12 or later
Step 1: Download and install Filmora on your computer. Filmora is available for Windows and Mac.
Step 2: Launch Filmora and click on New Project. Drag and drop all your media files into Project Media folder.
Step 3: Drag and place the video files one by one on the timeline as per your requirements. Place audio files in the same way on a different track.

Step 4: Go to Transitions located at the top bar and drag and drop any transition in between video clips and photos wherever required. You can also insert Titles, Effects, and Elements from the top bar.

Step 5: Go to Audio located at the top bar, and drag and drop audio effects on the audio files on the timeline. You can also check the Stock Media and use them in your video as required.
Step 6: Play the video once everything is done, and click on Export button to save the video file on your hard drive.

Part 5. FAQs about Camtasia
1. Can I use Camtasia for free?
You can download the free trial version of Camtasia and use it for a limited number of days. The free version has all the features unlocked, but the output video will have Camtasia watermark.
2. Is Camtasia good for video editing?
Camtasia is good for video editing if your video belongs to training and tutorial videos. There are templates and annotations available that are tailor-made to edit how-to videos and add interactivity for the viewers. However, for an all-rounder video editor, we recommend Filmora over Camtasia.
3. How do I trim a video in Camtasia?
Once your import the video and place it on the timeline, use green and red to select the part that you want to trim. Once the selection is done, click on Cut(scissor) icon. The portion will be cut, and you can paste it anywhere if required. Lastly, join the parts of the video on the timeline after trimming any part out.
4. Can I record my screen with Camtasia?
Yes, Camtasia allows you to record your screen, webcam, or both simultaneously. You can also capture system audio or record your own voiceover. This feature is useful for creating tutorials, demos, or presentations.
5. How do I export my videos from Camtasia?
Once you have finished editing your videos, you can export them in various formats, such as MP4, WMV, MOV, and AVI. Camtasia also allows you to customize the video settings, such as resolution, frame rate, and bitrate. You can also upload your videos directly to YouTube, Vimeo, or Screencast.com from Camtasia.
For macOS 10.12 or later
Step 1: Download and install Filmora on your computer. Filmora is available for Windows and Mac.
Step 2: Launch Filmora and click on New Project. Drag and drop all your media files into Project Media folder.
Step 3: Drag and place the video files one by one on the timeline as per your requirements. Place audio files in the same way on a different track.

Step 4: Go to Transitions located at the top bar and drag and drop any transition in between video clips and photos wherever required. You can also insert Titles, Effects, and Elements from the top bar.

Step 5: Go to Audio located at the top bar, and drag and drop audio effects on the audio files on the timeline. You can also check the Stock Media and use them in your video as required.
Step 6: Play the video once everything is done, and click on Export button to save the video file on your hard drive.

Part 5. FAQs about Camtasia
1. Can I use Camtasia for free?
You can download the free trial version of Camtasia and use it for a limited number of days. The free version has all the features unlocked, but the output video will have Camtasia watermark.
2. Is Camtasia good for video editing?
Camtasia is good for video editing if your video belongs to training and tutorial videos. There are templates and annotations available that are tailor-made to edit how-to videos and add interactivity for the viewers. However, for an all-rounder video editor, we recommend Filmora over Camtasia.
3. How do I trim a video in Camtasia?
Once your import the video and place it on the timeline, use green and red to select the part that you want to trim. Once the selection is done, click on Cut(scissor) icon. The portion will be cut, and you can paste it anywhere if required. Lastly, join the parts of the video on the timeline after trimming any part out.
4. Can I record my screen with Camtasia?
Yes, Camtasia allows you to record your screen, webcam, or both simultaneously. You can also capture system audio or record your own voiceover. This feature is useful for creating tutorials, demos, or presentations.
5. How do I export my videos from Camtasia?
Once you have finished editing your videos, you can export them in various formats, such as MP4, WMV, MOV, and AVI. Camtasia also allows you to customize the video settings, such as resolution, frame rate, and bitrate. You can also upload your videos directly to YouTube, Vimeo, or Screencast.com from Camtasia.
Splice Video Editor Online - Get Your Videos Splice
Create High-Quality Video - Wondershare Filmora
An easy and powerful YouTube video editor
Numerous video and audio effects to choose from
Detailed tutorials are provided by the official channel
We are in the digital era, and any online activity gives us a high exposure level. Making digital content and posting it online is not enough. You have to be creative and adopt an advanced mode of communication. The best place to begin is with online platforms. This is because most people find it easy to source information online instead of any other place.
The availability of video editors makes it possible to splice videos online and post them instantly, reaching thousands of viewers through social media platforms in a short time.
Recent research has shown that online videos are more effective and can help brands connect with their audience compared to other data types like images, audio, GIFs, and text, among others. Check out how to merge videos online and the advantages of going online on your video editing journey.
In this article
01 The Meaning of Splice Video
02 Top 6 Online Video Splice Editors
The Meaning of Splice Video
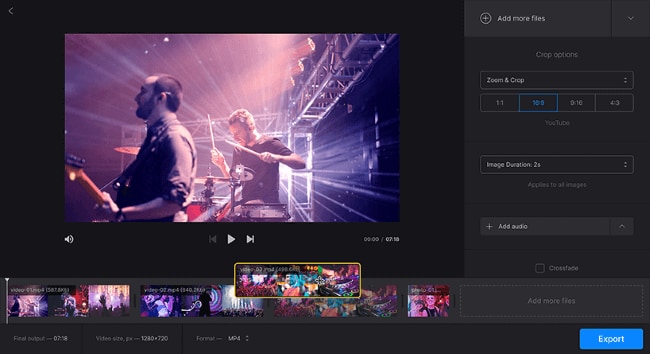
To splice a video means combining two or more video clips to form one. You can use the available editing apps to merge several videos. You need to select each video to splice and put them together in the timeline. Several apps enable you to edit your footage by trimming, cropping, adding music, and transitions, among other adjustments.
Reasons to splice video
You could be wondering why it is necessary to splice your videos. Well, people love to be creative, and working on several videos may not bring out the creativity they need. Here are some reasons that come in handy as far as splicing video is concerned.
- It isn’t easy to share many videos at once. Splicing your videos is a quick way to get your videos to move as one piece and express your message as direct as possible.
- You can also splice videos for easy management. Remember, you can edit it as one, making you finish the editing process quickly and easily.
- Merged videos make it easy to share on other platforms. It would be very hectic to promote several videos separately on media sites.
- Another reason for splicing videos is to compress them. It will take up less space compared to dealing with several videos at once.
- Spliced video is organized, indicating the starting point and endpoint of the video.
The Benefits of Online Video Editing
Since its backbone reason is to share videos online, several pros come with it. The Splice video editor online enables anyone to create engaging videos without software installation. Let’s peruse the advantages of using online video editing compared to the conventional options.
• Automatic updates
Updates are important for the normal operation of an application. It may be hectic to keep remembering when you should update your drivers on your device. However, online apps need no manual configuration as they do this automatically. You’ll always get the latest version anytime you log in. Besides, new templates and features are instantly available to you after every update.
• Easy collaboration
This comes when several people work on a project. It could be difficult to share files manually, given the rise of computer crashes and data loss. Online mechanisms come to the rescue as all files are kept in the cloud. This lets anyone working on the project access it on any device, anywhere, thereby minimizing the risks of data loss. Furthermore, multiple collaborators can log in to the same project to input their views and other additions. Anyone can upload the file from their end and make the necessary adjustments.
• Convenient
You don’t require any tools while manage Splice video editor online. You can easily make edits from anywhere as long as you have an internet connection. It also promotes easy accessibility of your files from any device. More so, making edits and polishing your video is accomplished faster than ever.
• Time-saving
You’ll get improved productivity when you work online on your video. You won’t waste time running up and down the stairs to install your app or get updates. All you need are a few clicks of a button to make quick moves as far as video editing is concerned. Instead, you can easily polish and post your clip while you figure out what works best for your audience at each step.
• Multi-OS compatible
An online video editor runs in a web browser and, therefore, can run on several operating systems. It doesn’t matter which device you use to compose your video. You can easily share it and be accessible on other platforms by several people. Likewise, the speed will not be affected no matter which operating system you use.
Top 6 Online Video Splice Editors
Now that we have seen what online video editing is best at, we need to explore the suitable Splice video editor online that will quickly bring out the creativity in you and elevate your editing ability to the next level.
1) MiniTool MovieMaker
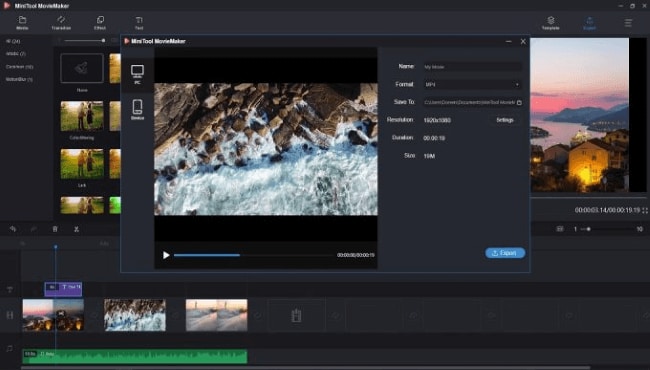
The app comes free with no ads and is watermark-free as well. It is rich in features that help you to maneuver as you edit your video to perfection. The MiniTool lets you create continuous videos based on your vision. It also encompasses video templates that make it easy to settle on a theme.
Pros
Customize videos with video transitions and animated text.
This app contains no advertisements.
It leaves no watermark on the finished video.
It has an intuitive and clean interface that enables easy editing of videos.
The app is highly compatible with popular video and audio formats.
Cons
It lacks some advanced features, like a green screen and motion speed control.
2) Filmora Video Editor
Filmora is another powerful tool with splice video templates. It has an intuitive interface that enables any level of user to easily edit videos. You can add filters and other video effects to create an engaging video. Also, make use of advanced features like keyframe animation, color matching, split screen, etc.
For Win 7 or later (64-bit)
For macOS 10.12 or later
Pros
It comes with advanced features to help you create compelling videos.
You can add music and other sound effects directly.
An intuitive interface that suits beginners.
Produce high-density videos.
Cons
It doesn’t support newer formats like HEIC photos..
3) Clipchamp
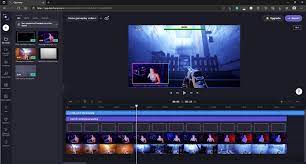
This online splice video editor offers you two modes of video creation online. You can either use the video templates or the blank project option. For templates, get customized ones right from the app’s gallery. However, you may also opt to start your video creation from scratch and make progress toward completion.
Pros
This app offers you two modes for video creation.
Preview your video clips before posting them.
Easily organize your music tracks in the timeline.
Splice your videos without quality loss.
Use styled text templates with animations.
Cons
It has no keyframe features for animation creation.
4) Kapwing
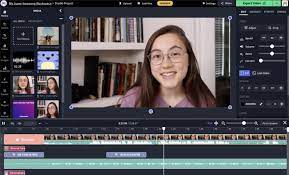
This is a video converter and splice video editor that freely edits your videos to any file format. You can use the screen-by-screen editing option for advanced editing ability. You can also bring on more creativity by using multiple scenes. Furthermore, you can’t run out of editing tools, which include rotating, splitting, and trimming, among others. Also, spice up your project by adding some background music and customizing text to the desired font and color.
Pros
It includes free music from the internet.
It comes with a large library of photos, stickers, etc.
It’s easy to use and allows editing of videos without signing in.
Cons
It lacks advanced features like speech ramping.
5) Video Editor by EaseUS
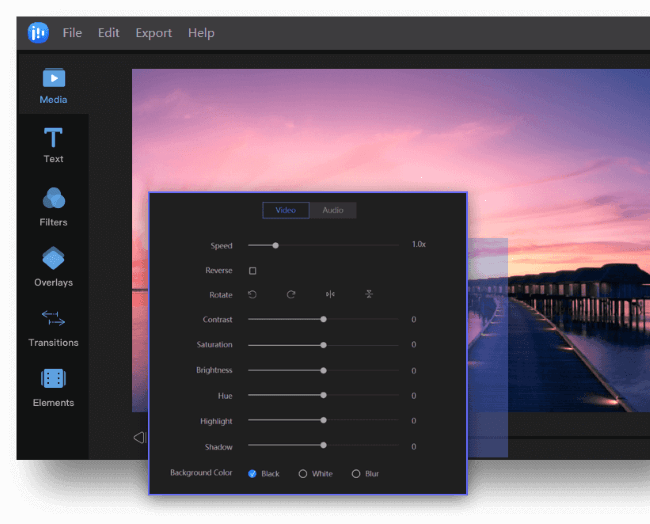
This is another reliable splice editor that comes with quality editing features. You can splice, merge, trim, and rotate your video, among other functionalities. Furthermore, the advanced features allow you to easily apply transitions and elements.
Pros
Splice your videos instantly using your mouse.
Easily detach the audio from the spliced video.
It supports various video formats.
Cons
It has limited templates.
6) WeVideo
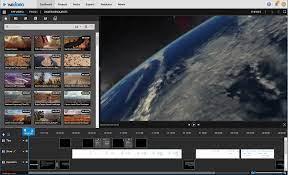
This online editor lets you splice your videos anywhere. It supports several formats, and you can finally export your video in any format. Besides, it allows you access to free stock media like music tracks, videos, and images, among others.
Pros
WeVideo is free to use. However, you can upgrade to the premium version for advanced features.
Directly export videos to YouTube, Instagram, etc.
Cons
The free version leaves a watermark on your videos.
Conclusion
● Are you looking forward to promoting your brand online? Then splice the video online at the best resolution for your editing purposes. You’ll quickly edit your videos and reach your target audience with just a few clicks of a button. Likewise, it is effective to monitor your viewers’ reactions through various comments and feedback. This article has brought you several editing apps for online use. You can easily pinpoint what works best for you concerning their features.
We are in the digital era, and any online activity gives us a high exposure level. Making digital content and posting it online is not enough. You have to be creative and adopt an advanced mode of communication. The best place to begin is with online platforms. This is because most people find it easy to source information online instead of any other place.
The availability of video editors makes it possible to splice videos online and post them instantly, reaching thousands of viewers through social media platforms in a short time.
Recent research has shown that online videos are more effective and can help brands connect with their audience compared to other data types like images, audio, GIFs, and text, among others. Check out how to merge videos online and the advantages of going online on your video editing journey.

In this article
01 The Meaning of Splice Video
02 Top 6 Online Video Splice Editors
The Meaning of Splice Video
To splice a video means combining two or more video clips to form one. You can use the available editing apps to merge several videos. You need to select each video to splice and put them together in the timeline. Several apps enable you to edit your footage by trimming, cropping, adding music, and transitions, among other adjustments.
Reasons to splice video
You could be wondering why it is necessary to splice your videos. Well, people love to be creative, and working on several videos may not bring out the creativity they need. Here are some reasons that come in handy as far as splicing video is concerned.
- It isn’t easy to share many videos at once. Splicing your videos is a quick way to get your videos to move as one piece and express your message as direct as possible.
- You can also splice videos for easy management. Remember, you can edit it as one, making you finish the editing process quickly and easily.
- Merged videos make it easy to share on other platforms. It would be very hectic to promote several videos separately on media sites.
- Another reason for splicing videos is to compress them. It will take up less space compared to dealing with several videos at once.
- Spliced video is organized, indicating the starting point and endpoint of the video.
The Benefits of Online Video Editing
Since its backbone reason is to share videos online, several pros come with it. The Splice video editor online enables anyone to create engaging videos without software installation. Let’s peruse the advantages of using online video editing compared to the conventional options.
• Automatic updates
Updates are important for the normal operation of an application. It may be hectic to keep remembering when you should update your drivers on your device. However, online apps need no manual configuration as they do this automatically. You’ll always get the latest version anytime you log in. Besides, new templates and features are instantly available to you after every update.
• Easy collaboration
This comes when several people work on a project. It could be difficult to share files manually, given the rise of computer crashes and data loss. Online mechanisms come to the rescue as all files are kept in the cloud. This lets anyone working on the project access it on any device, anywhere, thereby minimizing the risks of data loss. Furthermore, multiple collaborators can log in to the same project to input their views and other additions. Anyone can upload the file from their end and make the necessary adjustments.
• Convenient
You don’t require any tools while manage Splice video editor online. You can easily make edits from anywhere as long as you have an internet connection. It also promotes easy accessibility of your files from any device. More so, making edits and polishing your video is accomplished faster than ever.
• Time-saving
You’ll get improved productivity when you work online on your video. You won’t waste time running up and down the stairs to install your app or get updates. All you need are a few clicks of a button to make quick moves as far as video editing is concerned. Instead, you can easily polish and post your clip while you figure out what works best for your audience at each step.
• Multi-OS compatible
An online video editor runs in a web browser and, therefore, can run on several operating systems. It doesn’t matter which device you use to compose your video. You can easily share it and be accessible on other platforms by several people. Likewise, the speed will not be affected no matter which operating system you use.
Top 6 Online Video Splice Editors
Now that we have seen what online video editing is best at, we need to explore the suitable Splice video editor online that will quickly bring out the creativity in you and elevate your editing ability to the next level.
1) MiniTool MovieMaker
The app comes free with no ads and is watermark-free as well. It is rich in features that help you to maneuver as you edit your video to perfection. The MiniTool lets you create continuous videos based on your vision. It also encompasses video templates that make it easy to settle on a theme.

Pros
Customize videos with video transitions and animated text.
This app contains no advertisements.
It leaves no watermark on the finished video.
It has an intuitive and clean interface that enables easy editing of videos.
The app is highly compatible with popular video and audio formats.
Cons
It lacks some advanced features, like a green screen and motion speed control.
2) Filmora Video Editor
Filmora is another powerful tool with splice video templates. It has an intuitive interface that enables any level of user to easily edit videos. You can add filters and other video effects to create an engaging video. Also, make use of advanced features like keyframe animation, color matching, split screen, etc.
For Win 7 or later (64-bit)
For macOS 10.12 or later
Pros
It comes with advanced features to help you create compelling videos.
You can add music and other sound effects directly.
An intuitive interface that suits beginners.
Produce high-density videos.
Cons
It doesn’t support newer formats like HEIC photos..
3) Clipchamp
This online splice video editor offers you two modes of video creation online. You can either use the video templates or the blank project option. For templates, get customized ones right from the app’s gallery. However, you may also opt to start your video creation from scratch and make progress toward completion.

Pros
This app offers you two modes for video creation.
Preview your video clips before posting them.
Easily organize your music tracks in the timeline.
Splice your videos without quality loss.
Use styled text templates with animations.
Cons
It has no keyframe features for animation creation.
4) Kapwing
This is a video converter and splice video editor that freely edits your videos to any file format. You can use the screen-by-screen editing option for advanced editing ability. You can also bring on more creativity by using multiple scenes. Furthermore, you can’t run out of editing tools, which include rotating, splitting, and trimming, among others. Also, spice up your project by adding some background music and customizing text to the desired font and color.

Pros
It includes free music from the internet.
It comes with a large library of photos, stickers, etc.
It’s easy to use and allows editing of videos without signing in.
Cons
It lacks advanced features like speech ramping.
5) Video Editor by EaseUS
This is another reliable splice editor that comes with quality editing features. You can splice, merge, trim, and rotate your video, among other functionalities. Furthermore, the advanced features allow you to easily apply transitions and elements.

Pros
Splice your videos instantly using your mouse.
Easily detach the audio from the spliced video.
It supports various video formats.
Cons
It has limited templates.
6) WeVideo
This online editor lets you splice your videos anywhere. It supports several formats, and you can finally export your video in any format. Besides, it allows you access to free stock media like music tracks, videos, and images, among others.

Pros
WeVideo is free to use. However, you can upgrade to the premium version for advanced features.
Directly export videos to YouTube, Instagram, etc.
Cons
The free version leaves a watermark on your videos.
Conclusion
● Are you looking forward to promoting your brand online? Then splice the video online at the best resolution for your editing purposes. You’ll quickly edit your videos and reach your target audience with just a few clicks of a button. Likewise, it is effective to monitor your viewers’ reactions through various comments and feedback. This article has brought you several editing apps for online use. You can easily pinpoint what works best for you concerning their features.
We are in the digital era, and any online activity gives us a high exposure level. Making digital content and posting it online is not enough. You have to be creative and adopt an advanced mode of communication. The best place to begin is with online platforms. This is because most people find it easy to source information online instead of any other place.
The availability of video editors makes it possible to splice videos online and post them instantly, reaching thousands of viewers through social media platforms in a short time.
Recent research has shown that online videos are more effective and can help brands connect with their audience compared to other data types like images, audio, GIFs, and text, among others. Check out how to merge videos online and the advantages of going online on your video editing journey.

In this article
01 The Meaning of Splice Video
02 Top 6 Online Video Splice Editors
The Meaning of Splice Video
To splice a video means combining two or more video clips to form one. You can use the available editing apps to merge several videos. You need to select each video to splice and put them together in the timeline. Several apps enable you to edit your footage by trimming, cropping, adding music, and transitions, among other adjustments.
Reasons to splice video
You could be wondering why it is necessary to splice your videos. Well, people love to be creative, and working on several videos may not bring out the creativity they need. Here are some reasons that come in handy as far as splicing video is concerned.
- It isn’t easy to share many videos at once. Splicing your videos is a quick way to get your videos to move as one piece and express your message as direct as possible.
- You can also splice videos for easy management. Remember, you can edit it as one, making you finish the editing process quickly and easily.
- Merged videos make it easy to share on other platforms. It would be very hectic to promote several videos separately on media sites.
- Another reason for splicing videos is to compress them. It will take up less space compared to dealing with several videos at once.
- Spliced video is organized, indicating the starting point and endpoint of the video.
The Benefits of Online Video Editing
Since its backbone reason is to share videos online, several pros come with it. The Splice video editor online enables anyone to create engaging videos without software installation. Let’s peruse the advantages of using online video editing compared to the conventional options.
• Automatic updates
Updates are important for the normal operation of an application. It may be hectic to keep remembering when you should update your drivers on your device. However, online apps need no manual configuration as they do this automatically. You’ll always get the latest version anytime you log in. Besides, new templates and features are instantly available to you after every update.
• Easy collaboration
This comes when several people work on a project. It could be difficult to share files manually, given the rise of computer crashes and data loss. Online mechanisms come to the rescue as all files are kept in the cloud. This lets anyone working on the project access it on any device, anywhere, thereby minimizing the risks of data loss. Furthermore, multiple collaborators can log in to the same project to input their views and other additions. Anyone can upload the file from their end and make the necessary adjustments.
• Convenient
You don’t require any tools while manage Splice video editor online. You can easily make edits from anywhere as long as you have an internet connection. It also promotes easy accessibility of your files from any device. More so, making edits and polishing your video is accomplished faster than ever.
• Time-saving
You’ll get improved productivity when you work online on your video. You won’t waste time running up and down the stairs to install your app or get updates. All you need are a few clicks of a button to make quick moves as far as video editing is concerned. Instead, you can easily polish and post your clip while you figure out what works best for your audience at each step.
• Multi-OS compatible
An online video editor runs in a web browser and, therefore, can run on several operating systems. It doesn’t matter which device you use to compose your video. You can easily share it and be accessible on other platforms by several people. Likewise, the speed will not be affected no matter which operating system you use.
Top 6 Online Video Splice Editors
Now that we have seen what online video editing is best at, we need to explore the suitable Splice video editor online that will quickly bring out the creativity in you and elevate your editing ability to the next level.
1) MiniTool MovieMaker
The app comes free with no ads and is watermark-free as well. It is rich in features that help you to maneuver as you edit your video to perfection. The MiniTool lets you create continuous videos based on your vision. It also encompasses video templates that make it easy to settle on a theme.

Pros
Customize videos with video transitions and animated text.
This app contains no advertisements.
It leaves no watermark on the finished video.
It has an intuitive and clean interface that enables easy editing of videos.
The app is highly compatible with popular video and audio formats.
Cons
It lacks some advanced features, like a green screen and motion speed control.
2) Filmora Video Editor
Filmora is another powerful tool with splice video templates. It has an intuitive interface that enables any level of user to easily edit videos. You can add filters and other video effects to create an engaging video. Also, make use of advanced features like keyframe animation, color matching, split screen, etc.
For Win 7 or later (64-bit)
For macOS 10.12 or later
Pros
It comes with advanced features to help you create compelling videos.
You can add music and other sound effects directly.
An intuitive interface that suits beginners.
Produce high-density videos.
Cons
It doesn’t support newer formats like HEIC photos..
3) Clipchamp
This online splice video editor offers you two modes of video creation online. You can either use the video templates or the blank project option. For templates, get customized ones right from the app’s gallery. However, you may also opt to start your video creation from scratch and make progress toward completion.

Pros
This app offers you two modes for video creation.
Preview your video clips before posting them.
Easily organize your music tracks in the timeline.
Splice your videos without quality loss.
Use styled text templates with animations.
Cons
It has no keyframe features for animation creation.
4) Kapwing
This is a video converter and splice video editor that freely edits your videos to any file format. You can use the screen-by-screen editing option for advanced editing ability. You can also bring on more creativity by using multiple scenes. Furthermore, you can’t run out of editing tools, which include rotating, splitting, and trimming, among others. Also, spice up your project by adding some background music and customizing text to the desired font and color.

Pros
It includes free music from the internet.
It comes with a large library of photos, stickers, etc.
It’s easy to use and allows editing of videos without signing in.
Cons
It lacks advanced features like speech ramping.
5) Video Editor by EaseUS
This is another reliable splice editor that comes with quality editing features. You can splice, merge, trim, and rotate your video, among other functionalities. Furthermore, the advanced features allow you to easily apply transitions and elements.

Pros
Splice your videos instantly using your mouse.
Easily detach the audio from the spliced video.
It supports various video formats.
Cons
It has limited templates.
6) WeVideo
This online editor lets you splice your videos anywhere. It supports several formats, and you can finally export your video in any format. Besides, it allows you access to free stock media like music tracks, videos, and images, among others.

Pros
WeVideo is free to use. However, you can upgrade to the premium version for advanced features.
Directly export videos to YouTube, Instagram, etc.
Cons
The free version leaves a watermark on your videos.
Conclusion
● Are you looking forward to promoting your brand online? Then splice the video online at the best resolution for your editing purposes. You’ll quickly edit your videos and reach your target audience with just a few clicks of a button. Likewise, it is effective to monitor your viewers’ reactions through various comments and feedback. This article has brought you several editing apps for online use. You can easily pinpoint what works best for you concerning their features.
We are in the digital era, and any online activity gives us a high exposure level. Making digital content and posting it online is not enough. You have to be creative and adopt an advanced mode of communication. The best place to begin is with online platforms. This is because most people find it easy to source information online instead of any other place.
The availability of video editors makes it possible to splice videos online and post them instantly, reaching thousands of viewers through social media platforms in a short time.
Recent research has shown that online videos are more effective and can help brands connect with their audience compared to other data types like images, audio, GIFs, and text, among others. Check out how to merge videos online and the advantages of going online on your video editing journey.

In this article
01 The Meaning of Splice Video
02 Top 6 Online Video Splice Editors
The Meaning of Splice Video
To splice a video means combining two or more video clips to form one. You can use the available editing apps to merge several videos. You need to select each video to splice and put them together in the timeline. Several apps enable you to edit your footage by trimming, cropping, adding music, and transitions, among other adjustments.
Reasons to splice video
You could be wondering why it is necessary to splice your videos. Well, people love to be creative, and working on several videos may not bring out the creativity they need. Here are some reasons that come in handy as far as splicing video is concerned.
- It isn’t easy to share many videos at once. Splicing your videos is a quick way to get your videos to move as one piece and express your message as direct as possible.
- You can also splice videos for easy management. Remember, you can edit it as one, making you finish the editing process quickly and easily.
- Merged videos make it easy to share on other platforms. It would be very hectic to promote several videos separately on media sites.
- Another reason for splicing videos is to compress them. It will take up less space compared to dealing with several videos at once.
- Spliced video is organized, indicating the starting point and endpoint of the video.
The Benefits of Online Video Editing
Since its backbone reason is to share videos online, several pros come with it. The Splice video editor online enables anyone to create engaging videos without software installation. Let’s peruse the advantages of using online video editing compared to the conventional options.
• Automatic updates
Updates are important for the normal operation of an application. It may be hectic to keep remembering when you should update your drivers on your device. However, online apps need no manual configuration as they do this automatically. You’ll always get the latest version anytime you log in. Besides, new templates and features are instantly available to you after every update.
• Easy collaboration
This comes when several people work on a project. It could be difficult to share files manually, given the rise of computer crashes and data loss. Online mechanisms come to the rescue as all files are kept in the cloud. This lets anyone working on the project access it on any device, anywhere, thereby minimizing the risks of data loss. Furthermore, multiple collaborators can log in to the same project to input their views and other additions. Anyone can upload the file from their end and make the necessary adjustments.
• Convenient
You don’t require any tools while manage Splice video editor online. You can easily make edits from anywhere as long as you have an internet connection. It also promotes easy accessibility of your files from any device. More so, making edits and polishing your video is accomplished faster than ever.
• Time-saving
You’ll get improved productivity when you work online on your video. You won’t waste time running up and down the stairs to install your app or get updates. All you need are a few clicks of a button to make quick moves as far as video editing is concerned. Instead, you can easily polish and post your clip while you figure out what works best for your audience at each step.
• Multi-OS compatible
An online video editor runs in a web browser and, therefore, can run on several operating systems. It doesn’t matter which device you use to compose your video. You can easily share it and be accessible on other platforms by several people. Likewise, the speed will not be affected no matter which operating system you use.
Top 6 Online Video Splice Editors
Now that we have seen what online video editing is best at, we need to explore the suitable Splice video editor online that will quickly bring out the creativity in you and elevate your editing ability to the next level.
1) MiniTool MovieMaker
The app comes free with no ads and is watermark-free as well. It is rich in features that help you to maneuver as you edit your video to perfection. The MiniTool lets you create continuous videos based on your vision. It also encompasses video templates that make it easy to settle on a theme.

Pros
Customize videos with video transitions and animated text.
This app contains no advertisements.
It leaves no watermark on the finished video.
It has an intuitive and clean interface that enables easy editing of videos.
The app is highly compatible with popular video and audio formats.
Cons
It lacks some advanced features, like a green screen and motion speed control.
2) Filmora Video Editor
Filmora is another powerful tool with splice video templates. It has an intuitive interface that enables any level of user to easily edit videos. You can add filters and other video effects to create an engaging video. Also, make use of advanced features like keyframe animation, color matching, split screen, etc.
For Win 7 or later (64-bit)
For macOS 10.12 or later
Pros
It comes with advanced features to help you create compelling videos.
You can add music and other sound effects directly.
An intuitive interface that suits beginners.
Produce high-density videos.
Cons
It doesn’t support newer formats like HEIC photos..
3) Clipchamp
This online splice video editor offers you two modes of video creation online. You can either use the video templates or the blank project option. For templates, get customized ones right from the app’s gallery. However, you may also opt to start your video creation from scratch and make progress toward completion.

Pros
This app offers you two modes for video creation.
Preview your video clips before posting them.
Easily organize your music tracks in the timeline.
Splice your videos without quality loss.
Use styled text templates with animations.
Cons
It has no keyframe features for animation creation.
4) Kapwing
This is a video converter and splice video editor that freely edits your videos to any file format. You can use the screen-by-screen editing option for advanced editing ability. You can also bring on more creativity by using multiple scenes. Furthermore, you can’t run out of editing tools, which include rotating, splitting, and trimming, among others. Also, spice up your project by adding some background music and customizing text to the desired font and color.

Pros
It includes free music from the internet.
It comes with a large library of photos, stickers, etc.
It’s easy to use and allows editing of videos without signing in.
Cons
It lacks advanced features like speech ramping.
5) Video Editor by EaseUS
This is another reliable splice editor that comes with quality editing features. You can splice, merge, trim, and rotate your video, among other functionalities. Furthermore, the advanced features allow you to easily apply transitions and elements.

Pros
Splice your videos instantly using your mouse.
Easily detach the audio from the spliced video.
It supports various video formats.
Cons
It has limited templates.
6) WeVideo
This online editor lets you splice your videos anywhere. It supports several formats, and you can finally export your video in any format. Besides, it allows you access to free stock media like music tracks, videos, and images, among others.

Pros
WeVideo is free to use. However, you can upgrade to the premium version for advanced features.
Directly export videos to YouTube, Instagram, etc.
Cons
The free version leaves a watermark on your videos.
Conclusion
● Are you looking forward to promoting your brand online? Then splice the video online at the best resolution for your editing purposes. You’ll quickly edit your videos and reach your target audience with just a few clicks of a button. Likewise, it is effective to monitor your viewers’ reactions through various comments and feedback. This article has brought you several editing apps for online use. You can easily pinpoint what works best for you concerning their features.
2 Methods to Crop a Video in VLC
Want to crop your videos but don’t know how to start?
A video editor needs to know how he can crop his videos. There is a way to do this using the VLC that is installed in your computer. This guide will teach you a simple way to get what you want. This might appear as complicated at first sight but it will be shown to you in a digestible way. An alternative way would be to use Wondershare Filmora. You will also be guided on how to use this software to crop your videos. Don’t worry and just take it one step at a time.
Method 1: Cropping a Video using VLC
Have you ever heard of the VLC media player? If not, you can browse through it online and install it on your computer. Aside from watching content, you can also crop videos with it. Cropping is a way to remove spaces that you would not want to be included on your video.
Find the software on your computer and don’t be overwhelmed by the interface.

Then click the Media and select Open File to choose the video that you want to crop. You should prepare the videos that you want to be cropped and rename them to avoid confusion.

Click the Tools on the menu and select the Effects and Filters.

After that, click on the Video Effects and under that select Crop. Doing this, will open the cropping editor.

You need to enter specific pixels on the left, right, top and bottom. This will depend on your preferences. If it is your first time and you don’t know the exact pixels then just input what you think would be enough.

After entering your preferred pixels, you can preview it. If you would like to adjust then just simply repeat entering the specific pixels.

You decided to save the cropped video. Find the Tools menu and select Preferences.

Find the Show settings and click All. In the search bar type Croppadd then save your previous preferred pixel settings. Lastly, click Save.

In the Media menu select the Convert/Save. You can drag and drop the cropped video to the File box.

You can select your file format and codecs by clicking Convert/Save.

Find the Edit Selected Profile and click the Video Codec. Then under the Filters tab, select the Video cropping filter. Finally, click Save.

In the Destination file select where you want it to be saved.

Then click Start.

Congratulations on getting here! You finally cropped your video using the VLC media player.
Although there are disadvantages to using this as your cropping tool. Like for example you want the real-time preview of what you’ve changed in your video. This would be a turn off for some that want their outputs to be shown to them immediately. Aside from this, there is a chance that you will forget one step to make and thus, the whole process would need to start over from scratch. Lastly, is the freedom to batch crop multiple videos. This is especially important for those that need to have many clips in one video. A user might lose the continuity of the story within his video.
While one of its strong suits is the affordability of the software. It is completely free and has no additional charges that may surprise you in the future. Finally, your output won’t have watermarks that could destroy the aesthetics of your video.
What are your experiences with using it as a cropping tool? What would you recommend to improve it? It is up to you the user if you want to continue using this as your partner in removing the excess in your videos.
Method 2: Cropping a Video using Wondershare Filmora
Have you heard of an editing tool called Wondershare Filmora Video Editor ? What are your first impressions of this software? You can download this for free by going to the official site.
For Win 7 or later (64-bit)
For macOS 10.14 or later
Wondershare Filmora is a useful editor that can help you produce the content that you want. It is packed with beneficial tools that you can learn to apply. If it is already installed on your computer then proceed to opening it.

Prepare your videos that you need to crop. You can drag and drop your video or click the Import.

Select the video clip that you want to crop. Then, click the Crop tool and choose if you want the Crop or Pan & Zoom.

You can also right click the video clip .Under the Video tab you can select the Crop and Zoom or Crop to Fit then adjust to your preferred ratio.

One of the advantages of Filmora is you can preview what you have cropped immediately. This will greatly help you if you’re not sure what kind of crop that you want. If you’ve thought that you made a mistake then a simple Undo button could fix it. In short, you’re not going through the gruesome process of starting all over again. You can also do the batch cropping of multiple videos helping you ensure the smoothness of flow in the final output.
Although the Filmora is not free, there is a trial that you can use to test it to check if this video editor would meet your needs. It has tools that a beginner to expert video editor could use to produce high quality videos that would make the audience think that it was life from the movies.
The Bottom Line
The journey of exploring different options would help you make the decision. Both VLC media player and Wondershare Filmora have their great features which would aid the user to crop his videos in an efficient way. What are your thoughts on each of them? As an individual you have varied needs that a video tool should meet.
After reading this, you’ve had a clearer view of what these video softwares offers. Did this guide help you decide which would fit your needs as a video editor? What are your suggestions for improvement?
You could share with us the tips and tricks you know on cropping videos using these applications.
Then click the Media and select Open File to choose the video that you want to crop. You should prepare the videos that you want to be cropped and rename them to avoid confusion.

Click the Tools on the menu and select the Effects and Filters.

After that, click on the Video Effects and under that select Crop. Doing this, will open the cropping editor.

You need to enter specific pixels on the left, right, top and bottom. This will depend on your preferences. If it is your first time and you don’t know the exact pixels then just input what you think would be enough.

After entering your preferred pixels, you can preview it. If you would like to adjust then just simply repeat entering the specific pixels.

You decided to save the cropped video. Find the Tools menu and select Preferences.

Find the Show settings and click All. In the search bar type Croppadd then save your previous preferred pixel settings. Lastly, click Save.

In the Media menu select the Convert/Save. You can drag and drop the cropped video to the File box.

You can select your file format and codecs by clicking Convert/Save.

Find the Edit Selected Profile and click the Video Codec. Then under the Filters tab, select the Video cropping filter. Finally, click Save.

In the Destination file select where you want it to be saved.

Then click Start.

Congratulations on getting here! You finally cropped your video using the VLC media player.
Although there are disadvantages to using this as your cropping tool. Like for example you want the real-time preview of what you’ve changed in your video. This would be a turn off for some that want their outputs to be shown to them immediately. Aside from this, there is a chance that you will forget one step to make and thus, the whole process would need to start over from scratch. Lastly, is the freedom to batch crop multiple videos. This is especially important for those that need to have many clips in one video. A user might lose the continuity of the story within his video.
While one of its strong suits is the affordability of the software. It is completely free and has no additional charges that may surprise you in the future. Finally, your output won’t have watermarks that could destroy the aesthetics of your video.
What are your experiences with using it as a cropping tool? What would you recommend to improve it? It is up to you the user if you want to continue using this as your partner in removing the excess in your videos.
Method 2: Cropping a Video using Wondershare Filmora
Have you heard of an editing tool called Wondershare Filmora Video Editor ? What are your first impressions of this software? You can download this for free by going to the official site.
For Win 7 or later (64-bit)
For macOS 10.14 or later
Wondershare Filmora is a useful editor that can help you produce the content that you want. It is packed with beneficial tools that you can learn to apply. If it is already installed on your computer then proceed to opening it.

Prepare your videos that you need to crop. You can drag and drop your video or click the Import.

Select the video clip that you want to crop. Then, click the Crop tool and choose if you want the Crop or Pan & Zoom.

You can also right click the video clip .Under the Video tab you can select the Crop and Zoom or Crop to Fit then adjust to your preferred ratio.

One of the advantages of Filmora is you can preview what you have cropped immediately. This will greatly help you if you’re not sure what kind of crop that you want. If you’ve thought that you made a mistake then a simple Undo button could fix it. In short, you’re not going through the gruesome process of starting all over again. You can also do the batch cropping of multiple videos helping you ensure the smoothness of flow in the final output.
Although the Filmora is not free, there is a trial that you can use to test it to check if this video editor would meet your needs. It has tools that a beginner to expert video editor could use to produce high quality videos that would make the audience think that it was life from the movies.
The Bottom Line
The journey of exploring different options would help you make the decision. Both VLC media player and Wondershare Filmora have their great features which would aid the user to crop his videos in an efficient way. What are your thoughts on each of them? As an individual you have varied needs that a video tool should meet.
After reading this, you’ve had a clearer view of what these video softwares offers. Did this guide help you decide which would fit your needs as a video editor? What are your suggestions for improvement?
You could share with us the tips and tricks you know on cropping videos using these applications.
Then click the Media and select Open File to choose the video that you want to crop. You should prepare the videos that you want to be cropped and rename them to avoid confusion.

Click the Tools on the menu and select the Effects and Filters.

After that, click on the Video Effects and under that select Crop. Doing this, will open the cropping editor.

You need to enter specific pixels on the left, right, top and bottom. This will depend on your preferences. If it is your first time and you don’t know the exact pixels then just input what you think would be enough.

After entering your preferred pixels, you can preview it. If you would like to adjust then just simply repeat entering the specific pixels.

You decided to save the cropped video. Find the Tools menu and select Preferences.

Find the Show settings and click All. In the search bar type Croppadd then save your previous preferred pixel settings. Lastly, click Save.

In the Media menu select the Convert/Save. You can drag and drop the cropped video to the File box.

You can select your file format and codecs by clicking Convert/Save.

Find the Edit Selected Profile and click the Video Codec. Then under the Filters tab, select the Video cropping filter. Finally, click Save.

In the Destination file select where you want it to be saved.

Then click Start.

Congratulations on getting here! You finally cropped your video using the VLC media player.
Although there are disadvantages to using this as your cropping tool. Like for example you want the real-time preview of what you’ve changed in your video. This would be a turn off for some that want their outputs to be shown to them immediately. Aside from this, there is a chance that you will forget one step to make and thus, the whole process would need to start over from scratch. Lastly, is the freedom to batch crop multiple videos. This is especially important for those that need to have many clips in one video. A user might lose the continuity of the story within his video.
While one of its strong suits is the affordability of the software. It is completely free and has no additional charges that may surprise you in the future. Finally, your output won’t have watermarks that could destroy the aesthetics of your video.
What are your experiences with using it as a cropping tool? What would you recommend to improve it? It is up to you the user if you want to continue using this as your partner in removing the excess in your videos.
Method 2: Cropping a Video using Wondershare Filmora
Have you heard of an editing tool called Wondershare Filmora Video Editor ? What are your first impressions of this software? You can download this for free by going to the official site.
For Win 7 or later (64-bit)
For macOS 10.14 or later
Wondershare Filmora is a useful editor that can help you produce the content that you want. It is packed with beneficial tools that you can learn to apply. If it is already installed on your computer then proceed to opening it.

Prepare your videos that you need to crop. You can drag and drop your video or click the Import.

Select the video clip that you want to crop. Then, click the Crop tool and choose if you want the Crop or Pan & Zoom.

You can also right click the video clip .Under the Video tab you can select the Crop and Zoom or Crop to Fit then adjust to your preferred ratio.

One of the advantages of Filmora is you can preview what you have cropped immediately. This will greatly help you if you’re not sure what kind of crop that you want. If you’ve thought that you made a mistake then a simple Undo button could fix it. In short, you’re not going through the gruesome process of starting all over again. You can also do the batch cropping of multiple videos helping you ensure the smoothness of flow in the final output.
Although the Filmora is not free, there is a trial that you can use to test it to check if this video editor would meet your needs. It has tools that a beginner to expert video editor could use to produce high quality videos that would make the audience think that it was life from the movies.
The Bottom Line
The journey of exploring different options would help you make the decision. Both VLC media player and Wondershare Filmora have their great features which would aid the user to crop his videos in an efficient way. What are your thoughts on each of them? As an individual you have varied needs that a video tool should meet.
After reading this, you’ve had a clearer view of what these video softwares offers. Did this guide help you decide which would fit your needs as a video editor? What are your suggestions for improvement?
You could share with us the tips and tricks you know on cropping videos using these applications.
Then click the Media and select Open File to choose the video that you want to crop. You should prepare the videos that you want to be cropped and rename them to avoid confusion.

Click the Tools on the menu and select the Effects and Filters.

After that, click on the Video Effects and under that select Crop. Doing this, will open the cropping editor.

You need to enter specific pixels on the left, right, top and bottom. This will depend on your preferences. If it is your first time and you don’t know the exact pixels then just input what you think would be enough.

After entering your preferred pixels, you can preview it. If you would like to adjust then just simply repeat entering the specific pixels.

You decided to save the cropped video. Find the Tools menu and select Preferences.

Find the Show settings and click All. In the search bar type Croppadd then save your previous preferred pixel settings. Lastly, click Save.

In the Media menu select the Convert/Save. You can drag and drop the cropped video to the File box.

You can select your file format and codecs by clicking Convert/Save.

Find the Edit Selected Profile and click the Video Codec. Then under the Filters tab, select the Video cropping filter. Finally, click Save.

In the Destination file select where you want it to be saved.

Then click Start.

Congratulations on getting here! You finally cropped your video using the VLC media player.
Although there are disadvantages to using this as your cropping tool. Like for example you want the real-time preview of what you’ve changed in your video. This would be a turn off for some that want their outputs to be shown to them immediately. Aside from this, there is a chance that you will forget one step to make and thus, the whole process would need to start over from scratch. Lastly, is the freedom to batch crop multiple videos. This is especially important for those that need to have many clips in one video. A user might lose the continuity of the story within his video.
While one of its strong suits is the affordability of the software. It is completely free and has no additional charges that may surprise you in the future. Finally, your output won’t have watermarks that could destroy the aesthetics of your video.
What are your experiences with using it as a cropping tool? What would you recommend to improve it? It is up to you the user if you want to continue using this as your partner in removing the excess in your videos.
Method 2: Cropping a Video using Wondershare Filmora
Have you heard of an editing tool called Wondershare Filmora Video Editor ? What are your first impressions of this software? You can download this for free by going to the official site.
For Win 7 or later (64-bit)
For macOS 10.14 or later
Wondershare Filmora is a useful editor that can help you produce the content that you want. It is packed with beneficial tools that you can learn to apply. If it is already installed on your computer then proceed to opening it.

Prepare your videos that you need to crop. You can drag and drop your video or click the Import.

Select the video clip that you want to crop. Then, click the Crop tool and choose if you want the Crop or Pan & Zoom.

You can also right click the video clip .Under the Video tab you can select the Crop and Zoom or Crop to Fit then adjust to your preferred ratio.

One of the advantages of Filmora is you can preview what you have cropped immediately. This will greatly help you if you’re not sure what kind of crop that you want. If you’ve thought that you made a mistake then a simple Undo button could fix it. In short, you’re not going through the gruesome process of starting all over again. You can also do the batch cropping of multiple videos helping you ensure the smoothness of flow in the final output.
Although the Filmora is not free, there is a trial that you can use to test it to check if this video editor would meet your needs. It has tools that a beginner to expert video editor could use to produce high quality videos that would make the audience think that it was life from the movies.
The Bottom Line
The journey of exploring different options would help you make the decision. Both VLC media player and Wondershare Filmora have their great features which would aid the user to crop his videos in an efficient way. What are your thoughts on each of them? As an individual you have varied needs that a video tool should meet.
After reading this, you’ve had a clearer view of what these video softwares offers. Did this guide help you decide which would fit your needs as a video editor? What are your suggestions for improvement?
You could share with us the tips and tricks you know on cropping videos using these applications.
Ideas That Help You Out in Converting AVI to GIF
Ideas That Will Help You Out in Converting AVI to GIF
An easy yet powerful editor
Numerous effects to choose from
Detailed tutorials provided by the official channel
GIFs have grown in popularity over the years. They are a great way of expressing emotions in a fun way. You can create a GIF out of any video using a conversion tool.
Converting a video AVI to a gif has several benefits. It can be useful for creating cute gifs or memes. Most savvy agencies or freelancers are using this method to improve the effectiveness of their marketing campaigns.
Doing it manually will lead to splitting the video into several pictures at your own time. But with these ideas, you can avoid this extra task and directly convert AVI to GIF in just a few simple steps.
In this article
01 [How to Make an AVI to GIF on Windows/Mac/Online?](#Part 1)
02 [What’s Best 5 GIF to Avi Converters?](#Part 2)
Part 1 How to Make an AVI to GIF on Windows/Mac/Online?
There are many ways to create AVI to GIF based on your device operating system. Go through the various steps below to create it.
01Convert AVI to GIF with Uniconverter
Step 1: Launch Wondershare Uniconverter
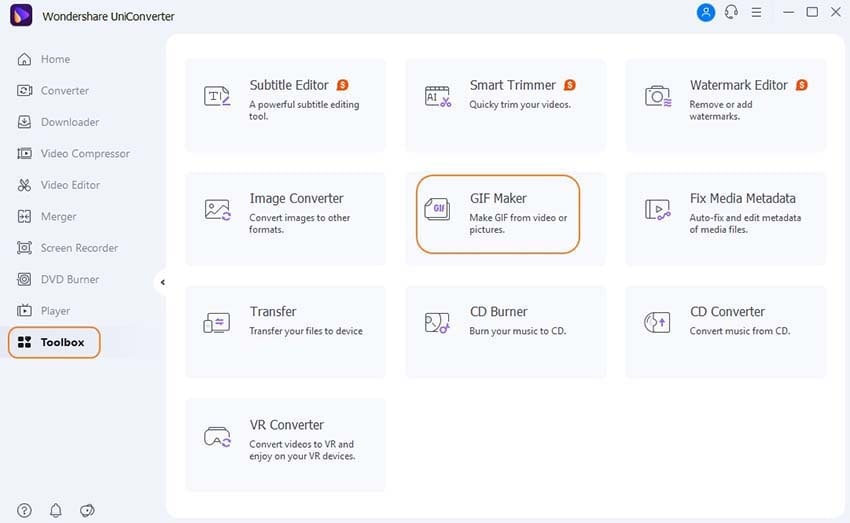
Download Wondershare Uniconvereter software from the official link to your PC/Mac (With Mojave). As the home interface appears, click on the “Toolbox” tab and choose the “GIF Maker” option.
Step 2: Upload the AVI File
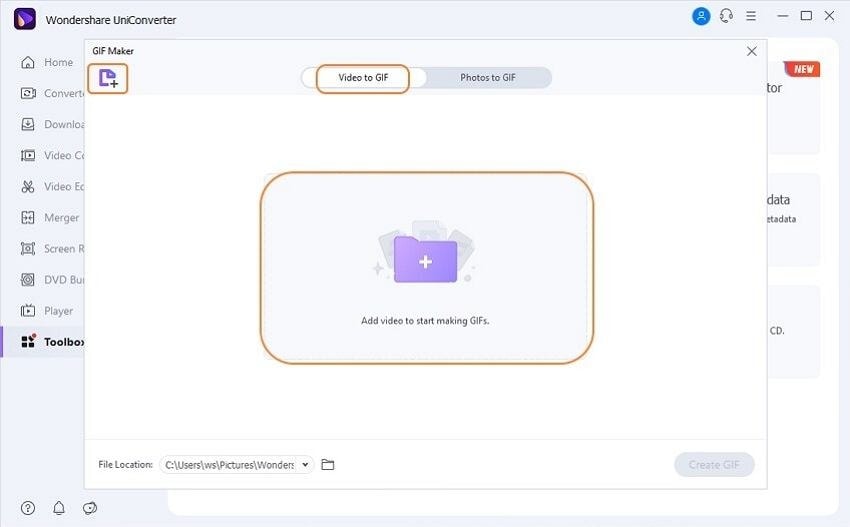
In the GIF Maker window, click on the “Import” icon to upload AVI files from your PC. On the right pane, select the start and stop times of the videos for GIF-making.
The next thing to do is select the output size and frame rate of the desired GIF output. On the bottom, click on the “File Location” to choose the directory for the output file.
Step 3: Convert
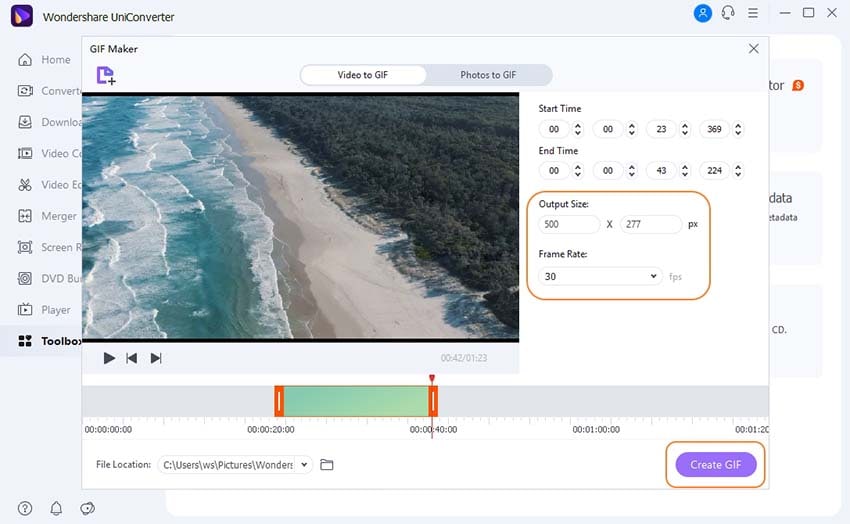
The end step is to convert AVI to gif by clicking on the “Create GIF” button to begin the process.
02Convert AVI to GIF with VLC Media Player
VLC is a cross-platform media player so you can use it on your Mac and Windows to convert AVI to Gif. It’s free and comes with numerous functions and support other than playing media. It can be used as a GIF maker too because of the snapshot feature.
Step 1: Launch VLC Media Player
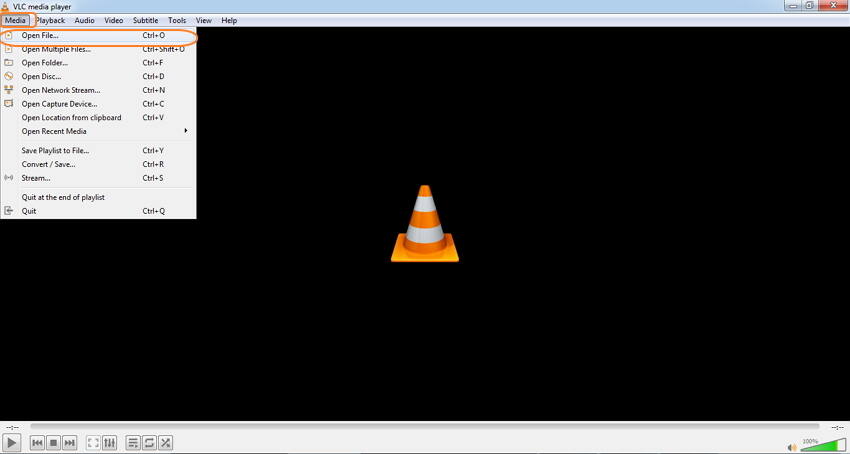
Run VLC Media Player and then click on “Media” > “Open File” to upload the AVI file from your PC or Mac.
Step 2: Select the Video Frame
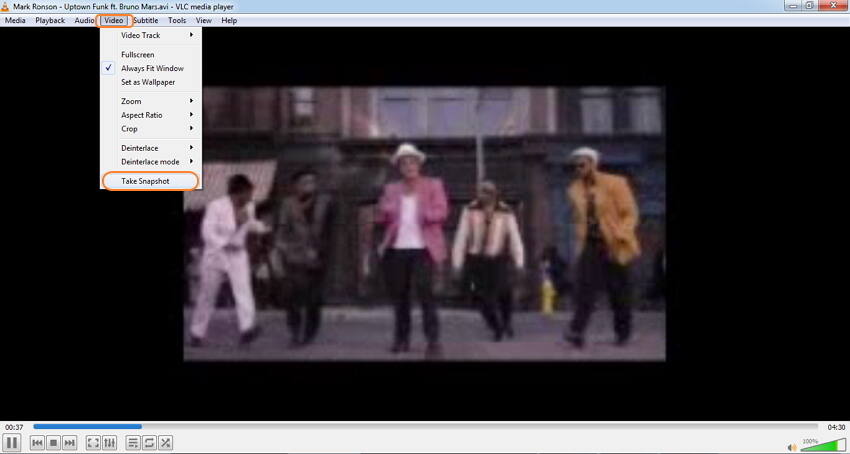
As you can see, the video will start running on your VLC media player screen. Now, select the video frame for getting the desired animation. Next, go to the “Video” menu and choose “Take Snapshop”. This step will save the video frame in the PNG format to the My Pictures folder.
Step 3: Open MSPaint
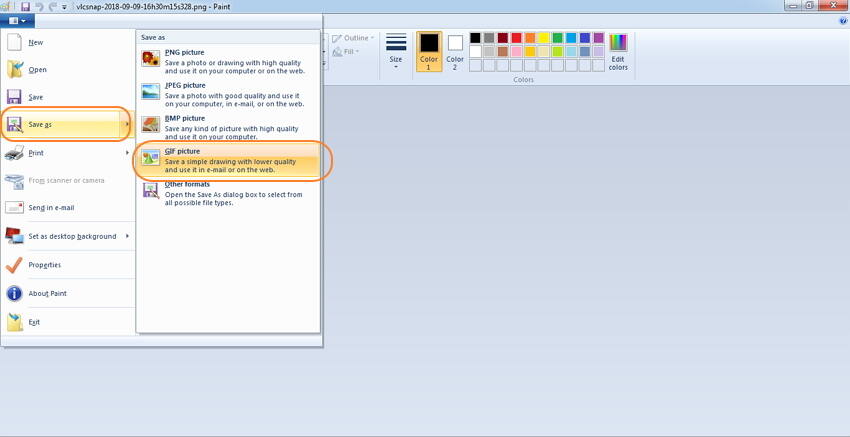
You will have to open MSPaint on your PC. When it opens, click on the “File” menu and then open the snapshot that you had taken in the previous step. Again, click on “File” > “Save As” > “GIF” to download your GIF.
03Convert AVI to GIF Using Photoshop
Converting AVI to GIF with photoshop can be a bit complex but you will get the highest quality GIFs in a short time. Read the steps here to start converting your AVI file.
Step 1: Launch and Import
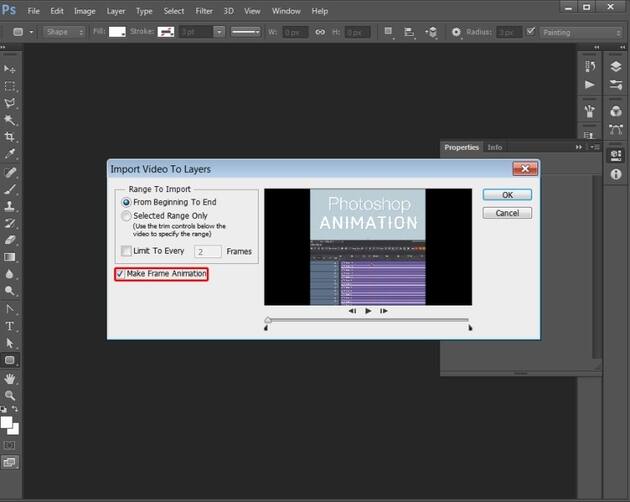
Run Adobe Photoshop on your PC or Mac. As the home interface will open, click on “File” > “Import” > “Video Frames to Layers”. Now, import your AVI video.
Step 2: Cut the Part
Separate that part of the video for which you want to create a GIF. From the “Range to Import option, select the default “Beginning to End” or “Selected Range”. You also have to check the box in the “Make Frame Animation” option.
Step 3: Check and Save
Come back to the window and check the animation. Trim or add frames if it seems necessary or else simply go to the left side of the animation and click on check forever.
At last, open “File” > “Save for Web”. Now from the “Preset” menu, choose from the GIF option or select from the drop-down list manually. Finish by clicking on “Save”.
Part 2 What’s Best 5 GIF to Avi Converters?
01Cloud Convert
Cloud Convert is a sophisticated, browser-based one-stop shop for all your video conversion needs. It can easily convert AVI to GIF online. It has been packed with plenty of features for yielding desired output to the users. You can adjust fps, preset, resolution, aspect ratio, codec, and more before getting the final result. Not only does it fit your video and image conversion needs but also provides you with audio, ebook, spreadsheet, and many other file conversion facilities. Over 200 file formats are compatible with this platform.
02Any Conv
Any Conv is a powerful solution to convert gifs to AVI files online without any downloads or installations. It supports over 400 file formats and you can use it with any of your devices. Convert any file from one format to another, or from a batch of files at once. This app doesn’t even ask for registration to use and is completely free! There are various options to modify your GIF before the final conversion to AVI such as changing screen size, resize handling, video bitrate, and more.
03Veed.io
Veed.io helps you to convert Gif to AVI and other popular video formats. You can directly upload a file from your computer or add it from your Dropbox. Moreover, you can paste a YouTube URL link for conversion of a video to GIF. It offers you a whole set of video editing, video conversion, and a lot of other features. If you are looking for some additional help in video creation and editing, it’s the best platform for you. Check it out today and start bringing your ideas to reality. The majority of its features can be accessed free of charge.
04MiConv
MiConv is another easy to use cloud-based gif to AVI converter online platform. This multi-platform online converter tool can turn any GIF to AVI online within a few seconds. In an hour, it allows you to convert around 120 GIFs stably. Don’t worry about the performance because you will get the highest quality output here. You just have to upload or drag and drop your files. After conversion, your files will be removed in the next two hours so no other person can access them.
05Convertio
Convertio lets you convert a video file into various formats. It works as an ebook, image, video, document, presentation, font, audio, and archive converter.
You can add files from the computer, dropbox, and google drive. The maximum input file size allowed here to convert is 100MB. If you wish, get the output AVI file from a GIF with increased size and quality.
Part 3 Bonus Want to Edit AVI Videos? Use Filmora
If you want to do something extra apart from GIF-making, like video editing, we have a surprise for you. Wondershare has rolled out the latest update of Wondershare Filmora Video Editor in the V11 beta version. It is a wonderful video editor for professionals as well as amateurs.

Wondershare Filmora - Best Video Editor for Mac/Windows
5,481,435 people have downloaded it.
Build unique custom animations without breaking a sweat.
Focus on creating epic stories and leave the details to Filmora’s auto features.
Start a creative adventure with drag & drop effects and endless possibilities.
Filmora simplifies advanced features to save you time and effort.
Filmora cuts out repetition so you can move on to your next creative breakthrough.
You can enhance your videos with a range of professional editing tools, including video effects, transitions, sound effects, and more. It can also help you create GIFs from UHD 4K videos without any quality compromise. This software also supports many other video formats, so you can personalize any of them as per your choice. It can turn your video idea into reality with perfection.
With the most comprehensive set of video editing tools available, Filmora is the most convenient way to create videos. It can also convert AVI to GIF and vice versafor your business, brands, and social media channels. More than just an editor, this is your all-in-one video production suite.
● Key Takeaways from This Episode →
● Thank you for taking some time out to read this article! We know the amount of time and effort you put into creating an animated GIF. We don’t want your time to go in vain by not having it be perfect.
● I hope these few tips will help you out in the future. Now, you will be able to create the most perfect GIFs to share with family, friends, and business associates.
● For all-in-one video editing tools, you can always use Wondershare Filmora. If you have any other ideas or questions, please leave a comment below.
GIFs have grown in popularity over the years. They are a great way of expressing emotions in a fun way. You can create a GIF out of any video using a conversion tool.
Converting a video AVI to a gif has several benefits. It can be useful for creating cute gifs or memes. Most savvy agencies or freelancers are using this method to improve the effectiveness of their marketing campaigns.
Doing it manually will lead to splitting the video into several pictures at your own time. But with these ideas, you can avoid this extra task and directly convert AVI to GIF in just a few simple steps.
In this article
01 [How to Make an AVI to GIF on Windows/Mac/Online?](#Part 1)
02 [What’s Best 5 GIF to Avi Converters?](#Part 2)
Part 1 How to Make an AVI to GIF on Windows/Mac/Online?
There are many ways to create AVI to GIF based on your device operating system. Go through the various steps below to create it.
01Convert AVI to GIF with Uniconverter
Step 1: Launch Wondershare Uniconverter

Download Wondershare Uniconvereter software from the official link to your PC/Mac (With Mojave). As the home interface appears, click on the “Toolbox” tab and choose the “GIF Maker” option.
Step 2: Upload the AVI File

In the GIF Maker window, click on the “Import” icon to upload AVI files from your PC. On the right pane, select the start and stop times of the videos for GIF-making.
The next thing to do is select the output size and frame rate of the desired GIF output. On the bottom, click on the “File Location” to choose the directory for the output file.
Step 3: Convert

The end step is to convert AVI to gif by clicking on the “Create GIF” button to begin the process.
02Convert AVI to GIF with VLC Media Player
VLC is a cross-platform media player so you can use it on your Mac and Windows to convert AVI to Gif. It’s free and comes with numerous functions and support other than playing media. It can be used as a GIF maker too because of the snapshot feature.
Step 1: Launch VLC Media Player

Run VLC Media Player and then click on “Media” > “Open File” to upload the AVI file from your PC or Mac.
Step 2: Select the Video Frame

As you can see, the video will start running on your VLC media player screen. Now, select the video frame for getting the desired animation. Next, go to the “Video” menu and choose “Take Snapshop”. This step will save the video frame in the PNG format to the My Pictures folder.
Step 3: Open MSPaint

You will have to open MSPaint on your PC. When it opens, click on the “File” menu and then open the snapshot that you had taken in the previous step. Again, click on “File” > “Save As” > “GIF” to download your GIF.
03Convert AVI to GIF Using Photoshop
Converting AVI to GIF with photoshop can be a bit complex but you will get the highest quality GIFs in a short time. Read the steps here to start converting your AVI file.
Step 1: Launch and Import
Run Adobe Photoshop on your PC or Mac. As the home interface will open, click on “File” > “Import” > “Video Frames to Layers”. Now, import your AVI video.

Step 2: Cut the Part
Separate that part of the video for which you want to create a GIF. From the “Range to Import option, select the default “Beginning to End” or “Selected Range”. You also have to check the box in the “Make Frame Animation” option.
Step 3: Check and Save
Come back to the window and check the animation. Trim or add frames if it seems necessary or else simply go to the left side of the animation and click on check forever.
At last, open “File” > “Save for Web”. Now from the “Preset” menu, choose from the GIF option or select from the drop-down list manually. Finish by clicking on “Save”.
Part 2 What’s Best 5 GIF to Avi Converters?
01Cloud Convert
Cloud Convert is a sophisticated, browser-based one-stop shop for all your video conversion needs. It can easily convert AVI to GIF online. It has been packed with plenty of features for yielding desired output to the users. You can adjust fps, preset, resolution, aspect ratio, codec, and more before getting the final result. Not only does it fit your video and image conversion needs but also provides you with audio, ebook, spreadsheet, and many other file conversion facilities. Over 200 file formats are compatible with this platform.
02Any Conv
Any Conv is a powerful solution to convert gifs to AVI files online without any downloads or installations. It supports over 400 file formats and you can use it with any of your devices. Convert any file from one format to another, or from a batch of files at once. This app doesn’t even ask for registration to use and is completely free! There are various options to modify your GIF before the final conversion to AVI such as changing screen size, resize handling, video bitrate, and more.
03Veed.io
Veed.io helps you to convert Gif to AVI and other popular video formats. You can directly upload a file from your computer or add it from your Dropbox. Moreover, you can paste a YouTube URL link for conversion of a video to GIF. It offers you a whole set of video editing, video conversion, and a lot of other features. If you are looking for some additional help in video creation and editing, it’s the best platform for you. Check it out today and start bringing your ideas to reality. The majority of its features can be accessed free of charge.
04MiConv
MiConv is another easy to use cloud-based gif to AVI converter online platform. This multi-platform online converter tool can turn any GIF to AVI online within a few seconds. In an hour, it allows you to convert around 120 GIFs stably. Don’t worry about the performance because you will get the highest quality output here. You just have to upload or drag and drop your files. After conversion, your files will be removed in the next two hours so no other person can access them.
05Convertio
Convertio lets you convert a video file into various formats. It works as an ebook, image, video, document, presentation, font, audio, and archive converter.
You can add files from the computer, dropbox, and google drive. The maximum input file size allowed here to convert is 100MB. If you wish, get the output AVI file from a GIF with increased size and quality.
Part 3 Bonus Want to Edit AVI Videos? Use Filmora
If you want to do something extra apart from GIF-making, like video editing, we have a surprise for you. Wondershare has rolled out the latest update of Wondershare Filmora Video Editor in the V11 beta version. It is a wonderful video editor for professionals as well as amateurs.

Wondershare Filmora - Best Video Editor for Mac/Windows
5,481,435 people have downloaded it.
Build unique custom animations without breaking a sweat.
Focus on creating epic stories and leave the details to Filmora’s auto features.
Start a creative adventure with drag & drop effects and endless possibilities.
Filmora simplifies advanced features to save you time and effort.
Filmora cuts out repetition so you can move on to your next creative breakthrough.
You can enhance your videos with a range of professional editing tools, including video effects, transitions, sound effects, and more. It can also help you create GIFs from UHD 4K videos without any quality compromise. This software also supports many other video formats, so you can personalize any of them as per your choice. It can turn your video idea into reality with perfection.
With the most comprehensive set of video editing tools available, Filmora is the most convenient way to create videos. It can also convert AVI to GIF and vice versafor your business, brands, and social media channels. More than just an editor, this is your all-in-one video production suite.
● Key Takeaways from This Episode →
● Thank you for taking some time out to read this article! We know the amount of time and effort you put into creating an animated GIF. We don’t want your time to go in vain by not having it be perfect.
● I hope these few tips will help you out in the future. Now, you will be able to create the most perfect GIFs to share with family, friends, and business associates.
● For all-in-one video editing tools, you can always use Wondershare Filmora. If you have any other ideas or questions, please leave a comment below.
GIFs have grown in popularity over the years. They are a great way of expressing emotions in a fun way. You can create a GIF out of any video using a conversion tool.
Converting a video AVI to a gif has several benefits. It can be useful for creating cute gifs or memes. Most savvy agencies or freelancers are using this method to improve the effectiveness of their marketing campaigns.
Doing it manually will lead to splitting the video into several pictures at your own time. But with these ideas, you can avoid this extra task and directly convert AVI to GIF in just a few simple steps.
In this article
01 [How to Make an AVI to GIF on Windows/Mac/Online?](#Part 1)
02 [What’s Best 5 GIF to Avi Converters?](#Part 2)
Part 1 How to Make an AVI to GIF on Windows/Mac/Online?
There are many ways to create AVI to GIF based on your device operating system. Go through the various steps below to create it.
01Convert AVI to GIF with Uniconverter
Step 1: Launch Wondershare Uniconverter

Download Wondershare Uniconvereter software from the official link to your PC/Mac (With Mojave). As the home interface appears, click on the “Toolbox” tab and choose the “GIF Maker” option.
Step 2: Upload the AVI File

In the GIF Maker window, click on the “Import” icon to upload AVI files from your PC. On the right pane, select the start and stop times of the videos for GIF-making.
The next thing to do is select the output size and frame rate of the desired GIF output. On the bottom, click on the “File Location” to choose the directory for the output file.
Step 3: Convert

The end step is to convert AVI to gif by clicking on the “Create GIF” button to begin the process.
02Convert AVI to GIF with VLC Media Player
VLC is a cross-platform media player so you can use it on your Mac and Windows to convert AVI to Gif. It’s free and comes with numerous functions and support other than playing media. It can be used as a GIF maker too because of the snapshot feature.
Step 1: Launch VLC Media Player

Run VLC Media Player and then click on “Media” > “Open File” to upload the AVI file from your PC or Mac.
Step 2: Select the Video Frame

As you can see, the video will start running on your VLC media player screen. Now, select the video frame for getting the desired animation. Next, go to the “Video” menu and choose “Take Snapshop”. This step will save the video frame in the PNG format to the My Pictures folder.
Step 3: Open MSPaint

You will have to open MSPaint on your PC. When it opens, click on the “File” menu and then open the snapshot that you had taken in the previous step. Again, click on “File” > “Save As” > “GIF” to download your GIF.
03Convert AVI to GIF Using Photoshop
Converting AVI to GIF with photoshop can be a bit complex but you will get the highest quality GIFs in a short time. Read the steps here to start converting your AVI file.
Step 1: Launch and Import
Run Adobe Photoshop on your PC or Mac. As the home interface will open, click on “File” > “Import” > “Video Frames to Layers”. Now, import your AVI video.

Step 2: Cut the Part
Separate that part of the video for which you want to create a GIF. From the “Range to Import option, select the default “Beginning to End” or “Selected Range”. You also have to check the box in the “Make Frame Animation” option.
Step 3: Check and Save
Come back to the window and check the animation. Trim or add frames if it seems necessary or else simply go to the left side of the animation and click on check forever.
At last, open “File” > “Save for Web”. Now from the “Preset” menu, choose from the GIF option or select from the drop-down list manually. Finish by clicking on “Save”.
Part 2 What’s Best 5 GIF to Avi Converters?
01Cloud Convert
Cloud Convert is a sophisticated, browser-based one-stop shop for all your video conversion needs. It can easily convert AVI to GIF online. It has been packed with plenty of features for yielding desired output to the users. You can adjust fps, preset, resolution, aspect ratio, codec, and more before getting the final result. Not only does it fit your video and image conversion needs but also provides you with audio, ebook, spreadsheet, and many other file conversion facilities. Over 200 file formats are compatible with this platform.
02Any Conv
Any Conv is a powerful solution to convert gifs to AVI files online without any downloads or installations. It supports over 400 file formats and you can use it with any of your devices. Convert any file from one format to another, or from a batch of files at once. This app doesn’t even ask for registration to use and is completely free! There are various options to modify your GIF before the final conversion to AVI such as changing screen size, resize handling, video bitrate, and more.
03Veed.io
Veed.io helps you to convert Gif to AVI and other popular video formats. You can directly upload a file from your computer or add it from your Dropbox. Moreover, you can paste a YouTube URL link for conversion of a video to GIF. It offers you a whole set of video editing, video conversion, and a lot of other features. If you are looking for some additional help in video creation and editing, it’s the best platform for you. Check it out today and start bringing your ideas to reality. The majority of its features can be accessed free of charge.
04MiConv
MiConv is another easy to use cloud-based gif to AVI converter online platform. This multi-platform online converter tool can turn any GIF to AVI online within a few seconds. In an hour, it allows you to convert around 120 GIFs stably. Don’t worry about the performance because you will get the highest quality output here. You just have to upload or drag and drop your files. After conversion, your files will be removed in the next two hours so no other person can access them.
05Convertio
Convertio lets you convert a video file into various formats. It works as an ebook, image, video, document, presentation, font, audio, and archive converter.
You can add files from the computer, dropbox, and google drive. The maximum input file size allowed here to convert is 100MB. If you wish, get the output AVI file from a GIF with increased size and quality.
Part 3 Bonus Want to Edit AVI Videos? Use Filmora
If you want to do something extra apart from GIF-making, like video editing, we have a surprise for you. Wondershare has rolled out the latest update of Wondershare Filmora Video Editor in the V11 beta version. It is a wonderful video editor for professionals as well as amateurs.

Wondershare Filmora - Best Video Editor for Mac/Windows
5,481,435 people have downloaded it.
Build unique custom animations without breaking a sweat.
Focus on creating epic stories and leave the details to Filmora’s auto features.
Start a creative adventure with drag & drop effects and endless possibilities.
Filmora simplifies advanced features to save you time and effort.
Filmora cuts out repetition so you can move on to your next creative breakthrough.
You can enhance your videos with a range of professional editing tools, including video effects, transitions, sound effects, and more. It can also help you create GIFs from UHD 4K videos without any quality compromise. This software also supports many other video formats, so you can personalize any of them as per your choice. It can turn your video idea into reality with perfection.
With the most comprehensive set of video editing tools available, Filmora is the most convenient way to create videos. It can also convert AVI to GIF and vice versafor your business, brands, and social media channels. More than just an editor, this is your all-in-one video production suite.
● Key Takeaways from This Episode →
● Thank you for taking some time out to read this article! We know the amount of time and effort you put into creating an animated GIF. We don’t want your time to go in vain by not having it be perfect.
● I hope these few tips will help you out in the future. Now, you will be able to create the most perfect GIFs to share with family, friends, and business associates.
● For all-in-one video editing tools, you can always use Wondershare Filmora. If you have any other ideas or questions, please leave a comment below.
GIFs have grown in popularity over the years. They are a great way of expressing emotions in a fun way. You can create a GIF out of any video using a conversion tool.
Converting a video AVI to a gif has several benefits. It can be useful for creating cute gifs or memes. Most savvy agencies or freelancers are using this method to improve the effectiveness of their marketing campaigns.
Doing it manually will lead to splitting the video into several pictures at your own time. But with these ideas, you can avoid this extra task and directly convert AVI to GIF in just a few simple steps.
In this article
01 [How to Make an AVI to GIF on Windows/Mac/Online?](#Part 1)
02 [What’s Best 5 GIF to Avi Converters?](#Part 2)
Part 1 How to Make an AVI to GIF on Windows/Mac/Online?
There are many ways to create AVI to GIF based on your device operating system. Go through the various steps below to create it.
01Convert AVI to GIF with Uniconverter
Step 1: Launch Wondershare Uniconverter

Download Wondershare Uniconvereter software from the official link to your PC/Mac (With Mojave). As the home interface appears, click on the “Toolbox” tab and choose the “GIF Maker” option.
Step 2: Upload the AVI File

In the GIF Maker window, click on the “Import” icon to upload AVI files from your PC. On the right pane, select the start and stop times of the videos for GIF-making.
The next thing to do is select the output size and frame rate of the desired GIF output. On the bottom, click on the “File Location” to choose the directory for the output file.
Step 3: Convert

The end step is to convert AVI to gif by clicking on the “Create GIF” button to begin the process.
02Convert AVI to GIF with VLC Media Player
VLC is a cross-platform media player so you can use it on your Mac and Windows to convert AVI to Gif. It’s free and comes with numerous functions and support other than playing media. It can be used as a GIF maker too because of the snapshot feature.
Step 1: Launch VLC Media Player

Run VLC Media Player and then click on “Media” > “Open File” to upload the AVI file from your PC or Mac.
Step 2: Select the Video Frame

As you can see, the video will start running on your VLC media player screen. Now, select the video frame for getting the desired animation. Next, go to the “Video” menu and choose “Take Snapshop”. This step will save the video frame in the PNG format to the My Pictures folder.
Step 3: Open MSPaint

You will have to open MSPaint on your PC. When it opens, click on the “File” menu and then open the snapshot that you had taken in the previous step. Again, click on “File” > “Save As” > “GIF” to download your GIF.
03Convert AVI to GIF Using Photoshop
Converting AVI to GIF with photoshop can be a bit complex but you will get the highest quality GIFs in a short time. Read the steps here to start converting your AVI file.
Step 1: Launch and Import
Run Adobe Photoshop on your PC or Mac. As the home interface will open, click on “File” > “Import” > “Video Frames to Layers”. Now, import your AVI video.

Step 2: Cut the Part
Separate that part of the video for which you want to create a GIF. From the “Range to Import option, select the default “Beginning to End” or “Selected Range”. You also have to check the box in the “Make Frame Animation” option.
Step 3: Check and Save
Come back to the window and check the animation. Trim or add frames if it seems necessary or else simply go to the left side of the animation and click on check forever.
At last, open “File” > “Save for Web”. Now from the “Preset” menu, choose from the GIF option or select from the drop-down list manually. Finish by clicking on “Save”.
Part 2 What’s Best 5 GIF to Avi Converters?
01Cloud Convert
Cloud Convert is a sophisticated, browser-based one-stop shop for all your video conversion needs. It can easily convert AVI to GIF online. It has been packed with plenty of features for yielding desired output to the users. You can adjust fps, preset, resolution, aspect ratio, codec, and more before getting the final result. Not only does it fit your video and image conversion needs but also provides you with audio, ebook, spreadsheet, and many other file conversion facilities. Over 200 file formats are compatible with this platform.
02Any Conv
Any Conv is a powerful solution to convert gifs to AVI files online without any downloads or installations. It supports over 400 file formats and you can use it with any of your devices. Convert any file from one format to another, or from a batch of files at once. This app doesn’t even ask for registration to use and is completely free! There are various options to modify your GIF before the final conversion to AVI such as changing screen size, resize handling, video bitrate, and more.
03Veed.io
Veed.io helps you to convert Gif to AVI and other popular video formats. You can directly upload a file from your computer or add it from your Dropbox. Moreover, you can paste a YouTube URL link for conversion of a video to GIF. It offers you a whole set of video editing, video conversion, and a lot of other features. If you are looking for some additional help in video creation and editing, it’s the best platform for you. Check it out today and start bringing your ideas to reality. The majority of its features can be accessed free of charge.
04MiConv
MiConv is another easy to use cloud-based gif to AVI converter online platform. This multi-platform online converter tool can turn any GIF to AVI online within a few seconds. In an hour, it allows you to convert around 120 GIFs stably. Don’t worry about the performance because you will get the highest quality output here. You just have to upload or drag and drop your files. After conversion, your files will be removed in the next two hours so no other person can access them.
05Convertio
Convertio lets you convert a video file into various formats. It works as an ebook, image, video, document, presentation, font, audio, and archive converter.
You can add files from the computer, dropbox, and google drive. The maximum input file size allowed here to convert is 100MB. If you wish, get the output AVI file from a GIF with increased size and quality.
Part 3 Bonus Want to Edit AVI Videos? Use Filmora
If you want to do something extra apart from GIF-making, like video editing, we have a surprise for you. Wondershare has rolled out the latest update of Wondershare Filmora Video Editor in the V11 beta version. It is a wonderful video editor for professionals as well as amateurs.

Wondershare Filmora - Best Video Editor for Mac/Windows
5,481,435 people have downloaded it.
Build unique custom animations without breaking a sweat.
Focus on creating epic stories and leave the details to Filmora’s auto features.
Start a creative adventure with drag & drop effects and endless possibilities.
Filmora simplifies advanced features to save you time and effort.
Filmora cuts out repetition so you can move on to your next creative breakthrough.
You can enhance your videos with a range of professional editing tools, including video effects, transitions, sound effects, and more. It can also help you create GIFs from UHD 4K videos without any quality compromise. This software also supports many other video formats, so you can personalize any of them as per your choice. It can turn your video idea into reality with perfection.
With the most comprehensive set of video editing tools available, Filmora is the most convenient way to create videos. It can also convert AVI to GIF and vice versafor your business, brands, and social media channels. More than just an editor, this is your all-in-one video production suite.
● Key Takeaways from This Episode →
● Thank you for taking some time out to read this article! We know the amount of time and effort you put into creating an animated GIF. We don’t want your time to go in vain by not having it be perfect.
● I hope these few tips will help you out in the future. Now, you will be able to create the most perfect GIFs to share with family, friends, and business associates.
● For all-in-one video editing tools, you can always use Wondershare Filmora. If you have any other ideas or questions, please leave a comment below.
Also read:
- New How to Make Video Fade to Black in Movie Maker Easily for 2024
- New Making a Countdown Timer Video Like a Pro Isnt a Problem Anymore. Follow the Steps Mentioned in This Guide and Create an Impressive Countdown Timer for Your Videos
- Updated Do You Waste Time Making Transparent Background in Paint for 2024
- New Ways to Learn Discord Game Bots – Even if Youre Just Starting Out for 2024
- Updated Slow-Motion Innovation with Sony S&Q Feature
- Updated In 2024, Best Tips on How to Design Travel Slideshow
- Updated How to Add Expression in After Effects for 2024
- Updated 2024 Approved Learn Top Best Free LUTs For Premiere Pro
- New In 2024, FLV Editors for Windows 11/10/8.1/8/7 Easily Edit FLV Videos on PC
- New In 2024, Best AR Video Apps
- New In 2024, How to Create a Bokeh Effect
- Updated How to Loop Video in Canva
- Updated 8 Tips to Apply Cinematic Color Grading to Your Video
- 2024 Approved Want to Add Subtitles to Netflix Videos in Your Preferred Language? Read This Article to Learn Two Different Methods for Uploading Custom Subtitles to Netflix
- In 2024, Learning Unique Ways to Slow Down Time Lapse on iPhone
- Updated How Does Sonys S&Q Feature Help Recording Slow-Motion Video
- Updated 2024 Approved What Are the Best 15 Slideshow Presentation Examples Your Audience Will Love
- 2024 Approved You Can Learn How to Color Grade Your Picture in Lightroom Effectively. By Understanding the Process of Color Grading in Lightroom, You Can Create Unique Works, and Improve Your Abilities
- In 2024, Top 15 Augmented Reality Games Like Pokémon GO To Play On Vivo S18e | Dr.fone
- Updated 4 Things You Should Know About Pinterest GIF for 2024
- In 2024, Edit and Send Fake Location on Telegram For your Samsung Galaxy A24 in 3 Ways | Dr.fone
- How to Remove a Previously Synced Google Account from Your Poco X5
- For People Wanting to Mock GPS on Gionee F3 Pro Devices | Dr.fone
- Latest way to get Shiny Meltan Box in Pokémon Go Mystery Box On Tecno Phantom V Fold | Dr.fone
- In 2024, How to Use Life360 on Windows PC For Samsung Galaxy F15 5G? | Dr.fone
- In 2024, Your Account Has Been Disabled in the App Store and iTunes From iPhone 14 Plus?
- How To Activate and Use Life360 Ghost Mode On OnePlus Ace 2V | Dr.fone
- How to Factory Reset Asus ROG Phone 7 in 5 Easy Ways | Dr.fone
- Overview of the Best Nokia C32 Screen Mirroring App | Dr.fone
- In 2024, Unlock Vivo T2 Pro 5G Phone Password Without Factory Reset Full Guide Here
- Read This Guide to Find a Reliable Alternative to Fake GPS On Apple iPhone 6s Plus | Dr.fone
- How To Unlock Any Samsung Galaxy XCover 6 Pro Tactical Edition Phone Password Using Emergency Call
- In 2024, Where Is the Best Place to Catch Dratini On Oppo A58 4G | Dr.fone
- Title: Camtasia Video Editor Review
- Author: Chloe
- Created at : 2024-06-26 06:24:23
- Updated at : 2024-06-27 06:24:23
- Link: https://ai-editing-video.techidaily.com/camtasia-video-editor-review/
- License: This work is licensed under CC BY-NC-SA 4.0.

