:max_bytes(150000):strip_icc():format(webp)/GettyImages-591408071-5bc7767d4cedfd0026a2ce3f.jpg)
How to Make Video Slow Motion? Complete Guide for 2024

How to Make Video Slow Motion? [Complete Guide]
Slow-motion videos are in trend now, especially when shooting for Instagram Reels , TikTok videos, or YouTube Shorts . While many users record the entire video in slow motion, there are others who need only a particular section of a clip to play at a reduced speed. Nevertheless, slowing down footage is no longer rocket science, thanks to the advancements in technology, and the availability and ease of access to relevant apps.
That said, here you will learn what is needed to record a video in slow motion, and how to get the job done in a simple way. In addition, you will also learn how to reduce the playback speed of an already existing video if it was recorded at a normal pace.
In this article
01 How to Make Slow Motion Videos via Recording?
02 How to Apply the Smooth Slow-Motion Effect in Post-Production?
Part 1: How to Make Slow Motion Videos via Recording?
The fact is, the playback speed of a video is inversely proportional to the frames per second (FPS) it has been recorded in. Usually, to have a video play at normal speed, it is recorded at 24 FPS or 30 FPS. On the other hand, if you increase the frame rate (FPS) to 120 or 240, the playback speed slows down. You can easily check this if you have access to a DSLR camera or an iPhone. These devices allow you to adjust the FPS so the videos can be recorded in slow motion.
For your convenience and learning, the step-by-step procedure on how to record a video in slow motion using an iPhone is explained below:
Step 1: Get to the SLO-MO Mode
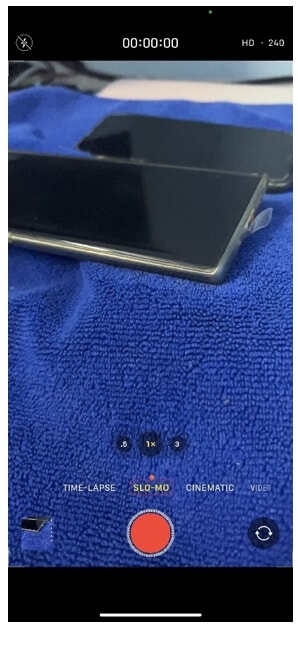
Launch the Camera app on your iPhone (iPhone 13 Pro Max is used here for illustrations), and swipe the screen to the left to get to the SLO-MO mode.
Step 2: Adjust Recording Preferences
Tap the number at the top-right corner to switch between 120 FPS and 240 FPS as needed. Tap 1x from the lower-middle section of the screen, and use the rotator to adjust your preferred zoom level.

Step 3: Start and Stop Recording
Tap the Record button from the bottom-center of the screen to begin recording the video in slow motion. Tap Stop when you are done. You can access the recorded video from the Videos container of the Photos app in your iPhone.
If you are using Android phone, you can check this article to find out more details about How to Record Super Slow Motion Videos on Your Phone.
You may also like: Best Slo-mo Camera Apps for Android And iPhone
Part 2: How to Apply the Smooth Slow-Motion Effect in Post-Production?
If you don’t have access to a camera that can record videos in slow motion, or in case you want to capture the footage at normal playback speed and then slow it down later, you need a dedicated tool to get the job done. Even though several post-production applications are available in the market, the one that is most versatile, has an intuitive interface, and is quite easy to use is Filmora video editor from Wondershare .
The latest version of the app, i.e., Wondershare Filmora 11 has a new feature called Speed Ramping that enables you to graphically manage the speed of the clips. While using the feature, you can either slow down the entire video or certain parts of it according to your requirements. For your learning, both the methods are explained below:
Method 1: Add Slow Motion Effect to the Whole Clip
For Win 7 or later (64-bit)
For macOS 10.12 or later
Step 1: Import the Source Video and Add to Timeline
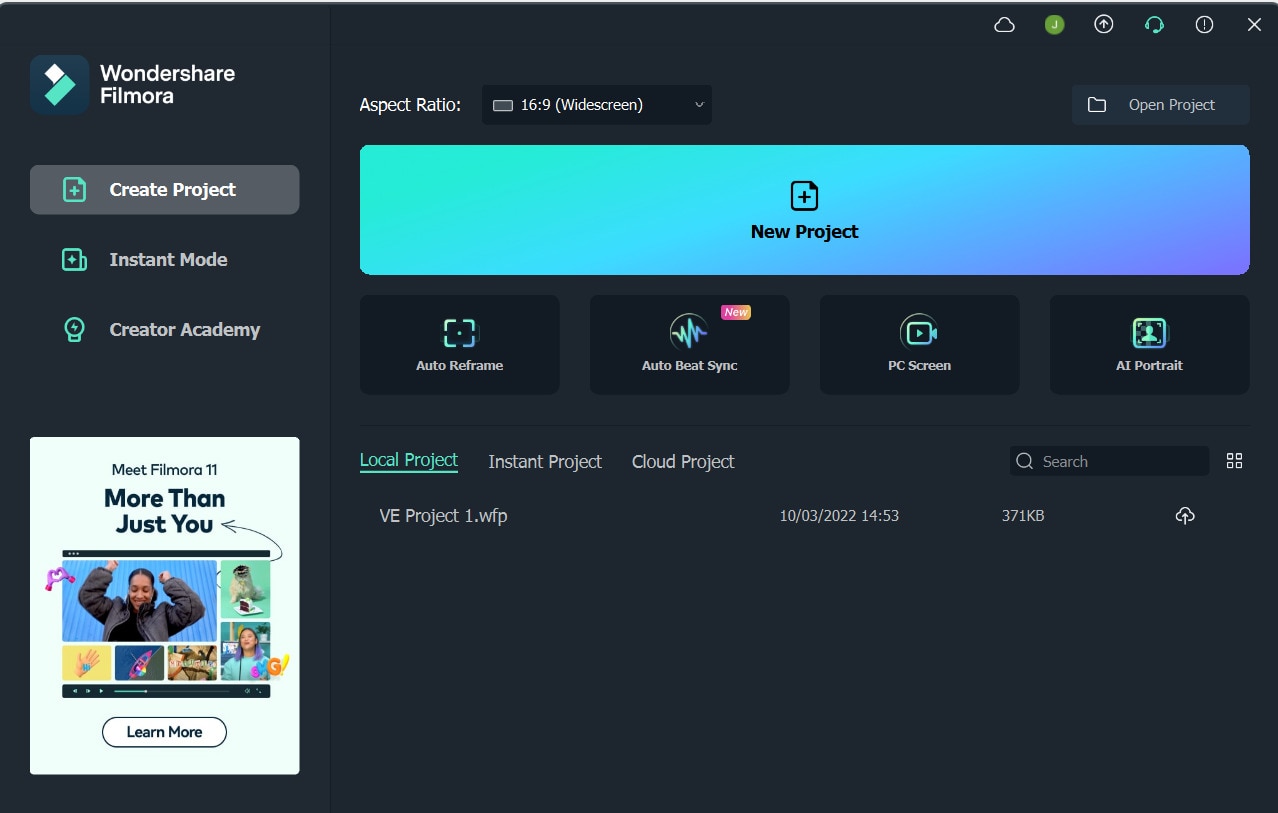
Launch Wondershare Filmora on your Windows or Mac computer (a Windows 11 PC is used here for illustrations), click New Project from the first screen that appears. Make sure that the Media tool is selected from the standard tool bar at the top, click anywhere inside the Media window, and select and import the source clip to the program.
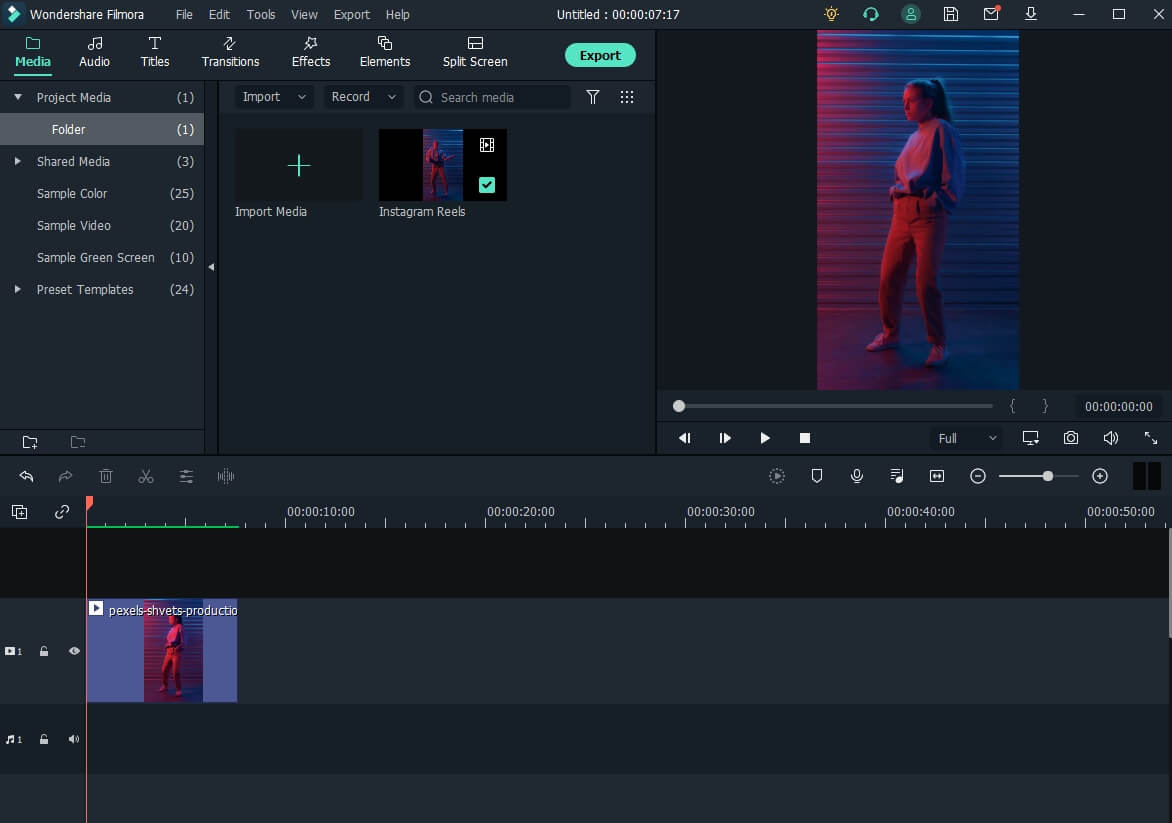
Next, hover the mouse over the thumbnail of the imported video in the Media window, and click the + icon present at its bottom-right corner. When the confirmation box comes up, click the Match to Media or Keep Project Settings button to change the project settings to match the resolution of the video, or change the footage to meet the project settings respectively.
Step 2: Add Slow Motion Effect to the Whole Clip
Once the media is added to the timeline, click on it and then click the Speed icon on the toolbar. Scroll down to the Slow menu and then you will see 0.5x, 0.25x, 0.1x, 0.05x and 0.01x presets. Select one to add slo-mo effects to the whole select clip. and click Speed Ramping from the menu that drops down.
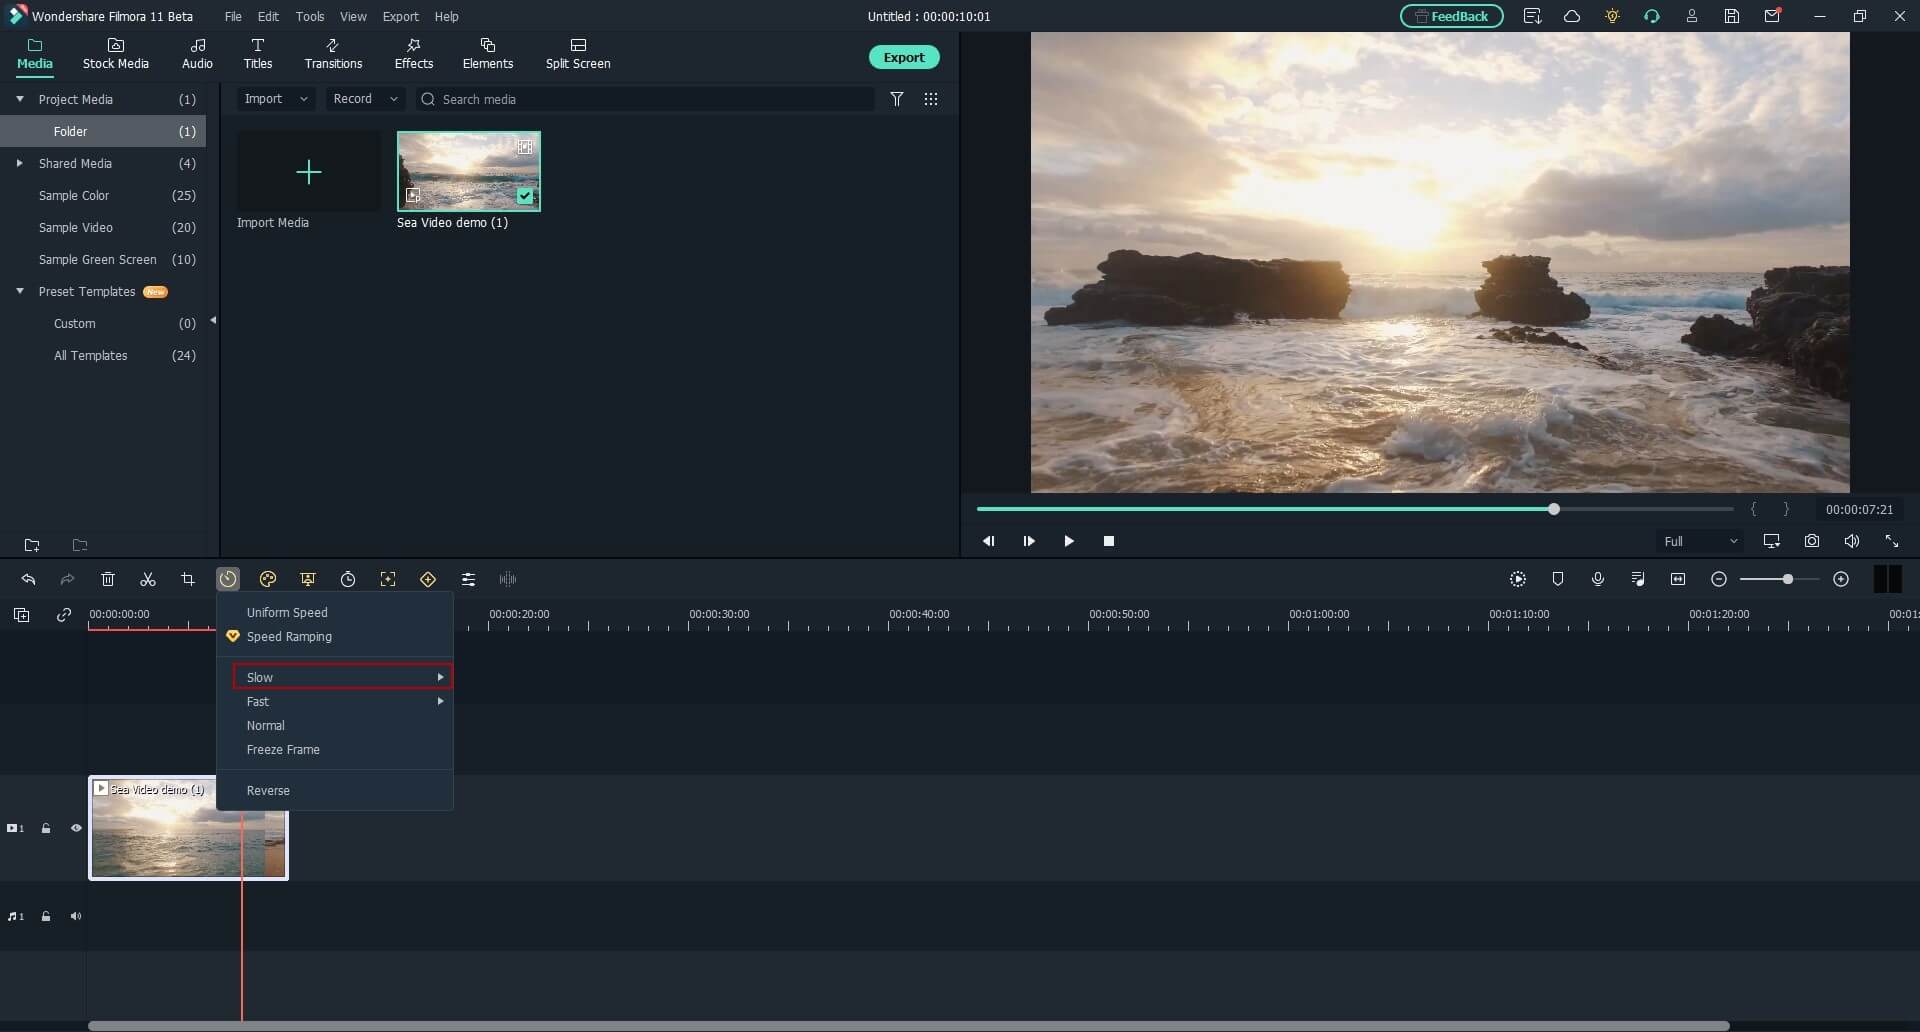
You can also right click the video in the timeline, and hover over to Speed option to select Uniform Speed to adjust the speed of the video to make a slo-mo effect video. Drag the speed slider to the left to slow down the video and you will see how many times it slowed down in the next field.
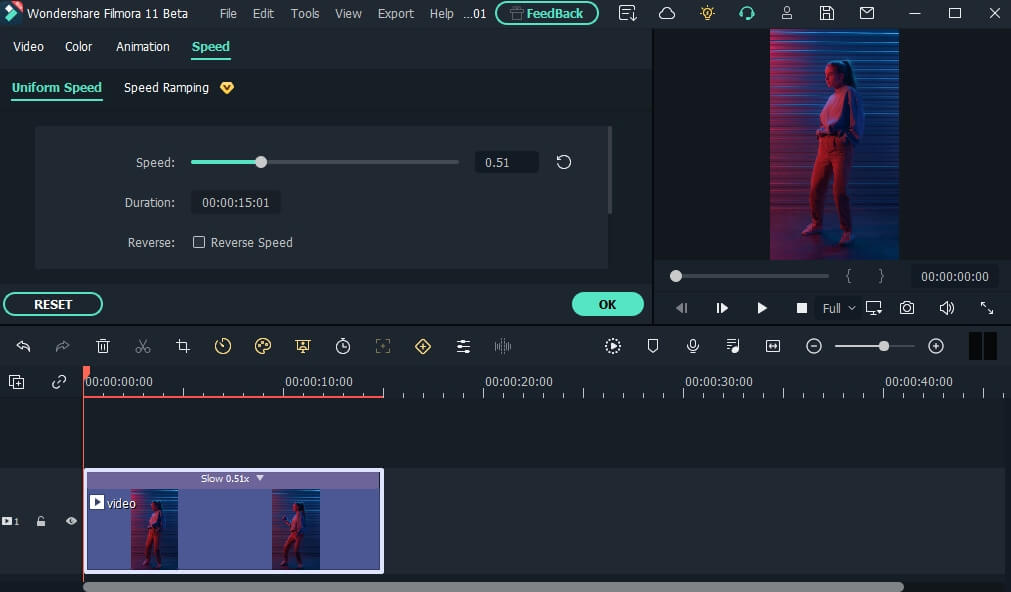
Method 2: Use Speed Ramping to Add Slow Motion Effect
For Win 7 or later (64-bit)
For macOS 10.12 or later
Speed Ramping enables you to add the slow-motion effect at different parts of a video and even freeze the screen for the duration that you specify. The processes to get these done are given below in detail:
Step 1: Add Source Video to Timeline and Get to the Speed Ramping Window
Use the process given in the previous method to import a source video to Wondershare Filmora 11 and add it to the Timeline. Then use the process given in the second step of the previous method to get to the Speed Ramping window.
Step 2: Add Slow Motion Effect to Different Parts of the Clip
Go to the Speed Ramping tab if it is not already selected, click Custom from the available options, and drag the adjustment points below the center line to reduce the playback speed for that particular section of the clip. Optionally, you can click any of the available presets to automatically add the slow-motion effect to the video.
Note: You can also drag the adjustment points above the line to increase the playback speed.
To add an adjustment point on the frame where it is not already present, place the playhead (skimmer) at the correct position, and click Add Adjust Point from the left of the Speed Ramping window itself. Once added, you can drag it downward to reduce the playback speed of that part of the clip.

Step 3: Freeze the Video
Place the skimmer on the frame where you want to freeze the video for a while, and click Add Freeze Frame from the left of the Speed Ramping window. When the time box appears, in the Freeze Time field, enter the duration in seconds you want to freeze the screen for, and click OK.
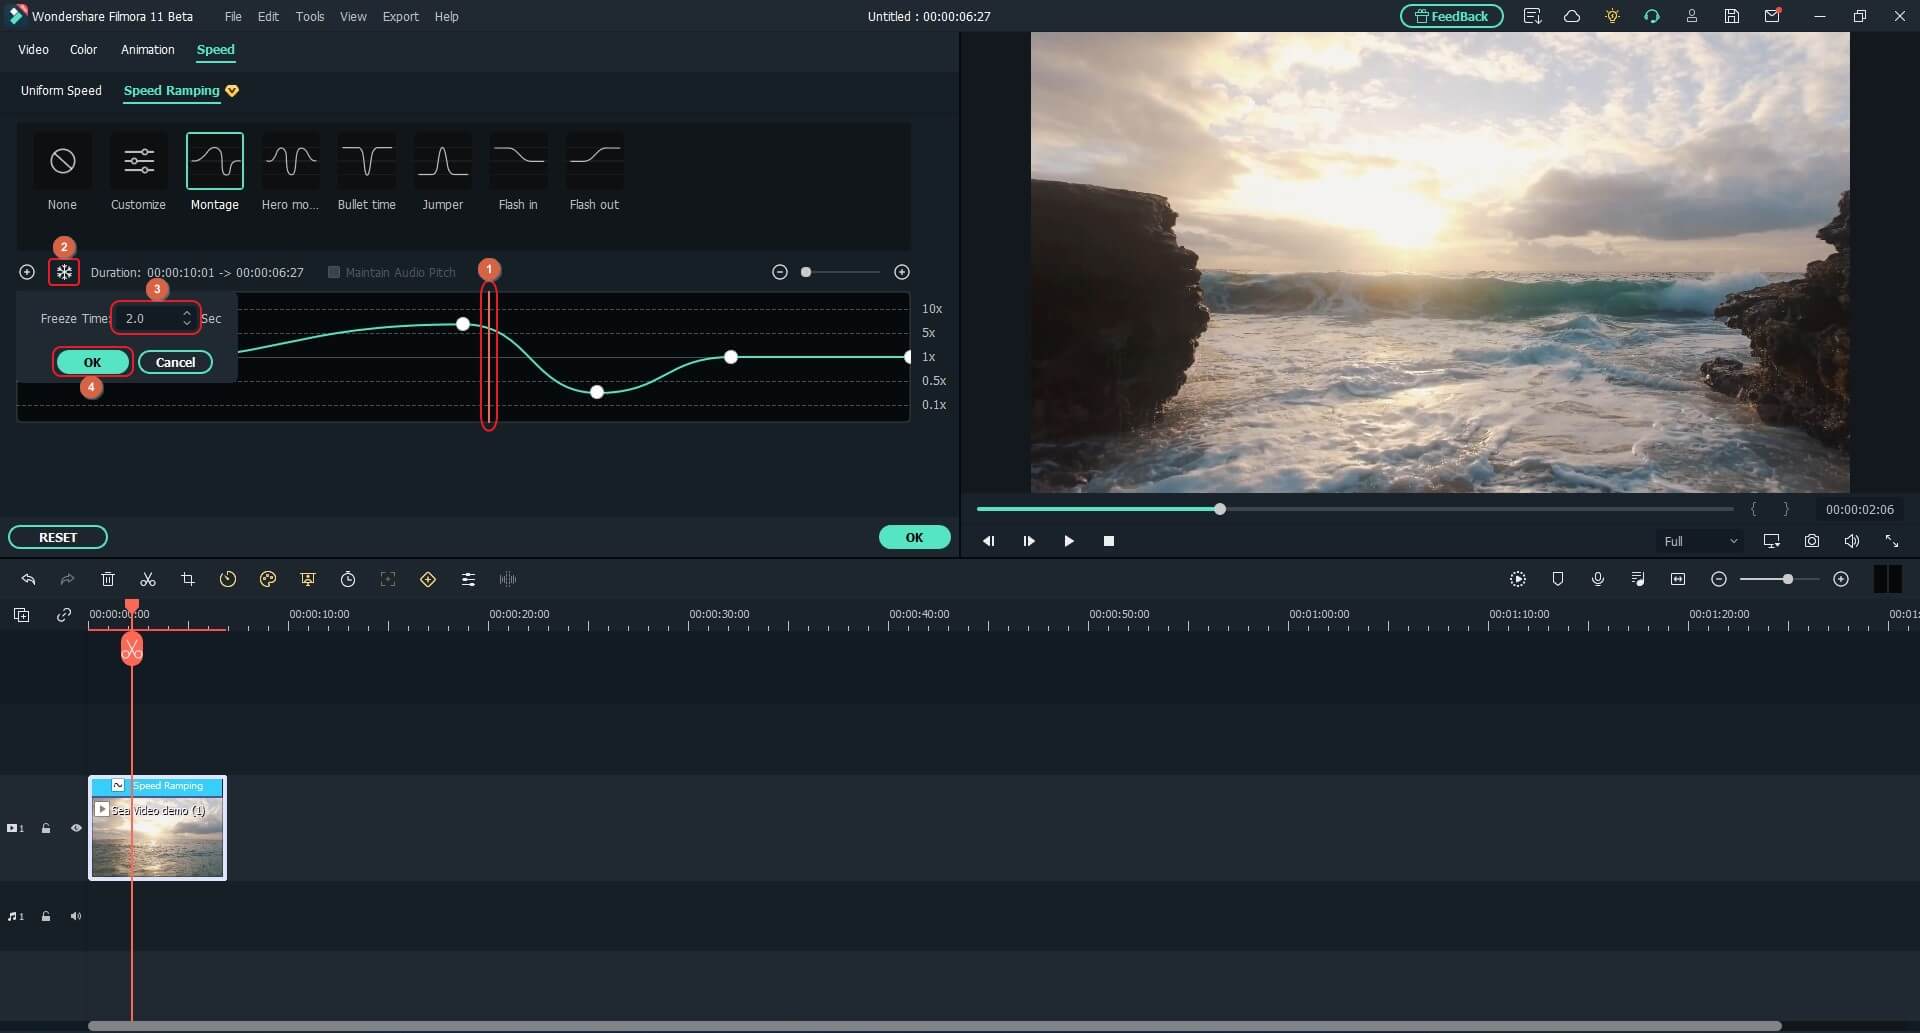
After adding a freeze point, optionally, you can drag and reposition it in the Speed Ramping timeline as needed. Finally, click OK from the bottom-right area to save the changes.
Part 3: When to Use Slow Motion?
There could be many instances when you want to add a slow-motion effect to your videos. Some of the most common ones include:
- Add Focus
If there is a particular scene in a clip that you want the audience to focus on, it would be a good idea to add the slow-motion effect right before that action appears on the screen, and bring the speed back to normal when the section is over.
- Skill or Style Demonstration
When a clip is playing at a normal speed, many times, the audience isn’t able to see the skills that you want to display. This is where you may want to add the slow-motion effect so that every detail can be noticed clearly and in detail.
- Replays
Mostly used for tournaments and matches where the actual action is to replayed so the audience, umpires, and other viewers can see the movements in detail before making the right decision.
- Observation
Some natural phenomena such as a deer running in the woods, a balloon full of water bursting, etc. occur quite quickly. If you want to witness such things clearly and in detail, it would be good to record them, and then reduce the playback speed for better viewing.
- Add Suspense
When you add the slow-motion effect to a scene, the impulse of the audience is automatically increased, and they take that particular section more seriously and with a thrill.
Conclusion
The slow-motion effect is inversely proportional to the framerate, i.e., frames per second or FPS. Almost all DSLR cameras that are available nowadays allow you to switch between different FPS values (typically 120 and 240) before recording. Also, if you have access to an iPhone, its Camera app has a built-in SLO-MO mode that can capture the footage in slow motion.
In addition, if you already have a video that has been recorded at a normal speed, you can use an efficient post-production software like Wondershare Filmora 11, and exploit its Speed Ramping feature to add the slow-motion effect at different scenes of a clip.
02 How to Apply the Smooth Slow-Motion Effect in Post-Production?
Part 1: How to Make Slow Motion Videos via Recording?
The fact is, the playback speed of a video is inversely proportional to the frames per second (FPS) it has been recorded in. Usually, to have a video play at normal speed, it is recorded at 24 FPS or 30 FPS. On the other hand, if you increase the frame rate (FPS) to 120 or 240, the playback speed slows down. You can easily check this if you have access to a DSLR camera or an iPhone. These devices allow you to adjust the FPS so the videos can be recorded in slow motion.
For your convenience and learning, the step-by-step procedure on how to record a video in slow motion using an iPhone is explained below:
Step 1: Get to the SLO-MO Mode
Launch the Camera app on your iPhone (iPhone 13 Pro Max is used here for illustrations), and swipe the screen to the left to get to the SLO-MO mode.

Step 2: Adjust Recording Preferences
Tap the number at the top-right corner to switch between 120 FPS and 240 FPS as needed. Tap 1x from the lower-middle section of the screen, and use the rotator to adjust your preferred zoom level.

Step 3: Start and Stop Recording
Tap the Record button from the bottom-center of the screen to begin recording the video in slow motion. Tap Stop when you are done. You can access the recorded video from the Videos container of the Photos app in your iPhone.
If you are using Android phone, you can check this article to find out more details about How to Record Super Slow Motion Videos on Your Phone.
You may also like: Best Slo-mo Camera Apps for Android And iPhone
Part 2: How to Apply the Smooth Slow-Motion Effect in Post-Production?
If you don’t have access to a camera that can record videos in slow motion, or in case you want to capture the footage at normal playback speed and then slow it down later, you need a dedicated tool to get the job done. Even though several post-production applications are available in the market, the one that is most versatile, has an intuitive interface, and is quite easy to use is Filmora video editor from Wondershare .
The latest version of the app, i.e., Wondershare Filmora 11 has a new feature called Speed Ramping that enables you to graphically manage the speed of the clips. While using the feature, you can either slow down the entire video or certain parts of it according to your requirements. For your learning, both the methods are explained below:
Method 1: Add Slow Motion Effect to the Whole Clip
For Win 7 or later (64-bit)
For macOS 10.12 or later
Step 1: Import the Source Video and Add to Timeline
Launch Wondershare Filmora on your Windows or Mac computer (a Windows 11 PC is used here for illustrations), click New Project from the first screen that appears. Make sure that the Media tool is selected from the standard tool bar at the top, click anywhere inside the Media window, and select and import the source clip to the program.

Next, hover the mouse over the thumbnail of the imported video in the Media window, and click the + icon present at its bottom-right corner. When the confirmation box comes up, click the Match to Media or Keep Project Settings button to change the project settings to match the resolution of the video, or change the footage to meet the project settings respectively.

Step 2: Add Slow Motion Effect to the Whole Clip
Once the media is added to the timeline, click on it and then click the Speed icon on the toolbar. Scroll down to the Slow menu and then you will see 0.5x, 0.25x, 0.1x, 0.05x and 0.01x presets. Select one to add slo-mo effects to the whole select clip. and click Speed Ramping from the menu that drops down.

You can also right click the video in the timeline, and hover over to Speed option to select Uniform Speed to adjust the speed of the video to make a slo-mo effect video. Drag the speed slider to the left to slow down the video and you will see how many times it slowed down in the next field.

Method 2: Use Speed Ramping to Add Slow Motion Effect
For Win 7 or later (64-bit)
For macOS 10.12 or later
Speed Ramping enables you to add the slow-motion effect at different parts of a video and even freeze the screen for the duration that you specify. The processes to get these done are given below in detail:
Step 1: Add Source Video to Timeline and Get to the Speed Ramping Window
Use the process given in the previous method to import a source video to Wondershare Filmora 11 and add it to the Timeline. Then use the process given in the second step of the previous method to get to the Speed Ramping window.
Step 2: Add Slow Motion Effect to Different Parts of the Clip
Go to the Speed Ramping tab if it is not already selected, click Custom from the available options, and drag the adjustment points below the center line to reduce the playback speed for that particular section of the clip. Optionally, you can click any of the available presets to automatically add the slow-motion effect to the video.
Note: You can also drag the adjustment points above the line to increase the playback speed.
To add an adjustment point on the frame where it is not already present, place the playhead (skimmer) at the correct position, and click Add Adjust Point from the left of the Speed Ramping window itself. Once added, you can drag it downward to reduce the playback speed of that part of the clip.

Step 3: Freeze the Video
Place the skimmer on the frame where you want to freeze the video for a while, and click Add Freeze Frame from the left of the Speed Ramping window. When the time box appears, in the Freeze Time field, enter the duration in seconds you want to freeze the screen for, and click OK.

After adding a freeze point, optionally, you can drag and reposition it in the Speed Ramping timeline as needed. Finally, click OK from the bottom-right area to save the changes.
Part 3: When to Use Slow Motion?
There could be many instances when you want to add a slow-motion effect to your videos. Some of the most common ones include:
- Add Focus
If there is a particular scene in a clip that you want the audience to focus on, it would be a good idea to add the slow-motion effect right before that action appears on the screen, and bring the speed back to normal when the section is over.
- Skill or Style Demonstration
When a clip is playing at a normal speed, many times, the audience isn’t able to see the skills that you want to display. This is where you may want to add the slow-motion effect so that every detail can be noticed clearly and in detail.
- Replays
Mostly used for tournaments and matches where the actual action is to replayed so the audience, umpires, and other viewers can see the movements in detail before making the right decision.
- Observation
Some natural phenomena such as a deer running in the woods, a balloon full of water bursting, etc. occur quite quickly. If you want to witness such things clearly and in detail, it would be good to record them, and then reduce the playback speed for better viewing.
- Add Suspense
When you add the slow-motion effect to a scene, the impulse of the audience is automatically increased, and they take that particular section more seriously and with a thrill.
Conclusion
The slow-motion effect is inversely proportional to the framerate, i.e., frames per second or FPS. Almost all DSLR cameras that are available nowadays allow you to switch between different FPS values (typically 120 and 240) before recording. Also, if you have access to an iPhone, its Camera app has a built-in SLO-MO mode that can capture the footage in slow motion.
In addition, if you already have a video that has been recorded at a normal speed, you can use an efficient post-production software like Wondershare Filmora 11, and exploit its Speed Ramping feature to add the slow-motion effect at different scenes of a clip.
02 How to Apply the Smooth Slow-Motion Effect in Post-Production?
Part 1: How to Make Slow Motion Videos via Recording?
The fact is, the playback speed of a video is inversely proportional to the frames per second (FPS) it has been recorded in. Usually, to have a video play at normal speed, it is recorded at 24 FPS or 30 FPS. On the other hand, if you increase the frame rate (FPS) to 120 or 240, the playback speed slows down. You can easily check this if you have access to a DSLR camera or an iPhone. These devices allow you to adjust the FPS so the videos can be recorded in slow motion.
For your convenience and learning, the step-by-step procedure on how to record a video in slow motion using an iPhone is explained below:
Step 1: Get to the SLO-MO Mode
Launch the Camera app on your iPhone (iPhone 13 Pro Max is used here for illustrations), and swipe the screen to the left to get to the SLO-MO mode.

Step 2: Adjust Recording Preferences
Tap the number at the top-right corner to switch between 120 FPS and 240 FPS as needed. Tap 1x from the lower-middle section of the screen, and use the rotator to adjust your preferred zoom level.

Step 3: Start and Stop Recording
Tap the Record button from the bottom-center of the screen to begin recording the video in slow motion. Tap Stop when you are done. You can access the recorded video from the Videos container of the Photos app in your iPhone.
If you are using Android phone, you can check this article to find out more details about How to Record Super Slow Motion Videos on Your Phone.
You may also like: Best Slo-mo Camera Apps for Android And iPhone
Part 2: How to Apply the Smooth Slow-Motion Effect in Post-Production?
If you don’t have access to a camera that can record videos in slow motion, or in case you want to capture the footage at normal playback speed and then slow it down later, you need a dedicated tool to get the job done. Even though several post-production applications are available in the market, the one that is most versatile, has an intuitive interface, and is quite easy to use is Filmora video editor from Wondershare .
The latest version of the app, i.e., Wondershare Filmora 11 has a new feature called Speed Ramping that enables you to graphically manage the speed of the clips. While using the feature, you can either slow down the entire video or certain parts of it according to your requirements. For your learning, both the methods are explained below:
Method 1: Add Slow Motion Effect to the Whole Clip
For Win 7 or later (64-bit)
For macOS 10.12 or later
Step 1: Import the Source Video and Add to Timeline
Launch Wondershare Filmora on your Windows or Mac computer (a Windows 11 PC is used here for illustrations), click New Project from the first screen that appears. Make sure that the Media tool is selected from the standard tool bar at the top, click anywhere inside the Media window, and select and import the source clip to the program.

Next, hover the mouse over the thumbnail of the imported video in the Media window, and click the + icon present at its bottom-right corner. When the confirmation box comes up, click the Match to Media or Keep Project Settings button to change the project settings to match the resolution of the video, or change the footage to meet the project settings respectively.

Step 2: Add Slow Motion Effect to the Whole Clip
Once the media is added to the timeline, click on it and then click the Speed icon on the toolbar. Scroll down to the Slow menu and then you will see 0.5x, 0.25x, 0.1x, 0.05x and 0.01x presets. Select one to add slo-mo effects to the whole select clip. and click Speed Ramping from the menu that drops down.

You can also right click the video in the timeline, and hover over to Speed option to select Uniform Speed to adjust the speed of the video to make a slo-mo effect video. Drag the speed slider to the left to slow down the video and you will see how many times it slowed down in the next field.

Method 2: Use Speed Ramping to Add Slow Motion Effect
For Win 7 or later (64-bit)
For macOS 10.12 or later
Speed Ramping enables you to add the slow-motion effect at different parts of a video and even freeze the screen for the duration that you specify. The processes to get these done are given below in detail:
Step 1: Add Source Video to Timeline and Get to the Speed Ramping Window
Use the process given in the previous method to import a source video to Wondershare Filmora 11 and add it to the Timeline. Then use the process given in the second step of the previous method to get to the Speed Ramping window.
Step 2: Add Slow Motion Effect to Different Parts of the Clip
Go to the Speed Ramping tab if it is not already selected, click Custom from the available options, and drag the adjustment points below the center line to reduce the playback speed for that particular section of the clip. Optionally, you can click any of the available presets to automatically add the slow-motion effect to the video.
Note: You can also drag the adjustment points above the line to increase the playback speed.
To add an adjustment point on the frame where it is not already present, place the playhead (skimmer) at the correct position, and click Add Adjust Point from the left of the Speed Ramping window itself. Once added, you can drag it downward to reduce the playback speed of that part of the clip.

Step 3: Freeze the Video
Place the skimmer on the frame where you want to freeze the video for a while, and click Add Freeze Frame from the left of the Speed Ramping window. When the time box appears, in the Freeze Time field, enter the duration in seconds you want to freeze the screen for, and click OK.

After adding a freeze point, optionally, you can drag and reposition it in the Speed Ramping timeline as needed. Finally, click OK from the bottom-right area to save the changes.
Part 3: When to Use Slow Motion?
There could be many instances when you want to add a slow-motion effect to your videos. Some of the most common ones include:
- Add Focus
If there is a particular scene in a clip that you want the audience to focus on, it would be a good idea to add the slow-motion effect right before that action appears on the screen, and bring the speed back to normal when the section is over.
- Skill or Style Demonstration
When a clip is playing at a normal speed, many times, the audience isn’t able to see the skills that you want to display. This is where you may want to add the slow-motion effect so that every detail can be noticed clearly and in detail.
- Replays
Mostly used for tournaments and matches where the actual action is to replayed so the audience, umpires, and other viewers can see the movements in detail before making the right decision.
- Observation
Some natural phenomena such as a deer running in the woods, a balloon full of water bursting, etc. occur quite quickly. If you want to witness such things clearly and in detail, it would be good to record them, and then reduce the playback speed for better viewing.
- Add Suspense
When you add the slow-motion effect to a scene, the impulse of the audience is automatically increased, and they take that particular section more seriously and with a thrill.
Conclusion
The slow-motion effect is inversely proportional to the framerate, i.e., frames per second or FPS. Almost all DSLR cameras that are available nowadays allow you to switch between different FPS values (typically 120 and 240) before recording. Also, if you have access to an iPhone, its Camera app has a built-in SLO-MO mode that can capture the footage in slow motion.
In addition, if you already have a video that has been recorded at a normal speed, you can use an efficient post-production software like Wondershare Filmora 11, and exploit its Speed Ramping feature to add the slow-motion effect at different scenes of a clip.
02 How to Apply the Smooth Slow-Motion Effect in Post-Production?
Part 1: How to Make Slow Motion Videos via Recording?
The fact is, the playback speed of a video is inversely proportional to the frames per second (FPS) it has been recorded in. Usually, to have a video play at normal speed, it is recorded at 24 FPS or 30 FPS. On the other hand, if you increase the frame rate (FPS) to 120 or 240, the playback speed slows down. You can easily check this if you have access to a DSLR camera or an iPhone. These devices allow you to adjust the FPS so the videos can be recorded in slow motion.
For your convenience and learning, the step-by-step procedure on how to record a video in slow motion using an iPhone is explained below:
Step 1: Get to the SLO-MO Mode
Launch the Camera app on your iPhone (iPhone 13 Pro Max is used here for illustrations), and swipe the screen to the left to get to the SLO-MO mode.

Step 2: Adjust Recording Preferences
Tap the number at the top-right corner to switch between 120 FPS and 240 FPS as needed. Tap 1x from the lower-middle section of the screen, and use the rotator to adjust your preferred zoom level.

Step 3: Start and Stop Recording
Tap the Record button from the bottom-center of the screen to begin recording the video in slow motion. Tap Stop when you are done. You can access the recorded video from the Videos container of the Photos app in your iPhone.
If you are using Android phone, you can check this article to find out more details about How to Record Super Slow Motion Videos on Your Phone.
You may also like: Best Slo-mo Camera Apps for Android And iPhone
Part 2: How to Apply the Smooth Slow-Motion Effect in Post-Production?
If you don’t have access to a camera that can record videos in slow motion, or in case you want to capture the footage at normal playback speed and then slow it down later, you need a dedicated tool to get the job done. Even though several post-production applications are available in the market, the one that is most versatile, has an intuitive interface, and is quite easy to use is Filmora video editor from Wondershare .
The latest version of the app, i.e., Wondershare Filmora 11 has a new feature called Speed Ramping that enables you to graphically manage the speed of the clips. While using the feature, you can either slow down the entire video or certain parts of it according to your requirements. For your learning, both the methods are explained below:
Method 1: Add Slow Motion Effect to the Whole Clip
For Win 7 or later (64-bit)
For macOS 10.12 or later
Step 1: Import the Source Video and Add to Timeline
Launch Wondershare Filmora on your Windows or Mac computer (a Windows 11 PC is used here for illustrations), click New Project from the first screen that appears. Make sure that the Media tool is selected from the standard tool bar at the top, click anywhere inside the Media window, and select and import the source clip to the program.

Next, hover the mouse over the thumbnail of the imported video in the Media window, and click the + icon present at its bottom-right corner. When the confirmation box comes up, click the Match to Media or Keep Project Settings button to change the project settings to match the resolution of the video, or change the footage to meet the project settings respectively.

Step 2: Add Slow Motion Effect to the Whole Clip
Once the media is added to the timeline, click on it and then click the Speed icon on the toolbar. Scroll down to the Slow menu and then you will see 0.5x, 0.25x, 0.1x, 0.05x and 0.01x presets. Select one to add slo-mo effects to the whole select clip. and click Speed Ramping from the menu that drops down.

You can also right click the video in the timeline, and hover over to Speed option to select Uniform Speed to adjust the speed of the video to make a slo-mo effect video. Drag the speed slider to the left to slow down the video and you will see how many times it slowed down in the next field.

Method 2: Use Speed Ramping to Add Slow Motion Effect
For Win 7 or later (64-bit)
For macOS 10.12 or later
Speed Ramping enables you to add the slow-motion effect at different parts of a video and even freeze the screen for the duration that you specify. The processes to get these done are given below in detail:
Step 1: Add Source Video to Timeline and Get to the Speed Ramping Window
Use the process given in the previous method to import a source video to Wondershare Filmora 11 and add it to the Timeline. Then use the process given in the second step of the previous method to get to the Speed Ramping window.
Step 2: Add Slow Motion Effect to Different Parts of the Clip
Go to the Speed Ramping tab if it is not already selected, click Custom from the available options, and drag the adjustment points below the center line to reduce the playback speed for that particular section of the clip. Optionally, you can click any of the available presets to automatically add the slow-motion effect to the video.
Note: You can also drag the adjustment points above the line to increase the playback speed.
To add an adjustment point on the frame where it is not already present, place the playhead (skimmer) at the correct position, and click Add Adjust Point from the left of the Speed Ramping window itself. Once added, you can drag it downward to reduce the playback speed of that part of the clip.

Step 3: Freeze the Video
Place the skimmer on the frame where you want to freeze the video for a while, and click Add Freeze Frame from the left of the Speed Ramping window. When the time box appears, in the Freeze Time field, enter the duration in seconds you want to freeze the screen for, and click OK.

After adding a freeze point, optionally, you can drag and reposition it in the Speed Ramping timeline as needed. Finally, click OK from the bottom-right area to save the changes.
Part 3: When to Use Slow Motion?
There could be many instances when you want to add a slow-motion effect to your videos. Some of the most common ones include:
- Add Focus
If there is a particular scene in a clip that you want the audience to focus on, it would be a good idea to add the slow-motion effect right before that action appears on the screen, and bring the speed back to normal when the section is over.
- Skill or Style Demonstration
When a clip is playing at a normal speed, many times, the audience isn’t able to see the skills that you want to display. This is where you may want to add the slow-motion effect so that every detail can be noticed clearly and in detail.
- Replays
Mostly used for tournaments and matches where the actual action is to replayed so the audience, umpires, and other viewers can see the movements in detail before making the right decision.
- Observation
Some natural phenomena such as a deer running in the woods, a balloon full of water bursting, etc. occur quite quickly. If you want to witness such things clearly and in detail, it would be good to record them, and then reduce the playback speed for better viewing.
- Add Suspense
When you add the slow-motion effect to a scene, the impulse of the audience is automatically increased, and they take that particular section more seriously and with a thrill.
Conclusion
The slow-motion effect is inversely proportional to the framerate, i.e., frames per second or FPS. Almost all DSLR cameras that are available nowadays allow you to switch between different FPS values (typically 120 and 240) before recording. Also, if you have access to an iPhone, its Camera app has a built-in SLO-MO mode that can capture the footage in slow motion.
In addition, if you already have a video that has been recorded at a normal speed, you can use an efficient post-production software like Wondershare Filmora 11, and exploit its Speed Ramping feature to add the slow-motion effect at different scenes of a clip.
Best Image (JPG/PNG) to GIF Converters
Great Video Converter - Wondershare Filmora
Provide abundant video effects - A creative video editor
Powerful color correction and grading
Detailed tutorials provided by the official channel
Introduction
GIF images have become a viral trend due to the high level of social media usage. Often, people like to share GIF images on social media websites to impress their family and friends or catch fun. One reason for the popularity of GIF images is that these images play like videos but without any voice and usually occupy less space compared to larger video files.
In addition, the format of this image uses lossless compression, which allows images to be saved multiple times without compromising the quality or originality. Therefore, if you have a lot of JPEG or PNG images and are looking for a way to combine them into a GIF format, you can do it very quickly as there are many professional tools available on the internet. This article will guide you on various methods to convert PNG or JPG into GIF and list the several PNG or JPG to GIF converters online and on desktop software.
Let us go through the following one by one:
In this article
Part 1: Top Online JPG/PNG to GIF Converters
Part 2: Best JPG/PNG to GIF Software
Part 3: Convert JPG/PNG to GIF Using Online Solution
Part 4: Convert JPG/PNG to GIF Using Wondershare Filmora

Part 1: Top Online JPG/PNG to GIF Converters
1. io
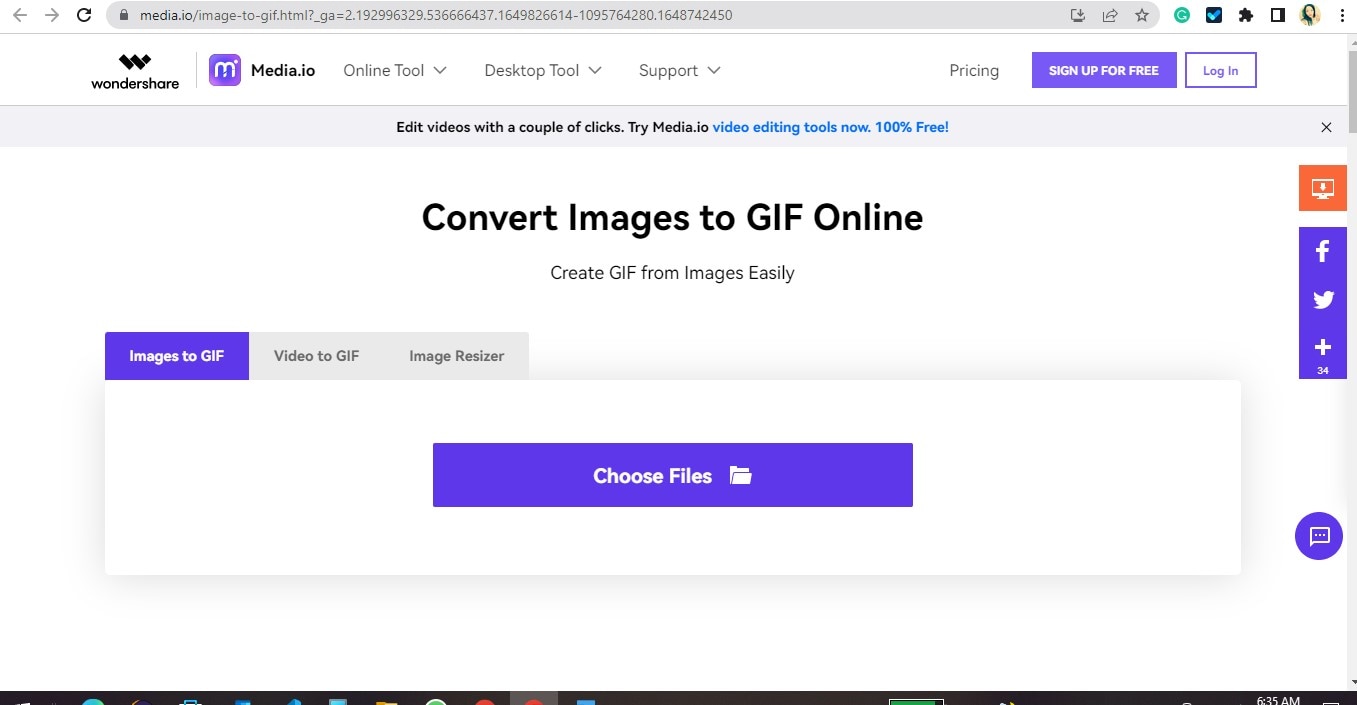
This is the best online free GIF maker that can convert images to GIF and video to GIF. It is a free online tool that leaves no watermark or ads on the website. Additionally, it does not require any download or payment and works for both JPG and PNG files.
Features
- Free to use
- No watermark
- Works for all image type
- No download
Cons
- No advanced customization in the free version
- Requires the use of the internet to use
2. Ezgif
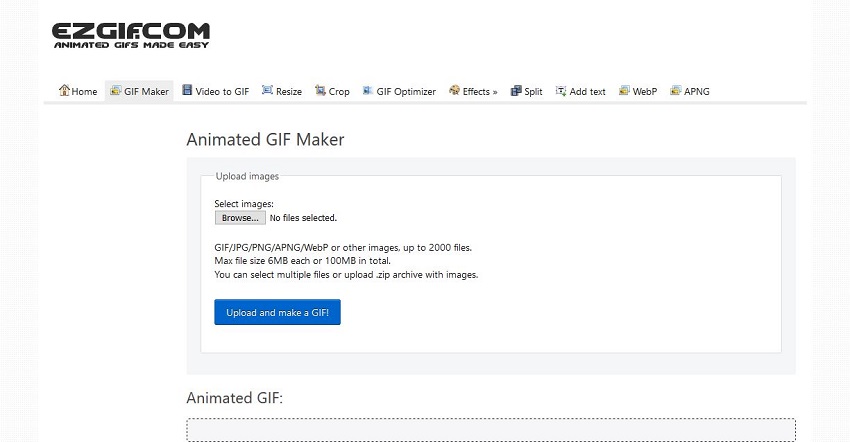
This online website allows users to convert PNG or JPG to GIF animation online without requiring any installation on their computer. This JPG to GIF converter website is free and accessible in nearly all major browsers. It allows users to easily convert PNG or JPG to an animated GIF using this website without making much effort. This website also offers other services, including optimizing GIFs, resizing, cropping, adding text, converting video to GIF, applying special effects, etc. All services on this website are free of charge.
Pros
It is free and speedy.
No watermark.
No Ads.
No downloads.
Cons
It allows the conversion of one file at a time.
3. Online-Convert
Online Convert is a straightforward online GIF converter that instantly gets the job done. It uploads files from Dropbox, Google Drive, or computer storage. After importing the files, this tool has many customization features, including changing the color scale, applying effects, resizing, etc.
Pros
Over 100 image formats supported
Very easy to use
Supports multiple customization options
Cons
Lots on Ad
The slow conversion speed and upload

4. Imgflip
Imgflip is another excellent online maker to turn images into GIFs. On it, you can add files from URL or local storage before converting to GIF. You can create GIFs from YouTube, Vimeo, Metacafe, and other video-sharing sites. The supported image formats include PNG, JPEG, GIF, and others.
Pros
Quick conversions
Multiple formats supported
No Ads
Cons
GIF output has a watermark
Limited conversion size of 35MB

Part 2: Best JPG/PNG to GIF Software
1 Filmora
Filmora is a straightforward and practical software converter available for Windows and Mac PC. This software has a lot of excellent optimization tools that can make your GIFs stand out. Furthermore, aside from being a superb GIF converter, it is also a meme-maker.
Features
- It is super easy to use
- Allows creation of GIF form still images
- GIFs created from videos can be in any format, such as MKV, MP4, WMV, WAV, DAT, EVO, AVI, MPEG, etc.
- You can edit GIFs with excellent texts, effects, and subtitles
- Change GIFs with basic editing like combine, crop, rotate, color correction, slow down, and speed up
Pros
GIF output is high quality
The editing tool is powerful
No Ads
Cons
No functionality to share
The file size is limited to 50MB

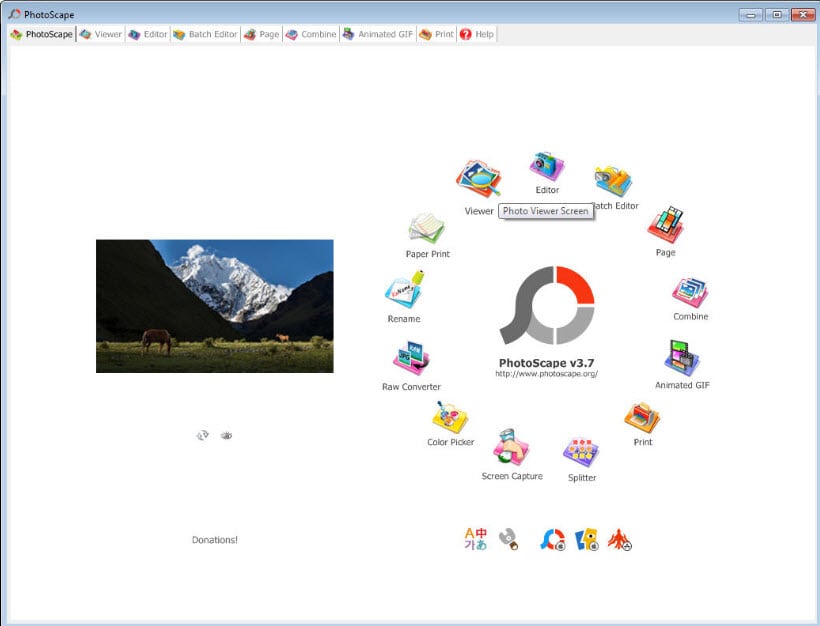
2 Photoscape
With Photoscape video editing software, you can do many fun editing effects for your videos. It includes features such as Editing, Viewing, Crop, Page merging, Animated GIF, Filter, Color picker, etc., and a Photo splitter to cut up a single photo into several pieces.
Pros
A lot of users discovered this software as relatively easy to use
Cons
Some users find it to be a bit slow
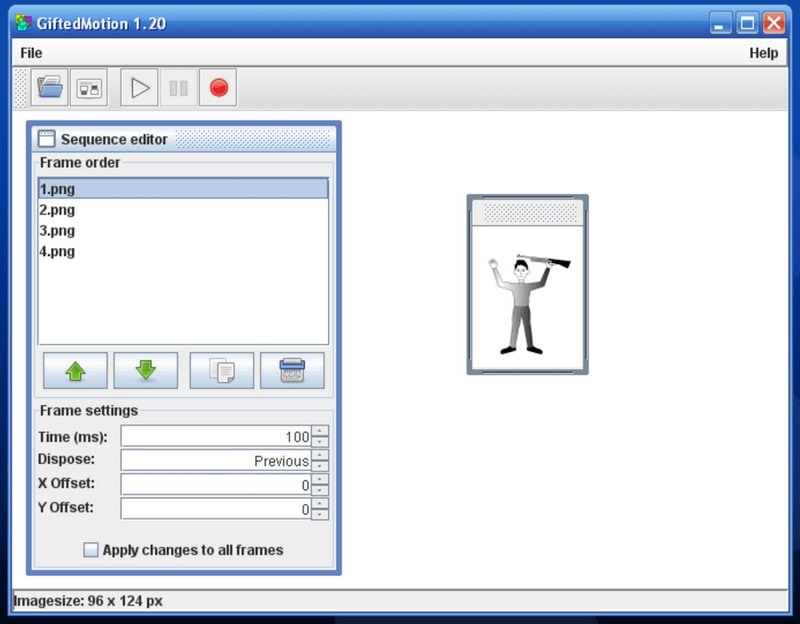
3 Gifted Motion
This software runs independently of a platform but makes use of JAVA. However, it can work on all Operating Systems. No additional installations are required; users can get to work right away.
Features
- Edit existing pictures
- PNG, JPEG, BMP, GIF supported
- No cost for licensing
Pros
Very Simple to use
Cons
Take some time in loading big size images
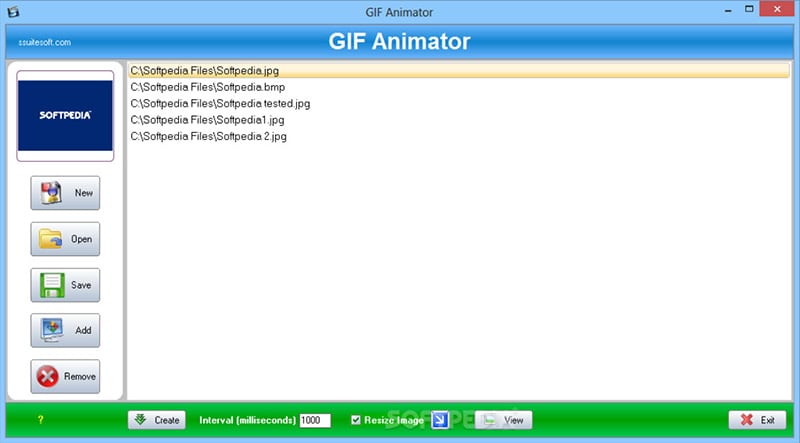
4 SSuite Gif Animator
This software is compatible with all windows, including 32 and 64bit software. However, it is one of the very few Green Software programs that utilize less energy when running the program. With this software, you can create movies, animated gifs, slide shows, etc.
Pros
Energy-efficient and straightforward to use,
It does not need windows registration.
Cons
There are a few restrictions on the ability to take control of editing fully
Part 4: Convert JPG/PNG to GIF Using Wondershare Filmora
Here is how to Convert your PNG or JPEG to GIF using the Wondershare Filmora converter
Step 1: Install Filmora and Upload Image
Open the Filmora software or click on Filmora Meme maker on your browser and click on Upload option or drag and drop the image on your timeline. Maximum file size: 50MB.
Step 2: Choose and Enter GIF
Enter your desired text, color, size, font, and position for your image, GIF, or video meme.
Step 3: Save the Final GIF
Export and Download your GIF, and enjoy

Conclusion
This article explained all you need to know about PNG/JPG to GIF converter and gave a step-by-step guide on converting images to GIF easily. The report also presents different online tools and software you can use to easily turn a photo into a GIF.
Lastly, as a complete video editing tool, we recommend Filmora as the best tool as it can be used both as software and Media.io as an online tool.
Introduction
GIF images have become a viral trend due to the high level of social media usage. Often, people like to share GIF images on social media websites to impress their family and friends or catch fun. One reason for the popularity of GIF images is that these images play like videos but without any voice and usually occupy less space compared to larger video files.
In addition, the format of this image uses lossless compression, which allows images to be saved multiple times without compromising the quality or originality. Therefore, if you have a lot of JPEG or PNG images and are looking for a way to combine them into a GIF format, you can do it very quickly as there are many professional tools available on the internet. This article will guide you on various methods to convert PNG or JPG into GIF and list the several PNG or JPG to GIF converters online and on desktop software.
Let us go through the following one by one:
In this article
Part 1: Top Online JPG/PNG to GIF Converters
Part 2: Best JPG/PNG to GIF Software
Part 3: Convert JPG/PNG to GIF Using Online Solution
Part 4: Convert JPG/PNG to GIF Using Wondershare Filmora

Part 1: Top Online JPG/PNG to GIF Converters
1. io
This is the best online free GIF maker that can convert images to GIF and video to GIF. It is a free online tool that leaves no watermark or ads on the website. Additionally, it does not require any download or payment and works for both JPG and PNG files.
Features
- Free to use
- No watermark
- Works for all image type
- No download
Cons
- No advanced customization in the free version
- Requires the use of the internet to use

2. Ezgif
This online website allows users to convert PNG or JPG to GIF animation online without requiring any installation on their computer. This JPG to GIF converter website is free and accessible in nearly all major browsers. It allows users to easily convert PNG or JPG to an animated GIF using this website without making much effort. This website also offers other services, including optimizing GIFs, resizing, cropping, adding text, converting video to GIF, applying special effects, etc. All services on this website are free of charge.
Pros
It is free and speedy.
No watermark.
No Ads.
No downloads.
Cons
It allows the conversion of one file at a time.
3. Online-Convert
Online Convert is a straightforward online GIF converter that instantly gets the job done. It uploads files from Dropbox, Google Drive, or computer storage. After importing the files, this tool has many customization features, including changing the color scale, applying effects, resizing, etc.
Pros
Over 100 image formats supported
Very easy to use
Supports multiple customization options
Cons
Lots on Ad
The slow conversion speed and upload

4. Imgflip
Imgflip is another excellent online maker to turn images into GIFs. On it, you can add files from URL or local storage before converting to GIF. You can create GIFs from YouTube, Vimeo, Metacafe, and other video-sharing sites. The supported image formats include PNG, JPEG, GIF, and others.
Pros
Quick conversions
Multiple formats supported
No Ads
Cons
GIF output has a watermark
Limited conversion size of 35MB

Part 2: Best JPG/PNG to GIF Software
1 Filmora
Filmora is a straightforward and practical software converter available for Windows and Mac PC. This software has a lot of excellent optimization tools that can make your GIFs stand out. Furthermore, aside from being a superb GIF converter, it is also a meme-maker.
Features
- It is super easy to use
- Allows creation of GIF form still images
- GIFs created from videos can be in any format, such as MKV, MP4, WMV, WAV, DAT, EVO, AVI, MPEG, etc.
- You can edit GIFs with excellent texts, effects, and subtitles
- Change GIFs with basic editing like combine, crop, rotate, color correction, slow down, and speed up
Pros
GIF output is high quality
The editing tool is powerful
No Ads
Cons
No functionality to share
The file size is limited to 50MB

2 Photoscape
With Photoscape video editing software, you can do many fun editing effects for your videos. It includes features such as Editing, Viewing, Crop, Page merging, Animated GIF, Filter, Color picker, etc., and a Photo splitter to cut up a single photo into several pieces.
Pros
A lot of users discovered this software as relatively easy to use
Cons
Some users find it to be a bit slow

3 Gifted Motion
This software runs independently of a platform but makes use of JAVA. However, it can work on all Operating Systems. No additional installations are required; users can get to work right away.
Features
- Edit existing pictures
- PNG, JPEG, BMP, GIF supported
- No cost for licensing
Pros
Very Simple to use
Cons
Take some time in loading big size images

4 SSuite Gif Animator
This software is compatible with all windows, including 32 and 64bit software. However, it is one of the very few Green Software programs that utilize less energy when running the program. With this software, you can create movies, animated gifs, slide shows, etc.
Pros
Energy-efficient and straightforward to use,
It does not need windows registration.
Cons
There are a few restrictions on the ability to take control of editing fully

Part 4: Convert JPG/PNG to GIF Using Wondershare Filmora
Here is how to Convert your PNG or JPEG to GIF using the Wondershare Filmora converter
Step 1: Install Filmora and Upload Image
Open the Filmora software or click on Filmora Meme maker on your browser and click on Upload option or drag and drop the image on your timeline. Maximum file size: 50MB.
Step 2: Choose and Enter GIF
Enter your desired text, color, size, font, and position for your image, GIF, or video meme.
Step 3: Save the Final GIF
Export and Download your GIF, and enjoy

Conclusion
This article explained all you need to know about PNG/JPG to GIF converter and gave a step-by-step guide on converting images to GIF easily. The report also presents different online tools and software you can use to easily turn a photo into a GIF.
Lastly, as a complete video editing tool, we recommend Filmora as the best tool as it can be used both as software and Media.io as an online tool.
Introduction
GIF images have become a viral trend due to the high level of social media usage. Often, people like to share GIF images on social media websites to impress their family and friends or catch fun. One reason for the popularity of GIF images is that these images play like videos but without any voice and usually occupy less space compared to larger video files.
In addition, the format of this image uses lossless compression, which allows images to be saved multiple times without compromising the quality or originality. Therefore, if you have a lot of JPEG or PNG images and are looking for a way to combine them into a GIF format, you can do it very quickly as there are many professional tools available on the internet. This article will guide you on various methods to convert PNG or JPG into GIF and list the several PNG or JPG to GIF converters online and on desktop software.
Let us go through the following one by one:
In this article
Part 1: Top Online JPG/PNG to GIF Converters
Part 2: Best JPG/PNG to GIF Software
Part 3: Convert JPG/PNG to GIF Using Online Solution
Part 4: Convert JPG/PNG to GIF Using Wondershare Filmora

Part 1: Top Online JPG/PNG to GIF Converters
1. io
This is the best online free GIF maker that can convert images to GIF and video to GIF. It is a free online tool that leaves no watermark or ads on the website. Additionally, it does not require any download or payment and works for both JPG and PNG files.
Features
- Free to use
- No watermark
- Works for all image type
- No download
Cons
- No advanced customization in the free version
- Requires the use of the internet to use

2. Ezgif
This online website allows users to convert PNG or JPG to GIF animation online without requiring any installation on their computer. This JPG to GIF converter website is free and accessible in nearly all major browsers. It allows users to easily convert PNG or JPG to an animated GIF using this website without making much effort. This website also offers other services, including optimizing GIFs, resizing, cropping, adding text, converting video to GIF, applying special effects, etc. All services on this website are free of charge.
Pros
It is free and speedy.
No watermark.
No Ads.
No downloads.
Cons
It allows the conversion of one file at a time.
3. Online-Convert
Online Convert is a straightforward online GIF converter that instantly gets the job done. It uploads files from Dropbox, Google Drive, or computer storage. After importing the files, this tool has many customization features, including changing the color scale, applying effects, resizing, etc.
Pros
Over 100 image formats supported
Very easy to use
Supports multiple customization options
Cons
Lots on Ad
The slow conversion speed and upload

4. Imgflip
Imgflip is another excellent online maker to turn images into GIFs. On it, you can add files from URL or local storage before converting to GIF. You can create GIFs from YouTube, Vimeo, Metacafe, and other video-sharing sites. The supported image formats include PNG, JPEG, GIF, and others.
Pros
Quick conversions
Multiple formats supported
No Ads
Cons
GIF output has a watermark
Limited conversion size of 35MB

Part 2: Best JPG/PNG to GIF Software
1 Filmora
Filmora is a straightforward and practical software converter available for Windows and Mac PC. This software has a lot of excellent optimization tools that can make your GIFs stand out. Furthermore, aside from being a superb GIF converter, it is also a meme-maker.
Features
- It is super easy to use
- Allows creation of GIF form still images
- GIFs created from videos can be in any format, such as MKV, MP4, WMV, WAV, DAT, EVO, AVI, MPEG, etc.
- You can edit GIFs with excellent texts, effects, and subtitles
- Change GIFs with basic editing like combine, crop, rotate, color correction, slow down, and speed up
Pros
GIF output is high quality
The editing tool is powerful
No Ads
Cons
No functionality to share
The file size is limited to 50MB

2 Photoscape
With Photoscape video editing software, you can do many fun editing effects for your videos. It includes features such as Editing, Viewing, Crop, Page merging, Animated GIF, Filter, Color picker, etc., and a Photo splitter to cut up a single photo into several pieces.
Pros
A lot of users discovered this software as relatively easy to use
Cons
Some users find it to be a bit slow

3 Gifted Motion
This software runs independently of a platform but makes use of JAVA. However, it can work on all Operating Systems. No additional installations are required; users can get to work right away.
Features
- Edit existing pictures
- PNG, JPEG, BMP, GIF supported
- No cost for licensing
Pros
Very Simple to use
Cons
Take some time in loading big size images

4 SSuite Gif Animator
This software is compatible with all windows, including 32 and 64bit software. However, it is one of the very few Green Software programs that utilize less energy when running the program. With this software, you can create movies, animated gifs, slide shows, etc.
Pros
Energy-efficient and straightforward to use,
It does not need windows registration.
Cons
There are a few restrictions on the ability to take control of editing fully

Part 4: Convert JPG/PNG to GIF Using Wondershare Filmora
Here is how to Convert your PNG or JPEG to GIF using the Wondershare Filmora converter
Step 1: Install Filmora and Upload Image
Open the Filmora software or click on Filmora Meme maker on your browser and click on Upload option or drag and drop the image on your timeline. Maximum file size: 50MB.
Step 2: Choose and Enter GIF
Enter your desired text, color, size, font, and position for your image, GIF, or video meme.
Step 3: Save the Final GIF
Export and Download your GIF, and enjoy

Conclusion
This article explained all you need to know about PNG/JPG to GIF converter and gave a step-by-step guide on converting images to GIF easily. The report also presents different online tools and software you can use to easily turn a photo into a GIF.
Lastly, as a complete video editing tool, we recommend Filmora as the best tool as it can be used both as software and Media.io as an online tool.
Introduction
GIF images have become a viral trend due to the high level of social media usage. Often, people like to share GIF images on social media websites to impress their family and friends or catch fun. One reason for the popularity of GIF images is that these images play like videos but without any voice and usually occupy less space compared to larger video files.
In addition, the format of this image uses lossless compression, which allows images to be saved multiple times without compromising the quality or originality. Therefore, if you have a lot of JPEG or PNG images and are looking for a way to combine them into a GIF format, you can do it very quickly as there are many professional tools available on the internet. This article will guide you on various methods to convert PNG or JPG into GIF and list the several PNG or JPG to GIF converters online and on desktop software.
Let us go through the following one by one:
In this article
Part 1: Top Online JPG/PNG to GIF Converters
Part 2: Best JPG/PNG to GIF Software
Part 3: Convert JPG/PNG to GIF Using Online Solution
Part 4: Convert JPG/PNG to GIF Using Wondershare Filmora

Part 1: Top Online JPG/PNG to GIF Converters
1. io
This is the best online free GIF maker that can convert images to GIF and video to GIF. It is a free online tool that leaves no watermark or ads on the website. Additionally, it does not require any download or payment and works for both JPG and PNG files.
Features
- Free to use
- No watermark
- Works for all image type
- No download
Cons
- No advanced customization in the free version
- Requires the use of the internet to use

2. Ezgif
This online website allows users to convert PNG or JPG to GIF animation online without requiring any installation on their computer. This JPG to GIF converter website is free and accessible in nearly all major browsers. It allows users to easily convert PNG or JPG to an animated GIF using this website without making much effort. This website also offers other services, including optimizing GIFs, resizing, cropping, adding text, converting video to GIF, applying special effects, etc. All services on this website are free of charge.
Pros
It is free and speedy.
No watermark.
No Ads.
No downloads.
Cons
It allows the conversion of one file at a time.
3. Online-Convert
Online Convert is a straightforward online GIF converter that instantly gets the job done. It uploads files from Dropbox, Google Drive, or computer storage. After importing the files, this tool has many customization features, including changing the color scale, applying effects, resizing, etc.
Pros
Over 100 image formats supported
Very easy to use
Supports multiple customization options
Cons
Lots on Ad
The slow conversion speed and upload

4. Imgflip
Imgflip is another excellent online maker to turn images into GIFs. On it, you can add files from URL or local storage before converting to GIF. You can create GIFs from YouTube, Vimeo, Metacafe, and other video-sharing sites. The supported image formats include PNG, JPEG, GIF, and others.
Pros
Quick conversions
Multiple formats supported
No Ads
Cons
GIF output has a watermark
Limited conversion size of 35MB

Part 2: Best JPG/PNG to GIF Software
1 Filmora
Filmora is a straightforward and practical software converter available for Windows and Mac PC. This software has a lot of excellent optimization tools that can make your GIFs stand out. Furthermore, aside from being a superb GIF converter, it is also a meme-maker.
Features
- It is super easy to use
- Allows creation of GIF form still images
- GIFs created from videos can be in any format, such as MKV, MP4, WMV, WAV, DAT, EVO, AVI, MPEG, etc.
- You can edit GIFs with excellent texts, effects, and subtitles
- Change GIFs with basic editing like combine, crop, rotate, color correction, slow down, and speed up
Pros
GIF output is high quality
The editing tool is powerful
No Ads
Cons
No functionality to share
The file size is limited to 50MB

2 Photoscape
With Photoscape video editing software, you can do many fun editing effects for your videos. It includes features such as Editing, Viewing, Crop, Page merging, Animated GIF, Filter, Color picker, etc., and a Photo splitter to cut up a single photo into several pieces.
Pros
A lot of users discovered this software as relatively easy to use
Cons
Some users find it to be a bit slow

3 Gifted Motion
This software runs independently of a platform but makes use of JAVA. However, it can work on all Operating Systems. No additional installations are required; users can get to work right away.
Features
- Edit existing pictures
- PNG, JPEG, BMP, GIF supported
- No cost for licensing
Pros
Very Simple to use
Cons
Take some time in loading big size images

4 SSuite Gif Animator
This software is compatible with all windows, including 32 and 64bit software. However, it is one of the very few Green Software programs that utilize less energy when running the program. With this software, you can create movies, animated gifs, slide shows, etc.
Pros
Energy-efficient and straightforward to use,
It does not need windows registration.
Cons
There are a few restrictions on the ability to take control of editing fully

Part 4: Convert JPG/PNG to GIF Using Wondershare Filmora
Here is how to Convert your PNG or JPEG to GIF using the Wondershare Filmora converter
Step 1: Install Filmora and Upload Image
Open the Filmora software or click on Filmora Meme maker on your browser and click on Upload option or drag and drop the image on your timeline. Maximum file size: 50MB.
Step 2: Choose and Enter GIF
Enter your desired text, color, size, font, and position for your image, GIF, or video meme.
Step 3: Save the Final GIF
Export and Download your GIF, and enjoy

Conclusion
This article explained all you need to know about PNG/JPG to GIF converter and gave a step-by-step guide on converting images to GIF easily. The report also presents different online tools and software you can use to easily turn a photo into a GIF.
Lastly, as a complete video editing tool, we recommend Filmora as the best tool as it can be used both as software and Media.io as an online tool.
It Is Easy to Separate the Audio From the Video in DaVinci Resolve. But, to Avail of This Feature, You Need to Follow Proper Steps, and This Article Is All About It
The DaVinci Resolve is an excellent software for editing videos; that’s why it attracts users. They also enjoy using it due to its simplicity and availability of features. One of them is separating the audio from the video that most people are looking for. It is easy to extract from this software. But, to avail of this feature, you need to follow proper steps, and this article is all about it. There are also details regarding the Wondershare Filmora as the most appropriate alternative and simpler solution provider.
How can you separate audio from the video clips in DaVinci resolve?
The DaVinci resolve is the complete package to solve your different issues. It is a solution provider regarding the editing of the videos, extraction of audio from videos, matching, correction of the colours and many more. It also includes modification of the lens that helps analyse and correct the distortion. Even the lens analysis is also available to deliver high-quality results.
Step 1: Launch the DaVinci Resolve in your system after its installation. Import the media file from the library in your timeline from which you have to separate the audio.

Step 2: Select the Edit tab in the timeline of your project if it isn’t selected by default. You need to choose the video clip by pointing the cursor or dragging the mouse towards it.

Step 3: After its selection, untick all the clips, and this step is for separating the audio from the video just from one file. Click the video file for deselection.

Step 4: Now it is easy to select the video and click on it. Select the audio and video clips separately. Simply edit, delete or move your audio whenever you want it to.
An easier way to separate the audio from the video
However, the DaVinci Resolve is the software of advanced level and the best choice for professionals. But its pricing that is $299, is quite disturbing for most of the users. So, they are always searching for a suitable approach and reasonable as well. And that is the first and foremost Filmora Video Editor . You can split the audio and listen to your favourite track on any media player.
All the tools are readily available, and they are used without facing any issue. After editing and applying all the effects, it is easy to upload on social network platforms. it is very simple to create fast or slow-motion videos with speed controls. This software is highly supportive of editing videos of any kind. There is no need to look for the reasons to choose Wondershare Filmora; instead, it is not to choose it for editing tasks.
For Win 7 or later (64-bit)
For macOS 10.14 or later
Features:
- Extracting the audio from videos
- Controls available for videos and audios
- Number of ways to split the clips and screens
- All the functions are performed by just drag and drop
- Sharing of the videos unlimitedly on Vimeo, YouTube and others
- mixing the audio and removing the noise
To extract the audio from the video clip in Wondershare Filmora, go through the following easy steps and get your task done.
Step 1: After completing the installation of Wondershare Filmora, selection of the ratio is required whether it is 4:3 or 16:9. It is your choice and dependent on the requirements of your project. Import the video from the folder of your computer when you will click “Import”. As the default, all the files are all together in one place with no gap.

Step 2: This step separates the audio from the video in a single click. You need to right-click on the video from which you have to split the audio and select “Detach Audio”. Instantly, an audio file will appear on the screen on the audio track. Yes, you have received the original audio final from the source file.
Successfully the audio is separate from the video. Wondershare Filmora also offers to replace the audio file you want to add to the video. It can provide a few instructions, some narrations or personal, funny tunes for sharing with family and friends.
Step 3: After step2, it is simple to delete the audio clips or video that isn’t needed anymore and add your own choice. Click on “Export” to save the audio file into the new MP3 file and select “iPod” presenting to play. Even, you can save it as your project file on your system. After the completion of exporting the audio track, load the project file again with the video frame and export it as the new file of your video.

Wondershare Filmora is the most user-friendly editing software for all. Whether you want to make complex or straightforward videos, all is done in just a few steps. The best part of this software is that all the features are easily accessible to all types of users. It is very simple to start and show your creative skills and share easily if you are unfamiliar with video editing.
There is a massive range of tools in Wondershare Filmora that you are looking for in any video editor. 800+ video effects are built-in, such as effects for the text, transitions, filters, stickers, motion graphics, and overlays.
In Wondershare Filmora, there are templates for the spilt screens as well. It is best for you to handle your YouTube channels or your Instagram account. It doesn’t record screen only but as well voice-over. Even capturing the videos from frame to frame is also possible. So, what are you waiting for? Download Wondershare Filmora today and start your editing done in just a few clicks.
Step 2: Select the Edit tab in the timeline of your project if it isn’t selected by default. You need to choose the video clip by pointing the cursor or dragging the mouse towards it.

Step 3: After its selection, untick all the clips, and this step is for separating the audio from the video just from one file. Click the video file for deselection.

Step 4: Now it is easy to select the video and click on it. Select the audio and video clips separately. Simply edit, delete or move your audio whenever you want it to.
An easier way to separate the audio from the video
However, the DaVinci Resolve is the software of advanced level and the best choice for professionals. But its pricing that is $299, is quite disturbing for most of the users. So, they are always searching for a suitable approach and reasonable as well. And that is the first and foremost Filmora Video Editor . You can split the audio and listen to your favourite track on any media player.
All the tools are readily available, and they are used without facing any issue. After editing and applying all the effects, it is easy to upload on social network platforms. it is very simple to create fast or slow-motion videos with speed controls. This software is highly supportive of editing videos of any kind. There is no need to look for the reasons to choose Wondershare Filmora; instead, it is not to choose it for editing tasks.
For Win 7 or later (64-bit)
For macOS 10.14 or later
Features:
- Extracting the audio from videos
- Controls available for videos and audios
- Number of ways to split the clips and screens
- All the functions are performed by just drag and drop
- Sharing of the videos unlimitedly on Vimeo, YouTube and others
- mixing the audio and removing the noise
To extract the audio from the video clip in Wondershare Filmora, go through the following easy steps and get your task done.
Step 1: After completing the installation of Wondershare Filmora, selection of the ratio is required whether it is 4:3 or 16:9. It is your choice and dependent on the requirements of your project. Import the video from the folder of your computer when you will click “Import”. As the default, all the files are all together in one place with no gap.

Step 2: This step separates the audio from the video in a single click. You need to right-click on the video from which you have to split the audio and select “Detach Audio”. Instantly, an audio file will appear on the screen on the audio track. Yes, you have received the original audio final from the source file.
Successfully the audio is separate from the video. Wondershare Filmora also offers to replace the audio file you want to add to the video. It can provide a few instructions, some narrations or personal, funny tunes for sharing with family and friends.
Step 3: After step2, it is simple to delete the audio clips or video that isn’t needed anymore and add your own choice. Click on “Export” to save the audio file into the new MP3 file and select “iPod” presenting to play. Even, you can save it as your project file on your system. After the completion of exporting the audio track, load the project file again with the video frame and export it as the new file of your video.

Wondershare Filmora is the most user-friendly editing software for all. Whether you want to make complex or straightforward videos, all is done in just a few steps. The best part of this software is that all the features are easily accessible to all types of users. It is very simple to start and show your creative skills and share easily if you are unfamiliar with video editing.
There is a massive range of tools in Wondershare Filmora that you are looking for in any video editor. 800+ video effects are built-in, such as effects for the text, transitions, filters, stickers, motion graphics, and overlays.
In Wondershare Filmora, there are templates for the spilt screens as well. It is best for you to handle your YouTube channels or your Instagram account. It doesn’t record screen only but as well voice-over. Even capturing the videos from frame to frame is also possible. So, what are you waiting for? Download Wondershare Filmora today and start your editing done in just a few clicks.
Step 2: Select the Edit tab in the timeline of your project if it isn’t selected by default. You need to choose the video clip by pointing the cursor or dragging the mouse towards it.

Step 3: After its selection, untick all the clips, and this step is for separating the audio from the video just from one file. Click the video file for deselection.

Step 4: Now it is easy to select the video and click on it. Select the audio and video clips separately. Simply edit, delete or move your audio whenever you want it to.
An easier way to separate the audio from the video
However, the DaVinci Resolve is the software of advanced level and the best choice for professionals. But its pricing that is $299, is quite disturbing for most of the users. So, they are always searching for a suitable approach and reasonable as well. And that is the first and foremost Filmora Video Editor . You can split the audio and listen to your favourite track on any media player.
All the tools are readily available, and they are used without facing any issue. After editing and applying all the effects, it is easy to upload on social network platforms. it is very simple to create fast or slow-motion videos with speed controls. This software is highly supportive of editing videos of any kind. There is no need to look for the reasons to choose Wondershare Filmora; instead, it is not to choose it for editing tasks.
For Win 7 or later (64-bit)
For macOS 10.14 or later
Features:
- Extracting the audio from videos
- Controls available for videos and audios
- Number of ways to split the clips and screens
- All the functions are performed by just drag and drop
- Sharing of the videos unlimitedly on Vimeo, YouTube and others
- mixing the audio and removing the noise
To extract the audio from the video clip in Wondershare Filmora, go through the following easy steps and get your task done.
Step 1: After completing the installation of Wondershare Filmora, selection of the ratio is required whether it is 4:3 or 16:9. It is your choice and dependent on the requirements of your project. Import the video from the folder of your computer when you will click “Import”. As the default, all the files are all together in one place with no gap.

Step 2: This step separates the audio from the video in a single click. You need to right-click on the video from which you have to split the audio and select “Detach Audio”. Instantly, an audio file will appear on the screen on the audio track. Yes, you have received the original audio final from the source file.
Successfully the audio is separate from the video. Wondershare Filmora also offers to replace the audio file you want to add to the video. It can provide a few instructions, some narrations or personal, funny tunes for sharing with family and friends.
Step 3: After step2, it is simple to delete the audio clips or video that isn’t needed anymore and add your own choice. Click on “Export” to save the audio file into the new MP3 file and select “iPod” presenting to play. Even, you can save it as your project file on your system. After the completion of exporting the audio track, load the project file again with the video frame and export it as the new file of your video.

Wondershare Filmora is the most user-friendly editing software for all. Whether you want to make complex or straightforward videos, all is done in just a few steps. The best part of this software is that all the features are easily accessible to all types of users. It is very simple to start and show your creative skills and share easily if you are unfamiliar with video editing.
There is a massive range of tools in Wondershare Filmora that you are looking for in any video editor. 800+ video effects are built-in, such as effects for the text, transitions, filters, stickers, motion graphics, and overlays.
In Wondershare Filmora, there are templates for the spilt screens as well. It is best for you to handle your YouTube channels or your Instagram account. It doesn’t record screen only but as well voice-over. Even capturing the videos from frame to frame is also possible. So, what are you waiting for? Download Wondershare Filmora today and start your editing done in just a few clicks.
Step 2: Select the Edit tab in the timeline of your project if it isn’t selected by default. You need to choose the video clip by pointing the cursor or dragging the mouse towards it.

Step 3: After its selection, untick all the clips, and this step is for separating the audio from the video just from one file. Click the video file for deselection.

Step 4: Now it is easy to select the video and click on it. Select the audio and video clips separately. Simply edit, delete or move your audio whenever you want it to.
An easier way to separate the audio from the video
However, the DaVinci Resolve is the software of advanced level and the best choice for professionals. But its pricing that is $299, is quite disturbing for most of the users. So, they are always searching for a suitable approach and reasonable as well. And that is the first and foremost Filmora Video Editor . You can split the audio and listen to your favourite track on any media player.
All the tools are readily available, and they are used without facing any issue. After editing and applying all the effects, it is easy to upload on social network platforms. it is very simple to create fast or slow-motion videos with speed controls. This software is highly supportive of editing videos of any kind. There is no need to look for the reasons to choose Wondershare Filmora; instead, it is not to choose it for editing tasks.
For Win 7 or later (64-bit)
For macOS 10.14 or later
Features:
- Extracting the audio from videos
- Controls available for videos and audios
- Number of ways to split the clips and screens
- All the functions are performed by just drag and drop
- Sharing of the videos unlimitedly on Vimeo, YouTube and others
- mixing the audio and removing the noise
To extract the audio from the video clip in Wondershare Filmora, go through the following easy steps and get your task done.
Step 1: After completing the installation of Wondershare Filmora, selection of the ratio is required whether it is 4:3 or 16:9. It is your choice and dependent on the requirements of your project. Import the video from the folder of your computer when you will click “Import”. As the default, all the files are all together in one place with no gap.

Step 2: This step separates the audio from the video in a single click. You need to right-click on the video from which you have to split the audio and select “Detach Audio”. Instantly, an audio file will appear on the screen on the audio track. Yes, you have received the original audio final from the source file.
Successfully the audio is separate from the video. Wondershare Filmora also offers to replace the audio file you want to add to the video. It can provide a few instructions, some narrations or personal, funny tunes for sharing with family and friends.
Step 3: After step2, it is simple to delete the audio clips or video that isn’t needed anymore and add your own choice. Click on “Export” to save the audio file into the new MP3 file and select “iPod” presenting to play. Even, you can save it as your project file on your system. After the completion of exporting the audio track, load the project file again with the video frame and export it as the new file of your video.

Wondershare Filmora is the most user-friendly editing software for all. Whether you want to make complex or straightforward videos, all is done in just a few steps. The best part of this software is that all the features are easily accessible to all types of users. It is very simple to start and show your creative skills and share easily if you are unfamiliar with video editing.
There is a massive range of tools in Wondershare Filmora that you are looking for in any video editor. 800+ video effects are built-in, such as effects for the text, transitions, filters, stickers, motion graphics, and overlays.
In Wondershare Filmora, there are templates for the spilt screens as well. It is best for you to handle your YouTube channels or your Instagram account. It doesn’t record screen only but as well voice-over. Even capturing the videos from frame to frame is also possible. So, what are you waiting for? Download Wondershare Filmora today and start your editing done in just a few clicks.
Easy Guide to Zoom Video in VLC
Even though VLC Media Player is not the default video player in any operating system, most users install VLC Player separately on their computers. This is because VLC Media Player offers several useful and advanced features that the default media player like Windows Media Player lacks. There are situations when users need to zoom into certain parts of a video, and that is where VLC zoom in video feature comes in handy.
You may need to zoom into videos to pay attention to details and focus on parts around the subject that others are missing out. For example, you have recorded a video, and you have played it on VLC to zoom in and ensure that there is nothing distracting before you publish the video. Now, we will illustrate all the different ways on how to zoom in VLC Media Player. We will also suggest a better alternative to zoom into videos easily.
Part 1: Zoom VLC Video Using Interactive Zoom
VLC Media Player comes with Interactive Zoom feature that lets you zoom into a section of a video irrespective of its resolution. You can use Interactive Zoom feature to zoom nearly eight times the original size of the video. While you zoom your video with Interactive Zoom option, VLC Media Player zooms the video digitally, and if the video resolution is not high, you can see some deterioration in video quality as you zoom in. Here are the steps on how to VLC zoom with Interactive Zoom.
Step1First, you have to enable Interactive Zoom feature. Launch VLC Player and go to Tools menu option.
Step2Select Effects and Filters and you will see Adjustments and Effects window open.
Step3Go to Video Effects tab and then go to Geometry tab.
Step4Turn on Interactive Zoom option. Click on Save and Close buttons.
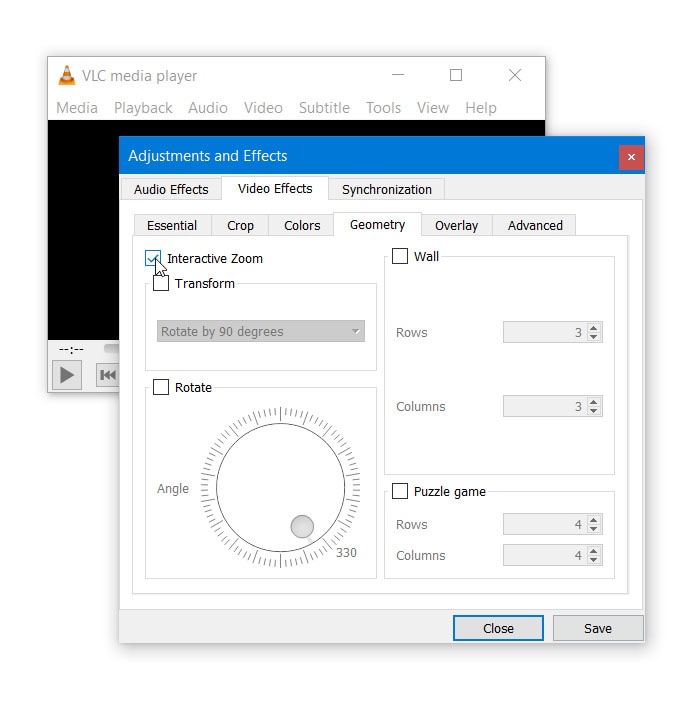
Step5Play a video and you will see a Picture in Picture window in the top-left corner where you can see live preview of the video. You will notice a rectangular box that you can drag around the PiP window to zoom that section of the video.
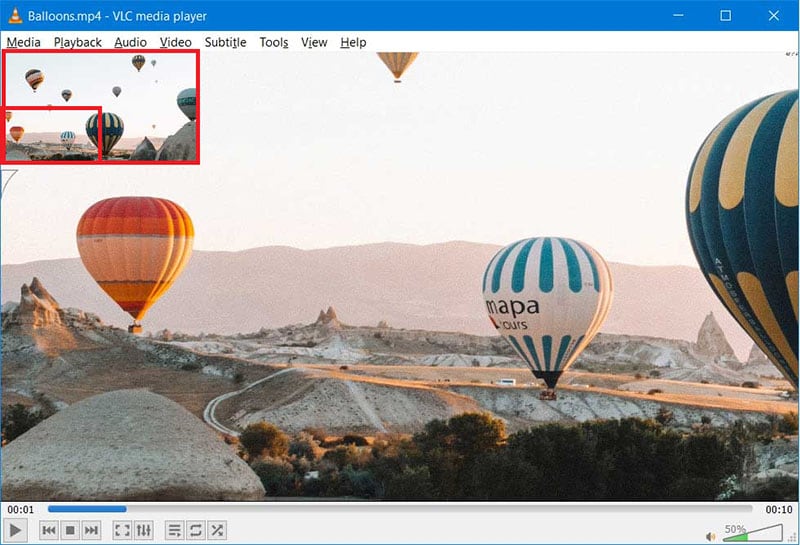
Step6Wherever you place the rectangular box in PiP window, that part will be zoomed and shown outside the PiP window. You can increase or decrease the level of magnification from the vertical slider present below PiP window.
Part 2: Zoom Video Using VLC Video Menu
Apart from Interactive Zoom, there is also an inbuilt Zoom option available under Video Menu. While Interactive Zoom is for detailed zooming, Zoom through Video menu on VLC is for instant zooming. Moreover, Zoom through Video menu is effective only when you view the video on VLC Player. If you are watching the video on full screen, the zooming effect will not be easily noticeable. Here are the steps on how to zoom in VLC player using VLC Video menu.
Step1Open VLC Media player in windowed mode and play the desired video.
Step2Go to Video menu and select Zoom option.
Step3You will come across several options such as 1:4 quarter, 1:2 half, 1:1 original, and 2:1 double. You can select from one of them as per your requirements.
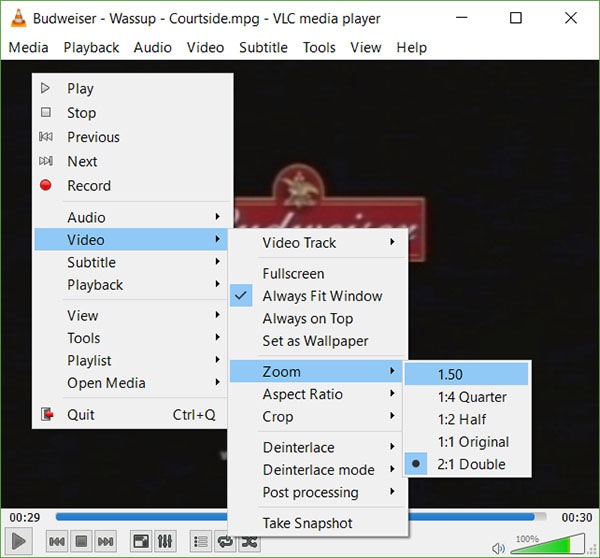
Otherwise, you can press Shift + Z keys together to try out different zoom options.
Part 3: Zoom VLC Video Using Magnifier
If you are using VLC Media Player on your Windows desktop computer, you can use the inbuilt Magnifier tool to zoom into a video that you are playing on VLC. You can zoom into videos to read any text in the background but this leads to low resolution and distortion. You can zoom in by 16 times which is the highest among all the three methods. Here are the steps on how to VLC zoom video using Magnifier tool.
Step1Open VLC Player and play the desired video.
Step2Go to Start menu on Windows and search for “Magnifier”.
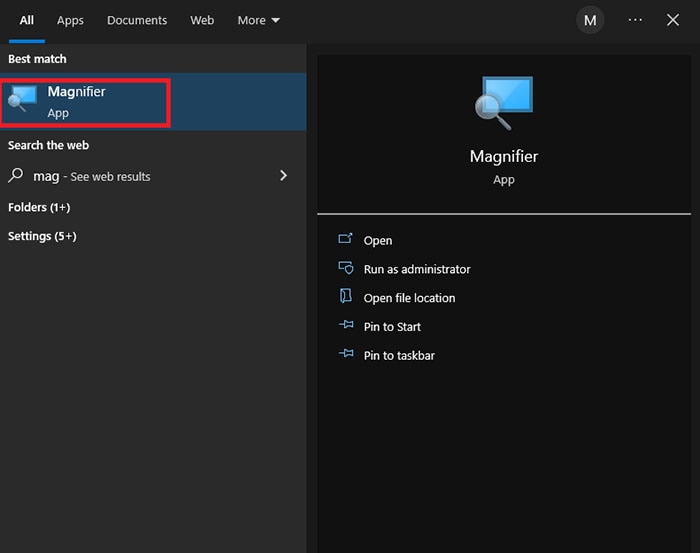
Step3Click on Magnifier App. Once it opens, place the mouse pointer on the video and you will see its magnified version.
Step4Press Windows and “+” keys to zoom in while press Windows and “-“ keys to zoom out.
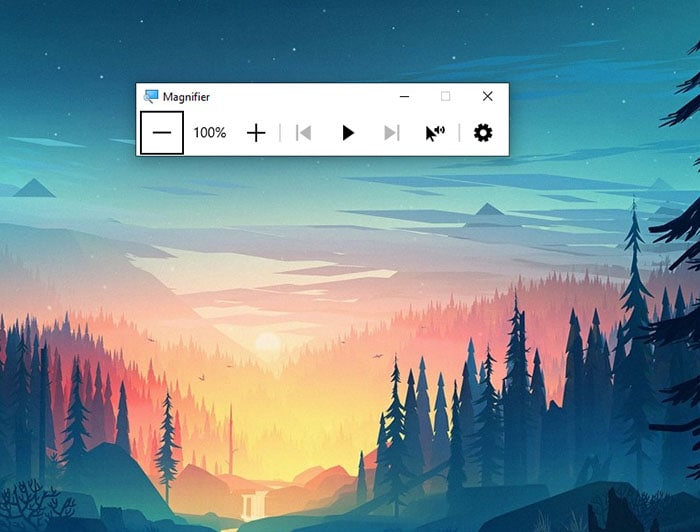
Part 4: VLC Alternative to Zoom in Videos
If you are not satisfied with VLC Player zoom feature, you can use a video editor to zoom into your video conveniently so that you can check any focused section on your video. You can also read any text on the video comfortably. We recommend Wondershare Filmora as an alternative to VLC Media Player for zooming into videos. Filmora is a professional video editor and here is the list of the steps on how to zoom into videos with Filmora.
Step 1: Download and install Wondershare Filmora and it is available for Windows and Mac users.
Free Download For Win 7 or later(64-bit)
Free Download For macOS 10.14 or later
Step 2: Launch Wondershare and click on New Project option.
Step 3: Import your video on Filmora into Project Media folder by drag and drop option.

Step 4: Drag and drop the video file into Timeline. Click on Crop icon on the top bar of Timeline.
Step 5: Go to Pan & Zoom tab and move the rectangular box and play the video to watch its magnified video. You can also export the video after cropping in your desired file format.

Conclusion
There are several scenarios when you need to zoom into a video to focus on the details. VLC Media Player comes with instant zoom as well as detailed zoom options to satisfy your requirements. You can even use Magnifier App on Windows to zoom into videos. But for the best result, we recommend Wondershare Filmora as the best VLC Player alternative for zooming videos.
Free Download For macOS 10.14 or later
Step 2: Launch Wondershare and click on New Project option.
Step 3: Import your video on Filmora into Project Media folder by drag and drop option.

Step 4: Drag and drop the video file into Timeline. Click on Crop icon on the top bar of Timeline.
Step 5: Go to Pan & Zoom tab and move the rectangular box and play the video to watch its magnified video. You can also export the video after cropping in your desired file format.

Conclusion
There are several scenarios when you need to zoom into a video to focus on the details. VLC Media Player comes with instant zoom as well as detailed zoom options to satisfy your requirements. You can even use Magnifier App on Windows to zoom into videos. But for the best result, we recommend Wondershare Filmora as the best VLC Player alternative for zooming videos.
Also read:
- 2024 Approved This Article Aims to Provide a Step-by-Step Guide to Changing a Videos Speed by Using the Speed Adjustment Panel and Duration Panel on Wondershare Filmora
- | Best WMV to GIF Converters
- Updated Premiere Pro Text Effects Beginner Guide for 2024
- How to Add VHS Green Screen to Your Video
- Updated 2024 Approved Adjust the TikTok Videos Length to Make Them Captivating
- Updated Do You Often Feel Fascinated to Try Hands at Anime Character Design to Spark up Your Editing Skills, or Just for a Fun-Filled Activity? Stay Here for the Best Inspirations You Can Ever Get
- Updated 2024 Approved | How to Livestream Zoom on Facebook?
- New 2024 Approved How Long Does It Take To Edit A Video
- New How to Change Aspect Ratio of Video?
- 4 Ways to Loop a Video on Vimeo for 2024
- In 2024, How to Resize FLV Videos Efficiently Windows, Mac,Android, iPhone & Online
- New Adding Text to Your Collage Not only Makes It Look Sophisticated but Also Versatile. So, if You Too Are Looking for Ways to Create a Collage Text, Check Out Our Article
- New 2024 Approved Best Ai Generated Memes
- Updated Finding The Best LUTs for Wondershare Filmora for 2024
- New 2024 Approved How to Create Loop Videos with Filmora
- Want to Make Your Slideshows More Fun and Exciting? Follow the Given Discussion to Know How to Make a Slideshow Gif, Thereby Making Your Slideshow More Enjoyable than Ever
- In 2024, Top 10 iPad Slideshow Apps to Create a Slideshow
- New In 2024, The Power of Music in Videos
- Updated Adding Text to Your Collage Not only Makes It Look Sophisticated but Also Versatile. So, if You Too Are Looking for Ways to Create a Collage Text, Check Out Our Article for 2024
- Updated Useful Guide to Speed Up/Down Videos in VLC for 2024
- New In 2024, How to Rotate a Video in Windows 10
- New In 2024, 33 Best Video Splitter Recommended
- New 2024 Approved How to Livestream Zoom on Facebook?
- How to Add a Slideshow in PowerPoint
- New 2024 Approved How to Add Customized Transitions to OBS
- Forgotten The Voicemail Password Of Honor Play 40C? Try These Fixes
- How To Pause Life360 Location Sharing For Vivo V29 | Dr.fone
- Remove FRP Lock on Find X6
- What To Do if Your Tecno Phantom V Fold Auto Does Not Work | Dr.fone
- How to remove Google FRP Lock on Realme 10T 5G
- Process of Screen Sharing Tecno Spark 20 Pro+ to PC- Detailed Steps | Dr.fone
- In 2024, How to Mirror Your Lava Storm 5G Screen to PC with Chromecast | Dr.fone
- Fixed Cannot Insert Object Error in Excel 2023 | Step-by-Step Guide | Stellar
- Best Android Data Recovery - Retrieve Lost Pictures from Xiaomi Redmi Note 12 5G.
- Tecno Spark 20 Pro+ Camera Not Working Unexpected Error? Fix It Now | Dr.fone
- In 2024, How to Bypass Google FRP Lock from OnePlus 11R Devices
- In 2024, How to Bypass Google FRP Lock on Honor 70 Lite 5G Devices
- 7 Fixes for Unfortunately, Phone Has Stopped on Realme Narzo 60x 5G | Dr.fone
- Easy Guide How To Bypass Vivo T2x 5G FRP Android 10/11/12/13
- Title: How to Make Video Slow Motion? Complete Guide for 2024
- Author: Chloe
- Created at : 2024-04-24 07:08:12
- Updated at : 2024-04-25 07:08:12
- Link: https://ai-editing-video.techidaily.com/how-to-make-video-slow-motion-complete-guide-for-2024/
- License: This work is licensed under CC BY-NC-SA 4.0.

