In 2024, How To Add Motion Blur Effect To Photos in GIMP

How To Add Motion Blur Effect To Photos in GIMP
GIMP is a cross-platform image editing software that you can use to edit photos and create graphics. The software is available for Linux, Windows, and macOS and can add a motion blur effect (A sense of movement in the photo), making your pictures look more realistic and professional.
So to help you tone your skills, we’ve written a comprehensive guide on how to apply the GIMP motion blur effect to your photos!
Part I. What Is GIMP?
GIMP software, a GNU Image Manipulation Program, is an open-source raster graphics editor used for image editing and retouching, converting between different image formats, free-form drawing, and more.
GIMP is frequently used as a Photoshop alternative. The software boasts a wide range of features, including support for layers, masks, color management, and third-party plugins.
Key Features
Here are some key features of the GIMP software:
- Quickly hide panels and menus to let you switch to a full-screen mode to preview pictures
- Fixes distorted images
- Available for Windows, Linux, Mac OS, and other operating systems
- Automatic image enhancement tool
- Lets you remove all the panels and tools from the workflow except the one you are working with.
- Released under a license called GNU General Public License v3 and later, which makes it free to use and distribute
- Add overlays and crop or resize an image
- Wide range of file formats that it can read and write, making it a versatile tool for working with images
Part II. How To Add The Motion Blur Effect To Your Photos in GIMP?
Below we’ve provided the step-by-step tutorial to add a motion blur effect to your photos in GIMP:
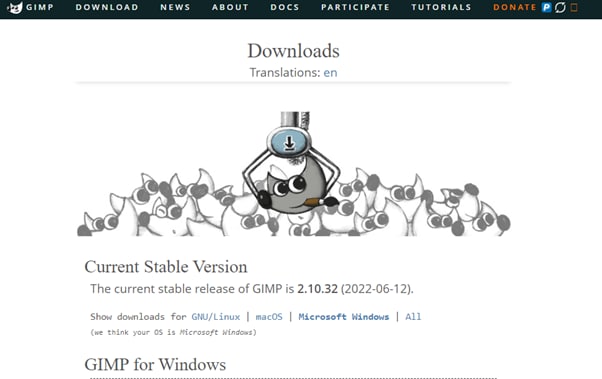
Step1 In the first step, launch a browser on your device, head to the GIMP website , and download the installation file according to your operating system. Now, click the downloaded installer, install the software on your system and launch it.
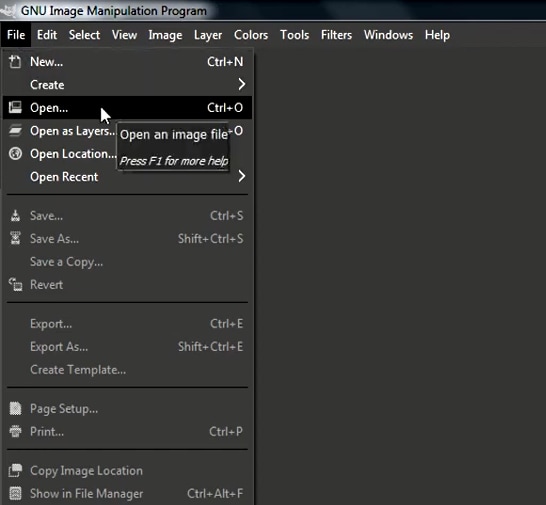
Step2 In the next step, click “File” on the GIMP dashboard, and select “Open” to access the Open Image window. Select your image file from your system and click “Open” to import the file.
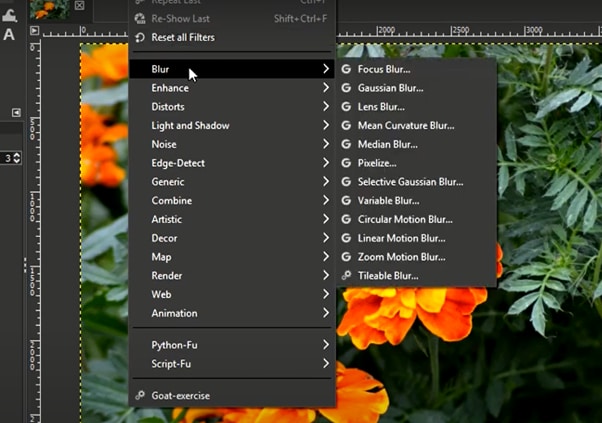
Step3 Next, click the “Filters” option from the top toolbar, select “Blur,” and choose “Motion Blur” from the drop-down menu. A dialogue box will now open where you can preview the effect and adjust the settings, including Blur Type, Blur Center, and Blur Parameters.
Step4 Once you are satisfied with your changes, click “OK” to apply the effect to the image, and make some other edits if needed. Finally, click “File” from the top toolbar, choose “Export As,” click “File Type” to select the format, and select the “Export” option to save your file.
Bonus Tips – The Alternative To GIMP To Create Motion Blur Effect
GIMP is a popular image editor that you can use to create motion blur effects. However, some users find it difficult to use the software for this purpose.
To simplify the process, we recommend usingWondershare Filmora an all-in-one editing software that offers multiple advanced features to help you quickly enhance your project.
Free Download For Win 7 or later(64-bit)
Free Download For macOS 10.14 or later
Here’s why Filmora is the best alternative to GIMP for creating motion blur effects:
- A user-friendly interface where you can quickly create the motion blur effect without spending hours learning the process
- Advanced video editing tools, such as keyframing, speed ramping, green screen, title editing, motion tracking, screen recorder, and preset templates
- Royalty-free music library where you can access millions of music and soundtracks
- Adds the motion blur effect to your videos as well as images
- Comes with multiple parameters to adjust the effect on your clip or image
To add the radial blur effect to images using Filmora, here are the quick and easy-to-follow steps:
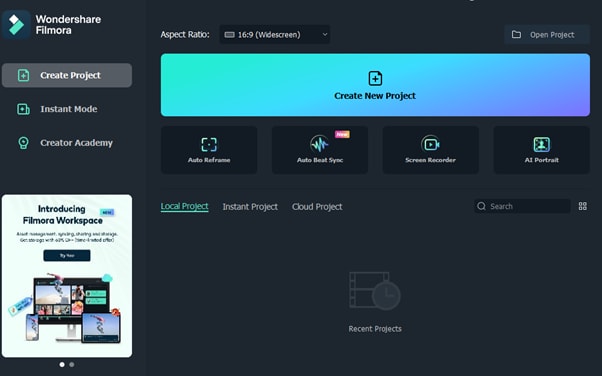
Step1 Download the Filmora software on your PC, launch it, and click “Create New Project” on the main panel. Use the “Click Here to Import your Media File” option to import your photo and drag and drop it into the timeline.
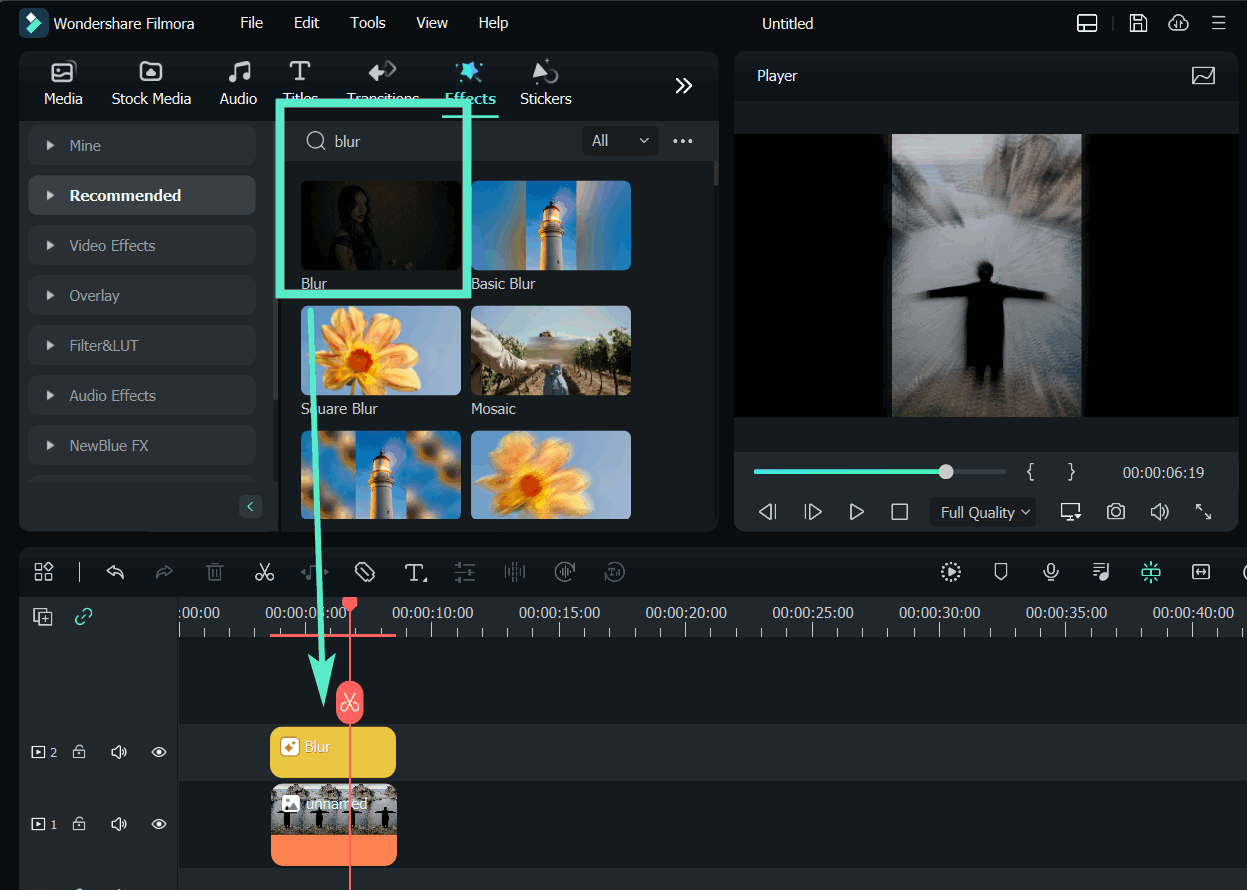
Step2 Now, head to the “Effects” tab from the taskbar. Use the search option to find the Blur effect. Afterward, drag & drop it in the timeline and adjust it on your selected clip.
Step3 Please note that motion blur is now a dynamic effect on the image. That means you can add multiple photos and make them into a slideshow with a blur effect transition. Or, press the “Play” icon to preview your photo and pause the clip where you think motion blur works best.
Step4 Click the effect in the timeline to open its settings. Now, play your clip to preview and adjust the parameters as you want to smooth down the motion effect.
Step5 Once satisfied with the outcome, click the “Export” option, go to the “Local” tab, select a file format to save the images, and click “Export” again to save your project.
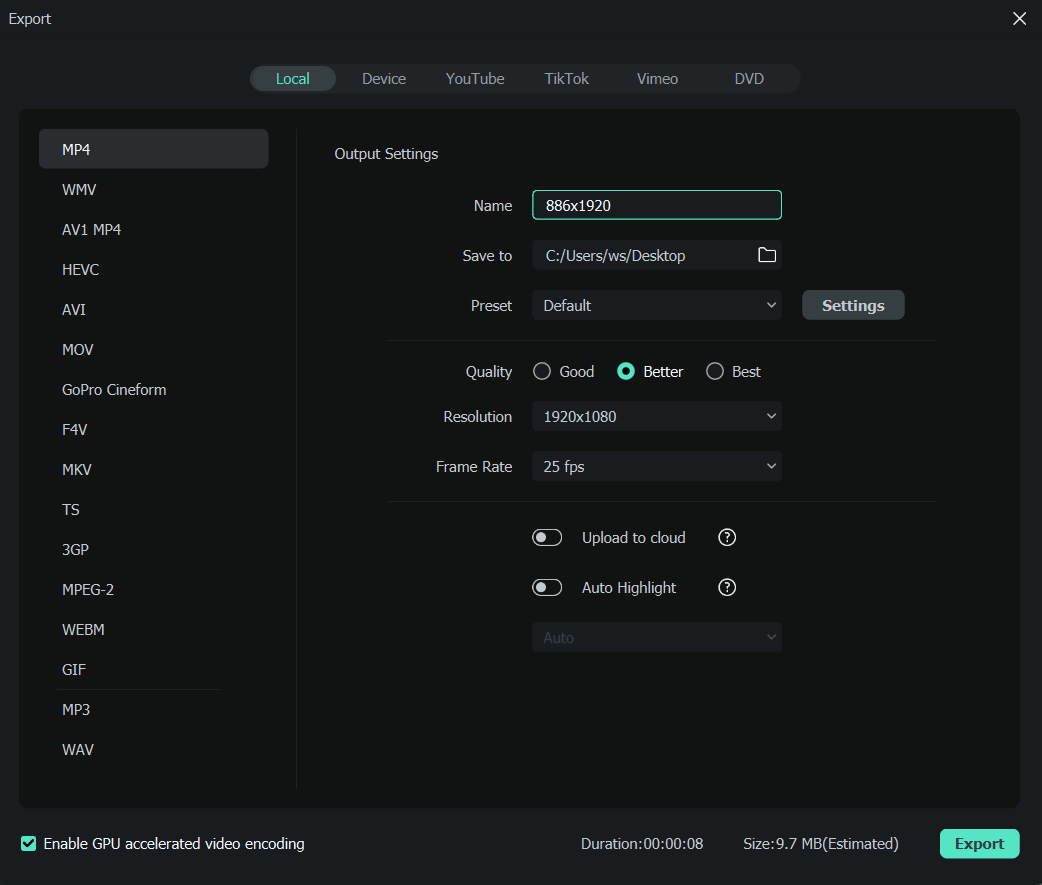
Filmora offers many export options, such as your device, YouTube, Vimeo, and DVD, with just a few clicks.
Last Words
In this detailed tutorial, we’ve discussed what GIMP is and its key features. We’ve provided a step-by-step guide to walk you through the process of creating the motion blur effect using the GIMP software.
In addition, we’ve provided a bonus tip to recommend Filmora as the best alternative to GIMP for creating the motion blur effect.
Hopefully, you found this article helpful in resolving your queries, and you can now add a smooth motion blur effect to your images.
Free Download For macOS 10.14 or later
Here’s why Filmora is the best alternative to GIMP for creating motion blur effects:
- A user-friendly interface where you can quickly create the motion blur effect without spending hours learning the process
- Advanced video editing tools, such as keyframing, speed ramping, green screen, title editing, motion tracking, screen recorder, and preset templates
- Royalty-free music library where you can access millions of music and soundtracks
- Adds the motion blur effect to your videos as well as images
- Comes with multiple parameters to adjust the effect on your clip or image
To add the radial blur effect to images using Filmora, here are the quick and easy-to-follow steps:
Step1 Download the Filmora software on your PC, launch it, and click “Create New Project” on the main panel. Use the “Click Here to Import your Media File” option to import your photo and drag and drop it into the timeline.

Step2 Now, head to the “Effects” tab from the taskbar. Use the search option to find the Blur effect. Afterward, drag & drop it in the timeline and adjust it on your selected clip.

Step3 Please note that motion blur is now a dynamic effect on the image. That means you can add multiple photos and make them into a slideshow with a blur effect transition. Or, press the “Play” icon to preview your photo and pause the clip where you think motion blur works best.
Step4 Click the effect in the timeline to open its settings. Now, play your clip to preview and adjust the parameters as you want to smooth down the motion effect.
Step5 Once satisfied with the outcome, click the “Export” option, go to the “Local” tab, select a file format to save the images, and click “Export” again to save your project.

Filmora offers many export options, such as your device, YouTube, Vimeo, and DVD, with just a few clicks.
Last Words
In this detailed tutorial, we’ve discussed what GIMP is and its key features. We’ve provided a step-by-step guide to walk you through the process of creating the motion blur effect using the GIMP software.
In addition, we’ve provided a bonus tip to recommend Filmora as the best alternative to GIMP for creating the motion blur effect.
Hopefully, you found this article helpful in resolving your queries, and you can now add a smooth motion blur effect to your images.
How to Be a Good Podcast Host (2024 Updated)
You may be a blogger who has the habit of writing long articles. Or you may be a YouTuber with a hi-fi channel with many subscribers, but a podcast is a different thing in general.
This article will look at how to prepare, call guests, warm them up, and give practical ideas about how to host a podcast. Let’s start the article by learning how to get prepared to host a podcast.
#1 Get prepared to host a podcast
A good podcast host always gets prepared, sets up his goals, and gets easy tips to set apart from everyone in the marketplace. For this, you have to follow the below instructions and tips:
1. A proper pre-interview process
Before starting the podcast, the host should have quality and organic content. The content is related to the guest or any foremost personality related to the topic.
The host should be confident and relaxed to kill the anxiety process. If the host has low confidence, he may suffer from nervousness. This will kill the authenticity.
2. Share questions with the audience
A good understanding of how to pan out a situation makes you a good host. You must share the question on and off during podcasts to build engaging criteria with the audience.
You don’t need to sound the script on the screen like a robot. Scripts can be helpful but only if read in a conversational mood.
3. Find the right location
A good location means good conversation. A proper set prepared for the guest and the podcast will help you boost your conversation skills and get yourself and the guest into the mood of your show.
Before the show, you can change the settings or have a monotone set that fits every mood.
#2 Warm up the audience
Warming up is a necessary part of the show. A warmup works just like gas in a car before a long drive. You have to do this by asking any question or by telling them an inspirational or motivational story.
A good host must realize that a warm show has a high chance of becoming viral, and you won’t get that if the guest is nervous, tired, or not in the mood.
Tip 1. Setting the mood
Your goal is to set the mood of the audience according to the topic. Warming up the audience before getting to the guest.
You have to set the tone according to the topic of your podcast to warm them up. In this way, you need to make the connection between the guest, you, and your voice.
Tip 2. Build an emotional connection
Building an emotional connection helps to engage the audience till the end of the show. To make this possible, you can share a funny story with them or about a recent event or any recent incident.
Tip 3. Polls and questionnaires
Modern media has connected everything through the internet. You need to interact with the audience by asking questions from them and giving them a chance to answer them by live calling or on social media.
You can also do this on Instagram polls or by posting a story and asking them to select an upcoming topic for the podcast. Introducing this concept will boost your podcast views and help you engage more followers on your other social media platforms.
#3 Try to be authenticity
You need to have authenticity if you want your podcast to be successful. An authentic show attracts a larger audience, while a show whose mood resembles a person with a multiple personality disorder will throw off the whole vibe of the podcast. And the listeners will eventually press back buttons to escape the colossal wreck.
Tips to have authentic content
- Your topic may be emotional, happy, or of any other information.
- A good host needs to have the skills of a good actor to convey the emotions that the audience will perceive more efficiently.
- An idea of how the audience will perceive you and how to make your voice tone with emotions on podcasts.
- Don’t go for a more serious tone.
Things to Avoid
- What you should opt away from is, faking
- Don’t try to get excited about something that you’re not.
- Do not pretend to care about something when you do not.
- The fakeness will only result in the downfall of your podcast, as the listeners will eventually grow tired and leave.
- You must act well and sell yourself more efficiently to develop that trust with the audience.
The more the audience trusts you, the more authentic you seem.
#4 Storytelling
Tales are as old as time. As time moves on, more and more stories pile up. Your podcast has the potential to be the best if you know how to utilize those storytelling skills of yours. It’s never about information alone!
You may have a bland topic to discuss or a guest who is tough to break character. These are the situations where your charm and concern will play their part. So you also want to learn how to make your podcasts enjoyable through stories? Then check out the short tips below:
How to add stories to your podcasts
- First, you should have the skill to read the room and the mood.
- If you start telling a story about yourself that has no relation to the topic whatsoever will only lead to the guest being annoyed.
- You may have called the guest for a reason. This reason should tally with your topic as it will make you ask about their experience.
- Asking the right questions is important.
- You’d better not begin with leading statements such as, “Obi-wan Kenobi is a good TV show.” the guest may simply reply, “I do not care.”
- You should approach with question statements such as, “Did you know that your son is a big fan of the Obi-wan Kenobi TV show.” These are indulging questions to help your audience be more involved in your podcasts.
The audience and the guest will also develop an interest in the conversation that will lead to a successful show for the day.
#5 Transcribe your episodes
A good podcast also looks to give you quality content for each episode. You may call on guests upon guests and promote your podcasts in many ways. One of the ways you can also allow your podcasts to be recognized more is by the use of transcribing.
What is transcribing?
Transcribing means converting the speech in the audio of your podcasts to a text format. Your podcast may raise some eyes if the content is desirable to the audience.
It may happen your podcast gets around a person whose brother suffers from hearing loss. By a transcription, you offer a chance to let them involved in your podcast. You can accomplish this feat in one of two ways.
- Either use an AI-powered audio editing program, like Wondershare Filmora , to get you through the speech-to-text transcription by default or a more auto way.
- Convert your text into audio, but this article will not look at it.
Free Download For Win 7 or later(64-bit)
Free Download For macOS 10.14 or later
Our main focus would be manually converting speech to text using a human transcriber. And we will be doing so by using the Wondershare Filmora app.
Transcribing podcasts with Wondershare Filmora
Filmora is an all-in-one video editing tool. In the following steps, we will learn the step-by-step process of transcribing podcast by using Wondershare Filmora.
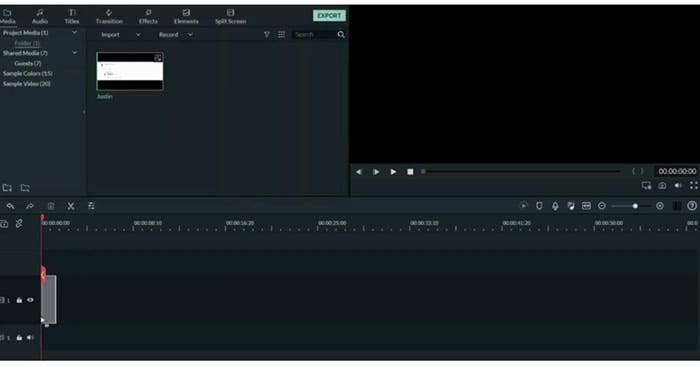
Step1Add audio files or footage
- First of all, drag the imported audio files or footage into the timeline.
Step2Add subtitles
To show the transcription of the podcast’s audio, you have to add sbtitles for better understanding. For this, perform these steps:
- Select the tile icon on the bar above.
- In the window that pops up, select your favorite subtitle format.
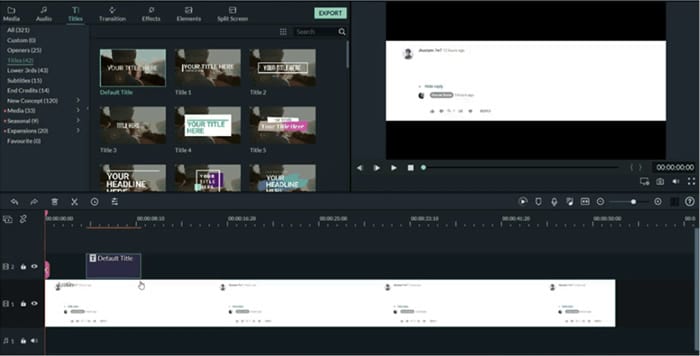
Step3Adjust the size
For better playout and matching the audio with subtitles, you have to adjust the size of the video as:
- Add a subtitle tile above the video.
- Then adjust the size of the video.
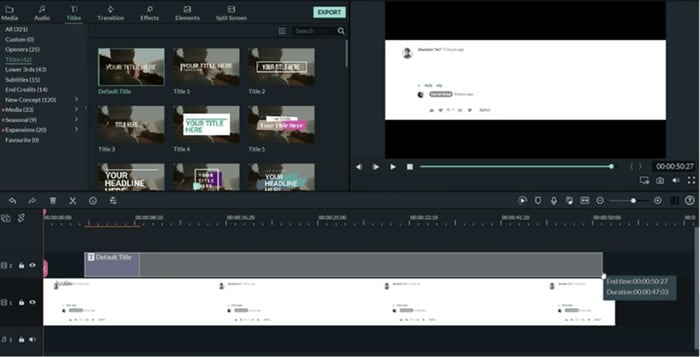
Step4Convert speech into text
- At last, type the speech into text in the subtitle box.
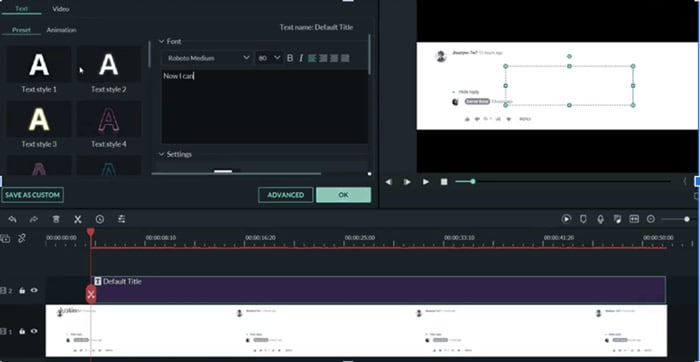
In this way, you have created speech-to-text using a human transcriber rather than an AI. Doing this will ensure no mistakes are recorded and make it even more efficient.
#6 Put yourself in audiences’ shoes
And if you feel like the general audience would want to make sense of a particular statement, ask the guest about it. This is what differentiates a good host from a bad one! A general understanding of the audience’s point of view would always allow you to process your podcast accordingly.
- You should understand the general sentiments of the audience.
- When you feel a particular subject will attract more audience, do the process accordingly.
- Maybe they like how you process a story and evaluate it. Do that!
All qualities of a good podcast are there, and it’s your job to identify them and make the most of them.
#7 Understand why the guest is here
You are the host of the podcast. Your job is to be sincere with the guest. Moreover, useful information or a valued thought might be a reason why the guest has come to your show. Understand that reason and try to make the most of it.
- The guest might have heard about your podcast, or they could be a constant
- Your approach to the guest should tally with the topic of the podcast.
- The guest might be going through a tough time that makes them a suitable guest for that particular episode.
- Or it could be that your podcast attracted them, and now they want to use your interview to promote a book or any other service they think is best.
- As a host, you should allow the guest to have some control over the podcast.
- Develop a sense of trust between the host and the guest.
- The more you allow the guest to speak freely about themselves, the more they will feel interested in your podcast.
Your goal should be to captivate the guest as much as you can. If the guest is entertained, the more chances are that they will recommend you to other guests. An experience gone wrong will be bad for the podcast.
#8 Invite the right guest
A podcast can be an excellent tool for attracting the audience to your content. And as podcast hosts guests, your first step is finding the right guests for your audience.
Is it necessary to search for a host before calling? Yes! It’s quite a complicated and sensitive step to call out guests. A guest is the only one who can make or break the Podcast show. It’s important to study the nature of guests too. Because a guest is also considered as a co-host of the show.
If a guest is bored and doesn’t take much interest, then there are 100% chance that the show will fail. To find who is more compatible, we have to take assistance from a tool.
You can do this by plugging your podcast into a tool like Sparktoro. Sparktoro allows you to see what your audience is engaging with. It could be other platforms of podcasts such as youtube or other social media platforms.
For example, If we search for “the art of product podcast” on the Sparktoro website. It will direct us to demographic data, providing information about the content the audience is interacting with.
- It will show different hashtags and frequently used phrases.
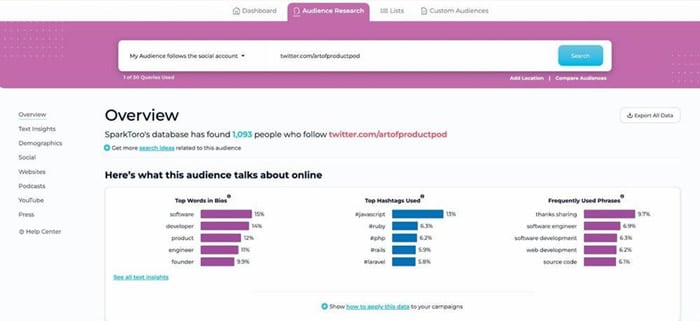
- Here you can see the top words in bios, hashtags, and frequent phrases.
- On the left window, you can search for other related podcasts your viewers are watching.

- Similarly, you can also use the YouTube option to look at what kind of content your audience watches on youtube.
Following the above methods could give you 50-100 potential clients. Your main goal will be creating a list allowing you to call guests on your show. You can divide the list according to the priorities.
- Close friends: the ones who are going to be available whenever you call upon them.
- The probable list: the ones who would most probably agree to come on your podcast.
- The premium list: these guests will resemble a dream list of guests you want to call on your podcast.
Start by writing emails and promoting content that will attract these guests. Your chances are increased by how much you polish your podcast into creating premium content. The more premium the content is, the more premium your chances are of inviting those dream guests.
The Bottom Line
Podcasts are tricky to promote. Many other alternatives are available in the market that provides a more Visual representation. And it’s no lie; an audience like to sit and watch rather than sit and listen.
Following the steps, tips, and tricks mentioned above, you can build a strong base for being a good podcast host. Although it will take time to set off on your dreams, consistency and determination will eventually bear fruit.
Free Download For macOS 10.14 or later
Our main focus would be manually converting speech to text using a human transcriber. And we will be doing so by using the Wondershare Filmora app.
Transcribing podcasts with Wondershare Filmora
Filmora is an all-in-one video editing tool. In the following steps, we will learn the step-by-step process of transcribing podcast by using Wondershare Filmora.
Step1Add audio files or footage
- First of all, drag the imported audio files or footage into the timeline.

Step2Add subtitles
To show the transcription of the podcast’s audio, you have to add sbtitles for better understanding. For this, perform these steps:
- Select the tile icon on the bar above.
- In the window that pops up, select your favorite subtitle format.

Step3Adjust the size
For better playout and matching the audio with subtitles, you have to adjust the size of the video as:
- Add a subtitle tile above the video.
- Then adjust the size of the video.

Step4Convert speech into text
- At last, type the speech into text in the subtitle box.

In this way, you have created speech-to-text using a human transcriber rather than an AI. Doing this will ensure no mistakes are recorded and make it even more efficient.
#6 Put yourself in audiences’ shoes
And if you feel like the general audience would want to make sense of a particular statement, ask the guest about it. This is what differentiates a good host from a bad one! A general understanding of the audience’s point of view would always allow you to process your podcast accordingly.
- You should understand the general sentiments of the audience.
- When you feel a particular subject will attract more audience, do the process accordingly.
- Maybe they like how you process a story and evaluate it. Do that!
All qualities of a good podcast are there, and it’s your job to identify them and make the most of them.
#7 Understand why the guest is here
You are the host of the podcast. Your job is to be sincere with the guest. Moreover, useful information or a valued thought might be a reason why the guest has come to your show. Understand that reason and try to make the most of it.
- The guest might have heard about your podcast, or they could be a constant
- Your approach to the guest should tally with the topic of the podcast.
- The guest might be going through a tough time that makes them a suitable guest for that particular episode.
- Or it could be that your podcast attracted them, and now they want to use your interview to promote a book or any other service they think is best.
- As a host, you should allow the guest to have some control over the podcast.
- Develop a sense of trust between the host and the guest.
- The more you allow the guest to speak freely about themselves, the more they will feel interested in your podcast.
Your goal should be to captivate the guest as much as you can. If the guest is entertained, the more chances are that they will recommend you to other guests. An experience gone wrong will be bad for the podcast.
#8 Invite the right guest
A podcast can be an excellent tool for attracting the audience to your content. And as podcast hosts guests, your first step is finding the right guests for your audience.
Is it necessary to search for a host before calling? Yes! It’s quite a complicated and sensitive step to call out guests. A guest is the only one who can make or break the Podcast show. It’s important to study the nature of guests too. Because a guest is also considered as a co-host of the show.
If a guest is bored and doesn’t take much interest, then there are 100% chance that the show will fail. To find who is more compatible, we have to take assistance from a tool.
You can do this by plugging your podcast into a tool like Sparktoro. Sparktoro allows you to see what your audience is engaging with. It could be other platforms of podcasts such as youtube or other social media platforms.
For example, If we search for “the art of product podcast” on the Sparktoro website. It will direct us to demographic data, providing information about the content the audience is interacting with.
- It will show different hashtags and frequently used phrases.

- Here you can see the top words in bios, hashtags, and frequent phrases.
- On the left window, you can search for other related podcasts your viewers are watching.

- Similarly, you can also use the YouTube option to look at what kind of content your audience watches on youtube.
Following the above methods could give you 50-100 potential clients. Your main goal will be creating a list allowing you to call guests on your show. You can divide the list according to the priorities.
- Close friends: the ones who are going to be available whenever you call upon them.
- The probable list: the ones who would most probably agree to come on your podcast.
- The premium list: these guests will resemble a dream list of guests you want to call on your podcast.
Start by writing emails and promoting content that will attract these guests. Your chances are increased by how much you polish your podcast into creating premium content. The more premium the content is, the more premium your chances are of inviting those dream guests.
The Bottom Line
Podcasts are tricky to promote. Many other alternatives are available in the market that provides a more Visual representation. And it’s no lie; an audience like to sit and watch rather than sit and listen.
Following the steps, tips, and tricks mentioned above, you can build a strong base for being a good podcast host. Although it will take time to set off on your dreams, consistency and determination will eventually bear fruit.
Try These 10 Music Video Templates To Make Your Work Easy
Music is essentially the food to the soul. A good song could pull you out of a bad mood or cheer you up when you feel low. You could also use music to motivate you to do tedious tasks, like tackling a mountain of dishes at the sink. In addition to having a catchy beat and rhythm, a good song should accompany a well-executed music video.
If you are a novice and new to the music industry, you might wonder how to make your video look stunning and polished to excite your fans. This article will discuss the ten best templates on Filmstock and how to incorporate them into your music video.
- Retro Music Visualization Background Video Template
- Audio Visualization Intro Template for Your Music Video
- Visualizer Overlays Pack Templates for Music Videos
- Audio Visualization Music Video Template
- Audio Spectrum Template for Music Video
- Music Playlist Video Title Pack Template Free for Download
- Lyrics for Music Video Templates
- Music Event Templates Pack for Your Video
- VJ Looping Backgrounds Templates for Music Videos
- EDM Logo Templates for Music Videos
- How To Edit Your Next Music Video With Templates Using Filmora for Desktop
- How To Use Music Video Templates With Filmora for Mobile
- Tips for Editing Your Music Videos
10 Best Music Video Templates
Without dilly-dallying too much, let’s look at some amazing templates from Filmstock you can use to edit your music videos.
1. Retro Music Visualization Background Video Template
The looping background in our first music video template removes the tedium from editing. Once you ensure your soundtrack is flawless, the template takes it to a whole new level, almost like giving it a facelift. The bright neon and pastel colors are sure to keep your audience glued to their screens, unable to look away from the masterpiece before their eyes.
2. Audio Visualization Intro Template for Your Music Video
This audio visualization intro template is beautifully designed and easy to use for even the least experienced editor. All you need to do is pair it with your favorite soundtrack; the template will match it to the audio animation. This intro template is compatible with Filmora 9.6 and above and comes with 12 titles and 12 effects. Sadly, there are no transitions here.
3. Visualizer Overlays Pack Templates for Music Videos
Perhaps your music videos are a bit bland, or your audience has grown used to a particular editing style. This music template video is a sure way to refresh your videos and introduce your audience to a whole new side of you. Even though it contains plenty of bright colors similar to other templates on our list, we guarantee it shines bright uniquely.
4. Audio Visualization Music Video Template
Podcasts are a new type of content where the viewers can plug in their headphones and listen to you rant while they complete their chores. You could take your podcast videos to the next level using this audio visualization template, which is easy to use and contains deep, rich colors that are easy on the eyes.
5. Audio Spectrum Template for Music Video
There is no shortage of templates with beautiful bold colors on our list. This audio spectrum template is definitely one of them. It also contains geometric shapes and futuristic designs to wow your audience.
6. Music Playlist Video Title Pack Template Free for Download
Some viewers prefer to watch one long video with their favorite artist’s songs bundled up in one place. This template for music video can provide the perfect background for your viewers as they enjoy their beloved songs.
7. Lyrics for Music Video Templates
This fun template takes the boredom out of any music video and allows your audience to enjoy both the auditory and visual experience simultaneously. The lyrics for music video templates are suitable for Filmora 9.6 and above and come with a whopping 16 titles, 17 elements, and four transitions.
8. Music Event Templates Pack for Your Video
The eighth music video template on our list is inspired by concerts and dance clubs, even though it is not as loud or chaotic. This template is compatible with Filmora 9.6 and above and comes with 14 titles, ten elements, four effects, and two transitions. Since you will be adding your own audio track, it’s not such a bummer that it doesn’t come with music.
9. VJ Looping Backgrounds Templates for Music Videos
The modern and futuristic look in the VJ looping background template makes it a great choice for concert-type videos or anything related to sci-fi. The bright colors are hard to miss and will wow your audience.
The VJ looping background template is easy to incorporate into any project, and within a few simple clicks, your video is ready for viewing. You can use this template with Filmora 9.6 and above. However, it only comes with 36 elements. There are no titles, transitions, or effects.
10. EDM Logo Templates for Music Videos
Last but not least, this EDM logo template is compatible with Filmora 9.6 or above and comes with six titles, eight elements, and two effects. Unfortunately, the package doesn’t include any transitions. This electronic video template is perfect for concerts and festival-related music videos that are anything but laid-back.
How To Edit Your Next Music Video With Templates Using Filmora for Desktop
Having seen the beautiful templates for your music video discussed above, you might wonder how you could use them in your next music video to increase traffic to your channel. Wondershare Filmora is an excellent editing tool that can help you achieve exactly that. The desktop version is free to download, not to mention its feature-rich interface and templates you can’t possibly exhaust.
Free Download For Win 7 or later(64-bit)
Free Download For macOS 10.14 or later
Below is a step-by-step guide on how to edit your video with a music video template**.**
Step1 Launch Filmora for desktop on your device and click on the logo to import media from your internal storage. Alternatively, you could drag and drop the files in the designated region as shown.

Step2 Navigate to the “Template” tab and wait for a drop-down menu to appear on the left side of the screen. Select the “Music” tab and wait a few seconds for the platform to download all the available music templates. Click the template that tickles your fancy and drag it to the timeline as shown below.

Step3 Select the “Media” tab at the top of the page. Drag your soundtrack and music video to the timeline and click “Replace” to remove the sample footage that comes with the template.
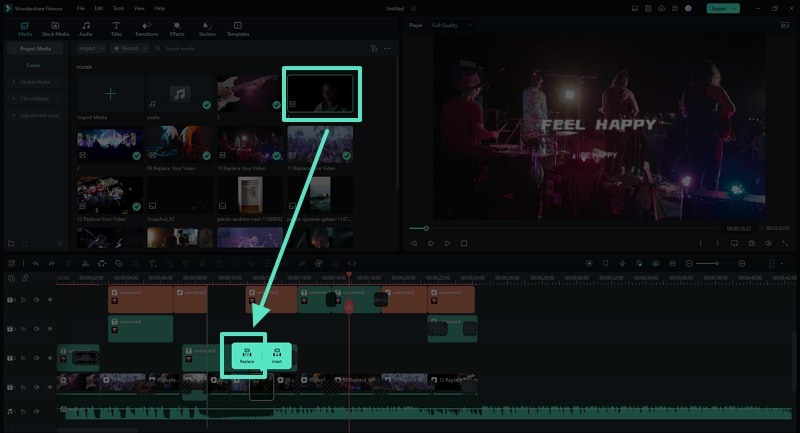
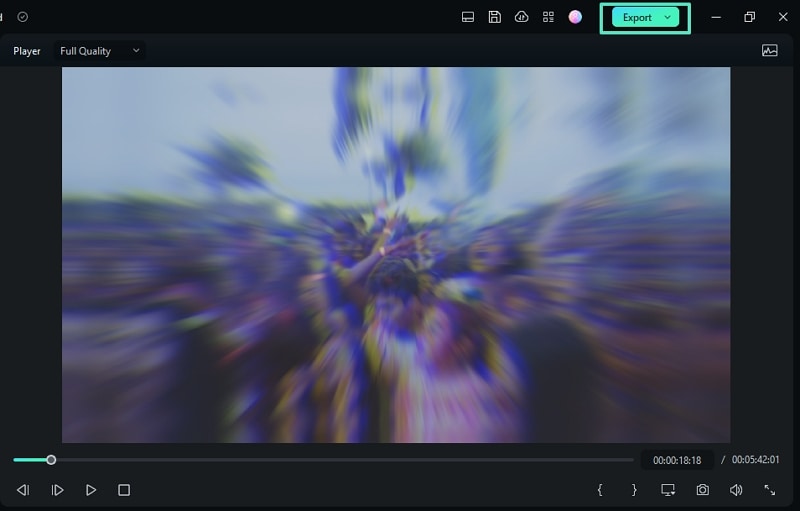
Step4 Customize your video by adding effects, transitions, and stickers as you see fit. View the changes you have made in the Player window of the platform. Once you are happy with the outcome, click “Export” to save a copy of the final video to your device.
If you want to add more custom designs to your music video, watch the video below to learn more:
How To Use Music Video Templates With Filmora for Mobile
Suppose you want to use your mobile phone to edit a short video clip. Filmora has a mobile app, which is no different from the desktop app, except that it is optimized for smartphones and tablets. The installation is pretty easy, and the interface is very user-friendly.
Stick around to learn how to use Filmora for mobile to edit your video with a free music video template.
Step1 Launch the app on your mobile phone and select the “Template” tab.
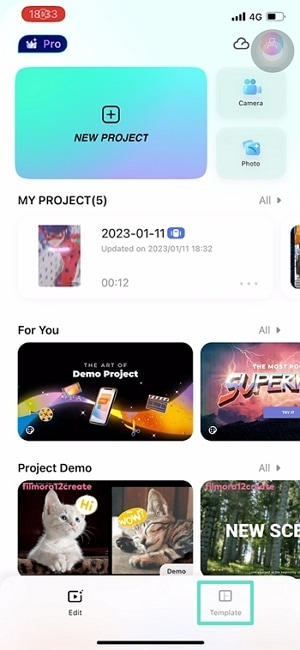
Step2 Navigate to the “Lyrics” or “Music Beats” tab to start perusing music video templates on the app.
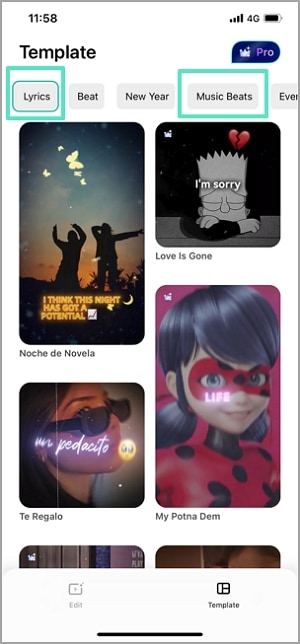
Step3 Choose a template you like and tap on the “Make Video” button.
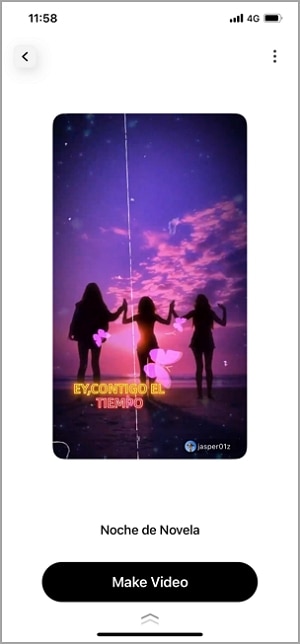
Step4 import your music video or photos from your internal storage. Select “Go >” to apply the changes.

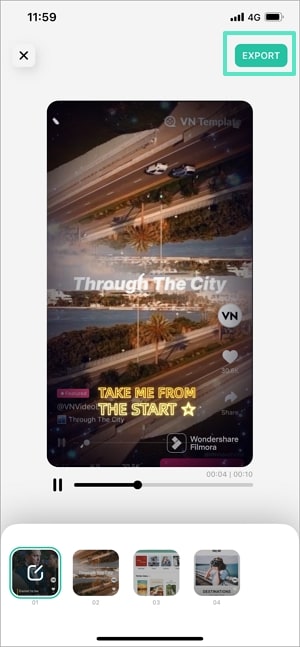
Step5 Preview the resulting footage and click “Export” once you are happy with the outcome.
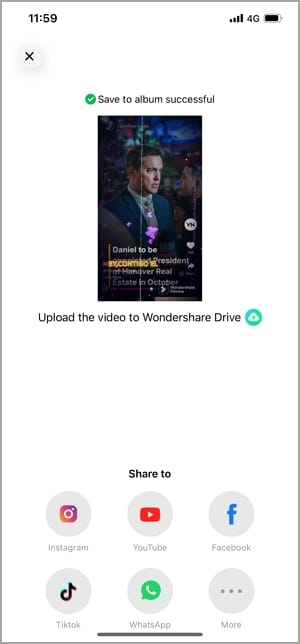
Step6 You can share the video directly on any of your social media platforms. Alternatively, if you want to download the edited video to your device, select “More.”
Tips for Editing Your Music Videos
Now that you have the ideal editing tool to take your videos from drab to fab, here are a few tips to help you along the way.
- Ensure you set the output file to the appropriate resolution to avoid lowering the quality of the video you edit.
- Resist the temptation to insert the artsy shots before you lay a basic framework. It would be wise to focus on the musician’s performance before you insert shots of the beautiful scenery.
- As you edit, it would help to create a storyline that matches the lyrics. You could create a simple story or a complex one.
- Since your computer might struggle to process numerous 4k videos, it would help to create proxy files as early as possible so you can save your progress along the way.
- During filming, create and collect your favorite b-roll shots. These clips provide extra information or context to anyone watching your music video.
- Ensure you match the video to the beat and look out for areas where the performer sings along. We guarantee your fans will notice the slightest delay between the song and the performer in the video.
- Once the music video looks polished and synchronized, you can adjust brightness, contrast, and exposure and change the white balance.
- Lastly, you could begin or end the video with the artists’ credits, such as their names or logo. Since it is a relevant piece of information, ensure this segment of the video grabs the viewers’ attention.
Conclusion
If you want your song to go viral, you ought to put in the work and make the video as good as the soundtrack. Nothing is as bad as a good song with a poorly executed video. Your fans will definitely criticize you for it, making the ratings go down.
Fortunately, the guidelines in this article will set you on the right path and help you make a polished-looking music video in no time.
10 Best Music Video Templates
Without dilly-dallying too much, let’s look at some amazing templates from Filmstock you can use to edit your music videos.
1. Retro Music Visualization Background Video Template
The looping background in our first music video template removes the tedium from editing. Once you ensure your soundtrack is flawless, the template takes it to a whole new level, almost like giving it a facelift. The bright neon and pastel colors are sure to keep your audience glued to their screens, unable to look away from the masterpiece before their eyes.
2. Audio Visualization Intro Template for Your Music Video
This audio visualization intro template is beautifully designed and easy to use for even the least experienced editor. All you need to do is pair it with your favorite soundtrack; the template will match it to the audio animation. This intro template is compatible with Filmora 9.6 and above and comes with 12 titles and 12 effects. Sadly, there are no transitions here.
3. Visualizer Overlays Pack Templates for Music Videos
Perhaps your music videos are a bit bland, or your audience has grown used to a particular editing style. This music template video is a sure way to refresh your videos and introduce your audience to a whole new side of you. Even though it contains plenty of bright colors similar to other templates on our list, we guarantee it shines bright uniquely.
4. Audio Visualization Music Video Template
Podcasts are a new type of content where the viewers can plug in their headphones and listen to you rant while they complete their chores. You could take your podcast videos to the next level using this audio visualization template, which is easy to use and contains deep, rich colors that are easy on the eyes.
5. Audio Spectrum Template for Music Video
There is no shortage of templates with beautiful bold colors on our list. This audio spectrum template is definitely one of them. It also contains geometric shapes and futuristic designs to wow your audience.
6. Music Playlist Video Title Pack Template Free for Download
Some viewers prefer to watch one long video with their favorite artist’s songs bundled up in one place. This template for music video can provide the perfect background for your viewers as they enjoy their beloved songs.
7. Lyrics for Music Video Templates
This fun template takes the boredom out of any music video and allows your audience to enjoy both the auditory and visual experience simultaneously. The lyrics for music video templates are suitable for Filmora 9.6 and above and come with a whopping 16 titles, 17 elements, and four transitions.
8. Music Event Templates Pack for Your Video
The eighth music video template on our list is inspired by concerts and dance clubs, even though it is not as loud or chaotic. This template is compatible with Filmora 9.6 and above and comes with 14 titles, ten elements, four effects, and two transitions. Since you will be adding your own audio track, it’s not such a bummer that it doesn’t come with music.
9. VJ Looping Backgrounds Templates for Music Videos
The modern and futuristic look in the VJ looping background template makes it a great choice for concert-type videos or anything related to sci-fi. The bright colors are hard to miss and will wow your audience.
The VJ looping background template is easy to incorporate into any project, and within a few simple clicks, your video is ready for viewing. You can use this template with Filmora 9.6 and above. However, it only comes with 36 elements. There are no titles, transitions, or effects.
10. EDM Logo Templates for Music Videos
Last but not least, this EDM logo template is compatible with Filmora 9.6 or above and comes with six titles, eight elements, and two effects. Unfortunately, the package doesn’t include any transitions. This electronic video template is perfect for concerts and festival-related music videos that are anything but laid-back.
How To Edit Your Next Music Video With Templates Using Filmora for Desktop
Having seen the beautiful templates for your music video discussed above, you might wonder how you could use them in your next music video to increase traffic to your channel. Wondershare Filmora is an excellent editing tool that can help you achieve exactly that. The desktop version is free to download, not to mention its feature-rich interface and templates you can’t possibly exhaust.
Free Download For Win 7 or later(64-bit)
Free Download For macOS 10.14 or later
Below is a step-by-step guide on how to edit your video with a music video template**.**
Step1 Launch Filmora for desktop on your device and click on the logo to import media from your internal storage. Alternatively, you could drag and drop the files in the designated region as shown.

Step2 Navigate to the “Template” tab and wait for a drop-down menu to appear on the left side of the screen. Select the “Music” tab and wait a few seconds for the platform to download all the available music templates. Click the template that tickles your fancy and drag it to the timeline as shown below.

Step3 Select the “Media” tab at the top of the page. Drag your soundtrack and music video to the timeline and click “Replace” to remove the sample footage that comes with the template.

Step4 Customize your video by adding effects, transitions, and stickers as you see fit. View the changes you have made in the Player window of the platform. Once you are happy with the outcome, click “Export” to save a copy of the final video to your device.

If you want to add more custom designs to your music video, watch the video below to learn more:
How To Use Music Video Templates With Filmora for Mobile
Suppose you want to use your mobile phone to edit a short video clip. Filmora has a mobile app, which is no different from the desktop app, except that it is optimized for smartphones and tablets. The installation is pretty easy, and the interface is very user-friendly.
Stick around to learn how to use Filmora for mobile to edit your video with a free music video template.
Step1 Launch the app on your mobile phone and select the “Template” tab.

Step2 Navigate to the “Lyrics” or “Music Beats” tab to start perusing music video templates on the app.

Step3 Choose a template you like and tap on the “Make Video” button.

Step4 import your music video or photos from your internal storage. Select “Go >” to apply the changes.

Step5 Preview the resulting footage and click “Export” once you are happy with the outcome.

Step6 You can share the video directly on any of your social media platforms. Alternatively, if you want to download the edited video to your device, select “More.”

Tips for Editing Your Music Videos
Now that you have the ideal editing tool to take your videos from drab to fab, here are a few tips to help you along the way.
- Ensure you set the output file to the appropriate resolution to avoid lowering the quality of the video you edit.
- Resist the temptation to insert the artsy shots before you lay a basic framework. It would be wise to focus on the musician’s performance before you insert shots of the beautiful scenery.
- As you edit, it would help to create a storyline that matches the lyrics. You could create a simple story or a complex one.
- Since your computer might struggle to process numerous 4k videos, it would help to create proxy files as early as possible so you can save your progress along the way.
- During filming, create and collect your favorite b-roll shots. These clips provide extra information or context to anyone watching your music video.
- Ensure you match the video to the beat and look out for areas where the performer sings along. We guarantee your fans will notice the slightest delay between the song and the performer in the video.
- Once the music video looks polished and synchronized, you can adjust brightness, contrast, and exposure and change the white balance.
- Lastly, you could begin or end the video with the artists’ credits, such as their names or logo. Since it is a relevant piece of information, ensure this segment of the video grabs the viewers’ attention.
Conclusion
If you want your song to go viral, you ought to put in the work and make the video as good as the soundtrack. Nothing is as bad as a good song with a poorly executed video. Your fans will definitely criticize you for it, making the ratings go down.
Fortunately, the guidelines in this article will set you on the right path and help you make a polished-looking music video in no time.
YouTube Algorithm Hacks
Every day, more than 1 billion hours of YouTube videos are seen by users worldwide, including cat videos and videos for cats. The YouTube algorithm determines the videos YouTube recommends to its more than 2 billion human users (and untold numbers of feline users).

The subject of how to encourage YouTube’s algorithm to promote your videos and give you more likes is crucial for marketers, influencers, and creators alike.
We’ll discuss what the algorithm is (and isn’t), the most recent updates for 2022, and how experts use
YouTube’s search and discovery tools to push their videos in front of viewers in this blog post.
Let’s start!
Part 1. YouTube’s algorithm’s history
The YouTube algorithm: What is it? Let’s take a quick look at how YouTube’s algorithm has evolved through time and how it functions now in order to respond to your question.
2005 to 2011: Click-and-view optimization
In order to crowdsource footage of Janet Jackson and Justin Timberlake’s infamous Superbowl performance, according to YouTube founder Jawed Karim (a.k.a. the star of Me at the Zoo), YouTube was established in 2005. Therefore, it should not be surprising that YouTube’s algorithm for many years displayed suggested videos that had the most views or clicks. Unfortunately, this resulted in an increase in deceptive titles and thumbnails, or clickbait. User experience suffered as a result of videos that made viewers feel duped, dissatisfied, or just plain irritated.
2012: Watch time optimization
YouTube made changes to its recommendation engine in 2012 to account for the amount of time spent watching each video as well as the total amount of time spent on the site. According to theory, when people find videos important and engaging, they watch them for a longer period of time, possibly all the way through. Due to this, some creators tried to make their movies shorter to enhance the likelihood that viewers would watch them through, while others made their videos longer to boost overall viewing time. YouTube maintained the official line—create content your audience wants to watch, and the algorithm will reward you—while refusing to support either of these strategies. However, as anyone who has used the internet for any length of time can attest, not all time spent online is created equal. YouTube has adopted a new strategy.
2015–2016: maximizing fulfillment
In addition to emphasizing direct reaction metrics like Shares, Likes, and Dislikes (and, of course, the extremely cruel “not interested” button), YouTube started monitoring viewer happiness directly using user surveys in 2005. YouTube published a whitepaper titled Deep Neural Networks for YouTube Recommendations in 2016 that detailed some of the inner workings of its AI.
2016-present: demonetization, and brand safety
The size and popularity of YouTube have led to an increase in content moderation difficulties over time, and what the algorithm suggests is now a major topic for news outlets and the government in addition to creators and advertisers.
YouTube has stated that it takes seriously its obligation to promote a variety of viewpoints while limiting the spread of damaging false material. For instance, algorithm modifications implemented in the beginning of 2019 have reduced consumption of questionable content by 70%. (According to YouTube, borderline content is that which is harmful or misleading but doesn’t quite go against community standards. On the other hand, offensive material is taken down right away.)
Creators are impacted by this problem because they worry about unintentionally breaking the constantly evolving community rules and getting punished with strikes, demonetization, or worse. (In fact, enhancing openness for community norms for artists is one of YouTube’s priorities for 2021, according to CEO Susan Wojcicki.) Brands and advertisers are also impacted since they don’t want their name and logo to be associated with white nationalists.
Politicians in America are growing more concerned about the societal impact of social media algorithms like YouTube’s. Democrats introduced the “Protecting Americans from Dangerous Algorithms Act” in early 2021, and YouTube (and other platforms) have been called to testify before Senate committees about their algorithms. Let’s now discuss what is known about this hazardous beast’s mechanism.
Part 2. How will YouTube’s algorithm function in 2022?
The YouTube algorithm chooses videos for users with the intention of finding the most relevant content for them and keeping them interested. When we refer to “the algorithm,” we mean one of three selection or discovery techniques that are related but slightly different: three different algorithms: one that chooses videos for YouTube’s main page, one that ranks the results of any given search, and one that chooses what videos users should watch next are used.
According to YouTube, in 2022 the majority of channels’ top traffic sources would often be their homepage and suggested videos. With the exception of explainer or instructional films, which frequently receive the most traffic via search (e.g., “how to tune up a bicycle”)
Part 3. How is the algorithm set up on YouTube?
What ranking factors does YouTube consider when deciding which videos to display to users? Every traffic source varies a little. But in the end, a combination of factors including customization (the history and preferences of the viewer) performance (the success of the video) external variables (the overall audience or market)
Part 4. How YouTube determines its homepage algorithm
The YouTube algorithm presents a wide selection of videos that it thinks a user might like to view every time they open the YouTube app or type in youtube.com. Because the computer hasn’t yet determined what the viewer wants—acoustic versions of popular songs, for example—this selection is frequently broad. talks that are motivating against procrastination? to watch their preferred possum vlogger? Two categories of ranking signals are used to determine which videos appear on the homepage:
Performance:
YouTube gauges performance using indicators including the click-through rate, typical viewing time, typical percentage of views, likes, and disapproval ratings from viewers. After you upload a video, the algorithm initially displays it to a small number of users on their homepage. If it appeals to, engages, and satisfies those viewers (i.e., they click on it, watch it through, like it, share it, etc.), then it is then presented to an increasing number of users on their homepages.
Personalization:
However, the trending tab does not include YouTube. According to their past activity, also known as their watch history, or personalization, YouTube suggests videos to users based on what it believes are relevant to their interests. More of the same will be presented to a user if they frequently watch a particular channel or show they have an interest in. This element is also responsive to behavioral alterations throughout time as a person’s affinities and interests change.
Conclusion
It’s a fallacy that the algorithm would penalize you for publishing too regularly or insufficiently frequently, even if YouTube undoubtedly promotes the idea of uploading constantly in order to develop and maintain a relationship with your audience. The growth of the audience is unrelated to the interval between uploads. The zeitgeist can change quickly, but by keeping an eye on Google Trends and giving yourself opportunity to explore, you won’t fall behind.
Free Download For Win 7 or later(64-bit)
Free Download For macOS 10.14 or later
Free Download For macOS 10.14 or later
Also read:
- Updated 2024 Approved How to Add Selective Color Effect to Your Videos
- Updated In 2024, Best 5 Tips to Freeze-Frame in After Effects
- Updated Green Screen Is a Widely Used Effect in After Effects. Many Professional Photographers Use It to Make Creative Video Effects. This Guide Will Show You How to Use Green Screen to Videos in After Effects
- Updated What Are the Best Video Background Changers Online for 2024
- Updated How to Use Twixtor Effect to Create Super Slow-Motion Video, In 2024
- 2024 Approved Green Screen YouTube Videos
- New What Do You Prefer More, MKV File Format or MOV? Increase Your Knowledge and Learn More About MKV Format by Ready the Detailed Article Below
- New 2024 Approved How to Loop Videos with iMovie
- New 10 Best Free Spanish Text To Speech Converter Software Windows, Mac, Android, iPhone, & Online for 2024
- New 2024 Approved A Complete Guideline To Better Use QuickTime Player
- Updated In This Article Let Me Share with You How to Start a Vlog? Ideas and Any Tips for You to Start Your Own Vlogging Channel
- How to Create Intro with Legend Intro Maker for 2024
- Do You Intend to Include Motion Blur on Your Video Using Video Star? This Article Explains How to Use Motion Blur on Video Star with Exquisite Control for 2024
- New Top Tips for Camtasia Freeze-Frame
- In 2024, Heres All About GIF Keyboard Youll Ever Want to Know
- 2024 Approved Make Your Presentation More Attractive with Best Google Slideshows Templates. How to Make a Google Slideshow in Simple Step? Do You Know How to Create Google Images Slideshow?
- Explore the List of the Top Six Online Video Speed Controllers for Chrome, Safari, and Firefox
- 2024 Approved Having Issues Trying to View SRT Files when You Add Subtitle Files for VLC? Learn the Right Ways to Do so and the Best Alternative Solution
- New 2024 Approved How to Change Video Resolution in Filmora
- Updated Mastering Video Marketing An Expert Playbook
- New 2024 Approved How to Create An Eye-Catching Intro Videos with InVideo
- New In 2024, Best Frame Rate for 4K Video
- 2024 Approved Steps To Fade Audio In Premier Pro
- Updated Know How to Make a Video Background Transparent? Export Transparent Background Video After Adding Effects. Steps to Remove White Background From Video
- New 2 Easy Methods | How To Zoom In On TikTok Videos, In 2024
- In 2024, Have You Ever Applied the Gaussian Blur Effect to Your Videos? Read This Article to Find a Reliable and Convenient Tool to Generate the Gaussian Blur Effect
- New 2024 Approved Want Make a Slide Show Video? Heres How
- New Perfecting the Art of Slowing Down Video on Instagram
- New In 2024, How to Create An Eye-Catching Intro Videos with InVideo
- Updated How To Create A YouTube Intro
- In 2024, Want to Save Your Edited Video File in MP4 Format in Windows Movie Maker? Here Are the Simple Steps Along with a Better Alternative
- New How To Create The Best AI Thumbnail Using The Right Tools?
- Updated 2024 Approved 10 Best Camera for YouTube Beginners
- The Only Guide Youll Ever Need to Learn GIF Design
- If You Are Looking Forward to Make Attractive and Customized Slideshows, Lightroom Is One of the Best Options that You Can Consider for 2024
- New Read on to Learn About Multi Object Tracking, Its Types, and Requirements. Youll Also Learn About the Different Approaches Toward Object Tracking
- New Turn Your Text Into a Podcast Made Possible
- In 2024, What If YouTube Zoom to Fill Not Working?
- Updated Best GIF to Video Converters
- Updated 2024 Approved 8 Unexpected Ways to Add Emoji to Photo Online
- New Best GIF Croppers How to Crop an Animated GIF
- Wondering the Best Alternative to Hola On Honor 90 Lite? Here Is the Answer | Dr.fone
- In 2024, 3 Things You Must Know about Fake Snapchat Location On Vivo Y78+ | Dr.fone
- Does find my friends work on Apple iPhone 6s | Dr.fone
- How Do I Stop Someone From Tracking My Samsung Galaxy M34 5G? | Dr.fone
- 2024 Approved How to Create Animated Video on Canva?
- Overview of the Best Samsung Galaxy A54 5G Screen Mirroring App | Dr.fone
- Why Does iTools Virtual Location Not Work For Apple iPhone 13 Pro/iPad? Solved | Dr.fone
- How To Transfer WhatsApp From Apple iPhone XR to other iPhone? | Dr.fone
- Looking For A Location Changer On Samsung Galaxy A15 4G? Look No Further | Dr.fone
- 3 Ways to Change Location on Facebook Marketplace for Oppo A38 | Dr.fone
- How to Vivo V27 Pro Get Deleted Pictures Back with Ease and Safety?
- In 2024, How to Track Apple iPhone 13 mini Location without Installing Software? | Dr.fone
- How to Factory Reset Motorola Moto G84 5G without Losing Data | Dr.fone
- In 2024, How to Reset Gmail Password on Infinix Hot 40i Devices
- In 2024, How To Do Vivo Y17s Screen Sharing | Dr.fone
- In 2024, Top IMEI Unlokers for Apple iPhone 13 Pro Max and Android Phones
- In 2024, How To Erase an Apple iPhone X Without Apple ID Password?
- How to Perform Hard Reset on HTC U23? | Dr.fone
- The Most Effective Ways to Bypass Apple iPhone 13 Activation Lock
- How To Recover Lost Data of Apple iPhone 7 Plus? | Dr.fone
- Simple Solutions to Fix Android SystemUI Has Stopped Error For Tecno Camon 30 Pro 5G | Dr.fone
- Reasons for Tecno Phantom V Fold Stuck on Boot Screen and Ways To Fix Them | Dr.fone
- In 2024, How To Track IMEI Number Of Infinix Note 30 Pro Through Google Earth?
- In 2024, How to Come up With the Best Pokemon Team On Vivo Y27 4G? | Dr.fone
- Getting the Pokemon Go GPS Signal Not Found 11 Error in Poco X5 | Dr.fone
- Easy Ways to Manage Your Nubia Red Magic 9 Pro+ Location Settings | Dr.fone
- Top IMEI Unlokers for Your Samsung Galaxy S24+ Phone
- 3 Best Tools to Hard Reset Samsung Galaxy A14 4G | Dr.fone
- In 2024, 3 Effective Ways to Unlock iCloud Account Without Password On iPhone 7 Plus
- 7 Ways to Unlock a Locked Honor 90 Pro Phone
- In 2024, Dose Life360 Notify Me When Someone Checks My Location On Samsung Galaxy S23 FE? | Dr.fone
- How To Bypass the Required Apple Store Verification For Apple iPhone SE (2020) | Dr.fone
- Title: In 2024, How To Add Motion Blur Effect To Photos in GIMP
- Author: Chloe
- Created at : 2024-06-18 14:30:50
- Updated at : 2024-06-19 14:30:50
- Link: https://ai-editing-video.techidaily.com/in-2024-how-to-add-motion-blur-effect-to-photos-in-gimp/
- License: This work is licensed under CC BY-NC-SA 4.0.

