
In 2024, How to Put a Filter on a Video in iMovie

How to Put a Filter on a Video in iMovie
There are times when you record a video and find out that the light and color in the video have been up to the mark. The light could be too bright or too dark while there could be some color overlays in certain portion as well as the entire frame of the video. Thanks to the video editing apps, you can correct any lighting and coloration issues with different filters available to apply to your video.
If you are using iPhone or Mac, you can use Apple’s iMovie app easily. Therefore, you should know how to add filters on iMovie to get the desired output. iMovie app is available for both iPhone and iPad users as well as Mac users. You do not need prior experience in video editing to add filter to your videos to enhance and improve them. We will illustrate the steps on how to add filters in iMovie as well as suggest a better iMovie alternative.
Part 1. How to add filters on iMovie iPhone
If you have an iPhone, you are more likely to record a video with your iPhone. This is because the camera quality of iPhones is extremely good and there are various modes available for capturing different types of videos like slow-motion and time-lapse. Once you capture a video with your iPhone, you can edit the video and add filters to enhance the video quality using iMovie app available for iPhone.
You have to install iMovie app from App Store as it does not come pre-install. If you already have it installed, make sure you update it to the latest version to get all the filters. Here are the steps how to put a filter on a video in iMovie app.
Step1 Open iMovie app on your iPhone. Tap on Create Project option and tap on Movie on the next screen.
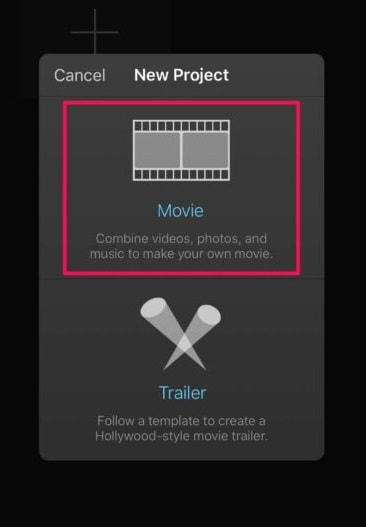
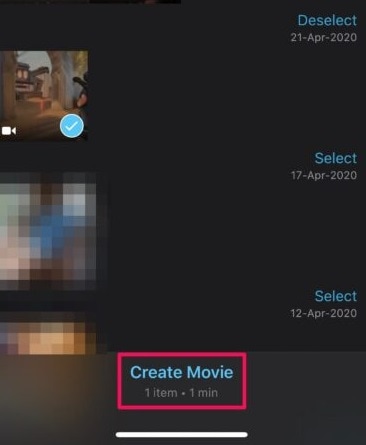
Step2 Select the video from your iPhone that you want to edit and add filters. After your selection, tap on Create Movie option located at the bottom.
Step3 Your selected video will now be available on the Timeline where you can edit your video. Tap on Filters icon located at the bottom-right corner.
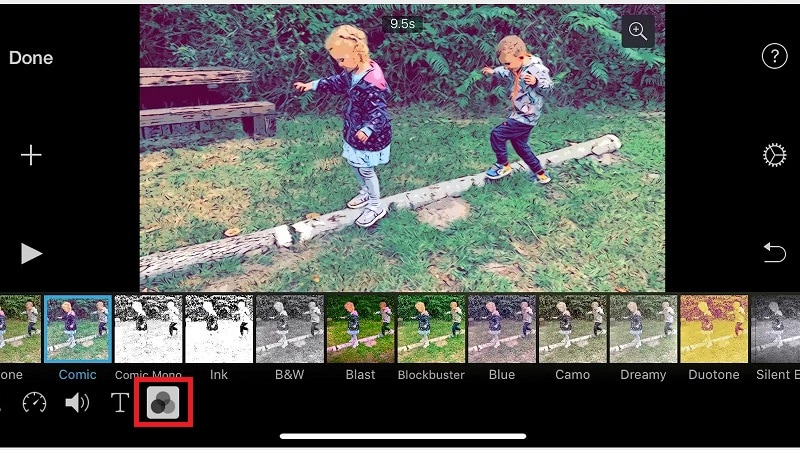
Step4 You will see all the different filters available on iMovie app. You can also find a slider above each selected filter. You can adjust the filter to increase or decrease the filter intensity.
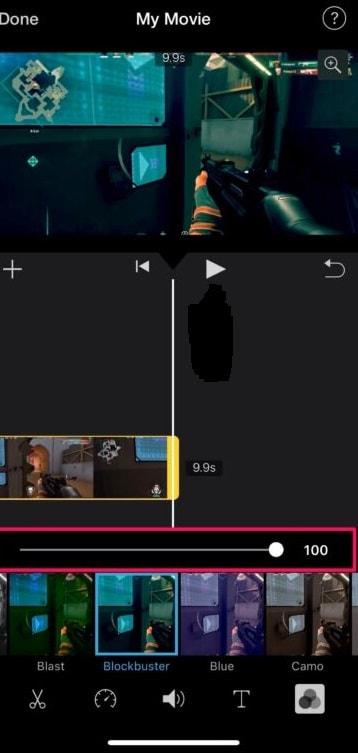
Step5 Tap on Play icon to check how the filter is looking on your video. Once you are satisfied, tap on Done option located at the top-left corner.
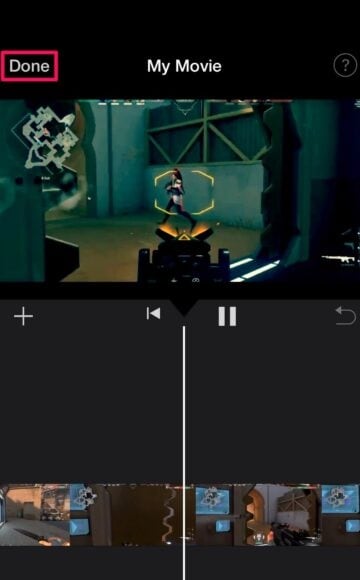
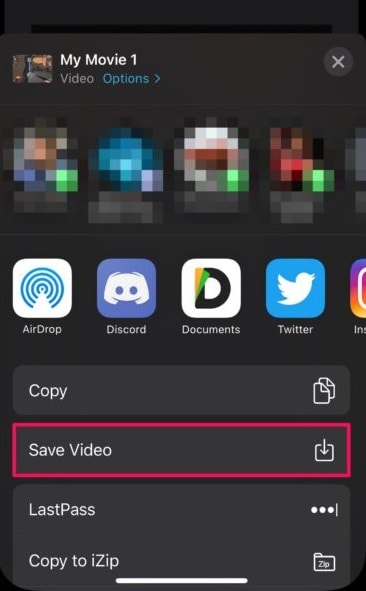
Step6 Tap on Share icon at the bottom and then tap on Save Video option to save the modified video on your iPhone.
Part 2. How to add filters on Mac iMovie
If you are someone who regularly makes videos for social media account or video streaming channel, you are more likely to record your video using a video camera and transfer the recorded video to you Mac for editing purposes. iMovie comes pre-installed on Mac, and therefore, once you have transferred the video, you can get started with editing and adding filters immediately. Here are the steps on how to add filters to iMovie on your Mac.
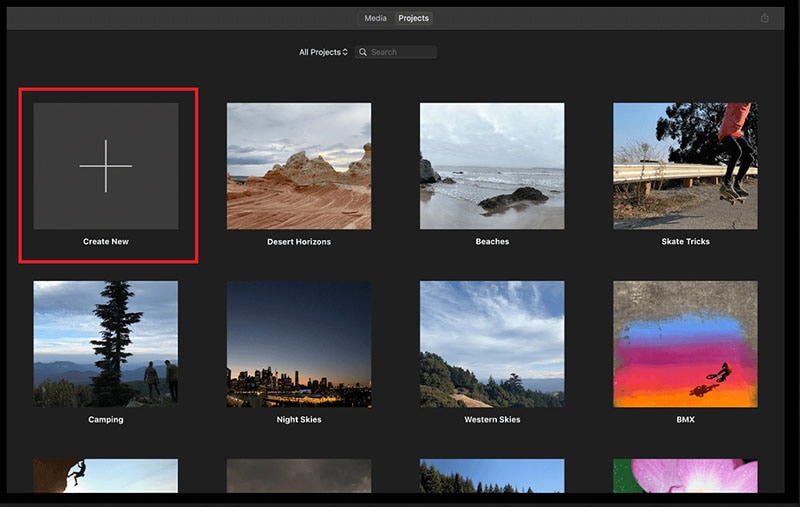
Step1 Launch iMovie from Applications folder. Click on Create New option to start a new Project.
Step2 Drag and drop the target video from Photos app to Desktop. Thereafter, drag and drop the video file from Desktop to the Timeline of iMovie project.
Step3 Click on the video clip on the Timeline and click on Crop Filter and Audio Effects icon above the Viewer.
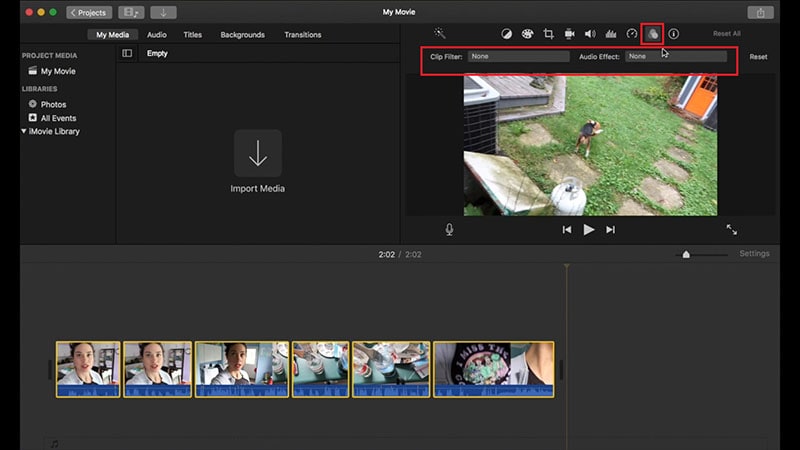
Step4 Click on Clip Filter option and you will see different filters in a window to the left. Place the mouse pointer over the filters, and you will see the filter in the Viewer.
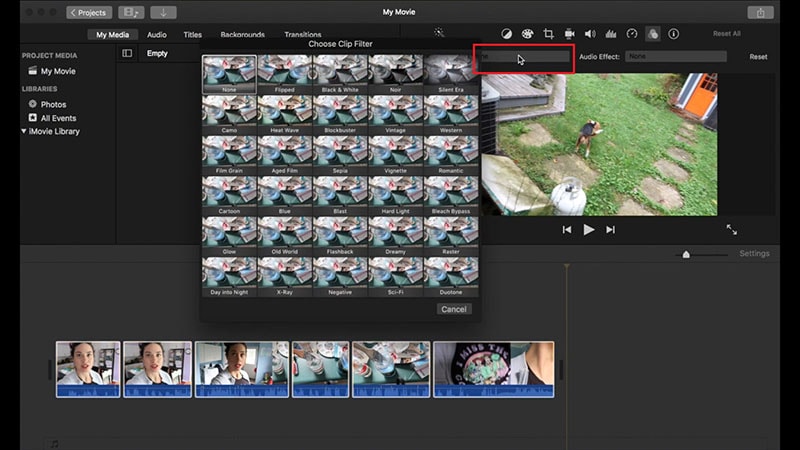
Step5 Once you are satisfied with a filter, click on that filter to apply it to the video clip.
Part 3. iMovie Alternative to add filters on Computer
There are several reasons iMovie filters may not always serve your purpose. For example, there is no way on how to add face filters on iMovie. The collection of filters is rather limited. If you are not satisfied with the filters available on iMovie, there are several iMovie alternatives available. We recommend Wondershare Filmora due to its vast collection of filters of all categories to enhance your video to the next level. Here are steps on how to add filters to your video using Filmora on your computer.
Free Download For Win 7 or later(64-bit)
Free Download For macOS 10.14 or later
Step1 Download and install Wondershare Filmora and it is available for Mac as well as Windows users. Open Filmora and click New Project.
Step2 Drag and drop video clips under Project Media folder. Thereafter, drag and drop video clips to Timeline.

Step3 Go to Effects from the top panel and click on Filters from the left panel. You will see all the different categories of filters.

Step4 Select any filter and drag and drop it on Timeline. You can stretch the duration of the filter as per your requirements.
You can also check Overlay> Utility option from the left panel to add face filters to your video in the same manner. If you want to save the modified video, click on Export button.
Conclusion
If you are an iPhone user or a Mac user, you can add filters to your video using iMovie app. You have to install iMovie app on your iPhone, but iMovie comes pre-installed on Mac. But there are limited filters available on iMovie and there is a lack of face filters which are trending in today’s viral videos. That is why we recommend Wondershare Filmora where there is a wide range of filters available to apply to your video conveniently as per your requirements.
Free Download For macOS 10.14 or later
Step1 Download and install Wondershare Filmora and it is available for Mac as well as Windows users. Open Filmora and click New Project.
Step2 Drag and drop video clips under Project Media folder. Thereafter, drag and drop video clips to Timeline.

Step3 Go to Effects from the top panel and click on Filters from the left panel. You will see all the different categories of filters.

Step4 Select any filter and drag and drop it on Timeline. You can stretch the duration of the filter as per your requirements.
You can also check Overlay> Utility option from the left panel to add face filters to your video in the same manner. If you want to save the modified video, click on Export button.
Conclusion
If you are an iPhone user or a Mac user, you can add filters to your video using iMovie app. You have to install iMovie app on your iPhone, but iMovie comes pre-installed on Mac. But there are limited filters available on iMovie and there is a lack of face filters which are trending in today’s viral videos. That is why we recommend Wondershare Filmora where there is a wide range of filters available to apply to your video conveniently as per your requirements.
Best Practical Tips to Improve Your Lighting in the Sun
Shooting outdoors is a challenge in most situations. We have to deal with the sun being overexposed or the background is too dark.
In this article, we’ll show you how to light with the sun the easiest way. These simple and effective tips can help you block the harsh sun and make it to your advantage!
1) Preparation
You may need those things to film under the harsh sun:
- An ND filter for your lens
- A flag to block the sun. It can be anything like a black poster.
- A white poster to bounce the sunlight.
- Artificial light equipment.
Now let’s see when and how to use them against the strong sunlight!
2) Direct to the Sun
If we want a specific background for our shot but our talent has to face the sun, here are some tips you can do to undermine the unflattering light or the blindness.
1. Pick up an ND filter on your lens
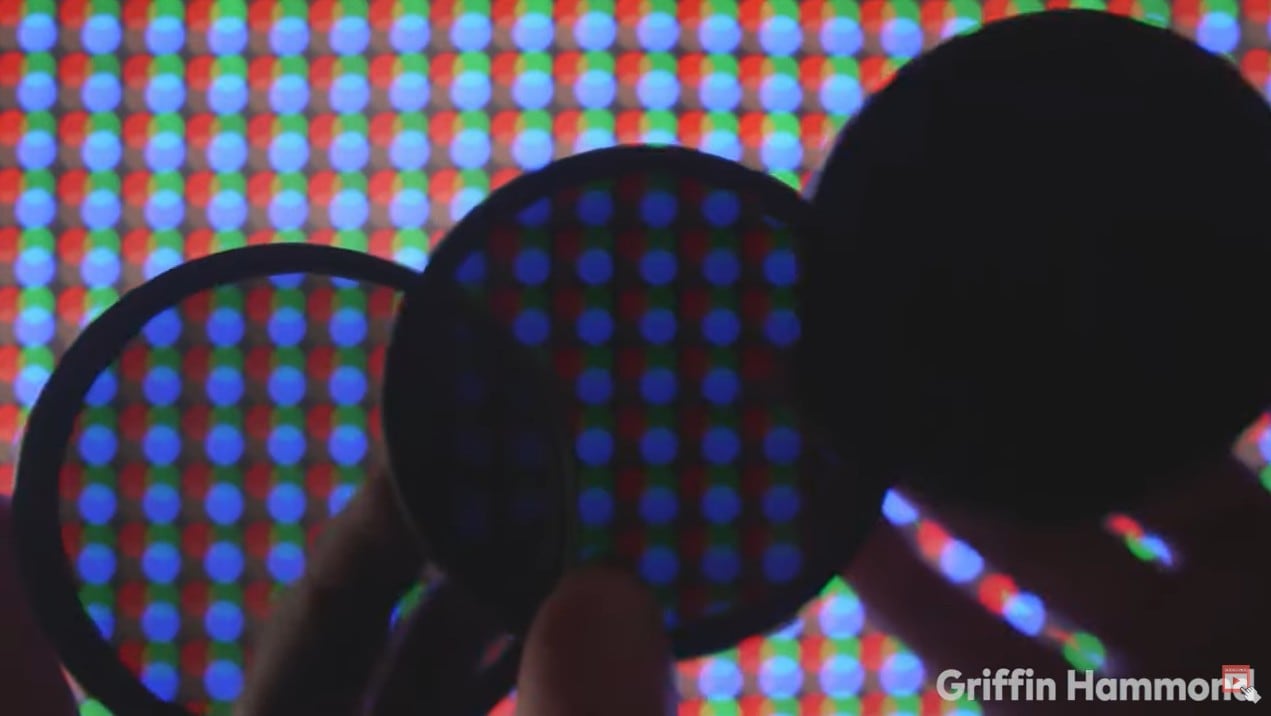
We use it outside so we can open our aperture to get nice blurry backgrounds without overexposing our footage.
2. Use a “flag” to block or shape the sunlight
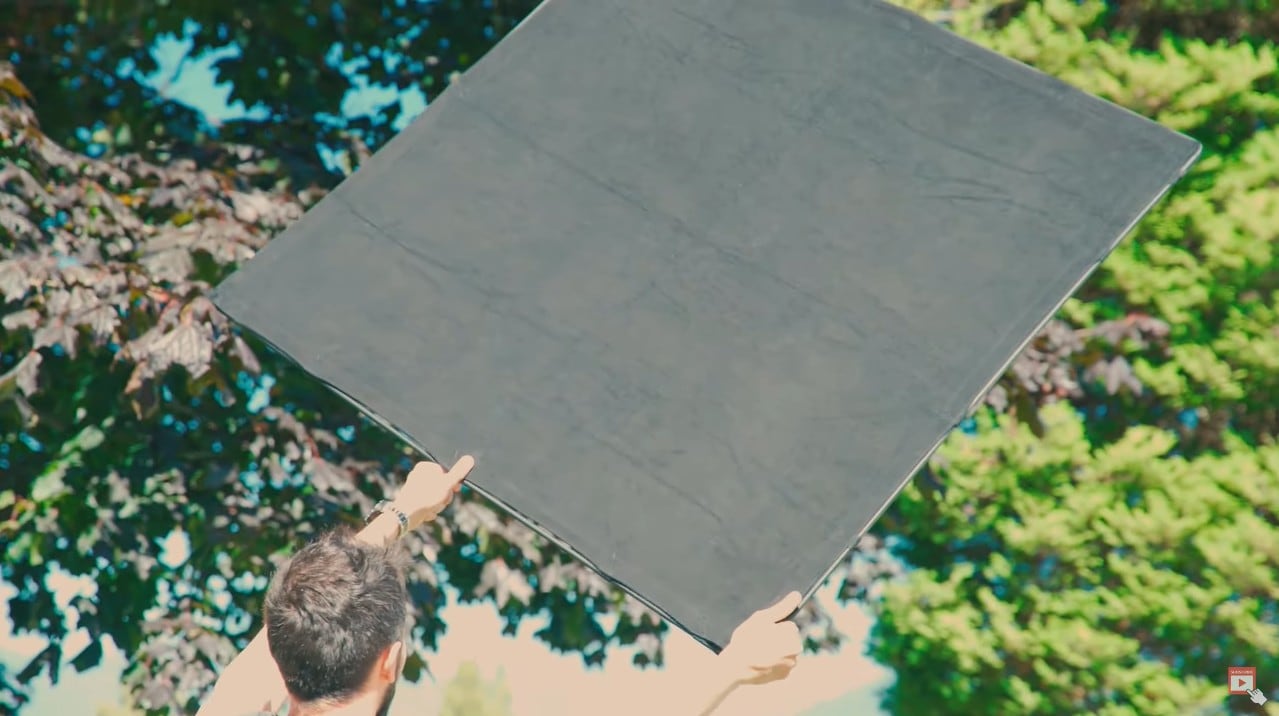
Using a black piece of poster board works perfectly fine, hold it up to the sun. Also, remember to angle your “flag” to create harsh lines or fully shade your talent.
3. Adjust your camera to fit the environment
For example, you can change the exposure of your camera to match the talent’s face giving a more silhouette look.
3) Back to the Sun
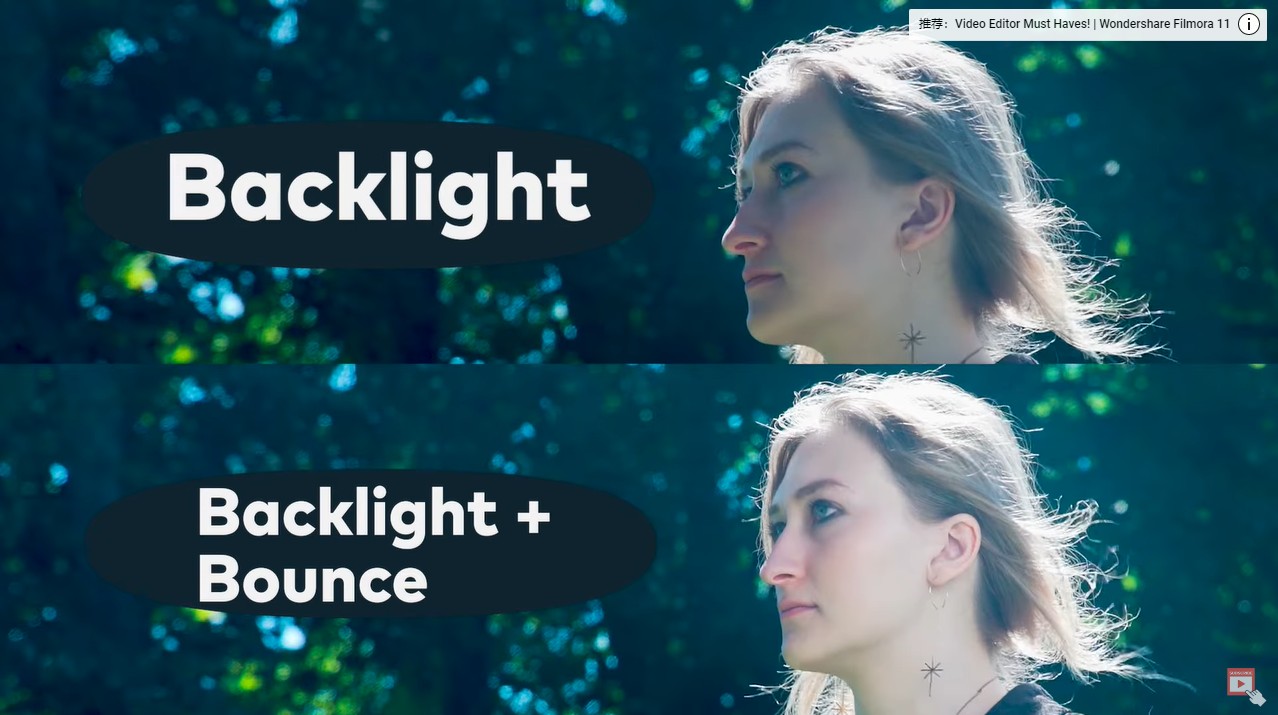
Have you ever been filming outside only to see your talent dark in the frame with the background blown out with light? To fix the problem, the simplest way is to use a “bounce”.
By using a “bounce”, we can reflect the light from the sun to our talent. Make sure to lift the bounce and move it around to get the right amount of light on your talent.
This should give us a nice look with the sun backlighting our subject and the bounce filling in the shadows and giving us soft light on our talent’s face!
4) Artificial lighting
If we want to control our lighting better, we will want to use artificial lights in combination with the sun.
For example, weather changes. As you shot, the sun will move and make lighting challenging to keep consistent.
In that case, we can use the flag technique that we used before to block the harsh sunlight and then use our lights on our talent’s face, this keeps our lighting more consistent than if we relied on just the natural light.
Now, take a look at the comparison with all the lighting conditions we create:
- Flag VS Flag & Light
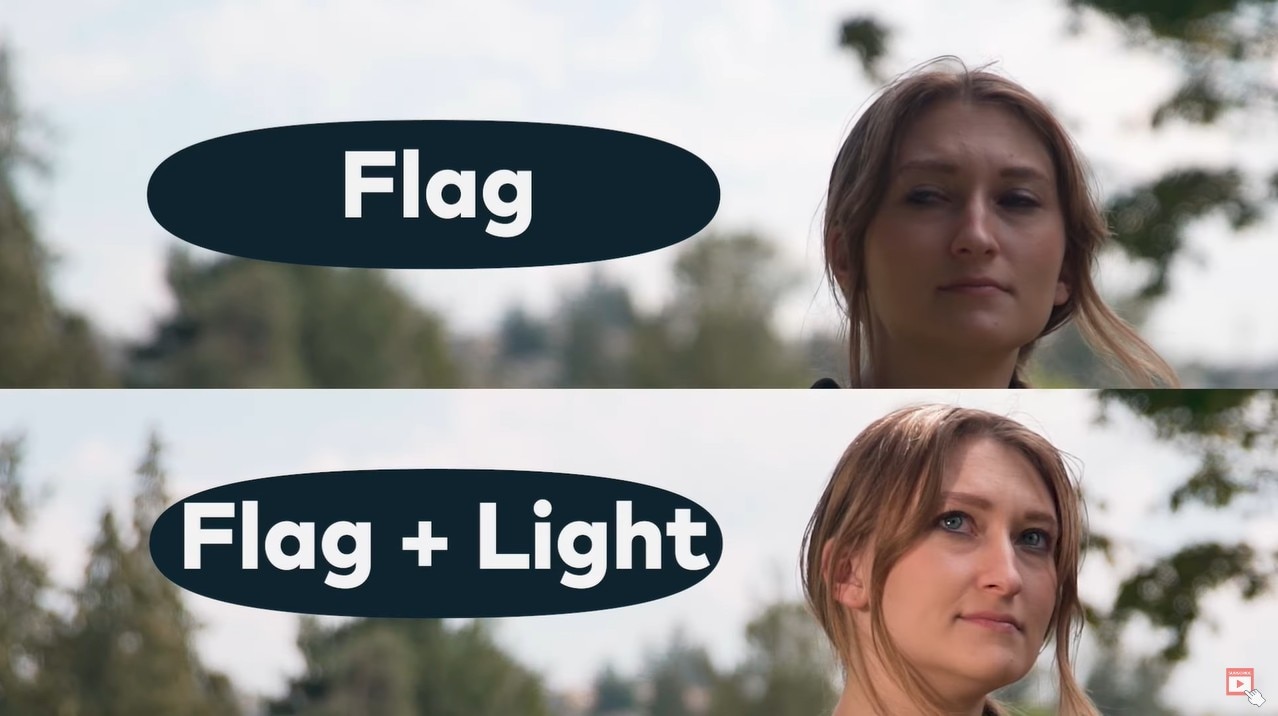
- Backlight VS Backlight & Bounce
Summary
If you shoot or film outdoors, you must learn how to cope with the unsteady natural light. Hope this article helps you with that and kindly leave your thoughts below.
Free Download For Win 7 or later(64-bit)
Free Download For macOS 10.14 or later
Free Download For macOS 10.14 or later
Level Up Videos By Applying Keyframe with Filmora
Everyone is fascinated by a video portraying creativity and effort in each frame. Your films can easily have this captivity through the keyframe feature. It provides you the accessibility to make even a simple, plain shot pace up, slow down, or pan across the screen.
Wondershare Filmora offers you a simple yet great experience of Keyframing. It has been the editors’ favorite feature for years. Under its Grow and Win Program, Filmora presents the Keyframe creativity contest. It is the ultimate solution for bringing captivity and precision to your shots.
Part 1. What is the Keyframe Feature?
A keyframe, also spelled “key frame,” defines any smooth transition’s beginning and conclusion. In the case of animation or film, or video, that something may be a drawing or a specific frame of a shot.
The keyframe feature creates room for boundless creativity. The Keyframe feature could imitate any illusive or fascinating impact, from object enlargement to magical power effects. A key frame is a frame that serves as a marker for the start or stop of a parameter change.
You could use a keyframe to mark the spot where the audio will have faded up or down to a specific volume.
Part 2. Where to Use The Keyframe Feature?
Editors and creators use keyframing for all kinds of stuff. These uses include:
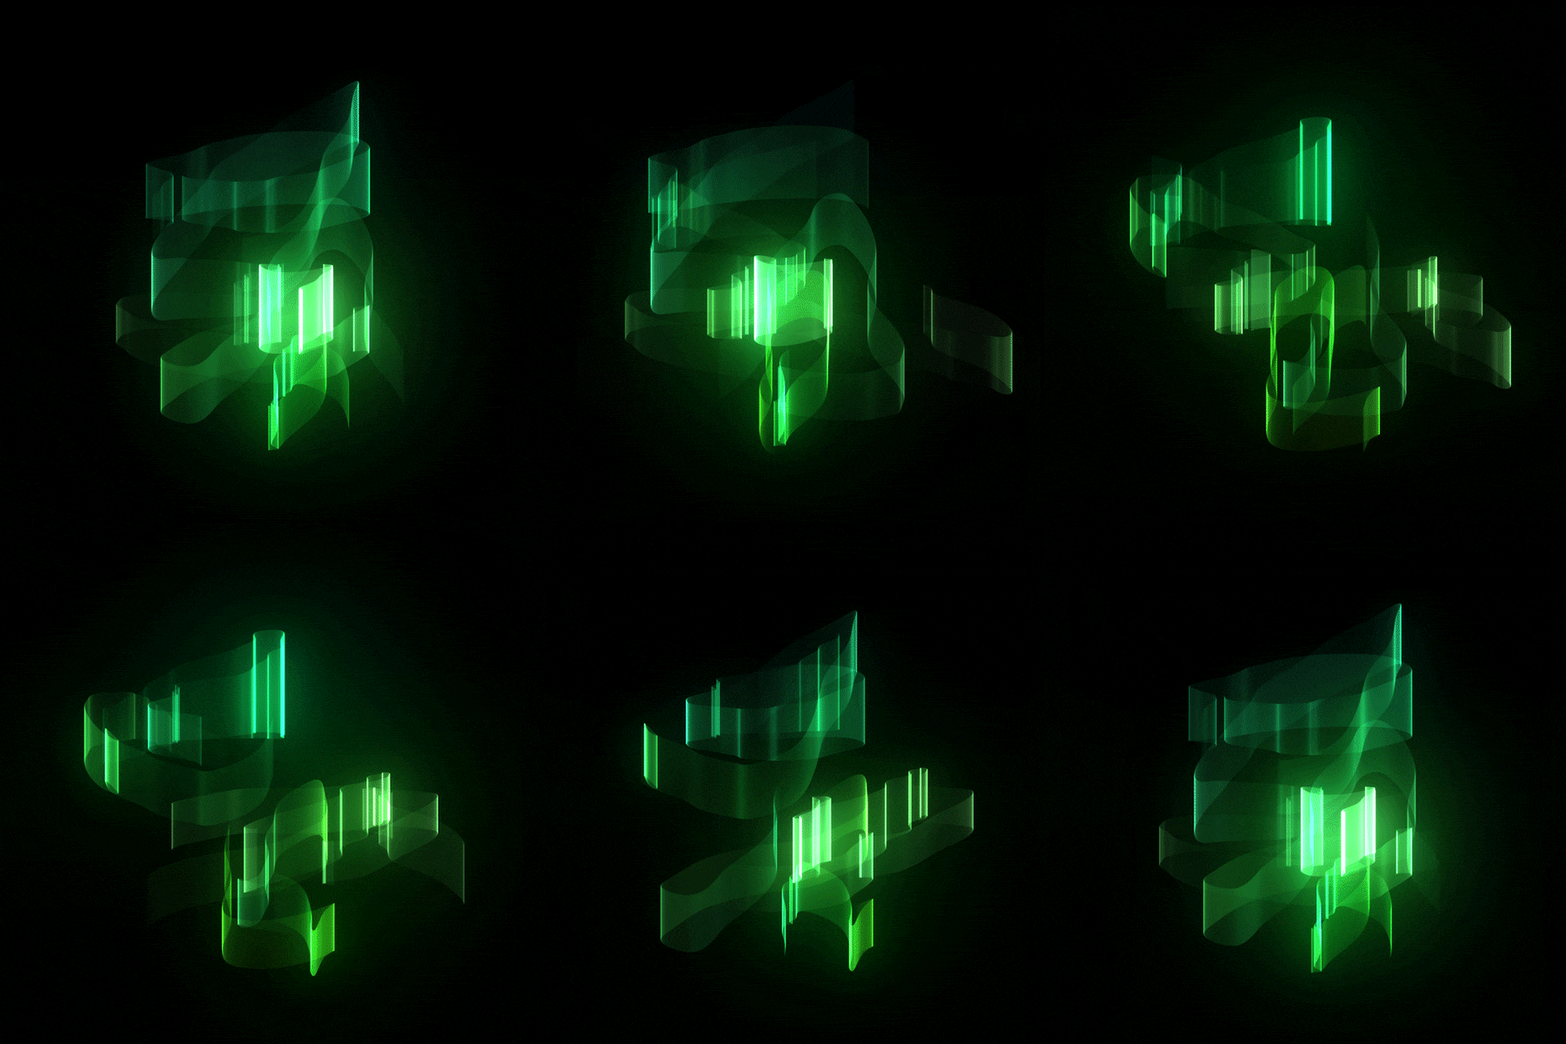
Animated Logo Intros
You can use the keyframe feature to create indigenous intros with animated logos. It helps the editors go for vlogging or tutorial videos.

Special Transparency Effects
Keyframing is famous for creating blended visuals through experimentation with the transparency of the clip.
Custom Picture-in-Picture Paths
We use the picture-in-picture effect in many editing formats, from tutorial videos to gaming streams and vlogs. Keyframing allows editors to execute the movement of the PIP as they wish. For instance, this video call was shot from a video.
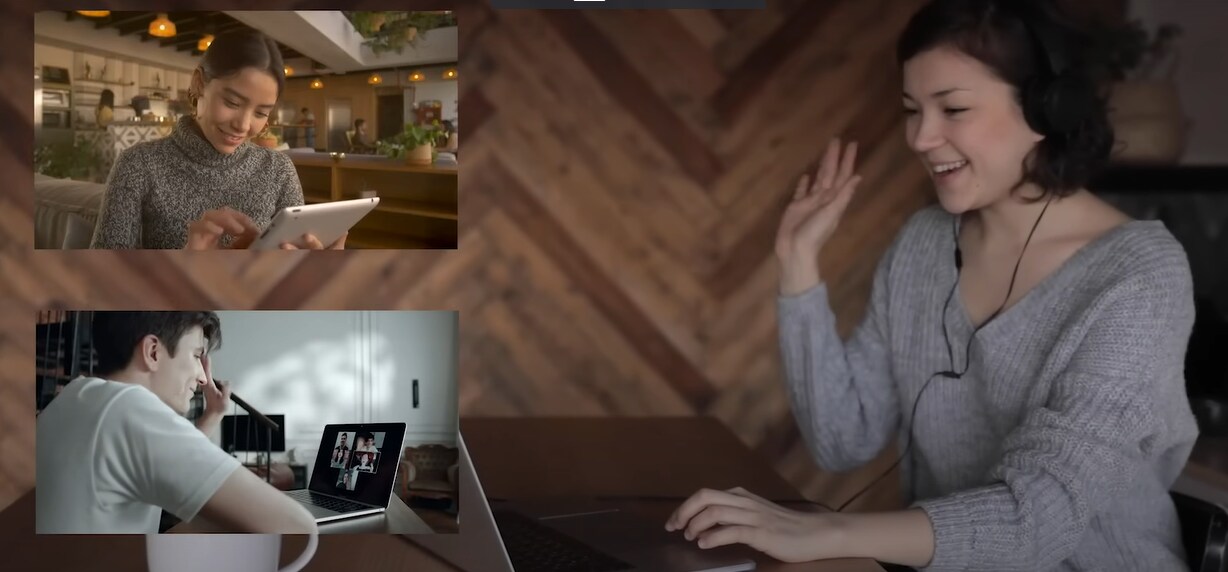
The picture will move across the screen between the 30-second and 1-minute marks if you indicate that it will be in the upper left corner of the screen at the 30-second timestamp of your video and the bottom right corner at the 1-minute timestamp.
Part 3. What Would You Need to Make a Keyframe Video
Let us share the procedure for making a video using the keyframe feature.
1. A Video Clip or Photos
For experimenting and creating with the keyframe feature, first, you would need high-quality video clips or images.
The high-resolution requirement is a prerequisite for the complete experience of all parameters of the keyframe feature. For example, the zooming and varying opacity effects you add might look bland and dull if the clip or image appears pixelated upon zooming and scaling.
2. Motion Elements
Keyframing allows for a vast area of creativity with motion elements that you can download online. The keyframe feature adds charm to these elements by playing with their orientation and scale.
3. An Advanced Editing Software
To utilize the keyframe feature, you need high-end video and animation editing software with an interactive and easy-to-use user interface and good accessibility options. So, what better choice than Filmora to use for this feature? To do the editing process on Filmora , follow the steps below and enjoy!
Free Download For Win 7 or later(64-bit)
Free Download For macOS 10.14 or later
Part 4. How to Make a Keyframe Video With Filmora
Filmora can be one of the best video editors to achieve the effect. It can personalize anything in detail. There is plenty of footage from its built-in stock media with unlimited resources. By using this platform for editing, your editing time hugely can be greatly reduced.
- The keyframe tool is efficient for adding beautiful animations to podcast videos.
- More than 2,000 audio resources, including music, audio effects, and more.
- Multiple clips can be edited more quickly with the shortcut key.
- Choose from over 1,000 video effects, including transitions, filters, titles, and many others, to spice up your keyframe videos.
There are many different ways you can use keyframes on Filmora. To learn the complete step-by-step instructions, continue reading. Here we explain three examples of how to use keyframing and how to use the tool in Filmora.
Step1 Install the Wondershare Filmora
Launch the most recent version of the software on your computer to produce an outstanding film. To do this, take the following actions.
- You must first download and open Wondershare Filmora on your PC or Mac.
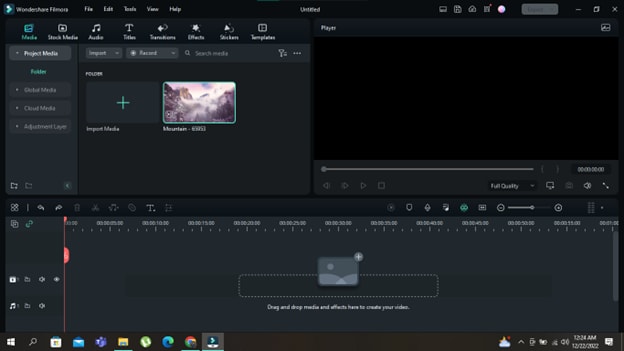
Step2 Import your Photos and Videos
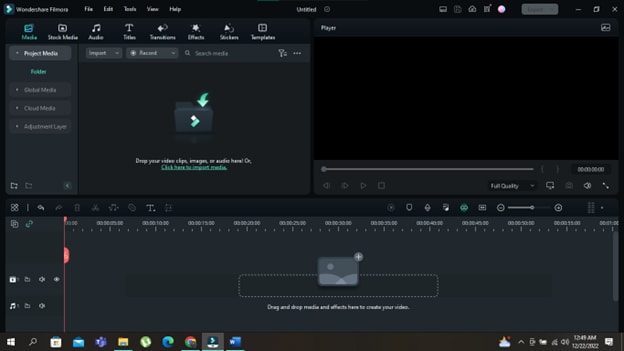
- When you open Wondershare Filmora, you will notice the main import window in the top left corner.
- Click in the center of the import window upon the import icon.
- After clicking, Wondershare Filmora will automatically direct you to your PC library.
- Browse to where your target Clips or Images are stored.
- Select all the objects you want to import.
- Click on Open, and you will have imported files.
Step3 Add your Photos and Videos to the Timeline
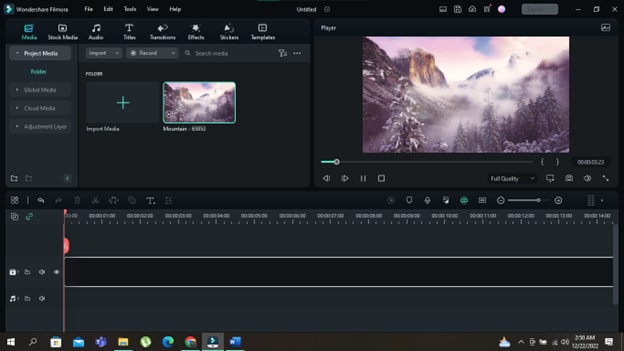
Your next step will be to add the imported videos and images to the timeline. When you have many videos and photos imported into the timeline, you can add them simultaneously.
Or you can also add them one by one wherever you need. To add an item to your timeline, follow the steps mentioned.
- Right-click on the photo or video you want to add to the timeline.
- Keep holding the right-click and drag it down to the timeline.
Step4 Adding Movement to your Shots
The next step would be to use the movement option in Keyframing, where you can pan and zoom a shot over a specified time. To do this, follow the bullet points below.
- After importing your clips to the timeline, double-click the clip to open the Editing Menu.
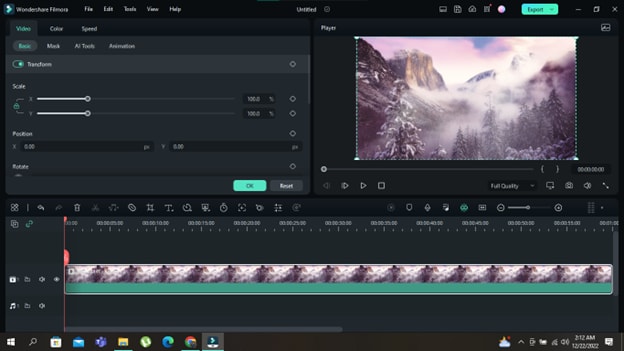
- Once opened, the editing menu will have a Basic tab; click it.
- Check the key-shaped button in front of the Transform button. It will create a Keyframe in the default form of your clip.
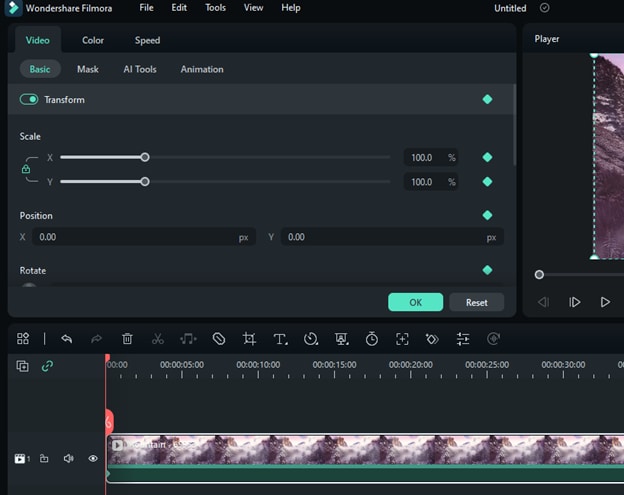
- You need to add a second keyframe at the end of the clip to create movement. First, move the timeline cursor to the end of the clip. Then, check the key-shaped button in front of the Transform button again for a second Keyframe.
- Now change the scale of the clip from the slider options in the Custom Animation
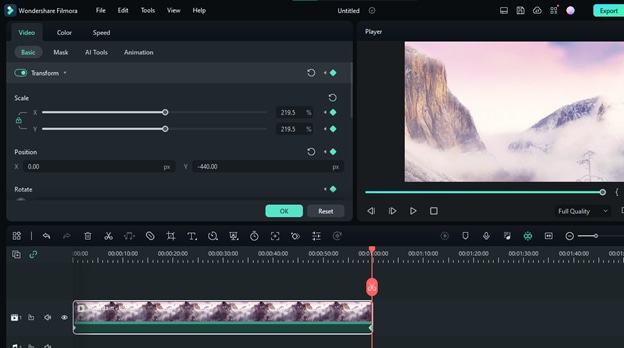
- Now play your clip, and you’ll see it zooms in and pans automatically to the state of the second keyframe over that timeline.

Step5 Adding Motion to your Shots
Keyframing can add motion to your project’s objects, clips, or images. To perform this in Filmora, follow these instructions:
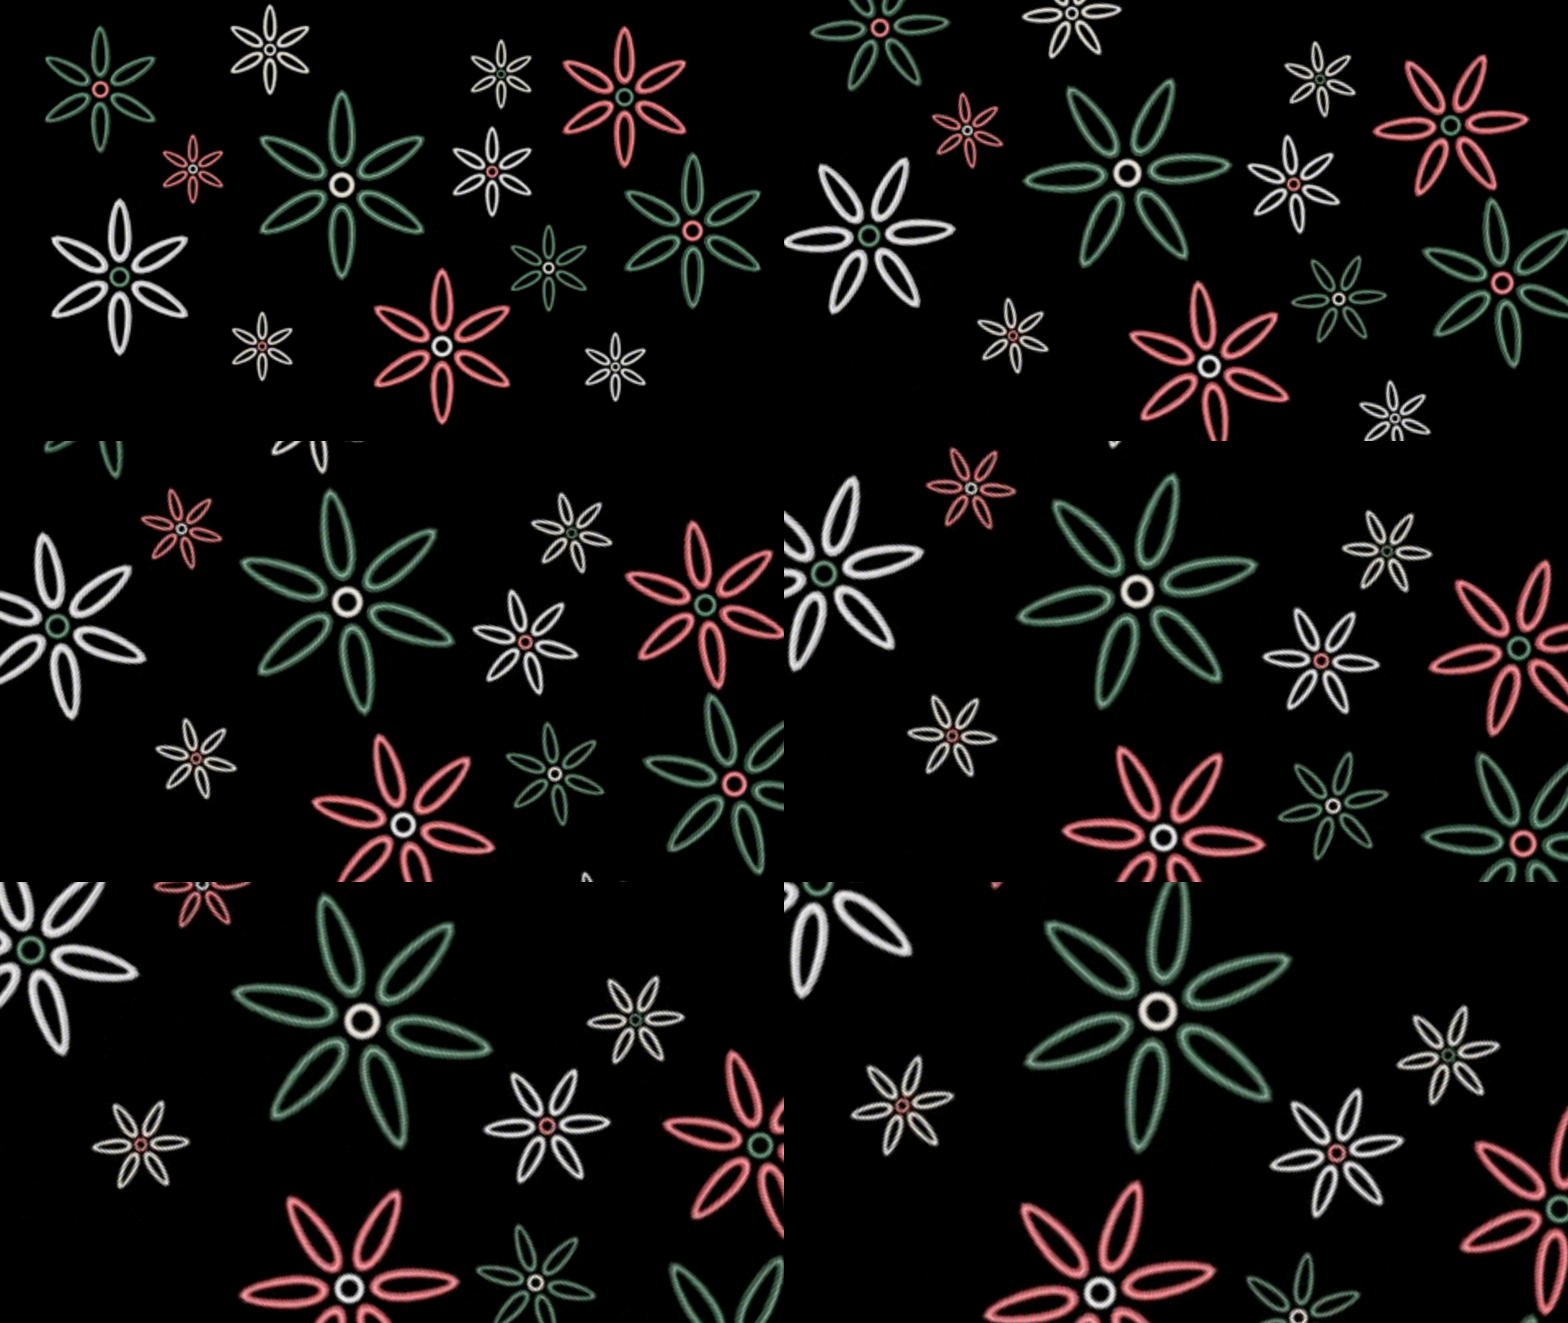
- Go to the Stock Media tab on the top left ribbon in Filmora and download some motion elements (videos/GIFs) from accessible outlets like the Flora GIF used here.
- After importing elements to the timeline, double-click the element to open the Editing Menu.
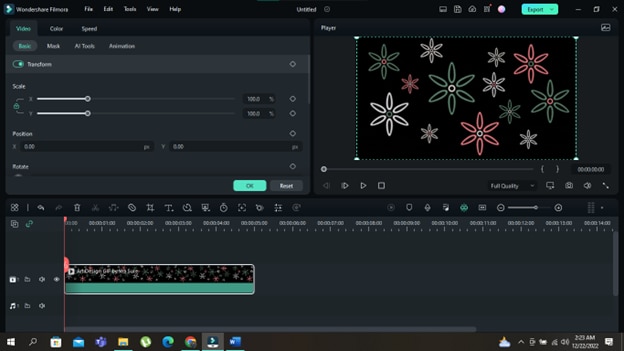
- Once opened, the editing menu will have a Basic tab; click
- Check the key-shaped button in the Basic Tab. It will create a Keyframe in the default form of your motion element.
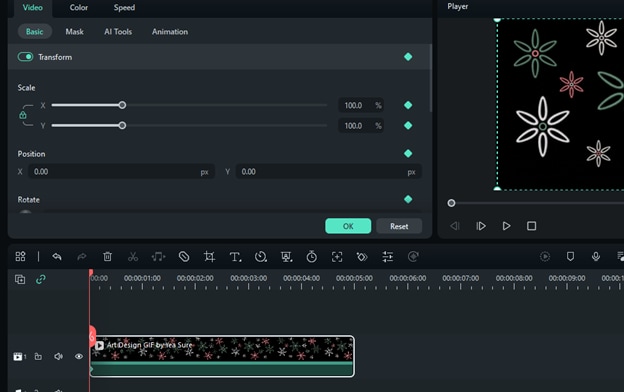
- Next, move it to the end of the clip, check the key-shaped button in front of the Transform button, and add another keyframe there, but this time, change its scale and rotation attributes as you like.
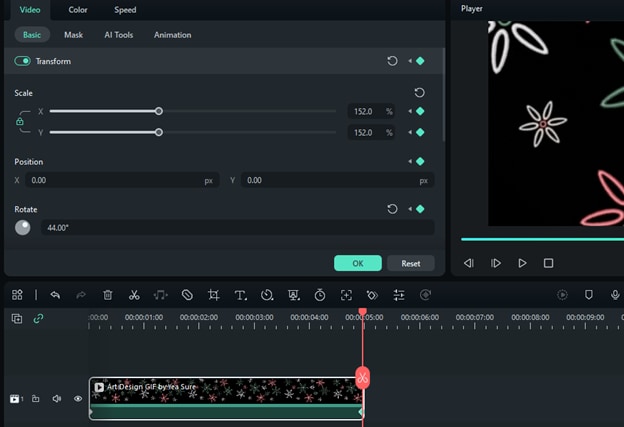
- Enter OK and play your clip to see the fantastic effect.
Step6 Keyframing Opacity
Keyframing allows creators to integrate variable opacity in their shots to instill a dramatic feel. This technique also helps create perfect fade-in and fade-out shots for your videos. Additionally, it is for theatrically dissolving shots too.
For an illustrated guide to keyframing opacity, keep on reading the following instructions:
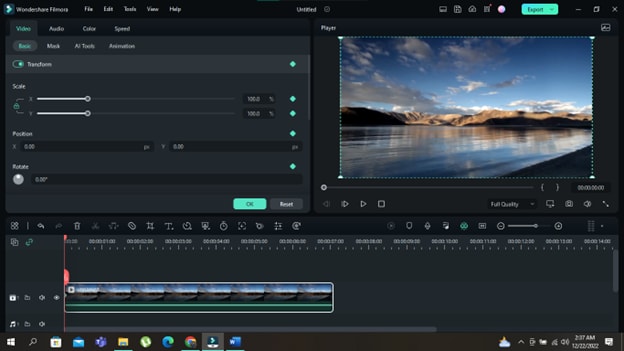
- Add a Keyframe to a clip on your timeline. For it, double-click the clip to open the Editing Menu, Then go to Basic Tab.
- Check the key-shaped button in front of the Transform button. It will create a Keyframe in the default form of your motion element.
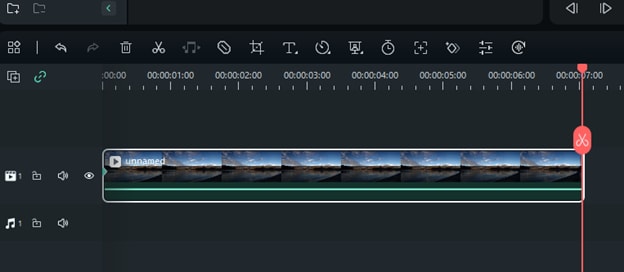
- Move the red cursor to the end of the clip.
- Next, add another keyframe, scroll down in the editing menu, and remove the opacity from the slider below the Bend Mode option.
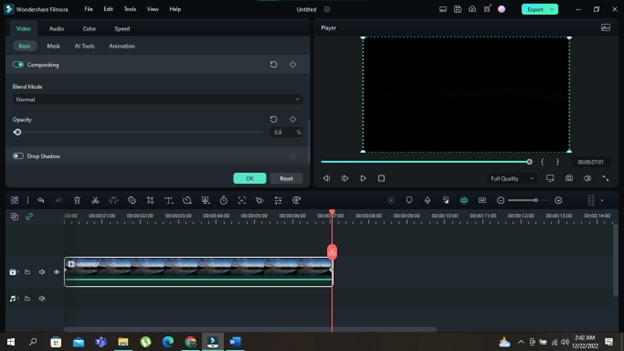
- That’s it; you have a theatrical variation of the clip’s visible opacity throughout the timeline.

Conclusion
On the whole, keyframing is all about creativity at your fingertips. When detailed effort becomes necessary, the keyframe feature is always there to save the day. This tool is a delight, from adding movement and motion to your playful and immersive shots to crafting a cinematic scene out of your films. This contest is your chance to show us how creative you can get with this beautiful feature. Good luck creating!
Free Download For macOS 10.14 or later
Part 4. How to Make a Keyframe Video With Filmora
Filmora can be one of the best video editors to achieve the effect. It can personalize anything in detail. There is plenty of footage from its built-in stock media with unlimited resources. By using this platform for editing, your editing time hugely can be greatly reduced.
- The keyframe tool is efficient for adding beautiful animations to podcast videos.
- More than 2,000 audio resources, including music, audio effects, and more.
- Multiple clips can be edited more quickly with the shortcut key.
- Choose from over 1,000 video effects, including transitions, filters, titles, and many others, to spice up your keyframe videos.
There are many different ways you can use keyframes on Filmora. To learn the complete step-by-step instructions, continue reading. Here we explain three examples of how to use keyframing and how to use the tool in Filmora.
Step1 Install the Wondershare Filmora
Launch the most recent version of the software on your computer to produce an outstanding film. To do this, take the following actions.
- You must first download and open Wondershare Filmora on your PC or Mac.

Step2 Import your Photos and Videos
- When you open Wondershare Filmora, you will notice the main import window in the top left corner.
- Click in the center of the import window upon the import icon.
- After clicking, Wondershare Filmora will automatically direct you to your PC library.
- Browse to where your target Clips or Images are stored.
- Select all the objects you want to import.
- Click on Open, and you will have imported files.

Step3 Add your Photos and Videos to the Timeline
Your next step will be to add the imported videos and images to the timeline. When you have many videos and photos imported into the timeline, you can add them simultaneously.
Or you can also add them one by one wherever you need. To add an item to your timeline, follow the steps mentioned.
- Right-click on the photo or video you want to add to the timeline.
- Keep holding the right-click and drag it down to the timeline.

Step4 Adding Movement to your Shots
The next step would be to use the movement option in Keyframing, where you can pan and zoom a shot over a specified time. To do this, follow the bullet points below.
- After importing your clips to the timeline, double-click the clip to open the Editing Menu.

- Once opened, the editing menu will have a Basic tab; click it.
- Check the key-shaped button in front of the Transform button. It will create a Keyframe in the default form of your clip.

- You need to add a second keyframe at the end of the clip to create movement. First, move the timeline cursor to the end of the clip. Then, check the key-shaped button in front of the Transform button again for a second Keyframe.
- Now change the scale of the clip from the slider options in the Custom Animation

- Now play your clip, and you’ll see it zooms in and pans automatically to the state of the second keyframe over that timeline.

Step5 Adding Motion to your Shots
Keyframing can add motion to your project’s objects, clips, or images. To perform this in Filmora, follow these instructions:
- Go to the Stock Media tab on the top left ribbon in Filmora and download some motion elements (videos/GIFs) from accessible outlets like the Flora GIF used here.
- After importing elements to the timeline, double-click the element to open the Editing Menu.

- Once opened, the editing menu will have a Basic tab; click
- Check the key-shaped button in the Basic Tab. It will create a Keyframe in the default form of your motion element.

- Next, move it to the end of the clip, check the key-shaped button in front of the Transform button, and add another keyframe there, but this time, change its scale and rotation attributes as you like.

- Enter OK and play your clip to see the fantastic effect.

Step6 Keyframing Opacity
Keyframing allows creators to integrate variable opacity in their shots to instill a dramatic feel. This technique also helps create perfect fade-in and fade-out shots for your videos. Additionally, it is for theatrically dissolving shots too.
For an illustrated guide to keyframing opacity, keep on reading the following instructions:
- Add a Keyframe to a clip on your timeline. For it, double-click the clip to open the Editing Menu, Then go to Basic Tab.
- Check the key-shaped button in front of the Transform button. It will create a Keyframe in the default form of your motion element.

- Move the red cursor to the end of the clip.

- Next, add another keyframe, scroll down in the editing menu, and remove the opacity from the slider below the Bend Mode option.

- That’s it; you have a theatrical variation of the clip’s visible opacity throughout the timeline.

Conclusion
On the whole, keyframing is all about creativity at your fingertips. When detailed effort becomes necessary, the keyframe feature is always there to save the day. This tool is a delight, from adding movement and motion to your playful and immersive shots to crafting a cinematic scene out of your films. This contest is your chance to show us how creative you can get with this beautiful feature. Good luck creating!
Leveraging the Vectorscope for Better Color Correction in Premiere Pro
Our eyes process colors differently. When two people look at the same picture, they may see different shades of colors. In post-production, Vectorscopes help to color grade and make sure you get your images exactly right. This means that you will process the exact color that you want across devices. Premiere Vectorscope is a great choice for anyone looking to correct and grade colors. Using Vectorscope Premiere allows you to get quantitative data about your image for a more accurate assessment of colors within the film. In this article, we explore what comprises Premiere Pro Vectorscope and how to use them in video editing.
Color Correction Editor An easy-to-use video editor helps you make color correction and color grading experience for videos!
Free Download Use Vectorscope in Filmora Try Color Correction

Part 1. Vectorscope: What is It and How to Read
Vectorscopes provide a great post-production way for color correction. It is video scope that provides greater data about the color properties of an image. Another way to look at it is that a Vectorscope is a circular graph, which monitors the following information of an image. By looking at it, you can measure saturation outward from the center while hue is measured in a circular pattern.
The Vectorscope contains markings indicating the degree of saturation and hue in an image. The distance of the markings from the center indicates how saturated the color is in your image. In simple terms, the further the markings, the more saturated the color. The two main options of Vectorscope are HLS and YUV. The HLS displays the hue, lightness, saturation, and signal information at a glance. On the other hand, the YUV mode contains several color boxes, giving accurate levels of hue and saturation.
Vectorscopes are useful to filmmakers and editors to ensure greater conformity in a film as they transition from one shot to the next. When the camera captures an image with too much saturation, using a Vectorscope helps to reduce the said saturation. This makes Vectorscope a useful feature for color correction and color grading. Color correction involves altering the colors of an image within a film to provide consistency and tone for the film. On the other hand, color grading is more like a supercharged version of color correction. It refers to altering a film so that it matches a tone or theme. Since the two, grading and correction are important, more video editing will use a combination of both.
How to Read a Vectorscope
Learning how to read a Vectorscope will make your video editing fun and easier. The best way is to view the Vectorscope in relation to the color wheel. When using Premiere Vectorscope, the colors are nicely labeled for anyone to understand. You only need to understand the primary colors of saturation and hue to accurately read a Vectorscope.
The hue color is the direction to which the marketer points. For instance, a marker pointing toward the boxes labeled “R” indicates that the hue is predominantly red. On the other hand, the saturation correlates to the length of the marker. The image is more saturated when the marker is furthest from the center of the wheel.
Keep note of the two boxes in each main color. The box that is close to the center indicates 75%, and you will normally avoid the marker extending beyond this first box. Any marketer that extends beyond this is known as non-broadcast safe or illegal colors. Although you may need to go beyond the first box in some projects for stylistic reasons, the general rule of thumb is to avoid that.
Without proper calibration, your images may end up looking too red or too blue. They will not look natural at all and will affect the overall quality of your video. Therefore, using the features within the vectorsope will help you color-grade your images to perfection.
Part 2. Vectorscope in Premiere Pro : A Brief Guide
Just like many other video editing software, Adobe Premiere Pro offers Vectorscope to help in post-production. The best way to look at Vectorscope in Premiere Pro is to use the Color Correction workspace. Once you have launched the software, Click Window, followed by Workspace, and then Color Correction. Access the reference monitor directly to deliver the program.
The reference monitor will first display composite video. Clicking on the setting icon allows you to access the panel and choose the video scope you want to use. Now, this is how you use the Vectorscope in Premiere Pro:
1. Reading a Vectorscope on Premiere Pro
A Vectorscope is similar to a color wheel. It displays colors in the same places as the wheel, with cyan to the bottom right and red to the top left. When you see a dot or line in the Vectorscope, you can tell it is giving you information about the color or chrominance of a shot. Essentially, this information is the hue (specific color) and the saturation (the strength of that hue).
As you examine the Vectorscope, you get to see how strong a particular color is by the length of the line from the center of the wheel. A longer line indicates that the color is more saturated. However, all Vectorscopes have small color targets. The Vectorscope points are lined with a drop-down used to read the scope. The default is set to 75%, which is a good limit for a typical broadcast system.
2. Adjusting Skin Tones
A commonly used feature of the Premier Pro Vectorscope is the Skin Tone Line. With this feature, you get the line on the scope between the Yellow and the Red sections at about 10.30 or 11 o’clock position.
The Vectorscope skin tone line represents the color of blood flowing through the skin. You can use this line to check the accuracy of skin tone color representation regardless of the ethnicity of the person you’re filming. In particular, video images are more accurate
The major problem is figuring out how to look at skin tones in a shot with many other colors. With the skin tons line in Premiere Pro, color correction becomes easy and quick. You only need to use a garbage matte, which is found under video effects then keying. Adjust the points so that they cover the skin of the person on the shot, then look at the Premiere Pro Vectorscope to see your end results.
Part 3. How to Use Vectorscope in Filmora : Step-by-Step Guide
The choice of video editing software can have an impact on how well you use your Vectorscopes. Wondershare Filmora is a great choice for anyone who wants to achieve great results with their videos. The versatile video editing software offers four types of video scopes, including the Vectorscope. This gives you more flexibility in video editing and achieving accurate results in color correction and grading. With the recent V13, you also get access to a range of AI features that make video editing quicker and easier.
Free Download For Win 7 or later(64-bit)
Free Download For macOS 10.14 or later
Access Vectorscope on Filmora
Accessing Vectorscope in Filmora is straightforward. As part of the four available video scopes, Filmora has made it easy to use Vectorscope during video editing. Here is a step-by-step guide to follow:
Step 1Create a New Project on Filmora
Once you have downloaded and installed the Filmora software on your desktop, launch it and click Create a New Project.
Step 2Access Video Scopes
After starting a new project, head to the top right corner of the main interface. Click on the Video Scope button to launch the video scope bar on the preview screen.
Step 3Customize Video Scopes Layout Bar
Customizing the layout of the video scope bar allows you to have more freedom in using the feature. You have the option to choose from four layouts or expand the button to display the video scope’s name. The purpose of this step is to modify the display option of the video scopes, allowing you to have a clear view of what you are editing.
Step 4Manage the Vectorscope as Desired
On the preview screen, choose the Vectorscope option. This video scope allows you to define the skin tone indication for better color grading and correction.
Step 5Change Other Video Scopes
To achieve more accurate and better results, explore the other video scopes in the same window. View the color changes in your image through parade, histogram, and waveform video scopes. You can also change the color channels to view specific color changes across the video.
Conclusion
Vectorscopes are great for post-production color correction. Although lesser-known features to many people, they are widely used in video production. They ensure that the colors in your video are consistent across all clips or shots of your film. Since filming will often involve different shots and settings, we recommend using Wondershare Filmora for your video editing. It comes with an easy-to-use Vectorscope and other video scopes that help you achieve great results with color correction and grading.
Free Download Use Vectorscope in Filmora Try Color Correction

Part 1. Vectorscope: What is It and How to Read
Vectorscopes provide a great post-production way for color correction. It is video scope that provides greater data about the color properties of an image. Another way to look at it is that a Vectorscope is a circular graph, which monitors the following information of an image. By looking at it, you can measure saturation outward from the center while hue is measured in a circular pattern.
The Vectorscope contains markings indicating the degree of saturation and hue in an image. The distance of the markings from the center indicates how saturated the color is in your image. In simple terms, the further the markings, the more saturated the color. The two main options of Vectorscope are HLS and YUV. The HLS displays the hue, lightness, saturation, and signal information at a glance. On the other hand, the YUV mode contains several color boxes, giving accurate levels of hue and saturation.
Vectorscopes are useful to filmmakers and editors to ensure greater conformity in a film as they transition from one shot to the next. When the camera captures an image with too much saturation, using a Vectorscope helps to reduce the said saturation. This makes Vectorscope a useful feature for color correction and color grading. Color correction involves altering the colors of an image within a film to provide consistency and tone for the film. On the other hand, color grading is more like a supercharged version of color correction. It refers to altering a film so that it matches a tone or theme. Since the two, grading and correction are important, more video editing will use a combination of both.
How to Read a Vectorscope
Learning how to read a Vectorscope will make your video editing fun and easier. The best way is to view the Vectorscope in relation to the color wheel. When using Premiere Vectorscope, the colors are nicely labeled for anyone to understand. You only need to understand the primary colors of saturation and hue to accurately read a Vectorscope.
The hue color is the direction to which the marketer points. For instance, a marker pointing toward the boxes labeled “R” indicates that the hue is predominantly red. On the other hand, the saturation correlates to the length of the marker. The image is more saturated when the marker is furthest from the center of the wheel.
Keep note of the two boxes in each main color. The box that is close to the center indicates 75%, and you will normally avoid the marker extending beyond this first box. Any marketer that extends beyond this is known as non-broadcast safe or illegal colors. Although you may need to go beyond the first box in some projects for stylistic reasons, the general rule of thumb is to avoid that.
Without proper calibration, your images may end up looking too red or too blue. They will not look natural at all and will affect the overall quality of your video. Therefore, using the features within the vectorsope will help you color-grade your images to perfection.
Part 2. Vectorscope in Premiere Pro : A Brief Guide
Just like many other video editing software, Adobe Premiere Pro offers Vectorscope to help in post-production. The best way to look at Vectorscope in Premiere Pro is to use the Color Correction workspace. Once you have launched the software, Click Window, followed by Workspace, and then Color Correction. Access the reference monitor directly to deliver the program.
The reference monitor will first display composite video. Clicking on the setting icon allows you to access the panel and choose the video scope you want to use. Now, this is how you use the Vectorscope in Premiere Pro:
1. Reading a Vectorscope on Premiere Pro
A Vectorscope is similar to a color wheel. It displays colors in the same places as the wheel, with cyan to the bottom right and red to the top left. When you see a dot or line in the Vectorscope, you can tell it is giving you information about the color or chrominance of a shot. Essentially, this information is the hue (specific color) and the saturation (the strength of that hue).
As you examine the Vectorscope, you get to see how strong a particular color is by the length of the line from the center of the wheel. A longer line indicates that the color is more saturated. However, all Vectorscopes have small color targets. The Vectorscope points are lined with a drop-down used to read the scope. The default is set to 75%, which is a good limit for a typical broadcast system.
2. Adjusting Skin Tones
A commonly used feature of the Premier Pro Vectorscope is the Skin Tone Line. With this feature, you get the line on the scope between the Yellow and the Red sections at about 10.30 or 11 o’clock position.
The Vectorscope skin tone line represents the color of blood flowing through the skin. You can use this line to check the accuracy of skin tone color representation regardless of the ethnicity of the person you’re filming. In particular, video images are more accurate
The major problem is figuring out how to look at skin tones in a shot with many other colors. With the skin tons line in Premiere Pro, color correction becomes easy and quick. You only need to use a garbage matte, which is found under video effects then keying. Adjust the points so that they cover the skin of the person on the shot, then look at the Premiere Pro Vectorscope to see your end results.
Part 3. How to Use Vectorscope in Filmora : Step-by-Step Guide
The choice of video editing software can have an impact on how well you use your Vectorscopes. Wondershare Filmora is a great choice for anyone who wants to achieve great results with their videos. The versatile video editing software offers four types of video scopes, including the Vectorscope. This gives you more flexibility in video editing and achieving accurate results in color correction and grading. With the recent V13, you also get access to a range of AI features that make video editing quicker and easier.
Free Download For Win 7 or later(64-bit)
Free Download For macOS 10.14 or later
Access Vectorscope on Filmora
Accessing Vectorscope in Filmora is straightforward. As part of the four available video scopes, Filmora has made it easy to use Vectorscope during video editing. Here is a step-by-step guide to follow:
Step 1Create a New Project on Filmora
Once you have downloaded and installed the Filmora software on your desktop, launch it and click Create a New Project.
Step 2Access Video Scopes
After starting a new project, head to the top right corner of the main interface. Click on the Video Scope button to launch the video scope bar on the preview screen.
Step 3Customize Video Scopes Layout Bar
Customizing the layout of the video scope bar allows you to have more freedom in using the feature. You have the option to choose from four layouts or expand the button to display the video scope’s name. The purpose of this step is to modify the display option of the video scopes, allowing you to have a clear view of what you are editing.
Step 4Manage the Vectorscope as Desired
On the preview screen, choose the Vectorscope option. This video scope allows you to define the skin tone indication for better color grading and correction.
Step 5Change Other Video Scopes
To achieve more accurate and better results, explore the other video scopes in the same window. View the color changes in your image through parade, histogram, and waveform video scopes. You can also change the color channels to view specific color changes across the video.
Conclusion
Vectorscopes are great for post-production color correction. Although lesser-known features to many people, they are widely used in video production. They ensure that the colors in your video are consistent across all clips or shots of your film. Since filming will often involve different shots and settings, we recommend using Wondershare Filmora for your video editing. It comes with an easy-to-use Vectorscope and other video scopes that help you achieve great results with color correction and grading.
Also read:
- [New] In 2024, Peak Creative Synopsis Thorough Studio Review for the Year 2023
- 2024 最佳免費 DVD 播放器軟件選擇 - Windows 11/10相容性比較
- 2024 Approved Learn How to Create a Kinetic Typography Text Effect in Filmora, One of the Best Video Editors for All Skill Levels. Check Out This Simple Step-by-Step Guide
- How To Transfer Data From Apple iPhone 14 Pro Max To Other iPhone 14 devices? | Dr.fone
- In 2024, How to Create A Freeze Frame Sequence in Video
- In 2024, How to Zoom Video in VLC Media Player
- In 2024, Top 10 Sites to Download Copyright-Free Meditation Music
- In 2024, Top Must-Know Elements About YouTube TV Subscription
- New Guide To Using Luts Perfectly in Final Cut Pro for 2024
- New The Premiere Pro Video Templates Help Make Original Content of Broadcast Quality. The Article Introduces 10 Free Premiere Pro Templates that Are Sure to Make Your Life Easy
- New Whatre the Best Alternatives to Pexels?
- The 5 Best Places to Find Freelance Work
- Top 16 from Honor Magic 6 Lite to Other Android Devices Data Transfer Apps to Switch Phone Easily | Dr.fone
- Updated Guide To Cropping and Combining Content in Wondershare Filmora Latest for 2024
- Xmas Cheer: Present Wrapped in MS Store Delights
- Title: In 2024, How to Put a Filter on a Video in iMovie
- Author: Chloe
- Created at : 2025-01-18 04:23:36
- Updated at : 2025-01-24 04:21:42
- Link: https://ai-editing-video.techidaily.com/in-2024-how-to-put-a-filter-on-a-video-in-imovie/
- License: This work is licensed under CC BY-NC-SA 4.0.


