:max_bytes(150000):strip_icc():format(webp)/sony-ps5-d3975e63d2ff47e6ac4e81768b79801c.jpg)
New 5 Tips for Faster Editing in Filmora

5 Tips for Faster Editing in Filmora
It’s an indisputable fact that editing is an essential aspect of video creation, and it’s what brings your initial idea to life. However, it can be very daunting and time-consuming, especially when working on a video project containing lots of footage.
In this post, we will walk you through the five best tips that can come in handy to operate fast and smoothly while editing videos of any size. All you just need is the Filmora video editor. You don’t even require technical knowledge.
1. Organize your Media
Since a video project usually has various elements, keeping track of them can take a lot of work. So, the first editing step should be to organize the files so that it is easy to follow them. To do that, you need to do the following;
Create a Folder for Each Media File in your Project
Creating folders involves sorting your video files into various categories, thus making it easy for you to look into specific files and find the missing ones quickly when you need them. For example, you can create a folder for A roll, B roll, Photos, Audio, Sound FX, Music, and Drone Footage. Follow the steps below to see how you can use Filmora to create a folder for each file in your video project;
Step1 Launch Filmora and click Create Project.
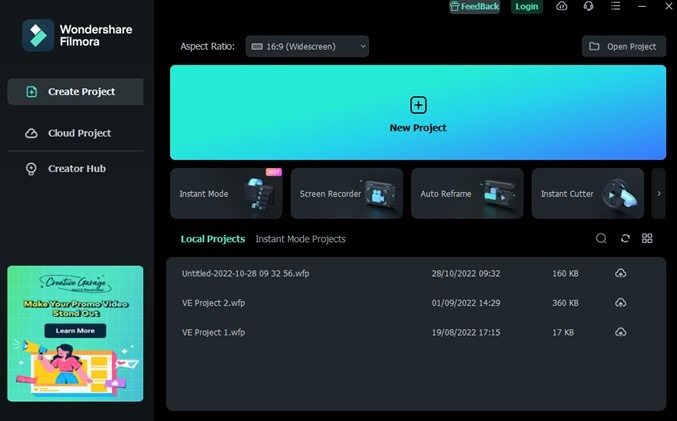
Step2 Navigate to the bottom left corner before the Timeline > click the Folder icon from there, as shown in the image below;
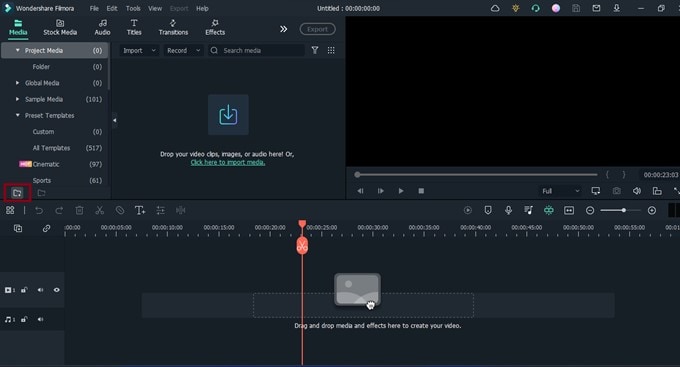
Step3 Click on the folder icon until you reach the total number of folders you need to categorize your video files.
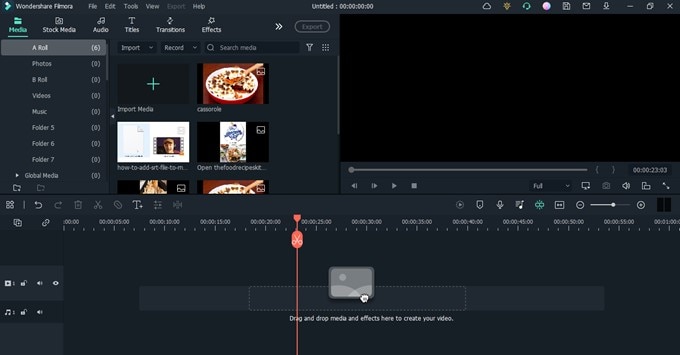
Right-click on each folder and name it accordingly.

After you name each folder, use the Import button to upload each video files you need to edit your video.
![]()
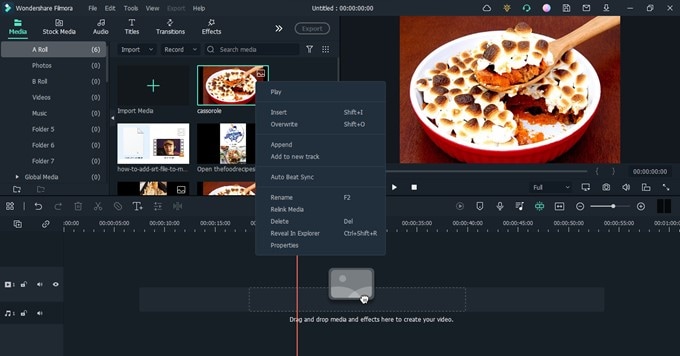
Note: since the media files you import into your project get the name associated with the code given by the source, it becomes hard to capture a specific file while editing. You need to rename each of the elements you imported for easier access.
Step4 Rename all imported files. To rename your imported files, right-click on them to add a preferred name. Then, click Rename from the pop-up list to name the files.
2. The Use of Proxies
Another tip that enhances a quick editing process is the use of proxies. Proxies can be described as low-resolution versions of your video files. So, if you’re working on video files that drag back playback speed, like 4K footage, you can create a proxy to enable your PC to handle the file seamlessly.
A tool like Filmora editor can help create proxies of your video file flawlessly. You just have to follow the steps below;
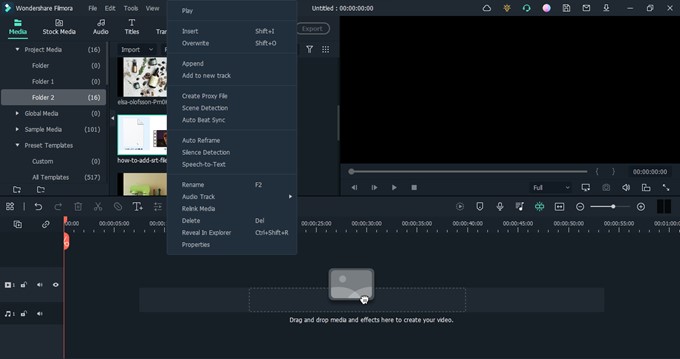
Step1 Locate the large video file you imported to Filmora and right-click it. Then, select Create Proxy File.
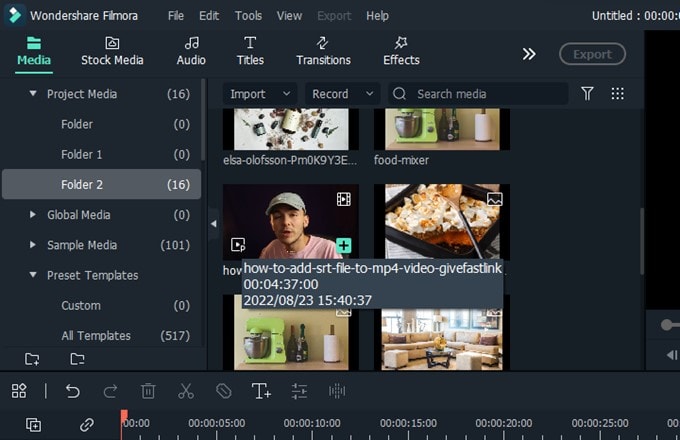
Step2 You should see the proxy icon at the bottom right corner of your video once it completes. This takes only a few minutes.
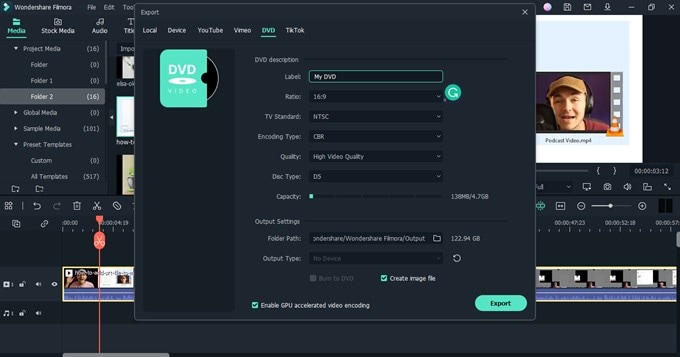
Step3 Drag-n-drop the video to the timeline and perform the necessary editing. Afterward, use the Export button to save the file to your PC.
3. Keep Your Videos and Audio Tracks Organized
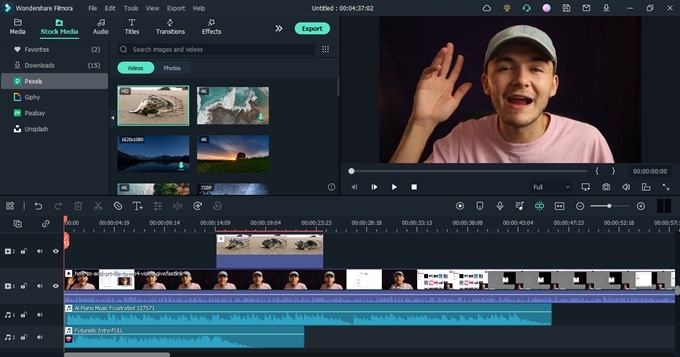
This is similar to our first tip, and fortunately, the Filmora video editor facilitates this kind of operation quickly and easily. It involves organizing video and audio clips in the timeline while editing. For instance, use video track #1 for graphics or text, #2 for your B roll, and #1 for the main footage taken.
You will also do the same for Audio, for instance, Audio track #1 for music, Audio track #2 for dialogues, and many more. This will allow you to edit various clips simultaneously, making the editing process faster and easier. Here are the steps to use this tip;
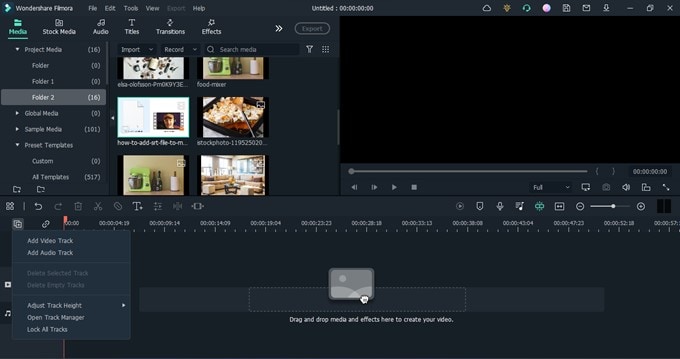
Step1 Click on the Add icon at the left side of the Timeline and select Add Video Track or Add Audio Track to add more timelines for your clips.
Step2 Drag-n-drop the video clips and audio clips to the relevant timeline.
4. Keyboard Shortcuts
These are commands on the keyboard of your pc that will enable you to edit your projects easily and quickly. Various options can be available by keying in specific orders rather than going through a long process using the mouse. This knowledge can be a real time-saver when handling projects. To get more enlightened on the setup in Filmora, follow the steps outlined below;
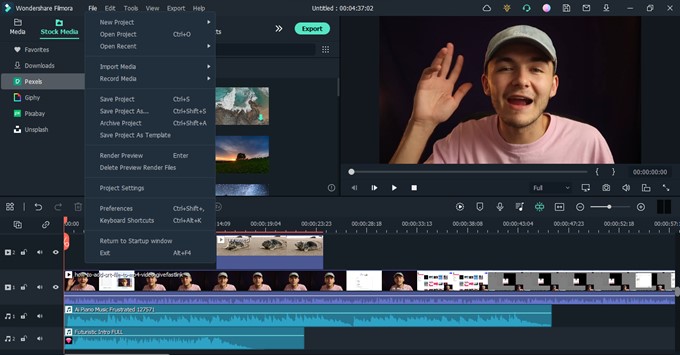
Step1 Open Filmora and click File from the top side.
Step2 Select Keyboard Shortcuts from the drop-down list.
Step3 The new pop-up window on your PC screen will display all shortcuts you can employ while using Filmora, and the interesting part is that you can customize the shortcut keys to your preference. Moreover, you can freely switch keyboard shortcuts between Filmora, Adobe Premiere Pro, and Final Cut Pro.
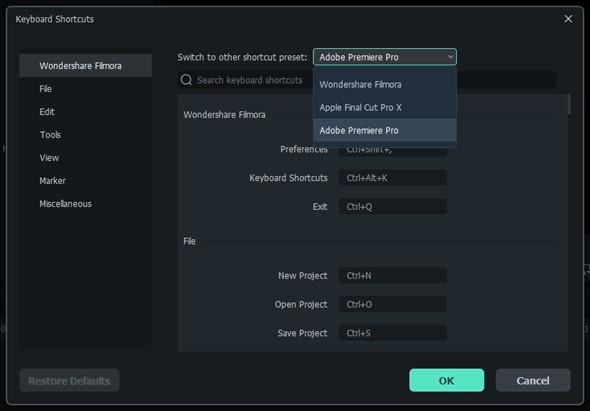
Step4 For clicking CTRL+ALT+N will allow you to create a new folder for your file.
5. Edit in Stages
Our final tip is to edit in stages. Yes, it is necessary to edit in stages when dealing with editing work. This helps to limit the time you spend on a project. In the beginning, you should do a rough cut. You can begin by editing the A roll at first and then move on to edit the B roll, moving on to the Sound FX, Music, Graphics, and Color Correction, and then reviewing the entire project before exporting it.
In case while editing the A roll, you find something that requires a quick fix in its audio, focus on it and, if possible, use a marker icon to describe it. This will help you not get confused once you get to the Audio stage. See the steps to use Filmora to do this below;
Step1 Firstly, focus on your video footage. Move them to the required timeline.
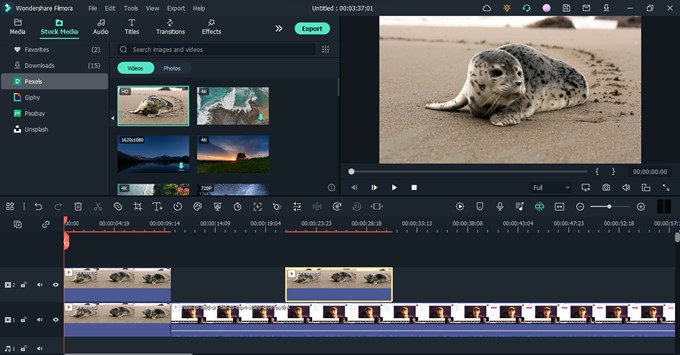
Step2 Next, move your B-roll to the relevant timeline. Then, apply the required editing.
Step3 Afterward, move drag-n-drop the audio clips to the timeline and apply the needed edits.
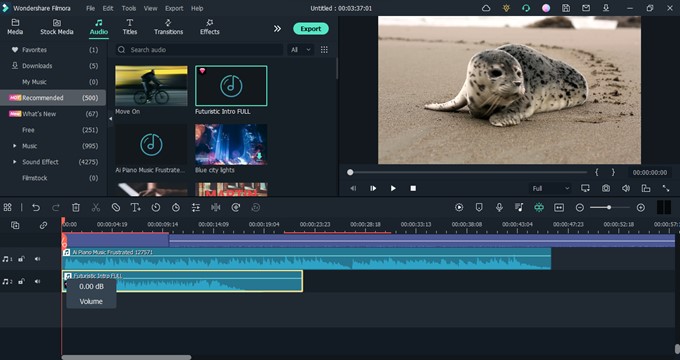
Repeat the process for different operations in stages until you finish.
Conclusion
The editing process is about having a free mind where creativity is the primary focus. When you can do that, you will be able to complete your projects in a short time and work on various tasks simultaneously. The tips discussed in this article will go a long way in helping you handle your projects using Filmora.
You can use Filmora to edit videos and other media files downloaded from YouTube, Vimeo, and many more video-sharing sites. Follow these tips and make editing your video projects quite easy and fast.
Free Download For Win 7 or later(64-bit)
Free Download For macOS 10.14 or later
Step4 Rename all imported files. To rename your imported files, right-click on them to add a preferred name. Then, click Rename from the pop-up list to name the files.

2. The Use of Proxies
Another tip that enhances a quick editing process is the use of proxies. Proxies can be described as low-resolution versions of your video files. So, if you’re working on video files that drag back playback speed, like 4K footage, you can create a proxy to enable your PC to handle the file seamlessly.
A tool like Filmora editor can help create proxies of your video file flawlessly. You just have to follow the steps below;
Step1 Locate the large video file you imported to Filmora and right-click it. Then, select Create Proxy File.

Step2 You should see the proxy icon at the bottom right corner of your video once it completes. This takes only a few minutes.

Step3 Drag-n-drop the video to the timeline and perform the necessary editing. Afterward, use the Export button to save the file to your PC.

3. Keep Your Videos and Audio Tracks Organized
This is similar to our first tip, and fortunately, the Filmora video editor facilitates this kind of operation quickly and easily. It involves organizing video and audio clips in the timeline while editing. For instance, use video track #1 for graphics or text, #2 for your B roll, and #1 for the main footage taken.
You will also do the same for Audio, for instance, Audio track #1 for music, Audio track #2 for dialogues, and many more. This will allow you to edit various clips simultaneously, making the editing process faster and easier. Here are the steps to use this tip;
Step1 Click on the Add icon at the left side of the Timeline and select Add Video Track or Add Audio Track to add more timelines for your clips.

Step2 Drag-n-drop the video clips and audio clips to the relevant timeline.

4. Keyboard Shortcuts
These are commands on the keyboard of your pc that will enable you to edit your projects easily and quickly. Various options can be available by keying in specific orders rather than going through a long process using the mouse. This knowledge can be a real time-saver when handling projects. To get more enlightened on the setup in Filmora, follow the steps outlined below;
Step1 Open Filmora and click File from the top side.
Step2 Select Keyboard Shortcuts from the drop-down list.

Step3 The new pop-up window on your PC screen will display all shortcuts you can employ while using Filmora, and the interesting part is that you can customize the shortcut keys to your preference. Moreover, you can freely switch keyboard shortcuts between Filmora, Adobe Premiere Pro, and Final Cut Pro.

Step4 For clicking CTRL+ALT+N will allow you to create a new folder for your file.
5. Edit in Stages
Our final tip is to edit in stages. Yes, it is necessary to edit in stages when dealing with editing work. This helps to limit the time you spend on a project. In the beginning, you should do a rough cut. You can begin by editing the A roll at first and then move on to edit the B roll, moving on to the Sound FX, Music, Graphics, and Color Correction, and then reviewing the entire project before exporting it.
In case while editing the A roll, you find something that requires a quick fix in its audio, focus on it and, if possible, use a marker icon to describe it. This will help you not get confused once you get to the Audio stage. See the steps to use Filmora to do this below;
Step1 Firstly, focus on your video footage. Move them to the required timeline.

Step2 Next, move your B-roll to the relevant timeline. Then, apply the required editing.
Step3 Afterward, move drag-n-drop the audio clips to the timeline and apply the needed edits.

Repeat the process for different operations in stages until you finish.
Conclusion
The editing process is about having a free mind where creativity is the primary focus. When you can do that, you will be able to complete your projects in a short time and work on various tasks simultaneously. The tips discussed in this article will go a long way in helping you handle your projects using Filmora.
You can use Filmora to edit videos and other media files downloaded from YouTube, Vimeo, and many more video-sharing sites. Follow these tips and make editing your video projects quite easy and fast.
Free Download For Win 7 or later(64-bit)
Free Download For macOS 10.14 or later
The Power of Music in Videos
No video is complete without suitable audio. Adding audio to a video is not that difficult, but choosing the right audio can be a hassle. You want something that captures the ears of the audience but, at the same time, compliments your video. The best way to do this is by adding music to your videos with Wondershare Filmora .
Free Download For Win 7 or later(64-bit)
Free Download For macOS 10.14 or later
The following passage will guide you through everything you must consider while choosing music for your videos. But first, we’ll show you how easy it is to alter your video with music using Wondershare Filmora.
How different types of music affect your videos
You can easily change the viewer’s perception using different music, even with the same visuals. The right song will elevate your video to another level and assist in relaying your feelings and emotions to the viewers. The following examples will illustrate how changing the audio changes the impression of the video.
Example #1
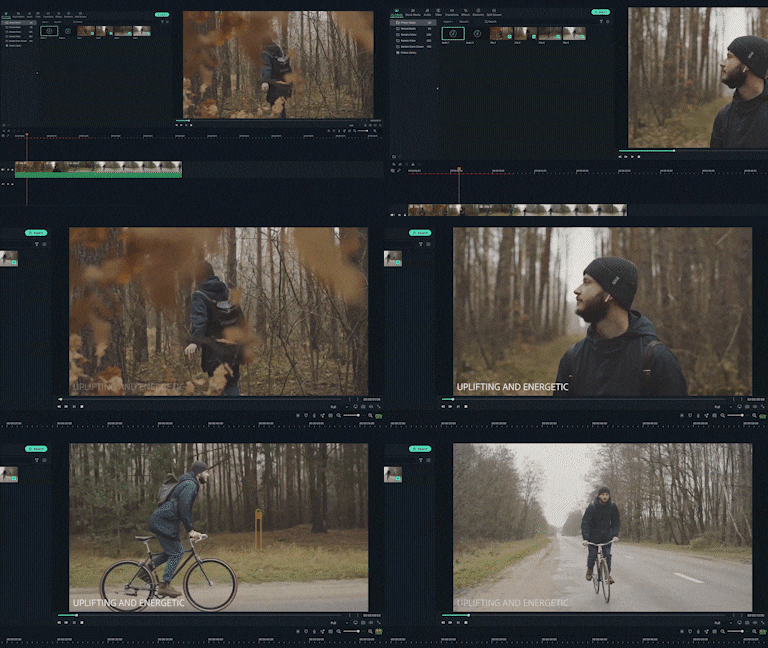
Let’s say you have a video of someone walking through the woods. Now without music audio, your video will be boring. You can quickly fix this by adding an upbeat song to make your video more energetic.
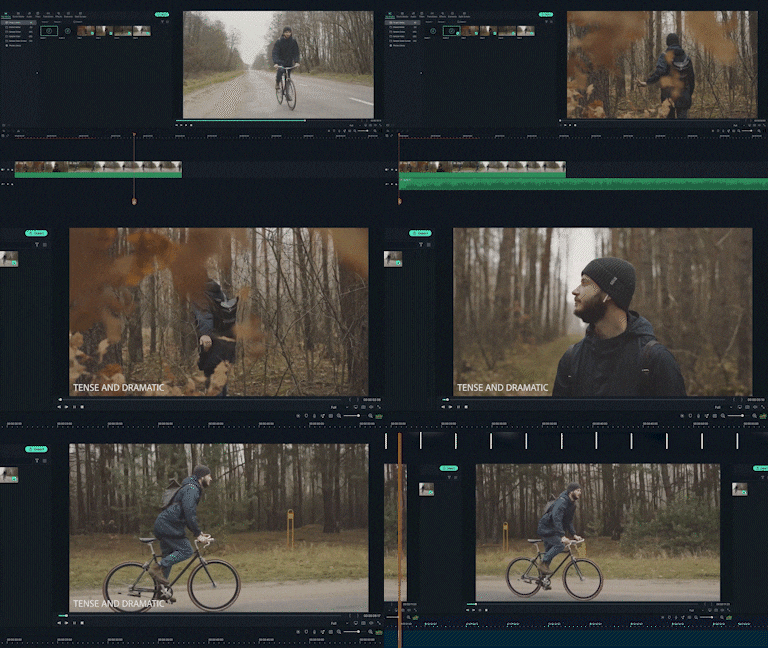
Using the same visuals, you can add a more tense and dramatic song, like from a horror movie. You have successfully changed the entire vibe of the same video from “inspiring” to “sinister.” It proves the importance of the balance between audio and visuals.
Example #2
For a better understanding, let’s look at a movie scene we all know and love. Take the entrance scene from Avengers: Endgame. The music used by the producer aims to excite the audience while building up the hype for the upcoming battle. However, if we change the audio of this scene, we end up with a completely different set of emotions that might not go too well with the shot.

Now that we’ve seen how crucial audio can be in a video, let’s see how to choose the best music audio for your video.
Tip #1: Identify the mood
As we’ve demonstrated before, the audio can change the entire mood of the video. The right music for any video will be the one that compliments the spirit of the visuals and relays the emotions the producer intended.

Rewatch your recorded clips until you know the mood portrayed by the visuals. Select music that matches the spirit of your visuals. For example, you would use different music for a sunny day compared to a cloudy day. Once you’ve figured out the mood and understand the emotions you want to elicit, search for audio that achieves this and balances out your visuals.
Tip #2: Video and music style
We’ve already established that different styles of music complement other types of videos. So, keep the type of your video in consideration. For example, is your video fast-paced and full of action, or is it more serious in nature, like an interview or documentary?

Once you have music that matches your video style, check the audio wave. The four most common patterns are steady, ascending, descending, or furious. The audio wave will help you select the visuals that best match that audio.
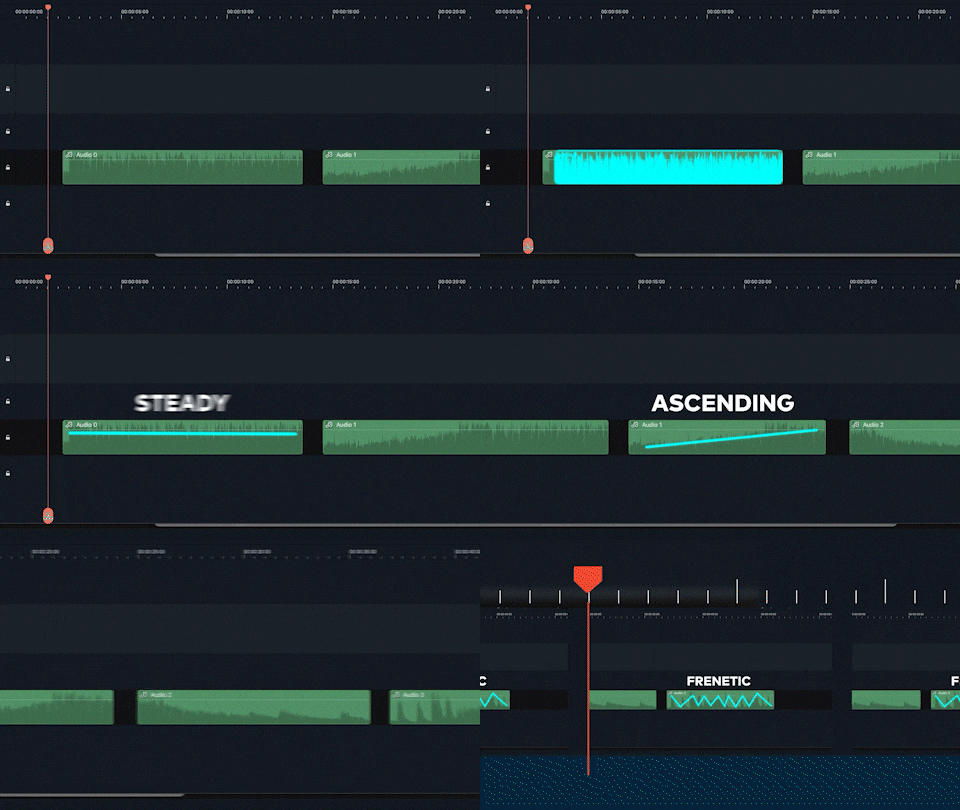
For example, if you’re using audio with an ascending audio wave, you would use visuals that build up with the audio. The beat drop will signal the transition to reveal a powerful shot.
Tip #3: Don’t force the music
As emphasized before, your music should match your video. We all have a favorite music genre, but sometimes that may not go well with our visuals. For example, you love country music but have a video about the nightlife in the city. Using country music in a video about the town does not match well and will confuse your audience.

To get music that best suits our video, we must be open and explore all music genres. You’ll see how easy it is to scout a song that fits perfectly with your visuals. The easiest way is to choose a song that gives out the same emotions as intended by the visuals.
Final Words
Now, you clearly understand the importance of music in videos. The right music can uplift your video into a viral sensation, while the wrong music track will turn your video into a catastrophe. Remember to review the legalities of copyright and infringement before using any music in your videos to avoid legal issues. Make sure you have permission to use the music or use royalty-free music.
Share this article with your friends and family interested in making stunning videos with perfect music audio. Comment below on your favorite scene from a movie or show where the music perfectly matched the visuals and left you with goosebumps.
Free Download For macOS 10.14 or later
The following passage will guide you through everything you must consider while choosing music for your videos. But first, we’ll show you how easy it is to alter your video with music using Wondershare Filmora.
How different types of music affect your videos
You can easily change the viewer’s perception using different music, even with the same visuals. The right song will elevate your video to another level and assist in relaying your feelings and emotions to the viewers. The following examples will illustrate how changing the audio changes the impression of the video.
Example #1
Let’s say you have a video of someone walking through the woods. Now without music audio, your video will be boring. You can quickly fix this by adding an upbeat song to make your video more energetic.

Using the same visuals, you can add a more tense and dramatic song, like from a horror movie. You have successfully changed the entire vibe of the same video from “inspiring” to “sinister.” It proves the importance of the balance between audio and visuals.

Example #2
For a better understanding, let’s look at a movie scene we all know and love. Take the entrance scene from Avengers: Endgame. The music used by the producer aims to excite the audience while building up the hype for the upcoming battle. However, if we change the audio of this scene, we end up with a completely different set of emotions that might not go too well with the shot.

Now that we’ve seen how crucial audio can be in a video, let’s see how to choose the best music audio for your video.
Tip #1: Identify the mood
As we’ve demonstrated before, the audio can change the entire mood of the video. The right music for any video will be the one that compliments the spirit of the visuals and relays the emotions the producer intended.

Rewatch your recorded clips until you know the mood portrayed by the visuals. Select music that matches the spirit of your visuals. For example, you would use different music for a sunny day compared to a cloudy day. Once you’ve figured out the mood and understand the emotions you want to elicit, search for audio that achieves this and balances out your visuals.
Tip #2: Video and music style
We’ve already established that different styles of music complement other types of videos. So, keep the type of your video in consideration. For example, is your video fast-paced and full of action, or is it more serious in nature, like an interview or documentary?

Once you have music that matches your video style, check the audio wave. The four most common patterns are steady, ascending, descending, or furious. The audio wave will help you select the visuals that best match that audio.

For example, if you’re using audio with an ascending audio wave, you would use visuals that build up with the audio. The beat drop will signal the transition to reveal a powerful shot.
Tip #3: Don’t force the music
As emphasized before, your music should match your video. We all have a favorite music genre, but sometimes that may not go well with our visuals. For example, you love country music but have a video about the nightlife in the city. Using country music in a video about the town does not match well and will confuse your audience.

To get music that best suits our video, we must be open and explore all music genres. You’ll see how easy it is to scout a song that fits perfectly with your visuals. The easiest way is to choose a song that gives out the same emotions as intended by the visuals.
Final Words
Now, you clearly understand the importance of music in videos. The right music can uplift your video into a viral sensation, while the wrong music track will turn your video into a catastrophe. Remember to review the legalities of copyright and infringement before using any music in your videos to avoid legal issues. Make sure you have permission to use the music or use royalty-free music.
Share this article with your friends and family interested in making stunning videos with perfect music audio. Comment below on your favorite scene from a movie or show where the music perfectly matched the visuals and left you with goosebumps.
Using The AI Auto Reframe Feature | Wondershare Filmora Tutorial
If you’ve struggled with adjusting the frame of your videos, there is a solution for you. The solution is to change the video aspect ratio, which is a game-changer in the world of video editing. It is a powerful feature that automatically adjusts the frame to fit different aspect ratios. With this feature, you don’t have to manually resize and reposition your video. The Auto Reframe feature will do all the work for you.
Additionally, it ensures that your videos look great on any screen by frame adjustment. It will keep your subject in focus and eliminate any unnecessary cropping. As we all know, the utility of auto reframe is undeniable. So, share your videos, knowing that they will look their best. The good part is that you can view your video at its best regardless of the device on which they are viewed.
Part 1: How Has AI Been Helping Video Editors?
With AI’s help, video editors’ jobs have become more accessible. You can change the aspect ratio of video with this feature to reduce your time and effort. Some of these ways are mentioned below, benefiting the video editors.
1. Automation in Video Editing
AI tools can help you analyze your video content and generate automated edited versions. This feature use algorithm to identify key moments in your video. Additionally, it improves your video by doing basic edits on it. These edits include basic trimming, color correction, and other options.
2. Content Analysis
This AI-based technology can help you to analyze your content in both video and image form. You can extract valuable information using AI, like facial recognition and sentiment analysis. With the help of this analysis, the editors can make precise decisions regarding editing and more.
3. Automated Captions
AI technology also recognizes speech which is very helpful for transcribing videos automatically. This feature is helping many video editors to add a professional touch to videos. Additionally, speech recognition tools add attention-grabbing subtitles with good accuracy. This saves the editors a lot of time and effort compared to manual transcription.
4. Noise Enhancement
If you have a problem with background noise and distortion, AI tools can help. AI algorithms can help you to improve your noise quality and reduce background noise. For this, you will need the original footage so that AI can work well on it. Furthermore, this will also improve the overall experience of the viewer.
5. Changing Background
With the help of AI, you can even remove unwanted elements or objects in your video. These AI tools allow you to replace objects from video frames. Also, it makes your video’s background look more appealing. In scenarios where removing logos and replacing the green screen background, this feature helps you a lot.
6. Professional Video Effects
Additionally, you can add artistic filters, effects, and appealing filters to your video with these tools. Such AI tools use deep learning algorithms to analyze the video and suggest you some corrections. This allows editors to add desired visual aesthetic effects to their content to look more attractive.
7. Content Recommendation
Using deep learning algorithms, AI can give you recommendations for your video content. These recommendations are based on user preferences and viewing patterns. This can help content creators understand their audience preferences and trends to create better video content.
Auto Reframe Video in 1-Click
Automatically resize videos in the fastest way. No editing skills are required!
Resize Video for Free Resize Video for Free Learn More >

Part 2: Understanding The Auto Reframe Feature in Wondershare Filmora
Wondershare Filmora embeds high-profile features into its video editing ecosystem. The platform integrates artificial intelligence into its video editing system to bring some of the best features. The Auto Reframe feature is one of the AI-integrated features of Wondershare Filmora. The video editing platform resizes the videos in the quickest possible ways.
Using this feature, you can easily involve a single video for all available platforms for posting videos. With a single click, you can save all the time and effort required to resize videos manually. The videos are easily adjusted across different aspect ratios using the efficient AI feature offered by Filmora.
Part 3: Other Prominent AI Features Offered by Wondershare Filmora
Wondershare Filmora offers many advanced and unique features. However, its newly incorporated AI features are some of the best. Here are the top 5 AI features Filmora offers, as discussed in the portion below.
1. AI Smart Cutout
Wondershare Filmora introduced an extraordinary feature of the smart cutout. This feature is a straightforward approach for creators who want to delete undesired items from a video. It uses AI to quickly and accurately find and separate people or objects from the background in videos. Users can easily make cool effects with a few steps, like having a green screen or changing the background effortlessly.
2. AI Copywriting
Filmora offers an AI copywriting feature that directly integrates with ChatGPT. It can generate video text and can also write titles and descriptions of YouTube Videos. The AI copywriting function saves a lot of time. It allows users to easily create professional-looking videos by incorporating AI into their platform.
3. AI Audio Stretch
Any audio track can be quickly re-timed to match the length of your video. AI Audio Stretch can be used with all kinds of music tracks. It works well for various types of videos, whether a casual vlog or a professional video. AI Audio Stretch can recognize and analyze music’s singing or vocal parts. It then remixes the audio clip to match the patterns.
4. AI Portrait
By using this feature of Filmora, users can easily remove backgrounds from images and videos. It offers over 70 different AI effects for portraits and stickers. Moreover, it can automatically detect faces and apply augmented reality (AR) stickers to them. Users don’t need any professional skills to use its portrait effects. Simply select the effect you like and click to add it to your video.
5. AI Audio Denoise
This feature automatically detects noise in any audio or video file and removes unwanted noise. It uses AI to detect background distortion in a video or audio file . Then, it further eliminates the distortion from your video project. This feature allows you to experience your video in quality and crisp sound.
Part 4: Using The Auto Reframe Feature in Wondershare Filmora
After covering an overview of Wondershare Filmora, we will work on the Auto Reframe feature. Look ahead into the steps to figure out how to auto-reframe a video using Filmora:
Convert Text-to-Speech For Win 7 or later(64-bit)
Convert Text-to-Speech For macOS 10.14 or later
Filmora Tutorial -Auto Reframe Filmora Tutorial
Step 1Start Using Auto Reframe Feature
Open Wondershare Filmora on your computer and proceed to select the “Auto Reframe” feature from the options available on the home screen.

Step 2Import The Video
This opens a new window where you can proceed with auto reframing of the video. Click the “Import” button on the top-right of the window to add the video you wish to reframe.

Step 3Change Parameters and Export
After adding the video, adjust the “Aspect Ratio” and “Motion Speed” with the available parameters. Click “Analyze” to observe the changes in reframing as provided. In this way, you can change the aspect ratio of your video using the auto reframe feature. Once completed, save your video project in the system.

Conclusion
In conclusion, auto reframe is a remarkable feature that simplifies video editing. This feature aims to ensure that your videos look great on any screen. If you seek a way to explain how to change the aspect ratio of a video, many video editing tools are now offering this feature to provide a better editing experience. Wondershare Filmora has this feature available for its users. You can easily download and install this tool to auto-reframe your video project.
Resize Video for Free Resize Video for Free Learn More >

Part 2: Understanding The Auto Reframe Feature in Wondershare Filmora
Wondershare Filmora embeds high-profile features into its video editing ecosystem. The platform integrates artificial intelligence into its video editing system to bring some of the best features. The Auto Reframe feature is one of the AI-integrated features of Wondershare Filmora. The video editing platform resizes the videos in the quickest possible ways.
Using this feature, you can easily involve a single video for all available platforms for posting videos. With a single click, you can save all the time and effort required to resize videos manually. The videos are easily adjusted across different aspect ratios using the efficient AI feature offered by Filmora.
Part 3: Other Prominent AI Features Offered by Wondershare Filmora
Wondershare Filmora offers many advanced and unique features. However, its newly incorporated AI features are some of the best. Here are the top 5 AI features Filmora offers, as discussed in the portion below.
1. AI Smart Cutout
Wondershare Filmora introduced an extraordinary feature of the smart cutout. This feature is a straightforward approach for creators who want to delete undesired items from a video. It uses AI to quickly and accurately find and separate people or objects from the background in videos. Users can easily make cool effects with a few steps, like having a green screen or changing the background effortlessly.
2. AI Copywriting
Filmora offers an AI copywriting feature that directly integrates with ChatGPT. It can generate video text and can also write titles and descriptions of YouTube Videos. The AI copywriting function saves a lot of time. It allows users to easily create professional-looking videos by incorporating AI into their platform.
3. AI Audio Stretch
Any audio track can be quickly re-timed to match the length of your video. AI Audio Stretch can be used with all kinds of music tracks. It works well for various types of videos, whether a casual vlog or a professional video. AI Audio Stretch can recognize and analyze music’s singing or vocal parts. It then remixes the audio clip to match the patterns.
4. AI Portrait
By using this feature of Filmora, users can easily remove backgrounds from images and videos. It offers over 70 different AI effects for portraits and stickers. Moreover, it can automatically detect faces and apply augmented reality (AR) stickers to them. Users don’t need any professional skills to use its portrait effects. Simply select the effect you like and click to add it to your video.
5. AI Audio Denoise
This feature automatically detects noise in any audio or video file and removes unwanted noise. It uses AI to detect background distortion in a video or audio file . Then, it further eliminates the distortion from your video project. This feature allows you to experience your video in quality and crisp sound.
Part 4: Using The Auto Reframe Feature in Wondershare Filmora
After covering an overview of Wondershare Filmora, we will work on the Auto Reframe feature. Look ahead into the steps to figure out how to auto-reframe a video using Filmora:
Convert Text-to-Speech For Win 7 or later(64-bit)
Convert Text-to-Speech For macOS 10.14 or later
Filmora Tutorial -Auto Reframe Filmora Tutorial
Step 1Start Using Auto Reframe Feature
Open Wondershare Filmora on your computer and proceed to select the “Auto Reframe” feature from the options available on the home screen.

Step 2Import The Video
This opens a new window where you can proceed with auto reframing of the video. Click the “Import” button on the top-right of the window to add the video you wish to reframe.

Step 3Change Parameters and Export
After adding the video, adjust the “Aspect Ratio” and “Motion Speed” with the available parameters. Click “Analyze” to observe the changes in reframing as provided. In this way, you can change the aspect ratio of your video using the auto reframe feature. Once completed, save your video project in the system.

Conclusion
In conclusion, auto reframe is a remarkable feature that simplifies video editing. This feature aims to ensure that your videos look great on any screen. If you seek a way to explain how to change the aspect ratio of a video, many video editing tools are now offering this feature to provide a better editing experience. Wondershare Filmora has this feature available for its users. You can easily download and install this tool to auto-reframe your video project.
How to Speed Up and Slow Down a Video
Speeding and slowing down the speed of a video is a marvel in the video editing world. In the older days, this feat was accomplished only by the big-budget filming industry.
This article will dive into how you can access the modern-day features available in video editing software. From these features, you can alter the speed of your video easily. However, before we get into the step-by-step guide, let’s understand what fast and slow-mo videos are.
Part 1. What Are Fast and Slow Motion Videos?
As the name suggests, fast-motion videos are the ones that have been sped up from their average speed.

Similarly, slow-motion videos are the ones that have been slowed down from their average speed. The slow-motion effect, also known as the slow-mo effect, is widespread in modern cinema.

Now that we know what Fast and slow-motion videos are. Let’s understand their applications. Or how you can use them in your videos. Scroll below to learn more!
Part 2. Why Should You Change the Speed of Your Videos?
The answer to this question would be that it’s a personal creative decision that will allow you to make your videos more engaging.
Fast Motion Videos
Fast-motion videos are used in many areas of filming. For example, you can speed up your videos to create a funny video or shorten its length.
The fast-motion effect has many applications, such as cooking tutorial videos. For example, the step-by-step process of a cooking tutorial can be too long to fit into a single video. Or it could also help you in cases where you want to keep the length of the video short.
The fast motion of the steps will allow the viewer to quickly grasp the whole process without watching the entire video.
Slow Motion Videos
You can also slow down your videos to give the viewers a more detailed perspective of a scene. Or you can also create a slow-mo video that offers a general surreal vibe.
A famous example is in action films. The producers of the first Matrix film used the Slow-mo effect in the famous bullet dodging scene.

You may wonder how the film producers made the slow-mo effect. The technology at that time was less developed than the recent day. So, even you can create a slow-mo effect.
Before we get into the editing process, let’s first understand what you will need to change the speed of your videos!
Part 3. What Will You Need to Change the Speed of Your Videos?
You will need the following essentials to change the speed of a video:
1. Wondershare Filmora
Free Download For Win 7 or later(64-bit)
Free Download For macOS 10.14 or later
To begin, you will need a good video editor. Wondershare Filmora is the best video editing software available. It has a very engaging system UI that allows inexperienced users to learn how to use it quickly. It also has a diverse collection of stock media. And not only that! It allows you to access reliable features to change the speed of a video.
You can change the speed of the video on Filmora by the speed adjustment panel or by the duration panel present above the timeline. It will adjust in just seconds with a few clicks. This feature makes Filmora more prior with editing tools.

2. Video Clips
Well, it is evident that to change the speed of your videos, you will need video clips. But there are a few things you can keep in mind before adjusting the speed of a video.
![]()
Note: Slowing down a video requires a shot at a higher frame rate. The greater the frame rate, the better will be the slow-mo quality. On the other hand, speeding up videos does not have a strict frame rate requirement.
Part 4. How Can You Change the Speed of Your Videos?
Here you will learn two ways in which you can change the speed of your videos. The two methods to change the speed of your video are mentioned:
- The speed adjustment panel.
- Duration panel settings.
Let’s get started with the editing process. The first method we will look into is the Speed Adjustment panel.
1. Change Speed With the Speed Adjustment Panel
The Speed Adjustment panel is the speed adjuster in the Wondershare Filmora software. This feature will give you a drag bar to adjust the speed of your video.
You can move the bar to the right to increase the speed of your video. Similarly, you can move it to the left to decrease the rate.
But before we use this feature, we will need to download the Filmora video editing software. So please scroll below to learn how to download it!
Step1 Download Filmora
First and foremost, you must have access to Filmora. For this, download Wondershare Filmora. Then, activate this app or software on your PC.
Step2 Import The Video Files
The next step after downloading Filmora is to import your video clips. To accomplish this, follow the steps outlined below:
- Locate and select the Import icon on the top left side of the Filmora Home Interface.
- It takes you to your computer’s library.
- Select the videos to be edited and then click OK.

You can also import the files by another method. After you have opened Filmora, you can restore the Filmora Window size and import by dragging and dropping the clips:
- Drag the cursor to select the video clips you want.
- Then, drop them in the Filmora import window.

Filmora supports various formats for your video clips. They include the Mp4, AVI, MOV, GIFs, and more.
After you have imported your video clips, add them to the timeline as shown below!
Step3 Add The Video Clips to The Timeline
After you’ve imported clips in the Import window, drag them onto the timeline. Follow the steps outlined below to accomplish this:
- Drag the clips into the import window and select them.
- Then, insert them into the timeline.

Now that we have our video clips in the timeline, we can start adjusting the speed.
Step4 Open the Speed Adjustment Panel
The speed adjustment panel, or the Uniform Speed, is the feature of Filmora that allows you to change the speed of your video. For example, to open the Unifrom Speed panel, do as follows:
- Double-click on the video clip.
- In the pop-up column, scroll down till you see the Unifrom Speed option and click on it.
- The speed controls will be shown in the import window.

In the speed control panel, you can see the speed adjuster slider. A number will usually mark this at the end. This number tells you the current speed your video is calibrated in and how fast or slow the motion effects will be.
1.00 is always the average speed. 0.5 being half and 2.00 being double the average speed. To control the speed through the slider, you will need to do the following:
- To increase the speed: Type in the number you want your rate to be. Or, drag the slider to the right as you wish.
- To decrease the speed: Type in a number less than the standard 1.00, or you can drag the slider to the left as you wish.
The number of your speed can be an inconvenience if you have no prior experience. Instead, render the video and play it from the beginning with the changes that you made. It gives you a better idea of the speed of your video.

Step5 Detach The Audio
The corresponding audio also gets affected when you slow down or speed up a video. In this scenario, you can also choose to detach the audio beforehand. It allows you to maintain the original playback speed. To detach the audio, follow the steps as mentioned:
- Right-click on the video clip.
- In the pop-up column, scroll down to the Detach Audio option and click on it.

It will create an audio file in a separate audio tab in the timeline. You can adjust this audio according to your liking. You can edit the detached audio by:
- Double-click on the audio file.
- A settings menu will open in the import window.
- Adjust the Fade options for your Audio.
- Drag the Fade out slider to the right to Fade out your Audio.
- To Fade in your Audio, drag the Fade in slider to the right.

You can also remove the background noise and the pitch of the audio if you want. You can also replace the video’s original audio with a new one. Click on the audio file and press Del on the keyboard to delete it. To add new audio, do as mentioned ahead:
- Click on The Audio icon above the import window.
- Browse The Audio that matches the vibe of your video.
- Drag and drop it below your video clip.

Doing so would have created alternate audio for your video. Play the video from the start and confirm your changes.
Step6 Save Your Project
Saving a project on Filmora is straightforward. First, you need a few steps to proceed with it. Then, when you are done making changes to the video, simply follow as guided ahead, and you’ll be good to go.
- On the Filmora home interface, Go to > File > Save Project.

- Select the Library/Folder where you want your project to be stored.
- Type in the text box to change the name of your project.

- Click on Save.
That’s about it! You have now saved your project. Now let’s move on to export our video.
Step7 Export Your Video
After we are done with saving our project, we will now move on to export our video.
![]()
Note: Before we export our video, ensure everything is according to your wish. Play the final video again and confirm your changes.
You can export your video to many of the available video formats. And not only that, but you can also export your video to local files and a specific device. You can also export your video directly to YouTube, Vimeo, and DVD format.

To export your video, all you have to do is the following steps:
- Click on Export.
- Type in the Video name.
- Select the Directory you want your file to be stored in.
- Select the Video Format.
- Select the Resolution of your Video.
![]()
Note: If you want to export your video directly to Youtube or Vimeo, ensure you are logged in.
- Click on Export.

Wait till Wondershare Filmora finishes exporting your video. Then, another window will pop up for a reminder when the shipping is done.
These were the methods by which you can change the speed of your video using the Speed Adjustment panel. Now let’s move on to the following method to adjust the speed via the Duration panel.
2. Change Speed via the Duration Panel
The duration panel is one the most valuable features of Wondershare Filmora as it allows you to change the video speed by duration adjustment.
This feature is typically helpful when you have a space between video clips and want to fill it. By measuring the time between the two clips, you can adjust the duration of your video.
It will ultimately hasten the speed of your video. The hastening in rate will depend upon the gap. The smaller the gap, the faster the video will be. Similarly, the greater the gap is, the longer the video will be.
Apart from the Speed Adjustment Panel, the Duration Panel has the advantage of editing the speed of your video by simply typing in the text.
Step1 Import Video Clips to Timeline
After downloading Filmora, the next step is importing your video clips. To do so, follow the steps outlined below:
- Locate and click the Import icon in the upper left corner of the Filmora Home Interface.
- Choose the videos to be edited, then click OK.
Now that you have imported files into Filmora, you can add them to the Timeline. Notice the steps mentioned ahead:
- Drag the clips into the import window and select them.
- Then, insert them into the timeline.
You can begin the editing process now that the clips are in the timeline.
Step2 Open The Duration Panel
The Duration Panel comes attached to the Unifrom Speed Panel. To access the Duration Panel, follow the steps ahead:
- Right-click on the video clip.
- In the pop column, scroll below to Unifrom Speed.
It will open the uniform speed panel in the import window. Below the speed of the controls, you can notice The Duration Panel.
Step3 Change The Speed of The Video
In The Duration Panel, you can see the average speed of your video clip. Now, if you want to reduce the speed of your video, you have to increase the duration of your video. Similarly, if you’re going to increase the speed of your video, you would have to decrease the duration.
Slow Down The Video
To slow down the video clip, follow the steps mentioned below:
- In The Duration Panel, Increase the time of the video.
- Type in a number bigger than the normal value
![]()
Note: If the average speed of the video is 00:01:00:00, increasing the value of the duration to 00:02:00:00 will reduce the speed of your video by half.

Speed Up The Video
To increase the speed of your video, follow as guided ahead:
- In The Duration Panel, decrease the time of the video.
- Type in a number smaller than the normal value
![]()
Note: If the normal video speed is 00:01:00:00, decreasing the value of the duration to 00:00:30:00 will increase the speed of your video by double.

Congratulations! You have successfully learned how to change the speed of your video by Filmora. Now, you can use both the Speed Adjustment Panel and The Duration Panel to adjust the speed of your video.
Conclusion
Changing the speed of your video can be helpful in many filming scenarios. Adjusting the speed in the older days was a marvel in the video editing industry. But the technology in the present day has allowed the typical user to edit the speed of a video.
By following the steps mentioned in this article, you can now change the speed of your video by Wondershare Filmora.
Free Download For macOS 10.14 or later
To begin, you will need a good video editor. Wondershare Filmora is the best video editing software available. It has a very engaging system UI that allows inexperienced users to learn how to use it quickly. It also has a diverse collection of stock media. And not only that! It allows you to access reliable features to change the speed of a video.
You can change the speed of the video on Filmora by the speed adjustment panel or by the duration panel present above the timeline. It will adjust in just seconds with a few clicks. This feature makes Filmora more prior with editing tools.

2. Video Clips
Well, it is evident that to change the speed of your videos, you will need video clips. But there are a few things you can keep in mind before adjusting the speed of a video.
![]()
Note: Slowing down a video requires a shot at a higher frame rate. The greater the frame rate, the better will be the slow-mo quality. On the other hand, speeding up videos does not have a strict frame rate requirement.
Part 4. How Can You Change the Speed of Your Videos?
Here you will learn two ways in which you can change the speed of your videos. The two methods to change the speed of your video are mentioned:
- The speed adjustment panel.
- Duration panel settings.
Let’s get started with the editing process. The first method we will look into is the Speed Adjustment panel.
1. Change Speed With the Speed Adjustment Panel
The Speed Adjustment panel is the speed adjuster in the Wondershare Filmora software. This feature will give you a drag bar to adjust the speed of your video.
You can move the bar to the right to increase the speed of your video. Similarly, you can move it to the left to decrease the rate.
But before we use this feature, we will need to download the Filmora video editing software. So please scroll below to learn how to download it!
Step1 Download Filmora
First and foremost, you must have access to Filmora. For this, download Wondershare Filmora. Then, activate this app or software on your PC.
Step2 Import The Video Files
The next step after downloading Filmora is to import your video clips. To accomplish this, follow the steps outlined below:
- Locate and select the Import icon on the top left side of the Filmora Home Interface.
- It takes you to your computer’s library.
- Select the videos to be edited and then click OK.

You can also import the files by another method. After you have opened Filmora, you can restore the Filmora Window size and import by dragging and dropping the clips:
- Drag the cursor to select the video clips you want.
- Then, drop them in the Filmora import window.

Filmora supports various formats for your video clips. They include the Mp4, AVI, MOV, GIFs, and more.
After you have imported your video clips, add them to the timeline as shown below!
Step3 Add The Video Clips to The Timeline
After you’ve imported clips in the Import window, drag them onto the timeline. Follow the steps outlined below to accomplish this:
- Drag the clips into the import window and select them.
- Then, insert them into the timeline.

Now that we have our video clips in the timeline, we can start adjusting the speed.
Step4 Open the Speed Adjustment Panel
The speed adjustment panel, or the Uniform Speed, is the feature of Filmora that allows you to change the speed of your video. For example, to open the Unifrom Speed panel, do as follows:
- Double-click on the video clip.
- In the pop-up column, scroll down till you see the Unifrom Speed option and click on it.
- The speed controls will be shown in the import window.

In the speed control panel, you can see the speed adjuster slider. A number will usually mark this at the end. This number tells you the current speed your video is calibrated in and how fast or slow the motion effects will be.
1.00 is always the average speed. 0.5 being half and 2.00 being double the average speed. To control the speed through the slider, you will need to do the following:
- To increase the speed: Type in the number you want your rate to be. Or, drag the slider to the right as you wish.
- To decrease the speed: Type in a number less than the standard 1.00, or you can drag the slider to the left as you wish.
The number of your speed can be an inconvenience if you have no prior experience. Instead, render the video and play it from the beginning with the changes that you made. It gives you a better idea of the speed of your video.

Step5 Detach The Audio
The corresponding audio also gets affected when you slow down or speed up a video. In this scenario, you can also choose to detach the audio beforehand. It allows you to maintain the original playback speed. To detach the audio, follow the steps as mentioned:
- Right-click on the video clip.
- In the pop-up column, scroll down to the Detach Audio option and click on it.

It will create an audio file in a separate audio tab in the timeline. You can adjust this audio according to your liking. You can edit the detached audio by:
- Double-click on the audio file.
- A settings menu will open in the import window.
- Adjust the Fade options for your Audio.
- Drag the Fade out slider to the right to Fade out your Audio.
- To Fade in your Audio, drag the Fade in slider to the right.

You can also remove the background noise and the pitch of the audio if you want. You can also replace the video’s original audio with a new one. Click on the audio file and press Del on the keyboard to delete it. To add new audio, do as mentioned ahead:
- Click on The Audio icon above the import window.
- Browse The Audio that matches the vibe of your video.
- Drag and drop it below your video clip.

Doing so would have created alternate audio for your video. Play the video from the start and confirm your changes.
Step6 Save Your Project
Saving a project on Filmora is straightforward. First, you need a few steps to proceed with it. Then, when you are done making changes to the video, simply follow as guided ahead, and you’ll be good to go.
- On the Filmora home interface, Go to > File > Save Project.

- Select the Library/Folder where you want your project to be stored.
- Type in the text box to change the name of your project.

- Click on Save.
That’s about it! You have now saved your project. Now let’s move on to export our video.
Step7 Export Your Video
After we are done with saving our project, we will now move on to export our video.
![]()
Note: Before we export our video, ensure everything is according to your wish. Play the final video again and confirm your changes.
You can export your video to many of the available video formats. And not only that, but you can also export your video to local files and a specific device. You can also export your video directly to YouTube, Vimeo, and DVD format.

To export your video, all you have to do is the following steps:
- Click on Export.
- Type in the Video name.
- Select the Directory you want your file to be stored in.
- Select the Video Format.
- Select the Resolution of your Video.
![]()
Note: If you want to export your video directly to Youtube or Vimeo, ensure you are logged in.
- Click on Export.

Wait till Wondershare Filmora finishes exporting your video. Then, another window will pop up for a reminder when the shipping is done.
These were the methods by which you can change the speed of your video using the Speed Adjustment panel. Now let’s move on to the following method to adjust the speed via the Duration panel.
2. Change Speed via the Duration Panel
The duration panel is one the most valuable features of Wondershare Filmora as it allows you to change the video speed by duration adjustment.
This feature is typically helpful when you have a space between video clips and want to fill it. By measuring the time between the two clips, you can adjust the duration of your video.
It will ultimately hasten the speed of your video. The hastening in rate will depend upon the gap. The smaller the gap, the faster the video will be. Similarly, the greater the gap is, the longer the video will be.
Apart from the Speed Adjustment Panel, the Duration Panel has the advantage of editing the speed of your video by simply typing in the text.
Step1 Import Video Clips to Timeline
After downloading Filmora, the next step is importing your video clips. To do so, follow the steps outlined below:
- Locate and click the Import icon in the upper left corner of the Filmora Home Interface.
- Choose the videos to be edited, then click OK.
Now that you have imported files into Filmora, you can add them to the Timeline. Notice the steps mentioned ahead:
- Drag the clips into the import window and select them.
- Then, insert them into the timeline.
You can begin the editing process now that the clips are in the timeline.
Step2 Open The Duration Panel
The Duration Panel comes attached to the Unifrom Speed Panel. To access the Duration Panel, follow the steps ahead:
- Right-click on the video clip.
- In the pop column, scroll below to Unifrom Speed.
It will open the uniform speed panel in the import window. Below the speed of the controls, you can notice The Duration Panel.
Step3 Change The Speed of The Video
In The Duration Panel, you can see the average speed of your video clip. Now, if you want to reduce the speed of your video, you have to increase the duration of your video. Similarly, if you’re going to increase the speed of your video, you would have to decrease the duration.
Slow Down The Video
To slow down the video clip, follow the steps mentioned below:
- In The Duration Panel, Increase the time of the video.
- Type in a number bigger than the normal value
![]()
Note: If the average speed of the video is 00:01:00:00, increasing the value of the duration to 00:02:00:00 will reduce the speed of your video by half.

Speed Up The Video
To increase the speed of your video, follow as guided ahead:
- In The Duration Panel, decrease the time of the video.
- Type in a number smaller than the normal value
![]()
Note: If the normal video speed is 00:01:00:00, decreasing the value of the duration to 00:00:30:00 will increase the speed of your video by double.

Congratulations! You have successfully learned how to change the speed of your video by Filmora. Now, you can use both the Speed Adjustment Panel and The Duration Panel to adjust the speed of your video.
Conclusion
Changing the speed of your video can be helpful in many filming scenarios. Adjusting the speed in the older days was a marvel in the video editing industry. But the technology in the present day has allowed the typical user to edit the speed of a video.
By following the steps mentioned in this article, you can now change the speed of your video by Wondershare Filmora.
Also read:
- 2024 Approved Learn to Splice Videos Together on iPhone
- Updated 2024 Approved Blender - A Video Editor for Every Professional
- 2024 Approved Here We Are Going to Show You the Best Effects to Appear on Camera Made with Filmora
- New In 2024, Guide To Slowing Down Videos in Snapchat Discussing the Details
- In 2024, How to Create a Clideo Slideshow Simply
- Looking for the Tools that Can Let You Blend Images Perfectly for Creating an Awesome Collage? Shortlisted for You Are the Best Bend Collage Program for an Effortless Task for 2024
- 2024 Approved Want to Learn How to Make a Fortnite Montage? This Guide Will Give You the Low-Down on Creating Epic Montage Fortnite Videos that You Can Share with Other Players on Social Media Platforms
- New In 2024, How to Resize FLV Videos Efficiently Windows, Mac,Android, iPhone & Online
- Updated Adding Text to Your Collage Not only Makes It Look Sophisticated but Also Versatile. So, if You Too Are Looking for Ways to Create a Collage Text, Check Out Our Article for 2024
- New Updated 8 Ways to Merge SRT with MP4 for 2024
- In 2024, Tips That Show Anybody How To Create Youtube Slideshow – Guaranteed
- Updated Some Leading AI Tools to Replace Sky Backgrounds for 2024
- Updated Basic Introduction of LumaFusion Color Grading
- New 2024 Approved What Is MOV Format and How to Edit MOV Video Better?
- 2024 Approved Do You Want to Rotate Your TikTok Video to Stylize It More? This Article Will Provide Simple Methods of Rotating TikTok Videos to Improve the Audience Viewing Experience
- New 2024 Approved How to Color-Correct an S-Log Footage
- Updated 10 Best Vlogging Cameras for Beginners for 2024
- In 2024, 2 Solutions to Cut Video in VLC on Windows
- Updated How To Quickly Create A Screen Print Effect In Photoshop Detailed Gui
- In 2024, Denoise Video in Adobe Premiere Pro – Audio and Video Noise Removal
- Ways to Make Canva Collages
- 2024 Approved Discord Is Becoming More Popular with Time with Millions of Users. Are You Thinking of Getting a GIF for Discord Profile? If Yes, Learn From This Piece Since We Have a Conclusive Summary of Getting a GIF Profile Picture for Discord
- New 2024 Approved How to Make Discord Logo GIF
- Updated Camtasia Vs. Final Cut Pro for 2024
- New Guaranteed 10 Storyboard Creators To Make Animation Easier for 2024
- New Split a Video in the Lightworks Step by Step for 2024
- New Unlink Audio and Video in DaVinci Resolve Detailed Steps
- Are You Looking for Cool Ideas to Use Green Screen and How Setting up Your Green Screen? Keep Reading Since We Have the Answer for You
- New 3 Ways to Create Motion Text Effects for Your Video
- Updated Best Photo Video Maker Apps with Song PC, Mobile, Online for 2024
- 2024 Approved Do You Want to Use LUTs in Final Cut Pro? There Are Many Free LUTs for FCPX Available that You Can Use. Using LUTs, You Can Create Professional-Looking Content
- In 2024, Learn Everything About Leeming LUT Pro
- Updated Free Green Screen Mobile Frame Downloads for 2024
- Wondering How to Create a Stunning Intro Video with KineMaster? Here Are the Simple Steps to Use KineMaster to Design Your Intro Video in Simple Steps
- Converting an SRT File to VTT Is Extremely Easy. The Article Enlists Various Methods You Can Use to Convert an SRT File to VTT, Introducing You to Filmora, Which Allows You to Edit Your SRT Files
- Updated 2024 Approved Level Up Videos By Applying Keyframe Like A Pro
- New Learn How to Blur Faces in Your Video on iPhone
- New Guide To Selecting and Using the Best Braw Luts
- In 2024, Separating Audio From Video in DaVinci Resolve Step by Step
- Read Through This Post to Know What Frame Rate Is, the Different Variations, and Why 60FPS Is Superior. Also, Know the Tools Available to Make the Conversion
- Updated How To Zoom In On TikTok Videos for 2024
- Doable Ways to Create Transparent Background in Procreate
- Updated This Is the Method Employed During Every Evening Weather Broadcast The Newscaster Is Standing in Front of a Blank Screen, but the Viewers at Home See a Weather Map
- Updated How To Combine Videos On TikTok for 2024
- New An Ultimate Guide on the Significance of Music in Videos and How to Choose the Right Music for Your Videos with Wondershare Filmora
- New In 2024, 10 Best Old Film Overlays to Make Your Videos Look Vintage
- How to Use Lumetri Color in Adobe After Effects
- New In 2024, How to Make Flying Objects in Wondershare Filmora
- New 7 Best GoPro Video Editors for Mac for 2024
- Now, You Can Also Apply the Stranger Things Upside Down Effect to Your Video! This Effect Combines Camera Tricks and Video Editing Within Filmora to Transition From the Normal World Into the Upside Down for 2024
- Ultimate Guide from Vivo Y100 FRP Bypass
- How Can Realme 11 5GMirror Share to PC? | Dr.fone
- How to Change GPS Location on Apple iPhone 15 Easily & Safely | Dr.fone
- Hassle-Free Ways to Remove FRP Lock on Samsung Galaxy A25 5Gwith/without a PC
- What are Location Permissions Life360 On Motorola Edge 2023? | Dr.fone
- 3 Things You Must Know about Fake Snapchat Location On Vivo Y200e 5G | Dr.fone
- 3 Solutions to Find Your Honor Magic5 Ultimate Current Location of a Mobile Number | Dr.fone
- A Complete Guide To OEM Unlocking on Tecno Spark 10C
- Easy Ways to Manage Your Infinix Hot 40 Location Settings | Dr.fone
- In 2024, How to Unlock Apple iPhone 13 Pro Max Passcode without Computer? | Dr.fone
- In 2024, Ultimate Guide from Infinix Smart 8 FRP Bypass
- How to Track Vivo Y100i Power 5G Location by Number | Dr.fone
- How to Mirror Apple iPhone SE (2022) to iPad? | Dr.fone
- In 2024, How to Fix Pokemon Go Route Not Working On Apple iPhone 6s? | Dr.fone
- Title: New 5 Tips for Faster Editing in Filmora
- Author: Chloe
- Created at : 2024-05-20 03:37:43
- Updated at : 2024-05-21 03:37:43
- Link: https://ai-editing-video.techidaily.com/new-5-tips-for-faster-editing-in-filmora/
- License: This work is licensed under CC BY-NC-SA 4.0.


