:max_bytes(150000):strip_icc():format(webp)/GettyImages-104626001-5c34f065c9e77c00010b8cd5.jpg)
New 7 Solutions to Edit GoPro Video on Mac

7 Solutions to Edit GoPro Video on Mac
Having a well-polished video is beyond just shooting the video. Once you shoot your GoPro videos, the next thing to do is use a video editor to make necessary corrections. These video editors’ effects and stabilizations turn your videos into a sophisticated presentation. However, there are several GoPro video editors for different video formats. So if you are thinking about how to edit GoPro videos on Mac, you’re in luck.
In this article, we’ll help you through editing your GoPro video on Mac and a list of these GoPro video editors. We will also explore paid and free GoPro video editors to help pick the right editor. So, if you are ready to impress audiences with your outstanding videos, let’s begin.
Import GoPro Videos to Mac before Editing
After filming your GoPro videos, you probably wonder how to send them to your Mac to begin editing. There are two ways you can about importing your GoPro videos to Mac before editing. The use of SD adapter and GoPro quick app. Use any of these methods to import your GoPro videos before you can begin editing. So with no further ado, let’s quickly dive into importing GoPro videos to Mac using an SD adapter and GoPro quick app.
Import GoPro Videos to Mac Before Editing – SD Adapter
This is actually one of the easiest ways to import GoPro videos to Mac. How does it work? It simply works by connecting GoPro’s SD card to the Mac. Simply remove the GoPro’s SD card and input it to Mac. By doing this, all content on the SD card will display on the Mac as external files. Let’s look at the step-by-step method of importing GoPro videos to Mac with an SD adapter.
- Step 1: First thing first, you have to power off the device
- Step 2: Next, you have to open the opening presentation just at the bottom of the GoPro camera. After successfully unlocking it, then direct access to the SD card.
- Step 3: This is where you insert the SD card into the SD card adapter or reader.
- Step 4: Now, you connect the SD card adapter or reader to your Mac
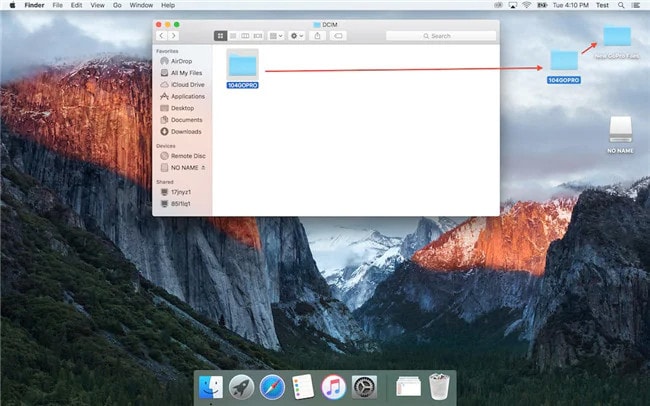
- Step 5: After a successful connection, it will display on your Mac desktop. Now, click on it to open all its content for accessibility.
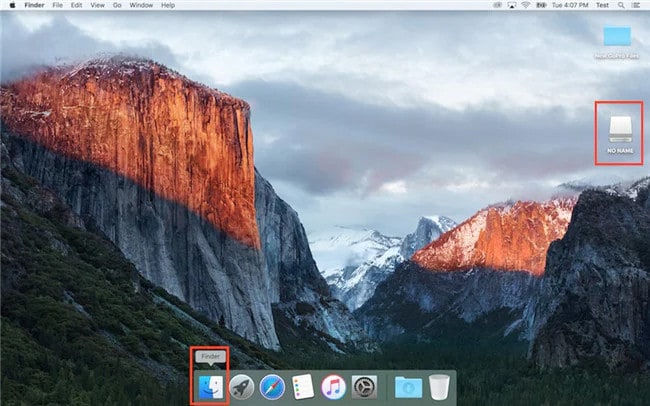
- Step 6: Once you open it, two folders will display. These folders are DCIM and MISC.
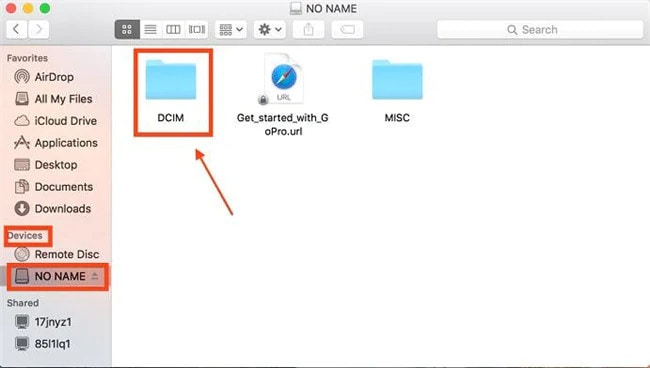
- Step 7: Click on the DCIM folder to find all videos stored on the device.
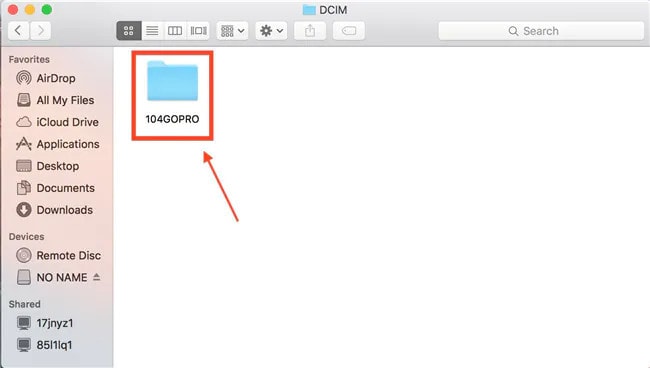
- Step 8: Finally, you can now begin uploading all your GoPro videos to Mac by simply copying and pasting.
Import GoPro Videos to Mac before editing – GoPro Quick App
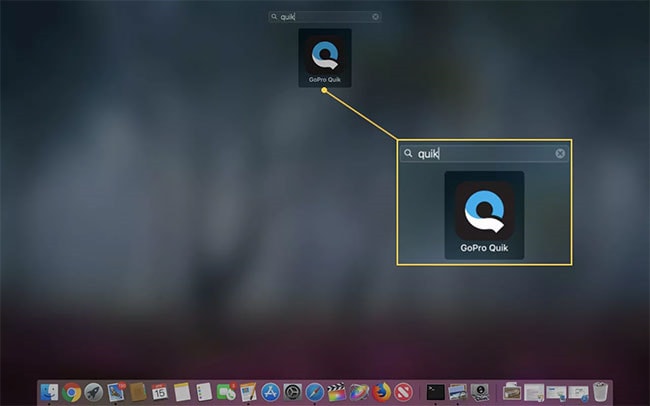
Another option to import GoPro videos to Mac is the GoPro Quick app. GoPro quick app is a tool by GoPro designed to help view GoPro videos on Mac and import them. Having this app on your Mac device is relatively easy. First, you have to download its setup from the GoPro website and install it. So far, this app is one of the best tools to view and import GoPro files to your Mac device. Here are the steps to importing GoPro videos to Mac while getting set to edit.
- Step 1: First thing first, Launch the app. However, if you have not installed the app, you should quickly download and install the app.
- Step 2: Now, you can connect the GoPro camera to your Mac. You can do this by using a USB cable.
- Step 3: After launching the app, you will see an icon labeled Import Filesdisplayed at the interface.
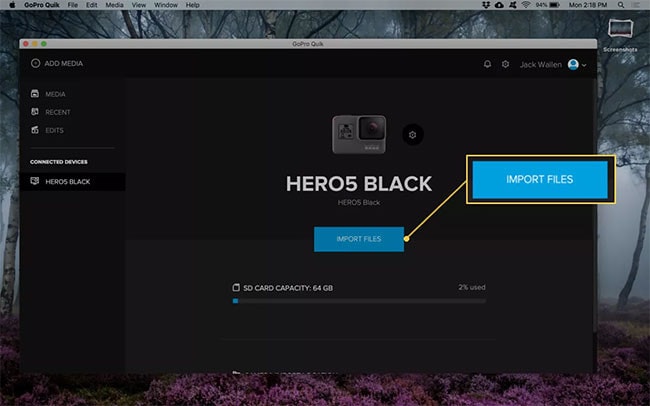
- Step 4: from here on, you will also see an icon to import the videos from your GoPro camera into your Mac device.
When the import is complete, you can now locate your GoPro videos in the folder of your choice. Now, you can close the GoPro quick app, unplug the GoPro camera and get ready to edit your videos.
Best GoPro Video Editor on Mac
A lot of people understand that GoPro is the best way to make your video look like a professional shot. After shooting the video, you’ll obviously want to make some edits to make them look more professional before sharing them. After all, no one wants to watch poor-quality videos, bad noises, and other unprofessional clips. Therefore, we have a list of the best GoPro editor for Mac in this article. Keep reading to learn about the best GoPro video editor on Mac.
Best GoPro Video Editor on Mac – Filmora Video Editor
Supported System: Mac and Windows
A lot of free video editing software usually comes as either too straightforward or too challenging to understand. While other video editing software lacks vital editing features such as color correction and audio or noise editing features. However, the Filmora Video Editor for Mac bridges the gap and is undoubtedly the best GoPro Video editor on Mac.
This video editing software is an easy-to-use editing tool totally equipped with a lot of video editing functions. With Filmora, you can edit your GoPro videos on your Mac like an expert and expect a professional outcome. Filmora offers excellent performance and enhances video quality taking the user experience to a whole new level.
Additionally, Filmora is an editing tool with helpful functionality taking the user experience to a whole new level. Finally, this tool is indispensable due to its speed, intuitive user interface, and other file format support.
For Win 7 or later (64-bit)
For macOS 10.14 or later
Filmora Features
- Filmora editing tool is versatile and supports other video formats like MP4, MOV, MKV, AVCHD, etc.
- You can cut, crop, split, trim, and even combine clips with just a few clicks.
- Filmora has access to several advanced video effects such as royalty-free music, transition, animated titles, and motion elements.
- With Filmora color tuning features, your videos can look like professional Hollywood videos.
- You can also edit sounds on your video with a noise removal feature, audio equalizer, and audio keyframing tools.
- You get 500+ free special video effects to create and customize your videos yourself.
- Filmora has access to advanced video effects like PIP, audio mixer, and green screen, which you can add to your videos.
- Access to 1000+ effects downloading resources to make videos in any desired styles.
Steps to Editing Videos on Mac Using Filmora
Want to edit your GoPro videos the right way? Editing your GoPro videos on Mac with Filmora is relatively easy and will only take a few clicks. Read and follow these steps below to learn to edit GoPro videos on Mac with this easy-to-use GoPro video editor.
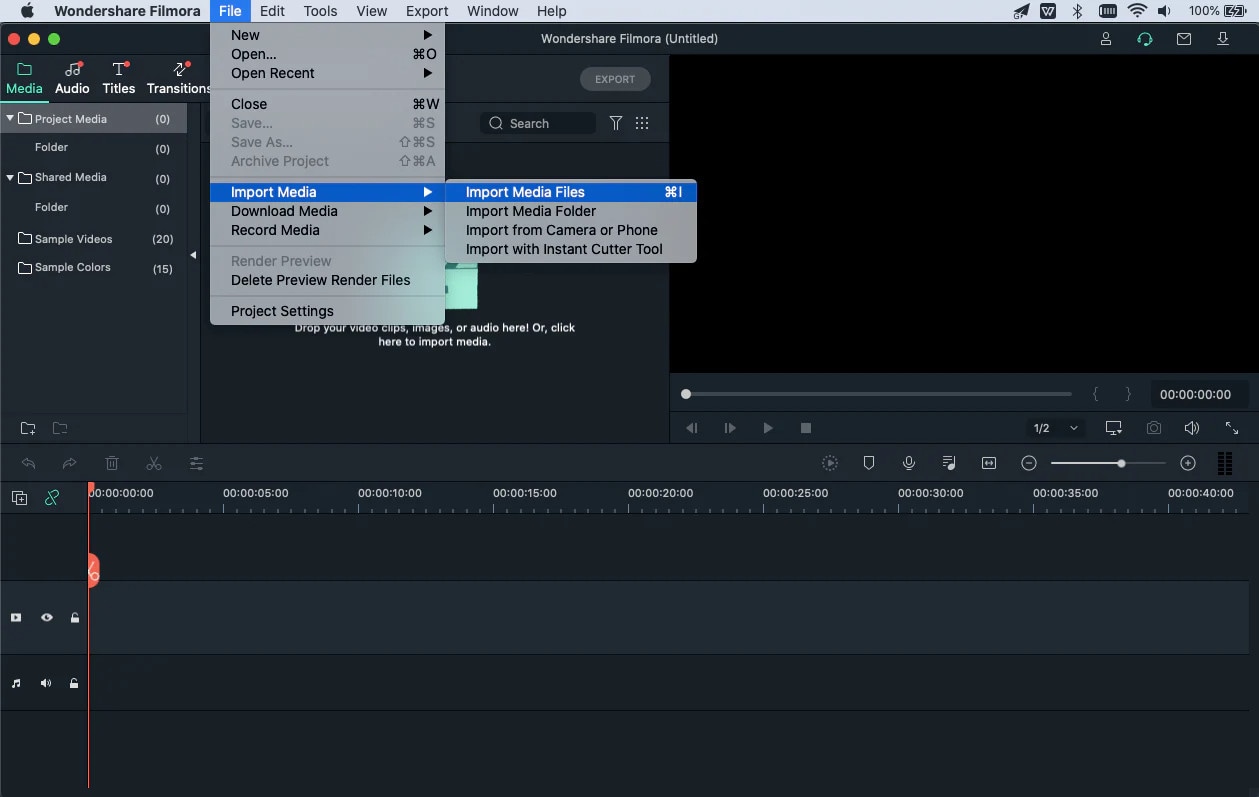
- Step 1: Import the GoPro video files
First, you launch the GoPro video editor and then click the “Import Media here” button. This will upload the GoPro video clips to the program. You can save these files in a suitable location for easy access before you begin editing.
- Step 2: Edit the GoPro Video clips
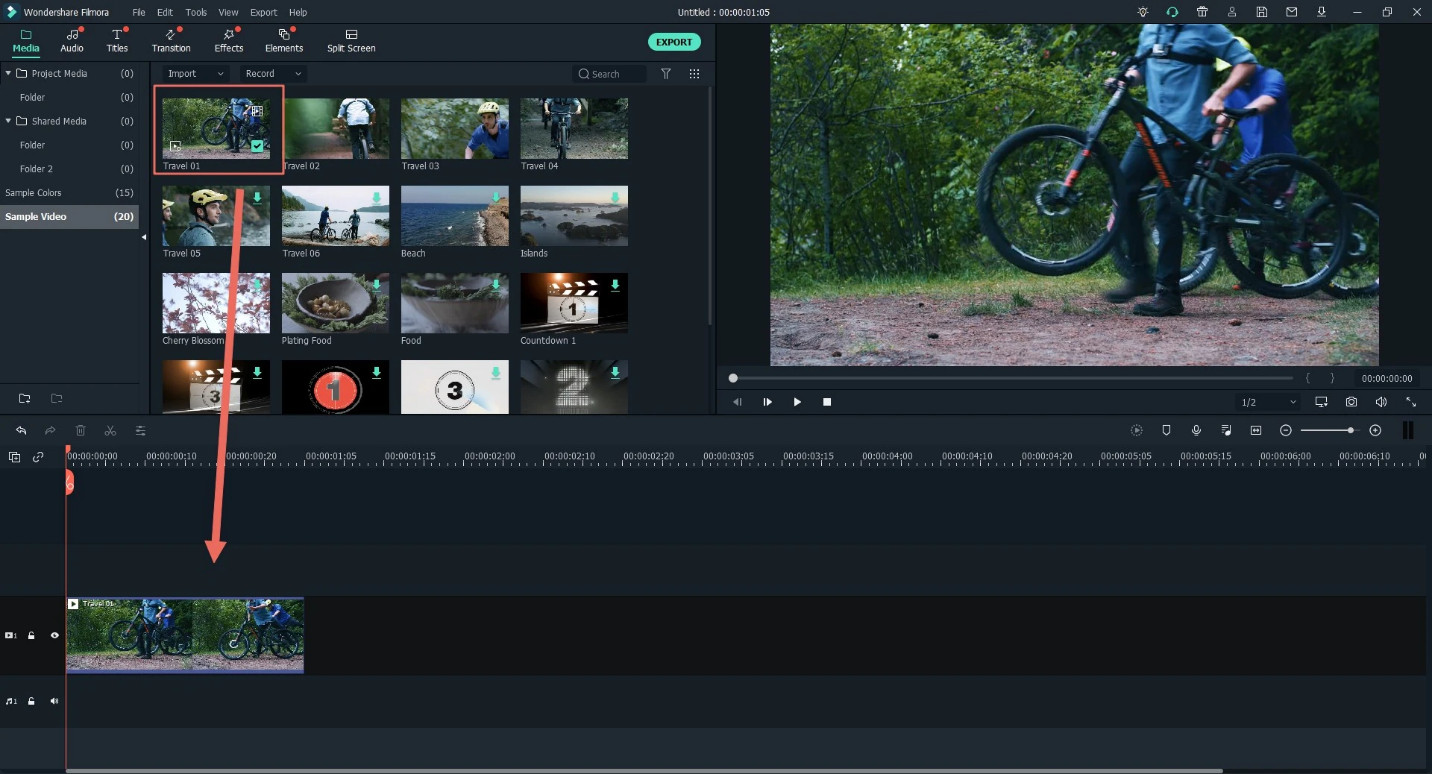
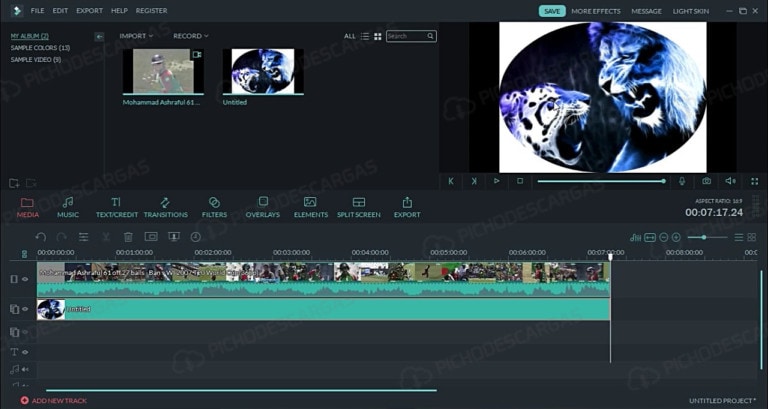
Secondly, you should drag the GoPro video clips from the folder or User’s album to the timeline and begin editing.
To trim your GoPro videos, simply mouser over the clip from the beginning to the end of the video. You should do this until the trim icon is displayed. The trim icon is labeled as “I” on the editing timeline. You can drag the trim icon forward or backward to trim the video as you desire.
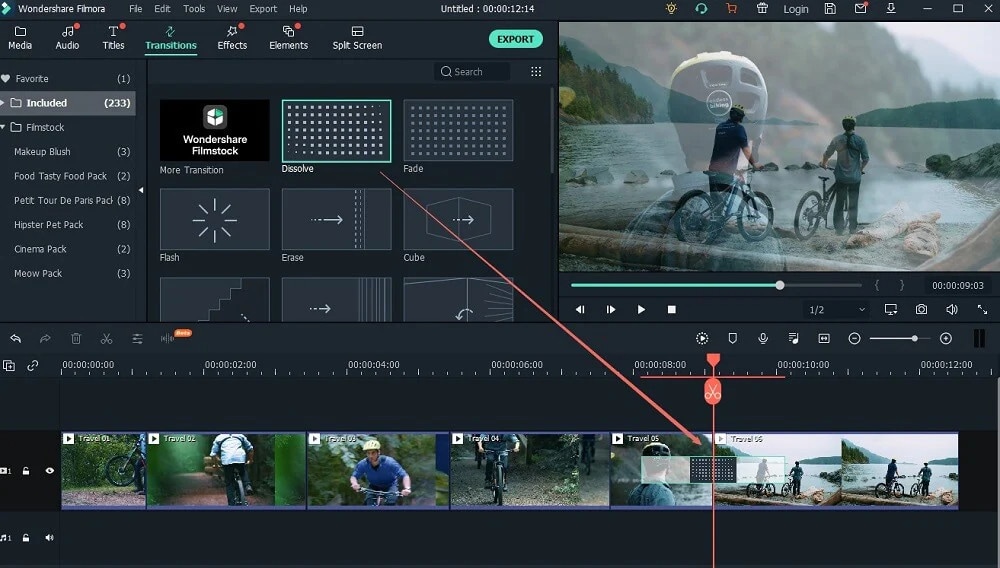
Aside from the trimming option, you can also apply split footage, video stabilization, and even add transitions between two clips. You can also combine GoPro videos and rotate GoPro videos by simply tapping the icons respectively.
- Step 3: Export the edited GoPro video files
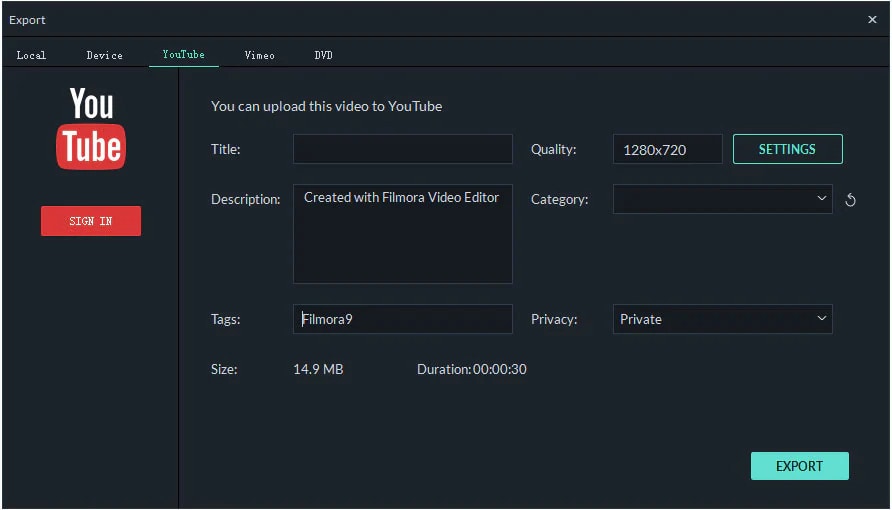
Once you finish editing, you can now navigate to the “Export” icon. Furthermore, you can also select the save path and file format from the displayed output window. After this selection, you can finally choose the “Export” icon. Once you complete this, you can find your edited video file in the same path.
More Free GoPro video editor on Mac to Edit Gopro Videos
In this section, we will list out some of the best free GoPro video editors to successfully edit your videos on Mac. These programs are, but you will have to download them to enjoy all the editing tools.
PowerDirector

Supported System: Windows and Mac
We have PowerDirector as the best overall editor on our list of best free GoPro video editors on Mac. This free GoPro video editor is compatible with Mac and has a robust video editing program. If you are looking for a free GoPro video editor with a wide range of exciting editing features, this is one of the best options. One of the benefits of using this GoPro video editor is that it comes with an Action Camera Center.
It has tons of cool effects, titles, filters, and templates to explore, especially if you want to make more action camera masterpieces. In addition, this video editor has special editing and effects tools to improve your action camera video. For example, you can stabilize your shaky video, apply cool speed effects, and correct fish-eye distortion in some minutes. You can also use the slow-motion effect, zoom, correct color problems, and freeze frame with just a few clicks.
The GoPro editor also comes with noise correction and video denoise to make your video crystal clear and remove unwanted audio noise. In addition, PowerDirector has thousands of royalty-free stock assets such as sound effects and background music. In essence, PowerDirector is a GoPro video editor that offers everything you need to produce, enhance and cut thrilling action videos. It is versatile, best for action footage editing, and supports several video formats.
Pros
- It is beginner-friendly
- It comes with easy-to-use action camera-specific editing tools
Cons
- While it is free, you need a subscription to enjoy the latest features.
Steps to Edit using PowerDirector
- Step 1: Launch the app and select ‘full mode’ to begin editing your video
- Step 2: Select’ import media folder’ to get the videos you wish to edit
- Step 3: You can now browse the folder on your Mac device and select the folder with the videos. Then Click ‘Select folder’ to move them into the editor’s media library.
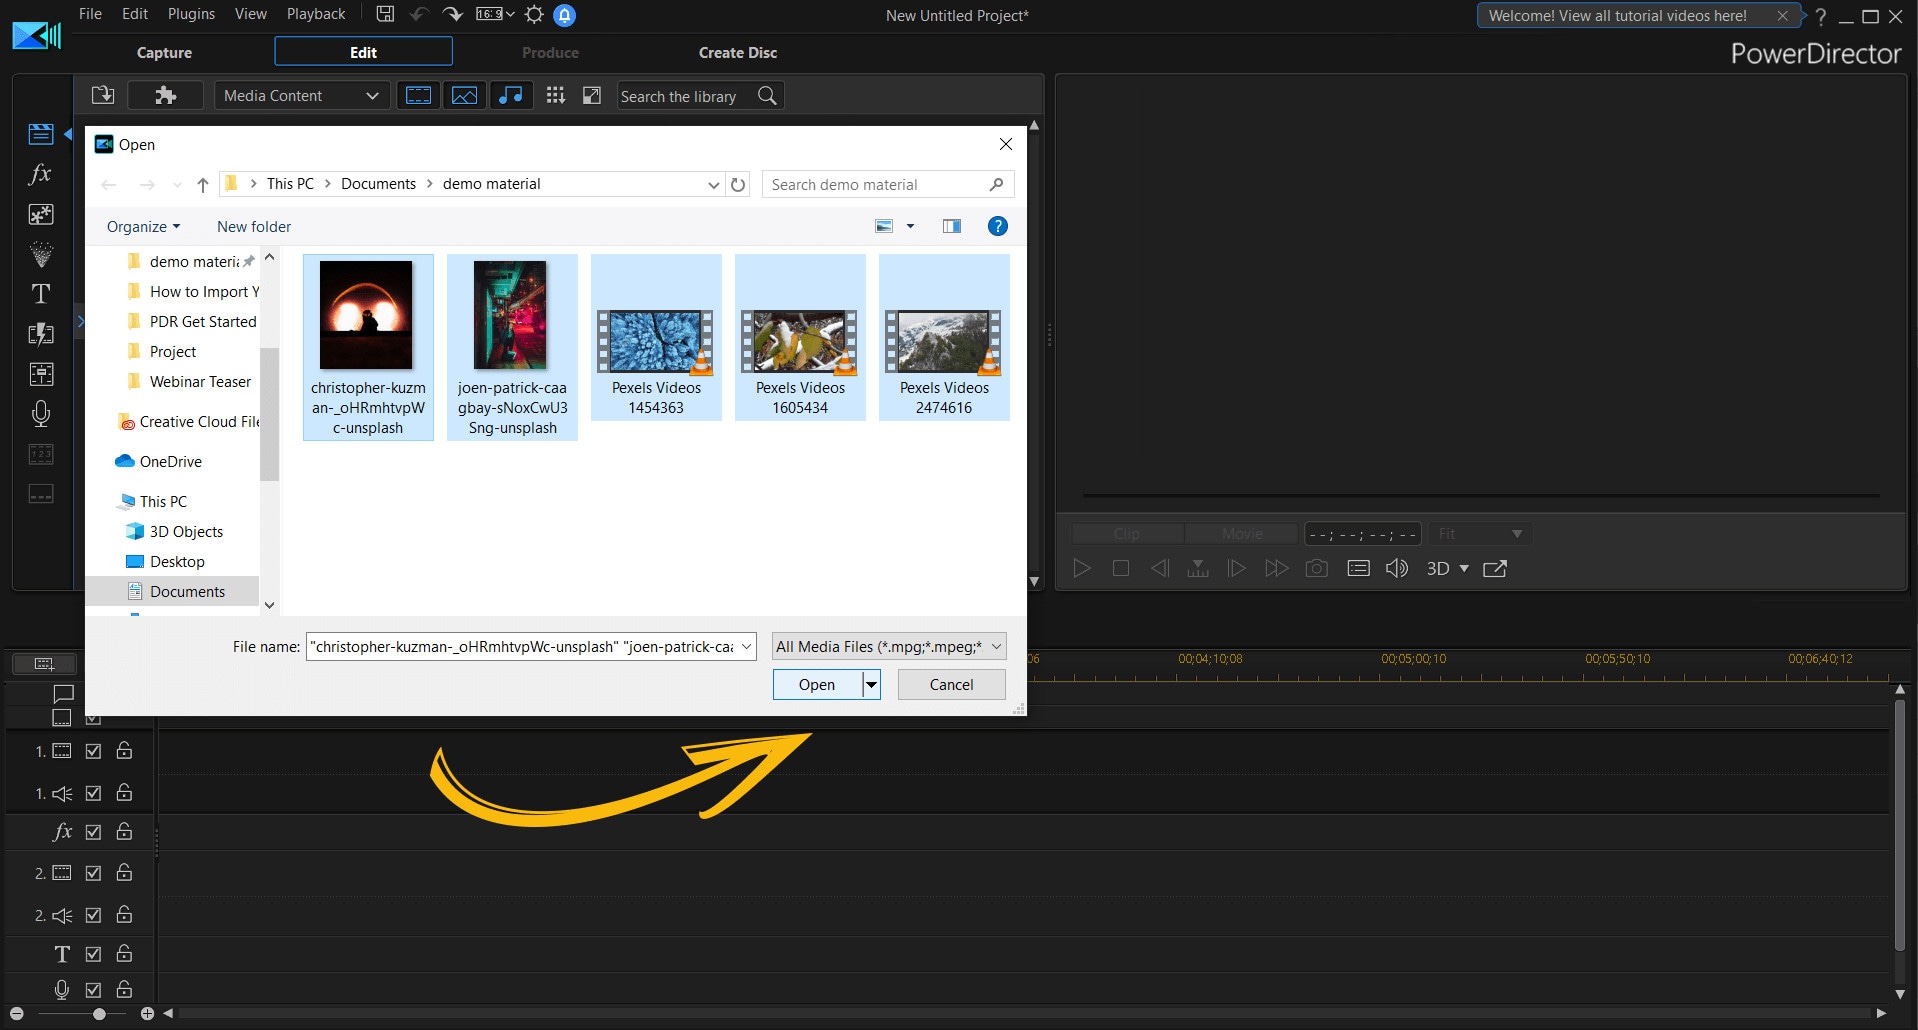
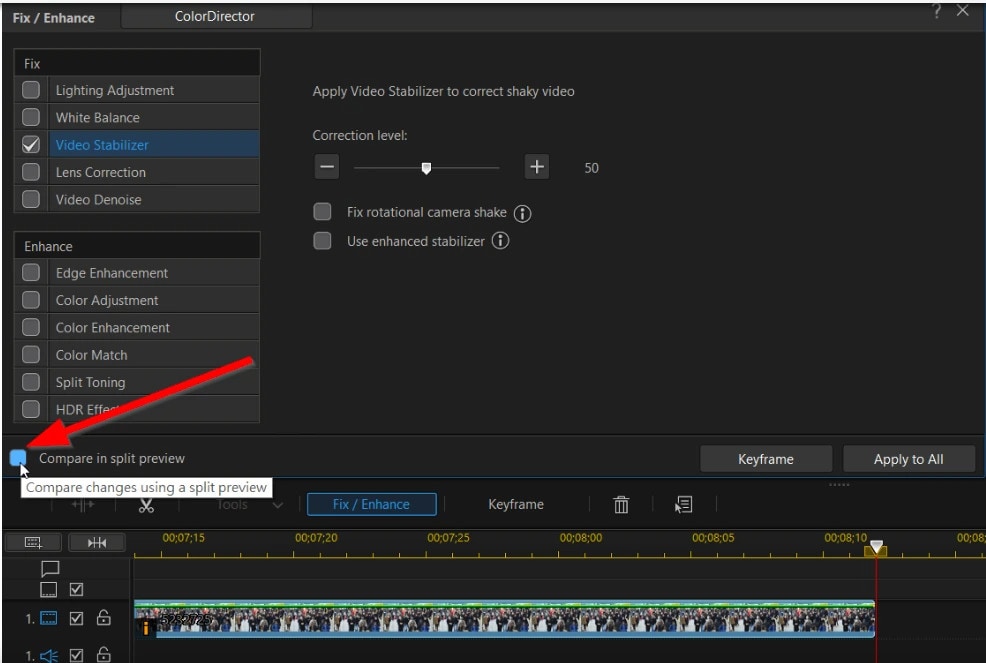
- Step 4: Now, the editing process can begin. You can stabilize and change the speed of your videos with PowerDirector.
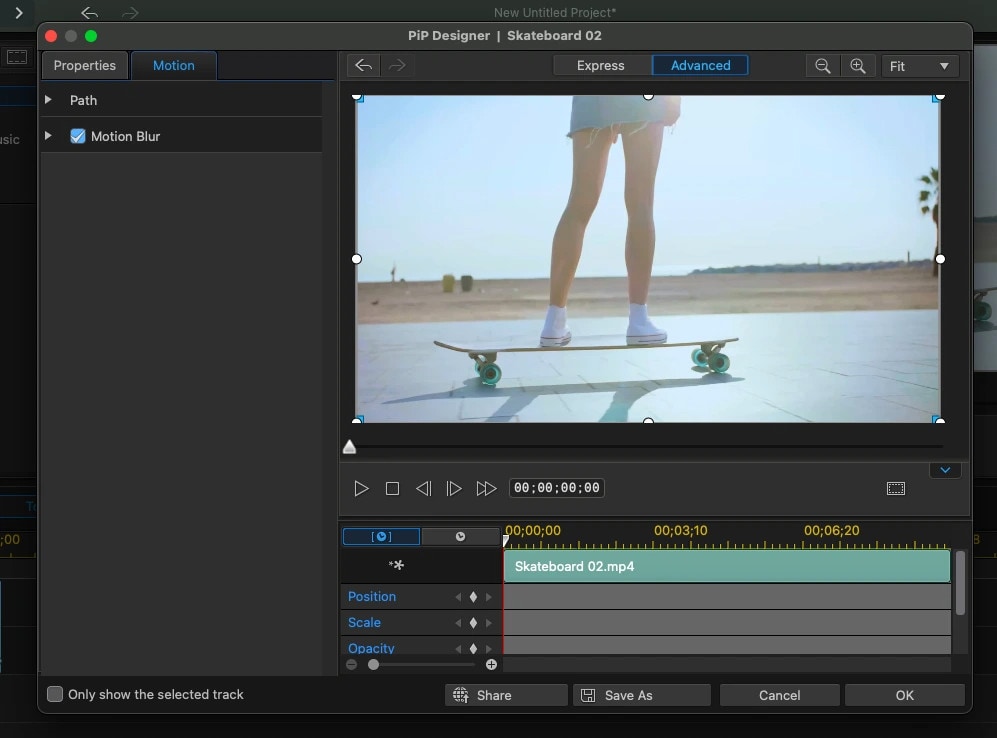
- You can add title text and motion blur to your GoPro videos if you like that.
- If you want to include transitions, you can do so by selecting the transition room.
- Step 5: Next, select the ‘produce’ button to export your video once you are sure that the editing is complete.
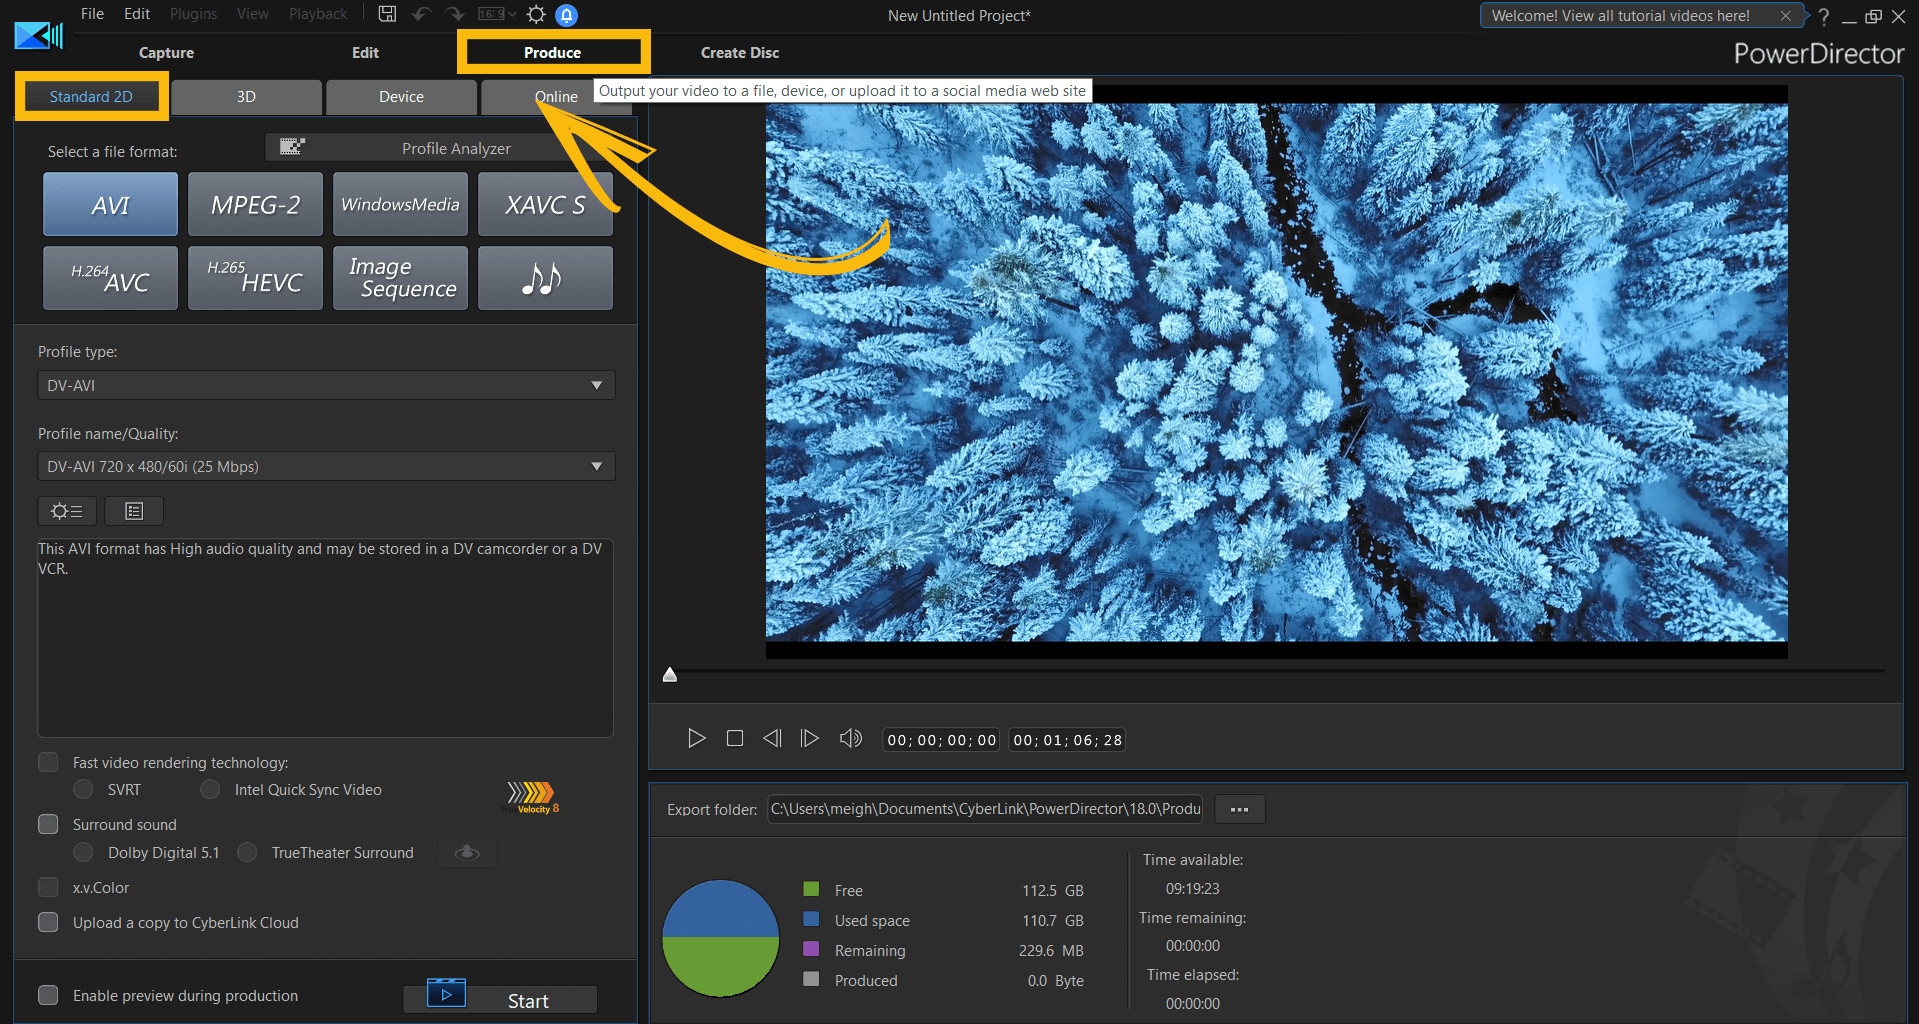
- Step 6: Change the video format before exporting.
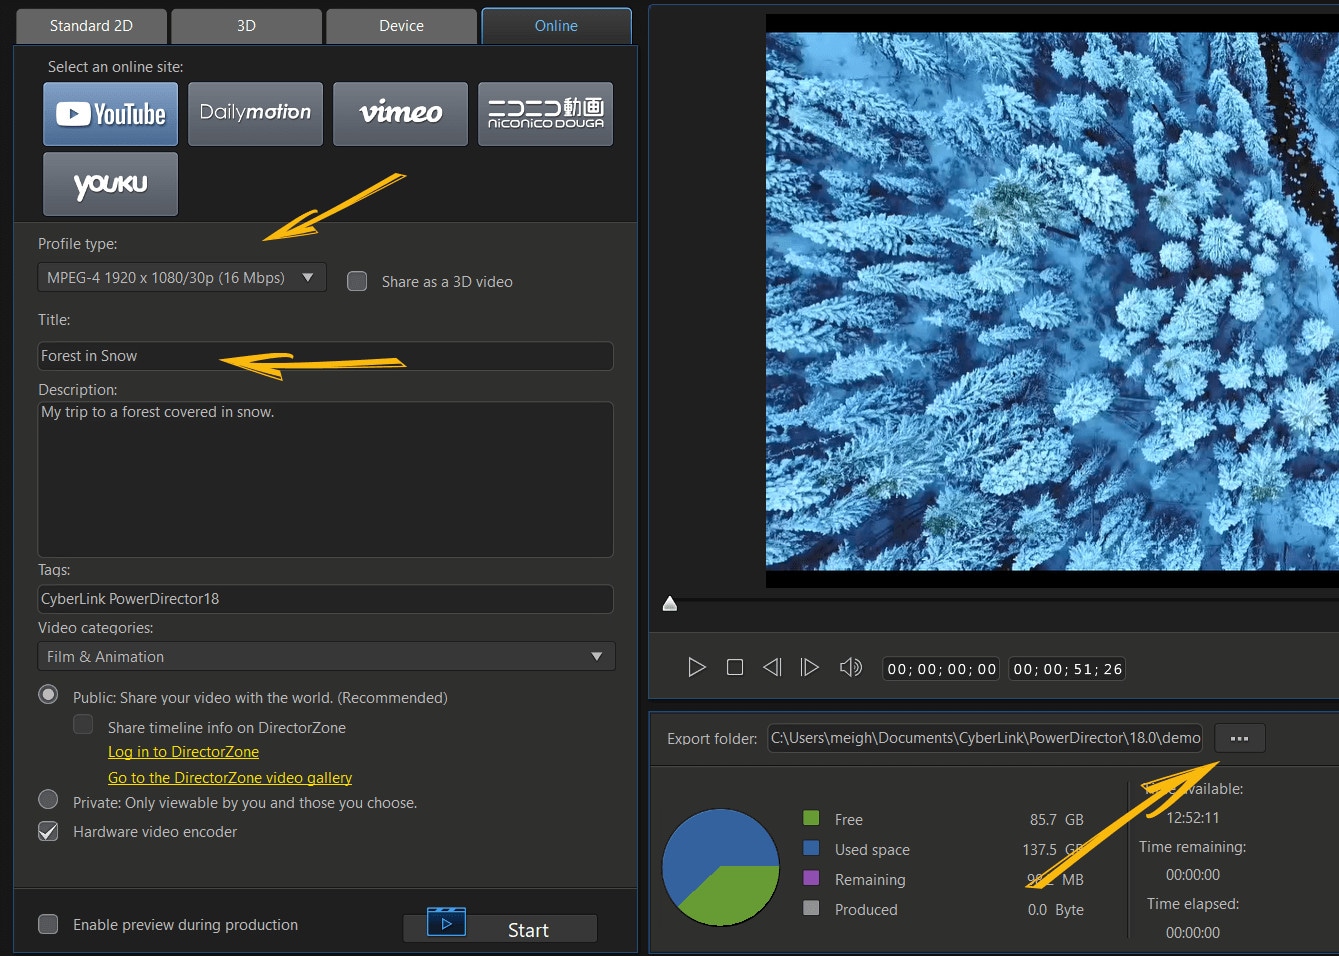
Once you select the video format you prefer, you will be able to save your GoPro video.
VideoProc Vlogger
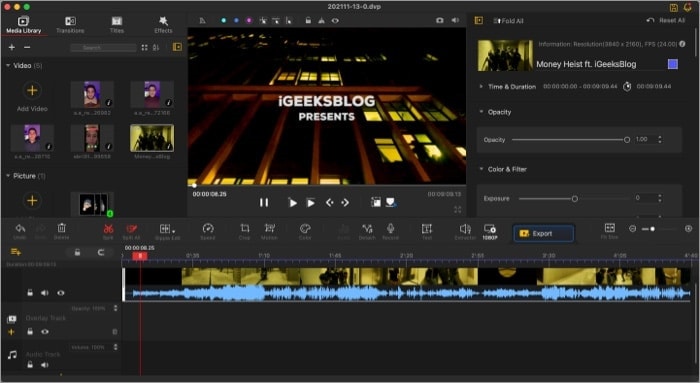
Supported System: Windows and Mac
VideoProc Vlogger is the best GoPro editor for anyone looking for speed adjustment. The video editor uses visualized speed ramping to alter the speed throughout a clip. This program contains over 20-speed features to help you quickly change the tone and tempo of your GoPro video. Furthermore, VideoProc Vlogger is beginner-friendly with a lot of advanced editing features. These features include automatic keyframes and flexible Bezier curves to slow parts of a video without splitting it.
This free GoPro video editor can simulate motion roll, dolly, tilt, and even truck effects. You can also push in and out and stylize your video clips with rotation, fast zooms, and shakes. With VideoProc Vlogger, you fix grain video, remove fish-eye, extract audio and apply motion crops to your video. The video editor is best at creating new motion trails to change the action of the video.
Although VideoProc Vlogger is a free video editor, it definitely lacks some advanced editing features. For example, you can edit your videos without the annoying ads or watermarks. In addition, the video editor is designed for beginners, content creators, and hobbyists as it lacks features like video stabilization. So while the video editor is not for professionals, it’s worth trying out.
Pros
- Requires low system requirements
- It is entirely free with no ads and watermarks
Cons
- It lacks advanced editing features
- Rendering is somewhat slow
Steps to Edit using VideoProc Vlogger
- Step 1: First, import your GoPro videos from your Mac device to VideoProc Vlogger.
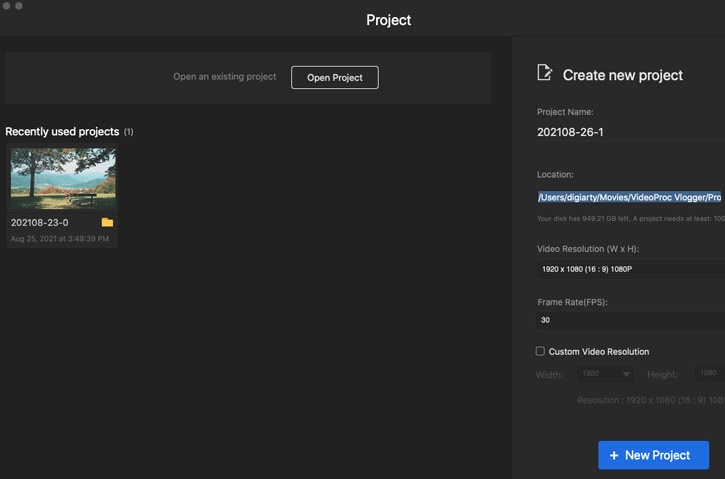
Simply Launch VideoProc Vlogger on your Mac, hit the plus icon in the media library, and add and import the videos.
- Step 2: Now, split and cut the GoPro Videos.
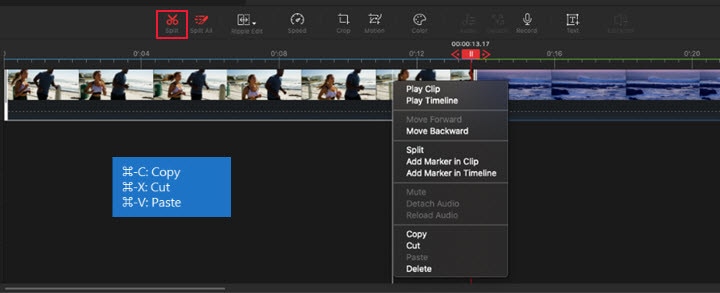
Simply drag the video clips to the timeline and begin editing. Now, put the playhead to exactly where you want to split the video and tap the split button.
- Step 3: You can also fix GoPro lens distortion.
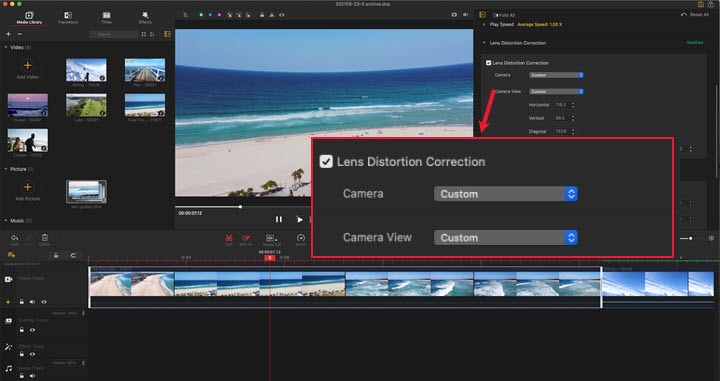
If you feel that your video looks distorted, tick the lens distortion box to resolve the issue.
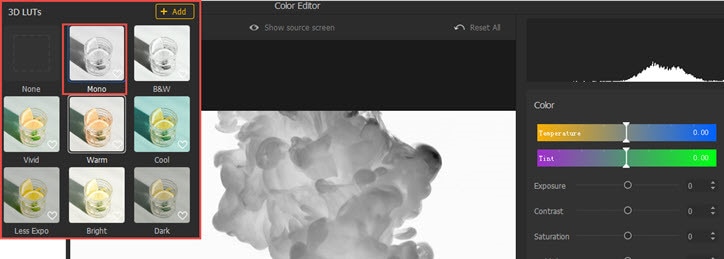
- Step 4: You can do the color correction or grading for any dark GoPro videos. Simply apply a preset aesthetic filter or simply adjust color normally.
- Step 5: Adjust the speed of the GoPro video.
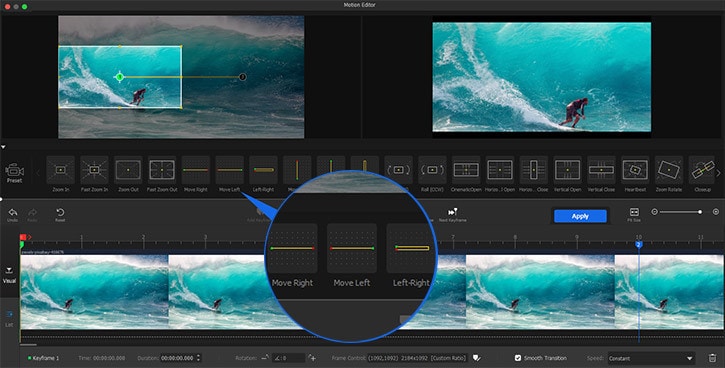
To adjust the speed of the video, click speed in the toolbar to open the speed editor. Then change as you desire.
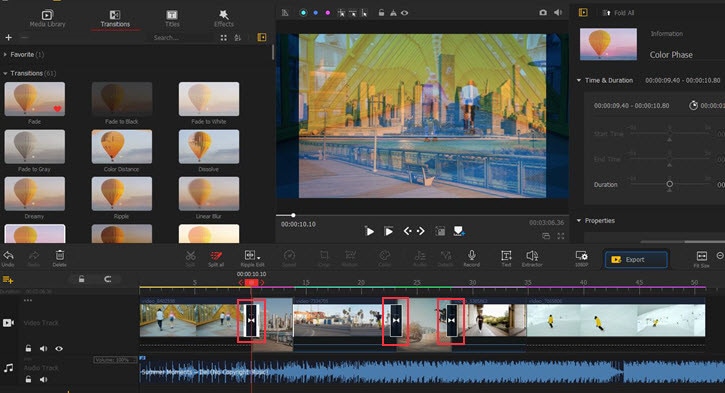
- Step 6: You can also add transitions, titles, and effects by opening the panels of transitions, effects, and tiles.
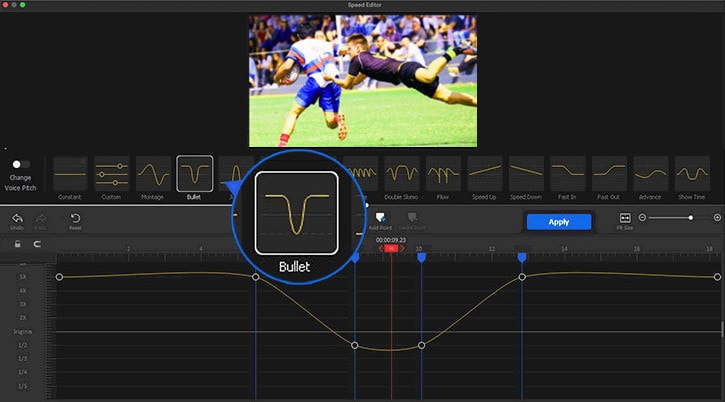
- Then drag a transition to the space between two video clips, same with titles to the subtitle and effect to the effect track.
- Step 7: Next, remove noise and background music by clicking the video track and tapping “detach” to separate the audio from the video.
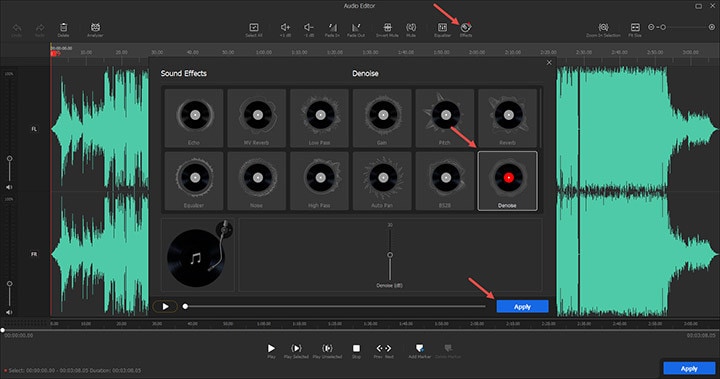
- You can also add music to replace the background noise.
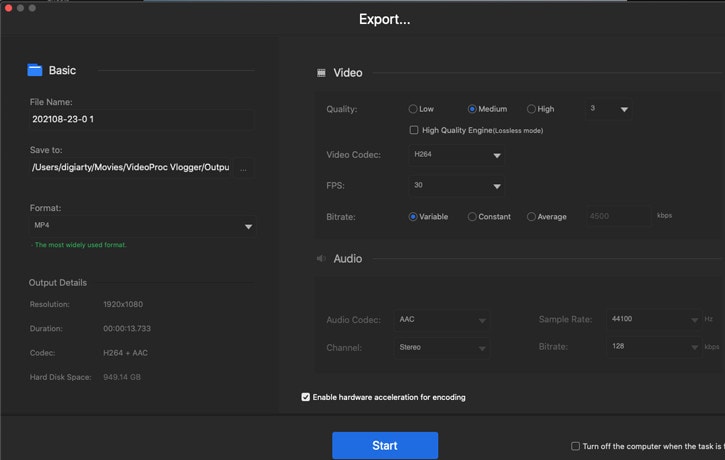
- Step 8: Finally, after the editing, you can export the GoPro video to your Mac device by setting the file name, format, file location, and video quality.
iMovie
Supported System: Mac only
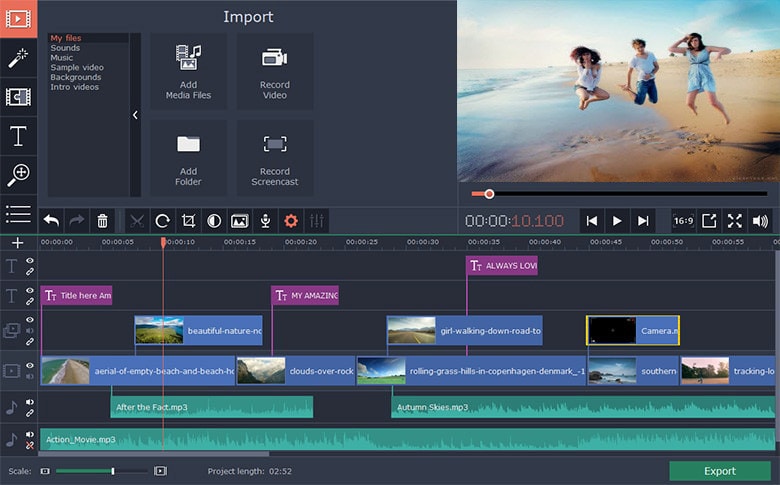
This editor is designed to ensure an excelling editing process for Mac users. Therefore, beginners, content creators, and even hobbyists can utilize this video editor to edit their videos. Although iMovie is a free GoPro video editor, it offers incredible editing features to make your video look more professional. These features include HD and 4K video support and speed adjustment tools that can slow down or speed up your video clips.
Although it comes free on all Mac devices, iMovie also has tons of themes, templates, and presets to make editing a breeze. For example, you can select the video clips that will be automatically styled and edited with titles, transitions, and music. You can make all these changes with just a few clicks. In addition, you can also rearrange, trim, split, and even delete your ready-made video clips.
Furthermore, you can always modify the shift focus and depth of field while editing your video. However, it lacks some advanced features you will need while editing, such as Multicam, motion tracking, and 360 editing. On the other hand, it has a user-friendly interface with essential editing functions.
Pros
- It has a simple and user-friendly interface
- It is definitely beginner-friendly
Cons
- It lacks essential and advanced GoPro editing features and functions
Steps to Edit using iMovie
- Step 1: first, you have to launch the iMovie and create a video project.
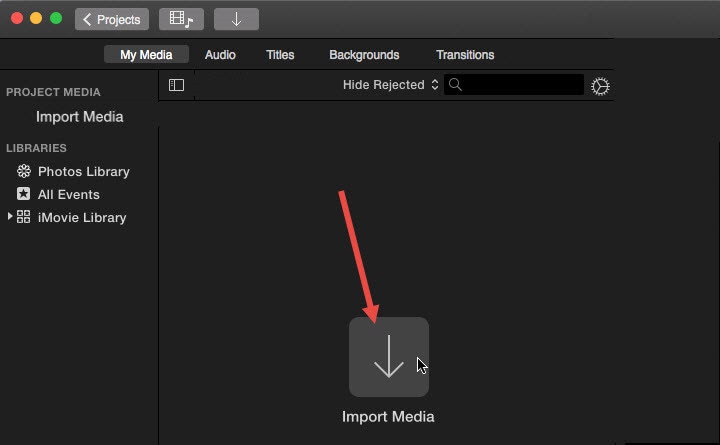
- Step 2: Now, you can click the Import button to import your GoPro video files from your Mac to it.
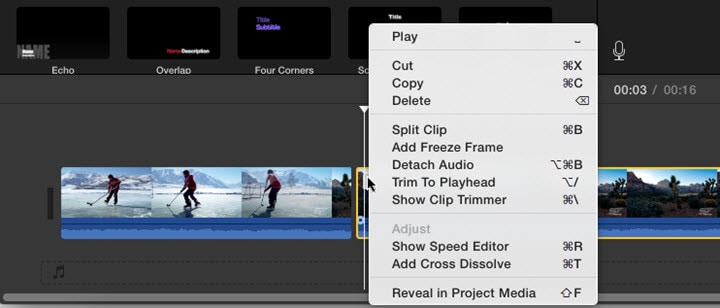
- Step 3: Drag the video files from the program media library to the timeline for editing.
- Step 4: Load a song to the audio track if you wish to add background music to your video.
- Step 5: To split your video into smaller parts, right-click on a clip.
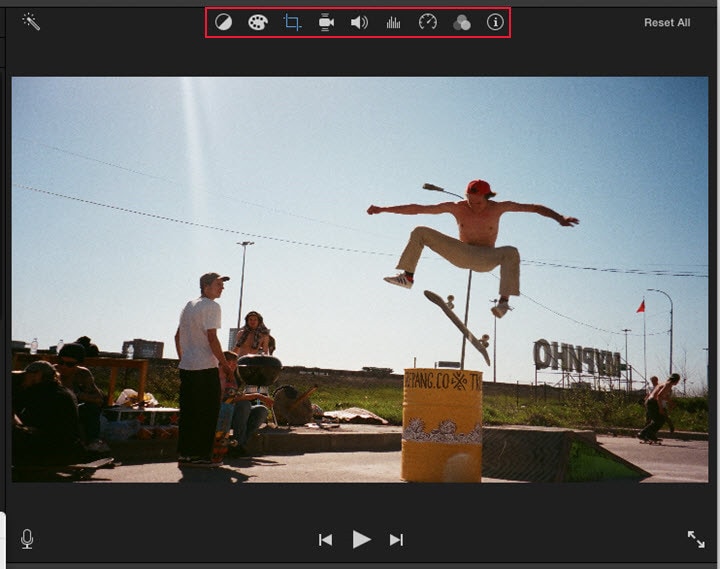
- Step 6: to edit your GoPro video with advanced tools like color correction, crop, grading, speed, and volume, simply move to the toolbar just above the timeline.
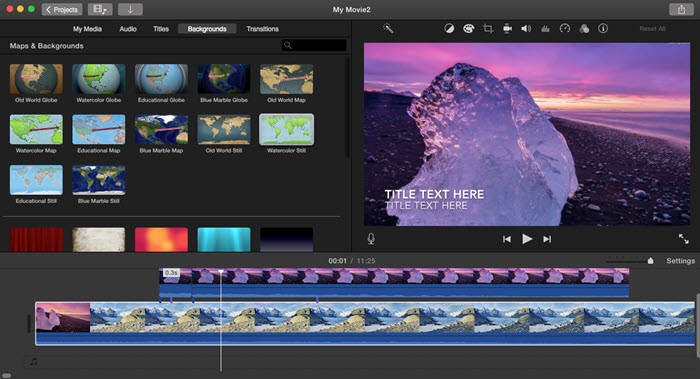
- Step 7: to add title, and transitions, you can drag a title and transition to the desired space between two clips.
- Step 8: preview and export your GoPro video from iMovie in the preferred format.
More Paid GoPro video editor on Mac to Cut MP4 Videos
If you desire GoPro video editors that offer more than just the basic editing features, you should try the paid GoPro video editors. The paid GoPro video editors offer more professional editing features for Mac users. In this section, you’ll learn about our top three paid GoPro video editors to edit your GoPro videos on Mac.
Adobe Premiere Pro
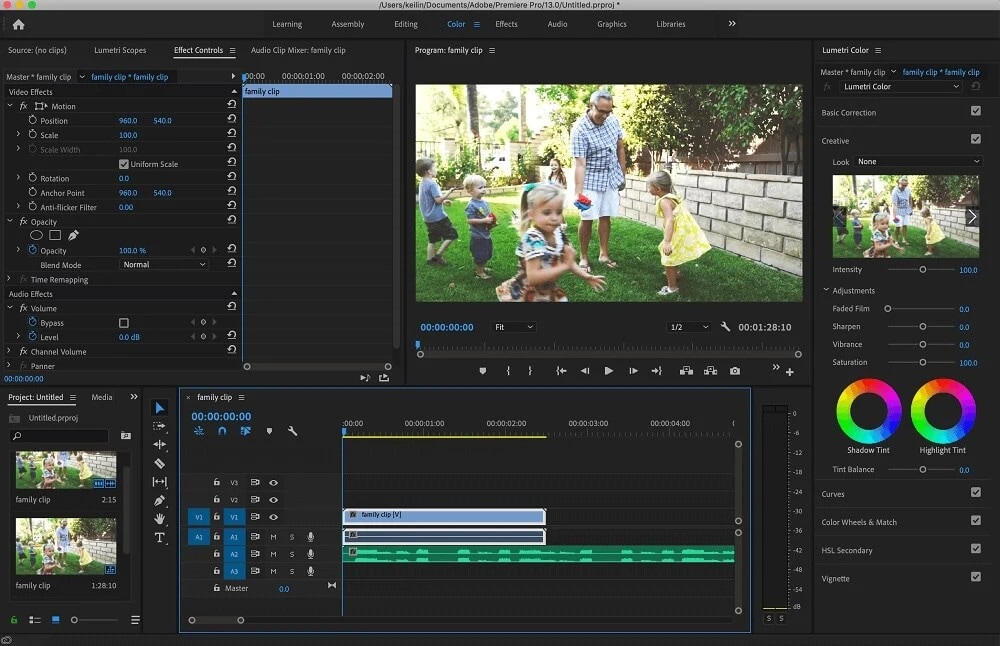
Supported System: Windows and Mac
This paid GoPro video editor is best for professionals who have experience creating video projects. This GoPro editing tool is compatible with Mac and Windows devices and also supports several video formats. Professionals use this video editor to edit top-notch videos such as Hollywood action movies and TV shows. In addition, it offers a long list of powerful features ideal for standard and action video editing.
Some of these professional features include Multicam, 360-degree, VR editing, and will export in up to 8k. The GoPro video editors also have a lot of sophisticated video stabilization tools, such as the warp stabilizer effect. The video stabilizer function help reduce camera shake, especially when zooming in. Other features include unlimited video tracks, lens distortion, access to the creative cloud and will match video to music.
In addition, the GoPro video editor only offers a 7-days free trial and is relatively expensive. Although Adobe Premiere Pro video editor is professional and high-quality, it has a steep learning curve. The steep learning curve is not appropriate for beginners.
Pros
- It supports all video formats
- It supports real-time video editing
Cons
- The system requirements are resource-intensive
- Not ideal for beginners
Steps to Edit using Adobe Premiere Pro
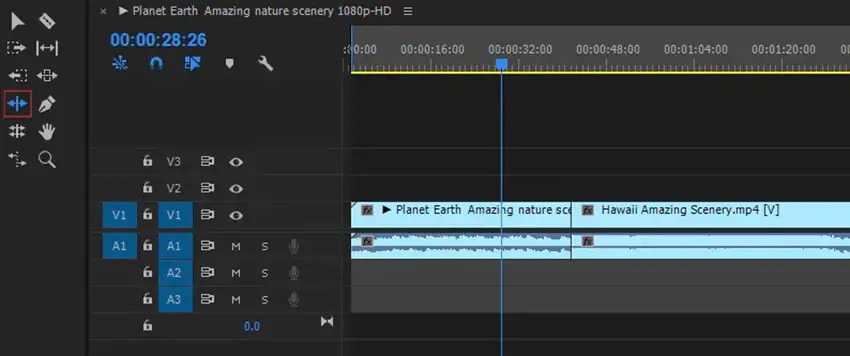
- Step 1: Import and cut your video files on PowerDirector. You can begin by cutting out any unnecessary parts from the video. You can also add text transitions, text, and other edits.
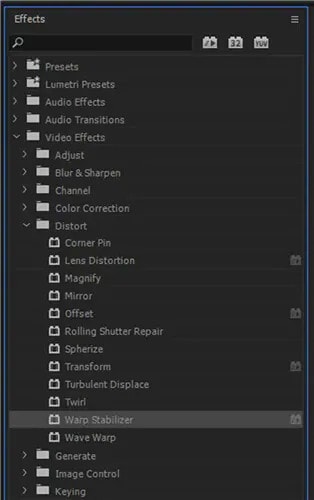
- Step 2: Next, stabilize the video using the Warp stabilizer. Double click on Warp stabilizer on the Effects menu to stabile the video.
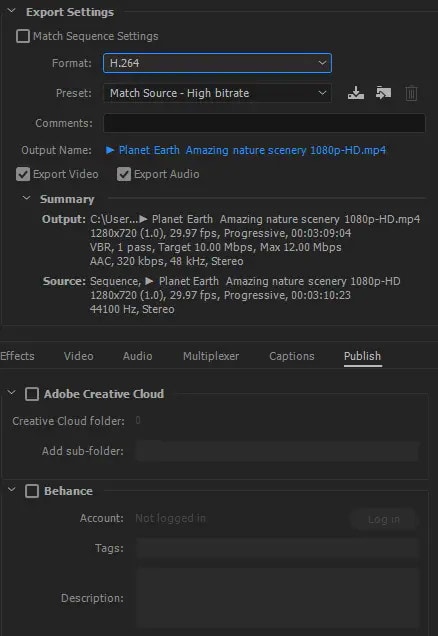
- Step 3: Finally, you can add audio and export the edited video file. Click on file, tap on export and select the format, presets, and the location to export your file.
Adobe After Effect
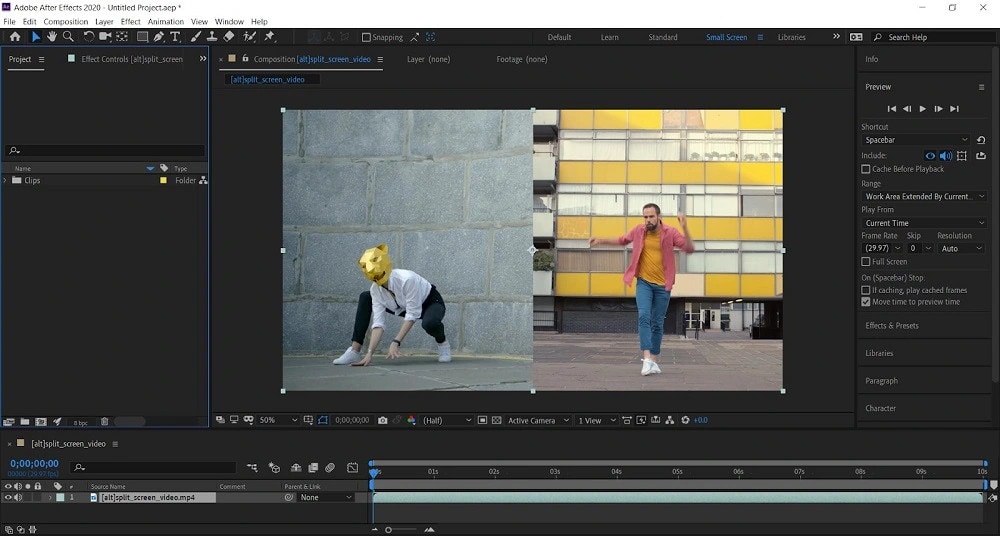
Supported System: Windows and Mac
This GoPro editor is compatible with Mac and offers many basic video editing features to ensure top-notch results. This GoPro editor is great for editors who want to add special effects like motion tracking to their videos. The after-effect function allows you to add a graphical element to a moving person, animal, car, or camera. You can also create cartoon effects, logos, stickers, or text to move seamlessly with the action onscreen.
In addition to its essential editing tools, you can also remove elements from your video with the pro-level digital rotoscoping tools. You can also use the after-effect to add elements to the missing video. Other features include 360, 3D, VR editing, transitions, lens distortions, and distortion effects for professional editing.
This GoPro video editor is an effective software and is best for adding visual effects to action camera videos. However, it lacks some essential video editing tools that you might need to make your video Hollywood standard. In addition, it also has a steep learning curve which makes it not ideal for beginners. Furthermore, as a GoPro video editor looking to do just the basic edits, then the After Effects is definitely not for you.
Pros
- It comes with realistic special effects
- It has a high-quality noise reduction
Cons
- It is not for beginners due to the steep learning curve
- It comes with only a 7-day free trial
- It is quite expensive
Steps to Edit using Adobe After Effects
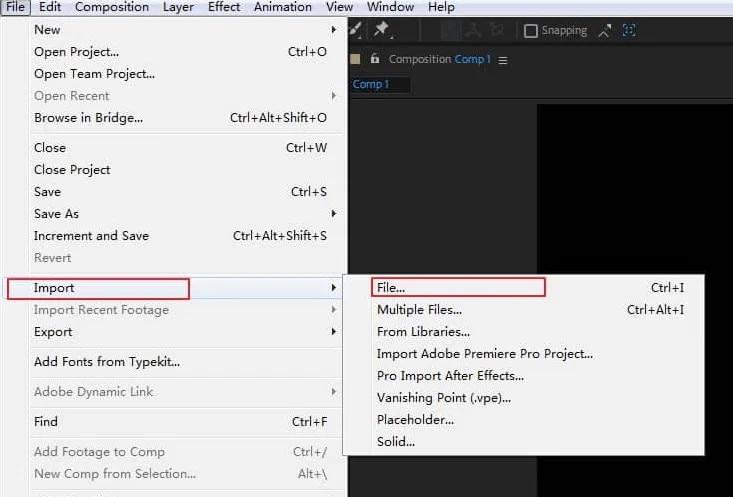
- Step 1: Import your video by going to ‘file’ on the menu and clicking ‘import’ from the dropdown menu.
- You can begin by cutting out any unnecessary parts from the video. You can also add text transitions, text, and other edits.
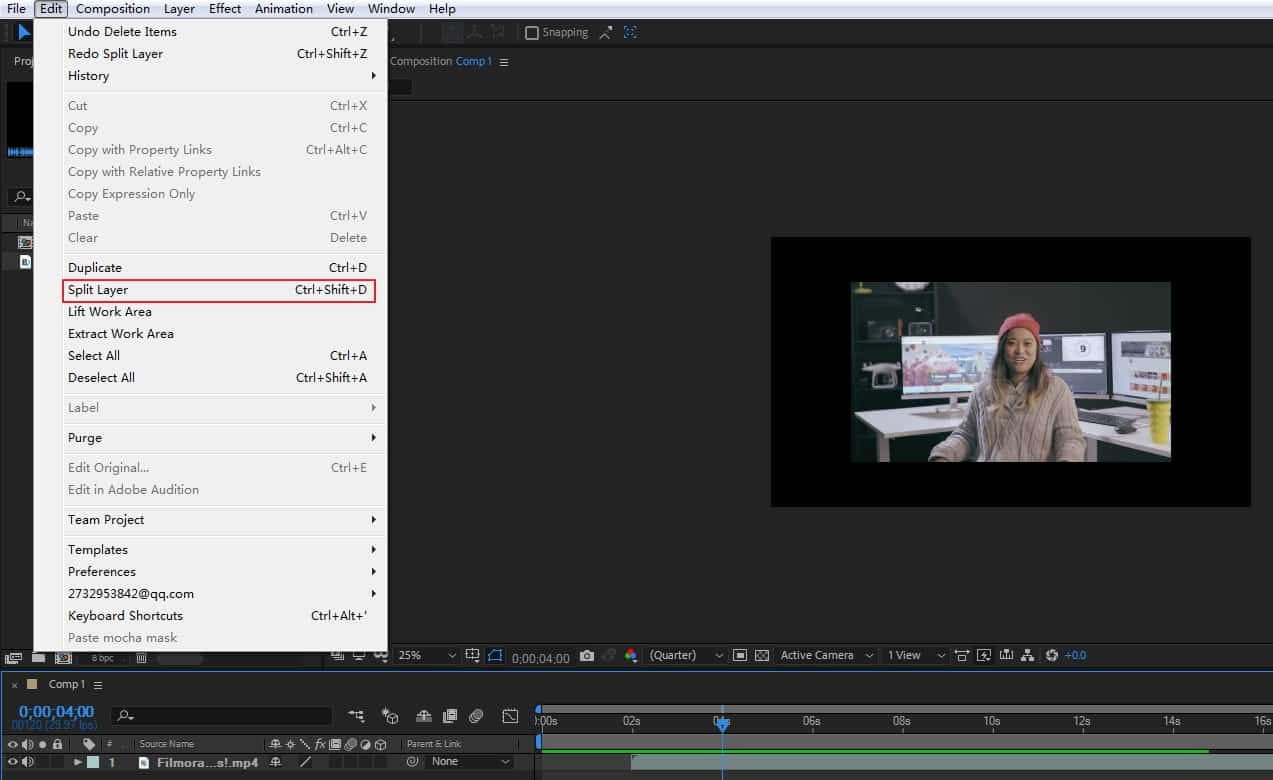
- Step 2: Next, you can apply necessary editing such as trimming, transitioning, and other edits.
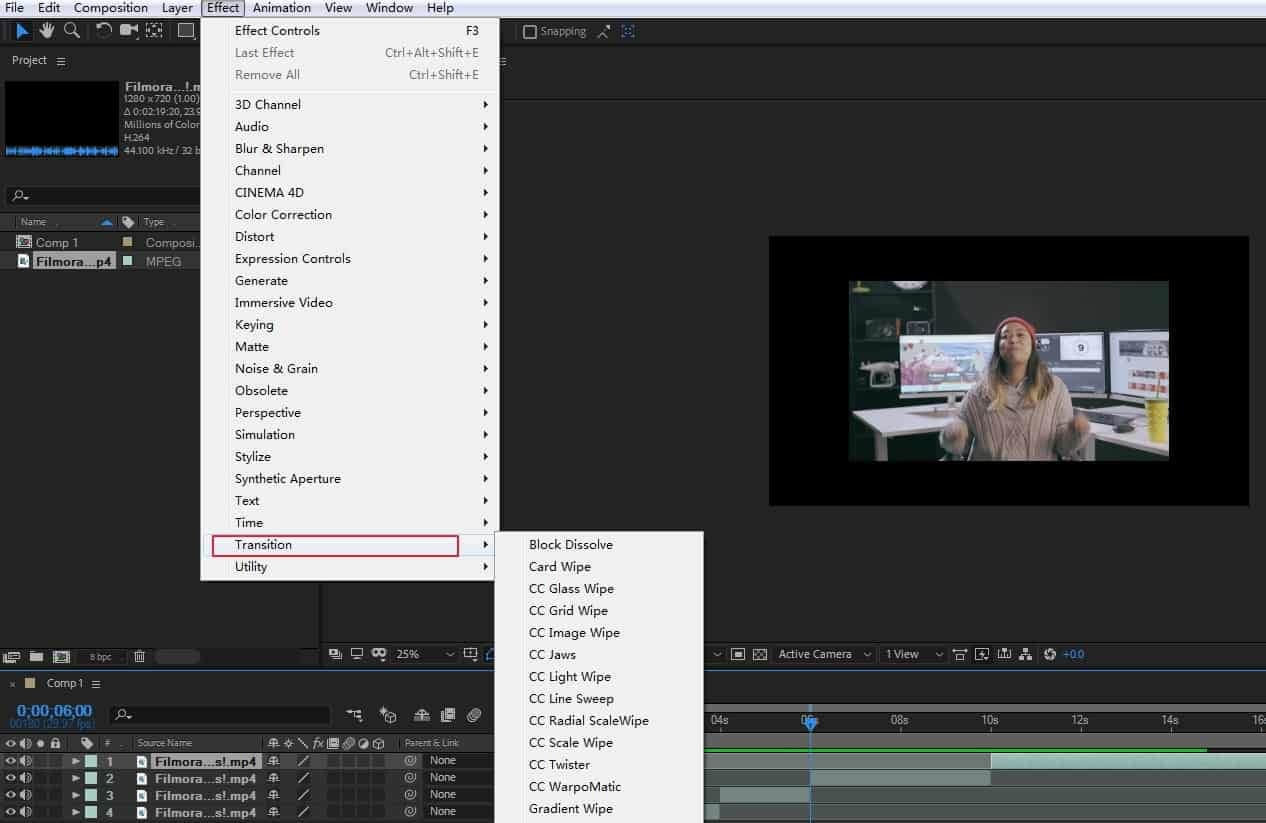
- Step 3: Finally, you can add audio and export the edited video file. Click on file, tap on export and select the format, presets, and the location to export your file.

Final Cut Pro
Supported System: Mac only
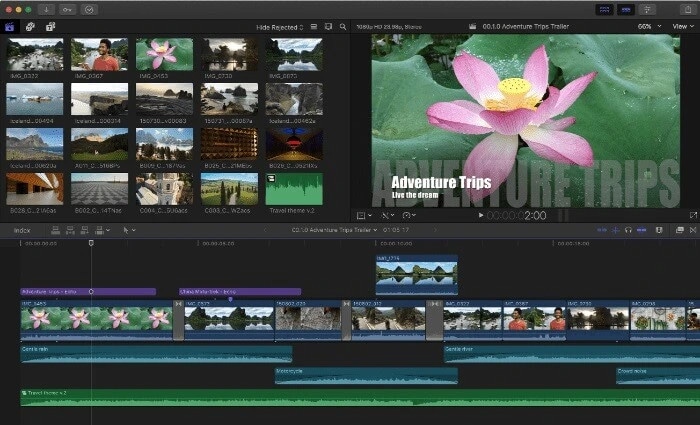
The Final Cut Pro is another best-paid GoPro video editor for editing GoPro videos on Mac. This video editor is ideal for editing 360 GoPro videos. This is because it offers all the editing tools you need to edit, import, and deliver both stereoscopic and monoscopic 360 videos. The GoPro video editors come with a lot of powerful features such as background noise removal, Multicam editing, color adjustment tools, and an object tracker.
You can use the GoPro video editor to visualize, remove camera rigs, change orientation, or straighten the horizon. Final Cut Pro can also easily apply graphics and effects to 360 videos and add 360 videos to regular videos with the tiny planet effect. With electronic stabilization, you can clean up your video and enhance your audience’s viewing experience. The magnetic timeline feature eliminates clip collisions and streamlines the video editing process.
Although the GoPro video editor has some notable GoPro features, it is expensive to purchase. However, it has a generous 90-day free trial to explore. It is also not beginner-friendly and requires time to learn, especially for new GoPro editors to understand. In addition, it supports several Video formats.
Pros
- It has convenient asset management functions
- Precision editing is sure with the magnetic timeline function
Cons
- It is expensive
- It is not ideal for GoPro beginners
Steps to Edit using Final Cut Pro
- Step 1: First, Launch the program
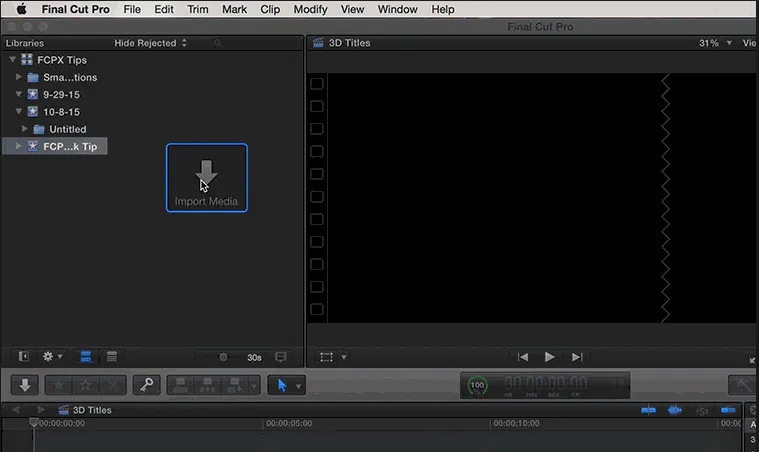
- Step 2: Import your video files to the timeline and begin editing.
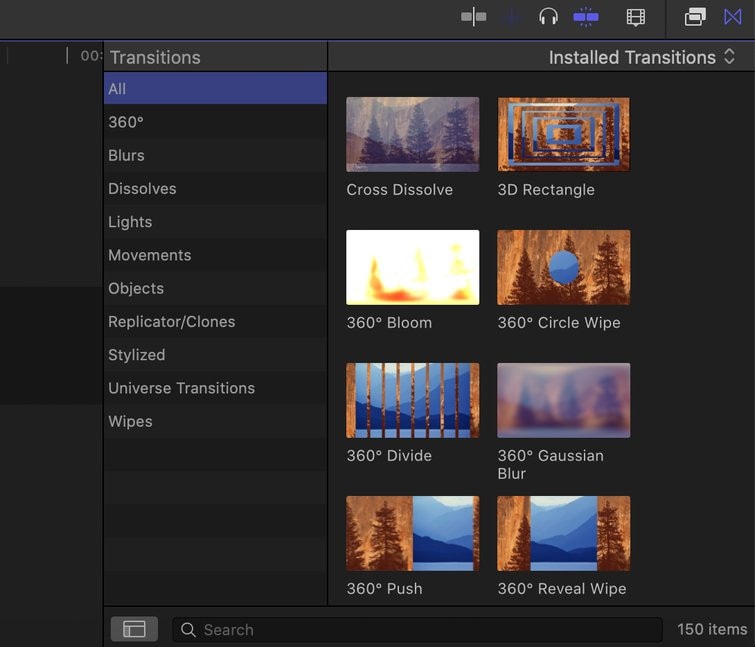
- Step 3: Next, you can apply necessary editing such as trimming, transitioning, and other edits.
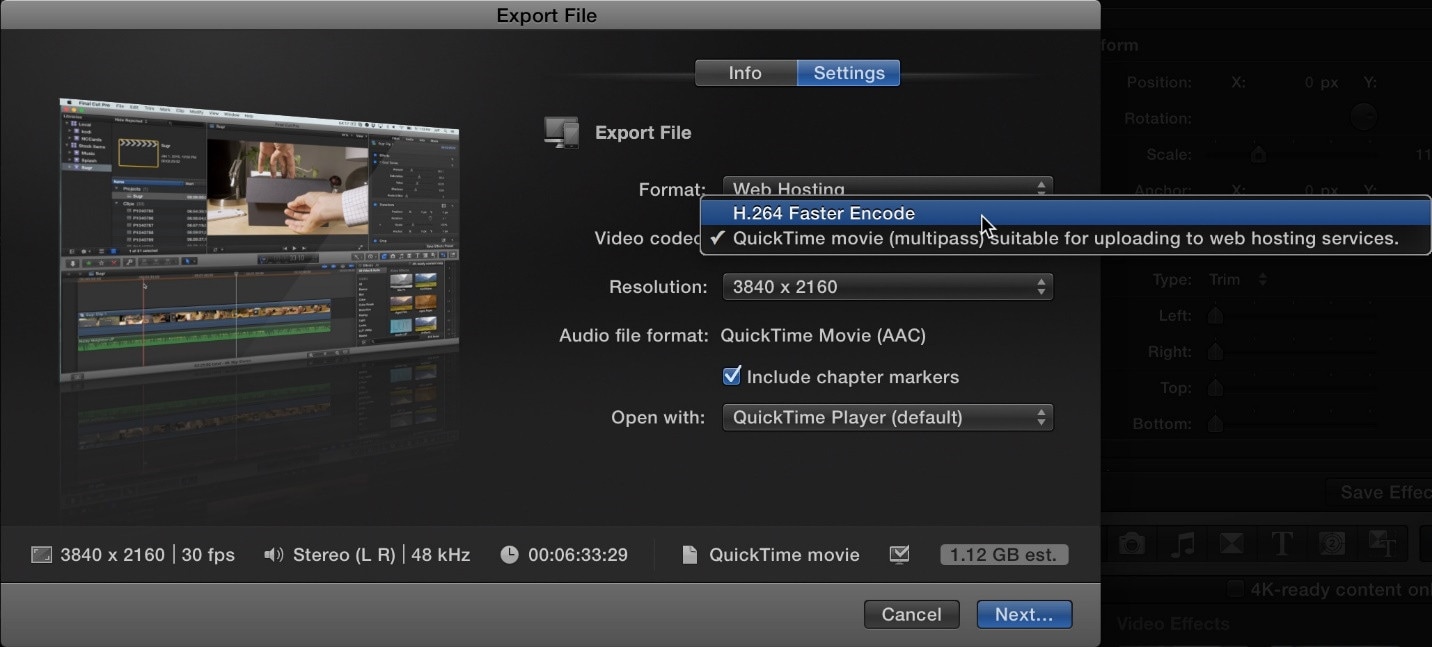
- Step 4: Finally, you can add audio and export the edited video file. Click on file, tap on export and select the format, presets, and the location to export your file.
Which should I Choose: Free or Paid GoPro Video Editor?
Many of these GoPro video editors for Mac (free and paid) are available on the internet. Therefore, it can be hard sometimes to choose the right GoPro video editor for Mac. However, you’ll need to consider factors before making your choice. Here are some of these factors.
Level of Expertise
This is a vital factor you should put into consideration before choosing a GoPro video editor. As a beginner, you wouldn’t need a GoPro editor that offers complex editing functions that you can’t use. Also, as a professional, you shouldn’t go for an editor that lacks the necessary editing tools to meet your editing needs. As an editor, you should totally be on the lookout for an editor that supports both beginners and professionals. This will remove the need to search for a new video editor at any experience level.
Interface
Another factor to consider is the user interface of your chosen video editor. When you go for a more friendly user interface, you will be saving yourself the time to get familiar with the software. Is the video editor free or paid? Regardless of the answer, check out the user interface before choosing one.
Formats
You also need to ensure that the editing software doesn’t limit you to specific video formats. You should go for a GoPro video editor that supports the common and trendy video formats. This will allow you to convert your edited videos when you need to share them.
Now, most free GoPro video editors offer just limited features to users, limiting your editing course. Furthermore, most paid GoPro video editors focus on a professional level, making it difficult for new editors to use. Therefore, you should totally opt for a GoPro video editor that succinctly supports all your editing needs.
FAQs About Editing Gopro Videos
- Can I edit GoPro videos like a Professional? Yes, you can. Learn to use advanced video editing features. The ideal thing to do is pick a GoPro video editor with a user-friendly interface to enable you to learn these professional methods.
- What is the best GoPro video editor for Mac? The best GoPro video editor for Mac devices depends on your level of expertise and what you want to achieve.
- Can I edit a GoPro video? Yes, you can. Find a GoPro editing software compatible with your Mac devices and ideal for your level of experience.
Conclusion
There are several GoPro video editors, and the editor you choose depends on your needs and your budget. It also depends on your level of experience and the equipment on the ground. However, we have a list of different GoPro video editors for you. Examine our reviews of these GoPro video editors and see which is perfect for you.

- Step 6: Once you open it, two folders will display. These folders are DCIM and MISC.

- Step 7: Click on the DCIM folder to find all videos stored on the device.

- Step 8: Finally, you can now begin uploading all your GoPro videos to Mac by simply copying and pasting.

Import GoPro Videos to Mac before editing – GoPro Quick App
Another option to import GoPro videos to Mac is the GoPro Quick app. GoPro quick app is a tool by GoPro designed to help view GoPro videos on Mac and import them. Having this app on your Mac device is relatively easy. First, you have to download its setup from the GoPro website and install it. So far, this app is one of the best tools to view and import GoPro files to your Mac device. Here are the steps to importing GoPro videos to Mac while getting set to edit.
- Step 1: First thing first, Launch the app. However, if you have not installed the app, you should quickly download and install the app.

- Step 2: Now, you can connect the GoPro camera to your Mac. You can do this by using a USB cable.
- Step 3: After launching the app, you will see an icon labeled Import Filesdisplayed at the interface.

- Step 4: from here on, you will also see an icon to import the videos from your GoPro camera into your Mac device.
When the import is complete, you can now locate your GoPro videos in the folder of your choice. Now, you can close the GoPro quick app, unplug the GoPro camera and get ready to edit your videos.
Best GoPro Video Editor on Mac
A lot of people understand that GoPro is the best way to make your video look like a professional shot. After shooting the video, you’ll obviously want to make some edits to make them look more professional before sharing them. After all, no one wants to watch poor-quality videos, bad noises, and other unprofessional clips. Therefore, we have a list of the best GoPro editor for Mac in this article. Keep reading to learn about the best GoPro video editor on Mac.
Best GoPro Video Editor on Mac – Filmora Video Editor

Supported System: Mac and Windows
A lot of free video editing software usually comes as either too straightforward or too challenging to understand. While other video editing software lacks vital editing features such as color correction and audio or noise editing features. However, the Filmora Video Editor for Mac bridges the gap and is undoubtedly the best GoPro Video editor on Mac.
This video editing software is an easy-to-use editing tool totally equipped with a lot of video editing functions. With Filmora, you can edit your GoPro videos on your Mac like an expert and expect a professional outcome. Filmora offers excellent performance and enhances video quality taking the user experience to a whole new level.
Additionally, Filmora is an editing tool with helpful functionality taking the user experience to a whole new level. Finally, this tool is indispensable due to its speed, intuitive user interface, and other file format support.
For Win 7 or later (64-bit)
For macOS 10.14 or later
Filmora Features
- Filmora editing tool is versatile and supports other video formats like MP4, MOV, MKV, AVCHD, etc.
- You can cut, crop, split, trim, and even combine clips with just a few clicks.
- Filmora has access to several advanced video effects such as royalty-free music, transition, animated titles, and motion elements.
- With Filmora color tuning features, your videos can look like professional Hollywood videos.
- You can also edit sounds on your video with a noise removal feature, audio equalizer, and audio keyframing tools.
- You get 500+ free special video effects to create and customize your videos yourself.
- Filmora has access to advanced video effects like PIP, audio mixer, and green screen, which you can add to your videos.
- Access to 1000+ effects downloading resources to make videos in any desired styles.
Steps to Editing Videos on Mac Using Filmora
Want to edit your GoPro videos the right way? Editing your GoPro videos on Mac with Filmora is relatively easy and will only take a few clicks. Read and follow these steps below to learn to edit GoPro videos on Mac with this easy-to-use GoPro video editor.
- Step 1: Import the GoPro video files
First, you launch the GoPro video editor and then click the “Import Media here” button. This will upload the GoPro video clips to the program. You can save these files in a suitable location for easy access before you begin editing.

- Step 2: Edit the GoPro Video clips

Secondly, you should drag the GoPro video clips from the folder or User’s album to the timeline and begin editing.
To trim your GoPro videos, simply mouser over the clip from the beginning to the end of the video. You should do this until the trim icon is displayed. The trim icon is labeled as “I” on the editing timeline. You can drag the trim icon forward or backward to trim the video as you desire.
Aside from the trimming option, you can also apply split footage, video stabilization, and even add transitions between two clips. You can also combine GoPro videos and rotate GoPro videos by simply tapping the icons respectively.

- Step 3: Export the edited GoPro video files

Once you finish editing, you can now navigate to the “Export” icon. Furthermore, you can also select the save path and file format from the displayed output window. After this selection, you can finally choose the “Export” icon. Once you complete this, you can find your edited video file in the same path.
More Free GoPro video editor on Mac to Edit Gopro Videos
In this section, we will list out some of the best free GoPro video editors to successfully edit your videos on Mac. These programs are, but you will have to download them to enjoy all the editing tools.
PowerDirector

Supported System: Windows and Mac
We have PowerDirector as the best overall editor on our list of best free GoPro video editors on Mac. This free GoPro video editor is compatible with Mac and has a robust video editing program. If you are looking for a free GoPro video editor with a wide range of exciting editing features, this is one of the best options. One of the benefits of using this GoPro video editor is that it comes with an Action Camera Center.
It has tons of cool effects, titles, filters, and templates to explore, especially if you want to make more action camera masterpieces. In addition, this video editor has special editing and effects tools to improve your action camera video. For example, you can stabilize your shaky video, apply cool speed effects, and correct fish-eye distortion in some minutes. You can also use the slow-motion effect, zoom, correct color problems, and freeze frame with just a few clicks.
The GoPro editor also comes with noise correction and video denoise to make your video crystal clear and remove unwanted audio noise. In addition, PowerDirector has thousands of royalty-free stock assets such as sound effects and background music. In essence, PowerDirector is a GoPro video editor that offers everything you need to produce, enhance and cut thrilling action videos. It is versatile, best for action footage editing, and supports several video formats.
Pros
- It is beginner-friendly
- It comes with easy-to-use action camera-specific editing tools
Cons
- While it is free, you need a subscription to enjoy the latest features.
Steps to Edit using PowerDirector
- Step 1: Launch the app and select ‘full mode’ to begin editing your video
- Step 2: Select’ import media folder’ to get the videos you wish to edit
- Step 3: You can now browse the folder on your Mac device and select the folder with the videos. Then Click ‘Select folder’ to move them into the editor’s media library.

- Step 4: Now, the editing process can begin. You can stabilize and change the speed of your videos with PowerDirector.

- You can add title text and motion blur to your GoPro videos if you like that.

- If you want to include transitions, you can do so by selecting the transition room.
- Step 5: Next, select the ‘produce’ button to export your video once you are sure that the editing is complete.

- Step 6: Change the video format before exporting.

Once you select the video format you prefer, you will be able to save your GoPro video.
VideoProc Vlogger

Supported System: Windows and Mac
VideoProc Vlogger is the best GoPro editor for anyone looking for speed adjustment. The video editor uses visualized speed ramping to alter the speed throughout a clip. This program contains over 20-speed features to help you quickly change the tone and tempo of your GoPro video. Furthermore, VideoProc Vlogger is beginner-friendly with a lot of advanced editing features. These features include automatic keyframes and flexible Bezier curves to slow parts of a video without splitting it.
This free GoPro video editor can simulate motion roll, dolly, tilt, and even truck effects. You can also push in and out and stylize your video clips with rotation, fast zooms, and shakes. With VideoProc Vlogger, you fix grain video, remove fish-eye, extract audio and apply motion crops to your video. The video editor is best at creating new motion trails to change the action of the video.
Although VideoProc Vlogger is a free video editor, it definitely lacks some advanced editing features. For example, you can edit your videos without the annoying ads or watermarks. In addition, the video editor is designed for beginners, content creators, and hobbyists as it lacks features like video stabilization. So while the video editor is not for professionals, it’s worth trying out.
Pros
- Requires low system requirements
- It is entirely free with no ads and watermarks
Cons
- It lacks advanced editing features
- Rendering is somewhat slow
Steps to Edit using VideoProc Vlogger
- Step 1: First, import your GoPro videos from your Mac device to VideoProc Vlogger.

Simply Launch VideoProc Vlogger on your Mac, hit the plus icon in the media library, and add and import the videos.
- Step 2: Now, split and cut the GoPro Videos.

Simply drag the video clips to the timeline and begin editing. Now, put the playhead to exactly where you want to split the video and tap the split button.
- Step 3: You can also fix GoPro lens distortion.

If you feel that your video looks distorted, tick the lens distortion box to resolve the issue.

- Step 4: You can do the color correction or grading for any dark GoPro videos. Simply apply a preset aesthetic filter or simply adjust color normally.
- Step 5: Adjust the speed of the GoPro video.

To adjust the speed of the video, click speed in the toolbar to open the speed editor. Then change as you desire.
- Step 6: You can also add transitions, titles, and effects by opening the panels of transitions, effects, and tiles.

- Then drag a transition to the space between two video clips, same with titles to the subtitle and effect to the effect track.

- Step 7: Next, remove noise and background music by clicking the video track and tapping “detach” to separate the audio from the video.

- You can also add music to replace the background noise.
- Step 8: Finally, after the editing, you can export the GoPro video to your Mac device by setting the file name, format, file location, and video quality.

iMovie

Supported System: Mac only
This editor is designed to ensure an excelling editing process for Mac users. Therefore, beginners, content creators, and even hobbyists can utilize this video editor to edit their videos. Although iMovie is a free GoPro video editor, it offers incredible editing features to make your video look more professional. These features include HD and 4K video support and speed adjustment tools that can slow down or speed up your video clips.
Although it comes free on all Mac devices, iMovie also has tons of themes, templates, and presets to make editing a breeze. For example, you can select the video clips that will be automatically styled and edited with titles, transitions, and music. You can make all these changes with just a few clicks. In addition, you can also rearrange, trim, split, and even delete your ready-made video clips.
Furthermore, you can always modify the shift focus and depth of field while editing your video. However, it lacks some advanced features you will need while editing, such as Multicam, motion tracking, and 360 editing. On the other hand, it has a user-friendly interface with essential editing functions.
Pros
- It has a simple and user-friendly interface
- It is definitely beginner-friendly
Cons
- It lacks essential and advanced GoPro editing features and functions
Steps to Edit using iMovie
- Step 1: first, you have to launch the iMovie and create a video project.

- Step 2: Now, you can click the Import button to import your GoPro video files from your Mac to it.

- Step 3: Drag the video files from the program media library to the timeline for editing.

- Step 4: Load a song to the audio track if you wish to add background music to your video.
- Step 5: To split your video into smaller parts, right-click on a clip.
- Step 6: to edit your GoPro video with advanced tools like color correction, crop, grading, speed, and volume, simply move to the toolbar just above the timeline.
- Step 7: to add title, and transitions, you can drag a title and transition to the desired space between two clips.
- Step 8: preview and export your GoPro video from iMovie in the preferred format.

More Paid GoPro video editor on Mac to Cut MP4 Videos
If you desire GoPro video editors that offer more than just the basic editing features, you should try the paid GoPro video editors. The paid GoPro video editors offer more professional editing features for Mac users. In this section, you’ll learn about our top three paid GoPro video editors to edit your GoPro videos on Mac.
Adobe Premiere Pro

Supported System: Windows and Mac
This paid GoPro video editor is best for professionals who have experience creating video projects. This GoPro editing tool is compatible with Mac and Windows devices and also supports several video formats. Professionals use this video editor to edit top-notch videos such as Hollywood action movies and TV shows. In addition, it offers a long list of powerful features ideal for standard and action video editing.
Some of these professional features include Multicam, 360-degree, VR editing, and will export in up to 8k. The GoPro video editors also have a lot of sophisticated video stabilization tools, such as the warp stabilizer effect. The video stabilizer function help reduce camera shake, especially when zooming in. Other features include unlimited video tracks, lens distortion, access to the creative cloud and will match video to music.
In addition, the GoPro video editor only offers a 7-days free trial and is relatively expensive. Although Adobe Premiere Pro video editor is professional and high-quality, it has a steep learning curve. The steep learning curve is not appropriate for beginners.
Pros
- It supports all video formats
- It supports real-time video editing
Cons
- The system requirements are resource-intensive
- Not ideal for beginners
Steps to Edit using Adobe Premiere Pro
- Step 1: Import and cut your video files on PowerDirector. You can begin by cutting out any unnecessary parts from the video. You can also add text transitions, text, and other edits.

- Step 2: Next, stabilize the video using the Warp stabilizer. Double click on Warp stabilizer on the Effects menu to stabile the video.

- Step 3: Finally, you can add audio and export the edited video file. Click on file, tap on export and select the format, presets, and the location to export your file.

Adobe After Effect

Supported System: Windows and Mac
This GoPro editor is compatible with Mac and offers many basic video editing features to ensure top-notch results. This GoPro editor is great for editors who want to add special effects like motion tracking to their videos. The after-effect function allows you to add a graphical element to a moving person, animal, car, or camera. You can also create cartoon effects, logos, stickers, or text to move seamlessly with the action onscreen.
In addition to its essential editing tools, you can also remove elements from your video with the pro-level digital rotoscoping tools. You can also use the after-effect to add elements to the missing video. Other features include 360, 3D, VR editing, transitions, lens distortions, and distortion effects for professional editing.
This GoPro video editor is an effective software and is best for adding visual effects to action camera videos. However, it lacks some essential video editing tools that you might need to make your video Hollywood standard. In addition, it also has a steep learning curve which makes it not ideal for beginners. Furthermore, as a GoPro video editor looking to do just the basic edits, then the After Effects is definitely not for you.
Pros
- It comes with realistic special effects
- It has a high-quality noise reduction
Cons
- It is not for beginners due to the steep learning curve
- It comes with only a 7-day free trial
- It is quite expensive
Steps to Edit using Adobe After Effects
- Step 1: Import your video by going to ‘file’ on the menu and clicking ‘import’ from the dropdown menu.

- You can begin by cutting out any unnecessary parts from the video. You can also add text transitions, text, and other edits.

- Step 2: Next, you can apply necessary editing such as trimming, transitioning, and other edits.

- Step 3: Finally, you can add audio and export the edited video file. Click on file, tap on export and select the format, presets, and the location to export your file.

Final Cut Pro

Supported System: Mac only
The Final Cut Pro is another best-paid GoPro video editor for editing GoPro videos on Mac. This video editor is ideal for editing 360 GoPro videos. This is because it offers all the editing tools you need to edit, import, and deliver both stereoscopic and monoscopic 360 videos. The GoPro video editors come with a lot of powerful features such as background noise removal, Multicam editing, color adjustment tools, and an object tracker.
You can use the GoPro video editor to visualize, remove camera rigs, change orientation, or straighten the horizon. Final Cut Pro can also easily apply graphics and effects to 360 videos and add 360 videos to regular videos with the tiny planet effect. With electronic stabilization, you can clean up your video and enhance your audience’s viewing experience. The magnetic timeline feature eliminates clip collisions and streamlines the video editing process.
Although the GoPro video editor has some notable GoPro features, it is expensive to purchase. However, it has a generous 90-day free trial to explore. It is also not beginner-friendly and requires time to learn, especially for new GoPro editors to understand. In addition, it supports several Video formats.
Pros
- It has convenient asset management functions
- Precision editing is sure with the magnetic timeline function
Cons
- It is expensive
- It is not ideal for GoPro beginners
Steps to Edit using Final Cut Pro
- Step 1: First, Launch the program
- Step 2: Import your video files to the timeline and begin editing.

- Step 3: Next, you can apply necessary editing such as trimming, transitioning, and other edits.

- Step 4: Finally, you can add audio and export the edited video file. Click on file, tap on export and select the format, presets, and the location to export your file.

Which should I Choose: Free or Paid GoPro Video Editor?
Many of these GoPro video editors for Mac (free and paid) are available on the internet. Therefore, it can be hard sometimes to choose the right GoPro video editor for Mac. However, you’ll need to consider factors before making your choice. Here are some of these factors.
Level of Expertise
This is a vital factor you should put into consideration before choosing a GoPro video editor. As a beginner, you wouldn’t need a GoPro editor that offers complex editing functions that you can’t use. Also, as a professional, you shouldn’t go for an editor that lacks the necessary editing tools to meet your editing needs. As an editor, you should totally be on the lookout for an editor that supports both beginners and professionals. This will remove the need to search for a new video editor at any experience level.
Interface
Another factor to consider is the user interface of your chosen video editor. When you go for a more friendly user interface, you will be saving yourself the time to get familiar with the software. Is the video editor free or paid? Regardless of the answer, check out the user interface before choosing one.
Formats
You also need to ensure that the editing software doesn’t limit you to specific video formats. You should go for a GoPro video editor that supports the common and trendy video formats. This will allow you to convert your edited videos when you need to share them.
Now, most free GoPro video editors offer just limited features to users, limiting your editing course. Furthermore, most paid GoPro video editors focus on a professional level, making it difficult for new editors to use. Therefore, you should totally opt for a GoPro video editor that succinctly supports all your editing needs.
FAQs About Editing Gopro Videos
- Can I edit GoPro videos like a Professional? Yes, you can. Learn to use advanced video editing features. The ideal thing to do is pick a GoPro video editor with a user-friendly interface to enable you to learn these professional methods.
- What is the best GoPro video editor for Mac? The best GoPro video editor for Mac devices depends on your level of expertise and what you want to achieve.
- Can I edit a GoPro video? Yes, you can. Find a GoPro editing software compatible with your Mac devices and ideal for your level of experience.
Conclusion
There are several GoPro video editors, and the editor you choose depends on your needs and your budget. It also depends on your level of experience and the equipment on the ground. However, we have a list of different GoPro video editors for you. Examine our reviews of these GoPro video editors and see which is perfect for you.

- Step 6: Once you open it, two folders will display. These folders are DCIM and MISC.

- Step 7: Click on the DCIM folder to find all videos stored on the device.

- Step 8: Finally, you can now begin uploading all your GoPro videos to Mac by simply copying and pasting.

Import GoPro Videos to Mac before editing – GoPro Quick App
Another option to import GoPro videos to Mac is the GoPro Quick app. GoPro quick app is a tool by GoPro designed to help view GoPro videos on Mac and import them. Having this app on your Mac device is relatively easy. First, you have to download its setup from the GoPro website and install it. So far, this app is one of the best tools to view and import GoPro files to your Mac device. Here are the steps to importing GoPro videos to Mac while getting set to edit.
- Step 1: First thing first, Launch the app. However, if you have not installed the app, you should quickly download and install the app.

- Step 2: Now, you can connect the GoPro camera to your Mac. You can do this by using a USB cable.
- Step 3: After launching the app, you will see an icon labeled Import Filesdisplayed at the interface.

- Step 4: from here on, you will also see an icon to import the videos from your GoPro camera into your Mac device.
When the import is complete, you can now locate your GoPro videos in the folder of your choice. Now, you can close the GoPro quick app, unplug the GoPro camera and get ready to edit your videos.
Best GoPro Video Editor on Mac
A lot of people understand that GoPro is the best way to make your video look like a professional shot. After shooting the video, you’ll obviously want to make some edits to make them look more professional before sharing them. After all, no one wants to watch poor-quality videos, bad noises, and other unprofessional clips. Therefore, we have a list of the best GoPro editor for Mac in this article. Keep reading to learn about the best GoPro video editor on Mac.
Best GoPro Video Editor on Mac – Filmora Video Editor

Supported System: Mac and Windows
A lot of free video editing software usually comes as either too straightforward or too challenging to understand. While other video editing software lacks vital editing features such as color correction and audio or noise editing features. However, the Filmora Video Editor for Mac bridges the gap and is undoubtedly the best GoPro Video editor on Mac.
This video editing software is an easy-to-use editing tool totally equipped with a lot of video editing functions. With Filmora, you can edit your GoPro videos on your Mac like an expert and expect a professional outcome. Filmora offers excellent performance and enhances video quality taking the user experience to a whole new level.
Additionally, Filmora is an editing tool with helpful functionality taking the user experience to a whole new level. Finally, this tool is indispensable due to its speed, intuitive user interface, and other file format support.
For Win 7 or later (64-bit)
For macOS 10.14 or later
Filmora Features
- Filmora editing tool is versatile and supports other video formats like MP4, MOV, MKV, AVCHD, etc.
- You can cut, crop, split, trim, and even combine clips with just a few clicks.
- Filmora has access to several advanced video effects such as royalty-free music, transition, animated titles, and motion elements.
- With Filmora color tuning features, your videos can look like professional Hollywood videos.
- You can also edit sounds on your video with a noise removal feature, audio equalizer, and audio keyframing tools.
- You get 500+ free special video effects to create and customize your videos yourself.
- Filmora has access to advanced video effects like PIP, audio mixer, and green screen, which you can add to your videos.
- Access to 1000+ effects downloading resources to make videos in any desired styles.
Steps to Editing Videos on Mac Using Filmora
Want to edit your GoPro videos the right way? Editing your GoPro videos on Mac with Filmora is relatively easy and will only take a few clicks. Read and follow these steps below to learn to edit GoPro videos on Mac with this easy-to-use GoPro video editor.
- Step 1: Import the GoPro video files
First, you launch the GoPro video editor and then click the “Import Media here” button. This will upload the GoPro video clips to the program. You can save these files in a suitable location for easy access before you begin editing.

- Step 2: Edit the GoPro Video clips

Secondly, you should drag the GoPro video clips from the folder or User’s album to the timeline and begin editing.
To trim your GoPro videos, simply mouser over the clip from the beginning to the end of the video. You should do this until the trim icon is displayed. The trim icon is labeled as “I” on the editing timeline. You can drag the trim icon forward or backward to trim the video as you desire.
Aside from the trimming option, you can also apply split footage, video stabilization, and even add transitions between two clips. You can also combine GoPro videos and rotate GoPro videos by simply tapping the icons respectively.

- Step 3: Export the edited GoPro video files

Once you finish editing, you can now navigate to the “Export” icon. Furthermore, you can also select the save path and file format from the displayed output window. After this selection, you can finally choose the “Export” icon. Once you complete this, you can find your edited video file in the same path.
More Free GoPro video editor on Mac to Edit Gopro Videos
In this section, we will list out some of the best free GoPro video editors to successfully edit your videos on Mac. These programs are, but you will have to download them to enjoy all the editing tools.
PowerDirector

Supported System: Windows and Mac
We have PowerDirector as the best overall editor on our list of best free GoPro video editors on Mac. This free GoPro video editor is compatible with Mac and has a robust video editing program. If you are looking for a free GoPro video editor with a wide range of exciting editing features, this is one of the best options. One of the benefits of using this GoPro video editor is that it comes with an Action Camera Center.
It has tons of cool effects, titles, filters, and templates to explore, especially if you want to make more action camera masterpieces. In addition, this video editor has special editing and effects tools to improve your action camera video. For example, you can stabilize your shaky video, apply cool speed effects, and correct fish-eye distortion in some minutes. You can also use the slow-motion effect, zoom, correct color problems, and freeze frame with just a few clicks.
The GoPro editor also comes with noise correction and video denoise to make your video crystal clear and remove unwanted audio noise. In addition, PowerDirector has thousands of royalty-free stock assets such as sound effects and background music. In essence, PowerDirector is a GoPro video editor that offers everything you need to produce, enhance and cut thrilling action videos. It is versatile, best for action footage editing, and supports several video formats.
Pros
- It is beginner-friendly
- It comes with easy-to-use action camera-specific editing tools
Cons
- While it is free, you need a subscription to enjoy the latest features.
Steps to Edit using PowerDirector
- Step 1: Launch the app and select ‘full mode’ to begin editing your video
- Step 2: Select’ import media folder’ to get the videos you wish to edit
- Step 3: You can now browse the folder on your Mac device and select the folder with the videos. Then Click ‘Select folder’ to move them into the editor’s media library.

- Step 4: Now, the editing process can begin. You can stabilize and change the speed of your videos with PowerDirector.

- You can add title text and motion blur to your GoPro videos if you like that.

- If you want to include transitions, you can do so by selecting the transition room.
- Step 5: Next, select the ‘produce’ button to export your video once you are sure that the editing is complete.

- Step 6: Change the video format before exporting.

Once you select the video format you prefer, you will be able to save your GoPro video.
VideoProc Vlogger

Supported System: Windows and Mac
VideoProc Vlogger is the best GoPro editor for anyone looking for speed adjustment. The video editor uses visualized speed ramping to alter the speed throughout a clip. This program contains over 20-speed features to help you quickly change the tone and tempo of your GoPro video. Furthermore, VideoProc Vlogger is beginner-friendly with a lot of advanced editing features. These features include automatic keyframes and flexible Bezier curves to slow parts of a video without splitting it.
This free GoPro video editor can simulate motion roll, dolly, tilt, and even truck effects. You can also push in and out and stylize your video clips with rotation, fast zooms, and shakes. With VideoProc Vlogger, you fix grain video, remove fish-eye, extract audio and apply motion crops to your video. The video editor is best at creating new motion trails to change the action of the video.
Although VideoProc Vlogger is a free video editor, it definitely lacks some advanced editing features. For example, you can edit your videos without the annoying ads or watermarks. In addition, the video editor is designed for beginners, content creators, and hobbyists as it lacks features like video stabilization. So while the video editor is not for professionals, it’s worth trying out.
Pros
- Requires low system requirements
- It is entirely free with no ads and watermarks
Cons
- It lacks advanced editing features
- Rendering is somewhat slow
Steps to Edit using VideoProc Vlogger
- Step 1: First, import your GoPro videos from your Mac device to VideoProc Vlogger.

Simply Launch VideoProc Vlogger on your Mac, hit the plus icon in the media library, and add and import the videos.
- Step 2: Now, split and cut the GoPro Videos.

Simply drag the video clips to the timeline and begin editing. Now, put the playhead to exactly where you want to split the video and tap the split button.
- Step 3: You can also fix GoPro lens distortion.

If you feel that your video looks distorted, tick the lens distortion box to resolve the issue.

- Step 4: You can do the color correction or grading for any dark GoPro videos. Simply apply a preset aesthetic filter or simply adjust color normally.
- Step 5: Adjust the speed of the GoPro video.

To adjust the speed of the video, click speed in the toolbar to open the speed editor. Then change as you desire.
- Step 6: You can also add transitions, titles, and effects by opening the panels of transitions, effects, and tiles.

- Then drag a transition to the space between two video clips, same with titles to the subtitle and effect to the effect track.

- Step 7: Next, remove noise and background music by clicking the video track and tapping “detach” to separate the audio from the video.

- You can also add music to replace the background noise.
- Step 8: Finally, after the editing, you can export the GoPro video to your Mac device by setting the file name, format, file location, and video quality.

iMovie

Supported System: Mac only
This editor is designed to ensure an excelling editing process for Mac users. Therefore, beginners, content creators, and even hobbyists can utilize this video editor to edit their videos. Although iMovie is a free GoPro video editor, it offers incredible editing features to make your video look more professional. These features include HD and 4K video support and speed adjustment tools that can slow down or speed up your video clips.
Although it comes free on all Mac devices, iMovie also has tons of themes, templates, and presets to make editing a breeze. For example, you can select the video clips that will be automatically styled and edited with titles, transitions, and music. You can make all these changes with just a few clicks. In addition, you can also rearrange, trim, split, and even delete your ready-made video clips.
Furthermore, you can always modify the shift focus and depth of field while editing your video. However, it lacks some advanced features you will need while editing, such as Multicam, motion tracking, and 360 editing. On the other hand, it has a user-friendly interface with essential editing functions.
Pros
- It has a simple and user-friendly interface
- It is definitely beginner-friendly
Cons
- It lacks essential and advanced GoPro editing features and functions
Steps to Edit using iMovie
- Step 1: first, you have to launch the iMovie and create a video project.

- Step 2: Now, you can click the Import button to import your GoPro video files from your Mac to it.

- Step 3: Drag the video files from the program media library to the timeline for editing.

- Step 4: Load a song to the audio track if you wish to add background music to your video.
- Step 5: To split your video into smaller parts, right-click on a clip.
- Step 6: to edit your GoPro video with advanced tools like color correction, crop, grading, speed, and volume, simply move to the toolbar just above the timeline.
- Step 7: to add title, and transitions, you can drag a title and transition to the desired space between two clips.
- Step 8: preview and export your GoPro video from iMovie in the preferred format.

More Paid GoPro video editor on Mac to Cut MP4 Videos
If you desire GoPro video editors that offer more than just the basic editing features, you should try the paid GoPro video editors. The paid GoPro video editors offer more professional editing features for Mac users. In this section, you’ll learn about our top three paid GoPro video editors to edit your GoPro videos on Mac.
Adobe Premiere Pro

Supported System: Windows and Mac
This paid GoPro video editor is best for professionals who have experience creating video projects. This GoPro editing tool is compatible with Mac and Windows devices and also supports several video formats. Professionals use this video editor to edit top-notch videos such as Hollywood action movies and TV shows. In addition, it offers a long list of powerful features ideal for standard and action video editing.
Some of these professional features include Multicam, 360-degree, VR editing, and will export in up to 8k. The GoPro video editors also have a lot of sophisticated video stabilization tools, such as the warp stabilizer effect. The video stabilizer function help reduce camera shake, especially when zooming in. Other features include unlimited video tracks, lens distortion, access to the creative cloud and will match video to music.
In addition, the GoPro video editor only offers a 7-days free trial and is relatively expensive. Although Adobe Premiere Pro video editor is professional and high-quality, it has a steep learning curve. The steep learning curve is not appropriate for beginners.
Pros
- It supports all video formats
- It supports real-time video editing
Cons
- The system requirements are resource-intensive
- Not ideal for beginners
Steps to Edit using Adobe Premiere Pro
- Step 1: Import and cut your video files on PowerDirector. You can begin by cutting out any unnecessary parts from the video. You can also add text transitions, text, and other edits.

- Step 2: Next, stabilize the video using the Warp stabilizer. Double click on Warp stabilizer on the Effects menu to stabile the video.

- Step 3: Finally, you can add audio and export the edited video file. Click on file, tap on export and select the format, presets, and the location to export your file.

Adobe After Effect

Supported System: Windows and Mac
This GoPro editor is compatible with Mac and offers many basic video editing features to ensure top-notch results. This GoPro editor is great for editors who want to add special effects like motion tracking to their videos. The after-effect function allows you to add a graphical element to a moving person, animal, car, or camera. You can also create cartoon effects, logos, stickers, or text to move seamlessly with the action onscreen.
In addition to its essential editing tools, you can also remove elements from your video with the pro-level digital rotoscoping tools. You can also use the after-effect to add elements to the missing video. Other features include 360, 3D, VR editing, transitions, lens distortions, and distortion effects for professional editing.
This GoPro video editor is an effective software and is best for adding visual effects to action camera videos. However, it lacks some essential video editing tools that you might need to make your video Hollywood standard. In addition, it also has a steep learning curve which makes it not ideal for beginners. Furthermore, as a GoPro video editor looking to do just the basic edits, then the After Effects is definitely not for you.
Pros
- It comes with realistic special effects
- It has a high-quality noise reduction
Cons
- It is not for beginners due to the steep learning curve
- It comes with only a 7-day free trial
- It is quite expensive
Steps to Edit using Adobe After Effects
- Step 1: Import your video by going to ‘file’ on the menu and clicking ‘import’ from the dropdown menu.

- You can begin by cutting out any unnecessary parts from the video. You can also add text transitions, text, and other edits.

- Step 2: Next, you can apply necessary editing such as trimming, transitioning, and other edits.

- Step 3: Finally, you can add audio and export the edited video file. Click on file, tap on export and select the format, presets, and the location to export your file.

Final Cut Pro

Supported System: Mac only
The Final Cut Pro is another best-paid GoPro video editor for editing GoPro videos on Mac. This video editor is ideal for editing 360 GoPro videos. This is because it offers all the editing tools you need to edit, import, and deliver both stereoscopic and monoscopic 360 videos. The GoPro video editors come with a lot of powerful features such as background noise removal, Multicam editing, color adjustment tools, and an object tracker.
You can use the GoPro video editor to visualize, remove camera rigs, change orientation, or straighten the horizon. Final Cut Pro can also easily apply graphics and effects to 360 videos and add 360 videos to regular videos with the tiny planet effect. With electronic stabilization, you can clean up your video and enhance your audience’s viewing experience. The magnetic timeline feature eliminates clip collisions and streamlines the video editing process.
Although the GoPro video editor has some notable GoPro features, it is expensive to purchase. However, it has a generous 90-day free trial to explore. It is also not beginner-friendly and requires time to learn, especially for new GoPro editors to understand. In addition, it supports several Video formats.
Pros
- It has convenient asset management functions
- Precision editing is sure with the magnetic timeline function
Cons
- It is expensive
- It is not ideal for GoPro beginners
Steps to Edit using Final Cut Pro
- Step 1: First, Launch the program
- Step 2: Import your video files to the timeline and begin editing.

- Step 3: Next, you can apply necessary editing such as trimming, transitioning, and other edits.

- Step 4: Finally, you can add audio and export the edited video file. Click on file, tap on export and select the format, presets, and the location to export your file.

Which should I Choose: Free or Paid GoPro Video Editor?
Many of these GoPro video editors for Mac (free and paid) are available on the internet. Therefore, it can be hard sometimes to choose the right GoPro video editor for Mac. However, you’ll need to consider factors before making your choice. Here are some of these factors.
Level of Expertise
This is a vital factor you should put into consideration before choosing a GoPro video editor. As a beginner, you wouldn’t need a GoPro editor that offers complex editing functions that you can’t use. Also, as a professional, you shouldn’t go for an editor that lacks the necessary editing tools to meet your editing needs. As an editor, you should totally be on the lookout for an editor that supports both beginners and professionals. This will remove the need to search for a new video editor at any experience level.
Interface
Another factor to consider is the user interface of your chosen video editor. When you go for a more friendly user interface, you will be saving yourself the time to get familiar with the software. Is the video editor free or paid? Regardless of the answer, check out the user interface before choosing one.
Formats
You also need to ensure that the editing software doesn’t limit you to specific video formats. You should go for a GoPro video editor that supports the common and trendy video formats. This will allow you to convert your edited videos when you need to share them.
Now, most free GoPro video editors offer just limited features to users, limiting your editing course. Furthermore, most paid GoPro video editors focus on a professional level, making it difficult for new editors to use. Therefore, you should totally opt for a GoPro video editor that succinctly supports all your editing needs.
FAQs About Editing Gopro Videos
- Can I edit GoPro videos like a Professional? Yes, you can. Learn to use advanced video editing features. The ideal thing to do is pick a GoPro video editor with a user-friendly interface to enable you to learn these professional methods.
- What is the best GoPro video editor for Mac? The best GoPro video editor for Mac devices depends on your level of expertise and what you want to achieve.
- Can I edit a GoPro video? Yes, you can. Find a GoPro editing software compatible with your Mac devices and ideal for your level of experience.
Conclusion
There are several GoPro video editors, and the editor you choose depends on your needs and your budget. It also depends on your level of experience and the equipment on the ground. However, we have a list of different GoPro video editors for you. Examine our reviews of these GoPro video editors and see which is perfect for you.

- Step 6: Once you open it, two folders will display. These folders are DCIM and MISC.

- Step 7: Click on the DCIM folder to find all videos stored on the device.

- Step 8: Finally, you can now begin uploading all your GoPro videos to Mac by simply copying and pasting.

Import GoPro Videos to Mac before editing – GoPro Quick App
Another option to import GoPro videos to Mac is the GoPro Quick app. GoPro quick app is a tool by GoPro designed to help view GoPro videos on Mac and import them. Having this app on your Mac device is relatively easy. First, you have to download its setup from the GoPro website and install it. So far, this app is one of the best tools to view and import GoPro files to your Mac device. Here are the steps to importing GoPro videos to Mac while getting set to edit.
- Step 1: First thing first, Launch the app. However, if you have not installed the app, you should quickly download and install the app.

- Step 2: Now, you can connect the GoPro camera to your Mac. You can do this by using a USB cable.
- Step 3: After launching the app, you will see an icon labeled Import Filesdisplayed at the interface.

- Step 4: from here on, you will also see an icon to import the videos from your GoPro camera into your Mac device.
When the import is complete, you can now locate your GoPro videos in the folder of your choice. Now, you can close the GoPro quick app, unplug the GoPro camera and get ready to edit your videos.
Best GoPro Video Editor on Mac
A lot of people understand that GoPro is the best way to make your video look like a professional shot. After shooting the video, you’ll obviously want to make some edits to make them look more professional before sharing them. After all, no one wants to watch poor-quality videos, bad noises, and other unprofessional clips. Therefore, we have a list of the best GoPro editor for Mac in this article. Keep reading to learn about the best GoPro video editor on Mac.
Best GoPro Video Editor on Mac – Filmora Video Editor

Supported System: Mac and Windows
A lot of free video editing software usually comes as either too straightforward or too challenging to understand. While other video editing software lacks vital editing features such as color correction and audio or noise editing features. However, the Filmora Video Editor for Mac bridges the gap and is undoubtedly the best GoPro Video editor on Mac.
This video editing software is an easy-to-use editing tool totally equipped with a lot of video editing functions. With Filmora, you can edit your GoPro videos on your Mac like an expert and expect a professional outcome. Filmora offers excellent performance and enhances video quality taking the user experience to a whole new level.
Additionally, Filmora is an editing tool with helpful functionality taking the user experience to a whole new level. Finally, this tool is indispensable due to its speed, intuitive user interface, and other file format support.
For Win 7 or later (64-bit)
For macOS 10.14 or later
Filmora Features
- Filmora editing tool is versatile and supports other video formats like MP4, MOV, MKV, AVCHD, etc.
- You can cut, crop, split, trim, and even combine clips with just a few clicks.
- Filmora has access to several advanced video effects such as royalty-free music, transition, animated titles, and motion elements.
- With Filmora color tuning features, your videos can look like professional Hollywood videos.
- You can also edit sounds on your video with a noise removal feature, audio equalizer, and audio keyframing tools.
- You get 500+ free special video effects to create and customize your videos yourself.
- Filmora has access to advanced video effects like PIP, audio mixer, and green screen, which you can add to your videos.
- Access to 1000+ effects downloading resources to make videos in any desired styles.
Steps to Editing Videos on Mac Using Filmora
Want to edit your GoPro videos the right way? Editing your GoPro videos on Mac with Filmora is relatively easy and will only take a few clicks. Read and follow these steps below to learn to edit GoPro videos on Mac with this easy-to-use GoPro video editor.
- Step 1: Import the GoPro video files
First, you launch the GoPro video editor and then click the “Import Media here” button. This will upload the GoPro video clips to the program. You can save these files in a suitable location for easy access before you begin editing.

- Step 2: Edit the GoPro Video clips

Secondly, you should drag the GoPro video clips from the folder or User’s album to the timeline and begin editing.
To trim your GoPro videos, simply mouser over the clip from the beginning to the end of the video. You should do this until the trim icon is displayed. The trim icon is labeled as “I” on the editing timeline. You can drag the trim icon forward or backward to trim the video as you desire.
Aside from the trimming option, you can also apply split footage, video stabilization, and even add transitions between two clips. You can also combine GoPro videos and rotate GoPro videos by simply tapping the icons respectively.

- Step 3: Export the edited GoPro video files

Once you finish editing, you can now navigate to the “Export” icon. Furthermore, you can also select the save path and file format from the displayed output window. After this selection, you can finally choose the “Export” icon. Once you complete this, you can find your edited video file in the same path.
More Free GoPro video editor on Mac to Edit Gopro Videos
In this section, we will list out some of the best free GoPro video editors to successfully edit your videos on Mac. These programs are, but you will have to download them to enjoy all the editing tools.
PowerDirector

Supported System: Windows and Mac
We have PowerDirector as the best overall editor on our list of best free GoPro video editors on Mac. This free GoPro video editor is compatible with Mac and has a robust video editing program. If you are looking for a free GoPro video editor with a wide range of exciting editing features, this is one of the best options. One of the benefits of using this GoPro video editor is that it comes with an Action Camera Center.
It has tons of cool effects, titles, filters, and templates to explore, especially if you want to make more action camera masterpieces. In addition, this video editor has special editing and effects tools to improve your action camera video. For example, you can stabilize your shaky video, apply cool speed effects, and correct fish-eye distortion in some minutes. You can also use the slow-motion effect, zoom, correct color problems, and freeze frame with just a few clicks.
The GoPro editor also comes with noise correction and video denoise to make your video crystal clear and remove unwanted audio noise. In addition, PowerDirector has thousands of royalty-free stock assets such as sound effects and background music. In essence, PowerDirector is a GoPro video editor that offers everything you need to produce, enhance and cut thrilling action videos. It is versatile, best for action footage editing, and supports several video formats.
Pros
- It is beginner-friendly
- It comes with easy-to-use action camera-specific editing tools
Cons
- While it is free, you need a subscription to enjoy the latest features.
Steps to Edit using PowerDirector
- Step 1: Launch the app and select ‘full mode’ to begin editing your video
- Step 2: Select’ import media folder’ to get the videos you wish to edit
- Step 3: You can now browse the folder on your Mac device and select the folder with the videos. Then Click ‘Select folder’ to move them into the editor’s media library.

- Step 4: Now, the editing process can begin. You can stabilize and change the speed of your videos with PowerDirector.

- You can add title text and motion blur to your GoPro videos if you like that.

- If you want to include transitions, you can do so by selecting the transition room.
- Step 5: Next, select the ‘produce’ button to export your video once you are sure that the editing is complete.

- Step 6: Change the video format before exporting.

Once you select the video format you prefer, you will be able to save your GoPro video.
VideoProc Vlogger

Supported System: Windows and Mac
VideoProc Vlogger is the best GoPro editor for anyone looking for speed adjustment. The video editor uses visualized speed ramping to alter the speed throughout a clip. This program contains over 20-speed features to help you quickly change the tone and tempo of your GoPro video. Furthermore, VideoProc Vlogger is beginner-friendly with a lot of advanced editing features. These features include automatic keyframes and flexible Bezier curves to slow parts of a video without splitting it.
This free GoPro video editor can simulate motion roll, dolly, tilt, and even truck effects. You can also push in and out and stylize your video clips with rotation, fast zooms, and shakes. With VideoProc Vlogger, you fix grain video, remove fish-eye, extract audio and apply motion crops to your video. The video editor is best at creating new motion trails to change the action of the video.
Although VideoProc Vlogger is a free video editor, it definitely lacks some advanced editing features. For example, you can edit your videos without the annoying ads or watermarks. In addition, the video editor is designed for beginners, content creators, and hobbyists as it lacks features like video stabilization. So while the video editor is not for professionals, it’s worth trying out.
Pros
- Requires low system requirements
- It is entirely free with no ads and watermarks
Cons
- It lacks advanced editing features
- Rendering is somewhat slow
Steps to Edit using VideoProc Vlogger
- Step 1: First, import your GoPro videos from your Mac device to VideoProc Vlogger.

Simply Launch VideoProc Vlogger on your Mac, hit the plus icon in the media library, and add and import the videos.
- Step 2: Now, split and cut the GoPro Videos.

Simply drag the video clips to the timeline and begin editing. Now, put the playhead to exactly where you want to split the video and tap the split button.
- Step 3: You can also fix GoPro lens distortion.

If you feel that your video looks distorted, tick the lens distortion box to resolve the issue.

- Step 4: You can do the color correction or grading for any dark GoPro videos. Simply apply a preset aesthetic filter or simply adjust color normally.
- Step 5: Adjust the speed of the GoPro video.

To adjust the speed of the video, click speed in the toolbar to open the speed editor. Then change as you desire.
- Step 6: You can also add transitions, titles, and effects by opening the panels of transitions, effects, and tiles.

- Then drag a transition to the space between two video clips, same with titles to the subtitle and effect to the effect track.

- Step 7: Next, remove noise and background music by clicking the video track and tapping “detach” to separate the audio from the video.

- You can also add music to replace the background noise.
- Step 8: Finally, after the editing, you can export the GoPro video to your Mac device by setting the file name, format, file location, and video quality.

iMovie

Supported System: Mac only
This editor is designed to ensure an excelling editing process for Mac users. Therefore, beginners, content creators, and even hobbyists can utilize this video editor to edit their videos. Although iMovie is a free GoPro video editor, it offers incredible editing features to make your video look more professional. These features include HD and 4K video support and speed adjustment tools that can slow down or speed up your video clips.
Although it comes free on all Mac devices, iMovie also has tons of themes, templates, and presets to make editing a breeze. For example, you can select the video clips that will be automatically styled and edited with titles, transitions, and music. You can make all these changes with just a few clicks. In addition, you can also rearrange, trim, split, and even delete your ready-made video clips.
Furthermore, you can always modify the shift focus and depth of field while editing your video. However, it lacks some advanced features you will need while editing, such as Multicam, motion tracking, and 360 editing. On the other hand, it has a user-friendly interface with essential editing functions.
Pros
- It has a simple and user-friendly interface
- It is definitely beginner-friendly
Cons
- It lacks essential and advanced GoPro editing features and functions
Steps to Edit using iMovie
- Step 1: first, you have to launch the iMovie and create a video project.

- Step 2: Now, you can click the Import button to import your GoPro video files from your Mac to it.

- Step 3: Drag the video files from the program media library to the timeline for editing.

- Step 4: Load a song to the audio track if you wish to add background music to your video.
- Step 5: To split your video into smaller parts, right-click on a clip.
- Step 6: to edit your GoPro video with advanced tools like color correction, crop, grading, speed, and volume, simply move to the toolbar just above the timeline.
- Step 7: to add title, and transitions, you can drag a title and transition to the desired space between two clips.
- Step 8: preview and export your GoPro video from iMovie in the preferred format.

More Paid GoPro video editor on Mac to Cut MP4 Videos
If you desire GoPro video editors that offer more than just the basic editing features, you should try the paid GoPro video editors. The paid GoPro video editors offer more professional editing features for Mac users. In this section, you’ll learn about our top three paid GoPro video editors to edit your GoPro videos on Mac.
Adobe Premiere Pro

Supported System: Windows and Mac
This paid GoPro video editor is best for professionals who have experience creating video projects. This GoPro editing tool is compatible with Mac and Windows devices and also supports several video formats. Professionals use this video editor to edit top-notch videos such as Hollywood action movies and TV shows. In addition, it offers a long list of powerful features ideal for standard and action video editing.
Some of these professional features include Multicam, 360-degree, VR editing, and will export in up to 8k. The GoPro video editors also have a lot of sophisticated video stabilization tools, such as the warp stabilizer effect. The video stabilizer function help reduce camera shake, especially when zooming in. Other features include unlimited video tracks, lens distortion, access to the creative cloud and will match video to music.
In addition, the GoPro video editor only offers a 7-days free trial and is relatively expensive. Although Adobe Premiere Pro video editor is professional and high-quality, it has a steep learning curve. The steep learning curve is not appropriate for beginners.
Pros
- It supports all video formats
- It supports real-time video editing
Cons
- The system requirements are resource-intensive
- Not ideal for beginners
Steps to Edit using Adobe Premiere Pro
- Step 1: Import and cut your video files on PowerDirector. You can begin by cutting out any unnecessary parts from the video. You can also add text transitions, text, and other edits.

- Step 2: Next, stabilize the video using the Warp stabilizer. Double click on Warp stabilizer on the Effects menu to stabile the video.

- Step 3: Finally, you can add audio and export the edited video file. Click on file, tap on export and select the format, presets, and the location to export your file.

Adobe After Effect

Supported System: Windows and Mac
This GoPro editor is compatible with Mac and offers many basic video editing features to ensure top-notch results. This GoPro editor is great for editors who want to add special effects like motion tracking to their videos. The after-effect function allows you to add a graphical element to a moving person, animal, car, or camera. You can also create cartoon effects, logos, stickers, or text to move seamlessly with the action onscreen.
In addition to its essential editing tools, you can also remove elements from your video with the pro-level digital rotoscoping tools. You can also use the after-effect to add elements to the missing video. Other features include 360, 3D, VR editing, transitions, lens distortions, and distortion effects for professional editing.
This GoPro video editor is an effective software and is best for adding visual effects to action camera videos. However, it lacks some essential video editing tools that you might need to make your video Hollywood standard. In addition, it also has a steep learning curve which makes it not ideal for beginners. Furthermore, as a GoPro video editor looking to do just the basic edits, then the After Effects is definitely not for you.
Pros
- It comes with realistic special effects
- It has a high-quality noise reduction
Cons
- It is not for beginners due to the steep learning curve
- It comes with only a 7-day free trial
- It is quite expensive
Steps to Edit using Adobe After Effects
- Step 1: Import your video by going to ‘file’ on the menu and clicking ‘import’ from the dropdown menu.

- You can begin by cutting out any unnecessary parts from the video. You can also add text transitions, text, and other edits.

- Step 2: Next, you can apply necessary editing such as trimming, transitioning, and other edits.

- Step 3: Finally, you can add audio and export the edited video file. Click on file, tap on export and select the format, presets, and the location to export your file.

Final Cut Pro

Supported System: Mac only
The Final Cut Pro is another best-paid GoPro video editor for editing GoPro videos on Mac. This video editor is ideal for editing 360 GoPro videos. This is because it offers all the editing tools you need to edit, import, and deliver both stereoscopic and monoscopic 360 videos. The GoPro video editors come with a lot of powerful features such as background noise removal, Multicam editing, color adjustment tools, and an object tracker.
You can use the GoPro video editor to visualize, remove camera rigs, change orientation, or straighten the horizon. Final Cut Pro can also easily apply graphics and effects to 360 videos and add 360 videos to regular videos with the tiny planet effect. With electronic stabilization, you can clean up your video and enhance your audience’s viewing experience. The magnetic timeline feature eliminates clip collisions and streamlines the video editing process.
Although the GoPro video editor has some notable GoPro features, it is expensive to purchase. However, it has a generous 90-day free trial to explore. It is also not beginner-friendly and requires time to learn, especially for new GoPro editors to understand. In addition, it supports several Video formats.
Pros
- It has convenient asset management functions
- Precision editing is sure with the magnetic timeline function
Cons
- It is expensive
- It is not ideal for GoPro beginners
Steps to Edit using Final Cut Pro
- Step 1: First, Launch the program
- Step 2: Import your video files to the timeline and begin editing.

- Step 3: Next, you can apply necessary editing such as trimming, transitioning, and other edits.

- Step 4: Finally, you can add audio and export the edited video file. Click on file, tap on export and select the format, presets, and the location to export your file.

Which should I Choose: Free or Paid GoPro Video Editor?
Many of these GoPro video editors for Mac (free and paid) are available on the internet. Therefore, it can be hard sometimes to choose the right GoPro video editor for Mac. However, you’ll need to consider factors before making your choice. Here are some of these factors.
Level of Expertise
This is a vital factor you should put into consideration before choosing a GoPro video editor. As a beginner, you wouldn’t need a GoPro editor that offers complex editing functions that you can’t use. Also, as a professional, you shouldn’t go for an editor that lacks the necessary editing tools to meet your editing needs. As an editor, you should totally be on the lookout for an editor that supports both beginners and professionals. This will remove the need to search for a new video editor at any experience level.
Interface
Another factor to consider is the user interface of your chosen video editor. When you go for a more friendly user interface, you will be saving yourself the time to get familiar with the software. Is the video editor free or paid? Regardless of the answer, check out the user interface before choosing one.
Formats
You also need to ensure that the editing software doesn’t limit you to specific video formats. You should go for a GoPro video editor that supports the common and trendy video formats. This will allow you to convert your edited videos when you need to share them.
Now, most free GoPro video editors offer just limited features to users, limiting your editing course. Furthermore, most paid GoPro video editors focus on a professional level, making it difficult for new editors to use. Therefore, you should totally opt for a GoPro video editor that succinctly supports all your editing needs.
FAQs About Editing Gopro Videos
- Can I edit GoPro videos like a Professional? Yes, you can. Learn to use advanced video editing features. The ideal thing to do is pick a GoPro video editor with a user-friendly interface to enable you to learn these professional methods.
- What is the best GoPro video editor for Mac? The best GoPro video editor for Mac devices depends on your level of expertise and what you want to achieve.
- Can I edit a GoPro video? Yes, you can. Find a GoPro editing software compatible with your Mac devices and ideal for your level of experience.
Conclusion
There are several GoPro video editors, and the editor you choose depends on your needs and your budget. It also depends on your level of experience and the equipment on the ground. However, we have a list of different GoPro video editors for you. Examine our reviews of these GoPro video editors and see which is perfect for you.
How to Do Masking in After Effects [Alternative Provided]
Masking is a powerful feature in After Effects that allows you to hide, reveal, or manipulate specific parts of a layer. Whether creating animations, visual effects, or enhancing your video content, masking can be a valuable tool in your arsenal. However, it can be intimidating for beginners, as it requires a good understanding of key concepts and techniques.
This article aims to demystify masking in After Effects and provide a comprehensive guide on getting started. Whether a beginner or an experienced user, you’ll find useful tips, tricks, and a creative alternative to masking that will take your skills to the next level. So let’s dive in and discover the art of masking in After Effects!
Overview of Masking in After Effects
Masking in After Effects hides or reveals certain layer parts, such as an image or video. This is achieved through masks, paths that determine the visibility of specific layer parts. Masks are an incredibly versatile tool in Adobe After Effects, allowing users to cut out and combine elements, create professional transitions, isolate objects in photos or videos, and build shapes, among other things.
Masks in After Effects are made up of two parts: the mask and the fill. The mask controls what is visible, while the fill determines the color or image used to fill the masked area.
By default, when a mask is created, it is set to “inverted,” meaning the masked area is visible, and the rest is hidden. However, this can easily be changed by pressing “M” to access the mask settings in the timeline and selecting the invert checkmark. Alternatively, the mode can be changed to subtract.
Overall, masks are an essential tool in After Effects, and it’s worth taking the time to learn as much as possible about them. The possibilities are endless, and mastering masks can greatly enhance your projects.
How To Do Masking in AE Using Shape Tools
Shape tools provide a quick and easy way to create masks in AE and are a great starting point for beginners. With these tools, you can easily create masks in various shapes and sizes to hide, reveal, or manipulate parts of a layer. We’ll guide you through creating masks using different shape tools, including the rectangle, ellipse, and polygon tools. So let’s get started!
Step1 Choose the layer to which you want to apply the mask.
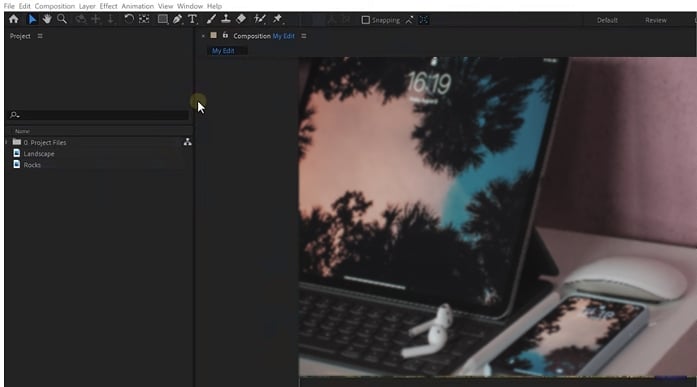
Step2 Choose one of the shape tools from the toolbar.
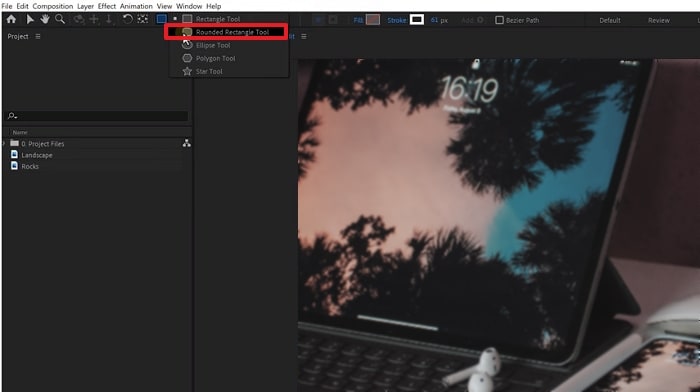
Step3 Drag the mouse and select the area you want to apply the shape tool mask.
![]()
Note:
- Holding down the “CTRL“ key for Windows or the “CMD“ key for Mac will draw the shape from the center.
- Holding down the “Shift“ key will maintain equal sides and create symmetrical shapes such as squares or circles.
How To Use Pen Tool for Masking in After Effects
The Pen Tool in After Effects is a powerful, flexible option for creating masks. This section will explore using the Pen Tool to create masks in After Effects.
Whether you need to create a complex or a simple mask, the Pen Tool provides precise control over the mask shape and can create any shape you desire. From freehand masks to geometric shapes, the Pen Tool is the tool of choice for many After Effects users. Let’s take a closer look at how to use the Pen Tool for masking in After Effects.
Step1 Import image to project and add to timeline.

Step2 Click on the “Pen“ icon to activate Pen Tool, and use it to mask out the background.
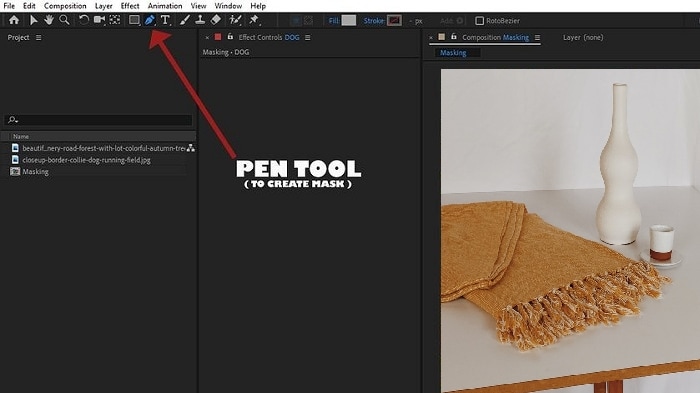
Step3 Place a new image behind a masked image for a new background.
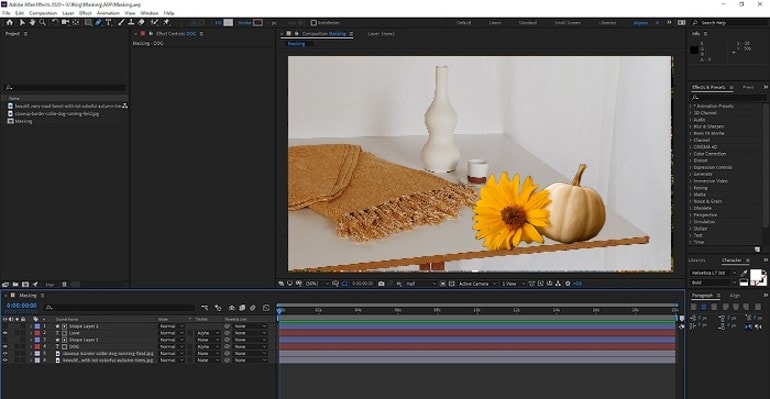
Step4 Add a masked image feather if needed.
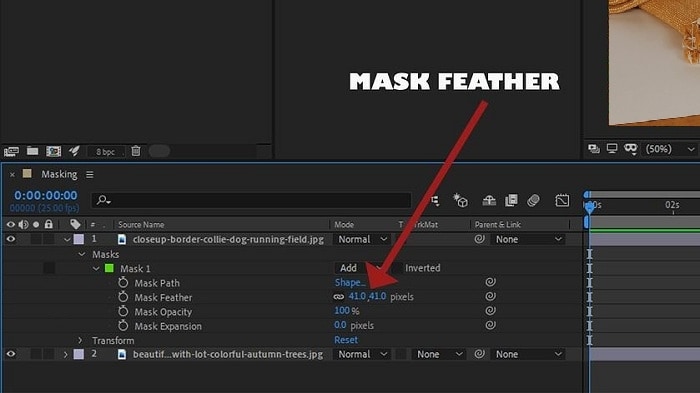
Step5 Add text, and create a “shape layer“ to place on the text.
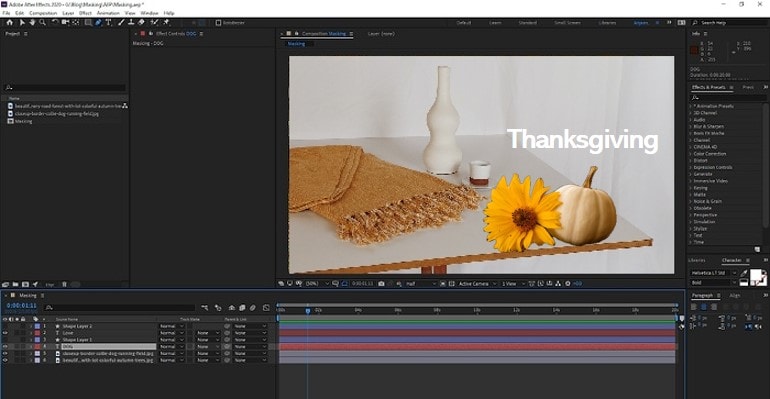
Step6 Use “Alpha Inverted Matte“ to mask the text.
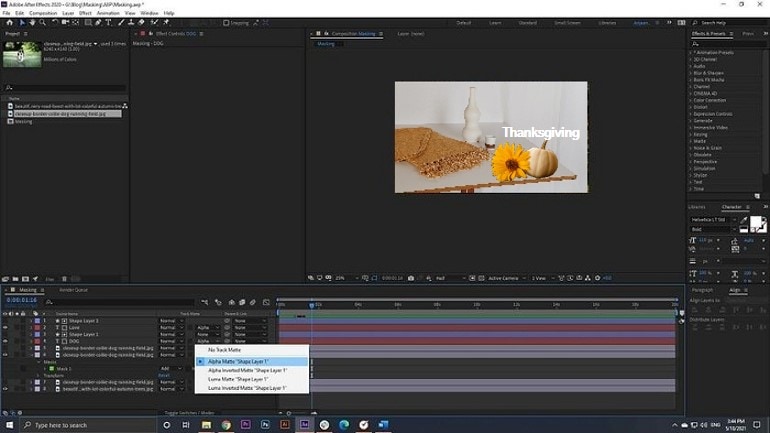
Wondershare Filmora - A Great Alternative to After Effects Masking
Wondershare Filmora is a popular video editing software that offers a range of features and tools for video editing. One of the most useful features is its masking capability, which provides a great alternative to the masking feature in Adobe After Effects.
Filmora’s masking feature is designed to be user-friendly, making it ideal for both beginner and advanced users. With its intuitive interface, users can easily create masks to hide, reveal, or manipulate parts of a video. The software offers a range of masking tools, including shape, freehand, and gradient masks, providing a wide range of options.
Free Download For Win 7 or later(64-bit)
Free Download For macOS 10.14 or later
In addition to its masking feature, Filmora offers various tools and features that make it a great choice for video editing. Its keyframe animation allows users to create smooth and professional transitions, and its audio editing features allow users to add music, sound effects, and voiceovers easily. The software also supports various file formats, making it easy to import and export videos for sharing and distribution.
Overall, Wondershare Filmora is a great alternative to After Effects, particularly for users looking for a more user-friendly and affordable video editing and masking option. With its comprehensive features, Filmora provides an excellent option for users who want to create professional-looking videos without needing advanced technical skills.
How To Use Shape Tool In Masking Using Filmora
The Shape Tool in Filmora is a feature in the video editing software Wondershare Filmora, which allows users to create masks with various shapes such as rectangles, circles, double lines, single lines, love, and star, as well as custom shapes using the draw mask feature. Masks in Filmora can hide or reveal specific parts of a video clip, add animations, and create composite images and videos.
Discover how to use the Shape Tool in Wondershare Filmora for masking, a great alternative to After Effects masking. Easy to use for beginners and advanced users alike, Filmora’s Shape Tool provides options for creating masks to manipulate video content.
Step1 Enter the Video panel, and switch to the Mask tab in Wondershare Filmora. Choose from basic mask shapes or create your own.
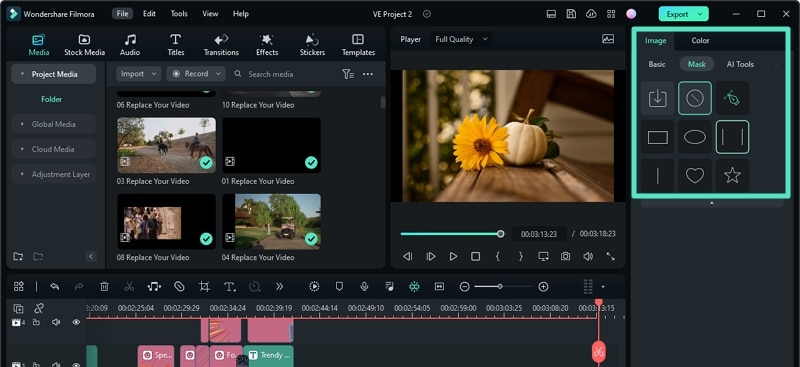
Step2 Select a shape; see only the masked area in the Preview window.
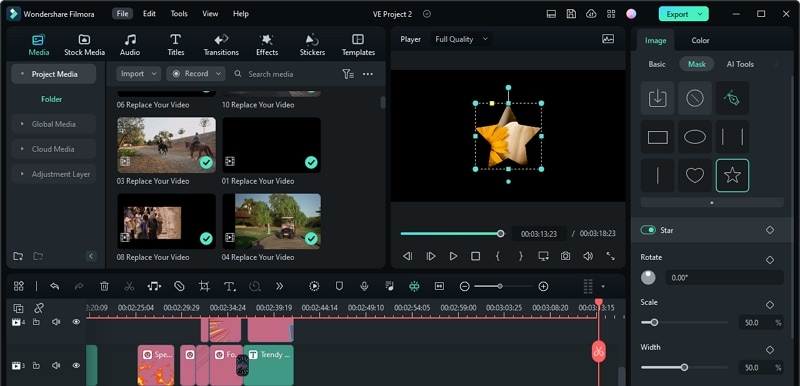
Step3 Add keyframes to animate the mask and adjust position, rotation, size, and blur strength.
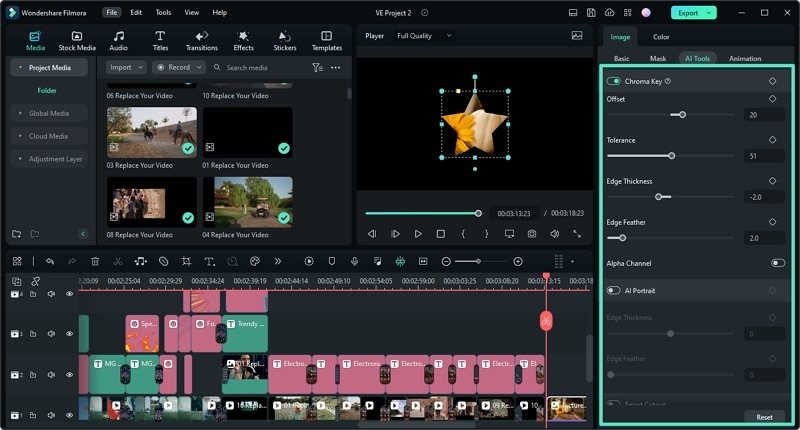
How To Use Pen Tool In Masking Using Filmora
Pen Tool in Masking Using Filmora is a feature that enables users to create complex masks by dragging control points and modifying B-Splines. The tool allows users to draw the mask shape precisely by zooming in and out on the player screen and to create smooth curves by holding the Alt/Option key to adjust the Bessel curve for drawn masks.
The mask created using the Pen Tool can be edited, resized, repositioned, and adjusted using sliders and handles in the Preview window. The tool also enables users to invert the mask, making the original visible part invisible and the hidden part visible.
Learn how to use the Pen Tool in Wondershare Filmora for masking, a versatile alternative to After Effects masking. With the Pen Tool, you can easily outline and manipulate specific areas in your video to create unique and professional effects.
Step1 Create a project and add the media to the timeline**. Enter** the Mask tab.
Step2 Edit the mask by adjusting the sliders in the Mask tab to resize, reposition, and change orientation. Also, adjust the blur strength, width, height, and radius, or invert the mask.
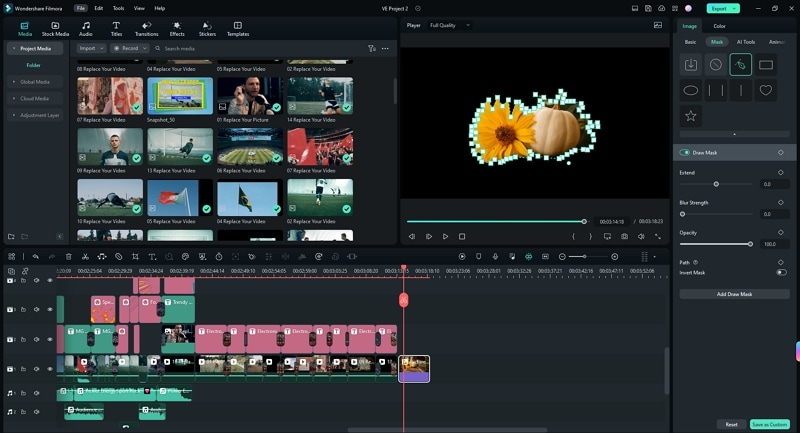
Conclusion
Masking is an important aspect of video editing and opens up a new world of creative possibilities. After Effects provides a comprehensive set of tools for masking, and Filmora is a great alternative for those looking for a more user-friendly option.
Whether you’re using After Effects or Filmora, you can use masks to control the visibility of parts of your image, make shapes, build transitions, and much more. Following this article’s simple steps, you can start masking and bringing your creative vision to life.
- Holding down the “CTRL“ key for Windows or the “CMD“ key for Mac will draw the shape from the center.
- Holding down the “Shift“ key will maintain equal sides and create symmetrical shapes such as squares or circles.
How To Use Pen Tool for Masking in After Effects
The Pen Tool in After Effects is a powerful, flexible option for creating masks. This section will explore using the Pen Tool to create masks in After Effects.
Whether you need to create a complex or a simple mask, the Pen Tool provides precise control over the mask shape and can create any shape you desire. From freehand masks to geometric shapes, the Pen Tool is the tool of choice for many After Effects users. Let’s take a closer look at how to use the Pen Tool for masking in After Effects.
Step1 Import image to project and add to timeline.

Step2 Click on the “Pen“ icon to activate Pen Tool, and use it to mask out the background.

Step3 Place a new image behind a masked image for a new background.

Step4 Add a masked image feather if needed.

Step5 Add text, and create a “shape layer“ to place on the text.

Step6 Use “Alpha Inverted Matte“ to mask the text.

Wondershare Filmora - A Great Alternative to After Effects Masking
Wondershare Filmora is a popular video editing software that offers a range of features and tools for video editing. One of the most useful features is its masking capability, which provides a great alternative to the masking feature in Adobe After Effects.
Filmora’s masking feature is designed to be user-friendly, making it ideal for both beginner and advanced users. With its intuitive interface, users can easily create masks to hide, reveal, or manipulate parts of a video. The software offers a range of masking tools, including shape, freehand, and gradient masks, providing a wide range of options.
Free Download For Win 7 or later(64-bit)
Free Download For macOS 10.14 or later
In addition to its masking feature, Filmora offers various tools and features that make it a great choice for video editing. Its keyframe animation allows users to create smooth and professional transitions, and its audio editing features allow users to add music, sound effects, and voiceovers easily. The software also supports various file formats, making it easy to import and export videos for sharing and distribution.
Overall, Wondershare Filmora is a great alternative to After Effects, particularly for users looking for a more user-friendly and affordable video editing and masking option. With its comprehensive features, Filmora provides an excellent option for users who want to create professional-looking videos without needing advanced technical skills.
How To Use Shape Tool In Masking Using Filmora
The Shape Tool in Filmora is a feature in the video editing software Wondershare Filmora, which allows users to create masks with various shapes such as rectangles, circles, double lines, single lines, love, and star, as well as custom shapes using the draw mask feature. Masks in Filmora can hide or reveal specific parts of a video clip, add animations, and create composite images and videos.
Discover how to use the Shape Tool in Wondershare Filmora for masking, a great alternative to After Effects masking. Easy to use for beginners and advanced users alike, Filmora’s Shape Tool provides options for creating masks to manipulate video content.
Step1 Enter the Video panel, and switch to the Mask tab in Wondershare Filmora. Choose from basic mask shapes or create your own.

Step2 Select a shape; see only the masked area in the Preview window.

Step3 Add keyframes to animate the mask and adjust position, rotation, size, and blur strength.

How To Use Pen Tool In Masking Using Filmora
Pen Tool in Masking Using Filmora is a feature that enables users to create complex masks by dragging control points and modifying B-Splines. The tool allows users to draw the mask shape precisely by zooming in and out on the player screen and to create smooth curves by holding the Alt/Option key to adjust the Bessel curve for drawn masks.
The mask created using the Pen Tool can be edited, resized, repositioned, and adjusted using sliders and handles in the Preview window. The tool also enables users to invert the mask, making the original visible part invisible and the hidden part visible.
Learn how to use the Pen Tool in Wondershare Filmora for masking, a versatile alternative to After Effects masking. With the Pen Tool, you can easily outline and manipulate specific areas in your video to create unique and professional effects.
Step1 Create a project and add the media to the timeline**. Enter** the Mask tab.
Step2 Edit the mask by adjusting the sliders in the Mask tab to resize, reposition, and change orientation. Also, adjust the blur strength, width, height, and radius, or invert the mask.

Conclusion
Masking is an important aspect of video editing and opens up a new world of creative possibilities. After Effects provides a comprehensive set of tools for masking, and Filmora is a great alternative for those looking for a more user-friendly option.
Whether you’re using After Effects or Filmora, you can use masks to control the visibility of parts of your image, make shapes, build transitions, and much more. Following this article’s simple steps, you can start masking and bringing your creative vision to life.
All Things About Adding Effects In Kinemaster
These days the usage of video editors and related software is getting increased quickly. Kinemaster appears as one of the popular and highly used video editors. It can be used for several purposes, such as – adding effects to videos, trimming, etc. Many individuals are considering its option for making different types of edits to the videos and achieving desired objectives with ease. Some people love to consider Kinemaster but they don’t know how to add effects in kinemaster. These types of individuals are regularly looking for the perfect guides and sources that can help them in getting some guidance and make things easier.
If you are also looking for such guidance and instructions, you should be focused on the upcoming details. In the upcoming paragraphs, we will discuss some crucial aspects of the Kinemaster and its procedure to add effects in a video.
In this article
01 [Effects In KineMaster You Should Know](#Part 1)
02 [How To Add Effects On Kinemaster?](#Part 2)
03 [FAQs Of KineMaster Effects](#Part 3)
Part 1 Effects In KineMaster You Should Know
KineMaster is serving video editing services in two different ways; free and paid. You can find out multiple differences in both versions. There are some advanced features that can be unlocked by using a paid version only. By using the free version, you can get your basic done without any kind of issue. If you choose the option of the free version of Kinemaster, you will be limited to two effects only, such as –
● Mosaic
● Gaussian Blur
In case you are interested in applying some blur effects to the video clips or layers, you can pick the option of the Gaussian Blur effect. If you are interested in applying blur effects with some pixelated appearance, you should consider the Mosaic effect. Many people are looking for more than these two effects, you need to consider the paid versions.
When it comes to getting paid version of Kinemaster, you can get its subscriptions by choosing a monthly or annual subscription. Once you get paid version of Kinemaster, you can get several effects unlocked. Here, we are listing some major ones.
● Mirror
● Ripple
● Cartoon
● Interference
● Mirror warp
● Pop out
● Anaglyph slide
● Split spectrum
● Auto HDR
● Poster perfect
● Rolling ball
● Rayburst
● Bulge / Pinch
● Bulge / Pinch
● Wave warp
● Radial blur
● Kaleidoscope
● Digital crash
● Prismatic
● Focus blur 2.0
● Sketch 2.0
● Swirl 2.0
● Neon outline
● Thermogram
● Square halftone
All with these, there are several other effects available on the Kinemaster that can make your video impressive. With a paid version, you can easily explore and present your creativity. Along with it, everyone also does not know how to add effects on kinemaster in a few minutes only. If you also want to figure it out, you should keep reading the article. In upcoming paragraphs, we are discussing a step-by-step procedure.
Part 2 How To Add Effects On Kinemaster?
Step-By-Step Procedure
Step1 Access KineMaster
Firstly, you should be focused on accessing KineMaster. Here, you can start importing videos or images with ease. You can also use your images as clips for an impressive outcome.
Step2 Import Images

For importing images, you should follow a small procedure. Here, firstly, you should click on MEDIA BUTTON to YOUR FOLDER to GO FOR IMAGES. Now, you should be focused on choosing images by marking them with check symbols. Afterward you can finalize the action and import all images.
Step3 Access Effects Menu

Now, it’s time to focus on adding effects to clips for an impressive video. For such a thing, you should proceed by focusing on the LAYER button on the interface. By clicking the LAYER button, you can access a specific menu with multiple options. One of these options is the EFFECT button. When you click on this particular button, it will take you to the effect menus. In case you have the paid version you can go with the GET MORE option in the EFFECT menu. It will be useful in getting more effective options. You can also download the effects to keep using them regularly.
Step4 Apply Effects

As per your application capability and subscriptions, you can see the availability of effects. You should choose the desired effect by clicking on it. Here, the most interesting thing is that when you apply any effect, it will not overlap the existing layer or anything like that but it will create a new layer. With it, you can use animations for both in and out purposes.
By following this small procedure, you can easily make things easier and add effects in a video by using KineMaster. In case you have any doubt regarding the procedure, you can be focused on guides and tutorials.
Part 3 FAQs Of KineMaster Effects
Are Effects In KineMaster Free?
KineMaster is providing video editing services in paid and free versions. While accessing services in both versions, you can see a big difference. In the paid version of KineMaster, you will get several effects that can make your video clip amazing. If we talk about the free version, you will get only 2 effects. These effects are – Mosaic and Gaussian Blur. In case you want more than these effects, you need to get paid subscription to KineMaster.
KineMaster Effects Alternative On PC
Some individuals are not satisfied with the services of KineMaster because of several reasons, such as – paid service options. If you are one of these individuals, you can consider the option of Filmora. It is a free video editor that will allow you to edit and modify a video in several possible ways. Filmora also has a big library that allows getting multiple effects and built-in video editing elements.
Is It Worth Paying For Extra Effects In KineMaster?
As we discussed earlier, with KineMaster you will get only two effects for free. For more, you need to spend money. In case you want several effects without spending any money, you can go with Filmora. It has a big built-in library to facilitate the users.
Can I Add Effects If I’m Working With Chroma Key?
Yes, the KineMaster users can easily apply Chrom Key while using video effects. It’s all about layering. By focusing on how to add chroma key in kinemaster guide, you can understand how it can be possible for creating an impressive video.
Final Words
By paying attention to all these things, you can understand everything about the KineMaster and its usability. You can also check out an alternative that can help you avoid the option of spending some money. It depends on you that what your requirements are and how want to get them fulfilled.
02 [How To Add Effects On Kinemaster?](#Part 2)
03 [FAQs Of KineMaster Effects](#Part 3)
Part 1 Effects In KineMaster You Should Know
KineMaster is serving video editing services in two different ways; free and paid. You can find out multiple differences in both versions. There are some advanced features that can be unlocked by using a paid version only. By using the free version, you can get your basic done without any kind of issue. If you choose the option of the free version of Kinemaster, you will be limited to two effects only, such as –
● Mosaic
● Gaussian Blur
In case you are interested in applying some blur effects to the video clips or layers, you can pick the option of the Gaussian Blur effect. If you are interested in applying blur effects with some pixelated appearance, you should consider the Mosaic effect. Many people are looking for more than these two effects, you need to consider the paid versions.
When it comes to getting paid version of Kinemaster, you can get its subscriptions by choosing a monthly or annual subscription. Once you get paid version of Kinemaster, you can get several effects unlocked. Here, we are listing some major ones.
● Mirror
● Ripple
● Cartoon
● Interference
● Mirror warp
● Pop out
● Anaglyph slide
● Split spectrum
● Auto HDR
● Poster perfect
● Rolling ball
● Rayburst
● Bulge / Pinch
● Bulge / Pinch
● Wave warp
● Radial blur
● Kaleidoscope
● Digital crash
● Prismatic
● Focus blur 2.0
● Sketch 2.0
● Swirl 2.0
● Neon outline
● Thermogram
● Square halftone
All with these, there are several other effects available on the Kinemaster that can make your video impressive. With a paid version, you can easily explore and present your creativity. Along with it, everyone also does not know how to add effects on kinemaster in a few minutes only. If you also want to figure it out, you should keep reading the article. In upcoming paragraphs, we are discussing a step-by-step procedure.
Part 2 How To Add Effects On Kinemaster?
Step-By-Step Procedure
Step1 Access KineMaster
Firstly, you should be focused on accessing KineMaster. Here, you can start importing videos or images with ease. You can also use your images as clips for an impressive outcome.
Step2 Import Images

For importing images, you should follow a small procedure. Here, firstly, you should click on MEDIA BUTTON to YOUR FOLDER to GO FOR IMAGES. Now, you should be focused on choosing images by marking them with check symbols. Afterward you can finalize the action and import all images.
Step3 Access Effects Menu

Now, it’s time to focus on adding effects to clips for an impressive video. For such a thing, you should proceed by focusing on the LAYER button on the interface. By clicking the LAYER button, you can access a specific menu with multiple options. One of these options is the EFFECT button. When you click on this particular button, it will take you to the effect menus. In case you have the paid version you can go with the GET MORE option in the EFFECT menu. It will be useful in getting more effective options. You can also download the effects to keep using them regularly.
Step4 Apply Effects

As per your application capability and subscriptions, you can see the availability of effects. You should choose the desired effect by clicking on it. Here, the most interesting thing is that when you apply any effect, it will not overlap the existing layer or anything like that but it will create a new layer. With it, you can use animations for both in and out purposes.
By following this small procedure, you can easily make things easier and add effects in a video by using KineMaster. In case you have any doubt regarding the procedure, you can be focused on guides and tutorials.
Part 3 FAQs Of KineMaster Effects
Are Effects In KineMaster Free?
KineMaster is providing video editing services in paid and free versions. While accessing services in both versions, you can see a big difference. In the paid version of KineMaster, you will get several effects that can make your video clip amazing. If we talk about the free version, you will get only 2 effects. These effects are – Mosaic and Gaussian Blur. In case you want more than these effects, you need to get paid subscription to KineMaster.
KineMaster Effects Alternative On PC
Some individuals are not satisfied with the services of KineMaster because of several reasons, such as – paid service options. If you are one of these individuals, you can consider the option of Filmora. It is a free video editor that will allow you to edit and modify a video in several possible ways. Filmora also has a big library that allows getting multiple effects and built-in video editing elements.
Is It Worth Paying For Extra Effects In KineMaster?
As we discussed earlier, with KineMaster you will get only two effects for free. For more, you need to spend money. In case you want several effects without spending any money, you can go with Filmora. It has a big built-in library to facilitate the users.
Can I Add Effects If I’m Working With Chroma Key?
Yes, the KineMaster users can easily apply Chrom Key while using video effects. It’s all about layering. By focusing on how to add chroma key in kinemaster guide, you can understand how it can be possible for creating an impressive video.
Final Words
By paying attention to all these things, you can understand everything about the KineMaster and its usability. You can also check out an alternative that can help you avoid the option of spending some money. It depends on you that what your requirements are and how want to get them fulfilled.
02 [How To Add Effects On Kinemaster?](#Part 2)
03 [FAQs Of KineMaster Effects](#Part 3)
Part 1 Effects In KineMaster You Should Know
KineMaster is serving video editing services in two different ways; free and paid. You can find out multiple differences in both versions. There are some advanced features that can be unlocked by using a paid version only. By using the free version, you can get your basic done without any kind of issue. If you choose the option of the free version of Kinemaster, you will be limited to two effects only, such as –
● Mosaic
● Gaussian Blur
In case you are interested in applying some blur effects to the video clips or layers, you can pick the option of the Gaussian Blur effect. If you are interested in applying blur effects with some pixelated appearance, you should consider the Mosaic effect. Many people are looking for more than these two effects, you need to consider the paid versions.
When it comes to getting paid version of Kinemaster, you can get its subscriptions by choosing a monthly or annual subscription. Once you get paid version of Kinemaster, you can get several effects unlocked. Here, we are listing some major ones.
● Mirror
● Ripple
● Cartoon
● Interference
● Mirror warp
● Pop out
● Anaglyph slide
● Split spectrum
● Auto HDR
● Poster perfect
● Rolling ball
● Rayburst
● Bulge / Pinch
● Bulge / Pinch
● Wave warp
● Radial blur
● Kaleidoscope
● Digital crash
● Prismatic
● Focus blur 2.0
● Sketch 2.0
● Swirl 2.0
● Neon outline
● Thermogram
● Square halftone
All with these, there are several other effects available on the Kinemaster that can make your video impressive. With a paid version, you can easily explore and present your creativity. Along with it, everyone also does not know how to add effects on kinemaster in a few minutes only. If you also want to figure it out, you should keep reading the article. In upcoming paragraphs, we are discussing a step-by-step procedure.
Part 2 How To Add Effects On Kinemaster?
Step-By-Step Procedure
Step1 Access KineMaster
Firstly, you should be focused on accessing KineMaster. Here, you can start importing videos or images with ease. You can also use your images as clips for an impressive outcome.
Step2 Import Images

For importing images, you should follow a small procedure. Here, firstly, you should click on MEDIA BUTTON to YOUR FOLDER to GO FOR IMAGES. Now, you should be focused on choosing images by marking them with check symbols. Afterward you can finalize the action and import all images.
Step3 Access Effects Menu

Now, it’s time to focus on adding effects to clips for an impressive video. For such a thing, you should proceed by focusing on the LAYER button on the interface. By clicking the LAYER button, you can access a specific menu with multiple options. One of these options is the EFFECT button. When you click on this particular button, it will take you to the effect menus. In case you have the paid version you can go with the GET MORE option in the EFFECT menu. It will be useful in getting more effective options. You can also download the effects to keep using them regularly.
Step4 Apply Effects

As per your application capability and subscriptions, you can see the availability of effects. You should choose the desired effect by clicking on it. Here, the most interesting thing is that when you apply any effect, it will not overlap the existing layer or anything like that but it will create a new layer. With it, you can use animations for both in and out purposes.
By following this small procedure, you can easily make things easier and add effects in a video by using KineMaster. In case you have any doubt regarding the procedure, you can be focused on guides and tutorials.
Part 3 FAQs Of KineMaster Effects
Are Effects In KineMaster Free?
KineMaster is providing video editing services in paid and free versions. While accessing services in both versions, you can see a big difference. In the paid version of KineMaster, you will get several effects that can make your video clip amazing. If we talk about the free version, you will get only 2 effects. These effects are – Mosaic and Gaussian Blur. In case you want more than these effects, you need to get paid subscription to KineMaster.
KineMaster Effects Alternative On PC
Some individuals are not satisfied with the services of KineMaster because of several reasons, such as – paid service options. If you are one of these individuals, you can consider the option of Filmora. It is a free video editor that will allow you to edit and modify a video in several possible ways. Filmora also has a big library that allows getting multiple effects and built-in video editing elements.
Is It Worth Paying For Extra Effects In KineMaster?
As we discussed earlier, with KineMaster you will get only two effects for free. For more, you need to spend money. In case you want several effects without spending any money, you can go with Filmora. It has a big built-in library to facilitate the users.
Can I Add Effects If I’m Working With Chroma Key?
Yes, the KineMaster users can easily apply Chrom Key while using video effects. It’s all about layering. By focusing on how to add chroma key in kinemaster guide, you can understand how it can be possible for creating an impressive video.
Final Words
By paying attention to all these things, you can understand everything about the KineMaster and its usability. You can also check out an alternative that can help you avoid the option of spending some money. It depends on you that what your requirements are and how want to get them fulfilled.
02 [How To Add Effects On Kinemaster?](#Part 2)
03 [FAQs Of KineMaster Effects](#Part 3)
Part 1 Effects In KineMaster You Should Know
KineMaster is serving video editing services in two different ways; free and paid. You can find out multiple differences in both versions. There are some advanced features that can be unlocked by using a paid version only. By using the free version, you can get your basic done without any kind of issue. If you choose the option of the free version of Kinemaster, you will be limited to two effects only, such as –
● Mosaic
● Gaussian Blur
In case you are interested in applying some blur effects to the video clips or layers, you can pick the option of the Gaussian Blur effect. If you are interested in applying blur effects with some pixelated appearance, you should consider the Mosaic effect. Many people are looking for more than these two effects, you need to consider the paid versions.
When it comes to getting paid version of Kinemaster, you can get its subscriptions by choosing a monthly or annual subscription. Once you get paid version of Kinemaster, you can get several effects unlocked. Here, we are listing some major ones.
● Mirror
● Ripple
● Cartoon
● Interference
● Mirror warp
● Pop out
● Anaglyph slide
● Split spectrum
● Auto HDR
● Poster perfect
● Rolling ball
● Rayburst
● Bulge / Pinch
● Bulge / Pinch
● Wave warp
● Radial blur
● Kaleidoscope
● Digital crash
● Prismatic
● Focus blur 2.0
● Sketch 2.0
● Swirl 2.0
● Neon outline
● Thermogram
● Square halftone
All with these, there are several other effects available on the Kinemaster that can make your video impressive. With a paid version, you can easily explore and present your creativity. Along with it, everyone also does not know how to add effects on kinemaster in a few minutes only. If you also want to figure it out, you should keep reading the article. In upcoming paragraphs, we are discussing a step-by-step procedure.
Part 2 How To Add Effects On Kinemaster?
Step-By-Step Procedure
Step1 Access KineMaster
Firstly, you should be focused on accessing KineMaster. Here, you can start importing videos or images with ease. You can also use your images as clips for an impressive outcome.
Step2 Import Images

For importing images, you should follow a small procedure. Here, firstly, you should click on MEDIA BUTTON to YOUR FOLDER to GO FOR IMAGES. Now, you should be focused on choosing images by marking them with check symbols. Afterward you can finalize the action and import all images.
Step3 Access Effects Menu

Now, it’s time to focus on adding effects to clips for an impressive video. For such a thing, you should proceed by focusing on the LAYER button on the interface. By clicking the LAYER button, you can access a specific menu with multiple options. One of these options is the EFFECT button. When you click on this particular button, it will take you to the effect menus. In case you have the paid version you can go with the GET MORE option in the EFFECT menu. It will be useful in getting more effective options. You can also download the effects to keep using them regularly.
Step4 Apply Effects

As per your application capability and subscriptions, you can see the availability of effects. You should choose the desired effect by clicking on it. Here, the most interesting thing is that when you apply any effect, it will not overlap the existing layer or anything like that but it will create a new layer. With it, you can use animations for both in and out purposes.
By following this small procedure, you can easily make things easier and add effects in a video by using KineMaster. In case you have any doubt regarding the procedure, you can be focused on guides and tutorials.
Part 3 FAQs Of KineMaster Effects
Are Effects In KineMaster Free?
KineMaster is providing video editing services in paid and free versions. While accessing services in both versions, you can see a big difference. In the paid version of KineMaster, you will get several effects that can make your video clip amazing. If we talk about the free version, you will get only 2 effects. These effects are – Mosaic and Gaussian Blur. In case you want more than these effects, you need to get paid subscription to KineMaster.
KineMaster Effects Alternative On PC
Some individuals are not satisfied with the services of KineMaster because of several reasons, such as – paid service options. If you are one of these individuals, you can consider the option of Filmora. It is a free video editor that will allow you to edit and modify a video in several possible ways. Filmora also has a big library that allows getting multiple effects and built-in video editing elements.
Is It Worth Paying For Extra Effects In KineMaster?
As we discussed earlier, with KineMaster you will get only two effects for free. For more, you need to spend money. In case you want several effects without spending any money, you can go with Filmora. It has a big built-in library to facilitate the users.
Can I Add Effects If I’m Working With Chroma Key?
Yes, the KineMaster users can easily apply Chrom Key while using video effects. It’s all about layering. By focusing on how to add chroma key in kinemaster guide, you can understand how it can be possible for creating an impressive video.
Final Words
By paying attention to all these things, you can understand everything about the KineMaster and its usability. You can also check out an alternative that can help you avoid the option of spending some money. It depends on you that what your requirements are and how want to get them fulfilled.
10 Best Suggestions for AI Video Interviews
10 Best Suggestions for AI Video Interviews
An easy yet powerful editor
Numerous effects to choose from
Detailed tutorials provided by the official channel
Artificial Intelligence is the replacement of human processes by machines and computer systems. It can replicate intelligent human behaviors, including facial expression recognition, problem-solving, and learning.
AI video interviewing, an increasingly popular assessment tool driven by artificial intelligence, is being incorporated by many large companies that receive thousands of job applications. AI electronically analyses many aspects of a video interview, including the candidate’s body language, facial expressions, word choices, and tone of voice. It can also track eye movements to determine whether candidates are looking at resources around them.
With the introduction of artificial intelligence, many tech companies and individuals have taken a likeness of it and have grown to utilize it to carry out tasks. Reconsider your position as applicants get selected by assessing their performance in the AI-based video interview against a large inventory of facial and linguistic information.
In this article
01 [How AI is Being Used in a Job Interview](#Part 1)
02 [How to Ace an AI Video Interview](#Part 2)
03 [Role of AI in a Video Interview](#Part 3)
04 [Role of AI in Video Making](#Part 4)
Part 1 How AI is being used in a job interview.
In most cases, an AI video interview is the initial stage in the hiring process, in place of or in addition to a typical cover letter and CV. It functions similarly to a face-to-face interview. Candidates get a series of job-specific interview questions, after which they have to record their responses on video with their smartphone or computer.
You’ll have a few minutes to answer each question as a candidate before going on to the next. Each exam takes about 20 minutes to complete and can be in any location convenient for you, whether in your living room, a quiet coffee shop nook, or somewhere else.
Each interview follows the same format, ensuring a similar experience for all individuals seeking that particular position.
The algorithm (also known as an assessment model) will assist the recruiter in making a more informed judgment if AI is in the process. It accomplishes this by identifying which candidates are most likely to succeed in the post based on data sets that predict job performance.
Part 2 How to Ace an AI video interview.
Planning ahead of time might make you feel less anxious and appear more confident, at ease, and relaxed. Here are some ideas for using artificial intelligence in video interviews.
It would help if you first determined whether you are going for an AI-based video interview, i.e., if you get an invite to a pre-recorded video interview via a platform. Massive firms are now using this type of interview to interview many possible employees without bias.
01Prepare for the interview differently.

When in an AI interview, you need to prepare differently. It’s not the same as a human-to-human interview. There will be no feedback from the person at the other end of the interview. Research the use of AI in interviews to know how it works. Remember to research the company in question as well.
02Go straight to the point.

Remember that you’re having an interview with a robot and not a human, so skip the small talk and hit the nail on the head. It is better to state your point clearly and straight to the end.
03Find a suitable environment for your interview.

Most artificial intelligence video interviews take place through your webcam in the comfort of your home. So, it’s essential to use an appropriate background. Your interview background should be clear of objects and distractions. It should also have enough lighting and be free from background noises since AI algorithms are designed to scan your environment and make deductions about you.
04Dress well for your interview.

There won’t be a human at the other end of the camera, so there’s no need to dress up, right? That’s wrong. You still need to dress well when attending a formal human job interview. Wear business casuals with plain colored clothes.
Another reason you want to dress professionally is that it can increase your self-confidence, making you relaxed and feel good about yourself.
05Practice before the interview.

To ace an AI interview, practice in front of a friend or mirror in advance of your interview. You can do a mock interview or record yourself to identify likely mistakes and correct them. Practice by recording yourself and then replaying the video to see where you are making mistakes and need improvement.
06Share your real-world experiences and provide proof.

Use real-world experiences to showcase your skills when responding to questions during an AI interview. To determine and ensure candidates’ suitability, AI looks for specific soft skills like communication, the ability to take the initiative, and lots more. So, talk about them, use a practical example to illustrate your skills, and generally talk about your interview experience.
07Smiling

Wear a pleasant smile as you answer. It is easy to forget to smile when focusing so hard on the questions, but remember to relax and act natural. Facial expressions such as smiling are criteria that artificial intelligence interviewers watch for. Remember to smile, nod, and Use Gestures During Your Interview to show that you are attentive.
08Maintain eye contact and a neutral voice tone.

During an AI video interview, maintain eye contact with the camera and gaze squarely into your webcam. Ensure your camera is at eye level, so you don’t have to strain to see into it. Avoid looking away all of the time; this can give the impression of being distracted and unfocused. Speak neutrally or brightly. Remember that the AI analyzes your speech tone and mannerisms. As a result, speaking in clear tones can help you succeed.
09Maintain proper body posture and even talking speed

Ensure to carry yourself the same way as you would in an in-person human interview because a human interviewer will watch your interview at some point. You emphasize more confidence when you sit up straight, Sit with an open posture, avoid crossed arms or legs, keep your chin towards your stomach, and do not hunch your shoulders or recline on the chair. Appear in control, natural, and ready to handle any question. Try to keep your talking speed at a conversational rate, and avoid talking too fast or too slow because it might come off as you being nervous or unsure of yourself.
10Make use of keywords

The use of keywords is essential in any job application process. Meanwhile, AI algorithms pick out keywords in a candidate’s response during an interview. Stand out during an AI interview by using phrases that explain what you can contribute, echoing the exact language of the job posting. Before the AI-based video interview, carefully go through the job description and note what keywords the company uses to describe the role on the company website or job posting page. Be sure to use their words specifically.
Part 3 Role of AI in a video interview

AI electronically analyzes many features of a video interview. It asks all candidates the same pre-determined questions and then explores how they answered them. Some AI models grade candidates’ responses. Many significant companies use AI video interviews or algorithm-based interviewing. Candidates are compared to previous success stories to select the best candidate for the job. The software analyzes the applicant’s performance to the last job for applicants deemed suitable for the position. It compares the inputs to the company’s ideal candidate profile and ranks you accordingly. The AI interviewer will most likely use speech analytics software to break down the candidate’s speech into parts and deduce numerous interpretations. It then uses semantic analytics to determine grammatical proficiency. It also indicates your emotional condition based on the time of your voice.
Part 4 Role of AI in video making
In video production, artificial intelligence has proven faster and more efficient than humans. It’s also more cost-effective and time-saving than hiring a video editor. It allows you to edit more films in a shorter amount of time. It streamlines your job by taking care of most of the burden, making video editing simple even for beginners. AI makes suggestions that the user may not consider, making video production more accessible and engaging. Automating color correction and scene recognition in films improves the visual experience and aids in the formulation of personalized messaging.
For Win 7 or later (64-bit)
For macOS 10.12 or later
To help simplify the artificial intelligence video interview act, you can use fantastic video editing software. This video editor employs AI in video editing and so can ensure cost-efficient video making.
Wondershare Filmora Video Editor is one of the most outstanding AI-powered video editing programs available. It can simply erase video backdrops without using a green screen or chroma key, and it also allows the insertion of borders, glitch effects, pixelated, noise, or segmentation video effects with its new AI portrait add-on.
● Ending Thoughts →
● After reading this article, you know that AI-based video interviews will gradually take over the human interview process and the video-making industry. So, gear up for AI video interviews and be prepared for your next meeting. The future is revamping.
● Besides, video making is seamless and easy when you have the right software. The Filmora tool has proven to be one of the best AI updated tools for video editing professionals and beginners.
Artificial Intelligence is the replacement of human processes by machines and computer systems. It can replicate intelligent human behaviors, including facial expression recognition, problem-solving, and learning.
AI video interviewing, an increasingly popular assessment tool driven by artificial intelligence, is being incorporated by many large companies that receive thousands of job applications. AI electronically analyses many aspects of a video interview, including the candidate’s body language, facial expressions, word choices, and tone of voice. It can also track eye movements to determine whether candidates are looking at resources around them.
With the introduction of artificial intelligence, many tech companies and individuals have taken a likeness of it and have grown to utilize it to carry out tasks. Reconsider your position as applicants get selected by assessing their performance in the AI-based video interview against a large inventory of facial and linguistic information.
In this article
01 [How AI is Being Used in a Job Interview](#Part 1)
02 [How to Ace an AI Video Interview](#Part 2)
03 [Role of AI in a Video Interview](#Part 3)
04 [Role of AI in Video Making](#Part 4)
Part 1 How AI is being used in a job interview.
In most cases, an AI video interview is the initial stage in the hiring process, in place of or in addition to a typical cover letter and CV. It functions similarly to a face-to-face interview. Candidates get a series of job-specific interview questions, after which they have to record their responses on video with their smartphone or computer.
You’ll have a few minutes to answer each question as a candidate before going on to the next. Each exam takes about 20 minutes to complete and can be in any location convenient for you, whether in your living room, a quiet coffee shop nook, or somewhere else.
Each interview follows the same format, ensuring a similar experience for all individuals seeking that particular position.
The algorithm (also known as an assessment model) will assist the recruiter in making a more informed judgment if AI is in the process. It accomplishes this by identifying which candidates are most likely to succeed in the post based on data sets that predict job performance.
Part 2 How to Ace an AI video interview.
Planning ahead of time might make you feel less anxious and appear more confident, at ease, and relaxed. Here are some ideas for using artificial intelligence in video interviews.
It would help if you first determined whether you are going for an AI-based video interview, i.e., if you get an invite to a pre-recorded video interview via a platform. Massive firms are now using this type of interview to interview many possible employees without bias.
01Prepare for the interview differently.

When in an AI interview, you need to prepare differently. It’s not the same as a human-to-human interview. There will be no feedback from the person at the other end of the interview. Research the use of AI in interviews to know how it works. Remember to research the company in question as well.
02Go straight to the point.

Remember that you’re having an interview with a robot and not a human, so skip the small talk and hit the nail on the head. It is better to state your point clearly and straight to the end.
03Find a suitable environment for your interview.

Most artificial intelligence video interviews take place through your webcam in the comfort of your home. So, it’s essential to use an appropriate background. Your interview background should be clear of objects and distractions. It should also have enough lighting and be free from background noises since AI algorithms are designed to scan your environment and make deductions about you.
04Dress well for your interview.

There won’t be a human at the other end of the camera, so there’s no need to dress up, right? That’s wrong. You still need to dress well when attending a formal human job interview. Wear business casuals with plain colored clothes.
Another reason you want to dress professionally is that it can increase your self-confidence, making you relaxed and feel good about yourself.
05Practice before the interview.

To ace an AI interview, practice in front of a friend or mirror in advance of your interview. You can do a mock interview or record yourself to identify likely mistakes and correct them. Practice by recording yourself and then replaying the video to see where you are making mistakes and need improvement.
06Share your real-world experiences and provide proof.

Use real-world experiences to showcase your skills when responding to questions during an AI interview. To determine and ensure candidates’ suitability, AI looks for specific soft skills like communication, the ability to take the initiative, and lots more. So, talk about them, use a practical example to illustrate your skills, and generally talk about your interview experience.
07Smiling

Wear a pleasant smile as you answer. It is easy to forget to smile when focusing so hard on the questions, but remember to relax and act natural. Facial expressions such as smiling are criteria that artificial intelligence interviewers watch for. Remember to smile, nod, and Use Gestures During Your Interview to show that you are attentive.
08Maintain eye contact and a neutral voice tone.

During an AI video interview, maintain eye contact with the camera and gaze squarely into your webcam. Ensure your camera is at eye level, so you don’t have to strain to see into it. Avoid looking away all of the time; this can give the impression of being distracted and unfocused. Speak neutrally or brightly. Remember that the AI analyzes your speech tone and mannerisms. As a result, speaking in clear tones can help you succeed.
09Maintain proper body posture and even talking speed

Ensure to carry yourself the same way as you would in an in-person human interview because a human interviewer will watch your interview at some point. You emphasize more confidence when you sit up straight, Sit with an open posture, avoid crossed arms or legs, keep your chin towards your stomach, and do not hunch your shoulders or recline on the chair. Appear in control, natural, and ready to handle any question. Try to keep your talking speed at a conversational rate, and avoid talking too fast or too slow because it might come off as you being nervous or unsure of yourself.
10Make use of keywords

The use of keywords is essential in any job application process. Meanwhile, AI algorithms pick out keywords in a candidate’s response during an interview. Stand out during an AI interview by using phrases that explain what you can contribute, echoing the exact language of the job posting. Before the AI-based video interview, carefully go through the job description and note what keywords the company uses to describe the role on the company website or job posting page. Be sure to use their words specifically.
Part 3 Role of AI in a video interview

AI electronically analyzes many features of a video interview. It asks all candidates the same pre-determined questions and then explores how they answered them. Some AI models grade candidates’ responses. Many significant companies use AI video interviews or algorithm-based interviewing. Candidates are compared to previous success stories to select the best candidate for the job. The software analyzes the applicant’s performance to the last job for applicants deemed suitable for the position. It compares the inputs to the company’s ideal candidate profile and ranks you accordingly. The AI interviewer will most likely use speech analytics software to break down the candidate’s speech into parts and deduce numerous interpretations. It then uses semantic analytics to determine grammatical proficiency. It also indicates your emotional condition based on the time of your voice.
Part 4 Role of AI in video making
In video production, artificial intelligence has proven faster and more efficient than humans. It’s also more cost-effective and time-saving than hiring a video editor. It allows you to edit more films in a shorter amount of time. It streamlines your job by taking care of most of the burden, making video editing simple even for beginners. AI makes suggestions that the user may not consider, making video production more accessible and engaging. Automating color correction and scene recognition in films improves the visual experience and aids in the formulation of personalized messaging.
For Win 7 or later (64-bit)
For macOS 10.12 or later
To help simplify the artificial intelligence video interview act, you can use fantastic video editing software. This video editor employs AI in video editing and so can ensure cost-efficient video making.
Wondershare Filmora Video Editor is one of the most outstanding AI-powered video editing programs available. It can simply erase video backdrops without using a green screen or chroma key, and it also allows the insertion of borders, glitch effects, pixelated, noise, or segmentation video effects with its new AI portrait add-on.
● Ending Thoughts →
● After reading this article, you know that AI-based video interviews will gradually take over the human interview process and the video-making industry. So, gear up for AI video interviews and be prepared for your next meeting. The future is revamping.
● Besides, video making is seamless and easy when you have the right software. The Filmora tool has proven to be one of the best AI updated tools for video editing professionals and beginners.
Artificial Intelligence is the replacement of human processes by machines and computer systems. It can replicate intelligent human behaviors, including facial expression recognition, problem-solving, and learning.
AI video interviewing, an increasingly popular assessment tool driven by artificial intelligence, is being incorporated by many large companies that receive thousands of job applications. AI electronically analyses many aspects of a video interview, including the candidate’s body language, facial expressions, word choices, and tone of voice. It can also track eye movements to determine whether candidates are looking at resources around them.
With the introduction of artificial intelligence, many tech companies and individuals have taken a likeness of it and have grown to utilize it to carry out tasks. Reconsider your position as applicants get selected by assessing their performance in the AI-based video interview against a large inventory of facial and linguistic information.
In this article
01 [How AI is Being Used in a Job Interview](#Part 1)
02 [How to Ace an AI Video Interview](#Part 2)
03 [Role of AI in a Video Interview](#Part 3)
04 [Role of AI in Video Making](#Part 4)
Part 1 How AI is being used in a job interview.
In most cases, an AI video interview is the initial stage in the hiring process, in place of or in addition to a typical cover letter and CV. It functions similarly to a face-to-face interview. Candidates get a series of job-specific interview questions, after which they have to record their responses on video with their smartphone or computer.
You’ll have a few minutes to answer each question as a candidate before going on to the next. Each exam takes about 20 minutes to complete and can be in any location convenient for you, whether in your living room, a quiet coffee shop nook, or somewhere else.
Each interview follows the same format, ensuring a similar experience for all individuals seeking that particular position.
The algorithm (also known as an assessment model) will assist the recruiter in making a more informed judgment if AI is in the process. It accomplishes this by identifying which candidates are most likely to succeed in the post based on data sets that predict job performance.
Part 2 How to Ace an AI video interview.
Planning ahead of time might make you feel less anxious and appear more confident, at ease, and relaxed. Here are some ideas for using artificial intelligence in video interviews.
It would help if you first determined whether you are going for an AI-based video interview, i.e., if you get an invite to a pre-recorded video interview via a platform. Massive firms are now using this type of interview to interview many possible employees without bias.
01Prepare for the interview differently.

When in an AI interview, you need to prepare differently. It’s not the same as a human-to-human interview. There will be no feedback from the person at the other end of the interview. Research the use of AI in interviews to know how it works. Remember to research the company in question as well.
02Go straight to the point.

Remember that you’re having an interview with a robot and not a human, so skip the small talk and hit the nail on the head. It is better to state your point clearly and straight to the end.
03Find a suitable environment for your interview.

Most artificial intelligence video interviews take place through your webcam in the comfort of your home. So, it’s essential to use an appropriate background. Your interview background should be clear of objects and distractions. It should also have enough lighting and be free from background noises since AI algorithms are designed to scan your environment and make deductions about you.
04Dress well for your interview.

There won’t be a human at the other end of the camera, so there’s no need to dress up, right? That’s wrong. You still need to dress well when attending a formal human job interview. Wear business casuals with plain colored clothes.
Another reason you want to dress professionally is that it can increase your self-confidence, making you relaxed and feel good about yourself.
05Practice before the interview.

To ace an AI interview, practice in front of a friend or mirror in advance of your interview. You can do a mock interview or record yourself to identify likely mistakes and correct them. Practice by recording yourself and then replaying the video to see where you are making mistakes and need improvement.
06Share your real-world experiences and provide proof.

Use real-world experiences to showcase your skills when responding to questions during an AI interview. To determine and ensure candidates’ suitability, AI looks for specific soft skills like communication, the ability to take the initiative, and lots more. So, talk about them, use a practical example to illustrate your skills, and generally talk about your interview experience.
07Smiling

Wear a pleasant smile as you answer. It is easy to forget to smile when focusing so hard on the questions, but remember to relax and act natural. Facial expressions such as smiling are criteria that artificial intelligence interviewers watch for. Remember to smile, nod, and Use Gestures During Your Interview to show that you are attentive.
08Maintain eye contact and a neutral voice tone.

During an AI video interview, maintain eye contact with the camera and gaze squarely into your webcam. Ensure your camera is at eye level, so you don’t have to strain to see into it. Avoid looking away all of the time; this can give the impression of being distracted and unfocused. Speak neutrally or brightly. Remember that the AI analyzes your speech tone and mannerisms. As a result, speaking in clear tones can help you succeed.
09Maintain proper body posture and even talking speed

Ensure to carry yourself the same way as you would in an in-person human interview because a human interviewer will watch your interview at some point. You emphasize more confidence when you sit up straight, Sit with an open posture, avoid crossed arms or legs, keep your chin towards your stomach, and do not hunch your shoulders or recline on the chair. Appear in control, natural, and ready to handle any question. Try to keep your talking speed at a conversational rate, and avoid talking too fast or too slow because it might come off as you being nervous or unsure of yourself.
10Make use of keywords

The use of keywords is essential in any job application process. Meanwhile, AI algorithms pick out keywords in a candidate’s response during an interview. Stand out during an AI interview by using phrases that explain what you can contribute, echoing the exact language of the job posting. Before the AI-based video interview, carefully go through the job description and note what keywords the company uses to describe the role on the company website or job posting page. Be sure to use their words specifically.
Part 3 Role of AI in a video interview

AI electronically analyzes many features of a video interview. It asks all candidates the same pre-determined questions and then explores how they answered them. Some AI models grade candidates’ responses. Many significant companies use AI video interviews or algorithm-based interviewing. Candidates are compared to previous success stories to select the best candidate for the job. The software analyzes the applicant’s performance to the last job for applicants deemed suitable for the position. It compares the inputs to the company’s ideal candidate profile and ranks you accordingly. The AI interviewer will most likely use speech analytics software to break down the candidate’s speech into parts and deduce numerous interpretations. It then uses semantic analytics to determine grammatical proficiency. It also indicates your emotional condition based on the time of your voice.
Part 4 Role of AI in video making
In video production, artificial intelligence has proven faster and more efficient than humans. It’s also more cost-effective and time-saving than hiring a video editor. It allows you to edit more films in a shorter amount of time. It streamlines your job by taking care of most of the burden, making video editing simple even for beginners. AI makes suggestions that the user may not consider, making video production more accessible and engaging. Automating color correction and scene recognition in films improves the visual experience and aids in the formulation of personalized messaging.
For Win 7 or later (64-bit)
For macOS 10.12 or later
To help simplify the artificial intelligence video interview act, you can use fantastic video editing software. This video editor employs AI in video editing and so can ensure cost-efficient video making.
Wondershare Filmora Video Editor is one of the most outstanding AI-powered video editing programs available. It can simply erase video backdrops without using a green screen or chroma key, and it also allows the insertion of borders, glitch effects, pixelated, noise, or segmentation video effects with its new AI portrait add-on.
● Ending Thoughts →
● After reading this article, you know that AI-based video interviews will gradually take over the human interview process and the video-making industry. So, gear up for AI video interviews and be prepared for your next meeting. The future is revamping.
● Besides, video making is seamless and easy when you have the right software. The Filmora tool has proven to be one of the best AI updated tools for video editing professionals and beginners.
Artificial Intelligence is the replacement of human processes by machines and computer systems. It can replicate intelligent human behaviors, including facial expression recognition, problem-solving, and learning.
AI video interviewing, an increasingly popular assessment tool driven by artificial intelligence, is being incorporated by many large companies that receive thousands of job applications. AI electronically analyses many aspects of a video interview, including the candidate’s body language, facial expressions, word choices, and tone of voice. It can also track eye movements to determine whether candidates are looking at resources around them.
With the introduction of artificial intelligence, many tech companies and individuals have taken a likeness of it and have grown to utilize it to carry out tasks. Reconsider your position as applicants get selected by assessing their performance in the AI-based video interview against a large inventory of facial and linguistic information.
In this article
01 [How AI is Being Used in a Job Interview](#Part 1)
02 [How to Ace an AI Video Interview](#Part 2)
03 [Role of AI in a Video Interview](#Part 3)
04 [Role of AI in Video Making](#Part 4)
Part 1 How AI is being used in a job interview.
In most cases, an AI video interview is the initial stage in the hiring process, in place of or in addition to a typical cover letter and CV. It functions similarly to a face-to-face interview. Candidates get a series of job-specific interview questions, after which they have to record their responses on video with their smartphone or computer.
You’ll have a few minutes to answer each question as a candidate before going on to the next. Each exam takes about 20 minutes to complete and can be in any location convenient for you, whether in your living room, a quiet coffee shop nook, or somewhere else.
Each interview follows the same format, ensuring a similar experience for all individuals seeking that particular position.
The algorithm (also known as an assessment model) will assist the recruiter in making a more informed judgment if AI is in the process. It accomplishes this by identifying which candidates are most likely to succeed in the post based on data sets that predict job performance.
Part 2 How to Ace an AI video interview.
Planning ahead of time might make you feel less anxious and appear more confident, at ease, and relaxed. Here are some ideas for using artificial intelligence in video interviews.
It would help if you first determined whether you are going for an AI-based video interview, i.e., if you get an invite to a pre-recorded video interview via a platform. Massive firms are now using this type of interview to interview many possible employees without bias.
01Prepare for the interview differently.

When in an AI interview, you need to prepare differently. It’s not the same as a human-to-human interview. There will be no feedback from the person at the other end of the interview. Research the use of AI in interviews to know how it works. Remember to research the company in question as well.
02Go straight to the point.

Remember that you’re having an interview with a robot and not a human, so skip the small talk and hit the nail on the head. It is better to state your point clearly and straight to the end.
03Find a suitable environment for your interview.

Most artificial intelligence video interviews take place through your webcam in the comfort of your home. So, it’s essential to use an appropriate background. Your interview background should be clear of objects and distractions. It should also have enough lighting and be free from background noises since AI algorithms are designed to scan your environment and make deductions about you.
04Dress well for your interview.

There won’t be a human at the other end of the camera, so there’s no need to dress up, right? That’s wrong. You still need to dress well when attending a formal human job interview. Wear business casuals with plain colored clothes.
Another reason you want to dress professionally is that it can increase your self-confidence, making you relaxed and feel good about yourself.
05Practice before the interview.

To ace an AI interview, practice in front of a friend or mirror in advance of your interview. You can do a mock interview or record yourself to identify likely mistakes and correct them. Practice by recording yourself and then replaying the video to see where you are making mistakes and need improvement.
06Share your real-world experiences and provide proof.

Use real-world experiences to showcase your skills when responding to questions during an AI interview. To determine and ensure candidates’ suitability, AI looks for specific soft skills like communication, the ability to take the initiative, and lots more. So, talk about them, use a practical example to illustrate your skills, and generally talk about your interview experience.
07Smiling

Wear a pleasant smile as you answer. It is easy to forget to smile when focusing so hard on the questions, but remember to relax and act natural. Facial expressions such as smiling are criteria that artificial intelligence interviewers watch for. Remember to smile, nod, and Use Gestures During Your Interview to show that you are attentive.
08Maintain eye contact and a neutral voice tone.

During an AI video interview, maintain eye contact with the camera and gaze squarely into your webcam. Ensure your camera is at eye level, so you don’t have to strain to see into it. Avoid looking away all of the time; this can give the impression of being distracted and unfocused. Speak neutrally or brightly. Remember that the AI analyzes your speech tone and mannerisms. As a result, speaking in clear tones can help you succeed.
09Maintain proper body posture and even talking speed

Ensure to carry yourself the same way as you would in an in-person human interview because a human interviewer will watch your interview at some point. You emphasize more confidence when you sit up straight, Sit with an open posture, avoid crossed arms or legs, keep your chin towards your stomach, and do not hunch your shoulders or recline on the chair. Appear in control, natural, and ready to handle any question. Try to keep your talking speed at a conversational rate, and avoid talking too fast or too slow because it might come off as you being nervous or unsure of yourself.
10Make use of keywords

The use of keywords is essential in any job application process. Meanwhile, AI algorithms pick out keywords in a candidate’s response during an interview. Stand out during an AI interview by using phrases that explain what you can contribute, echoing the exact language of the job posting. Before the AI-based video interview, carefully go through the job description and note what keywords the company uses to describe the role on the company website or job posting page. Be sure to use their words specifically.
Part 3 Role of AI in a video interview

AI electronically analyzes many features of a video interview. It asks all candidates the same pre-determined questions and then explores how they answered them. Some AI models grade candidates’ responses. Many significant companies use AI video interviews or algorithm-based interviewing. Candidates are compared to previous success stories to select the best candidate for the job. The software analyzes the applicant’s performance to the last job for applicants deemed suitable for the position. It compares the inputs to the company’s ideal candidate profile and ranks you accordingly. The AI interviewer will most likely use speech analytics software to break down the candidate’s speech into parts and deduce numerous interpretations. It then uses semantic analytics to determine grammatical proficiency. It also indicates your emotional condition based on the time of your voice.
Part 4 Role of AI in video making
In video production, artificial intelligence has proven faster and more efficient than humans. It’s also more cost-effective and time-saving than hiring a video editor. It allows you to edit more films in a shorter amount of time. It streamlines your job by taking care of most of the burden, making video editing simple even for beginners. AI makes suggestions that the user may not consider, making video production more accessible and engaging. Automating color correction and scene recognition in films improves the visual experience and aids in the formulation of personalized messaging.
For Win 7 or later (64-bit)
For macOS 10.12 or later
To help simplify the artificial intelligence video interview act, you can use fantastic video editing software. This video editor employs AI in video editing and so can ensure cost-efficient video making.
Wondershare Filmora Video Editor is one of the most outstanding AI-powered video editing programs available. It can simply erase video backdrops without using a green screen or chroma key, and it also allows the insertion of borders, glitch effects, pixelated, noise, or segmentation video effects with its new AI portrait add-on.
● Ending Thoughts →
● After reading this article, you know that AI-based video interviews will gradually take over the human interview process and the video-making industry. So, gear up for AI video interviews and be prepared for your next meeting. The future is revamping.
● Besides, video making is seamless and easy when you have the right software. The Filmora tool has proven to be one of the best AI updated tools for video editing professionals and beginners.
Also read:
- How To Change Sky Background With Adobe Photoshop Best Ways for 2024
- New How to Add Subtitles in VLC Media Play
- Updated Premiere Pro Text Effects Beginner Guide for 2024
- New 2024 Approved Guide Adding Audio in Wondershare Filmora
- New What Is MKV Format and How To Play MKV Video?
- Doable Ways to Make Transparent Background in Procreate for 2024
- Updated 6 Instant Ways to Make Windows 10 Slideshow for 2024
- Shotcut Video Editor Review
- 2024 Approved Top 10 iPad Slideshow Apps to Create a Slideshow
- Updated The Availability of the Slow-Motion Feature on the iPhone Is Often Debated. This Article Will Guide You on How to Slow Down a Video on iPhone
- Here We Are Going to Show You the Best Effects to Appear on Camera Made with Filmora
- The Glitch Effect Shows Errors and Flaws in the Image or a Video. The Write-Up Presents the Complete Procedure of Adding Premiere Pros Glitch Effect and Introduces Eight Free Glitch Effects for 2024
- 2024 Approved Its Always a Cool Thing to Use a 3D Intro Maker to Create Intro Videos for Your Clips. This Post Will Introduce You 4 of the Best Intro Video Makers to Help You Improve Your Video
- Find Out About MAGIX Vegas Pro Pricing Plan and Features to See How the Software Can Help You with Your Video Editing Tasks
- Updated Efficient Ways to Change Slow Motion Video to Normal on iPhone
- Updated Are You Looking to Remove Echo in Premiere Pro? Please Look at Our Guide for Advice and Suggestions on Getting the Best Possible Outcomes
- New 2024 Approved 10 Best Movie Trailer Voice Generators Windows, Mac, Android, iPhone & Online
- Updated How to Animate Designs With Canva GIF
- Best Animated Text Generator
- New Are You Looking for the Best Premiere Pro Slideshow Template Online for Free? If Yes, You Can Find a Few Exciting Slideshow Templates Here. They Are Worth Using
- Updated EasyHDR Review Is This a Good Choice to Create HDR
- Updated What Is Animated GIF | GIF Example & Advantages of GIF
- Looking For a Cheap Camera to Make Slow Motion Video? Get It Now for 2024
- How to Uue Adobe Lightroom Color Grading for 2024
- 2024 Approved What Slideshow Templates Can Teach You About Aesthetic
- How to Make Cool COD Warzone Thumbnail
- 2024 Approved SBV to SRT How to Convert YouTube SBV Subtitle to SRT Format
- Updated How to Rotate Video in iMovie with Alternative for 2024
- Updated How to Zoom Video in VLC Media Player
- 2024 Approved Do You Need More Time to Explain a Particular Screen or Moment in Your Recording Using an Extended Freeze-Frame? Learn How to Use Camtasia Freeze-Frame to Extend Parts of a Video Effectively
- In 2024, How to Hide/Fake Snapchat Location on Your Realme Narzo 60x 5G | Dr.fone
- Prevent Cross-Site Tracking on Realme Narzo 60 Pro 5G and Browser | Dr.fone
- In 2024, Here are Some of the Best Pokemon Discord Servers to Join On Samsung Galaxy S23 | Dr.fone
- How to Stop My Spouse from Spying on My Motorola Razr 40 | Dr.fone
- In 2024, Ways to stop parent tracking your ZTE Blade A73 5G | Dr.fone
- Here are Some of the Best Pokemon Discord Servers to Join On Oppo Reno 11F 5G | Dr.fone
- In 2024, Mastering Android Device Manager The Ultimate Guide to Unlocking Your Poco M6 Pro 5G Device
- In 2024, How to Unlock Apple ID On your iPhone XS Max without Security Questions?
- How To Repair iPhone 11 System Issues? | Dr.fone
- Red Magic 9 Pro Messages Recovery - Recover Deleted Messages from Red Magic 9 Pro
- In 2024, Fake the Location to Get Around the MLB Blackouts on Apple iPhone 15 Plus | Dr.fone
- In 2024, How To Unlock Apple iPhone 6s Without Swiping Up? 6 Ways | Dr.fone
- In 2024, How to Unlock Itel S23+ Pattern Lock if Forgotten? 6 Ways
- Top Apps and Online Tools To Track Nubia Red Magic 9 Pro Phone With/Without IMEI Number
- Your Complete Guide To Reset Nubia Red Magic 8S Pro | Dr.fone
- In 2024, The Magnificent Art of Pokemon Go Streaming On Samsung Galaxy A25 5G? | Dr.fone
- 11 Ways to Fix it When My Nokia 130 Music Wont Charge | Dr.fone
- Simple ways to get lost messages back from Google Pixel 7a
- In 2024, How to Unlock Apple iPhone 7, Apples New iPhone
- 3 Ways to Track ZTE Nubia Flip 5G without Them Knowing | Dr.fone
- Detailed guide of ispoofer for pogo installation On Vivo Y27 5G | Dr.fone
- In 2024, Overview of the Best Vivo S18e Screen Mirroring App | Dr.fone
- 4 Methods to Turn off Life 360 On Infinix Hot 40i without Anyone Knowing | Dr.fone
- Guide to Mirror Your Samsung Galaxy A14 4G to Other Android devices | Dr.fone
- Pokemon Go No GPS Signal? Heres Every Possible Solution On Xiaomi Civi 3 Disney 100th Anniversary Edition | Dr.fone
- App Wont Open on Your Samsung Galaxy A14 5G? Here Are All Fixes | Dr.fone
- Title: New 7 Solutions to Edit GoPro Video on Mac
- Author: Chloe
- Created at : 2024-05-20 03:37:44
- Updated at : 2024-05-21 03:37:44
- Link: https://ai-editing-video.techidaily.com/new-7-solutions-to-edit-gopro-video-on-mac/
- License: This work is licensed under CC BY-NC-SA 4.0.


