:max_bytes(150000):strip_icc():format(webp)/how-to-set-up-speech-to-text-on-android-0-928c48ab121248f9aa543a136d971f9a.jpg)
New How To Add Motion Blur In Davinci Resolve?

How To Add Motion Blur In Davinci Resolve?
Do you want to give extra details to your object’s movements in a video? Motion blur effect can instantly add a natural effect to your videos by smoothening the lines and edges. It also adds a sense of action in a video quite dramatically.
Many professionals also say that motion blur creates a passage of time by crafting vibrant streaks of colors. So, if you want to add this dynamic effect, this article will help you. By reading this article, you can learn how to add motion blur in DaVinci Resolve using efficient ways.
Part 1: What is DaVinci Resolve?
DaVinci Resolve is an all-in-one software that includes various capabilities. Using this tool, you can effortlessly add effects, filters, visual graphics, and other elements. You can also use this professional software to color-correct your video by altering saturation, hue, contrast, and brightness. With new upgrades, DaVinci provides remote collaboration using Blackmagic Cloud. This will allow you to collaborate with multiple users efficiently.
You can find different tools on different pages of DaVinci. This flexibility and wide space will help you to execute video editing effortlessly. Furthermore, you can also create customizable keyboard shortcuts to increase your overall work efficiency. Thus, its highly professional software contains a wide range of media management, organization, and editing tools.
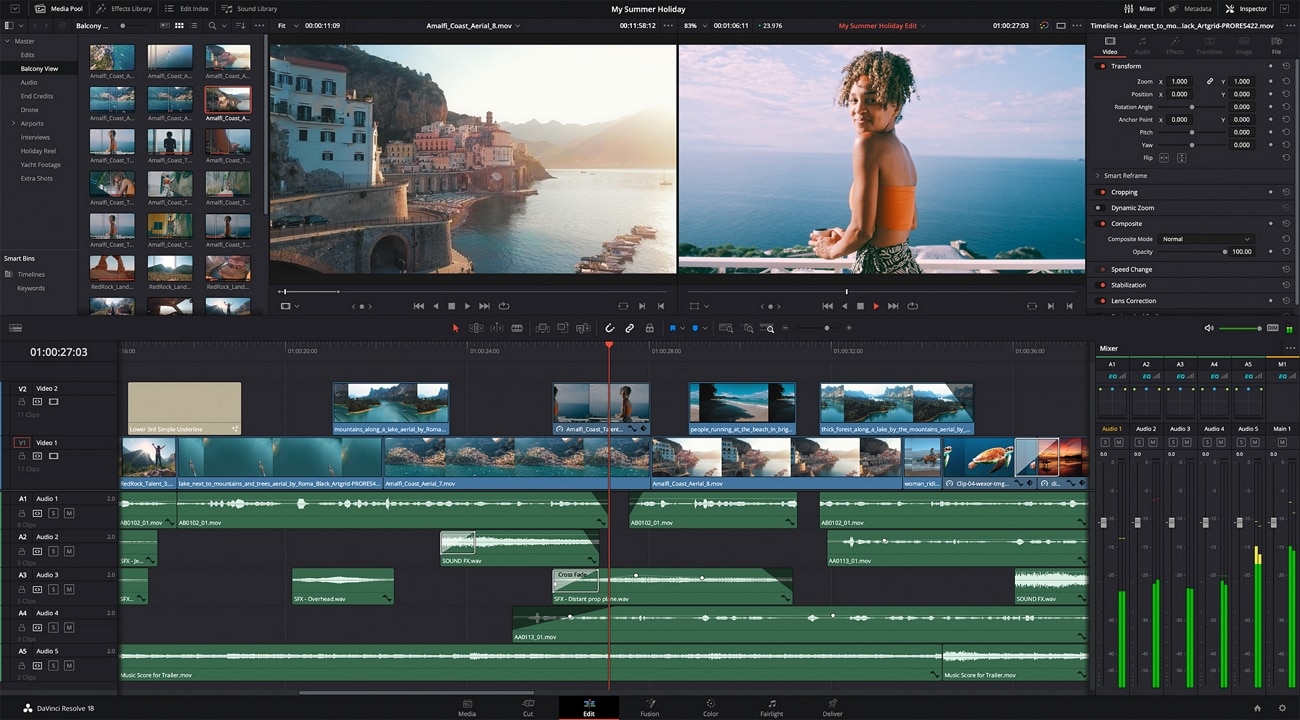
Part 2: How to Add Motion Blur to Videos in DaVinci Resolve?
DaVinci Resolve can professionally add a motion blur effect to your videos to smoothen the look. To use the DaVinci motion blur effect, there are two efficient ways. To learn about them in detail, read this part of the section carefully.
1. On the Fusion Page
DaVinci has separate pages, like the Fusion page, for different uses. If you want to learn how to add a motion blur effect on the fusion page, check the following instructions carefully.
What is the Fusion Page in DaVinci?
On the Fusion page, you can use captivating visual effects to add a new perspective to your videos. This page consists of a diverse range of motion graphics and visual effects. You can use retouching and repairing tools from the fusion page to generate a cinematic effect quickly.
So, by merging images, effects, and animations together, you can create a vibrant effect of your own efficiently. To add DaVinci Resolve motion blur on the fusion page, here are the simple steps:
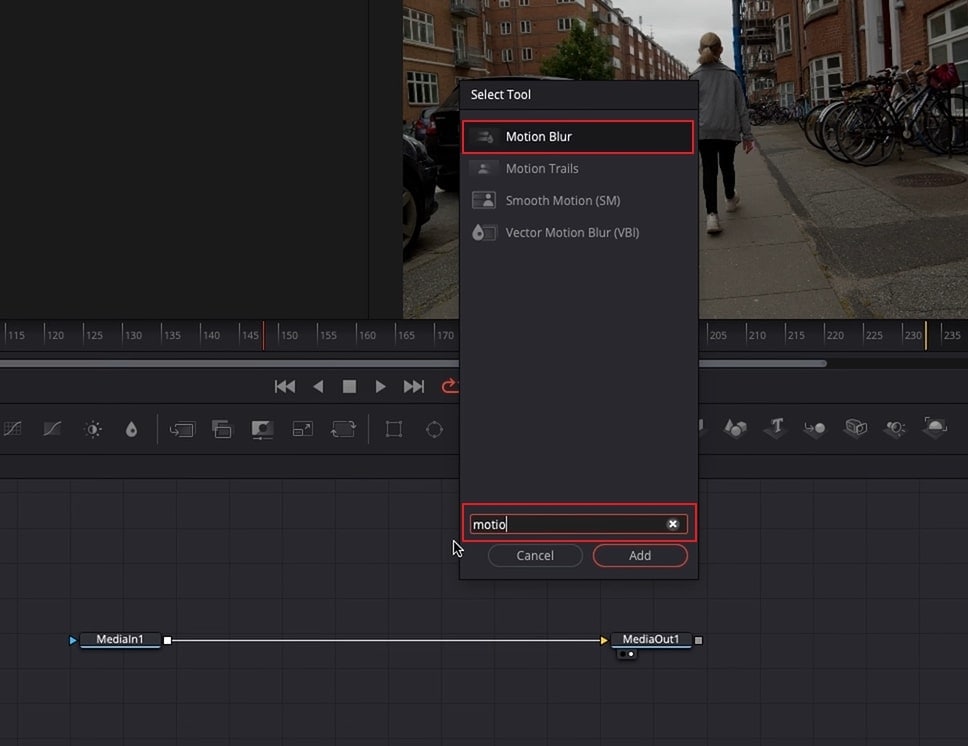
Step1 Navigate to the DaVinci Resolve tool and upload your video. Now open the fusion page and press “Shift” and “Spacebar.” On the search box, type “Motion” and select “Motion Blur” from the results. After selecting it, tap on the “Add” button.
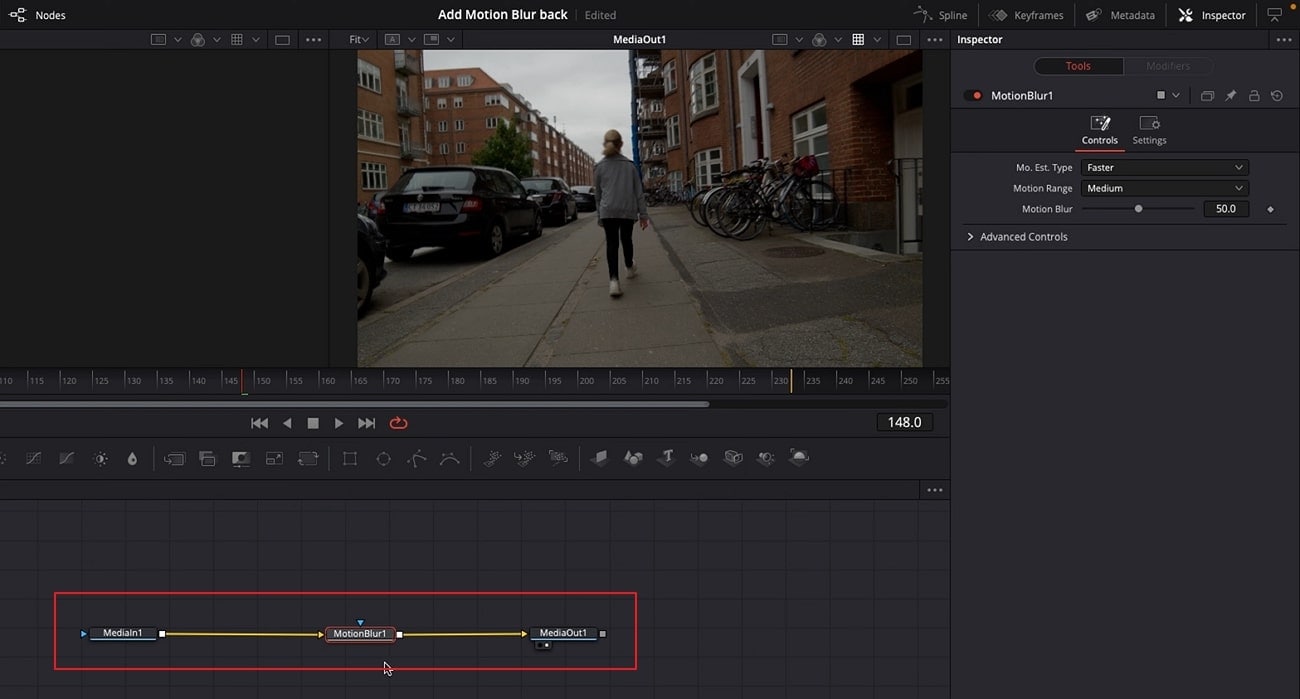
Step2 Now, you will be able to see a nod of Motion Blur on the interface. Drag this node to the center of “Media in” and “Media Out.” By selecting the motion blur node, you can adjust the settings from the right direction.
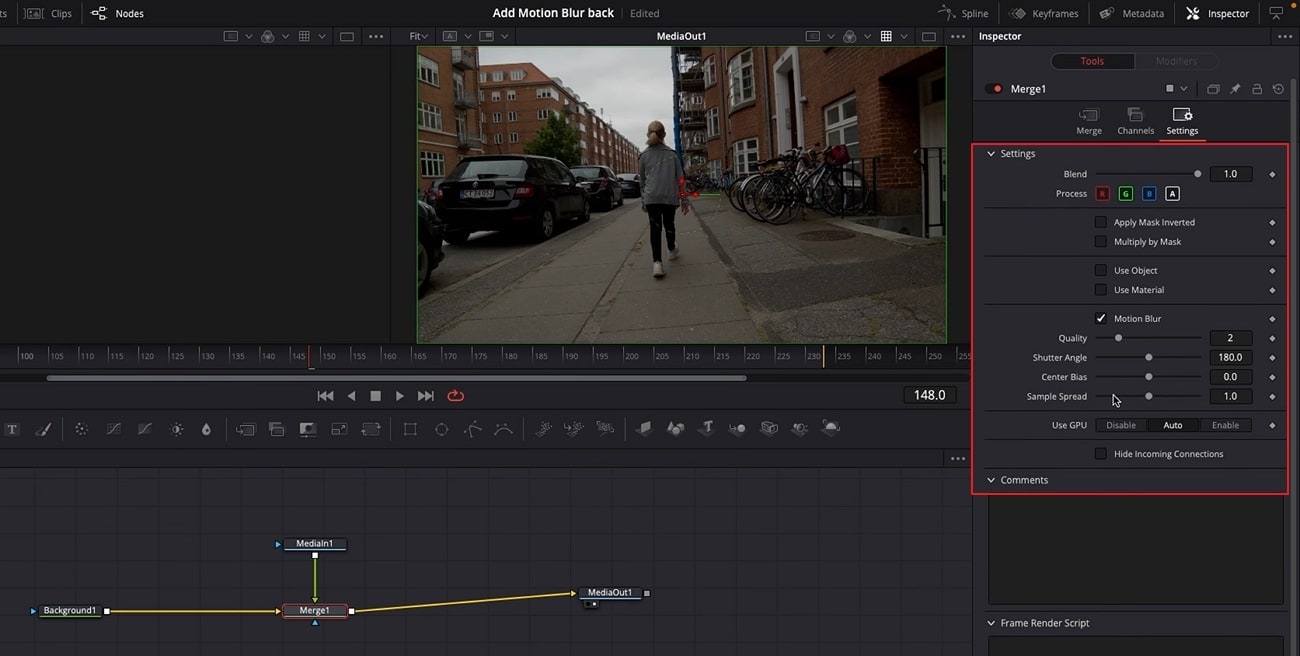
Step3 You can also remove the Motion Blur node to create more enhancements. After removing it, you have to add a “Background” and connect it to Media in and Media out nodes. Now merge the nodes and navigate to “Settings.” From the settings, you can check the box of motion blur and change its elements like quality, shutter angle, etc.
2. In the Edit Page
The Edit page in DaVinci Resolve provides you with complete freedom to add transitions, titles, and effects to the videos. On this page, you can replace, insert, overwrite and trim the clip effectively. Moreover, you can also add 2D and 3D titles to your videos on the edit page.
If you want to add a motion blur effect on DaVinci Resolve 17, you can instantly increase your work efficiency. The reason is that on DaVinci, you would be able to directly drag the motion blur effect on the editing area. Thus, it can increase your editing speed drastically. To add DaVinci motion blur on the editing page, read the below steps:
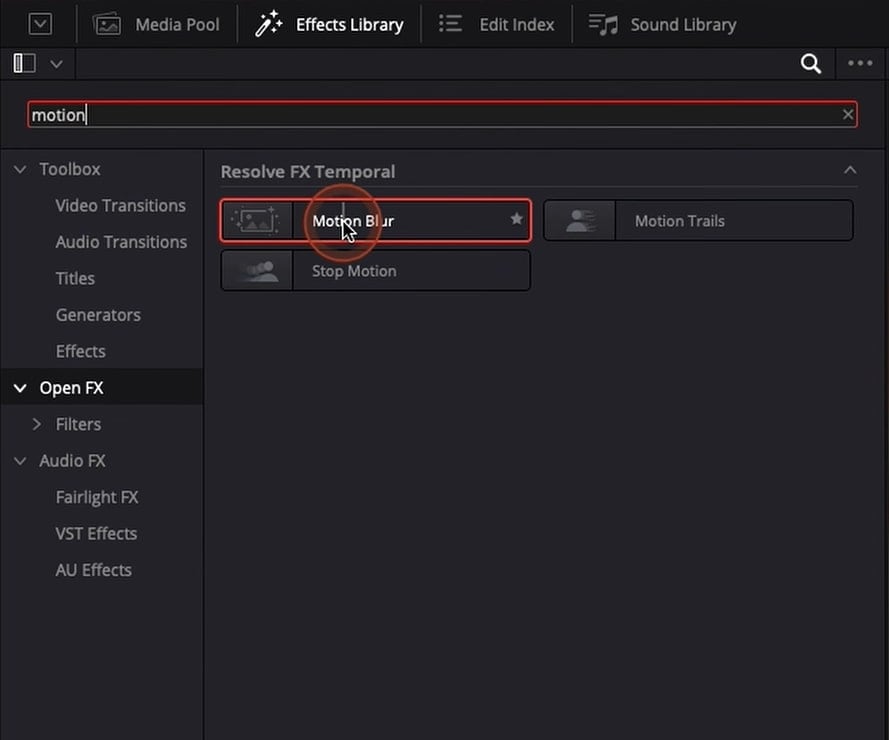
Step1 After accessing the DaVinci Resolve, open its edit page and upload the video. Once done, go to “Effects Library” and select “Open FX.” Now from the search bar, type “Motion Blur.” Select motion blur from the results and apply it to the timeline.
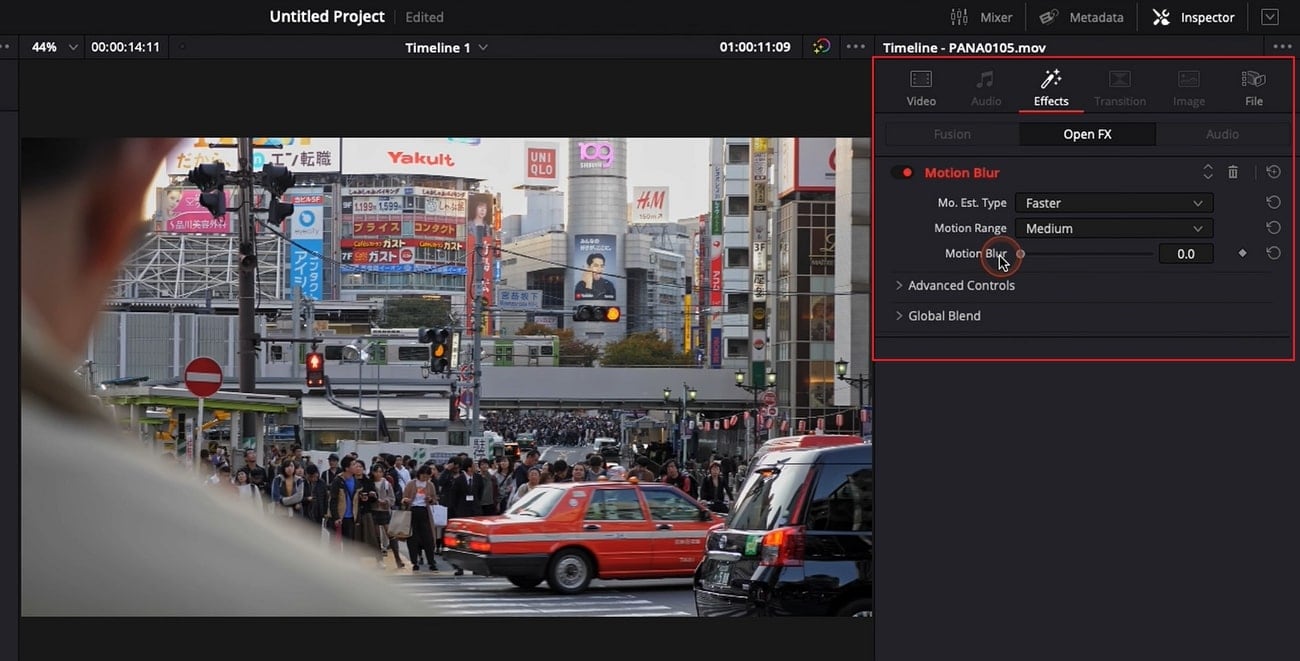
Step2 On the right side, select the “Effects” tab, and then you will be able to modify the motion range, motion blur value, and other elements.
Bonus Tips – Add Motion Blur with an Alternative to DaVinci Resolve
Do you want a better tool than DaVinci Resolve motion blur? Filmora is an easy-to-use tool that has a delightful and well-designed interface. Using this tool, you can effortlessly perform flawless editing on your videos without interruption. You can transitions and effects to your video to improve their visual appeal. You can also add audio clips to the video on this platform with great ease.
Free Download For Win 7 or later(64-bit)
Free Download For macOS 10.14 or later
Apart from advanced functioning, you can also use Filmora to execute basic functions. For instance, you can cut, trim, split, merge, and crop your videos with high precision. Moreover, you can use its stock footage to create a dynamic video from scratch. Hence, it’s a complete professional software that can change the outlook of your video efficiently.
Steps to Add Motion Blur in Wondershare Filmora
Follow the steps described below to add the motion blur to your videos if you are a beginner in the video industry:
Step1 Create a New Filmora Project
After launching Filmora, hit the “Create New Project” button to open a new interface. On the project media, upload your desired media file and then drag it to the timeline.

Step2 Choose the Motion Blur Effect
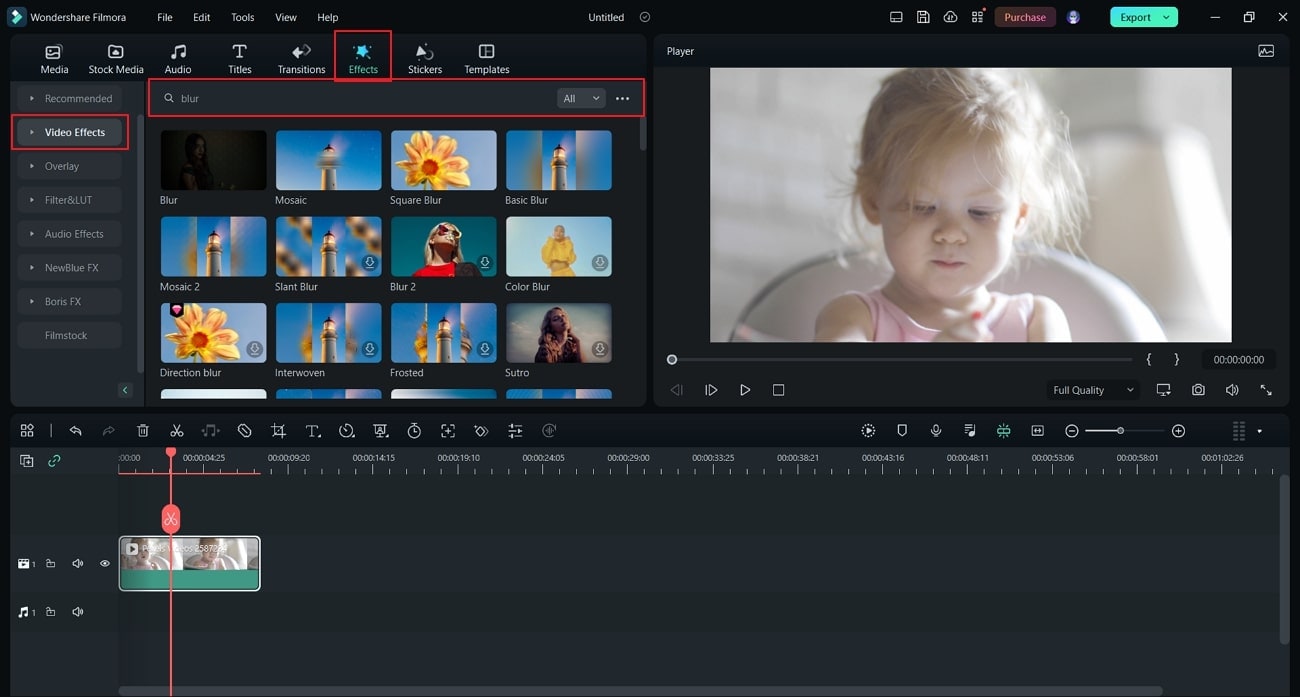
Now go to the “Effects” tab and select the “Video Effects” category from the left panel. Now you will have to type “Blur” in the search bar to get all the blur effects of Filmora. Select your option and apply the effect to the timeline.
Step3 Add the Dissolve Transition
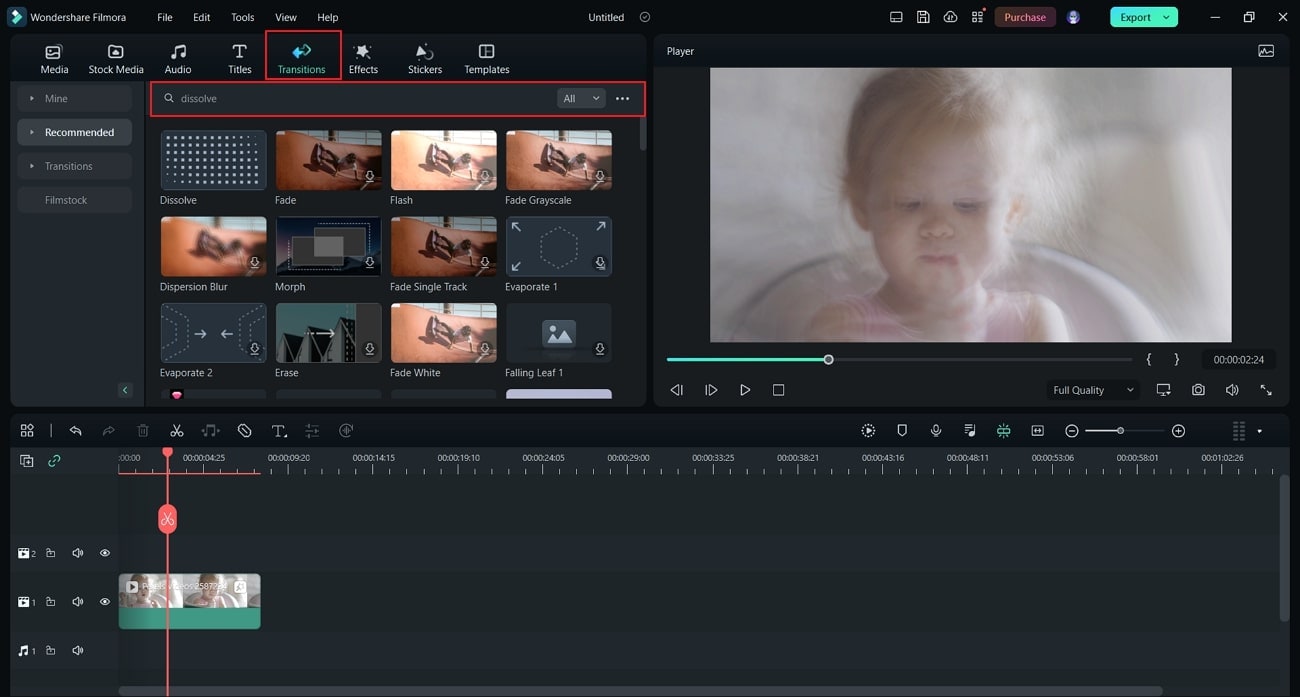
You can also add a transition known as “Dissolve” by searching for it in the “Transitions” tab to smoothen your video. You can see the final results in the preview window.
Conclusion
Have you ever added a motion blur effect to your videos? If you are unaware of how to create a professional motion blur effect, this article can provide you with complete guidance. In this article, we have used DaVinci Resolve to flawlessly add a motion blur effect. However, if you find the interface of DaVinci Resolve motion blur complicated, you can try its best alternative, Wondershare Filmora.
Free Download For macOS 10.14 or later
Apart from advanced functioning, you can also use Filmora to execute basic functions. For instance, you can cut, trim, split, merge, and crop your videos with high precision. Moreover, you can use its stock footage to create a dynamic video from scratch. Hence, it’s a complete professional software that can change the outlook of your video efficiently.
Steps to Add Motion Blur in Wondershare Filmora
Follow the steps described below to add the motion blur to your videos if you are a beginner in the video industry:
Step1 Create a New Filmora Project
After launching Filmora, hit the “Create New Project” button to open a new interface. On the project media, upload your desired media file and then drag it to the timeline.

Step2 Choose the Motion Blur Effect
Now go to the “Effects” tab and select the “Video Effects” category from the left panel. Now you will have to type “Blur” in the search bar to get all the blur effects of Filmora. Select your option and apply the effect to the timeline.

Step3 Add the Dissolve Transition
You can also add a transition known as “Dissolve” by searching for it in the “Transitions” tab to smoothen your video. You can see the final results in the preview window.

Conclusion
Have you ever added a motion blur effect to your videos? If you are unaware of how to create a professional motion blur effect, this article can provide you with complete guidance. In this article, we have used DaVinci Resolve to flawlessly add a motion blur effect. However, if you find the interface of DaVinci Resolve motion blur complicated, you can try its best alternative, Wondershare Filmora.
How to Create Cinematic Style Videos?
Do you find cinematic-style videos appealing? Do you wish to give your content a cinematic vibe? Hold on to this article for more!
A cinematic video style resembles a film. The act is employed in film making and visual storytelling that considers aspect ratio, composition, color, lighting style, type of film, editing, filters, and set design. The cinematic background music plays an equally important role. The article is a guide to creating a cinematic intro for YouTube.
Additionally, we will discuss the procedure to work on travel intro for a vlog. So, let us not waste time anymore! Time to start the adventure!
In this article
01 How to Create a Cinematic Intro for Your Video?
02 How to Cinematic Travel Intro for Your Travel Vlog?
03 3 Trendy Sites to Download Cinematic Background Music
Part 1: How to Create a Cinematic Intro for Your Video?
Every content creator wishes to bring new ideas to the set. The part played by cinematic background music cannot be avoided no matter what innovation is ahead of us. A cinematic and classy intro to your video displays the effort performed on your work. It compels the audience to keep following you.
For this very reason, the article conveys a guide to creating a powerful cinematic intro. Let us begin this!
For Win 7 or later (64-bit)
For macOS 10.12 or later
Step 1: Launch Wondershare Filmora to begin. Import the targeted music in the program and drag it to the timeline. Now, trim the music to 30 seconds and listen to the end part. Select the last note to match the beat in the beginning part of the music.

Step 2: Moving on, add markers to the music. Use “M” from the keyboard to mark the specific part of the track. After you are done, drag the first track onto the timeline. Trim the video to match it to the first marker.

Step 3: Perform a similar process for the rest of the video clips and trim them according to the markers. The user is directed to create a 2.35:1 widescreen cinemascope bar opener. To do so, drag two black mattes onto the timeline on top of each other.

Step 4: Drag the end of both clips to match the length of the whole video. Now, it is time to animate it. Insert 240° in the y-axis for the first keyframe. Similarly, use 422.2° for the second keyframe. For the bottom y-axis, use -240° for the first keyframe and -422.2° for the second keyframe.

Step 5: After the animation is completed, head to the “Titles” tab and look for cinematic packs. Choose one and drag it onto the timeline. Secondly, alter the duration and animation of the title. The user is expected to insert a dissolve transition at the end of the title.

Step 6: Perform the same process for the rest of the tracks. Time the titles to match the clip’s ending. Now, add a dissolve transition at the end of the clip. Trim the clip into two parts and apply square blur by navigating to the “Effects” tab to blur the video clips.

Step 7: Moving on, adjust the alpha for blur intensity. Add a dissolve transition between the cuts. In the final step, go to the “Animation” and then “Customize.” Reframe the last clip and animate a zoom-out effect. Reduce the “Scale” percent to do so. A creative cinematic intro is ready!

Part 2: How to Cinematic Travel Intro for Your Travel Vlog?
Vacationing and traveling offer exposure to learn more about people and the world around us. Are you a traveler? Do you prefer a solo vacation or with your family? Whatever your answer might be, we have got you!
To make an astonishing and engaging cinematic travel for your travel vlog, Filmora is there for us. The section shall reflect on the whole procedure using royalty-free cinematic music. Let us initiate!
For Win 7 or later (64-bit)
For macOS 10.12 or later
Step 1: The first step is simple. Open Wondershare Filmora and head to the “Media” tab. Import the targeted travel video clips onto the timeline and rearrange them. Now, navigate to the “Effects” section and search “cinematic.”

Step 2: Pick one and drag it onto the second track to present cinematic bars and a widescreen look to the video. Now, move to the “Titles” section and choose the suitable one. Drag it to the third track. Double click on it to access the “Advanced settings” and make the required alterations.

Step 3: You can modify the font size, color, and timing of the video. Again, use the “Titles” panel and hit the “Subtitles” category. Select one and drag to the third track. Make relevant changes through the same procedure as above.

Step 4: After that, duplicate the subtitle track on the timeline and repeat the required changes. Sync the text to the audio once you are done with the process.

Step 5: The user is instructed to go back to the “Titles” section and search “cinematic end credits.” Pick one and drag it to the third track. Double click on it to make a few alterations. You have performed the procedure successfully.

Part 3: 3 Trendy Sites to Download Cinematic Background Music
The use of royalty-free cinematic music creates an unmatched vibe. If you do not use it, you might not run for competition. Therefore, you need to access a great music platform for this purpose. Allow us to introduce you to three workable marketplaces. The cinematic background music that they offer is mind-boggling for sure. So, let’s go? Shall we?
Pixabay
Pixabay is an online marketplace that can be accessed effortlessly. The user is free to tailor the filter options to give the system an idea of the music requirement. You can change the results from genre to movement and theme to categories as needed. Essentially, royalty-free cinematic music can be downloaded with one tap of a button.
Moreover, the duration of the track is shown to decide consciously. Cinematic dramatic, caves of dawn, honor and sword, the introvert, and chill abstract are some music offered by Pixabay.

Chosic
Chosic is a house for a wide range of cinematic background music tracks. You can preview the audio tracks before downloading them and tackle the search bar according to your movie themes and type of set design.
Furthermore, the search filters are tailored based on relevancy, popularity, and random audios. Press the download button to have the audio in MP3 format. Epic cinematic, the inspiration, discovery, and the battle are renowned cinematic background music from Chosic.

Mixkit
Mixkit has got to be an excellent choice to deal with your everyday needs of royalty-free cinematic music. With Mixkit in the frame, the user can create movie magic using the impeccable cinematic music collection. Cinematic trailer, slow trail, piano horror, motivational cinematic, and silent descent are a few examples of a strong cinematic collection.

Final Thoughts
Every content creator wishes to transform their work using different effects and filters. Adding a cinematic style video compels the audience to be on the verge of their seats, giving them a film notion. The article highlighted three apps to download good quality and cinematic background music. Filmora also brought a thrill to the vlogs and YouTube intros.
Versatile Video Editor - Wondershare Filmora
An easy yet powerful editor
Numerous effects to choose from
Detailed tutorials provided by the official channel
02 How to Cinematic Travel Intro for Your Travel Vlog?
03 3 Trendy Sites to Download Cinematic Background Music
Part 1: How to Create a Cinematic Intro for Your Video?
Every content creator wishes to bring new ideas to the set. The part played by cinematic background music cannot be avoided no matter what innovation is ahead of us. A cinematic and classy intro to your video displays the effort performed on your work. It compels the audience to keep following you.
For this very reason, the article conveys a guide to creating a powerful cinematic intro. Let us begin this!
For Win 7 or later (64-bit)
For macOS 10.12 or later
Step 1: Launch Wondershare Filmora to begin. Import the targeted music in the program and drag it to the timeline. Now, trim the music to 30 seconds and listen to the end part. Select the last note to match the beat in the beginning part of the music.

Step 2: Moving on, add markers to the music. Use “M” from the keyboard to mark the specific part of the track. After you are done, drag the first track onto the timeline. Trim the video to match it to the first marker.

Step 3: Perform a similar process for the rest of the video clips and trim them according to the markers. The user is directed to create a 2.35:1 widescreen cinemascope bar opener. To do so, drag two black mattes onto the timeline on top of each other.

Step 4: Drag the end of both clips to match the length of the whole video. Now, it is time to animate it. Insert 240° in the y-axis for the first keyframe. Similarly, use 422.2° for the second keyframe. For the bottom y-axis, use -240° for the first keyframe and -422.2° for the second keyframe.

Step 5: After the animation is completed, head to the “Titles” tab and look for cinematic packs. Choose one and drag it onto the timeline. Secondly, alter the duration and animation of the title. The user is expected to insert a dissolve transition at the end of the title.

Step 6: Perform the same process for the rest of the tracks. Time the titles to match the clip’s ending. Now, add a dissolve transition at the end of the clip. Trim the clip into two parts and apply square blur by navigating to the “Effects” tab to blur the video clips.

Step 7: Moving on, adjust the alpha for blur intensity. Add a dissolve transition between the cuts. In the final step, go to the “Animation” and then “Customize.” Reframe the last clip and animate a zoom-out effect. Reduce the “Scale” percent to do so. A creative cinematic intro is ready!

Part 2: How to Cinematic Travel Intro for Your Travel Vlog?
Vacationing and traveling offer exposure to learn more about people and the world around us. Are you a traveler? Do you prefer a solo vacation or with your family? Whatever your answer might be, we have got you!
To make an astonishing and engaging cinematic travel for your travel vlog, Filmora is there for us. The section shall reflect on the whole procedure using royalty-free cinematic music. Let us initiate!
For Win 7 or later (64-bit)
For macOS 10.12 or later
Step 1: The first step is simple. Open Wondershare Filmora and head to the “Media” tab. Import the targeted travel video clips onto the timeline and rearrange them. Now, navigate to the “Effects” section and search “cinematic.”

Step 2: Pick one and drag it onto the second track to present cinematic bars and a widescreen look to the video. Now, move to the “Titles” section and choose the suitable one. Drag it to the third track. Double click on it to access the “Advanced settings” and make the required alterations.

Step 3: You can modify the font size, color, and timing of the video. Again, use the “Titles” panel and hit the “Subtitles” category. Select one and drag to the third track. Make relevant changes through the same procedure as above.

Step 4: After that, duplicate the subtitle track on the timeline and repeat the required changes. Sync the text to the audio once you are done with the process.

Step 5: The user is instructed to go back to the “Titles” section and search “cinematic end credits.” Pick one and drag it to the third track. Double click on it to make a few alterations. You have performed the procedure successfully.

Part 3: 3 Trendy Sites to Download Cinematic Background Music
The use of royalty-free cinematic music creates an unmatched vibe. If you do not use it, you might not run for competition. Therefore, you need to access a great music platform for this purpose. Allow us to introduce you to three workable marketplaces. The cinematic background music that they offer is mind-boggling for sure. So, let’s go? Shall we?
Pixabay
Pixabay is an online marketplace that can be accessed effortlessly. The user is free to tailor the filter options to give the system an idea of the music requirement. You can change the results from genre to movement and theme to categories as needed. Essentially, royalty-free cinematic music can be downloaded with one tap of a button.
Moreover, the duration of the track is shown to decide consciously. Cinematic dramatic, caves of dawn, honor and sword, the introvert, and chill abstract are some music offered by Pixabay.

Chosic
Chosic is a house for a wide range of cinematic background music tracks. You can preview the audio tracks before downloading them and tackle the search bar according to your movie themes and type of set design.
Furthermore, the search filters are tailored based on relevancy, popularity, and random audios. Press the download button to have the audio in MP3 format. Epic cinematic, the inspiration, discovery, and the battle are renowned cinematic background music from Chosic.

Mixkit
Mixkit has got to be an excellent choice to deal with your everyday needs of royalty-free cinematic music. With Mixkit in the frame, the user can create movie magic using the impeccable cinematic music collection. Cinematic trailer, slow trail, piano horror, motivational cinematic, and silent descent are a few examples of a strong cinematic collection.

Final Thoughts
Every content creator wishes to transform their work using different effects and filters. Adding a cinematic style video compels the audience to be on the verge of their seats, giving them a film notion. The article highlighted three apps to download good quality and cinematic background music. Filmora also brought a thrill to the vlogs and YouTube intros.
Versatile Video Editor - Wondershare Filmora
An easy yet powerful editor
Numerous effects to choose from
Detailed tutorials provided by the official channel
02 How to Cinematic Travel Intro for Your Travel Vlog?
03 3 Trendy Sites to Download Cinematic Background Music
Part 1: How to Create a Cinematic Intro for Your Video?
Every content creator wishes to bring new ideas to the set. The part played by cinematic background music cannot be avoided no matter what innovation is ahead of us. A cinematic and classy intro to your video displays the effort performed on your work. It compels the audience to keep following you.
For this very reason, the article conveys a guide to creating a powerful cinematic intro. Let us begin this!
For Win 7 or later (64-bit)
For macOS 10.12 or later
Step 1: Launch Wondershare Filmora to begin. Import the targeted music in the program and drag it to the timeline. Now, trim the music to 30 seconds and listen to the end part. Select the last note to match the beat in the beginning part of the music.

Step 2: Moving on, add markers to the music. Use “M” from the keyboard to mark the specific part of the track. After you are done, drag the first track onto the timeline. Trim the video to match it to the first marker.

Step 3: Perform a similar process for the rest of the video clips and trim them according to the markers. The user is directed to create a 2.35:1 widescreen cinemascope bar opener. To do so, drag two black mattes onto the timeline on top of each other.

Step 4: Drag the end of both clips to match the length of the whole video. Now, it is time to animate it. Insert 240° in the y-axis for the first keyframe. Similarly, use 422.2° for the second keyframe. For the bottom y-axis, use -240° for the first keyframe and -422.2° for the second keyframe.

Step 5: After the animation is completed, head to the “Titles” tab and look for cinematic packs. Choose one and drag it onto the timeline. Secondly, alter the duration and animation of the title. The user is expected to insert a dissolve transition at the end of the title.

Step 6: Perform the same process for the rest of the tracks. Time the titles to match the clip’s ending. Now, add a dissolve transition at the end of the clip. Trim the clip into two parts and apply square blur by navigating to the “Effects” tab to blur the video clips.

Step 7: Moving on, adjust the alpha for blur intensity. Add a dissolve transition between the cuts. In the final step, go to the “Animation” and then “Customize.” Reframe the last clip and animate a zoom-out effect. Reduce the “Scale” percent to do so. A creative cinematic intro is ready!

Part 2: How to Cinematic Travel Intro for Your Travel Vlog?
Vacationing and traveling offer exposure to learn more about people and the world around us. Are you a traveler? Do you prefer a solo vacation or with your family? Whatever your answer might be, we have got you!
To make an astonishing and engaging cinematic travel for your travel vlog, Filmora is there for us. The section shall reflect on the whole procedure using royalty-free cinematic music. Let us initiate!
For Win 7 or later (64-bit)
For macOS 10.12 or later
Step 1: The first step is simple. Open Wondershare Filmora and head to the “Media” tab. Import the targeted travel video clips onto the timeline and rearrange them. Now, navigate to the “Effects” section and search “cinematic.”

Step 2: Pick one and drag it onto the second track to present cinematic bars and a widescreen look to the video. Now, move to the “Titles” section and choose the suitable one. Drag it to the third track. Double click on it to access the “Advanced settings” and make the required alterations.

Step 3: You can modify the font size, color, and timing of the video. Again, use the “Titles” panel and hit the “Subtitles” category. Select one and drag to the third track. Make relevant changes through the same procedure as above.

Step 4: After that, duplicate the subtitle track on the timeline and repeat the required changes. Sync the text to the audio once you are done with the process.

Step 5: The user is instructed to go back to the “Titles” section and search “cinematic end credits.” Pick one and drag it to the third track. Double click on it to make a few alterations. You have performed the procedure successfully.

Part 3: 3 Trendy Sites to Download Cinematic Background Music
The use of royalty-free cinematic music creates an unmatched vibe. If you do not use it, you might not run for competition. Therefore, you need to access a great music platform for this purpose. Allow us to introduce you to three workable marketplaces. The cinematic background music that they offer is mind-boggling for sure. So, let’s go? Shall we?
Pixabay
Pixabay is an online marketplace that can be accessed effortlessly. The user is free to tailor the filter options to give the system an idea of the music requirement. You can change the results from genre to movement and theme to categories as needed. Essentially, royalty-free cinematic music can be downloaded with one tap of a button.
Moreover, the duration of the track is shown to decide consciously. Cinematic dramatic, caves of dawn, honor and sword, the introvert, and chill abstract are some music offered by Pixabay.

Chosic
Chosic is a house for a wide range of cinematic background music tracks. You can preview the audio tracks before downloading them and tackle the search bar according to your movie themes and type of set design.
Furthermore, the search filters are tailored based on relevancy, popularity, and random audios. Press the download button to have the audio in MP3 format. Epic cinematic, the inspiration, discovery, and the battle are renowned cinematic background music from Chosic.

Mixkit
Mixkit has got to be an excellent choice to deal with your everyday needs of royalty-free cinematic music. With Mixkit in the frame, the user can create movie magic using the impeccable cinematic music collection. Cinematic trailer, slow trail, piano horror, motivational cinematic, and silent descent are a few examples of a strong cinematic collection.

Final Thoughts
Every content creator wishes to transform their work using different effects and filters. Adding a cinematic style video compels the audience to be on the verge of their seats, giving them a film notion. The article highlighted three apps to download good quality and cinematic background music. Filmora also brought a thrill to the vlogs and YouTube intros.
Versatile Video Editor - Wondershare Filmora
An easy yet powerful editor
Numerous effects to choose from
Detailed tutorials provided by the official channel
02 How to Cinematic Travel Intro for Your Travel Vlog?
03 3 Trendy Sites to Download Cinematic Background Music
Part 1: How to Create a Cinematic Intro for Your Video?
Every content creator wishes to bring new ideas to the set. The part played by cinematic background music cannot be avoided no matter what innovation is ahead of us. A cinematic and classy intro to your video displays the effort performed on your work. It compels the audience to keep following you.
For this very reason, the article conveys a guide to creating a powerful cinematic intro. Let us begin this!
For Win 7 or later (64-bit)
For macOS 10.12 or later
Step 1: Launch Wondershare Filmora to begin. Import the targeted music in the program and drag it to the timeline. Now, trim the music to 30 seconds and listen to the end part. Select the last note to match the beat in the beginning part of the music.

Step 2: Moving on, add markers to the music. Use “M” from the keyboard to mark the specific part of the track. After you are done, drag the first track onto the timeline. Trim the video to match it to the first marker.

Step 3: Perform a similar process for the rest of the video clips and trim them according to the markers. The user is directed to create a 2.35:1 widescreen cinemascope bar opener. To do so, drag two black mattes onto the timeline on top of each other.

Step 4: Drag the end of both clips to match the length of the whole video. Now, it is time to animate it. Insert 240° in the y-axis for the first keyframe. Similarly, use 422.2° for the second keyframe. For the bottom y-axis, use -240° for the first keyframe and -422.2° for the second keyframe.

Step 5: After the animation is completed, head to the “Titles” tab and look for cinematic packs. Choose one and drag it onto the timeline. Secondly, alter the duration and animation of the title. The user is expected to insert a dissolve transition at the end of the title.

Step 6: Perform the same process for the rest of the tracks. Time the titles to match the clip’s ending. Now, add a dissolve transition at the end of the clip. Trim the clip into two parts and apply square blur by navigating to the “Effects” tab to blur the video clips.

Step 7: Moving on, adjust the alpha for blur intensity. Add a dissolve transition between the cuts. In the final step, go to the “Animation” and then “Customize.” Reframe the last clip and animate a zoom-out effect. Reduce the “Scale” percent to do so. A creative cinematic intro is ready!

Part 2: How to Cinematic Travel Intro for Your Travel Vlog?
Vacationing and traveling offer exposure to learn more about people and the world around us. Are you a traveler? Do you prefer a solo vacation or with your family? Whatever your answer might be, we have got you!
To make an astonishing and engaging cinematic travel for your travel vlog, Filmora is there for us. The section shall reflect on the whole procedure using royalty-free cinematic music. Let us initiate!
For Win 7 or later (64-bit)
For macOS 10.12 or later
Step 1: The first step is simple. Open Wondershare Filmora and head to the “Media” tab. Import the targeted travel video clips onto the timeline and rearrange them. Now, navigate to the “Effects” section and search “cinematic.”

Step 2: Pick one and drag it onto the second track to present cinematic bars and a widescreen look to the video. Now, move to the “Titles” section and choose the suitable one. Drag it to the third track. Double click on it to access the “Advanced settings” and make the required alterations.

Step 3: You can modify the font size, color, and timing of the video. Again, use the “Titles” panel and hit the “Subtitles” category. Select one and drag to the third track. Make relevant changes through the same procedure as above.

Step 4: After that, duplicate the subtitle track on the timeline and repeat the required changes. Sync the text to the audio once you are done with the process.

Step 5: The user is instructed to go back to the “Titles” section and search “cinematic end credits.” Pick one and drag it to the third track. Double click on it to make a few alterations. You have performed the procedure successfully.

Part 3: 3 Trendy Sites to Download Cinematic Background Music
The use of royalty-free cinematic music creates an unmatched vibe. If you do not use it, you might not run for competition. Therefore, you need to access a great music platform for this purpose. Allow us to introduce you to three workable marketplaces. The cinematic background music that they offer is mind-boggling for sure. So, let’s go? Shall we?
Pixabay
Pixabay is an online marketplace that can be accessed effortlessly. The user is free to tailor the filter options to give the system an idea of the music requirement. You can change the results from genre to movement and theme to categories as needed. Essentially, royalty-free cinematic music can be downloaded with one tap of a button.
Moreover, the duration of the track is shown to decide consciously. Cinematic dramatic, caves of dawn, honor and sword, the introvert, and chill abstract are some music offered by Pixabay.

Chosic
Chosic is a house for a wide range of cinematic background music tracks. You can preview the audio tracks before downloading them and tackle the search bar according to your movie themes and type of set design.
Furthermore, the search filters are tailored based on relevancy, popularity, and random audios. Press the download button to have the audio in MP3 format. Epic cinematic, the inspiration, discovery, and the battle are renowned cinematic background music from Chosic.

Mixkit
Mixkit has got to be an excellent choice to deal with your everyday needs of royalty-free cinematic music. With Mixkit in the frame, the user can create movie magic using the impeccable cinematic music collection. Cinematic trailer, slow trail, piano horror, motivational cinematic, and silent descent are a few examples of a strong cinematic collection.

Final Thoughts
Every content creator wishes to transform their work using different effects and filters. Adding a cinematic style video compels the audience to be on the verge of their seats, giving them a film notion. The article highlighted three apps to download good quality and cinematic background music. Filmora also brought a thrill to the vlogs and YouTube intros.
Versatile Video Editor - Wondershare Filmora
An easy yet powerful editor
Numerous effects to choose from
Detailed tutorials provided by the official channel
How to Make Boring Videos Look Cool By B Rolls
Everyone is bored after watching a simple recorded video in which a character explains or tells a story. No one will watch it for more than 4 minutes!
After looking through this article, you will make your video more fascinating and get more views instantly. It’s all just due to B-roll, which will act as a ninja feature in your video. In this regard, Wondershare Filmora will handle everything.
Scroll more to discover two different types of B-roll videos and get an idea of how to make fascinating B-roll videos.
Part 1. What Is a B-roll?
B-roll is alternative or supplementary video footage that editors can use to intercut in between their main video. In that way, B-roll can add more information to a scene.
An additional footage
It is added as a supplementary video to interact with viewers more closely. This feature helps to give more details of a scene.
Visual representation
When the main explanatory video is too boring, you can add a b-roll to represent the movie’s story visually. It can also add to spice up and beat the energy of the narrative.
Without sound
The B-roll shots are mostly without audio or with little background sound. In most cases, the sound of the primary video is continued while the B-roll footage is just shown.
Act as a filler
The criteria for the B-roll is to provide the situation of the storyline. Additionally, it could be utilized as filler in between scenes in a movie or television program. B-roll may be found almost anywhere!
In this article, you will learn about two main kinds of B-rolls and the steps to edit them on Wondershare Filmora . Stick with us to the end!
Free Download For Win 7 or later(64-bit)
Free Download For macOS 10.14 or later
Part 2. Two Types of B-rolls: Explanation Video B-rolls
When recording any explanatory video, the audience may leave it in the middle of a video if a character explains without any visual representation. When explaining something new, showing the object in B-roll can be more effective than just verbally explaining what the audience is seeing.
Let’s take the video we made about microphones as an example. Instead of just verbally introduce the various mics, we inserted B-roll footage to display what they look like and how they can be used. The combination of the visual footage and the background voiceover presents the mic in a more vivid way. Also, it keeps the audience’s attention.

Goal of the explanation B-roll video
The main goal of this type of B-roll is to show your audience what you are talking about instead of just telling them in a dull way.
Part 3. How to Edit Explanation B-roll Footage on Filmora?
After getting the footage and recording shots for B-roll videos, you need to edit it on the Wondershare Filmora. For this, follow the below-mentioned steps:
Step1Download the Wondershare Filmora
There is no need to do any complex process for editing on any platform. Because we have one platform on which every tool is available.
- First of all, you have to download the Wondershare Filmora .
- Then get access to the entire features.
The premium version has new features and effects plugins that make editing more filmy and fun!
Step2Stock media in Filmora
After downloading, it’s time to edit the B-roll video. If you can’t film your own B-roll, you can use stock footage but make sure you have the license to use them.
Filmora has a unique “stock media” option that enables us to use all these elements and more to boost our videos! To add stock media, follow the below steps:
- Open the app or window of Filmora, which you have installed.
- Head towards the tab on the top right side.
- Then click on the Stock Media option and open it.
- A long list of stock videos and images will pop up.
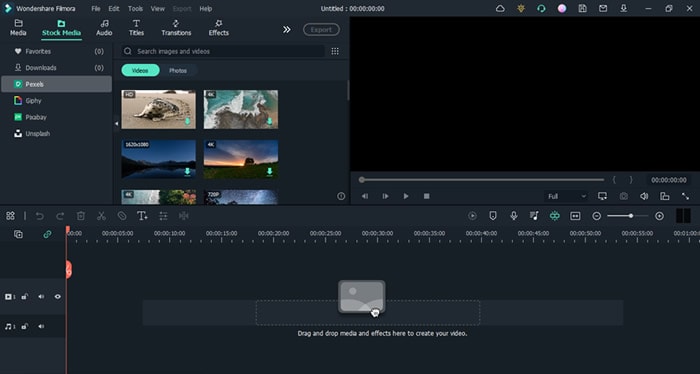
- Select whatever you want, and download it.
- Then drag and drop it in the timeline and insert it between your video.
![]()
Note: Only premium customers will get access to the stock media of the Wondershare Filmora.
Step3Add B-roll in between the main video
The most difficult and frequent asking situation is how you know when to cut to B-roll. To get to know when to insert B-roll, follow the following steps:
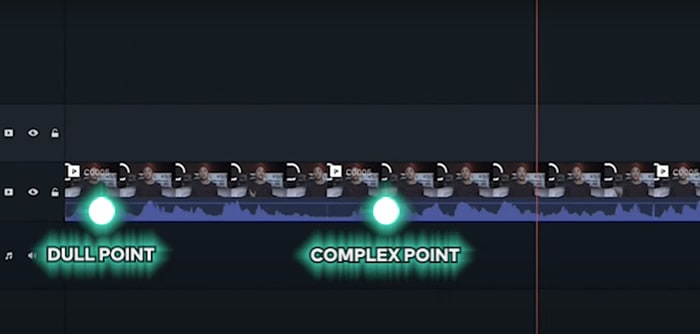
- Watch your edits back and check out where you need.
- Sense about the dull and complex points and cut the main video from there.
- The points can be easily fixed with visual aids.
Part 4. Two Types of B-rolls: Storytelling Video B-rolls
During the creation of short films or any storytelling videos, if a person sits and speaks without showing any character or anything else, it will turn boring. Due to this, you have more chances to lose your audience and viewers.
In visual storytelling, if you will insert more clips with close shots, it will make the environment cool. The crazy thing is that you can make mimic shots easily at home by utilizing household objects. Let’s check out one of the examples.
Example 1. Film B-roll footage with food
So let’s add some b-roll to give it more context even if you have a master shot of yourself looking off frame alone.
Step1Write a script
Before making any video, the first step is to write a script for the whole video. If you will have more than two characters, then make dialogues for everyone and practice it again and again to give a fascinating look.
Then speak to your audience, make sure that what you are speaking is vivid and make everything simple and crystal clear.
Step2Shot a primary video
First of all, make a primary video according to your script by implementing a camera at one side, or you can also change the angle of the camera lens during shooting to have a look from all sides.

As you can see that it’s kind of boring for the audience, but we will make it more unique by implementing closer shots. For this, follow the last step:
Step3Make B-roll shots
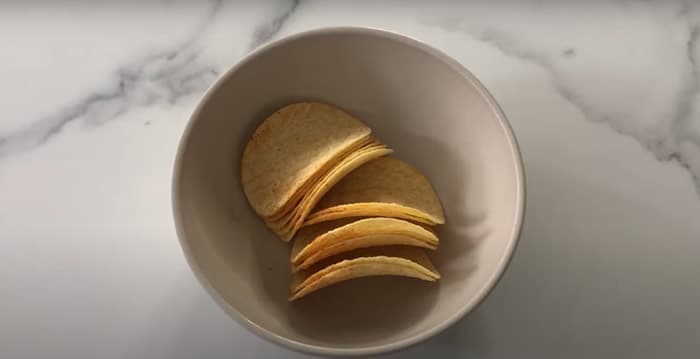
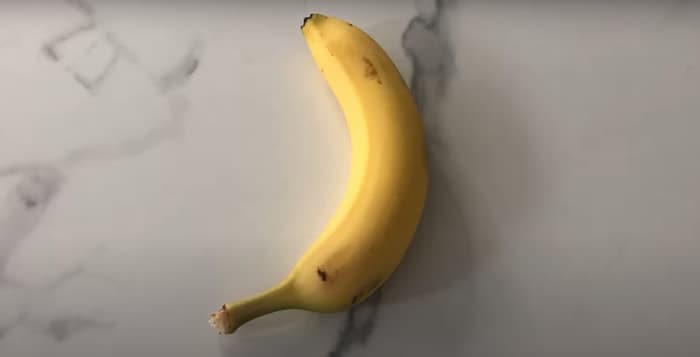
Make closer shots of things which the character have to select and pick up. Check out two B-roll shots for the main video:
- First, make a closer shot of the object (Snacks) that the character is noticing prior.
- Second, create more intimate footage of the second object (Banana) which the character will select and grab.
Step4Edit both B-roll footages in Main Video
Now, in the last, insert the B-roll footage in between the primary video from the Filmora and get your results. Enjoy it with your viewers!

Now experiment at home with more daily life activities and create all on Filmora. Check out one more example to create B-roll footage!
Example 2. Make B-roll shots with a cardboard
Try using readily accessible cardboard to create light effects in different shapes and give the film a fantastical place. These methods frequently produce artistic videos that transmit unique moods to viewers.
Only experienced photographers and videographers understand how to use these fundamental tricks to gain viewers into the photos.
The intriguing thing is that if the light is more shaped, it will more accurately reflect the image’s background, setting, and context. Try it out!
Step1Cut the cardboard
You may shape the cardboard any way you desire. We’ll experiment with this by cutting cardboard into the shape of window shades.

Step2Make B-roll footage
Create B-roll footage by moving the cardboard around the light source after giving it shape. The person appears to be seated close to the window and conveys aesthetic vibrancy.

Now, use this B-roll footage in your video and give it a more professional look. The more creative you are, the more audience will attract to you.
Conclusion
Making B-roll shots is creative and fun! You can make all the footage at home by following easy steps. Try out different ones to make your video viral and boost the target audience!
You can easily use Wondershare Filmora during editing and their stock media to save your time in video making. Share your hacks with your audience to get more experience!
Free Download For macOS 10.14 or later
Part 2. Two Types of B-rolls: Explanation Video B-rolls
When recording any explanatory video, the audience may leave it in the middle of a video if a character explains without any visual representation. When explaining something new, showing the object in B-roll can be more effective than just verbally explaining what the audience is seeing.
Let’s take the video we made about microphones as an example. Instead of just verbally introduce the various mics, we inserted B-roll footage to display what they look like and how they can be used. The combination of the visual footage and the background voiceover presents the mic in a more vivid way. Also, it keeps the audience’s attention.

Goal of the explanation B-roll video
The main goal of this type of B-roll is to show your audience what you are talking about instead of just telling them in a dull way.
Part 3. How to Edit Explanation B-roll Footage on Filmora?
After getting the footage and recording shots for B-roll videos, you need to edit it on the Wondershare Filmora. For this, follow the below-mentioned steps:
Step1Download the Wondershare Filmora
There is no need to do any complex process for editing on any platform. Because we have one platform on which every tool is available.
- First of all, you have to download the Wondershare Filmora .
- Then get access to the entire features.
The premium version has new features and effects plugins that make editing more filmy and fun!
Step2Stock media in Filmora
After downloading, it’s time to edit the B-roll video. If you can’t film your own B-roll, you can use stock footage but make sure you have the license to use them.
Filmora has a unique “stock media” option that enables us to use all these elements and more to boost our videos! To add stock media, follow the below steps:
- Open the app or window of Filmora, which you have installed.
- Head towards the tab on the top right side.
- Then click on the Stock Media option and open it.
- A long list of stock videos and images will pop up.

- Select whatever you want, and download it.
- Then drag and drop it in the timeline and insert it between your video.
![]()
Note: Only premium customers will get access to the stock media of the Wondershare Filmora.
Step3Add B-roll in between the main video
The most difficult and frequent asking situation is how you know when to cut to B-roll. To get to know when to insert B-roll, follow the following steps:
- Watch your edits back and check out where you need.
- Sense about the dull and complex points and cut the main video from there.
- The points can be easily fixed with visual aids.

Part 4. Two Types of B-rolls: Storytelling Video B-rolls
During the creation of short films or any storytelling videos, if a person sits and speaks without showing any character or anything else, it will turn boring. Due to this, you have more chances to lose your audience and viewers.
In visual storytelling, if you will insert more clips with close shots, it will make the environment cool. The crazy thing is that you can make mimic shots easily at home by utilizing household objects. Let’s check out one of the examples.
Example 1. Film B-roll footage with food
So let’s add some b-roll to give it more context even if you have a master shot of yourself looking off frame alone.
Step1Write a script
Before making any video, the first step is to write a script for the whole video. If you will have more than two characters, then make dialogues for everyone and practice it again and again to give a fascinating look.
Then speak to your audience, make sure that what you are speaking is vivid and make everything simple and crystal clear.
Step2Shot a primary video
First of all, make a primary video according to your script by implementing a camera at one side, or you can also change the angle of the camera lens during shooting to have a look from all sides.

As you can see that it’s kind of boring for the audience, but we will make it more unique by implementing closer shots. For this, follow the last step:
Step3Make B-roll shots
Make closer shots of things which the character have to select and pick up. Check out two B-roll shots for the main video:
- First, make a closer shot of the object (Snacks) that the character is noticing prior.

- Second, create more intimate footage of the second object (Banana) which the character will select and grab.

Step4Edit both B-roll footages in Main Video
Now, in the last, insert the B-roll footage in between the primary video from the Filmora and get your results. Enjoy it with your viewers!

Now experiment at home with more daily life activities and create all on Filmora. Check out one more example to create B-roll footage!
Example 2. Make B-roll shots with a cardboard
Try using readily accessible cardboard to create light effects in different shapes and give the film a fantastical place. These methods frequently produce artistic videos that transmit unique moods to viewers.
Only experienced photographers and videographers understand how to use these fundamental tricks to gain viewers into the photos.
The intriguing thing is that if the light is more shaped, it will more accurately reflect the image’s background, setting, and context. Try it out!
Step1Cut the cardboard
You may shape the cardboard any way you desire. We’ll experiment with this by cutting cardboard into the shape of window shades.

Step2Make B-roll footage
Create B-roll footage by moving the cardboard around the light source after giving it shape. The person appears to be seated close to the window and conveys aesthetic vibrancy.

Now, use this B-roll footage in your video and give it a more professional look. The more creative you are, the more audience will attract to you.
Conclusion
Making B-roll shots is creative and fun! You can make all the footage at home by following easy steps. Try out different ones to make your video viral and boost the target audience!
You can easily use Wondershare Filmora during editing and their stock media to save your time in video making. Share your hacks with your audience to get more experience!
Do You Want to Give Your Videos and Photos a Cinematic Look but Couldn’t Find How? Here Are Different Cinematic LUTs Discussed that You Can Try and Use
With the development of new editing tools and apps, we all want our content to look different and better from others. Moreover, increasing social media usage has also made people more concerned about their photos and videos. However, besides editing tools, you can add layers of adjustments and apply LUTs, filters, and more to your content.
With different LUTs, such as cinematic LUTs, you can give your digital content a professional look. These LUTs also give a dramatic feel and add depth to your photos and videos.
Part 1: What are Cinematic LUTs Used for?
Cinematic LUTs have several uses, including creating a specific mood or look. They can be used to make the footage look vintage or retro or to create a dark, moody atmosphere or a bright, colorful tone. Furthermore, these cinematic LUTs can match the footage’s colors and tones so they all look the same. They can also be used to contrast and color your photos and images.
It can also make your media files look like they were filmed on a real film camera, giving them a more natural, organic feel. These are useful tools for making videos or images look a certain way. They can improve the color quality and make the story more interesting.
Empower your videos with a new mood using different LUTs. Filmora now offers 100+ top-quality 3D LUTs cover a broad range of scenarios. Transform your videos with Filmora’s powerful 3D LUTs.
Apply LUT on Videos Apply LUT on Videos Learn More

Part 2: Top Cinematic LUT Pack to Consider for Your Media
Many LUTs give a cinematic feel when applied to your digital content. These LUTs add depth and emotion to your images and videos. There are many cinematic LUT packs that you can download and use them.
1. Cinematic LUTs Pack 2023
Many free cinematic LUTs are available to download, but this one differs. The Cinematic LUTs Pack 2023 has various Hollywood-style color grading options available. This pack has different color correction layers that give you a modern cinematic feel. Moreover, you can darken the highlights to enhance the subject in your content.

2. Cinematic LUT
Another LUT that gives your content the cinematic feel you want is this exceptional collection. This LUT fades the colors in your photos and videos to give a rusty look. It gives your media files a West Hollywood-style look to give them a cinematic look. Furthermore, it also enhances certain colors to improve the color grading in your video footage or images.

3. 20 FREE Travel LUTs for Cinematic Looks
It is a great LUT pack if you want multiple options to add cinematic-style LUTs to your digital media content. You get 20 different cinematic LUTs for your travel photos and videos. With the right amount of tan, shadows, highlights, and grains, your videos will look like they are from a movie clip. It improves your travel videos and photos by giving them movie-like color adjustments.

4. Sandstorm
As the name suggests, it gives your media files the golden cinematic shade. It is a LUT, which highlights golden, orange, and brown colors to add a warm tone to your files. This LUT will give your pictures and videos a warm cinematic feel. You can use your photos and videos to apply this adjustment layer to make them look like Hollywood content.

5. Vintage Vibe
Last but not least, Vintage Vibe is a great LUT that adds depth to your photos and videos. It creates an ambiance of an old-style cinematic touch to your digital files. You can improve your story by adding emotion and depth to your content with this LUT. Moreover, you can add this vintage color correction layer to give your content a unique and creative style.

Part 3: 3D LUT Creator: An Effective Cinematic LUTs Software
3D LUT Creator is a powerful tool packed with amazing color correction features for photo and video editing. This tool offers different cinematic LUTs to use and apply to your content. Moreover, users can create their LUTs according to their style and preference. Another impressive feature is its plugin support for different editing software.
Furthermore, the tool also comes with seven color gradients, a color wheel option, and A/B and C/L grids. These options allow you to change and distribute colors to their media files. Additionally, its AI retouching plugin can retouch and beautify your image. With all these features, you can create one of the best cinematic LUTs without hassle.

Part 4: Wondershare Filmora: A Good Platform to Consume Cinematic LUTs
Wondershare Filmora is a great professional editing software. You can easily achieve a cinematic look for your videos with its color grading upgrades and LUT intensity adjustments. Furthermore, the color wheel feature allows you to make professional-looking color grading adjustments. It even offers a cinematic LUTs download option to the users.
Add LUTs on Video For Win 7 or later(64-bit)
Add LUTs on Video For macOS 10.14 or later
Additionally, it has a sharpening tool that sharpens your digital media files. With its new update, you can have many editing options, including over 200 LUTs and other color correction features. Besides this, you have so many different color grading options that you can choose from the LUTs library.

Key Features of Wondershare Filmora To Keep Notice of
- It has a unique feature that lets you denoise any background sounds or voices in your video file. This useful feature removes background noise distortion from a video file.
- Furthermore, silent detection is another unique feature that you can use. It analyzes your video content and removes unnecessary pauses. You can automatically remove awkward pauses and silent moments from your video to make it look professional.
- Additionally, you can access and use its free stock media library. This library has over 10 billion free stock media files you can use in your content.
Conclusion
In conclusion, cinematic LUTs have become essential. With multiple options available in the market, selecting the best cinematic LUT pack can be difficult. However, 3D LUT Creator is a great tool offering plugin options for multiple editing software. In contrast, Wondershare Filmora is an excellent option for creating and consuming cinematic LUTs.
Add LUTs on Video For Win 7 or later(64-bit)
Add LUTs on Video For macOS 10.14 or later
Apply LUT on Videos Apply LUT on Videos Learn More

Part 2: Top Cinematic LUT Pack to Consider for Your Media
Many LUTs give a cinematic feel when applied to your digital content. These LUTs add depth and emotion to your images and videos. There are many cinematic LUT packs that you can download and use them.
1. Cinematic LUTs Pack 2023
Many free cinematic LUTs are available to download, but this one differs. The Cinematic LUTs Pack 2023 has various Hollywood-style color grading options available. This pack has different color correction layers that give you a modern cinematic feel. Moreover, you can darken the highlights to enhance the subject in your content.

2. Cinematic LUT
Another LUT that gives your content the cinematic feel you want is this exceptional collection. This LUT fades the colors in your photos and videos to give a rusty look. It gives your media files a West Hollywood-style look to give them a cinematic look. Furthermore, it also enhances certain colors to improve the color grading in your video footage or images.

3. 20 FREE Travel LUTs for Cinematic Looks
It is a great LUT pack if you want multiple options to add cinematic-style LUTs to your digital media content. You get 20 different cinematic LUTs for your travel photos and videos. With the right amount of tan, shadows, highlights, and grains, your videos will look like they are from a movie clip. It improves your travel videos and photos by giving them movie-like color adjustments.

4. Sandstorm
As the name suggests, it gives your media files the golden cinematic shade. It is a LUT, which highlights golden, orange, and brown colors to add a warm tone to your files. This LUT will give your pictures and videos a warm cinematic feel. You can use your photos and videos to apply this adjustment layer to make them look like Hollywood content.

5. Vintage Vibe
Last but not least, Vintage Vibe is a great LUT that adds depth to your photos and videos. It creates an ambiance of an old-style cinematic touch to your digital files. You can improve your story by adding emotion and depth to your content with this LUT. Moreover, you can add this vintage color correction layer to give your content a unique and creative style.

Part 3: 3D LUT Creator: An Effective Cinematic LUTs Software
3D LUT Creator is a powerful tool packed with amazing color correction features for photo and video editing. This tool offers different cinematic LUTs to use and apply to your content. Moreover, users can create their LUTs according to their style and preference. Another impressive feature is its plugin support for different editing software.
Furthermore, the tool also comes with seven color gradients, a color wheel option, and A/B and C/L grids. These options allow you to change and distribute colors to their media files. Additionally, its AI retouching plugin can retouch and beautify your image. With all these features, you can create one of the best cinematic LUTs without hassle.

Part 4: Wondershare Filmora: A Good Platform to Consume Cinematic LUTs
Wondershare Filmora is a great professional editing software. You can easily achieve a cinematic look for your videos with its color grading upgrades and LUT intensity adjustments. Furthermore, the color wheel feature allows you to make professional-looking color grading adjustments. It even offers a cinematic LUTs download option to the users.
Add LUTs on Video For Win 7 or later(64-bit)
Add LUTs on Video For macOS 10.14 or later
Additionally, it has a sharpening tool that sharpens your digital media files. With its new update, you can have many editing options, including over 200 LUTs and other color correction features. Besides this, you have so many different color grading options that you can choose from the LUTs library.

Key Features of Wondershare Filmora To Keep Notice of
- It has a unique feature that lets you denoise any background sounds or voices in your video file. This useful feature removes background noise distortion from a video file.
- Furthermore, silent detection is another unique feature that you can use. It analyzes your video content and removes unnecessary pauses. You can automatically remove awkward pauses and silent moments from your video to make it look professional.
- Additionally, you can access and use its free stock media library. This library has over 10 billion free stock media files you can use in your content.
Conclusion
In conclusion, cinematic LUTs have become essential. With multiple options available in the market, selecting the best cinematic LUT pack can be difficult. However, 3D LUT Creator is a great tool offering plugin options for multiple editing software. In contrast, Wondershare Filmora is an excellent option for creating and consuming cinematic LUTs.
Add LUTs on Video For Win 7 or later(64-bit)
Add LUTs on Video For macOS 10.14 or later
Also read:
- Ideas That Help You Out in Making Transparent Image
- 2024 Approved Do You Need to Make Your Video More Immersive? You Can Make It 60 FPS to Achieve That. And Here Are the 5 Best Tools that You Can Use
- Add Background to Video With/Without a Green Screen
- New 2024 Approved 4 Ways to Merge MP4 and MP3
- Why Your Transparent GIF Is Hard to Remove
- Updated In 2024, The Most Efficient Ways to Manage Your Timeline
- Advancements in Game Recording Software A Comprehensive Overview for 2024
- Updated A Review of 3D LUT Mobile App - A Composite Application for Editing Media for 2024
- Want to Add a Motion Blur Effect to Your Photos? This Step-by-Step Tutorial Will Show You How to Use GIMP Software to Get the Effect You Want for 2024
- New Adding Slow Motion in DaVinci Resolve A Comprehensive Overview for 2024
- New 6 Best Text to Speech Generators for YouTube Videos Windows, Mac, Android, iPhone & Online
- New Want to Immediately Know All About Discord GIF?
- A Comprehensive Guide on VHS Technology and Its Influence on Video Editing for 2024
- 2024 Approved Learn How to Blur the Background in Adobe Premiere Pro with Our Quick and Simple Step-by-Step Instructions to Make Your Subject More Attention-Grabbing
- New 12 Impressive AI Video Ideas for Creating Engaging Video Content for 2024
- 2024 Approved What You Should Know About Speech-to-Text Technology
- Updated In 2024, Find The Best Free Canon LUTs
- Is Augmented Reality Conferencing the Future of Workplace Collaboration?
- New Do You Want to Replace the Sky in Your Media? Read the Article to Learn How to Change the Sky App on Your Mobile Phone
- How to Concatenate Videos Using FFmpeg
- New In 2024, 2 Easy Methods | How To Zoom In On TikTok Videos?
- Updated Discover the Best Game Recording Software for Your PC in This Developing Industry. Record Your Gameplay in Real Time and Enjoy the Benefits that Come with It
- Explore the List of the Top Six Online Video Speed Controllers for Chrome, Safari, and Firefox
- New Top Online Video Background Changers Transform Your Videos with Ease
- In 2024, Learning Unique Ways to Slow Down Time Lapse on iPhone
- Updated 2024 Approved Color Lut in Video - Color Grade Your Video
- New Change Aspect Ratio of Video
- In 2024, Best 5 Solutions on How to Add Emojis to iPhone
- Updated Ways to Make Sure Your Recording Slideshow in Powerpoint Is Not Wrong
- Updated Do You Wish to Learn About some Tools to Slow Down a Video? Discover How to Slow Down Time Lapse on iPhone Throughout This Article
- New In 2024, Detailed Guide to Merge Videos in VLC Media Player
- In 2024, Top 10 Free Spanish Text To Speech Converter Software Windows, Mac
- Transform Your Videos Into 90S VHS Nostalgia for Free! Learn Where to Get Overlays and Use Filmoras Built-In Presets. Dive Into the Retro Realm Now
- Converting an SRT (SRT/Sorted Reader) Into a DOCX File Is a Process. Here We Will Discuss Converting a Set File to a Docx File and More Details About This
- Updated Best GIF to AVI Converters (Online + Software Solutions)
- In 2024, In This Article, We Introduce You Our Top 5 Picks of Video to Ppt Converter
- Updated How to Make Strobe Light Text Effect?
- New Do You Want to Professionally Blur the Background in Your Video? Read This Article to Find Out the Easiest Way to Blur the Background in Videos Using Adobe After Effects
- New In 2024, A Detailed Guid to Remove Background From a Video in Premier Pro
- New Step by Step to Split a Clip in VLC
- New 2024 Approved 5 Best Video Denoisers
- How to Use a Stabilization Tool in Filmora for 2024
- In 2024, Best Youtube Video Meme Maker
- New Best Ways to Slow Down Motion in CapCut for 2024
- Best GIF to AVI Converters for 2024
- New Detailed Tutorial to Crop a Video Using Openshot for 2024
- You Can Splice Video on the iPhone Using Various Applications. This Article Will Guide You Through the Steps Necessary to Splice Your Videos for 2024
- Updated How to Make a Slideshow GIF?
- Fix Unfortunately Settings Has Stopped on Honor 100 Pro Quickly | Dr.fone
- 5 Ways to Reset Lava Yuva 2 Without Volume Buttons | Dr.fone
- How to Remove a Previously Synced Google Account from Your Xiaomi Civi 3
- In 2024, How to Cast Samsung Galaxy F34 5G to Computer for iPhone and Android? | Dr.fone
- 5 Solutions For Honor 90 GT Unlock Without Password
- The Updated Method to Bypass Tecno Spark 20 Pro FRP
- In 2024, A Quick Guide to Itel P55 5G FRP Bypass Instantly
- 7 Solutions to Fix Chrome Crashes or Wont Open on Asus ROG Phone 8 | Dr.fone
- In 2024, How to Bypass FRP from Xiaomi Redmi K70E?
- In 2024, The 6 Best SIM Unlock Services That Actually Work On Your Samsung Galaxy F34 5G Device
- Apple ID Locked or Disabled On iPhone 8? 7 Mehtods You Cant-Miss
- How to Change Your Motorola Moto E13 Location on life360 Without Anyone Knowing? | Dr.fone
- How Can Poco M6 Pro 4GMirror Share to PC? | Dr.fone
- Latest way to get Shiny Meltan Box in Pokémon Go Mystery Box On Xiaomi Redmi Note 12 4G | Dr.fone
- In 2024, How to Track Motorola Moto G13 by Phone Number | Dr.fone
- What are Location Permissions Life360 On Vivo Y28 5G? | Dr.fone
- Fake the Location to Get Around the MLB Blackouts on Tecno Spark 10 5G | Dr.fone
- How to Change Location On Facebook Dating for your Oppo Find X7 | Dr.fone
- In 2024, List of Pokémon Go Joysticks On Apple iPhone 11 Pro Max | Dr.fone
- How To Leave a Life360 Group On Oppo Reno 11F 5G Without Anyone Knowing? | Dr.fone
- How To Unlock SIM Cards Of Motorola Moto G34 5G Without PUK Codes
- In 2024, A Beginners Guide for Learning 3D Animation
- In 2024, Forgot Apple iPhone 13 Pro Backup Password? Heres What to Do
- How to Unlock Itel A70 Phone without Any Data Loss
- 5 Best Route Generator Apps You Should Try On Motorola Moto G34 5G | Dr.fone
- Read This Guide to Find a Reliable Alternative to Fake GPS On Realme 11X 5G | Dr.fone
- In 2024, How to Cast Samsung Galaxy A05 to Computer for iPhone and Android? | Dr.fone
- Your Complete Guide To Reset Poco X5 Pro | Dr.fone
- How to Access Your iPhone 7 Plus When You Forget the Passcode?
- What To Do if Your Motorola Defy 2 Auto Does Not Work | Dr.fone
- In 2024, Pattern Locks Are Unsafe Secure Your Vivo Y200 Phone Now with These Tips
- Solved Photos Disappeared from iPhone XS Suddenly | Stellar
- New 2024 Approved Best 15 Horror Animes That Will Trigger a Heart Attack
- Top 6 Apps/Services to Trace Any Apple iPhone 8 Location By Mobile Number | Dr.fone
- 3 Easy Ways to Factory Reset a Locked Apple iPhone XS Max Without iTunes
- In 2024, How Can Xiaomi Redmi Note 12RMirror Share to PC? | Dr.fone
- How to Come up With the Best Pokemon Team On Samsung Galaxy A15 4G? | Dr.fone
- Ultimate Guide on Apple iPhone 13 Pro iCloud Activation Lock Bypass
- In 2024, How To Delete iCloud Account Remove Your Apple ID Permanently On Apple iPhone 14 Plus
- In 2024, How to Unlock iPhone 14 Pro?
- In 2024, Best Pokemons for PVP Matches in Pokemon Go For Vivo Y36i | Dr.fone
- How Can I Screen Mirroring Apple iPhone 15 Pro to TV/Laptop? | Dr.fone
- The Best Android Unlock Software For Oppo Reno 11F 5G Device Top 5 Picks to Remove Android Locks
- Title: New How To Add Motion Blur In Davinci Resolve?
- Author: Chloe
- Created at : 2024-05-20 03:38:32
- Updated at : 2024-05-21 03:38:32
- Link: https://ai-editing-video.techidaily.com/new-how-to-add-motion-blur-in-davinci-resolve/
- License: This work is licensed under CC BY-NC-SA 4.0.


