
:max_bytes(150000):strip_icc():format(webp)/sony-wh-1000xm2-wireless-noise-cancelling-headphones-59c91370c412440010f51191.PNG)
New How to Add Text Animation Online for 2024
How to Add Text Animation Online
Before you can publish your recorded video to your viewers, you need to polish the video so that you can get everyone’s appreciation. This is where the magic of video editing comes into the scene. Editing your video is not just about trimming unnecessary parts and adding transitions and effects. The titles and texts you display on your video play a major role in your video content. In fact, you can create a video based on texts and titles only.
Instead of showing static texts, you should create animated texts and place them in the video wherever appropriate. You do not need to download a video editor on your computer or smartphone to add animated text to your video. You can make text animation online using an online text animation maker. We will illustrate the steps to create animated text with three different online editors.
Part 1. Use Biteable Animated Text
Biteable is a popular online platform where you can create amazing animated text video using Biteable text video maker. You can add animated text to your videos as well as photos. The user interface of Biteable is extremely easy for all users. You have to first create an account for free to get started. There are various templates available to create your animated text video from scratch. Here are the steps to use Biteable online text animation maker to create a video based on animated texts.
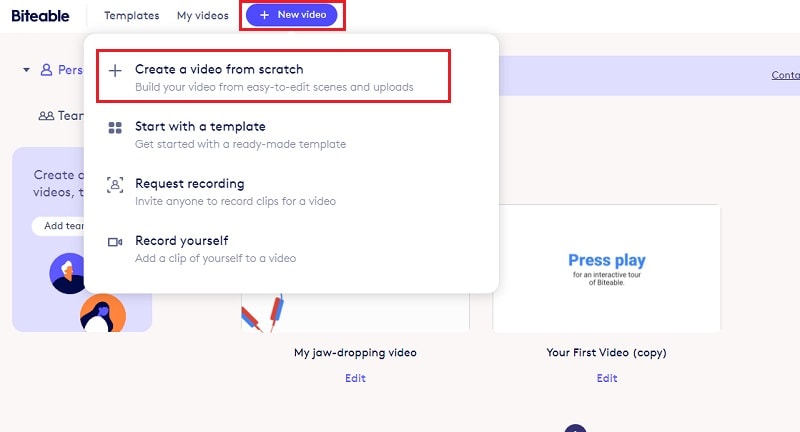
Step1Open your web browser and visit “biteable.com/animated/text”. Click on “Make a video with animated text” button.

Step2Create an account by following the on-screen instructions. Click on New Video button and select “Create a video from scratch”.
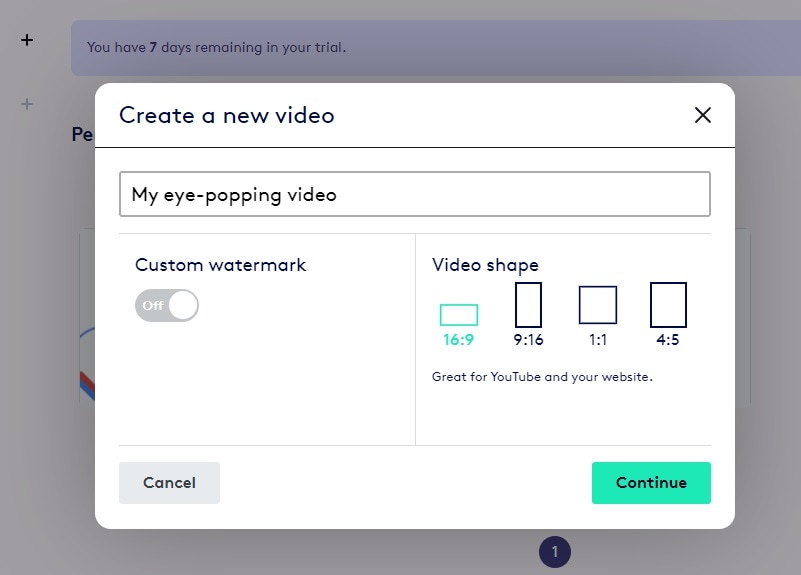
Step3Enter a name for the video and select a video shape as per your preference. Click on Continue button.
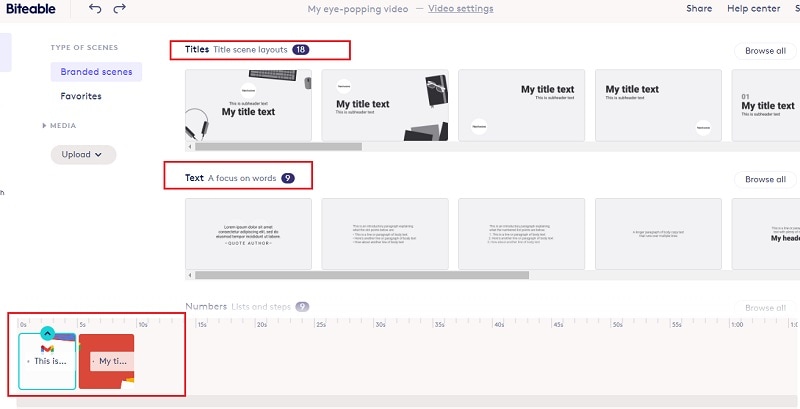
Step4Under Titles, select any template and it will be added to the Timeline. Similarly, you can add multiple titles templates, text templates, number templates and likewise. You will see them in the Timeline placed side by side. You can stretch their durations as per your requirements.
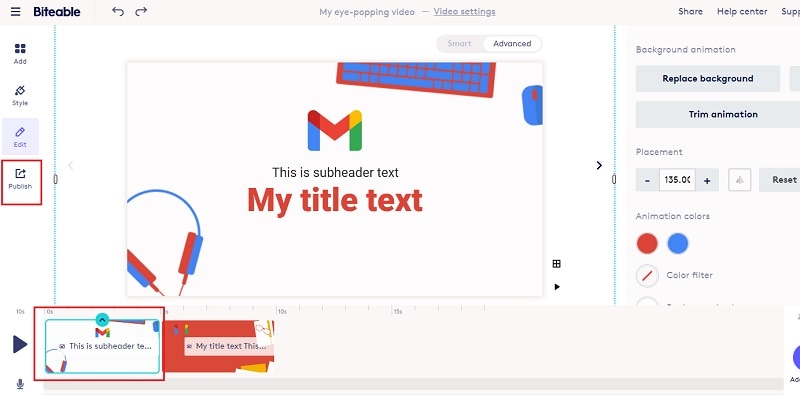
Step5Double-click on each template to edit the text in them and select the text animations as per your preference. Play the video and if you are satisfied, click on Publish button to save the video.
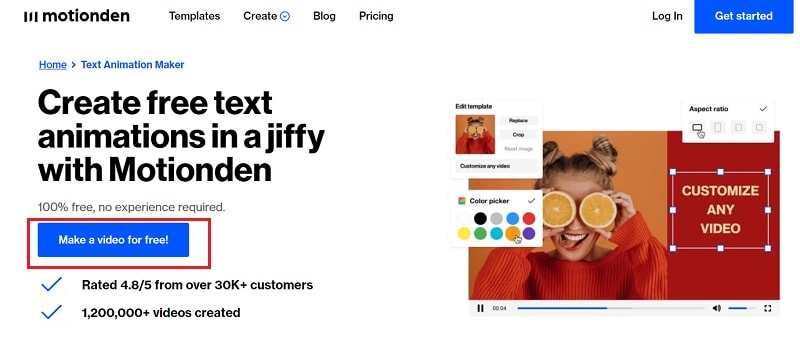
Part 2. Use Motionden Video Maker
Motionden is yet another powerful text animation maker where you can create free text animations instantly. There are over 1500 templates available to choose from in order to create text videos from scratch. You can choose video templates from any category as per the video theme you want. Besides, you can upload your video or photo and add texts and music as per your preference. Here are the steps to create animated text online using Motionden Video Maker.
Step1Open your web browser and visit “motionden.com/video-maker/text-animation”. Click on “Make a video for free” button.
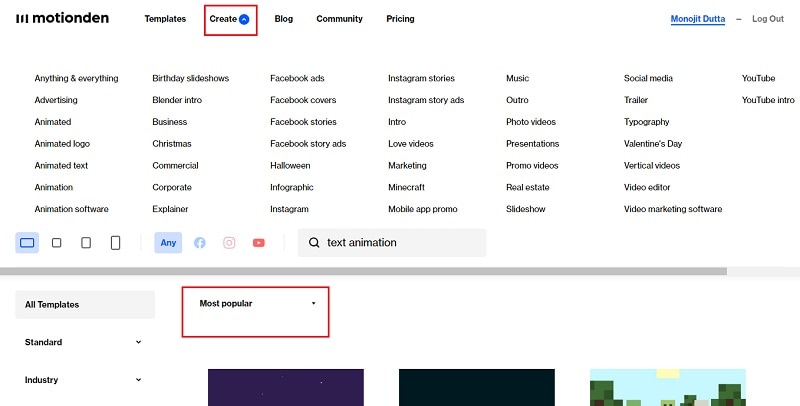
Step2Go to Create menu option and select any category of video templates. You can also check out the popular video templates and select anyone as per your preference.
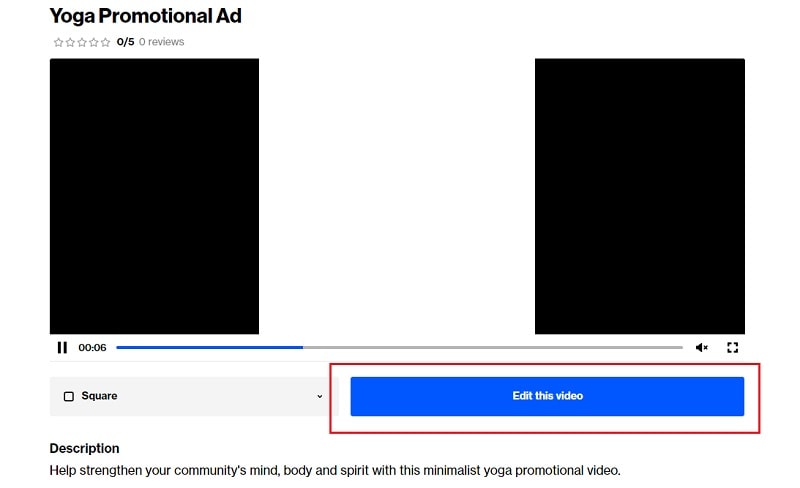
Step3For the selected category, you need to select the desired video template. Click on Edit Video and you can make changes to the template on the video editor as per your requirements. You need to sign up for free in order to continue and edit the template.
Step4Click on individual scenes and click on texts to customize them. Once the editing is done for each scene, click on Make Video button to build and save the text video.

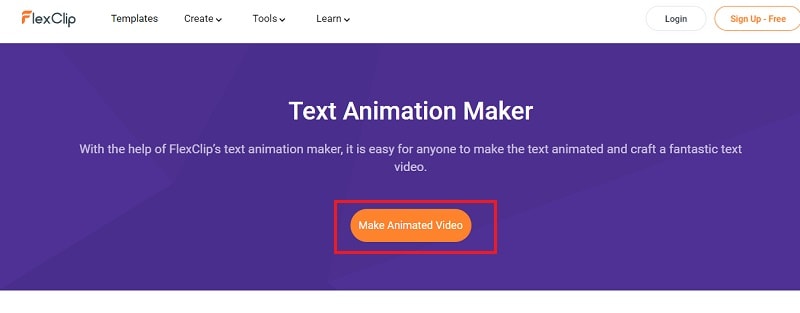
Part 3. Use Flexclip Text Animation Tool
You can use Flexclip Text Animation Tool to create text video from scratch as well as add text to your recorded video. You should use Biteable and Motionden to create video with text effects only directly using video template while you should use Flexclip to edit your video and add text. You can add text effects to photos and videos and here are the steps to follow.
Step1Open web browser and visit “flexclip.com/features/text-animation.html”. Click on Make Animated Video button.
Step2You can choose from the available templates to create video with text from scratch. If you want to add text to your recorded video, go to Media tab. Click on Local Files button and upload your recorded video.

Step3Drag and drop the uploaded video into the Timeline. Thereafter, go to Text tab.
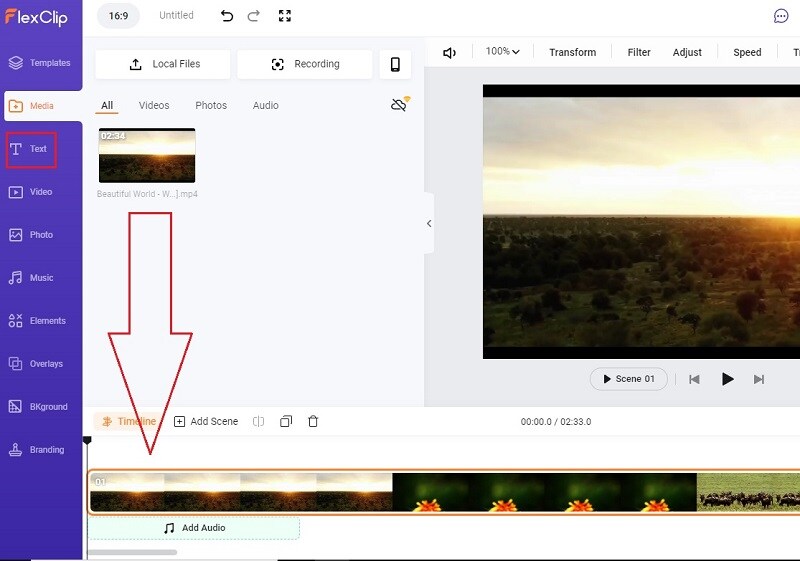
Step4You will see all the different text effects and animations. Place your mouse pointer to preview the animation. Drag and drop the select text template to the video on the Viewer. You can check the Timeline and stretch or compress the text layer as per your requirements.
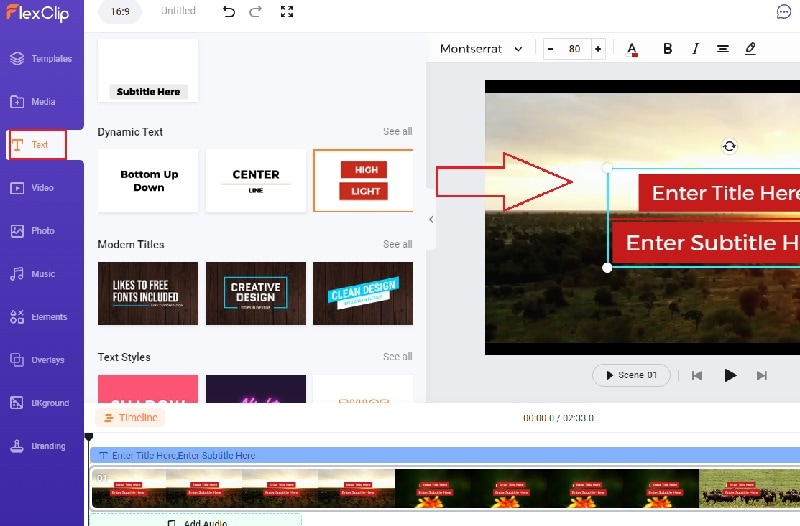
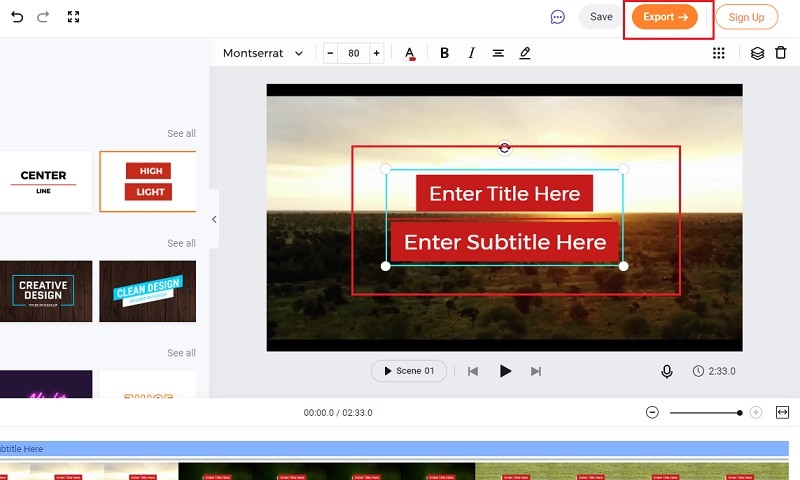
Step5Double-click on the text on Viewer window and customize the text as per your preference. Finally, click on Export button to save the edited video.
Conclusion
You can make video with animated text to make your presentation video eye-catching and attention-grabbing. We have mentioned three different online text animation makers that you can use to create animated text video from scratch by choosing different video templates. You can also edit your recorded video and add animated text wherever you want using Flexclip Text Animation Tool.
Free Download For Win 7 or later(64-bit)
Free Download For macOS 10.14 or later
Different Ways to Crop TikTok Video in High-Quality
TikTok videos are popular and always trending on various platforms. If you want to use or share a TikTok video by removing unwanted elements from it, you would require to crop it. Moreover, you would be able to manage the aspect ratio and the size of the video. It will also help you in producing a better composition of your video by highlighting a specific part.
Therefore, you must properly know about the cropping of a TikTok video. To learn how to crop video on TikTok, this article will provide detailed steps for mobile devices and desktop platforms.

Part 1: How to Crop Videos on TikTok on iPhone and Android
Each phone has a built-in feature through which users can crop or edit videos within a few taps. On your Android and iPhone, you can crop TikTok videos without using the additional editor. Read this section carefully to learn the steps for cropping TikTok videos to the aspect ratio of 9:16 on iPhone and Android.
For iPhone
Step 1: On your iPhone, open your gallery and scroll down to find your desired video. Afterward, tap on the “Edit” option in the top-right corner.

Step 2: Now, you will be able to find all the tools located at the bottom of the screen. Select the “Crop” icon given at the bottom right and then adjust the video. You can also change the aspect ratio by accessing the “Aspect Ratio” icon on the top toolbar. To save the changes, tap on the “Done” button.

For Android
Step 1: On your Android phone, open the gallery and locate the video you want to crop. Tap on the “Edit” option to open the editing section.

Step 2: Select the “Crop” option and remove the unwanted parts from your video. Once you are done, tap on the “Tick” icon to save the changes.

Part 2: How to Crop Videos on TikTok with the Third-party App
If you find your video blurry after cropping it on your phone, you won’t be able to post it on TikTok. Thus, you would need a third-party app like Filmora , which you can download on iOS and Android devices. It’s a friendly video editor through which you can modify your TikTok videos without affecting their original quality.
You can also add visual effects and filters to make the colors of the video prominent and vibrant. It has an easy-to-use interface, so you can edit your videos on its timeline without complications. Moreover, it offers a professional crop feature through which you can manage your video’s aspect ratio. You can choose different aspect ratios from the given options to adjust the frame accordingly.
Steps to Crop TikTok Video Using Filmora
Have you ever used Filmora app before? This section will guide you on how to crop TikTok videos through the Filmora app on your phone.
Step 1: Create a New Filmora Project
Launch Filmora on your phone and tap “New Project” to import your video. Choose the video from your phone and tap on “Import.”

Step 2: Access the Crop Tool
Once done, tap on the “Trim” option and select the “Crop” feature to change the TikTok aspect ratio. After adjusting the aspect ratio, preferably, tap on the “Tick” icon to save the changes. After editing, choose the “Export” button to save or share your video.

Part 3: How to Crop Videos on TikTok on Desktop
Some people don’t prefer mobile apps for editing or cropping TikTok videos. That’s why people use desktop software to crop their videos on a larger screen. Fortunately, Wondershare Filmora is also available for desktop platforms that can be launched on Windows and Mac operating systems. Moreover, TikTok is also available on browsers, so you can directly upload the video on TikTok after editing it on TikTok.
Online video editors can also be preferred for video cropping. They can be accessed from any web browser through an active internet connection. Thus, you can also use online video editors as a reliable solution to crop TikTok videos.
download filmora app for ios ](https://app.adjust.com/b0k9hf2%5F4bsu85t ) download filmora app for android ](https://app.adjust.com/b0k9hf2%5F4bsu85t )
Conclusion
During filming videos, you may capture unnecessary objects, which can ruin the whole impression. To post flawless videos on TikTok, use the crop feature to eliminate all unwanted elements. In this article, we have provided comprehensive steps on how to crop TikTok videos on mobile devices. To fetch high-quality results, you should try Wondershare Filmora on desktop and mobile devices.
Let’s Learn How to Convert a Normal Video Into a Film Shot in the 1920S with Wondershare Filmora
Do you want to roll back the hands of time and shoot a film like you were in WWI or Charlie Chaplin’s era? That’s what a vintage film effect is all about. In other words, this video effect will give your videos an old-film look and feel. So, without wasting time, let’s learn how to convert a normal video into a film shot in the 1920s with Wondershare Filmora.
Preparation

In this tutorial, you don’t need a lot of creativity to create a vintage film, as Wondershare Filmora will be doing the heavy lifting. Just shoot an action video like chasing each other around, chatting with friends, running away from something, or doing anything else. Let’s learn how to do that below!
Free Download For Win 7 or later(64-bit)
Free Download For macOS 10.14 or later
Step1 Add a video you want to edit

Upload your video on Filmora, then move it to the editing timeline by dragging it. This should take a second or two.
Step2 Add a crop effect

After successfully adding your video to the timeline, tap the Effect tab on top of the screen and click Utility. Then, choose the Crop effect and add a few tracks above the video clip.

Next, double-tap the Crop effect on the editing timeline to open the effect editing tools. Now change the crop amount to 15 to add a vintage feel to your video. Just enter 15 on the Left and Right boxes.
Step3 Add the Dirty Film and Silent Film effects

Tap the Effect tab, then open the Overlay drop-down menu. Then, choose the Old Film category before adding a Dirty Film effect above the clip. To apply a more vintage feel to your video, add a Silent Film effect to the track above the Dirty Film effect.
Step4 Add a black & white effect to your video

Up to this point, your film should now start having a more vintage feel. But to make it look even older, double-click the video clip and tap the Color tab. After that, open the 3D LUT arrow and choose the B&W Film option. Now play the video and enjoy.
Summary
See, you don’t need to break a sweat to add a vintage feel to your funny video. With Filmora, you’ll access multiple tools and effects to create an old-looking film with just a single click. And don’t forget to play around with other Filmora overlays and effects to bring out the inner video editor in you. Thanks for reading!
Free Download For macOS 10.14 or later
Step1 Add a video you want to edit
Upload your video on Filmora, then move it to the editing timeline by dragging it. This should take a second or two.
Step2 Add a crop effect
After successfully adding your video to the timeline, tap the Effect tab on top of the screen and click Utility. Then, choose the Crop effect and add a few tracks above the video clip.
Next, double-tap the Crop effect on the editing timeline to open the effect editing tools. Now change the crop amount to 15 to add a vintage feel to your video. Just enter 15 on the Left and Right boxes.
Step3 Add the Dirty Film and Silent Film effects
Tap the Effect tab, then open the Overlay drop-down menu. Then, choose the Old Film category before adding a Dirty Film effect above the clip. To apply a more vintage feel to your video, add a Silent Film effect to the track above the Dirty Film effect.
Step4 Add a black & white effect to your video
Up to this point, your film should now start having a more vintage feel. But to make it look even older, double-click the video clip and tap the Color tab. After that, open the 3D LUT arrow and choose the B&W Film option. Now play the video and enjoy.
Summary
See, you don’t need to break a sweat to add a vintage feel to your funny video. With Filmora, you’ll access multiple tools and effects to create an old-looking film with just a single click. And don’t forget to play around with other Filmora overlays and effects to bring out the inner video editor in you. Thanks for reading!
The Best Way to Remove Audio From Your Videos
Extracting audio from video lets you focus on the main video. Moreover, it also protects privacy and addresses copyright problems. Thus, controlling the audio is a crucial skill for video editors. One approach to making the video seem better is to remove the noise. Well, it isn’t just about reducing background noise. Instead, it’s a calculated move to make your editing more precise. So, how do you remove audio from a video? Don’t worry if you are a newcomer in the video editing field! This post is your go-to guide to effortlessly eliminating audio from your video content.
Extracting audio from video lets you focus on the main video. Moreover, it also protects privacy and addresses copyright problems. Thus, controlling the audio is a crucial skill for video editors. One approach to making the video seem better is to remove the noise. Well, it isn’t just about reducing background noise. Instead, it’s a calculated move to make your editing more precise. So, how do you remove audio from a video? Don’t worry if you are a newcomer in the video editing field! This post is your go-to guide to effortlessly eliminating audio from your video content.
In this article
- Part 1: Why Is It Necessary to Remove Audio from a Video?
- Part 2: How Can You Improve Storytelling With Silent Videos?
- Part 3: How to Use Filmora to Remove Audio from Your Video?
Remove Audio Now For Win 7 or later(64-bit)
Remove Audio Now For macOS 10.14 or later
Why Is It Necessary to Remove Audio from a Video?
You can make a video far more versatile and successful for many different things by removing the audio.
Your Video Becomes Multipurpose
Taking the audio out of a video makes it more versatile. Presentations, slide decks, and instructional videos may all benefit from this. The original audio or background noise might be too distracting in such videos.
No Language Issues
The muted or removed audio lets you reach viewers who speak a different language. By removing the original audio, the video becomes language-neutral. Thus, you save time adding subtitles or dubbing without disturbing the narration.
Place Emphasis on the Video Itself
Cutting off the sound may make the video’s visuals the main attraction. It may be beneficial when creating tutorials or instructional videos. That’s because viewers may prefer to see the demos without the sound.
Eliminating Excessive Background Noise
The video might get dull with background noises, echoes, or unwanted sounds. Deleting the audio stream helps to eliminate distractions. As a result, viewers get a cleaner viewing experience.
Keeping Copyright Concerns at Bay
Businesses can avoid copyright infringement problems by eliminating audio from videos. Removing someone’s audio work before using it in public venues is necessary. It supports copyright laws on audio material by limiting display to visual components.
Content Personalization
Creators can let viewers add their soundtracks or voiceovers by removing audio. Thus, it can make the watching experience more customized. It suits projects that need a high degree of personalization or user-generated content.
Confidential Data Security
Sometimes, a video might capture sensitive conversations or information. So, it’s essential to remove the audio to protect privacy. Remember, sharing the visual footage does not compromise confidentiality. It hides the crucial discussions or data from the original audio.
As you can see, removing audio from a video has several benefits. Many options are available when you mute the audio in a video. By eliminating background noise, you’re freeing your imagination.
So, how do silent videos improve your video production strategies? Let’s find out!
How Can You Improve Storytelling With Silent Videos?
There is a much unrealized narrative potential in silent videos. Most videos rely only on visual elements to convey narratives. Thus, mute clips have a unique ability to captivate audiences. It also offers many possibilities for storytelling, allowing for a more immersive experience.
Setting a Narrative
Videos without sound force viewers to rely more on their visual perception of the tale. It can draw your viewers closer to the visuals. Moreover, it also heightens their involvement with the story as it develops.
Improving Stories
Silence directs the viewer’s attention to certain visual aspects. When you remove all sound distractions, the audience can focus on the pictures. It helps you highlight essential story aspects.
For instance, rely on more than just dialogue to convey emotion. Instead, you can take a modest close-up of the character’s face.
Build Emotions With No Audio
One effective method of building intense emotions is the complete absence of sound. Remember, silent clips can keep viewers on the top of their seats. The audience may get more invested in the story’s raw essence when a scene unfolds in silence. In short, this technique aims to evoke a range of emotions in the audience.
Add Metaphor
The lack of audio permits the use of symbolic language only via visual representations. You can use each picture to convey information. It eliminates the need for dialogue or background music.
The audience can interact with the story on a deeper level via interpretation. Here, video scenes, objects, or actions work as symbols.
Simplify Complex Stories
Silent videos let storytellers elicit strong emotional reactions from audiences. They can co-create the story by deciphering visual cues. Besides, they can also add thoughts, emotions, and interpretations in silent videos. Without words, silent videos can help you convey stories that captivate audiences.
How to Use Filmora to Remove Audio from Your Video?
Two main approaches are available for using this software. You can start by downloading Wondershare Filmora for free to try it out. Here is how to remove audio in a video editor.
Remove Audio Now For Win 7 or later(64-bit)
Remove Audio Now For macOS 10.14 or later
Method 1: Use the “Mute” Button
The first method is using the “Mute” function available in Filmora. You can start by importing the local video file into this software.
Drop the file into Filmora’s video editing timeline. You can mute the file by right-clicking on it. Once you’ve finished, choose a format to save the file in.
As you can see, the mute option stands out as a fantastic one-click feature. It removes the necessity for specialized video editing skills. Anyone can effortlessly remove audio from their videos with ease.

Method 2: Use the Audio Detach feature
Now, let’s turn our focus to a different, efficient way. The Audio Detach function becomes a potent feature for separating audio from videos. Let’s check out its detailed instructions for precisely separating audio and video.
Step1Upload Your Video
First, select the video clip whose audio you want to extract. You can start by clicking “Import” and then navigating to the relevant folder on your hard drive.
While you pick more files, keep the “Ctrl” button down to select them all at once. The main editing dashboard will show thumbnails of all the currently loaded files. You can see a preview in the right-hand window when you double-click them.

Step2Cut Out the Music
Now, you should drag videos from the dashboard into the Video Timeline. After that, you can right-click the video to choose the “Audio Detach” option.
The Music Timeline will immediately display a new audio file. Here, you can see the original video’s soundtrack. Now, pressing the “Delete” button can remove the sounds.
You can also detach audio from multiple video files. Remember, all the files will mesh together perfectly on the Video Timeline.
Thus, you need to click the application icon on the left-hand side of the screen and choose “Save As…” to create new project files if you need to extract audio from more than one file. Then, export each output file individually after reloading the project file.

Step3Download the Video
To be sure this is what you need, double-tap the file in the Video Timeline. You can add suitable music files to the clip if needed. To save only the video track, click the “Create” option directly. A popup will open up, asking you to choose a format before you can save it to your PC.
The Music Timeline will immediately display a new audio file. Here, you can see the original video’s soundtrack. Now, pressing the “Delete” button can remove the sounds.
You can also detach audio from multiple video files. Remember, all the files will mesh together perfectly on the Video Timeline.
Thus, you need to click the application icon on the left-hand side of the screen and choose “Save As…” to create new project files if you need to extract audio from more than one file. Then, export each output file individually after reloading the project file.
Now you know how to remove audio from videos in Wondershare Filmora. As you can see, removing background noise from videos is a breeze using Filmora. You don’t need extensive experience or expensive software packages.
Follow the simple steps outlined above, even if this is your first time. You may remove distracting or unnecessary audio from your file in just a few minutes.
Conclusion
As you can see, your ability to control the audio in video editing defines the viewing experience. It is about not just transforming video material but also expanding possibilities. This silent space is where imagination soars.
It’s a technique to make your video clips more adaptable. Thus, they can transcend language obstacles, legal limitations, and distractions.
Think of a vacation video where the beautiful sights and sounds of the busy streets are in front. It will allow the audience to lose themselves in the lively atmosphere completely. If you remove the audio from this clip, it can become livelier.
In short, sound removal is crucial in creating a more engaging story. It changes the viewer’s experience by focusing on visuals and increasing engagement. You can use Filmora’s powerful audio removal features. The software streamlines the editing process without compromising the quality of the video. Learn to use silence as a tool to tell stories and make people feel things in your videos.
- Part 2: How Can You Improve Storytelling With Silent Videos?
- Part 3: How to Use Filmora to Remove Audio from Your Video?
Remove Audio Now For Win 7 or later(64-bit)
Remove Audio Now For macOS 10.14 or later
Why Is It Necessary to Remove Audio from a Video?
You can make a video far more versatile and successful for many different things by removing the audio.
Your Video Becomes Multipurpose
Taking the audio out of a video makes it more versatile. Presentations, slide decks, and instructional videos may all benefit from this. The original audio or background noise might be too distracting in such videos.
No Language Issues
The muted or removed audio lets you reach viewers who speak a different language. By removing the original audio, the video becomes language-neutral. Thus, you save time adding subtitles or dubbing without disturbing the narration.
Place Emphasis on the Video Itself
Cutting off the sound may make the video’s visuals the main attraction. It may be beneficial when creating tutorials or instructional videos. That’s because viewers may prefer to see the demos without the sound.
Eliminating Excessive Background Noise
The video might get dull with background noises, echoes, or unwanted sounds. Deleting the audio stream helps to eliminate distractions. As a result, viewers get a cleaner viewing experience.
Keeping Copyright Concerns at Bay
Businesses can avoid copyright infringement problems by eliminating audio from videos. Removing someone’s audio work before using it in public venues is necessary. It supports copyright laws on audio material by limiting display to visual components.
Content Personalization
Creators can let viewers add their soundtracks or voiceovers by removing audio. Thus, it can make the watching experience more customized. It suits projects that need a high degree of personalization or user-generated content.
Confidential Data Security
Sometimes, a video might capture sensitive conversations or information. So, it’s essential to remove the audio to protect privacy. Remember, sharing the visual footage does not compromise confidentiality. It hides the crucial discussions or data from the original audio.
As you can see, removing audio from a video has several benefits. Many options are available when you mute the audio in a video. By eliminating background noise, you’re freeing your imagination.
So, how do silent videos improve your video production strategies? Let’s find out!
How Can You Improve Storytelling With Silent Videos?
There is a much unrealized narrative potential in silent videos. Most videos rely only on visual elements to convey narratives. Thus, mute clips have a unique ability to captivate audiences. It also offers many possibilities for storytelling, allowing for a more immersive experience.
Setting a Narrative
Videos without sound force viewers to rely more on their visual perception of the tale. It can draw your viewers closer to the visuals. Moreover, it also heightens their involvement with the story as it develops.
Improving Stories
Silence directs the viewer’s attention to certain visual aspects. When you remove all sound distractions, the audience can focus on the pictures. It helps you highlight essential story aspects.
For instance, rely on more than just dialogue to convey emotion. Instead, you can take a modest close-up of the character’s face.
Build Emotions With No Audio
One effective method of building intense emotions is the complete absence of sound. Remember, silent clips can keep viewers on the top of their seats. The audience may get more invested in the story’s raw essence when a scene unfolds in silence. In short, this technique aims to evoke a range of emotions in the audience.
Add Metaphor
The lack of audio permits the use of symbolic language only via visual representations. You can use each picture to convey information. It eliminates the need for dialogue or background music.
The audience can interact with the story on a deeper level via interpretation. Here, video scenes, objects, or actions work as symbols.
Simplify Complex Stories
Silent videos let storytellers elicit strong emotional reactions from audiences. They can co-create the story by deciphering visual cues. Besides, they can also add thoughts, emotions, and interpretations in silent videos. Without words, silent videos can help you convey stories that captivate audiences.
How to Use Filmora to Remove Audio from Your Video?
Two main approaches are available for using this software. You can start by downloading Wondershare Filmora for free to try it out. Here is how to remove audio in a video editor.
Remove Audio Now For Win 7 or later(64-bit)
Remove Audio Now For macOS 10.14 or later
Method 1: Use the “Mute” Button
The first method is using the “Mute” function available in Filmora. You can start by importing the local video file into this software.
Drop the file into Filmora’s video editing timeline. You can mute the file by right-clicking on it. Once you’ve finished, choose a format to save the file in.
As you can see, the mute option stands out as a fantastic one-click feature. It removes the necessity for specialized video editing skills. Anyone can effortlessly remove audio from their videos with ease.
Method 2: Use the Audio Detach feature
Now, let’s turn our focus to a different, efficient way. The Audio Detach function becomes a potent feature for separating audio from videos. Let’s check out its detailed instructions for precisely separating audio and video.
Step1Upload Your Video
First, select the video clip whose audio you want to extract. You can start by clicking “Import” and then navigating to the relevant folder on your hard drive.
While you pick more files, keep the “Ctrl” button down to select them all at once. The main editing dashboard will show thumbnails of all the currently loaded files. You can see a preview in the right-hand window when you double-click them.
Step2Cut Out the Music
Now, you should drag videos from the dashboard into the Video Timeline. After that, you can right-click the video to choose the “Audio Detach” option.
The Music Timeline will immediately display a new audio file. Here, you can see the original video’s soundtrack. Now, pressing the “Delete” button can remove the sounds.
You can also detach audio from multiple video files. Remember, all the files will mesh together perfectly on the Video Timeline.
Thus, you need to click the application icon on the left-hand side of the screen and choose “Save As…” to create new project files if you need to extract audio from more than one file. Then, export each output file individually after reloading the project file.
Step3Download the Video
To be sure this is what you need, double-tap the file in the Video Timeline. You can add suitable music files to the clip if needed. To save only the video track, click the “Create” option directly. A popup will open up, asking you to choose a format before you can save it to your PC.
The Music Timeline will immediately display a new audio file. Here, you can see the original video’s soundtrack. Now, pressing the “Delete” button can remove the sounds.
You can also detach audio from multiple video files. Remember, all the files will mesh together perfectly on the Video Timeline.
Thus, you need to click the application icon on the left-hand side of the screen and choose “Save As…” to create new project files if you need to extract audio from more than one file. Then, export each output file individually after reloading the project file.
Now you know how to remove audio from videos in Wondershare Filmora. As you can see, removing background noise from videos is a breeze using Filmora. You don’t need extensive experience or expensive software packages.
Follow the simple steps outlined above, even if this is your first time. You may remove distracting or unnecessary audio from your file in just a few minutes.
Conclusion
As you can see, your ability to control the audio in video editing defines the viewing experience. It is about not just transforming video material but also expanding possibilities. This silent space is where imagination soars.
It’s a technique to make your video clips more adaptable. Thus, they can transcend language obstacles, legal limitations, and distractions.
Think of a vacation video where the beautiful sights and sounds of the busy streets are in front. It will allow the audience to lose themselves in the lively atmosphere completely. If you remove the audio from this clip, it can become livelier.
In short, sound removal is crucial in creating a more engaging story. It changes the viewer’s experience by focusing on visuals and increasing engagement. You can use Filmora’s powerful audio removal features. The software streamlines the editing process without compromising the quality of the video. Learn to use silence as a tool to tell stories and make people feel things in your videos.
Also read:
- New 9 Best Sparkle Effects Photo and Video Editors You Should Know
- In 2024, Tiktok Video Aspect Ratio
- 8 Tips to Apply Cinematic Color Grading to Your Videos
- Vintage Film Effect 1920S - How to Make for 2024
- Updated Fast Method to Match Color in Photoshop for 2024
- New In 2024, How to Make Boring Videos Look Cool By B Rolls
- New Gifs Can Convey Your Emotions in a Way that Words Cannot, so They Are Becoming a Popular Way to Express Yourself, and You Must Know How to Make a Gif and You Wont Believe that Its Not Difficult to Do
- Top 7 Color Match Paint Apps for 2024
- New Attaining Slow Motion Video Trend Finding The Best CapCut Templates for 2024
- Updated The Best Laptops For Video Editing
- New In 2024, How to Make Text Reveal Effect Easily
- New 11 Best Video Editing Apps for iPhone
- LumaFusion Color Grading Achieving It Through LUTs for 2024
- New How to Make Vintage Film Effect 1950S
- Updated 11 Best Video Editing Apps for iPhone for 2024
- New How to Create Vintage Film Effect 1920S
- Updated In 2024, How Can I Control Speed of a Video
- An Easy-to-Understand Guide on How to Loop a Video on Canva. This Article Is Sure to Help You if This Is Your First Time Attempting a Loop Video
- Updated Best AR Video App - Top 10 Picks
- Updated In 2024, How to Livestream Zoom on Facebook?
- New 2024 Approved Best Dark Moody LUTs During Editing
- In 2024, This Article Is Regarding the Guidance About the Split of the Audio From the Video in Premiere Pro. And Also, the Discussion of the Wondershare Fllmora as the Replacement and How to Perform a Similar Task in It
- 2024 Approved Adding Slow Motion in DaVinci Resolve A Comprehensive Overview
- In 2024, Shoot Video with Virtual Green Screen
- Updated Motion Tracking Never Goes Out of Trend, so Do You Wish to Make Your Videos Trendy with This? No Issue because Here We Will Guide You on How to Do Motion Tracking
- Updated Guide To Creating the Best Video Collages
- In 2024, TOP 10 Types of Video Framing From Novice to Master
- Top Fixes to Resolve Issues with Premiere Pro Slow Playback
- Best Video Grabbers for Chrome
- Focusing On The Best Ways To Convert Slow-Motion Video to Normal
- 2024 Approved Top Way to Freeze-Frame in Final Cut Pro
- New In 2024, Looking For The Best Slow Motion Effect in Premiere Pro
- Updated 2024 Approved 4 Ways to Add White Borders on Mobile and Desktop
- Updated Top 8 AI Video Denoise Software
- Updated 2024 Approved Create Your Face Zoom TikTok Now
- New What Is the Best Filmora Slideshow Templates? Experts Choice
- In 2024, How to Create Discord Logo GIF
- Ideas to Make A Perfect Café Vlog for 2024
- Level Up Videos By Applying Keyframe Like A Pro for 2024
- New Adobe Premiere Pro Rec 709 LUTs Finding The Best Options for 2024
- New 2024 Approved Best GIF to AVI Converters
- Will Pokémon Go Ban the Account if You Use PGSharp On Tecno Pova 6 Pro 5G | Dr.fone
- In 2024, Catch or Beat Sleeping Snorlax on Pokemon Go For Oppo A78 5G | Dr.fone
- How to Intercept Text Messages on ZTE Axon 40 Lite | Dr.fone
- Updated Ever-Changing Era of AI Video Translation A Reality to Be Fulfilled
- Does Life360 Notify When You Log Out On Nokia C300? | Dr.fone
- In 2024, Here are Some Pro Tips for Pokemon Go PvP Battles On Motorola Defy 2 | Dr.fone
- In 2024, How To Leave a Life360 Group On Apple iPhone 7 Plus Without Anyone Knowing? | Dr.fone
- Planning to Use a Pokemon Go Joystick on Sony Xperia 5 V? | Dr.fone
- In 2024, How Can I Use a Fake GPS Without Mock Location On Vivo Y200e 5G? | Dr.fone
- How To Transfer Data From iPhone 11 Pro To Other iPhone? | Dr.fone
- 11 Proven Solutions to Fix Google Play Store Not Working Issue on Infinix Note 30 VIP Racing Edition | Dr.fone
- 3 Things You Must Know about Fake Snapchat Location On Asus ROG Phone 8 Pro | Dr.fone
- How To Use Allshare Cast To Turn On Screen Mirroring On Infinix GT 10 Pro | Dr.fone
- In 2024, Apple ID Locked or Disabled From Apple iPhone SE (2022)? 7 Mehtods You Cant-Miss
- In 2024, How To Track IMEI Number Of Infinix Note 30 5G Through Google Earth?
- Can Life360 Track Or See Text Messages? What Can You Do with Life360 On Honor X7b? | Dr.fone
- Vivo S17 Screen Unresponsive? Heres How to Fix It | Dr.fone
- Unlock Apple ID without Phone Number From iPhone 13 Pro
- Solved Warning Camera Failed on Honor Magic 5 | Dr.fone
- In 2024, Best Nubia Z50 Ultra Pattern Lock Removal Tools Remove Android Pattern Lock Without Losing Data
- In 2024, 10 Easy-to-Use FRP Bypass Tools for Unlocking Google Accounts On Realme C53
- Solutions to restore deleted files from Lava
- Title: New How to Add Text Animation Online for 2024
- Author: Chloe
- Created at : 2024-04-24 07:08:29
- Updated at : 2024-04-25 07:08:29
- Link: https://ai-editing-video.techidaily.com/new-how-to-add-text-animation-online-for-2024/
- License: This work is licensed under CC BY-NC-SA 4.0.
