
New How to Add Text to Video for 2024

How to Add Text to Video
If you are making an instructional or explainer video, you will often find that you need to add text to various sections of the video. Depending on the tool you use, the process of adding text to a video can be simple or complicated.
In this article, we will share with you the different options you have when you want to add text elements to a video project.
Add Text to a Video Online
One of the easiest ways that you can add text to any video is to use a free online solution. There are many online tools to choose from but VEED is a free solution that is easy to use and offers a wide range of features to choose from.
Here’s how you can use VEED to add text to your video;
Step1Go to https://www.veed.io/ on any browser to access the video editing tool. Click on “Upload Your Video” to open a new project. In the new project screen that appears, tap on “Upload a file” to add your video.

Step2Once the video is open, click on the “Text” tab on the left and then select the type of text you want to add to the video.

Step3Type in your text and then use the options below the text box to choose the font style, size, and color of the text. You can also use the duration icons below the text to indicate where you want the text to appear during playback.

Step4When you’re happy with the changes, click on the “Export” button at the top to save the changes and download the video.
Add Text to Video on Computer
While online tools like VEED can come in handy when you want to make simple changes to a video, you will often find that they don’t have the necessary features to customize the text in various ways. For that, we recommend Wondershare Filmora, a desktop editing suite that has a lot of useful features.
Filmora combines its wealth of editing features and a simple user interface to make it one of the most effective video editors in the market. Here’s how you can add text to any video using Filmora.
Step1Download and install Wondershare Filmora onto your computer. Open the program and then click on the “Import” button to start. You can also just drag and drop the video to the main window to open it.
Step2Once the video is open in Filmora, you will need to drag it to the timeline panel before you can start to edit it.

Step3Click on the “Titles” tab at the top to open the text and title presets that you will need to add text to the document. Filmora offers more than 200 text effects to choose from. Just double-click on one of the presents to select it and then the preview window to see it in real-time.

Step4If you like the preset that you have selected, place the cursor on the position in the timeline where you would like to add the text and then drag and drop the title track above the video in the timeline.

Step5If you would like to change the duration of the text simply drag the edge of the timeline until you get the length that you desire. Filmora also allows you to edit and customize the text. To do that, double-click on the “Title” time frame to get some customization options.
Step6Once you are happy with all the changes you have made, click on “Export” and choose an output format to save and export your video.

Add text to Video on iPhone
One of the easiest ways to edit a video on an iPhone is to use iMovie. This simple and effective solution can help you edit videos on your iPhone in numerous ways including adding text and subtitles. The following are simple steps to help you use iMovie to add text to a video on an iPhone;
Step1Open the video clip that you would like to add text to. Once the video is open, click on the Text icon from the options at the bottom of the screen.
![]()
Step2Select the style you would like to use from the list of templates.

Step3A sample text will appear on the screen. Tap on it and then select “Edit” to enter the desired text. Tap “Done” once you are done typing.

Step4To move the text to the desired location, simply tap on it again and reposition it. You also have the option to increase or decrease the size of the text as desired using the pinch motion. If you want to change the color or font, tap on the “T” that will appear below the clip and choose “Aa” to change the font or the multicolored circle to change color.

You also have numerous other options in terms of effects including text-shadow. Just tap on the “three-dot icon” to access these features.
Add Text to Video on Android
The best way to add a video on Android devices is to use third-party apps. The good news is that there are several very useful video editing apps that you can use for this purpose. In this guide, we will show you how you can add text to a video on Android using two of the most effective solution.
Using the PowerDirector by Cyberlink
PowerDirector is a video editing app that allows you to edit various aspects of the video including adding text to the video. Available on the Google Play Store, this app has a wealth of additional features that include trimming, rotating clips, and even adjusting the color, brightness, and saturation.
Here’s how you can use PowerDirector to add text to your video;
Step1Install PowerDirector on your device. Open it and tap “New Project” at the top. Select an aspect ratio depending on the video project you are working on and enter a project name.

Step2Select the video that you would like to edit from the folders that show up on the screen. The video will be added to the main timeline of the project.
Step3Select the video layer and then tap on the layer mask from the left sidebar. Select the text tab at the top and then choose the text style that you want to add to the video. Tap on the “+” button inside the style to add the text style you have selected.

Step4Type in the text that you want to add to the video on the text box and then tap on the “T” icon at the top-right corner of the text box to customize the text.
You can use PowerDirector to change the font, color, and text size or even add effects like Text shadow.

Step5When you’re done editing the video, tap on the “Export” icon at the top-right corner of the screen and choose if you would like to save the video on the device or share it via a social media app.

Free Download For Win 7 or later(64-bit)
Free Download For macOS 10.14 or later
Free Download For macOS 10.14 or later
Before & After Editing Trick | Wondershare Filmora Tutorial
How do travel vloggers instantly grab everyone’s attention with their magical content? The unique animation preset is the answer. Video makers use them to morph video clips into scenic views that make viewers’ jaws drop in awe. Also, these edits can cover up any flaws made during the production of the original video clip. Isn’t it cool?
You might be wondering how to add these effects to the video. Keep reading to discover some of the simplest effects that are bound to add soul to your content. Before diving into the details, let’s first understand these effects.
Part 1. What are the before/after effects?
After-effects are visual effects that are used to enhance the aesthetic appeal of videos. You might have encountered these effects several times during watching YouTube videos or movies. These transitions make the videos more appealing to the audience.
In films, for example, the dissolve effect is employed to signify a time change. It informs viewers that there is a time difference between the two shots. You can see how this effect is used to dissolve one scene into another in the video clip mentioned below.
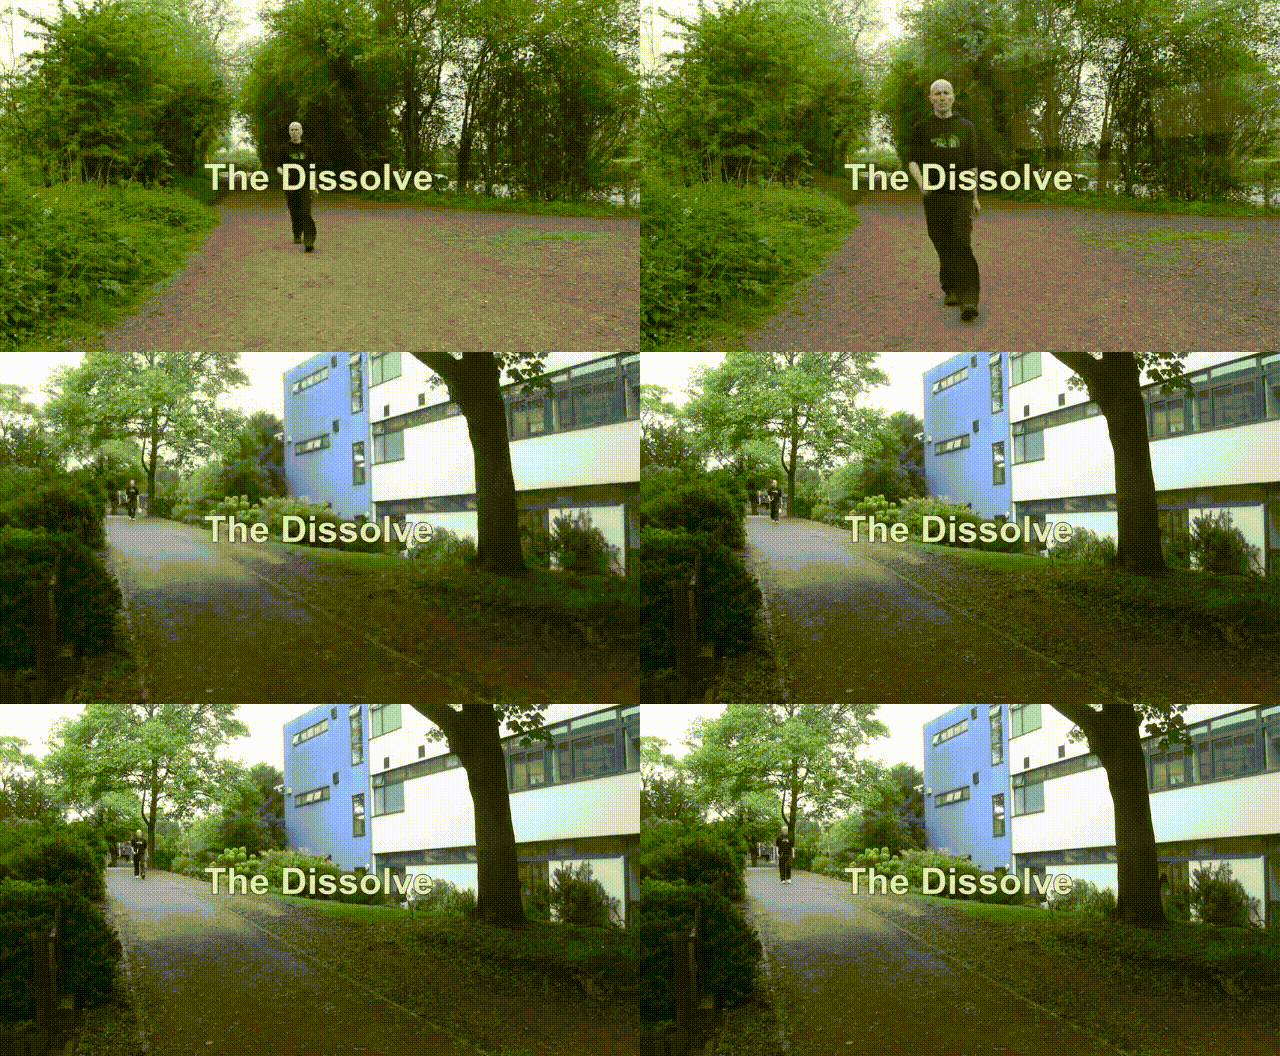
The history of after-effects can be traced back to 1993. These effects enabled the crew to mix 3D and 2D images to produce virtual dinosaur motion visuals in the Jurassic Park film, which we all love. Now that you have a fundamental understanding of the origins of after-effects, let’s take a look at where they might be applied!
Part 2. Where can you use these before/after effects?
If you are a fan of fiction movies, then you must have noticed that some of their scenes though fake, look so realistic that they blow our minds. And now you might have an idea of how these shots are created!
Whether it be shooting a movie or a commercial, these transitions have the power to make our content irresistible. Once you are familiar with the purpose of these after-effects, it’s time to show you how you can edit your videos using these effects.
Part 3. How to edit your videos using before/after effects?
If you’re new to editing and don’t know much about video graphics, Filmora video editor is the finest platform for you. It is not only easier to use but also more entertaining than other online video editors. Filmora is a free video editor that is accessible for both Windows and macOS.
Steps for installing the Filmora video editor
To install the Filmora video editor, follow these steps
Step1 Go to the official site of Filmora.
Step2 Click on the download button.
Step3 Install the application on your PC.
Step4 Now, you can use the Filmora video editor to beautify your content.
Now, let’s explore some of the coolest transition effects that you can use in your videos for before and after comparison.
Part 4. Filmora’s top three transition effects for beginners
Wondershare Filmora can help video editors achieve their goals in the most basic and economical fashion. The best three transition effects that may completely transform your videos are shown below.
Wipe Effect
Wipe transition is used to produce an apparent transformation to videos with similar frames for the before/after comparison. Travel vloggers mostly use this effect to create a retro vibe in their videos. This transition is frequently used in movies to demonstrate the influence of time on any place.
The wipe effect’s fundamental goal is to transition from one shot into another via a sliding animation, giving the video an elegant vibe. For instance, we can use the wipe effect to convert the raw film to colored corrected footage.
Steps to apply the Wipe effect
Step1 Drag and drop the video clip ‘before color correction’ onto the timeline’s first video track.
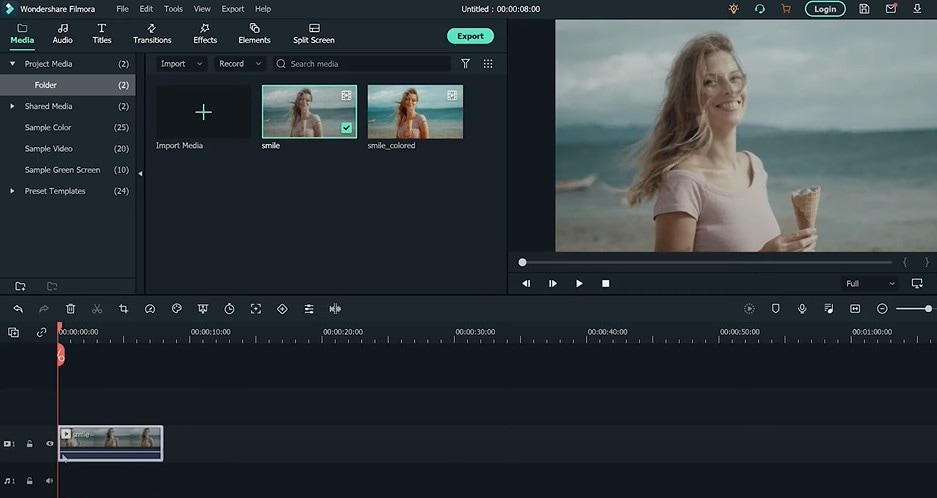
Step2 Then, drag and drop the color-corrected video clip on the second video track. Ensure that the clips are piled on top of one another so they may all be played simultaneously. It will make it easier for us to trim the footage.
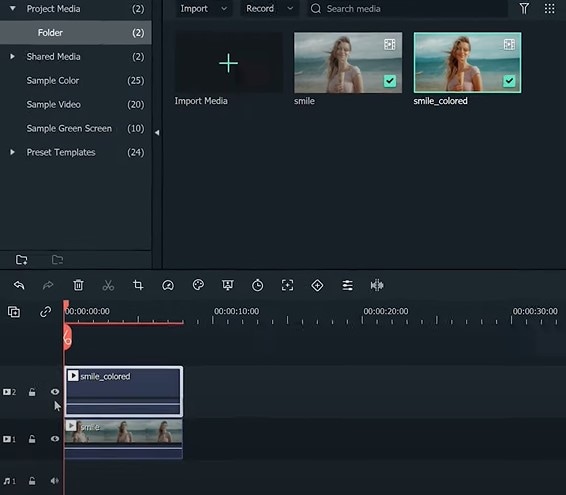
Step3 Place the play head where we want the transformation to begin. Then trim the second clip.
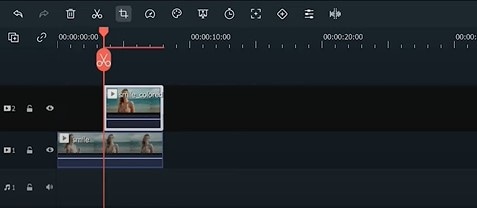
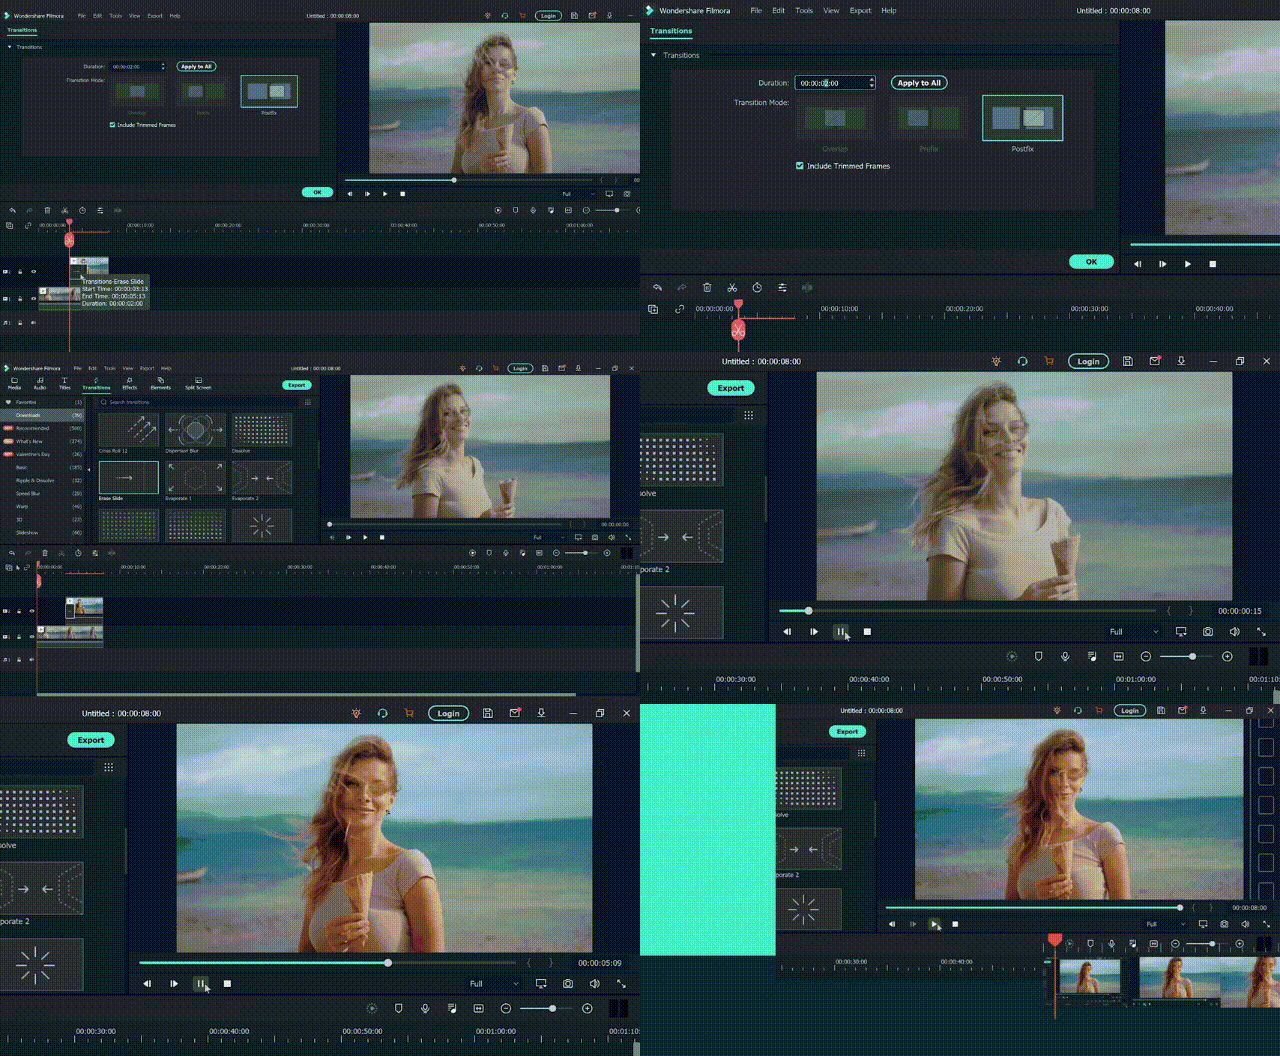
Step4 Go to the Transitions window and select “Erase slide.” Drag the transition to the start of the second video clip. Then, double-click the transition on the timeline to open the settings box.
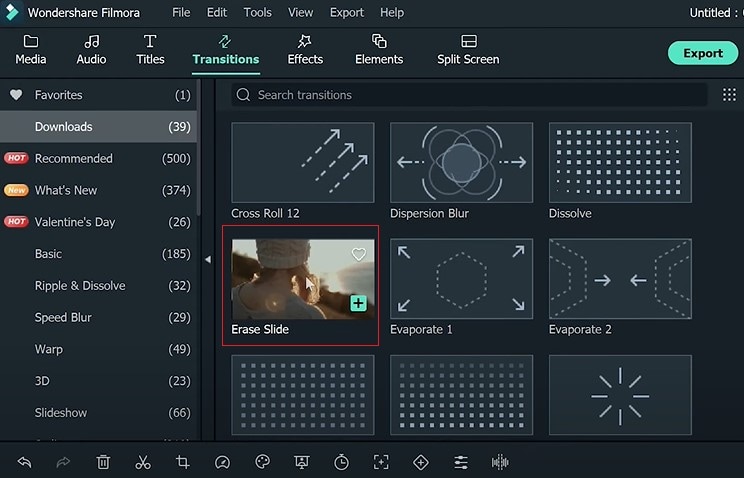
Step5 Adjust the length of the “Erase slide.” Let’s see how it turns out!
Dissolve Effect
The dissolve effect allows us to shift from one shot to another by using slow block dissolution. It gives the impression that one scene is being morphed into another. And, it is frequently used in documentaries.
We may utilize the dissolve transition to display the differences between two video segments more naturally. To explain the objective of the dissolve effect, we used two clips of the same place shot at separate times. The first film is current, but the second is from the same place but was taken a few years back.
Steps to apply the Dissolve effect
Step1 Drag and drop the first video clip onto the timeline’s first video track.
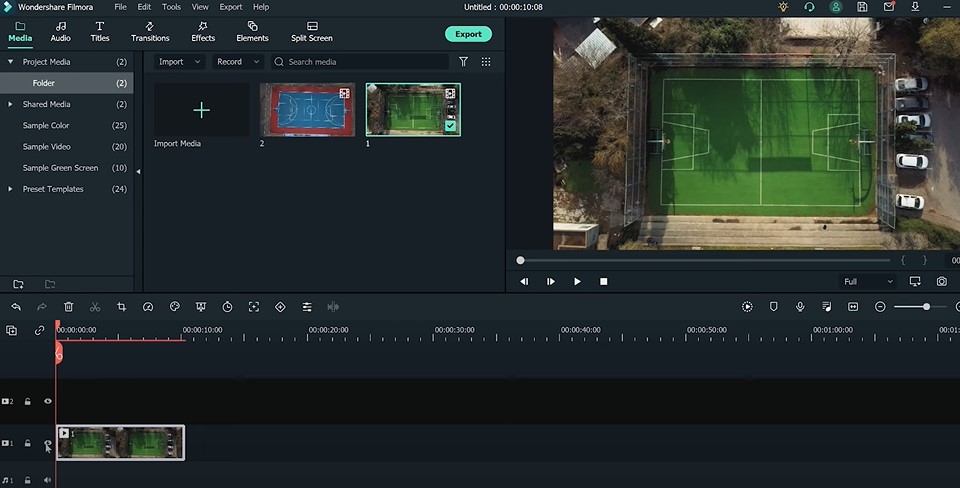
Step2 Then, on the second video track, drag and drop the second video clip. Make sure the start of the second clip is where you want the transition to begin.
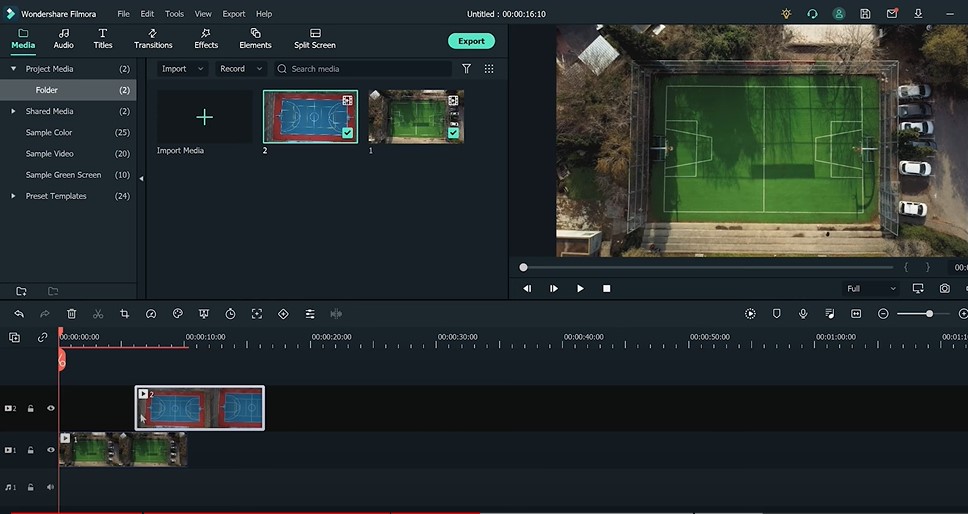
Step3 Then Go to the Transitions window and choose the “Dissolve” effect.
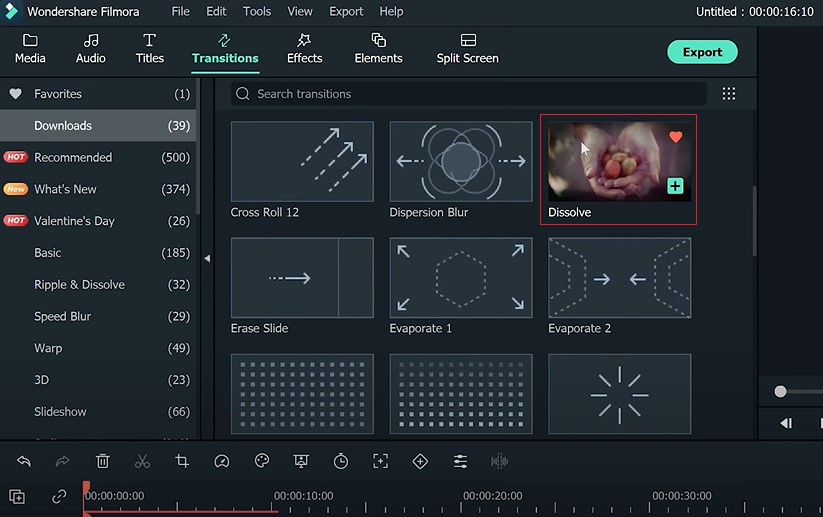
Step4 Drag the transition to the start of the second video clip.
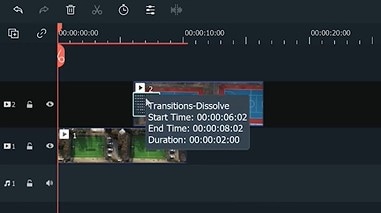
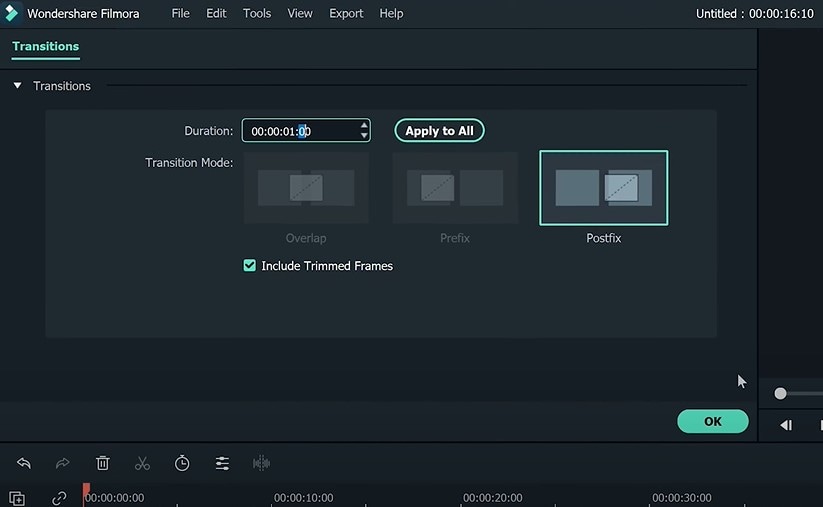
Step5 Then, on the timeline, double-click the transition to open the settings box. If necessary, adjust the duration of the “Dissolve “ effect as needed.
You can see how it looks in the image below. If we play the timeline, we can watch the green court convert into the old basketball court. However, the two visuals don’t truly match each other during the transformation.
Steps to adjust the frames of the clips
Step1 We may fix it by adjusting the location and scale of the clips.
Step2 Move the play head to the transition section to watch both video segments.
Step3 To open the settings window, double-click on the first video.
Step4 Find the transform section and scale it to 110%.
Step5 Then, move the first video’s frame to match the second video’s placement. We may notice a more natural transition when we replay the timeline.
Split Screen Effect
The split-screen technique first appeared in the film “The Queen of Spades,” which was released in 1949. It depicted a man suffering from a psychological illness. The split-screen effect was used to demonstrate the contrast between reality and his hallucinations. It made the viewer more aware of what was actually happening in the film.
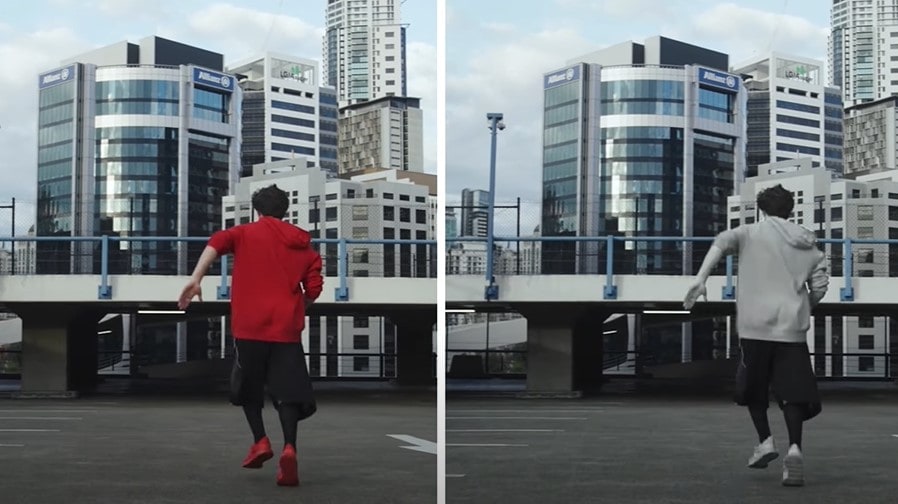
Since then, the split screen has been used as the simplest technique to demonstrate the before/after comparison. This effect is also ideal for emphasizing the changes in only one section of the video.
Because the split screen effect does not display the whole frame of the video clips, you may eliminate the top and bottom bars of the video clips using this effect.
How to apply a split screen effect?
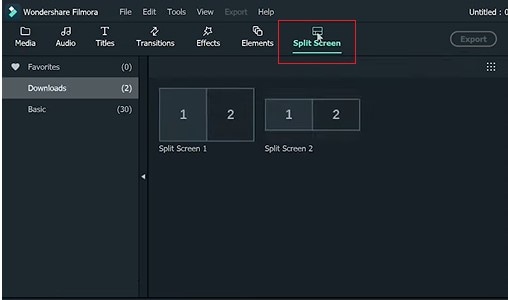
Step1 Find “Split Screen1” in the window by clicking “Split Screen.”
Step2 Drag it over to the timeline.
Step3 You’ll see the split-screen template in the preview box when you double-click it.
Step4 Drag the two video clips you wish to compare to the template’s left and right sides.
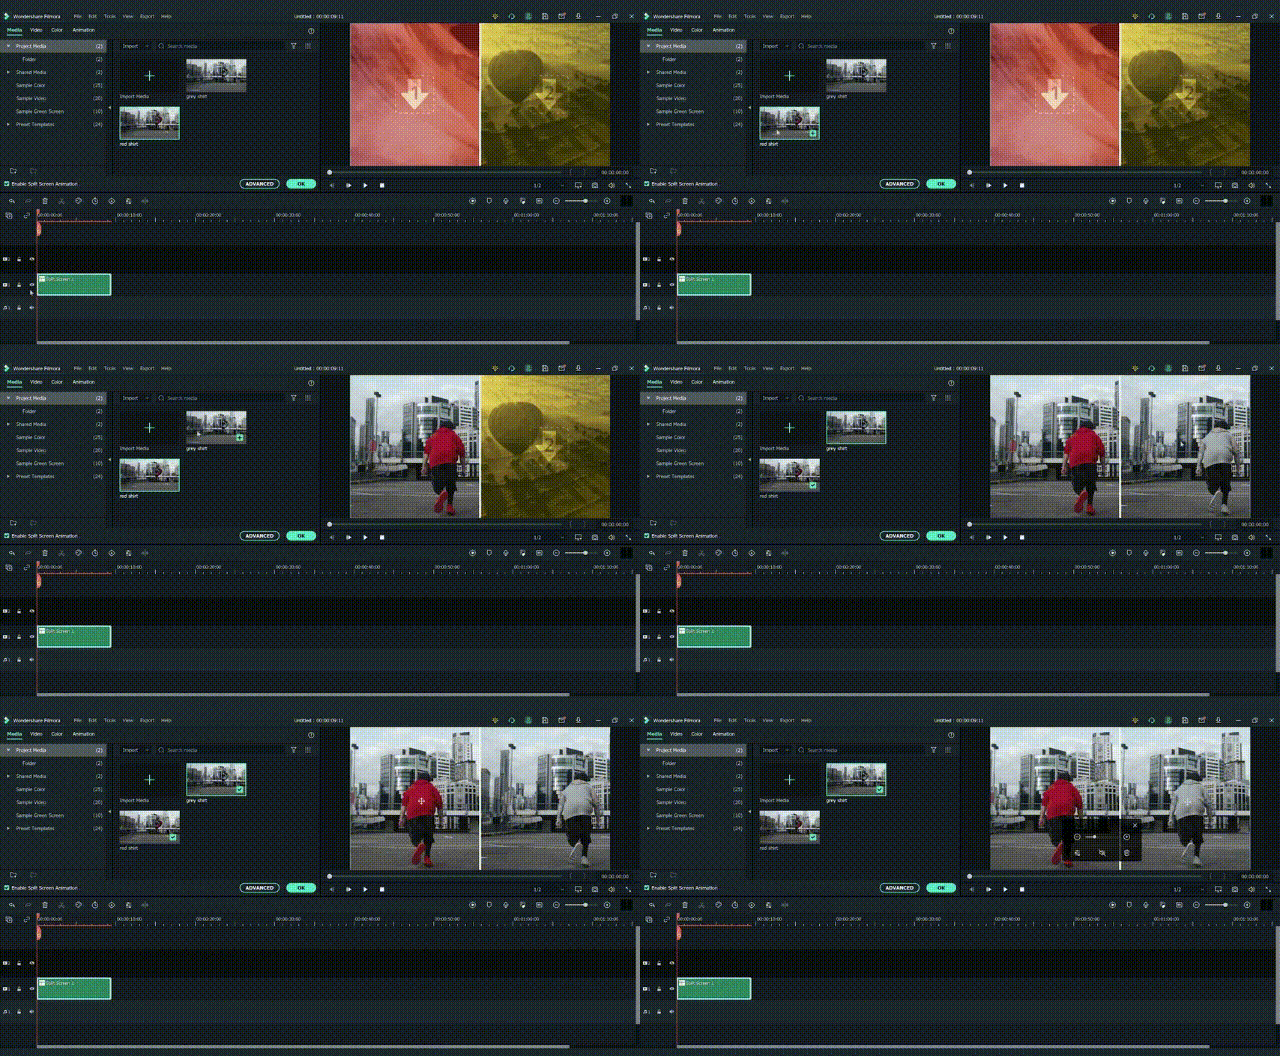
Step5 If necessary, you may also adjust the location of the videos in the preview clip.
Step6 Finally, uncheck the option labeled “allow split screen animation.”
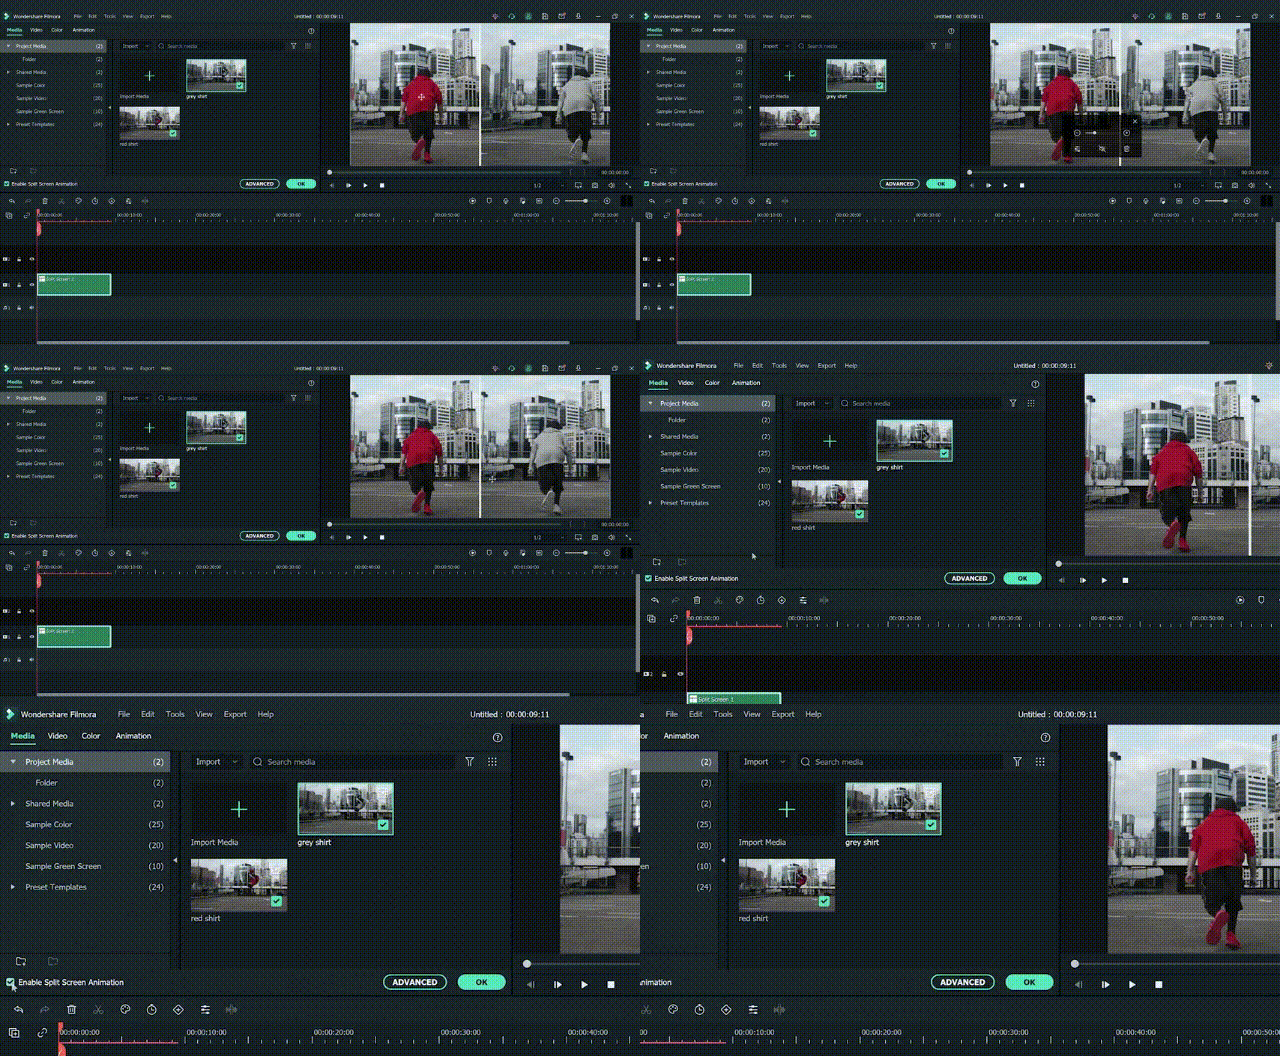
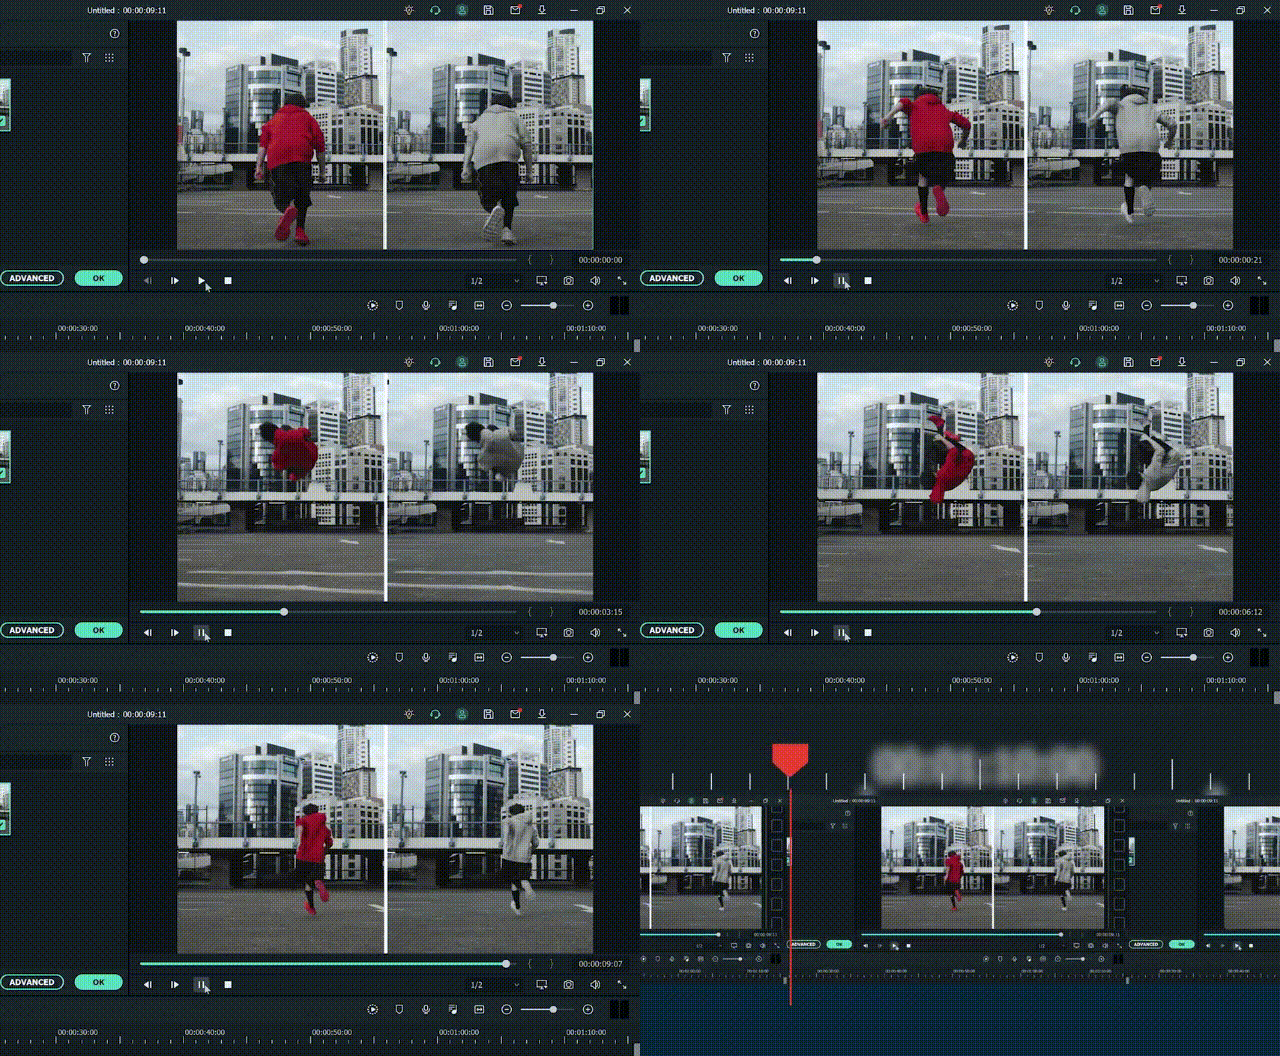
Step7 All of the steps for the before/after split screen are now complete.
Step8 Let’s wait and see how it turns out!
Final words
If you are a vlogger and you desire to add an aesthetic touch to your videos, you should try Filmora. It offers a variety of unique transitions, so you can use it to build your own trademark style that will represent your content.
By the end of this article, you must understand how to employ the wipe effect, the dissolve effect, or the split screen effect in your videos to give them an elegant and professional vibe.
Free Download For Win 7 or later(64-bit)
Free Download For macOS 10.14 or later
Free Download For macOS 10.14 or later
Google Meet Green Screen Is the Latest Addition to the Virtual Meeting App. It Is a Crucial Feature as It Allows Users to Maintain a Semblance of Privacy Through Virtual Backgrounds
Google meet green screen is the latest addition to the virtual meeting app. It is a crucial feature as it allows users to maintain a semblance of privacy through virtual backgrounds. This video communication app has been a popular choice for classrooms and workplaces since the COVID 19 pandemic of 2019. Since then, Google meet has seen an increase of 3 million users per day since 2020.
The green screen for Google meet has come in handy for its millions of active users across the globe. It is an important feature that safeguards the privacy of its user in the cyber world. Google meet green screen allows you to alter the meeting’s background in real-time, similar to how movies employ the famous green curtain behind the performers during filming. You can use this feature to immediately insert a backdrop image of your choice by activating the green screen provided in the browser extension Visual Effects for Google Meet.
Uses of Google Meet Green Screen
The Google Meet Green Screen feature keeps things interesting in corporate meetings. It also allows users to hide their backgrounds which can often be a source of discomfort or vulnerability. The green screen for Google Meet is a handy feature as you can now attend meetings without worrying about the background.
Virtual Green Screens, Blur, Pixelate, Inverse, Contrast and More! This extension allows you to apply effects like Blur, Pixelate and Inverse to your camera live during Google Meets. And you can use the Virtual Green Screen feature to mask whatever you would not fancy appearing in your videos’ background.
Green screen from Google helps you limit distractions or make video calls more fun, you can now blur or replace your background or replace it with an image, an immersive background, or a video. You can also apply styles to customize your video with various light, color filters and stylized backgrounds.
How to Use Green Screen on Google Meet
With Google Meet Green Screen, you can create a virtual background by either uploading photographs from their PC or using the extension’s stock photos. You can utilize an office background as a backdrop for business meetings. Teachers can add a classroom background to their online classes. Parties and vacation backgrounds from other nations might be used for informal encounters with friends.
For a get-together with friends, users might choose a Hawaii theme or an office wall for business chats. You can create and save as many background photos as you want with Google Meet Green Screen. In addition to all of this, it offers a picture-in-picture (floating window) function that users can enable if desired.
How to use green screen for Google Meet: A guide
You can select a virtual background before beginning a meeting or during an ongoing video conversation. However, this feature is only available on the desktop currently. You can follow the steps given below to use the Green Screen for Google Meet.
Prior to a video call
- Go to Google Meet and select a meeting.
- Change the background of your self-view by clicking Change Background in the bottom right corner.
- Click Blur your background to totally blur your background.
- Click Somewhat blur your background to blur your background slightly.
- Click background to select a previously downloaded backdrop.
- Click Add to add your own image as a background.
- Click on Join Now.
During a video conference
- Click More at the bottom of the page.
- Select Change Background from the drop-down menu.
- Click Blur your background to totally blur your background.
- Click Somewhat blur your background to blur your background slightly.
- Click a background to select a previously downloaded backdrop.
- Click Add to add your own image as a background.
Extra Tips
How to Add Green Screen to Meeting Video
Prior to a video call
- Go to Google Meet and select a meeting.
- Change the background of your self-view by clicking Change Background in the bottom right corner. Click Blur your background to totally blur your background. …
- Click Add to add your own image as a background.
- Click on Join Now.
Filmora
If you’re just starting out with video editing, or just want a simple program that works, Wondershare Filmora might be what you’re looking for. It has the essential tools, and anyone can learn to use it easily.
Wondershare Filmora is the one of best video editing software with cool features that compares to other competing video editing Softwares. Many video editing programs claim to offer professional results; Filmora is one of a few consumer-level tools that actually delivers.
For Win 7 or later (64-bit)
For macOS 10.12 or later
Installation Steps
- Click the icon in the center of the Media Library to add files directly.
- Go File > Import Media > Import Media Files.
- Drag and drop to the Media Library directly.
While importing a media file, Wondershar Filmora may ask you if you wish to create a proxy file to accelerate the editing process. Select “Yes” to have a fast video editing experience.
You can also import video clips using your Touch Bar controls if your computer has Touch Bar.
Record a media file
Apart from the videos shot by your digital devices, you can also directly import media files by recording video from your webcam, capturing the computer screen, or recording a voice-over.
Record computer screen:
Click the “Record” option, and choose “Record PC Screen” to get the built-in Wondershare Screen Recorder. Hit the red button to get started. If you want to stop the recording, you can hit F9.
Record videos from webcam:
Also, click the “Record” option, and choose “Record from Webcam”. In the pop-up Video Recording window, click the red button to start recording and click it again to stop recording. Then click OK to save the recorded video file.
Record voice-over:
Choose “Record a voiceover” under the Record menu. It would be better to connect a microphone to your Mac for a better result. Hit the Record button, and it leaves you 3 seconds to get ready.
All the recorded media files will be saved into Media Library automatically and you can drag them to the Timeline for editing.
Conclusion
The zoom meeting green screen for Google background feature essentially allows users to display an image or a video in place of the actual background during video calls. The feature is especially helpful when you are video conferencing in a messy room. The feature is starting to gain popularity among users and is also available on WebEx for iOS. While Google Meet does not come with a built-in feature to blur or obscure the existing background while on camera, there are still ways you can do it. Luckily, there are a bunch of third-party tools that can build a virtual background for you without a green screen. One of the popular tools you can use is ChromaCam and can be configured in just a few minutes.
Boost Your Spirit: Creating Motivational Status Videos
The rise in social media’s popularity has brought about a fresh era of creating and enjoying content. Among this plethora of content, one category has managed to stand out prominently - motivational videos. These snippets of inspiration, often not more than a few minutes long, have become a staple of many users’ daily feeds. But what makes them so universally loved?
To begin with, let’s consider the times we live in. The modern world is fast-paced and filled with challenges and hurdles. This is where “motivational video status” or “motivation status video” comes into play. They serve as a brief pause, a moment of reflection, and a powerful jolt of motivation for many. They remind people of their worth, potential, and the strength they possess to overcome adversities. Plus, given their short length, they’re easily digestible, making them perfect for quick breaks.
Moreover, these videos are often shared during specific times of the year, such as the Republic Day. “Republic Day status videos,” for instance, fuse motivation with patriotism, making them a hit among the masses.
For content creators and marketers, the appeal lies in the sheer virality of these videos. A compelling “motivational status video download” can quickly gain traction, garnering thousands, if not millions, of views in a short span. With the right mix of powerful imagery, stirring words, and evocative music, these videos can resonate with a vast audience, driving engagement and shares.
Part 1: 6 Websites to Free Download Motivational Video Footage
Finding the right footage for crafting that perfect motivational video is crucial. The imagery must align with the message, ensuring it’s impactful. For those on the lookout, here are six renowned platforms where one can source high-quality footage for free or at a cost:
Adobe Stock
Adobe Stock is a treasure trove of high-quality videos. While it’s primarily a paid platform, the range and quality of clips available make it a top choice for professionals.
iStock
Another premium platform, iStock by Getty Images, offers a diverse collection of video clips. From breathtaking landscapes to poignant human moments, you’ll find a plethora of options here.
Shutterstock
Shutterstock is a household name in the world of digital media. With an extensive library, this platform provides clips that can cater to virtually any theme or mood you’re aiming for.
Videezy
For those on a budget, Videezy offers a mix of free and premium video clips. It’s a community-driven platform, so you’ll find a unique array of footage not available elsewhere.
Pixabay
Pixabay is an entirely free platform, making it perfect for beginners or those not looking to invest heavily. The site hosts a variety of footage, from nature scenes to urban landscapes.
Pexels
Similar to Pixabay, Pexels offers a rich collection of free video clips. With its user-friendly interface and diverse catalog, it’s a favorite among many content creators.
In essence, whether you’re crafting a “motivation status video download” for a broad audience or a personalized “motivational status video” for a niche group, these platforms have got you covered. Dive in, explore, and let your creativity flow!
Part 2: Using Filmora to Edit Motivational Video Footage
Filmora has steadily risen in popularity, becoming a go-to choice for many when it comes to video editing. Whether you have tons of experience or you’re just starting out in the world of video creation, Filmora provides a user-friendly interface along with a wide range of useful tools. Let’s delve into how you can use Filmora to craft that perfect “motivation status video.”
Step1 Importing Your Footage
Start by importing your selected motivational video footage from platforms like Pixabay, Pexels, or any of the previously mentioned sites. Exactly! Just click on the ‘Import’ button and choose the clips you’d like.
Step2 Trimming and Merging
Once imported, you may want to trim the videos or merge multiple clips to make your motivational status video coherent. Use Filmora’s easy drag-and-drop timeline for this purpose.
Step3 Adding Music
**”motivational video status”**without inspiring music is like a cake without frosting. Filmora boasts an extensive library of music tracks. Alternatively, import your own to perfectly match the tone of your video.
Step4 Text and Titles
If you’re aiming for a “Republic Day status videos”theme or any other, adding text or titles can amplify your message. Filmora offers a range of customizable text options, from sleek and professional to fun and quirky.
Create AI Captions For Win 7 or later(64-bit)
Create AI Captions For macOS 10.14 or later
Step5 Transitions and Effects
Give your**”motivation status video download”**a polished feel with smooth transitions between clips. Add effects like slow motion or color grading to enhance the visual appeal further.
Step6 Export and Share
Once satisfied, export your video in the desired format. With Filmora, you can also directly share your **”motivational status video download”**to various social media platforms, amplifying its reach.
Filmora’s versatility ensures that you not only create a compelling “motivation status video” but also enjoy the process. Its user-friendly tools are perfect for crafting videos that resonate and inspire.
Part 3: Summary
In the age of social media, where content is consumed voraciously, motivational videos have carved a unique niche. They inspire, uplift, and connect with audiences, offering solace in trying times or propelling one towards their goals. Platforms like Adobe Stock, iStock, and Shutterstock, among others, offer a goldmine of footage for crafting these videos. But the magic truly comes alive in the editing room.
Filmora, with its rich array of tools and features, stands out as an excellent choice for editing. Whether you’re crafting a poignant “Republic Day status video” or a general “motivation status video,” Filmora’s capabilities can help bring your vision to fruition.
While sourcing the right footage lays the foundation, it’s the editing that breathes life into a “motivational status video.” So, dive in, explore the world of video creation, and let your stories inspire the world.
Also read:
- Updated 2024 Approved Kdenlive Review – Is It The Best Video Editor?
- New In 2024, How To Make Split Screen Videos in Filmora
- In 2024, Best AR Video Apps
- New AVI Editors for Windows 11/10/8.1/8/7 Easily Edit AVI Files on PC
- Updated 5 Tools to Create a Time-Lapse Video Online
- Updated In 2024, How to Edit A Time Lapse Video on iPhone?
- New Best Guide of 8 Photo Collage Apps for PC for 2024
- New 10 Best Voice Over Generators Windows, Mac, Android, iPhone, and Online
- Updated Easily Combine Videos and Audios with 5 Simple Online Tools
- 2024 Approved How to Remove Background From a Video in Premier Pro
- New 2024 Approved How to Polish Your Music Video Edits Using Filmora
- 2024 Approved How to Set Up Twitch Green Screen
- New In 2024, Find The Best Free Canon LUTs
- In 2024, Replace Sky Background in Video Figuring Out the Best Options
- Updated Easy Way to Create a DIY Green Screen Video Effect
- New What Are the 10 Best GIF Creator?
- Updated How to Find a High-Quality Video Marketing Agency for 2024
- New Backup and Organize Your Tons of Footage in Minutes for 2024
- New Video Inspiration for Birthday Slideshow for 2024
- Updated 10 BEST TEXT TO SPEECH VIDEO MAKERS
- 2024 Approved FLV Editor for Windows 11/10/8.1/8/7 Easily Edit FLV Videos on PC
- Updated In 2024, How to Convert Images Into Video - Kapwing Tutorial
- Easiest Fix Included! Top 5 Ways to Convert HDR to SDR Videos for 2024
- How to Make Video Slow Motion? Complete Guide for 2024
- New Detailed Tutorial to Merge Videos in VLC Media Player
- Updated Top 5 Apps To Add Song To Video
- Here Is a Step-by-Step Guide to Color Correct and Color Grade a Video Professionally with Wondershare Filmora. Lets Get Going for 2024
- Updated How To Brighten Video In Premiere Pro | Step By Step Guide
- In 2024, Discover the Best Video Frame Rate Converters for Smooth Playback, Including Online and Offline Options. Learn How to Convert Frame Rates for Free and Elevate Your Video Quality with These Top 8 Tools
- In 2024, How to Use Canva Color Match
- New 2024 Approved Add Camera Shake to Video in Adobe After Effects
- 2024 Approved Merging Videos Like a Pro A Step-by-Step Guide to Use FFmpeg
- New In 2024, Step by Step to Cut Video in Adobe Premiere Pro
- New 2024 Approved What Is AI Composite Video App and AI Composite Video Tutorial
- Convert Slow Motion Videos to Regular Videos in Your iOS Device |A How
- In 2024, How Can You Create Outstanding Educational Teaching Videos?
- In 2024, Camtasia Vs Captivate Which Is Better
- New The Right Ways to Slow Down a Video on iPhone
- Updated How to Uue Adobe Lightroom Color Grading
- Updated Learn About some of the Best Photo Collage with Music Tools
- Updated 2024 Approved Spooky Halloween with the Best 15+ Halloween Countdown Video Clips
- New In 2024, Create Your Slow Zoom TikTok in Minutes
- In 2024, Can I Bypass a Forgotten Phone Password Of Xiaomi 13T Pro?
- How to fix iCloud lock from your Apple iPhone 12 mini and iPad
- In 2024, How PGSharp Save You from Ban While Spoofing Pokemon Go On Motorola Edge+ (2023)? | Dr.fone
- Updated In 2024, Must-Read Top 10 AI Realistic Avatar Generators
- How to Unlock Xiaomi Civi 3 Disney 100th Anniversary Edition Phone Password Without Factory Reset?
- In 2024, Best Ways on How to Unlock/Bypass/Swipe/Remove Infinix Note 30i Fingerprint Lock
- How to Unlock Apple ID Activation Lock From iPhone 14?
- In 2024, Sim Unlock Vivo V29e Phones without Code 2 Ways to Remove Android Sim Lock
- Full Guide to Unlock Your Infinix Hot 40 Pro
- Set Your Preferred Job Location on LinkedIn App of your Oppo Find X7 | Dr.fone
- 6 Solutions to Fix Error 505 in Google Play Store on Xiaomi Redmi Note 12R | Dr.fone
- Edit and Send Fake Location on Telegram For your Realme 11 Pro+ in 3 Ways | Dr.fone
- 6 Solutions to Fix Error 505 in Google Play Store on Vivo Y100i | Dr.fone
- How to Unlock Apple ID From your iPhone 13 Pro Max without Security Questions?
- Title: New How to Add Text to Video for 2024
- Author: Chloe
- Created at : 2024-06-09 16:15:17
- Updated at : 2024-06-10 16:15:17
- Link: https://ai-editing-video.techidaily.com/new-how-to-add-text-to-video-for-2024/
- License: This work is licensed under CC BY-NC-SA 4.0.

