
Quickest Guide | Zoom In and Out on Snapchat for 2024

Quickest Guide | Zoom In and Out on Snapchat
Abundant Video Effects - Wondershare Filmora
Provide abundant video effects - A creative video editor
Powerful color correction and grading
Detailed tutorials are provided by the official channel
People make Snapchat videos for various purposes, such as capturing beautiful natural scenery or a funny video of a friend. To capture the details or to focus on a specific part, the zoom in and out feature is commonly used. By doing so, you can manually focus on a particular area clearly with your fingers.
The following article will focus on how to zoom in on Snapchat by offering detailed and easy steps. Moreover, we will suggest a powerful tool that can help you in zooming in and out on Snapchat flawlessly, along with additional distinct features.
In this article
Part 1: How to Zoom In and Out a Video on Snapchat While Recording?
Part 2: How to Zoom In and Out a Pre-Recorded Video on Snapchat?
Part 3: How to Zoom In and Zoom Out Videos using Wondershare Filmora?
Part 1: How to Zoom In and Out a Video on Snapchat While Recording?
In this section, we will provide you with two methods of how to zoom in and out on Snapchat videos instantly:
Method 1: Without Locking Snapchat Recorder
Step 1: Start by opening your Snapchat from on your mobile device to access the camera screen for recording a video. Now, start capturing the video by holding the center red button from the middle of your screen.

Step 2: While holding the center recording button, use your finger and slide it in the upward direction to zoom in.
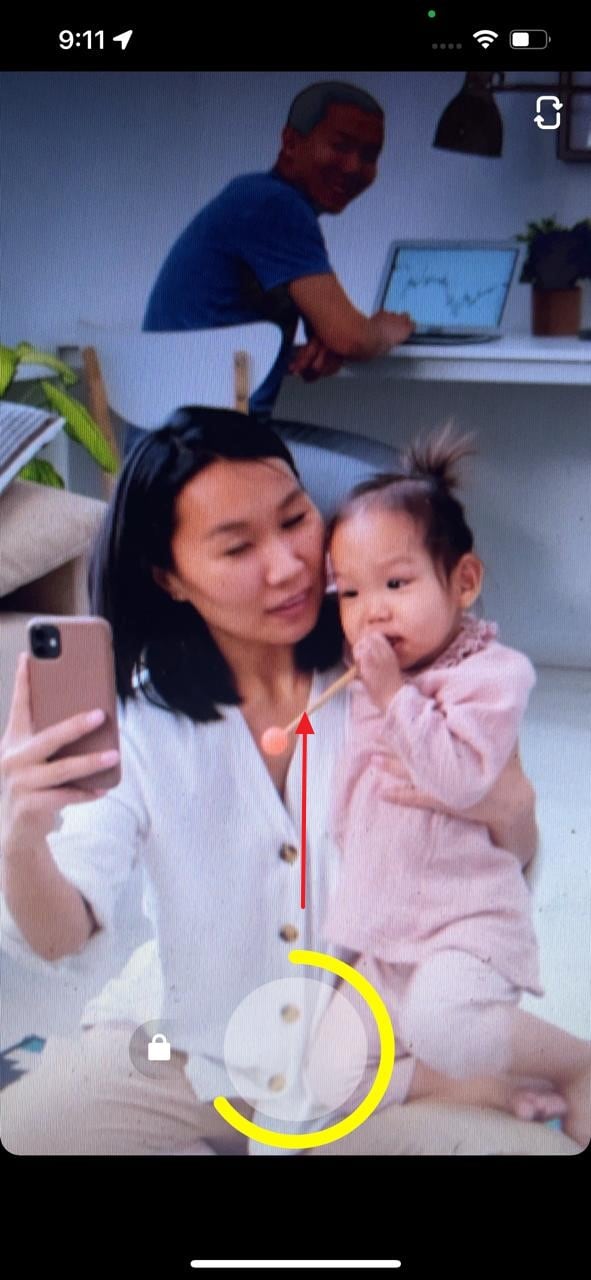
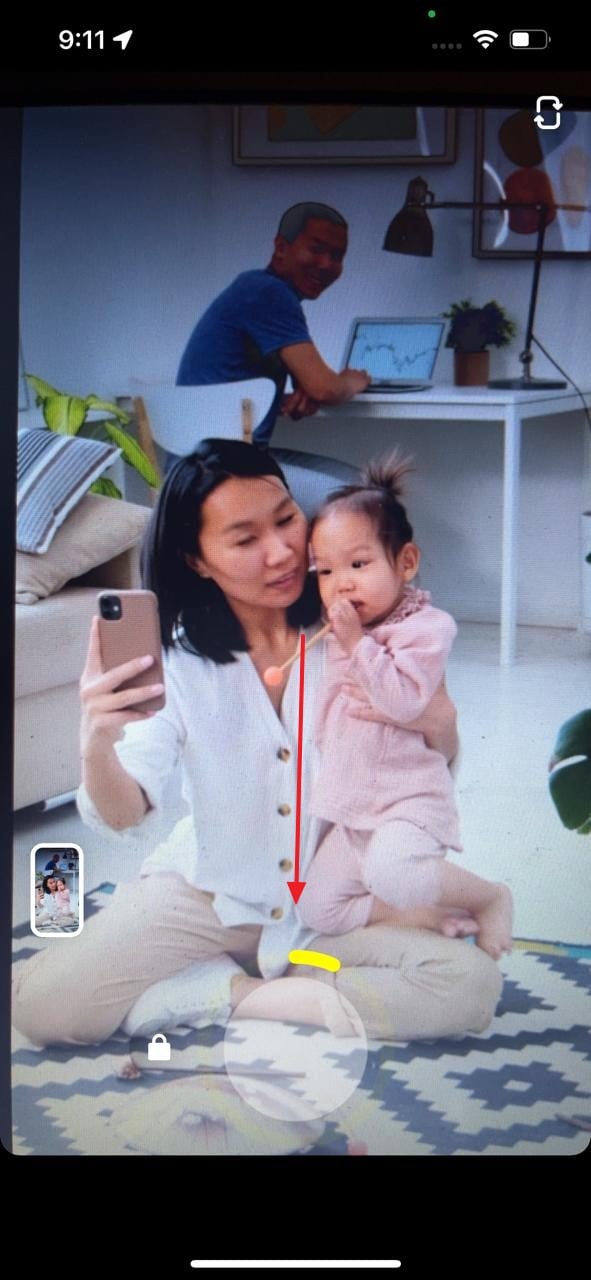
Step 3: To zoom out, use the same finger by sliding it to the bottom direction. Once done, leave the recording button by removing your finger to finish the recording. Now you can save the recorded video on Snapchat.
Method 2: By Using the Snapchat Lock Feature
Step 1: Begin with opening your Snapchat account and stay on your camera screen to record the video. Now start the recording by holding the center red button from your displayed screen.
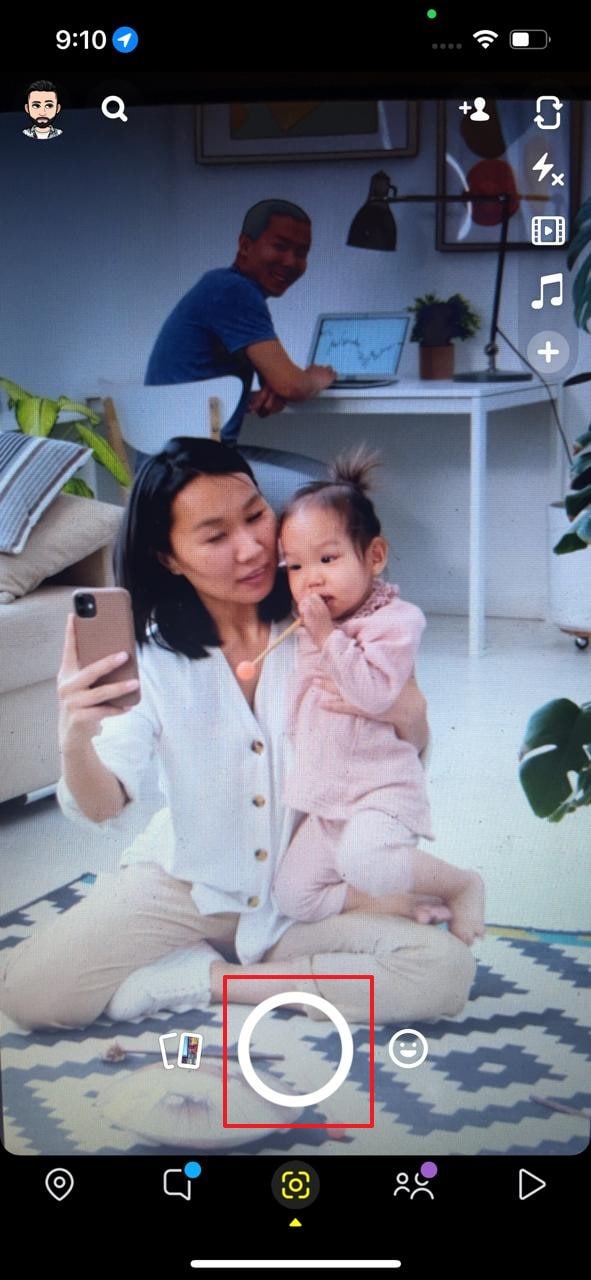
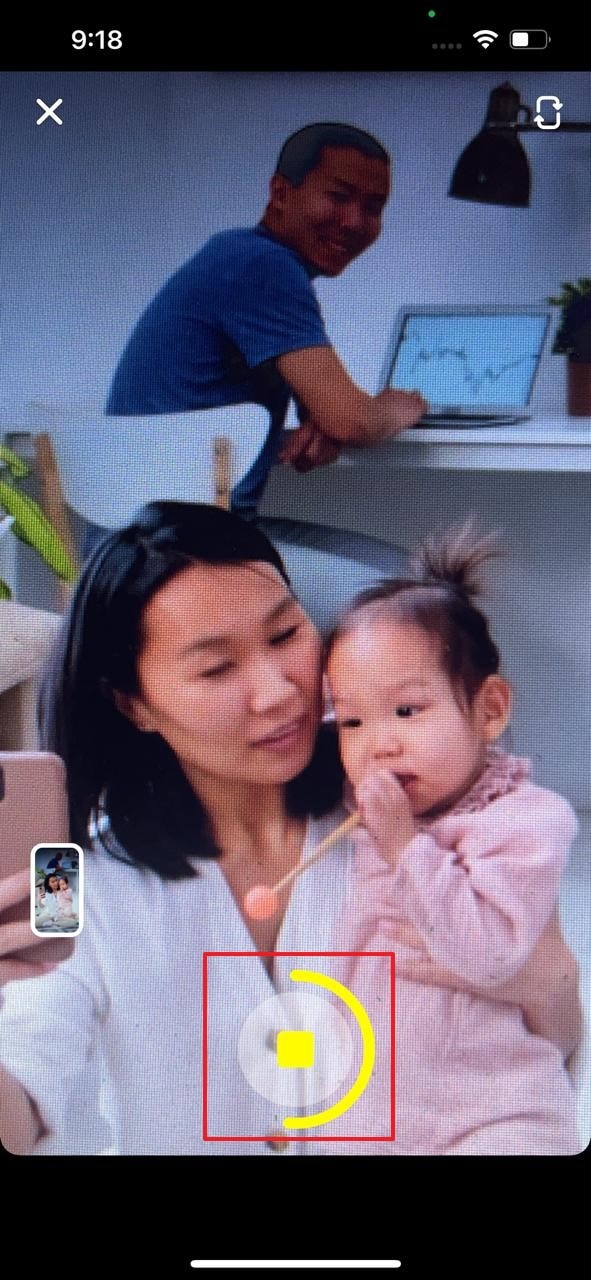
Step 2: To “Lock” the recording, move your finger towards the left side, after which you can see the padlock icon on your screen.
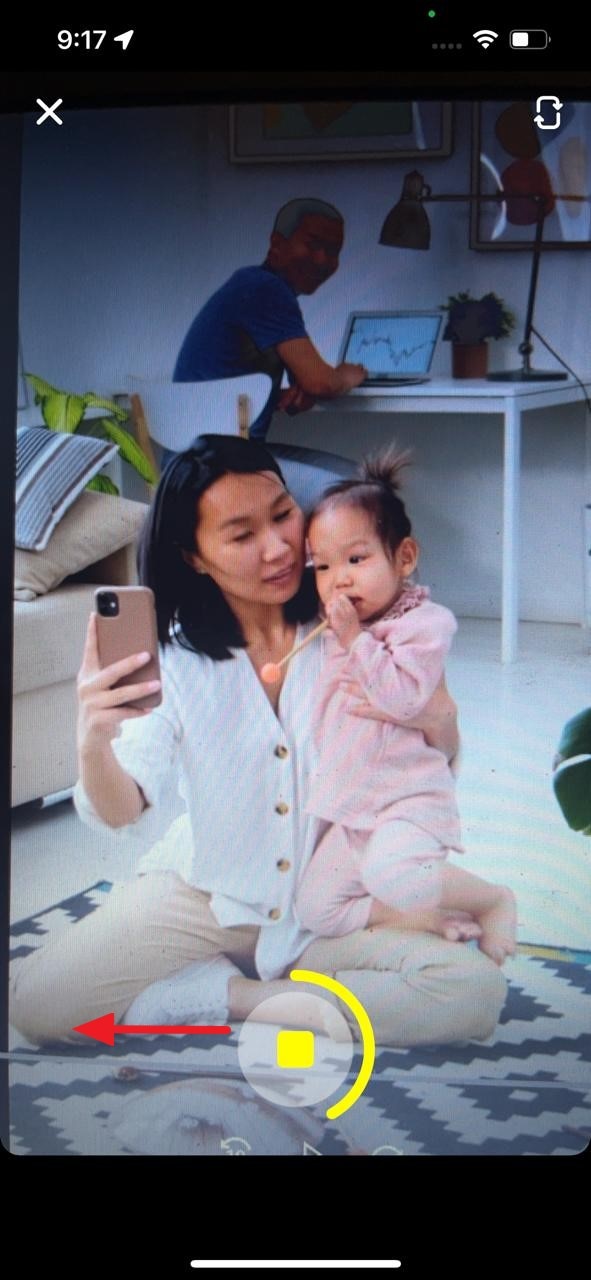
Step 3: After recording the video is locked, use your two fingers simultaneously and move them apart to zoom in on the specific part. Conversely, for zooming out, use your two fingers and move them in an inward direction.
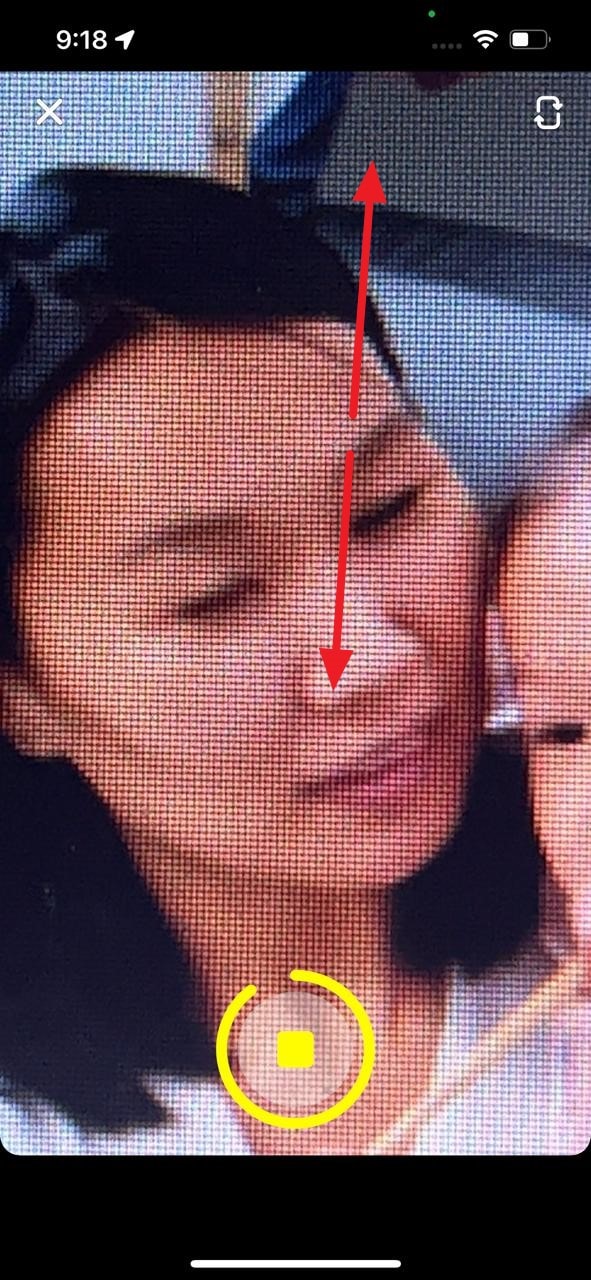
Step 4: To finalize the recording, simply tap on the recording icon, and the recording will stop. You can now edit your snap and send it to your friends or post it on your Snapchat.
Part 2: How to Zoom In and Out a Pre-Recorded Video on Snapchat?
In this section, we will offer detailed steps on how to zoom in and out on Snapchat with pre-recorded videos:
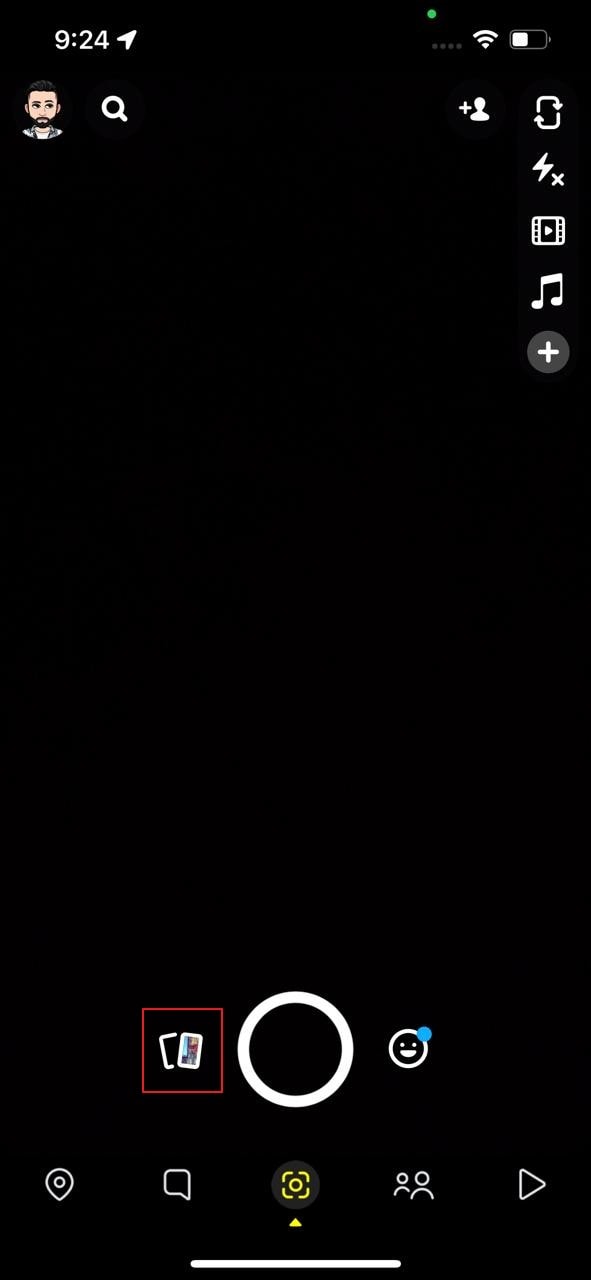
Step 1: Open your Snapchat from your smartphone and then tap on the icon showing on the left side depicting “Two Mobiles Overlapping Each Other.” From this icon, navigate to your “Camera Roll.”
Step 2: From your camera roll, choose the video you want to edit. Then click on the “Pencil” icon by going to the bottom left corner to zoom in and out on your video.

Step 3: On the next screen, you will see various editing options on the right side. Select the second last option, which is for cropping and can be used to zoom in on the videos.

Step 4: By using this selected option, you can zoom in and out on the video according to your preference. Just use your two fingers and place them on the screen. To zoom in, stretch the fingers and move them apart and control the zoom value manually.
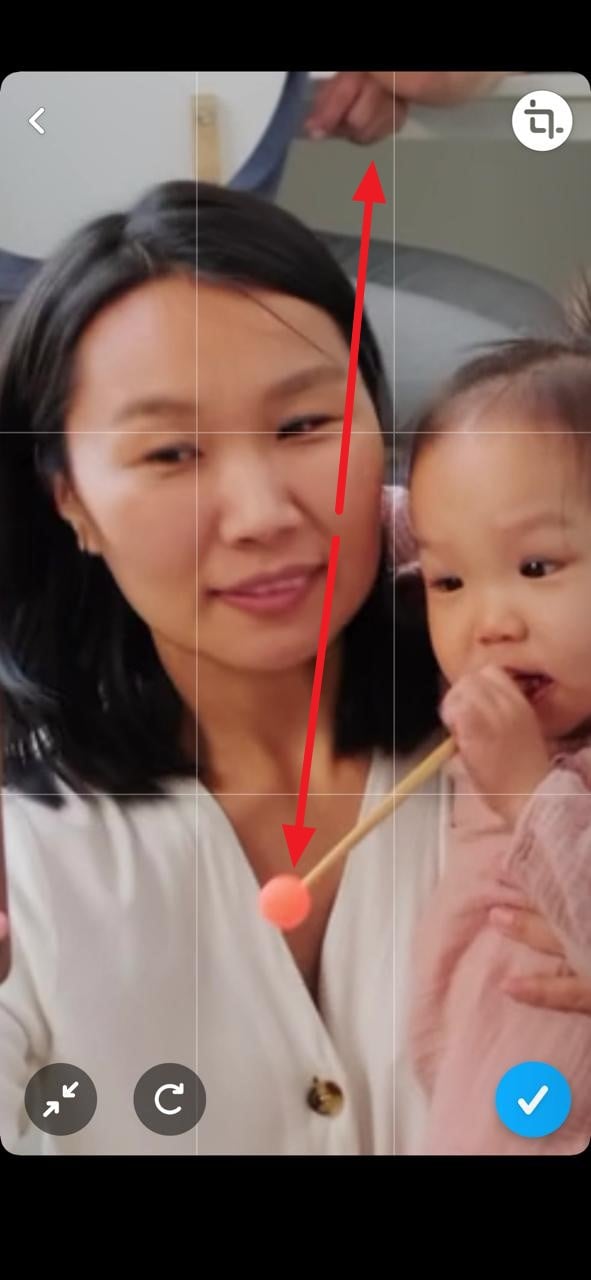
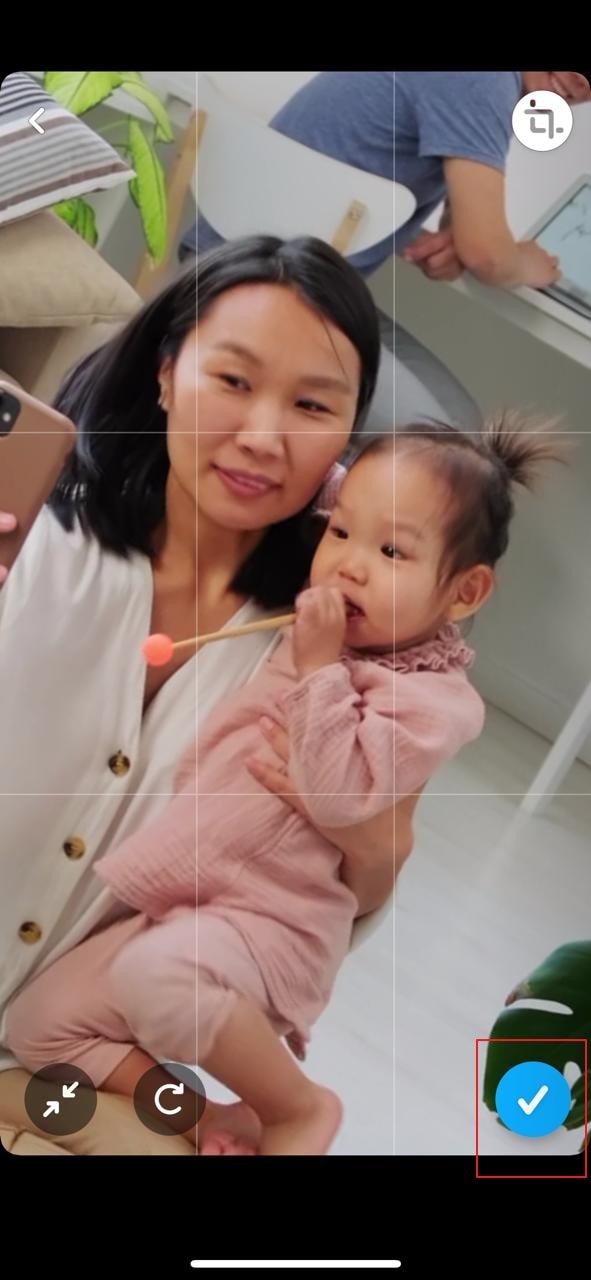
Step 5: For zooming out, move the fingers in an inward direction. Once done with all the changes, tap on the “Tick” button. Afterward, click on the “Done” option and save the changes by tapping on “Save Changes.”
Part 3: How to Zoom In and Zoom Out Videos using Wondershare Filmora?
If you are finding it difficult how to zoom in on Snapchat effortlessly, we will recommend Wondershare Filmora as a complete toolbox for editing videos. Through this tool, you can not only flawlessly zoom in on the multiple Snapchat videos but can also perform various editing functions. The user interface is specially designed in a way to assist beginners in executing the editing process.
You can take advantage of tons of advanced features in Filmora like auto reframing, video effects, transitions, and instant mode. The user interface is so simple that within seconds you can zoom in and out on any video perfectly.
Collectively, this tool functions as a complete professional toolbox for video editing and does not require technical experience or additional tools. Steps to Zoom In and Out through Wondershare Filmora:
Step 1: Select New Project
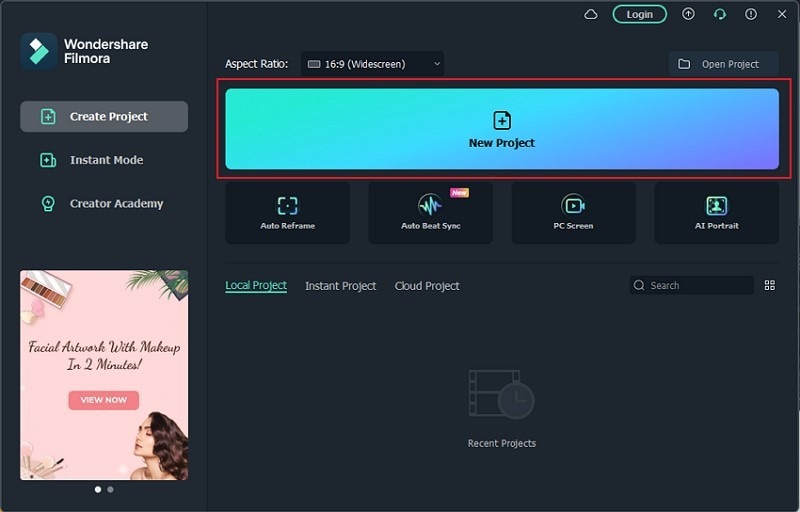
Begin with launching Wondershare Filmora on your computer and click to open its user interface. Afterward, tap on the option “New Project” to continue with the process.
Step 2: Import your Snapchat Video
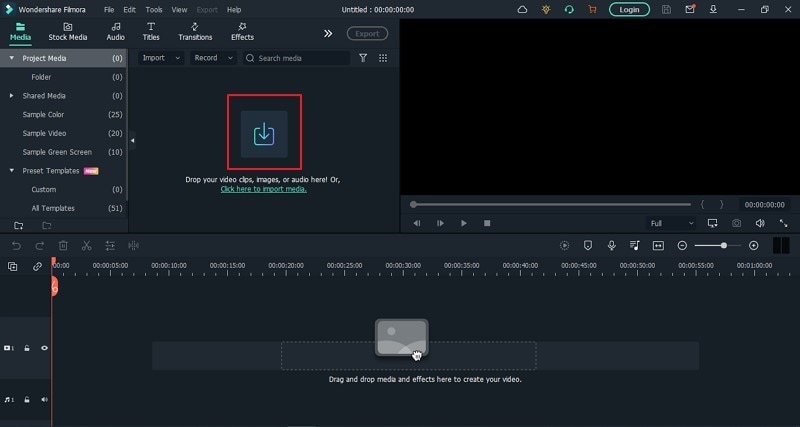
On the new window, click on the icon of the “Arrowhead” to import the video on this tool. Once done with uploading the video, drag the video to the timeline of this tool.
Step 3: Go to Transitions Tab
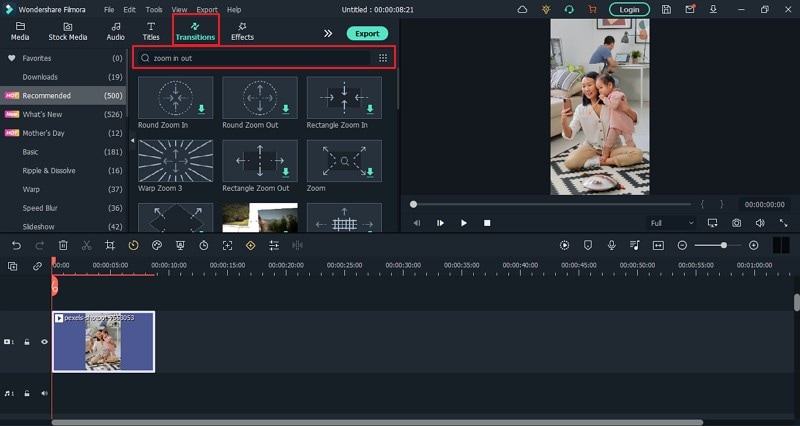
From the tabs displayed on the left side, navigate to the “Transitions” tab by clicking on them. On its search box, type “Zoom In Out,” and the tool will automatically fetch transitions related to it.
Step 4: Choose Transitions
From the displayed transitions, select any transition of your choice. Apply the transition to your video by dragging it to the video available on the timeline.
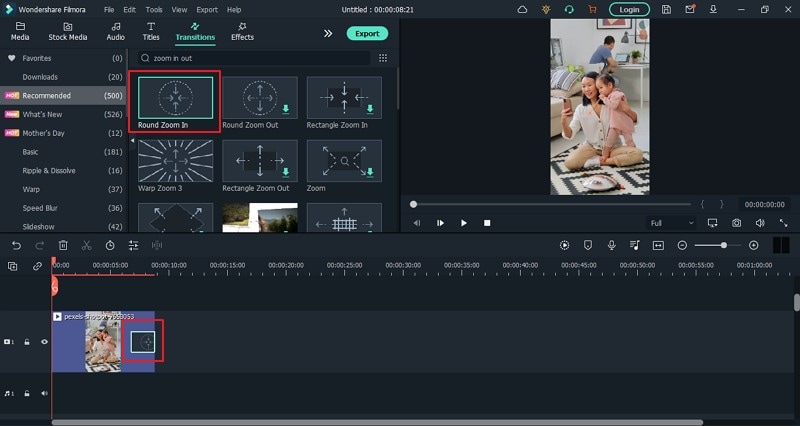
Step 5: Preview the video
If you find the results satisfactory in the preview window, tap on the “Export” button displayed on top and save the video on your computer.
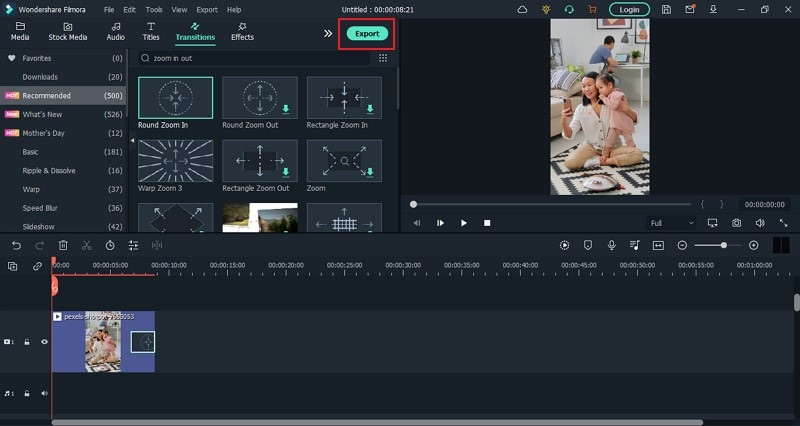
Conclusion
Snapchat videos are highly popular due to their high-quality results and features. However, if you are struggling to focus on certain parts while recording a video through Snapchat, this article has offered a well-structured guide on how to zoom in and out on Snapchat quickly. If you are finding manual methods confusing, you can rely on the top-notch tool called Wondershare Filmora for Snapchat zoomed in.
People make Snapchat videos for various purposes, such as capturing beautiful natural scenery or a funny video of a friend. To capture the details or to focus on a specific part, the zoom in and out feature is commonly used. By doing so, you can manually focus on a particular area clearly with your fingers.
The following article will focus on how to zoom in on Snapchat by offering detailed and easy steps. Moreover, we will suggest a powerful tool that can help you in zooming in and out on Snapchat flawlessly, along with additional distinct features.
In this article
Part 1: How to Zoom In and Out a Video on Snapchat While Recording?
Part 2: How to Zoom In and Out a Pre-Recorded Video on Snapchat?
Part 3: How to Zoom In and Zoom Out Videos using Wondershare Filmora?
Part 1: How to Zoom In and Out a Video on Snapchat While Recording?
In this section, we will provide you with two methods of how to zoom in and out on Snapchat videos instantly:
Method 1: Without Locking Snapchat Recorder
Step 1: Start by opening your Snapchat from on your mobile device to access the camera screen for recording a video. Now, start capturing the video by holding the center red button from the middle of your screen.

Step 2: While holding the center recording button, use your finger and slide it in the upward direction to zoom in.

Step 3: To zoom out, use the same finger by sliding it to the bottom direction. Once done, leave the recording button by removing your finger to finish the recording. Now you can save the recorded video on Snapchat.

Method 2: By Using the Snapchat Lock Feature
Step 1: Begin with opening your Snapchat account and stay on your camera screen to record the video. Now start the recording by holding the center red button from your displayed screen.

Step 2: To “Lock” the recording, move your finger towards the left side, after which you can see the padlock icon on your screen.

Step 3: After recording the video is locked, use your two fingers simultaneously and move them apart to zoom in on the specific part. Conversely, for zooming out, use your two fingers and move them in an inward direction.

Step 4: To finalize the recording, simply tap on the recording icon, and the recording will stop. You can now edit your snap and send it to your friends or post it on your Snapchat.

Part 2: How to Zoom In and Out a Pre-Recorded Video on Snapchat?
In this section, we will offer detailed steps on how to zoom in and out on Snapchat with pre-recorded videos:
Step 1: Open your Snapchat from your smartphone and then tap on the icon showing on the left side depicting “Two Mobiles Overlapping Each Other.” From this icon, navigate to your “Camera Roll.”

Step 2: From your camera roll, choose the video you want to edit. Then click on the “Pencil” icon by going to the bottom left corner to zoom in and out on your video.

Step 3: On the next screen, you will see various editing options on the right side. Select the second last option, which is for cropping and can be used to zoom in on the videos.

Step 4: By using this selected option, you can zoom in and out on the video according to your preference. Just use your two fingers and place them on the screen. To zoom in, stretch the fingers and move them apart and control the zoom value manually.

Step 5: For zooming out, move the fingers in an inward direction. Once done with all the changes, tap on the “Tick” button. Afterward, click on the “Done” option and save the changes by tapping on “Save Changes.”

Part 3: How to Zoom In and Zoom Out Videos using Wondershare Filmora?
If you are finding it difficult how to zoom in on Snapchat effortlessly, we will recommend Wondershare Filmora as a complete toolbox for editing videos. Through this tool, you can not only flawlessly zoom in on the multiple Snapchat videos but can also perform various editing functions. The user interface is specially designed in a way to assist beginners in executing the editing process.
You can take advantage of tons of advanced features in Filmora like auto reframing, video effects, transitions, and instant mode. The user interface is so simple that within seconds you can zoom in and out on any video perfectly.
Collectively, this tool functions as a complete professional toolbox for video editing and does not require technical experience or additional tools. Steps to Zoom In and Out through Wondershare Filmora:
Step 1: Select New Project
Begin with launching Wondershare Filmora on your computer and click to open its user interface. Afterward, tap on the option “New Project” to continue with the process.

Step 2: Import your Snapchat Video
On the new window, click on the icon of the “Arrowhead” to import the video on this tool. Once done with uploading the video, drag the video to the timeline of this tool.

Step 3: Go to Transitions Tab
From the tabs displayed on the left side, navigate to the “Transitions” tab by clicking on them. On its search box, type “Zoom In Out,” and the tool will automatically fetch transitions related to it.

Step 4: Choose Transitions
From the displayed transitions, select any transition of your choice. Apply the transition to your video by dragging it to the video available on the timeline.

Step 5: Preview the video
If you find the results satisfactory in the preview window, tap on the “Export” button displayed on top and save the video on your computer.

Conclusion
Snapchat videos are highly popular due to their high-quality results and features. However, if you are struggling to focus on certain parts while recording a video through Snapchat, this article has offered a well-structured guide on how to zoom in and out on Snapchat quickly. If you are finding manual methods confusing, you can rely on the top-notch tool called Wondershare Filmora for Snapchat zoomed in.
People make Snapchat videos for various purposes, such as capturing beautiful natural scenery or a funny video of a friend. To capture the details or to focus on a specific part, the zoom in and out feature is commonly used. By doing so, you can manually focus on a particular area clearly with your fingers.
The following article will focus on how to zoom in on Snapchat by offering detailed and easy steps. Moreover, we will suggest a powerful tool that can help you in zooming in and out on Snapchat flawlessly, along with additional distinct features.
In this article
Part 1: How to Zoom In and Out a Video on Snapchat While Recording?
Part 2: How to Zoom In and Out a Pre-Recorded Video on Snapchat?
Part 3: How to Zoom In and Zoom Out Videos using Wondershare Filmora?
Part 1: How to Zoom In and Out a Video on Snapchat While Recording?
In this section, we will provide you with two methods of how to zoom in and out on Snapchat videos instantly:
Method 1: Without Locking Snapchat Recorder
Step 1: Start by opening your Snapchat from on your mobile device to access the camera screen for recording a video. Now, start capturing the video by holding the center red button from the middle of your screen.

Step 2: While holding the center recording button, use your finger and slide it in the upward direction to zoom in.

Step 3: To zoom out, use the same finger by sliding it to the bottom direction. Once done, leave the recording button by removing your finger to finish the recording. Now you can save the recorded video on Snapchat.

Method 2: By Using the Snapchat Lock Feature
Step 1: Begin with opening your Snapchat account and stay on your camera screen to record the video. Now start the recording by holding the center red button from your displayed screen.

Step 2: To “Lock” the recording, move your finger towards the left side, after which you can see the padlock icon on your screen.

Step 3: After recording the video is locked, use your two fingers simultaneously and move them apart to zoom in on the specific part. Conversely, for zooming out, use your two fingers and move them in an inward direction.

Step 4: To finalize the recording, simply tap on the recording icon, and the recording will stop. You can now edit your snap and send it to your friends or post it on your Snapchat.

Part 2: How to Zoom In and Out a Pre-Recorded Video on Snapchat?
In this section, we will offer detailed steps on how to zoom in and out on Snapchat with pre-recorded videos:
Step 1: Open your Snapchat from your smartphone and then tap on the icon showing on the left side depicting “Two Mobiles Overlapping Each Other.” From this icon, navigate to your “Camera Roll.”

Step 2: From your camera roll, choose the video you want to edit. Then click on the “Pencil” icon by going to the bottom left corner to zoom in and out on your video.

Step 3: On the next screen, you will see various editing options on the right side. Select the second last option, which is for cropping and can be used to zoom in on the videos.

Step 4: By using this selected option, you can zoom in and out on the video according to your preference. Just use your two fingers and place them on the screen. To zoom in, stretch the fingers and move them apart and control the zoom value manually.

Step 5: For zooming out, move the fingers in an inward direction. Once done with all the changes, tap on the “Tick” button. Afterward, click on the “Done” option and save the changes by tapping on “Save Changes.”

Part 3: How to Zoom In and Zoom Out Videos using Wondershare Filmora?
If you are finding it difficult how to zoom in on Snapchat effortlessly, we will recommend Wondershare Filmora as a complete toolbox for editing videos. Through this tool, you can not only flawlessly zoom in on the multiple Snapchat videos but can also perform various editing functions. The user interface is specially designed in a way to assist beginners in executing the editing process.
You can take advantage of tons of advanced features in Filmora like auto reframing, video effects, transitions, and instant mode. The user interface is so simple that within seconds you can zoom in and out on any video perfectly.
Collectively, this tool functions as a complete professional toolbox for video editing and does not require technical experience or additional tools. Steps to Zoom In and Out through Wondershare Filmora:
Step 1: Select New Project
Begin with launching Wondershare Filmora on your computer and click to open its user interface. Afterward, tap on the option “New Project” to continue with the process.

Step 2: Import your Snapchat Video
On the new window, click on the icon of the “Arrowhead” to import the video on this tool. Once done with uploading the video, drag the video to the timeline of this tool.

Step 3: Go to Transitions Tab
From the tabs displayed on the left side, navigate to the “Transitions” tab by clicking on them. On its search box, type “Zoom In Out,” and the tool will automatically fetch transitions related to it.

Step 4: Choose Transitions
From the displayed transitions, select any transition of your choice. Apply the transition to your video by dragging it to the video available on the timeline.

Step 5: Preview the video
If you find the results satisfactory in the preview window, tap on the “Export” button displayed on top and save the video on your computer.

Conclusion
Snapchat videos are highly popular due to their high-quality results and features. However, if you are struggling to focus on certain parts while recording a video through Snapchat, this article has offered a well-structured guide on how to zoom in and out on Snapchat quickly. If you are finding manual methods confusing, you can rely on the top-notch tool called Wondershare Filmora for Snapchat zoomed in.
People make Snapchat videos for various purposes, such as capturing beautiful natural scenery or a funny video of a friend. To capture the details or to focus on a specific part, the zoom in and out feature is commonly used. By doing so, you can manually focus on a particular area clearly with your fingers.
The following article will focus on how to zoom in on Snapchat by offering detailed and easy steps. Moreover, we will suggest a powerful tool that can help you in zooming in and out on Snapchat flawlessly, along with additional distinct features.
In this article
Part 1: How to Zoom In and Out a Video on Snapchat While Recording?
Part 2: How to Zoom In and Out a Pre-Recorded Video on Snapchat?
Part 3: How to Zoom In and Zoom Out Videos using Wondershare Filmora?
Part 1: How to Zoom In and Out a Video on Snapchat While Recording?
In this section, we will provide you with two methods of how to zoom in and out on Snapchat videos instantly:
Method 1: Without Locking Snapchat Recorder
Step 1: Start by opening your Snapchat from on your mobile device to access the camera screen for recording a video. Now, start capturing the video by holding the center red button from the middle of your screen.

Step 2: While holding the center recording button, use your finger and slide it in the upward direction to zoom in.

Step 3: To zoom out, use the same finger by sliding it to the bottom direction. Once done, leave the recording button by removing your finger to finish the recording. Now you can save the recorded video on Snapchat.

Method 2: By Using the Snapchat Lock Feature
Step 1: Begin with opening your Snapchat account and stay on your camera screen to record the video. Now start the recording by holding the center red button from your displayed screen.

Step 2: To “Lock” the recording, move your finger towards the left side, after which you can see the padlock icon on your screen.

Step 3: After recording the video is locked, use your two fingers simultaneously and move them apart to zoom in on the specific part. Conversely, for zooming out, use your two fingers and move them in an inward direction.

Step 4: To finalize the recording, simply tap on the recording icon, and the recording will stop. You can now edit your snap and send it to your friends or post it on your Snapchat.

Part 2: How to Zoom In and Out a Pre-Recorded Video on Snapchat?
In this section, we will offer detailed steps on how to zoom in and out on Snapchat with pre-recorded videos:
Step 1: Open your Snapchat from your smartphone and then tap on the icon showing on the left side depicting “Two Mobiles Overlapping Each Other.” From this icon, navigate to your “Camera Roll.”

Step 2: From your camera roll, choose the video you want to edit. Then click on the “Pencil” icon by going to the bottom left corner to zoom in and out on your video.

Step 3: On the next screen, you will see various editing options on the right side. Select the second last option, which is for cropping and can be used to zoom in on the videos.

Step 4: By using this selected option, you can zoom in and out on the video according to your preference. Just use your two fingers and place them on the screen. To zoom in, stretch the fingers and move them apart and control the zoom value manually.

Step 5: For zooming out, move the fingers in an inward direction. Once done with all the changes, tap on the “Tick” button. Afterward, click on the “Done” option and save the changes by tapping on “Save Changes.”

Part 3: How to Zoom In and Zoom Out Videos using Wondershare Filmora?
If you are finding it difficult how to zoom in on Snapchat effortlessly, we will recommend Wondershare Filmora as a complete toolbox for editing videos. Through this tool, you can not only flawlessly zoom in on the multiple Snapchat videos but can also perform various editing functions. The user interface is specially designed in a way to assist beginners in executing the editing process.
You can take advantage of tons of advanced features in Filmora like auto reframing, video effects, transitions, and instant mode. The user interface is so simple that within seconds you can zoom in and out on any video perfectly.
Collectively, this tool functions as a complete professional toolbox for video editing and does not require technical experience or additional tools. Steps to Zoom In and Out through Wondershare Filmora:
Step 1: Select New Project
Begin with launching Wondershare Filmora on your computer and click to open its user interface. Afterward, tap on the option “New Project” to continue with the process.

Step 2: Import your Snapchat Video
On the new window, click on the icon of the “Arrowhead” to import the video on this tool. Once done with uploading the video, drag the video to the timeline of this tool.

Step 3: Go to Transitions Tab
From the tabs displayed on the left side, navigate to the “Transitions” tab by clicking on them. On its search box, type “Zoom In Out,” and the tool will automatically fetch transitions related to it.

Step 4: Choose Transitions
From the displayed transitions, select any transition of your choice. Apply the transition to your video by dragging it to the video available on the timeline.

Step 5: Preview the video
If you find the results satisfactory in the preview window, tap on the “Export” button displayed on top and save the video on your computer.

Conclusion
Snapchat videos are highly popular due to their high-quality results and features. However, if you are struggling to focus on certain parts while recording a video through Snapchat, this article has offered a well-structured guide on how to zoom in and out on Snapchat quickly. If you are finding manual methods confusing, you can rely on the top-notch tool called Wondershare Filmora for Snapchat zoomed in.
How Can You Get VHS Filter and Glitch Filter to Your Images or Videos?
A glitch in the video or an image gives the notion of an error in the video recording process, and it was not accepted in the media industry. However, presently, creative professionals are incorporating the VHS filters to give a vintage impression. The visual distortions are used by gamers and streaming creators extensively.
For this very reason, the article discusses the procedure to create a glitch filter in Photoshop, Instagram, TikTok, and in one of your impeccable travel videos. Time to start!
In this article
01 How to Make VHS Filter in Photoshop?
02 How to Get VHS Filter in Instagram?
03 How to Get VHS Filter in TikTok?
04 How to Add VHS Effects to your Travel Video?
Part 1: How to Make VHS Filter in Photoshop?
There are a lot of steps associated with VHS filter Photoshop. The procedure can be tricky for a beginner in the industry. Therefore, we have sketched out a guide to make a VHS image filter in Photoshop. Follow it carefully to have desirable results.
Step 1: Open Photoshop
Open Photoshop from your computer and click on “New.” Use the “Custom” option from the windows that appear. After that, click on “File” and launch the imagery. Drag and drop that picture to the customized workspace.

Step 2: Apply the Transformation
Head to the “Edit” from the top panel and press “Transform” from there. Click on “Scale” from the context menu. The user is recommended to set the scale as required using arrows from the mouse. After that, apply the transformation.

Step 3: Changing the Parameters
Now, right-click on your layer to click on “Brightness and Contrast.” Change it as you need. After that, move on to the “Curves” and play with the graphs of the picture. Change the “Solid Color” as well. Make the color white and change the opacity levels.

Step 4: Adding Noise
Moving on, click on the first layer and navigate to the “Filter” bar on the top of the interface. Hit “Noise” and then “Add Noise.” Make the necessary changes as you like and press “Enter.” Scroll up to the “File” and hit “Open Recent” to launch the VHS texture photo. Drag and drop the texture to the photo layer that we are working on.

Step 5: Inserting VHS Texture
Resize the VHS texture and then apply the transformation. By default, the blend mode is “Normal.” Change it to “Darken” from the right panel. The picture will get dark. Again, change the mode to “Screen.” Moving on, input another VHS Filter texture and drag and drop it to the layer we are working on. Resize it and apply the transformation.

Step 6: Altering the Blend Mode
Alter the blend mode to “Darker” and then to “Screen.” Apply another filter and then drag and drop the layer. Change the blend mode to “Screen.” Pick up the eraser from the left panel of tools and make necessary edits.

Step 7: Duplicating the Layer
Duplicate the photo layer and move it up. Again, click on “Filter” then “Noise” to add the noise as needed. Alter the blend mode to “Soft Light” and set the opacity value. After that, add any solid color and switch the blend mode back to Soft Light.

Step 8: Playing with the Layers
Duplicate the layer again to change the color. After that, double click the layer and deselect “R.” Move to left or right. Perform the same procedure for the rest of the layers. Use the erase tool to offer fine imprinting to the transition. Duplicate the final layer and deselect “R” and “C.” Move left and right.

Step 9: Final Process
Use the eraser tool one last time, and you are done with the VCR filter.
Part 2: How to Get VHS Filter in Instagram?
Now that you know how to add glitch filter Photoshop let us move on to Instagram. The sub-section of this write-up shall focus on VHS filter Instagram. If you are an Instagram user wishing to get a retro VHS filter, follow our lead.
Step 1: Finding the Filters
The first step revolves around clicking on the Instagram app to open it. Navigate to the “Story.” The user will find a number of filters in the top panel along a circle.

Step 2: Picking the Vintage Filter
Swipe right towards those filters until a “Search” option is seen. Type “Vintage DV” and press “Enter,” where several VHS video filters will be displayed. Pick one and save it to your camera roll.

Step 3: Using the VHS Filter
Head back to the “Story” and select the “Effects” option. Select the filter that you saved and initiate the recording process. You have got the VHS filter for videos.

Part 3: How to Get VHS Filter in TikTok?
The following section of the write-up shall highlight finding and getting the 90s VHS filter in TikTok. So, what are we waiting for? Let us start the procedure.
Find the VHS Filter in TikTok
Step 1: Navigate to the App
Use your computer to launch the TikTok application. As soon as the interface appears, click on “Trends” in the bottom left corner.
Step 2: Open the Effects
Type Retro VHS in the search bar and click on the second result that is displayed. Click on the “Effects” that says, “VHS Retro.”
Step 3: Add in Favorites
Add it to the favorites and then tap on the video icon located at the center of the screen.

Use the VHS Filter in TikTok
Step 1: Deactivating the Filter</p
With the camera open, click on “Effects” right next to the camera icon. The filter is activated, but we need to deactivate it by clicking on the stop icon with the effects. Click anywhere on the screen to exit the “Effects” panel.
Step 2: Recording Process
Now, click on the red video sign and begin recording for some seconds without the filter. It is important to record the video by pointing at the targeted person. After the first part of the video is recorded, head back to the “Effects” menu and navigate to the tab that says, “Add to Favorites.”

Step 3: Publishing the Video
Choose the Retro VHS Filter and point the camera at the person that needs the filter. Hit the “Register” button. Make the recording and press the red popcorn. Hit “Next” and “Publish” the video finally.

Part 4: How to Add VHS Effects to your Travel Video?
With vacation season on, bloggers are into adding VHS photo filters to their videos to be uploaded on YouTube channels. The section shall convey the detailed procedure of adding a glitch effect filter to the travel and vacation videos in Wondershare Filmora .
For Win 7 or later (64-bit)
For macOS 10.12 or later
Step 1: Initiating the Process
Begin the process by launching Wondershare Filmora. For starters, let us work on the perfect music for the video. The Audio tab shows an awful collection. Choose the “Young and Bright” category for the music.

Step 2: Picking the Music
Select any music and drag and drop it to the timeline. Now, trim the music into 15 seconds long. Now, input the travel videos to start their editing. Set the order for the video afterward.

Step 3: Choosing the Overlays
Navigate to the “Effects” panel and search for VHS. The software would offer multiple choices to pick from. Choose different overlays and place them onto the video tracks as you like.

Step 4: Adding the Transition
To add the transition, head to the “Transition” tab and find VHS. Drag and drop the transitions among the cuts between the video clips. Adjust their duration as needed. Preview the video, and the mission is accomplished.

Final Thoughts
Grabbing the attention of the audience is not as easy as it sounds. The creative industry uses a vast range of effects to compel the viewers to be on the edge of their seats. The article introduced the VHS filter while covering its procedure. If you are a TikTok, Instagram, or Photoshop user, we have got you. Wondershare Filmora helps perfectly to add the glitch filter to the vacation videos.
Versatile Video Editor - Wondershare Filmora
An easy yet powerful editor
Numerous effects to choose from
Detailed tutorials provided by the official channel
02 How to Get VHS Filter in Instagram?
03 How to Get VHS Filter in TikTok?
04 How to Add VHS Effects to your Travel Video?
Part 1: How to Make VHS Filter in Photoshop?
There are a lot of steps associated with VHS filter Photoshop. The procedure can be tricky for a beginner in the industry. Therefore, we have sketched out a guide to make a VHS image filter in Photoshop. Follow it carefully to have desirable results.
Step 1: Open Photoshop
Open Photoshop from your computer and click on “New.” Use the “Custom” option from the windows that appear. After that, click on “File” and launch the imagery. Drag and drop that picture to the customized workspace.

Step 2: Apply the Transformation
Head to the “Edit” from the top panel and press “Transform” from there. Click on “Scale” from the context menu. The user is recommended to set the scale as required using arrows from the mouse. After that, apply the transformation.

Step 3: Changing the Parameters
Now, right-click on your layer to click on “Brightness and Contrast.” Change it as you need. After that, move on to the “Curves” and play with the graphs of the picture. Change the “Solid Color” as well. Make the color white and change the opacity levels.

Step 4: Adding Noise
Moving on, click on the first layer and navigate to the “Filter” bar on the top of the interface. Hit “Noise” and then “Add Noise.” Make the necessary changes as you like and press “Enter.” Scroll up to the “File” and hit “Open Recent” to launch the VHS texture photo. Drag and drop the texture to the photo layer that we are working on.

Step 5: Inserting VHS Texture
Resize the VHS texture and then apply the transformation. By default, the blend mode is “Normal.” Change it to “Darken” from the right panel. The picture will get dark. Again, change the mode to “Screen.” Moving on, input another VHS Filter texture and drag and drop it to the layer we are working on. Resize it and apply the transformation.

Step 6: Altering the Blend Mode
Alter the blend mode to “Darker” and then to “Screen.” Apply another filter and then drag and drop the layer. Change the blend mode to “Screen.” Pick up the eraser from the left panel of tools and make necessary edits.

Step 7: Duplicating the Layer
Duplicate the photo layer and move it up. Again, click on “Filter” then “Noise” to add the noise as needed. Alter the blend mode to “Soft Light” and set the opacity value. After that, add any solid color and switch the blend mode back to Soft Light.

Step 8: Playing with the Layers
Duplicate the layer again to change the color. After that, double click the layer and deselect “R.” Move to left or right. Perform the same procedure for the rest of the layers. Use the erase tool to offer fine imprinting to the transition. Duplicate the final layer and deselect “R” and “C.” Move left and right.

Step 9: Final Process
Use the eraser tool one last time, and you are done with the VCR filter.
Part 2: How to Get VHS Filter in Instagram?
Now that you know how to add glitch filter Photoshop let us move on to Instagram. The sub-section of this write-up shall focus on VHS filter Instagram. If you are an Instagram user wishing to get a retro VHS filter, follow our lead.
Step 1: Finding the Filters
The first step revolves around clicking on the Instagram app to open it. Navigate to the “Story.” The user will find a number of filters in the top panel along a circle.

Step 2: Picking the Vintage Filter
Swipe right towards those filters until a “Search” option is seen. Type “Vintage DV” and press “Enter,” where several VHS video filters will be displayed. Pick one and save it to your camera roll.

Step 3: Using the VHS Filter
Head back to the “Story” and select the “Effects” option. Select the filter that you saved and initiate the recording process. You have got the VHS filter for videos.

Part 3: How to Get VHS Filter in TikTok?
The following section of the write-up shall highlight finding and getting the 90s VHS filter in TikTok. So, what are we waiting for? Let us start the procedure.
Find the VHS Filter in TikTok
Step 1: Navigate to the App
Use your computer to launch the TikTok application. As soon as the interface appears, click on “Trends” in the bottom left corner.
Step 2: Open the Effects
Type Retro VHS in the search bar and click on the second result that is displayed. Click on the “Effects” that says, “VHS Retro.”
Step 3: Add in Favorites
Add it to the favorites and then tap on the video icon located at the center of the screen.

Use the VHS Filter in TikTok
Step 1: Deactivating the Filter</p
With the camera open, click on “Effects” right next to the camera icon. The filter is activated, but we need to deactivate it by clicking on the stop icon with the effects. Click anywhere on the screen to exit the “Effects” panel.
Step 2: Recording Process
Now, click on the red video sign and begin recording for some seconds without the filter. It is important to record the video by pointing at the targeted person. After the first part of the video is recorded, head back to the “Effects” menu and navigate to the tab that says, “Add to Favorites.”

Step 3: Publishing the Video
Choose the Retro VHS Filter and point the camera at the person that needs the filter. Hit the “Register” button. Make the recording and press the red popcorn. Hit “Next” and “Publish” the video finally.

Part 4: How to Add VHS Effects to your Travel Video?
With vacation season on, bloggers are into adding VHS photo filters to their videos to be uploaded on YouTube channels. The section shall convey the detailed procedure of adding a glitch effect filter to the travel and vacation videos in Wondershare Filmora .
For Win 7 or later (64-bit)
For macOS 10.12 or later
Step 1: Initiating the Process
Begin the process by launching Wondershare Filmora. For starters, let us work on the perfect music for the video. The Audio tab shows an awful collection. Choose the “Young and Bright” category for the music.

Step 2: Picking the Music
Select any music and drag and drop it to the timeline. Now, trim the music into 15 seconds long. Now, input the travel videos to start their editing. Set the order for the video afterward.

Step 3: Choosing the Overlays
Navigate to the “Effects” panel and search for VHS. The software would offer multiple choices to pick from. Choose different overlays and place them onto the video tracks as you like.

Step 4: Adding the Transition
To add the transition, head to the “Transition” tab and find VHS. Drag and drop the transitions among the cuts between the video clips. Adjust their duration as needed. Preview the video, and the mission is accomplished.

Final Thoughts
Grabbing the attention of the audience is not as easy as it sounds. The creative industry uses a vast range of effects to compel the viewers to be on the edge of their seats. The article introduced the VHS filter while covering its procedure. If you are a TikTok, Instagram, or Photoshop user, we have got you. Wondershare Filmora helps perfectly to add the glitch filter to the vacation videos.
Versatile Video Editor - Wondershare Filmora
An easy yet powerful editor
Numerous effects to choose from
Detailed tutorials provided by the official channel
02 How to Get VHS Filter in Instagram?
03 How to Get VHS Filter in TikTok?
04 How to Add VHS Effects to your Travel Video?
Part 1: How to Make VHS Filter in Photoshop?
There are a lot of steps associated with VHS filter Photoshop. The procedure can be tricky for a beginner in the industry. Therefore, we have sketched out a guide to make a VHS image filter in Photoshop. Follow it carefully to have desirable results.
Step 1: Open Photoshop
Open Photoshop from your computer and click on “New.” Use the “Custom” option from the windows that appear. After that, click on “File” and launch the imagery. Drag and drop that picture to the customized workspace.

Step 2: Apply the Transformation
Head to the “Edit” from the top panel and press “Transform” from there. Click on “Scale” from the context menu. The user is recommended to set the scale as required using arrows from the mouse. After that, apply the transformation.

Step 3: Changing the Parameters
Now, right-click on your layer to click on “Brightness and Contrast.” Change it as you need. After that, move on to the “Curves” and play with the graphs of the picture. Change the “Solid Color” as well. Make the color white and change the opacity levels.

Step 4: Adding Noise
Moving on, click on the first layer and navigate to the “Filter” bar on the top of the interface. Hit “Noise” and then “Add Noise.” Make the necessary changes as you like and press “Enter.” Scroll up to the “File” and hit “Open Recent” to launch the VHS texture photo. Drag and drop the texture to the photo layer that we are working on.

Step 5: Inserting VHS Texture
Resize the VHS texture and then apply the transformation. By default, the blend mode is “Normal.” Change it to “Darken” from the right panel. The picture will get dark. Again, change the mode to “Screen.” Moving on, input another VHS Filter texture and drag and drop it to the layer we are working on. Resize it and apply the transformation.

Step 6: Altering the Blend Mode
Alter the blend mode to “Darker” and then to “Screen.” Apply another filter and then drag and drop the layer. Change the blend mode to “Screen.” Pick up the eraser from the left panel of tools and make necessary edits.

Step 7: Duplicating the Layer
Duplicate the photo layer and move it up. Again, click on “Filter” then “Noise” to add the noise as needed. Alter the blend mode to “Soft Light” and set the opacity value. After that, add any solid color and switch the blend mode back to Soft Light.

Step 8: Playing with the Layers
Duplicate the layer again to change the color. After that, double click the layer and deselect “R.” Move to left or right. Perform the same procedure for the rest of the layers. Use the erase tool to offer fine imprinting to the transition. Duplicate the final layer and deselect “R” and “C.” Move left and right.

Step 9: Final Process
Use the eraser tool one last time, and you are done with the VCR filter.
Part 2: How to Get VHS Filter in Instagram?
Now that you know how to add glitch filter Photoshop let us move on to Instagram. The sub-section of this write-up shall focus on VHS filter Instagram. If you are an Instagram user wishing to get a retro VHS filter, follow our lead.
Step 1: Finding the Filters
The first step revolves around clicking on the Instagram app to open it. Navigate to the “Story.” The user will find a number of filters in the top panel along a circle.

Step 2: Picking the Vintage Filter
Swipe right towards those filters until a “Search” option is seen. Type “Vintage DV” and press “Enter,” where several VHS video filters will be displayed. Pick one and save it to your camera roll.

Step 3: Using the VHS Filter
Head back to the “Story” and select the “Effects” option. Select the filter that you saved and initiate the recording process. You have got the VHS filter for videos.

Part 3: How to Get VHS Filter in TikTok?
The following section of the write-up shall highlight finding and getting the 90s VHS filter in TikTok. So, what are we waiting for? Let us start the procedure.
Find the VHS Filter in TikTok
Step 1: Navigate to the App
Use your computer to launch the TikTok application. As soon as the interface appears, click on “Trends” in the bottom left corner.
Step 2: Open the Effects
Type Retro VHS in the search bar and click on the second result that is displayed. Click on the “Effects” that says, “VHS Retro.”
Step 3: Add in Favorites
Add it to the favorites and then tap on the video icon located at the center of the screen.

Use the VHS Filter in TikTok
Step 1: Deactivating the Filter</p
With the camera open, click on “Effects” right next to the camera icon. The filter is activated, but we need to deactivate it by clicking on the stop icon with the effects. Click anywhere on the screen to exit the “Effects” panel.
Step 2: Recording Process
Now, click on the red video sign and begin recording for some seconds without the filter. It is important to record the video by pointing at the targeted person. After the first part of the video is recorded, head back to the “Effects” menu and navigate to the tab that says, “Add to Favorites.”

Step 3: Publishing the Video
Choose the Retro VHS Filter and point the camera at the person that needs the filter. Hit the “Register” button. Make the recording and press the red popcorn. Hit “Next” and “Publish” the video finally.

Part 4: How to Add VHS Effects to your Travel Video?
With vacation season on, bloggers are into adding VHS photo filters to their videos to be uploaded on YouTube channels. The section shall convey the detailed procedure of adding a glitch effect filter to the travel and vacation videos in Wondershare Filmora .
For Win 7 or later (64-bit)
For macOS 10.12 or later
Step 1: Initiating the Process
Begin the process by launching Wondershare Filmora. For starters, let us work on the perfect music for the video. The Audio tab shows an awful collection. Choose the “Young and Bright” category for the music.

Step 2: Picking the Music
Select any music and drag and drop it to the timeline. Now, trim the music into 15 seconds long. Now, input the travel videos to start their editing. Set the order for the video afterward.

Step 3: Choosing the Overlays
Navigate to the “Effects” panel and search for VHS. The software would offer multiple choices to pick from. Choose different overlays and place them onto the video tracks as you like.

Step 4: Adding the Transition
To add the transition, head to the “Transition” tab and find VHS. Drag and drop the transitions among the cuts between the video clips. Adjust their duration as needed. Preview the video, and the mission is accomplished.

Final Thoughts
Grabbing the attention of the audience is not as easy as it sounds. The creative industry uses a vast range of effects to compel the viewers to be on the edge of their seats. The article introduced the VHS filter while covering its procedure. If you are a TikTok, Instagram, or Photoshop user, we have got you. Wondershare Filmora helps perfectly to add the glitch filter to the vacation videos.
Versatile Video Editor - Wondershare Filmora
An easy yet powerful editor
Numerous effects to choose from
Detailed tutorials provided by the official channel
02 How to Get VHS Filter in Instagram?
03 How to Get VHS Filter in TikTok?
04 How to Add VHS Effects to your Travel Video?
Part 1: How to Make VHS Filter in Photoshop?
There are a lot of steps associated with VHS filter Photoshop. The procedure can be tricky for a beginner in the industry. Therefore, we have sketched out a guide to make a VHS image filter in Photoshop. Follow it carefully to have desirable results.
Step 1: Open Photoshop
Open Photoshop from your computer and click on “New.” Use the “Custom” option from the windows that appear. After that, click on “File” and launch the imagery. Drag and drop that picture to the customized workspace.

Step 2: Apply the Transformation
Head to the “Edit” from the top panel and press “Transform” from there. Click on “Scale” from the context menu. The user is recommended to set the scale as required using arrows from the mouse. After that, apply the transformation.

Step 3: Changing the Parameters
Now, right-click on your layer to click on “Brightness and Contrast.” Change it as you need. After that, move on to the “Curves” and play with the graphs of the picture. Change the “Solid Color” as well. Make the color white and change the opacity levels.

Step 4: Adding Noise
Moving on, click on the first layer and navigate to the “Filter” bar on the top of the interface. Hit “Noise” and then “Add Noise.” Make the necessary changes as you like and press “Enter.” Scroll up to the “File” and hit “Open Recent” to launch the VHS texture photo. Drag and drop the texture to the photo layer that we are working on.

Step 5: Inserting VHS Texture
Resize the VHS texture and then apply the transformation. By default, the blend mode is “Normal.” Change it to “Darken” from the right panel. The picture will get dark. Again, change the mode to “Screen.” Moving on, input another VHS Filter texture and drag and drop it to the layer we are working on. Resize it and apply the transformation.

Step 6: Altering the Blend Mode
Alter the blend mode to “Darker” and then to “Screen.” Apply another filter and then drag and drop the layer. Change the blend mode to “Screen.” Pick up the eraser from the left panel of tools and make necessary edits.

Step 7: Duplicating the Layer
Duplicate the photo layer and move it up. Again, click on “Filter” then “Noise” to add the noise as needed. Alter the blend mode to “Soft Light” and set the opacity value. After that, add any solid color and switch the blend mode back to Soft Light.

Step 8: Playing with the Layers
Duplicate the layer again to change the color. After that, double click the layer and deselect “R.” Move to left or right. Perform the same procedure for the rest of the layers. Use the erase tool to offer fine imprinting to the transition. Duplicate the final layer and deselect “R” and “C.” Move left and right.

Step 9: Final Process
Use the eraser tool one last time, and you are done with the VCR filter.
Part 2: How to Get VHS Filter in Instagram?
Now that you know how to add glitch filter Photoshop let us move on to Instagram. The sub-section of this write-up shall focus on VHS filter Instagram. If you are an Instagram user wishing to get a retro VHS filter, follow our lead.
Step 1: Finding the Filters
The first step revolves around clicking on the Instagram app to open it. Navigate to the “Story.” The user will find a number of filters in the top panel along a circle.

Step 2: Picking the Vintage Filter
Swipe right towards those filters until a “Search” option is seen. Type “Vintage DV” and press “Enter,” where several VHS video filters will be displayed. Pick one and save it to your camera roll.

Step 3: Using the VHS Filter
Head back to the “Story” and select the “Effects” option. Select the filter that you saved and initiate the recording process. You have got the VHS filter for videos.

Part 3: How to Get VHS Filter in TikTok?
The following section of the write-up shall highlight finding and getting the 90s VHS filter in TikTok. So, what are we waiting for? Let us start the procedure.
Find the VHS Filter in TikTok
Step 1: Navigate to the App
Use your computer to launch the TikTok application. As soon as the interface appears, click on “Trends” in the bottom left corner.
Step 2: Open the Effects
Type Retro VHS in the search bar and click on the second result that is displayed. Click on the “Effects” that says, “VHS Retro.”
Step 3: Add in Favorites
Add it to the favorites and then tap on the video icon located at the center of the screen.

Use the VHS Filter in TikTok
Step 1: Deactivating the Filter</p
With the camera open, click on “Effects” right next to the camera icon. The filter is activated, but we need to deactivate it by clicking on the stop icon with the effects. Click anywhere on the screen to exit the “Effects” panel.
Step 2: Recording Process
Now, click on the red video sign and begin recording for some seconds without the filter. It is important to record the video by pointing at the targeted person. After the first part of the video is recorded, head back to the “Effects” menu and navigate to the tab that says, “Add to Favorites.”

Step 3: Publishing the Video
Choose the Retro VHS Filter and point the camera at the person that needs the filter. Hit the “Register” button. Make the recording and press the red popcorn. Hit “Next” and “Publish” the video finally.

Part 4: How to Add VHS Effects to your Travel Video?
With vacation season on, bloggers are into adding VHS photo filters to their videos to be uploaded on YouTube channels. The section shall convey the detailed procedure of adding a glitch effect filter to the travel and vacation videos in Wondershare Filmora .
For Win 7 or later (64-bit)
For macOS 10.12 or later
Step 1: Initiating the Process
Begin the process by launching Wondershare Filmora. For starters, let us work on the perfect music for the video. The Audio tab shows an awful collection. Choose the “Young and Bright” category for the music.

Step 2: Picking the Music
Select any music and drag and drop it to the timeline. Now, trim the music into 15 seconds long. Now, input the travel videos to start their editing. Set the order for the video afterward.

Step 3: Choosing the Overlays
Navigate to the “Effects” panel and search for VHS. The software would offer multiple choices to pick from. Choose different overlays and place them onto the video tracks as you like.

Step 4: Adding the Transition
To add the transition, head to the “Transition” tab and find VHS. Drag and drop the transitions among the cuts between the video clips. Adjust their duration as needed. Preview the video, and the mission is accomplished.

Final Thoughts
Grabbing the attention of the audience is not as easy as it sounds. The creative industry uses a vast range of effects to compel the viewers to be on the edge of their seats. The article introduced the VHS filter while covering its procedure. If you are a TikTok, Instagram, or Photoshop user, we have got you. Wondershare Filmora helps perfectly to add the glitch filter to the vacation videos.
Versatile Video Editor - Wondershare Filmora
An easy yet powerful editor
Numerous effects to choose from
Detailed tutorials provided by the official channel
Best 5 Tips to Freeze-Frame in After Effects
Top 5 Tips to Freeze Frame in After Effects
An easy yet powerful editor
Numerous effects to choose from
Detailed tutorials provided by the official channel
After Effects (AE) does not require any introduction as it is one of the most preferred video editing tools for commercial and professional purposes. However, this editing software is a bit complex for beginners. A freeze-frame is basically for holding the video on a single frame for an extended period. When it comes to clip editing, Adobe After Effects is a tool that no one can miss as it has plenty of editing tools and features that other tools do not have. In addition, AE offers a layer-based editing tool that provides the most professional way to edit videos, whereby users can add transition, multiple layers, effects, audio, etc., at the same instant.

Among many other features, one of the essential features of AE that we will talk about is a freeze-frame. Now the question is, what is freeze-frame? The freeze-frame stops or freezes stop the specific frame that users should focus on or feature. Simply, select or pick the frame required to be frozen and follow the steps to freeze the frame of their choice. This article will explain how you can frame hold in After Effects by following a few simple steps.
In this article
01 [How to Freeze-frame in After Effects](#Part 1)
02 [FAQs on Freeze Effect on After Effects](#Part 2)
03 [Compared with Filmora, What Are the Advantages of Freeze-frame After Effects?](#Part 3)
Part 1 How to Freeze-frame in After Effects
This part explains how to hold a frame in After Effects and the working of the freeze-frame button. After Effects requires ample resources, and the layers need to be solo for the editing process to speed up. However, sometimes you may need to see other objects in the scene, and that is where the freeze-frame button will be helpful. This freeze-frame Effect temporarily freezes the selected layers while you continue editing the video and does not overload the After Effects editor. In addition, you can press the button again to remove the freeze. Here is a step-by-step guide on how to use Adobe After Effects to freeze-frame:
Step 1: Add Video Clip to Adobe After Effects
First, make sure you have the AE composition open, and the video clip added. Next is to find the point where you want the video to “pause” or freeze by moving the time position indicator on the timeline.
Step 2: Choose Layer for Freezing Frame
Next, select the layer and then right-click on the layer to find Time in the menu that appears, and under Time find Freeze-frame and click it. Once done, the entire layer will get stuck on that frame.

Step 3: Add Multiple Layers for Effects
Start the same way before and repeat it several times by splitting the layer, which means that After Effects will take the layer at the time position indicator and cut it into two layers. To achieve this, use the keyboard shortcut Command+Shift+D if you are using a Mac or Control+Shift+D if you are using a Windows operating system.
Step 4: Zoom in
Next, hit the plus (+) sign a few times to zoom into the timeline, move forward one frame, select the new layer, the one on top, and split the layer again using the keyboard shortcut, and now have three layers.

Finally, export and save it on your device when you are satisfied with the result.
Thus, you successfully used the After Effects Freeze Frame to bring cinematic effects to your video.
Part 2 FAQs on Freeze Effect on After Effects
Now, let us view some common FAQs that may come across while using After Effects frame hold.
● What does freeze do in After Effects?
With After Effects holding the last frame (freeze-frame), you can instantly add multiple layers, effects, transitions, audio, and other media. In addition, the freeze-frame in After Effect pauses or stops the specific frame that you want to feature or focus.
● Why can’t I freeze-frame in After Effects?
The reason you cannot freeze-frame in After Effect could be a result of the greyed-out features. With this grey-out feature, a freeze-frame cannot be created or added from a sequence, as you will be required to go back to the original clip to create a freeze-frame or any other type of Effect.
● How do you Freeze the current frame for the duration of the layer in After Effects 2020?
● First, in the Composition or the Timeline panel, pick the layer.
● Place the current-time indicator on the frame that you want to freeze.
● Choose Layer > Time > Freeze-frame.
Part 3 Compared with Filmora, What Are the Advantages of Freeze-frame After Effects?
A freeze-frame can be any frame from a video clip you would like to turn into an After Effects still frame or still image. Another perfect way to explain a freeze-frame called a still image is that it is like pressing the pause button on remote control, making a statue, or taking a photo.
Other Advantages of Freeze-frame in Adobe After Effect is that:
● The images can be worked upon quickly without discussion or rehearsed and planned.
● They are instrumental as an immediate way of communicating ideas or telling a story.
● They can be valuable to represent people or objects and even abstract concepts like emotions or atmospheres.
● As there are no lines to learn, frame hold in After Effects can help shyer performers to gain confidence.
More so, with the Filmora Video Editor, you can freeze a frame of your video clip, and it also allows users to set the duration of the freeze automatically.
Other Advantages of Freeze-frame in Filmora are that:
● Freeze Frame in Filmora has made the editing tasks more flexible and accessible.
● It makes the video more appealing and exciting.
● It helps extend the duration of any point in the video and makes it more focused.
▲**Comparison Table of Adobe After Effect and Wondershare Filmora Video Editor
For Win 7 or later (64-bit)
For macOS 10.12 or later
| DIMENSIONS | ADOBE AFTER EFFECT (AE) | FILMORA |
|---|---|---|
| Smartscore | 9.0 | 9.5 |
| User Satisfaction | 82% | 96% |
| Price | $29.99 | $7.99 |
| Price Model | Monthly PaymentAnnual SubscriptionQuote Based | Monthly PaymentAnnual SubscriptionQuote BasedOne-time Payment |
| List of Features | Immersive Virtual Reality EffectsData-Driven AnimationExpression Access to Shape, Mask, And Brush Stroke Path PointsCreate Virtual Reality EffectsVR ConverterVR Comp EditorVR Rotate SphereCreate Nulls from Path PanelGPU Accelerated Effects | 4K editing supportGIF supportNoise removalColor tuningAdvanced text editorAudio mixerVideo stabilizationScene detectionAudio equalizer |
| Integration | Video collaboration tool3D graphic programProject management solution | YouTubeFacebookTwitterInstagramVimeo |
| Language Supported | EnglishDutchPolishTurkishSwedish | EnglishSwedishPortugueseDutchItalianRussianFrenchSpanishJapaneseHindiGermanChinese |
| Available Device | WindowsMacAndroidWeb-basediPhone/iPadLinux | WindowsMac |
In short, Adobe After Effects is a much better instrument for professionals due to its extensive range of features. However, it can seem complex for newbies. Thus, if you are new to video editing and freeze frames on After Effects, we suggest you go for Filmora first to get yourself acquainted.
● Ending Thoughts →
● Thus, this report recommends Filmora as an essential alternative to After Effect in using freeze-frame as Filmora allows work with ease.
● We added a list of FAQs on the After Effects freeze-frame.
After Effects (AE) does not require any introduction as it is one of the most preferred video editing tools for commercial and professional purposes. However, this editing software is a bit complex for beginners. A freeze-frame is basically for holding the video on a single frame for an extended period. When it comes to clip editing, Adobe After Effects is a tool that no one can miss as it has plenty of editing tools and features that other tools do not have. In addition, AE offers a layer-based editing tool that provides the most professional way to edit videos, whereby users can add transition, multiple layers, effects, audio, etc., at the same instant.

Among many other features, one of the essential features of AE that we will talk about is a freeze-frame. Now the question is, what is freeze-frame? The freeze-frame stops or freezes stop the specific frame that users should focus on or feature. Simply, select or pick the frame required to be frozen and follow the steps to freeze the frame of their choice. This article will explain how you can frame hold in After Effects by following a few simple steps.
In this article
01 [How to Freeze-frame in After Effects](#Part 1)
02 [FAQs on Freeze Effect on After Effects](#Part 2)
03 [Compared with Filmora, What Are the Advantages of Freeze-frame After Effects?](#Part 3)
Part 1 How to Freeze-frame in After Effects
This part explains how to hold a frame in After Effects and the working of the freeze-frame button. After Effects requires ample resources, and the layers need to be solo for the editing process to speed up. However, sometimes you may need to see other objects in the scene, and that is where the freeze-frame button will be helpful. This freeze-frame Effect temporarily freezes the selected layers while you continue editing the video and does not overload the After Effects editor. In addition, you can press the button again to remove the freeze. Here is a step-by-step guide on how to use Adobe After Effects to freeze-frame:
Step 1: Add Video Clip to Adobe After Effects
First, make sure you have the AE composition open, and the video clip added. Next is to find the point where you want the video to “pause” or freeze by moving the time position indicator on the timeline.
Step 2: Choose Layer for Freezing Frame
Next, select the layer and then right-click on the layer to find Time in the menu that appears, and under Time find Freeze-frame and click it. Once done, the entire layer will get stuck on that frame.

Step 3: Add Multiple Layers for Effects
Start the same way before and repeat it several times by splitting the layer, which means that After Effects will take the layer at the time position indicator and cut it into two layers. To achieve this, use the keyboard shortcut Command+Shift+D if you are using a Mac or Control+Shift+D if you are using a Windows operating system.
Step 4: Zoom in
Next, hit the plus (+) sign a few times to zoom into the timeline, move forward one frame, select the new layer, the one on top, and split the layer again using the keyboard shortcut, and now have three layers.

Finally, export and save it on your device when you are satisfied with the result.
Thus, you successfully used the After Effects Freeze Frame to bring cinematic effects to your video.
Part 2 FAQs on Freeze Effect on After Effects
Now, let us view some common FAQs that may come across while using After Effects frame hold.
● What does freeze do in After Effects?
With After Effects holding the last frame (freeze-frame), you can instantly add multiple layers, effects, transitions, audio, and other media. In addition, the freeze-frame in After Effect pauses or stops the specific frame that you want to feature or focus.
● Why can’t I freeze-frame in After Effects?
The reason you cannot freeze-frame in After Effect could be a result of the greyed-out features. With this grey-out feature, a freeze-frame cannot be created or added from a sequence, as you will be required to go back to the original clip to create a freeze-frame or any other type of Effect.
● How do you Freeze the current frame for the duration of the layer in After Effects 2020?
● First, in the Composition or the Timeline panel, pick the layer.
● Place the current-time indicator on the frame that you want to freeze.
● Choose Layer > Time > Freeze-frame.
Part 3 Compared with Filmora, What Are the Advantages of Freeze-frame After Effects?
A freeze-frame can be any frame from a video clip you would like to turn into an After Effects still frame or still image. Another perfect way to explain a freeze-frame called a still image is that it is like pressing the pause button on remote control, making a statue, or taking a photo.
Other Advantages of Freeze-frame in Adobe After Effect is that:
● The images can be worked upon quickly without discussion or rehearsed and planned.
● They are instrumental as an immediate way of communicating ideas or telling a story.
● They can be valuable to represent people or objects and even abstract concepts like emotions or atmospheres.
● As there are no lines to learn, frame hold in After Effects can help shyer performers to gain confidence.
More so, with the Filmora Video Editor, you can freeze a frame of your video clip, and it also allows users to set the duration of the freeze automatically.
Other Advantages of Freeze-frame in Filmora are that:
● Freeze Frame in Filmora has made the editing tasks more flexible and accessible.
● It makes the video more appealing and exciting.
● It helps extend the duration of any point in the video and makes it more focused.
▲**Comparison Table of Adobe After Effect and Wondershare Filmora Video Editor
For Win 7 or later (64-bit)
For macOS 10.12 or later
| DIMENSIONS | ADOBE AFTER EFFECT (AE) | FILMORA |
|---|---|---|
| Smartscore | 9.0 | 9.5 |
| User Satisfaction | 82% | 96% |
| Price | $29.99 | $7.99 |
| Price Model | Monthly PaymentAnnual SubscriptionQuote Based | Monthly PaymentAnnual SubscriptionQuote BasedOne-time Payment |
| List of Features | Immersive Virtual Reality EffectsData-Driven AnimationExpression Access to Shape, Mask, And Brush Stroke Path PointsCreate Virtual Reality EffectsVR ConverterVR Comp EditorVR Rotate SphereCreate Nulls from Path PanelGPU Accelerated Effects | 4K editing supportGIF supportNoise removalColor tuningAdvanced text editorAudio mixerVideo stabilizationScene detectionAudio equalizer |
| Integration | Video collaboration tool3D graphic programProject management solution | YouTubeFacebookTwitterInstagramVimeo |
| Language Supported | EnglishDutchPolishTurkishSwedish | EnglishSwedishPortugueseDutchItalianRussianFrenchSpanishJapaneseHindiGermanChinese |
| Available Device | WindowsMacAndroidWeb-basediPhone/iPadLinux | WindowsMac |
In short, Adobe After Effects is a much better instrument for professionals due to its extensive range of features. However, it can seem complex for newbies. Thus, if you are new to video editing and freeze frames on After Effects, we suggest you go for Filmora first to get yourself acquainted.
● Ending Thoughts →
● Thus, this report recommends Filmora as an essential alternative to After Effect in using freeze-frame as Filmora allows work with ease.
● We added a list of FAQs on the After Effects freeze-frame.
After Effects (AE) does not require any introduction as it is one of the most preferred video editing tools for commercial and professional purposes. However, this editing software is a bit complex for beginners. A freeze-frame is basically for holding the video on a single frame for an extended period. When it comes to clip editing, Adobe After Effects is a tool that no one can miss as it has plenty of editing tools and features that other tools do not have. In addition, AE offers a layer-based editing tool that provides the most professional way to edit videos, whereby users can add transition, multiple layers, effects, audio, etc., at the same instant.

Among many other features, one of the essential features of AE that we will talk about is a freeze-frame. Now the question is, what is freeze-frame? The freeze-frame stops or freezes stop the specific frame that users should focus on or feature. Simply, select or pick the frame required to be frozen and follow the steps to freeze the frame of their choice. This article will explain how you can frame hold in After Effects by following a few simple steps.
In this article
01 [How to Freeze-frame in After Effects](#Part 1)
02 [FAQs on Freeze Effect on After Effects](#Part 2)
03 [Compared with Filmora, What Are the Advantages of Freeze-frame After Effects?](#Part 3)
Part 1 How to Freeze-frame in After Effects
This part explains how to hold a frame in After Effects and the working of the freeze-frame button. After Effects requires ample resources, and the layers need to be solo for the editing process to speed up. However, sometimes you may need to see other objects in the scene, and that is where the freeze-frame button will be helpful. This freeze-frame Effect temporarily freezes the selected layers while you continue editing the video and does not overload the After Effects editor. In addition, you can press the button again to remove the freeze. Here is a step-by-step guide on how to use Adobe After Effects to freeze-frame:
Step 1: Add Video Clip to Adobe After Effects
First, make sure you have the AE composition open, and the video clip added. Next is to find the point where you want the video to “pause” or freeze by moving the time position indicator on the timeline.
Step 2: Choose Layer for Freezing Frame
Next, select the layer and then right-click on the layer to find Time in the menu that appears, and under Time find Freeze-frame and click it. Once done, the entire layer will get stuck on that frame.

Step 3: Add Multiple Layers for Effects
Start the same way before and repeat it several times by splitting the layer, which means that After Effects will take the layer at the time position indicator and cut it into two layers. To achieve this, use the keyboard shortcut Command+Shift+D if you are using a Mac or Control+Shift+D if you are using a Windows operating system.
Step 4: Zoom in
Next, hit the plus (+) sign a few times to zoom into the timeline, move forward one frame, select the new layer, the one on top, and split the layer again using the keyboard shortcut, and now have three layers.

Finally, export and save it on your device when you are satisfied with the result.
Thus, you successfully used the After Effects Freeze Frame to bring cinematic effects to your video.
Part 2 FAQs on Freeze Effect on After Effects
Now, let us view some common FAQs that may come across while using After Effects frame hold.
● What does freeze do in After Effects?
With After Effects holding the last frame (freeze-frame), you can instantly add multiple layers, effects, transitions, audio, and other media. In addition, the freeze-frame in After Effect pauses or stops the specific frame that you want to feature or focus.
● Why can’t I freeze-frame in After Effects?
The reason you cannot freeze-frame in After Effect could be a result of the greyed-out features. With this grey-out feature, a freeze-frame cannot be created or added from a sequence, as you will be required to go back to the original clip to create a freeze-frame or any other type of Effect.
● How do you Freeze the current frame for the duration of the layer in After Effects 2020?
● First, in the Composition or the Timeline panel, pick the layer.
● Place the current-time indicator on the frame that you want to freeze.
● Choose Layer > Time > Freeze-frame.
Part 3 Compared with Filmora, What Are the Advantages of Freeze-frame After Effects?
A freeze-frame can be any frame from a video clip you would like to turn into an After Effects still frame or still image. Another perfect way to explain a freeze-frame called a still image is that it is like pressing the pause button on remote control, making a statue, or taking a photo.
Other Advantages of Freeze-frame in Adobe After Effect is that:
● The images can be worked upon quickly without discussion or rehearsed and planned.
● They are instrumental as an immediate way of communicating ideas or telling a story.
● They can be valuable to represent people or objects and even abstract concepts like emotions or atmospheres.
● As there are no lines to learn, frame hold in After Effects can help shyer performers to gain confidence.
More so, with the Filmora Video Editor, you can freeze a frame of your video clip, and it also allows users to set the duration of the freeze automatically.
Other Advantages of Freeze-frame in Filmora are that:
● Freeze Frame in Filmora has made the editing tasks more flexible and accessible.
● It makes the video more appealing and exciting.
● It helps extend the duration of any point in the video and makes it more focused.
▲**Comparison Table of Adobe After Effect and Wondershare Filmora Video Editor
For Win 7 or later (64-bit)
For macOS 10.12 or later
| DIMENSIONS | ADOBE AFTER EFFECT (AE) | FILMORA |
|---|---|---|
| Smartscore | 9.0 | 9.5 |
| User Satisfaction | 82% | 96% |
| Price | $29.99 | $7.99 |
| Price Model | Monthly PaymentAnnual SubscriptionQuote Based | Monthly PaymentAnnual SubscriptionQuote BasedOne-time Payment |
| List of Features | Immersive Virtual Reality EffectsData-Driven AnimationExpression Access to Shape, Mask, And Brush Stroke Path PointsCreate Virtual Reality EffectsVR ConverterVR Comp EditorVR Rotate SphereCreate Nulls from Path PanelGPU Accelerated Effects | 4K editing supportGIF supportNoise removalColor tuningAdvanced text editorAudio mixerVideo stabilizationScene detectionAudio equalizer |
| Integration | Video collaboration tool3D graphic programProject management solution | YouTubeFacebookTwitterInstagramVimeo |
| Language Supported | EnglishDutchPolishTurkishSwedish | EnglishSwedishPortugueseDutchItalianRussianFrenchSpanishJapaneseHindiGermanChinese |
| Available Device | WindowsMacAndroidWeb-basediPhone/iPadLinux | WindowsMac |
In short, Adobe After Effects is a much better instrument for professionals due to its extensive range of features. However, it can seem complex for newbies. Thus, if you are new to video editing and freeze frames on After Effects, we suggest you go for Filmora first to get yourself acquainted.
● Ending Thoughts →
● Thus, this report recommends Filmora as an essential alternative to After Effect in using freeze-frame as Filmora allows work with ease.
● We added a list of FAQs on the After Effects freeze-frame.
After Effects (AE) does not require any introduction as it is one of the most preferred video editing tools for commercial and professional purposes. However, this editing software is a bit complex for beginners. A freeze-frame is basically for holding the video on a single frame for an extended period. When it comes to clip editing, Adobe After Effects is a tool that no one can miss as it has plenty of editing tools and features that other tools do not have. In addition, AE offers a layer-based editing tool that provides the most professional way to edit videos, whereby users can add transition, multiple layers, effects, audio, etc., at the same instant.

Among many other features, one of the essential features of AE that we will talk about is a freeze-frame. Now the question is, what is freeze-frame? The freeze-frame stops or freezes stop the specific frame that users should focus on or feature. Simply, select or pick the frame required to be frozen and follow the steps to freeze the frame of their choice. This article will explain how you can frame hold in After Effects by following a few simple steps.
In this article
01 [How to Freeze-frame in After Effects](#Part 1)
02 [FAQs on Freeze Effect on After Effects](#Part 2)
03 [Compared with Filmora, What Are the Advantages of Freeze-frame After Effects?](#Part 3)
Part 1 How to Freeze-frame in After Effects
This part explains how to hold a frame in After Effects and the working of the freeze-frame button. After Effects requires ample resources, and the layers need to be solo for the editing process to speed up. However, sometimes you may need to see other objects in the scene, and that is where the freeze-frame button will be helpful. This freeze-frame Effect temporarily freezes the selected layers while you continue editing the video and does not overload the After Effects editor. In addition, you can press the button again to remove the freeze. Here is a step-by-step guide on how to use Adobe After Effects to freeze-frame:
Step 1: Add Video Clip to Adobe After Effects
First, make sure you have the AE composition open, and the video clip added. Next is to find the point where you want the video to “pause” or freeze by moving the time position indicator on the timeline.
Step 2: Choose Layer for Freezing Frame
Next, select the layer and then right-click on the layer to find Time in the menu that appears, and under Time find Freeze-frame and click it. Once done, the entire layer will get stuck on that frame.

Step 3: Add Multiple Layers for Effects
Start the same way before and repeat it several times by splitting the layer, which means that After Effects will take the layer at the time position indicator and cut it into two layers. To achieve this, use the keyboard shortcut Command+Shift+D if you are using a Mac or Control+Shift+D if you are using a Windows operating system.
Step 4: Zoom in
Next, hit the plus (+) sign a few times to zoom into the timeline, move forward one frame, select the new layer, the one on top, and split the layer again using the keyboard shortcut, and now have three layers.

Finally, export and save it on your device when you are satisfied with the result.
Thus, you successfully used the After Effects Freeze Frame to bring cinematic effects to your video.
Part 2 FAQs on Freeze Effect on After Effects
Now, let us view some common FAQs that may come across while using After Effects frame hold.
● What does freeze do in After Effects?
With After Effects holding the last frame (freeze-frame), you can instantly add multiple layers, effects, transitions, audio, and other media. In addition, the freeze-frame in After Effect pauses or stops the specific frame that you want to feature or focus.
● Why can’t I freeze-frame in After Effects?
The reason you cannot freeze-frame in After Effect could be a result of the greyed-out features. With this grey-out feature, a freeze-frame cannot be created or added from a sequence, as you will be required to go back to the original clip to create a freeze-frame or any other type of Effect.
● How do you Freeze the current frame for the duration of the layer in After Effects 2020?
● First, in the Composition or the Timeline panel, pick the layer.
● Place the current-time indicator on the frame that you want to freeze.
● Choose Layer > Time > Freeze-frame.
Part 3 Compared with Filmora, What Are the Advantages of Freeze-frame After Effects?
A freeze-frame can be any frame from a video clip you would like to turn into an After Effects still frame or still image. Another perfect way to explain a freeze-frame called a still image is that it is like pressing the pause button on remote control, making a statue, or taking a photo.
Other Advantages of Freeze-frame in Adobe After Effect is that:
● The images can be worked upon quickly without discussion or rehearsed and planned.
● They are instrumental as an immediate way of communicating ideas or telling a story.
● They can be valuable to represent people or objects and even abstract concepts like emotions or atmospheres.
● As there are no lines to learn, frame hold in After Effects can help shyer performers to gain confidence.
More so, with the Filmora Video Editor, you can freeze a frame of your video clip, and it also allows users to set the duration of the freeze automatically.
Other Advantages of Freeze-frame in Filmora are that:
● Freeze Frame in Filmora has made the editing tasks more flexible and accessible.
● It makes the video more appealing and exciting.
● It helps extend the duration of any point in the video and makes it more focused.
▲**Comparison Table of Adobe After Effect and Wondershare Filmora Video Editor
For Win 7 or later (64-bit)
For macOS 10.12 or later
| DIMENSIONS | ADOBE AFTER EFFECT (AE) | FILMORA |
|---|---|---|
| Smartscore | 9.0 | 9.5 |
| User Satisfaction | 82% | 96% |
| Price | $29.99 | $7.99 |
| Price Model | Monthly PaymentAnnual SubscriptionQuote Based | Monthly PaymentAnnual SubscriptionQuote BasedOne-time Payment |
| List of Features | Immersive Virtual Reality EffectsData-Driven AnimationExpression Access to Shape, Mask, And Brush Stroke Path PointsCreate Virtual Reality EffectsVR ConverterVR Comp EditorVR Rotate SphereCreate Nulls from Path PanelGPU Accelerated Effects | 4K editing supportGIF supportNoise removalColor tuningAdvanced text editorAudio mixerVideo stabilizationScene detectionAudio equalizer |
| Integration | Video collaboration tool3D graphic programProject management solution | YouTubeFacebookTwitterInstagramVimeo |
| Language Supported | EnglishDutchPolishTurkishSwedish | EnglishSwedishPortugueseDutchItalianRussianFrenchSpanishJapaneseHindiGermanChinese |
| Available Device | WindowsMacAndroidWeb-basediPhone/iPadLinux | WindowsMac |
In short, Adobe After Effects is a much better instrument for professionals due to its extensive range of features. However, it can seem complex for newbies. Thus, if you are new to video editing and freeze frames on After Effects, we suggest you go for Filmora first to get yourself acquainted.
● Ending Thoughts →
● Thus, this report recommends Filmora as an essential alternative to After Effect in using freeze-frame as Filmora allows work with ease.
● We added a list of FAQs on the After Effects freeze-frame.
Leveraging the Vectorscope for Better Color Correction in Premiere Pro
Our eyes process colors differently. When two people look at the same picture, they may see different shades of colors. In post-production, Vectorscopes help to color grade and make sure you get your images exactly right. This means that you will process the exact color that you want across devices. Premiere Vectorscope is a great choice for anyone looking to correct and grade colors. Using Vectorscope Premiere allows you to get quantitative data about your image for a more accurate assessment of colors within the film. In this article, we explore what comprises Premiere Pro Vectorscope and how to use them in video editing.
Color Correction Editor An easy-to-use video editor helps you make color correction and color grading experience for videos 

Part 1. Vectorscope: What is It and How to Read
Vectorscopes provide a great post-production way for color correction. It is video scope that provides greater data about the color properties of an image. Another way to look at it is that a Vectorscope is a circular graph, which monitors the following information of an image. By looking at it, you can measure saturation outward from the center while hue is measured in a circular pattern.
The Vectorscope contains markings indicating the degree of saturation and hue in an image. The distance of the markings from the center indicates how saturated the color is in your image. In simple terms, the further the markings, the more saturated the color. The two main options of Vectorscope are HLS and YUV. The HLS displays the hue, lightness, saturation, and signal information at a glance. On the other hand, the YUV mode contains several color boxes, giving accurate levels of hue and saturation.
Vectorscopes are useful to filmmakers and editors to ensure greater conformity in a film as they transition from one shot to the next. When the camera captures an image with too much saturation, using a Vectorscope helps to reduce the said saturation. This makes Vectorscope a useful feature for color correction and color grading. Color correction involves altering the colors of an image within a film to provide consistency and tone for the film. On the other hand, color grading is more like a supercharged version of color correction. It refers to altering a film so that it matches a tone or theme. Since the two, grading and correction are important, more video editing will use a combination of both.
How to Read a Vectorscope
Learning how to read a Vectorscope will make your video editing fun and easier. The best way is to view the Vectorscope in relation to the color wheel. When using Premiere Vectorscope, the colors are nicely labeled for anyone to understand. You only need to understand the primary colors of saturation and hue to accurately read a Vectorscope.
The hue color is the direction to which the marketer points. For instance, a marker pointing toward the boxes labeled “R” indicates that the hue is predominantly red. On the other hand, the saturation correlates to the length of the marker. The image is more saturated when the marker is furthest from the center of the wheel.
Keep note of the two boxes in each main color. The box that is close to the center indicates 75%, and you will normally avoid the marker extending beyond this first box. Any marketer that extends beyond this is known as non-broadcast safe or illegal colors. Although you may need to go beyond the first box in some projects for stylistic reasons, the general rule of thumb is to avoid that.
Without proper calibration, your images may end up looking too red or too blue. They will not look natural at all and will affect the overall quality of your video. Therefore, using the features within the vectorsope will help you color-grade your images to perfection.
Part 2. ** Vectorscope in Premiere Pro
Just like many other video editing software, Adobe Premiere Pro offers Vectorscope to help in post-production. The best way to look at Vectorscope in Premiere Pro is to use the Color Correction workspace. Once you have launched the software, Click Window, followed by Workspace, and then Color Correction. Access the reference monitor directly to deliver the program.
The reference monitor will first display composite video. Clicking on the setting icon allows you to access the panel and choose the video scope you want to use. Now, this is how you use the Vectorscope in Premiere Pro:
1. Reading a Vectorscope on Premiere Pro
A Vectorscope is similar to a color wheel. It displays colors in the same places as the wheel, with cyan to the bottom right and red to the top left. When you see a dot or line in the Vectorscope, you can tell it is giving you information about the color or chrominance of a shot. Essentially, this information is the hue (specific color) and the saturation (the strength of that hue).
As you examine the Vectorscope, you get to see how strong a particular color is by the length of the line from the center of the wheel. A longer line indicates that the color is more saturated. However, all Vectorscopes have small color targets. The Vectorscope points are lined with a drop-down used to read the scope. The default is set to 75%, which is a good limit for a typical broadcast system.
2. Adjusting Skin Tones
A commonly used feature of the Premier Pro Vectorscope is the Skin Tone Line. With this feature, you get the line on the scope between the Yellow and the Red sections at about 10.30 or 11 o’clock position.
The Vectorscope skin tone line represents the color of blood flowing through the skin. You can use this line to check the accuracy of skin tone color representation regardless of the ethnicity of the person you’re filming. In particular, video images are more accurate
The major problem is figuring out how to look at skin tones in a shot with many other colors. With the skin tons line in Premiere Pro, color correction becomes easy and quick. You only need to use a garbage matte, which is found under video effects then keying. Adjust the points so that they cover the skin of the person on the shot, then look at the Premiere Pro Vectorscope to see your end results.
Part 3. **How to Use Vectorscope in Filmora
The choice of video editing software can have an impact on how well you use your Vectorscopes. Wondershare Filmora is a great choice for anyone who wants to achieve great results with their videos. The versatile video editing software offers four types of video scopes, including the Vectorscope. This gives you more flexibility in video editing and achieving accurate results in color correction and grading. With the recent V13, you also get access to a range of AI features that make video editing quicker and easier.
Free Download For Win 7 or later(64-bit)
Free Download For macOS 10.14 or later
Access Vectorscope on Filmora
Accessing Vectorscope in Filmora is straightforward. As part of the four available video scopes, Filmora has made it easy to use Vectorscope during video editing. Here is a step-by-step guide to follow:
Step 1Create a New Project on Filmora
Once you have downloaded and installed the Filmora software on your desktop, launch it and click Create a New Project.
Step 2Access Video Scopes
After starting a new project, head to the top right corner of the main interface. Click on the Video Scope button to launch the video scope bar on the preview screen.
Step 3Customize Video Scopes Layout Bar
Customizing the layout of the video scope bar allows you to have more freedom in using the feature. You have the option to choose from four layouts or expand the button to display the video scope’s name. The purpose of this step is to modify the display option of the video scopes, allowing you to have a clear view of what you are editing.
Step 4Manage the Vectorscope as Desired
On the preview screen, choose the Vectorscope option. This video scope allows you to define the skin tone indication for better color grading and correction.
Step 5Change Other Video Scopes
To achieve more accurate and better results, explore the other video scopes in the same window. View the color changes in your image through parade, histogram, and waveform video scopes. You can also change the color channels to view specific color changes across the video.
Conclusion
Vectorscopes are great for post-production color correction. Although lesser-known features to many people, they are widely used in video production. They ensure that the colors in your video are consistent across all clips or shots of your film. Since filming will often involve different shots and settings, we recommend using Wondershare Filmora for your video editing. It comes with an easy-to-use Vectorscope and other video scopes that help you achieve great results with color correction and grading.
Free Download Use Vectorscope in Filmora Try Color Correction

Part 1. Vectorscope: What is It and How to Read
Vectorscopes provide a great post-production way for color correction. It is video scope that provides greater data about the color properties of an image. Another way to look at it is that a Vectorscope is a circular graph, which monitors the following information of an image. By looking at it, you can measure saturation outward from the center while hue is measured in a circular pattern.
The Vectorscope contains markings indicating the degree of saturation and hue in an image. The distance of the markings from the center indicates how saturated the color is in your image. In simple terms, the further the markings, the more saturated the color. The two main options of Vectorscope are HLS and YUV. The HLS displays the hue, lightness, saturation, and signal information at a glance. On the other hand, the YUV mode contains several color boxes, giving accurate levels of hue and saturation.
Vectorscopes are useful to filmmakers and editors to ensure greater conformity in a film as they transition from one shot to the next. When the camera captures an image with too much saturation, using a Vectorscope helps to reduce the said saturation. This makes Vectorscope a useful feature for color correction and color grading. Color correction involves altering the colors of an image within a film to provide consistency and tone for the film. On the other hand, color grading is more like a supercharged version of color correction. It refers to altering a film so that it matches a tone or theme. Since the two, grading and correction are important, more video editing will use a combination of both.
How to Read a Vectorscope
Learning how to read a Vectorscope will make your video editing fun and easier. The best way is to view the Vectorscope in relation to the color wheel. When using Premiere Vectorscope, the colors are nicely labeled for anyone to understand. You only need to understand the primary colors of saturation and hue to accurately read a Vectorscope.
The hue color is the direction to which the marketer points. For instance, a marker pointing toward the boxes labeled “R” indicates that the hue is predominantly red. On the other hand, the saturation correlates to the length of the marker. The image is more saturated when the marker is furthest from the center of the wheel.
Keep note of the two boxes in each main color. The box that is close to the center indicates 75%, and you will normally avoid the marker extending beyond this first box. Any marketer that extends beyond this is known as non-broadcast safe or illegal colors. Although you may need to go beyond the first box in some projects for stylistic reasons, the general rule of thumb is to avoid that.
Without proper calibration, your images may end up looking too red or too blue. They will not look natural at all and will affect the overall quality of your video. Therefore, using the features within the vectorsope will help you color-grade your images to perfection.
Part 2. ** Vectorscope in Premiere Pro
Just like many other video editing software, Adobe Premiere Pro offers Vectorscope to help in post-production. The best way to look at Vectorscope in Premiere Pro is to use the Color Correction workspace. Once you have launched the software, Click Window, followed by Workspace, and then Color Correction. Access the reference monitor directly to deliver the program.
The reference monitor will first display composite video. Clicking on the setting icon allows you to access the panel and choose the video scope you want to use. Now, this is how you use the Vectorscope in Premiere Pro:
1. Reading a Vectorscope on Premiere Pro
A Vectorscope is similar to a color wheel. It displays colors in the same places as the wheel, with cyan to the bottom right and red to the top left. When you see a dot or line in the Vectorscope, you can tell it is giving you information about the color or chrominance of a shot. Essentially, this information is the hue (specific color) and the saturation (the strength of that hue).
As you examine the Vectorscope, you get to see how strong a particular color is by the length of the line from the center of the wheel. A longer line indicates that the color is more saturated. However, all Vectorscopes have small color targets. The Vectorscope points are lined with a drop-down used to read the scope. The default is set to 75%, which is a good limit for a typical broadcast system.
2. Adjusting Skin Tones
A commonly used feature of the Premier Pro Vectorscope is the Skin Tone Line. With this feature, you get the line on the scope between the Yellow and the Red sections at about 10.30 or 11 o’clock position.
The Vectorscope skin tone line represents the color of blood flowing through the skin. You can use this line to check the accuracy of skin tone color representation regardless of the ethnicity of the person you’re filming. In particular, video images are more accurate
The major problem is figuring out how to look at skin tones in a shot with many other colors. With the skin tons line in Premiere Pro, color correction becomes easy and quick. You only need to use a garbage matte, which is found under video effects then keying. Adjust the points so that they cover the skin of the person on the shot, then look at the Premiere Pro Vectorscope to see your end results.
Part 3. **How to Use Vectorscope in Filmora
The choice of video editing software can have an impact on how well you use your Vectorscopes. Wondershare Filmora is a great choice for anyone who wants to achieve great results with their videos. The versatile video editing software offers four types of video scopes, including the Vectorscope. This gives you more flexibility in video editing and achieving accurate results in color correction and grading. With the recent V13, you also get access to a range of AI features that make video editing quicker and easier.
Free Download For Win 7 or later(64-bit)
Free Download For macOS 10.14 or later
Access Vectorscope on Filmora
Accessing Vectorscope in Filmora is straightforward. As part of the four available video scopes, Filmora has made it easy to use Vectorscope during video editing. Here is a step-by-step guide to follow:
Step 1Create a New Project on Filmora
Once you have downloaded and installed the Filmora software on your desktop, launch it and click Create a New Project.
Step 2Access Video Scopes
After starting a new project, head to the top right corner of the main interface. Click on the Video Scope button to launch the video scope bar on the preview screen.
Step 3Customize Video Scopes Layout Bar
Customizing the layout of the video scope bar allows you to have more freedom in using the feature. You have the option to choose from four layouts or expand the button to display the video scope’s name. The purpose of this step is to modify the display option of the video scopes, allowing you to have a clear view of what you are editing.
Step 4Manage the Vectorscope as Desired
On the preview screen, choose the Vectorscope option. This video scope allows you to define the skin tone indication for better color grading and correction.
Step 5Change Other Video Scopes
To achieve more accurate and better results, explore the other video scopes in the same window. View the color changes in your image through parade, histogram, and waveform video scopes. You can also change the color channels to view specific color changes across the video.
Conclusion
Vectorscopes are great for post-production color correction. Although lesser-known features to many people, they are widely used in video production. They ensure that the colors in your video are consistent across all clips or shots of your film. Since filming will often involve different shots and settings, we recommend using Wondershare Filmora for your video editing. It comes with an easy-to-use Vectorscope and other video scopes that help you achieve great results with color correction and grading.
Also read:
- Updated Guide to Making Cinematography for Music Video for 2024
- How to Add Text to Video for 2024
- Updated 2024 Approved How to Create a Dynamic Text Animation in Filmora — Step-By-Step
- 3 Ways To Stream And Record At The Same Time for 2024
- How to Make a DIY Vlog or Video for 2024
- Updated 2024 Approved Camtasia Vs Captivate Which Is Better
- Updated 2024 Approved Steps to Rotate Videos in Lightworks
- New How to Make After Effects Gifs for 2024
- Updated Are You Looking for the Best Video Marketing Agency to Help Your Business Grow Exponentially with Engaging Video Content? Here Is How to Find a High-Quality Video Marketing Company that Takes Your Videos to the Next Level
- In 2024, Top 7 Easy Ways to Convert a Video to a GIF Online
- How to Use Zoom in Google
- Guide To Creating the Best Video Collages
- Updated 2024 Approved Progressive Solutions to Add VHS Effects to Video with Ease
- Updated How to Start a Vlog
- The Ultimate Guide to Using AR Emoji Stickers in Your Videos
- Updated In 2024, How to Use LUTs in Lumafusion & Free LUTs Resource
- Updated In 2024, Adding Slow Motion in DaVinci Resolve A Comprehensive Overview
- AVI Editor for Windows 11/10/8.1/8/7 Easily Edit AVI Files on PC for 2024
- New In 2024, Easy Guide to Use a Stabilization Tool in Filmora
- Final Cut Pro - How to Download and Install It, In 2024
- Best 10 Crazy-Cool Examples of AR Video for 2024
- In 2024, Slow Motion Videos Are Taking over Social Media and Becoming a New Trend. Read This Article if You Want to Learn How to Slow Down Video in After Effects
- Updated Top 4 Free 3D Intro Maker to Use
- New 2024 Approved 6 Best Text to Speech Generators for YouTube Videos Windows, Mac, Android, iPhone & Online
- Updated 2024 Approved Clone Yourself in Videos with Filmora
- Updated Guide to Create Intro Video with KineMaster
- How to Use LUTs in Lumafusion & Free LUTs Resource for 2024
- 2024 Approved How Can You Get VHS Filter and Glitch Filter to Your Images or Videos?
- How to Speed up a Video on Splice
- New Final Cut Pro - How to Download and Install It, In 2024
- In 2024, How to Make OBS Slideshow
- 8 Excellent Video and Photo Mergers on Desktop/Mobile/Online
- In 2024, Easy Guide to Overlay Videos in Premiere Pro
- New 2024 Approved Getting Into The Details A Review of Kodak LUTs
- Add Emoji to Linkedin Post – 5 Tips You Would Like to Know for 2024
- How to Animate Designs With Canva GIF
- New 20 Best Text To Speech Software Windows, Mac, Android, iPhone & O
- 2024 Approved Color Match Game Tips for You
- In 2024, The Benefits Of Using Video For Social Media Marketing
- 2024 Approved Blender Green Screen Effects
- Updated 2024 Approved How to Create Glowing Edge Effect in TikTok Dancing Video
- In 2024, How To Trim Video In Premiere Pro in Different Ways
- New In 2024, Create Glitch Text Effect
- Do You Want to Know How to Import or Adjust Clips in Wondershare Filmora? Dont Worry because Importing or Adjusting Video Clips in This Tool Is Pretty Easy
- 2024 Approved Methods on How to Speed Up Video on Splice
- Updated 2024 Approved Top 12 Best Freeze Frame Video Editing Examples
- 2024 Approved Read and Learn How to Convert a Slow-Motion Video to Normal in This Guide. Besides, Find the Best Desktop Solution to Adjust Video Speed Quickly and Easily
- Best Android Data Recovery - Retrieve Lost Pictures from Honor .
- Read This Guide to Find a Reliable Alternative to Fake GPS On Motorola G54 5G | Dr.fone
- In 2024, How to Fix iPad or Apple iPhone 13 Pro Stuck On Activation Lock?
- How to Reset Vivo Y17s Without the Home Button | Dr.fone
- In 2024, Top 10 Password Cracking Tools For Nokia C12 Plus
- Undelete lost music from Realme
- Disabling Apple iPhone X Parental Restrictions With/Without Password
- In 2024, How To Bypass Activation Lock On Apple Watch Or Apple iPhone 15 Pro Max?
- How to Detect and Remove Spyware on Samsung Galaxy A23 5G? | Dr.fone
- How to Use Google Assistant on Your Lock Screen Of Oppo Find X7 Phone
- In 2024, 10 Easy-to-Use FRP Bypass Tools for Unlocking Google Accounts On Vivo Y02T
- 4 Easy Ways for Your Motorola Moto G13 Hard Reset | Dr.fone
- Process of Screen Sharing Oppo A38 to PC- Detailed Steps | Dr.fone
- In 2024, Best 3 Honor Play 8T Emulator for Mac to Run Your Wanted Android Apps | Dr.fone
- Updated In 2024, Breakthrough How to Make A Picture Speak
- In 2024, New Guide How To Check iCloud Activation Lock Status On Your Apple iPhone 7
- In 2024, Everything To Know About Apple ID Password Requirements For Apple iPhone XS
- Quick Fixes for Why Is My Realme C33 2023 Black and White | Dr.fone
- How to Recover Apple iPhone 11 Pro Max Data From iOS iTunes? | Dr.fone
- How To Change Your Apple ID on iPhone SE With or Without Password
- 3 Ways to Fake GPS Without Root On Tecno Spark 20C | Dr.fone
- Best Free Apple iPhone 15 Pro Max IMEI Checker
- How to Transfer Data from Nubia Z50S Pro to Other Android Devices? | Dr.fone
- Nubia Red Magic 8S Pro Not Connecting to Wi-Fi? 12 Quick Ways to Fix | Dr.fone
- How to Fix Unfortunately, Contacts Has Stopped Error on Vivo Y27 5G | Dr.fone
- In 2024, 4 Ways to Transfer Music from Realme 10T 5G to iPhone | Dr.fone
- Why Is My Xiaomi Redmi Note 13 5G Offline? Troubleshooting Guide | Dr.fone
- Preparation to Beat Giovani in Pokemon Go For Apple iPhone 6s Plus | Dr.fone
- How and Where to Find a Shiny Stone Pokémon For Poco F5 5G? | Dr.fone
- In 2024, Bypass iCloud Activation Lock with IMEI Code On Apple iPhone 6 Plus
- Complete Tutorial to Use VPNa to Fake GPS Location On OnePlus 12 | Dr.fone
- How to view MOV files on Sony Xperia 10 V ?
- How to Change Credit Card from Your Apple iPhone 7 Plus Apple ID and Apple Pay
- In 2024, What Pokémon Evolve with A Dawn Stone For Apple iPhone 6? | Dr.fone
- In 2024, Is GSM Flasher ADB Legit? Full Review To Bypass Your ZTE Phone FRP Lock
- In 2024, How to Unlock iPhone 15 Pro Without Passcode? | Dr.fone
- Solved Warning Camera Failed on Samsung Galaxy M14 5G | Dr.fone
- How to Fake GPS on Android without Mock Location For your Honor X9a | Dr.fone
- Home Button Not Working on Realme GT 3? Here Are Real Fixes | Dr.fone
- 11 Best Location Changers for Vivo Y100 5G | Dr.fone
- In 2024, How To Unlock a Samsung Galaxy S24 Easily?
- Guide to Mirror Your Xiaomi 14 Ultra to Other Android devices | Dr.fone
- Infinix Smart 8 HD Bootloop Problem, How to Fix it Without Data Loss | Dr.fone
- 2024 Approved User Choice Top Free Streaming Sites for Sports
- In 2024, Guide to Mirror Your Motorola Moto G24 to Other Android devices | Dr.fone
- Title: Quickest Guide | Zoom In and Out on Snapchat for 2024
- Author: Chloe
- Created at : 2024-06-26 06:24:09
- Updated at : 2024-06-27 06:24:09
- Link: https://ai-editing-video.techidaily.com/quickest-guide-zoom-in-and-out-on-snapchat-for-2024/
- License: This work is licensed under CC BY-NC-SA 4.0.


