:max_bytes(150000):strip_icc():format(webp)/GettyImages-1345967858-4e7ba42433504ee899e05ceb500f3b68.jpg)
Updated A Complete Guide to Use Distortion Effect in Premiere Pro

A Complete Guide to Use Distortion Effect in Premiere Pro
Create High-Quality Video - Wondershare Filmora
An easy and powerful YouTube video editor
Numerous video and audio effects to choose from
Detailed tutorials are provided by the official channel
Premiere Pro is one of the most popular timeline-based video editing software, with over 9 million users. It’s the successor to Adobe Premiere, and it comes with cool distortion effects. We’ll look at Premiere Pro distortion effects and how to use them.
In this article
01 How to Use Distortion Effect in Premiere Pro?
02 Bonus! Free Distortion Effects for Premiere Pro
Adobe Premiere Pro offers a wide variety of beneficial editing tools and effects. Below are some of the impressive distortion effects you’ll find in Premiere Pro and how to use them in your project.
1. Corner Pin Effect
This effect distorts your image by simply changing the position of its corners. You can use the Corner pin effect to twist, skew, shrink, or stretch an image. Additionally, you can use it to simulate movement or perspective pivoting from the edge of your clip like a door opening.
You can directly manipulate the properties of the Corner Pin effect in the Program monitor by clicking the Transform right next to Corner Pin. To adjust the properties, drag one of the corner handles.
- To use this effect, open Premiere Pro and click File. Choose Import from the drop-down menu. The File Explorer window will open and allow you to find your footage. Select the video file you want to import, then click Open.
- Go to Effects Control and click Distortion. Choose Corner Pin Effect from the drop-down menu.

- You can now pin each corner from its original point to another specific point by adjusting the slider on the Upper Left, Upper Right, Lower Left, and Lower Right. You can also highlight your selection tool when working with the Corner Pin effect.

2. Lens Distortion Effect
This distortion effect Premiere Pro simulates the distorted lens through which people view the clip.
1. Go to Effects Control>Distortion>Lens Distortion Effect.
2. Choose the settings you want to use from the available options and adjust the slider.
- The Vertical and Horizontal Decentering control displaces the lens’ focal and makes the image bend and smear. The image will wrap in on itself at extreme settings.
- The Curvature setting alters the curvature of the lens. You can specify a positive value to make the image convex, while the negative value makes the image concave.
- The Vertical and Horizontal Prism FX setting created results similar to horizontal decentering and vertical, but the image does not wrap in on itself at extreme values.
- Use the Fill Color option to specify the background color, and Fill Alpha to make your background transparent.

3. Magnify Effect
This effect allows you to enlarge a selected area of your clip. The Magnify effect acts as a magnifying glass set over an area of an image. You can also use this effect to scale the whole image far beyond 100 percent and still maintain resolution.
1. To use this effect, go to Effect Control>Distortion>Magnify.
2. Next, go to the left side of the Effects Control panel and make the necessary adjustments to suit your preferences.
- Shape: This control specifies the magnified area shape.
- Center: The Center control allows you to specify the center of the magnified section.
- Magnification: This setting lets users specify the percentage of the magnification of the area they have selected, while the values represent the scale percentage.
- Link: The Link control allows you to specify how the effect will link the Size, Feather, and Magnification amount, to enable them to decrease or increase proportionally. You will disable the Resize Layer option if you set the Link control to any of the available settings except None. Setting the Link control to any setting except None disables Resize Layer. Size & Feather To Magnification allows you to specify that the edge feather and size of the magnified section decrease or increase proportionally regarding the magnification adjustment.
- Size: This control allows you to specify the magnified area size in pixels.
- Feather: With the Feather option, you can specify the amount of feather the effect applies to the magnified area edge. Lower values will sharpen the edge. Higher values will soften the edge while blending the edge with the layer that’s behind it.
- Opacity: This control allows you to specify the transparency of the magnified region.
- Scaling: Use this option to specify the kind of scaling the effect is using to magnify an image.
- Blending Mode: Use this control to specify the blend mode the effect will use to combine the original clip with the magnified area. The None option shows transparent pixels around the magnified section.
- Resize Layer: Selecting this option means the effect will only use the boundaries as the clip’s edge when the magnified region extends beyond the original boundaries of the clip. Deselecting the Resize Layer means that the boundaries of the clip will crop any area of your image outside the bounding box of the original clip.

4. Mirror Effect
This distortion Premiere Pro effect splits an image along a line while reflecting one side onto the other. Where the reflection appears and which side will be reflected is determined by the reflection angles.
1. Head over to Effect Control>Distortion>Mirror to use this effect.
2. Adjust the controls until you get the results you desire.
- Reflection Angle: With the Reflection Angle control, you can specify the angle of reflection and where it appears on the clip. A zero-degree angle reflects the left-hand side on the right.
- Reflection Center: This control allows you to specify the position of the line. You need to click the box, then drag the resulting crosshair up to the area in the image where you would like to place the line.

5. Offset Effect
This effect pans your image within a clip, and visual details pushed off one side of this image will appear on the opposite side. You have to perform the offset with subpixel precision at the best quality.
Also, you can use Offset with a combination of other effects. Head over to Effect Control>Distortion>Offset to use this effect.

6. Spherize Effect
The Spherize effect allows users to wrap a video clip around a spherical shape. You can use it to give texts and objects a three-dimensional effect. Go to Effect Control>Distortion>Spherize and adjust the radius and center of the sphere.

7. Transform Effect
This effect applies 2-dimensional geometric transformations to your clip. You can use this effect to skew clips along any axis.
1. Go to Effect Control>Distortion>Transform to apply this effect to your clip.
2. Use Transform settings to adjust Opacity, Skew, Rotation, Scale, Anchor Point, and more.

8. Turbulent Displace Effect
This fun effect utilizes fractal noise to create turbulent Premiere Pro distortion effects in your image. You can use the Turbulent Displace effect to add movement to your clip.
1. Head to Effect Control>Distortion>Turbulent Displace.
2. Adjust the following controls:
- Displacement
- Amount
- Size
- Offset (Turbulence)
- Complexity
- Evolution
- Pinning
- Resize Layer
- Antialiasing For Best Quality

9. Twirl Effect
The Twirl effect allows you to rotate your clip around its center. It rotates the image more sharply in the middle than at the edge. You can use it on faces to make a funny clip. Navigate to Effect Control>Distortion>Twirl to start using this effect. Next, use the settings to adjust how much angle it twirls and the radius.

10. Wave Warp Effect
This effect is one of the most popular Premiere Pro distortion effects. It generates the appearance of a wave as it’s traveling across an image. The Wave Warp effect allows you to produce various wave shapes, including sine, circular, and square waves.
It’s automatically animated at a steady speed across the time range, and that’s without frames. You need to set keyframes to vary speeds.
1. Head to Effect Control>Distortion>Wave Warp to apply this effect in your video clip.
2. Now, change the wave speed, direction, height, width, and type to suit your preference.

Bonus! Free Distortion Effects for Premiere Pro
1. Liquid Distortion Effect
This effect can distort the content in a clip and can be used to shift into the next clip. It could be utilized in editing or used as a transition.

2. Earthquake Effect
This effect adds a shaking motion to the video clip you add it to; it works as a transition but could also be a useful editing tool.

3. Glass Effect
This effect can add various blurs to the video clip and be used to transition from one clip to the next.

4. TV Effect
This effect imitates the view of a television being turned on or off. You can use it to introduce a new video clip. It would also be a great start or end to the entire video.

5. Glitch Effect
This effect adds a glitch to the video clip. You can use it in editing or as a transition from one clip to the next.

Conclusion
● You can add any of these Premiere Pro distortion effects to make your videos more catchy. In turn, they will get more attention and views. Premiere Pro comes with tons of distortion effects and a responsive interface.
Premiere Pro is one of the most popular timeline-based video editing software, with over 9 million users. It’s the successor to Adobe Premiere, and it comes with cool distortion effects. We’ll look at Premiere Pro distortion effects and how to use them.
In this article
01 How to Use Distortion Effect in Premiere Pro?
02 Bonus! Free Distortion Effects for Premiere Pro
Adobe Premiere Pro offers a wide variety of beneficial editing tools and effects. Below are some of the impressive distortion effects you’ll find in Premiere Pro and how to use them in your project.
1. Corner Pin Effect
This effect distorts your image by simply changing the position of its corners. You can use the Corner pin effect to twist, skew, shrink, or stretch an image. Additionally, you can use it to simulate movement or perspective pivoting from the edge of your clip like a door opening.
You can directly manipulate the properties of the Corner Pin effect in the Program monitor by clicking the Transform right next to Corner Pin. To adjust the properties, drag one of the corner handles.
- To use this effect, open Premiere Pro and click File. Choose Import from the drop-down menu. The File Explorer window will open and allow you to find your footage. Select the video file you want to import, then click Open.
- Go to Effects Control and click Distortion. Choose Corner Pin Effect from the drop-down menu.

- You can now pin each corner from its original point to another specific point by adjusting the slider on the Upper Left, Upper Right, Lower Left, and Lower Right. You can also highlight your selection tool when working with the Corner Pin effect.

2. Lens Distortion Effect
This distortion effect Premiere Pro simulates the distorted lens through which people view the clip.
1. Go to Effects Control>Distortion>Lens Distortion Effect.
2. Choose the settings you want to use from the available options and adjust the slider.
- The Vertical and Horizontal Decentering control displaces the lens’ focal and makes the image bend and smear. The image will wrap in on itself at extreme settings.
- The Curvature setting alters the curvature of the lens. You can specify a positive value to make the image convex, while the negative value makes the image concave.
- The Vertical and Horizontal Prism FX setting created results similar to horizontal decentering and vertical, but the image does not wrap in on itself at extreme values.
- Use the Fill Color option to specify the background color, and Fill Alpha to make your background transparent.

3. Magnify Effect
This effect allows you to enlarge a selected area of your clip. The Magnify effect acts as a magnifying glass set over an area of an image. You can also use this effect to scale the whole image far beyond 100 percent and still maintain resolution.
1. To use this effect, go to Effect Control>Distortion>Magnify.
2. Next, go to the left side of the Effects Control panel and make the necessary adjustments to suit your preferences.
- Shape: This control specifies the magnified area shape.
- Center: The Center control allows you to specify the center of the magnified section.
- Magnification: This setting lets users specify the percentage of the magnification of the area they have selected, while the values represent the scale percentage.
- Link: The Link control allows you to specify how the effect will link the Size, Feather, and Magnification amount, to enable them to decrease or increase proportionally. You will disable the Resize Layer option if you set the Link control to any of the available settings except None. Setting the Link control to any setting except None disables Resize Layer. Size & Feather To Magnification allows you to specify that the edge feather and size of the magnified section decrease or increase proportionally regarding the magnification adjustment.
- Size: This control allows you to specify the magnified area size in pixels.
- Feather: With the Feather option, you can specify the amount of feather the effect applies to the magnified area edge. Lower values will sharpen the edge. Higher values will soften the edge while blending the edge with the layer that’s behind it.
- Opacity: This control allows you to specify the transparency of the magnified region.
- Scaling: Use this option to specify the kind of scaling the effect is using to magnify an image.
- Blending Mode: Use this control to specify the blend mode the effect will use to combine the original clip with the magnified area. The None option shows transparent pixels around the magnified section.
- Resize Layer: Selecting this option means the effect will only use the boundaries as the clip’s edge when the magnified region extends beyond the original boundaries of the clip. Deselecting the Resize Layer means that the boundaries of the clip will crop any area of your image outside the bounding box of the original clip.

4. Mirror Effect
This distortion Premiere Pro effect splits an image along a line while reflecting one side onto the other. Where the reflection appears and which side will be reflected is determined by the reflection angles.
1. Head over to Effect Control>Distortion>Mirror to use this effect.
2. Adjust the controls until you get the results you desire.
- Reflection Angle: With the Reflection Angle control, you can specify the angle of reflection and where it appears on the clip. A zero-degree angle reflects the left-hand side on the right.
- Reflection Center: This control allows you to specify the position of the line. You need to click the box, then drag the resulting crosshair up to the area in the image where you would like to place the line.

5. Offset Effect
This effect pans your image within a clip, and visual details pushed off one side of this image will appear on the opposite side. You have to perform the offset with subpixel precision at the best quality.
Also, you can use Offset with a combination of other effects. Head over to Effect Control>Distortion>Offset to use this effect.

6. Spherize Effect
The Spherize effect allows users to wrap a video clip around a spherical shape. You can use it to give texts and objects a three-dimensional effect. Go to Effect Control>Distortion>Spherize and adjust the radius and center of the sphere.

7. Transform Effect
This effect applies 2-dimensional geometric transformations to your clip. You can use this effect to skew clips along any axis.
1. Go to Effect Control>Distortion>Transform to apply this effect to your clip.
2. Use Transform settings to adjust Opacity, Skew, Rotation, Scale, Anchor Point, and more.

8. Turbulent Displace Effect
This fun effect utilizes fractal noise to create turbulent Premiere Pro distortion effects in your image. You can use the Turbulent Displace effect to add movement to your clip.
1. Head to Effect Control>Distortion>Turbulent Displace.
2. Adjust the following controls:
- Displacement
- Amount
- Size
- Offset (Turbulence)
- Complexity
- Evolution
- Pinning
- Resize Layer
- Antialiasing For Best Quality

9. Twirl Effect
The Twirl effect allows you to rotate your clip around its center. It rotates the image more sharply in the middle than at the edge. You can use it on faces to make a funny clip. Navigate to Effect Control>Distortion>Twirl to start using this effect. Next, use the settings to adjust how much angle it twirls and the radius.

10. Wave Warp Effect
This effect is one of the most popular Premiere Pro distortion effects. It generates the appearance of a wave as it’s traveling across an image. The Wave Warp effect allows you to produce various wave shapes, including sine, circular, and square waves.
It’s automatically animated at a steady speed across the time range, and that’s without frames. You need to set keyframes to vary speeds.
1. Head to Effect Control>Distortion>Wave Warp to apply this effect in your video clip.
2. Now, change the wave speed, direction, height, width, and type to suit your preference.

Bonus! Free Distortion Effects for Premiere Pro
1. Liquid Distortion Effect
This effect can distort the content in a clip and can be used to shift into the next clip. It could be utilized in editing or used as a transition.

2. Earthquake Effect
This effect adds a shaking motion to the video clip you add it to; it works as a transition but could also be a useful editing tool.

3. Glass Effect
This effect can add various blurs to the video clip and be used to transition from one clip to the next.

4. TV Effect
This effect imitates the view of a television being turned on or off. You can use it to introduce a new video clip. It would also be a great start or end to the entire video.

5. Glitch Effect
This effect adds a glitch to the video clip. You can use it in editing or as a transition from one clip to the next.

Conclusion
● You can add any of these Premiere Pro distortion effects to make your videos more catchy. In turn, they will get more attention and views. Premiere Pro comes with tons of distortion effects and a responsive interface.
Premiere Pro is one of the most popular timeline-based video editing software, with over 9 million users. It’s the successor to Adobe Premiere, and it comes with cool distortion effects. We’ll look at Premiere Pro distortion effects and how to use them.
In this article
01 How to Use Distortion Effect in Premiere Pro?
02 Bonus! Free Distortion Effects for Premiere Pro
Adobe Premiere Pro offers a wide variety of beneficial editing tools and effects. Below are some of the impressive distortion effects you’ll find in Premiere Pro and how to use them in your project.
1. Corner Pin Effect
This effect distorts your image by simply changing the position of its corners. You can use the Corner pin effect to twist, skew, shrink, or stretch an image. Additionally, you can use it to simulate movement or perspective pivoting from the edge of your clip like a door opening.
You can directly manipulate the properties of the Corner Pin effect in the Program monitor by clicking the Transform right next to Corner Pin. To adjust the properties, drag one of the corner handles.
- To use this effect, open Premiere Pro and click File. Choose Import from the drop-down menu. The File Explorer window will open and allow you to find your footage. Select the video file you want to import, then click Open.
- Go to Effects Control and click Distortion. Choose Corner Pin Effect from the drop-down menu.

- You can now pin each corner from its original point to another specific point by adjusting the slider on the Upper Left, Upper Right, Lower Left, and Lower Right. You can also highlight your selection tool when working with the Corner Pin effect.

2. Lens Distortion Effect
This distortion effect Premiere Pro simulates the distorted lens through which people view the clip.
1. Go to Effects Control>Distortion>Lens Distortion Effect.
2. Choose the settings you want to use from the available options and adjust the slider.
- The Vertical and Horizontal Decentering control displaces the lens’ focal and makes the image bend and smear. The image will wrap in on itself at extreme settings.
- The Curvature setting alters the curvature of the lens. You can specify a positive value to make the image convex, while the negative value makes the image concave.
- The Vertical and Horizontal Prism FX setting created results similar to horizontal decentering and vertical, but the image does not wrap in on itself at extreme values.
- Use the Fill Color option to specify the background color, and Fill Alpha to make your background transparent.

3. Magnify Effect
This effect allows you to enlarge a selected area of your clip. The Magnify effect acts as a magnifying glass set over an area of an image. You can also use this effect to scale the whole image far beyond 100 percent and still maintain resolution.
1. To use this effect, go to Effect Control>Distortion>Magnify.
2. Next, go to the left side of the Effects Control panel and make the necessary adjustments to suit your preferences.
- Shape: This control specifies the magnified area shape.
- Center: The Center control allows you to specify the center of the magnified section.
- Magnification: This setting lets users specify the percentage of the magnification of the area they have selected, while the values represent the scale percentage.
- Link: The Link control allows you to specify how the effect will link the Size, Feather, and Magnification amount, to enable them to decrease or increase proportionally. You will disable the Resize Layer option if you set the Link control to any of the available settings except None. Setting the Link control to any setting except None disables Resize Layer. Size & Feather To Magnification allows you to specify that the edge feather and size of the magnified section decrease or increase proportionally regarding the magnification adjustment.
- Size: This control allows you to specify the magnified area size in pixels.
- Feather: With the Feather option, you can specify the amount of feather the effect applies to the magnified area edge. Lower values will sharpen the edge. Higher values will soften the edge while blending the edge with the layer that’s behind it.
- Opacity: This control allows you to specify the transparency of the magnified region.
- Scaling: Use this option to specify the kind of scaling the effect is using to magnify an image.
- Blending Mode: Use this control to specify the blend mode the effect will use to combine the original clip with the magnified area. The None option shows transparent pixels around the magnified section.
- Resize Layer: Selecting this option means the effect will only use the boundaries as the clip’s edge when the magnified region extends beyond the original boundaries of the clip. Deselecting the Resize Layer means that the boundaries of the clip will crop any area of your image outside the bounding box of the original clip.

4. Mirror Effect
This distortion Premiere Pro effect splits an image along a line while reflecting one side onto the other. Where the reflection appears and which side will be reflected is determined by the reflection angles.
1. Head over to Effect Control>Distortion>Mirror to use this effect.
2. Adjust the controls until you get the results you desire.
- Reflection Angle: With the Reflection Angle control, you can specify the angle of reflection and where it appears on the clip. A zero-degree angle reflects the left-hand side on the right.
- Reflection Center: This control allows you to specify the position of the line. You need to click the box, then drag the resulting crosshair up to the area in the image where you would like to place the line.

5. Offset Effect
This effect pans your image within a clip, and visual details pushed off one side of this image will appear on the opposite side. You have to perform the offset with subpixel precision at the best quality.
Also, you can use Offset with a combination of other effects. Head over to Effect Control>Distortion>Offset to use this effect.

6. Spherize Effect
The Spherize effect allows users to wrap a video clip around a spherical shape. You can use it to give texts and objects a three-dimensional effect. Go to Effect Control>Distortion>Spherize and adjust the radius and center of the sphere.

7. Transform Effect
This effect applies 2-dimensional geometric transformations to your clip. You can use this effect to skew clips along any axis.
1. Go to Effect Control>Distortion>Transform to apply this effect to your clip.
2. Use Transform settings to adjust Opacity, Skew, Rotation, Scale, Anchor Point, and more.

8. Turbulent Displace Effect
This fun effect utilizes fractal noise to create turbulent Premiere Pro distortion effects in your image. You can use the Turbulent Displace effect to add movement to your clip.
1. Head to Effect Control>Distortion>Turbulent Displace.
2. Adjust the following controls:
- Displacement
- Amount
- Size
- Offset (Turbulence)
- Complexity
- Evolution
- Pinning
- Resize Layer
- Antialiasing For Best Quality

9. Twirl Effect
The Twirl effect allows you to rotate your clip around its center. It rotates the image more sharply in the middle than at the edge. You can use it on faces to make a funny clip. Navigate to Effect Control>Distortion>Twirl to start using this effect. Next, use the settings to adjust how much angle it twirls and the radius.

10. Wave Warp Effect
This effect is one of the most popular Premiere Pro distortion effects. It generates the appearance of a wave as it’s traveling across an image. The Wave Warp effect allows you to produce various wave shapes, including sine, circular, and square waves.
It’s automatically animated at a steady speed across the time range, and that’s without frames. You need to set keyframes to vary speeds.
1. Head to Effect Control>Distortion>Wave Warp to apply this effect in your video clip.
2. Now, change the wave speed, direction, height, width, and type to suit your preference.

Bonus! Free Distortion Effects for Premiere Pro
1. Liquid Distortion Effect
This effect can distort the content in a clip and can be used to shift into the next clip. It could be utilized in editing or used as a transition.

2. Earthquake Effect
This effect adds a shaking motion to the video clip you add it to; it works as a transition but could also be a useful editing tool.

3. Glass Effect
This effect can add various blurs to the video clip and be used to transition from one clip to the next.

4. TV Effect
This effect imitates the view of a television being turned on or off. You can use it to introduce a new video clip. It would also be a great start or end to the entire video.

5. Glitch Effect
This effect adds a glitch to the video clip. You can use it in editing or as a transition from one clip to the next.

Conclusion
● You can add any of these Premiere Pro distortion effects to make your videos more catchy. In turn, they will get more attention and views. Premiere Pro comes with tons of distortion effects and a responsive interface.
Premiere Pro is one of the most popular timeline-based video editing software, with over 9 million users. It’s the successor to Adobe Premiere, and it comes with cool distortion effects. We’ll look at Premiere Pro distortion effects and how to use them.
In this article
01 How to Use Distortion Effect in Premiere Pro?
02 Bonus! Free Distortion Effects for Premiere Pro
Adobe Premiere Pro offers a wide variety of beneficial editing tools and effects. Below are some of the impressive distortion effects you’ll find in Premiere Pro and how to use them in your project.
1. Corner Pin Effect
This effect distorts your image by simply changing the position of its corners. You can use the Corner pin effect to twist, skew, shrink, or stretch an image. Additionally, you can use it to simulate movement or perspective pivoting from the edge of your clip like a door opening.
You can directly manipulate the properties of the Corner Pin effect in the Program monitor by clicking the Transform right next to Corner Pin. To adjust the properties, drag one of the corner handles.
- To use this effect, open Premiere Pro and click File. Choose Import from the drop-down menu. The File Explorer window will open and allow you to find your footage. Select the video file you want to import, then click Open.
- Go to Effects Control and click Distortion. Choose Corner Pin Effect from the drop-down menu.

- You can now pin each corner from its original point to another specific point by adjusting the slider on the Upper Left, Upper Right, Lower Left, and Lower Right. You can also highlight your selection tool when working with the Corner Pin effect.

2. Lens Distortion Effect
This distortion effect Premiere Pro simulates the distorted lens through which people view the clip.
1. Go to Effects Control>Distortion>Lens Distortion Effect.
2. Choose the settings you want to use from the available options and adjust the slider.
- The Vertical and Horizontal Decentering control displaces the lens’ focal and makes the image bend and smear. The image will wrap in on itself at extreme settings.
- The Curvature setting alters the curvature of the lens. You can specify a positive value to make the image convex, while the negative value makes the image concave.
- The Vertical and Horizontal Prism FX setting created results similar to horizontal decentering and vertical, but the image does not wrap in on itself at extreme values.
- Use the Fill Color option to specify the background color, and Fill Alpha to make your background transparent.

3. Magnify Effect
This effect allows you to enlarge a selected area of your clip. The Magnify effect acts as a magnifying glass set over an area of an image. You can also use this effect to scale the whole image far beyond 100 percent and still maintain resolution.
1. To use this effect, go to Effect Control>Distortion>Magnify.
2. Next, go to the left side of the Effects Control panel and make the necessary adjustments to suit your preferences.
- Shape: This control specifies the magnified area shape.
- Center: The Center control allows you to specify the center of the magnified section.
- Magnification: This setting lets users specify the percentage of the magnification of the area they have selected, while the values represent the scale percentage.
- Link: The Link control allows you to specify how the effect will link the Size, Feather, and Magnification amount, to enable them to decrease or increase proportionally. You will disable the Resize Layer option if you set the Link control to any of the available settings except None. Setting the Link control to any setting except None disables Resize Layer. Size & Feather To Magnification allows you to specify that the edge feather and size of the magnified section decrease or increase proportionally regarding the magnification adjustment.
- Size: This control allows you to specify the magnified area size in pixels.
- Feather: With the Feather option, you can specify the amount of feather the effect applies to the magnified area edge. Lower values will sharpen the edge. Higher values will soften the edge while blending the edge with the layer that’s behind it.
- Opacity: This control allows you to specify the transparency of the magnified region.
- Scaling: Use this option to specify the kind of scaling the effect is using to magnify an image.
- Blending Mode: Use this control to specify the blend mode the effect will use to combine the original clip with the magnified area. The None option shows transparent pixels around the magnified section.
- Resize Layer: Selecting this option means the effect will only use the boundaries as the clip’s edge when the magnified region extends beyond the original boundaries of the clip. Deselecting the Resize Layer means that the boundaries of the clip will crop any area of your image outside the bounding box of the original clip.

4. Mirror Effect
This distortion Premiere Pro effect splits an image along a line while reflecting one side onto the other. Where the reflection appears and which side will be reflected is determined by the reflection angles.
1. Head over to Effect Control>Distortion>Mirror to use this effect.
2. Adjust the controls until you get the results you desire.
- Reflection Angle: With the Reflection Angle control, you can specify the angle of reflection and where it appears on the clip. A zero-degree angle reflects the left-hand side on the right.
- Reflection Center: This control allows you to specify the position of the line. You need to click the box, then drag the resulting crosshair up to the area in the image where you would like to place the line.

5. Offset Effect
This effect pans your image within a clip, and visual details pushed off one side of this image will appear on the opposite side. You have to perform the offset with subpixel precision at the best quality.
Also, you can use Offset with a combination of other effects. Head over to Effect Control>Distortion>Offset to use this effect.

6. Spherize Effect
The Spherize effect allows users to wrap a video clip around a spherical shape. You can use it to give texts and objects a three-dimensional effect. Go to Effect Control>Distortion>Spherize and adjust the radius and center of the sphere.

7. Transform Effect
This effect applies 2-dimensional geometric transformations to your clip. You can use this effect to skew clips along any axis.
1. Go to Effect Control>Distortion>Transform to apply this effect to your clip.
2. Use Transform settings to adjust Opacity, Skew, Rotation, Scale, Anchor Point, and more.

8. Turbulent Displace Effect
This fun effect utilizes fractal noise to create turbulent Premiere Pro distortion effects in your image. You can use the Turbulent Displace effect to add movement to your clip.
1. Head to Effect Control>Distortion>Turbulent Displace.
2. Adjust the following controls:
- Displacement
- Amount
- Size
- Offset (Turbulence)
- Complexity
- Evolution
- Pinning
- Resize Layer
- Antialiasing For Best Quality

9. Twirl Effect
The Twirl effect allows you to rotate your clip around its center. It rotates the image more sharply in the middle than at the edge. You can use it on faces to make a funny clip. Navigate to Effect Control>Distortion>Twirl to start using this effect. Next, use the settings to adjust how much angle it twirls and the radius.

10. Wave Warp Effect
This effect is one of the most popular Premiere Pro distortion effects. It generates the appearance of a wave as it’s traveling across an image. The Wave Warp effect allows you to produce various wave shapes, including sine, circular, and square waves.
It’s automatically animated at a steady speed across the time range, and that’s without frames. You need to set keyframes to vary speeds.
1. Head to Effect Control>Distortion>Wave Warp to apply this effect in your video clip.
2. Now, change the wave speed, direction, height, width, and type to suit your preference.

Bonus! Free Distortion Effects for Premiere Pro
1. Liquid Distortion Effect
This effect can distort the content in a clip and can be used to shift into the next clip. It could be utilized in editing or used as a transition.

2. Earthquake Effect
This effect adds a shaking motion to the video clip you add it to; it works as a transition but could also be a useful editing tool.

3. Glass Effect
This effect can add various blurs to the video clip and be used to transition from one clip to the next.

4. TV Effect
This effect imitates the view of a television being turned on or off. You can use it to introduce a new video clip. It would also be a great start or end to the entire video.

5. Glitch Effect
This effect adds a glitch to the video clip. You can use it in editing or as a transition from one clip to the next.

Conclusion
● You can add any of these Premiere Pro distortion effects to make your videos more catchy. In turn, they will get more attention and views. Premiere Pro comes with tons of distortion effects and a responsive interface.
Top 10 Free WhatsApp Video Converter
WhatsApp is one of the most popular apps for global users. It is a simple tool for sending messages and instant videos, and also sharing statuses. However, there is a size limit to sharing video files via WhatsApp. Plus, the app supports only certain types of video file formats.
At this point, using a high-quality WhatsApp video converter is a proper way to go. This article will let you know not only the best software but also web-based tools to convert WhatsApp video in any situation.
Which Video Formats Does WhatsApp Support?
“WhatsApp only allows me to send (a) video of maximum (of) 17 MB size, of duration 2:50 minutes. But my cousin has sent me a video of 35 MB, with (a) 5:40 minutes duration. How has this been possible?”
Indeed, WhatsApp has size and format-related restrictions, like a 16 MB size limit. However, you can access the WhatsApp Web version to share longer videos since it allows a size limit of 64 MB. Alternatively, you can reduce video size for WhatsApp with converter tools to compress, convert, and optimize video files**.**
The Best Video Formats for WhatsApp
This platform only supports specific video codec or format types that suits the pre-set compression standards.
WhatsApp-supported video formats
AVI, MP4, MOV, MKV, FLV audio codec, and 3 GP (/MPEG-4 video codec encoding).
WhatsApp allowed file size
16MB
To make sure that videos transfer safely and smoothly via WhatsApp, make the necessary size and codec conversion.
Best 5 Software to convert video for WhatsApp
Specific WhatsApp video converter types come in software versions for Mac or Windows users. You can download and launch them to use the features without network connection.
WinX HD Video Converter Deluxe
WinX HD Video Converter Deluxe is a user-friendly tool to convert video for WhatsApp, from different formats and devices. You can expect high-quality video output, reaching 4K to 8K resolution. Make necessary video codec and size changes to compress videos fit for WhatsApp-based sharing.

Converting Speed: High.
Compatible Platforms: WhatsApp, YouTube, Facebook, Instagram, Email, etc.
Supported Formats: MP4, GoPro devices, MKV, Drone devices, MOV, MTS, AVI, etc.
Rating: 3.6/5 (Top Ten Reviews)
Main Features:
- Multiple file sizes for conversion.
- Resolution up to 1080p or 4K.
- Change frame rate.
- The open-source platform is fit for Mac and Windows.
Pros
- No significant quality loss during conversions.
- Reduce GB-based sizes to MB.
- Stable compression process.
Cons
- Not for free.
- Limited advanced editor settings.
Filmora
Filmora is a high-quality WhatsApp video converter, it enables you convert any types of videos for WhatsApp, YouTube, also TikTok. Besides, Filmora is best for video editing functions, like cutting, trimming, rotating, compressing, and more. Also, get advanced editing functions like color correction, background removal, audio visualization, etc., before converting files in the WhatsApp-support format of choice.
Free Download For Win 7 or later(64-bit)
Free Download For macOS 10.14 or later

Converting Speed: High.
Compatible Platforms: YouTube, Vimeo, WhatsApp, etc.
Supported Formats: MKV, MP4, MOV, AVI, WMV, F4V, MP3, etc.
Rating: 8/10 (TrustRadius)
Main Features:
- Compress video during output as per file format type.
- Cut the size of the video to reduce the size.
- Advanced editing like background removal.
- High-quality HD resolution.
Pros
- Convert to different formats.
- Adjust the speed of the video.
- Trim file size.
Cons
- Advanced functions like watermark removal are available in premium plans.
- At least 10 GB of disk space is necessary for the device.
Wondershare Uniconverter
This software for Mac and Windows users is useful for converting different file formats into different output files. Here, you can add videos from the device library or cloud storage. Later, make conversion choices like video format type, scale size, etc.

Converting Speed: High
Compatible Platforms: WhatsApp, YouTube, etc.
Supported Formats: MP4 (Standard/4K), MKV, AVI, AVCHD, FLV, MP3, etc.
Rating: 5/5 (GetApp)
Main Features:
- Split screen video support.
- Adjust the frame rate of videos.
- Customize video filters.
- Converts HD and SD files.
Pros
- Video quality remains the same during conversion.
- Compress files to smaller sizes.
- Automated conversion.
Cons
- Advanced features like watermark removal require payment.
- Limited access to cloud storage.
HandBrake
HandBrake is a user-friendly and open-source WhatsApp video converter fit for different devices. You can convert and even edit the video files for other devices and compress the size without quality loss. See a preview before completing the changes.

Converting Speed: Medium-High.
Compatible Platforms: All browser types on Linux, Windows, and Mac devices.
Supported Formats: MKV, MP4 (mainly M4V), and WebM.
Rating: 4/5 (TechRadar)
Main Features:
- Make chapter markers on files.
- Many pre-set video filters are available.
- Live preview of the video before conversion.
- Convert Blu-ray and DVD video files.
Pros
- Open-source platform.
- Batch scanning and encoding files in queues.
- CFR and VFR-based compatibility.
Cons
- No direct conversion of the file to WhatsApp.
- Limited variety in output file format choices.
Freemake Video Converter
Freemake is a top-notch video converter tool that users can try to create and compress different file formats for free. Download the output file in any form and high-resolution quality.

Converting Speed: High.
Compatible Platforms: YouTube, Vimeo, WhatsApp, etc.
Supported Formats: AVI, MP4, WMV, MKV, 3GP, MP3, DVD, FLV, SWF, MOV, Divx, MTS, etc.
Rating: 4.5/5 (TechRadar)
Main Features:
- Supports multiple video codecs like MPEG4, and AV1.
- Batch processing is possible.
- Edit videos by rotation, trimming, etc.
- Encode the videos.
Pros
- No extra cost for conversions.
- Users can convert bigger files as well.
- Supports videos from different devices and online platforms, like Vimeo.
Cons
- Users cannot directly prepare/send WhatsApp videos.
- It is mainly allowed on Windows.
Top 5 Online Video Converter for WhatsApp
Online tools are available that allow users to convert videos to WhatsApp format. The top 5 of them are listed here.
FlexClip
FlexiClip offers an online WhatsApp video converter for free to quickly change file formats into WhatsApp-supported options. In addition, you can use this tool to make other types of conversions like audio and image files.

Converting Speed: Medium-High.
Supported Formats: MOV, MP4, AVI, etc.
Rating: 4.4/5 (TrustPilot)
Main Features:
- Create video for social media marketing.
- Pre-set templates are available.
- Multiple stock images and videos are available.
- Rich-quality overlays and transitions.
Pros
- Dynamic types of vector elements are available.
- 1000+ text-based animations/pre-set styles present.
- High-quality transitions.
Cons
- Registration is vital to export files.
- It is hard to edit pre-saved videos.
Online Converter
This is a free WhatsApp video converter web service for users to change files to suit the WhatsApp platform quickly. In addition, you can decide the resolution of the video for output and even cut files based on timestamps.

Converting Speed: Medium-High.
Supported Formats: AVI, MOV, MP4, etc.
Rating: 3.6/5 (TrustPilot)
Main Features:
- Convert any file suitable for WhatsApp.
- Support cloud-based file insertion.
- Time-based video cutting for editing.
- Enable or disable the background audio track.
Pros
- Convert multiple files at a time.
- Different resolution-based choices are available.
- Add video URL to convert.
Cons
- Limited advanced settings.
- Does not support diverse file formats.
Clideo
Clideo is a suitable WhatsApp video converter that mainly compresses the files to WhatsApp-appropriate sizes. Moreover, you can insert your video file from cloud storage and quickly convert multiple files.

Converting Speed: Medium.
Supported Formats: MP4, AVI, WMV, VOB, MOV, etc.
Rating: 4.8/5 (TrustPilot)
Main Features:
- See preview before conversion.
- Automated file size-reducing parameters.
- Support file sizes upto 500 MB.
- Add a file from any device.
Pros
- Fast processing.
- Encryption-protected files.
- Intuitive interface.
Cons
- The uploading and conversion process can take a long time.
- The watermark is visible.
Kapwing
Kapwing’s online conversion tool can change video files and make them WhatsApp-compatible quickly. Users can customize different aspects of exporting feature, like ratio, video length, and frame rate.

Converting Speed: Very High.
Supported Formats: FLV, WAV, MOV, WMV, MP4, AVI, etc.
Rating: 4.7/5 (TrustPilot)
Main Features:
- Change the file format, type, size, and frame rate.
- Convert to MP4 from different formats.
- Upload by clicking the necessary button on the screen or drag the file and drop.
- Choose aspect ratios like 16:9 or 1:1.
Pros
- AI-powered conversion.
- Online converter tool available for free.
- Convert video to image format as well.
Cons
- A limited variety of formats are supported.
- Registered members can remove watermarks.
Aconvert
This is a speedy WhatsApp video converter that users can try out on any device quickly. It supports a wide range of input and output format options for conversion/compression.

Converting Speed: Medium-High
Supported Formats: Multiple types, like AVI, MKV, MOV, MPEG, PNG, JPG, PDF, etc.
Rating: 100/100 (Scam Detector)
Main Features:
- Add at least files for converting.
- Insert files from computers, tablets, or mobile phones.
- Size and status information is visible during conversion.
- The original file size cannot extend beyond 40 MB in size.
Pros
- Multiple types of formats are supported, like images, videos, ebooks, etc.
- No installation or registration is necessary.
- Batch conversion is allowed.
Cons
- Not available in some regions.
- The speed is standard-level.
Hot FAQs on Converting Videos for WhatsApp
1. How can I send a 10-minute video on WhatsApp?
Users can directly send videos with 10-minute-length via WhatsApp if the file size is 16 MB or lower. Otherwise, you can compress the file using a video converter for WhatsApp. Alternatively, you can upload your file into your Cloud account and copy the link to send.
2. How to convert YouTube videos to WhatsApp?
You can directly copy the YouTube-based video link below the Share button on its page, paste it into the chat, and send it. Alternatively, you can use a reliable converter tool to download YouTube videos in one of the supported video formats (e.g., MP4). Then, share them via WhatsApp chat.
3. How to Send Videos on WhatsApp Without Compressing?
WhatsApp compresses the video files automatically when users insert and send them via the Gallery icon within chats. However, you can avoid reducing video quality or compressing them if you send it by clicking on the Document icon > My Media Files/whichever folder the file is in.
Final Words
Overall, multiple online and software-based tools help convert video files to suit WhatsApp-based restrictions. Among them, Filmora is all-in-one software to cut and edit videos for sharing correctly. For online-based conversion, Kapwing is a usable alternative, in our opinion. To make your choice, though, go through all options carefully.
- WinX HD Video Converter Deluxe
- Filmora
- Wondershare Uniconverter
- HandBrake
- Freemake Video Converter
- Top 5 Online Video Converter for WhatsApp
Which Video Formats Does WhatsApp Support?
“WhatsApp only allows me to send (a) video of maximum (of) 17 MB size, of duration 2:50 minutes. But my cousin has sent me a video of 35 MB, with (a) 5:40 minutes duration. How has this been possible?”
Indeed, WhatsApp has size and format-related restrictions, like a 16 MB size limit. However, you can access the WhatsApp Web version to share longer videos since it allows a size limit of 64 MB. Alternatively, you can reduce video size for WhatsApp with converter tools to compress, convert, and optimize video files**.**
The Best Video Formats for WhatsApp
This platform only supports specific video codec or format types that suits the pre-set compression standards.
WhatsApp-supported video formats
AVI, MP4, MOV, MKV, FLV audio codec, and 3 GP (/MPEG-4 video codec encoding).
WhatsApp allowed file size
16MB
To make sure that videos transfer safely and smoothly via WhatsApp, make the necessary size and codec conversion.
Best 5 Software to convert video for WhatsApp
Specific WhatsApp video converter types come in software versions for Mac or Windows users. You can download and launch them to use the features without network connection.
WinX HD Video Converter Deluxe
WinX HD Video Converter Deluxe is a user-friendly tool to convert video for WhatsApp, from different formats and devices. You can expect high-quality video output, reaching 4K to 8K resolution. Make necessary video codec and size changes to compress videos fit for WhatsApp-based sharing.

Converting Speed: High.
Compatible Platforms: WhatsApp, YouTube, Facebook, Instagram, Email, etc.
Supported Formats: MP4, GoPro devices, MKV, Drone devices, MOV, MTS, AVI, etc.
Rating: 3.6/5 (Top Ten Reviews)
Main Features:
- Multiple file sizes for conversion.
- Resolution up to 1080p or 4K.
- Change frame rate.
- The open-source platform is fit for Mac and Windows.
Pros
- No significant quality loss during conversions.
- Reduce GB-based sizes to MB.
- Stable compression process.
Cons
- Not for free.
- Limited advanced editor settings.
Filmora
Filmora is a high-quality WhatsApp video converter, it enables you convert any types of videos for WhatsApp, YouTube, also TikTok. Besides, Filmora is best for video editing functions, like cutting, trimming, rotating, compressing, and more. Also, get advanced editing functions like color correction, background removal, audio visualization, etc., before converting files in the WhatsApp-support format of choice.
Free Download For Win 7 or later(64-bit)
Free Download For macOS 10.14 or later

Converting Speed: High.
Compatible Platforms: YouTube, Vimeo, WhatsApp, etc.
Supported Formats: MKV, MP4, MOV, AVI, WMV, F4V, MP3, etc.
Rating: 8/10 (TrustRadius)
Main Features:
- Compress video during output as per file format type.
- Cut the size of the video to reduce the size.
- Advanced editing like background removal.
- High-quality HD resolution.
Pros
- Convert to different formats.
- Adjust the speed of the video.
- Trim file size.
Cons
- Advanced functions like watermark removal are available in premium plans.
- At least 10 GB of disk space is necessary for the device.
Wondershare Uniconverter
This software for Mac and Windows users is useful for converting different file formats into different output files. Here, you can add videos from the device library or cloud storage. Later, make conversion choices like video format type, scale size, etc.

Converting Speed: High
Compatible Platforms: WhatsApp, YouTube, etc.
Supported Formats: MP4 (Standard/4K), MKV, AVI, AVCHD, FLV, MP3, etc.
Rating: 5/5 (GetApp)
Main Features:
- Split screen video support.
- Adjust the frame rate of videos.
- Customize video filters.
- Converts HD and SD files.
Pros
- Video quality remains the same during conversion.
- Compress files to smaller sizes.
- Automated conversion.
Cons
- Advanced features like watermark removal require payment.
- Limited access to cloud storage.
HandBrake
HandBrake is a user-friendly and open-source WhatsApp video converter fit for different devices. You can convert and even edit the video files for other devices and compress the size without quality loss. See a preview before completing the changes.

Converting Speed: Medium-High.
Compatible Platforms: All browser types on Linux, Windows, and Mac devices.
Supported Formats: MKV, MP4 (mainly M4V), and WebM.
Rating: 4/5 (TechRadar)
Main Features:
- Make chapter markers on files.
- Many pre-set video filters are available.
- Live preview of the video before conversion.
- Convert Blu-ray and DVD video files.
Pros
- Open-source platform.
- Batch scanning and encoding files in queues.
- CFR and VFR-based compatibility.
Cons
- No direct conversion of the file to WhatsApp.
- Limited variety in output file format choices.
Freemake Video Converter
Freemake is a top-notch video converter tool that users can try to create and compress different file formats for free. Download the output file in any form and high-resolution quality.

Converting Speed: High.
Compatible Platforms: YouTube, Vimeo, WhatsApp, etc.
Supported Formats: AVI, MP4, WMV, MKV, 3GP, MP3, DVD, FLV, SWF, MOV, Divx, MTS, etc.
Rating: 4.5/5 (TechRadar)
Main Features:
- Supports multiple video codecs like MPEG4, and AV1.
- Batch processing is possible.
- Edit videos by rotation, trimming, etc.
- Encode the videos.
Pros
- No extra cost for conversions.
- Users can convert bigger files as well.
- Supports videos from different devices and online platforms, like Vimeo.
Cons
- Users cannot directly prepare/send WhatsApp videos.
- It is mainly allowed on Windows.
Top 5 Online Video Converter for WhatsApp
Online tools are available that allow users to convert videos to WhatsApp format. The top 5 of them are listed here.
FlexClip
FlexiClip offers an online WhatsApp video converter for free to quickly change file formats into WhatsApp-supported options. In addition, you can use this tool to make other types of conversions like audio and image files.

Converting Speed: Medium-High.
Supported Formats: MOV, MP4, AVI, etc.
Rating: 4.4/5 (TrustPilot)
Main Features:
- Create video for social media marketing.
- Pre-set templates are available.
- Multiple stock images and videos are available.
- Rich-quality overlays and transitions.
Pros
- Dynamic types of vector elements are available.
- 1000+ text-based animations/pre-set styles present.
- High-quality transitions.
Cons
- Registration is vital to export files.
- It is hard to edit pre-saved videos.
Online Converter
This is a free WhatsApp video converter web service for users to change files to suit the WhatsApp platform quickly. In addition, you can decide the resolution of the video for output and even cut files based on timestamps.

Converting Speed: Medium-High.
Supported Formats: AVI, MOV, MP4, etc.
Rating: 3.6/5 (TrustPilot)
Main Features:
- Convert any file suitable for WhatsApp.
- Support cloud-based file insertion.
- Time-based video cutting for editing.
- Enable or disable the background audio track.
Pros
- Convert multiple files at a time.
- Different resolution-based choices are available.
- Add video URL to convert.
Cons
- Limited advanced settings.
- Does not support diverse file formats.
Clideo
Clideo is a suitable WhatsApp video converter that mainly compresses the files to WhatsApp-appropriate sizes. Moreover, you can insert your video file from cloud storage and quickly convert multiple files.

Converting Speed: Medium.
Supported Formats: MP4, AVI, WMV, VOB, MOV, etc.
Rating: 4.8/5 (TrustPilot)
Main Features:
- See preview before conversion.
- Automated file size-reducing parameters.
- Support file sizes upto 500 MB.
- Add a file from any device.
Pros
- Fast processing.
- Encryption-protected files.
- Intuitive interface.
Cons
- The uploading and conversion process can take a long time.
- The watermark is visible.
Kapwing
Kapwing’s online conversion tool can change video files and make them WhatsApp-compatible quickly. Users can customize different aspects of exporting feature, like ratio, video length, and frame rate.

Converting Speed: Very High.
Supported Formats: FLV, WAV, MOV, WMV, MP4, AVI, etc.
Rating: 4.7/5 (TrustPilot)
Main Features:
- Change the file format, type, size, and frame rate.
- Convert to MP4 from different formats.
- Upload by clicking the necessary button on the screen or drag the file and drop.
- Choose aspect ratios like 16:9 or 1:1.
Pros
- AI-powered conversion.
- Online converter tool available for free.
- Convert video to image format as well.
Cons
- A limited variety of formats are supported.
- Registered members can remove watermarks.
Aconvert
This is a speedy WhatsApp video converter that users can try out on any device quickly. It supports a wide range of input and output format options for conversion/compression.

Converting Speed: Medium-High
Supported Formats: Multiple types, like AVI, MKV, MOV, MPEG, PNG, JPG, PDF, etc.
Rating: 100/100 (Scam Detector)
Main Features:
- Add at least files for converting.
- Insert files from computers, tablets, or mobile phones.
- Size and status information is visible during conversion.
- The original file size cannot extend beyond 40 MB in size.
Pros
- Multiple types of formats are supported, like images, videos, ebooks, etc.
- No installation or registration is necessary.
- Batch conversion is allowed.
Cons
- Not available in some regions.
- The speed is standard-level.
Hot FAQs on Converting Videos for WhatsApp
1. How can I send a 10-minute video on WhatsApp?
Users can directly send videos with 10-minute-length via WhatsApp if the file size is 16 MB or lower. Otherwise, you can compress the file using a video converter for WhatsApp. Alternatively, you can upload your file into your Cloud account and copy the link to send.
2. How to convert YouTube videos to WhatsApp?
You can directly copy the YouTube-based video link below the Share button on its page, paste it into the chat, and send it. Alternatively, you can use a reliable converter tool to download YouTube videos in one of the supported video formats (e.g., MP4). Then, share them via WhatsApp chat.
3. How to Send Videos on WhatsApp Without Compressing?
WhatsApp compresses the video files automatically when users insert and send them via the Gallery icon within chats. However, you can avoid reducing video quality or compressing them if you send it by clicking on the Document icon > My Media Files/whichever folder the file is in.
Final Words
Overall, multiple online and software-based tools help convert video files to suit WhatsApp-based restrictions. Among them, Filmora is all-in-one software to cut and edit videos for sharing correctly. For online-based conversion, Kapwing is a usable alternative, in our opinion. To make your choice, though, go through all options carefully.
How to Make a Super Easy Rotating Video Effect
Controlling camera direction to the subject’s hands and filming is trending nowadays. Create this effect by using easy film hacks, as shown in this article.
Many users make rotating illusion videos for TikTok or any branding video. The foremost items to record are explained in this article with detailed instructions. The best editing tool is also clarified below for instant results. So keep reading to get a hand with filming and editing a professional rotating transition video!
Part 1. What is a Rotating Video Illusion/Effect
Rotating transition video is a trending feature used by models and influencers. The brands also use this style to record the model’s videos in advertisements. It could be any makeup transition or clothing transition video.

It helps to indulge the audience with your content and show the after and before transitions. You can try this with any object or any character. But first, let’s figure out the requirements for rotating effects.
Part 2. Prerequisites to Make a Rotating Video Effect
You will need a few items to create a rotating transition video. First, look at the fundamental priorities for creating this feature.
The Subject Matters
To record a successful rotating video, you need a person or a subject to perform in front of the camera. It can be a model hired by a brand, a social influencer, or maybe it’s you. Keep in mind the following things before recording:
- The person should get two different costumes.
- All the actions need to be rehearsed before shooting
- Show affinity and control of the camera.

Shotting Equipment
To record a professional video, you need a good camera. You can use a smartphone to record this footage. There is no need to have a tripod stand or any gear to hold the camera because the camera will be in a rotating position, the same as the subject’s hand.
For this, you need a filmmaker or any person living with you. Just give instructions as shown below to him to record a perfect video for yourself:
- Record the whole video in just one direction.
- Don’t shake the camera because it gives blurry footage.
- Ensure to focus on the subject during recording.
- Don’t zoom in or out while recording the video.
- Keep the subject in the middle of the frame during the recording process.
- The hand rotation timing is the same as the camera’s rotation.
![]()
Note: Ensure to record one footage multiple times so that you can choose the perfect one later for editing.

Filming of the First Footage
To make the footage for the rotating video illusion, we have to record it at least twice to get crystal clear and high-resolution results. Therefore, ensure that we have camera movement in the same direction during all recording times.
![]()
Note: You can film the video either in the vertical format of the camera or in horizontal format. It all depends upon your script!
Follow the below-mentioned steps to record the first footage for the video:
- Hold the camera in a perfect format, whatever you choose.
- Let the subject stand or sit in the middle of the frame.
- The filmmaker can rotate the camera when the subject’s hand rotates.
- Try your best to rotate the camera 180 degrees.
- Ensure that the camera lens faces the ground at the end of the rotation.

After filming the first footage for the video, it’s time to record the second footage to transition between the two.
Filming of the Second Footage
To create a second shot, you have to remember that the costume and location of the filming are different from the first footage. Follow the below steps to record it:
- The first step is to hold the camera in the same direction as the first footage.
- When editing, make sure the subject’s position matches the first footage.
- Make sure the subject’s hand movement is in the opposite direction from the first shot.

Now you have both scenes and footage ready. Next, you have to edit them by inserting them into editing software. Follow the step guides below to perform this action!
Part 3. Step-by-Step Guide to Edit on Filmora
To create a professional rotating video illusion, Wondershare Filmora is an ideal tool. Even beginners can quickly get the hang of it due to its highly engaging system user interface (UI). You will discover how to create a rotating video effect in a few clicks.
Free Download For Win 7 or later(64-bit)
Free Download For macOS 10.14 or later

Step1 Download Wondershare Filmora
To edit your video like a pro, download the most recent version of Wondershare Filmora.
- Download and open Wondershare Filmora on your PC or Mac.
Step2 Import the Footage
Import recorded footage to start the editing process. It is better to have all your footage in one folder before importing all the clips. The main import window locates in the upper left corner when it is first launched.
- Click on the Import icon in the import window’s center.
- Wondershare Filmora will then immediately point you toward your PC
- Navigate to the location where your preferred Videos and Photos are kept.
- Choose every footage you wish to import.
- Once you click Open, the files will import.

It’s time to prepare the footage for editing after inserting it into the Filmora. Follow the next steps to do this!
Step3 Add Footage to the Timeline
The videos you’ve imported will be added to the timeline after that. You can import both footages at once and put them all at once into the timeline.
Alternatively, you can add them one at a time as needed. Follow the procedures as shown to add an item to your timeline.
- To choose a photo or movie, use the right-click
- Holding the Right-click, and move it to the timeline from the bottom.

Your images and videos have been imported into the timeline; now it’s time to trim them according to requirements.
Step4 Trim the Clips
To insert transition effects, you must trim the clip at a specific point and speed up the clip at the required duration. For this, follow the next actions as shown below:
- Playback clips and stop the playhead where you want by pressing the Space button from the Keyboard.
- Then, click on the Split icon present on the playhead.
- It will trim the clip from that point and separate it from its former one.

After splitting or trimming the clips, you now have to adjust the speed of the clips, as shown below!
Step5 Adjust Speed and Duration
There is a need to increase the speed of some scenes where the transition starts or ends. For this, follow the below actions:
- Find the section which needs to speed up, such as in the last half of each rotation.
- Right-click on the section of the clip in the timeline.
- Then, select the Speed option as shown in the icon of the timer present on the upper tab of the timeline.
- Select the Fast option, and if you want to lower the speed, select the Slow option**.**
- Choose the speed range according to your requirement.
- Select that required option and play it back to check if it is correct.

The video is all set; give it the final touches by following the last step, as shown below!
Step6 Playback the Video
After adding and adjusting all the features, double-check the video by playback. If you find any duration issue, review it and adjust it according to your requirement.
You can playback the video by clicking on the Play button. Perform this a few more times to ensure the speed looks okay and adjust if it is too slow or too fast.

You can also view it in full screen by selecting the last option on the tab. If there is no problem, you can export it locally or directly share it on TikTok or anywhere you want to gain views and attract an audience. You can also use it as a magic trick to inspire other people or as a transition for videos!
Conclusion
Keep creating and experimenting with other features on Wondershare Filmora. For example, you can use different effects, try on stock media, and then create or film your own. In this way, you’ll get professional results.
If you are showing new strategies daily to your viewers, they will hook up with you, and it’ll assist in the algorithm working by your side. That’s why keep doing it and enjoying the rest!

Filming of the First Footage
To make the footage for the rotating video illusion, we have to record it at least twice to get crystal clear and high-resolution results. Therefore, ensure that we have camera movement in the same direction during all recording times.
![]()
Note: You can film the video either in the vertical format of the camera or in horizontal format. It all depends upon your script!
Follow the below-mentioned steps to record the first footage for the video:
- Hold the camera in a perfect format, whatever you choose.
- Let the subject stand or sit in the middle of the frame.
- The filmmaker can rotate the camera when the subject’s hand rotates.
- Try your best to rotate the camera 180 degrees.
- Ensure that the camera lens faces the ground at the end of the rotation.

After filming the first footage for the video, it’s time to record the second footage to transition between the two.
Filming of the Second Footage
To create a second shot, you have to remember that the costume and location of the filming are different from the first footage. Follow the below steps to record it:
- The first step is to hold the camera in the same direction as the first footage.
- When editing, make sure the subject’s position matches the first footage.
- Make sure the subject’s hand movement is in the opposite direction from the first shot.

Now you have both scenes and footage ready. Next, you have to edit them by inserting them into editing software. Follow the step guides below to perform this action!
Part 3. Step-by-Step Guide to Edit on Filmora
To create a professional rotating video illusion, Wondershare Filmora is an ideal tool. Even beginners can quickly get the hang of it due to its highly engaging system user interface (UI). You will discover how to create a rotating video effect in a few clicks.
Free Download For Win 7 or later(64-bit)
Free Download For macOS 10.14 or later

Step1 Download Wondershare Filmora
To edit your video like a pro, download the most recent version of Wondershare Filmora.
- Download and open Wondershare Filmora on your PC or Mac.
Step2 Import the Footage
Import recorded footage to start the editing process. It is better to have all your footage in one folder before importing all the clips. The main import window locates in the upper left corner when it is first launched.
- Click on the Import icon in the import window’s center.
- Wondershare Filmora will then immediately point you toward your PC
- Navigate to the location where your preferred Videos and Photos are kept.
- Choose every footage you wish to import.
- Once you click Open, the files will import.

It’s time to prepare the footage for editing after inserting it into the Filmora. Follow the next steps to do this!
Step3 Add Footage to the Timeline
The videos you’ve imported will be added to the timeline after that. You can import both footages at once and put them all at once into the timeline.
Alternatively, you can add them one at a time as needed. Follow the procedures as shown to add an item to your timeline.
- To choose a photo or movie, use the right-click
- Holding the Right-click, and move it to the timeline from the bottom.

Your images and videos have been imported into the timeline; now it’s time to trim them according to requirements.
Step4 Trim the Clips
To insert transition effects, you must trim the clip at a specific point and speed up the clip at the required duration. For this, follow the next actions as shown below:
- Playback clips and stop the playhead where you want by pressing the Space button from the Keyboard.
- Then, click on the Split icon present on the playhead.
- It will trim the clip from that point and separate it from its former one.

After splitting or trimming the clips, you now have to adjust the speed of the clips, as shown below!
Step5 Adjust Speed and Duration
There is a need to increase the speed of some scenes where the transition starts or ends. For this, follow the below actions:
- Find the section which needs to speed up, such as in the last half of each rotation.
- Right-click on the section of the clip in the timeline.
- Then, select the Speed option as shown in the icon of the timer present on the upper tab of the timeline.
- Select the Fast option, and if you want to lower the speed, select the Slow option**.**
- Choose the speed range according to your requirement.
- Select that required option and play it back to check if it is correct.

The video is all set; give it the final touches by following the last step, as shown below!
Step6 Playback the Video
After adding and adjusting all the features, double-check the video by playback. If you find any duration issue, review it and adjust it according to your requirement.
You can playback the video by clicking on the Play button. Perform this a few more times to ensure the speed looks okay and adjust if it is too slow or too fast.

You can also view it in full screen by selecting the last option on the tab. If there is no problem, you can export it locally or directly share it on TikTok or anywhere you want to gain views and attract an audience. You can also use it as a magic trick to inspire other people or as a transition for videos!
Conclusion
Keep creating and experimenting with other features on Wondershare Filmora. For example, you can use different effects, try on stock media, and then create or film your own. In this way, you’ll get professional results.
If you are showing new strategies daily to your viewers, they will hook up with you, and it’ll assist in the algorithm working by your side. That’s why keep doing it and enjoying the rest!
How to Create Liquid Water Reveal Intro?
Introduction to any video content should be short, crisp, and impressive simultaneously. Hence, video content creators look for the best techniques to create fantastic introduction effects. Wondershare Filmora is the leading video editor equipped with built-in editing features with more than 200 instant modes and preset templates.
With more than 10+ billion stock media, plugin effects, advanced editing functions, etc., it is the first choice of many content creators. Wondershare Filmora comes with a built-in installer that can be quickly downloaded from the official website . Beginners and professionals can start using this creative video editing tool to make videos for personal and professional purposes.
Out of all the amazing effects available in this editing tool, it is easy to go with the liquid water reveal intro effect. It offers unique and engaging video content. Let us understand the detailed steps to create this effect in your next video easily and quickly.

Steps to create liquid water reveal intro
Wondershare Filmora offers multiple advanced capabilities to content creators. There are multiple options when it comes to creating impressive introductions. Let us explore the liquid water text reveal intro option in this section. We’ve bifurcated the different steps for quick understanding of our readers in an easy and effective way.
Free Download For Win 7 or later(64-bit)
Free Download For macOS 10.14 or later
Step1Launching Wondershare Filmora
Before starting to edit the videos with the liquid water text reveal intro, it is necessary to download, install, and launch Wondershare Filmora. It is dedicated software that can be used for Windows or Mac devices. All you need to do is go to the official website of Wondershare Filmora and start the downloading process. The quick steps for the same are:
- Go to the official website of Wondershare Filmora on your Windows or Mac device.
- Select the Windows or Mac version according to your available device.
- Next, locate the “Free Download” button on the official website. It is located on the left side of the web page. It is easy to select the version type and initiate the download process.
- Once downloaded, the Wondershare Filmora Installer package will be available on your device.
- All you need to do is double-click on the installer package and start the installation process.
- Press yes for all the pop-ups initiated, including the “Agree” on the terms and conditions pop-up.
- The installation process will start quickly.
- Once completed, Wondershare Filmora will start and run automatically on your device.
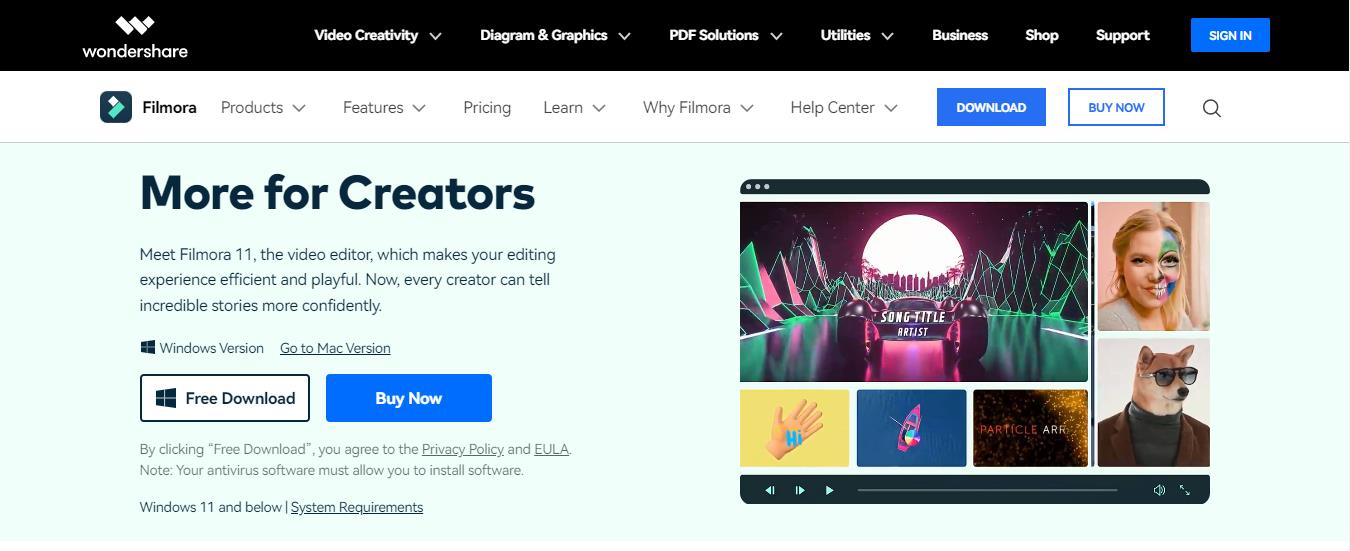
Step2Importing and select the stock video
Once Wondershare Filmora is running on your system, you can start by importing and selecting the stock video. The quick steps for the same are:
- It is easy to download the stock video from any available source.
- Now, import the stock video from the source to the Wondershare Filmora.
- Locate the “Titles” option in the menu bar located next to the “Audio” option.
- Then, drop the default title on track two.
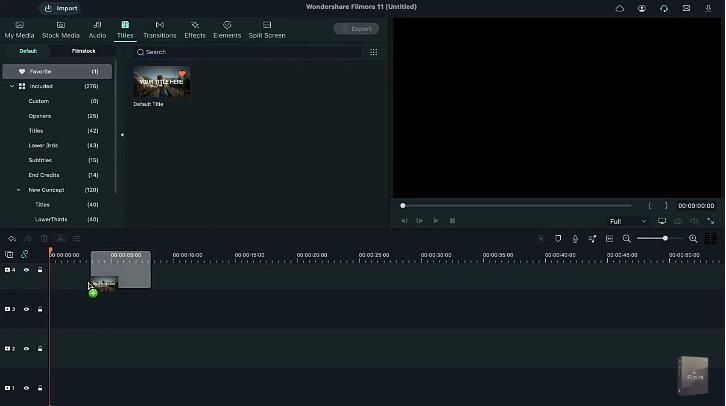
Step3Entering the text
After the successful uploading of the stock video, it is time to add text to the intro. In this step, you can change the font style, and font size, and maintain the text spacing. The quick steps for the same are:
- Start by double-clicking on the default title.
- Enter the text in the space provided, e.g., here, we’ve entered “Liquid.”
- Start text editing by changing the font to “Billion Dreams.”
- Now, change the font size to 250.
- Then, increase the text spacing by five.
- Last, you have to rotate the text according to the needs and align its position accordingly.
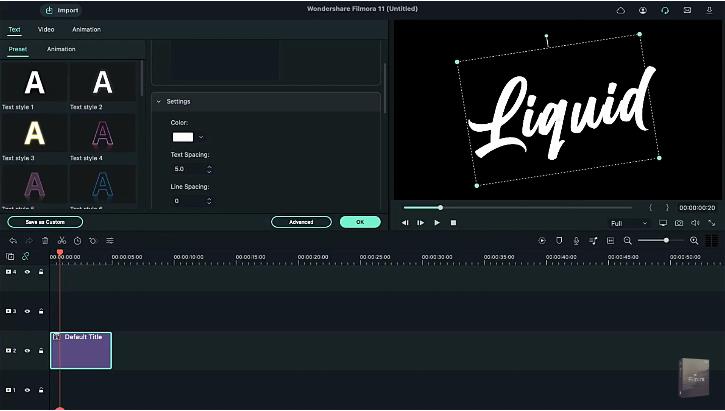
Step4Selecting the color
After making the text settings according to your liking or as required in the video, the next step is to select the color. It is easy to select it from the range of options available in the “Sample Color” menu of the tool. The quick steps for the same are:
- Go to the “My Media” option.
- Here, locate the “Sample Color” option and select it.
- Drop black color on track one and take a quick screenshot of it.
- Then, delete both these files from the timeline.
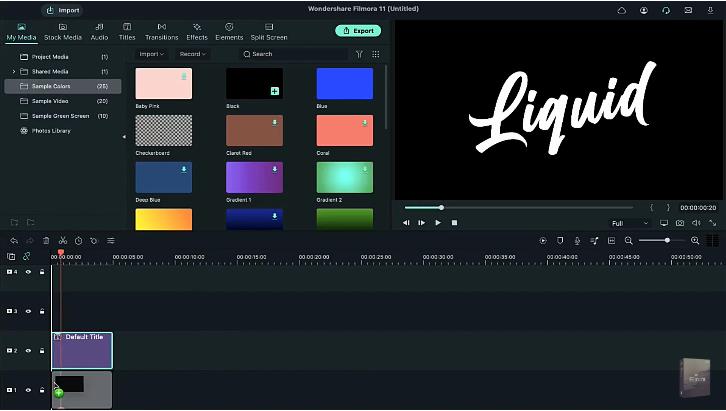
Step5Adding water effect
Now is the time to create the water text effect. It is located in the “Effects” section of Wondershare Filmora, along with numerous other options. You can select it by searching for it in the search bar. The quick steps for the same are:
- Drop the stock video on track one.
- Now, double-click on this video and bring it to half of the screen.
- Next, go to the “Effects” option.
- Search for “Water” and apply the water effect on track two.
- Lastly, extend the duration of this track.
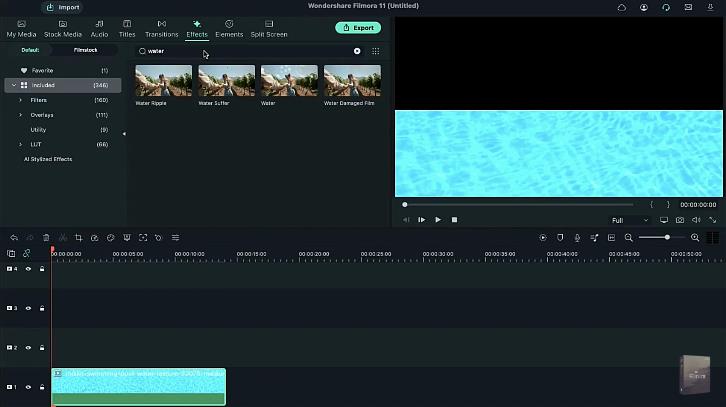
Step6Completing the water effect settings
After adding the water effect to the video, you can adjust the settings like “Emboss” and “Steps” for a realistic and creative feel. The quick steps to complete the water effect settings in the video are:
- Double-click on “Effects.”
- Increase the “Emboss” settings to 0.53.
- Decrease the “Steps” settings to seven.
- Press “OK” to apply changes.
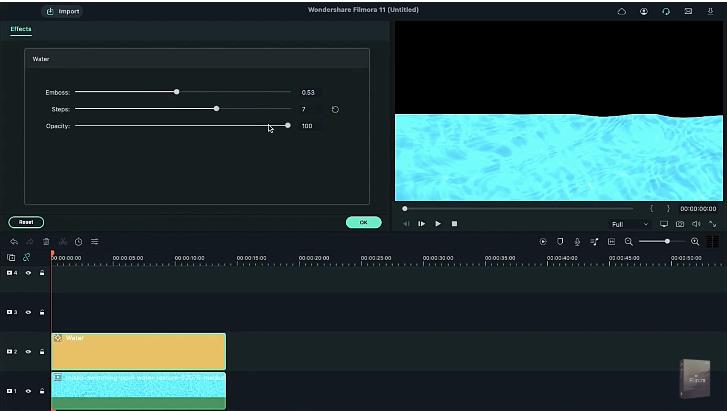
Step7Enabling the Chroma Key and other settings
Next, you have to enable the “Chroma Key” effect in the video. Further, the color pick logo and other settings are adjusted in this step only. The detailed steps for the same are:
- Go to “My Media.”
- Drop the screenshot on track three.
- Now, increase the duration of this track.
- Double-click on it and go to the “Videos” section.
- Locate the “Chroma Key (Green Screen)” effect and enable it.
- Go to the color pick logo and select the white color from the previous screen.
- Reduce the “Edge Thickness” to negative 3.3
- Reduce the “Edge Feather” to 1.1
- Press “OK” to apply these settings.
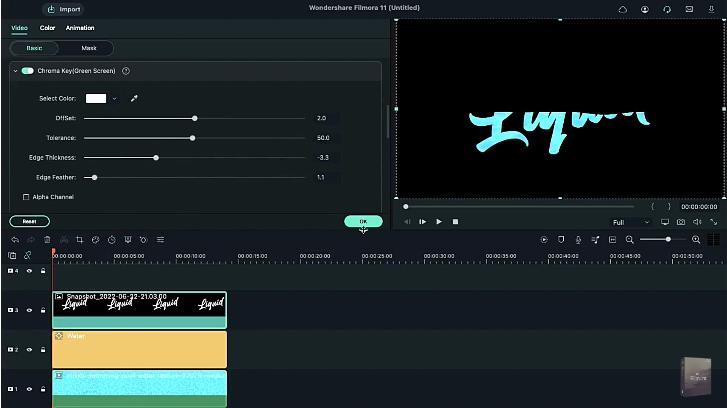
Step8Adding the stock video clip
The next step in the process of creating liquid water text reveal intro is to add the stock video clip. Here, you can adjust the clip position also. The quick steps for the same are:
- Start by selecting the stock video clip.
- Now, double-click on the stock video clip.
- Open the “Videos” option.
- Next, change the “Y” axis position and drag the clip out of the text.
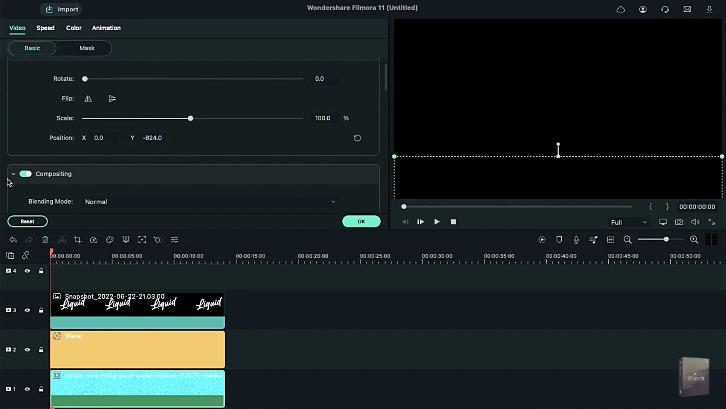
Step9Adding keyframes and adjusting playheads
Next, you have to add the keyframes and adjust the playheads in the video. In this step, it is easy to add the keyframes from the “Animations” option in Wondershare Filmora. The stock video is incorporated in this step, and playheads are added accordingly. Further, all the clips are made uniform in this step only. The quick steps for completing these features are:
- Start by opening the “Animations” tab.
- Go to the “Add” option to add a keyframe.
- Now, place the playhead at the three seconds position on the timeline.
- Then, bring the stock video to half of the text.
- Next, place the playhead in the eight seconds position and fill the text with the stock footage at the end.
- Again, place playhead but now at the ten seconds position.
- Locate the “Opacity” option and decrease it to zero.
- Last but not least, reduce all clips’ duration to ten seconds for uniformity.
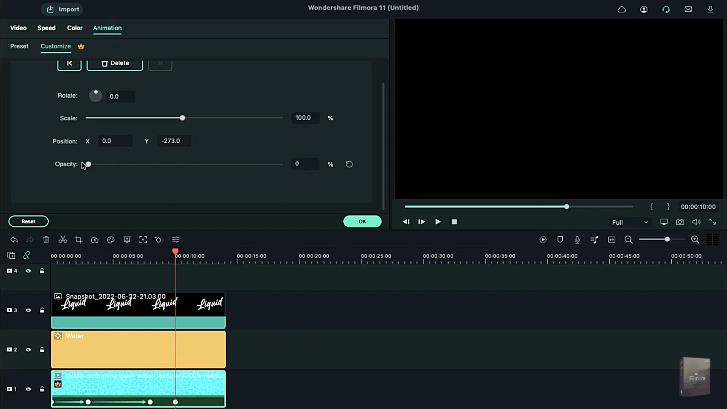
Step10Previewing and export the video
Once done with all the necessary effects and settings, it is time for a quick preview of the created video. The “Render Preview” option in the Wondershare Filmora offers a fast rendering of the made video to help users with a brief overview of the file. It reduces the preview lag, as observed in other tools due to the application of heavy effects and features. After previewing, you can quickly export the video. The quick steps for the same are:
- Click the “Render Preview” option.
- Go through the preview of the created file in detail. Check for any issues or changes required.
- Now, go to the “Export” option for quick exporting of the file with the liquid water text reveal intro.
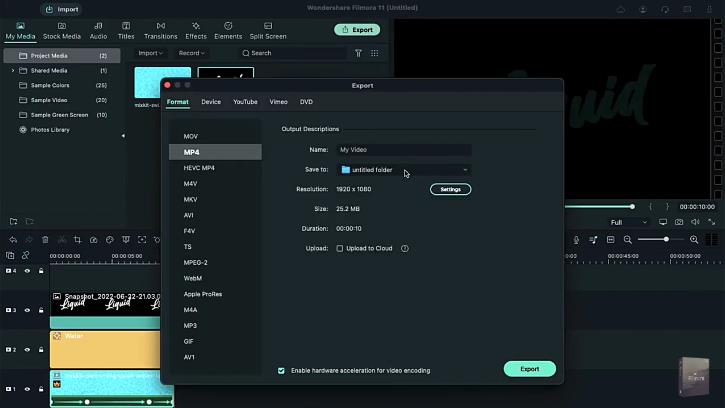
So, you’re done with creating a liquid water text reveal intro in this way. It is easy to save these steps for quick future reference.
Wrapping Up
Hence, it is easy for Wondershare Filmora users to create liquid water reveal intro in their videos. All you need to do is quickly download and install Wondershare Filmora on your Windows or Mac devices. Once done, it will launch automatically on your system. Next, you can follow all the steps mentioned above one by one to incorporate liquid water text reveal intro in videos.
So, download Wondershare Filmora for your system right now and start creating professional-grade videos today!
Free Download For macOS 10.14 or later
Step1Launching Wondershare Filmora
Before starting to edit the videos with the liquid water text reveal intro, it is necessary to download, install, and launch Wondershare Filmora. It is dedicated software that can be used for Windows or Mac devices. All you need to do is go to the official website of Wondershare Filmora and start the downloading process. The quick steps for the same are:
- Go to the official website of Wondershare Filmora on your Windows or Mac device.
- Select the Windows or Mac version according to your available device.
- Next, locate the “Free Download” button on the official website. It is located on the left side of the web page. It is easy to select the version type and initiate the download process.
- Once downloaded, the Wondershare Filmora Installer package will be available on your device.
- All you need to do is double-click on the installer package and start the installation process.
- Press yes for all the pop-ups initiated, including the “Agree” on the terms and conditions pop-up.
- The installation process will start quickly.
- Once completed, Wondershare Filmora will start and run automatically on your device.

Step2Importing and select the stock video
Once Wondershare Filmora is running on your system, you can start by importing and selecting the stock video. The quick steps for the same are:
- It is easy to download the stock video from any available source.
- Now, import the stock video from the source to the Wondershare Filmora.
- Locate the “Titles” option in the menu bar located next to the “Audio” option.
- Then, drop the default title on track two.

Step3Entering the text
After the successful uploading of the stock video, it is time to add text to the intro. In this step, you can change the font style, and font size, and maintain the text spacing. The quick steps for the same are:
- Start by double-clicking on the default title.
- Enter the text in the space provided, e.g., here, we’ve entered “Liquid.”
- Start text editing by changing the font to “Billion Dreams.”
- Now, change the font size to 250.
- Then, increase the text spacing by five.
- Last, you have to rotate the text according to the needs and align its position accordingly.

Step4Selecting the color
After making the text settings according to your liking or as required in the video, the next step is to select the color. It is easy to select it from the range of options available in the “Sample Color” menu of the tool. The quick steps for the same are:
- Go to the “My Media” option.
- Here, locate the “Sample Color” option and select it.
- Drop black color on track one and take a quick screenshot of it.
- Then, delete both these files from the timeline.

Step5Adding water effect
Now is the time to create the water text effect. It is located in the “Effects” section of Wondershare Filmora, along with numerous other options. You can select it by searching for it in the search bar. The quick steps for the same are:
- Drop the stock video on track one.
- Now, double-click on this video and bring it to half of the screen.
- Next, go to the “Effects” option.
- Search for “Water” and apply the water effect on track two.
- Lastly, extend the duration of this track.

Step6Completing the water effect settings
After adding the water effect to the video, you can adjust the settings like “Emboss” and “Steps” for a realistic and creative feel. The quick steps to complete the water effect settings in the video are:
- Double-click on “Effects.”
- Increase the “Emboss” settings to 0.53.
- Decrease the “Steps” settings to seven.
- Press “OK” to apply changes.

Step7Enabling the Chroma Key and other settings
Next, you have to enable the “Chroma Key” effect in the video. Further, the color pick logo and other settings are adjusted in this step only. The detailed steps for the same are:
- Go to “My Media.”
- Drop the screenshot on track three.
- Now, increase the duration of this track.
- Double-click on it and go to the “Videos” section.
- Locate the “Chroma Key (Green Screen)” effect and enable it.
- Go to the color pick logo and select the white color from the previous screen.
- Reduce the “Edge Thickness” to negative 3.3
- Reduce the “Edge Feather” to 1.1
- Press “OK” to apply these settings.

Step8Adding the stock video clip
The next step in the process of creating liquid water text reveal intro is to add the stock video clip. Here, you can adjust the clip position also. The quick steps for the same are:
- Start by selecting the stock video clip.
- Now, double-click on the stock video clip.
- Open the “Videos” option.
- Next, change the “Y” axis position and drag the clip out of the text.

Step9Adding keyframes and adjusting playheads
Next, you have to add the keyframes and adjust the playheads in the video. In this step, it is easy to add the keyframes from the “Animations” option in Wondershare Filmora. The stock video is incorporated in this step, and playheads are added accordingly. Further, all the clips are made uniform in this step only. The quick steps for completing these features are:
- Start by opening the “Animations” tab.
- Go to the “Add” option to add a keyframe.
- Now, place the playhead at the three seconds position on the timeline.
- Then, bring the stock video to half of the text.
- Next, place the playhead in the eight seconds position and fill the text with the stock footage at the end.
- Again, place playhead but now at the ten seconds position.
- Locate the “Opacity” option and decrease it to zero.
- Last but not least, reduce all clips’ duration to ten seconds for uniformity.

Step10Previewing and export the video
Once done with all the necessary effects and settings, it is time for a quick preview of the created video. The “Render Preview” option in the Wondershare Filmora offers a fast rendering of the made video to help users with a brief overview of the file. It reduces the preview lag, as observed in other tools due to the application of heavy effects and features. After previewing, you can quickly export the video. The quick steps for the same are:
- Click the “Render Preview” option.
- Go through the preview of the created file in detail. Check for any issues or changes required.
- Now, go to the “Export” option for quick exporting of the file with the liquid water text reveal intro.

So, you’re done with creating a liquid water text reveal intro in this way. It is easy to save these steps for quick future reference.
Wrapping Up
Hence, it is easy for Wondershare Filmora users to create liquid water reveal intro in their videos. All you need to do is quickly download and install Wondershare Filmora on your Windows or Mac devices. Once done, it will launch automatically on your system. Next, you can follow all the steps mentioned above one by one to incorporate liquid water text reveal intro in videos.
So, download Wondershare Filmora for your system right now and start creating professional-grade videos today!
Also read:
- In 2024, Every Compositor Should Know The Tips of Color Match in After Effects
- New 2024 Approved 5 Methods to Make a Fake Facetime Call Video
- New Want to Add Life to Your Customary Business Presentations and Videos on a MacOs Device with Expressive Emojis? Dive in to Have an Insight Into the Credibility of Using Emojis on a Mac
- In 2024, 3D LUT Mobile App Review - A Composite Application for Editing Media
- Updated How to Add Motion Blur in After Effects
- Updated 2024 Approved Guide To Using Free Luts for OBS
- Updated Learning Some Perfect Ways to Convert a Slow-Motion Video to Normal for 2024
- New 2024 Approved Guide on VHS Technology and Its Influence on Video Editing
- Any Video May Be Enhanced Using Adobe Premiere Transitions. If You Are Looking to Learn How to Add Fade to Black in Premiere Pro? Then, Check Out This Fade to Black Transition Premiere Pro Guide to Learn the Trick
- New Finding The Finest Way To Add Subtitles to Videos | Filmora for 2024
- 2024 Approved Hyperlapse VS Timelapse Videos
- New This Guide Will Help You to Understand Everything About the Zoho Show. Also, Know What the Zoho Show Slide Is, Why It Is Used and All Related Information
- New Best 8 AI Video Denoise Software for 2024
- In 2024, How to Make A Jaw-Dropping Time Lapse Video?
- Turn Your Blog Content Into Audio Podcasts to Reach a Wider Audience and Increase Reader Participation for 2024
- In 2024, This Easy Hack Using Wondershare Filmora New Masking Feature Will Be a Great Addition to Your Next Horror Video Content
- Updated If You Are a Free Video Editor Being a Windows User, VSDC Free Video Editor Is a Great Choice. But Is It the Best Video Editor You Should Use? Find Out From Our VSDC Free Video Editor Review
- 2024 Approved 4 Ways to Merge MP4 and MP3
- Updated 2024 Approved Tactics to Make Transparent Image in Minimal Steps
- New 2024 Approved How to Remove Background From a Video in Premier Pro
- New How to Add the Popular Video Text Effects to Your Video for 2024
- Updated 6 Top Online MP4 Croppers for 2024
- 2024 Approved What Is the Best FPS for YouTube Videos?
- Updated 2024 Approved How to Blur a Still or Moving Part of Video
- Updated In 2024, 100 Working Methods to Learn How to Rotate TikTok Video
- How to Vlog? A Ultimate Guide for Beginners for 2024
- Do You Like Clouds or Sky and Want to Use Them as a Video Background? Explore This Article to Learn About the Sky Change Video in Filmora
- Updated 3 Best Effects to Appear on Camera
- Updated 2024 Approved How to Remove Motion Blur In Photoshop
- 2024 Approved Top LUTs for Sony HLG to Download
- Updated In 2024, Easy Ways to Make Procreate GIFs
- New 2024 Approved Facts About GIF Background You Didnt Know
- How to Make a Slideshow with Icecream Slideshow Maker
- Updated 2024 Approved 2 Solutions to Crop a Video Using After Effects
- How to Make a Movie with Windows Movie Maker?
- New 2024 Approved Best Cinematic LUTs For Premiere Pro You Can Come Across
- New In 2024, 15 Camera Shake Preset for Premiere Pro to Add Camera Shake with Simple Keyframes. Each Preset Is Editable with Easy Steps. Make Your Video Shocking and Impressive with These Camera Shake Effects
- Updated A Guide to Adding Audio in Wondershare Filmora for 2024
- Updated How To Make A Political Video for 2024
- Best Tips for Better Event Videography for 2024
- Simple ways to get recent calls back from Vivo V27
- New Create AI Videos Using Synthesia Avatar and Voices for 2024
- The Top 5 Android Apps That Use Fingerprint Sensor to Lock Your Apps On Itel P55T
- How To Remove or Bypass Knox Enrollment Service On Nokia C22
- 5 Easy Ways to Change Location on YouTube TV On Vivo Y100i | Dr.fone
- Simple ways to get lost videos back from Google Pixel 8
- 9 Best Phone Monitoring Apps for Meizu 21 Pro | Dr.fone
- In 2024, How to Migrate Android Data From Lava Agni 2 5G to New Android Phone? | Dr.fone
- How to Mirror PC Screen to Infinix Zero 30 5G Phones? | Dr.fone
- iPhone 13 Pro Backup Password Never Set But Still Asking? Heres the Fix
- New 2024 Approved How To Make Talking Emoji on iPhone in Easy Steps
- Network Locked SIM Card Inserted On Your Samsung Galaxy A24 Phone? Unlock It Now
- How to Change Location On Facebook Dating for your OnePlus 12R | Dr.fone
- 2024 Approved How to Make Animated Videos for Business Simple Guide
- How to unlock a disable iPhone 12 Pro using macOS finder
- 8 Safe and Effective Methods to Unlock Your Apple iPhone SE (2020) Without a Passcode
- updated Top 10 AI Subtitle Translators for Content Creators That Anyone Can Use
- In 2024, Rootjunky APK To Bypass Google FRP Lock For Vivo S18 Pro
- Android Safe Mode - How to Turn off Safe Mode on Tecno Spark 20 Pro? | Dr.fone
- In 2024, How to Change Location On Facebook Dating for your Samsung Galaxy S23+ | Dr.fone
- In 2024, How To Create an Apple Developer Account From Apple iPhone 15 Pro
- Fake the Location to Get Around the MLB Blackouts on Infinix Note 30 Pro | Dr.fone
- Reasons for Lava Blaze 2 Pro Stuck on Boot Screen and Ways To Fix Them | Dr.fone
- In 2024, Unlock Your Disabled iPhone 14 Plus Without iTunes in 5 Ways | Dr.fone
- Two Ways to Track My Boyfriends OnePlus Nord N30 SE without Him Knowing | Dr.fone
- In 2024, Full Tutorial to Bypass Your Samsung Galaxy M14 4G Face Lock?
- In 2024, How to Use Google Assistant on Your Lock Screen Of Xiaomi Redmi Note 13 Pro+ 5G Phone
- How Do You Get Sun Stone Evolutions in Pokémon For Apple iPhone 13 Pro Max? | Dr.fone
- Top 10 Fingerprint Lock Apps to Lock Your Samsung Galaxy M14 4G Phone
- Can I use iTools gpx file to catch the rare Pokemon On Tecno Pova 5 Pro | Dr.fone
- Title: Updated A Complete Guide to Use Distortion Effect in Premiere Pro
- Author: Chloe
- Created at : 2024-05-20 03:37:45
- Updated at : 2024-05-21 03:37:45
- Link: https://ai-editing-video.techidaily.com/updated-a-complete-guide-to-use-distortion-effect-in-premiere-pro/
- License: This work is licensed under CC BY-NC-SA 4.0.

