
Updated Create Dynamic Text Animation in Filmora for 2024

Create Dynamic Text Animation in Filmora
Preparation
What you need to prepare:
- A computer (Windows or macOS)
- Your video materials.
- Filmora video editor
Step 1
Download and install the Filmora video editor . Just click the link, hit “Download”, and it will start automatically. Then, open a New Project.
Step 2
Click on the “Titles” tab and drag a Default Title to Track 2 on your Timeline.

Step 3
Double-click on it and change the font to anything you like. Then, enter the text in the box in front of you. While you’re here, you can also edit the text spacing and other features.

Step 4
Now, take a snapshot of the text. Then, double-click on the default title again and change the text to a single letter I. Once again, take a snapshot of this text and then delete the default title from the timeline.

You should have two snapshots in My Media now. One of them should say “FILMORA” and one with the letter “I”.

Step 5
Drag the “FILMORA” snapshot to track 2 and the “I” snapshot to track 3. Then, click on the “Zoom” button and set this to 50%.

Step 6
Double-click on the “I” snapshot from the timeline. Then, input these settings when the window pops up. After that, drag the Playhead 1 second and 15 frames further down the timeline. Then, double-click on the “I” snapshot again, and change the Y-axis value to 0.

Step 7
Copy the “I” snapshot track from the timeline. Then, paste it on Track 4. Next, double-click on this one and change the X-axis position to whichever letter you want. In this case, it’s the letter “M”. As for the Y-Axis, you can change it any way that suits you.

Step 8
Copy this process as often and with as many letters as you want. Then, when you’re done, export the title animation to your computer.

Step 9
Open a new project in Filmora and import the title animation we just created.
Step 10
Drag the custom title animation to Track 2 and drag any video background you have on Track 1.

Step 11
Double-click on the title track, go to the Video tab, and select “Lighten” from the Blending Mode tab.

Step 12
Shift the title clip from Track 2 to Track 3. Then, go to the Effects tab and drag the Dark Film effect to Track 1 on the timeline.

Step 13
Search for the “Blur” effect in the Effects tab. Then, drag “Square Blur” to Track 2 in the timeline.

Step 14
Select the “Cinema” effect from the Effects tab and drag it to Track 4. Double-click on it and change the border height to 0.10.

Step 15
Now, all left is to render the clip and review the final result.

Summary
What you’ve learned:
- Create a professional-level animated text in Filmora in 15 simple steps
- How to add a video background and cinematic effects to your animated title
- Adjust the settings of clips in the Filmora timeline
What you need to prepare:
- A computer (Windows or macOS)
- Your video materials.
- Filmora video editor
Step 1
Download and install the Filmora video editor . Just click the link, hit “Download”, and it will start automatically. Then, open a New Project.
Step 2
Click on the “Titles” tab and drag a Default Title to Track 2 on your Timeline.

Step 3
Double-click on it and change the font to anything you like. Then, enter the text in the box in front of you. While you’re here, you can also edit the text spacing and other features.

Step 4
Now, take a snapshot of the text. Then, double-click on the default title again and change the text to a single letter I. Once again, take a snapshot of this text and then delete the default title from the timeline.

You should have two snapshots in My Media now. One of them should say “FILMORA” and one with the letter “I”.

Step 5
Drag the “FILMORA” snapshot to track 2 and the “I” snapshot to track 3. Then, click on the “Zoom” button and set this to 50%.

Step 6
Double-click on the “I” snapshot from the timeline. Then, input these settings when the window pops up. After that, drag the Playhead 1 second and 15 frames further down the timeline. Then, double-click on the “I” snapshot again, and change the Y-axis value to 0.

Step 7
Copy the “I” snapshot track from the timeline. Then, paste it on Track 4. Next, double-click on this one and change the X-axis position to whichever letter you want. In this case, it’s the letter “M”. As for the Y-Axis, you can change it any way that suits you.

Step 8
Copy this process as often and with as many letters as you want. Then, when you’re done, export the title animation to your computer.

Step 9
Open a new project in Filmora and import the title animation we just created.
Step 10
Drag the custom title animation to Track 2 and drag any video background you have on Track 1.

Step 11
Double-click on the title track, go to the Video tab, and select “Lighten” from the Blending Mode tab.

Step 12
Shift the title clip from Track 2 to Track 3. Then, go to the Effects tab and drag the Dark Film effect to Track 1 on the timeline.

Step 13
Search for the “Blur” effect in the Effects tab. Then, drag “Square Blur” to Track 2 in the timeline.

Step 14
Select the “Cinema” effect from the Effects tab and drag it to Track 4. Double-click on it and change the border height to 0.10.

Step 15
Now, all left is to render the clip and review the final result.

Summary
What you’ve learned:
- Create a professional-level animated text in Filmora in 15 simple steps
- How to add a video background and cinematic effects to your animated title
- Adjust the settings of clips in the Filmora timeline
What you need to prepare:
- A computer (Windows or macOS)
- Your video materials.
- Filmora video editor
Step 1
Download and install the Filmora video editor . Just click the link, hit “Download”, and it will start automatically. Then, open a New Project.
Step 2
Click on the “Titles” tab and drag a Default Title to Track 2 on your Timeline.

Step 3
Double-click on it and change the font to anything you like. Then, enter the text in the box in front of you. While you’re here, you can also edit the text spacing and other features.

Step 4
Now, take a snapshot of the text. Then, double-click on the default title again and change the text to a single letter I. Once again, take a snapshot of this text and then delete the default title from the timeline.

You should have two snapshots in My Media now. One of them should say “FILMORA” and one with the letter “I”.

Step 5
Drag the “FILMORA” snapshot to track 2 and the “I” snapshot to track 3. Then, click on the “Zoom” button and set this to 50%.

Step 6
Double-click on the “I” snapshot from the timeline. Then, input these settings when the window pops up. After that, drag the Playhead 1 second and 15 frames further down the timeline. Then, double-click on the “I” snapshot again, and change the Y-axis value to 0.

Step 7
Copy the “I” snapshot track from the timeline. Then, paste it on Track 4. Next, double-click on this one and change the X-axis position to whichever letter you want. In this case, it’s the letter “M”. As for the Y-Axis, you can change it any way that suits you.

Step 8
Copy this process as often and with as many letters as you want. Then, when you’re done, export the title animation to your computer.

Step 9
Open a new project in Filmora and import the title animation we just created.
Step 10
Drag the custom title animation to Track 2 and drag any video background you have on Track 1.

Step 11
Double-click on the title track, go to the Video tab, and select “Lighten” from the Blending Mode tab.

Step 12
Shift the title clip from Track 2 to Track 3. Then, go to the Effects tab and drag the Dark Film effect to Track 1 on the timeline.

Step 13
Search for the “Blur” effect in the Effects tab. Then, drag “Square Blur” to Track 2 in the timeline.

Step 14
Select the “Cinema” effect from the Effects tab and drag it to Track 4. Double-click on it and change the border height to 0.10.

Step 15
Now, all left is to render the clip and review the final result.

Summary
What you’ve learned:
- Create a professional-level animated text in Filmora in 15 simple steps
- How to add a video background and cinematic effects to your animated title
- Adjust the settings of clips in the Filmora timeline
What you need to prepare:
- A computer (Windows or macOS)
- Your video materials.
- Filmora video editor
Step 1
Download and install the Filmora video editor . Just click the link, hit “Download”, and it will start automatically. Then, open a New Project.
Step 2
Click on the “Titles” tab and drag a Default Title to Track 2 on your Timeline.

Step 3
Double-click on it and change the font to anything you like. Then, enter the text in the box in front of you. While you’re here, you can also edit the text spacing and other features.

Step 4
Now, take a snapshot of the text. Then, double-click on the default title again and change the text to a single letter I. Once again, take a snapshot of this text and then delete the default title from the timeline.

You should have two snapshots in My Media now. One of them should say “FILMORA” and one with the letter “I”.

Step 5
Drag the “FILMORA” snapshot to track 2 and the “I” snapshot to track 3. Then, click on the “Zoom” button and set this to 50%.

Step 6
Double-click on the “I” snapshot from the timeline. Then, input these settings when the window pops up. After that, drag the Playhead 1 second and 15 frames further down the timeline. Then, double-click on the “I” snapshot again, and change the Y-axis value to 0.

Step 7
Copy the “I” snapshot track from the timeline. Then, paste it on Track 4. Next, double-click on this one and change the X-axis position to whichever letter you want. In this case, it’s the letter “M”. As for the Y-Axis, you can change it any way that suits you.

Step 8
Copy this process as often and with as many letters as you want. Then, when you’re done, export the title animation to your computer.

Step 9
Open a new project in Filmora and import the title animation we just created.
Step 10
Drag the custom title animation to Track 2 and drag any video background you have on Track 1.

Step 11
Double-click on the title track, go to the Video tab, and select “Lighten” from the Blending Mode tab.

Step 12
Shift the title clip from Track 2 to Track 3. Then, go to the Effects tab and drag the Dark Film effect to Track 1 on the timeline.

Step 13
Search for the “Blur” effect in the Effects tab. Then, drag “Square Blur” to Track 2 in the timeline.

Step 14
Select the “Cinema” effect from the Effects tab and drag it to Track 4. Double-click on it and change the border height to 0.10.

Step 15
Now, all left is to render the clip and review the final result.

Summary
What you’ve learned:
- Create a professional-level animated text in Filmora in 15 simple steps
- How to add a video background and cinematic effects to your animated title
- Adjust the settings of clips in the Filmora timeline
Ultimate Guide on Making A Slideshow Video
You have taken photos and videos all over your trip. Showing them to your friends and family can be a hassle if you have a lot of pictures. Viewing them all at once is possible by creating a slideshow video.
The slideshow video combines all the memories in one place. To make one on your own, we prefer just one best UI editing tools, Wondershare Filmora.
Before we create a slideshow, ensure to learn the basics of the slideshow video. Then, scroll below to get more!
Part 1. What Is a Slideshow Video?
A slideshow video is a video that combines your photos and videos to create a montage. This slideshow can be used as a collection of memories you can watch whenever you like.
You might have a photo album lying around somewhere in your house. A slideshow video can act like a modern-day photo album. But instead of photos, you can also add videos and create a monument of your precious memories.
Modern-day content creators on Youtube and other platforms can use a slideshow method to create short recap videos of their travels.
Part 2. What Are Some of the Uses of Slideshow Videos?
A slideshow video can be a great way to summarize all the moments of a marriage ceremony, graduation event, etc. And the list goes on and on.
- A wedding ceremony
- Anniversary recording
- A graduation ceremony
- A birthday party
- Your pet
- Your friends
- Your family
- A trip that you went on
Part 3. What Are the Benefits of a Slideshow?
There are many benefits to creating a slideshow video.
A long-lasting memory
Creating a slideshow video can be a digital reminiscent, allowing you to hold a precious video with your friends and family. Apart from physical portraits, a slideshow video will be a digital backup for your memories that you can watch in the future.
Easy to save and share
Since a video slideshow is a digital content, typically with an extension .mp4, .mov, etc., you can watch it whenever and wherever you want. Moreover, you can conveniently send it to the person who spent the time and shares the same memories with you.
Part 4. What Will You Need To Make a Slideshow?
To create an attractive slideshow video, you must fulfill the following requirements.
1. Good Quality Photos
To create a good slideshow, you must have good-quality photos with good resolution. Always take pictures with a good-quality camera or a mobile phone whenever you want to create a slideshow. Using filters in the editing software can disrupt the quality of your slideshow.
2. Video Clips
The slideshow is always combined with videos and photos. After taking good-quality images, remember always to record short video clips you can add between your pictures.
3. A Good Video Editor - Wondershare Filmora
To edit a slideshow video, you will need editing software. There’s no better tool to do the job than Wondershare Filmora . Wondershare Filmora enables you to make creative and appealing videos. It has a very engaging system UI that allows even novice users to get the hang of it quickly. You will learn how to make a slideshow in a few simple steps.
Free Download For Win 7 or later(64-bit)
Free Download For macOS 10.14 or later 
Let’s start with the step-by-step instructions for making a slideshow video now that you know the requirements for generating a slideshow.
Part 5. Step-by-Step Guide to Creating a Slideshow Video
Utilizing filmora will reduce your workload while producing quality work. Follow the below step-by-step guide to make your slideshow video instantly!
Step1 Download Wondershare Filmora
Wondershare Filmora will provide the working platform. Follow the below steps to download it:
- First, install the Wondershare Filmora.
- Then, launch this application on your PC or Mac
Let’s proceed to edit our video after downloading the Wondershare Filmora software. Continue reading to find out how to begin the editing process.
Step2 Import your Photos and Videos
Importing your videos and pictures to Filmora’s media panel is best to have them all in one folder. Therefore, when you open Wondershare Filmora, you will notice the main import window in the top left corner.
- Click in the center of the import window upon the import icon.
- Browse from the PC library to where your target Videos and Photos are stored.
- Please select the required videos and photos and Open
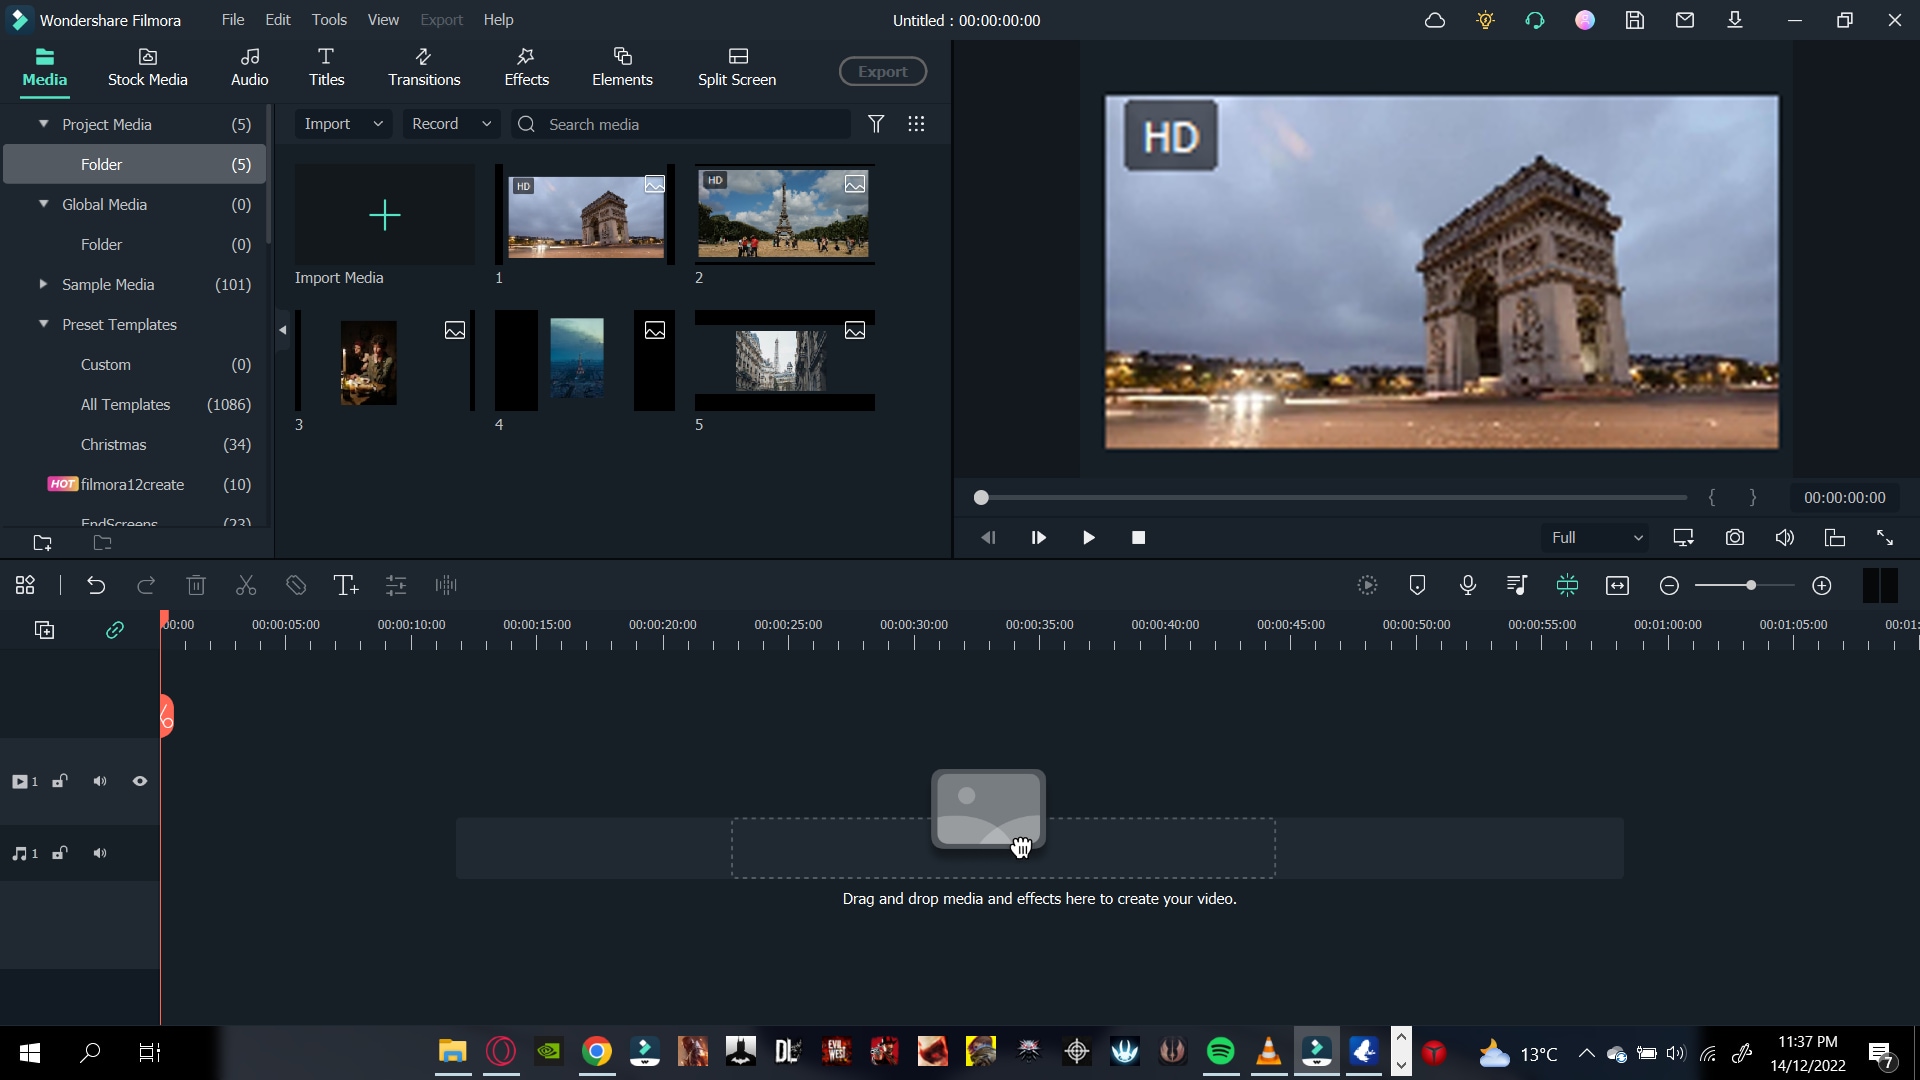
Your next step will be to add the imported videos and images to the timeline.
Step3 Add your Photos and Videos to the Timeline
When you have multiple videos and photos, you can add all of them simultaneously. Or you can also add them one by one wherever you need. Follow the steps mentioned:
- Right-click on the photo or video you want.
- Keep holding the Right-click and drag it down to the timeline.
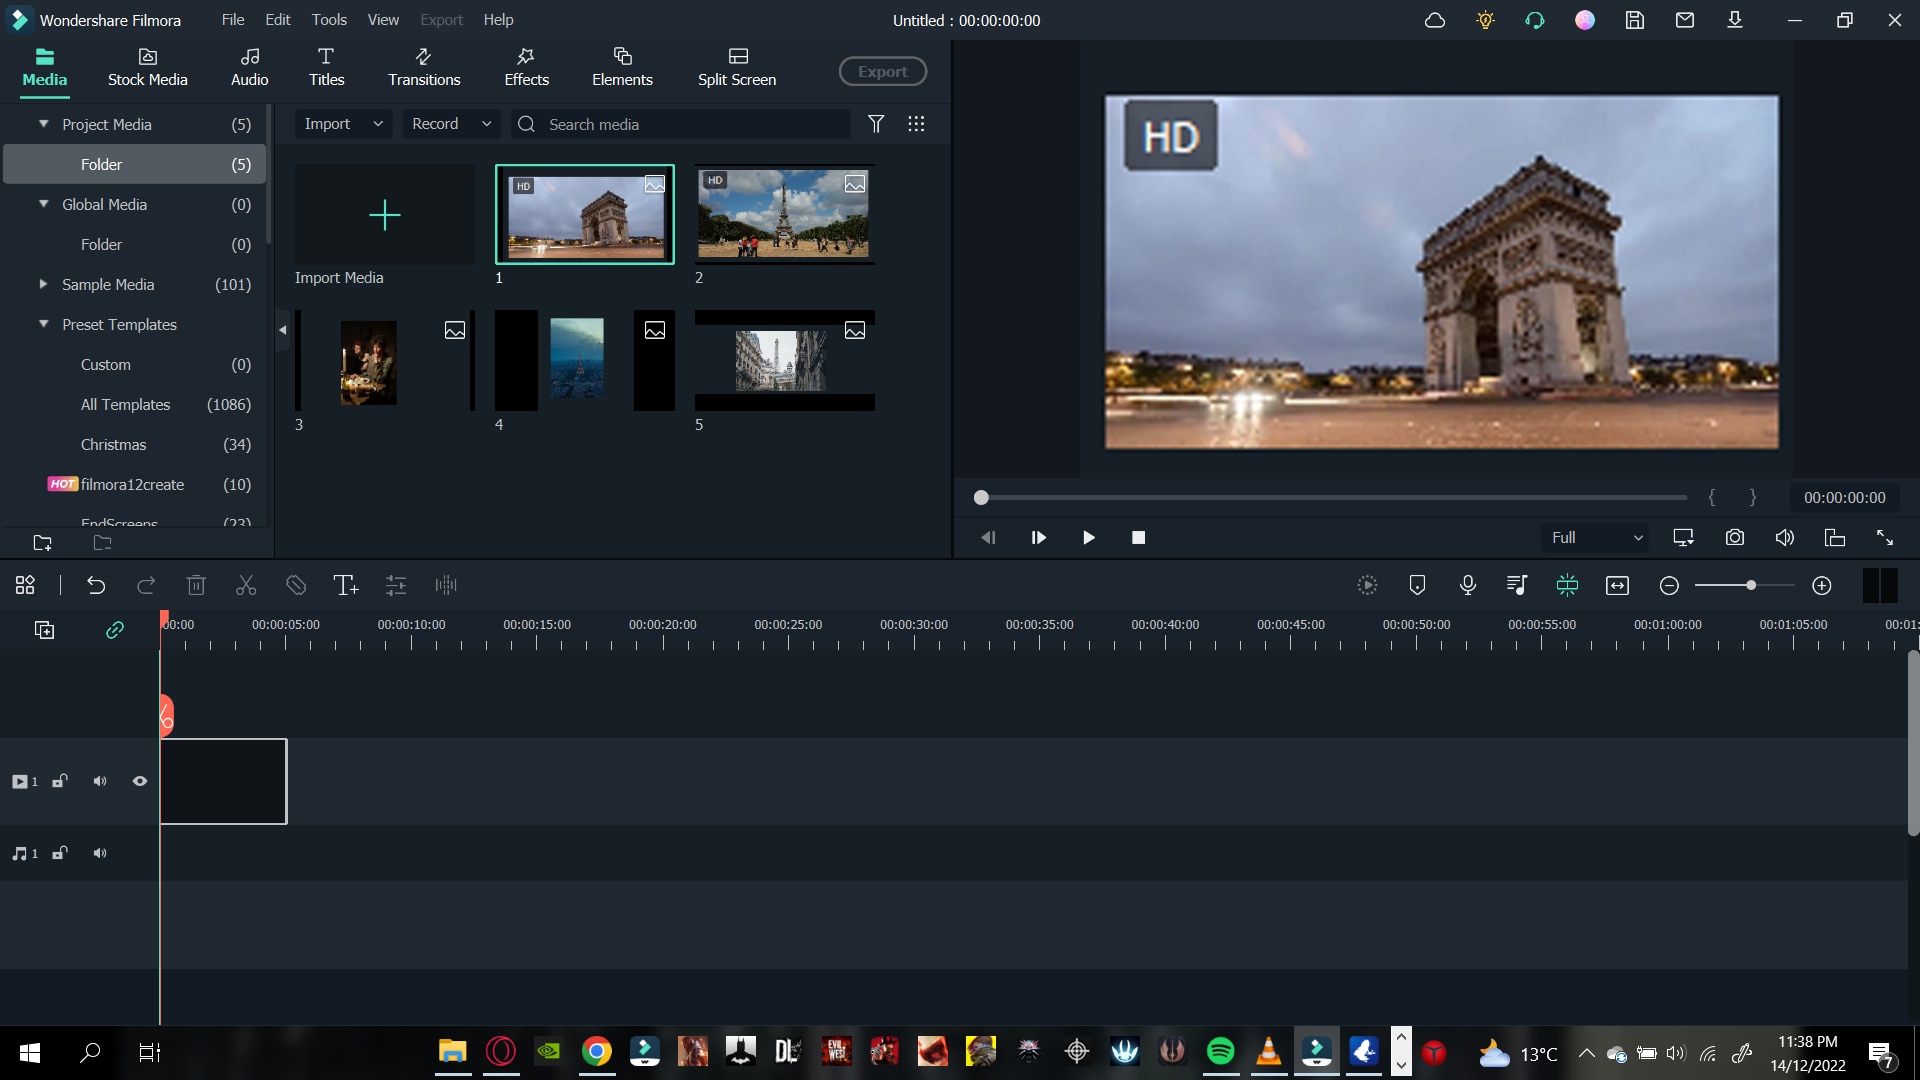
Now that we have imported your photos and videos into the timeline, it is time to align and add text.
Step4 Add the Title
To create an attractive slideshow, you will need to add a title before the start of the video. Doing so will allow you to gain more viewers and audiences.
Add a Black Screen
The black screen will eventually act like a canvas to give your title a good look. To add a black screen, follow the steps mentioned:
- Click on the media icon from the bar above the import window.
- You will notice many tabs on the left-hand side under a drop-down bar.
- Scroll below to find the sample media
- Download the black color if it is not downloaded already.
- Click and drag it down below to the start of your video.
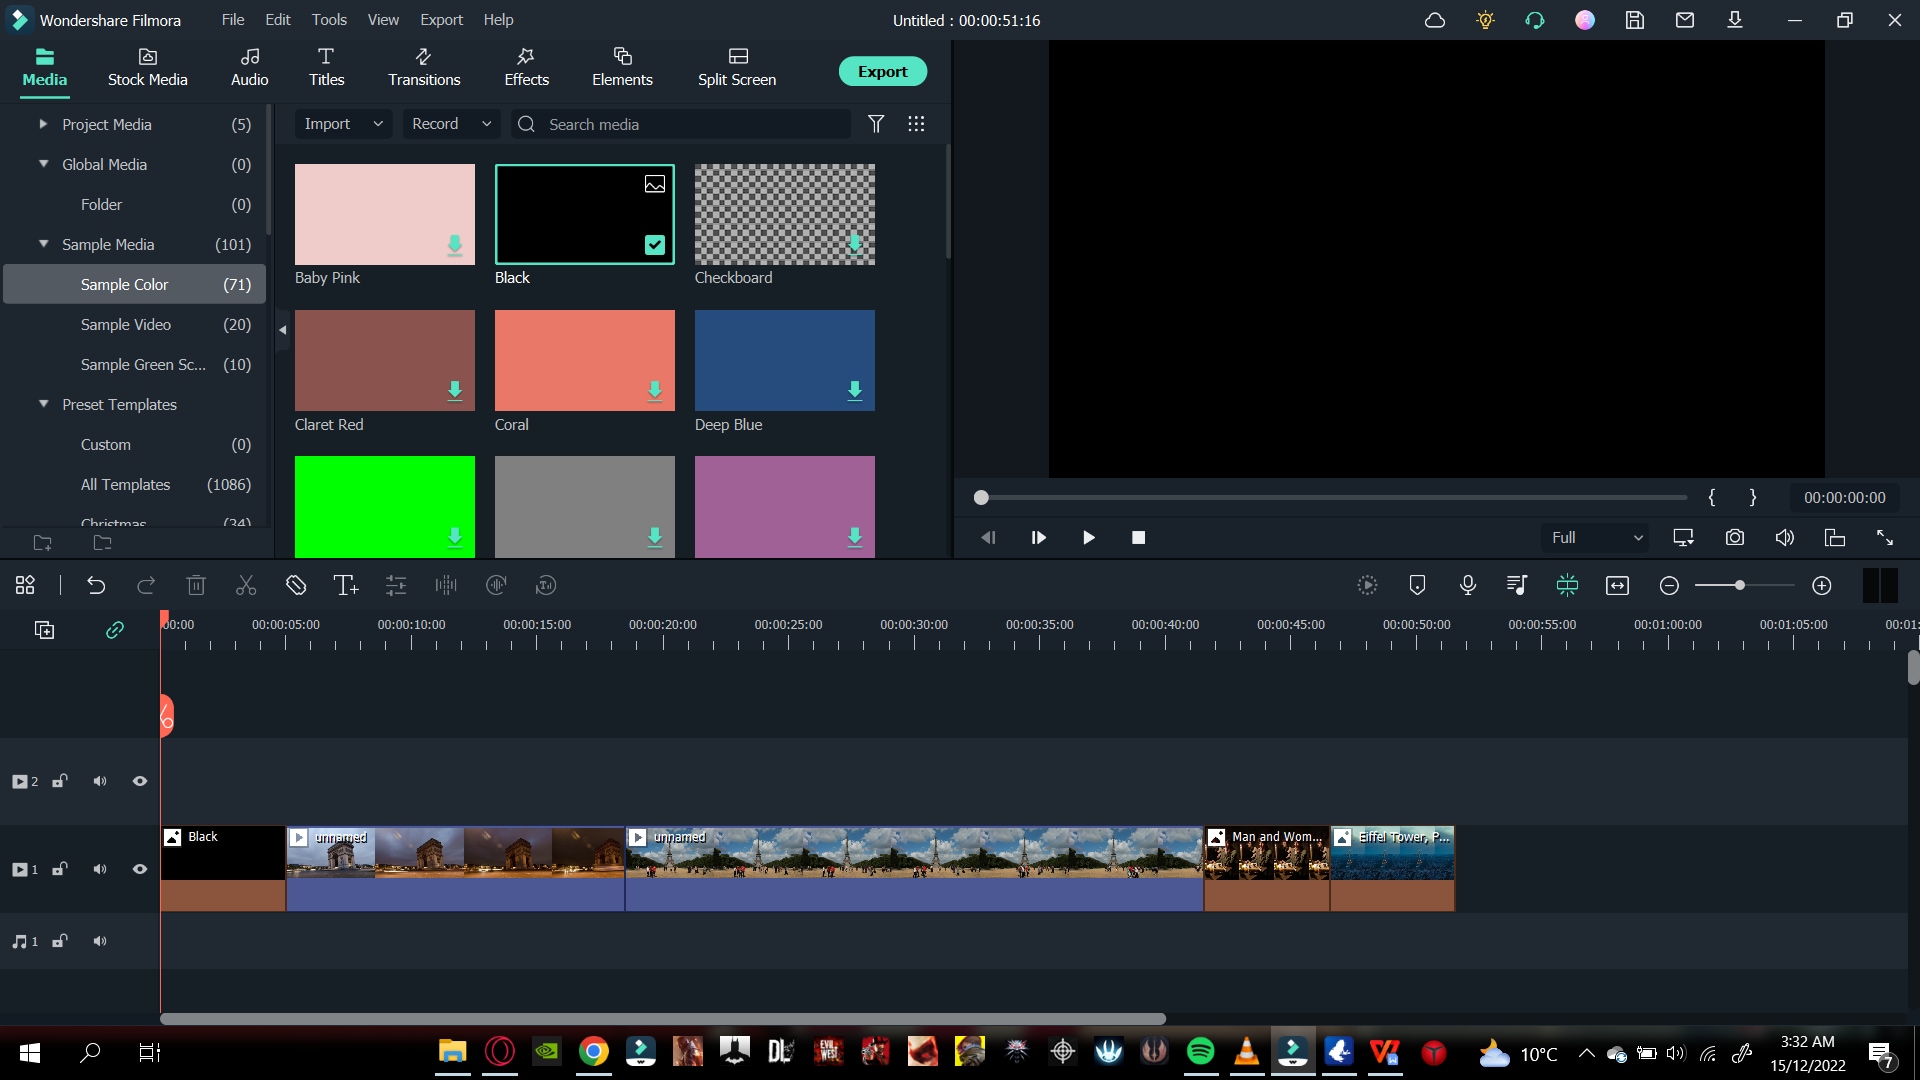
Add a Title Tile
Now that we have our canvas, we will now add the title. Above the import media library, there will be a Title icon.
- Click on the title icon, and select the title that you want for your video by browsing and scrolling down.
- For this purpose, we will use a simple title tile called “Title 29.”
![]()
Note: You can find the same title by scrolling, browsing, or searching in the search bar above the import library.
- Click and drag the title onto the black screen that we added.
- Double-click the title to open its settings.
- Here you can type in the text that you want.
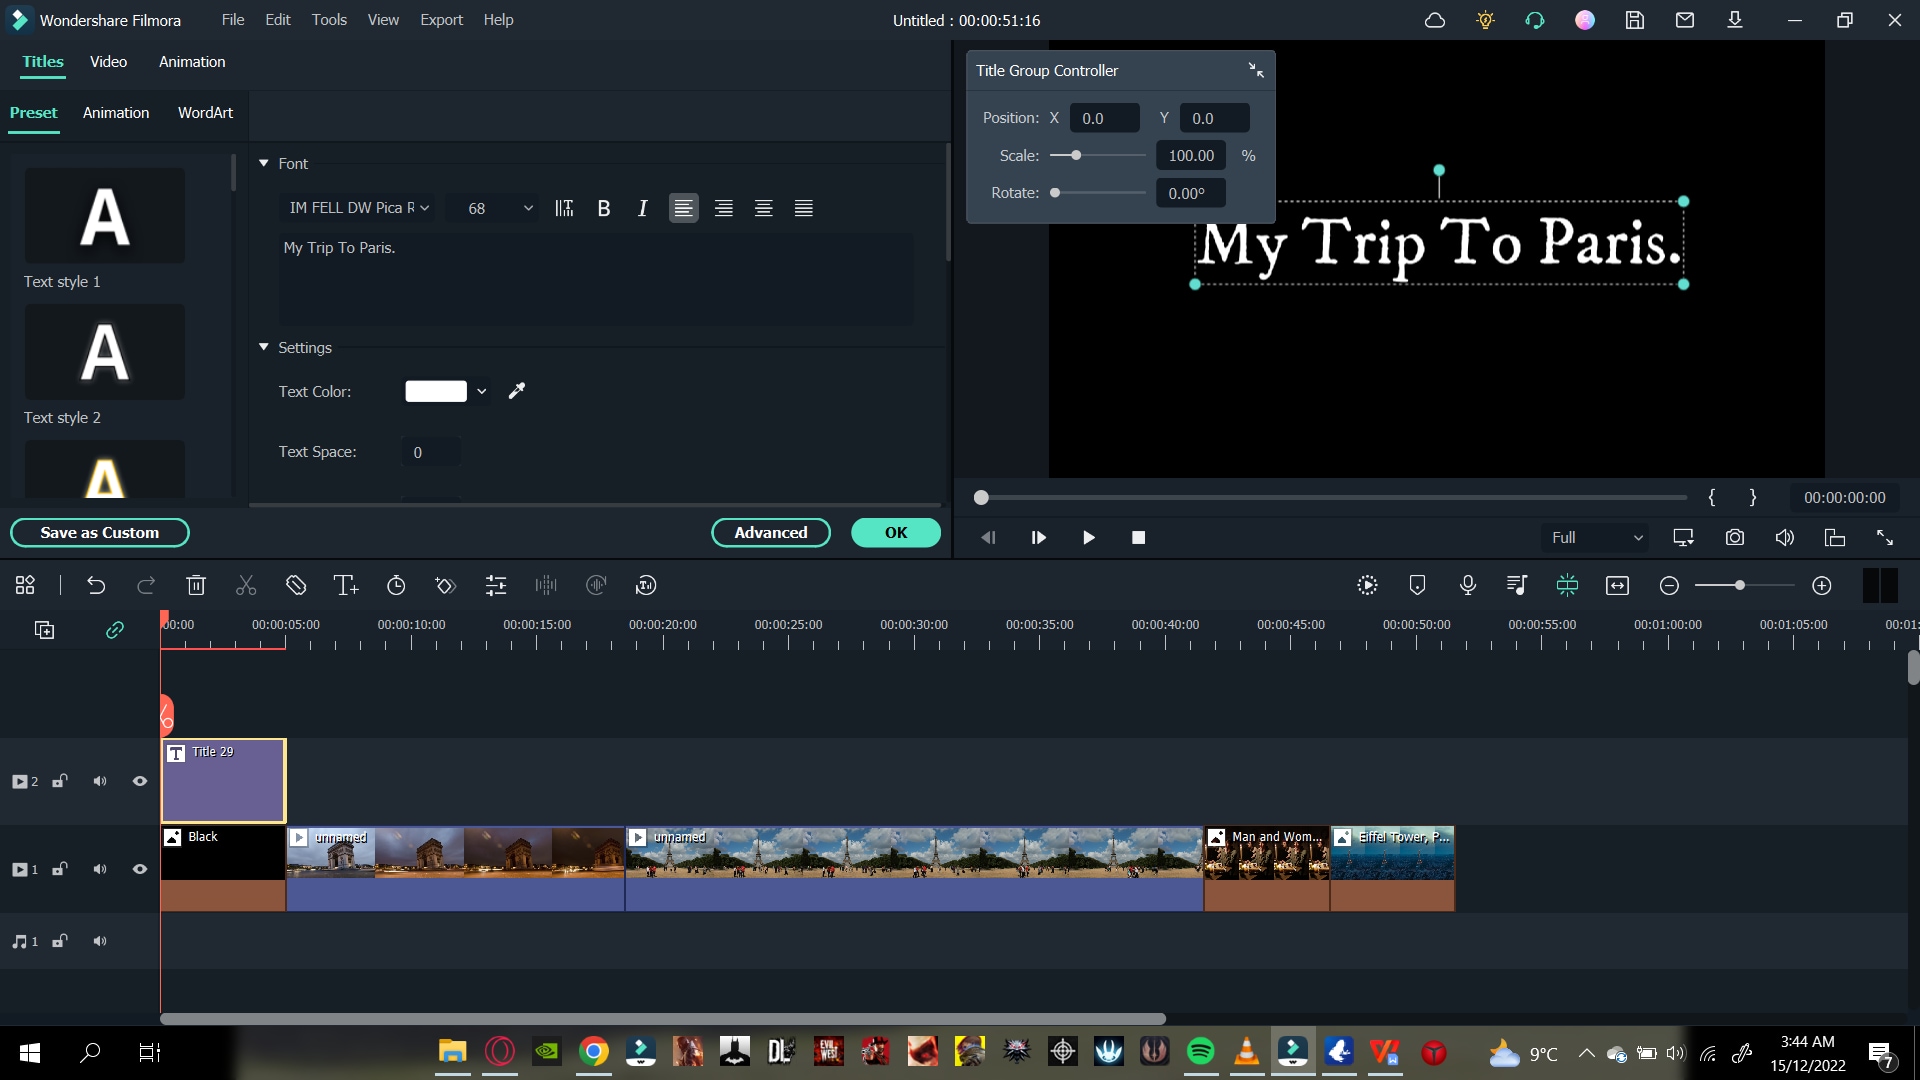
You can also change its font. When you click on the font bar, a drop-down option will pop up, and you choose whichever you like.
- Change the animation of the text title from the top left corner animation
Change The Timing of The Title
You can also adjust the timing of the title by below steps:
- Click on the advanced option in the bottom right corner, and settings will pop up.
- Find the title bar and drag it to the right side to increase the timing of the title.
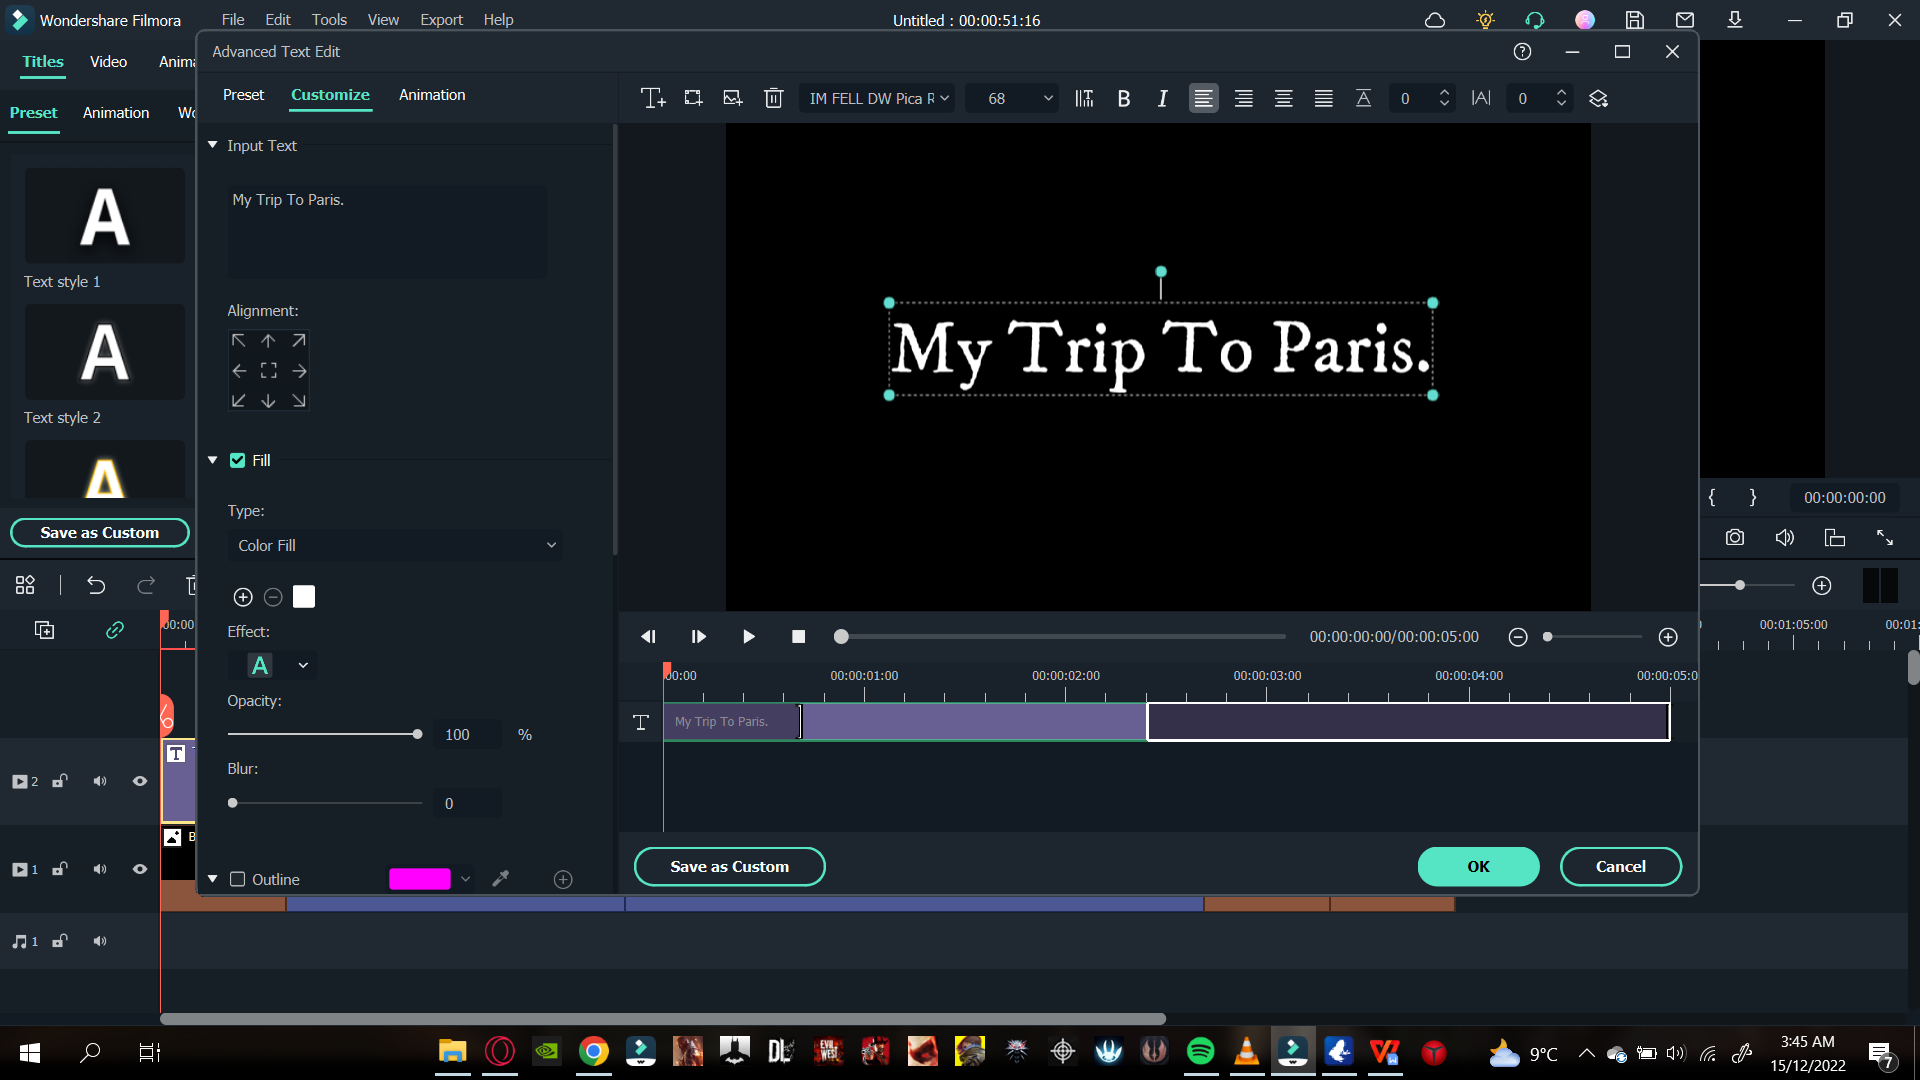
After adding the title, it’s time to go with fading effect as shown below!
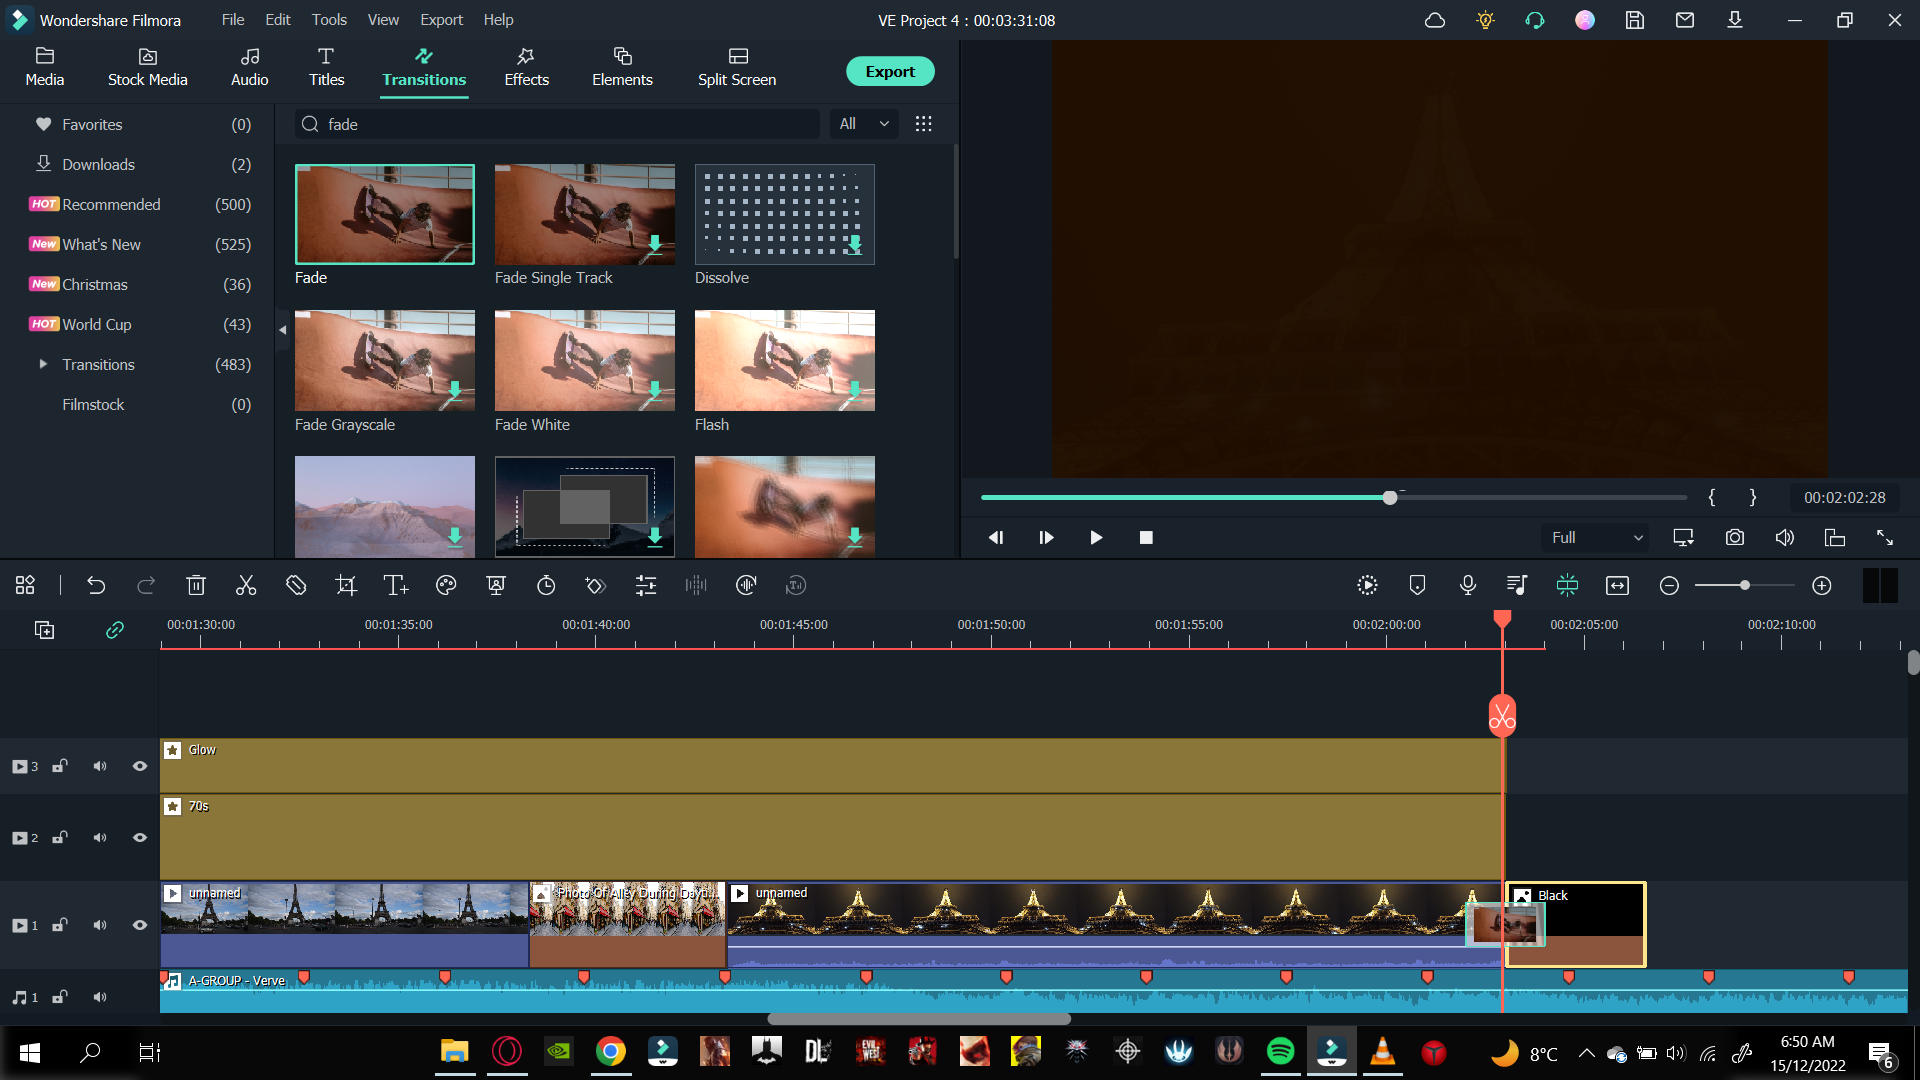
Step5 Add a Fade effect
You can also add a fade transition to the start of your video. It will blend the title with the first clip. Follow the steps mentioned to add the transition effects:
- Search the Fade option from the Transitions tab above the import window

Note: A fade transition will allow your title to fade into the first clip creating a visually pleasing effect.
- Download the Fade transition and drag it between the Black screen and the first clip.
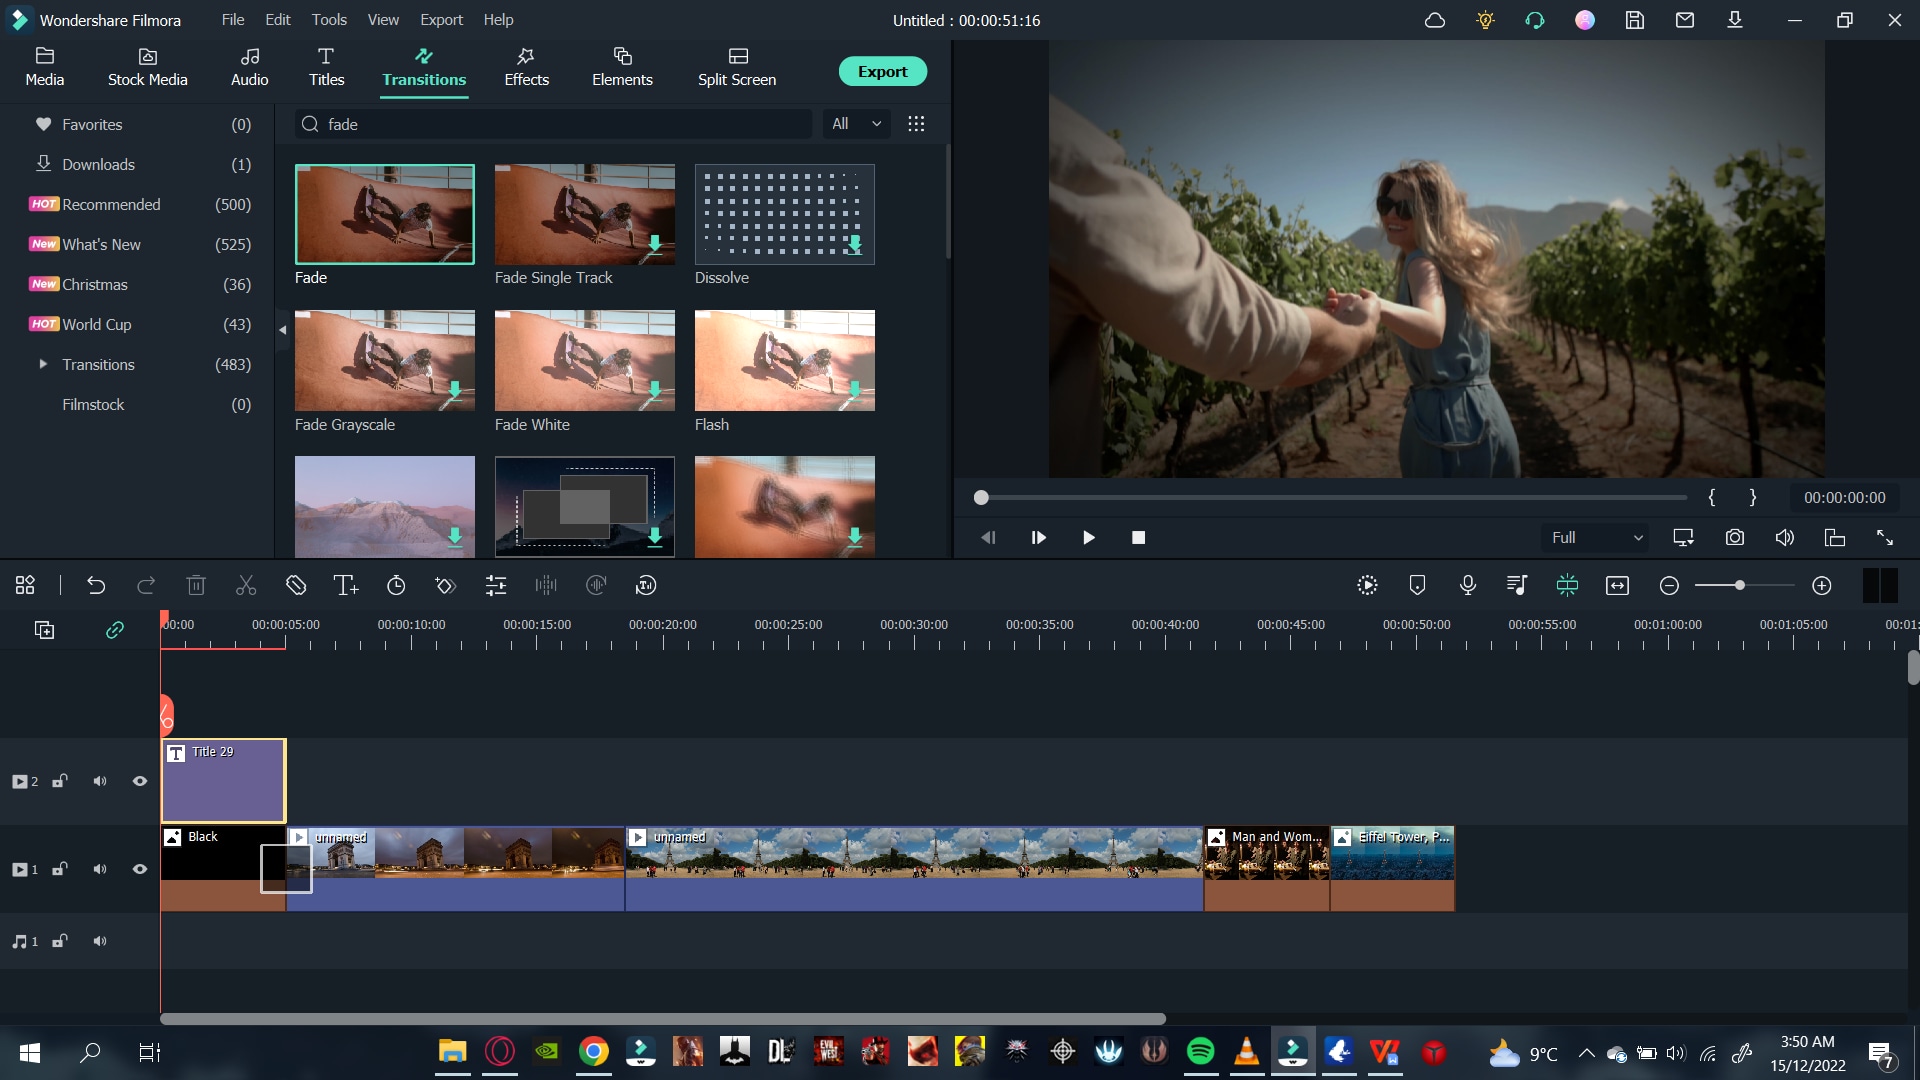
Now that we have added a transition, it is time to move on to our music!
Step6 Add The Music
You can add your music to the slideshow from your PC library, but make sure you have the music rights. It is better to use stock audio by following the steps:
- Click on the Audio icon on the bar above the import window, and the list will pop up.
- Please browse the library to find music that best suits your video and download it.
- Then add it to the timeline’s audio track.
Add Beat Detection
To match your video clips properly with the music, so it remains in sync, you can adjust it with the beat of the music. To add beat detection, follow the steps mentioned:
- Right-Click on the audio that you selected in the audio library.
- You will see a pop-up list, and in the options, you will see Beat detection.
- Click on Beat detection.
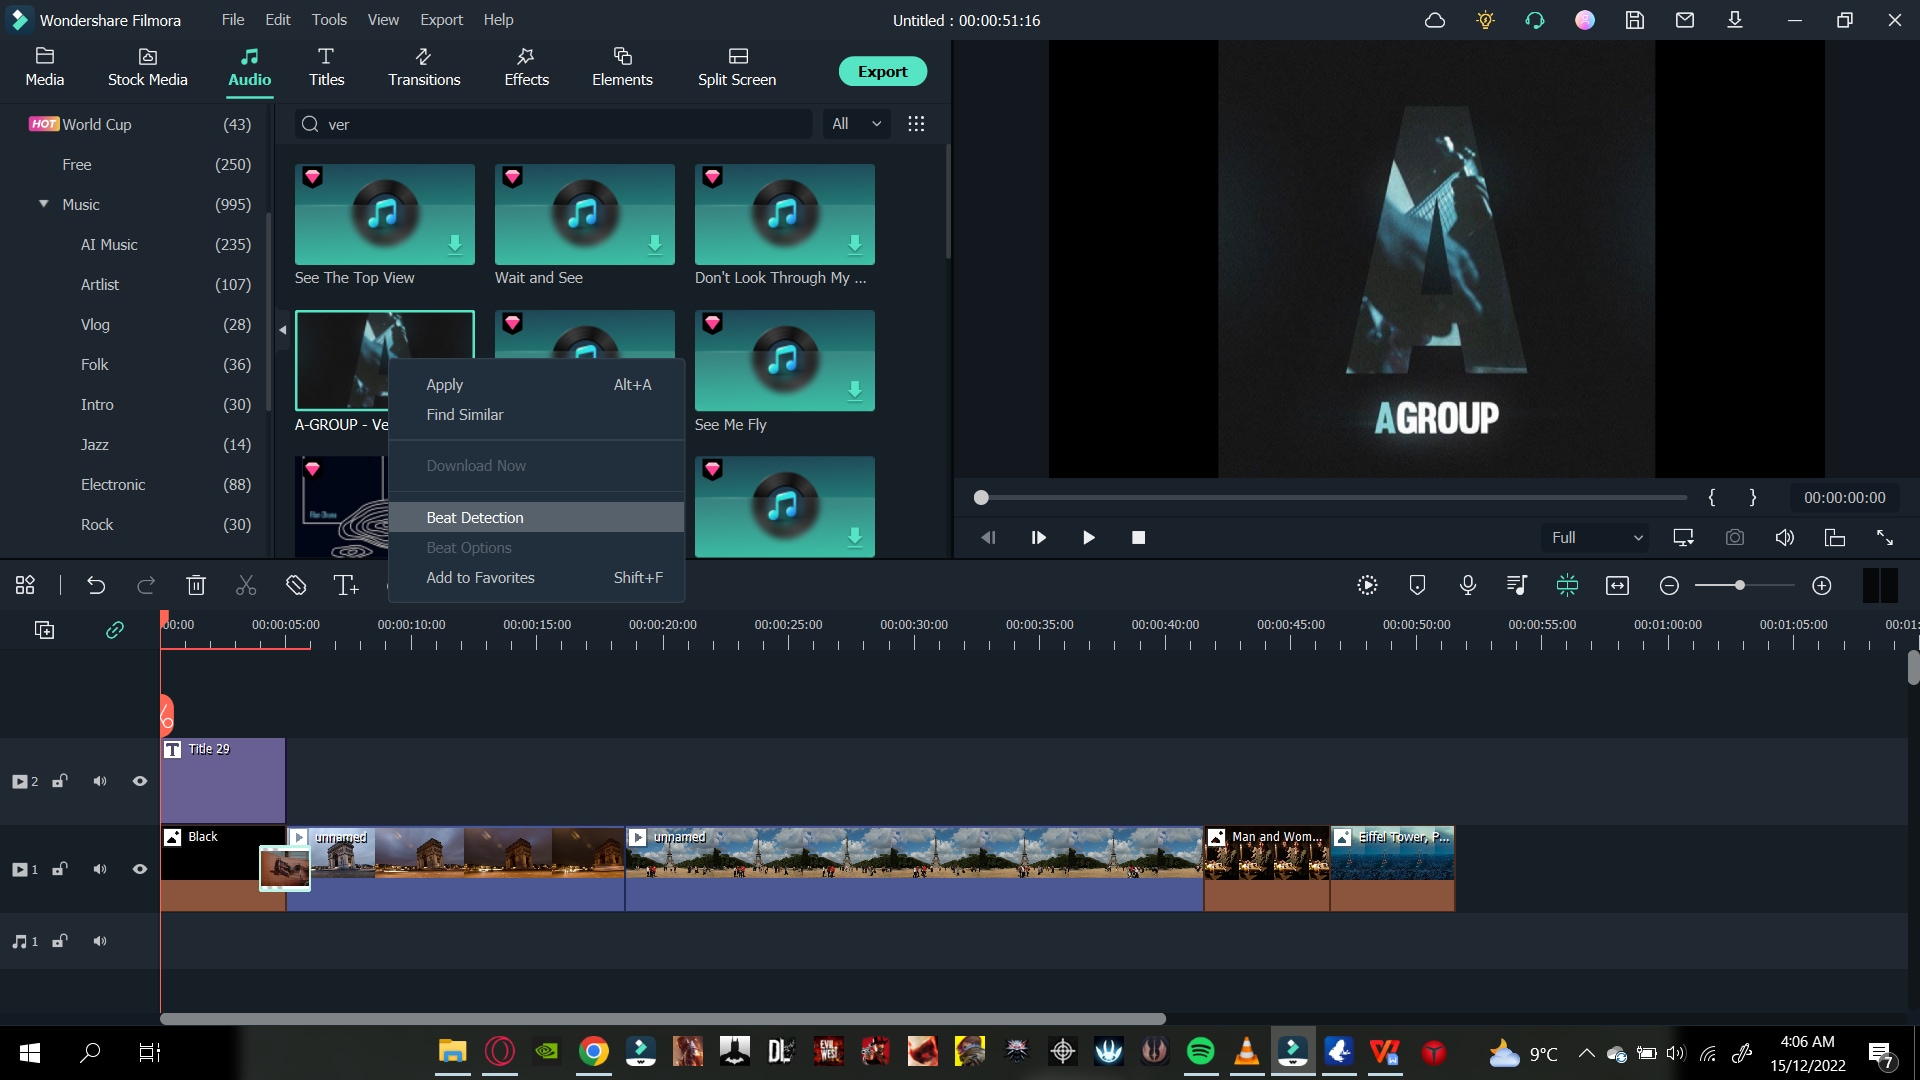
- Then click on the audio and drag it below on the timeline.
Match The Video With The Audio Markers
To have the full advantage of beat detection, you must adjust your videos and photos to the markers. Follow the steps mentioned below to do so:
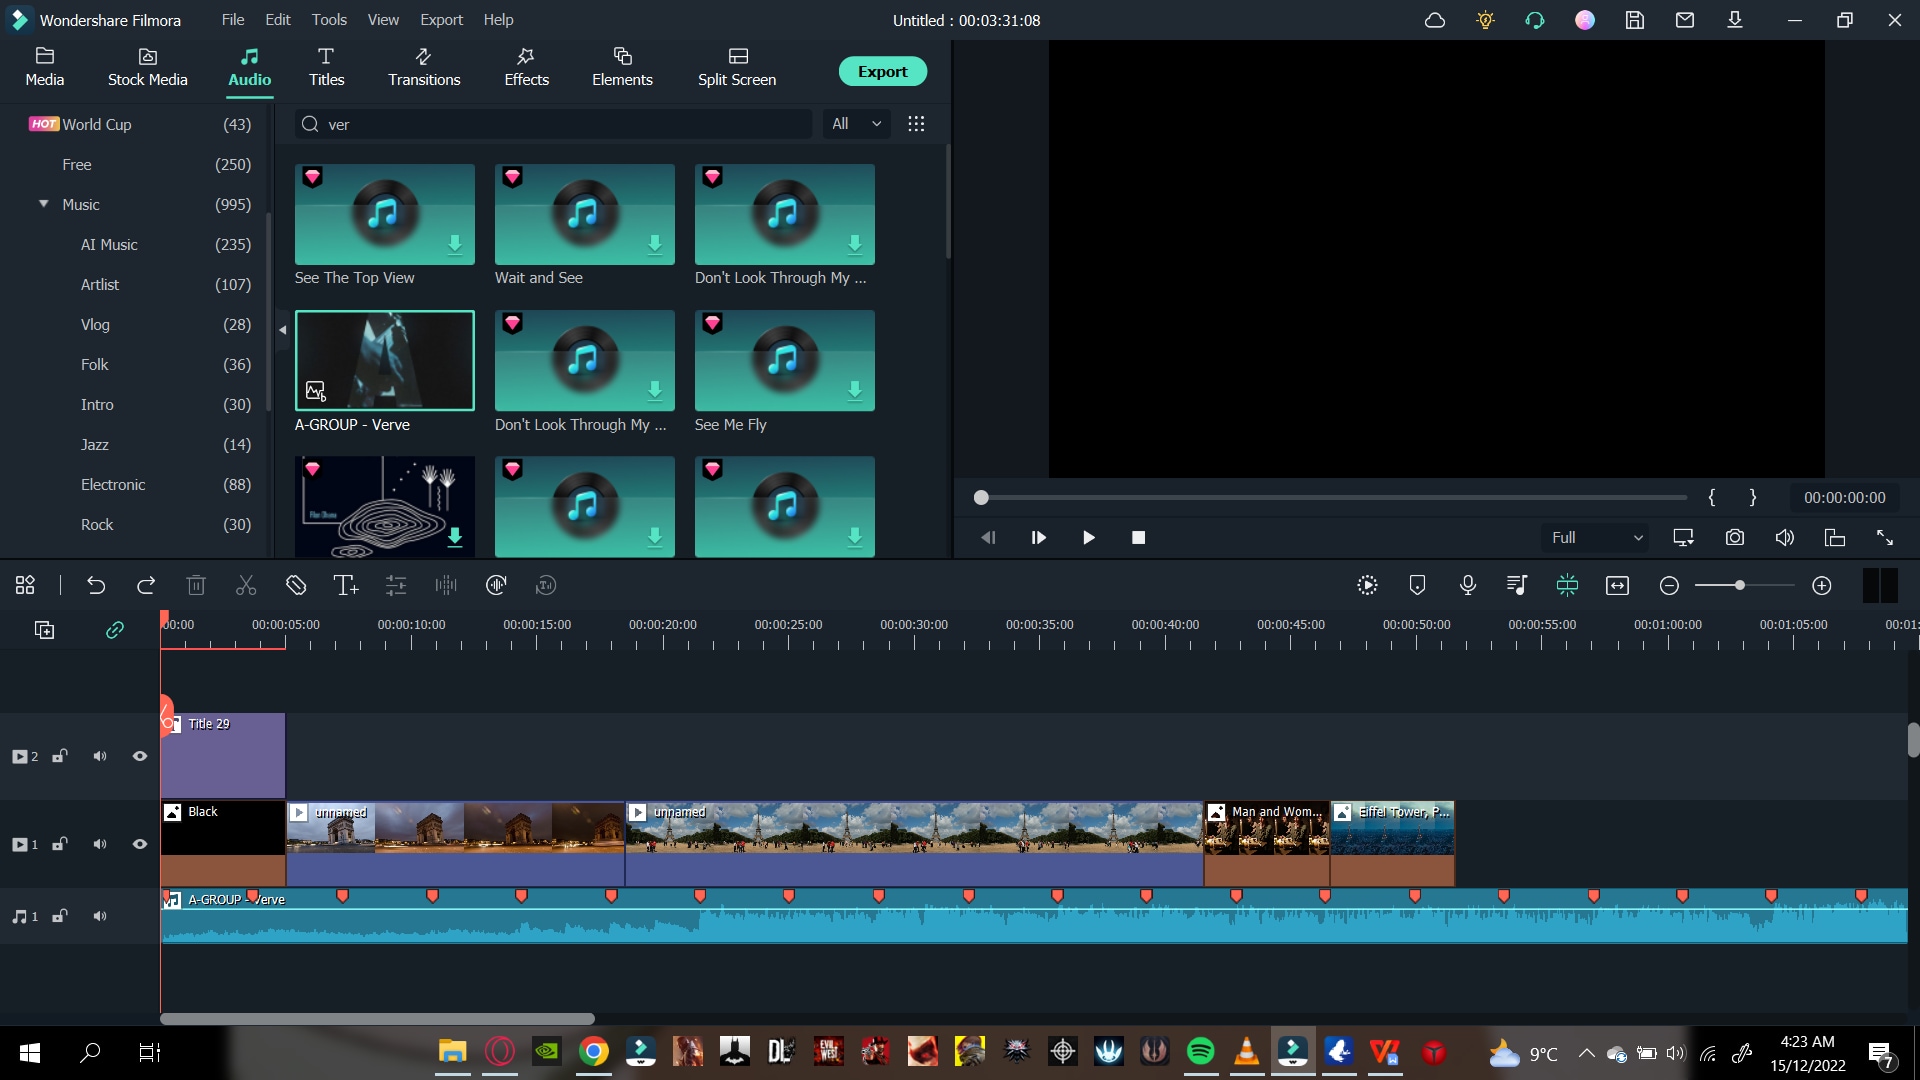
- Check that the video clips are in sync with the marker on the audio.
- For this, drag one video end to a marker or as many videos as you want.
- Ultimately, you will create a timeline in which your videos sync with the audio beat.
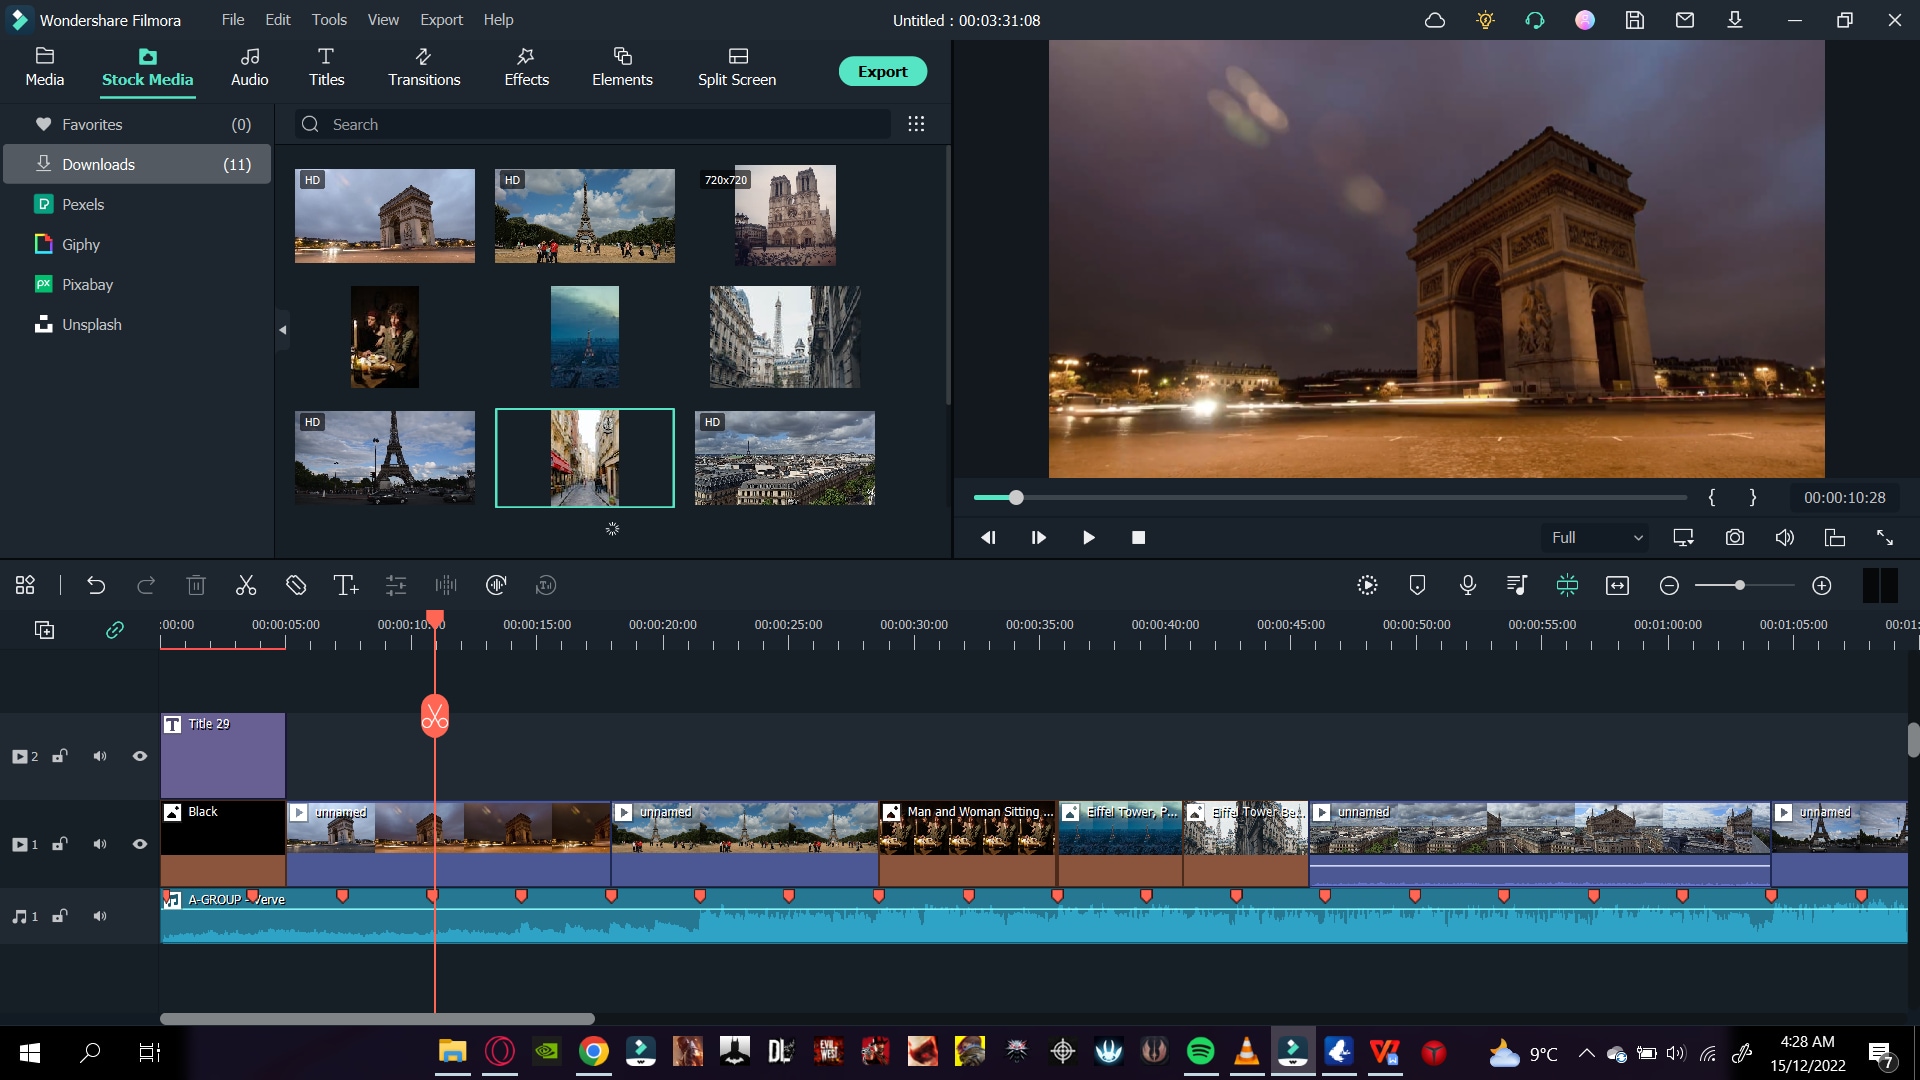
After syncing your videos and photos to the audio, it is time to move on to the scaling and background blur.
Step7 Scale and Blur The Background
Now, some of the pictures you have added must-have black borders. It usually means that your image is shorter than the aspect ratio.
If you leave the picture/photo as it is, the black borders will make it look shorter and out of proportion. As a result, it gives a generally poor look, as shown below.
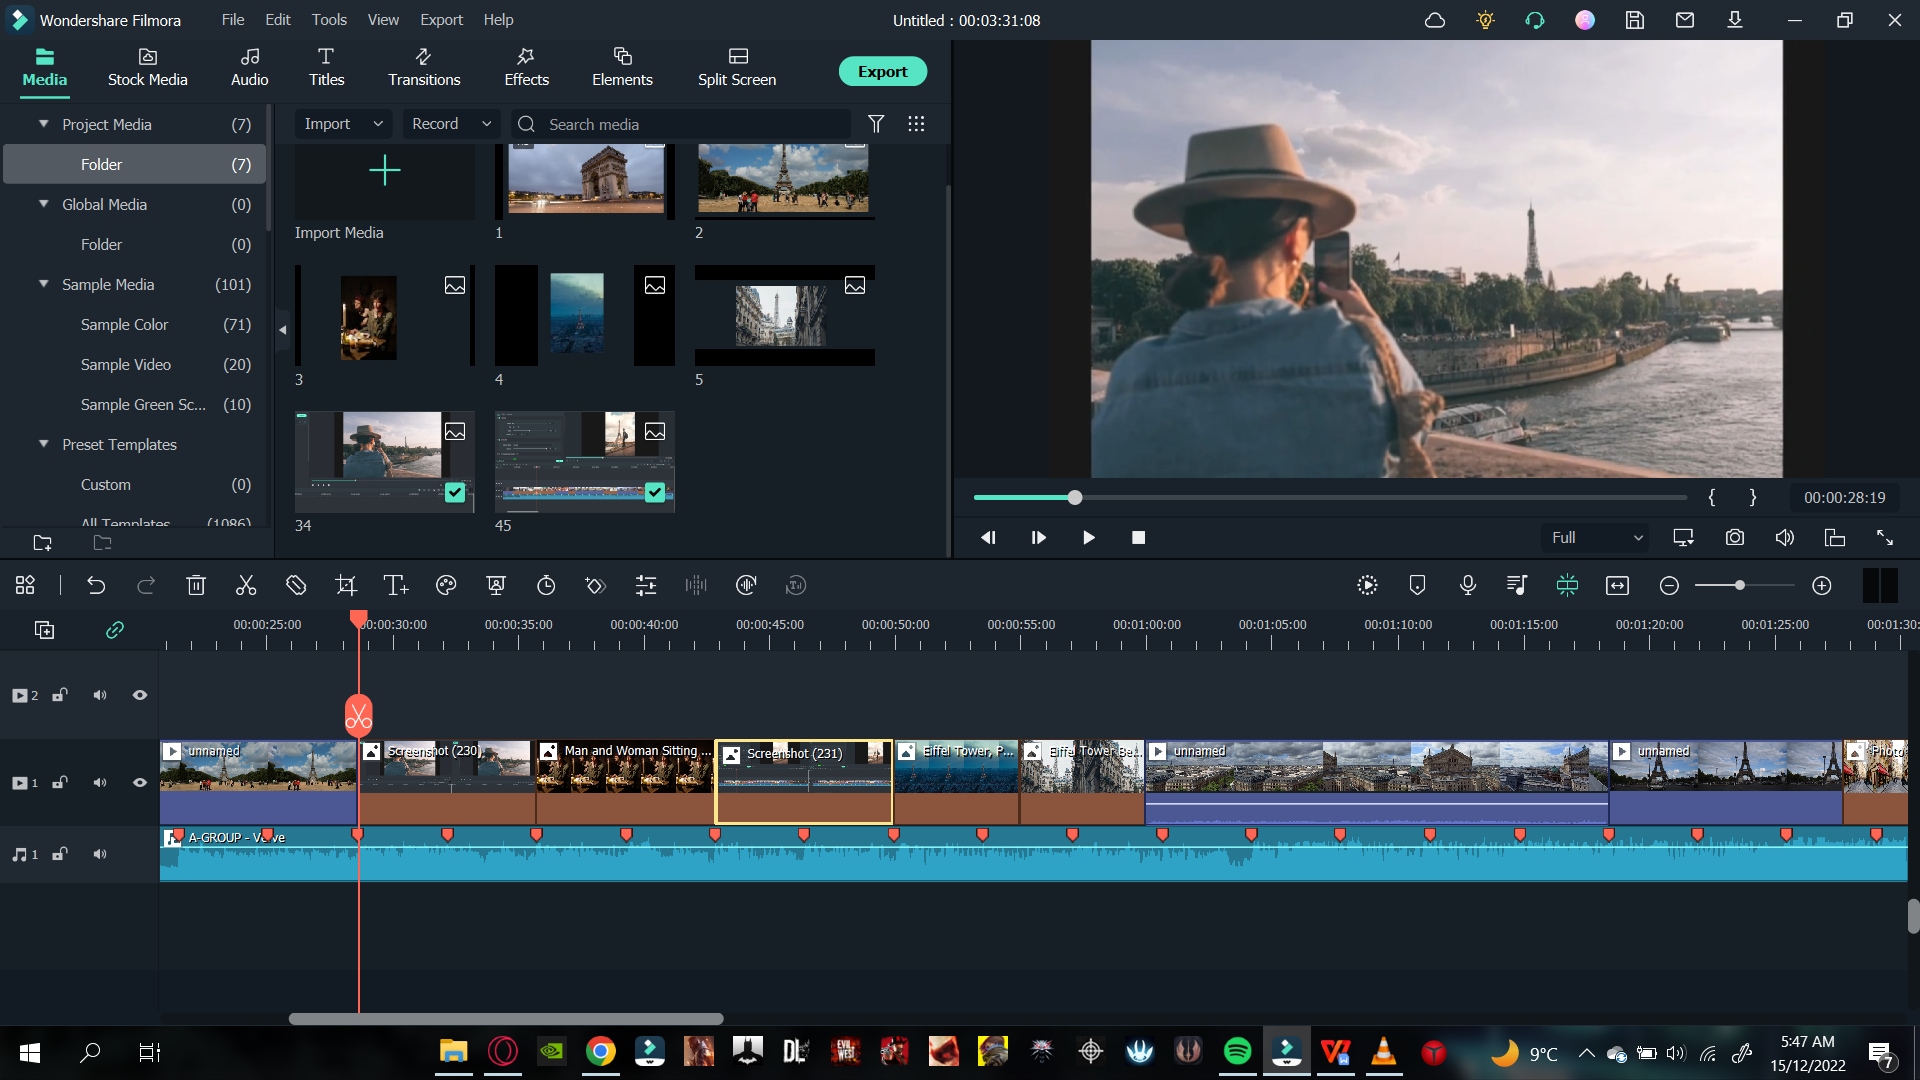
To counter this problem, follow some easy steps:
- Double-click on the picture with black borders, and it will open the settings list.
- Go into the Transform Here you can see multiple settings.
- Increase the size of your photo to match the aspect ratio.
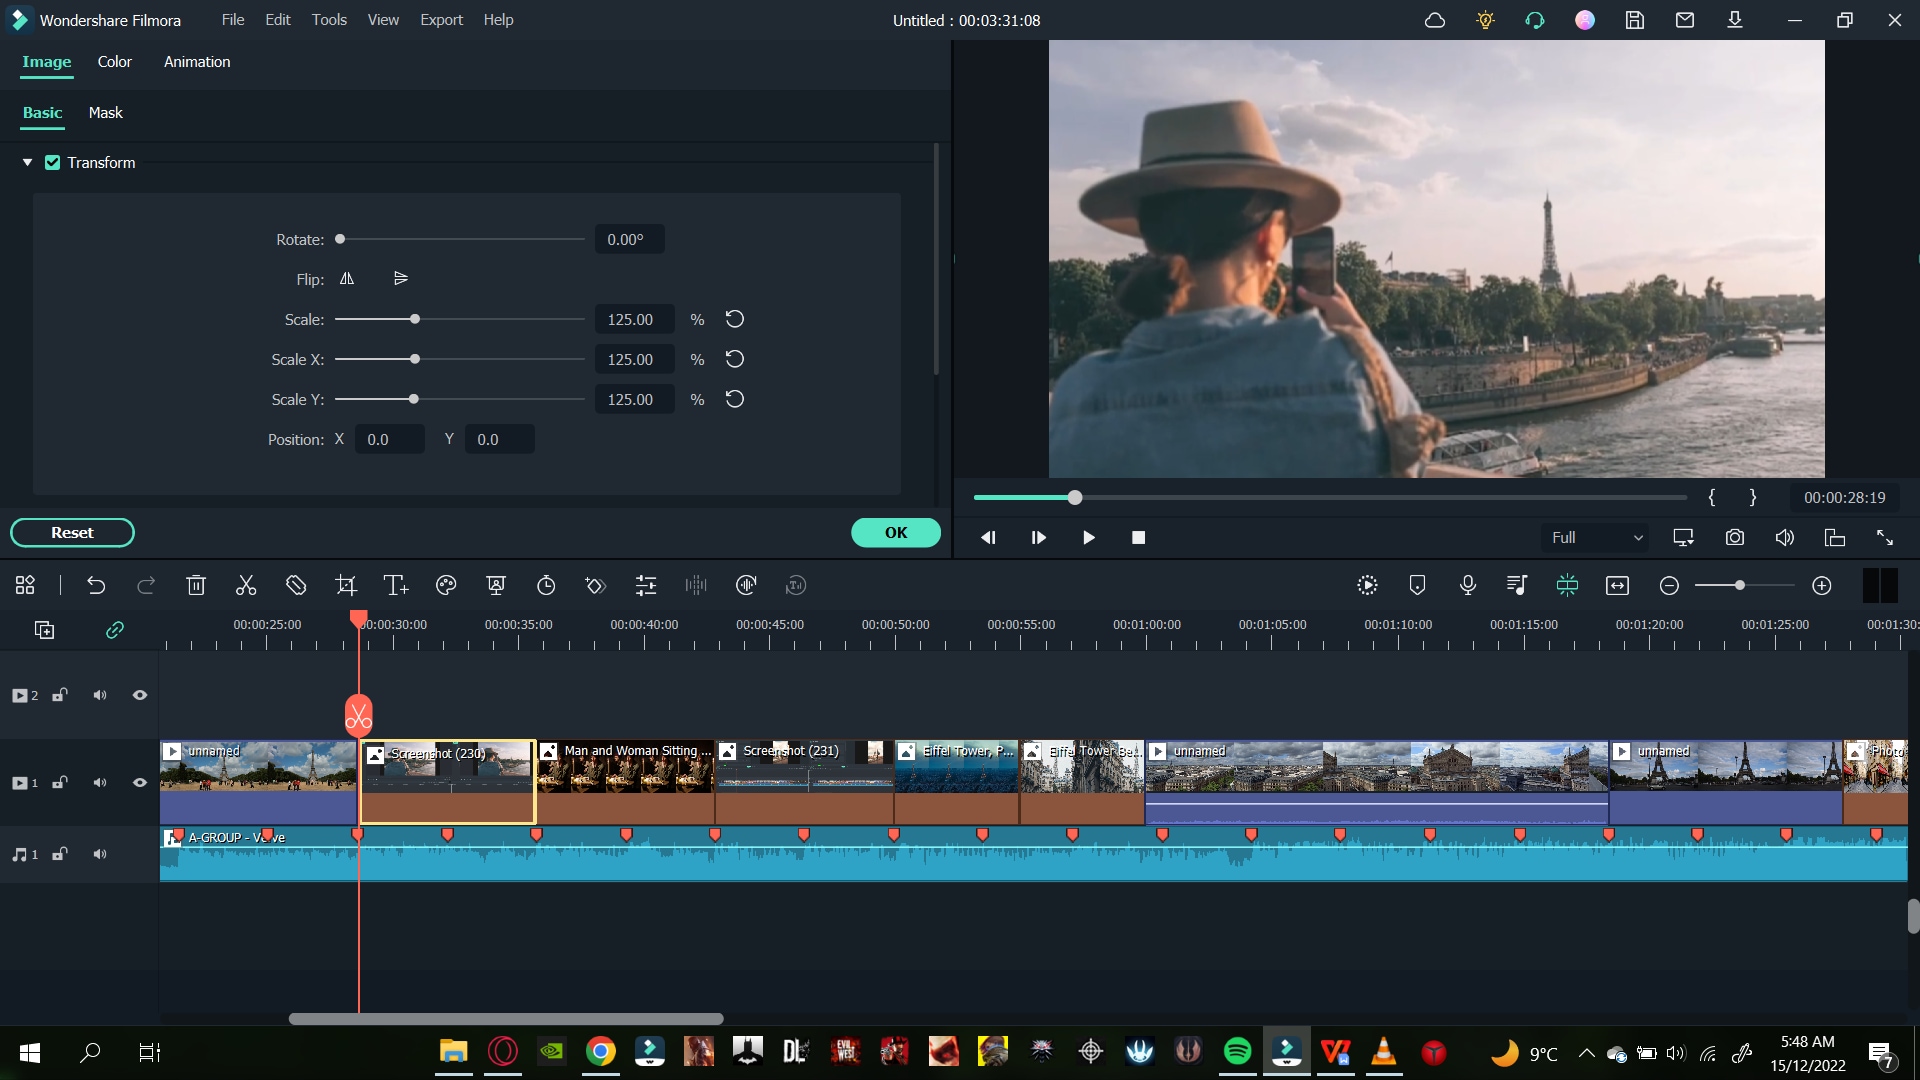
Add a Background Blur Effect
In some cases where you have taken a portrait photo where the picture is vertical, it ultimately stays out of proportion to the aspect ratio.
![]()
Note: Simply scaling the image to match the aspect ratio size is not sensible in this case. Doing so will hide the many pretty features of a portrait.
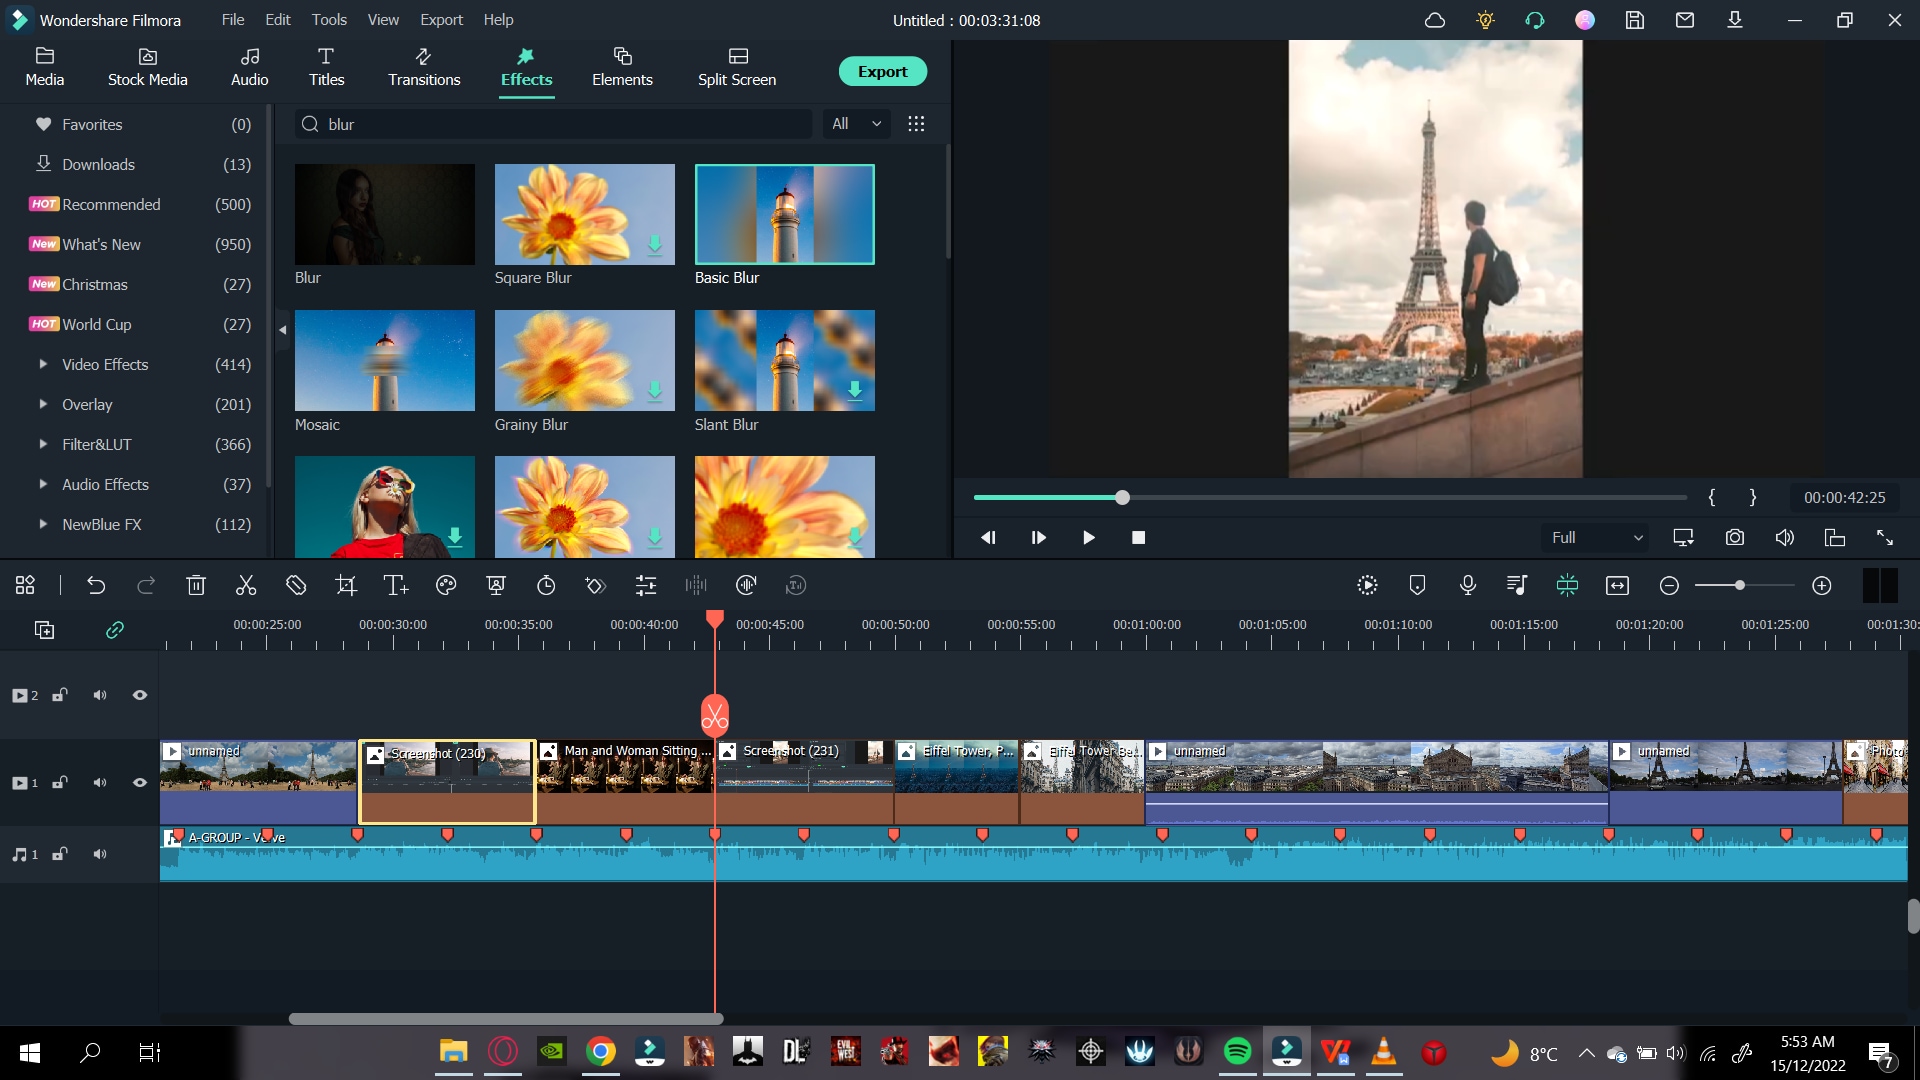
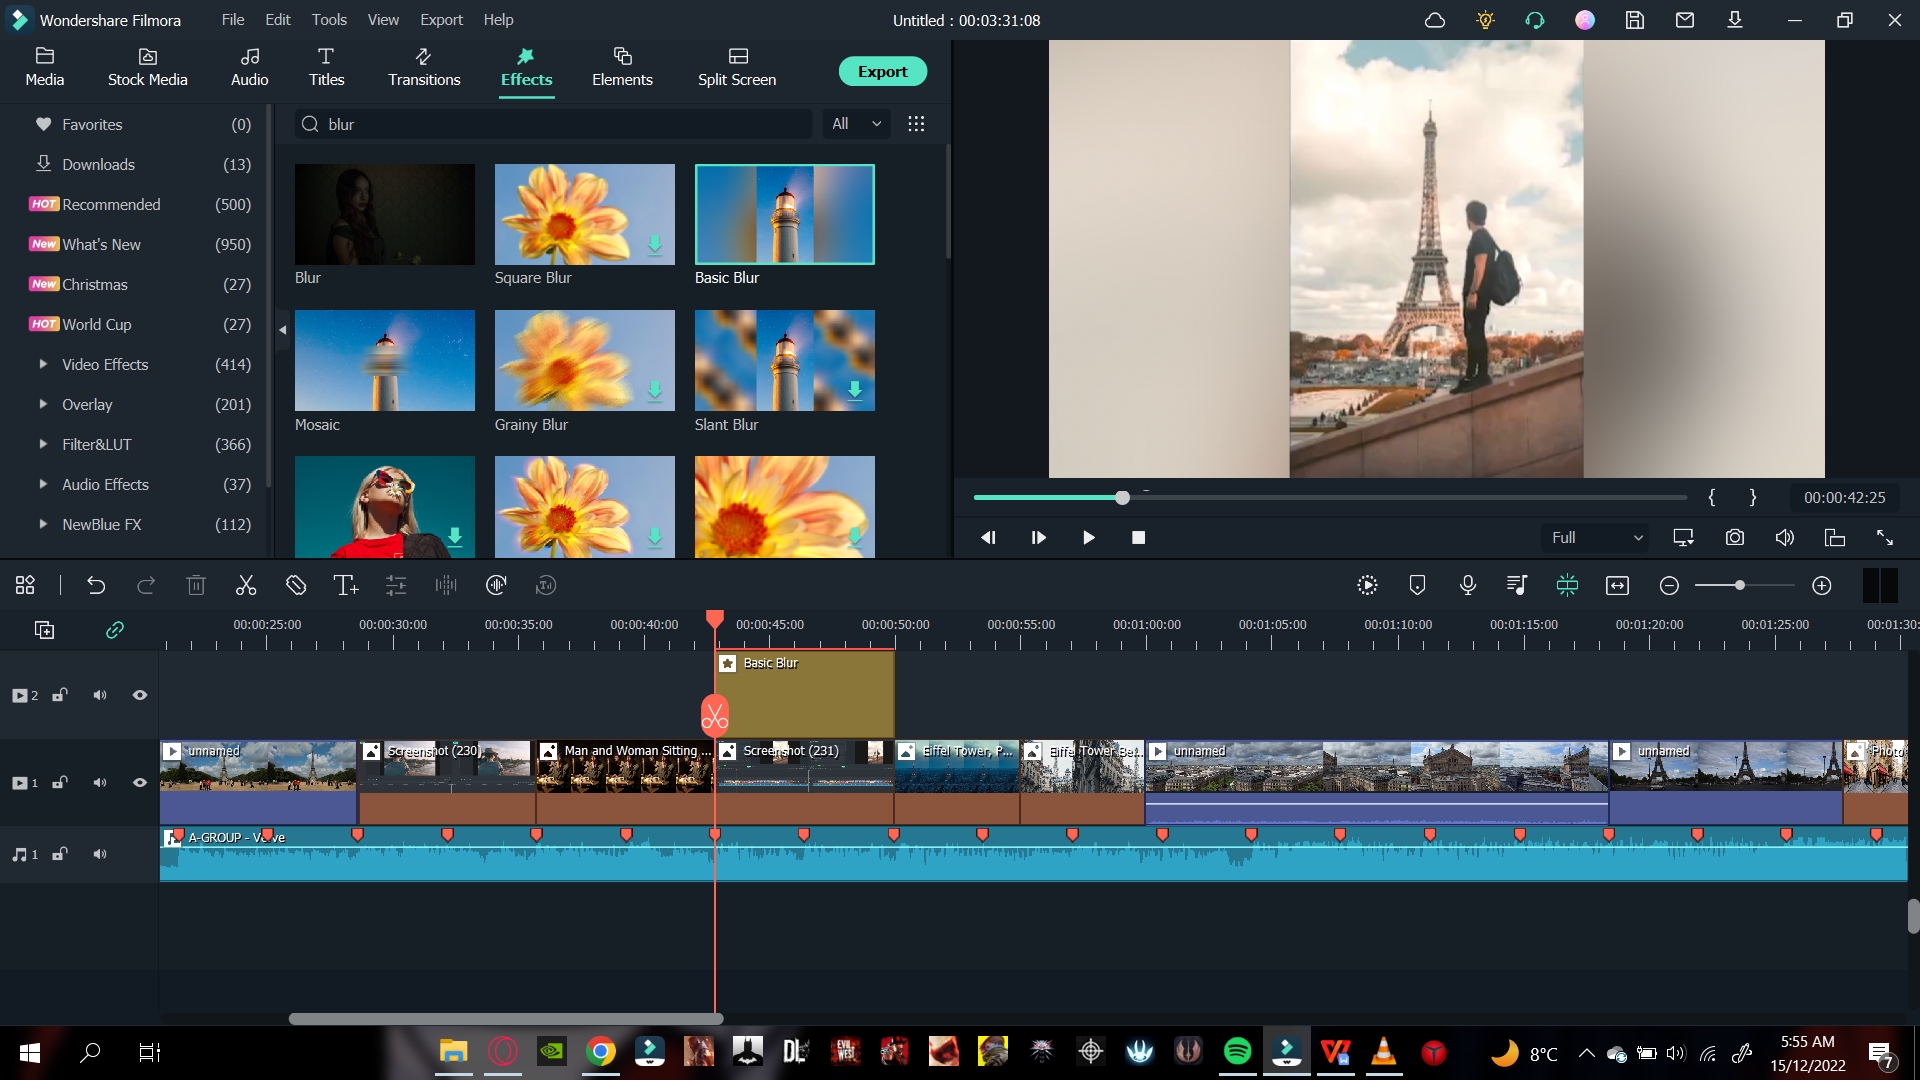
To counter this problem, you can add a blur effect. This effect will turn your background blur, matching the aspect ratio. Follow the steps mentioned below:
- Click on the Effects tab above the import window and search for Blur.
- Download the blur effect that suits you best and then drag the blur effect above your photo in the timeline.
You will notice the background turn to a blur in the main play screen.
Step8 Add a Transition
You can also add a transition effect to spice up things. It can get bland when your video or photo changes from one to another. To create a good slideshow video, you can add a transition effect by following the steps mentioned below:
- Click on the Transition icon above the import window.
- Browse the library until you find a transition you like, then download one.
- Click on the transition and drag it between the clips.

Adjust The Duration and Placement of The Transition
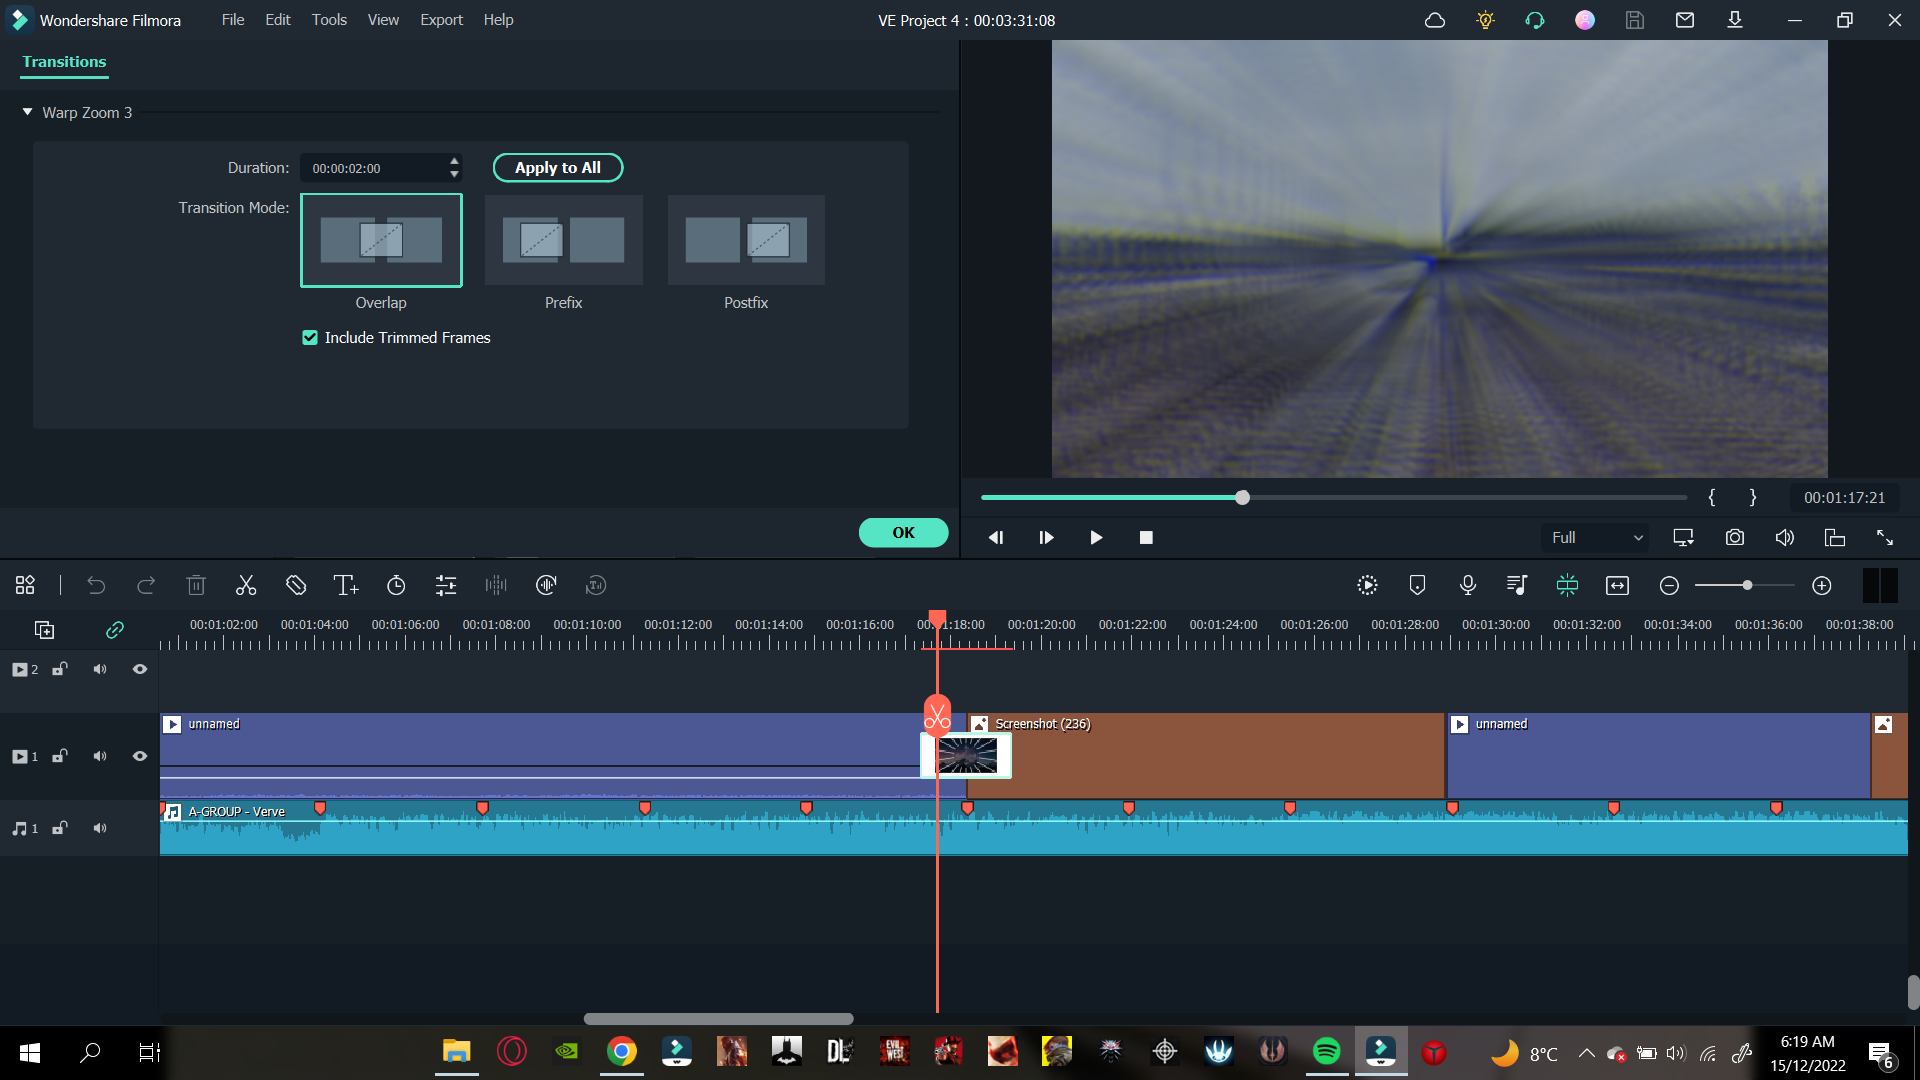
Now it’s time to adjust the duration and placement of the transition. For this, you can follow the steps mentioned below:
- Double-click on the transition effect, and it will open the settings list.
- You can adjust the duration by setting the timer as per your requirement.
![]()
Note: If other transitions are added to the timeline, you can adjust them by clicking Apply to all.
When you have adjusted the slideshow transitions, it is time to move on to the effects and filters.
Step9 Add the Effects and Filters
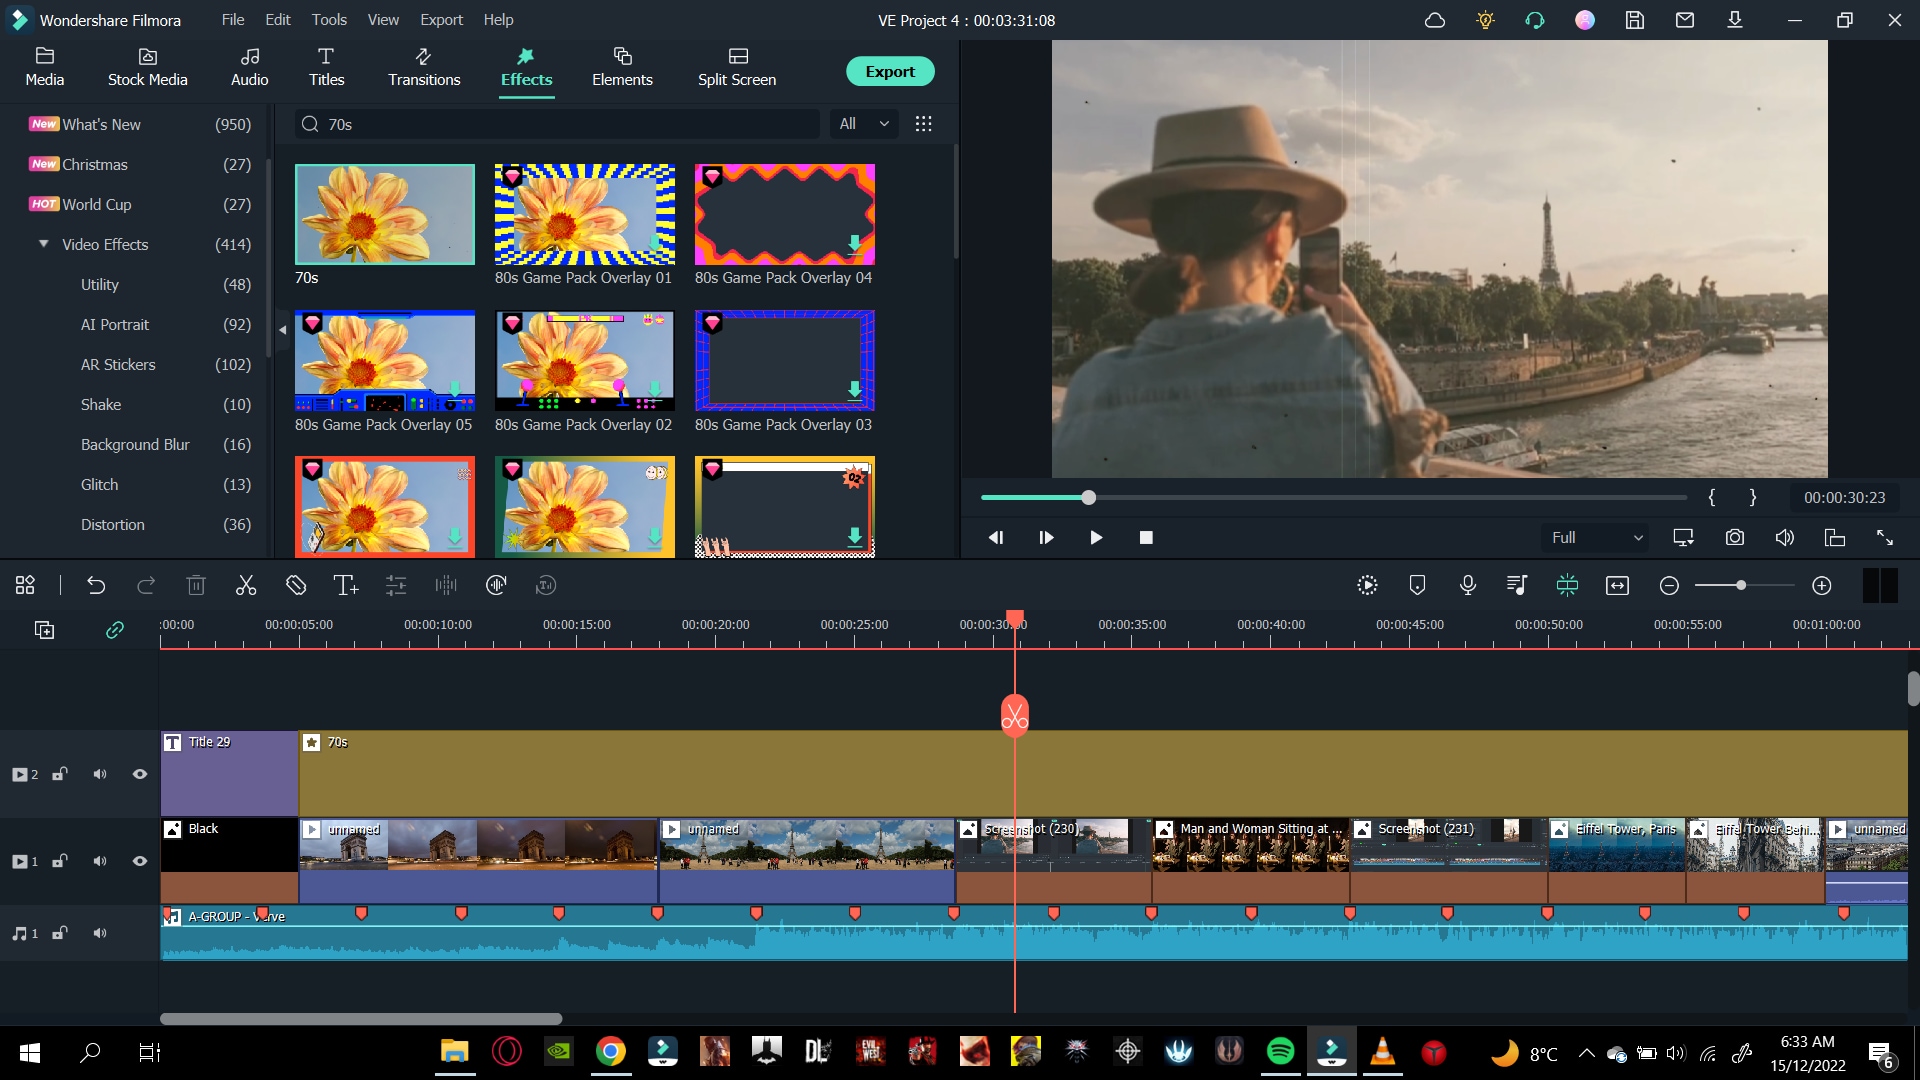
If you create a slideshow video of your trip to a historical place. You can add a Vintage filter to your video to give it that vintage tint. Follow the steps mentioned below:
- Head over to the Effects tab, where the effects library will open up
- Select any effect and download
- Click on the effect and drag it to drop in the timeline.
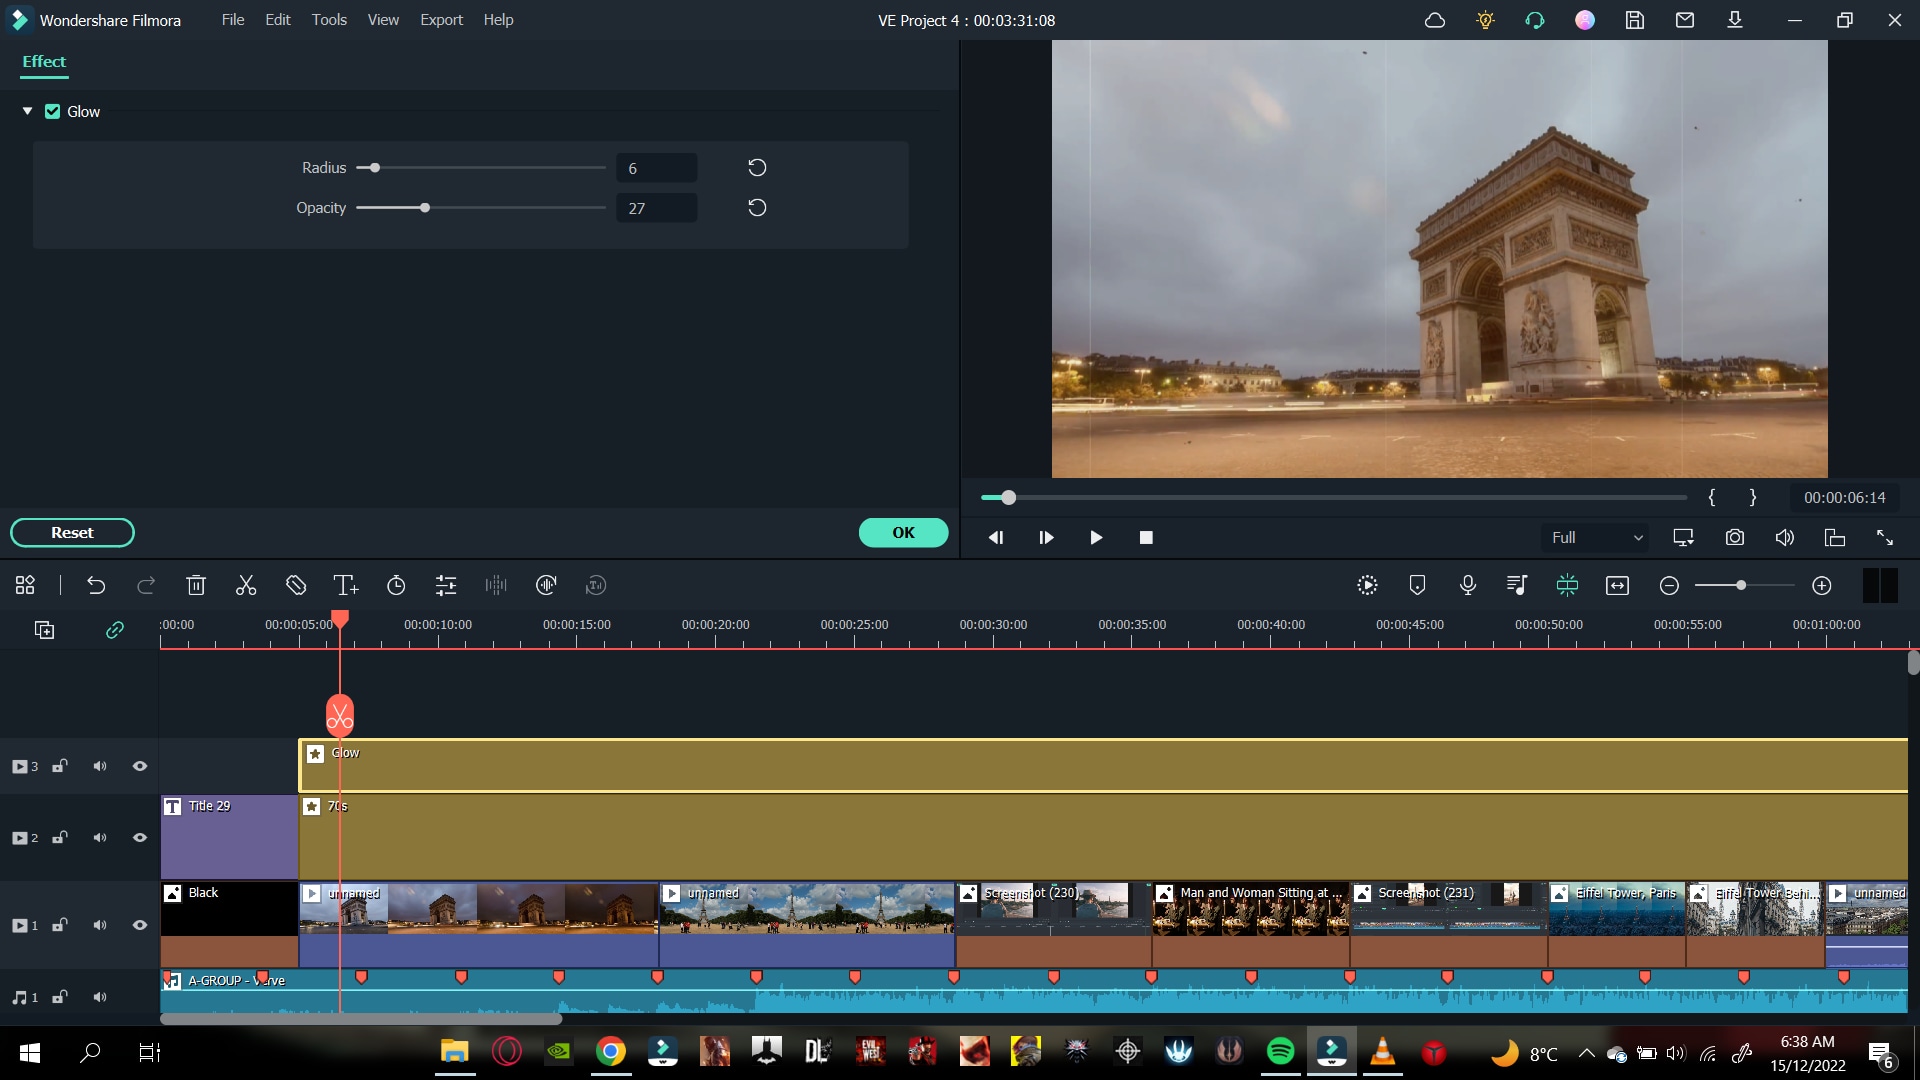
Combining a vintage effect with a dreamy glow will make your video pop up even more. To add a nostalgic glow to your video, follow the steps:
- Click on the effects and search for Glow in the search bar.
- Click and drag the glow effect above the timeline and ensure the effect is in the separate video timeline.
- Ensure the effect is applied to every photo and video.
- Double-click on the effect, and settings will open in the import window.
- Then, you can adjust the radius and opacity of the video. Adjust as you desire.
We are almost done. Let us now move toward our outro!
Step10 Create an Outro
The steps we will do will be similar to the ones we did initially. As we are creating, we will again need a canvas. Follow the steps mentioned below:
- Head to the media icon on the bar and scroll until you see the sample media tab.
- In the sample color option, drag and drop the black color at the end of your video.
Add an Outro Transition
To finalize things, add a transition effect at the end of the clip by these steps:
- In the Transition tab, search for the Fade effect.
- Drag and drop the Fade effect between your last video clip and the Black screen.
Fade out The Audio
If the audio suddenly ends at the end of your slideshow, it will create a bitter effect. Therefore, you should always fade out audio at the end of the video. To do this, follow the steps mentioned:
- Double-click on the audio in the timeline, and the settings list will pop up.
- On the top section of the import window, you will notice fade options.
- In the fade-out bar, drag it to the side to set your fade-out timer.
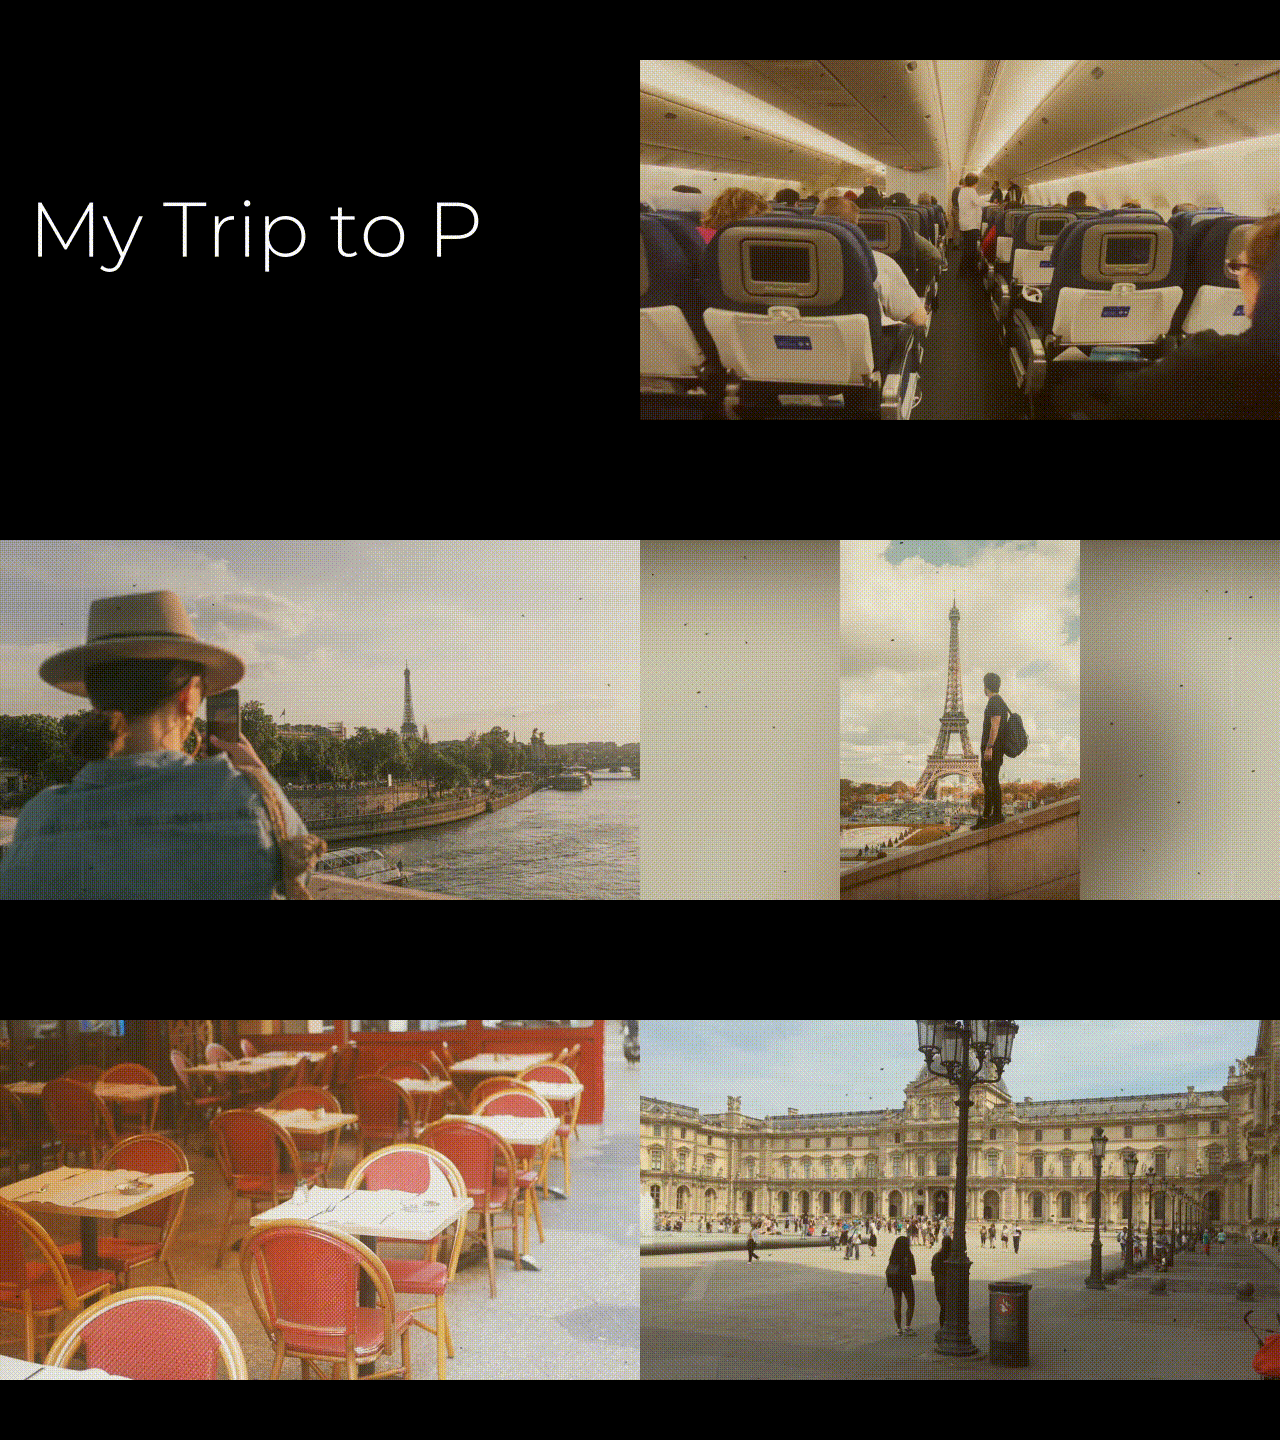
You can show your friends and family the slideshow or upload it to Youtube. Play the Slideshow Video from the beginning to see the changes.
Conclusion
By the steps mentioned above, you can create a slideshow video. Give every moment a chance to align everything on one side! The slideshow will also save your device space by aligning everything in one video.
Free Download For macOS 10.14 or later 
Let’s start with the step-by-step instructions for making a slideshow video now that you know the requirements for generating a slideshow.
Part 5. Step-by-Step Guide to Creating a Slideshow Video
Utilizing filmora will reduce your workload while producing quality work. Follow the below step-by-step guide to make your slideshow video instantly!
Step1 Download Wondershare Filmora
Wondershare Filmora will provide the working platform. Follow the below steps to download it:
- First, install the Wondershare Filmora.
- Then, launch this application on your PC or Mac
Let’s proceed to edit our video after downloading the Wondershare Filmora software. Continue reading to find out how to begin the editing process.
Step2 Import your Photos and Videos
Importing your videos and pictures to Filmora’s media panel is best to have them all in one folder. Therefore, when you open Wondershare Filmora, you will notice the main import window in the top left corner.
- Click in the center of the import window upon the import icon.
- Browse from the PC library to where your target Videos and Photos are stored.
- Please select the required videos and photos and Open

Your next step will be to add the imported videos and images to the timeline.
Step3 Add your Photos and Videos to the Timeline
When you have multiple videos and photos, you can add all of them simultaneously. Or you can also add them one by one wherever you need. Follow the steps mentioned:
- Right-click on the photo or video you want.
- Keep holding the Right-click and drag it down to the timeline.

Now that we have imported your photos and videos into the timeline, it is time to align and add text.
Step4 Add the Title
To create an attractive slideshow, you will need to add a title before the start of the video. Doing so will allow you to gain more viewers and audiences.
Add a Black Screen
The black screen will eventually act like a canvas to give your title a good look. To add a black screen, follow the steps mentioned:
- Click on the media icon from the bar above the import window.
- You will notice many tabs on the left-hand side under a drop-down bar.
- Scroll below to find the sample media
- Download the black color if it is not downloaded already.
- Click and drag it down below to the start of your video.

Add a Title Tile
Now that we have our canvas, we will now add the title. Above the import media library, there will be a Title icon.
- Click on the title icon, and select the title that you want for your video by browsing and scrolling down.
- For this purpose, we will use a simple title tile called “Title 29.”
![]()
Note: You can find the same title by scrolling, browsing, or searching in the search bar above the import library.
- Click and drag the title onto the black screen that we added.
- Double-click the title to open its settings.
- Here you can type in the text that you want.

You can also change its font. When you click on the font bar, a drop-down option will pop up, and you choose whichever you like.
- Change the animation of the text title from the top left corner animation
Change The Timing of The Title
You can also adjust the timing of the title by below steps:
- Click on the advanced option in the bottom right corner, and settings will pop up.
- Find the title bar and drag it to the right side to increase the timing of the title.

After adding the title, it’s time to go with fading effect as shown below!
Step5 Add a Fade effect
You can also add a fade transition to the start of your video. It will blend the title with the first clip. Follow the steps mentioned to add the transition effects:
- Search the Fade option from the Transitions tab above the import window

Note: A fade transition will allow your title to fade into the first clip creating a visually pleasing effect.
- Download the Fade transition and drag it between the Black screen and the first clip.

Now that we have added a transition, it is time to move on to our music!
Step6 Add The Music
You can add your music to the slideshow from your PC library, but make sure you have the music rights. It is better to use stock audio by following the steps:
- Click on the Audio icon on the bar above the import window, and the list will pop up.
- Please browse the library to find music that best suits your video and download it.
- Then add it to the timeline’s audio track.
Add Beat Detection
To match your video clips properly with the music, so it remains in sync, you can adjust it with the beat of the music. To add beat detection, follow the steps mentioned:
- Right-Click on the audio that you selected in the audio library.
- You will see a pop-up list, and in the options, you will see Beat detection.
- Click on Beat detection.

- Then click on the audio and drag it below on the timeline.
Match The Video With The Audio Markers
To have the full advantage of beat detection, you must adjust your videos and photos to the markers. Follow the steps mentioned below to do so:

- Check that the video clips are in sync with the marker on the audio.
- For this, drag one video end to a marker or as many videos as you want.
- Ultimately, you will create a timeline in which your videos sync with the audio beat.

After syncing your videos and photos to the audio, it is time to move on to the scaling and background blur.
Step7 Scale and Blur The Background
Now, some of the pictures you have added must-have black borders. It usually means that your image is shorter than the aspect ratio.
If you leave the picture/photo as it is, the black borders will make it look shorter and out of proportion. As a result, it gives a generally poor look, as shown below.

To counter this problem, follow some easy steps:
- Double-click on the picture with black borders, and it will open the settings list.
- Go into the Transform Here you can see multiple settings.
- Increase the size of your photo to match the aspect ratio.

Add a Background Blur Effect
In some cases where you have taken a portrait photo where the picture is vertical, it ultimately stays out of proportion to the aspect ratio.
![]()
Note: Simply scaling the image to match the aspect ratio size is not sensible in this case. Doing so will hide the many pretty features of a portrait.

To counter this problem, you can add a blur effect. This effect will turn your background blur, matching the aspect ratio. Follow the steps mentioned below:
- Click on the Effects tab above the import window and search for Blur.
- Download the blur effect that suits you best and then drag the blur effect above your photo in the timeline.
You will notice the background turn to a blur in the main play screen.

Step8 Add a Transition
You can also add a transition effect to spice up things. It can get bland when your video or photo changes from one to another. To create a good slideshow video, you can add a transition effect by following the steps mentioned below:
- Click on the Transition icon above the import window.
- Browse the library until you find a transition you like, then download one.
- Click on the transition and drag it between the clips.

Adjust The Duration and Placement of The Transition
Now it’s time to adjust the duration and placement of the transition. For this, you can follow the steps mentioned below:
- Double-click on the transition effect, and it will open the settings list.
- You can adjust the duration by setting the timer as per your requirement.
![]()
Note: If other transitions are added to the timeline, you can adjust them by clicking Apply to all.

When you have adjusted the slideshow transitions, it is time to move on to the effects and filters.
Step9 Add the Effects and Filters
If you create a slideshow video of your trip to a historical place. You can add a Vintage filter to your video to give it that vintage tint. Follow the steps mentioned below:
- Head over to the Effects tab, where the effects library will open up
- Select any effect and download
- Click on the effect and drag it to drop in the timeline.

Combining a vintage effect with a dreamy glow will make your video pop up even more. To add a nostalgic glow to your video, follow the steps:
- Click on the effects and search for Glow in the search bar.
- Click and drag the glow effect above the timeline and ensure the effect is in the separate video timeline.
- Ensure the effect is applied to every photo and video.
- Double-click on the effect, and settings will open in the import window.
- Then, you can adjust the radius and opacity of the video. Adjust as you desire.

We are almost done. Let us now move toward our outro!
Step10 Create an Outro
The steps we will do will be similar to the ones we did initially. As we are creating, we will again need a canvas. Follow the steps mentioned below:
- Head to the media icon on the bar and scroll until you see the sample media tab.
- In the sample color option, drag and drop the black color at the end of your video.
Add an Outro Transition
To finalize things, add a transition effect at the end of the clip by these steps:
- In the Transition tab, search for the Fade effect.
- Drag and drop the Fade effect between your last video clip and the Black screen.

Fade out The Audio
If the audio suddenly ends at the end of your slideshow, it will create a bitter effect. Therefore, you should always fade out audio at the end of the video. To do this, follow the steps mentioned:
- Double-click on the audio in the timeline, and the settings list will pop up.
- On the top section of the import window, you will notice fade options.
- In the fade-out bar, drag it to the side to set your fade-out timer.
You can show your friends and family the slideshow or upload it to Youtube. Play the Slideshow Video from the beginning to see the changes.

Conclusion
By the steps mentioned above, you can create a slideshow video. Give every moment a chance to align everything on one side! The slideshow will also save your device space by aligning everything in one video.
How to Use LUTS to Color Grade on Your iPhone
Are you a photographer? Do you like to capture the best moments as media files? Then, the LUTs app offers you surprising editing options to retain realistic clicks. The iPhone LUT refine the images and videos by color grading and adding filters. It is an exclusive tool applicable to iPhone and iOS gadgets.
Many iPhone devices have a good picture quality, and some users try filming using this gadget. Upgrade the recordings and redefine the images and videos with perfect color matches using the grading techniques. The essence of the picture depends on the combinations of brightness, hue, color, and saturation level. The LUT apps include the correct combinations of these attributes to enhance the overall captures. Connect with this article to discover the best ways to use the LUTs app for optimal image and video clicks.

Useful LUTs app for iPhone
Here, you will explore the best LUTs apps available for download at the app store. Here, you will find only reliable applications that serve your purpose without compromising the quality factors.
• 3D LUT app
In this LUT apo, you can perform high-end color grading techniques and bring out the best in the picture by assigning the correct combination of colors. This app also works on complex images and fixes the issues quickly. It allows you to build your color filter and apply it to the photos and videos on your iPhone. You can either upload the media file into the 3D LUT interface or use the recent clicks to customize the color attributes using this software.
Pros
- Excellent and quality color grading is feasible using this tool.
- Easy to upload the media files into this editing interface. It does not consume much of your time.
Cons
- Some newbie users find it slightly hard to handle the controls on its interface.

3DLUTS-app
• Video LUT
It is a high-end video editing LUTs app that works on every detail of the videos. This app helps you upload the images even from the virtual storage effortlessly. It supports some of the LUT formats like a 3D cube, Autodesk 3D LUT, and .png files. Use this app to adjust the brightness level, contrast, shadows, and saturation to obtain better looks in the images and videos.
Use this application to set the CMYK curves and insert the desired effects like glow and denoise to improve the visual and audio quality of the videos. The color grading option increases the standards of the videos and photos. The White balance attributes can be set to automatic mode to adapt to the existing levels in the original videos.
Pros
- Allows the users to perform batch processing and enables you to work with multiple files hassle-free.
- Merging of LUTs to create newer ones is feasible using this tool.
Cons
- Sometimes due to the file size, importing the videos from different sources affects the overall editing time. While accessing the virtual storage space, any unexpected network issues slow down the procedure.

Video LUts
• LUTs App
This application assists you to edit the LUTs images professionally. It is in-built with features like brightness, saturation, contrast, shadow, light, and tone. Set the precise values for these attributes to enhance the overall appearance of the images and videos. This application allows you to create a filter by customizing it with desired visual settings and implementing it on any uploaded videos and images for future use. This app aids you to share it without friends too.
Pros
- Easy navigation while editing the imported images and videos.
- Efficiently edit the color and export the photo directly to any destination quickly.
Cons
- Only limited features are available with this LUTs app.

LUTs app
• Filmic Pro
It is a cinematic LUT app and provides you with the essential effects of the uploaded content. You can purchase the professional LUTs pack to add value to your captures. It is a sophisticated tool and it works beyond boundaries. Use this limitless feature of this Cini Kit to bring out the best in the imported video content. There are options to integrate the in-built LUTs into your editing interface and apply the desired ones based on your requirements. It has a comfortable interface and promises you quality results.
Pros
- This app satisfies both beginners and professionals. It is a valuable LUT pack and makes a worthy purchase by purchasing the advanced features at cost-effective price tags.
- There are options to create a 3D illusion of the imported images using this Filmic Pro LUTs tool.
Cons
- The learning curve is steep and you have to spend extra hours to master all the in-built options available with this software.

Filmic Pro
How do you use the LUTs app to edit the videos precisely?
This section is an elaborate discussion on the best ways to use the LUTs app to edit the images or videos on iPhone efficiently. Every image takes a new look after editing with this giant program. The unique feature of this program is that you can create a filter on your own and apply it to obtain awesome outcomes. In the LUTs app, you will find the Export option on every edit page. It helps you to share it with your friends anytime even during the editing period. Any changes can be further included by scrolling the option at its interface.
You can follow up on the below instructions to successfully edit the images and videos using the LUTs app. Carefully watch out for the steps to edit the images or videos on your iPhone precisely.
Step 1Install the LUTs app
Go to the App Store and download this app. You can install the program and launch it to make further edits to the images.

Install Luts
Step 2 Create your filter
On the home screen of this app, create a customized filter and upload the images to apply to it. You can also use the in-built filters, LUTs files, and color grading attributes. The onscreen instruction is available to guide you with the respective pages for further edits on the imported files.

Create LUTs
Select the LUTs and apply, then adjust the color gradings and work with the parameters like brightness, hue, luminescence, and saturation. Make changes with the uploaded file and save the changes by tapping the tick icon at the top corner of the screen on your iPhone device.
Step 3 Export the edited content
Finally, press the export button to share the edited images with your friends at their respective destinations.

Export
Some of the options integrate for free into this platform. Apply them wisely to make the right changes to the image and videos.
All the above discussed three LUTs application gives you results with high standards. Every image looks great after undergoing the LUT filters. They are precise applications and reveal the flavors of the images and videos efficiently. The LUTs applications are simple and give you more features to personalize the photos and videos for your need. It is high time to select the reliable one from the list.
Wondershare Filmora11 Express Better
Archive More
Grow Together
Free Download Free Download Learn More

Summarize:
Thus, you had an enlightening journey with the iPhone LUT. You can process the images and videos using these LUTs apps and choose the above-discussed programs to make the perfect edits on the media files. They are simple to work with and give you the best outcomes without prior editing skills.
All the editing control are visible, and it is enough if you make the right clicks to include the desired effects on the imported media file. Connect with this article to discover efficient editing with the LUTs app. Stay tuned for further exciting facts about it in detail.

3DLUTS-app
• Video LUT
It is a high-end video editing LUTs app that works on every detail of the videos. This app helps you upload the images even from the virtual storage effortlessly. It supports some of the LUT formats like a 3D cube, Autodesk 3D LUT, and .png files. Use this app to adjust the brightness level, contrast, shadows, and saturation to obtain better looks in the images and videos.
Use this application to set the CMYK curves and insert the desired effects like glow and denoise to improve the visual and audio quality of the videos. The color grading option increases the standards of the videos and photos. The White balance attributes can be set to automatic mode to adapt to the existing levels in the original videos.
Pros
- Allows the users to perform batch processing and enables you to work with multiple files hassle-free.
- Merging of LUTs to create newer ones is feasible using this tool.
Cons
- Sometimes due to the file size, importing the videos from different sources affects the overall editing time. While accessing the virtual storage space, any unexpected network issues slow down the procedure.

Video LUts
• LUTs App
This application assists you to edit the LUTs images professionally. It is in-built with features like brightness, saturation, contrast, shadow, light, and tone. Set the precise values for these attributes to enhance the overall appearance of the images and videos. This application allows you to create a filter by customizing it with desired visual settings and implementing it on any uploaded videos and images for future use. This app aids you to share it without friends too.
Pros
- Easy navigation while editing the imported images and videos.
- Efficiently edit the color and export the photo directly to any destination quickly.
Cons
- Only limited features are available with this LUTs app.

LUTs app
• Filmic Pro
It is a cinematic LUT app and provides you with the essential effects of the uploaded content. You can purchase the professional LUTs pack to add value to your captures. It is a sophisticated tool and it works beyond boundaries. Use this limitless feature of this Cini Kit to bring out the best in the imported video content. There are options to integrate the in-built LUTs into your editing interface and apply the desired ones based on your requirements. It has a comfortable interface and promises you quality results.
Pros
- This app satisfies both beginners and professionals. It is a valuable LUT pack and makes a worthy purchase by purchasing the advanced features at cost-effective price tags.
- There are options to create a 3D illusion of the imported images using this Filmic Pro LUTs tool.
Cons
- The learning curve is steep and you have to spend extra hours to master all the in-built options available with this software.

Filmic Pro
How do you use the LUTs app to edit the videos precisely?
This section is an elaborate discussion on the best ways to use the LUTs app to edit the images or videos on iPhone efficiently. Every image takes a new look after editing with this giant program. The unique feature of this program is that you can create a filter on your own and apply it to obtain awesome outcomes. In the LUTs app, you will find the Export option on every edit page. It helps you to share it with your friends anytime even during the editing period. Any changes can be further included by scrolling the option at its interface.
You can follow up on the below instructions to successfully edit the images and videos using the LUTs app. Carefully watch out for the steps to edit the images or videos on your iPhone precisely.
Step 1Install the LUTs app
Go to the App Store and download this app. You can install the program and launch it to make further edits to the images.

Install Luts
Step 2 Create your filter
On the home screen of this app, create a customized filter and upload the images to apply to it. You can also use the in-built filters, LUTs files, and color grading attributes. The onscreen instruction is available to guide you with the respective pages for further edits on the imported files.

Create LUTs
Select the LUTs and apply, then adjust the color gradings and work with the parameters like brightness, hue, luminescence, and saturation. Make changes with the uploaded file and save the changes by tapping the tick icon at the top corner of the screen on your iPhone device.
Step 3 Export the edited content
Finally, press the export button to share the edited images with your friends at their respective destinations.

Export
Some of the options integrate for free into this platform. Apply them wisely to make the right changes to the image and videos.
All the above discussed three LUTs application gives you results with high standards. Every image looks great after undergoing the LUT filters. They are precise applications and reveal the flavors of the images and videos efficiently. The LUTs applications are simple and give you more features to personalize the photos and videos for your need. It is high time to select the reliable one from the list.
Wondershare Filmora11 Express Better
Archive More
Grow Together
Free Download Free Download Learn More

Summarize:
Thus, you had an enlightening journey with the iPhone LUT. You can process the images and videos using these LUTs apps and choose the above-discussed programs to make the perfect edits on the media files. They are simple to work with and give you the best outcomes without prior editing skills.
All the editing control are visible, and it is enough if you make the right clicks to include the desired effects on the imported media file. Connect with this article to discover efficient editing with the LUTs app. Stay tuned for further exciting facts about it in detail.
How to Make a DIY Vlog or Video
Personally, this is a fun way vlog the DIY vlog because you can make anything that is on your own knowledge, share to the public what they don’t know yet. You See and hear DIY everywhere, and you probably already know what it stands for “Do it Yourself” it’s a pretty straightforward video concept. DIY is about so many things, basically DIY means that you’re choosing to do that task or create those products yourself with no direct help from the experts. DIY is really about you seeking out the knowledge and developing the skills you need to do something that you would normally pay someone else to do for you. Personally, when I think about DIY video, my mind goes to home improvements, things like painting, crafting or how to videos.
In this article I share to you my tips on how to make a DIY vlog or video.
- Informative Content
- Plan your Video
- Write a script
- Make your Video short but full of information
- Edit and Personalize your video
Samples of DIY Vlogs
- How to Videos
- Crafts
- Recycling Handmade Stuff
- Life hacks
- Trick and trips
Here are few tips for creating DIY Vlogs
- Informative Content
- Plan your Video
- Write a script
- Make your Video short but full of information
- Edit and Personalize your video with Filmora
Informative Content
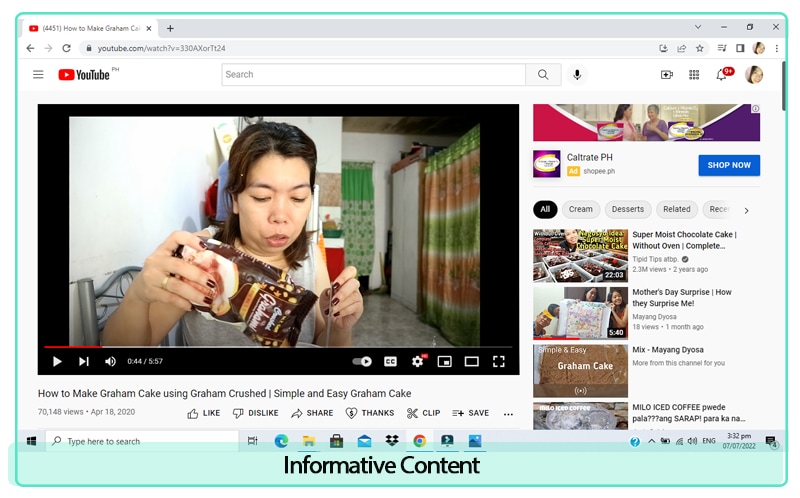
A DIY video should be purely educational. Your audience will forgive your poor production values if they’re learning great information. Be sure your DIY video is full of meaty content that’s meaningful to the viewer. Think of advice, tips or recommendations, this type of video has an instructive and educational content that is both shareable and easy to retain. Information video are good for educating you audience about certain topics related to your video content.
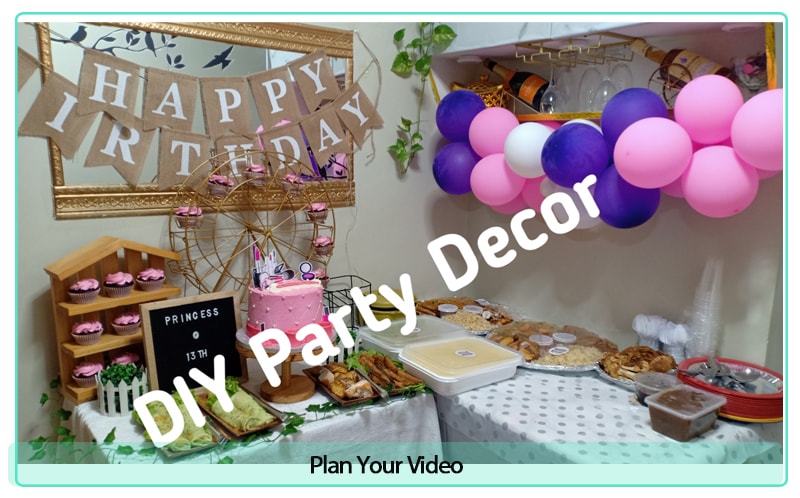
Plan your video
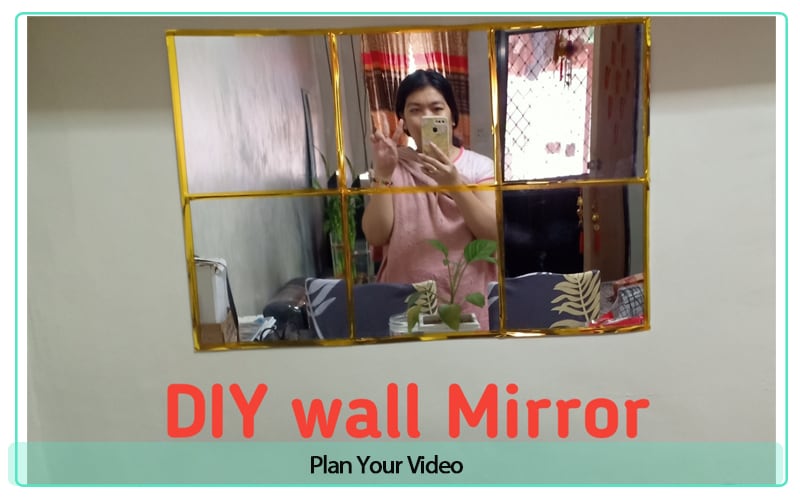
Ask yourself first of what you are trying to accomplish by producing the video. Remember that video is a tool and that it can hurt your channel if you don’t take it seriously and come properly prepared. Get organized and take down note if you have to.
Understand your target audience you need to know who you’ll be speaking to through your video content. Make sure that you really understand what you are doing, by this kind of video content is in need your expertise. You have to share to your audience what your knowledge and experience about your video topic. This is the time where its ok to make or create a script and to map out a storyboard to guide you.
Write a script
Making a script in your video is one way guide for you not to rattle or messed up everything, for me DIY vlog is different from product reviews or unboxing vlog. You can either write a word-by-word script for the video or just the general topics you aim to cover in the video. Either way, the point is to have a reference note so you don’t accidentally forget to cover an essential topic when you begin filming the video. DIY vlogs need to plan and make scripting because this is a more on tutorial video and you don’t like to missed one instruction on your video that is why making a script is a must unless you already doing it over and over again. You don’t have to be perfect and you don’t have to memorize any script. You just have to be relatable and authentic, yet professional.
Make You Video Short but full of information
Make your video short but demand more attentions to your viewers because modern viewers have short attention spans specially when they’re on social media and there is always another video to see. Just make sure to grab your viewers attention by creating a catching footage.
As long as you know well your topic then that’s good enough because it take some guts to get in front of the camera and be confident.
Editing and Personalize your DIY Video
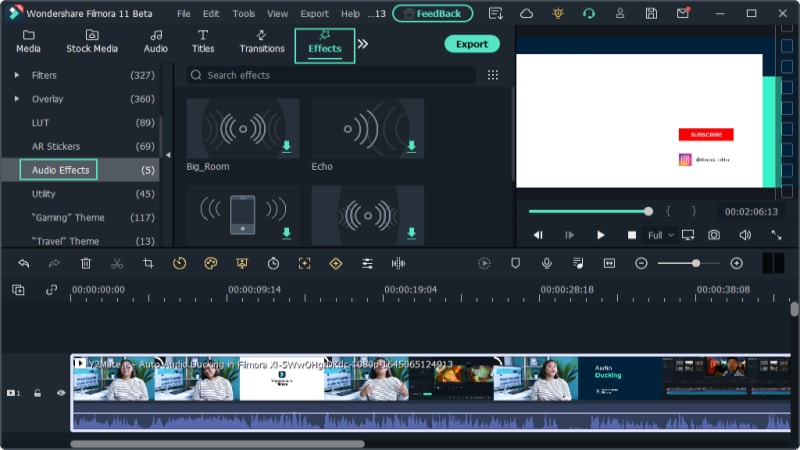
The last step is the process of editing and personalize your video content. There are a number of great video editing apps and programs out there, and with a quick internet search, you should be able to find one that meet your needs, skills level and budget. Editing is what really takes a video to the next level, use a powerful video editing software.
I will recommend Wondershare Filmora because of its great tools that will create your video stand out to others. Enable you to add transitions to your videos, color grade them, add tittles, subtitles intros and outros.
Free Download For Win 7 or later(64-bit)
Free Download For macOS 10.14 or later
Adding in background music always helps liven up a video, just make sure the music isn’t copyrighted. Filmora has a lot of recommended music that is royalty free stock music, you can use this music without worrying and you can add more music if you want to.
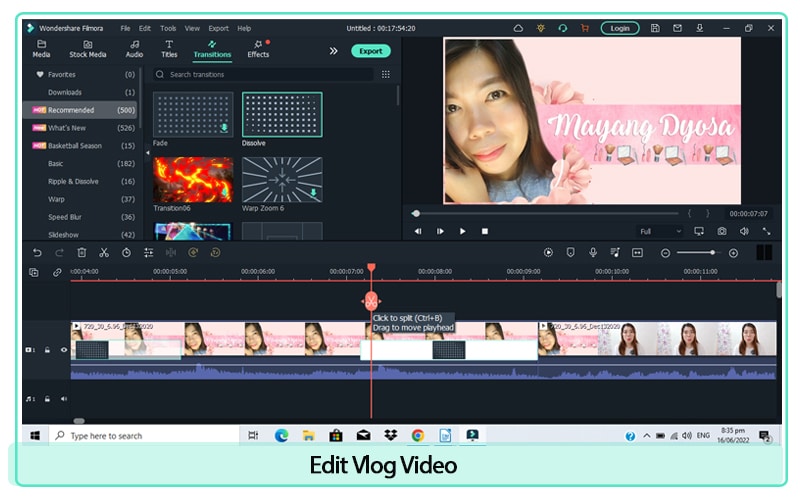
Add in your logo and branding to the video, it will make your video seem professional and customized and reminds you’re viewers of your legitimacy and expertise. Edit this one at Filmora Title and Filter tab you can create an extra ordinary branding that you like, make it creative and catchy so your audience will always remember your channel.
Verdict
Some studies say that making DIY project help reduce stress and improve your mood, that’s why a lot of people are watching DIY vlogs or video. DIY projects require you to use your hands, you’ll be able to learn new techniques and methods to put something together. This could also help you with future projects and you can even teach others how to use those skills as well.
People usually looking for a tutorial that is in video form because in this case it is easy for them to follow step by step the video instruction. Video now a days is used as a valuable marketing tool of businesses today. Online marketing efforts are relying on video content more than ever as a suitable replacement of face-to-face communication. So almost everyone now when there is a need or there are wants to do that cannot afford to do alone, they’re looking for tutorial online.
Now that you know what kind of DIY videos you want to create, be ready and be professional on making your first DIY video.
Samples of DIY Vlogs
- How to Videos
- Crafts
- Recycling Handmade Stuff
- Life hacks
- Trick and trips
Here are few tips for creating DIY Vlogs
- Informative Content
- Plan your Video
- Write a script
- Make your Video short but full of information
- Edit and Personalize your video with Filmora
Informative Content
A DIY video should be purely educational. Your audience will forgive your poor production values if they’re learning great information. Be sure your DIY video is full of meaty content that’s meaningful to the viewer. Think of advice, tips or recommendations, this type of video has an instructive and educational content that is both shareable and easy to retain. Information video are good for educating you audience about certain topics related to your video content.

Plan your video
Ask yourself first of what you are trying to accomplish by producing the video. Remember that video is a tool and that it can hurt your channel if you don’t take it seriously and come properly prepared. Get organized and take down note if you have to.
Understand your target audience you need to know who you’ll be speaking to through your video content. Make sure that you really understand what you are doing, by this kind of video content is in need your expertise. You have to share to your audience what your knowledge and experience about your video topic. This is the time where its ok to make or create a script and to map out a storyboard to guide you.


Write a script
Making a script in your video is one way guide for you not to rattle or messed up everything, for me DIY vlog is different from product reviews or unboxing vlog. You can either write a word-by-word script for the video or just the general topics you aim to cover in the video. Either way, the point is to have a reference note so you don’t accidentally forget to cover an essential topic when you begin filming the video. DIY vlogs need to plan and make scripting because this is a more on tutorial video and you don’t like to missed one instruction on your video that is why making a script is a must unless you already doing it over and over again. You don’t have to be perfect and you don’t have to memorize any script. You just have to be relatable and authentic, yet professional.
Make You Video Short but full of information
Make your video short but demand more attentions to your viewers because modern viewers have short attention spans specially when they’re on social media and there is always another video to see. Just make sure to grab your viewers attention by creating a catching footage.
As long as you know well your topic then that’s good enough because it take some guts to get in front of the camera and be confident.
Editing and Personalize your DIY Video
The last step is the process of editing and personalize your video content. There are a number of great video editing apps and programs out there, and with a quick internet search, you should be able to find one that meet your needs, skills level and budget. Editing is what really takes a video to the next level, use a powerful video editing software.
I will recommend Wondershare Filmora because of its great tools that will create your video stand out to others. Enable you to add transitions to your videos, color grade them, add tittles, subtitles intros and outros.
Free Download For Win 7 or later(64-bit)
Free Download For macOS 10.14 or later
Adding in background music always helps liven up a video, just make sure the music isn’t copyrighted. Filmora has a lot of recommended music that is royalty free stock music, you can use this music without worrying and you can add more music if you want to.

Add in your logo and branding to the video, it will make your video seem professional and customized and reminds you’re viewers of your legitimacy and expertise. Edit this one at Filmora Title and Filter tab you can create an extra ordinary branding that you like, make it creative and catchy so your audience will always remember your channel.

Verdict
Some studies say that making DIY project help reduce stress and improve your mood, that’s why a lot of people are watching DIY vlogs or video. DIY projects require you to use your hands, you’ll be able to learn new techniques and methods to put something together. This could also help you with future projects and you can even teach others how to use those skills as well.
People usually looking for a tutorial that is in video form because in this case it is easy for them to follow step by step the video instruction. Video now a days is used as a valuable marketing tool of businesses today. Online marketing efforts are relying on video content more than ever as a suitable replacement of face-to-face communication. So almost everyone now when there is a need or there are wants to do that cannot afford to do alone, they’re looking for tutorial online.
Now that you know what kind of DIY videos you want to create, be ready and be professional on making your first DIY video.
Also read:
- Updated Want to Learn How to Add VHS Green Screen to Your Videos? This Guide Will Cover All the Details You Need to Know to Add This Effect to Your Videos and Make Them Stand Out
- How to Do Velocity Edits on PC
- In 2024, Fun & Easy Masking Tricks in Filmora
- New 2024 Approved Looking Into The Top Free Slow Motion Apps (Android & iOS)
- In 2024, Top 9 Sparkle Effects Photo and Video Editors You Should Know
- Updated Ll About GIF Keyboard That You Want to Know for 2024
- Updated Change Aspect Ratio of Video for 2024
- 2024 Approved How to Time-Lapse a Video on iMovie
- Updated How I Got Free After Effects Templates Slideshow with Simple Trick
- Updated How to Find a High-Quality Video Marketing Agency?
- Best Ai Generated Memes
- In 2024, Boost Your Spirit Creating Motivational Status Videos
- In 2024, Slow Motion Videos Are Taking over Social Media and Becoming a New Trend. Read This Article if You Want to Learn How to Slow Down Video in After Effects
- Updated Adjust the TikTok Videos Length to Make Them Captivating for 2024
- Updated Best 10 Tools to Convert a GIF Into a PDF
- Updated In 2024, How to Convert Videos to Slow Motion? Complete Guide
- 2024 Approved If You Want to Color Grading Your Video, Final Cut Pro Can Be One of the Best Choices. However, Its Not Easy for Everyone to Use Color Grading Feature, and in This Guide Well Show You How to Do That
- Updated In 2024, How to Brighten a Video in Windows 10 Easily
- In 2024, Want to Feather Shapes in After Effects? Read This
- Updated How to Export Video From iMovie
- In 2024, How-To Tutorials of Kapwing Collage Maker
- New 2024 Approved 10 Best Meme Text to Speech Tools Windows, Mac, Android, iPhone
- In 2024, Dollar-Store DIY Hacks to Use for Filmmaking on a Budget
- Beginners Guide to Green Screen Keying
- Updated In 2024, Color Lut in Video - Color Grade Your Video
- Updated How to Create Your Own Subscribe Channel Graphics for 2024
- Updated 2024 Approved How To Make a Video by Mouse in Filmora?
- Practical Way to Resize Video in Handbrake
- New How to Add Transitions in Adobe Premiere Pro for 2024
- Updated Free Green Screen Mobile Frame Downloads for 2024
- New How to Create an Aesthetic Slideshow Presentation
- Updated How to Merge Videos in HandBrake? Expectation Vs. Reality for 2024
- Updated Create A Freeze Frame Sequence In Your Videos for 2024
- New In 2024, Find The Best Free Canon LUTs
- 2024 Approved Want to Immediately Know Something About Discord GIF?
- 2024 Approved Quick Answer What Is a GIF File?
- How to Remove Audio From Video Without Watermark for 2024
- How to Create a Slideshow GIF, In 2024
- 2024 Approved Reviewing Efectum App and The Best Alternatives for Smartphone Users
- In 2024, Most-Used 3 Ways to Compress Video for Instagram Story, Feed, and IGTV
- New In 2024, Change Speed of a Video on iPhone
- Additional Tips About Sinnoh Stone For Realme GT Neo 5 | Dr.fone
- In 2024, Here Are Some Reliable Ways to Get Pokemon Go Friend Codes For Honor 90 Pro | Dr.fone
- Easy Ways to Manage Your Samsung Galaxy S23 Tactical Edition Location Settings | Dr.fone
- Things You Dont Know About Huawei Nova Y71 Reset Code | Dr.fone
- How Can We Unlock Our Samsung Galaxy A05s Phone Screen?
- How to Track WhatsApp Messages on Apple iPhone 15 Without Them Knowing? | Dr.fone
- How to Unlock a Network Locked Xiaomi Redmi 13C Phone?
- How to Reset Tecno Pop 7 Pro Without the Home Button | Dr.fone
- The Most Useful Tips for Pokemon Go Ultra League On Meizu 21 Pro | Dr.fone
- In 2024, How to Use Google Assistant on Your Lock Screen Of Realme 10T 5G Phone
- Complete Tutorial to Use VPNa to Fake GPS Location On Apple iPhone 12 Pro | Dr.fone
- In 2024, How to Unlock SIM Card on Motorola G54 5G online without jailbreak
- What Is a SIM Network Unlock PIN? Get Your Xiaomi Redmi Note 12 Pro+ 5G Phone Network-Ready
- 9 Solutions to Fix Itel P40+ System Crash Issue | Dr.fone
- How to Turn Off Google Location to Stop Tracking You on Realme GT 5 Pro | Dr.fone
- How to Resolve Vivo Y27 4G Screen Not Working | Dr.fone
- In 2024, How to Unlock T-Mobile iPhone 13 Pro Max online without SIM Card?
- Change Location on Yik Yak For your Google Pixel 7a to Enjoy More Fun | Dr.fone
- In 2024, A Perfect Guide To Remove or Disable Google Smart Lock On Samsung Galaxy S23 Ultra
- In 2024, A Step-by-Step Guide on Using ADB and Fastboot to Remove FRP Lock from your Itel A05s
- Title: Updated Create Dynamic Text Animation in Filmora for 2024
- Author: Chloe
- Created at : 2024-06-26 06:24:10
- Updated at : 2024-06-27 06:24:10
- Link: https://ai-editing-video.techidaily.com/updated-create-dynamic-text-animation-in-filmora-for-2024/
- License: This work is licensed under CC BY-NC-SA 4.0.

