
Updated In 2024, 4 Ways to Loop a Video on Vimeo

4 Ways to Loop a Video on Vimeo
Vimeo is a popular video streaming platform where you can watch videos all day. Vimeo is a close competitor of YouTube. If you are a regular viewer on Vimeo, you may want to watch a video in a loop. Instead of manually playing the video again and again, you can automatically loop the video on Vimeo.
If you are embedding a Vimeo video on your website, you will want to play it on a loop. This will ensure maximum watch time from the audience. Besides, if you are a video creator, you may want to loop Vimeo videos for your video project. We will illustrate how to loop video on Vimeo for all scenarios.
Way 1. Loop A Video on Vimeo Directly
Most online users watch videos on Vimeo directly through the web browser. This is specifically applicable to computer users. If you want Vimeo loop video for any desired video, the steps are simple. You have to make some adjustments and additions to the video URL on the address bar. You should change the URL accurately for looping a video. Here are the steps on how to loop a video on Vimeo directly.
Step 1: On your device, launch the web browser. Open the official website of Vimeo Watch. Play any video of your liking.

Step 2: Now, you need to change the URL of the video you are playing. Here are the changes to make in the address bar.
- Remove everything at the beginning of “vimeo.com”. Add “.player” at the beginning of the URL.
- Add “/video/“ after “vimeo.com”.
- Add “?amp;loop=1:” at the end of the URL.
Therefore, the initial URL of the video was “https://vimeo.com/754255543 “. You have to change it to “player.vimeo.com/video/754255543?amp;loop=1”.
Step 3: After making the changes, press Enter key. The same video will play in a loop until you pause the video or close the web browser’s tab.
Way 2. Loop a Vimeo Video When Embedded on Your Site
You can embed a Vimeo video on your website so that the audience can watch it. The video will play only once when someone lands on your website. After the video ends playing, the embedding will show suggested videos. If you want the same video to play again and again, you have to put it in a loop. Here are the steps on how to loop Vimeo video when embedded on your website.
Step 1: Open the Vimeo video on your web browser. Click on Share icon present inside the player in the top-right corner.
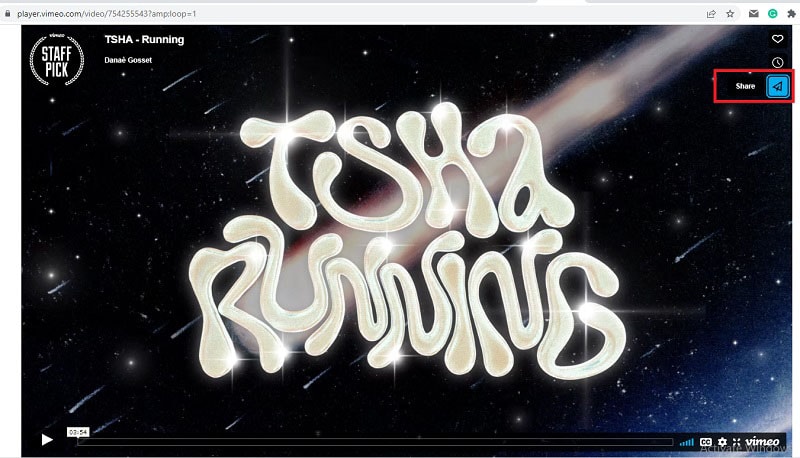
Step 2: You will get to see several options, and you need to click on “Get Embed Code” option.
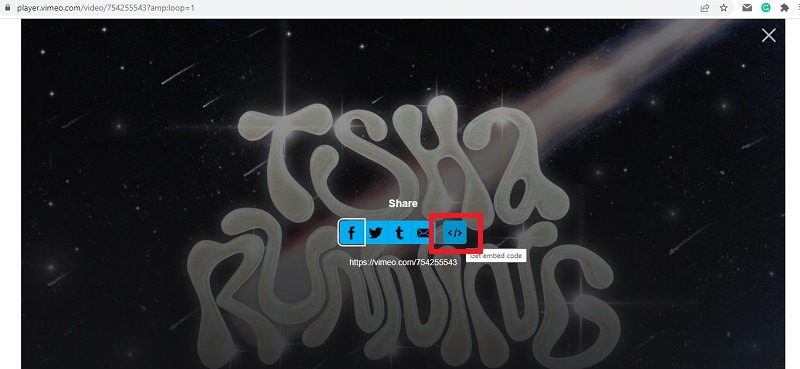
Step 3: On the next screen, you will get the embed code in a pop-up box. Click on Show options.

Step 4: From the expanded section, go to Special Stuff section. Turn on “Loop this video” option.

Step 5: Thereafter, copy the code and paste it into your website to play the video in a loop.
Way 3. How to Loop a Vimeo Video on Mobile
If you are a mobile user, you can use the Vimeo app. But you cannot loop a video on the Vimeo app, quite surprisingly. If you are using the Vimeo app, you can copy the link to the video. Thereafter, you can open the video on your web browser app. You can follow the steps we have mentioned for looping a video on Vimeo directly. Here are the steps for Vimeo loop video on mobile devices.
Step 1: Open the Vimeo app on your mobile device. Play the video that you want in the loop.
Step 2: Tap on the Share icon and tap on Copy URL option.
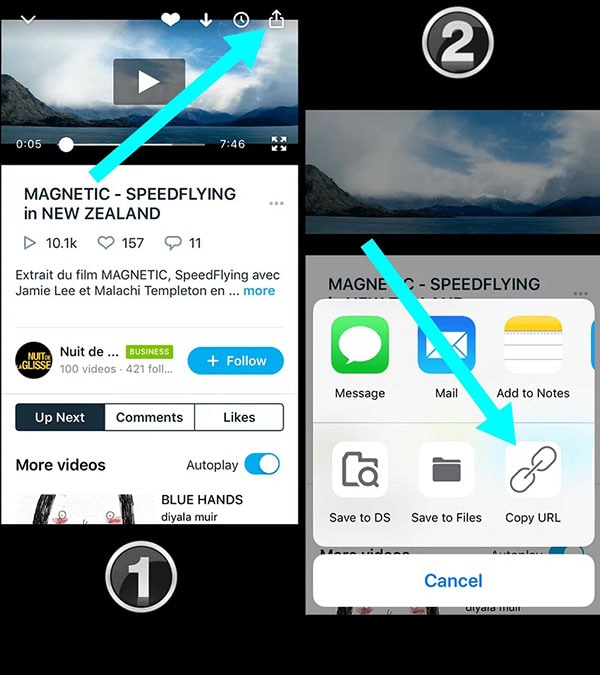
Step 3: Open your web browser and paste the copied URL.
Step 4: Modify the URL in the address bar following the steps we have mentioned in Way 1.
After the modification, the URL of the video should change from “https://vimeo.com/754255543 “ to “player.vimeo.com/video/754255543?amp;loop=1”.
Way 4. How to Loop Vimeo Videos on Computer
If you want to use Vimeo loop video in your video project on your computer, you can use Wondershare Filmora. Filmora is a professional video editor where you can loop any downloaded Vimeo video as long as you want. There are several online Vimeo downloaders available to download any designed Vimeo video.
Thereafter, you can import the downloaded video into Filmora. Then you can extend the duration by looping the video. Filmora is available for Windows and macOS. Apart from looping, you can edit your video like a professional. Here are the steps on how to loop a video on Vimeo.
Free Download For Win 7 or later(64-bit)
Free Download For macOS 10.14 or later
Step 1: Download and install Wondershare Filmora. Download the desired Vimeo video on your computer. Launch Filmora and click on New Project.

Step 2: Drag and drop the downloaded video file into the Project Media folder on Filmora. Thereafter, bring the video file from Project Media folder into the timeline.

Step 3: Drag and drop the video clip into the timeline again. Make sure that there is no gap between the clips and they are on the same channel for looping. Alternative, you can copy and paste the video clip multiple times for looping.

Step 4: You can play the video and watch it in loop. Finally, click on the Export button to save the video in the desired file format.

Wondershare Filmora Best Video Looper Software for Social Media Video Creation.
Free Download Free Download Learn More

Conclusion
There are several ways to loop a video on Vimeo. The best way out is to go for Vimeo loop video directly from the web browser. We have also illustrated how to embed a Vimeo video in a loop into your website. If you want to have a looped Vimeo video in your video project, you can use Filmora on your computer.
Free Download For macOS 10.14 or later
Step 1: Download and install Wondershare Filmora. Download the desired Vimeo video on your computer. Launch Filmora and click on New Project.

Step 2: Drag and drop the downloaded video file into the Project Media folder on Filmora. Thereafter, bring the video file from Project Media folder into the timeline.

Step 3: Drag and drop the video clip into the timeline again. Make sure that there is no gap between the clips and they are on the same channel for looping. Alternative, you can copy and paste the video clip multiple times for looping.

Step 4: You can play the video and watch it in loop. Finally, click on the Export button to save the video in the desired file format.

Wondershare Filmora Best Video Looper Software for Social Media Video Creation.
Free Download Free Download Learn More

Conclusion
There are several ways to loop a video on Vimeo. The best way out is to go for Vimeo loop video directly from the web browser. We have also illustrated how to embed a Vimeo video in a loop into your website. If you want to have a looped Vimeo video in your video project, you can use Filmora on your computer.
Shotcut Review – Is It The Best Free Video Editor?
If you are looking for a free video editor, you should definitely opt for an open-source video editor. They come free of cost without locking any feature and they are compatible with all desktop operating systems. The user interface of Shotcut looks powerful still easy to operate. There are dockable panels and flexible layouts to customize the interface.
Coming to the features, there are plenty of video effects and filters to enhance video content. You can do all the standard video editing works comfortably. There are certain advanced features available such as keyframe, audio mixing and much more. However, can we consider Shotcut video editor the best for editing professional-quality videos? Find out the complete Shotcut reviews.
Part 1. How to Download and Install Shotcut
Shotcut is completely compatible with Windows, Mac and Linux. The company has discontinued Shotcut 32 bit version and the current version only supports 64 bit computer. Shotcut is safe to download and the installer is free of spyware and malware. Here are the steps to download and install Shotcut.

Step 1: From your web browser, visit “shotcut.org/download”. It automatically detects your operating system and provides you the installer to download Shotcut that could be compatible with your system.
Step 2: You can download the installer from Site 1(FossHub) or Site 2(GitHub). Besides, you can download the .exe file from Windows installer link or .zip file from Windows portable zip file.
Step 3: After downloading the installer file, install Shotcut from it by following the on-screen instructions.
Step 4: After installation, launch Shotcut and import all video and audio clips from Open File option. Bring them down to Timeline for basic editing.
Part 2. Key Features of Shotcut
Shotcut has all the standard features for basic video editing. Before downloading Shotcut, you should be aware of the features so that you can decide whether the video editor is suitable for your video editing purpose. Here are all the key features of Shotcut that stand out.
Video Capture – You can capture your screen as well as webcam video. Shotcut supports audio capture from the system as well as from the external mic. In fact, the software supports 4K resolution which is great being an open-source video editor.
Standard Editing – You can trim video clips and perform cut-copy-paste on clips. You can also append clips, insert clips in between, and extract audio from the videos. There are keyframes for video filters, presents, and markers. You can drag and drop files and keep notes. Besides, Shotcut uses proxy editing for handling high-resolution video files.
Audio Features – Shotcut comes with several audio filters that you can apply on your audio clips to enhance them. There are options for volume control, audio mixing, tone generator, and pitch adjustment. The popular fade in and fade out effects are also available along with audio scopes.
Video Effects – There is no dearth of effects and filters on Shotcut. In fact, you can compare Shotcut with premium video editors when it comes to video filters. Besides, there are blending modes and track compositing. Moreover, there are several transitions and deinterlacing. You can opt for 360-degree filters and reverse video clips as well as use video scopes.
Wide Support – Shotcut supports almost all the different video and audio formats. In fact, you get to select different photo file formats. The multi-format timeline supports mixing video and audio of different parameters perfectly. The software also supports network streaming and alpha channel videos.
Part 3. How to Edit Videos with Shotcut
Shotcut is good as a free video editor for standard editing options. You can add texts and titles, crop and trim video clips, as well as split and join clips. Besides, you can control the speed of the video clips as well as add transitions. Thereafter, you can export the video and publish online. Here are the steps about Shotcut editing videos.
Step 1: Launch Shotcut and go to File> New. Select Projects Folder and Video Mode and enter Project Name. Finally, click on Start button to get started.
Step 2: Go to View> Layout> Timeline Project for the best editing layer.
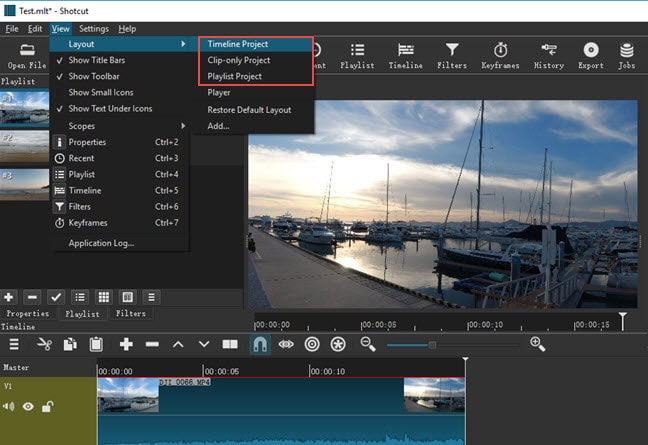
Step 3: To import media files, go to File> Open File> and select media files.
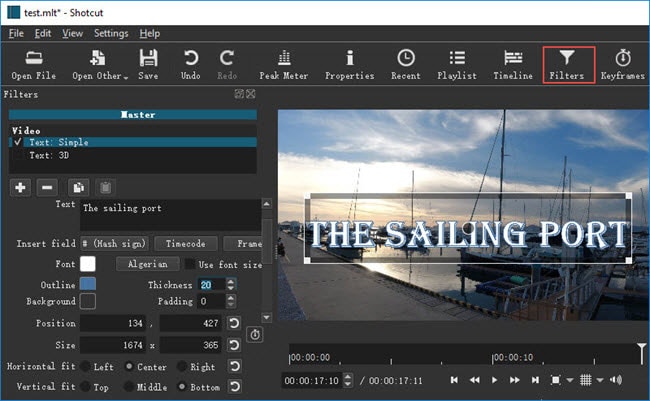
Step 4: To add texts, go to Filters> “+” icon> Video tab> select “Text:Simple”. Thereafter, type anything and choose a font and select any color.
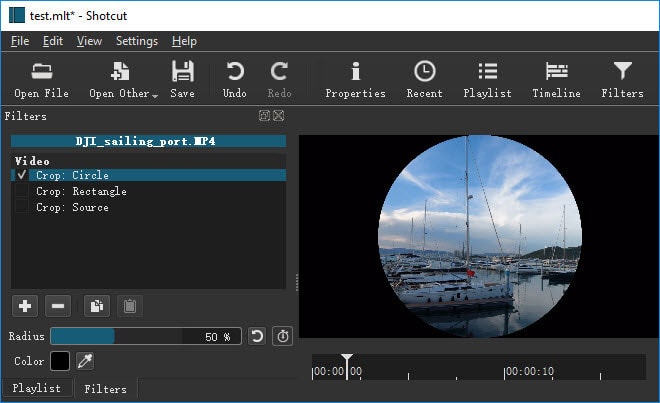
Step 5: To crop any video, go to Filters> Video> and Crop option. You can select various geometry shapes as you think appropriate.
Step 6: To add transitions, keep two clips on the same track and get them overlapped. Choose a transition from Properties and apply to your video.
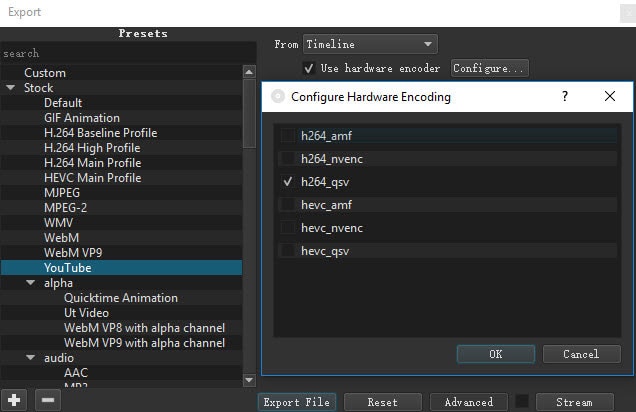
Step 7: Finally, go to File> Export Video option. You can choose from different option and select frame rate, video resolution, and others from Advanced option.
Part 4. Shotcut Alternative to Edit Videos
There are many reasons why you could be looking for a better alternative to Shotcut. First of all, there is a big lack of advanced video editing features. That is why editing professional-quality videos with Shotcut is not highly feasible. The user interface is not as robust as the standard user interface of video. The editing cannot be as fluent as any premium and professional video editor. That is why we recommend Wondershare Filmora as the best alternative to Shotcut.
Wondershare Filmora is a premium video editor where there is a perfect balance of standard and advanced features. You can also capture screen and webcam video. There are tons of transitions, effects, filters, elements, and much more. There is also a stock media library available. Filmora has wider support for different file formats. Here are the steps on how to edit videos with Filmora.
For Win 7 or later (64-bit)
For macOS 10.12 or later
Step 1: Download and install Filmora as per your operating system. Launch Filmora and click on New Project option on the welcome screen. Drag and drop media files into Project Media folder.
Step 2: Drag and drop video clips and audio clips on the timeline in proper sequence. Thereafter, you can do basic editing such as trimming, cropping, splitting, and much more.

Step 3: Go to Transitions option and add your desired transitions in between clips. You can also opt for Titles for texts, Effects for animations, and Elements for objects.

Step 4: Once you are satisfied with the editing, click on Export button to save your video to your hard drive.

Part 5. FAQs about Shotcut
**Is Shotcut totally free?
Yes, Shotcut is a completely free video editor as it belongs to the open-source software category. It is available for free for Windows, Mac, and Linux users. All the features are completely unlocked, and there is no premium version available.
**Is Openshot better than Shotcut?
Openshot is equally good as Shotcut in terms of features. But in terms of user experience and editing 4K videos, Shotcut scores better than Openshot. Shotcut is a more lightweight video editor, and hence, the chances of crashes are relatively low.
**Is Shotcut good for YouTube?
Shotcut is particularly good for YouTube if you need only basic editing on your videos. You can export the edited video file from Shotcut to YouTube after basic editing. You can get eh frame rate, video resolution, and aspect ratio as per your requirements.
For macOS 10.12 or later
Step 1: Download and install Filmora as per your operating system. Launch Filmora and click on New Project option on the welcome screen. Drag and drop media files into Project Media folder.
Step 2: Drag and drop video clips and audio clips on the timeline in proper sequence. Thereafter, you can do basic editing such as trimming, cropping, splitting, and much more.

Step 3: Go to Transitions option and add your desired transitions in between clips. You can also opt for Titles for texts, Effects for animations, and Elements for objects.

Step 4: Once you are satisfied with the editing, click on Export button to save your video to your hard drive.

Part 5. FAQs about Shotcut
**Is Shotcut totally free?
Yes, Shotcut is a completely free video editor as it belongs to the open-source software category. It is available for free for Windows, Mac, and Linux users. All the features are completely unlocked, and there is no premium version available.
**Is Openshot better than Shotcut?
Openshot is equally good as Shotcut in terms of features. But in terms of user experience and editing 4K videos, Shotcut scores better than Openshot. Shotcut is a more lightweight video editor, and hence, the chances of crashes are relatively low.
**Is Shotcut good for YouTube?
Shotcut is particularly good for YouTube if you need only basic editing on your videos. You can export the edited video file from Shotcut to YouTube after basic editing. You can get eh frame rate, video resolution, and aspect ratio as per your requirements.
For macOS 10.12 or later
Step 1: Download and install Filmora as per your operating system. Launch Filmora and click on New Project option on the welcome screen. Drag and drop media files into Project Media folder.
Step 2: Drag and drop video clips and audio clips on the timeline in proper sequence. Thereafter, you can do basic editing such as trimming, cropping, splitting, and much more.

Step 3: Go to Transitions option and add your desired transitions in between clips. You can also opt for Titles for texts, Effects for animations, and Elements for objects.

Step 4: Once you are satisfied with the editing, click on Export button to save your video to your hard drive.

Part 5. FAQs about Shotcut
**Is Shotcut totally free?
Yes, Shotcut is a completely free video editor as it belongs to the open-source software category. It is available for free for Windows, Mac, and Linux users. All the features are completely unlocked, and there is no premium version available.
**Is Openshot better than Shotcut?
Openshot is equally good as Shotcut in terms of features. But in terms of user experience and editing 4K videos, Shotcut scores better than Openshot. Shotcut is a more lightweight video editor, and hence, the chances of crashes are relatively low.
**Is Shotcut good for YouTube?
Shotcut is particularly good for YouTube if you need only basic editing on your videos. You can export the edited video file from Shotcut to YouTube after basic editing. You can get eh frame rate, video resolution, and aspect ratio as per your requirements.
For macOS 10.12 or later
Step 1: Download and install Filmora as per your operating system. Launch Filmora and click on New Project option on the welcome screen. Drag and drop media files into Project Media folder.
Step 2: Drag and drop video clips and audio clips on the timeline in proper sequence. Thereafter, you can do basic editing such as trimming, cropping, splitting, and much more.

Step 3: Go to Transitions option and add your desired transitions in between clips. You can also opt for Titles for texts, Effects for animations, and Elements for objects.

Step 4: Once you are satisfied with the editing, click on Export button to save your video to your hard drive.

Part 5. FAQs about Shotcut
**Is Shotcut totally free?
Yes, Shotcut is a completely free video editor as it belongs to the open-source software category. It is available for free for Windows, Mac, and Linux users. All the features are completely unlocked, and there is no premium version available.
**Is Openshot better than Shotcut?
Openshot is equally good as Shotcut in terms of features. But in terms of user experience and editing 4K videos, Shotcut scores better than Openshot. Shotcut is a more lightweight video editor, and hence, the chances of crashes are relatively low.
**Is Shotcut good for YouTube?
Shotcut is particularly good for YouTube if you need only basic editing on your videos. You can export the edited video file from Shotcut to YouTube after basic editing. You can get eh frame rate, video resolution, and aspect ratio as per your requirements.
Easy Way to Add Effects to Art Video
Filmora is a powerful tool and with the know-how can make your art be more than just a still image. Whether it is for a music video or a portfolio showreel, there are better ways than just inserting an image and letting it fade to the next still image. We can make use of effects and transitions to put our art to better use.
In this guide I’m going to show a couple of ways to enhance your images within Filmora for your videos.
Transitions
By inserting a transition to your image, you can add some diversity to how the viewer first see’s your image, You may want to emphasis a certain element of your art and therefore would select a transition that zooms in on that element before zooming out to the whole image or maybe you have a painting of a cyberpunk angel and wish to have the image enter in a grid formation. The point is that by experimenting with transitions and trying to select the best ones based on the element in your work you will achieve a better first impression. This is true for all aspects of video creation.
Having multiple transitions can create a unique look for your videos with minimal understanding of how to create a transition but there needs to be an understanding of how the layers work in Filmora being that a layer on top is in front of the one below, remember this when you start to add transitions as sometime you may need to duplicate your art as to keep it in the shot.
Free Download For Win 7 or later(64-bit)
Free Download For macOS 10.14 or later
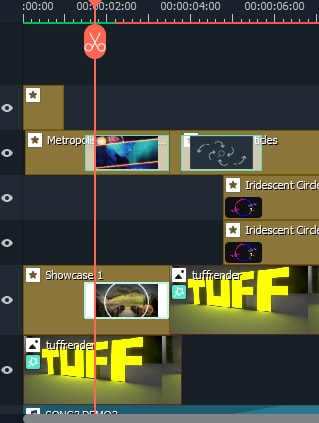
As you can see here, I have duplicated my image onto separate channels as to always keep the image in the scene.
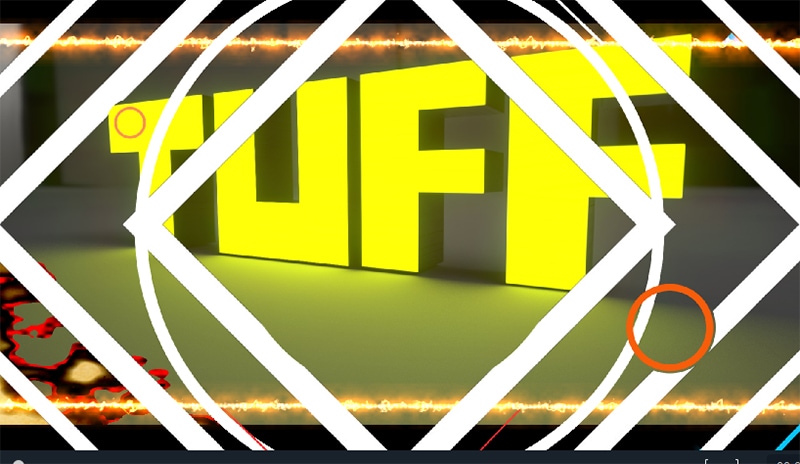
In the image above you can see how I used multiple transitions, I did this as my image is off center and I wanted to emphasize that, I picked transitions that had clear symmetry and lines so that the viewer had a reference point of where center was without me having to place that in my art. This is a very useful way of adding information to your art without telling the viewer directly. As for the color theory, I went with oranges and yellows predominantly here as they are neighboring colors on the color wheel and we know they work well together with my main color of yellow. As for the composition I have tried to keep all the eye-catching points along the top third of the image as to create a piece more pleasing to the eye even with all this information going on.
Effects
The inclusion of effect onto your art should not be discouraged depending on what the art is used for, in my example i created this as though it was album art and the musician wanted to upload a simple music video using that art, on its own it is static and can loose engagement but by applying relevant effects you can capture the viewer’s eye and make the listening experience more enjoyable. Effects can also be stacked to create unique assets for your art and help tell a story, if your art includes fire why not add a fire effect breaking the stillness of the image or maybe your art has motion, you could include a motion effect to your still image and give the viewer more information.
Even when using effects you can use fundamentals such as color theory or composition to better enhance your imagery.
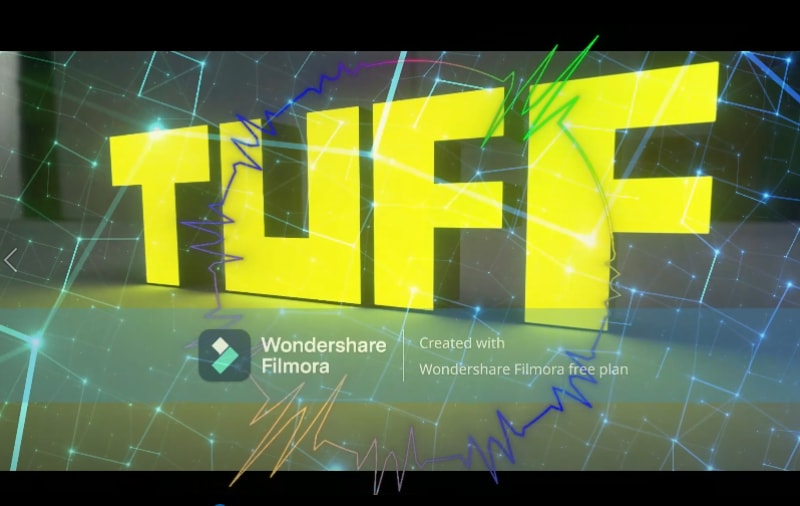
In this image you can see I have added an audio visualizer effect as well as a spectral light effect. I did this to reinforce the face of my image having a strong light source, it creates dynamic movement and the audio visualizer was added due to the nature of the video being music oriented but I felt this could have been done better. The composition of the audio visualizer was front and center and seemed boring and uninteresting. This is where the research into art fundamentals comes into play as remembering the rule of thirds and how all the main features of the image are in the top horizontal third, we can make use of the vertical thirds to gain a better composition and hopefully create more engagement.
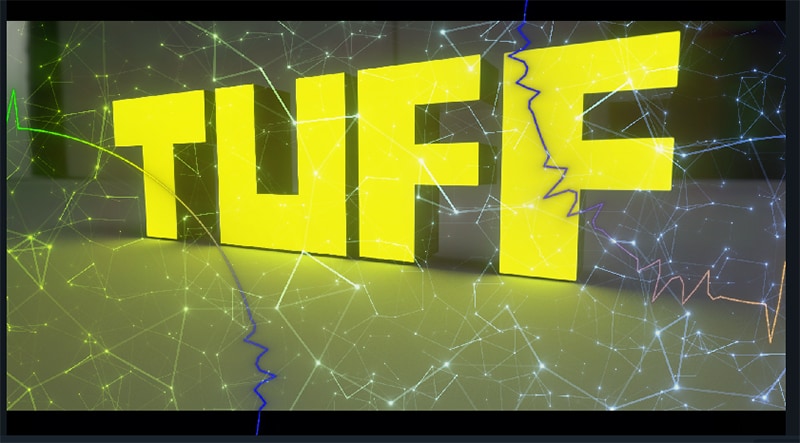
As you can see, we have duplicated the audio visualizer and made better use of the thirds nor having opposing placement within the scene, the same information is being given by the effect but we have managed to use the space more effectively and created a visually pleasing aesthetic to our video. Trick like this can make your still image feel more animated and have more purpose within the video itself.
Adding Titles and Text
Adding text is another way of adding information to your art. It’s said an image can speak a thousand words but sometimes you need words to talk for an image. When words are needed for your video, there should be some thought into how them words are presented as just selecting any text and inserting that to your video may look jarring to the viewer and result in a loss of interest towards your videos. Selecting the right transition for your text or the color or even the font can have different results and can help with affordance depending on what you’re looking to portray.
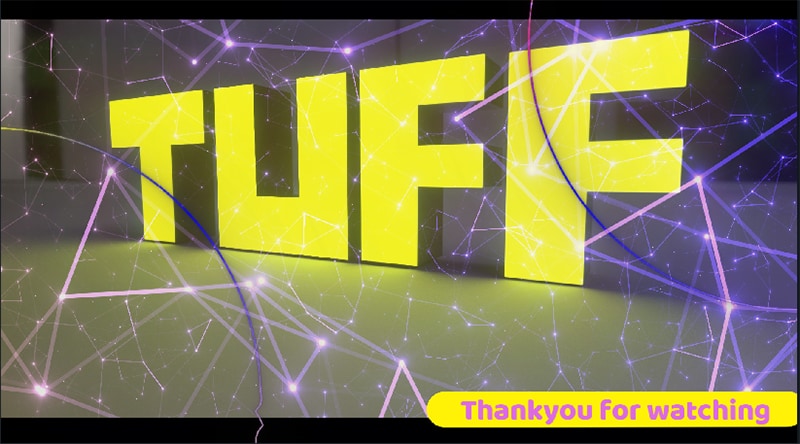
In my example I wanted to say thank you and felt sharp edges would seem formal and because of the main image it would be too similar so I went with a font that was more rounded. When inserting text onto a scene such as this one you are given a lot of information for your selections, we already have color in there to help us choose our font and background color, I went with yellow and pink due to the fact it was already in the scene and I didn’t want to take the attention away from the focus. The way the text transitions onto the screen secures just enough attention to itself that the viewer knows it’s there and can read it if they wish to. If I wanted to gain full attention i would have picked a transition that overlaps the key element and picked complementary colors on the opposite sides of the color wheel guaranteeing the viewer’s eyes would notice and engage with the motion.
Conclusion
By incorporating all the art fundamentals and skills we have learned we can use the tools provided by Filmora more effectively and create dynamic and engaging videos that are aesthetically pleasing for our audience. Upon learning the many different types and styles of transitions, effects, and titles we can enhance our artwork for use within our video. This includes artwork specifically made for use in video or even to show off your art and gain a wider audience. These are forever evolving and what you find is pleasing now may change in the future but that’s part of the fun with learning a new skill as you will find what you like and progress from there creating an identifiable style that viewers will recognize and associate you with.
Free Download For macOS 10.14 or later

As you can see here, I have duplicated my image onto separate channels as to always keep the image in the scene.

In the image above you can see how I used multiple transitions, I did this as my image is off center and I wanted to emphasize that, I picked transitions that had clear symmetry and lines so that the viewer had a reference point of where center was without me having to place that in my art. This is a very useful way of adding information to your art without telling the viewer directly. As for the color theory, I went with oranges and yellows predominantly here as they are neighboring colors on the color wheel and we know they work well together with my main color of yellow. As for the composition I have tried to keep all the eye-catching points along the top third of the image as to create a piece more pleasing to the eye even with all this information going on.
Effects
The inclusion of effect onto your art should not be discouraged depending on what the art is used for, in my example i created this as though it was album art and the musician wanted to upload a simple music video using that art, on its own it is static and can loose engagement but by applying relevant effects you can capture the viewer’s eye and make the listening experience more enjoyable. Effects can also be stacked to create unique assets for your art and help tell a story, if your art includes fire why not add a fire effect breaking the stillness of the image or maybe your art has motion, you could include a motion effect to your still image and give the viewer more information.
Even when using effects you can use fundamentals such as color theory or composition to better enhance your imagery.

In this image you can see I have added an audio visualizer effect as well as a spectral light effect. I did this to reinforce the face of my image having a strong light source, it creates dynamic movement and the audio visualizer was added due to the nature of the video being music oriented but I felt this could have been done better. The composition of the audio visualizer was front and center and seemed boring and uninteresting. This is where the research into art fundamentals comes into play as remembering the rule of thirds and how all the main features of the image are in the top horizontal third, we can make use of the vertical thirds to gain a better composition and hopefully create more engagement.

As you can see, we have duplicated the audio visualizer and made better use of the thirds nor having opposing placement within the scene, the same information is being given by the effect but we have managed to use the space more effectively and created a visually pleasing aesthetic to our video. Trick like this can make your still image feel more animated and have more purpose within the video itself.
Adding Titles and Text
Adding text is another way of adding information to your art. It’s said an image can speak a thousand words but sometimes you need words to talk for an image. When words are needed for your video, there should be some thought into how them words are presented as just selecting any text and inserting that to your video may look jarring to the viewer and result in a loss of interest towards your videos. Selecting the right transition for your text or the color or even the font can have different results and can help with affordance depending on what you’re looking to portray.

In my example I wanted to say thank you and felt sharp edges would seem formal and because of the main image it would be too similar so I went with a font that was more rounded. When inserting text onto a scene such as this one you are given a lot of information for your selections, we already have color in there to help us choose our font and background color, I went with yellow and pink due to the fact it was already in the scene and I didn’t want to take the attention away from the focus. The way the text transitions onto the screen secures just enough attention to itself that the viewer knows it’s there and can read it if they wish to. If I wanted to gain full attention i would have picked a transition that overlaps the key element and picked complementary colors on the opposite sides of the color wheel guaranteeing the viewer’s eyes would notice and engage with the motion.
Conclusion
By incorporating all the art fundamentals and skills we have learned we can use the tools provided by Filmora more effectively and create dynamic and engaging videos that are aesthetically pleasing for our audience. Upon learning the many different types and styles of transitions, effects, and titles we can enhance our artwork for use within our video. This includes artwork specifically made for use in video or even to show off your art and gain a wider audience. These are forever evolving and what you find is pleasing now may change in the future but that’s part of the fun with learning a new skill as you will find what you like and progress from there creating an identifiable style that viewers will recognize and associate you with.
How to Customize Your Loading Text Effect?
Wondershare Filmora is all you need when it is to professional and creative video editing. The tool is equipped with multiple effects to optimize video editing based on your immediate needs. Using these effects is essential to grand and hold the attention of the audience easily.
Out of all the video effects available in Wondershare Filmora, the loading text effect can be a game changer for keeping your audience engaged. It will reduce the chances of the viewer’s churn and ensure that you offer them something amazing in every part of the video. The best part here is that Wondershare Filmora allows quick customization of this loading text effect.
Let us go through the detailed steps to customize the loading text effect in Wondershare Filmora for your next project. Not to miss is that the customized text effects can be quickly accessed from the “Text Edit” panel or “Advanced Text Edit” panel for future reference.
Step1Download, install, and launch Wondershare Filmora
Free Download For Win 7 or later(64-bit)
Free Download For macOS 10.14 or later
The first step to start creating impressive videos using Wondershare Filmora is to download this amazing tool on your Mac or Windows system. It is recommended to go for a quick download and install from the official website of Wondershare Filmora only. The detailed steps for completing this are:
- Open the official website https://filmora.wondershare.com/video-editor/ of the Wondershare Filmora in your Windows or Mac browser.
- Go to the “Download” option located in the top right corner of the web page. Click on it to start downloading the Wondershare Filmora installer.
- Once the download is complete, double-click on it, and accept the terms and conditions. The Wondershare Filmora installer will start running and complete the installation process in a couple of seconds only.
- Once the installation is complete, Wondershare Filmora will get opened on your system for quick use.
Step2Go to the Titles option
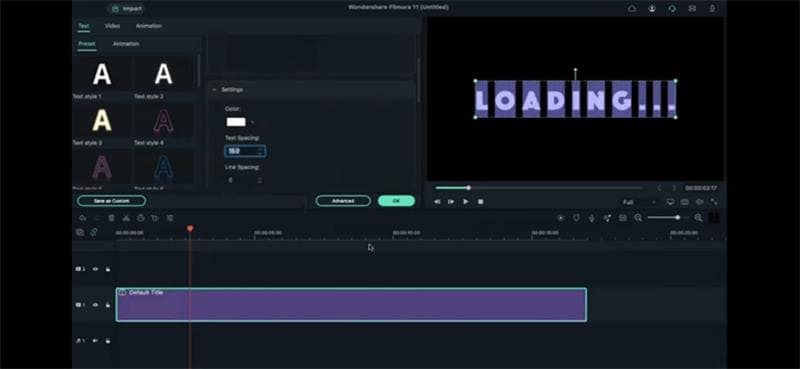
Once Wondershare Filmora is running on your system, it is time to take the first step for customizing the loading text effect. It starts with the titles option where you can select the font of your choice and manage the text spacing. The quick steps for the same are:
- Start by dropping the default title on track 1.
- Keep the title up to 17 seconds long.
- Double-click on the default title to open the font selection.
- Select the font of your choice from the available options of the numerous fonts.
- It is easy to change the text loading here.
- You can increase the text spacing by 15 and then click the ok to close the Titles option.
Step3Go to the My Media option
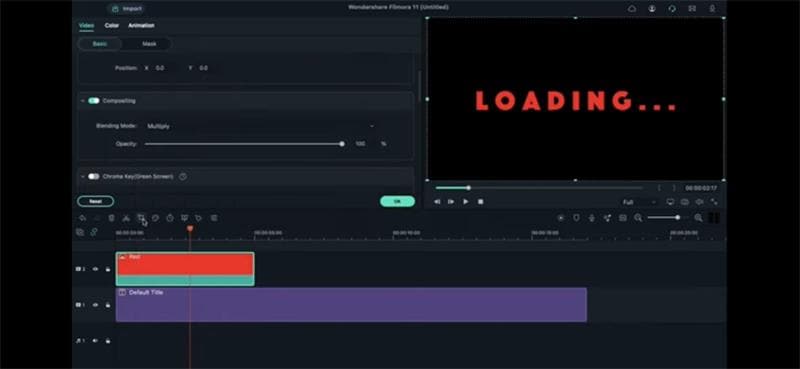
Now move to the My Media option to add color to the loading text. Here, the blending mode required is also selected. The quick steps to follow in the My Media option are:
- Open the My Media option and select the red color under the sample color option.
- Drop red color on track 2.
- Double-click on the red color and go to the video option.
- Open the composting option in the video and select the blending mode.
- Change the blending mode to multiply.
Step4Using the Crop tool
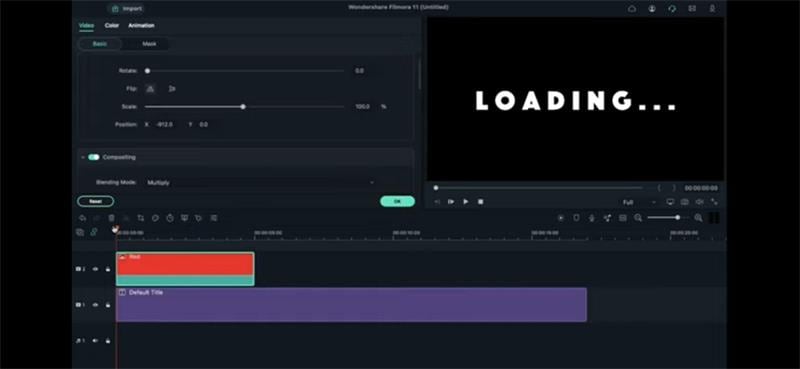
The next step is to move to the crop tool. You have to select the red color ratio and position. The steps for using the crop tool are:
- Go to the crop tool and select the custom option under the “Ratio” section.
- Crop red color in the ratio of 80 * 1080.
- Go to the “Basics” menu located upside to define its position on the left side edge.
- End the process by placing the playhead at the starting point.
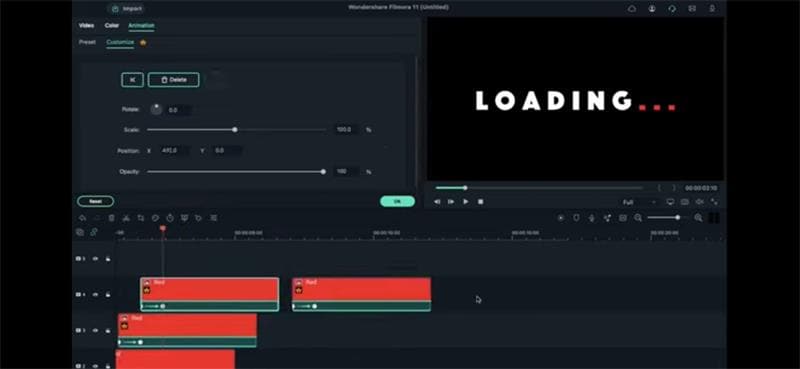
Step5Using Animations option
After the crop tool, it is time to use the animations option to create a loading text effect. You will be placing the keyframes and arranging the playheads in this section. The quick steps for the same are:
- Add a keyframe to the track and place the playhead to 20 frames further.
- Start by defining the x-axis position of the red color on the third dot of the “Loading …” text.
- Now, copy the red color and paste it on the blank space on track two.
- Next, click on the second keyframe and shift the pasted red color clip on track three to the playhead position.
- It is time for the third clip now. Click on the second keyframe on the track three clip and define its x-axis position on the second dot of the “Loading …” text.
- Repeat for track three copying the red color clip and pasting it on the blank space.
- Click again on the second keyframe on the track three clip and shift the pasted clip to the playhead position.
- Now, click on the second keyframe of the track four clip and define its x-axis on the first dot of the loading text.
- You have to repeat the same process until you will the whole “Loading…” text with red color.
Step6Extending the clip durations
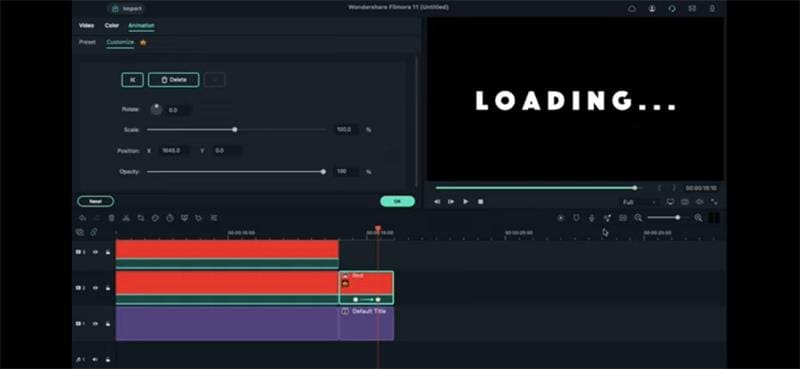
After getting the red color in all the loading text, it is time to make the clips in uniformity. All you need to do is extend the clip duration, cut them in uniformity, and place playheads and keyframes accordingly. The detailed steps for the same are:
- Start by extending every red color clip duration to 17 seconds.
- Place the playhead at the 14 seconds position and cut all the clips.
- Delete the extra part left after cutting the clips.
- Keep track 1 and copy and paste the text on it. Keep the length at 2 seconds only. Leave the rest of the clip part.
- Start by dropping the red color on track 2 and keep it for 2 seconds duration.
- Now double-click on the red color and change the “Blending Mode” to multiply.
- Put the playhead at 14 seconds and add a blank keyframe at the 15th
- Now put the playhead at the 15 seconds at the 10th frame. Here, define the x-axis position by dragging it from the left to right out of the loading text.
Step7Selecting render preview
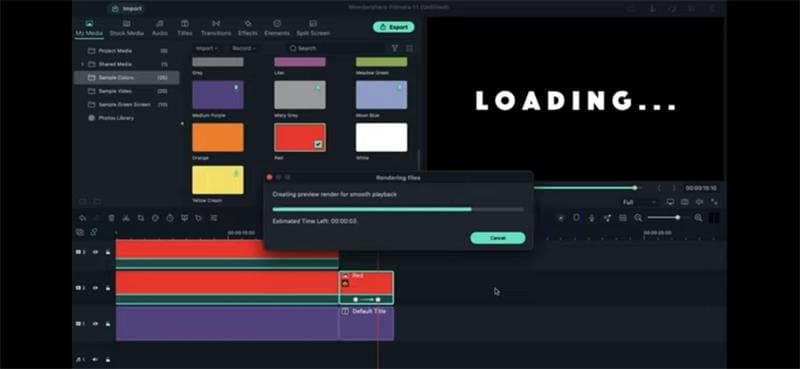
The last step but most important is to go for the render preview option. It offers a fast and quick review of the created video file to incorporate any last-minute changes. The quick steps for the same are:
- Click on the render preview button to see the final preview
- It will take a few seconds to prepare the rendering frame and will show the preview of the file.
Wrapping Up
Hope everything is clear to you about customizing the loading text effect in Wondershare Filmora. All you need to do is download this amazing video editing software on your Windows and Mac and start using it instantly. It has an easy-to-use interface which is liked by beginners and professionals in video creation like the same.
Wondershare Filmora users can easily start adding customized loading text effects to their videos by accessing the titles menu. Once the font size of the text and other specifications are selected here, you can quickly move to the My Media section to select the color. The next step is to use the crop tool and animations option to bring the red color loading text effect to your video.
Once done with all the steps, it is time to cut the clips and go for the render preview option. Hence, your professional-grade video having the loading text effect is ready. Go for downloading Wondershare Filmora today for creating some exclusive masterpieces.
Free Download For macOS 10.14 or later
The first step to start creating impressive videos using Wondershare Filmora is to download this amazing tool on your Mac or Windows system. It is recommended to go for a quick download and install from the official website of Wondershare Filmora only. The detailed steps for completing this are:
- Open the official website https://filmora.wondershare.com/video-editor/ of the Wondershare Filmora in your Windows or Mac browser.
- Go to the “Download” option located in the top right corner of the web page. Click on it to start downloading the Wondershare Filmora installer.
- Once the download is complete, double-click on it, and accept the terms and conditions. The Wondershare Filmora installer will start running and complete the installation process in a couple of seconds only.
- Once the installation is complete, Wondershare Filmora will get opened on your system for quick use.

Step2Go to the Titles option
Once Wondershare Filmora is running on your system, it is time to take the first step for customizing the loading text effect. It starts with the titles option where you can select the font of your choice and manage the text spacing. The quick steps for the same are:
- Start by dropping the default title on track 1.
- Keep the title up to 17 seconds long.
- Double-click on the default title to open the font selection.
- Select the font of your choice from the available options of the numerous fonts.
- It is easy to change the text loading here.
- You can increase the text spacing by 15 and then click the ok to close the Titles option.

Step3Go to the My Media option
Now move to the My Media option to add color to the loading text. Here, the blending mode required is also selected. The quick steps to follow in the My Media option are:
- Open the My Media option and select the red color under the sample color option.
- Drop red color on track 2.
- Double-click on the red color and go to the video option.
- Open the composting option in the video and select the blending mode.
- Change the blending mode to multiply.

Step4Using the Crop tool
The next step is to move to the crop tool. You have to select the red color ratio and position. The steps for using the crop tool are:
- Go to the crop tool and select the custom option under the “Ratio” section.
- Crop red color in the ratio of 80 * 1080.
- Go to the “Basics” menu located upside to define its position on the left side edge.
- End the process by placing the playhead at the starting point.

Step5Using Animations option
After the crop tool, it is time to use the animations option to create a loading text effect. You will be placing the keyframes and arranging the playheads in this section. The quick steps for the same are:
- Add a keyframe to the track and place the playhead to 20 frames further.
- Start by defining the x-axis position of the red color on the third dot of the “Loading …” text.
- Now, copy the red color and paste it on the blank space on track two.
- Next, click on the second keyframe and shift the pasted red color clip on track three to the playhead position.
- It is time for the third clip now. Click on the second keyframe on the track three clip and define its x-axis position on the second dot of the “Loading …” text.
- Repeat for track three copying the red color clip and pasting it on the blank space.
- Click again on the second keyframe on the track three clip and shift the pasted clip to the playhead position.
- Now, click on the second keyframe of the track four clip and define its x-axis on the first dot of the loading text.
- You have to repeat the same process until you will the whole “Loading…” text with red color.

Step6Extending the clip durations
After getting the red color in all the loading text, it is time to make the clips in uniformity. All you need to do is extend the clip duration, cut them in uniformity, and place playheads and keyframes accordingly. The detailed steps for the same are:
- Start by extending every red color clip duration to 17 seconds.
- Place the playhead at the 14 seconds position and cut all the clips.
- Delete the extra part left after cutting the clips.
- Keep track 1 and copy and paste the text on it. Keep the length at 2 seconds only. Leave the rest of the clip part.
- Start by dropping the red color on track 2 and keep it for 2 seconds duration.
- Now double-click on the red color and change the “Blending Mode” to multiply.
- Put the playhead at 14 seconds and add a blank keyframe at the 15th
- Now put the playhead at the 15 seconds at the 10th frame. Here, define the x-axis position by dragging it from the left to right out of the loading text.

Step7Selecting render preview
The last step but most important is to go for the render preview option. It offers a fast and quick review of the created video file to incorporate any last-minute changes. The quick steps for the same are:
- Click on the render preview button to see the final preview
- It will take a few seconds to prepare the rendering frame and will show the preview of the file.

Wrapping Up
Hope everything is clear to you about customizing the loading text effect in Wondershare Filmora. All you need to do is download this amazing video editing software on your Windows and Mac and start using it instantly. It has an easy-to-use interface which is liked by beginners and professionals in video creation like the same.
Wondershare Filmora users can easily start adding customized loading text effects to their videos by accessing the titles menu. Once the font size of the text and other specifications are selected here, you can quickly move to the My Media section to select the color. The next step is to use the crop tool and animations option to bring the red color loading text effect to your video.
Once done with all the steps, it is time to cut the clips and go for the render preview option. Hence, your professional-grade video having the loading text effect is ready. Go for downloading Wondershare Filmora today for creating some exclusive masterpieces.
Free Download For macOS 10.14 or later
The first step to start creating impressive videos using Wondershare Filmora is to download this amazing tool on your Mac or Windows system. It is recommended to go for a quick download and install from the official website of Wondershare Filmora only. The detailed steps for completing this are:
- Open the official website https://filmora.wondershare.com/video-editor/ of the Wondershare Filmora in your Windows or Mac browser.
- Go to the “Download” option located in the top right corner of the web page. Click on it to start downloading the Wondershare Filmora installer.
- Once the download is complete, double-click on it, and accept the terms and conditions. The Wondershare Filmora installer will start running and complete the installation process in a couple of seconds only.
- Once the installation is complete, Wondershare Filmora will get opened on your system for quick use.

Step2Go to the Titles option
Once Wondershare Filmora is running on your system, it is time to take the first step for customizing the loading text effect. It starts with the titles option where you can select the font of your choice and manage the text spacing. The quick steps for the same are:
- Start by dropping the default title on track 1.
- Keep the title up to 17 seconds long.
- Double-click on the default title to open the font selection.
- Select the font of your choice from the available options of the numerous fonts.
- It is easy to change the text loading here.
- You can increase the text spacing by 15 and then click the ok to close the Titles option.

Step3Go to the My Media option
Now move to the My Media option to add color to the loading text. Here, the blending mode required is also selected. The quick steps to follow in the My Media option are:
- Open the My Media option and select the red color under the sample color option.
- Drop red color on track 2.
- Double-click on the red color and go to the video option.
- Open the composting option in the video and select the blending mode.
- Change the blending mode to multiply.

Step4Using the Crop tool
The next step is to move to the crop tool. You have to select the red color ratio and position. The steps for using the crop tool are:
- Go to the crop tool and select the custom option under the “Ratio” section.
- Crop red color in the ratio of 80 * 1080.
- Go to the “Basics” menu located upside to define its position on the left side edge.
- End the process by placing the playhead at the starting point.

Step5Using Animations option
After the crop tool, it is time to use the animations option to create a loading text effect. You will be placing the keyframes and arranging the playheads in this section. The quick steps for the same are:
- Add a keyframe to the track and place the playhead to 20 frames further.
- Start by defining the x-axis position of the red color on the third dot of the “Loading …” text.
- Now, copy the red color and paste it on the blank space on track two.
- Next, click on the second keyframe and shift the pasted red color clip on track three to the playhead position.
- It is time for the third clip now. Click on the second keyframe on the track three clip and define its x-axis position on the second dot of the “Loading …” text.
- Repeat for track three copying the red color clip and pasting it on the blank space.
- Click again on the second keyframe on the track three clip and shift the pasted clip to the playhead position.
- Now, click on the second keyframe of the track four clip and define its x-axis on the first dot of the loading text.
- You have to repeat the same process until you will the whole “Loading…” text with red color.

Step6Extending the clip durations
After getting the red color in all the loading text, it is time to make the clips in uniformity. All you need to do is extend the clip duration, cut them in uniformity, and place playheads and keyframes accordingly. The detailed steps for the same are:
- Start by extending every red color clip duration to 17 seconds.
- Place the playhead at the 14 seconds position and cut all the clips.
- Delete the extra part left after cutting the clips.
- Keep track 1 and copy and paste the text on it. Keep the length at 2 seconds only. Leave the rest of the clip part.
- Start by dropping the red color on track 2 and keep it for 2 seconds duration.
- Now double-click on the red color and change the “Blending Mode” to multiply.
- Put the playhead at 14 seconds and add a blank keyframe at the 15th
- Now put the playhead at the 15 seconds at the 10th frame. Here, define the x-axis position by dragging it from the left to right out of the loading text.

Step7Selecting render preview
The last step but most important is to go for the render preview option. It offers a fast and quick review of the created video file to incorporate any last-minute changes. The quick steps for the same are:
- Click on the render preview button to see the final preview
- It will take a few seconds to prepare the rendering frame and will show the preview of the file.

Wrapping Up
Hope everything is clear to you about customizing the loading text effect in Wondershare Filmora. All you need to do is download this amazing video editing software on your Windows and Mac and start using it instantly. It has an easy-to-use interface which is liked by beginners and professionals in video creation like the same.
Wondershare Filmora users can easily start adding customized loading text effects to their videos by accessing the titles menu. Once the font size of the text and other specifications are selected here, you can quickly move to the My Media section to select the color. The next step is to use the crop tool and animations option to bring the red color loading text effect to your video.
Once done with all the steps, it is time to cut the clips and go for the render preview option. Hence, your professional-grade video having the loading text effect is ready. Go for downloading Wondershare Filmora today for creating some exclusive masterpieces.
Free Download For macOS 10.14 or later
The first step to start creating impressive videos using Wondershare Filmora is to download this amazing tool on your Mac or Windows system. It is recommended to go for a quick download and install from the official website of Wondershare Filmora only. The detailed steps for completing this are:
- Open the official website https://filmora.wondershare.com/video-editor/ of the Wondershare Filmora in your Windows or Mac browser.
- Go to the “Download” option located in the top right corner of the web page. Click on it to start downloading the Wondershare Filmora installer.
- Once the download is complete, double-click on it, and accept the terms and conditions. The Wondershare Filmora installer will start running and complete the installation process in a couple of seconds only.
- Once the installation is complete, Wondershare Filmora will get opened on your system for quick use.

Step2Go to the Titles option
Once Wondershare Filmora is running on your system, it is time to take the first step for customizing the loading text effect. It starts with the titles option where you can select the font of your choice and manage the text spacing. The quick steps for the same are:
- Start by dropping the default title on track 1.
- Keep the title up to 17 seconds long.
- Double-click on the default title to open the font selection.
- Select the font of your choice from the available options of the numerous fonts.
- It is easy to change the text loading here.
- You can increase the text spacing by 15 and then click the ok to close the Titles option.

Step3Go to the My Media option
Now move to the My Media option to add color to the loading text. Here, the blending mode required is also selected. The quick steps to follow in the My Media option are:
- Open the My Media option and select the red color under the sample color option.
- Drop red color on track 2.
- Double-click on the red color and go to the video option.
- Open the composting option in the video and select the blending mode.
- Change the blending mode to multiply.

Step4Using the Crop tool
The next step is to move to the crop tool. You have to select the red color ratio and position. The steps for using the crop tool are:
- Go to the crop tool and select the custom option under the “Ratio” section.
- Crop red color in the ratio of 80 * 1080.
- Go to the “Basics” menu located upside to define its position on the left side edge.
- End the process by placing the playhead at the starting point.

Step5Using Animations option
After the crop tool, it is time to use the animations option to create a loading text effect. You will be placing the keyframes and arranging the playheads in this section. The quick steps for the same are:
- Add a keyframe to the track and place the playhead to 20 frames further.
- Start by defining the x-axis position of the red color on the third dot of the “Loading …” text.
- Now, copy the red color and paste it on the blank space on track two.
- Next, click on the second keyframe and shift the pasted red color clip on track three to the playhead position.
- It is time for the third clip now. Click on the second keyframe on the track three clip and define its x-axis position on the second dot of the “Loading …” text.
- Repeat for track three copying the red color clip and pasting it on the blank space.
- Click again on the second keyframe on the track three clip and shift the pasted clip to the playhead position.
- Now, click on the second keyframe of the track four clip and define its x-axis on the first dot of the loading text.
- You have to repeat the same process until you will the whole “Loading…” text with red color.

Step6Extending the clip durations
After getting the red color in all the loading text, it is time to make the clips in uniformity. All you need to do is extend the clip duration, cut them in uniformity, and place playheads and keyframes accordingly. The detailed steps for the same are:
- Start by extending every red color clip duration to 17 seconds.
- Place the playhead at the 14 seconds position and cut all the clips.
- Delete the extra part left after cutting the clips.
- Keep track 1 and copy and paste the text on it. Keep the length at 2 seconds only. Leave the rest of the clip part.
- Start by dropping the red color on track 2 and keep it for 2 seconds duration.
- Now double-click on the red color and change the “Blending Mode” to multiply.
- Put the playhead at 14 seconds and add a blank keyframe at the 15th
- Now put the playhead at the 15 seconds at the 10th frame. Here, define the x-axis position by dragging it from the left to right out of the loading text.

Step7Selecting render preview
The last step but most important is to go for the render preview option. It offers a fast and quick review of the created video file to incorporate any last-minute changes. The quick steps for the same are:
- Click on the render preview button to see the final preview
- It will take a few seconds to prepare the rendering frame and will show the preview of the file.

Wrapping Up
Hope everything is clear to you about customizing the loading text effect in Wondershare Filmora. All you need to do is download this amazing video editing software on your Windows and Mac and start using it instantly. It has an easy-to-use interface which is liked by beginners and professionals in video creation like the same.
Wondershare Filmora users can easily start adding customized loading text effects to their videos by accessing the titles menu. Once the font size of the text and other specifications are selected here, you can quickly move to the My Media section to select the color. The next step is to use the crop tool and animations option to bring the red color loading text effect to your video.
Once done with all the steps, it is time to cut the clips and go for the render preview option. Hence, your professional-grade video having the loading text effect is ready. Go for downloading Wondershare Filmora today for creating some exclusive masterpieces.
Also read:
- New Beginners Guide to Green Screen Keying
- New In 2024, 6 Tips for Your First Facebook Ads
- How to Make Vintage Film Effect 1980S
- New IMovie Review – Is It The Best Video Editor for Mac Users for 2024
- In 2024, In This Article, We Will Discuss How to Rotate Videos in the Lightworks Application. Below Is a Way to Rotate Videos in Lightworks Manually, Here, We Will Use the Z-Axis Rotation
- New In 2024, How to Use Rule of Thirds in Video
- 2024 Approved There Are Many Vlogging Cameras You Can Find in the Market. However, to Get a Good Start in Vlogging, some Sony Vlogging Cameras and Canon Vlog Cameras Are to Consider. This Article Introduces You to the Respective List
- Updated Do You Want to Know How to Convert YouTube SBV Subtitles to SRT Format? Here Is an Ultimate Guide About It
- Updated 2024 Approved How to Start a Vlog
- Guide to Create Freeze Frame Clone Effect Video for 2024
- Updated How to Create a Makeup Video for 2024
- New How to Animate Your Designs With Canva GIF
- 2024 Approved Are You Stuck with How to Use Discord GIF Ideally? Check that Out in This Article, as We Will Guide You on All You Need to Know About GIFs for Discord
- New Keyframes Interval Everything You Need To Know
- Guide To Using Free Luts for OBS for 2024
- You Are at the Right Post if You Are Surfing for a GIF to MP4 Conversion Tool. This Article Will Provide You with the Top Best Converters that Can Help You Convert GIF to MP4 Videos Quickly and Easily
- New Motion Tracking Never Goes Out of Trend, so Do You Wish to Make Your Videos Trendy with This? No Issue because Here We Will Guide You on How to Do Motion Tracking
- How to Concatenate Videos Using FFmpeg
- Add Subtitles To Videos With Kapwing Step by Step for 2024
- How To Make a Video Podcast
- Updated Do You Know How AI Is Helping Video Editors and Enthusiasts? Many Video Editing Software Allows an Auto Reframe Option to Use that Can Help Manage Videos
- New In 2024, Convert MP4 to 60 FPS GIF A Step-by-Step Guide
- Want to Buy a Drone for Better Videography Creating? This Article Will Review 6 of the Best Drones on the Market for You to Consider for 2024
- In 2024, A Detailed Guid to Remove Background From a Video in Premier Pro
- Updated A Guide to Create Your Own LOL Montage Video
- Updated Full Guide to Funcall Voice Changer and Its Alternatives for 2024
- In 2024, How Much Information Do You Have About MP4 Digital File Storage? Let Us Tell You More About the MP4 File Format; Get Ready to Increase Your Knowledge
- New How to Remove Audio From Video on Mac? Free and Official Solutions
- New Create Slide Masking Effect Intro【Filmora】
- Updated Best 8 Online MPEG to GIF Converters for 2024
- Updated Best Cinematic LUTs For Premiere Pro Recommendation for 2024
- Updated 2024 Approved Top 10 Picks for Flawless Slow Motion Video Generation
- Updated In 2024, Guide to Create a Timelapse Video in After Effects
- Slow-Motion Edits Are Pretty Mesmerizing, and Weve All Imagined Ourselves in One of Those Visually Appealing, Slowed-Down Movies. Well Teach You How to Make a Smooth Slo-Mo Video Using Twixtor in This Article. Stay Tuned Until the End for 2024
- Updated 7 Best MP4 Editors on Mac Edit MP4 in Mac
- Updated How to Create Vintage Film Effect 1990S for 2024
- In 2024, Synchronizing Videos Can Be Hectic, but Do You Wish to Know a Good Tool for This Purpose? This Article Will Discuss Wondershare Filmora, Which Is Perfect for This
- New 2024 Approved How to Make Text Reveal Effect Easily
- Updated Cropping a Video in Davinci Resolve Step by Step for 2024
- New In 2024, Bandicut Video Editor Review
- 2024 Approved 7 Best MP4 Editors for Mac Edit MP4 in Mac
- Best Android Data Recovery - Retrieve Lost Contacts from Y36i.
- Fake the Location to Get Around the MLB Blackouts on Apple iPhone 13 Pro | Dr.fone
- In 2024, Ultimate guide to get the meltan box pokemon go For Motorola Edge 40 Pro | Dr.fone
- In 2024, Pokemon Go Error 12 Failed to Detect Location On Samsung Galaxy S23+? | Dr.fone
- How To Erase Private Data From Apple iPhone 12 Pro | Dr.fone
- Delete Gmail Account With/Without Password On Infinix Smart 8 Plus
- Updated 2024 Approved Register | Online
- Planning to Use a Pokemon Go Joystick on Lava Yuva 3 Pro? | Dr.fone
- In 2024, Best Pokemons for PVP Matches in Pokemon Go For Samsung Galaxy XCover 6 Pro Tactical Edition | Dr.fone
- Prank Your Friends! Easy Ways to Fake and Share Google Maps Location On Vivo S17 | Dr.fone
- In 2024, Disabled Apple iPhone XR How to Unlock a Disabled Apple iPhone XR?
- A Step-by-Step Guide to Finding Your Apple ID On Your iPhone 7 Plus
- How To Do Poco X6 Pro Screen Sharing | Dr.fone
- In 2024, Top 9 Samsung Galaxy S24 Monitoring Apps for Parental Controls | Dr.fone
- All Things You Need to Know about Wipe Data/Factory Reset For Realme C67 5G | Dr.fone
- Samsung Galaxy A14 4G Bootloop Problem, How to Fix it Without Data Loss | Dr.fone
- Easy steps to recover deleted music from Nokia 105 Classic
- In 2024, Top 4 Ways to Trace Xiaomi Redmi Note 12R Location | Dr.fone
- How to Unlock iPhone 6?
- For People Wanting to Mock GPS on Samsung Galaxy S23 Ultra Devices | Dr.fone
- Full Guide to Bypass Asus ROG Phone 7 FRP
- In 2024, Different Methods To Unlock Your Apple iPhone XS | Dr.fone
- 10 Free Location Spoofers to Fake GPS Location on your Realme C67 5G | Dr.fone
- How To Update or Downgrade Apple iPhone 13 mini Without Data Loss? | Dr.fone
- How to Cast Realme 11 Pro+ to Computer for iPhone and Android? | Dr.fone
- How to restore wiped call history on Honor Magic V2?
- How To Remove Passcode From iPhone 11 Pro Max? Complete Guide
- In 2024, 3 Ways for Android Pokemon Go Spoofing On Sony Xperia 10 V | Dr.fone
- In 2024, How to Track Oppo Reno 11 Pro 5G Location by Number | Dr.fone
- Title: Updated In 2024, 4 Ways to Loop a Video on Vimeo
- Author: Chloe
- Created at : 2024-06-18 14:31:03
- Updated at : 2024-06-19 14:31:03
- Link: https://ai-editing-video.techidaily.com/updated-in-2024-4-ways-to-loop-a-video-on-vimeo/
- License: This work is licensed under CC BY-NC-SA 4.0.


