:max_bytes(150000):strip_icc():format(webp)/GettyImages-769729481-5bd367dcc9e77c007c015257.jpg)
Have You Ever Heard of the Video Format for PowerPoint? Allow Us to Help You Learn More About PowerPoint. It Will Help You Make an Impression by Making Good Slides

Have You Ever Heard of the Video Format for PowerPoint? Allow Us to Help You Learn More About PowerPoint. It Will Help You Make an Impression by Making Good Slides
It doesn’t matter if you are a student or a working person; you must have made a PowerPoint presentation in your life. It can be a business presentation, educational presentation, or any work-related presentation if you are an employee. The types of presentation may vary, but the way to make a presentation is almost the same.
We are here to share a few tips and tricks to make your presentations unique like, you can add videos, voice-overs, and much more things. Remember one thing; there are certain video formats that PowerPoint supports. The video formats for PowerPoint presentations are discussed below, read ahead, and you’ll know more about them.
In this article
01 Overview of PowerPoint Supported Video Format
02 How to Insert or Embed Video in PowerPoint?
03 How to Turn Your Presentation into A Video with PowerPoint?
04 How to Match Color and Remove Image Background in PowerPoint?
Part 1. Overview of PowerPoint Supported Video Format
The supported video formats for PowerPoint are different for both Windows and macOS. All the supported formats for both types of the operating system are discussed below individually:

Windows
ASF: Advanced System Format (ASF) is a proprietary video and audio container format. It is an extensible file format design.
AVI: AVI is an Audio Video Interleave file. It is a multimedia container format made by Microsoft. It allows synchronous audio with video playback.
MP4, M4V, MOV: MPEG-4 file format is also known as MP4 or M4V. It is a common video file format. In comparison, MOV is developed by Apple Inc. It is the same as MP4 but is made for Apple devices.
MPEG, MPG: It is a famous file format for movies that are distributed over the internet. They use specific compression that makes downloading and steaming easy and fast.
WMV: WMV was introduced by Microsoft, and it stands for Windows Media Video. It is a compressed file container. The format is based on ASF.
macOS
AVI, VFW: AVI stands for Audio Video Interleave, and VFW stands for Video for Windows. Both are multimedia container files. AVI is encoded into VFW.
MP4, MPEG-4: MP4 is a digital video file format. MPEG-4 uses compression, but it is less common than the MP4 extension. MPEG encodes audio tracks.
M4V: It is a video container format developed by Apple Inc. It is similar to MP4. MV4 is used to encode video files in iTunes.
MPG, MPEG, MPE, M75, M15: MPG, MPEG, MPE, M75, and M15 are all the different types of formats developed by the Moving Pictures Expert Group.
M2V: It contains only video data and no other files. It is encoded by using MPEG-2 compression. It is mostly used by DVD authorized applications.
TS: It is a Video Transport Stream file and is used to store MPEG-2 compressed video data. It is used by digital broadcasting systems.
MOV, QT: QT and MOV both were developed by Apple Inc. Both the formats can hold multiple types of multimedia formats (audio, video, and subtitles).
DIF: DIF stands for Data Interchange Format. It is a text-based file format and is used for tabular and spreadsheet data. It is also used to transfer data between spreadsheets.
Part 2. How to Insert or Embed Video in PowerPoint?
PowerPoint is the simplest way to make a presentation. You might impress your boss with a good presentation. Do you ever consider adding videos from your computer across your slides? Have you ever embedded a video in PowerPoint? Allow us to help you out with this. The process to insert or embed a video in PowerPoint is not difficult; you can do this in a few simple steps.
How to Insert a Video in PowerPoint
The video format for PowerPoint differs for different versions. The steps to insert a video in PowerPoint do not deviate much. You can follow the following instructions and insert the video:
Step 1: First, you need to select the slide in which the video is supposed to be inserted. Select the video from the device you are using by heading to the ‘Insert’ tab. There, look for the ‘Video’ option and click on it to select the ‘This Device’ option.

Step 2: After you have located and selected the video, click on ‘Insert.’ Adjust the video settings from the ‘Format’ and ‘Playback’ toolbar according to your needs. You can resize the video, add effects, play full screen, etc.

Step 3: After all the settings are done, you need to preview the slideshow to check if the video is playing according to your desire or not.

How to Embed a Video in PowerPoint
If you are looking to add an online video across PowerPoint, the platform allows you to either embed its code or use its URL for adding it within your slides. To follow this, look into the steps featured below.
Step 1: Access the online video across your browser that you wish to embed in your PowerPoint slides. You can either copy its embed code or simply copy its URL. However, this video can only be from YouTube, SlideShare, Vimeo, Stream, or Flipgrid, as allowed by PowerPoint.

Step 2: Once copied, open your slides, and navigate to the “Insert” panel. Select “Video” from the available options and proceed to click on “Online Videos.”

Step 3: A new window opens up. Paste the copied code or URL across the provided space and tap “Insert” to add the online video across your slides. You can enhance the video across the “Video Format” and “Playback” sections.

Part 3. How to Turn Your Presentation into A Video with PowerPoint?
Inserting videos in PowerPoint presentations is normal; now, it’s time to discover something new. Have you ever thought of making a PowerPoint presentation a video itself? It is interesting! Your superior authority might get impressed and give you a promotion; who knows.
How to save your presentation as a video in PowerPoint? It can be done in a few simple steps. These steps are concisely discussed in the section below; follow to help yourself.
Step 1: You need to save the presentation that you made at first. After saving the original file, you need to click on ‘Export’ from the main menu.

Step 2: From the ‘Export’ menu, click on the ‘Create Video’ option. Select the video quality as per your needs. You can use pre-recorded narrations with the timings. In case no recorded narrations exist, you can record your own.

Step 3: The recorded narration will play over your video. If you don’t want narrations, you can simply skip these settings and move on.

Step 4: Next step is to select how much time a single slide will be shown. Keep in mind the longest slide; select an appropriate time so that all the material in the slides can be read easily.

Step 5: Now, moving towards the final step, click on ‘Create Video.’ This will generate and save the new PowerPoint video on your respective device.

Part 4. How to Match Color and Remove Image Background in PowerPoint?
There are two different things that you can do to make your presentation better. These are distinctive concerning video format for PowerPoint. Removal of background in PowerPoint is discussed, followed by Color Matching.
Remove Image Background
A simple way to remove background in PowerPoint is discussed in the following steps, read them for further assistance:
Step 1: Start by opening the PowerPoint software. Afterward, move to the ‘Insert’ tab and hit the ‘Pictures’ option to insert the image you plan to work with. As you click the photo, the ‘Picture Format’ tab will appear on the taskbar. Select the ‘Remove Background’ option on the left-most side below the taskbar.

Step 2: When you click ‘Remove Background,’ it will give options. Select the ‘Mark Areas to Keep’ option and draw the section that you want to save. You can also select the option ‘Mark Areas to Remove.’ It depends on the type of photo on which the task is being performed.

Step 3: Once all the necessary editing is done, click on the option ‘Keep Changes.’ You can save the image separately by clicking on ‘Save as Picture.’

Match Color in PowerPoint
Eyedropper helps you to match colors in your presentation. This takes a few clicks, and you have done color matching.
Step 1: For this, you need to open PowerPoint and select the image that you want to match the color of its background with the rest of the slide. Navigate to the “Design” panel and select the “Format Background” option.

Step 2: Click on ‘Drawing tool’ from the ribbon. Select the option of ‘Solid Fill’ from the menu bar at the top of the screen. Now, from ‘Solid Fill,’ move the mouse towards the ‘Eyedropper’ option. Tap on the background color that you wish to match within the background.

Step 3: Select the area that you want to change the background to its desired color. Access the option of “Solid Fill” after selecting the appropriate section of the document and select the color from the preview window present in the recent colors.

Closing Words
After reading the above article, you will be able to make incredible PowerPoint presentations. As videos add great information to your presentation so hence, we discussed in detail various video formats for PowerPoint. Now let’s share something new.
Do you know anything about Wondershare Filmora ? The software is a video editor with tons of great features and functionalities. You can create stunning videos with Filmora and its wide list of features. The video editor lets you trim, join, cut, split, and do much more than this. You get so many different effects, transitions, and elements with Filmora.
For Win 7 or later (64-bit)
For macOS 10.12 or later
02 How to Insert or Embed Video in PowerPoint?
03 How to Turn Your Presentation into A Video with PowerPoint?
04 How to Match Color and Remove Image Background in PowerPoint?
Part 1. Overview of PowerPoint Supported Video Format
The supported video formats for PowerPoint are different for both Windows and macOS. All the supported formats for both types of the operating system are discussed below individually:

Windows
ASF: Advanced System Format (ASF) is a proprietary video and audio container format. It is an extensible file format design.
AVI: AVI is an Audio Video Interleave file. It is a multimedia container format made by Microsoft. It allows synchronous audio with video playback.
MP4, M4V, MOV: MPEG-4 file format is also known as MP4 or M4V. It is a common video file format. In comparison, MOV is developed by Apple Inc. It is the same as MP4 but is made for Apple devices.
MPEG, MPG: It is a famous file format for movies that are distributed over the internet. They use specific compression that makes downloading and steaming easy and fast.
WMV: WMV was introduced by Microsoft, and it stands for Windows Media Video. It is a compressed file container. The format is based on ASF.
macOS
AVI, VFW: AVI stands for Audio Video Interleave, and VFW stands for Video for Windows. Both are multimedia container files. AVI is encoded into VFW.
MP4, MPEG-4: MP4 is a digital video file format. MPEG-4 uses compression, but it is less common than the MP4 extension. MPEG encodes audio tracks.
M4V: It is a video container format developed by Apple Inc. It is similar to MP4. MV4 is used to encode video files in iTunes.
MPG, MPEG, MPE, M75, M15: MPG, MPEG, MPE, M75, and M15 are all the different types of formats developed by the Moving Pictures Expert Group.
M2V: It contains only video data and no other files. It is encoded by using MPEG-2 compression. It is mostly used by DVD authorized applications.
TS: It is a Video Transport Stream file and is used to store MPEG-2 compressed video data. It is used by digital broadcasting systems.
MOV, QT: QT and MOV both were developed by Apple Inc. Both the formats can hold multiple types of multimedia formats (audio, video, and subtitles).
DIF: DIF stands for Data Interchange Format. It is a text-based file format and is used for tabular and spreadsheet data. It is also used to transfer data between spreadsheets.
Part 2. How to Insert or Embed Video in PowerPoint?
PowerPoint is the simplest way to make a presentation. You might impress your boss with a good presentation. Do you ever consider adding videos from your computer across your slides? Have you ever embedded a video in PowerPoint? Allow us to help you out with this. The process to insert or embed a video in PowerPoint is not difficult; you can do this in a few simple steps.
How to Insert a Video in PowerPoint
The video format for PowerPoint differs for different versions. The steps to insert a video in PowerPoint do not deviate much. You can follow the following instructions and insert the video:
Step 1: First, you need to select the slide in which the video is supposed to be inserted. Select the video from the device you are using by heading to the ‘Insert’ tab. There, look for the ‘Video’ option and click on it to select the ‘This Device’ option.

Step 2: After you have located and selected the video, click on ‘Insert.’ Adjust the video settings from the ‘Format’ and ‘Playback’ toolbar according to your needs. You can resize the video, add effects, play full screen, etc.

Step 3: After all the settings are done, you need to preview the slideshow to check if the video is playing according to your desire or not.

How to Embed a Video in PowerPoint
If you are looking to add an online video across PowerPoint, the platform allows you to either embed its code or use its URL for adding it within your slides. To follow this, look into the steps featured below.
Step 1: Access the online video across your browser that you wish to embed in your PowerPoint slides. You can either copy its embed code or simply copy its URL. However, this video can only be from YouTube, SlideShare, Vimeo, Stream, or Flipgrid, as allowed by PowerPoint.

Step 2: Once copied, open your slides, and navigate to the “Insert” panel. Select “Video” from the available options and proceed to click on “Online Videos.”

Step 3: A new window opens up. Paste the copied code or URL across the provided space and tap “Insert” to add the online video across your slides. You can enhance the video across the “Video Format” and “Playback” sections.

Part 3. How to Turn Your Presentation into A Video with PowerPoint?
Inserting videos in PowerPoint presentations is normal; now, it’s time to discover something new. Have you ever thought of making a PowerPoint presentation a video itself? It is interesting! Your superior authority might get impressed and give you a promotion; who knows.
How to save your presentation as a video in PowerPoint? It can be done in a few simple steps. These steps are concisely discussed in the section below; follow to help yourself.
Step 1: You need to save the presentation that you made at first. After saving the original file, you need to click on ‘Export’ from the main menu.

Step 2: From the ‘Export’ menu, click on the ‘Create Video’ option. Select the video quality as per your needs. You can use pre-recorded narrations with the timings. In case no recorded narrations exist, you can record your own.

Step 3: The recorded narration will play over your video. If you don’t want narrations, you can simply skip these settings and move on.

Step 4: Next step is to select how much time a single slide will be shown. Keep in mind the longest slide; select an appropriate time so that all the material in the slides can be read easily.

Step 5: Now, moving towards the final step, click on ‘Create Video.’ This will generate and save the new PowerPoint video on your respective device.

Part 4. How to Match Color and Remove Image Background in PowerPoint?
There are two different things that you can do to make your presentation better. These are distinctive concerning video format for PowerPoint. Removal of background in PowerPoint is discussed, followed by Color Matching.
Remove Image Background
A simple way to remove background in PowerPoint is discussed in the following steps, read them for further assistance:
Step 1: Start by opening the PowerPoint software. Afterward, move to the ‘Insert’ tab and hit the ‘Pictures’ option to insert the image you plan to work with. As you click the photo, the ‘Picture Format’ tab will appear on the taskbar. Select the ‘Remove Background’ option on the left-most side below the taskbar.

Step 2: When you click ‘Remove Background,’ it will give options. Select the ‘Mark Areas to Keep’ option and draw the section that you want to save. You can also select the option ‘Mark Areas to Remove.’ It depends on the type of photo on which the task is being performed.

Step 3: Once all the necessary editing is done, click on the option ‘Keep Changes.’ You can save the image separately by clicking on ‘Save as Picture.’

Match Color in PowerPoint
Eyedropper helps you to match colors in your presentation. This takes a few clicks, and you have done color matching.
Step 1: For this, you need to open PowerPoint and select the image that you want to match the color of its background with the rest of the slide. Navigate to the “Design” panel and select the “Format Background” option.

Step 2: Click on ‘Drawing tool’ from the ribbon. Select the option of ‘Solid Fill’ from the menu bar at the top of the screen. Now, from ‘Solid Fill,’ move the mouse towards the ‘Eyedropper’ option. Tap on the background color that you wish to match within the background.

Step 3: Select the area that you want to change the background to its desired color. Access the option of “Solid Fill” after selecting the appropriate section of the document and select the color from the preview window present in the recent colors.

Closing Words
After reading the above article, you will be able to make incredible PowerPoint presentations. As videos add great information to your presentation so hence, we discussed in detail various video formats for PowerPoint. Now let’s share something new.
Do you know anything about Wondershare Filmora ? The software is a video editor with tons of great features and functionalities. You can create stunning videos with Filmora and its wide list of features. The video editor lets you trim, join, cut, split, and do much more than this. You get so many different effects, transitions, and elements with Filmora.
For Win 7 or later (64-bit)
For macOS 10.12 or later
02 How to Insert or Embed Video in PowerPoint?
03 How to Turn Your Presentation into A Video with PowerPoint?
04 How to Match Color and Remove Image Background in PowerPoint?
Part 1. Overview of PowerPoint Supported Video Format
The supported video formats for PowerPoint are different for both Windows and macOS. All the supported formats for both types of the operating system are discussed below individually:

Windows
ASF: Advanced System Format (ASF) is a proprietary video and audio container format. It is an extensible file format design.
AVI: AVI is an Audio Video Interleave file. It is a multimedia container format made by Microsoft. It allows synchronous audio with video playback.
MP4, M4V, MOV: MPEG-4 file format is also known as MP4 or M4V. It is a common video file format. In comparison, MOV is developed by Apple Inc. It is the same as MP4 but is made for Apple devices.
MPEG, MPG: It is a famous file format for movies that are distributed over the internet. They use specific compression that makes downloading and steaming easy and fast.
WMV: WMV was introduced by Microsoft, and it stands for Windows Media Video. It is a compressed file container. The format is based on ASF.
macOS
AVI, VFW: AVI stands for Audio Video Interleave, and VFW stands for Video for Windows. Both are multimedia container files. AVI is encoded into VFW.
MP4, MPEG-4: MP4 is a digital video file format. MPEG-4 uses compression, but it is less common than the MP4 extension. MPEG encodes audio tracks.
M4V: It is a video container format developed by Apple Inc. It is similar to MP4. MV4 is used to encode video files in iTunes.
MPG, MPEG, MPE, M75, M15: MPG, MPEG, MPE, M75, and M15 are all the different types of formats developed by the Moving Pictures Expert Group.
M2V: It contains only video data and no other files. It is encoded by using MPEG-2 compression. It is mostly used by DVD authorized applications.
TS: It is a Video Transport Stream file and is used to store MPEG-2 compressed video data. It is used by digital broadcasting systems.
MOV, QT: QT and MOV both were developed by Apple Inc. Both the formats can hold multiple types of multimedia formats (audio, video, and subtitles).
DIF: DIF stands for Data Interchange Format. It is a text-based file format and is used for tabular and spreadsheet data. It is also used to transfer data between spreadsheets.
Part 2. How to Insert or Embed Video in PowerPoint?
PowerPoint is the simplest way to make a presentation. You might impress your boss with a good presentation. Do you ever consider adding videos from your computer across your slides? Have you ever embedded a video in PowerPoint? Allow us to help you out with this. The process to insert or embed a video in PowerPoint is not difficult; you can do this in a few simple steps.
How to Insert a Video in PowerPoint
The video format for PowerPoint differs for different versions. The steps to insert a video in PowerPoint do not deviate much. You can follow the following instructions and insert the video:
Step 1: First, you need to select the slide in which the video is supposed to be inserted. Select the video from the device you are using by heading to the ‘Insert’ tab. There, look for the ‘Video’ option and click on it to select the ‘This Device’ option.

Step 2: After you have located and selected the video, click on ‘Insert.’ Adjust the video settings from the ‘Format’ and ‘Playback’ toolbar according to your needs. You can resize the video, add effects, play full screen, etc.

Step 3: After all the settings are done, you need to preview the slideshow to check if the video is playing according to your desire or not.

How to Embed a Video in PowerPoint
If you are looking to add an online video across PowerPoint, the platform allows you to either embed its code or use its URL for adding it within your slides. To follow this, look into the steps featured below.
Step 1: Access the online video across your browser that you wish to embed in your PowerPoint slides. You can either copy its embed code or simply copy its URL. However, this video can only be from YouTube, SlideShare, Vimeo, Stream, or Flipgrid, as allowed by PowerPoint.

Step 2: Once copied, open your slides, and navigate to the “Insert” panel. Select “Video” from the available options and proceed to click on “Online Videos.”

Step 3: A new window opens up. Paste the copied code or URL across the provided space and tap “Insert” to add the online video across your slides. You can enhance the video across the “Video Format” and “Playback” sections.

Part 3. How to Turn Your Presentation into A Video with PowerPoint?
Inserting videos in PowerPoint presentations is normal; now, it’s time to discover something new. Have you ever thought of making a PowerPoint presentation a video itself? It is interesting! Your superior authority might get impressed and give you a promotion; who knows.
How to save your presentation as a video in PowerPoint? It can be done in a few simple steps. These steps are concisely discussed in the section below; follow to help yourself.
Step 1: You need to save the presentation that you made at first. After saving the original file, you need to click on ‘Export’ from the main menu.

Step 2: From the ‘Export’ menu, click on the ‘Create Video’ option. Select the video quality as per your needs. You can use pre-recorded narrations with the timings. In case no recorded narrations exist, you can record your own.

Step 3: The recorded narration will play over your video. If you don’t want narrations, you can simply skip these settings and move on.

Step 4: Next step is to select how much time a single slide will be shown. Keep in mind the longest slide; select an appropriate time so that all the material in the slides can be read easily.

Step 5: Now, moving towards the final step, click on ‘Create Video.’ This will generate and save the new PowerPoint video on your respective device.

Part 4. How to Match Color and Remove Image Background in PowerPoint?
There are two different things that you can do to make your presentation better. These are distinctive concerning video format for PowerPoint. Removal of background in PowerPoint is discussed, followed by Color Matching.
Remove Image Background
A simple way to remove background in PowerPoint is discussed in the following steps, read them for further assistance:
Step 1: Start by opening the PowerPoint software. Afterward, move to the ‘Insert’ tab and hit the ‘Pictures’ option to insert the image you plan to work with. As you click the photo, the ‘Picture Format’ tab will appear on the taskbar. Select the ‘Remove Background’ option on the left-most side below the taskbar.

Step 2: When you click ‘Remove Background,’ it will give options. Select the ‘Mark Areas to Keep’ option and draw the section that you want to save. You can also select the option ‘Mark Areas to Remove.’ It depends on the type of photo on which the task is being performed.

Step 3: Once all the necessary editing is done, click on the option ‘Keep Changes.’ You can save the image separately by clicking on ‘Save as Picture.’

Match Color in PowerPoint
Eyedropper helps you to match colors in your presentation. This takes a few clicks, and you have done color matching.
Step 1: For this, you need to open PowerPoint and select the image that you want to match the color of its background with the rest of the slide. Navigate to the “Design” panel and select the “Format Background” option.

Step 2: Click on ‘Drawing tool’ from the ribbon. Select the option of ‘Solid Fill’ from the menu bar at the top of the screen. Now, from ‘Solid Fill,’ move the mouse towards the ‘Eyedropper’ option. Tap on the background color that you wish to match within the background.

Step 3: Select the area that you want to change the background to its desired color. Access the option of “Solid Fill” after selecting the appropriate section of the document and select the color from the preview window present in the recent colors.

Closing Words
After reading the above article, you will be able to make incredible PowerPoint presentations. As videos add great information to your presentation so hence, we discussed in detail various video formats for PowerPoint. Now let’s share something new.
Do you know anything about Wondershare Filmora ? The software is a video editor with tons of great features and functionalities. You can create stunning videos with Filmora and its wide list of features. The video editor lets you trim, join, cut, split, and do much more than this. You get so many different effects, transitions, and elements with Filmora.
For Win 7 or later (64-bit)
For macOS 10.12 or later
02 How to Insert or Embed Video in PowerPoint?
03 How to Turn Your Presentation into A Video with PowerPoint?
04 How to Match Color and Remove Image Background in PowerPoint?
Part 1. Overview of PowerPoint Supported Video Format
The supported video formats for PowerPoint are different for both Windows and macOS. All the supported formats for both types of the operating system are discussed below individually:

Windows
ASF: Advanced System Format (ASF) is a proprietary video and audio container format. It is an extensible file format design.
AVI: AVI is an Audio Video Interleave file. It is a multimedia container format made by Microsoft. It allows synchronous audio with video playback.
MP4, M4V, MOV: MPEG-4 file format is also known as MP4 or M4V. It is a common video file format. In comparison, MOV is developed by Apple Inc. It is the same as MP4 but is made for Apple devices.
MPEG, MPG: It is a famous file format for movies that are distributed over the internet. They use specific compression that makes downloading and steaming easy and fast.
WMV: WMV was introduced by Microsoft, and it stands for Windows Media Video. It is a compressed file container. The format is based on ASF.
macOS
AVI, VFW: AVI stands for Audio Video Interleave, and VFW stands for Video for Windows. Both are multimedia container files. AVI is encoded into VFW.
MP4, MPEG-4: MP4 is a digital video file format. MPEG-4 uses compression, but it is less common than the MP4 extension. MPEG encodes audio tracks.
M4V: It is a video container format developed by Apple Inc. It is similar to MP4. MV4 is used to encode video files in iTunes.
MPG, MPEG, MPE, M75, M15: MPG, MPEG, MPE, M75, and M15 are all the different types of formats developed by the Moving Pictures Expert Group.
M2V: It contains only video data and no other files. It is encoded by using MPEG-2 compression. It is mostly used by DVD authorized applications.
TS: It is a Video Transport Stream file and is used to store MPEG-2 compressed video data. It is used by digital broadcasting systems.
MOV, QT: QT and MOV both were developed by Apple Inc. Both the formats can hold multiple types of multimedia formats (audio, video, and subtitles).
DIF: DIF stands for Data Interchange Format. It is a text-based file format and is used for tabular and spreadsheet data. It is also used to transfer data between spreadsheets.
Part 2. How to Insert or Embed Video in PowerPoint?
PowerPoint is the simplest way to make a presentation. You might impress your boss with a good presentation. Do you ever consider adding videos from your computer across your slides? Have you ever embedded a video in PowerPoint? Allow us to help you out with this. The process to insert or embed a video in PowerPoint is not difficult; you can do this in a few simple steps.
How to Insert a Video in PowerPoint
The video format for PowerPoint differs for different versions. The steps to insert a video in PowerPoint do not deviate much. You can follow the following instructions and insert the video:
Step 1: First, you need to select the slide in which the video is supposed to be inserted. Select the video from the device you are using by heading to the ‘Insert’ tab. There, look for the ‘Video’ option and click on it to select the ‘This Device’ option.

Step 2: After you have located and selected the video, click on ‘Insert.’ Adjust the video settings from the ‘Format’ and ‘Playback’ toolbar according to your needs. You can resize the video, add effects, play full screen, etc.

Step 3: After all the settings are done, you need to preview the slideshow to check if the video is playing according to your desire or not.

How to Embed a Video in PowerPoint
If you are looking to add an online video across PowerPoint, the platform allows you to either embed its code or use its URL for adding it within your slides. To follow this, look into the steps featured below.
Step 1: Access the online video across your browser that you wish to embed in your PowerPoint slides. You can either copy its embed code or simply copy its URL. However, this video can only be from YouTube, SlideShare, Vimeo, Stream, or Flipgrid, as allowed by PowerPoint.

Step 2: Once copied, open your slides, and navigate to the “Insert” panel. Select “Video” from the available options and proceed to click on “Online Videos.”

Step 3: A new window opens up. Paste the copied code or URL across the provided space and tap “Insert” to add the online video across your slides. You can enhance the video across the “Video Format” and “Playback” sections.

Part 3. How to Turn Your Presentation into A Video with PowerPoint?
Inserting videos in PowerPoint presentations is normal; now, it’s time to discover something new. Have you ever thought of making a PowerPoint presentation a video itself? It is interesting! Your superior authority might get impressed and give you a promotion; who knows.
How to save your presentation as a video in PowerPoint? It can be done in a few simple steps. These steps are concisely discussed in the section below; follow to help yourself.
Step 1: You need to save the presentation that you made at first. After saving the original file, you need to click on ‘Export’ from the main menu.

Step 2: From the ‘Export’ menu, click on the ‘Create Video’ option. Select the video quality as per your needs. You can use pre-recorded narrations with the timings. In case no recorded narrations exist, you can record your own.

Step 3: The recorded narration will play over your video. If you don’t want narrations, you can simply skip these settings and move on.

Step 4: Next step is to select how much time a single slide will be shown. Keep in mind the longest slide; select an appropriate time so that all the material in the slides can be read easily.

Step 5: Now, moving towards the final step, click on ‘Create Video.’ This will generate and save the new PowerPoint video on your respective device.

Part 4. How to Match Color and Remove Image Background in PowerPoint?
There are two different things that you can do to make your presentation better. These are distinctive concerning video format for PowerPoint. Removal of background in PowerPoint is discussed, followed by Color Matching.
Remove Image Background
A simple way to remove background in PowerPoint is discussed in the following steps, read them for further assistance:
Step 1: Start by opening the PowerPoint software. Afterward, move to the ‘Insert’ tab and hit the ‘Pictures’ option to insert the image you plan to work with. As you click the photo, the ‘Picture Format’ tab will appear on the taskbar. Select the ‘Remove Background’ option on the left-most side below the taskbar.

Step 2: When you click ‘Remove Background,’ it will give options. Select the ‘Mark Areas to Keep’ option and draw the section that you want to save. You can also select the option ‘Mark Areas to Remove.’ It depends on the type of photo on which the task is being performed.

Step 3: Once all the necessary editing is done, click on the option ‘Keep Changes.’ You can save the image separately by clicking on ‘Save as Picture.’

Match Color in PowerPoint
Eyedropper helps you to match colors in your presentation. This takes a few clicks, and you have done color matching.
Step 1: For this, you need to open PowerPoint and select the image that you want to match the color of its background with the rest of the slide. Navigate to the “Design” panel and select the “Format Background” option.

Step 2: Click on ‘Drawing tool’ from the ribbon. Select the option of ‘Solid Fill’ from the menu bar at the top of the screen. Now, from ‘Solid Fill,’ move the mouse towards the ‘Eyedropper’ option. Tap on the background color that you wish to match within the background.

Step 3: Select the area that you want to change the background to its desired color. Access the option of “Solid Fill” after selecting the appropriate section of the document and select the color from the preview window present in the recent colors.

Closing Words
After reading the above article, you will be able to make incredible PowerPoint presentations. As videos add great information to your presentation so hence, we discussed in detail various video formats for PowerPoint. Now let’s share something new.
Do you know anything about Wondershare Filmora ? The software is a video editor with tons of great features and functionalities. You can create stunning videos with Filmora and its wide list of features. The video editor lets you trim, join, cut, split, and do much more than this. You get so many different effects, transitions, and elements with Filmora.
For Win 7 or later (64-bit)
For macOS 10.12 or later
Creating Motivational Videos with AI: Comprehensive Guide 2024
In the buzzing realm of social media, motivational videos have risen as a beacon of hope and inspiration for millions. Scrolling through your feeds, you’ve likely encountered a motivational video status that tugged at your heartstrings or ignited a spark of ambition. But why are these videos so compelling?
The answer lies in the innate human desire for encouragement. These videos often blend heartwarming visuals with potent words of wisdom, creating an emotional cocktail that resonates deeply with viewers. As the dawn of 2023 approaches, the ease with which we can produce these motivational status videos is becoming unparalleled, thanks to the advancements in artificial intelligence.
- Part 2: Use Runway Gen2 to convert pictures to videos
- Part 3: Use Chat-GPT to generate motivational quotes
- Part 4: Quick solution: Filmora AI Editing tool
- Part 5: Summary
Part 1: Use Midjourney to generate motivation status images
Enter Midjourney is a cutting-edge platform that harnesses AI to generate enchanting images that capture the essence of motivation. Whether you’re looking to convey an athlete’s grit or a scholar’s determination, Midjourney has an array of templates to cater to your needs.
To begin, simply navigate to the Midjourney homepage. From here, choose a theme or emotion you want to convey. You can input keywords like “determination,” “strength,” or any word that resonates with your desired sentiment. The platform will then utilize its AI algorithms to generate images that align with your keyword, giving you a wealth of visuals.
Remember the importance of keeping the motivation status video download feature in mind. Users love to save and share these videos, and starting with a captivating image ensures your video gets the traction it deserves.
Part 2: Use Runway Gen2 to convert pictures to videos
With your motivation status image, it’s time to bring it to life! That’s where Runway Gen2 steps in. This platform is designed to seamlessly convert static images into dynamic videos, enriching the user experience.
Start by uploading your chosen image from Midjourney. The intuitive interface of Runway Gen2 will guide you through the process. You can choose the movement or animation you want to infuse into your image. Whether it’s a subtle breeze causing ripples in a flag on Republic Day status videos or the emphatic beat of a heart symbolizing passion – the possibilities are endless.
The beauty of Runway Gen2 is that it does all the heavy lifting. Within moments, your static image evolves into a mesmerizing video clip. Perfect for those looking to create motivational status videos that inspire and captivate the viewer’s attention.
By harnessing AI tools like Midjourney and Runway Gen2, anyone can now become a creator of powerful motivational content.
Part 3: Use Chat-GPT to generate motivational quotes
Now that we have the visual backbone for our motivational video, the next step is to infuse it with words that resonate, inspire, and motivate. And who better to turn to than Chat-GPT, the AI writing virtuoso?
Chat-GPT’s prowess lies in producing human-like text that strikes a chord. It’s not just about churning out words; it’s about curating sentiments that align with the intended emotion.
To get started with Chat-GPT for your motivation status video:
- Navigate to the Chat-GPT portal.
- In the prompt box, specify the kind of quote you’re seeking. For instance, “Generate a motivational quote about perseverance.”
- You’ll receive a tailor-made quote for your video’s theme within moments.
Imagine having the capability to request specific quotes on themes like “overcoming challenges” or “embracing change” and receiving phrases that could potentially go viral on social media! With Chat-GPT, you have a personal quote-generator at your fingertips.
But what if you’re targeting events? For those creating Republic Day status videos, you can request patriotic quotes that ignite national pride or reflect upon the nation’s journey.
Part 4: Quick solution: Filmora AI Editing tool
For those in a hurry or those who might not incline to traverse through various platforms, there’s a one-stop solution: Filmora AI Editing tool. This all-encompassing tool streamlines the process of creating compelling motivational videos.
Create AI Captions For Win 7 or later(64-bit)
Create AI Captions For macOS 10.14 or later
Step 1: Use AI writing tools to generate motivational quotes
Begin with Filmora’s in-built AI writing tool. Like Chat-GPT, this tool provides many quotes based on the emotion or theme you’re targeting. Simply input a keyword and watch as the AI curates a list of quotes suitable for motivation status video download.
Step 2: Search for motivational footage in stock media
Filmora comes equipped with a rich library of stock media. Whether you’re hunting for serene landscapes, bustling cityscapes, or intimate close-ups, there’s a high chance you’ll find the perfect clip that complements your quote. These visuals are curated keeping in mind the trends and preferences of viewers in 2024, ensuring your video remains relevant and engaging.
Step 3: One-click generation using templates
For those who are not seasoned video editors, Filmora offers a range of templates designed specifically for motivational content. By selecting a template, the AI takes over, meshing together the quote and the footage to create a cohesive and professional video. The one-click generation feature is a godsend for those seeking a quick turnaround without compromising quality.
With the tools and techniques available in 2024, creating motivational videos has never been more accessible. Whether you’re a seasoned creator or a novice dipping your toes into the world of content creation, the AI-driven platforms mentioned above ensure that your motivation status video stands out and leaves an indelible mark on your audience.
Part 5: Summary
AI-driven tools have democratized motivational content creation. No longer exclusive to professionals, crafting inspiring motivational videos status is now accessible to all. These AI-enhanced videos serve as beacons of hope and encouragement, resonating deeply across various audience demographics.
In this digital era, harnessing AI simplifies content creation and amplifies its impact, making every message more poignant and every story more compelling. Embrace this AI revolution and let your creativity shine in 2024.
Premiere Pro Tutorial: How To Change Video Frame Rate
The video’s frame rate is an important aspect of it. Too high of a frame rate makes the video seem unnatural. On the other hand, too low can make some videos choppy. You can fix that by changing the frame rate using a video editor. And we are here to help you learn how to do that. Here’s how to change the frame rate in Premiere Pro.
The frame rate sometimes makes or breaks the video. So it is important to get this setting right. Suppose you made a mistake and recorded your video in the wrong setting. You can follow this guide to solve your problem.
How To Check Video Frame Rate in Premiere Pro
Before we teach you how to change a video’s frame rate in Premiere Pro, let’s first make sure you know how to check. Maybe you don’t need to modify the video because it is already in the correct setting.
So how do you do that in Premiere Pro?
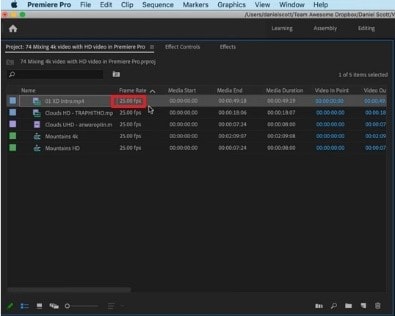
- Import the video to Adobe Premiere Pro.
- Check the “Media” window. Next to the video file name is its frame rate. It is written in the format x.00 fps. FPS stands for “frames per second,” which is used interchangeably with the term frame rate.
Reasons for Changing Frame Rate
Suppose you have an action-packed video. It would not look great at 30 fps - it will look too choppy. That will give your audience a rotten viewing experience. By increasing the frames, you can make the motion more fluid and smoother.
Increasing the frames per second also results in better slow-motion videos. A 30 fps one would not look good with this effect because it does not show smooth motion. Thus, we recommend making the video at least 60 fps.
However, a higher frame rate does not always mean better videos. It can result in what they call the “soap opera effect.” It means the video shows too many details. That makes the videos seem “unnatural” or less cinematic.
High frame rates make videos look more realistic since there is less stuttering and motion blur between frames. That’s great. But for older audiences - the ones used to watching videos at 24 fps, it can be off-putting. So it’s also important to consider your target audience when deciding the right frame rate for your video.
With these reasons in mind, you may want to change your video’s frame rate.
How To Change FPS in Premiere Pro
Let’s dilly-dally no more. Here’s a quick guide on how to change fps in Adobe Premiere Pro. This program gives you two different ways to change fps. One is changing the frame rate of a sequence; the other is changing the frame rate of the video clip. We will teach you how to do both.
l Change the Frame Rate of a Sequence
Suppose you want to keep the frame rate of most of the video the same. Only some parts need adjusting. You can change the frame rate of the sequences that need changing instead. Here are the steps to follow to achieve this:
- Open your project in Adobe Premiere Pro.
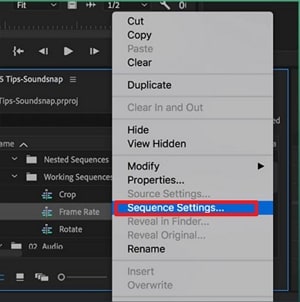
- In the Project panel, select the sequence whose frame rate you want to change. Right-click on that sequence.
- Choose “Sequence Settings” from the menu that appears.
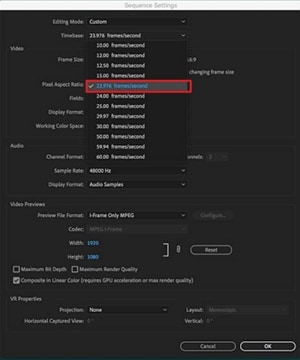
- Click the drop-down menu for “Timebase.”
- Select the frame rate you want the sequence to be in.
- Click “OK.”
l Change the Frame Rate of a Video Clip
Here are the steps you should follow if you want to change the frame rate of an entire video clip.
- Import your video clip to Premiere Pro and drag it to the timeline.
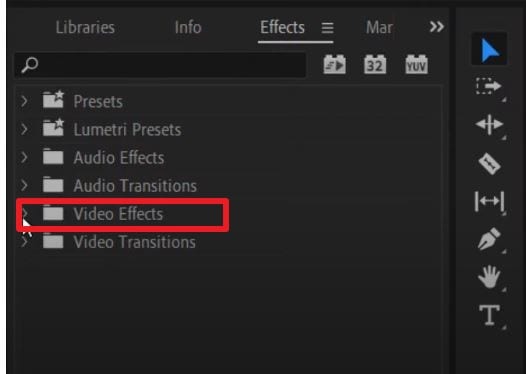
- Go to the “Effects” tab. It’s in the options at the bottom left of the screen.
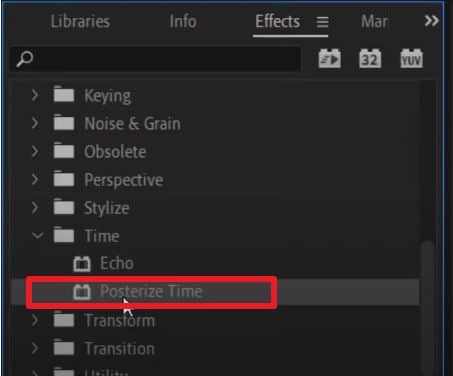
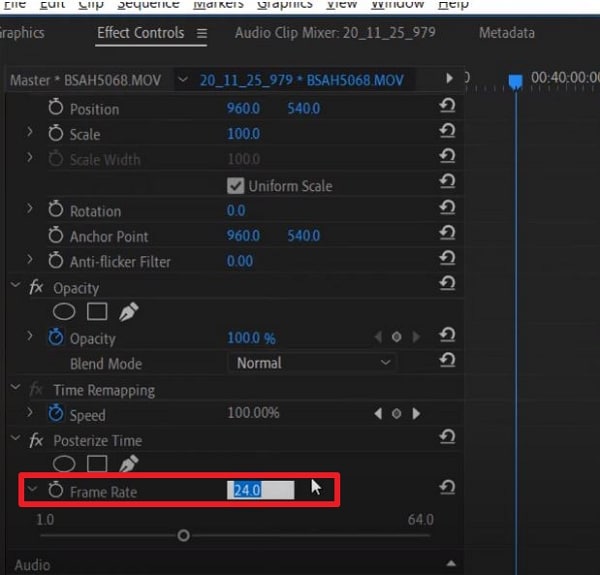
- Select “Video Effects” > “Time” > “Posterize Time.”
- Drag and drop the Posterize Time effect to the clip whose frame rate you want to change.
- Click “Effect Controls” at the top left of the screen.
- Select the small “arrow” button next to the “Frame Rate” text under “Posterize Time.”
- Change the frame rate to your preferred setting. For example, type “60” to make the video 60 fps.
- Click “Sequence” > “Render Selection.”
And that’s it! That is how you change a video clip’s frame rate in Adobe Premiere Pro.
How To Make 120 FPS Videos With Premiere Pro
Videos that are 120 fps are very popular now. If you are a gaming content creator on YouTube, you probably record videos at this frame rate. You’d want to edit that footage and export it at the same frame rate.
Adobe Premiere Pro allows you to do that. But it’s a little bit of a hidden feature. When creating a sequence, you may notice that the highest the frame rate can go is 60 frames per second. That’s obviously not the number that we want. Don’t worry. There is a workaround. The best thing is that it’s super easy.
Follow these steps to change your video to 120 fps:
- Import your 120 fps video to Adobe Premiere Pro.
- Select your footage. Drag it to your timeline or the tab where the text says, “Drop media here to create sequence.”
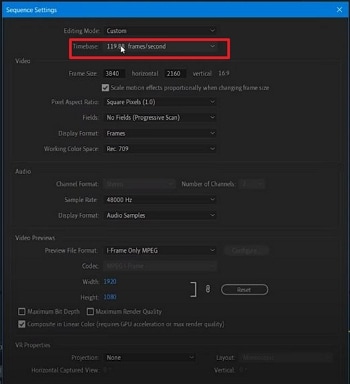
- Select the timeline panel. Click “Sequence” > “Sequence Settings.”
- Check the “Timebase” section. It should say “119.88 frames/second,” 120 fps when rounded off.
- Edit the video as needed and render it. The output should stay at 120 fps.
How To Change Video From 30 FPS to 60 FPS in Premiere Pro
Do you have a video recorded at 30 frames per second, and do you want it at 60? Here’s a simple solution to that. Follow these steps in Adobe Premiere Pro to double the video’s frame rate.
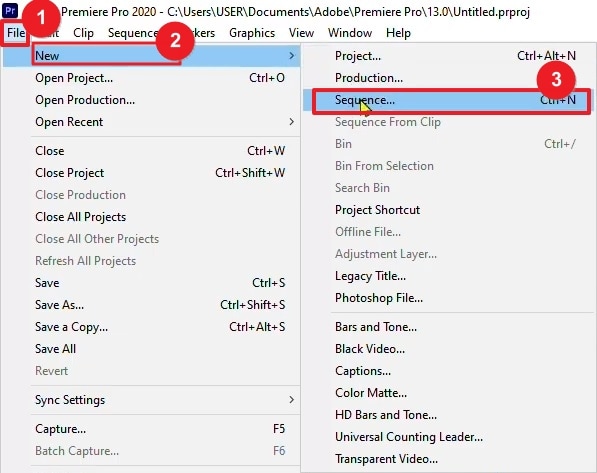
- Open Adobe Premiere Pro. Click “File” > “New” > “Sequence.”
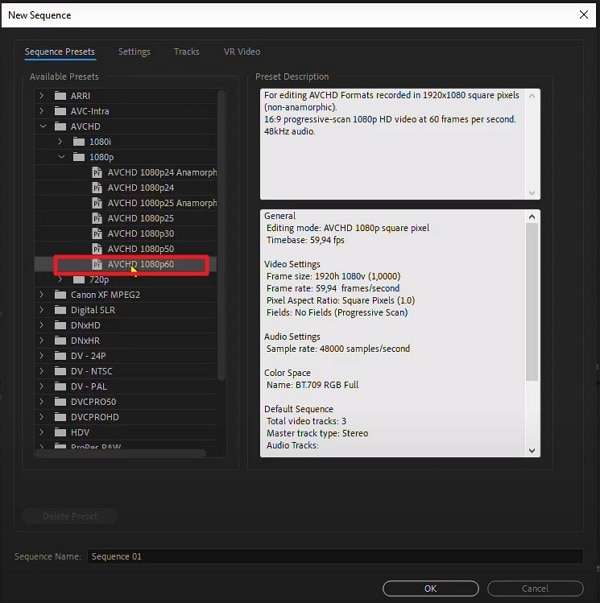
- Click “AVCHD” > “1080p” > “AVCHD 1080p60” > “OK.”
- Import your 30 fps video into Adobe Premiere Pro.
- Drag the video into the timeline.
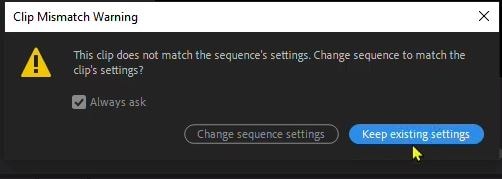
- Click “Keep existing settings.”
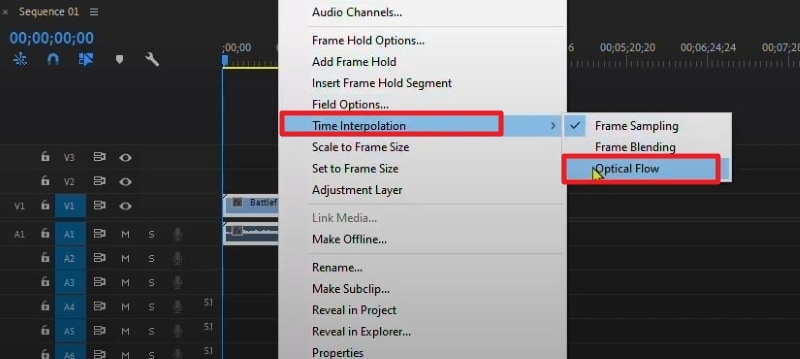
- Right-click the video in the timeline. Select “Time interpolation” > “Optical Flow.”
- Press the “Enter” key. Wait for the processing to finish. This can take hours.
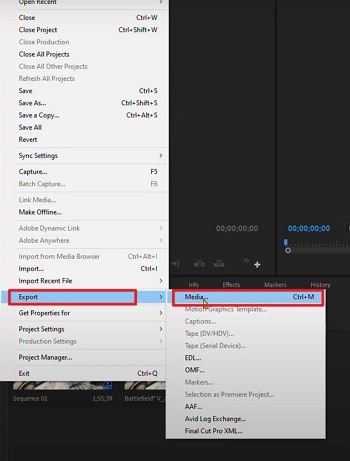
- Click “File” > “Export” > “Media.”
- Select a preset.
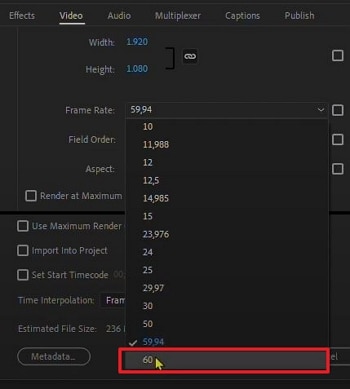
- Scroll down to the “Effects” section to check if the frame rate is at 60 fps. If not, change it to 60 fps.
- Click “Export.”
[Bonus] Wondershare Filmora - Premiere Pro’s Alternative
Free Download For Win 7 or later(64-bit)
Free Download For macOS 10.14 or later
What if you don’t have Adobe Premiere Pro or don’t like this tool? What’s a good alternative? That would be Wondershare Filmora.

Why use Filmora as a substitute for Premiere Pro? This video editor offers lots of great features, basic or advanced. With these at your fingertips, you can bring your videos to the next level and wow your audiences.
Among Filmora’s handy features is the ability to quickly change a video’s frame rate. You don’t even need to be a video editing expert to do it with this software! That’s how straightforward the process is.
How To Change the Frame Rate in Wondershare Filmora
Changing a video’s frame rate in Wondershare Filmora is super easy. Even a child can do it due to how simple the steps are. Here, read this 5-step guide to change a video’s frame rate using this amazing video editor.
- Launch Wondershare Filmora and create a new project.

- Import the video whose frame rate you want to change.
- Drag the video into the timeline.
![]()
- Click “Export.”
- Select the format you want the output file to be in. Find the “Frame Rate” in the options, click the drop-down menu, and select the frame rate that you want. Click “Export.”

Conclusion
Getting the frame rate of a video right is important, so you should not neglect it. It greatly affects your audience’s viewing experience. Thankfully, if you make mistakes, you can correct them with video editors like Premiere Pro. If it’s not to your liking, you can use Wondershare Filmora instead - it’s the best alternative.
Filmora lets you change a video’s frame rate very easily. Also, it gives you a bunch of other features you might enjoy using. And here’s some good news: this software app is affordable! You can also download the free trial to give it a shot.
Free Download For macOS 10.14 or later
What if you don’t have Adobe Premiere Pro or don’t like this tool? What’s a good alternative? That would be Wondershare Filmora.

Why use Filmora as a substitute for Premiere Pro? This video editor offers lots of great features, basic or advanced. With these at your fingertips, you can bring your videos to the next level and wow your audiences.
Among Filmora’s handy features is the ability to quickly change a video’s frame rate. You don’t even need to be a video editing expert to do it with this software! That’s how straightforward the process is.
How To Change the Frame Rate in Wondershare Filmora
Changing a video’s frame rate in Wondershare Filmora is super easy. Even a child can do it due to how simple the steps are. Here, read this 5-step guide to change a video’s frame rate using this amazing video editor.
- Launch Wondershare Filmora and create a new project.

- Import the video whose frame rate you want to change.
- Drag the video into the timeline.
![]()
- Click “Export.”
- Select the format you want the output file to be in. Find the “Frame Rate” in the options, click the drop-down menu, and select the frame rate that you want. Click “Export.”

Conclusion
Getting the frame rate of a video right is important, so you should not neglect it. It greatly affects your audience’s viewing experience. Thankfully, if you make mistakes, you can correct them with video editors like Premiere Pro. If it’s not to your liking, you can use Wondershare Filmora instead - it’s the best alternative.
Filmora lets you change a video’s frame rate very easily. Also, it gives you a bunch of other features you might enjoy using. And here’s some good news: this software app is affordable! You can also download the free trial to give it a shot.
Some Leading AI Tools to Replace Sky Backgrounds
Digital imagery has seen some ground-breaking revolutions in previous years. The latest AI trends have transformed how we edit and see images. Many creative tools now have integrated features to let users manipulate images as they wish. One of the applications of these AI integrated tools is their ability to replace sky.
You can now use AI to replace the sky in an image, change the background, add or remove elements, and whatnot. If you want to read more about sky replacement and how to do it in photos, the following read is at your service. Discover the leading tools to help you with sky replacement with a bonus tip for this task.
Sky Replacement A cross-platform works like magic for background removal or sky replacement photos!
Free Download Free Download Learn More

Part 1: AI Sky Replacement with BeFunky: Looking into the Step-by-Step Overview
If you are looking for a smart tool to replace a sky online, you can try BeFunky . BeFunky is a notable image editor and graphic design tool. It offers an all-in-one creative platform to help you easily edit photos, create graphic designs, make collages, and more.
BeFunky previously offered a background remover tool to replace skies. But now, it has a dedicated sky replacement feature that can easily detect the sky and foreground of your image. This allows for precise adjustments and accurate replacements.
Steps for BeFunky’s AI Sky Replacer
Step 1: Open the Sky Replacer feature of BeFunky on your web browser. Tap the “Open” button or drop the images into the interface for sky replacement.

Step 2: Select the “Change Sky” button once you have uploaded your image.

Step 3: You can now select a new sky from the stock images provided or choose an image from your device. You can also manually adjust the contrast, saturation, and other aspects of the sky or the foreground. Tap on the “Save” button to save the image to your device.

Part 2: Fotor AI: Performing Sky Replacement with Perfection
Another remarkable AI tool that can be used to change the sky from the background is Fotor . It is a free online photo editor that can help enhance images. Fotor is quite useful for bulk-editing images. You can also use it to transform text into images.
Fotor features a free sky replacement option that can be used to swap skies from images. You can easily add starry, sunny, gloomy, cloudy, and rainy skies to your images. The AI sky replacement of Fotor can help personalize skies in no time.
Steps for Sky Replacement in Fotor AI
Step 1: Launch Fotor on your browser and open the “Background Remover” tool. Upload your image to Fotor, and it will automatically remove the image background.

Step 2: From the toolbar at the right, tap “Backgrounds.” Here, you can find lots of sky images that you can use in your picture. You can also generate a custom sky by writing prompts in the built-in AI background generator. Now, replace the sky and download the image to your device.

Part 3: Changing Skies with Autoenhance.ai: A Review
Autoenhance.ai is a web-based photo editor integrated with AI power. It offers fast and automatic processing to enhance your workflow. Autoenhance.ai offers perspective correction to fix wonky angles in images. It also offers image relighting and HDR merging for better results.
This online platform lets users create the perfect sky effect in their images. Its comprehensive sky packs cover a range of seasons and vibrant views. The tool caters well to business and professional needs. Using this sky replacement online, you can add a vibrant yet natural touch to your images.
Step 1: Go to Autoenhance.ai and toggle the switch next to the “Sky Replacement” option to turn it on. Now, use the dropdown menu below the option to choose a sky preference for your image. Then, upload the images to change the sky online.

Step 2: Based on your chosen sky pack, Autoenhance.ai will replace the sky in your image. You can then download your image with the replaced sky.

Part 4: SnapEdit: Online AI Sky Replacement Made Easy
For a simple and clean online editor to replace a sky, you can try SnapEdit . It is an easy-to-use photo editor with AI technology to bring the best out of your photos. You can use SnapEdit to remove unwanted objects from photos. The tool can also remove watermarks and text from images.
For efficient sky change online, SnapEdit offers an effective solution. Its sky replacement feature can change the sky’s color, feel, and gradient in the background. While changing the sky, SnapEdit automatically adjusts the photo’s overall color for better results.
Steps to Replace Sky Using SnapEdit
Step 1: Open the Sky Changer feature of SnapEdit on your device. Tap the “Upload Image” button or paste the image whose background you wish to remove.

Step 2: SnapEdit will offer a range of sky options you can choose to swap with the original. You can tap the “More Sky” option and find further options to choose from. The slider next to the “Color Set” option is available to help blend the image with the background. Once you are satisfied with the results, tap the “Download” button to save your image.

Bonus Part: Make Composed AI Background Replacements with Wondershare Filmora
The above-mentioned tools are wonderful options to help you change sky online. However, online tools require constant internet stability and can crash due to heavy site traffic. To avoid these issues, it is better to choose offline tools that can make the editing process easier. For AI editing, there is no better software solution than Wondershare Filmora .
Filmora is a video editing software designed for professional use. It is an intuitive solution that can create powerful results in no time. With a wide range of resourceful toolsets, Filmora contains everything your videos might need. This multi-platform tool can help users bring the best out of their videos in no time. You can use Filmora to enhance your videos and boost your productivity.
Free Download For Win 7 or later(64-bit)
Free Download For macOS 10.14 or later
Key Features of Wondershare Filmora
Filmora offers a wide range of useful features for videos. It is the perfect one-stop solution for video editing. Some of the features offered by Filmora include:
- Motion Tracking: Filmora lets users track the movement of an object in a video. This helps to pin graphics and media files to follow the motion. You can add text, mosaic, or other elements that move smoothly with the object using Filmora.

- Preset Templates: To help you start your video editing journey, Filmora offers built-in templates. More than 1000 preset templates are available to give your videos a head-start. You can also create and share your own templates in Filmora.

- Screen Recorder: Filmora acts as an efficient screen recorder. You can record your screen and webcam at the same time for video. You can thus record high-quality gameplay, tutorials, lectures, and other videos.

- AI Copywriting: Using Filmora, you can now create AI scripts for your videos. The tool uses ChatGPT integration to help you create custom content for videos. This also helps generate creative video titles and descriptions.

- Auto Reframe: You can resize your videos automatically using Filmora. The tool enables users to convert horizontal videos to portrait versions. Filmora can also help users adjust the frame ratios manually. Its built-in size templates can help you create videos for all major platforms.

Step-by-Step Guide to Replace Background of Videos using Filmora
Filmora offers a quick and simple process for AI sky replacement. Here is the step-by-step guide to help you replace the background of videos using AI on Filmora:
Step 1Add Tracks in Filmora
Install and launch Wondershare Filmora on your device. From the main interface, tap the “Add” button to import the video whose background you wish to change. Also, add the track with the background you wish to swap with the original one.

Step 2Replace Background From Media
While keeping the layer with the original video selected, go to the “Video” tab from the right panel and tap “AI Tools”. Toggle the switch next to the “Chroma Key” option if your video features a monochromatic background. If you want to replace a more complex background, enable the “AI Portrait” option. As soon as you toggle the switch, Filmora will automatically replace the background.

Step 3Export Video After Sky Replacement
Once you are done with the AI sky swapping, tap the “Export” button from the top. In the pop-up window, you can rename your project and select other preferences, such as the resolution and frame rate. Choose a pathway and tap “Export” to save your video with the replaced background.

Free Download For Win 7 or later(64-bit)
Free Download For macOS 10.14 or later
Conclusion
The power of AI has now made it easy to enhance and edit images. Sky replacement is one of the wonders bestowed by AI tools. You can use the wonderful editors mentioned above for AI sky replacement online. If you want a thorough offline solution, you can try Wondershare Filmora. Its remarkable toolset and powerful features make it one of the best tools for replacing skies in images.
Free Download Free Download Learn More

Part 1: AI Sky Replacement with BeFunky: Looking into the Step-by-Step Overview
If you are looking for a smart tool to replace a sky online, you can try BeFunky . BeFunky is a notable image editor and graphic design tool. It offers an all-in-one creative platform to help you easily edit photos, create graphic designs, make collages, and more.
BeFunky previously offered a background remover tool to replace skies. But now, it has a dedicated sky replacement feature that can easily detect the sky and foreground of your image. This allows for precise adjustments and accurate replacements.
Steps for BeFunky’s AI Sky Replacer
Step 1: Open the Sky Replacer feature of BeFunky on your web browser. Tap the “Open” button or drop the images into the interface for sky replacement.

Step 2: Select the “Change Sky” button once you have uploaded your image.

Step 3: You can now select a new sky from the stock images provided or choose an image from your device. You can also manually adjust the contrast, saturation, and other aspects of the sky or the foreground. Tap on the “Save” button to save the image to your device.

Part 2: Fotor AI: Performing Sky Replacement with Perfection
Another remarkable AI tool that can be used to change the sky from the background is Fotor . It is a free online photo editor that can help enhance images. Fotor is quite useful for bulk-editing images. You can also use it to transform text into images.
Fotor features a free sky replacement option that can be used to swap skies from images. You can easily add starry, sunny, gloomy, cloudy, and rainy skies to your images. The AI sky replacement of Fotor can help personalize skies in no time.
Steps for Sky Replacement in Fotor AI
Step 1: Launch Fotor on your browser and open the “Background Remover” tool. Upload your image to Fotor, and it will automatically remove the image background.

Step 2: From the toolbar at the right, tap “Backgrounds.” Here, you can find lots of sky images that you can use in your picture. You can also generate a custom sky by writing prompts in the built-in AI background generator. Now, replace the sky and download the image to your device.

Part 3: Changing Skies with Autoenhance.ai: A Review
Autoenhance.ai is a web-based photo editor integrated with AI power. It offers fast and automatic processing to enhance your workflow. Autoenhance.ai offers perspective correction to fix wonky angles in images. It also offers image relighting and HDR merging for better results.
This online platform lets users create the perfect sky effect in their images. Its comprehensive sky packs cover a range of seasons and vibrant views. The tool caters well to business and professional needs. Using this sky replacement online, you can add a vibrant yet natural touch to your images.
Step 1: Go to Autoenhance.ai and toggle the switch next to the “Sky Replacement” option to turn it on. Now, use the dropdown menu below the option to choose a sky preference for your image. Then, upload the images to change the sky online.

Step 2: Based on your chosen sky pack, Autoenhance.ai will replace the sky in your image. You can then download your image with the replaced sky.

Part 4: SnapEdit: Online AI Sky Replacement Made Easy
For a simple and clean online editor to replace a sky, you can try SnapEdit . It is an easy-to-use photo editor with AI technology to bring the best out of your photos. You can use SnapEdit to remove unwanted objects from photos. The tool can also remove watermarks and text from images.
For efficient sky change online, SnapEdit offers an effective solution. Its sky replacement feature can change the sky’s color, feel, and gradient in the background. While changing the sky, SnapEdit automatically adjusts the photo’s overall color for better results.
Steps to Replace Sky Using SnapEdit
Step 1: Open the Sky Changer feature of SnapEdit on your device. Tap the “Upload Image” button or paste the image whose background you wish to remove.

Step 2: SnapEdit will offer a range of sky options you can choose to swap with the original. You can tap the “More Sky” option and find further options to choose from. The slider next to the “Color Set” option is available to help blend the image with the background. Once you are satisfied with the results, tap the “Download” button to save your image.

Bonus Part: Make Composed AI Background Replacements with Wondershare Filmora
The above-mentioned tools are wonderful options to help you change sky online. However, online tools require constant internet stability and can crash due to heavy site traffic. To avoid these issues, it is better to choose offline tools that can make the editing process easier. For AI editing, there is no better software solution than Wondershare Filmora .
Filmora is a video editing software designed for professional use. It is an intuitive solution that can create powerful results in no time. With a wide range of resourceful toolsets, Filmora contains everything your videos might need. This multi-platform tool can help users bring the best out of their videos in no time. You can use Filmora to enhance your videos and boost your productivity.
Free Download For Win 7 or later(64-bit)
Free Download For macOS 10.14 or later
Key Features of Wondershare Filmora
Filmora offers a wide range of useful features for videos. It is the perfect one-stop solution for video editing. Some of the features offered by Filmora include:
- Motion Tracking: Filmora lets users track the movement of an object in a video. This helps to pin graphics and media files to follow the motion. You can add text, mosaic, or other elements that move smoothly with the object using Filmora.

- Preset Templates: To help you start your video editing journey, Filmora offers built-in templates. More than 1000 preset templates are available to give your videos a head-start. You can also create and share your own templates in Filmora.

- Screen Recorder: Filmora acts as an efficient screen recorder. You can record your screen and webcam at the same time for video. You can thus record high-quality gameplay, tutorials, lectures, and other videos.

- AI Copywriting: Using Filmora, you can now create AI scripts for your videos. The tool uses ChatGPT integration to help you create custom content for videos. This also helps generate creative video titles and descriptions.

- Auto Reframe: You can resize your videos automatically using Filmora. The tool enables users to convert horizontal videos to portrait versions. Filmora can also help users adjust the frame ratios manually. Its built-in size templates can help you create videos for all major platforms.

Step-by-Step Guide to Replace Background of Videos using Filmora
Filmora offers a quick and simple process for AI sky replacement. Here is the step-by-step guide to help you replace the background of videos using AI on Filmora:
Step 1Add Tracks in Filmora
Install and launch Wondershare Filmora on your device. From the main interface, tap the “Add” button to import the video whose background you wish to change. Also, add the track with the background you wish to swap with the original one.

Step 2Replace Background From Media
While keeping the layer with the original video selected, go to the “Video” tab from the right panel and tap “AI Tools”. Toggle the switch next to the “Chroma Key” option if your video features a monochromatic background. If you want to replace a more complex background, enable the “AI Portrait” option. As soon as you toggle the switch, Filmora will automatically replace the background.

Step 3Export Video After Sky Replacement
Once you are done with the AI sky swapping, tap the “Export” button from the top. In the pop-up window, you can rename your project and select other preferences, such as the resolution and frame rate. Choose a pathway and tap “Export” to save your video with the replaced background.

Free Download For Win 7 or later(64-bit)
Free Download For macOS 10.14 or later
Conclusion
The power of AI has now made it easy to enhance and edit images. Sky replacement is one of the wonders bestowed by AI tools. You can use the wonderful editors mentioned above for AI sky replacement online. If you want a thorough offline solution, you can try Wondershare Filmora. Its remarkable toolset and powerful features make it one of the best tools for replacing skies in images.
Also read:
- Updated Best 10 Anime Movies for All Time for 2024
- New Have You Tried Creating an Engaging Video? Try Out Impressive AI Video Ideas that Give You a Clue on How to Create an Attention Catching Video. Here Is a Breakdown of What an AI Video Idea Generator Is and How to Utilize It Efficiently
- New Hard to Remove Black Background in After Effects? Heres the Best Way to Deal With It
- Updated 10 Best Vloggers on YouTube
- Updated 2024 Approved How to Brighten Video in Premiere Pro
- How to Loop a Video on Android
- New 2024 Approved Basic Knowledge About WMV Format and Best WMV Video Editor
- 4 Methods How To Make a Recap Video for 2024
- New How to Clone Yourself in Videos with Filmora for 2024
- 2024 Approved What Is Motion Tracking and How to Use It
- New Learn How to Feather Shapes in After Effects and Add a Professional Touch to Your Designs. This Comprehensive Guide Covers Everything From the Basics to Advanced Techniques. Perfect for Beginners and Experts Alike
- New How to Turn Text Into a Podcast
- New Vlogs and Travel Content Are Incomplete without a Fast-Motion Effect. Learn Step-by-Step How to Make Fast Motion Video on an iPhone in This Article
- 2024 Approved How to Add Expression in After Effects
- New In 2024, Doable Ways to Make Transparent Background in Procreate
- 2024 Approved How to Make a Movie with Windows Movie Maker?
- New Learn Topaz Video Enhance AI Review
- Updated 2024 Approved How to Speed Up Pictures on TikTok Slideshow
- Top 10 Transparent Image Online Tools That Help You A Lot
- Updated Read on to Learn About Multi Object Tracking, Its Types, and Requirements. Youll Also Learn About the Different Approaches Toward Object Tracking
- New Detailed Steps to Rotate Videos in Windows Media Player for 2024
- New 2024 Approved 4 Solutions to Add White Border to Video on Mobile and Desktop
- Updated Camtasia Vs. Final Cut Pro for 2024
- If You Wish to Edit FLV Videos without Any Problems, You Should Utilize a Multipurpose Video Editor that Supports the FLV File Format
- Updated Do You Need More Time to Explain a Particular Screen or Moment in Your Recording Using an Extended Freeze-Frame? Learn How to Use Camtasia Freeze-Frame to Extend Parts of a Video Effectively
- The Quick and Simple Way to Mirror Video in Premiere Pro for 2024
- Updated 2024 Approved Best 20 Slideshow Makers for Win/Mac/Online Review
- New Detailed Tutorial to Rotate a Video in Cyberlink PowerDirector
- How To Zoom In On TikTok Videos, In 2024
- 2024 Approved Learn the Step-by-Step Process of Slowing Down Time-Lapse Videos on Your iPhone
- Updated Using One of the Best Converter Tools to Turn GIFs Into PNG or JPG. Here, Learn About the Ten Best Ones for Different Operating Systems, with Details on Features, Prices, and More
- Updated How to Speed Up and Slow Down a Video
- How to Animate Designs With Canva GIF
- In 2024, Top 10 Sound Extractors to Extract Sound From Video
- Updated Steps to Create Gold Text Effects After Effects for 2024
- How To Use Slow Zoom Effect in Your Video for 2024
- Updated Top 10 Transparent Image Online Tools That Give You an Advantage
- Rootjunky APK To Bypass Google FRP Lock For Realme C51
- How to Transfer Photos from Gionee F3 Pro to Laptop Without USB | Dr.fone
- In 2024, 8 Ways to Transfer Photos from Nokia C22 to iPhone Easily | Dr.fone
- In 2024, Does Oppo A79 5G Have Find My Friends? | Dr.fone
- In 2024, Ultimate guide to get the meltan box pokemon go For Vivo Y27s | Dr.fone
- In 2024, How Realme GT Neo 5 Mirror Screen to PC? | Dr.fone
- 9 Best Free Android Monitoring Apps to Monitor Phone Remotely For your Lava Blaze 2 | Dr.fone
- In 2024, 10 Must Watch Netflix Cartoon Series
- In 2024, Solutions to Spy on Apple iPhone 7 Plus with and without jailbreak | Dr.fone
- Updated AI Portrait Generator Getting Closer to the Artistic Marvels for 2024
- How To Create an Apple Developer Account From iPhone 15
- Updated How to Make Animation Characters with the Best Character Creators for 2024
- 5 Ways to Restart Infinix Zero 30 5G Without Power Button | Dr.fone
- In 2024, Unlocking Made Easy The Best 10 Apps for Unlocking Your Realme C51 Device
- 5 Quick Methods to Bypass Asus ROG Phone 7 Ultimate FRP
- How to convert AVCHD MTS to MP4 for Huawei ?
- In 2024, Does Huawei Nova Y71 Have Find My Friends? | Dr.fone
- How To Install the Latest iOS/iPadOS Beta Version on iPhone 13 mini? | Dr.fone
- The way to get back lost music from Samsung Galaxy Z Flip 5
- In 2024, Top IMEI Unlokers for iPhone SE and Android Phones
- Best Pokemons for PVP Matches in Pokemon Go For Honor X50i+ | Dr.fone
- Hassle-Free Ways to Remove FRP Lock on Xiaomi Redmi K70 Phones with/without a PC
- How to Transfer Data from Nokia C32 to Other Android Devices? | Dr.fone
- In 2024, How to Unlock iPhone SE (2020) Online? Here are 6 Easy Ways
- All Things You Need to Know about Wipe Data/Factory Reset For Samsung Galaxy XCover 7 | Dr.fone
- In 2024, Easiest Guide How to Clone Vivo X Fold 2 Phone? | Dr.fone
- In 2024, Double Location Dongle All to Know About Apple iPhone 8 Plus/iPad GPS Spoofing | Dr.fone
- How To Transfer WhatsApp From Apple iPhone 15 to other iPhone 11 devices? | Dr.fone
- How To Enable USB Debugging on a Locked Samsung Galaxy A14 5G Phone
- In 2024, 4 solution to get rid of pokemon fail to detect location On Nokia C12 Pro | Dr.fone
- In 2024, How to Detect and Stop mSpy from Spying on Your Apple iPhone 14 Pro Max | Dr.fone
- 2024 Approved Create AI Avatar Video with Templates
- In 2024, Top 12 Prominent Realme Note 50 Fingerprint Not Working Solutions
- Is pgsharp legal when you are playing pokemon On OnePlus Nord N30 5G? | Dr.fone
- Full Tutorial to Bypass Your Realme GT Neo 5 Face Lock?
- Title: Have You Ever Heard of the Video Format for PowerPoint? Allow Us to Help You Learn More About PowerPoint. It Will Help You Make an Impression by Making Good Slides
- Author: Chloe
- Created at : 2024-05-20 03:37:34
- Updated at : 2024-05-21 03:37:34
- Link: https://ai-editing-video.techidaily.com/have-you-ever-heard-of-the-video-format-for-powerpoint-allow-us-to-help-you-learn-more-about-powerpoint-it-will-help-you-make-an-impression-by-making-good-s/
- License: This work is licensed under CC BY-NC-SA 4.0.

